1
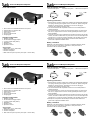
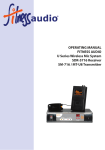
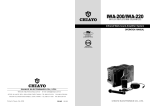
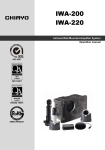
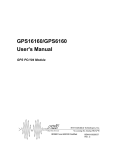
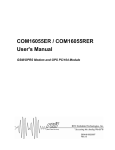
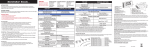
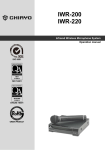
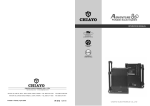
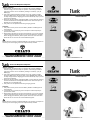
Personal Beltpack Amplifier
Battery charging
1. After switchon, the Power/bettery low indicator LED will glow GREEN to
indicate enough power and ready for operation. If this LED glows RED, it
means the power is too low and battery recharge is necessary. (only for
NiMH type)
2. This product applies intellectual charging circuit. The charging indicator
LED glows RED during charging process. It turns GREEN when batteries
are fully charged and the charging process will automatically stop to prevent
overcharge to batteries.
3. When the charging indicator LED flashes RED, it means abnormal charging.
Causes include that the rechargeable batteries have reached life span or
batteries are not chargeable type.
4. This product can be operated even during charging process.
Personal Beltpack Amplifier
OPERATION MANUAL
Cautions
1. This product uses 4 pieces of AA size battery. Alkaline or NiMH types are
recommended.
2. It is advised not to pull and plug in the microphone contact frequently to
prevent loose contact.
3. When battery operating hour shortens tremendously or can not be charged,
it means their life span has arrived and a new set of batteries is necessary.
When changing the batteries, please replace all of them at the same time.
Please do not mix and use new and old batteries together.
Do not attempt to recharge non-NiMH batteries in this product. Consequences
caused by incorrect charging will not be compensated by CHIAYO.
Printed in Taiwan, November, 2008
12I1156
Personal Beltpack Amplifier
Battery charging
1. After switchon, the Power/bettery low indicator LED will glow GREEN to
indicate enough power and ready for operation. If this LED glows RED, it
means the power is too low and battery recharge is necessary. (only for
NiMH type)
2. This product applies intellectual charging circuit. The charging indicator
LED glows RED during charging process. It turns GREEN when batteries
are fully charged and the charging process will automatically stop to prevent
overcharge to batteries.
3. When the charging indicator LED flashes RED, it means abnormal charging.
Causes include that the rechargeable batteries have reached life span or
batteries are not chargeable type.
4. This product can be operated even during charging process.
Cautions
1. This product uses 4 pieces of AA size battery. Alkaline or NiMH types are
recommended.
2. It is advised not to pull and plug in the microphone contact frequently to
prevent loose contact.
3. When battery operating hour shortens tremendously or can not be charged,
it means their life span has arrived and a new set of batteries is necessary.
When changing the batteries, please replace all of them at the same time.
Please do not mix and use new and old batteries together.
Do not attempt to recharge non-NiMH batteries in this product. Consequences
caused by incorrect charging will not be compensated by CHIAYO.
Printed in Taiwan, November, 2008
12I1156
Personal Beltpack Amplifier
OPERATION MANUAL
Personal Beltpack Amplifier
Personal Beltpack Amplifier
Input microphone selections
Parts and Controls
1. Headset microphone
2. lavalier microphone
3. Mini wired microphone
Operating Instructions
1 2 3
4
5 6
1. Mic in socket for headset/lavalier/wired microphone
2. Power/bettery low indicator LED
3. Power/volume control
4. Tone control
5. Charging indicator LED
6. Charging port
Standard Configuration
1.
2.
3.
4.
5.
6.
Beltpack amplifier
6V DC/500mA charging adaptor
Φ3.5mm signal cable(100cm)
Waist Belt
Speaker pouch
Operation manual
1. Please beware of battery polarity when installing the rechargeable batteries.
The spring end being the negative contact. For first use, please charge the
batteries for at least 6 hours. Thereafter 6 to 8 hours of charging is
necessary when batteries become weak.
2. This unit is delivered with adjustable waist belt. It can be belt-packed or
shoulder-strapped.
3. Turn Volume and Tone controls to minimum before switch on. After turning
this unit on, adjust volume and tone controls gradually till maximum gain
before feedback.
4. Insert the microphone plug completely into the MIC IN socket to get the full
contact, otherwise contact noise may occur due to loose contact. Adjust the
microphone to as near the mouth as possible to get the best voice pickup.
5. Microphone and speaker should always maintain a certain distance to
prevent the unpleasant feedback effect.
Battery installation
Optional Items
1. NiMH battery (1.2V / 2600 mAH)
2. Headset microphone
3. Lavalier microphone
4. Mini wired microphone (3.5mm phone jack + 120cm cable)
Personal Beltpack Amplifier
iTalk uses 4 AA-sized batteries to operate. To install the batteries, please
open the cover of its rear battery compartment, then place them in
accordance with its indicated polarity.
Personal Beltpack Amplifier
Input microphone selections
Parts and Controls
1. Headset microphone
2. lavalier microphone
3. Mini wired microphone
Operating Instructions
1 2 3
4
5 6
1. Mic in socket for headset/lavalier/wired microphone
2. Power/bettery low indicator LED
3. Power/volume control
4. Tone control
5. Charging indicator LED
6. Charging port
Standard Configuration
1.
2.
3.
4.
5.
6.
Beltpack amplifier
6V DC/500mA charging adaptor
Φ3.5mm signal cable(100cm)
Waist Belt
Speaker pouch
Operation manual
Optional Items
1. NiMH battery (1.2V / 2600 mAH)
2. Headset microphone
3. Lavalier microphone
4. Mini wired microphone (3.5mm phone jack + 120cm cable)
1. Please beware of battery polarity when installing the rechargeable batteries.
The spring end being the negative contact. For first use, please charge the
batteries for at least 6 hours. Thereafter 6 to 8 hours of charging is
necessary when batteries become weak.
2. This unit is delivered with adjustable waist belt. It can be belt-packed or
shoulder-strapped.
3. Turn Volume and Tone controls to minimum before switch on. After turning
this unit on, adjust volume and tone controls gradually till maximum gain
before feedback.
4. Insert the microphone plug completely into the MIC IN socket to get the full
contact, otherwise contact noise may occur due to loose contact. Adjust the
microphone to as near the mouth as possible to get the best voice pickup.
5. Microphone and speaker should always maintain a certain distance to
prevent the unpleasant feedback effect.
Battery installation
iTalk uses 4 AA-sized batteries to operate. To install the batteries, please
open the cover of its rear battery compartment, then place them in
accordance with its indicated polarity.