1
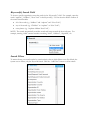
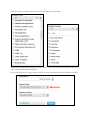
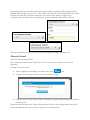
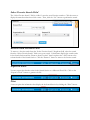
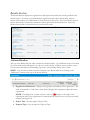
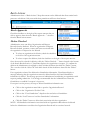
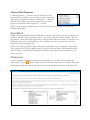
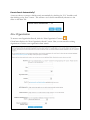
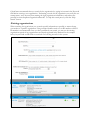
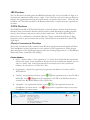
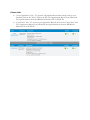
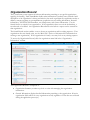
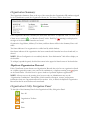
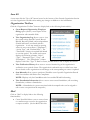
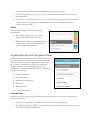
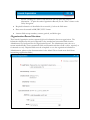
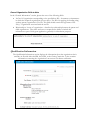
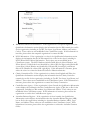
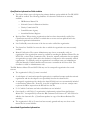
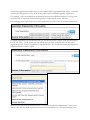
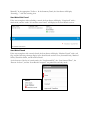
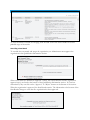
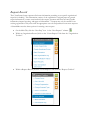
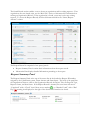
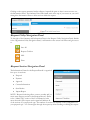
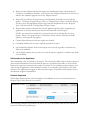
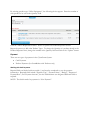
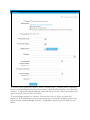
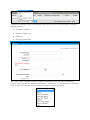
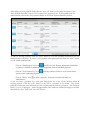
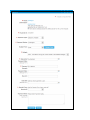
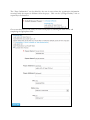
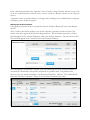
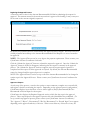
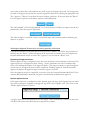
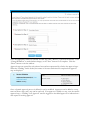
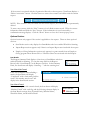
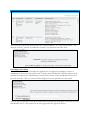
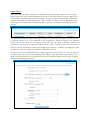
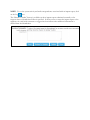
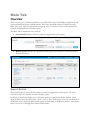
Main Tab Overview When a user logs in, CyberGrants defaults to the Main Tab screen, which displays organization and request information based on default criteria. Most users spend the majority of their time in the Main Tab screen. With the appropriate user group access, a user may create or edit organizations, requests, and GrantSeekers from this screen. The Main Tab is comprised of two sections: Search Section defines criteria to search for organizations and requests Results Section displays the organizations and requests that match the criteria specified in the Search Section. Search Section The Search Section is used to define criteria to search for organizations and requests. You must search by at least one criterion in order to display results. By default, CyberGrants displays up to 100 search results at a time in the Results Section. If the query produces more than 100 results, “Next”, and/or “Prev” links appear at the top and bottom of the Results Section and page number links appear at the bottom of the Results Section. These links allow a user to move through the returned search results. You also have the ability to change the number of results per page by choosing a different number from the drop-down list: NOTE: You may customize the default search criteria that display on your Main Tab by clicking on the “Preferences” later section. button on the right side of the search filters. This will be detailed in a Set a Default Search CyberGrants does not set a default search for the Surveys Tab. However, each user can choose a set of search criteria as their default search. To create a customized default search, do the following: Select the criteria. Click the “Search” button. Your results will display in the Results Section. Click the “Make Default” button. If you would like to make your one of your Favorite Searches the Default do the following: Select your Favorite Search from the “Select Favorite Search” field. Click the “Go” button. Your results will display in the Results Section. Click the “Make Default” button. NOTE: Only one set of search criteria can be the default at any given time. Therefore, if a user previously designated a search as the default, then clicks the “Make Default” button for another search, the first search criteria is overwritten by the new default search. Keyword(s) Search Field To locate a specific organization enter the words in the “Keyword(s)” field. For example, enter the words “orphans”, “children”, “New York” in the Keyword(s). Use the selection field to indicate if the search should include: all of the words (e.g. “children” and “orphans” and “„New York”) any of the words (e.g. “Children” or “orphans” or “New York”) exact phrase (e.g. “orphans children New York”) NOTE: The search automatically considers words and letters around the keyword entry. For example, entering “child” returns matches containing “child”, “children”, “stepchild”, etc. Search Filters To narrow down your search results by certain criteria, choose which filters to use. By default, the system uses no filters, only the Keyword Search. Click the “Add Filter” button to select criteria: After choosing your filters, define the items by selecting the ones desired: The default selection after choosing a selection filter is “All”. If you choose an actual list value, the “All” selection will become unselected. If one of the filters is no longer desired, click the x next to the filter to remove it from your search: Some search filters are entry filters rather than selection filters (e.g. Request ID, Organization ID, Submitted date, Request Amount, etc.). These fields will always have “All” display before the search has been executed. Click the menu drop-down arrow and an entry field(s) will open to be completed. After the fields have been completed, the filter will display what will be searched: Click the Search button after you‟ve set all your search criteria to display desired results. Favorite Search Name this Favorite Search Field The “Name this favorite search” field allows a user to name and save searches that are used frequently. To name and save a search: After configuring and running your search, click on the A window will pop open for you to name your favorite search: Click the “Save Favorite” Button and a confirmation will appear indicating that your favorite has been saved. icon Named searches are listed in the “Select Favorite Search” field on the top right hand corner of the screen and eliminate the need to re-enter a specific set of search criteria. Select Favorite Search Field The “Select Favorite Search” field is visible if a user has saved favorite searches. Click the arrow to display the named searches then click a name. Then, click the “Go” button to perform the search. Remove from Favorites Field To remove a favorite search from the “Select Favorite Search” dropdown field, select the search from the “Select Favorite Search” field to run your search. CyberGrants displays the search results in the Search Section and the “Remove from Favorites” button replaces the “Add” button at the column header of the Search Section. Click the “Remove” button to remove the favorite search. Export to Excel You may export the data that exists in the Search Section to a Microsoft Excel file. Click on the “Export to Excel” button to generate the file. Print A user can print the information that displays in the Search Section by clicking the “Print” button. Results Section The Results Section displays the organizations and requests that match the criteria specified in the Search Section. It consists of column headers, organization and request information, and two buttons (three buttons for Administrators) at the bottom of the screen. Above the Results Section table is the number of results that match the criteria specified in the Search Section. Below the Results Section table is the criteria used to perform the search. Column Headers The top of the Results Section table contains the column headers. Up and Down arrows are located by each column header and appear if you hover over the header, and these arrows enable a user to sort the screen information in ascending (Up arrow) or descending (Down arrow) order. NOTE: You can choose which columns to display in the Results Section by clicking on the “Preferences” button at the top of the Search Section. Organization Information – displays the legal name and address of the organization. The name is formatted as a link which, when clicked, displays the Organization Record for that organization. NOTE: If configured as a search column, a Scan icon displays to the right of the organization name if the organization is scanned and the results have not yet been reviewed, accepted and signed off. Project Title – lists the request‟s Project Title. Proposal Type – lists the request‟s Proposal Type. Grant/Request Amount – displays the grant or request amount, an icon that corresponds to the request Status, and a checkbox. If the status is approved, the amount displayed is the amount granted; for all other status values, the amount displayed is the amount originally requested by the GrantSeeker. The amount is a link which, when clicked, opens the Request Record. NOTE: A Scan icon displays to the left of the request amount if the request is scanned and the results have not yet been reviewed, accepted, and signed off. Request Paid Amount – displays the total amount of payments with a status of “Paid” for the request. New Request – contains a “New Request” icon if the user has permission to create a new request. The “New Request” icon takes the user to the Request Screen, where a new request for the specified organization can be entered. NOTE: A user with Viewer authority will not be able to view the “New Request” column. Request Status Icons The “External” icon indicates that the request was created and submitted by a nonprofit organization via the Internet and has not been edited by an internal user. The dollar amount shown for an external request is the original amount requested by the organization. Once an internal user saves information on an external request, the request status changes to “Pending”. The “Pending” icon indicates that the request is being reviewed. The dollar amount shown for pending requests is the original amount requested by the organization and is not necessarily the amount the GrantMaker is recommending or approving. The “Approved” icon indicates that the request is approved for funding. The dollar amount shown for approved requests is the amount approved by the GrantMaker. “Rejected” icon indicates that the request is rejected for funding. The dollar amount shown for a rejected request is the original amount requested by the organization. The “Canceled” icon indicates that the request is canceled. The dollar amount shown for a canceled request is the original amount requested by the organization. The “Returned to Applicant” icon indicates that the request was returned via the Internet to the applicant for additional information or modifications. The dollar amount shown for a returned request is the original amount requested by the organization. Batch Actions Administrators have a “Batch Actions” drop-down menu on the Main tab that allow certain batch processes or deletions. Only users with these permissions will have these buttons. Batch Approvals Check the checkbox to the right of the request amount that you wish to approve then select the “Batch Approvals…” selection from the Batch Actions menu: Delete Checked Administrative users can delete Organization and Request Records from the database. When an organization or Request Record is deleted, payment, contact, and letters associated with the organization or request are also deleted. To select an organization for deletion, check the checkbox to the left of the organization name. To select a request for deletion, check the checkbox to the right of the request amount. Once the record is selected for deletion, click the “Delete Checked…” button located at the bottom of the Search Results Section. CyberGrants displays the organization or request. To confirm the deletion the Administrator is required to check another checkbox then click the “Delete” button. The u can also click the “Select All” link which checks all the checkboxes then click the “Delete” button. If an organization selected for deletion has GrantSeeker information, CyberGrants displays a message indicating that the organization cannot be deleted until the associated GrantSeeker information is deleted. The message prevents an Administrator from deleting an organization with requests pending submission. It is strongly recommended that the Administrator contact the GrantSeeker to establish if a request is in process. If a request is not in process, the steps to delete GrantSeeker information are: Click on the organization name link to open the Organization Record. Click on the “Organization Toolbox” link. Click on the “View GrantSeeker:” dropdown box and select a GrantSeeker. Click the “Load” button to load the GrantSeeker's information. Click the “Delete” button to delete their association with that organization. NOTE: All GrantSeeker information associated with an Organization Record must be deleted before the Administrator can delete the Organization Record and its associated records. Create/Edit Payments A “Batch Approvals…” button located at the bottom of the Results Section is available to non-Viewers to select requests for which they have approval authority or editor access. Check the checkbox to the right of the request amount that you wish to approve then click the “Batch Approvals…” button. NOTE: Quid Pro Quo payments may not be created or edited from within the Create/Edit Payment functionality. Scan Match Within the Organization Information and Request Amount columns, the Scan icon may display as a red flag to the right of the organization name or to the left of the grant/request amount. The red flag indicates a name within the Organization or Request Record that has received a value above the match threshold set by the Administrator. Also, it indicates that the scan results have not been reviewed, accepted, and signed off. NOTE: The following fields are always automatically included in scans: Organization Legal Name, AKA Name, In Care Of, and Official Name, Contact First and Last Name, and GrantSeeker First and Last Name. A CyberGrants Administrator can add custom organization user-defined or text fields to the scan. Preferences You may customize the default selection boxes that display on your Main Tab by clicking the “Preferences” cog icon . Search Preferences allow the CyberGrants user to customize the default search criteria fields and columns that display in the Search and Results Sections of the Main Tab. Columns A user can add or remove columns to their Search Results table: Adding columns – select the columns in the “Available” list, click the “Add” button to move the selected fields from the “Available” list to the “In Use” list, and click the “Save” button. Removing columns – select the columns in the “In Use” list, click the “Remove” button to move the selected fields from the “In Use” list to the “Available” list, and click the “Save” button. Default Search Fields To include additional search criteria fields to the Default Search display: Check the checkbox beside the search criteria field. Click the “Save” button. NOTE: The default search criteria fields available for users to select are determined by the Administrator in the User Management section of the Admin Tab. Execute Search Automatically? A user can choose to execute a default search automatically by checking the “Yes” checkbox, and then clicking on the “Save” button. This will run a user‟s search automatically whenever a user clicks on the Main Tab. New Organization To create a new Organization Record, click the “New Organization” button. CyberGrants displays the “New Organization Search” screen. Here you can search for existing organizations or create a new organization from scratch. CyberGrants recommends that you search for the organization by typing in its name in the Keyword field before creating a new organization. Performing a search for the organization can verify the taxexempt status, saves the user from entering the legal organization information, and reduces the potential to create duplicate Organization Records. To skip this search process, click the “Skip Search” button. Existing organizations When searching for organizations, use as much specific information as possible to narrow down your results to a specific organization. Using a unique identifier such as a tax ID number or NCES ID number is recommended. Once you have performed your search, you may see the existing organizations portlet if any organizations are already registered in the database. In the example below, keyword and tax ID fields are searched. One existing record is in the system: IRS Database The Tax ID value is checked against the IRS Master Business File. Enter a Tax ID as 9 digits or in the format nn-nnnnnnn in which each n is a digit. If the Tax ID is not found, a message displays to indicate “No organizations matching the search criteria you specified were found”. A user may call the IRS at 1-877-829-5500 and refer to the Business Master File to inquire about the organization‟s tax status. NCES Database The NCES District ID or NCES School ID value is checked against a database derived from the National Center for Education Statistics (NCES) which contains information regarding all public schools, school districts, and private schools in the United States. The NCES School ID for a public school is a combination of the District ID (first 7 digits) and the School ID (last 5 digits) respectively, with no spaces between the two IDs. Private Schools are identified by a School ID (eight digits). Charity Commission Database The Charity Commission Table contains Charity IDs from organizations from England and Wales. The GrantMaker‟s existing organizations is also searched. If the Organization is found, the legal name and address of the organization appears within the “Existing Organizations” or “IRS Business Master and Charity Commission File Listings”. Column Headers Select – displays either a “View organization” or “Create New” link beside the organization found in the search. If the organization already exists in the CyberGrants database, the user will see a “Select” link. If the organization does not already exist in the CyberGrants database, the user will see a “Create New” link. Organization – displays the organization‟s legal name and address, Tax Status, and Tax ID/NCES ID. Verified - An organization will have a green if the organization has a valid Tax ID or NCES ID. A red appears if the organization‟s Tax ID or NCES ID could not be verified in the IRS Master Business File or NCES file. Acceptable – An organization will have a green GrantMaker‟s tax status criteria. A red GrantMaker's tax status criteria. , if the organization meets the appears for organization does not meet the Column Links “View Organization” link – To open the Organization Record that already exists in your database, click on the “Select” link on the left. The Organization Record is pre-filled with the legal information from the IRS Master Business File or NCES file. “Create New” link – To create a new Organization Record, click on the “Create New” link. The Organization Record is pre-filled with the legal information from the IRS Master Business File or NCES file. Organization Record The CyberGrants system captures all relevant information pertaining to non-profit organizations applying for funding. Each GrantMaker decides what information is needed; it may include a brief description of the organization‟s history and mission, the need or problem the organization works to address, current programs or accomplishments, population served, staffing information, financial information, Tax ID/NCES ID number, tax exempt status, and contact information. Use the Search Section to search for an organization. If the organization does not exist in the database, a record needs to be added. An Organization Record must exist before a request can be created for that organization. The Search Results section enables a user to locate an organization and its existing requests. (If an organization does not already exist, see the “Main Tab” section of this manual for information on creating a new organization.) If the organization is found, a user may look at any existing requests. To access the Organization Record, click the organization name link in the “Organization Information” column. The Organization Record is comprised of: Organization Summary contains top-level to assist with managing the organization information. General Information displays detailed information pertaining to the organization. All active organization fields will be in every organization record, regardless of if the data was collected during the application process(es). Organization Summary The Organization Summary Pane at the top of the screen lists the Organization ID number assigned by the CyberGrants system, the Organization Name, the Tax Status, and the Scan Status. If the Organization Record is scanned, the scan status will turn to “Completed” with a “Check” icon if there are no matches , or “Matches Found” with a “Red Flag” the right of the Scan Status if matches are found. warning icon displayed to Organization Legal Name, Address, Tax Status, and Scan Status will be in the Summary Pane at all times: Tax Status indicates if an organization is verified and by which database Scan Status indicates if the organization has been scanned and if matches have been found and/or cleared NOTE: If Scan Configuration is not enabled, then the “Scan Information” link will not display on the checklist. To collapse/expand the panel, click the blue arrow in the upper left hand corner of the header bar. Duplicate Organization Detected If the CyberGrants system detects two Organization Records that exist for one organization (based on a similar organization name, state, and tax id combination), a duplicate warning icon appears on the Panel header. Click this icon to open a window of potential duplicate organizations. NOTE: All users can see the warning icon, however only an Administrator may use the “Organization Combination” functionality, which transfers all request, contact, and payment information from one Organization Record to another. Also, it deletes the duplicate Organization Record that had its associated records transferred. Organization Utility Navigation Panel To the right of the Summary Panel is the Organization Utility Navigation Panel: Save All Organization Toolbox Mail Print Save All A user must click the "Save All" button located at the bottom of the General Organization Section or in the Organization Checklist after making any changes or additions to the information. Organization Toolbox Click the “Organization Toolbox” button to display links to the following functionalities: Create Request/Opportunity/Employee Giving opens (creates) a new request for the organization with enterable fields. View Organization Log allows a user to view the system activity (Record Created, Record Deleted, Record Updated) and correspondence (Emails and Letters) associated with this organization. A user can search by entering values for one or more filters (“TimeFrame”, “Action Type”, and “Performed By”). The “TimeFrame” criterion is required and limited to one time period. The search result screen displays the following columns: “Select”, “Type”, “Transaction Type”, “User”, and “Description”. The “Description” column displays a link if the “Type” is Email or Letter; the link allows a user to display the content. View Verification History allows users to access a historical log of the organization‟s verification over a period of time. The organization‟s credentials are re-verified every time the tax details on the organization record change or the corresponding tax source is updated. Scan Manually allows a user to perform a WatchList scan of specific Organization Record fields for assistance with Patriot Act Compliance. NOTE: Displays only for GrantMakers who have enabled WatchList Scanning View GrantSeeker Information allows a user to enter a new GrantSeeker, edit an existing GrantSeeker, or delete a GrantSeeker. NOTE: A GrantSeeker is a person associated with the nonprofit who can be assigned to edit or revise a request from the nonprofit.) Mail Click on “Mail” to display links to the following functionalities: Create New Mail allows a user to create a letter or e-mail message to send to the organization or request contacts. (See the Mail Tab in this manual for more information about creating letters and e-mail messages.) View Existing Mail allows a user to view the system mail correspondence associated with this organization. View/Create Contacts allows a user to view, create, and edit the information for all contacts associated with the organization. An organization may have an unlimited number of contacts associated with it. Print Click on Print to display links to the following functionalities: Word (RTF) Version prints the request information in Word rich text format PDF Version displays the request information in PDF format. Click Print on the Acrobat toolbar to print this information. Organization Section Navigation Panel Organization Section Navigation Panel will always be on the left of the Information Panel and remain static on the left panel as you scroll through the information on the main page. When a section name is clicked, the system will navigate/scroll to the corresponding section in the Organization‟s Information Panel. The Panel is organized into up to five sections: General Information Scan Information Qualification Information Discussion Request History Contact Information Conventions Several conventions apply among the different organization sections. At the right of each section, title bar icons display: The “W” icon generates a Word RTF version of that section‟s information. The PDF icon generates a PDF version of that section‟s information; use the printer icon on the toolbar to print the PDF format. NOTE: Clicking on a section‟s title bar icons will only print that section‟s information. To print the entire Organization Record, use the “Print” feature on the Utility Navigation. Required information is identified with an asterisk (*) before the field name. Dates must be entered in MM/DD/YYYY format. Amount fields accept numbers, commas, periods, and dollar signs. Organization Record Sections The General Organization section captures high level information about an organization. The information displayed in this section depends on the standard and customized fields that the Administrator has configured for the Organization Record. The Administrator may choose to rename standard fields; create customized fields; and determine whether a field is active, required, or for internal use only. Required fields must be completed to save the organization information. (Administrators, please see the documentation for the Admin Tab to obtain more detail about customizing organization fields.) General Organization Fields to Note In the “General Information” section, please take note of the following fields: In Care Of (organization corresponding to the specified tax ID) – documents a circumstance in which the nonprofit organization does not have a Tax ID or is applying for funding using another (parent) organization‟s Tax ID. This field should contain the legal name of the 501(c) 3 organization associated with the tax ID. Relationship to „in care of‟ organization – describes the relationship between the parent and child organizations. They allow end users or nonprofits the ability to include this information as part of their grant application, generally for information purposes. Qualification Information The Qualification Information section displays the information about the organization that is currently on file with either the IRS, the NCES, or the Charity Comission. It also contains information concerning the organization‟s most recent Tax Status verification. IRS Business Master File Information - If the organization is a nonprofit organization, the Qualification Information section displays the information that the IRS currently has on file for the organization, including its Tax ID, Tax Status, Legal Name, Address, and Activity Code(s). These values are not modifiable in the CyberGrants system. If this information is incorrect, please advise the nonprofit organization to contact the IRS. NCES Information - If the organization is a school, the Qualification Information section displays the information that the NCES currently has on file for the school, including its NCES ID and NCES School Information. These values are not modifiable in the CyberGrants system. The NCES database includes Public Schools, School Districts, and Private Schools. Public Schools are identified by a School ID (five digits) and a District ID (seven digits); School Districts are identified by a District ID (seven digits); and Private Schools are identified by a School ID (eight digits). If this information is incorrect, please advise the school to contact the National Center for Education Statistics. Charity Commission File – If the organization is a charity from England and Wales, the Qualification Information section displays the information that the Charity Comission currently has on file for the organization, including its Tax ID, Tax Status, Legal Name, and Address. These values are not modifiable in the CyberGrants system. If this information is incorrect, please advise the organization to contact the Charity Commission. Canada Revenue Agency – If the organization is from Canada, the Qualification Information section displays the information that the Canada Revenue Agency (CRA) has on file for the organization, including its CRA number, Legal Name and Address. These values are not modifiable in the CyberGrants system. If this information is incorrect, please advise the organization to contact the Canada Revenue Agency. Australian Business Register – If the organization is from Australia, the Qualification Information section displays the information that the Australian Business Register (ABR) has on file for the organization, including its Australian Business Number (ABN), Legal Name, and Address. These values are not modifiable in the CyberGrants system. If this information is incorrect, please advise the organization to contact the Australian Taxation Office. Qualification Information Fields to Note Tax Source allows users to designate the primary database against which the Tax ID/NCES IDs will be verified. The following databases for electronic verification are currently available: o IRS Business Master File o National Center for Education Statistics o Charity Commission File o Canada Revenue Agency o Australian Business Register Revision Date: When viewing organizations that have been electronically verified, the CyberGrants user will see the date on which that tax source was last updated below the registered organization information. Last Verified By stores the name of the last user who verified the organization. Tax Status Last Verified On stores the date on which the organization was most recently verified. Manual Verification: The system Administrator may choose to manually verify an organization if the organization cannot be verified by searching the Business Master File, the NCES File, or the Charity Commission File. However, manual verification does not permit an organization to apply online unless the database is configured to allow manually verified organizations. To manually verify an organization‟s tax-exempt status, an Administrator clicks the Manually Verified checkbox and can enter a comment in the Notes field. The checkbox is visible to Administrators only. The IRS Business Master File and NCES file may not list a nonprofit organization for several reasons: The organization's 501(c)(3) status is revoked. A sub-chapter of a national nonprofit organization is considered exempt under the national organization and the sub-chapter is not specifically listed in the electronic file A nonprofit organization with a budget less than $25,000/year is not automatically included on the Business Master File. However, it can file an application to seek tax- exempt status or phone the IRS to request that the IRS add it to the file. U. S. Catholic Conference and other subsidiaries are not included. Occasionally, a valid 501(c)(3) organization is inadvertently omitted from the Business Master File. A nonprofit may contact the IRS Cincinnati Call Center at 877-829-5500 to be added to the electronic file. (CyberGrants updates its copy of the Master Business File monthly.) The organization‟s 501(c)(3) status has been recently granted and may not show on the master file for several months. Associated Organization Information Associated Organizations enable a user to create parent-child organization relationships. Generally used for reporting purposes, they show all the grants under an umbrella (parent) organization. For example, a user can establish the relationship between the individual campuses of a large state university and the university itself and then generate a report based on the university. If an existing parent organization exists, that organization would be listed in the drop-down menu: If a parent organization is not already listed, the user should choose “Other” from the drop-down list (the last value). A field would open up and the user can start typing the name of the parent organization in the “Parent Organization” type-ahead field. The system will return potential parent companies based on what is typed. When the user goes into the parent record‟s “Associated Organization Information” section, they will see a line for each child organization that has been associated to it. This section displays the Organization ID, Legal Name, Address, City, State and Country. Click on the Organization ID to open the Organization Record in a new window. Review Information The “Review Information” subsection includes several fields related to organization approval. Please note the following fields: Next Review Date – stores the date on which the next review of the organization‟s eligibility should take place by an Administrator. After this date, warnings/errors display in the Organization Record. This is an optional field. Prior Approval Processes for Current Grant – lists the history of the organization approval. It also includes the individuals who approved or rejected the organization and their comments. Approving an Organization When a user clicks the “Submit for Approval” button the screen refreshes and the organization approval step(s) are listed at the bottom of the Qualification Information section. If a user has authorization, the Approve and Reject buttons are displayed to allow a user to approve or reject the organization. Once complete, the “Submit for Approval” button reappears to allow a user to resubmit the organization for approval. NOTE: You should be aware of the full implications of approving organizations before doing so. Speak to your administrator/account coordinator for more information. Request History Information The “Request History Information” section contains summary information for all requests associated with the organization. NOTE: The Request ID is a link which, when clicked, displays the detailed Request Record in a pop-up screen. Contact Information The Contact Information section contains information for all contacts associated with the organization. An organization may have an unlimited number of contacts associated with it. NOTE: The Contact Name is a link, when clicked, displays the detailed Contact Record in a pop-up screen. This screen includes a dropdown contact list containing all of the contacts associated with the organization as well as the information for the contact on whose name you clicked. To add a new contact: Select “(New Contact)” from the list of contacts Click on the “Load” button. The “Address” and “Telephone” fields for a new contact default to that of the organization. Scan Results (Optional) The Organization Summary Panel and Request Summary Panel displays a Scan icon to GrantMakers who have enabled WatchList Scanning. To scan the name fields in the Organization Record or Request, click “Scan Manually” in the appropriate Toolbox. In the Summary Panel, the Scan Status will display “Scanning…” with the scanning icon. Scan Match Not Found If the scan completes without finding a match, the Scan Status will display “Completed” with a check mark, and the words “No matches were found” will display in the Scan Results section. Scan Match Found If the scan completes with a match found, the Scan Status will display “Matches Found” with a red flag, and the following columns display in the Scan Results section: Score, Scanned Entity, Matched Name, WatchList Name, and WatchList Detail. At the bottom of the list of search results, the “Last Scanned By”, the “Last Scanned Time”, the “Reason for Scan”, and the “Scan Results Accepted” are printed in read-only mode. To view the full list of results on one page, click the PDF icon in the section header to create a printable copy of the results. Overriding a Scan Match To override the scan match and accept the organization, an Administrator must approve the organization in the Qualification Information section. When a user clicks the “Submit for Approval” button, the screen refreshes and the organization approval step(s) are listed at the bottom of the Qualification Information section. If a user has authorization, they can click on the “Approve” or “Reject” buttons at the bottom of the section. When the organization is approved, the Scan Results remain. The information at the bottom of the Scan Results changes to state that the organization has been approved. Request Record The CyberGrants System captures all relevant information pertaining to non-profit organizations‟ requests for funding. This information consists of the organization‟s original proposal, general request information, contacts associated with the request, payment and other accounts payable information, impact reporting, and approval information. A request may only be created for an existing organization. Only users with the appropriate user role and permission can create requests. A GrantMaker user has three options for creating a new request: On the Main Tab, click the “New Req” icon in the “New Request” column. Within an Organization Record, click on the “Create Request” link from the “Organization Toolbox”. Within a Request Record, click the “Clone Request” link from the “Request Toolbox”. The Search Results section enables a user to locate an organization and its existing requests. (If an organization does not already exist, see the “Main Tab” section of this manual for information on creating an Organization Record.) If the organization is found, a user may look at any existing requests. To access the Request Record, click the dollar amount link in the “Grant/Request Amount” column. The Request Record is comprised of two panes/panels: Request Summary Panel contains basic information about the request record. Information Pane displays detailed information pertaining to the request. Request Summary Panel The Request Summary Panel at the top of the screen lists in the header the Request ID number assigned by the CyberGrants system, Grant Amount and Grant Status. The body of the panel lists the Organization Name as a link to the Organization Record, the Project Title, the Proposal Type, Request Owner, and Scan Status. If the Request Record is scanned, the scan status will turn to “Completed” with a “Check” icon if there are no matches , or “Matches Found” with a “Red Flag” warning icon displayed to the right of the Scan Status if matches are found. Clicking on the request summary header collapses/expands the pane so there is more room to see the Information Panel. The Summary Panel will remain static at the top of your screen as you scroll through the Information Pane to other sections within the request. Request Utility Navigation Panel To the right of the Summary and Information Panes is the Request Utility Navigation Panel. Similar to the Organization Utility Navigation Panel, it will remain on the screen at all times and give access to Save All Request Toolbox Mail Print Request Section Navigation Panel The Information Frame for the Request Record is organized into up to six sections: Proposal Payment Approval Contact Information Scan Results Impact Report NOTE: Request Sectioning allows a user to reorder and/or create more request sections in the Request Record. (Refer to the “Admin Tab” section of the User Manual to learn more about this.)The request section panel will indicate all of the sections of your proposal type. The number of sections will depend on the configuration of your proposal type. You can navigate through the request by either scrolling or clicking the request sections on the panel. If you scroll, the system will recognize which section you are in and highlight the appropriate. You will see a red indicator in the section panel if there are missing/invalid values: Conventions Several conventions apply among the different request sections: At the right of each section title bar icons display: The “W” icon generates a Word RTF version of that section‟s information. The PDF icon generates a PDF version of that section‟s information. Required information is identified with an asterisk (*) before the field name. Dates must be entered in MM/DD/YYYY format. Amount fields accept numbers, commas, periods, and dollar signs. Request Toolbox Depending on your user role and permissions, you will have access to different functions of the request toolbox: Change Owner allows you to change the CyberGrants request owner. Scan Manually performs an immediate WatchList scan on select fields in the request to assist with Patriot Act compliance. (Displays only for GrantMakers who have enabled WatchList Scanning.) Change Organization allows you to move a request from one organization record to another. Change Proposal Type gives the option to change the current proposal to a different type. Return To Applicant gives the option to return a request to an external applicant for revision. This link displays only if a GrantSeeker is associated with the request. NOTE: The “Return to Applicant” button allows a GrantMaker to return the proposal to the GrantSeeker Editor via e-mail with comments, suggestions, or to indicate missing information that is necessary for the GrantSeeker to complete. “Cancel Return to Applicant” is also available to Administrators in the Request Toolbox when an application has been returned. When returned to the applicant, all fields appear in read-only mode. Click the “Cancel Return to Applicant” button to reload the request back to edit mode for the request owner. The nonprofit applicant is no longer able to revise the request. Schedule Impact Reports allows a user to add an impact report to this request. This link displays only for GrantMakers who have created Impact Report Types. Clone Request copies request information, but not Payment, Approval or Impact Report information, into a new request for the organization. The Request Date of the new request defaults to the current date. NOTE: Only the request owner or a user with editor linking has access to the “Clone Request” link. View Request Log allows a user to view the system activity (Record Created, Record Deleted, Record Updated) and correspondence (Emails and Letters) associated with this request. A user can search by selecting values for one or more filters (“TimeFrame”, “Action Type”, and “Performed By”). The “TimeFrame” criterion is required and limited to one time period. The search result screen displays the following columns: “Select”, “Type”, “Transaction Type”, “User”, and “Description”. The “Description” column displays a link if the “Type” is Email or Letter; the link allows a user to display the content. Mail Click on the Mail icon to display links to the following functionalities: Create New Mail allows a user to create a letter or e-mail message to send to the organization or request contacts. (Please see the Mail Tab in this manual for more information on creating letters and e-mail.) View Existing Mail retrieves a current list of all mail activity associated with the request. View/Create Contacts opens a new window to edit the contact information, or create new contacts. Print Click on Print to display links to the following functionalities: Word (RTF) Version prints the request information in Word rich text format PDF Version displays the request information in PDF format. Request Record Sections Proposal The Proposal Information section captures the content of the request for funding. A nonprofit can enter the information directly through the public web site or a user from the GrantMaking organization can enter it internally. Required fields (typically Project Title, Request Date, and Requested Amount) must be completed and saved before any payment and approval information can be entered. Proposal Fields to Note Request Owner indicates the owner of the proposal. To change the request owner, click on “Change Owner” under the Request Toolbox, select the appropriate name from the dropdown list in the Request Owner field, click the “Change Owner” button then click the “Save All” button. Request Source indicates whether the request was submitted from the web (External) or entered by a GrantMaker (Internal). If the request was submitted from the web, the date on which it was submitted appears next to the “Request Source”. Proposal Type indicates the proposal type and determines the fields associated with the request. To change the proposal type, click on “Change Proposal Type” under the Request Toolbox, select the appropriate proposal type from the dropdown list in the “Proposal Type” field and click the “Change Proposal Type” button. Request Date indicates either the date that the applicant specified when completing the application or the date that the user entered on an internally created request. NOTE: An internal user should select a proposal type before entering data for a new request. When a new proposal type is selected, the screen refreshes and only the fields specific to that proposal type appear. Creation Date indicates the date the request was created. Created By indicates the user who originally entered the request. Last Saved Date indicates the date the request was last saved (regardless of whether any fields were modified). Last Saved By indicates the user who last saved the request (regardless of whether any fields were modified). Grantseeker (a.k.a. Applicant) The GrantSeeker is the user linked to the request. The Grantseeker Editor allows request owners to grant another GrantSeeker (associated with the request‟s organization) the ability to view/edit the request if the request is returned to the sender for revision or if an internally created request is sent to the nonprofit applicant to enter information online. For externally created requests, this field defaults to the applicant who logged in and created the request. Internally created requests are not automatically assigned a GrantSeeker. Products Requested The Products Requested area will only display for GrantMakers who have activated products in Proposal Types where Product is associated. When entering a Request for products, the area is devoid of all products until the user searches by keyword or browses by product type. By selecting product type “Office Equipment”, the following choices appear. Enter the number of each product to be sent in the Quantity Field. Click the “Add to Requested Products” button to update the Product Requested section. Repeat the process to add other Product Types. To change the Quantity of a product already in the Product Requested Area, change the number in the Quantity field and click on the “Update” button. Payment There are two types of payments in the CyberGrants System: Cash Payments Product Payments (for GrantMakers with Products only) Working with Cash Payments Required fields are labeled with an asterisk (*) and must be completed to save the payment information. Required fields include “Payment Type”, “Payment Status”, “Budget”, “Requested Payment Date”, and “Payment Amount”, but the Administrator can designate additional fields as required. NOTE: The default mode for payments is “New Payment”. To create a single payment for a request: Select a “Payment Type”, “Payment Status” and budget from the corresponding dropdown lists then enter the “Requested Payment Date” and “Payment Amount”. Complete all required fields and other fields that are relevant. Before proceeding to the Approval section, click the “Save All” button. To create multiple payments for a request: Click the arrow for the “Select a payment task” dropdown. If the Administrator has selected payment types for schedule multiple payments, they appear beneath “Schedule Multiple Payments”. Highlight the payment type then click the “Go” button. A payment form displays with the standard payment fields plus 4 new, required fields to schedule multiple payments: Installment Amount Number of Payments Frequency Starting Payment Date The “Total Value of Payments” field is a calculated field equal to the amount in “Installment Amount” times the value in “Number of Payments”. “Frequency” is a dropdown menu that allows a user to select the time span between payments and has the following options: After filling out these payment fields, click the “Save All” button in the utility navigation or the “Save Payment Schedule” button at the bottom of the payment form. If all required fields are entered and no error results, the payments display in the Grant Payment Summary section: To edit an existing payment, click the “Edit” button to load the payment information into the editable fields for revision. To create a new payment when payment exists, click the “New” button to load a blank payment form. Click the “Print Receipt Form” icon located in the blue Payment Information Header Bar to generate a charitable contribution acknowledgement form for individual payments. Click the “View Payment Log” icon associated with a particular payment. while the payment is loaded to see all system activity Click the “Delete” icon to delete a payment. Payments can only be deleted by an Administrator. A user can create a payment for a cash grant through the use of the “Clone” button within an existing payment. Click the “Edit” button to the left of a payment to be cloned. The cloned payment contains the same information as the original payment with one exception – the “Payment Status” is set to “Contingent”. Select the appropriate status, make any additional changes as needed, then click the “Save” link or the “Save All” button. The “Payee Information” can be edited by the user in cases where the organization information associated with the request is different from the payee. Click on the “(Change Default)” link to expand Payee Information. Choose another payee (if one exists) or create a new payee by selecting the radio button and completing the appropriate fields. Payment Fields to Note Payment Status – There are six payment statuses: Contingent indicates that a payment is being held until an event takes place. An example would be an impact report that has yet to be completed by the organization. Once the information arrives from the organization, the GrantMaker can change the status of the payment to “Scheduled”, prompting payment. Deferred indicates payments are being held for a given time. The payment status would need to be manually changed to “Scheduled” for the payment to process when using an AP feed. Paid indicates that a payment has been sent to the organization. Refund indicates money has been returned to the GrantMaker from the organization due to an erroneous payment or an over-payment. Any payment with a status of “Refund” must have a negative payment amount; conversely, a negative payment amount may only have a payment status of “Refund”. Scheduled indicates the payment is scheduled for a date in the future. A “Scheduled” status prompts a check to be cut when using an AP feed, once the scheduled payment date is reached and the grant is approved. Void indicates a payment was not received by the organization. The original dollar amount will be held in the payment field for reporting purposes on "Void" payments, but will not reflect in the budget totals. Budget is the specific budget to which the payment is assigned. A user must pick the lowest level in the appropriate budget hierarchy from the dropdown box. A user may only select a budget that has sufficient funds to cover the payment unless the Administrator or Budget user allows a negative budget amount. Users may only select from budgets that they have been given access to by an Administrator or Budget level user. Change Budget Year allows a user to change the budget year of a previously saved payment, enabling the selection of a budget from an alternate budget year for payment. A user may select from all budget years with a budget status of “In Process” or “Open”. After the appropriate budget year is selected, click the “Change Year” button. When the request screen reloads, all budgets available to the user from the newly selected budget year are displayed in the Budget dropdown. Payment Date & Check Number (#) should be completed for reference purposes once the payment has been made. Quid Pro Quo Payments are required for Quid Pro Quo requests. These payments require that the user break the payment amount into Fair Market Value and Deductible Amounts. These fields will only appear on proposal types where the Quid Pro Quo amount is accepted. NOTE: CyberGrants does not permit the following conditions: A single Payment Amount in the Payment section (or the total of all non-voided Payment Amount values in the Payment section) cannot exceed the Amount Recommended in the Approval section. If the Amount Recommended in the Approval section is blank, a single Payment Amount (or the total of all non-voided Payment Amount values) cannot exceed the Request Amount in the Proposal section. A payment cannot exceed the balance of a budget unless a Budget user or Administrator configures the budget years to be driven negative. Working with Product Payments Using product payments works in conjunction with the “Products Requested” area in the Request Section. The Cost Price (amount the product costs for the company to produce) and the List Price (fair market value price) appear in the Products Requested area. The information from the Cost Price field will appear in the “Amount Deducted” field in the Payment Summary. The amount in the List Price field will appear in the "Amount" field in the Payment Summary. Once the Quantity for products is entered in the Products Requested area, Product payments are automatically calculated for each product and placed in a product order. The product order, however, does not include the Budget or the Requested Ship Date. Click the “View Order Detail” link in the “Product X Quantity” column to see the items contained in the order. Click the “Edit” button associated with the order to edit the items in the order and to set the Budget and Requested Ship date. Add a Budget and a Request Ship Date to the payment and press the “Save All” button. Here the User may also change the quantity of products, add additional products, and transfer products to additional orders. Click “Save All” at the bottom of the Order Detail section. Each payment or order can have a different Budget line and Requested Ship Date by editing the line individually. Click the “Edit” button to the left of the payment or order, add Budget and Request Ship Date information then click the "Save All" button. Notice below that the In Kind payment is associated with the 2014 Product Line budget and has a requested Payment date of 05/01/2014, while the Cash Contributions payment is associated with the 2014 Corporate Giving budget and has a payment date of 05/07/2014. NOTE: If the request is to be approved for both, cash and product, the cash payment must be created manually by clicking the “Select a Payment Task” menu at the bottom of the payment summary and creating the payment separately. Approval The Approval section captures all request related approval information including the amount recommended for funding and any prior approved grants for the organization. The approval process performs a dual role: Dictates the total amount for which the grant will be funded. Approves the grant for funding. Beginning the Approval Process A user must enter a value in the Amount Recommended field before submitting the request for approval. The amount entered is the actual amount that is approved for funding. It may or may not be the same as the amount originally requested. By default, the payments must be created before the Approval Process begins. The total of the nonvoided payments must add up to the Amount Recommended if the Request is to move forward to be approved. NOTE: The Approval Process can be set to bypass the payment requirement. Please contact your CyberGrants Account Coordinator for details. Click the “Submit for Approval” button to submit the request for approval. Once the “Submit for Approval” button is clicked, it disappears, indicating that the request is currently in the approval process. The “Submit for Approval” button re-appears once the request approval process is completed and the request is either approved or rejected. By default, the Amount Recommended cannot be changed until the approval process is complete. NOTE: The Approval Process can be set up to allow the Amount Recommended to be changed at certain steps in the Approval Process. Please contact your CyberGrants Account Coordinator for details. Approve a Request At each step of the process, a user has the option to enter comments, complete any custom fields, and register a decision concerning the request. Depending on the approval process configuration, CyberGrants displays icons that allow a user to either Approve/Reject, Recommend/Do Not Recommend or Record Input for the request. CyberGrants also displays the Required Approval section, which lists the steps in the approval process. These steps depend on the approval process that each GrantMaker has established. (To set up a multi-step approval process, please contact your CyberGrants Account Coordinator.) The “Approve”/“Reject”, “Recommend”/“Do Not Recommend” or “Record Input” icons appear depending on the approval authority of the user. When a user clicks any of these five icons, the user‟s name, current date, and comments are saved as part of the approval record. No changes may be made to the approval step after the user has registered a decision by clicking the appropriate icon. The “Approve”/“Reject” icons allow the user to indicate a decision. If the user clicks the "Reject" icon, the approval process ends and the request is marked Rejected. The “Recommend”/“Do Not Recommend” icons allow the user to indicate an opinion, but do not permanently affect the request‟s disposition. The “Record Input” icon allows a user to record their input and comments without rendering any decision or opinion. Initiating the Approval Process prior to entering payment information If payment information is required and the user selects the “Submit” icon before the payments are entered, only the “Reject” option will appear. If the user wants to continue, they can complete the Payment Information section to receive the "Approve" icon or click the “Reject” icon. Completing the Approval Process When an approval step is completed, a user may view the decision and comments of that step if the approval process is configured to allow viewing. (Your CyberGrants Account Coordinator may assist you in limiting the display of the approval details.) The request continues to pass through the various steps of the approval process and is considered “Pending Approval” until all authorized approvers complete the approval steps or until the request is rejected. Once the approval process is completed, a user may revise the Amount Recommended field. If the Amount Recommended is increased, the grant is automatically resubmitted for approval. Dynamic Approval Process If the approval process is configured to allow dynamic approval steps, the designated user can select one or more persons to complete each approval step from a list of eligible users. First, click on the “Define Approval Process” button. A pop-up Approval Process Definition box will display. Select from the list of names or enter each user ID or user name in the Reviewers box separated by commas. Once the appropriate names are selected for each step, click “Review” to preview the choices. Click “Change Definition” to make further changes, or the “Save” button if it is complete. Click the “Done” button to exit the window. Approval steps are created for each selected user and are represented by a link to the approval type. When the “Pending” link is clicked, the names of the users authorized to complete that approval step are displayed. Once a dynamic approval process is defined, it can be modified. Approvers can be added to a step, removed from a step, and a step can be removed. If an approver is added to a step, even the current approval step, a “Pending Your Approval” email is triggered to the added approver to indicate that a new request is awaiting approval. Cancel Request The “Cancel” icon may be clicked at any time, regardless of status, by the request owner or editor to cancel grant processing. However, if the request has a Paid payment, the payment must be voided in the CyberGrants system before the request can be canceled. This is done in the Approval section of a request. Contact Information The Contact Information section captures the information for one or more contacts associated with the request. This information may differ from the organization‟s contact information since there may be different individuals associated with each request. A request may have an unlimited number of contacts associated with it. To edit a contact‟s information, click on the contact‟s name. A pop-up screen appears with additional information for the contact you selected. You may also edit other contacts by clicking on a name, which is a link. To create a new request contact, click the Mail icon on the Request Utility Navigation and click View/Create Contacts. A pop-up screen appears with a dropdown menu containing all of the contacts associated with the request The values in the “Address” and “Telephone” fields for a new contact default to those of the organization. A user can revise this information if necessary. To edit an existing contact, click on the appropriate name within the contact list or within the request Contact section. The contact‟s information loads into the boxes for revision. The list of contacts in the request's Contacts section lists both contacts associated with the organization and the request. To associate an organization contact with a request, select the name from the list of contacts, then click the “Save” button without editing any information. When you refresh the request record, the additonal contact(s) will also appear in the Contact section. Similarly, request-specific contacts may be associated with the Organization Record. NOTE: Correspondence may be created for both organization and request contacts from within the organization or Request Record. To delete a contact, click on a contact name, load the contact information, and then click the “Delete Request Association” button. If the contact is associated with the Organization Record or other requests, CyberGrants displays a “Delete Association” button. Click the button to remove the contact's association with the current request. NOTE: If the contact is only associated with the current request, the contact record is permanently deleted. To enter a new contact, click the “New” button to load a blank contact record. Fill in the contact information fields and click the “Save” button. If the information is saved successfully, a confirmation message displays. Click the “Done” button to close the Contact pop-up screen. Optional Sections Optional sections only appear if the section is applicable to the request. There are three optional sections. Scan Results section only displays for GrantMakers who have enabled WatchList Scanning. Impact Report section appears only if there is an Impact Report associated with the request. Employee Giving Information section only appears in a grant created from an Employee Giving program where Donor Gifts or Volunteer Hours are associated with the Request. Scan Results The Request Summary Panel displays a Scan icon to GrantMakers who have enabled WatchList Scanning. To scan the name fields in the Request Record, click “Scan Manually” in the Request Toolbox. In the Summary Panel, the Scan Status will display “Scanning…” with the scanning icon. Scan Match Not Found If the scan completes without finding a match, the Scan Status will display “Completed” with a check mark, and the words “No matches were found” will display in the Scan Results section. Scan Match Found If the scan completes with a match found, the Scan Status will display “Matches Found” with a red flag, and the following columns display in the Scan Results section: Score, Scanned Entity, Matched Name, WatchList Name, and WatchList Detail. At the bottom of the list of search results, the “Last Scanned By”, the “Last Scanned Time”, the “Reason for Scan”, and the “Scan Results Accepted” are printed in read-only mode. Overriding a Scan Match To override the scan results and allow the application to be approved, the Request Owner or Administrator must enter their initials in the “I accept these Scan Results” field (this phrase can be modified as needed by the Administrator), located at the bottom of the Scan Results Section and press the enter key. This is to ensure that due diligence has been preformed on this match. The user who accepted the scan and the initials used in parenthesis will display at the bottom of the Scan Results section. The request can now be approved in the Approval Section. Impact Report The Impact Reports section captures the completed and pending impact reports for that request. Impact reports are used to obtain information relevant to the request after the grant is approved. It is often used to track the impact that the funding is having upon the community and to determine whether the funding was used appropriately. The summary view allows a user to determine which impact reports are scheduled for completion, which reports are completed, and which reports are past due. The summary includes the name of the impact report associated with the request, whether or not it is required, whether it is to be completed by the Organization, Donor/Volunteer or the Request Owner, the current status of the impact report, the date on which it became available for completion, and the date on which the impact report is due. E-mail events can be activated to notify the person scheduled to complete the impact report when it is available for completion, when it is past due, when it is completed, and if it is returned for revision. A request may have an unlimited number of impact reports associated with it. To view the details of an impact report, click on the corresponding Impact Report Type name link in the summary view. Impact reports assigned to the Organization that are not completed display only the type of impact report and scheduling information. Completed external impact reports, however, display the applicant‟s answers, as well as the scheduling information. Internally assigned reports list all of the fields including a Comments field to be answered by the CyberGrants user. To schedule a new impact report, select the “New Impact Report” option from the available dropdown list then click the “Load” button. Select “Organization” or “Request Owner” from the "To Be Completed By" dropdown menu. If the Request Owner is chosen, all of the Impact Report fields become available. If the “Organization” is chosen, only the scheduling information is displayed until the report is externally completed. NOTE: To see the system activity and mail correspondence associated with an impact report, click on the Log icon. The “Return to Sender” button is available on those impact reports submitted externally or for requests where a GrantSeeker Editor is specified. It allows a user to return the impact report to the applicant via e-mail with comments or suggestions that indicate what additional information is needed from the GrantSeeker.