1
Navision® Financials
mt.bk Page 1 Thursday, March 4, 1999 9:58 AM
Merge Tool
mt.bk Page 2 Thursday, March 4, 1999 9:58 AM
mt.bk Page 1 Thursday, March 4, 1999 9:58 AM
Merge Tool
mt.bk Page 2 Thursday, March 4, 1999 9:58 AM
This publication is subject to change without notice and does not represent
any commitment on the part of Navision Software a/s.
Navision Software a/s assumes no responsibility for any faults or
shortcomings in this publication.
The software described is supplied under license and must be used and
copied in accordance with the enclosed license terms and conditions.
According to Danish copyright legislation, it is against the law to reproduce
any part of this publication in any form or by any means, without the
permission of Navision Software a/s.
Navision, C/SIDE and Navigator are registered trademarks of Navision
Software a/s. AssistButton, C/AL, SIFTWARE, FlowField, FlowFilter, SIFT,
SumIndex, SumIndexField and TrendScape are trademarks of Navision
Software a/s.
Microsoft is a registered trademark and Windows and Windows NT are
trademarks of Microsoft Corporation. IBM and OS/2 are registered
trademarks and LAN Server, OS/2 LAN Server, Presentation Manager and
WIN-OS/2 are trademarks of International Business Machines Corporation.
Novell and NetWare are registered trademarks of Novell, Inc. UNIX is a
registered trademark of Unix System Laboratories Inc. Paintbrush is a
registered trademark of Zsoft Corporation.
This book was printed using xerography. The MetaPlus font was used.
Copyright © 1999 Navision Software a/s. All rights reserved.
ISBN 87-7849-352-8
Published by Navision Software a/s.
Printed in Denmark 1999.
mt.bk Page 1 Thursday, March 4, 1999 9:58 AM
Preface
This book is the user manual for the Merge Tool.
The manual is divided into two chapters: Getting Started, and Working with
the Merge Tool. Each chapter starts with a short introduction and an
overview of the chapter contents. This enables you to decide quickly whether
the chapter contains the information you are looking for.
In this manual, you will often see command words with the names of menus,
menu items and buttons which tell you how a special window is opened or a
function executed. If it is not a window which is already open, the entire
sequence is written down, for example, "Click h Setup, Merge Setup." Calls
from the menu bar (such as Edit, Insert New) are identified accordingly.
You can use either the mouse or the keyboard to choose a menu item or to
execute any other operation in Navision Financials. When there is an access
key for a command, it is indicated by an underscored letter; you execute the
command by holding down the Alt key and pressing the access key. You can
read more about keyboard commands in the Introduction to Navision
Financials manual.
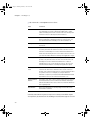
You should also be familiar with the symbols and typographical conventions
used in the Navision Financials manuals. In the list below you can see how
various elements of the program are distinguished by highlighting an
symbols:
Appearance
Element
Ctrl
Keys on the keyboard. They are written in small capitals.
Design
Menu items and buttons in windows. They always start with a
capital letter, and the access key is underlined.
Code
Field names. They appear in medium bold and start with a
capital letter.
Import Version
Names windows, boxes and tabs. They appear in medium bold
italics and start with a capital letter.
mt.bk Page 2 Thursday, March 4, 1999 9:58 AM
Appearance
Element
NF-2.00
Text that you must enter, for example: “...enter Yes in this field“.
It is written in italics.
fin.flf
File names. They are written with Courier font and lowercase
letters.
p o v a b g f
Special symbols that can be seen in the windows on the screen.
mt.bk Page i Thursday, March 4, 1999 9:58 AM
Table of Contents
Chapter 1
Getting Started 1
Merge Tool Setup 2
Chapter 2
The Merge Tool 5
Working with the Merge Tool 6
i
mt.bk Page ii Thursday, March 4, 1999 9:58 AM
Contents
ii
mt.bk Page 1 Thursday, March 4, 1999 9:58 AM
Chapter 1
Getting Started
This chapter discusses the structure of the
Merge Tool and provides instructions for
installing and setting up versions of Navision
Financials.
The chapter contains the following section:
· Merge Tool Setup
mt.bk Page 2 Thursday, March 4, 1999 9:58 AM
Chapter 1. Getting Started
1.1 Merge Tool Setup
Quick Start
You should read all of this document to understand the Merge Tool and to be
able to troubleshoot if you run into problems. However, if you want to start
off quickly by trying to upgrade a customer version to the newest Navision
Financials version, this is what you have to do:
1 Make sure you have the latest version of Navision Financials installed
on your computer.
2 Start Navision Financials, and create the database MergeTool.fdb.
3 Restore the backup into the database. There will now be a company in the
database with the base versions from the local country version of Navision
Financials.
4 Set up your screen resolution in the Merge Setup table.
5 See "Working with the Merge Tool" on page 6 of this manual for
guidelines on the various tasks you can do with the Merge Tool,
particularly the section called "Types of Object Files."
Basic Structure of the Merge Tool
The Merge Tool is a Navision Financials utility designed to help Navision
Solution Centers document, compare, upgrade and maintain modified
customer solutions. This tool can also be used for implementing or
upgrading add-on solutions in a modified customer version.
The Merge Tool uses the text format of Navision Financials objects to
compare and merge versions. Understanding what happens during merging
requires knowledge of the text format for Navision Financials objects.
Here are descriptions of the tables in the Merge Tool:
2
Table
Description
Merge Setup
In this table, you can set up the various system parameters
for the Merge Tool.
mt.bk Page 3 Thursday, March 4, 1999 9:58 AM
1.1 Merge Tool Setup
Table
Description
NF Customer
In this table, you can name the customer versions read into
the Merge Tool. The table is used for accessing all the
versions that have been created for a specific customer.
NF Product
In this table, you can name the Navision Financials products
that are read into the Merge Tool. Normally you will only
have one product in each company, so all the versions will
have the same Navision Financials product code. This table
also contains text constants specific for each country
version.
Version
In this table, you can view all the versions that are read into
the Merge Tool. This table contains some historical
information about previous versions and indicates which
version is the base version.
Version Comment
In this table, you can add additional comments to a version.
Comments must be entered manually. The Merge Tool does
not create comments.
Application Object
In this table, you can view all the application objects for a
version.
Application Object Line
This table contains the text lines for the application objects.
Contrast Header
When two objects are compared and there is a difference, a
record of the difference is created in this table.
Contrast Line
When two objects are compared and there is a difference,
the lines that differ are stored in this table.
Manual Merge Line
During the merging process, when manual adjustments
must be made about which lines to include, you can use the
Manual Merge Lines table to view the lines from the
different versions.
3
mt.bk Page 4 Thursday, March 4, 1999 9:58 AM
Chapter 1. Getting Started
You can see how the tables in the Merge Tool are connected in the following
illustration:
NF Customer
NF Product
Version
Version
Comment
Application
Object
Merge Setup
Application
Object Line
Contrast
Header
Manual
Merge Line
4
Contrast
Line
mt.bk Page 5 Thursday, March 4, 1999 9:58 AM
Chapter 2
The Merge Tool
This chapter describes the setup information and
the tasks that can be performed with the Merge
Tool. These tasks include importing and
exporting a version, comparing versions,
exporting a log of differences, and merging and
making manual adjustments to a merged
version.
The chapter contains the following section:
· Working with the Merge Tool
mt.bk Page 6 Thursday, March 4, 1999 9:58 AM
Chapter 2. The Merge Tool
2.1 Working with the Merge Tool
Types of Object Files
It is very important that you import the correct objects into the Merge Tool. In
the table below, you can see what you must import for the various types of
objects.
There are four different types of object files:
· Base version
· New add-on
· New version add-on
· Customer version
What to
Import
6
New Base
Version
New Add-On
New Version
of Add-On
New
Customer
Version
Import only
objects from
the new
version to do
the merge
faster
Import only
changed and
new objects
Import only
changed and
new objects
Import only
changed and
new objects
mt.bk Page 7 Thursday, March 4, 1999 9:58 AM
2.1 Working with the Merge Tool
Example
An example of what to import in the different versions can be seen in the following table:
What to
Import
NF Version
1.20.02
NB Version
1.00
NB Version
2.00
Version ABC2
Only the
objects with
version list
NF1.20.02
must be
imported
Only the
objects that
contain
NB1.00 in the
version list
must be
imported
Only the
objects that
contain NB in
the version list
must be
imported
Only the
objects that
contain ABC or
all add-ons.
Versions in the
version list
must be
imported
Example
An example of what should be entered in each field of each version can be seen in the
following table:
Version 1.20B Version 1.00
Version 2.00
Version ABC
Description
field
NF Service
Add-on 1.00
Pack NF
Version 1.20B
Add-on 2.00
Customer
ABC's version
2
Base Version
field
Yes
No
No
Previous
Version field
NF 1.20.01
NB1.00
ABC1
NF 1.20
NF 1.20
NF 1.20
NF
NF
NF
NAVIBANK
NAVIBANK
ABC
Based on
Version field
NF Product
Code field
NF Customer
Code field
NF
No
7
mt.bk Page 8 Thursday, March 4, 1999 9:58 AM
Chapter 2. The Merge Tool
To optimize the performance of the compare and merge, carefully select
what to import from each version. If too many objects are imported for
each version, it will take much longer to compare and merge.
Setup
Default values and setup parameters for the processes run with the Merge
Tool can be defined in the Merge Setup Card window.
To view or edit these values, click Setup h, Merge Setup.
A version must have a product code assigned to it to allow naming the
Navision Financials products that are read into the Merge Tool. Normally you
have only one product in each company so all the versions have the same
Navision Financials product code. Fixed texts in the code are defined in the
Merge Setup window, and it is possible to import them.
To view or edit these values: click Setup h, NF Products.
8
mt.bk Page 9 Thursday, March 4, 1999 9:58 AM
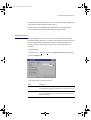
2.1 Working with the Merge Tool
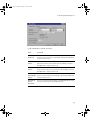
Importing a Version
To create a version, you will need to make a text export of the objects from
the customer’s version of Navision Financials and import them to the version.
To import:
1 Click Versions h, Functions, Import. The Import Version window opens.
2 Click the Options tab.
9
mt.bk Page 10 Thursday, March 4, 1999 9:58 AM
Chapter 2. The Merge Tool
3 Fill in the fields on the Options tab as follows:
Field
Comments
Version
Enter the name of the version you are importing. You can enter the
code manually. You can also click the AssistButton p to either
select an existing version code or enter a new one. The imported
new version must not already exist in the database.
File Name
Enter the data path and name of the file that was exported from
Navision Financials containing text versions of the objects. You
can enter the file name manually or use the AssistButton p.
Description
The text you enter here will be written to the Description field of
the version.
NF Customer Code If you want the version you are importing to be associated with a
customer, then enter the relevant customer code here. You can
enter the code manually. You can also click the AssistButton p to
either select an existing version code or enter a new one. The code
you enter here will be written to each imported application object.
NF Product Code
If you want the version you are importing to be associated with a
product code, then enter that code here. You can enter the code
manually. You can also click the AssistButton p to select an
existing version code or you can enter a new one. The code you
enter here will be written to each imported application object.
Previous Version
Code
You can use the Previous Version Code field to give an order to
search for an older version. This field can be used for the base
product, add-on and customer versions. It must be filled in if there
is a previous version. For example, if you import Navision
Financials 2.00A, then you must fill in the Previous Version Code
field with the version code for Navision Financials 2.00.
Created on Base
Version
This field is used only for add-on and customer versions. Here you
can indicate the base version of Navision Financials manually or
click the AssistButton p to select a version to which modifications
were originally made.
Base Version
Place a x in this field if you are importing a version that comes
from Navision Software.
Carefully select which objects to import. If too many unmodified objects
are imported, all the functions in the Merge Tool will take longer to run and
10
mt.bk Page 11 Thursday, March 4, 1999 9:58 AM
2.1 Working with the Merge Tool
require a larger database. (Version 2.00 contains around 1400 objects, but
a typical add-on will normally modify only 50.)
Fill in the fields on the Options tab carefully because merging with this
version will depend on the information entered in these fields.
Exporting a Version
After you upgrade an add-on or a customer version, only the objects that
have been merged will need to be exported. This file must then be imported
into the targeted Navision Financials database. Limiting the number of
objects in the export will decrease the amount of objects that must be
compiled.
To run the import:
1 Click Versions h, Functions, Export. The Export Version window appears.
2 Click the Options tab.
3 Fill in the fields on the tab as follows:
Field
Comments
Version
Enter the name of the version you are exporting. You can enter the
code manually or click the AssistButton p to select a version code.
File Name
Enter the data path and the name of the file to be created by this
export. This file will be in the necessary format to be imported into
Navision Financials.
11
mt.bk Page 12 Thursday, March 4, 1999 9:58 AM
Chapter 2. The Merge Tool
Field
Comments
Export Object from Place a x in this field if you want the base version objects to be
Base
exported with the object file. The base object of a version is
indicated in the Created on Base Version field in the Version Card
window .
Export as
Individual Object
Place a x in this field if you want each object to be exported to a
separate file. Each file will be named according to its object type
and object number and written to the path entered in the File
Name field.
Substitute Date
and Time
Place a x in this field if you want the new date and time that were
entered during the merge to be written to the exported objects.
Remove Modified
Line
Place a x in this field if you want the modified property of the
objects to be removed.
Insert New
Version List
Place a x in this field if you want the version list object property to
be updated.
When exporting a version, carefully consider which objects should be
included.
Comparing Two Versions
A comparison is always performed between two objects.
Here is an illustration of what happens when two versions are compared:
Old Object
Compare
New Object
Old Version
<=>
New Version
As the two versions of each object are compared, a contrast header is
created for each version.
12
mt.bk Page 13 Thursday, March 4, 1999 9:58 AM
2.1 Working with the Merge Tool
If the old version is a base version, the previous versions will be searched for
objects that do not exist in the current base version.
To compare:
1 Click Versions h, Functions, Compare.
2 On the Application Object tab, the Object Type and Object Number fields
contain default values. You can enter filter criteria for these fields in the
Filter column to delimit the objects to be compared.
3 Click the Options tab.
4 Fill in the fields on the tab as follows:
Field
Comments
Old Version
Enter the name of the earlier version you want to compare against.
You can enter the code manually. You can also click the
AssistButton p to either select an existing version code or enter a
new one.
New Version
Enter the name of the later version you want to compare. You can
also click the AssistButton p to either select an existing version
code or enter a new one.
Delete Equal
Objects
Enter a x if you want the program to delete objects that are exactly
the same as the objects they are compared to.
13
mt.bk Page 14 Thursday, March 4, 1999 9:58 AM
Chapter 2. The Merge Tool
Exporting the Log of Changes
After two versions have been compared, the log of changes can be exported.
The log is based on the contrast header and contrast lines, which were
created when you compared versions.
To export:
1 Click Versions h, Functions, Export Log.
2 On the Old Version Filter and New Version Filter tabs, the Object Type
and Object Number fields contain default values. If you want to delimit
the export, enter the filter criteria for these fields in the Filter column.
3 Click the Options tab.
4 Fill in the fields on the tab as follows:
14
Field
Comments
Version
Enter the name of the version you are exporting. You can enter the
code manually or click the AssistButtonp to select a version code.
File Name
Enter the data path and the name of the file to be created by this
export.
Log Format
Select an option to determine the log format. As a default, the field
contains the option you entered in the Log Format field on the Log
tab in the Merge Setup window.
mt.bk Page 15 Thursday, March 4, 1999 9:58 AM
2.1 Working with the Merge Tool
Field
Comments
Equal Lines to
Display
Here you can enter the number of equal lines to be displayed
before and after the changes. As a default, the field contains the
option you entered in the Log Format field on the Log tab in the
Merge Setup window.
If the number of equal lines in the code is less than the required number,
only the equal lines will be displayed.
Setting New Object Properties
You can adjust properties on objects that have been imported into a version
with the Set New Objects Properties function. This function is intended to be
used when manual changes have been made to the objects in a customer’s
version.
The objects must have been compared to the previous version of the
customer solution or to the base version if it is the first version of the
customer version in the Merge Tool. To set new object properties, follow this
procedure:
1 Click Versions h, Functions, Set New Object Properties.
2 On the Application Object tab, the Object Type and Object Number fields
contain default values. You can enter filter criteria for these fields in the
Filter column to delimit the objects to be changed in a version.
3 Click the Options tab.
15
mt.bk Page 16 Thursday, March 4, 1999 9:58 AM
Chapter 2. The Merge Tool
4 Fill in the fields on the tab as follows:
Field
Comments
Version
Enter the name of the version containing the objects with
properties you want to change. You can enter the code manually
or click the AssistButtonp to select a version code.
Adjust Against
Here you choose whether to use the base version or a previous
version as a point of reference for the adjustment.
New Date
Enter the date you want the objects to have.
New Time
Enter the time you want the objects to have.
New or Added
Version List
Enter the description you want to add to the object version list.
Merging Versions
The merge process uses three existing versions to create a fourth, new
version. It will automatically handle many code changes, but there are
situations where the developer is required to make manual changes. For
example, the Merge Tool cannot handle conflicts if there are changes in the
same part of code in different versions. The Merge Tool will decrease the
amount of work required to enter the same changes again in the newest
version of the objects released from Navision Software, an add-on developer
or manual changes done in the customer’s solution.
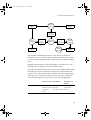
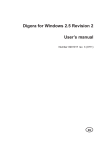
The following illustration shows the steps performed to merge three
versions.
16
mt.bk Page 17 Thursday, March 4, 1999 9:58 AM
2.1 Working with the Merge Tool
Step 2
Compare
Old Base
Object
Old Custom
Object
Old Base
<=>
Old Custom
Step 1
Compare
New Base
Object
Old Base
<=>
New Base
Step 3
Merge
Old Base
<=>
New Custom
Step 5
Modify
Fixed ID
Step 4
Create
Version
New Custom
Object
The comparison between three versions is the same as a comparison
between two versions. If the comparison already has been performed, then
in order to enhance performance the result from the last comparison will be
used.
Merging is performed in five steps by the Merge Tool, but the user is only
required to run one batch job to carry out all these steps.
If an object already exists in the new custom version, it will be skipped during
the merge. If an object is merged incorrectly, it can be deleted in the new
custom version, and the merge can be repeated. The various merging types
(new base version, new add-on and new version of add-on), how they are
used, and which objects are copied can be seen in the following table:
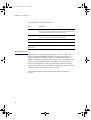
New Base Version New Add-On
Purpose
New Version of
Add-On
Upgrades
Implements new
Upgrades add-on
customer’s version add-on in
in customer’s
to new base
customer’s version version
version
17
mt.bk Page 18 Thursday, March 4, 1999 9:58 AM
Chapter 2. The Merge Tool
Example
Objects Copied
New Base Version New Add-On
New Version of
Add-On
Upgrade customer Implement
from 1.20 base
Navibanking in
Upgrade
Navibanking from
version to 2.00
base version.
customer version.
version 1.00 to
1.10.
Objects existing
only in the custom
version are copied
to the new custom
version. The text
for the version list
can be made by
adding the version
list from the
custom version to
the version list
from the new base
version.
Objects existing
only in the new
version and the
custom version are
copied to the new
custom version.
The version list
from the objects is
combined with the
new version list.
Objects existing
only in the new
version and the
custom version are
copied to the new
custom version.
The version list
from the new
version is
substituted by the
new version list if
the object exists in
the custom
version.
To merge:
1 Click Versions h, Functions, Merge Version.
2 On the Application Object tab, the Object Type and Object Number fields
contain default values. You can enter filter criteria for these fields in the
Filter column to delimit the objects to be changed in a version.
3 Click the Options tab.
18
mt.bk Page 19 Thursday, March 4, 1999 9:58 AM
2.1 Working with the Merge Tool
4 Fill in the fields on the tab as follows:
Field
Comments
Old Base/Add- Enter the name of the base/add-on version upon which the merge will
On Version
be based. You can enter the code manually or click the AssistButton p
to select a version code.
Old Custom
Version
Enter the name of the object that should be merged with the new
base/add-on version. You can enter the code manually or click the
AssistButton p to select a version code
New Custom
Version
Enter the name of the new version to be created and the new version
that you want to merge. You can enter the code manually or click the
AssistButton p to select a version code.
New
Base/Add-On
Version
Enter the name of the object that should be merged with the custom
version. You can enter the code manually or click the AssistButton p
to select a version code
New Custom
Version
Description
The text you enter here will be written to the Description field on the
version card of the version created by the merge.
19
mt.bk Page 20 Thursday, March 4, 1999 9:58 AM
Chapter 2. The Merge Tool
Field
Comments
Merging Type
The Merging Type field controls how objects are copied between
versions and how the version list in the objects is maintained. This
field has three options:
New Base Version
New Add-On
New Version of Add-On
See the table on page 16 for details about these three options.
New Date for
Changed
Objects
The date you enter here will be written to the objects of the new
version.
New Time for
Changed
Objects
The time you enter here will be written to the objects of the new
version.
Skip If Manual Place a x in this field if you do not want to make a manual merge and
Merge
do not want the manual merge form to appear.
The Skip If Manual Merge field is intended for running through all the
objects that can be merged without any considerations from the
programmer. The remaining objects can be merged in a second run.
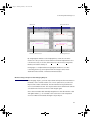
The Manual Merge Form window appears when a conflict is encountered
during the merge. The four subforms show the lines from each of the
versions.
20
mt.bk Page 21 Thursday, March 4, 1999 9:58 AM
2.1 Working with the Merge Tool
Old Version
Old Custom Version
New Base/Add-on version
New Merged Version
By assigning line numbers to the displayed line, a new version can be
created. It is also possible to insert new lines if manual adjustments to the
code are necessary. To do this, click Functions, Custom Lines, Assign Line
Number, and run this batch job.
If merging is so complicated that assigning line numbers is too time
consuming, then a log can be printed and the changes can be made
afterwards in the text file or in Navision Financials later.
Manual Changes Required after Merging Objects
After merging objects, you must export them and import them into Navision
Financials. If the text file contains one or more syntax errors, it cannot be
imported into Navision Financials. The line number and object where the
error occurred will be shown. This object can then be modified in the text file
or deleted in the new custom version and merged again.
One common mistake with manually merged lines is that the number of left
and right brackets { } do not match. This could cause some unexpected
errors from Navision Financials during the object import.
21
mt.bk Page 22 Thursday, March 4, 1999 9:58 AM
Chapter 2. The Merge Tool
During merging, conflicting control IDs will be fixed automatically, but
controls placed in the same area on a form or report will not be corrected.
The Overlapping Control report performs a check on each object and prints a
description of the objects and controls that must be modified manually.
Because merging can change already existing objects, you will need to test
both the new functionality and the existing functionality.
After all the objects have been imported, compiled and manually changed, a
new version should be imported into the Merge Tool for future use.
An Example of Merging a Customer Solution
This section contains a practical example of how a merge can be performed.
In this example, a customer solution based on Navision Financials 2.00 will
be updated with a Navision Financials Service Pack. As with most customer
solutions, this one includes modifications to the base product and custom
objects. In this example, modifications have been made to objects in the
Sales & Receivables, Purchases & Payables and Inventory application areas.
The goal of the merge is to produce a version of the customer solution
containing the service pack changes.
All the versions will have an NF Product Code of FIN-2.00.
Because the customization was based on Navision Financials 2.00, it will be
the base version for this merge.
First, go into an unmodified version of the product and export all the objects
in text format. For this merge, only the base objects that are part of the
customization must be exported, but because this version may be the base
version for other add-ons and customer modifications, you may want to
export all the objects.
To import this version, follow this procedure:
1 Click Versions h, Functions, Import. The Import Version window appears.
2 Click the Options tab.
3 Fill in the fields as shown in the following picture, and click OK.
22
mt.bk Page 23 Thursday, March 4, 1999 9:58 AM
2.1 Working with the Merge Tool
Placing a x in the Base Version field causes the program to use Version
NF2.00 as the base version for the merge.
Now you must export the customized objects from the customer solution
and import them using the options shown in the next illustration. Because
only base application objects are affected by this particular merge, you can
choose to export only those objects, or you can export the entire
customization in order to handle future version tracking and modifications.
Because the customization is based on Navision Financials 2.00, the base
version that you imported is entered in the Created on Base Version Code
field. The information you entered is written to the version record and can be
seen in the Version Card window.
23
mt.bk Page 24 Thursday, March 4, 1999 9:58 AM
Chapter 2. The Merge Tool
The third version for this merge will be the Navision Financials objects that
comprise the service pack. These will be only those 2.00 objects modified as
part of the service pack. You enter the name of the base version that you just
created in the Created in Base Vesion Code field. Fill in the fields in the
Version Card window as in the following picture:
The next step is to compare versions. Because you are comparing two
versions, the comparisons needed for this merge will be between base and
service pack (NF2.00 and NF2.00A) and base and customization (NF2.00 and
PI1.00.00.06). Complete the following steps to run the first comparison:
1 Click Versions h, Functions, Compare. Do not set any filters on the
Application Object tab.
2 Click the Options tab and fill in the fields as shown in the following
picture:
24
mt.bk Page 25 Thursday, March 4, 1999 9:58 AM
2.1 Working with the Merge Tool
3 Click OK.
Repeat this process for version codes NF2.00 and PI1.00.00.06.
The data will now be ready to merge.
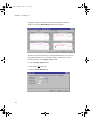
To merge, follow this procedure:
1 Click h Versions and go to the custom version.
2 Select Functions, Merge Version. The Merge Version window appears. Do
not set any filters on the Application Object tab.
3 Click the Options tab and fill in the fields as shown in the following
picture:
4 Click OK.
25
mt.bk Page 26 Thursday, March 4, 1999 9:58 AM
Chapter 2. The Merge Tool
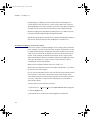
During the merge, you may have to make manual merges. When this
situation occurs, the Manual Merge Form window appears:
The lines in the window that are to be merged manually are color coded. To
understand what these color coded lines mean, see the color codes for
manual merge lines in the Merge Setup window.
To open the Merge Setup window:
1 Click Setup h, Merge Setup.
2 Click the Colors (Merging) tab.
26
mt.bk Page 27 Thursday, March 4, 1999 9:58 AM
2.1 Working with the Merge Tool
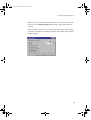
Based on the color codes and lines in question, you can edit the line of the
new version in the Manual Merge Form window as appropriate and then
continue.
After the merge is complete, you can export the new version, import it into
your Navision Financials customized database, and compile and test all the
modified objects.
27
mt.bk Page 28 Thursday, March 4, 1999 9:58 AM
Chapter 2. The Merge Tool
28
mt.bk Page i Thursday, March 4, 1999 9:58 AM
Index
A
add-on 6, 20, 22
Application Object (table) 3
B
base application 23
base version 3, 20, 23
C
changed objects 20
Colors (Merging) 26
compare 8, 24
comparison 17
contrast header 12
Contrast Header (table) 3
Contrast Line (table) 3
control ID 22
controls 22
customer solution 2, 22, 23
customer version 2
E
export 11, 14, 22
I
import 6, 27
L
line number 21
log 5, 14, 21
M
manual 26
manual changes 15, 16, 20, 21
manual merge 20, 26
Manual Merge (field) 20
Manual Merge Form (window) 20, 26
Manual Merge Line (table) 3
Merge Setup (table) 2
merging 17
Merging Type (field) 20
N
Navision Solution Centers 2
new custom version 17, 18, 21
New Custom Version Description (field)
19
new version 6
NF Customer (table) 3
NF Customer Code 7
NF Product (table) 3
NF Product Code 7, 10, 22
O
object number 12
object properties 15
object type 12
Object Type (field) 13, 14, 15, 18
objects 2, 21, 27
old version 13
Overlapping Control report 22
P
previous version 3, 7, 13, 16
Previous Version Code (field) 10
product 22
T
text file 21
V
Version (table) 3
version code 10, 11, 13, 14, 16, 19, 25
Version Comment (table) 3
version list 7, 12, 20
version tracking 23
i
mt.bk Page ii Thursday, March 4, 1999 9:58 AM
ii