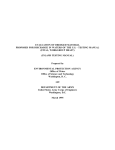
1
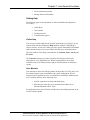
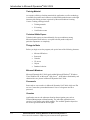
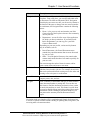
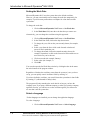
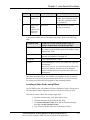
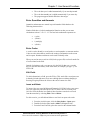
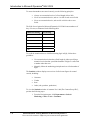
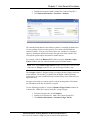
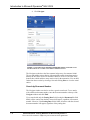
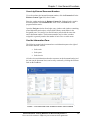
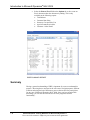
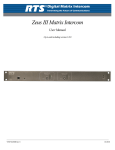
Chapter 1: Use General Functions
CHAPTER 1: USE GENERAL FUNCTIONS
Objectives
The objectives are:
•
Provide an overview of ERP and Microsoft Dynamics® NAV 2009.
•
Navigate in the Role Center.
•
Use function keys and basic keyboard shortcuts.
•
Able to Customize Microsoft Dynamics NAV 2009 UI (User
Interface).
•
Navigate and customize the List Places.
•
Change the look of windows in the program.
•
Enter and edit information.
•
Obtain selected information from the program.
•
Look up a business partner's location on a map.
Introduction
A broad overview of ERP and its benefits are discussed. The general concepts of
the user interface design in Microsoft Dynamics® NAV 2009 are introduced, and
an outline of all general functions in the program are provided, including how to
edit, view, delete, and extract information. New users learn how to navigate from
the Role Center and Navigation panes, as well as how to perform simple
customizations of their windows and personal menu.
The lessons are structured as mostly conceptual descriptions and several listings
of the basic functions. No demonstrations or labs are created for this basic
content, however substantial test are provided to test navigation skills and
knowledge of the general functions.
For anyone learning to use the program, it is a natural first step that they know
the basic functions and how to navigate between windows.
Users need to become familiar with navigating from the Role Center and
Navigation panes-in addition to how to perform simple customizations of their
windows and personal menus. For anyone learning to use Microsoft Dynamics
NAV 2009, it is a natural first step to learn the basic functions and how to
navigate between windows to make the processes within the ERP system
smoother.
Microsoft Official Training Materials for Microsoft Dynamics ®
Your use of this content is subject to your current services agreement
1-1
Introduction to Microsoft Dynamics® NAV 2009
Overview
What is ERP
The main objective of Enterprise Resource Planning, or ERP, is to integrate all
departments and functions across a company into a single system by using a
common database, the value of which is to be able to have only one correct set of
data. One of the challenges that companies face is access to timely and correct
information, which is critical in making appropriate business decisions. In many
cases, corporate information is located in several databases. For example, records
about inventory levels may be found in one database, while customer information
may be found in its own separate database. Furthermore, these databases may be
"island systems" (operating independently from each other and having no
integration with other databases).
FIGURE 1.1 ISLAND SYSTEMS
As shown in the diagram, Island Systems , information about warehousing,
production, sales, and customer data are found in several databases across the
enterprise. Because this information is not shared, this makes extracting relevant
information difficult.
For example, John , a customer who usually buys on credit, wants to triple his
standard order, and it must be delivered within the month. Jane, the sales
representative, needs to verify the following to ensure she can comply with the
order:
1-2
•
Authorization (whether the sales representative needs her manager's
approval to approve the order)
•
Credit limit (how much the customer can order from the company
based solely on credit)
Microsoft Official Training Materials for Microsoft Dynamics ®
Your use of this content is subject to your current services agreement
Chapter 1: Use General Functions
•
Inventory levels, production levels, and forecasts. (if there is enough
stock to comply with the order)
•
Shipping (if the items can be delivered on time)
If the sales representative is unable to get this information in a timely manner,
she may be unable to close the sale. Alternatively, if she agrees to complete this
order without performing the necessary background check, she runs the risk of
not meeting the order, and more importantly, losing a customer.
ERP systems do not suffer from this limitation because all information is found
in one common database. For example, even though a warehouse supervisor
enters information into the system using the warehousing module, that
information is visible across the enterprise.
Thus, when a sales representative takes an order from a customer, all information
required to fulfill that order will be readily available (for example, customer
credit history, inventory levels, shipping availability).
FIGURE 1.2 AN ERP SYSTEM
Real Time
Another factor is that information entered in a legacy system may not be in realtime. This means that records may only be updated at certain intervals during a
period (hour, day, week, or month) usually done as a batch job. The advantage of
an ERP system is that once data is entered into the system, it becomes instantly
available, with no waiting time. The disadvantage is that incorrectly entered data
will be seen as well. Users must be cautious when entering data into the system.
It is critical that only correct data reside within an ERP system.
Microsoft Official Training Materials for Microsoft Dynamics ®
Your use of this content is subject to your current services agreement
1-3
Introduction to Microsoft Dynamics® NAV 2009
ERP system tied to company's business process
In many cases, an ERP system is configured to match a company's business
process. Although companies in a particular industry may share common
business processes, each company may have certain business processes specific
only to them. Accordingly, an ERP system will be modified and configured to
meet a company's specific requirements.
Job Roles and Authorization
While information in the system is accessible, proper authorization is required.
Access to data is often determined by one's job role and responsibilities within
the organization. For example, an HR manager is authorized to view and modify
confidential employee information (such as job description, salary, and benefits),
while employees can only edit personal information. In some cases, authorization
to access information in the system may be given from time to time. For
example, a production supervisor may authorize a subordinate to create and
release production orders on his behalf, while he is away on vacation. This is to
ensure that data cannot be accessed by unauthorized personnel.
The ERP System
Microsoft Dynamics NAV 2009 is a fully integrated relational database system
that allows you to enter and maintain financial and other business activities in
one place, including:
•
General ledger
•
Inventory
•
Sales and receivables
•
Purchases and payables
•
Resources
•
Manufacturing
As such, it is categorized as an enterprise resource planning (ERP) system.
The business functionality is displayed in a graphical user interface that provides
the following benefits:
•
All work on the screen is done in windows.
•
Many windows can be open at the same time.
•
One key stroke or mouse click can choose, select, and execute
various functions.
The application's general functions allow you to:
•
1-4
Organize daily routines
Microsoft Official Training Materials for Microsoft Dynamics ®
Your use of this content is subject to your current services agreement
Chapter 1: Use General Functions
•
Locate information quickly
•
Manage business information
Getting Help
The following types of documentation are offered with Microsoft Dynamics
NAV 2009:
•
Online Help
•
User manuals
•
Training material
•
Technical white papers
Online Help
You can access online Help directly from the application by pressing F1 for any
selected field, and then clicking the Help button in windows. Online Help is
context-sensitive, and as such, mainly provides specific functionality information
rather than the broad overviews provided in the other types of documentation.
The main window of the Help system has tabs for Contents, Index, Search, and
Favorites.
The Contents tab brings up a table of contents for all topics and includes
subfolders for every application area. Within each application area is help
available to assist you with procedures and provide information on tables and
reports.
User Manuals
User manuals are delivered with the product on the product CD. They only cover
the technical aspects such as installation and system configuration. No user
manuals exist for application areas. User manuals are intended to familiarize the
novice with the software in the following ways:
•
Specific instructions on setup and initial usage.
•
Reference for when the user is uncertain about what to do in
Microsoft Dynamics NAV 2009.
For application areas such as Finance and Inventory, the training manuals can be
used as reference guides.
Microsoft Official Training Materials for Microsoft Dynamics ®
Your use of this content is subject to your current services agreement
1-5
Introduction to Microsoft Dynamics® NAV 2009
Training Material
An extensive offering of training materials-for application as well as technologyis available for partners and customers on dedicated download centers or through
instructor-led training sessions organized by Microsoft Solutions Learning
Centers. Training offerings include:
•
Training manuals
•
E-Learning
•
Certification exams
Technical White Papers
Technical white papers are intended mainly for expert audiences among
Microsoft partner staff and serve to explain selected product subjects of
particular importance or complexity.
Things to Note
Before you begin to use the program, take special note of the following elements:
•
Microsoft Windows
•
Passwords
•
Granules
•
UI Access
•
Objects
•
Database behavior
Microsoft Windows
Microsoft Dynamics NAV 2009 works within Microsoft Windows®, Windows
Vista, Windows XP, or Microsoft® SQL Server®. All Windows functionality and
characteristics are present in Microsoft Dynamics NAV 2009.
Passwords
Passwords are case sensitive in Microsoft Dynamics NAV 2009, while user IDs
are not. Contact the system administrator in case of a forgotten user ID or
password.
Granules
Application areas are the submenus found on the navigation pane, such as
Financial Management or Manufacturing. The individual application areas
consist of even smaller units called granules. The available granules depend on
the license agreement and the access rights.
1-6
Microsoft Official Training Materials for Microsoft Dynamics ®
Your use of this content is subject to your current services agreement
Chapter 1: Use General Functions
UI Access
UI objects for displaying information are granule-specific and granuledependent. Users therefore have different access to the UI and this will define
their interaction with the system when they input and output information.
Objects
The application areas and granules are constructed of small independent units
called objects. This structure makes it possible to change an individual object
without affecting the others.
Database Behavior
Because Microsoft Dynamics NAV 2009 is a database system, be aware that
entered data is written (committed) directly to the database; therefore, no Save
action is required. Any entered and unposted data can be edited or deleted from
the database. Posted data cannot be deleted as they are considered binding
financial transactions.
The Role Center
The Role Center is the central point for all information and actions that you will
be performing in Microsoft Dynamics 2009. It provides a quick overview of
tasks and transactions related to your job role. Furthermore, Microsoft® Outlook®
is integrated within the interface. This provides flexibility in being able to work
with Microsoft Dynamics 2009 and Outlook at the same time
The following table shows the several buttons, links, and menus in the Role
Center that allow you to navigate within Microsoft Dynamics NAV 2009.
Name
Description
Actions menu
Located in the menu bar. It provides access to the
transactions seen in the Role Center, tasks, and history.
Reports menu
Provides access to reports.
Address bar
Shows the path of your present action. You can also
navigate within Microsoft Dynamics NAV 2009 by clicking
on the name or arrow buttons and making your selection.
Microsoft
Dynamics NAV
button
Click on this button to set your work date and select a
language, server, or company.
Back and
Forward button
Allows you to navigate the pages that you have already
visited.
Customize
button
Allows you to customize Actions, Reports, the page that you
are presently viewing, and the navigation pane.
Microsoft Official Training Materials for Microsoft Dynamics ®
Your use of this content is subject to your current services agreement
1-7
Introduction to Microsoft Dynamics® NAV 2009
1-8
Name
Description
Refresh button
Refreshes the information in your Role Center
Help button
Provides access to Microsoft Dynamics NAV Help and the
license information
My Customers
Part
Provides a list of customers. This list can be updated by
clicking on the Action button > Manage List.
My Items Part
Provides a list of items that you frequently use. This list can
be updated by clicking on the Action button > Manage
List.
My
Notifications
Part
Provides a list of your notifications. From the Action button,
you have the option of viewing, deleting, or removing a
notification.
Microsoft
Outlook Part
Integrates with Microsoft Outlook. By default, your mail,
calendar, and tasks are shown. This can be customized by
clicking the actions icon.
Departments
button
Click on the Departments button to access parts of the
application that are not included in your personalized
menus.
Every user is assigned a job-related profile by their
administrator. Your profile provides you with a Role Center
and one or more menus that provide access to the tasks,
lists, reports, and documents that you need most often. In
addition, all users have access to the Departments menu.
From the Departments menu, you can navigate to everything
in the application that you have access to, including setup
and configuration windows.
Home button
Access the icons in the Activities part by clicking on the
buttons on the left side of the pane.
Posted
Documents
Shows a list of posted documents.
Cue
Represents the number of documents that you have in a
stack. Click on a cue to access that stack.
Microsoft Official Training Materials for Microsoft Dynamics ®
Your use of this content is subject to your current services agreement
Chapter 1: Use General Functions
Name
Description
Navigation Pane
Use the Microsoft Dynamics NAV Navigation Pane to open
list places. From a list place, you can open individual cards
or documents. The Microsoft Dynamics NAV Navigation
Pane displays one menu at a time; use the activity buttons at
the bottom of the pane to change from one menu to another.
As a minimum, the Navigation Pane contains the following
menus:
• Home - is for your user role and contains your Role
Center plus all of the list places that are most commonly
used in your role.
•
Departments - access all of the areas of the application
for which you have permissions. If you find a useful
link in Departments, you can copy it to your Role
Center or Home menu.
Depending on your user profile, various activity buttons
may be available, such as:
• Posted Documents - the Posted Documents menu
contains the posted documents that are most often used
by your user role.
•
Other - Your Navigation Pane may also contain other
custom-made menus that have been made especially for
your user role.
You can rearrange the order of items in a menu, add or
remove menu items, and create a new menu.
Activities Part
Shows the default activities that a person can perform,
which are based on their job role. For example, the activities
that can be performed include creating a new sales order and
creating a new sales quote or credit memo.
Status Bar
Located at the bottom of the user interface. It shows the
company name, date, and user.
Navigate
View a summary of the number and type of entries with the
same document number or posting date. You can also use
this feature to find the documents and entries where certain
lot and serial numbers are used. This feature is useful when
you need to find the ledger entries that resulted from certain
transactions. When searching by document numbers, you
can print out the summary from the Document Entries
report.
Navigating in the user interface (UI) is straightforward. Simply click on an icon
to access it. Options available include entering or updating data, using filters, and
accessing other relevant transactions.
Microsoft Official Training Materials for Microsoft Dynamics ®
Your use of this content is subject to your current services agreement
1-9
Introduction to Microsoft Dynamics® NAV 2009
Setting the Work Date
Microsoft Dynamics NAV uses the system date as the default work date.
However, you may occasionally need to change the work date temporarily, for
example, if you have many transactions to complete for a date that is not the
system date.
To change the work date:
1. Click on Microsoft Dynamics NAV button > Set Work date.
2. In the Work Date field, enter the work date that you want to use.
Alternatively, you can change the work date using this approach:
1. Click on Microsoft Dynamics NAV button > Set Work Date.
2. In the Work Date field, click on the drop-down arrow.
3. To change the year, click on the year currently shown (for example,
2010).
4. Select a year from the list or click on the forward or backward
arrows to find a particular year.
5. To change the month, click on the month currently shown (for
example, September) or click on the forward or backward arrows to
move from one year to the next.
6. Click on a month (for example, January).
7. Select a date (for example, 1).
8. Click OK.
You can also open the Set Work Date window by clicking the date in the status
bar at the bottom of the program window.
Regardless of whether the work date comes from the system or is one you have
set up, you can quickly enter it in all date fields by entering "w".
If you have defined a work date, you can still insert the system date in date fields
by entering "t" (which stands for today's date).
The program will only remember the work date for as long as you have the
company open. If you open a different company, or when you open the company
again the next day, you will have to set the work date again if you still need to
use one that is not the system date.
Select a Language
If other languages are installed, you can change the application language.
To select a language:
1. Click on Microsoft Dynamics NAV button > Select Language.
1-10
Microsoft Official Training Materials for Microsoft Dynamics ®
Your use of this content is subject to your current services agreement
Chapter 1: Use General Functions
2. Click the drop-down button and select another language (if any).
3. Click OK.
About Multilingual Functionality
Microsoft Dynamics NAV is multilingual enabled . This means that a localized
version of Microsoft Dynamics NAV can present itself in different languages. It
is possible for the user to change the language that is used to display texts, and
the change is immediate. There is no need to stop and restart Microsoft Dynamics
NAV.
Do not confuse the multilingual capability with localized versions. A localized
version of Microsoft Dynamics NAV is one that has been adapted to a local
market. This means that all texts presented to the user have been translated into
the local language, but it also means that functional areas have been adapted to
the requirements of the local market.
A multilingual version of Microsoft Dynamics NAV is a localized version that
you can run in different languages while all other local adaptations remain the
same. For example, you can run the Swiss version of Microsoft Dynamics NAV
in German, French, and Italian, but it is still a Swiss version of Microsoft
Dynamics NAV in all other aspects. It is not the same as, say, a French version of
Microsoft Dynamics NAV.
Be aware of the distinction between changing the language of Microsoft
Dynamics NAV and changing the language of the data stored in Microsoft
Dynamics NAV. You can address the first issue by enabling the multilingual
features. These features make it possible for the user to change the language of
all the texts displayed by the application in captions for text boxes, on command
buttons, in menus, and so on.
Changing the texts that are stored as application data is not part of the
multilingual capability; this is an application design issue. Examples of such texts
are the names of items in the inventory or the comments for a customer. In other
words, these types of texts are not translated.
Select a Server
In Microsoft Dynamics NAV, you may have to change the company that you are
working with from time to time. The companies that you work with can be stored
in the same database or in different databases. If the company is stored in a
different database, you must select the server before opening the company.
To select a server and open a company:
1. Click on Microsoft Dynamics NAV button > Select Server.
2. In the Server name field, enter the URL of the server that you want
to connect. Be sure that the URL follows this format:
servername/DynamicsNAV, where servername is the name of the
computer on which the service is installed.
Microsoft Official Training Materials for Microsoft Dynamics ®
Your use of this content is subject to your current services agreement
1-11
Introduction to Microsoft Dynamics® NAV 2009
3. Click Connect.
4. In the Companies field, select the company that you want to open.
5. Click OK.
Microsoft Dynamics NAV will access the server and open the last database you
were using the next time you open it.
Select a Company
To select or change a company:
1. Click on Microsoft Dynamics NAV button > Select Company.
2. Click the drop-down arrow from the Company field and select a
company.
3. Click OK.
Use Keyboard Shortcuts
When you want to choose a menu item, or do anything else in Microsoft
Dynamics NAV 2009, you can either use the mouse or the keyboard. Because it
is more intuitive to use a mouse, all actions in this training manual are described
according to mouse usage. However, once you learn how, it can be more efficient
to use the keyboard.
Basic Keyboard Shortcuts
The following table lists how to perform certain actions with the mouse and the
keyboard.
1-12
Goal
Mouse
Keyboard
Select field
contents
Double-click field
or drag mouse over
field.
Use the Tab or arrow keys to move the
cursor to the field you want. The contents
will be highlighted.
Execute a
function on
selected field
contents
Select the text and
activate the
function by
clicking it on the
menu bar, toolbar,
or a button in the
window.
Select the text. If the function is on the
menu bar, press F10 or ALT and then
press the underlined letter in the menu
name. Use the arrow keys to select the
menu item. If the function is a button in
the window, use the arrow keys or
CTRL+ the down-arrow to get to the row
of buttons, and then use the arrow keys to
move between buttons. Press ENTER to
activate the selected button or menu item.
Microsoft Official Training Materials for Microsoft Dynamics ®
Your use of this content is subject to your current services agreement
Chapter 1: Use General Functions
Goal
Mouse
Keyboard
Enter contents
in an empty
field
Click where you
want to type, type,
and then click
outside the field to
save.
Move the cursor to the field using
ENTER, TAB, and/or the arrow keys, and
then start typing. Press ENTER to save
what you have entered.
Leave menu bar
Click outside the
menu bar.
Press ALT or ESC.
Choose button
in the window
Click the button
you want to
activate.
Press ALT and then the underlined letter
on the button. Or, press the arrow keys or
CTRL + the down-arrow to move to the
first (left) button, and then use the rightarrow if you want to move to another
button. Press ENTER to activate it.
Go to first
record
Click the button.
Press CTRL+HOME.
Go to last
record.
Click the button.
Press CTRL + END.
Go to next
record
Click the button.
Press Page Down.
Go to previous
record
Click the button.
Press Page Up.
Keyboard Shortcuts
Some actions can be performed using keyboard shortcuts, shown in the following
table.
Keyboard shortcut
Action
Alt
Key tips on Action pane
Alt + A
Launch Action menu
Alt + I
Launch Related Information
menu
Alt + M
Launch MS Dyn NAV menu
Alt + P
Launch Action pane
Alt + R
Launch Report menu
Ctrl + +
Insert New line (in a grid)
Ctrl + Shift + K
Edit list
Ctrl + Shift + L
View list
Ctrl + Shift + V
View
Microsoft Official Training Materials for Microsoft Dynamics ®
Your use of this content is subject to your current services agreement
1-13
Introduction to Microsoft Dynamics® NAV 2009
Keyboard shortcut
Action
Ctrl + Shift + W
Open in new window (list)
Ctrl + Shift + X
Exit
Enter (Double-Click)
Open
Ctrl + A
Select (copy) All
Ctrl + C
Copy
Ctrl + E
Export to Excel
Ctrl + F
Find/Navigate form
Ctrl + L
Linked files
Ctrl + O
Open company
Ctrl + P
Print
Ctrl + V
Paste
Ctrl + W
Export to Word
Ctrl + X
Cut
Ctrl + Z
Undo
Delete
Clear selected text or line
Enter
Expand/Collapse of tree in grid
Customizing Microsoft Dynamics NAV 2009
This lesson will show you how to personalize Microsoft Dynamics NAV 2009.
Changing a Profile
The default profile (Sales Order Processor) in the Role Center is for illustrative
purposes only. This means that it can be changed to meet the needs of a particular
user.
To change a profile:
1. Click on Departments > Administration > Application Setup >
Role Tailored Client > Lists > Profiles. Note that the default profile
is set to Sales Order Processor.
2. Double-click the profile that you want to use.
3. Select the check box beside Default Role Center.
4. Click OK.
5. Restart Microsoft Dynamics NAV 2009 by closing and opening it; t
he selected profile appears.
6. For the purpose of this course, revert to the Sales Order Processor
profile by following steps 1-6.
1-14
Microsoft Official Training Materials for Microsoft Dynamics ®
Your use of this content is subject to your current services agreement
Chapter 1: Use General Functions
Customizing the Role Center
The Role Center is like your personal home page in Microsoft Dynamics NAV.
Microsoft has designed a number of different role centers for users with different
jobs in a company. An administrator assigns you a role and he or she can
customize the Role Center to ensure that it presents the information needed for
your job. Then, you can make additional adjustments to make the UI fit your
work habits.
You can make the following changes in your Role Center:
•
Customize the Navigation Pane
•
Customize the Action Pane
•
Customize the FactBox Pane
•
Add or Remove Panes
•
Customize Fast Tabs
Customizing the Navigation Pane
The navigation pane contains one or more menus that have been defined based
on your role. The menus in the navigation pane contain links to lists. You access
task pages, reports, and documents from the lists.
Adding and Arranging a Navigation Pane Button
1.
2.
3.
4.
5.
6.
7.
8.
9.
On the menu bar, click the Customize button.
Click Customize Navigation Pane.
Click New.
In the Name field, enter Favorites
Select an icon from the list.
Click OK.
Click the Move Down button.
Click OK.
Restart the program by clicking Yes.
Note that you cannot rename, move, or remove the Home and Departments
buttons.
Removing a Navigation Pane Button
1. On the menu bar, click the Customize button.
2. Click Customize Navigation Pane.
3. Click the Favorites icon.
Microsoft Official Training Materials for Microsoft Dynamics ®
Your use of this content is subject to your current services agreement
1-15
Introduction to Microsoft Dynamics® NAV 2009
4. Click the Remove button.
5. Click OK.
6. Restart the program by clicking Yes.
Restoring Defaults
If you wish to have the default settings back, perform the following steps:
1.
2.
3.
4.
5.
On the menu bar, click the Customize button.
Click Customize Navigation Pane.
Click Restore Defaults.
Click OK.
Restart the program by clicking Yes.
Customizing This Page Functionality
The Customizing This Page functionality allows a user to add or remove
information shown in the Role Center.
1.
2.
3.
4.
5.
6.
7.
8.
9.
On the menu bar, click the Customize button.
Click Customize This Page .
Check that Chart Part is highlighted
Click Add.
Check that Blank Chart is highlighted.
Click Customize Part.
In the Available charts list, select SO per Location.
Click OK.
The selected information appears in the Role Center.
Adding a Link to a Menu in the Navigation Pane
There may be situations where you will be asked to perform other functions
outside of your job role. For example, you may need to fill in for a colleague who
is sick or on vacation. For this exercise, you will add a link for the released
production order.
1.
2.
3.
4.
5.
6.
7.
8.
1-16
On the menu bar, click the Customize button.
Click Customize Navigation Pane.
Click Add.
From the Available Lists, click the plus sign beside Manufacturing
> Execution.
Select Released Prod. Orders.
Click OK.
Click OK.
To restart the program, click Yes.
Microsoft Official Training Materials for Microsoft Dynamics ®
Your use of this content is subject to your current services agreement
Chapter 1: Use General Functions
The Released Production Orders link appears in the Navigation Pane . You can
click the link to view the information. To return to the home page, click Home,
the Role Center button, or the back button.
Customizing My Customers Pane
You can add information in the My Customers pane.
1. From the My Customers pane, click the Actions button (thunderbolt
icon).
2. Click Manage Lists.
3. Click the drop-down arrow below customer No. and select
Spotsmeyer's Furnishings.
4. Click OK.
5. From the My Customers pane, double-click on Spotsmeyer's
Furnishings to view and edit the pane .
6. Click ESC to close.
This procedure is also applicable for the My Items pane.
My Notifications
Actions that need your attention will appear in the My Notifications pane.
Otherwise, this pane will be empty. If you have notifications, you can view,
delete, and remove a notification using the Actions button in the My Notification
pane.
Removing a Pane
You may find that there is too much information in your home page. Microsoft
Dynamics NAV 2009 allows you to remove a pane (for example, Activities, My
Customers, and My Items) so you can tailor the information that you want to see.
In this exercise, you will remove the My Notifications pane.
1. From My Notifications pane, click the Actions button (thunderbolt
icon). You may move your cursor beside the expand/collapse button
to view it.
2. Click Remove.
Microsoft Official Training Materials for Microsoft Dynamics ®
Your use of this content is subject to your current services agreement
1-17
Introduction to Microsoft Dynamics® NAV 2009
The List Places
List places are pages that contain a list plus additional information related to the
list. The list may be filtered; click the Expand arrow in the filter pane to view the
filter details.
If you double-click a line on the list, the entity will open in the default mode
(Edit, View, or New) that has been set up for you. Depending on the rights that
you have been granted, you may be able to open the entity in another mode from
the Actions menu.
Components of the UI (User Interface)
Similar to the Role Center, the List Places has several buttons, links, and menusshown in the following table-that allow you to navigate within Microsoft
Dynamics NAV 2009.
1-18
Name
Description
Action Pane
Just below the menu bar, this pane presents your most-used
tasks and menu items, where you can access them with one
click, instead of having to look through menus to find them.
Note that the actions that are available depend on the transaction
that you are using. The Action Pane is divided into several
groups (New, Process, and Reports).
Filter Pane
Allows you to view and sort information based on the criteria
that you have selected.
Factbox
FactBoxes on list places and task pages provide you with
additional information. This means that you can quickly find
related information depending on the transaction that you are
viewing.
Information about an order, customer, invoice, item, or vendor,
for example may be shown. This helps you to make solid
business decisions in a timely manner. For example, on the
Customers list place, you can use the Customer Sales History
FactBox to get a quick overview of a customer's sales statistics
without opening the customer card. The FactBox includes a
count and links to sales orders, quotes, invoices, and so on, so
you can drill down to the document you need.
Microsoft Official Training Materials for Microsoft Dynamics ®
Your use of this content is subject to your current services agreement
Chapter 1: Use General Functions
Customize List Page
Similar to the Role Center, the List Places can be customized to show
information that is relevant to you.
Use the following procedure to add a Factbox to an existing sales order.
1. From the Activities Pane, click Sales Orders -Open. Note the default
Factbox panes (Customer Statistics - Bill-to Customer, Customer
Details, Notes).
2. Double-click sales order 101017. Note that the default Factbox panes
are different (Customer Sales History, Links, Notes).
3. From the menu bar, click the Customize button (beside the Help
button).
4. Click Customize this Page.
5. Click Factboxes.
6. Click Approval from the Available Factboxes.
7. Click Add.
8. Click OK.
The Approval Factbox is now added to the Factbox pane.
Adding Columns to List Places
You can also add more information in the List Places.
Follow these steps to add the Currency Code column to the Sales Quote pane.
1. From the Activities Pane, click Sales Orders-Open.
2. From the menu bar, click the Customize button (beside the Help
button).
3. Click Choose columns.
4. Click Currency Code.
5. Click Add.
6. Click OK.
7. Scroll to the right to view the added column.
Adding Links to a Record
Microsoft Dynamics NAV allows you to link to a document, folder, or web site.
For example, you may want to link an invoice to a sales quote. This provides you
with the flexibility to access relevant information quickly.
Microsoft Official Training Materials for Microsoft Dynamics ®
Your use of this content is subject to your current services agreement
1-19
Introduction to Microsoft Dynamics® NAV 2009
Linking to a document, folder, or web site requires the following steps.
1. From the Activities pane, click Sales Orders -Open . Check that the
Links Factbox is displayed. If not, follow steps 2-7.
2. From the menu bar, click the Customize button (beside the Help
button).
3. Click Customize this Page.
4. Click Factboxes.
5. Click Links from the Available Factboxes.
6. Click Add.
7. Click OK.
8. Double-click on sales order 101017.
9. From the Links Factbox, click the actions button (lightning symbol).
10. Click New.
11. In the link address field, type http://www.microsoft.com/.
12. In the description field, type Microsoft.
13. Click Save.
Note that in the Links FactBox, the link you have just created is displayed.
Using Filters
Use field filters and table filters to have a window display only certain accounts,
customers, entries, or other records. FlowFilters are used to limit the contents of
fields that display amounts or quantities.
You can set a filter by specifying criteria for one or for several fields in a table.
The program then tests all records, and only records that match the criteria pass
through the filter. If criteria are specified for several fields at the same time,
records must match all criteria to pass through the filter.
Note that Field and table filters are window-dependent. If you set a filter on a
table in a window and then see the same table in a different window, the filter is
not in effect there. On the other hand, the filter will remain in effect in the
window where you set it until you remove it.
Filters remain in effect until you remove them or replace them with new ones. To
remove a filter, click View, Show All on the menu bar.
The following features are available to extract information from the program:
•
1-20
Drill down - from a calculated quantity or amount (displayed in
FlowFields) to open another window showing the individual entries
that make up the calculated value.
Microsoft Official Training Materials for Microsoft Dynamics ®
Your use of this content is subject to your current services agreement
Chapter 1: Use General Functions
•
Filters - to limit the scope of the information that appears in a
window or report with one of these three filter types:
o
o
o
Field
Table
Flow
•
Sorting - to organize information in a way that makes it easier to
analyze.
•
Statistics - to see a summary of relevant figures for each record and
drill into details.
•
The Navigate window - to find, view, and print all related database
records from one place.
•
Information Pane - for quick links to sales-related information.
•
Reports - to view and print filtered information with a variety of
standard reports for typical business needs.
•
Integration to Microsoft Office products - to manage information in
Word, Excel, or another product.
Entering Criteria in Filters
When you enter criteria, you can use all the numbers and letters that you can
normally use in the field. In addition, you can use some special symbols or
mathematical expressions. The following table shows the available formats.
Symbol
Meaning
Sample Expression
Records Displayed
=
Equal to
377
Number 377
BLUE
Those with the BLUE code, for
example, the BLUE warehouse
code
22
A datetime: from 22-current
month-current year 0:00:00 to 22current month-current year
22:59:59
22 10
An exact datetime: 22-01-01
10:00:00
1100..2100
Numbers 1100 through 2100
..2500
Up to and including 2500
..12 31 00
Dates up to and including 12 31
00
P8..
Information for accounting period
8 and thereafter
..
Interval
Microsoft Official Training Materials for Microsoft Dynamics ®
Your use of this content is subject to your current services agreement
1-21
Introduction to Microsoft Dynamics® NAV 2009
Symbol
Sample Expression
Records Displayed
..23
From the beginning of time until
23-current month-current year
23:59:59
23..
From 23-current month-current
year 0:00:00 until the end of time
22..23
From 22-current month-current
year 0:00:00 until 23-current
month-current year 23:59:59
|
Either/or
1200|1300
Those with number 1200 or 1300
&
And
<2000&→1000
Numbers that are less than 2000
and greater than 1000.
The ampersand (&) cannot be
used by itself with numbers
because no record can have two
numbers.
<→
Not equal to
<→0
All numbers except 0
The SQL Server Option allows
you to combine this symbol with
a wild card expression. For
example, <→A* meaning not
equal to any texts that start with
A.
→
Greater than
→1200
Numbers greater than 1200
→=
Greater than
or equal to
→=1200
Numbers greater than or equal to
1200
<
Less than
<1200
Numbers less than 1200
<=
Less than or
equal to
<=1200
Numbers less than or equal to
1200
*
An
indefinite
number of
unknown
characters
*Co*
Texts that contain "Co"
*Co
Texts that end with "Co"
Co*
Texts that begin with "Co"
Hans?n
Texts such as Hansen or Hanson
?
1-22
Meaning
One
unknown
character
Microsoft Official Training Materials for Microsoft Dynamics ®
Your use of this content is subject to your current services agreement
Chapter 1: Use General Functions
Symbol
@
Meaning
Sample Expression
Records Displayed
Calculate
before rest
30|(→=10&<=20)
Those with number 30 or with a
number from 10 through 20 (the
result of the calculation within
the parentheses)
Ignore case
(either
uppercase or
lowercase
allowed)
@location
Texts such as LOCATION,
location, or Location
You can also combine the various format expressions shown in the following
table.
5999|8100..8490
Include any records with the number 5999 or a
number from the interval 8100 through 8490.
..1299|1400..
Include records with a number less than or equal to 1299
or a number equal to 1400 or greater (all numbers except
1300 through 1399).
→50&<100
Include records with numbers that are greater than 50 and
less than 100 (numbers 51 through 99).
*C*&*D*
Texts containing both C and D.
@*co?*
Texts containing co, CO, Co, cO, such as cot, cope, and
incorporated.
The text CO, cO, Co, or co must be present, followed by
at least one character, but there can be an indefinite
number of characters before and after these, and case is
unimportant.
Enter only meaningful filters. For example, it is possible to specify an interval
that does not exist, and the program cannot check this for you. You must know
the sorting rules followed by this program to enter meaningful filters.
Locating a Sales Order using Filters
In a live ERP system, your database will have thousands of entries. Being able to
filter through this data is important so that you can proceed with your work.
This exercise shows a sales order using a simple filter.
1. From the Activities pane, click Sales Orders- Open.
2. Click the drop-down arrow beside the No. field.
3. Click Sell-to Customer Name. Note that the field name changes
from No. to Sell-to Customer Name.
4. Type "Fairway Sound" in the filter field and press Enter.
Microsoft Official Training Materials for Microsoft Dynamics ®
Your use of this content is subject to your current services agreement
1-23
Introduction to Microsoft Dynamics® NAV 2009
5.
6.
7.
8.
Double-click on sales order to view its details.
Click ESC to close.
Delete Fairway Sound in the filter field to clear the filter.
Press Enter to see the total list.
For more complex filtering requirements, you can choose multiple filtering
criteria.
In this exercise, you will find items with the following characteristics: no bill of
materials, no adjusted cost, vendor no. 2000, and with a unit price of 125.10
1.
2.
3.
4.
5.
6.
7.
8.
9.
10.
11.
12.
13.
14.
From the Navigation pane, click Items.
In the Where field, select Bill of Materials.
Click Select a value, and in the drop-down button , select No.
Click Add Filter.
Select Cost is Adjusted.
Click Select a value, and in the drop-down button , select No.
Click Add Filter.
Click the drop-down button and click Additional Columns and select
Vendor No.
In the Enter a value field, type 20000.
Click Add Filter.
Click the drop-down button and click Additional Columns and select
Unit Price.
In the Enter a value field, type 125.10
Press Enter.
You can always delete filters that you have used. In the previous
example, delete the unit price filter by clicking on the delete button
(red X icon) beside the unit price filter.
The information shown on your screen is now updated.
1-24
Microsoft Official Training Materials for Microsoft Dynamics ®
Your use of this content is subject to your current services agreement
Chapter 1: Use General Functions
Change How Windows Display
Microsoft Dynamics NAV 2009 has functionality that allows you to change how
tabular windows display. Any changed view is associated with the user ID and
saved in the so-called ZUP file on the computer so that it is present next time the
user logs on.
NOTE: Changes are overwritten if users receive an object, for example a new
general journal, to replace the one that they modified.
Change Column Width
Follow these steps to change the width of a column:
1. From the Activities pane, click the Sales Orders - Open queue.
2. Place the cursor on the vertical line separating the columns No. and
Sell-to Customer in the column header. (The cursor displays as a
vertical line with an arrow through it.)
3. Hold the mouse button and drag the column separator to the desired
width.
4. Release the mouse button when satisfied with the width.
Microsoft Dynamics NAV 2009 allows you to add and move columns in order to
make the information relevant.
1.
2.
3.
4.
5.
6.
7.
From the Activities pane, click the Sales Orders - Open queue.
Place the cursor on the column header.
Right-click and select Choose Columns.
In the Available columns list, click on Bill-to Customer No.
Click Add.
Click Move Up five times.
Click OK.
The Bill-to Customer No. Column has been added and moved beside the Sell-to
Customer column.
Microsoft Official Training Materials for Microsoft Dynamics ®
Your use of this content is subject to your current services agreement
1-25
Introduction to Microsoft Dynamics® NAV 2009
Enter and Edit Information
When you enter information into fields, Microsoft Dynamics NAV 2009
provides the format for the type of information you enter in the following types
of fields:
•
Date fields - only accept date parameters
•
Number fields - only accept numbers
•
Text fields - accept information in any format
Enter Dates
Microsoft Dynamics NAV 2009 is flexible in how you enter dates. The following
table shows valid entries in a date field.
User Input
Result
w
Work date entered in Tools>Work Date
t
Today's date
c
Closing date
#
Number of the day in the current work month
Month-day-year
122502, 12 25 02, 12-25-02, 12/25/02
Weekday-weeknumber-year
Fr5202, fr 52 02, fr-52-02, fr/52/02
You can also enter abbreviations for the weekday and the program will then enter
the date for that weekday based on the work date, as shown in the following
table.
User Input
Result
m
Monday
tu
Tuesday
we
Wednesday
th
Thursday
f
Friday
sa
Saturday
su
Sunday
When entering a date, take special note of the following:
1-26
•
Start-day of the week is Monday.
•
Date fields will accept wrong year numbers such as 9008.
Microsoft Official Training Materials for Microsoft Dynamics ®
Your use of this content is subject to your current services agreement
Chapter 1: Use General Functions
•
The work date year is added automatically if you enter day/month.
•
The work date month/year is added automatically if you enter day.
•
The program supports default Windows date ranges.
Enter Quantities and Amounts
Quantities and amounts are entered in special number fields that have the
following characteristics.
Number fields have a built-in mathematical function so that you can enter
calculations such as 13.50 * 2 - 12. The four basic mathematic operators are:
•
+ (plus)
•
- (minus)
•
* (multiply)
•
/ (divide)
Enter Codes
A code is used to identify a record such as a vendor number or customer number.
Codes are also values that are used for the sorting of information on the screen
and in reports. Numbers and letters can be used to identify codes.
When you need to enter a code in a field, look up (press F6) to select from the list
of codes related to the field.
Instead of selecting a code, you can type it in the field. In that case, you only
have to enter the first letter(s) in the code name; for example, just type "y" for
YELLOW.
Edit Fields
To edit information in a field, press the F2 key. This works like a word processor
in that the left and right arrow keys move through the text without changing it.
Pressing F2 again positions the cursor at the end of content in a field.
Insert and Delete
To insert a line or a record in Microsoft Dynamics NAV 2009, place your cursor
on a line, right-click, and select New Line. To delete a line or a record, press
Ctrl+D or click the Delete icon. Both of these functions can also be accessed
from the menu bar by selecting Edit > New or Delete.
For this exercise, you will add and delete a new line in an open sales order.
1. From the Activities pane, click the Sales Orders - Open queue.
2. Double-click sales order number 101017 (Selangorian Ltd.).
3. From the Lines FastTabs, place the cursor on the column header.
Microsoft Official Training Materials for Microsoft Dynamics ®
Your use of this content is subject to your current services agreement
1-27
Introduction to Microsoft Dynamics® NAV 2009
4. Right-click and select New Line.
5. To delete the new line, ensure that your cursor is placed on the new
line that you have just created.
6. Right-click and select delete line.
7. Click Yes.
Extract Information
There are several features in the program that help you gather the information
you need, whether the purpose is to analyze it within the program or to extract it
to another program or as a printout. The following features are available to
extract information from the program:
•
Drill down - from a calculated quantity or amount (displayed in
FlowFields) to open another window showing the individual entries
that make up the calculated value.
•
Filters - to limit the scope of the information that appears in a
window or report with one of these three filter types:
o
o
o
Field
Table
FlowFilter
•
Sorting - to organize information in a way that makes it easier to
analyze.
•
Statistics - to view a summary of relevant figures for each record and
drill into details.
•
The Navigate window - to find, view, and print all related database
records from one place.
•
Information Pane - for quick links to sales-related information.
•
Reports - to view and print filtered information with a variety of
standard reports for typical business needs.
•
Integration to Microsoft Office products - to manage information in
Word, Excel, or another product.
Fields that display amounts and quantities calculated by the program are called
FlowFields. An example of a FlowField is the Balance field for G/L accounts.
All FlowFields have a drill-down button (down arrow) that you can click to open
a separate window, such as the General Ledger Entries window, showing the
entries included in the calculation.
1-28
Microsoft Official Training Materials for Microsoft Dynamics ®
Your use of this content is subject to your current services agreement
Chapter 1: Use General Functions
FlowFields also have the following characteristics:
•
The contents of a FlowField are calculated each time they are
displayed. This means that a FlowField is always 100 percent
updated and displays the newest figures.
•
You can limit the number of entries included in the calculation by
setting FlowFilters on the field.
For example, view the customer ledger entries of customer number 10000 (the
Cannon Group Ltd.) with the following steps:
1. From the navigation pane, click Customers.
2. Double-click customer number 10000 (the Cannon Group Ltd.)
3. Click Related Information > Customer > Ledger Entries.
FIGURE 1.3 CUSTOMER LEDGER ENTRIES WINDOW OPENED FROM THE
BALANCE (LCY) FLOWFIELD
Sort Information
The sorting functionality in Microsoft Dynamics NAV 2009 helps simplify
getting an overview of information. For example, if you have a large number of
customer ledger entries, you can choose to order them by:
•
Entry number only
•
Customer number first, then by posting date
•
Document type first, then by document number
•
Document number first, then by customer number
The sorting options are predefined, and there are many for each table in the
program. Each sorting option (or combination of sorting options) is called a key.
You can see all the keys for a window by clicking the drop-down arrow beside
the Sorting field.
Microsoft Official Training Materials for Microsoft Dynamics ®
Your use of this content is subject to your current services agreement
1-29
Introduction to Microsoft Dynamics® NAV 2009
By choosing a different sorting option, you can view the lines in a different order.
Procedure - Change the Sorting Order
Follow these steps to change the sorting order of a list of vendor ledger entries:
1. From the Navigation pane, click on Departments > Purchase >
Planning > Lists > Vendors.
2. Double-click on Vendor number 1000 (London Postmaster).
3. Click Related Information > Vendor > Ledger Entries.
4. Click the drop-down arrow beside Entry No.; the list of possible
sorting options appear.
5. Select Vendor No., Posting Date, Currency Code.
6. Click the sort ascending/descending button, and select Sort
descending.
The vendor ledger entries for London Postmaster has now been sorted based on
your chosen criteria.
FIGURE 1.4 VENDOR LEDGER ENTRIES WINDOW AND RELATED SORT
WINDOW SHOWING CHOSEN SORTING ORDER.
NOTE: The new sorting will be valid for all vendors until you close the Vendor
Ledger Entries window. If you want to view another vendor with the same
sorting order, you can now just browse to that vendor's card. If you keep the
Vendor Ledger Entry window open, it will be updated accordingly.
1-30
Microsoft Official Training Materials for Microsoft Dynamics ®
Your use of this content is subject to your current services agreement
Chapter 1: Use General Functions
Sorting Order
Once you have chosen a sorting key, the program will sort the field contents of
the selected columns according to the following order:
1. Numbers only without blank spaces or special characters
2. Letters only
3. Numbers and letters combined
When numbers and letters are combined, the field contents are checked character
by character from left to right. The sorting priority is as follows:
•
Blank spaces come before characters
•
Letters come before numbers
•
Numbers come before special characters
The sorting priority results in the sorted list shown in the following table.
Order
Reason
1
Numbers without blank spaces or special characters come before
letters or combinations of numbers and letters, and Microsoft
Dynamics NAV 2009 counts in ascending order.
11
12
111
A1
This is a combination of letters and numbers. It comes before
other such combinations because the blank space between A and 1
comes before anything else.
ABC
Letters come after blank spaces (so ABC comes after A 1 above).
AB1
Letters come before numbers in letter/number combinations (so
ABC comes before AB1).
A1
Numbers are sorted after letters (so A1 comes after AB).
DSB
D comes after A, and blank spaces come before a character.
D1
Numbers are sorted after letters (so D1 comes after D S B).
D.S.B.
Special characters come after numbers.
1A
A number at the start of a combination of letters comes next to last
in the sorting order.
+A1
Special characters come last in a sorting.
You must be familiar with sorting rules so that filters can be entered correctly.
For example, the filter A100..110 does not result in any data being found since
the interval cannot exist. The result of an incorrectly used filter can be incorrect
or even no information.
Microsoft Official Training Materials for Microsoft Dynamics ®
Your use of this content is subject to your current services agreement
1-31
Introduction to Microsoft Dynamics® NAV 2009
To ensure that numbers are sorted correctly, use the following principles:
•
Always use a numerical series of a fixed length (100 to 999).
•
Never use a numerical series, such as 1 to 999 in code or text fields.
•
Never use a numerical series, such as 001 to 999 in code or text
fields.
The SQL Server Option for Microsoft Dynamics NAV 2009 sorts numbers as if
they were text, as illustrated in the following table.
Numerical Sorting
Text Sorting
1
1
2
10
3
100
4
2
10
3
100
4
To avoid the mentioned issues of different sorting logic in SQL, follow these
guidelines:
•
Use a numerical series that has a fixed length by either specifying a
numerical series that has a predefined number of digits or s tarts with
a number other than zero.
•
Manually follow the numbering principles and use a fixed number of
digits.
The Statistics window displays an overview of all relevant figures for central
records, including:
•
Customer
•
Vendor
•
Item
•
Order (sale, purchase, production)
To view the Statistics window of customer No. 1000 (The Cannon Group PLC),
perform the following steps:
1. From the Navigation pane, click Departments > Sales &
Marketing > Sales > Lists > Customers.
1-32
Microsoft Official Training Materials for Microsoft Dynamics ®
Your use of this content is subject to your current services agreement
Chapter 1: Use General Functions
2. Double-click customer number 10000 (The Cannon Group PLC).
3. Click Related Information > Customer > Statistics.
FIGURE 1.5 CUSTOMER STATISTICS WINDOW
The calculated information in the statistics windows is constantly updated based
on entry postings for the record in question. You cannot edit information in
statistics windows. You can view which entries were included in a calculated
figure by clicking the drill-down button to the right of the field contents. This
will open the posted entries document for further analysis.
For example, click in the Balance (LCY) field to open the Customer Ledger
Entries window and view entries that make up the calculated balance.
NOTE: Leave the Customer Ledger Entrieswindow open because it will be used
to illustrate the Navigate window in the "use the Navigate Window" topic.
The Navigate window is designed to help you analyze business figures across the
whole database. The window is available from all tabular windows showing
posted entries. It is also available directly from the History menu folder for every
application area.
Navigate can be used as a context-sensitive search, meaning that it will contain
the information of the line for which it is opened.
Use the following procedure to view the Customer Ledger Entries window for
Customer No. 10000 (The Cannon Group PLC) using Navigate.
1. From the Navigate pane, click Customers.
2. Double-click Customer No. 10000 (The Cannon Group PLC).
3. Click Related Information > Customer Ledger Entries.
Microsoft Official Training Materials for Microsoft Dynamics ®
Your use of this content is subject to your current services agreement
1-33
Introduction to Microsoft Dynamics® NAV 2009
4. Click Navigate.
FIGURE 1.6 THE NAVIGATE WINDOW SHOWING WHICH TRANSACTION
ENTRIES RELATE TO ONE CUSTOMER LEDGER ENTRY.
The Navigate results show the first customer ledger entry for customer 10000.
The top and middle sections display information about the selected transaction,
namely the first sales invoice for customer 10000 on 12/31/09. The lines at the
bottom show which and how many entries exist for the transaction. You can drill
further into these results by selecting a line and clicking Show to view the actual
entries.
Search by Document Number
The Navigate window can also be used as a generic search tool. To see entries
with a different document number, enter the document number at the top of the
Navigate window and click Find.
If you search with only the Posting Date field (leaving the Document No. field
blank), all the entries from the date entered will appear, regardless of document
number. Likewise, if the Posting Date field is blank, all entries with the selected
document number will appear, regardless of the posting date.
1-34
Microsoft Official Training Materials for Microsoft Dynamics ®
Your use of this content is subject to your current services agreement
Chapter 1: Use General Functions
Search by External Document Numbers
If you do not know the internal document number, click the External tab. In the
Business Contact Type field, select Vendor.
Enter the vendor number in the Business Contact No. field and/or the vendor's
document number in the Document No. field. Then, click Find to have the
program find the entries.
Open the Navigate window from ledger entry windows and windows containing
posted shipments and receipts, or from all the History menu folders in the
navigation pane. You can use it to find all entries posted with the same date
and/or document number. The document number may be either a number
assigned in a general journal or the number of an invoice or credit memo.
Use the Information Pane
The following central sales documents have an information pane to the right of
the header and lines sections:
•
Sales order
•
Sales quote
•
Sales invoice
All sales-relevant information about the customer (on the document header) and
the item (on the document lines) can be easily extracted by clicking the different
links on the FactBoxes.
FIGURE 1.7 INFORMATION PANE OPENED FROM A SALES ORDER
Microsoft Official Training Materials for Microsoft Dynamics ®
Your use of this content is subject to your current services agreement
1-35
Introduction to Microsoft Dynamics® NAV 2009
The Customer Sales History Factbox lists all open and posted documents for the
customer in question, organized by document types, such as quotes, blanket
orders, posted credit memos, and so on.
Some windows in the program represent business documents that will be sent to
customers, business partners, and internal staff. Examples are:
•
Order confirmations - from sales orders
•
Quotes - from sales and purchase quotes
•
Work order - from sales orders
•
Job cards, picking lists - from production orders
For more information on how to import a picture as your company logo, refer to
the "Installation & Setup Guide" user manual.
Another way to extract information from the system is to send it to Word, Excel,
and other Office products for further processing or presentation.
For example, to view all open sales orders, perform the following steps:
1. Click on Role Center.
2. From the Activities pane, click the Sales Orders -Open Queue.
3. From the menu bar, click Actions > Send To > Microsoft Word.
Use MapPoint
The integration to Microsoft MapPoint provides users the possibility to look up
the geographical location of customers and business partners directly from
Microsoft Dynamics NAV 2009 and display it on a web-based map, including
standard route planning information.
MapPoint must be set up on the Microsoft Dynamics NAV installation before it
can be used from the application. For information on setting up MapPoint, refer
to the "Application Setup" manual.
You can look up a customer's address in MapPoint. The customer's address can
be located directly from the Customer Card and all the other places where
customer address information is shown in the program. The same applies to the
windows (forms) shown in the following table.
1-36
Form
Form Name
5703
Location Card
21
Customer Card
26
Vendor Card
1
Company Information
Microsoft Official Training Materials for Microsoft Dynamics ®
Your use of this content is subject to your current services agreement
Chapter 1: Use General Functions
Form
Form Name
76
Resource Card
88
Job Card
300
Ship-to Address
370
Bank Account Card
5050
Contact Card
5200
Employee Card
When MapPoint is set up, a Show on Map icon (shaped as a pin ) is visible next
to the Country/Region Code field of the customer/contact card.
The Show on Map icon works in a similar way as other link icons in the
program, such as the e-mail icon that sends an e-mail message through Outlook
and the phone icon that makes a phone call.
When you click on the icon, a small request form with five display options
appears, where you select how to show the map.
Once the MapPoint map opens showing the address on the map, you can use
several standard tools for that web-based map, such as route planner.
Print Reports and Documents
Microsoft Dynamics NAV 2009 contains a number of standard reports relating to
business processes. For each application area, all relevant reports are placed in
the respective Reports menu folder in the navigation pane.
When you have selected a report, a card window called a report request form
opens. Here you can specify which information the report must include and how
it must be included.
Report request forms typically have two tabs. On the first tab, which is named
after the table that provides the information, you can set filters to define which
field information to include. The second tab, the Options tab, has varying setup
fields with relevant options to define how the report must be created.
When you have defined the report contents, you can process it in the following
ways:
•
Click Preview to view it a Print Preview window
•
Click Print to send it to your printer.
Microsoft Official Training Materials for Microsoft Dynamics ®
Your use of this content is subject to your current services agreement
1-37
Introduction to Microsoft Dynamics® NAV 2009
•
Select the Print to Excel field on the Options tab to also create an
Excel document when the document it printing. This is only
available on the following reports:
o
o
o
o
o
Trial Balance
Customer/Item Sales
Inventory Cost and Price List
Aged Accounts Receivables
Customer - Order Detail
FIGURE 1.8 A PRINT PREVIEW WINDOW SHOWING THE CUSTOMER ORDER SUMMARY REPORT
Summary
Having a general understanding of ERP is important for a user to understand its
purpose . Knowing how to navigate in the role center, Navigation panes, different
windows and using the basic functions to process data are the first prerequisites
for any user of Microsoft Dynamics NAV 2009. Once you have acquired this
knowledge, you can start to learn and use all of the program's business
functionality .
1-38
Microsoft Official Training Materials for Microsoft Dynamics ®
Your use of this content is subject to your current services agreement
Chapter 1: Use General Functions
Test Your Knowledge
Use your acquired skills in navigating and using general features to interact with
the system. Thus, you need access to a Microsoft Dynamics NAV 2009 VPC
(Virtual PC) in order to answer most of the following questions.
1. How many employees are there in Cronus International, Ltd.?
()7
()8
()9
()6
2. Who is the contact at customer 49525252, Beef House?
( ) Mrs. Carol Philips
( ) Mr. Frank Lee
( ) Frau Karin Fleischer
( ) Mr. Barry Potter
3. What is the current balance (LCY) on customer 49525252, Beef House?
( ) 6,346.16
( ) 5,951.36
( ) 5,641.36
( ) 5,941.37
4. How many open invoices does customer 49525252, Beef House have?
()2
()3
()4
()5
5. What is the inventory of item number 70000?
( ) 4,202
( ) 5,202
( ) 4,402
( ) 4,204
6. What is the unit price of item number 70040?
( ) 801.20
( ) 108.20
( ) 108.40
( ) 118.20
Microsoft Official Training Materials for Microsoft Dynamics ®
Your use of this content is subject to your current services agreement
1-39
Introduction to Microsoft Dynamics® NAV 2009
7. What happens when you type the letter t in a date field ?
8. What keys do you press to delete a customer?
( ) F8
( ) F6
( ) Ctrl+D
( ) F2
9. What happens when you type the letter w in a date field?
10. What would will the following filter expression display: 1100..2100?
( ) Records 1100 through 2100 are displayed.
( ) Records 1100 and 2100 are displayed.
( ) Records 1100 through 2100 are not be displayed.
( ) Records 1100 and 2100 are not be displayed.
11. From what type of field can you drill down to related entries?
( ) Calculation field
( ) FlowField
( ) Amount field
( ) Quantity field
1-40
Microsoft Official Training Materials for Microsoft Dynamics ®
Your use of this content is subject to your current services agreement
Chapter 1: Use General Functions
12. Which three filter types are available in Microsoft Dynamics NAV 2009?
(Select all that apply)
( ) Table filter
( ) Form filter
( ) Field filter
( ) FlowFilter
13. Outline the purpose of the Navigate window.
14. From the Activities pane, what do the numbers on the Cues stand for?
Microsoft Official Training Materials for Microsoft Dynamics ®
Your use of this content is subject to your current services agreement
1-41
Introduction to Microsoft Dynamics® NAV 2009
Quick Interaction: Lessons Learned
Take a moment and write down three key points you have learned from this
chapter
1.
2.
3.
1-42
Microsoft Official Training Materials for Microsoft Dynamics ®
Your use of this content is subject to your current services agreement
Chapter 1: Use General Functions
Solutions
Test Your Knowledge
1. How many employees are there in Cronus International, Ltd.?
()7
(•) 8
()9
()6
2. Who is the contact at customer 49525252, Beef House?
( ) Mrs. Carol Philips
( ) Mr. Frank Lee
(•) Frau Karin Fleischer
( ) Mr. Barry Potter
3. What is the current balance (LCY) on customer 49525252, Beef House?
(•) 6,346.16
( ) 5,951.36
( ) 5,641.36
( ) 5,941.37
4. How many open invoices does customer 49525252, Beef House have?
()2
()3
(•) 4
()5
5. What is the inventory of item number 70000?
(•) 4,202
( ) 5,202
( ) 4,402
( ) 4,204
6. What is the unit price of item number 70040?
( ) 801.20
(•) 108.20
( ) 108.40
( ) 118.20
Microsoft Official Training Materials for Microsoft Dynamics ®
Your use of this content is subject to your current services agreement
1-43
Introduction to Microsoft Dynamics® NAV 2009
7. What happens when you type the letter t in a date field ?
MODEL ANSWER: The field is populated with today's date.
8. What keys do you press to delete a customer?
( ) F8
( ) F6
(•) Ctrl+D
( ) F2
9. What happens when you type the letter w in a date field?
MODEL ANSWER: The field is populated with the specified work date.
10. What would will the following filter expression display: 1100..2100?
(•) Records 1100 through 2100 are displayed.
( ) Records 1100 and 2100 are displayed.
( ) Records 1100 through 2100 are not be displayed.
( ) Records 1100 and 2100 are not be displayed.
11. From what type of field can you drill down to related entries?
( ) Calculation field
(•) FlowField
( ) Amount field
( ) Quantity field
12. Which three filter types are available in Microsoft Dynamics NAV 2009?
(Select all that apply)
(√) Table filter
( ) Form filter
(√) Field filter
(√) FlowFilter
13. Outline the purpose of the Navigate window.
MODEL ANSWER: It is a context-sensitive search tool, designed to that
helps users analyze business figures across the whole database.
14. From the Activities pane, what do the numbers on the Cues stand for?
MODEL ANSWER: It They represents the number of documents you have
in the stack.
1-44
Microsoft Official Training Materials for Microsoft Dynamics ®
Your use of this content is subject to your current services agreement