1
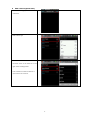
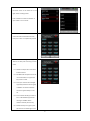
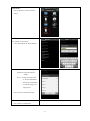
SoloMote User’s Manual 0 Add a Device (Quick Start) 1. On “Device List” page, press “Add” to add a new device. 2. Select device type 3. Select device brand Use letter search or the select bar in the right side for locating brands Press “Unable to confirm the brand?” if your brand is not on the list. 1 4. Select device model number Use letter search or the select bar in the right side for locating brands Press “Unable to confirm the model?” if your model is not on the list. 5. Press buttons to make sure the remote codes have been downloaded correctly then press “save” to complete the process 6. When the code is missing or mistake, press “Menu” and then press “Learning” to learn codes. 6.1 AsONE is ready to learn if its Status Indicator flashes 6.2 SoloMote will autopilot to learn but users themselves can appoint the key to learn as well. 6.3 Point your remote control straight oppositely toward the Learning Eye of AsONE. The distance between the two is approximately 5 to 10 cm. 6.4 Press and hold the key you want to learn until SoloMote appears OK message or AsONE’s Status Indicator radiates permanently. 6.5 Release the key and a green point will show on the lower right corner 2 of the key once the learning is successful. The process will automatically move to the next key to learn. 6.6 Press “Menu” and then press “Stop Learn” to exit. Please refer to the manual of AsONE for more instructions 7. Add user’s first new device after learning. 8. Repeat above steps to add other new devices. The maximum of 7 devices is allowed to add in SoloMote. Start To Use Use the remote control: - Select the device you want to remote control on “Device List” page. - Press the key you want to remote control. - Scroll up and down to select different key pages. - Press “Back” to back to “Device List” page. 3 Exit SoloMote - Press “Menu” and then press “Exit” on “Device List” page to exit SoloMote. - Press “Back” or “Home” to leave the screen of Solomote and run SoloMote in the background. Advanced Settings IR code Learning 1. Press “Menu” on Device Page to open “Learning” and “Delete” function. 2. Press “Learning” to start learning. AsONE is ready to learn if its Status Indicator flashes. 3. SoloMote will autopilot to learn but users themselves can appoint the key to learn as well. 4. Point your remote control straight oppositely toward the Learning Eye of AsONE. The distance between the two is approximately 5 to 10 cm. 5. Press and hold the key you want to learn until SoloMote appears OK message or AsONE’s Status Indicator radiates permanently. 6. Release the key and a green point will 4 show on the lower right coner of the key once the learning is successful. The process will automatically move to the next key to learn and repeat above steps. 7. Press “Menu” and then press “Stop Learn” to exit. Please refer to the manual of AsONE for more instructions Delete IR Code 1. Press “Menu” to open Learning & Delete function. 2. Press “Delete” 3. Select the key where you want to delete its IR Code. 4. Repeat step 2 & 3 to delete other IR Code. 5. Press “Menu” and then press “Stop Edit” to exit. Device Setting - Press the Device Icon until the dialog box for “Duplication”, “Modify” and “Delete” appears. 5 Duplication: - Press “Duplication” to add an identical Device. Modify: Press “Modify” to do as below: - revise “Device Name” & “Device Name2” - switch “IR Shooting Port” IR LED Out: emit IR directly from AsONE Port 1 – 4: assign an IR Output Port on the back of AsONE for IR emission; the IR Blaster is required to plug in the assigned port. - Press”Cancel” to exit without change. Delete: - Press “Delete” to delete Device 6 Macro Setting 1. On “Device List” page, press ”Macro” into “Marco List” page. 2. Press “Add” to begin seetings. 3. Name a set of Macro 4. Select “New Step” to begin settings 7 5. Key in Step Name 6. Select Step source 6.1 By Key - Select a device you want to set up - Press the buttons you want to use - Save this set of step 6.2 By Learn - Point your remote control straight oppositely toward AsONE. - Learn the key of remote control by learning process. 8 6.3 By Delay time(sec) - Type how many seconds you want to between two step - Press “OK” to save or Press “Cancel” to exit without saving. 7. Repeat step 4 - 6 to add more Step. 8. Press “Save” to save and exit 9. Repeat step 2 - 8 to add Marco. Use Macro function: 1. On “Device List” page, press “Marco” into “Marco List” page. 2. Select the Marco key of remote controlled device. 3. Press “Back” to back to “Device List” page 9 Setting - On “Device List” page, press “Menu” and then press “Setting” into Setting page. Account: - Register in SoloMote which is essential for cloud back up. Backup: - Auto Backup: Tick Auto Backup box - Backup Frequency: Set up Auto Backup Period - Manual Backup - Recover: Recover previous backup About: - Information about SoloMote FAQ: - Frequently asked questions Feedback: - Feedback 10 Software Info: - App Version: SoloMote Apk Version - Box Firmware Version: AsONE Firmware version - Box ID: AsONE ID Number - IR Output Port: Output port number - Firmware upgrade: AsONE firmware upgrade Environment Setting: - Key Press vibration: Tick Key press vibration box. 11