1
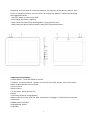
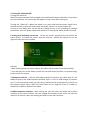
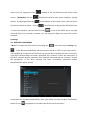
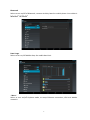
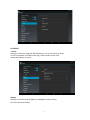
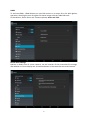
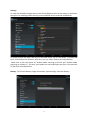
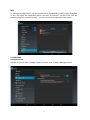
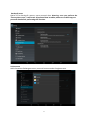
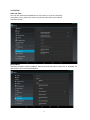
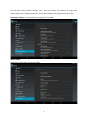
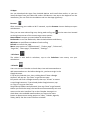
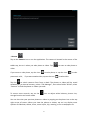
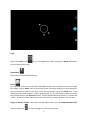
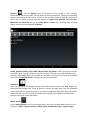
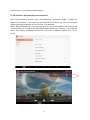
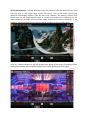
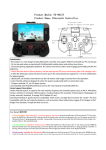
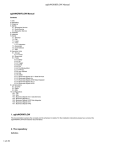
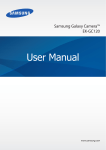
 Rembrandt 3D Corporation 10” Android 3D Auto Stereoscopic Tablet MODEL M10001A OWNERS MANUAL AUGUST 1, 2014 ITHACA, NEW YORK COPYRIGHT 201 TABLE OF CONTENTS…………………………………………………………………….……………………….2 1. What's Included………………………………………………………………………………………………. . 3 2. Getting Started……………………………………………………………………………………………………3 3. Battery Charging……………………………………………………………………….…………………………3 4. Appearance and Buttons………………………………………………………….……………….…………4 5. Turning the Tablet On/Off………………………………………………………….…………………….….5 6. Locking and Unlocking the Screen……………………………………………….……………………….5 7. Connection with PC……………………………………………………………………….………………..……5 8. Tablet Operation Interface…………………………………………………………….……………………..5 8.1 Delete Icons ……………………………………………………………………………………………...6 8.2 Wallpaper………………………………………………………………………………………………..…6 8.3 Status Bar Descriptions……………………………………………………………………………….6 8.4 Quick Guide For Touch Operations……………………………………………………………..6 9. Settings……………………………………………………………………….………………….…………….………7 9.1. Wireless and Networks …………………………………….…………………………………………7 Bluetooth…………………………………………………………………………………………………7 Data Useage…………………………………………………………………………………………….8 9.2. Device ……………………………………………………….……………………………………………….8 Display…………………………………………………………………………………………………….8 HDMI………………………………………………………………………………………………………9 Screen shot Settings……………………………………………………………………………..9 Storage……………………………………………………………………………………………………9 Battery……………………………………………………………………………………………………9 9.3. Personal……………………………………..……………………………………………………………,10 Security………………………………………………………………………………………………..11 Language and Input………………………………………………………………………………11 9.4. Accounts………………………………..………………………………………………………………….12 9.5. System……………………………………..……………………………………………………………….13 About the Rembrandt 3D Tabet……………………………………………………………..14 10.. Apps / Descriptions……………………….…………………………………………………….………….15 Browser / Calculator / Caledar /…………………………………………………………..15 Camera…………………………………………………………………………………………………..16 Clock /Downloads / Email……………………………………………………………………….17 Explorer / Play Store / Movie Studio……………………………………………….………18 Music / People / Search….……………………………………………………………………19 Sound Recorder / Manager / Video Player /….………………………………………..19 11. 3D Functions……………………………………………………………………………………………………..20 3D Player / 3D Adjustments / ………………………………………………………………….20 3D Format Selection………………………………………………………………………….…….21 2D Content Conversion / 2 Slider Controls………………………………………….…..22 3D Games………………………………………………….…………………………………….………22 12. Safety Precautions. ………………………………………………………………………………….………22. 13. Frequently Asked Questions ……………………………………………………………………….…..23. WARRANTY………………………………………………….…………………………………………..23 2
Rembrandt 3D Glasses‐Free Tablet PC User Manual Owners Manual 1 What's Included The following components are included with your purchased product: ‐ 10.1inch 3D Glasses‐Free Tablet PC ‐ Power Adapter ‐ USB Cable ‐ Quick Start Instruction Manual 2 Getting Started Before operating your Tablet PC for the first time, read this manual carefully and follow the instructions for use. 3 Battery The tablet is equipped with a built‐in rechargeable Lithium battery. It is suggested that you fully charge the battery before use. We strongly recommend using the power adapter included in the packaging. Using other adapters may damage the tablet and void the warranty. The battery is not fully charged from factory, so it is recommended that you charge the battery for at least 6 hours before you start to use the device. Charging Process ‐ Connect the power adapter to your tablet (#12 in diagram), and plug the power adapter into the nearest electrical outlet. ‐ Users can still use the tablet while it is being charged. When fully charged, the battery icon displays as: A fully discharged battery will take you approximately 6 hours, but you can use the device while it is being charged. Do not use other adapters than the one provided in your packaging, it may cause damage to the Lithium battery inside. Do not attempt to open the tablet to replace the battery inside, this will damage the tablet and void the warranty. The rechargeable battery is designed and manufactured to be used and recharged 3
frequently. As same with all of lithium batteries, the capacity of the battery reduces each time it is charged. However, you can still try to prolong the battery's lifetime by following the suggestions below: ‐ Use your Tablet at least once a week. ‐ Fully charge the battery regularly. ‐ Never leave the battery fully discharged for a long period of time. ‐ Always keep the device and the battery away from heat and moisture. 4 Appearance and Buttons 1 Power Switch ‐ Turns the tablet on and off. 2 Volume ‐ Press the Volume + button to increase the sound volume. Press the Volume ‐ button to decrease the sound volume 3 Front Camera 4 Rear Camera 5 TF Card Slot ‐ Micro SD card slot 6 Reset 7 DC Power Socket to charge battery 8 Micro USB‐ to connect to PC for data transmission, charging or connection with external USB devices. 9 HDMI Output Interface 10 Headphone Socket 11 Speaker 4
5 Turning the Tablet On/Off Turning the Tablet On After the battery has been fully charged, press and hold the power switch for 3 seconds to turn on the device. The screen lock will appear on the screen after starting up. Turning the Tablet Off ‐ When the tablet is on, press and hold the power switch for 3 seconds and the system will show power off option, tap on it to turn the tablet off. In case of your tablet locks up and you are unable to turn it off according to standard procedures, press the power switch and hold it for 7 seconds,the tablet will be turned off. 6 Locking and Unlocking the Screen ‐ To lock the screen, quickly press and release the Power Switch. To unlock the screen, slide the lock icon toward the unlock icon on the right to access the main interface Remarks: ‐ When battery power has been used up, the tablet will shut down itself automatically. ‐ If you abruply turn off the tablet, restart will scan and restore the disk, it may take longer time to enter into system. 7 Connection with PC ‐ Use the USB cable provided to connect the tablet with PC, the tablet will pop up the USB connection window, click on “Turn on USB storage” to connect to PC, in the connection mode, you can copy or delete the file on the device or the file on the memory device. Open “MiD” file from Tablet on PC, drag files from PC to MID, or delete files in MID to remove from Tablet. 8 Tablet Operation Interface ‐ After starting up, you will enter into below main screen interface. In the main interface, you can manage the software icons: press the icon and hold it for 3 seconds, then you can drag anywhere in the main interface. 5
Delete icons: press the icon and hold it for 3 seconds, and drag the icon onto the “Remove” icon at the top of the screen, then you can delete that icon from Desktop. Wallpaper‐ Touch the screen and hold for 2 seconds, the dialog box “Choose wallpaper from” will pop out as shown below: You can choose the wallpaper from different sources and change the Wallpaper Status Bar Descriptions From left to right: Volume lower, Back to previous screen, Back to main screen, Display the Apps used previously, Volume higher. Quick Guide For Touch Operations ‐ No matter which interface you are on the screen, you can go back to the 6
main screen by tapping the key screen. [Attention] The key located at the left bottom center of the main functions as back to main screen interface.‐ During options, by tapping the back key
to previous screen interface. ‐ Click to
at the bottom of the touch screen, you can return see all history of Apps performed previously. ‐ In the main interface, you can touch the icon
to see all the APPS, tap on any App icon and hold it for around 3 seconds, you can drag that App icon onto main screen interface. 9 Settings 9.1. WIRELESS & NETWORKS ‐ Wi‐Fi‐ First open the APPS menu by touching the icon, then tap on setting icon, , In the Wireless & Networks sub‐menu tap on the Wi‐Fi “OFF” to open the choices. , All available Wi‐Fi networks will be listed, tap on your Wi‐Fi network and start to connect. If the Wi‐Fi network does not need a password, tap "connect" to start the connection. If the Wi‐Fi network needs a password, then input the password and tap “connect” to start the connection. If the Wi‐Fi network has been successfully connected before, thatinformation will be stored. Connection will be done automatically. Once your tablet connects to Wi‐Fi successfully, the Wi‐Fi icon will appear on the status bar at the top of the screen. 7
Bluetooth Select to turn on/off of Bluetooth, connect with Key board or mobile phone. Your tablet is labeled “rk30sdk” Data Usage Select to turn on/off Mobile data, Set mobile data limit. ‐ More… Select to turn on/off Airplane mode, to setup Ethernet connection, VPN and Mobile networks. 8
9.2 DEVICE ‐ Sound Settings on Volume, Ringtone & Notifications, you can also click to select or click to unselect for Vibrate and ring,Touch sounds, Screen lock sound and Vibrate on touch. Display Settings on LCD Panel for Brightness, Wallpaper choices, Sleep Font size, Wireless Display 9
HDMI To activate HDMI,‐ HDMI Output can send 3d content to a stereo 3d tv for With glasses operation, allowing the user to adjust the Stereo image with the Tablet 3D tools. For Resolution, Zoom factor and Timeout options, select and click. Screen Shot Settings Options to delay time of screen capture, set the location of the screenshot file storage, and whether or not to display the screenshot button in the status bar on screen bottom 10
Storage To view the available storage space, Erase SD card(format the internal memory) and select the option of enabling media scanning of mounted SD card or external USB devices To safely remove the Micro SD card or USB flash drive, tap on the option “Unmount SD card”, and confirm the selection, after this, you can safely remove SD card/USB host. Make sure to tick the option of “Enable media scanning on extsd” and “Enable media scanning on usbhost 1”, this way, your tablet can scan and display the files in the external TF (SD) card and USB devices. Battery‐ To view the battery usage information, open Settings, and click Battery. 11
Apps To Manage the applications, tap on the directories (DOWNLOAD, ON SD CARD, RUNNING or ALL) and select the application which you want to uninstall, you will enter into the following interface, tap on Uninstall, you can remove that application from tablet. 9.3.PERSONAL Location services Options for you to select “Google's location service” and “Location &Google search” 12
Security Settings for Screen lock, Owner info, Encrypt tablet, Make password visible, Device administrators, Unknown sources, Trusted credentials, Install from SD card. Language & Input Language selection, text input and automatic error correction option, select your desired Keyboard & Input methods, and settings on Text‐to‐speech output, Pointer speed. 13
Backup & reset Option of for backup & restore, erase personal data. Warning: once you perform the “Factory data reset”, it will erase all personal data in tablet, make sure to back up your personal data before performing this function. 9.4 Accounts Add a Corporate Exchange account, an email account and a Google account 14
9.5 SYSTEM Date and Time You can use network‐provided time or time zone, or you can manually setup date, time, select time zone and you can also select time format and date format Accessibility TalkBack provides spoken feedback help blind and low‐vision users This is available for download from from Android Market. 15
You can also setup system settings here. You can choose the options of Large text, Auto‐rotate screen, Speak passwords, Touch & hold delay time and Install web scripts. Developer options ‐ Some advanced settings for the tablet. About tablet Additional information about the Tablet 16
10 Apps You can download the Apps from Android Market and install them online, or you can install the Apps from your Micro SD card or USB devices. Just tap on the App and run the installation, you can finish the installation and run that App right away. Browser After connecting your tablet to Wi‐Fi network, tap the Browser iconon desktop to open web browser. Then you can start web surfing now, during web surfing, tap on the menu icon located at the right top corner of the screen to get more options: New window: to open up new window of web browser Bookmarks: to see the Bookmarks, Most visited websites and History Windows: to see different windows of web surfing Refresh: to refresh the page More: more options of “Add bookmark”, “Find on page”, “Select text”, “Page info”, “Share page”,“Downloads”, “Settings”. ‐ Calculator The tablet is with built‐in calculator, tap on the Calculator icon tocarry out your calculations. ‐ Calendar Users can use the Calendar to check date, time and memorandum or add memorandum etc. But before doing this, you have to sign in the Google Account. 1 Tap on the Calendar icon, then a dialog box of “New a Google Account” will pop up .Tap “Next” to go the next step.. 2 If you do not have a Google Account, then tap “Create” to create a new Google account, if you already had a Google Account, tap on “Sign in” to go to next step. 3 Input Gmail address and password, then tap “Next” to go forward. 4 After you finish the setup, the interface will automatically exit and return to the main interface.Tap on the Calendar icon again to check date, time and add memorandum etc.Tap on the menu button to popup more setting options of 1 Day, 7 Weeks, Agenda, Today, More, see the screen interface as below: 17
‐ Camera Tap on the Camera icon to run the application. The camera is located in the center of the tablet top, aim at it when you take photo or video. Tap to start to take photo or video. If you want to take photo, tap the icon to take photo, or tap the icon panoramic stills ; if you want totake video, tap on the icon to take to take video. Tap the to switch cameras from front to back The photos or videos will be saved automatically to internal memory, select “File Manager”, then select folder “DCIM”, select “Camera” to find the photos or videos just took. To access more controls, tap on the icon to adjust white balance, picture size, storage location and scene mode. You can also view your previous photos or videos by tapping on the photo icon at the top right corner of screen. When you view the photos or videos, tap on it to display more options of slideshow, delete, share, zoom in/out, clip, rotating, or set as wallpaper etc. 18
Clock Tap on the Clock icon to run the application. After running the Clock application, you can setup alarm clock Downloads Tap to check all downloaded history. Email You can enter one or more personal email address which you would like to access through this tablet. Tap on Email icon to setup your email account according to the procedures. You can receive or send e‐mails after setup. To read emails, tap on the Email icon, if you setup only one email account, it opens immediately, if you have setup multiple accounts, they will be listed in the Accounts screen. Tap on the desired email account, and then tap “Inbox”, all emails will be listed, tap on the email which you want to open. You can also Reply, Forward or Delete ‐ the emails. On the Inbox screen, you can Compose New Email, type on menuIcon for more settings on your Email account. 19
Explorer ‐ Tap on Explorer icon to browse the files saved in your memory devices(Local, SD card or USB) .You can view the files by categories. Tap on corresponding memory devices(Local, SD card or U‐Disk) to see the files inside.Tapping on the file and hold it for 3 seconds, you will have the options of: Delete File, Rename File, Copy File, Move File and Email File.You can also Copy, Move or Paste files between each memory device. You can have the options of Delete. Folder, Rename Folder, Copy Folder, Move Folder, Zip Folder ‐ when you tap on a folder and hold it for 3 seconds. How to copy file: to copy a file: tap on the file and hold it for 3 seconds, select Copy, then tap and hold on the folder which your file needs to be copied into, select “Paste into folder” to copy your file into that folder. Play Store After you signed in the Google Account (mentioned above), tap on the Play Store icon, and accept the Google Play Terms of Service to enter into play shop. You can download more apps from the Android market. If you want to download apps from Android market, tap on the app icon which you want to download, follow the procedures to download the app and install it onto you tablet. Movie Studio Tap on Movie Studio icon to run the application, you have to Create New Project first, th en tap on “ADD” to Record a video, Take a photo, Import video clip or import image. 20
Music To play the music, tap on the Music icon to run the application. All songs will be listed and tap on your desired song to play it. People You can create an address book of your personal contacts. 1. Tap on the People application icon to run the application. 2. If you already logged into your Google account, then you can run the application right away, if you have not logged into your Google account, please log into your Google account by following the steps. 3. After entering into People application, you can see the all yourcontacts information, you can also Search, Add, Edit yourcontacts. Tap on the menu icon options: Share: to share contacts Delete: to delete the contacts Contacts to display: to select the options for contacts display. Import/Export: import/Export contacts. Accounts: sync your accounts Settings: display options for your contacts 4. In the Contacts screen, tap on the desired contact, then tap the “star” icon at the right side of screen to add the Contact to Favorites. Search to display below Search the APK files in your tablet or search online. To search online, please tap on the icon Sound Recorder To start the sound recorder, tap on the Sound Recorder icon to run the application. Tap on the icon to start recording. Tap on the icon to stop recording. Once you stopped the recording, system will prompt: Discard, Done. Tap on Discard to discard the recording; Tap on Done to save the recording. The recorded files can be found at root directory of folder File Manager. Video Player To play the videos, tap on the Video Player icon to run the application. All videos will be 21
listed and tap on your desired video to play it. 11. 3D Functions‐ 3D Video player and 3D pictures Click “Function Menu” button; enter “the application‐ 3D Gallery (Tridef), Images will appear of 2D photos, a 2D video file, anda 3d video file. Select the file, and a window opens displaying screenshot of each content. Click and play. NOTE; Before selecting 3D conversion operation for any of the pictures and videos in 2D and 3D format, we should set the 3D Display Mode. Please click “Setting” in the right top coner, then choose “component interlaced”, click, after complete it, please click “ close” to exit 22
3D Format Selection ‐ Playing 3D video, enter the interface like the above picture, then click L/R, next to “3D” upper Right corner. This opens a bar of L/R boxes representing different stereoscopic formats, (side by side / top –bottom, and others,) Choose each format until the 3D image appears close to correct, then adjust fine tuning with the 3D Slider control to the Right of the L/R box. Most commercial content is generally in the orange 1st box as displayed in the picture. Adjust 3D effect to your comfort level. Click”3D”, slide the button on the line to adjust the depth of the screen, 3D effects can be selected by yourself. Adjust double images to eliminate ghosting, blurred edges. 23
Two Slider Controls ‐2D Conversion –To Play 2D content in 3D, Select L/R Box, upper Right corner, click on “ 2d to 3D” icon on the far left of the bar. That will convert what ever is playing into 3D. Two slider controls will appear on the screen. Think of the two controls as Gross and Fine tuning on a Microscope. Where ever the Gross adjustment locates the focal point, the Fine tuning adjustment can Focus. The two controls operate in conjunction with each other, allowing the User to set his / her own comfort level as to the intensity of the 3D effect relative to the sharpness of the edges. Based on the angle of the screen, the viewers distance, room lighting, content’s production values and the Users vision issues, each User will adjust the same image differently. These factors all contribute to determining how the User best adjusts the screen to his personal comfort. For most Viewers eliminating 3D artifacts and being able to enjoy the visual magic of 3D imagery without eyestrain, side‐effects or discomfort is a primary goal. PLAY WITH THE CONTROLS. You may find a Perfect picture adjustment for your vision and content that allows you to never need to touch the controls. Or you may “fix” the image with every change of content from sports to dramas to nightly news. NOTE ‐ Not all 2D content delivers the same degree of 3D depth impact when converted into 3D, no glasses, auto stereoscopic 3DTV. The best content conversions are close up shots, sports, layered activities, views, scenes. 3D Games Click “Function Menu” button; enter “the application‐ 3D games (Tridef), The games include: Angry Birds, Angry Birds: Rio, Angry Birds: Seasons Angry Birds: Star Wars, Death Rally, Minecraft – Pocket Edition, Minecraft Pocket Edition – Demo, Raging Thunder 2, Celestial Assault, ShineRunner, Riptide GP, Cogs Demo, Cordy 2 Other interesting games can be downloaded . 12.Precautions Always follow these basic safety precautions when using your Tablet. This reduces the risk of fire, electric shock, and injury. Do not expose this product to rain or moisture. ‐ Keep the device out of direct sunlight and heat sources.‐ Do not place other objects on LCD screen, as it may crush and damage the LCD screen. ‐ Do not use any sharp objects to touch the LCD screen, as this will scratch the screen. ‐ Only use the AC adapter included with the device. Using any other power adapters will damage your tablet and void the warranty. Do not attempt to dismantle the tablet by yourself to do any repair, this will damage the tablet and void the warranty. 24
Clean Your Device To clean fingerprints or dust from the screen, we recommend to use soft, non‐abrasive and non‐corrosive cloth for cleaning, such as a camera lens Cloth. Reset To restore the tablet to original factory settings and erase all personal informations, tap on “Settings” > “Backup&reset” > “Factory data reset”. Warning: After resetting the device, Google account, data, system settings, and downloaded applications will be removed from your tablet. 13 Frequently Asked Questions Android Q: What Android OS version is on my Device? A: Android 4.2.2 Basic Functionality Q: Do I have to charge the battery before use? A: You should charge the battery for at least 6 hours, but you can use the device while it's being charged. Use the included power adapter to charge. Email Q: Can I use any of my personal email addresses to send/receive email? A: The device supports POP3 accounts. Some free email accounts are not supported on mobile devices. Check with your email provider to see if you account is supported. Media Cards Q: Which media cards are compatible with my Device? A: Micro SD cards. Music Q: What type of music files can I play on my device? A: MP2, MP3,WAV,AAC,WMA Q: How do I add music files to my device? A: Copy music files from your PC, Micro SD card /USB storage device directly to device. WARRANTY –THIS UNIT IS WARRANTEED AGAINS DEFECT IN MATERIALS AND WORKMANSHIP FOR A PERIOD OF 1 YEAR ON THE LCD CORE DISPLAY AND HAS A 90 DAYS WARRANTY ON ALL PARTS AND LABOR FROM THE DATE OF PURCHASE. THE ACTION FOR REPAIR OR REPLACEMENT OF THE UNIT IS DETERMINED BY WARRANTY AUTHORIZATION. OWNER IS RESPONSIBLE FOR ALL SHIPPING AND HANDELING COSTS. THE WARRANTY IS VOID IF UNIT HAS BEEN OPENNED, SUFFERED WATER DAMAGE OR EXPOSED TO EXCESSIVE ELECTRICAL SHOCK AND OR PHYSICAL ABUSE OR DAMAGE. CONTACT – REMBRANDT 3D CORP. [email protected] , www.rembrandt3d.com Phone – 607‐339‐6098 25