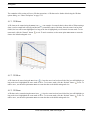
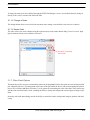
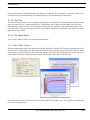
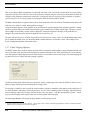
1
User’s Manual
EZXY® Plotter
Version 5.8
EZXY User’s Manual, C&R Technologies, Inc.
i-1
i-2
EZXY User’s Manual, C&R Technologies, Inc.
Preface
Prepared, distributed, and supported by:
C&R Technologies, Inc.
Boulder Colorado, USA
Phone: (303) 971-0292
Web Site: www.crtech.com
Authors:
Steve Ring
Matt Garrett
This manual, as well as the software described in it, is furnished under license and may be used or copied only in accordance with
the terms of such license. The content of this manual is furnished for informational use only, is subject to change without notice,
and should not be construed as a commitment by Cullimore & Ring Technologies. Cullimore & Ring Technologies assumes no
responsibility or liability for any errors or inaccuracies that may appear in this book.
EZXY User’s Manual, C&R Technologies, Inc.
i-3
i-4
EZXY User’s Manual, C&R Technologies, Inc.
Table of Contents
Exporting and Printing Plot Sets
CHAPTER 4
3-3
Viewing Plots
Refreshing and Regenerating Plots
Introduction
CHAPTER 1
Overview
Scroll and Zoom
1-2
3D Viewing
Improvements in Version 5.2
Improvements in Version 5.3
Improvements in Version 5.4
Improvements in Version 5.5
Improvements in Version 5.6
Improvements in Version 5.7
Improvements in Version 5.8
Menus and Tool Bars
Getting Help
1-2
1-2
1-2
1-3
1-3
1-4
1-4
CHAPTER 5
2-1
2-1
SINDA/FLUINT Input Files
2-2
Thermal Desktop Input Files
2-3
Text Input Files
2-4
Modifying the Input File Table 2-5
Using Multiple Input Files 2-5
Plot Manager
2-6
SINDA/FLUINT Plot Manager 2-6
Select Item Dialog 6
X-Axis Dialog 12
Axis Expressions 13
Working with Multiple Input Files 15
Thermal Desktop Plot Manager 2-17
Thermal Desktop Data Dialog 18
Units Dialog 21
Axis Expressions 22
Statistical Plotting
CHAPTER 3
2-23
Plot Sets
Creating a Plot Set
4-2
Plot Customization
Chart Display Customization
1-7
Input Files
4-1
3D Rotate 4-3
3D Move 4-3
3D Zoom 4-3
3D Depth 4-4
1-5
Creating a Chart
3-1
3-1
Adding Plots to a Plot Set 3-2
Saving Plot Sets 3-3
Refreshing Plots 3-3
Renaming a Plot 3-3
Editing a Plot 3-3
Globally Managing the Input Files 3-3
4-1
How to Zoom (2D) 4-1
How to Scroll 4-2
1-1
Revision History
CHAPTER 2
1-1
4-1
5-1
5-2
Chart Series Options 5-2
Series Visibility 2
Adding a Custom Series 3
Delete a Series 4
Series Title 4
Change a Series 5
Series Order 5
Chart Panel Options 5-5
Panel Borders 6
Panel Background 7
Panel Margins 8
Panel Gradient 8
Panel Shadow 8
Chart Axes 5-8
Axes Selection 9
Axes Scales 9
Axes Title 10
Axes Ticks 10
Axes Labels 11
Axes Minor 12
Axes Position 13
Adding/Deleting an Axis 13
Chart General Options 5-14
General>Zoom Options 14
General>Scroll Options 15
General>Cursor Options 15
Chart>Titles Options 5-15
Titles Style 15
Titles Position 16
Titles Format 16
Titles Gradient 16
Titles Shadow 16
Titles Text 17
Titles Bevel Option 17
EZXY User’s Manual, C&R Technologies, Inc.
i-1
Chart>Walls Options 5-17
Chart>Paging Options 5-18
Chart>Legend Options 5-19
Legend Style 19
Legend Position 20
Legend Symbols 21
Legend Title 21
Legend Format 21
Legend Gradient 21
Legend Shadow 21
Legend Text 21
Legend Bevel Option 22
Chart>3D Options 5-22
Series Customization
5-22
Series Format 5-22
Series Points 5-23
Series General
5-23
Series Data Source 5-23
Series Marks
5-24
Tools Option
5-25
Annotation Tool 5-26
Adding Annotations 26
Editing Annotations 26
Color Band Tool 5-27
Adding a Color Band 27
Editing a Color Band 27
Color Line Tool 5-27
Themes
5-28
Default Theme
CHAPTER 6
5-29
Exporting and Printing
Exporting Charts as Images or Data
6-1
6-1
Exporting Plot Sets 6-2
Printing Charts
CHAPTER 7
Introduction
6-3
Excel Plotter
7-1
7-1
Installing the Excel Plot Template 7-1
Creating Plots in Excel
7-2
Input Files 7-2
SINDA/FLUINT Plot Manager 7-3
Refreshing a Plot 7-4
Data Import Only 7-4
Customizing Plot Appearance 7-4
Index
i-2
1-1
EZXY User’s Manual, C&R Technologies, Inc.
Introduction
CHAPTER 1
Introduction
1.1 Overview
EZ-XY®, the plotter for C&R Technologies’ Sinaps®, Thermal Desktop® and SINDA/FLUINT, allows the user to
produce X-Y plots of data contained in either SINDA/FLUINT Compressed Solution Results (CSR) folders, save files,
or in databases produced by Thermal Desktop® and RadCAD®. Formatted text files may also be used as input files.
Charts can be created and saved as individual plot files (*.ezp2) or as part of a plot set (*.ezps2). The information displayed in each chart is controlled by a collection of associated input files. Each plot file may use multiple input files,
allowing results to be combined onto a single chart (e.g., to compare different runs, compare test data with predictions.
or map heating rates to temperature results). Upon reopening a saved chart, the chart can be updated through the regenerate or refresh commands to reflect any changes that have been made to the associated input files since the chart was
last saved.
Charts can be exported as graphic files or the data itself can be exported as text files such as comma- or tab-separated
files. When using plot sets, several plots can be exported simultaneously.
EZXY contains two editors, the content editor and the chart editor. The content editor is accessed using the Add/Edit
menu option and is used for defining content such as input files and which data is to be plotted. The use of the content
editor is described in Input Files and Plot Manager. The chart editor provides a means of customizing the appearance
of the chart by modifying titles, axis labels, annotation, color, and background. The chart editor is described further in
Plot Customization. A preferences dialog allows the user to set up a template or format to be used for all future plotting.
EZXY User’s Manual, C&R Technologies, Inc.
1-1
Introduction
1.2 Revision History
Initial Release
Version 5.1
December 2007
Annual Update
Version 5.2
October 2008
Annual Update
Version 5.3
January 2010
Annual Update
Version 5.4
February 2011
Annual Update
Version 5.5
February 2012
Annual Update
Version 5.6
June 2013
Annual Update
Version 5.7
October 2014
Annual Update
Version 5.8
July 2015
1.2.1 Improvements in Version 5.2
For the benefit of users of EZXY Plotter Version 5.1, features new to Version 5.2 are summarized below:
1.
2.
Added ability to set plotting preferences
Added a help file
1.2.2 Improvements in Version 5.3
For the benefit of users of EZXY Plotter Version 5.2, features new to Version 5.3 are summarized below:
1.
Updated for compatibility with SINDA/FLUINT 5.3 save files.
2.
Integrated into Thermal Desktop.
1.2.3 Improvements in Version 5.4
For the benefit of users of EZXY Plotter Version 5.3, features new to Version 5.4 are summarized below:
1.
Minor updates for usage clarification.
2.
Support for plotting of diffuse source components in Thermal Desktop.
Added the ability to change the parameter (plot item) of an entry in the plot manager selection table.
Due to version matching requirements within Microsoft products, please note that the 5.4 version of the
Excel Plotter is not compatible with 5.3 Excel Plotter files. To retain the ability to open 5.3 Excel plotter
files, the 5.3 Excel Plotter should remain installed. Note, that due to save file differences between 5.3 and
5.4, old 5.3 Excel plot files cannot plot from 5.4 save files. The EZXY plotter has no version compatibility
issues.
3.
4.
1-2
EZXY User’s Manual, C&R Technologies, Inc.
Introduction
1.2.4 Improvements in Version 5.5
For the benefit of users of EZXY Plotter Version 5.4, features new to Version 5.5 are summarized below:
1.
A new optional filter to eliminate retrograde values on the X axis (superfluous right to left lines created
when plotting parametric or cyclic data) has been added to the SINDA/FLUINT Plot Manager, see Select
Item Dialog.
2.
Added ability to plot multiple save files from restart operations providing continuous data plots, see Plotting From Restart Files.
1.2.5 Improvements in Version 5.6
For the benefit of users of EZXY Plotter Version 5.5, features new to Version 5.6 are summarized below:
1.
The EZXY Plotter has been updated to provide support for the new Compressed Solution Results (CSR)
folder introduced with version 5.6 of SINDA/FLUINT. Do to the internal changes required to provide this
support, the 5.6 plotter is no longer compatible with plot files generated by earlier versions of the plotter.
The distinguish new plot files from old plot files, the file name suffix has been changed from *.ezp and
*.ezps (version 5.5. and earlier) to *.ezp2 and *.ezps2 (version 5.6 and forward). For more information on
working with CSR folders, see SINDA/FLUINT Input Files.
To assist users in transitioning existing version 5.5 and earlier plot files into the new plotter, a transitional
plotter is included withe the 5.6 Sinaps and Thermal Desktop installers. This transition plotter saves an
existing plot file in the new plotter format. It does not transition a chart from using a save file to using a
CSR folder, this must be performed manually (see item 2 below).
Double-clicking on an older plot file (*.ezp) or plot set file (*.ezps) results in the file automatically opening
in the transition plotter. The user will see the warning message shown below indicating that the transitional
plotter is being used. After saving the plot file or plot set in the transitional plotter, double-clicking on the
new *.ezp2 version of the file will open in the new 5.6 plotter with CSR folder support. It is recommended
the transitional plotter only be used to save plot files to the new format, i.e. do not use the transitional plotter for modifying existing charts in a plot file.
2.
When migrating charts created prior to version 5.6 to work with the new CSR folder, it is best to have the
original *.sav files present in the working folder. If these are not present, series information on the SINDA/
FLUINT Plot Manager tab (in the Add/Edit dialog) will not be retained through the transition process. After
transitioning a chart to the new format and rerunning the model using a CSR folder, follow the steps below
EZXY User’s Manual, C&R Technologies, Inc.
1-3
Introduction
3.
4.
to migrate the input file reference to a CSR folder.
a) Open the plot file (*.ezp2) by double-clicking on the file name.
b) Click Add/Edit to open the EZXY Input/Edit dialog and move to the Input Files tab.
c) In the upper “CSR Folders” table, click the browse button [...], and browse to and select the new CSR
folder.
d) Change the Internal Name associated with the CSR folder to match the old save file Internal name.
e) In the lower “Save File” table, highlight the row containing the old save file and click the delete key to
remove the entry.
f) Click OK to save the changes and then save the chart.
Starting with version 5.6, the Filter X Retrograde option is defaulted to be enabled. This option filters out
reverse lines on the X-axis which can occur when plotting multiple save files or when plotting the results of
a parametric run.
A new Save File and CSR Folder manager has been added for plot sets. This new feature provides the user
the ability to change input files for all plots in a plot set.
1.2.6 Improvements in Version 5.7
For the benefit of users of EZXY Plotter Version 5.6, features new to Version 5.7 are summarized below. (Several of
these features were added as updates to Version 5.6 prior to the Version 5.7 release.)
1.
Completely overhauled data table and image export.
2.
Added all new SINDA/FLUINT 5.7 output variables to data type trees.
User can now open a CRTech support ticket for EZXY using Help menu.
Added drag and drop functionality to main window.
Increased node and conductor threshold from 100 to 10,000 before message asks if user wants to import
submodels to tree to cut down on spurious messages.
Added several keyboard shortcuts.
If user chooses Edit->Add/Edit with no active plot, EZXY now creates new plot.
Added a print options/preview dialog.
EZXY now remembers last-used CSR, save, and TD text folders independently.
Various bug fixes for EZXY and the Excel Plotter.
3.
4.
5.
6.
7.
8.
9.
10.
1.2.7 Improvements in Version 5.8
For the benefit of users of EZXY Plotter Version 5.7, features new to Version 5.8 are summarized below. (Several of
these features were added as updates to Version 5.7 prior to the Version 5.8 release.)
1.
When plotting from Thermal Desktop, the time units are now added to the x-axis label.
2.
Drag and drop on main screen now accepts plotset files.
Copy to new plot and then saving no longer overwrites original plot.
Opening plot files now refreshes all series, including user-generated series.
Submodels and registers now sorted alphabetically in Add/Edit trees.
Added FQ to tie parameter list.
Open file dialog now defaults to show plot and plotset files.
3.
4.
5.
6.
7.
1-4
EZXY User’s Manual, C&R Technologies, Inc.
Introduction
8.
Various bug fixes for EZXY and the Excel Plotter.
1.3 Menus and Tool Bars
EZXY has pull down menus and tool bars to assist the user in manipulating charts. Right clicking on the chart will
bring up the object edit menu. The menu functions are summarized in table “EZXY Menu Option Summary”. The tool
bar options are summarized in table “EZXY Tool Bar Option Summary”. Keyboard shortcuts are listed where available.
TABLE 1. EZXY
Menu Option Summary
Menu
Submenu
File >
New X-Y
Submenu
Description
Opens a new plot window, see Creating a Chart
New Plot Set
Opens a new plot set, see Plot Sets
Open (Ctrl+O)
Opens an existing chart
Close
Closes a plot file
Save (Ctrl+S)
Saves the current plot file
Save As
Saves a plot to a new file name
Print
Prints the existing plot, see Printing Charts
Export Image
Exports the current plot as a bitmap image, see Exporting Charts
and Data
Export Tabular Data
Exports a table containing the current plot data, see Exporting
Charts and Data
Edit>
Statistics>
Legacy Export
Accesses the pre-Version 5.7 Export menu.
Exit
Exit and close the EZXY Plotter
Add/Edit (Alt+A)
Opens plot manager dialog to edit source file and plot content,
see Creating a Chart
Regenerate Plot
Updates the current chart for changes in the source file/database
Regenerate All
Updates all open charts for changes in the source files/databases
Refresh Plot
Updates the current chart for changes in the source file/database
without resetting axes limits
Refresh All
Updates all open charts for changes in the source files/databases
without resetting axes limits
Reset
Resets view of a 3D chart
Copy to new Plot
Copies chart to a new chart
Set Default Theme
Defines viewing preferences to be applied to current and future
charts.
Histogram>
Display
Convert chart to a histogram (relative frequency versus value)
EZXY User’s Manual, C&R Technologies, Inc.
1-5
Introduction
TABLE 1. EZXY
Menu
Window>
Help>
Right click edit>
Menu Option Summary
Submenu
Submenu
Description
Set Divisions
Change number of “buckets” displayed
Show Statistics
Opens a table of statistics associated with the histogram
Cascade
Cascade all charts
Tile
Tile all charts
Arrange Icons
Locates all minimized chart icons at lower frame of plotter window
Help
Open a hyperlinked version of this document.
Open CRTech Support Ticket
Request support with EZXY from CRTech
CRTech Home Page
Visit CRTech’s web site
About
Displays detailed version and build information
Export Image
Exports the current plot as a bitmap image, see Exporting Charts
and Data
Export Tabular Data
Exports a table containing the current plot data, see Exporting
Charts and Data
TABLE 2. EZXY
Tool Bar
Customize
Opens chart customization dialog, see Plot Customization
Print
Prints the existing plot, see Printing Charts
Add/Edit
Opens plot manager dialog to edit source file and plot content,
see Creating a Chart
Save
Saves a EZXY plot file
Reset
Resets view of a 3D chart
Tool Bar Option Summary
Title
Option (left to right)
Description
3D Operations>
Normal
Normal (end rotate, move or zoom commands)
3D Rotate
Rotate 3D chart
3D Move
Move a 3D chart
Chart Options>
File Options>
1-6
3D Zoom
Zoom on a 3D chart
3D Depth
Controls depth of a 3D chart
3D Chart
Toggle chart view between 3D and 2D
Edit/Customize
Opens chart customization dialog, see Plot Customization
Print
Opens print dialog, see Printing Charts
Copy
Copies current chart into memory/clipboard
Save (Ctrl+S)
Saves the current plot file
Add/Edit (Alt+A)
Opens plot manager dialog to edit source file
and plot content, see Creating a Chart
New XY Plot
Opens new plot file
EZXY User’s Manual, C&R Technologies, Inc.
Introduction
TABLE 2. EZXY
Tool Bar Option Summary
Tool Bar
Title
Plot Set>
Option (left to right)
Description
Copy to New Plot
Copies chart to a new plot
Open (Ctrl+O)
Opens an existing chart
Add a new plot
Creates a new chart in plot set
Open selected plots
Opens selected plot set charts
Open all plots
Opens all charts in the plot set
Add existing plot
Add an existing open chart to the plot set
Delete selected plot
Deletes selected chart
Copy selected plot to new file
Copes selected chart into a new chart within the
plot set
Save the plot set
Saves the plot set
Print selected plot
Sends selected chart to printer
Rename selected plot
Allows a chart in the plot set to be renamed
Export selected plots
Exports selected charts as *.png files
1.4 Getting Help
This help document is available as either a hyperlinked file or as a PDF document. The hyperlinked file is available as
the menu entry EZXY Help in the Sinaps or Thermal Desktop Windows Start menu groups, or via the Help->Help menu
option in EZXY. The PDF document version is available as the menu entry EZXY Help PDF File in the Sinaps or Thermal Desktop Windows Start menu groups.
To request help from CRTech Customer Support, use the Help->Open CRTech Support Ticket menu entry in EZXY.
This opens the following form:
EZXY User’s Manual, C&R Technologies, Inc.
1-7
Introduction
Here you should summarize the problem in a sentence and enter your phone number. Then you can click on Send to
email to transfer this information (along with debug information) to a new message in your email program. There you
can add any additional information and attach files, then send the message to CRTech, where our customer support
team will receive your message and contact you promptly. There is also a button on this form to open the CRTech
License Manager, to help debug licensing issues.
1-8
EZXY User’s Manual, C&R Technologies, Inc.
Creating a Chart
CHAPTER 2
Creating a Chart
To create a new chart, open the EZ-XY plotter and use the menu option File>New X-Y. This will open an empty plot
window. Once the plot window has appeared, data may be added to the chart using the Edit->Add/Edit menu option or
the Alt-A keyboard shortcut. An alternative is to simply choose Edit->Add/Edit with no chart open. This will create a
new chart and open the Add/Edit form. The Add/Edit form contains several tabs for managing input files and managing
the data to be plotted. When creating a chart, the input files must first be identified on the Input Files tab, and then the
chart content can be defined using either the SINDA/FLUINT Plot Manager or the Thermal Desktop Plot Manager tab.
When creating a chart directly from one of C&R Technologies’ graphical user interfaces (GUIs), Thermal Desktop or
Sinaps, the user can select the network elements to be plotted directly in the GUI and then select the plot option. The
input file will automatically be associated to the chart by the GUI and a plot window will appear with a completed
chart. EZXY will recognize various data types in the selection set and will provide multiple y-axes if necessary and, in
some cases, axis titles and units. Once created, the chart content can be further expanded or customized using the plot
manager and/or the customization dialog.
To open an existing chart saved as an ezp2 file, either drag and drop the file into the main EZXY window, or use the
menu item or Ctrl-O shortcut. Multiple ezp2 files may be dragged and dropped into the main EZXY window to open them all at once.
File->Open
The remainder of this chapter will discuss managing input files and chart content. Customizing the appearance of an
existing chart is discussed in “Plot Customization” on page 5-1.
2.1 Input Files
Input files are the files which contain the data to be plotted. An input file can be added by using the Edit->Add/Edit
menu option or icon (
). When the EZXY Input/Edit form appears, the user will see the tab that allows them to specify the Input File sources. The input files can be SINDA/FLUINT CSR folders, binary save files, Thermal Desktop heat
rate or RADK databases, or text files. When defining input files on the Input File tab, the input file(s) must be defined
on the appropriate sub-tab associated with its origin (i.e. SINDA/FLUINT, Thermal Desktop, or Text). Each input tab
may contain multiple input files or folders allowing the user to plot multiple results within a single chart. Additionally
EZXY User’s Manual, C&R Technologies, Inc.
2-1
Creating a Chart
multiple input types can be used in a single chart, for example data from a SINDA/FLUINT CSR folder and a Thermal
Desktop heat rate database can be plotted in a single chart. To define an input file or folder, click the browse button (
) in the Folder/File Name field and browse to locate the folder or file. After defining the input files, the various Plot
Manager tabs in the form can be used to define data content for the chart.
For information on defining SINDA/FLUINT results as input, please see“SINDA/FLUINT Input Files” on page 2-2.
For information on defining Thermal Desktop databases as input, see “Thermal Desktop Input Files” on page 2-3
2.1.1 SINDA/FLUINT Input Files
When defining input created by SINDA/FLUINT, the CSR folders or save files must be defined on the Input
Files>SINDA/FLUINT tab, shown below. This table provides two grids, one for associating data from a CSR folder to
the chart, the second for associating to a traditional save file. To define an input folder/file, click the browse button (
) in the Folder/File Name field and locate the input for plotting. When plotting data from multiple input files or
folders, each input folder or file must be defined in the input table.
Browse Button
Internal Name: This field is automatically set as the name of the input folder or file (less the suffix). However, the user
can change it at his/her discretion, perhaps to distinguish between two input files with the same name in different directories. The Internal Name is used to map each data series in the Selection Table of the Plot Manager tab (see Section
2.2) to a specific input defined on the Input File table. The internal name can be renamed by typing a new name in the
Internal Name field on the Input Files tab.When renamed for an existing chart, the name change will automatically
propagate throughout the selection table.
2-2
EZXY User’s Manual, C&R Technologies, Inc.
Creating a Chart
The Plot Manager dialog is only aware of the internal name, not the input files to which the internal name points. To
switch the entire chart from one input to another, all that is required is to change the folder or file which is pointed to by
the internal name on the Input Files tab. If you only want to change the input for a few series in the selection table (on
one of the plot manager tabs), use the Internal Name column in the selection table of the Plot Manager tab to re-point a
specific series to a different internal name.
Folder/File Name: This is the name of the input folder or file containing the data to be plotted. The browse button on
each line can be used to access a browser window to find the results to be used as input to the chart. After selecting a
folder/file, the name and path will automatically appear in the Folder/File Name field. Alternatively the full or relative
path and file name can be typed directly in the File Name field. If the path is stripped off of the name as shown with
myworkfolder\fishtran.sav in the graphic above, the path is assumed relative to the location of the folder in which the
chart file resides, in this case pointing to a subfolder called “myworkfolder”. The SINDA/FLUINT input may be a CSR
folder, save file, restart results, or reliability data created by one the following SINDA/FLUINT routines: SAVE,
RESAVE, or SAVEDB.
Source: This field specifies the type of machine (or source) that created the results file. The only options are PC and
Unix. (The use of the Unix option is extremely rare or specialized.)
X Type and Label: These columns store information internal to the plotter and cannot be changed by the user.
After defining the SINDA/FLUINT data to be used as source files, content can be added to the chart as defined in
“SINDA/FLUINT Plot Manager” on page 2-6.
2.1.2 Thermal Desktop Input Files
EZXY can be used to plot data from various Thermal Desktop databases: heating rate, radiation conductors and form
factors. When plotting heat rates, options are provided for plotting total absorbed heat, direct incident heat, or the number of rays shot for any or all types of heating sources; sources being solar, albedo and planetshine. Radiation databases
can be used for plotting hemispherical (integrated) emissivity, view factors to space, or the number of rays shot.
The first step to plot from a Thermal Desktop database is to define the input folder. Using the Input Files>Thermal
) in the Folder Name field and browse to the database folder
Desktop tab shown below, click the browse button (
(directory) to be used for plotting. This will typically be a *.rck folder for radiation conductors, a *.rcf folder for form
factors, or a *.rch for heating rates.
EZXY User’s Manual, C&R Technologies, Inc.
2-3
Creating a Chart
Browse Button
Internal Name: This field is automatically set as the name of the input folder. However, the user can change it at his/her
discretion, perhaps to distinguish between two input files with the same name in different directories. The Internal
Name is used to map each data series in the Selection Table of the Plot Manager tab (see Section 2.2) to a specific input
defined on the Input File table. The internal name can be renamed at anytime by the user by typing a new name in the
Internal Name field on the Input Files tab.When renamed for an existing chart, the name change will automatically
propagate throughout the selection table.
Folder Name: This is the name of the folder containing the input database to be plotted. For Thermal Desktop databases, this will be one of three folder options: *.rcf, *.rck, or *.rch. The browse button on each line can be used to
access a browser window to find the input folder. After selecting a folder, the name will automatically appear in the
Folder Name field. Alternatively the full or relative path and folder name can be typed directly in the Folder Name
field.
After selecting Thermal Desktop databases for the input files, the chart content can be further defined as covered in section “Thermal Desktop Plot Manager” on page 2-17.
2.1.3 Text Input Files
Text files can be plotted with the EZXY Plotter. This feature is useful for plotting model results together with test data.
Two text file formats are supported: column format and Thermal Desktop text transient format.
An example of column format is as follows:
Time, USUCP.69, USUCP.70, USUCP.71
1., 53.7093946669, 53.7093946669, 53.2207743327
2., 60., 65., 70.
2-4
EZXY User’s Manual, C&R Technologies, Inc.
Creating a Chart
The column format text file can be comma- or tab-delimited. The first row in the file will be used as the header data and
applied as series titles. A header data row must exist in the file and cannot include spaces in the series titles. Each subsequent row in the file contains data for one x-axis increment, e.g. x, y1, y2, y3..., yn. In the example above, time is the
X variable and USUCP.69, 70, and 71 represent the three series to be plotted.
Here is the same data in Thermal Desktop text transient format, which is also a valid input format for EZXY text input
files:
3
USUCP.69
USUCP.70
USUCP.71
1.
53.7093946669
53.7093946669
53.2207743327
2.
60.
65.
70.
The Thermal Desktop text transient format begins with an integer representing the total number of series, followed by
the names of each series, which must be of the form SUBMODEL.ID or just ID. If SUBMODEL is omitted, it is
assumed to be “MAIN”. Next is a line representing the time, followed by the data, either one series per line or all on
one line, separated by spaces. These last two items (time and series data) repeat for all times.
The data series defined by text input files will not appear in the selection tables of the SINDA/FLUNT or Thermal
Desktop plot manager. By default all data in the text file will be plotted. If only specific series from the text file are to
be plotted, use the Chart>Series tab of the Customization dialog to turn the visibility off for the series which are not to
be plotted (see “Chart Series Options” on page 5-2).
2.1.4 Modifying the Input File Table
Once a chart has been created, the input files used by the chart can be modified. To return to the Input File dialog click
) and move to the Input Files tab. The internal names can be changed, or they can be reassigned
the Add/Edit icon (
to a new input file by browsing to and selecting a new file or folder. Changing the input file which an internal name
points to allows the results being used as input for the chart to easily be changed throughout a chart. Renaming the
internal name of an input file on the Input Files tab will result in the name change propagating throughout the selection
table for the chart. To delete a file, click on the row number to highlight the row and use the delete key on the computer
keyboard.
2.1.5 Using Multiple Input Files
The table format on the input file tabs allows multiple source files to be defined for a single plot. When using more than
one input file, be sure to identify each one with a unique Internal Name.
EZXY User’s Manual, C&R Technologies, Inc.
2-5
Creating a Chart
2.2 Plot Manager
Each Input File sub-tab has an associated Plot Manager data tab except for the Text File tab. The Plot Manger tabs are
used to enable specific data selection, or plot content, from the input files and folders. The user must specify at least
one SINDA/FLUINT or Thermal Desktop input before the associated Plot Manager tabs can be accessed. For example,
to access the SINDA/FLUINT Plot Manager tab, at least one CSR folder or save file must be defined on the SINDA/
FLUINT Input File tab.
The Plot Manager tabs allows the user to customize the content of the chart, whereas the appearance of the chart (axes,
fonts, etc.) is generally controlled through the customization dialog or the chart editor (see “Plot Customization” on
page 5-1). The Plot Manager dialog also allows the user to control the association of each data series with an internal
name, selecting alternative x-axis parameters, controlling series labels in the legend, and applying expressions to either
the x or y axes.
Since there is no plot file associated with a text file, all content in the text file will be plotted. The visibility of individual series can be toggled through customization options (see “Plot Customization” on page 5-1.)
Once a chart has been created, the user can return to the plot manager using the Add/Edit icon (
such as input files or selected series can be changed at any time using this dialog.
). Chart content
The remainder of this section will discuss the usage of the various plot managers individually.
2.2.1 SINDA/FLUINT Plot Manager
If the input files identified for a chart are SINDA/FLUINT CSR folders or save files, the SINDA/FLUINT Plot Manager
must be used to select and prepare the data to be plotted. This dialog is accessible by clicking on the SINDA/FLUINT
Plot Mgr. tab after at least one input file has been defined. This plot manager contains three tabs of information Select
Item, X Axis and Axis Expression, each of these will be discussed in this section
2.2.1.1 Select Item Dialog
The SINDA/FLUINT data selection dialog is broken into two input areas: the Series Selection area and the Selection
Table, as shown in the figure below. The Series Selection allows the user to browse a model tree to select the content to
be plotted, such as network element parameters or registers. After identifying a network element to be plotted (e.g., a
lump), the user must select an associated parameter to be plotted (e.g., the pressure of that lump) by clicking on the
Select Data Type to Plot button. Once the series has been defined, clicking the Add Selections to Table button will add
the series to the Selection Table in the lower portion of the dialog. Each of the fields in the form are discussed in further
detail below. Clicking OK in the Input/Edit form will dismiss the edit form and update the chart.
2-6
EZXY User’s Manual, C&R Technologies, Inc.
Creating a Chart
Series Selection
Selection Table
Select Internal Name: If more than one input file or folder has been defined on the Input Files tab, this pull down sets
the current internal name. When data is added to the selection table it will be linked to the current internal name. When
the current internal name is changed, existing items in the selection table will not be affected, however any subsequent
additions to the selection table will use the newly selected internal name. The name which appears in this field is the
internal name defined on the Input Files tab. The model tree displayed below this field will vary depending on the content of the input file associated with the current internal name.
Model Tree: The Model Tree shown on the left in the graphic below, provides an expandable “tree” for browsing the
results defined in the input file or folder. It is organized by hierarchy of submodel type (fluid or thermal), submodel
name, network element type, or register. When selecting elements to add to a chart, the user must first select the element type in the tree, once selected, element numbers will appear in the adjacent pane.
EZXY User’s Manual, C&R Technologies, Inc.
2-7
Creating a Chart
Element Nums: The pane in the middle of the series selection area (shown in graphic above) will display the IDs of all
elements based on the type of network element selected in the model tree. The user must select these IDs to define
which specific network elements are to be plotted. The user can select a single ID by clicking it (it will highlight), or a
group of IDs using the shift or control keys during the selection process. Once the IDs to be plotted are highlighted, the
parameter to be plotted must be selected using the Select Data Type to Plot button.
Select Data Type to Plot: After a group of network element IDs have been selected, the Select Data Type to Plot button
will provide access to a list of all parameters available for plotting based on the type of element selected in the model
tree. For example, a node can have either the temperature or the capacitance plotted. After selecting a parameter, the
parameter acronym will appear in the associated data field and will be remain in effect for all subsequent series selections until either the parameter is changed or the type of network element is changed. After selecting the element numbers and the parameter, clicking the Add Selections to Table button will add the new series to the selection table in the
lower portion of the form. When plotting multiple parameters for a single element type, such as lump temperature and
pressure, select only the lumps for which the temperature is to be plotted and add them to the selection table, then
repeat the parameter selection process to select pressure and add them to the selection table.
2-8
EZXY User’s Manual, C&R Technologies, Inc.
Creating a Chart
Add Selections to Table: After selecting network element types, IDs, parameters, or selecting registers, the Add Selecbutton must be clicked to add the selected input to the Selection Table in the lower portion of the form.
Only items listed in the selection table will be displayed on the final chart.
tions to Table
Change Plot Items in Grid: This button is used for changing the “plot item” in the selection table. See “Modifying
Existing Series” on page 2-11.
Current Y Axis: EZXY supports multiple axes for plotting. The user can select a second y axis which will be located on
the right side of the plot. Before adding a new series to the selection table, the user may click the Set Y Axis button to
change the y axis from the default left to a right axis. Once the data field is set to left or right, all subsequent additions
to the selection table will follow this rule until it is changed. The Add button in the Set Y Axis dialog allows the user to
create additional Y axes for the chart. Additional X axes can be added after the chart has been created, as explained in
Section 5.1.3.8.
Reset Axis Labels: This option can be used when modifying existing charts (see “Modifying Existing Series” on
page 2-11) to reset the axis labels when the parameter being plotted has been changed. For example if you changed all
series from plotting lump temperature to plotting pressure, checking the Reset Axis Labels box will relabel the Y-axis
from temperature to pressure.
Reset Axis Limits: This option can be used to suppress the autoscaling of a chart when you wish to retain custom axis
limits. If the box is check, the chart will be autoscaled when the form is closed. When unchecked, custom axis limits
defined by the user prior to editing the chart will be retained when the form is closed. For retention of custom axis limits during other chart operations, please see the refresh/regenerate options (see “Refreshing and Regenerating Plots” on
page 4-1.)
EZXY User’s Manual, C&R Technologies, Inc.
2-9
Creating a Chart
Filter Retrograde X: This option is used to suppress retrograde values on the X axis (decreasing X values) which are
often encountered when using multiple input files or plotting the results of a parametric run. By default this box is
checked, suppressing decreasing X values. Unchecking the box will enable the display of retrograde values.
2.2.1.1.1 Selection Table
The Selection Table in the lower half of the Plot Manager provides a summary of the series which have been selected
for plotting. For each series, the table identifies the following
•
•
•
•
•
•
•
•
•
the submodel each series belongs to, if appropriate
the type of item to be plotted (e.g., lump, path, or register)
the ID of network element (“Item Number”), or the register name
the parameter (“Plot Item”) of the network element to be plotted
a series label which will appear in the chart legend
the internal name of the input file or folder being used
identifies the x-axis variable for the series
x and y axis expressions (optional)
y axis selection for this series (left, right, or custom)
Some of these settings for each series can be changed within the table, some can be changed elsewhere through the plot
manager, and some cannot be changed. Columns of data with a white background can be modified directly within the
selection table. These options include the label, source file association, and y-axis designation. Columns with a yellow
background cannot be changed in the Selection Table but may be modified elsewhere (in the options provided above
the Selection Table).
Label: This is the label with which the series will be identified in the plot legend. The series label defaults to the form
of [submodel].[parameter][element ID], or to the name of a register. For example SAMPLE.TL23 would be the label
for a plot of the temperature of lump 23 in submodel “sample.” The label can be changed through the Selection Table to
be any alphanumeric name.
Internal Name: This field identifies the internal name of the input file which is to be used for the series. The name displayed in this column is the internal name assigned to the input file/folder on the Input File tab. To change which input
is being used for a series, the user can select a different internal name from the drop down list in the data field. (Alternatively, the input the internal name points to can be changed on the Input File tab. This method is more useful for
global changes (to all entries in the table), and the pull down method is more useful when making changes to individual
series.) It is possible for the user to select an internal name which does not contain the item to be plotted. This will
result in a error message stating “For one or more lines, the size of the time array and data array don’t match...”, after
clicking OK, the resulting plot will exclude the incompatible series.
Y-axis Name: This identifies which y-axis (“left” or “right”) will be used for the data series on the plot. The y-axis
information can be changed using the pull down menu in the data field and selecting a new axis. The drop down menu
will display “left”, “right”, or the title provided to any additional axis created through the plot customization dialog (see
Section 5.1.3.8).
2-10
EZXY User’s Manual, C&R Technologies, Inc.
Creating a Chart
2.2.1.1.2 Adding New Series to a Chart
To add a new series to a chart, first select the internal name associated with the input to be used using the Select Internal Name pull-down in the upper left corner of the form. Next, use the model tree to locate the type of element (or register) to be plotted. The element IDs or register names will appear in the middle pane. Select the element ID or register
name to be plotted (hold the Ctrl or Shift buttons to select multiple items). Next, choose the Select Data Type to Plot
button. Either a drop down list or a tree of parameters will appear. Select the parameter to be plotted. Choose either the
left or right axis to be used for the data to be added (using the Set Y Axis button). Finally, choose the Add Selections to
Table button, and the new series will appear as specified in the Selection Table in the lower portion of the form.
2.2.1.1.3 Modifying Existing Series
The parameters for each series will appear in the Selection Table. The plot item, label, internal name, and left/right Y
axis designation columns may be edited, hence they are shown in white. (Yellow fields either cannot be changed in the
table, or must be changed using other methods.) The x-axis value and the x- and y-axis expressions can be changed
using other tabs, as explained below. For other changes (e.g., submodel or the element ID etc.), delete the line and recreate it.
To customize the appearance of a series (line thickness, color, etc.) use the customization dialog, see Section 5.1.1.
2.2.1.1.4 Changing the Parameter to be Plotted
The parameter to be plotted, such as temperature or pressure for a lump, can be changed for a single series, a group of
series or the entire Selection Table. When changing parameters to be plotted, the labels will not automatically update
unless the Reset Axis Labels box is check before leaving the SINDA/FLUINT Plot Manager dialog.
To change the parameter (plot item) of a single series in the Selection Table, e.g. changing a series to plot a lump pressure instead of a lump quality, click the [...] button to the right of the Plot Item cell. A parameter tree will appear. Select
the new parameter to plot and click OK to exit the dialog.
To change the parameter for multiple items, select multiple rows by clicking on the row number while holding the shift
key (range selection) or control key (individual selection) to highlight the rows to be changed. With the rows highlighted, use the Select Data Type to Plot button to select a new y-axis parameter. After exiting the parameter selection,
click the Change Plot Items in Grid button to apply the new parameter to the selected items in the table.
To change the plot item for all elements of a specific type (e.g. all nodes), click the Select Data Type to Plot button and
select a new parameter. After exiting the parameter selection dialog, click the Change Plot Items in Grid button to
apply the new parameter to all associated elements in the selection table. Note: when changing the parameter globally
for an element type, the plot item field must first be active (content displayed). If it is not active, select the element type
(node, lump, conductor, etc.) in the model tree to activate it.
2.2.1.1.5 Deleting a Series
A series can be deleted from the selection table by clicking on the row number on the left side of the table to highlight
the row and then press the delete key on the keyboard. A series can also be deleted through the series customization
dialog (see Section 5.2).
EZXY User’s Manual, C&R Technologies, Inc.
2-11
Creating a Chart
2.2.1.2 X-Axis Dialog
The SINDA/FLUINT X-Axis dialog provides the ability to change the parameter being plotted for the x-axis. By
default, save files are plotted using time as the x-axis parameter or record number if a time record is not found. The XAxis form contains two input areas, the X-Axis selection area and the Selection Table as shown in the figure below.
X-Axis Selection
Selection Table
The user may select any of the following parameters for the x-axis:
• TIME (the default)
• LOOPCT - steady state loop count
• LOOPCO - solver module, iteration count
• LOOPCR - reliability engineering module, iteration count
• NREC - record number, which is an integer variable associated with each saved solution point that is written to
the save file
• Processor variables - the model tree can be expanded and any processor variable (e.g., submodel.T30) can be
selected for the x-axis
• Register - a listing of all registers, any one of which could be used as the x axis.
For a parametric sweep of steady-state runs, choose the swept register as the x axis. For diagnosing convergence within
a steady-state run, it may be helpful to choose LOOPCT. To plot as a function of Solver calls to Procedure, choose
LOOPCO. Finally, if all other variations are inapplicable, the user can choose to plot versus the automatically-generated Fortran record number (NREC). (This NREC value is guaranteed to be unique for each point in the file.)
2-12
EZXY User’s Manual, C&R Technologies, Inc.
Creating a Chart
After selecting a new x-axis parameter, the Set buttons must be used to apply the change to all entries in the selection
table which use the current internal name, or only the selected rows of the selection table (must be highlighted before
using the Set button.) The current save file is indicated above the set buttons and can be changed on the Select Item
tab. After the x-axis parameter is changed it will appear in the data field below the set buttons and be updated in the xaxis column of the selection table. This new x-axis parameter will be for the default for subsequent additions to the
Selection Table until it is changed again using this X-Axis dialog. Note that if two x-axis parameters are applied to a
chart, the plot will need to be customized to either add a top or second horizontal axis (see Section 5.1.3.8).
2.2.1.3 Axis Expressions
The SINDA/FLUINT Axis Expressions dialog provides the ability to apply an expression to the raw data for either the
X or Y the plot axes. These expressions will be applied before the data is sent to the plotter. This feature is often useful
for converting units or scaling data. For example, if the temperature data is in units of degrees F but the plot should be
in units of degrees C, then a y axis expression of “(y-32)/1.8” will accomplish the conversion when it is applied to the
appropriate series containing temperature values.
The Axis Expression form shown below contains the selection table in the lower portion of the form and the tools to set
expressions in the upper portion.
Axis Expressions
Selection Table
EZXY User’s Manual, C&R Technologies, Inc.
2-13
Creating a Chart
Axis expressions may use the operators ( ) * + - / as well as ^ or ** for powers. They may also access the functions:
sin, cos, tan, asin, acos, atan, ln, log, exp, sqrt, abs, ciel and floor. They may also reference the following built-in conversion constants:
btuhrwat
cmtoin
dtor
ft3tom3
fttom
gasr
gasrsi
grav
gravsi
inhgtoat
intocm
jtobtu
kgs2lbh
lb2kg
lbf2n
lbf3kgm3
mtoft
pi
psi2pa
psitoat
rtod
sbcon
sbconsi
wmk2bhfr
= BTU/hr to watts = 2.930722e-1
= cm to inches = 0.3937007874
= degrees to radians = 0.017453292519943
= ft3 to m3 = 2.831685e-02
= ft to meter = 0.3048
= gas const in eng = 1545.0
= gas const in si = 8314.23
= gravity in eng = 416955600.0
= gravity in si = 9.80621
= inches of Hg to atmospheres = 3.342e-2
= inch to cm = 2.54
= joules to BTU = 9.480e-4
= kg/sec to lb/hr = 7.936641e+03
= lb to kg = 0.4535924
= lb force to newtons = 4.44822
= lb/ft^3 to kg/m^3 = 16.01846
= meters to feet = 3.280839895
= 3.141592653589739
= psi to pascals = 6.894757e+03
= psi to atmospheres = 6.804e-2
= radians to degrees = 57.2957795131
= sigma (Stefan-Boltzmann Constant) = 0.1712e-8
= sigma in si units = 5.6693e-8
= watts/m-k to BTU/hr-ft-F = 1.73073e+00
Expressions should be formed using the axis variable (x or y) as a replaceable variable. For example, an x axis expression may have the form x/3600.0 which will divide the raw data by 3600, possibly to convert from seconds to hours.
When the expression is evaluated the “x” will be replaced with the current data value and sent to the expression evaluator. The result will “replace” the read value in the display. No other variables other than the axis name (x or y) and the
built in conversion constants are recognized. In other words, when defining the x axis expression it is illegal to reference the y axis or other results stored in the input file.
To set an axis expression, type the expression in the appropriate expression data field on the left side of the form. After
defining the expression, the user must click one of the Set button to apply the changes. The three Set buttons provide
the options to apply the expression to all entries in the selection table, to apply the expression to entries using the current internal name (displayed above the Set buttons), or to apply the expression to only the currently selected rows in
the selection table (or grid). The two check boxes provide the user the ability to control which axis expressions will be
applied when the Set button is clicked.
Caution: Forgetting to uncheck the radio button for an axis whose expression is not being changed
could result in previously set expressions being erased.
2-14
EZXY User’s Manual, C&R Technologies, Inc.
Creating a Chart
Once an expression has been applied, the axis expression columns in the selection table will automatically update to
display the expressions. This provides a visual check to make sure the expressions are applied to the correct series.
2.2.1.4 Working with Multiple Input Files
The EZXY plotter supports plotting from multiple input files. The two primary reasons to plot from multiple files are to
compare the results of two different cases or to plot from multiple files created by restart operations. Note that each
source file (e.g. save file or CSR folder) will most likely have a unique X-axis range due to time step differences during
the solution process. Unlike the Excel Plotter and many other plot packages, EZXY is designed to deal with a unique
X-axis range for each series in a chart.
Comparing Results. In this situation, generally the goal is to create a separate series for each input file, perhaps distinguished by using different colors or lines styles. To create such a plot, click the Add/Edit option in the plot window
and go to the Input Files tab. Browse to and add a the second input file. Move to the Sinda/Fluint Plot Mgr tab and add
a series to compare from each input file. For example in the graphic below, the current internal name selection window
is used to pick the first file and a series was plotted to the chart. The current internal name was then changed and then
add the same series to the chart was added to the chart. Check to make sure the series are pointing to the proper input
files in the selection table. EZXY will automatically add a suffix to the second label to create a unique label for each
series, however the user can change the labels to be more descriptive. Click “OK” to create the plot. Since the data to
be plotted has been defined as two series in the selection table, two distinct lines have been plotted on the chart as
shown below.
EZXY User’s Manual, C&R Technologies, Inc.
2-15
Creating a Chart
Plotting From Restart Files. In this situation, the restart save set is typically a continuation of the first input file so
the user most likely wants the color and line style of the series to be continuous across the two save sets. The “All”
option in the Input Files column of the selection table will create a continuous series between multiple input files.
To create such a plot, click the Add/Edit option in the plot window and go to the Input Files tab. Browse to and add the
first and second input files. Move to the Sinda/Fluint Plot Mgr tab, set the current internal name to the be the first input
file and add each series to be plotted to the selection table. In the plot selection table, use the pull down in the Source
2-16
EZXY User’s Manual, C&R Technologies, Inc.
Creating a Chart
column and select “all” (shown below) for each series to make them continuous across both input files. Click “OK” to
create the plot.
Plot shown is not a restart file,
rather two save files to demonstrate how data is plotted a
continuous series.
(Compare to previous figure.)
2.2.2 Thermal Desktop Plot Manager
If Thermal Desktop databases are being used as the source files, the Thermal Desktop Plot Manager must be used to
select and customize the series of data to be plotted. This dialog is accessible by clicking on the Thermal Desktop Plot
Mgr. tab after source files have been selected. This plot manager contains three tabs of information Thermal Desktop
Data, Units, and Axis Expressions. Each of these will be discussed in this section
EZXY User’s Manual, C&R Technologies, Inc.
2-17
Creating a Chart
2.2.2.1 Thermal Desktop Data Dialog
This dialog is divided into three areas; the Series Selection area, Data Type Selection, and the Selection Table as shown
in the figure below. The Series Selection allows the user to browse the contents of the Thermal Desktop database for
network elements. The data type area allows the selection of the parameter to be plotted, such as total absorbed albedo
heat. The contents of the of data type selection area will vary depending on the type of database being used. Once the
series has been found and highlighted and the associated parameter type defined, clicking the Add to List button will
add the information in the Selection Table. Each of the fields in the form are discussed in further detail below.
Data Type Selection
Series Selection
Selection Table
Select TD Source: If more than one database has been defined on the input tab, this pull down defines the current database. The pull down menu can be used to change the current database. Changing the current database will not change
the database for items already in the Selection Table, however all subsequent additions to the table will use the current
database. Once an item is placed in the Selection Table, the TD source column can be used to change the source database. The name which appears in the TD Source field is the internal name provided when the source database was identified using the Input Files tab. The model tree displayed below this field will vary depending on which database is
selected.
Model Tree (left pane): The Model Tree provides and expandable means of browsing the database. It is organized by
hierarchy of submodel names and element type. The tree is used to locate network elements for plotting. After locating
2-18
EZXY User’s Manual, C&R Technologies, Inc.
Creating a Chart
a submodel in the model tree, selecting an element type, and highlighting it, the node IDs will appear in the Node Numlist to the right of the model tree.
ber
Node Numbers: The pane in the middle of the series selection area will display the IDs of all elements based on type
selected in the model tree. The user must select the IDs which are to be plotted. The user can select a single ID by clicking to highlight it, or a group of IDs using the shift or control keys during the selection process. Once the items to be
plotted are highlighted and associated parameters selected, clicking the Add to List button will add the items to the
Selection Table.
Add to List: After selecting network element IDs and parameters to be plotted, the Add to List button must be clicked to
add the data series to the selection table in the lower portion of the form. After items have be added to the list, additional elements with different parameters can be subsequently added to the list
Select Data Type to Plot: The contents of this area will vary depending on the type of database selected as the source as
shown below.
Heating Rate Database
Radiation Conductor Database
Form Factor Database
Source Selection: For solar heating, select
Solar, Albedo, and/or Planetshine. Diffuse
Sky options can be used to plot the diffuse
component of solar, albedo or planetshine
IR. If both solar and diffuse are selected,
the sum will be plotted.
Type: Select hemispherical (integrated)
emissivity, exchange factors (Radks) to
space, or number of rays shot.
Type: Select area*Fij to space or number
of rays shot.
Type: Select Direct incident, Direct
Absorbed, Reflected absorbed, Total
absorbed (the sum of direct and reflected
absorbed), or number of rays shot.
Divide by Area: Option to divide the
parameter by the area of the node
Divide by Area: Option to divide the
parameter by the area of the node
Divide by Area: Option to divide the
parameter by the area of the node
Set Source in Grid: This button can be used to modify source selections after items have been added to the selection
table. See “Modifying Existing Series” on page 2-20.
Selection Table: The Selection Table in the lower half of the Plot Manager provides a listing of all data series to be plotted. For each data series, the table identifies the following
•
in which submodel each series belongs
EZXY User’s Manual, C&R Technologies, Inc.
2-19
Creating a Chart
• the ID of network element or register name
• a series label for use in the legend
• source information indicating the type of data being plotted, heat rates (HR), RADKs, or form factors (FF), e.g.
HR-SAP indicates heat rates for solar, albedo and planetshine, while HR-D indicates heat rates for diffuse solar
only.
S = Solar
A = Albedo
P = Planetshine
D = Diffuse Solar
I = Diffuse IR
L = Diffuse Albedo
• the parameter type of the network element to be plotted (ex. TA indicates total absorbed for a heat rate database
and XCHNG indicates exchange factor to space)
• a check box indicated if it the parameter is divided by the area
• Thermal Desktop database source folder
• units for plotting
• x and y axis expressions
Some of the settings for each series can be changed directly within the table while others cannot be changed but may be
deleted and reentered. Columns of data with a white background can be modified directly within the Selection Table.
These include the label and area divide. The remaining columns with a yellow background cannot be changed within
the table.
Series Label: The series label defaults to the form of [submodel].[parameter][element ID]. For example SAMPLE.TL23 would be the label for a plot of the temperature of lump 23 in submodel “sample”. The label can be changed
through the selection table to be any alpha-numeric name.
2.2.2.1.1 Adding New Series
To add a new series to a plot, first use the Select TD Internal Name pull-down in the upper left corner of the form to
select which input file is to be used. Next, use the model tree to locate the type of element (or register) whose data is to
be plotted. The element IDs or register names will appear in the middle pane. Hold the Ctrl or Shift buttons to select
multiple items. Next, choose the Select Data Type to Plot button. Finally, choose the Add to List button, and the new
data will appear as specified in the yellow table (the Selection Table) at the bottom of the form.
2.2.2.1.2 Modifying Existing Series
The parameters for each line will appear in the Selection Table at the bottom of the form. The Label and the Area Div
columns may be edited, hence they are shown in white. (Yellow fields either cannot be changed in the table, or must be
changed using other methods.) The X axis value and the X and Y axis expressions can be changed using other tabs, as
explained below. For other changes (e.g., the submodel or the element ID etc.), delete the line and regenerate it.
The change the source of series in the selection table, check the boxes next to the sources to be plotted and the click the
Set Source in Grid button to apply it to all items in the table. To change an individual series, delete the series and add a
revised version to the table.
2-20
EZXY User’s Manual, C&R Technologies, Inc.
Creating a Chart
To customize the appearance of a series (line thickness, color, etc.) use the customization dialog, see Section 5.1.1.
2.2.2.1.3 Deleting a Series
A series can be deleted from the selection table but clicking on the row number on the far left of the table to highlight
the row and then press the delete key on the keyboard.
2.2.2.2 Units Dialog
Thermal Desktop databases are stored in standard SI units (watts, meters, seconds). The Unit tab shown below, provides the ability to change the units used when the plot is displayed. This form only applies to thermal desktop databases and does not apply to SINDA/FLUINT save files or text files. The list of pull down fields on the left side of the
form provides access to change units for individual parameters. The reset buttons on the right (SI and ENG) provide an
full parameter toggle for standard SI or standard ENG units. The derived units displayed below the reset buttons are the
units for display based on the current unit selection.
After selecting the units of choice, the SET button must be clicked to apply the changes. The Units column in the selection table in the lower portion of the form will update after the changes have been applied. Click OK to close the dialog
and return to the plot window.
Unit Selection
Selection Table
EZXY User’s Manual, C&R Technologies, Inc.
2-21
Creating a Chart
2.2.2.3 Axis Expressions
The Thermal Desktop Axis Expressions dialog provides the ability to apply an expression to the data for the X and primary Y plot axes. These expressions will be applied before the data is sent to the plotter. The Axis Expression form
shown below contains the selection table in the lower portion of the form and the tools to set expressions in the upper
portion. This dialog is distinct from the units dialog but can be used as an alternative method for applying unit conversions.
Axis Expressions
Selection Table
Axis expressions may use the operators ( ) * + - / as well as ^ or ** for powers. They may access the functions: sin,
cos, tan, asin, acos, atan, ln, log, exp, sqrt, abs, ciel and floor. They may also reference the following built-in conversion
constants:
btuhrwat
cmtoin
dtor
ft3tom3
fttom
gasr
gasrsi
grav
gravsi
inhgtoat
intocm
2-22
= BTU/hr to watts = 2.930722e-1
= cm to inches = 0.3937007874
= degrees to radians = 0.017453292519943
= ft3 to m3 = 2.831685e-02
= ft to meter = 0.3048
= gas const in eng = 1545.0
= gas const in si = 8314.23
= gravity in eng = 416955600.0
= gravity in si = 9.80621
= inches of Hg to atmospheres = 3.342e-2
= inch to cm = 2.54
EZXY User’s Manual, C&R Technologies, Inc.
Creating a Chart
jtobtu
kgs2lbh
lb2kg
lbf2n
lbf3kgm3
mtoft
pi
psi2pa
psitoat
rtod
sbcon
sbconsi
wmk2bhfr
= joules to BTU = 9.480e-4
= kg/sec to lb/hr = 7.936641e+03
= lb to kg = 0.4535924
= lb force to newtons = 4.44822
= lb/ft^3 to kg/m^3 = 16.01846
= meters to feet = 3.280839895
= 3.141592653589739
= psi to pascals = 6.894757e+03
= psi to atmospheres = 6.804e-2
= radians to degrees = 57.2957795131
= sigma (Stefan-Boltzmann Constant) = 0.1712e-8
= sigma in si units = 5.6693e-8
= watts/m-k to BTU/hr-ft-F = 1.73073e+00
Expressions should be formed using the axis name (X or Y) as a replaceable variable. For example, an x axis expression may have the form X/3600.0 which will divide the raw data by 3600, possibly to convert from seconds to hours.
When the expression is evaluated the “x” will be replaced with the current data value and sent to the expression evaluator. The result will “replace” the read value in the display. No other variables other than the axis name (x or y),
numeric values, operators, and the built in conversion constants are recognized. In other words, when defining the x
axis expression it is illegal to reference the Y axis or other items that may be in the save file.
To set an axis expression, type the expression in the appropriate expression data field on the left side of the form. After
defining the expression, the user must click the Set button to apply the changes. The three Set buttons provide the
option to apply the expression to all entries in the selection table, to apply the expression to entries using the current
save file (displayed above the Set buttons), or to apply the expression to only the currently selected rows in the selection table (or grid). Two additional check boxes provide the user the ability to control which axis expressions will be
applied when the Set button is clicked.
Once an expression has been applied, the axis expression columns in the selection table will automatically update to
display the expressions. This provides a visual check to make sure the expressions are applied to the correct series.
2.3 Statistical Plotting
Statistics are primarily meant to be used with the reliability options of SINDA/FLUINT (see Section 5 of the SINDA/
FLUINT User’s Manual: “Reliability Engineering”). However they can be used to examine any plotted data. The
choices under Statistics are Histogram and Show Statistics. The Histogram option will change the data display to a histogram of the data and will allow the user to specify the number of buckets (divisions) used to create the histogram.
The Show Statistics option will display the grid show below. When this grid is filled, the user may change the upper
and lower limits (the columns Low Lim and Hi Lim). Then, by clicking the Update Stats button, the displayed statistics
will be updated for the new limits. For descriptions of these values, refer to documentation on the RCSTTAB routine in
Section 7 of the SINDA/FLUINT User’s Manual.
EZXY User’s Manual, C&R Technologies, Inc.
2-23
Creating a Chart
2-24
EZXY User’s Manual, C&R Technologies, Inc.
Plot Sets
CHAPTER 3
Plot Sets
Plots can be grouped or organized using the plot set feature. A plot set is a collection of plots which can be opened,
refreshed, exported, and saved as a group. Plot sets are convenient when several plots are associated with a model or an
analysis project. After modifying and rerunning the models, the plot set can be opened and all plots refreshed at once
and then exported for reporting purposes.
Each plot within the plot set file is completely independent in that it can be customized, it can reference unique save
files or databases, etc. For example, a plot set may include plots of heating rates from Thermal Desktop along with
transient SINDA/FLUINT results and possibly the results of a parametric model from Sinaps.
New plots can be created within a plot set or existing plots can be added to a plot set.
3.1 Creating a Plot Set
To create a plot set use the file menu option File>New Plot Set. The following window will appear. The tool bar provides a means of performing the specified tasks specified.
EZXY User’s Manual, C&R Technologies, Inc.
3-1
Plot Sets
Add a new plot
Open selected plot
Open all plots
Add an existing plot
Delete selected plot
Copy selected plot to a new plot
Save plot set
Print selected plot
Rename a plot
Export plot(s)
Manage CRS folder or Save file
3.1.1 Adding Plots to a Plot Set
Once a plot set has been created, new plots can be added and existing plots can be transferred into the plot set. With the
plot set open, click on the Add a new plot icon to start a new X-Y plot. A query window will appear asking for a new
plot name. After entering a name, the new plot name will appear in the list of plots in the plot set window and a new XY plot window will appear. Data can be added to the new plot as previously discussed in “Creating a Chart” on page 21.
Alternatively, a previously created plot file (*.ezp2), possibly created via Sinaps or Thermal Desktop, can be added to a
plot set. In this case if the plot is not open, use the main EZXY Plotter menu option File>Open to open the existing plot
in the same EZXY window as the plot set. Once the plot is open, use the Add an existing plot icon to add the plot to the
plot set. The Add Plot to Set dialog shown below will appear. In the left pane highlight the plot file to add to the set,
provide a unique name in the new name data field and click OK. The new name will be added to the name list in the plot
set window.
Note that once a previously created plot file is added to the set, it can be modified in the plot set and will be saved with
the plot set. Additions or customizations made to the original plot file outside the plot set will have no effect on the
appearance of the plot inside the plot set. They are now two independent files.
3-2
EZXY User’s Manual, C&R Technologies, Inc.
Plot Sets
3.1.2 Saving Plot Sets
To save a plot set, use the save icon in the plot set window. Plot sets are saved with the suffix of “ezps2”. If the main
EZXY menu File>Save is used, it will save the individual plot externally from the plot set as a separate plot file
(*.ezp2).
3.1.3 Refreshing Plots
To refresh any individual plot or all the plots in a plot set, use the regenerate or refresh options in the main EZXY edit
menu.
3.1.4 Renaming a Plot
Any plot in the plot set can be renamed by highlighting the plot name in the plot set window and then click the rename
icon. A query window will appear. Provide the new name and click OK.
3.1.5 Editing a Plot
A plot within a plot set can be edited in the same manner as any individual plot. Input files and plot content can be
modified using the Add/Edit dialog and the appearance of a plot can be changed using the Customization dialog, see
“Plot Manager” on page 2-6 and “Plot Customization” on page 5-1 respectively.
3.1.6 Globally Managing the Input Files
A separate input file manager is available for global management of the CSR folder or Save file. When the plot set contains multiple charts using one or more CSR folders or save files, any input folder or file can be changed globally
(across all charts) by using the Manage CRS Folder and Save File dialog. This dialog allows the user to substitute any
CSR folder or save file for an existing folder or file throughout the plot set. CSR folders can only be replaced with a
CSR folder and a save file can only be replaced with a different save file. This will re-point the internal names in the
Add/Edit dialog for each chart to the new input file.
3.2 Exporting and Printing Plot Sets
Once a plot set has been created, the plots can be printed and exported individually or together. To print either a portion
or the entire plot set, select the plots to be printed in the plot set window and click the Print icon on the plot set tool bar.
Likewise, to export plots from the set, select the plots to be exported and click the Export icon on the tool bar.
For more information on exporting and printing see “Exporting and Printing” on page 6-1.
EZXY User’s Manual, C&R Technologies, Inc.
3-3
Plot Sets
3-4
EZXY User’s Manual, C&R Technologies, Inc.
Viewing Plots
CHAPTER 4
Viewing Plots
4.1 Refreshing and Regenerating Plots
After a plot as been created, if the input file is updated, the plot can be refreshed or regenerated to reflect any changes
to the underlying data. EZXY provides two options, refresh and regenerate. Refresh will update the plot while retaining
any custom axis limits the user may have defined. Regenerate will re-enable autoscaling upon regenerating the plot. To
update a plot, select the menu item Edit>Refresh Plot or Edit>Regenerate Plot. If multiple plots are open in a single
EZXY window, the Edit>Refresh All and Edit>Regenerate All command will update all the plots in the window.
4.2 Scroll and Zoom
Once a plot is created, EZXY provides scroll and zoom features which are useful for zooming into a portion of a large
plot and then scrolling through the chart.
4.2.1 How to Zoom (2D)
To zoom in on a Chart, press the left mouse button at the top left hand corner of the target zoom area and maintaining
the mouse button pressed, drag out the rectangle to the bottom right hand corner of the zoom area. Release the mouse
button and the Chart will update to contain only the area selected. Zoom properties can be customized, see “General>Zoom Options” on page 5-14.
To undo the zoom, press the left mouse button anywhere on the Chart area and drag up and left with the mouse button
depressed. Release the button and the Chart will redraw the full extent of the data.
The 3D zoom mode icon (Section 4.3.3, accessed using the
should only be used with caution.
icon) is distinct from the above manipulations, and
EZXY User’s Manual, C&R Technologies, Inc.
4-1
Viewing Plots
4.2.2 How to Scroll
By default, the scroll option uses the right mouse button. Due to the right click option menu in EZXY, the default scroll
feature has been disabled. The scroll feature can be changed per “General>Scroll Options” on page 5-15 to use the middle mouse button. To scroll a Chart across, press the middle mouse button and maintaining the mouse button pressed,
drag the mouse in the direction you wish to scroll the Chart. When you release the mouse button the Chart will remain
at the new location.
To undo the scroll, press the left mouse button anywhere on the Chart area and drag up and left with the mouse button
depressed. Release the button and the Chart will redraw to the originally defined Chart area.
4.3 3D Viewing
The EZXY Plotter allows viewing of charts in either two dimensions (default) or in a three dimensional view. Once a
chart has been created, the view can be changed to 3D using either the 3D tool icon,
, or by selecting the 3D option
in the customization dialog (see “Chart>3D Options” on page 5-22). A sample 3D chart is displayed below. To change
a 3D chart back to 2D if no editing has been performed in 3D, click on the 3D icon in the tool bar a second time.
Once a chart has been defined as 3D, the 3D tool bar can be used to rotate, move, or change the depth of the chart.
Clicking any of the following icons automatically turns the chart into the 3D mode:
To exit 3D mode, make sure the “Normal” (arrow) icon is selected
and all other 3D icons are not selected. If the axes do not return to
normal, use the Edit>Reset option.
4-2
EZXY User’s Manual, C&R Technologies, Inc.
Viewing Plots
The remainder of this section will cover 3D chart operations. A 3D chart can be further edited using the 3D chart
options dialog, see “Chart>3D Options” on page 5-22.
4.3.1 3D Rotate
A 3D chart can be rotated using the Rotate icon ( ). An example of a rotated chart is shown below. When rotating a
chart, it can be rotated both vertically and horizontally around the center of the chart. Once the rotate icon has been
clicked, the icon will become highlighted. As long as the icon is highlighted you will remain in rotate mode. To exit
rotate mode, click the “Normal” button
to exit. To undo a rotation, use the menu option Edit>Reset to return the
chart to the default orthogonal view.
4.3.2 3D Move
A 3D chart can be moved using the Move icon (
). Once the move icon has been clicked, the icon will highlight. As
long as the icon is highlighted the move mode is active. To exit move mode, click the “Normal” button
undo a move, use the menu option Edit>Reset to return the chart to the default orthogonal view.
to exit. To
4.3.3 3D Zoom
A 3D chart can be zoomed using the Zoom icon (
). Once the zoom icon has been clicked, the icon will highlight. As
long as the icon is highlighted the zoom mode is active. To exit zoom mode, click the “Normal” button
undo a move, use the menu option Edit>Reset to return the chart to the default orthogonal view.
EZXY User’s Manual, C&R Technologies, Inc.
to exit. To
4-3
Viewing Plots
4.3.4 3D Depth
The Depth icon ( ) can be used to control the depth of a 3D chart. A sample of chart with increased depth is shown
below. Once the Depth icon has been clicked the icon will highlight and EZXY will remain in depth control mode. To
exit depth control, click the “Normal” button
to exit. To undo a change to the depth of chart, use the menu option
Edit>Reset to return the chart to the default orthogonal view.
4-4
EZXY User’s Manual, C&R Technologies, Inc.
Plot Customization
CHAPTER 5
Plot Customization
Once the content of the plot is defined via the plot manager tab, the plot can be further customized using the Customize
Plot dialog accessible either through the Customize icon (
) or via the right click Customize option. The customization dialog shown below allows the user to extensively modify the look of a plot. The top row of tabs provide access to
Chart customization, Series customization,Tools, and Themes. Each of these will be discussed in the sections below.
EZXY User’s Manual, C&R Technologies, Inc.
5-1
Plot Customization
5.1 Chart Display Customization
Chart display features are those which affect the overall appearance of the Chart. They include those properties and
methods that define the color of the background, titles and their position, margins, borders and bevels, background
images, frame and axis visible, pen colors and widths, 3D, walls, etc.
The chart display customization tab provides access to control the display properties. There are several tabs associated
with the Chart tab: Series, Panel, Axes, General, Titles, Walls, Paging, Legend, and 3D. Due to the broad capabilities of
the underlying plotting package “TeeChart,” some features may not be applicable to EZXY and will not be discussed
herein.
5.1.1 Chart Series Options
The Chart Series tab is shown below. This dialog provides access to controlling series visibility, adding a function
series (a new series defined as a function of another series), customizing the appearance of the plot field, customizing
axes, customizing the legend, adding titles, etc.
5.1.1.1 Series Visibility
The visibility of any series may be toggle on/off using the check box on this tab. A series is visible if the check box has
been checked. The series visibility can also be controlled through visibility check boxes in the legend, see “Chart>Legend Options” on page 5-19.
Visibility Toggles
5-2
EZXY User’s Manual, C&R Technologies, Inc.
Plot Customization
5.1.1.2 Adding a Custom Series
The Add button allows a new series to be defined. This dialog contains two tabs: Series and Functions. Since the plot
content is controlled via the Plot Manager dialog (Section 2.2), this Chart>Series tab is not appropriate for adding a
new series based on the source file or a text file. However, a user-defined series can be added using this dialog (e.g., the
difference between the pressure of two fluid lumps).
Adding a User-defined Series. After clicking the Add button on the Chart>Series tab, select the series type, such
as Standard>Line. Click OK to add the new series to the chart. Use the top level Series tab to customize the new series.
The Data Source tab allow manual definition of the new series. For a simple horizontal or vertical line, it may be easier
to use the Tools>Axis>Color Line option (Section 5.1.3).
Adding a Function Series. The Add button is useful for adding a new function series to the chart, i.e., a series
which is based on data contained in other series within the chart. Functions can be defined as arithmetic functions
(addition, subtraction, multiplication, etc.), statistical, or extended which includes options to smooth a line, add a trend
line, curve fitting, etc.
After clicking the Add button, the Functions tab allows a new series to be define as a function of other series in the
chart. Once a function has been selected, clicking OK will bring up the Series>Data Source dialog. This dialog allows
the Functions to be selected or changed and the Source Series to be defined. Functions are performed on selected series
in descending order. Once the function has been setup, the Apply button must be clicked to create the new series.
For example, in the chart below (TVS sample problem) the volume ratio is defined as a function: the volume of a tank
divided by a register. First, each of these parameters (HYDRO.VOL1 and VTANK) must be requested as series in the
Selection Table and plotted. In the customization menu, the plotting of the user-defined volume ratio can be accomplished by clicking the Add button, and in the next window selecting the Functions tab. Next click on the Divide option
EZXY User’s Manual, C&R Technologies, Inc.
5-3
Plot Customization
and click OK. In the next dialog, use the arrow buttons to move the series to be used in the function from the left to the
right pane. The up and down buttons can be used to control order of the series in the function. In this example, the ratio
is defined as HYDRO.VOL1/VTANK so HYDRO.VOL1 must appear at the top of the list. Additional tabs (format,
points, general, data source, and marks) allow further customizing of the series. The General tab provides access to
specify which vertical and horizontal axes are to be used for the series, in addition to controlling the number format
(see analogous features in Section 5.1.3.5).
Now a new series (line5) is available the chart as shown below. The Title button can be used to rename the plot from
line5 to “Volume Ratio” and the visibility of the two series VTANK and HYDRO.VOL1 can be turned off by unchecking the visibility boxes. Click close to save the changes and close the dialog.
5.1.1.3 Delete a Series
The Delete button can be used to delete a series. Note that this will also delete the series in the EZXY selection table in
the Plot Manager dialog (Section 2.2). Series can also be deleted directly from the plot manager Selection Table (e.g.,
Section 2.2.1.1) by highlighting the series line in the table and using the delete key on the keyboard.
5.1.1.4 Series Title
The Title button can be used to change the title or name of a series. This is the name of the series which is displayed in
the legend. This feature is useful for renaming a custom series, however it is not recommended for changing the title of
a series previously defined in the plot manager Selection Table (e.g., Section 2.2.1.1). Otherwise, the change will only
be temporary and when the plot is refreshed, the legend will return to the name defined in the EZXY Selection Table.
5-4
EZXY User’s Manual, C&R Technologies, Inc.
Plot Customization
To change the name of an series defined through the EZXY Plot Manager (versus a user-defined function), change it
directly in the “Label” column of the Selection Table.
5.1.1.5 Change a Series
The Change button allows access back to the Functions tab to change a user-defined series based on a function.
5.1.1.6 Series Order
The order of the series can be changed using the up/down arrows in the Chart>Series dialog. To move a series, highlight it and then click the arrow buttons to relocate it.
Arrows for controlling
series order
5.1.2 Chart Panel Options
The Panel tab provides access to customization options for the plot panel, which is the border area around the plot field
(not within the plot area). The background in the center of the plot (under the lines in 2D, and surrounding the plotted
lines in 3D) is called a wall. Refer to Section 5.1.6 for options for customizing the walls of the chart. Those options parallel the ones described in this section, including the ability to change the background color and apply an image or gradient.
Secondary tabs in the Panel dialog provide the ability to control the borders, background, margins, gradient, and shadowing.
EZXY User’s Manual, C&R Technologies, Inc.
5-5
Plot Customization
5.1.2.1 Panel Borders
The Borders tab allows the border (outer frame) of the chart to be modified. The Border button provides access for
turning the visibility of the border on or off via the Visible check box. Mixing borders and bevel options can give the
appearance of 3D to a chart. On the right below is a customized border with a line width of 5 and colored orange.
The Bevel area provides the ability to add a bevel to the border as shown below. In this example, a lower bevel has been
added in red to the orange border.
5-6
EZXY User’s Manual, C&R Technologies, Inc.
Plot Customization
5.1.2.2 Panel Background
The Background tab allows the background color of the panel to be changed. The Color button can be used to set the
color. The Pattern button may be used to select either solid, hatch, gradient or image. Note that by default the gradient
is set to be visible. It must be turned off and the solid visibility enabled in order to see color changes. The example
below has the background color set to be yellow.
The background transparency can also be controlled on a scale of 0 to 100, with 0 meaning not transparent (opaque),
and 100 meaning fully transparent. The background can also be defined to be an image.
To modify the plot area color or gradient, see “Chart>Walls Options” on page 5-17.
EZXY User’s Manual, C&R Technologies, Inc.
5-7
Plot Customization
5.1.2.3 Panel Margins
The panel margins can be increased or decreased using the Panel>Margin dialog. The margins define the distance
between the frame of the chart and the edges of the plot area.
5.1.2.4 Panel Gradient
A color gradient can be defined for the panel background. By default the gradient is turned “on.”
The Format tab controls the type of gradient, horizontal, vertical, radial, or diagonal. The Angle field allows the angle
of the gradient to be changed. The Visible check box allows the gradient to be turned on or off.
The Color tab provides access to define the gradient to be based on two or three colors. Use the No Middle Color check
box to disable the middle color. Use the Start, Middle, and End buttons to set the three colors. The example below
shows a background gradient with custom colors.
To modify the plot area color or gradient see “Chart>Walls Options” on page 5-17.
5.1.2.5 Panel Shadow
The Shadow tab provides the ability to add a drop shadow to the chart to give it a 3-dimensional look. The Color button
allows the color of the shadow to be modified. The slider bar below the Color button allows the intensity of the color to
be set. The Pattern button allows a hatch, gradient or image to be associated with the shadow.
The size fields allow the width and height of the shadow to be modified. The transparency of the shadow can be controlled using a scale of 0 to 100, with 0 meaning not transparent (opaque), and 100 meaning fully transparent. The
background can also be defined to be an image.
5.1.3 Chart Axes
EZXY provides access to one x-axis and two y-axes in the plot manager Selection Table (e.g., Section 2.2.1.1). Additional x and y axes can be added through the Chart>Axes dialog, shown below. Additionally, this dialog can be used to
customize the scale, title, ticks, tables and position of any axis
5-8
EZXY User’s Manual, C&R Technologies, Inc.
Plot Customization
Axis Selection
Customization
5.1.3.1 Axes Selection
The left panel of the Chart>Axes is used to select which axis is to be customized. To customize an axis, select the axis
name in the left panel to highlight it, and then use the tabbed panels on the right side of the dialog to access the various
customization options for the selected axis.
The dialog also provides the ability to add new axes, as described in Section 5.1.3.8. The default axes are left, right,
top, bottom, depth bottom, and depth top axes. The visibility button at the upper left, above the Axes list, turns the visibility on or off for all axes.
5.1.3.2 Axes Scales
The Axes>Scale dialog shown below allows the scale of an axis to be modified. To customize the scale of an axis, be
sure to first select the axis to be modified in the list of axes on the left side of the dialog.
By default, axes are autoscaled as indicated by the Auto box being checked. If the Auto check box is unselected, the
min/max values for the axis (lower and upper limits) can be controlled using the Minimum and Maximum tabbed dialogs. To change a scale limit, uncheck the Auto box on the tab and then click on the Change button located on the Minimum/Maximum tabs. The subsequent dialog provides a Value field where the new limit can be input.
EZXY User’s Manual, C&R Technologies, Inc.
5-9
Plot Customization
The Offset field allows the min/max level of the axes to be offset from the frame of the plot field. By default, EZXY
sets this value to be 3. This offset allows a series to be more visible if it is pegged at the limit of the axis: it avoids both
the plotted line and the axis from overlapping.
The visibility of the axes can be controlled using the Visible check box. If visibility is set to off, any series using the
axis will still be plotted but no axis will be visible. To disable the visibility of the series, see Section 5.1.1.1.
The Inverted check box will invert the scale, swapping min/max locations.
The Change button located under the Automatic check box allows the increment of the numbers on the axis scale to be
changed. To the right of this button, the current increment is shown. An increment of 0 defaults to automatic increment
selection.
The Logarithmic button is used to change the scale to logarithmic which defaults to base 10, although this can be
changed. The ‘e’ check box allows the scale to be changed to base e.
5.1.3.3 Axes Title
The Axes>Title dialog allows the title of each axis on the plot to be modified. To customize the title of an axis, be sure
to first select the axis to be modified in the list of axes on the left side of the dialog
The Style tab provides access to the Title field and the angle of the title (useful for 3D plots). The Text tab provides
access for customizing the look of the text. The Font button dialog allows the font name, style and size to be set along
with the color. A drop shadow can be added using the Visible check box in the Shadow portion of the form. The color
and intensity of the shadow are controlled via the Color button and the slider below the button. The Size fields control
the offset of the shadow from the text. Transparency and patterns can also be applied to the drop shadow.
5.1.3.4 Axes Ticks
The Axes>Ticks dialog provides control for the axis line, major tick marks and inner tick marks. To customize the ticks
or line of an axis, be sure to first select the axis to be modified in the list of axes on the left side of the dialog.
There are three types of tick marks, major, minor and inner. Minor tick marks are controlled via the Axes>Minor dialog.
5-10
EZXY User’s Manual, C&R Technologies, Inc.
Plot Customization
The Axis button allows the modification of the axis line. The visibility can be turned off, the color changed, the line
width changed, and the line type may be changed.
The Ticks button controls the visibility, color, width, and line style for the major tick marks on the axis. The top Len
data field controls the length of the major tick mark.
The Grid button provides access to customize the major grid in the plot field. Line color, type, visibility, and width may
all be changed. The Draw every data field controls placement of the major grid lines; the number of major tick marks
between grid lines. For controlling the minor grid, see Section 5.1.3.6.
5.1.3.5 Axes Labels
The Axes>Labels dialog provides control over the appearance of the numeric labels on an axis. To customize the labels
of an axis, be sure to first select the axis to be modified in the list of axes on the left side of the dialog.
Three tabs provide access to style, format, and text control.
Label Scale. On the Style tab, the label scale visibility can be toggled using the Visible check box. The Round first
check box will round off the first label of axes to the nearest increment specified on the Axes>Scales tab. The Alternate
check box will offset every other label along the axis, providing a fine grid to be used without overlapping the scale
labels.
The location of the labels and orientation can be controlled using the Size and Angle fields. The Min Separation %
defines the minimum spacing between labels. These are all defaulted to automatic if set to 0. If left as the default, the
minimum separation will be autodefined to prevent overlap of labels. The Style option should be left as Auto.
EZXY User’s Manual, C&R Technologies, Inc.
5-11
Plot Customization
Label Format. The Format tab controls the format for the numeric labels. The default format is #,##0.### which is a
general format. In some cases, EZXY will automatically select scientific notation (00e0) as the format. Other formats
are available if needed.
The table below shows sample numbers in the top row and sample formats in the left column, with the entries in the
table showing the result of the format on the left applied to the number at the top. A zero (“0”) means a digit should be
printed, whereas a number sign (“#”) means to print a digit if applicable.
The format string may consist of up to three parts, separated by a semi-colon (“;”). The three parts are: format for positive; format for negative; format for zero. If only a single format appears, it will be used for all numbers.
Format String
1234
-1234
0.5
0
0
1234
-1234
1
0
0.00
1234.00
-1234.00
0.50
0.00
#.##
1234
-1234
.5
.0
##0.00
1,234.00
-1,234.00
0.50
0.00
#,##0.00;(#,##0.00)
1,234.00
(1234.00)
0.50
0.00
#,##0.00;Zero
1,234.00
-1234.00
0.50
Zero
0.000E+00
1.234E+03
-1.234E+03
5.000E-01
01 0.000E+00
#.###E-0
1.234E3
-1.234E3
5E-1
0E0
Label Text. The Text tab provides access for customizing the look of the label text. The Font button dialog allows the
font name, style and size to be set along with the color. A drop shadow can be added using the Visible check box in the
Shadow portion of the form. The color and intensity of the shadow are controlled via the Color button and the slider
below the button. The Size fields control the offset of the shadow from the text. Transparency and patterns can also be
applied to the drop shadow.
5.1.3.6 Axes Minor
The Axes>Minor dialog controls the display for the minor grid and ticks in the plot field. To customize the ticks or grid,
be sure to first select the axis to be modified in the list of axes on the left side of the dialog. The major grid and ticks are
controlled via the Axes>Ticks dialog, see Section 5.1.3.4.
5-12
EZXY User’s Manual, C&R Technologies, Inc.
Plot Customization
The Ticks button controls the visibility, color, width, and line style for the minor tick marks on the axis. The Length
data field controls the length of the minor tick marks. The Count field controls placement of the minor tick marks; the
number of minor tick marks between major ticks.
The Grid button provides access to customize the minor grid in the plot field. Line color, type, visibility, and width may
all be changed. The minor grid will be drawn at every minor tick mark.
5.1.3.7 Axes Position
The Axes>Position dialog controls the location of an axis. To customize the position of an axis, be sure to first select
that axis in the list of axes on the left side of the dialog.
The Position field controls the offset of the axis line from the origin. For a vertical axis, this will be a horizontal offset;
for a horizontal axis, this will be a vertical offset. The Start field controls the location for the left end of a horizontal
axis, or the top end of a vertical axis, while the End field controls the right end of a horizontal or lower end of a vertical
axis. The Z field controls the depth of an axis when displayed in 3D mode. Units can be set to either pixels or percent.
5.1.3.8 Adding/Deleting an Axis
The easiest way to add additional Y axes to a chart is through the “Current Y Axis” section of the “SINDA/FLUINT
Plot Manager” on page 2-6. However additional axes can also be created through the customization dialog. This dialog
also allows additional X axes to be created in a plot.
New axes can be added using the ‘+’ button below the list of axes. New axes will be labeled Custom 0, Custom 1, Custom 2, etc.
An axis may be deleted by selecting the axis in the Axes list and then clicking the ‘-’ button. Only custom axes may be
deleted. The default axes (left, top, bottom etc.) cannot be removed.
Note that when plotting a variety of SINDA/FLUINT network elements (lumps, nodes, paths, ties, etc.), the EZXY
Plotter will automatically determine that different scales are needed for each of the various elements. In such a case
additional y-axes will automatically be created as shown below and titles assigned based on the parameter being plotted. Each of these axes may be further customized by the user. These automatically generated axes are also accessible
through the plot manager Selection Table if additional series are added to the plot. This feature eliminates the need to
manually create new axes in most cases.
EZXY User’s Manual, C&R Technologies, Inc.
5-13
Plot Customization
5.1.4 Chart General Options
and Scroll are useful aids for focusing on specific data in a densely populated chart. The Chart>General dialog
provides access for controlling zoom, scroll and cursor options in the EZXY Plotter.
Zoom
5.1.4.1 General>Zoom Options
The General>Zoom tab provides control for the zoom features. The scroll feature can be enabled or disabled using the
Allow check box. The zoom can be animated (stepping in or out of the zoomed view) by clicking the Animated check
box. The Steps field controls how many increments will be used for the animation.
5-14
EZXY User’s Manual, C&R Technologies, Inc.
Plot Customization
The Pen and Pattern buttons provide access to customize the appearance of the zoom window. The Direction field controls the type of zoom allowed (horizontal, vertical or both). The Mouse Button field allows the zoom option to be reassigned to a different mouse button versus the default of left.
5.1.4.2 General>Scroll Options
The General>Scroll dialog allows the properties of the scroll feature to be modified by the user. By default the scroll
will be both horizontal and vertical using the right mouse button. Since the EZXY Plotter uses the right mouse button
for the options menu, the scroll feature is disabled by default. To enable the scroll feature, it is recommended that the
Mouse Button field be changed to the middle button.
The Allow Scroll dialog allows the scroll direction to be changed.
5.1.4.3 General>Cursor Options
The General>Cursor dialog allows the user to change the appearance of the cursor.
5.1.5 Chart>Titles Options
The header title of the chart appears above the plot by default. The appearance and location of the title can be customized using the Chart>Titles option in the Customization dialog. This dialog is divided into Style, Position, Format,
Gradient, Shadow, Text, and Bevels.
5.1.5.1 Titles Style
The Titles>Style tab can be used to change the chart header, add a sub header, or add footers. The Title pull down
allows the user to select which of the title options is to be customized. Once selected, all customization on the title tabs
will be applied to the selected title option.
The new title or foot text must be defined in the text field in the lower portion of the dialog. Note the text will not automatically wrap in the title area so “returns” are required for multiline text. The visibility of the title can be toggled on/
off using the Visibility check box. The Alignment field allows the title to be centered or left/right justified.
EZXY User’s Manual, C&R Technologies, Inc.
5-15
Plot Customization
Chart Title
Subtitle
Footer
5.1.5.2 Titles Position
By default, EZXY automatically adjusts the positions of the titles, plot, and axes. However the title position can be
changed. Be aware that the margins and/or the legend position may need to be modified also if the title position is
changed.
To customize the position of a title, first check the Custom check box. This will disable automatic positioning. Use the
Left and Top data fields to adjust the position of the title from the left and top edges of the chart window. Remember
that the chart margins and legend position may also need to be adjusted.
5.1.5.3 Titles Format
The Titles>Format dialog provides the ability to add a frame area around a header or footer. Using the Color button, the
background color of the title area can be set. The Frame button allows the color and thickness of the frame around the
title area to be set. Transparency and patterns can also be added.
5.1.5.4 Titles Gradient
A color gradient can be defined for the title area background. By default the gradient is turned off.
The Format tab controls the type of gradient: horizontal, vertical, radial, or diagonal. The Angle field allows the angle
of the gradient to be changed. The Visible check box allows the gradient to be turned on or off.
The Color tab provides access to define the gradient to be based on two or three colors. Use the No Middle Color check
box to disable the middle color. Use the Start, Middle, and End buttons to set the three colors.
5.1.5.5 Titles Shadow
The Titles>Shadow tab provides the ability to add a drop shadow to a title to give it a 3D look. The Color button allows
the color of the shadow to be modified. The slider bar below the Color button allows the intensity of the color to be set.
The Pattern button allows a hatch, gradient or image to be associated with the shadow.
5-16
EZXY User’s Manual, C&R Technologies, Inc.
Plot Customization
The size fields allow the width and height of the shadow to be modified. The transparency of the shadow can be controlled from 0 to 100, with 0 meaning not transparent (opaque), and 100 meaning fully transparent.
5.1.5.6 Titles Text
The Titles>Text tab provides access for changing the appearance of the title text. The Font button dialog allows the font
name, style and size to be set along with the color. A drop shadow can be added using the Visible check box in the
Shadow portion of the form. The color and intensity of the shadow are controlled via the Color button and the slider
below the button. The Size fields control the offset of the shadow from the text. Transparency and patterns can also be
applied to the drop shadow.
5.1.5.7 Titles Bevel Option
A bevel can be added to a title area using the Titles>Bevels tab.
5.1.6 Chart>Walls Options
The Chart>Walls dialog controls the appearance of the plot field walls. Since the EZXY Plotter can display plots as 3D,
options exist for customizing the left, right, back and bottom walls. For a 2D plot, the plot field is the back wall. Below
is an example of a 2D and 3D chart with custom walls, the back wall is blue, the bottom wall white, the left wall is grey,
and the right wall has the visibility turned off. Notice only the back wall is visible in the 2D mode.
The Visible Walls check box allow the user to turn off the visibility of all walls at once. This overrides the Visible check
box located on each wall tab.
EZXY User’s Manual, C&R Technologies, Inc.
5-17
Plot Customization
Tabs are provided to allow customization of wall of the four chart walls. On each tab, a Visible check box is provided to
control the visibility of the wall. The color of the wall can be changed using the Color button. (Note that by default, the
visibility of the gradient is turned on for some walls. To define the wall as a sing color with no gradient, the gradient
visibility must first be turned off, perhaps by selecting the Solid tab from the Pattern button)
The Border button allows a separate border color or frame around the wall to be defined. The Pattern button allows the
wall color to be define as a solid, hatch, gradient or image.*
Using the Gradient button, a color gradient can be defined for the panel background. By default the gradient is turned
on. In the gradient dialog, the Format tab controls the type of gradient, the visibility and the angle. The types of gradients available are horizontal, vertical, radial, or diagonal. The Angle field allows the angle of the gradient to be
changed. The Visible check box allows the gradient to be turned on or off.
The Color tab provides access to define the gradient to be based on two or three colors. Use the No Middle Color check
box to disable the middle color. Use the Start, Middle, and End buttons to set the three colors. The example below
shows a background gradient with custom colors.
5.1.7 Chart>Paging Options
The EZXY Plotter allows a plot or chart to be divided into a set number of data points per page, through which the user
can leaf. In other words, the plot can be divided into segments along the x-axis. If the data source for a chart contains
more data than can legibly displayed on one chart screen, it is convenient to divide it into pages. The Chart>Paging dialog allows the user to control how and if paging is applied.
The Point per Page field controls how may data points will be a single page of the chart. By default, a chart is set to 0
points per page, which represents all data point on a single chart.
The last page is unlikely to have exactly the correct number of points to match the point quantity in the other pages. If
so, choose Scale the Last page, which will perform a “best fit” of the remaining points to the page, adjusting the axis
scale accordingly. Otherwise, the page will be treated as were prior pages ... with the same number of points ... which
may leave the last page rather empty if there are not many points in the final page.
The Show Page Number will display the page number currently being viewed.
*. To clear an image for a wall, press the “Browse...” button again. This is a defect in the underlying third-party software: the button should be
labeled “Clear” if an image has previously been applied.
5-18
EZXY User’s Manual, C&R Technologies, Inc.
Plot Customization
The <<, <, >, >> buttons provide a means of moving between pages in the chart.
5.1.8 Chart>Legend Options
EZXY will display a legend on a chart by default if there is more than one data series. The legend can be customized
for location, content, and appearance by selected the Legend tab in the chart customization dialog. Subtabs in the dialog provide access to legend style, position, symbols, title, format, gradient, shadow, text and bevel. The following sections will discuss the various customization options.
5.1.8.1 Legend Style
The Legend>Style tab shown below can be used to change the basics style of the legend.
Visible: This check box allows the visibility of the legend to be toggled on or off. By default the legend visibility is
set to off if more than one data series exists in the chart. If only one data series is present, the legend will be toggled off.
Inverted: The Inverted check box will reverse the order of the legend entries.
Check boxes: This check box will add visibility check boxes to each series in the legend as shown below. This is
useful for controlling the visibility of each series. Series visibility can also be toggled through the check boxes on the
Chart Series dialog (see Section 5.1.1).
EZXY User’s Manual, C&R Technologies, Inc.
5-19
Plot Customization
Font Series Color: The Font Series Color toggles the color of the text in the legend to match the color of the series
in the plot.
Legend Style: The default legend style Automatic will use Series [point] values when there is only one series in the
chart. When the chart contains more than one series, “automatic” will use Series names in the legend. The drop down
data field Legend Styles can be used to select options other than the default. The options are Automatic, Series Name
(the name provided in the EZXY Selection Table), Series values (numeric values), Last Value (places the last value of
each series in the legend box), and Palette. If legend style is changed to display values, and if there is more than one
series in the chart, then EZXY will display only the values for the first series.
Text Style: If the Legend Style is selected as Series Values, the Text Style drop down field can be used to control
what will be displayed in the legend. Options include left or right values or percents, X value, value, percent, X and
value, or X and percent.
Vert. Spacing: This option allows the spacing between legend entries to be modified.
Dividing Lines: The Dividing Lines button gives access to the pen editor window where the visibility, color, and
width of the lines between legend entries can be customized.
5.1.8.2 Legend Position
The Legend>Position dialog shown below allows the user to change the position of the legend.
Position: By default the EZXY plotter automatically places the legend to the right of the plot field. The Position
radio buttons allow the legend to be moved from the right to the top, left, or bottom of the plot.
Resize Chart: When checked, the Resize Chart button automatically adjusts the size of the chart based on location of
the legend.
Margin: The Margin data field controls the margin between the legend and the chart by adjusting the chart frame.
When set to 0, the margin is set automatically.
Position Offset: The Position Offset data field adjusts the position of the legend left or right if the legend is located
at either the top or bottom of the chart. If the legend is positioned on the left or right, the offset will adjust the position
up or down.
5-20
EZXY User’s Manual, C&R Technologies, Inc.
Plot Customization
Custom: The Custom button and associated left/top fields allow the user to fully control the location of the legend.
When checked, the resize, margin and offset fields become inactive (gray) and the user controls the position using the
left and top offset fields. Note that using a custom legend position, disables the automatic resizing of the chart based on
the legend location. The chart margins will also need to be adjusted to prevent overlap of the legend and the chart.
5.1.8.3 Legend Symbols
The Legend>Symbols dialog allows the customization of the key associated with each legend entry. For a series with
“points” visible, the Visible check box will show the point symbols in the key for the series. The Width field controls
the width of the key entries. The Position field controls the location of the key relative to the text for each legend entry.
5.1.8.4 Legend Title
The Legend>Titles dialog provides the ability to add and customize a title for the legend. The Options tab allows a title
to be defined. To see the title, the visibility must be turned on using the visibility check box. The remaining tabs control
the formatting of the title, similar to “Chart>Titles Options” on page 5-15.
5.1.8.5 Legend Format
The Legend>Format dialog provides the ability to customize the legend background color and add a frame area around
the legend. Using the Color button, the background color can be set. The Frame button allows the color and thickness of
the frame around the legend to be set. Transparency and patterns can also be added.
5.1.8.6 Legend Gradient
A color gradient can be defined for the legend background. By default the gradient is turned off.
The Format tab controls the type of gradient, horizontal, vertical, radial, or diagonal. The Angle field allows the angle
of the gradient to be changed. The Visible check box allows the gradient to be turned on or off.
The Color tab provides access to define the gradient to be based on two or three colors. Use the No Middle Color check
box to disable the middle color. Use the Start, Middle, and End buttons to set the three colors.
5.1.8.7 Legend Shadow
The Legend>Shadow tab provides the ability to add a drop shadow to the legend to give it a 3-dimensional look. The
Color button allows the color of the shadow to be modified. The slider bar below the Color button allows the intensity
of the color to be set. The Pattern button allows a hatch, gradient or image to be associated with the shadow.
The size fields allow the width and height of the shadow to be modified. The transparency of the shadow can be
changed; 0 is not transparent, 100 is fully transparent.
5.1.8.8 Legend Text
The Legend>Text tab provides access for changing the appearance of the legend text. The Font button dialog allows the
font name, style and size to be set along with the color. A drop shadow can be added using the Visible check box in the
Shadow portion of the form. The color and intensity of the shadow are controlled via the Color button and the slider
EZXY User’s Manual, C&R Technologies, Inc.
5-21
Plot Customization
below the button. The Size fields control the offset of the shadow from the text. Transparency and patterns can also be
applied to the drop shadow.
5.1.8.9 Legend Bevel Option
A bevel can be added to the legend area using the Titles>Bevels tab.
5.1.9 Chart>3D Options
Charts can be given a 3D appearance in EZXY by checking the 3 Dimensions check box. The 3D % field controls the
depth of the chart. The sliders allow user control for the level of zoom, rotation, elevation, horizontal and vertical offsets, and perspective. Unchecking the 3 Dimensions box will return the chart to a 2D view.
The Orthogonal mode is another variation to obtain 3D 'effect' in a chart. You cannot rotate a 3D Orthogonal chart, the
bottom axis is always horizontal. Note some of the slider controls are not applicable to an orthogonal chart.
For more information on working 3D charts, see “3D Viewing” on page 4-2
5.2 Series Customization
The Series dialog below allows customization of individual data series. These customizations include axis association,
line color, style, thickness, symbols, data values, etc.
5.2.1 Series Format
The Series>Format dialog controls the color and format of the series line. The Border button controls the width and
style of the line. The Color button controls the line color. The Color Each and Color Each Line options provide the ability to color each data point or segment a different color in a series.
5-22
EZXY User’s Manual, C&R Technologies, Inc.
Plot Customization
5.2.2 Series Points
The Series>Points dialog provides the ability to turn customize the appearance of the individual data points. If the Visibility check box is checked, a symbol will appear at each data point. The Style field controls the geometric symbol
assigned to a series. The Pattern button controls the color of the symbol and the Border button controls the color of the
border.
5.2.3 Series General
The Series>General dialog controls the general formatting for the series. The Show in Legend check box controls
whether or not the series is included in the legend. The turn the visibility of a series off in the legend, uncheck the box.
The Horizontal Axis and Vertical Axis fields are used to assign which axes are associated with a series. For example, to
change the y-axis a series should use, use the pull down in the Vertical Axis field to select a new axis. Only existing vertical axes will display in the pull down. To add a new axis, see “Adding/Deleting an Axis” on page 5-13.
The Values field controls the numeric formatting of the data point values when displayed. To turn values on see “Series
Marks” on page 5-24.
5.2.4 Series Data Source
By default in EZXY the series data source is controlled by the plot manager dialog (“Plot Manager” on page 2-6), however the Series Data Source dialog can be used to define “user series” such as creating a series which is a arithmetic
function based on other series or a series based on user input. The content of this dialog will vary depending on the type
of series to be defined.
When creating a user defined series, the first step is to “add” a new series on the Chart>Series tab. Once added the Title
button can be clicked to define a title for the series. After the series is created, select the series to highlight it, and then
move to the Series>Data Source tab. Select the “Manual” pull down option and define the x and y coordinates for
points as shown on the left below.
To create a series which is a function based on other series in the chart, follow the steps above to create a new series
however on the Series>Data Source tab use the pull down option to select “Function”. Use the Function pull down list
to select the type of function to be performed. The two panels in the Source Series tab display the available and
selected series. When creating the function click to highlight a series in the available panel and then click the “>” button to move it into the selected panel. All series can be moved to the selected panel by using the “>>” button. The function will be performed on the selected series in ascending order. The up and down arrow buttons can be used to
rearrange the selection set. Click the Apply button to create the new series.
EZXY User’s Manual, C&R Technologies, Inc.
5-23
Plot Customization
5.2.5 Series Marks
The Series>Marks dialog allows marks or labels to be added to each data point in the series. The subtabs in the dialog
control the type, location, and formatting of the labels.
Using the Style tab, the visibility of labels can be turned on. The style of label can be set to be the X or Y value, percent, and various combinations of these. The frequency of the labels can be controlled using the Draw Every field.
The Arrow tab allows lines to be added between the labels and its associated point. Arrows heads and pointers can also
be added.
The Symbol tab provides the ability to include the data geometric symbols on the labels and to control the formatting of
these symbols.
The Format and Gradient tabs controls the formatting of the label box.
The Shadow tab allows a drop shadow to be added to the label.
The Text tab controls the formatting of the label text.
5-24
EZXY User’s Manual, C&R Technologies, Inc.
Plot Customization
5.3 Tools Option
The Tools tab of the chart editor dialog allows the user to add a variety of objects to a chart. Some commonly used
options are drawing lines on a chart, adding axis color bands, and annotations. Other options are available but only
these commonly used options will be discussed here.
Tools can be added or removed from a chart using the “+” and “-” buttons. The panel on the left will provide a list of all
tools added to the chart. Once added to the chart the individual tools can be made active or inactive by highlighting the
tool name and then toggle the Active check box. The up and down arrow buttons control the order in the listing within
the left panel. Once created, a tool can be edited by highlighting the name in the left panel. The associated edit dialog
will automatically appear in the right portion of the dialog.
To access the various tool options, click the “+” button in the upper left of the dialog. This will bring up the Chart Tools
Gallery dialog. The tool gallery is organized by a series of three tabs, Series, Axis, and Other.
EZXY User’s Manual, C&R Technologies, Inc.
5-25
Plot Customization
5.3.1 Annotation Tool
5.3.1.1 Adding Annotations
Annotations are useful for documenting events on a chart or adding additional labels to a series. Annotations can be
added to a chart using the chart editor Tools dialog. Click the “+” button to access the Tool Gallery and select the Other
tab. Highlight the Annotation option and the click the Add button. The following Annotation dialog will appear.
5.3.1.2 Editing Annotations
Once an annotation has been added to a chart, it can be edited by returning to the chart editor Tools dialog. Highlight
the annotation entry in the list on the left. The annotation dialog will automatically appear on the right side of the form.
The annotation should be typed in the Text field of the Options tab. Options are provide to control alignment, cursor,
clipping of text, add the ability to edit the text directly on the chart. When the Allow Edit option is selected, clicking on
the annotation will launch the edit mode. To exit the edit mode, hit the escape key.
The Position tab controls the location of the annotation on the chart. The Left and Top fields are offsets from the default
location which is the upper left of the chart. Units can be set as pixels or percent. Extension lines can be added to the
annotation using the Callout tab and the font format is controlled via the Text tab.
The annotation frame can be further customized. The Size tab controls the size of the frame around the annotation. By
default the frame is fitted to the text. The Format, Gradient, Shadow and Bevel tabs all apply to the frame of the annotation.
5-26
EZXY User’s Manual, C&R Technologies, Inc.
Plot Customization
5.3.2 Color Band Tool
Color bands can be added to a chart to highlight a portion of the chart. Color bands can be added to any axis. The example displayed on the left below, shows a red color band associated the x axis and a yellow band on the y axis.
5.3.2.1 Adding a Color Band
To add a color band use the Tools tab of the Chart Editor. Click the “+” button and using the Axis tab, select Color
Band. The color band edit form is displayed on the right below. Use the Axis field to associate the color band with one
of the axes. Use the Start Value and the End Value fields to define the width of the band.
5.3.2.2 Editing a Color Band
Once a color band has been added to a chart, it can be edited by returning to the tools dialog and selecting the color
band object in the tool list in the left panel of the Tools dialog. Once selected, the color band dialog will appear on the
right side of the form.
The Border button provides formatting options for the border line on the band. The Pattern button allows the color and
pattern of the band to be customized. The Options tab provides alternate access to the bar color options and provides
the ability to add a gradient to the band.
5.3.3 Color Line Tool
The color line tool can be used to add a line to a chart marking a specific value on one of the axes.
To add a color line use the Tools tab of the Chart Editor. Click the “+” button and using the Axis tab, select Color Line.
The color line edit form is displayed on the right below. Use the Axis field to associate the color line with one of the
axes. Use the Value field to define the location of the line. The Active check box controls the visibility of then line. By
default the Allow Drag is checked which will allow the line to be moved directly in the chart by clicking on it, holding
the left mouse button and dragging it to a new location.
EZXY User’s Manual, C&R Technologies, Inc.
5-27
Plot Customization
5.4 Themes
EZXY provides a predefined set of chart themes to quickly customize the look of a chart. To access the theme dialog,
right click on the chart and select Customize to bring up the customization dialog, then click on the Theme tab to bring
up the dialog shown below.
There are six predefined themes which can be selected. The themes control the chart background color, font styles, etc.
Additionally on the theme tab is a Color Palette option. This option controls the colors used for individual series in the
chart. There are 17 different color palette options. Any color palette option can be applied to any theme.
Alternatively the user may create a custom appearance for a chart, possibly starting from one of the build in themes,
and save it as a preference. For more information on this, see “Default Theme” on page 5-29 .
5-28
EZXY User’s Manual, C&R Technologies, Inc.
Plot Customization
5.5 Default Theme
EZXY allows the user to define a preferred plot style. To do this, use the menu option Edit>Set Default Theme. When
a default theme has been set, a file called ezxyprefs.xml is created in C:\Documents and Settings\[user name]\Local Settings\Application Data. Once defined, the default theme can be returned to its original settings by deleting this file. Setting a theme only affects the current and future plots and will not change the appearance of previously saved plots.
The Set Default Theme dialog allows any of the predefined themes or the current theme (perhaps customized) to be
selected as the preferred theme for future plots. The Color Pallet (i.e. the color tones used for coloring the individual
series) can be selected separately from the theme. For more information on the themes dialog see “Themes” on page 528.
EZXY User’s Manual, C&R Technologies, Inc.
5-29
Plot Customization
When defining a preference, click on any theme name or “current” in the list of themes, then click on the desired color
pallet. Click the Apply button (you may have to toggle between color palettes to get the “Apply” button to activate) to
set your preference. Note that when setting preferences, parameters such as font type and size, grid lines, panel and
wall colors, and color palette will all be retained for future plots. Parameters associated with the data series, such as line
thickness, color, and line type will not be retained in the preferences.
To create a custom theme, use the customization dialog (see “Plot Customization” on page 5-1) to set the panel colors,
font sizes, etc. prior to setting the theme preference. A standard built-in theme can be used as a starting point for custom
themes. After customizing a plot to set preferred panel colors, font sizes, etc., open the Preferences dialog and select
“Current” for the them, select a preferred color pallet, and then click apply to set the current theme as the preferred
theme for future plots.Once created, a theme file (ezxyprefs.xml) can be shared with co-workers.
Alternatively a customized plot can be saved as a plot file to be used for future plotting instead of setting a default
theme. This template plot file can later be opened, the save file changed, and the data series can be deleted and reselected, etc. The advantage of this method is that you can save line colors, thickness and line types. However this type of
template will only support plotting outside of Sinaps and Thermal Desktop. By comparison, the default theme is used
for all new plots created through the graphical interfaces of Sinaps and Thermal Desktop.
5-30
EZXY User’s Manual, C&R Technologies, Inc.
Exporting and Printing
CHAPTER 6
Exporting and Printing
6.1 Exporting Charts as Images or Data
Once a plot has been customized, and its appearance is acceptable, it can be exported as an image (e.g., png, jpg) or
copied to the clipboard. Choosing Export Image from either the File menu or after right-clicking on a plot brings up the
following form:
The output image type can be selected from among several types, some of which offer greyscale and user-selectable
quality options. The size of the chart defaults to the current size on the screen, but can be adjusted using the controls on
the right side of the form. It is important to note that if a size other than the current size on the screen is chosen, EZXY
completely regenerates the chart at the new size, which may yield unexpected results. The buttons on the bottom left of
the form are used to export the image to the clipboard or to a file.
Alternatively, to quickly copy the current plot as an image to the clipboard, use the Copy icon,
EZXY User’s Manual, C&R Technologies, Inc.
, in the tool bar.
6-1
Exporting and Printing
To export the data behind a chart in tabular form, choose Export Tabular Data from either the File menu or after rightclicking on a plot. This brings up the following form:
Data for any combination of series can be exported by selecting them from the list on the left of the form. (The default
is all of the series.) The data can be exported in various formats, including as a text file or in a Microsoft Excel spreadsheet. If exported as a text file, any character or character string can be used as a delimiter. (Comma is the default.)
The number format is specified using Microsoft .NET standard or custom numeric format strings. Examples:
'Autodetect' to choose the most compact format,
'0.00' for fixed 2 decimal places,
'0.000' for fixed 3 decimal places,
'0.00E+00' for scientific notation with 2 decimal places,
'0.000E+00' for scientific notation with 3 decimal places,
'0.##' for up to 2 decimal places.
Note that regardless of your local settings for decimal and thousands separator, in the format string decimal is specified
as '.' (dot) and thousands separator as ',' (comma). Output will be as per your local settings. See Microsoft
documentation for more information.
These commands for exporting images and data replace the Export menu item found in previous versions of EZXY.
This command is still available under File->Legacy Export, although its use is deprecated.
6.1.1 Exporting Plot Sets
When a group of plots (CHAPTER 3) have been defined as a plot set, the plots can be exported as images either indi). By default, this method of export will use the
vidually or as a group by using the Export Selected Plots icon (
6-2
EZXY User’s Manual, C&R Technologies, Inc.
Exporting and Printing
portable graphics (PNG) format which will produce the best quality while maintaining a small file size. To export in a
different format, plots will need to be exported individually through the normal plot export dialog.
6.2 Printing Charts
To bring up the print dialog click on the print icon in the tool bar or select File>Print. The print dialog allows the printer
to be selected and the printout to be formatted.
EZXY User’s Manual, C&R Technologies, Inc.
6-3
Exporting and Printing
6-4
EZXY User’s Manual, C&R Technologies, Inc.
Excel Plotter
CHAPTER 7
Excel Plotter
7.1 Introduction
The Excel SINDA/FLUINT Plotter is a Microsoft ExcelTM template which provides an interface for accessing data
from a SINDA/FLUINT save file or CSR folder, for the purposes of plotting data in Excel or simply to transfer data to
Excel. Please note that EZXY, Thermal Desktop and Sinaps all provide alternative methods for exporting data to Excel,
which may be more efficient than this plot tool. The Excel Plotter uses the EZXY Plot Manager for controlling and
managing source data. The plot template is not intended to be as full featured as the EZXY Plotter, it is simply provided
as a convenience for users who prefer the Microsoft Excel environment for plotting. Due to limitations of the Excel
interface there are several features in the EZXY Plotter which are not supported in the Excel Plotter, however the Excel
Plotter does provide a few features not available in the EZXY Plotter.
Current known limitations are:
• The Excel Plotter only supports SINDA/FLUINT save files and CSR folders, not Thermal Desktop databases.
• Plots are limited to 250 series (items in the selection set).
• Data import is limited to a single Y axis, although this can be overcome by customizing a plot in the Excel
environment.
• Plotting from multiple data sources is supported however they must have the same range of x-values. EZXY
supports plotting from multiple sources with varying x-ranges.
The remainder of this chapter will highlight basic usage of the Excel Plotter.
7.2 Installing the Excel Plot Template
By default the Excel Plotter is not installed with the EZXY Plotter, however it can be easily installed from the Windows
Start menu, Start>All Programs>[Sinaps or Thermal Desktop]>Excel Plotter Setup. Once installed, if new versions
are distributed with Sinaps or Thermal Desktop, the user must manually reinstall through the Start menu.
EZXY User’s Manual, C&R Technologies, Inc.
7-1
Excel Plotter
7.3 Creating Plots in Excel
Launch the Excel Plotter using the Windows’ Start menu, Start>All Programs>[Sinaps or Thermal Desktop]>Excel
SINDA/FLUINT Plotter. This will open an Excel template as shown below. Click the Add/Edit Plot Items button to open
the EZXY Input/Edit dialog also depicted below.
7.3.1 Input Files
On the Input Files tab specify an internal name and then use the browse button [...] to locate the SINDA/FLUINT CSR
folder or save file to be used as the source. For more information on internal names and their usage, see “SINDA/FLUINT Input Files” on page 2-2. If an internal name is not defined prior to selecting the save file, a name will be automatically created using the name of the save file without the.sav suffix. If the data source was created on a UNIX platform,
use the pull down option in the Source column to select “Unix”. Multiple source files can be defined through the Input
Files tab.
7-2
EZXY User’s Manual, C&R Technologies, Inc.
Excel Plotter
7.3.2 SINDA/FLUINT Plot Manager
After the input files have been defined, the SINDA/FLUINT Plot Manager tab is used to defined the content to be sent to
Excel. The plot manager tab provides access to a model tree for selecting data series and parameters to be plotted. It
also provides the ability to select a different x-axis variable and add scaling expressions to the axes. For detailed information on the using the SINDA/FLUINT Plot manager dialog see “SINDA/FLUINT Plot Manager” on page 2-6.
After defining content in the Plot Manager, upon clicking OK to dismiss the dialog, the “Plot Items” table in the Excel
template will be populated as shown below. A new worksheet will also be created containing the chart, and the raw data
will be imported to the “data” worksheet. Editing the raw data is not recommended.
Note the similarity between the tables in the Plot Manager and in Excel. To add items to the table, apply scaling factors,
etc. click the Add/Edit Plot Button to return to the EZXY Input/Edit dialog to make changes. If you simply want to
change the parameter being plotted, perhaps pressure drop instead of flow rate, unlike EZXY this can be changed
EZXY User’s Manual, C&R Technologies, Inc.
7-3
Excel Plotter
directly in the Excel table. Similarly the type, number and label can all be edited in this fashion. After editing the table
directly, the Add/Edit Plot Button must be clicked to send the info back to the plot manager. Subsequently clicking the
OK button in the plot manager will refresh the plot. Likewise the save file path can be edited and the change will be
sent back to the plot manager for updating.
7.3.3 Refreshing a Plot
Once a plot has been created, when a model is run and the save file is updated, clicking the Refresh Plot button will
bring the new save file data into Excel. By default each time the plot is refreshed, it will create a new chart. Unchecking
the Always Make a New Plot button will allow the chart to refresh without creating new chart sheets in the workbook.
Note that for plots with many series and large data sources, refreshing an existing plot will generally be faster than creating new plots.
7.3.4 Data Import Only
When using the Excel Plotter for data import only, not plotting, uncheck the “Always make chart” box. This will suppress the plotting feature. Once data has been imported, the user can created their own charts based on content within
the “Data” worksheet.
7.3.5 Customizing Plot Appearance
The appearance of a plot can be customized through the Excel interface. For details on customizing a plot, please refer
to the Microsoft Excel documentation.
7-4
EZXY User’s Manual, C&R Technologies, Inc.
Index
Index
A
About EZXY 1-1
Annotations 5-26
Axes
Series Association 5-23
Axis
Adding and Deleting 2-9, 5-13
Current 2-9
Expressions 2-13
Labels 5-11
Minor 5-12
Number Format 5-11
Setting Position 5-13
Setting Scales 5-9
Tick Marks 5-10
Title 5-10
Using Expressions 2-22
Axis Formatting 5-8
B
background
back wall 5-17
panel (periphery) 5-7
C
Chart
3D Options 4-2, 5-22
Create New 2-1
Defining Source Files 2-1
General Options 5-14
Scroll Options 5-15
Title Options 5-15
Chart Tools
Annotations 5-26
Color Bands 5-27
Color Line 5-27
Usage 5-25
Color Bands 5-27
Color Line 5-27
Color Palette 5-28
Copy
To Clipboard 6-1
Create New Plot 2-1
From Sinaps 2-1
Create New Plot from Thermal Desktop 2-1
Current 2-9
Customization
Axis Scaling 5-9
Axis Titles 5-10
Legend 5-19
Panel Formatting 5-5
Plot Field/Wall Appearance 5-17
Series Line Appearance 5-22
Customizing Plots 5-1
Adding a Custom Series 5-3
Chart Appearance 5-2
Series Visibility 5-2
D
Depth, 3D chart 4-4
Drag and Drop 2-1
E
Excel Plotter
Creating Plots 7-2
Installation 7-1
Introduction 7-1
Exporting
Plot Sets 6-1
Plots 6-1
Series Data 6-1
To Clipboard 6-1
Expressions
Applying to Axes 2-13
H
Heating Rate Database 2-17
Histograms 2-23
I
Introduction 1-1
K
Keyboard Shortcuts 1-5
L
Legend
Customization 5-19
Formatting 5-21
Position 5-20
Series Visibility 5-23
Text Formatting 5-21
M
Menus 1-5
Move, 3D chart 4-3
O
Overview 1-1
P
Paging Options
Multipage Plots 5-18
panel
changing view 5-5
vs. wall 5-5
Plot Manager
Overview 2-6
Sinda/Fluint Plot Manager 2-6
Thermal Desktop 2-17
Plot Sets
About 3-1
Adding Plots 3-2
EZXY User’s Manual, C&R Technologies, Inc.
1-1
Index
Form Factors 2-19
Heating Rates 2-19
Radiation Conductors 2-19
Titles
Axis 5-10
Chart 5-15
Toolbars 1-5
Creating 3-1
Plots
Setting Preferences 5-29
Source file updates 4-1
Viewing 4-1
Plotting
Create a New Plot 2-1
Customization 5-1
Statistical 2-23
Preferences 5-29
Printing
Chart 6-3
Printer Configuration 6-3
U
Units
Thermal Desktop Database 2-21
W
wall
versus panel 5-5
Walls
Customizing 5-17
R
RadK Databases 2-17
Refreshing Plots 4-1
Regenerating Plots 4-1
Reset, 3D chart 4-2
Restart Files 2-15
Rotate, 3D chart 4-3
S
Save Files
Adding 2-2
Defining Multiple 2-2
Mulitple 2-15
Plot selection 2-7
Plotting from multiple 2-7
Scrolling
How to Scroll 4-2
Options 5-15
Series
Adding Functions 5-3, 5-23
Adding Through Sinda/Fluint Plot Manager 2-11
Adding through Thermal Desktop Plot Manager 2-20
Axis Selection 5-23
Customization 5-22
Deleting 2-11, 2-21, 5-4
Display Points 5-23
Labels, Adding and Formatting 5-24
Line Formatting 5-22
Marks 5-24
Paging Options 5-18
User Defined 5-23
SINDA/FLUINT
Save Files 2-2
Source Files
Defining 2-1
Sinda/Fluint Save Files 2-2
Text Files 2-4
Thermal Desktop Databases 2-3
Statistical Plots
Histograms 2-23
Z
Zoom
2D (zoom in on data) 4-1
3D (grow/shrink plot) 4-3
How to Zoom 4-1
Options 5-14
T
Templates
Create with Themes 5-29
Text Files 2-3
Themes 5-28
Thermal Desktop Databases
1-2
EZXY User’s Manual, C&R Technologies, Inc.