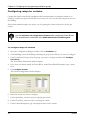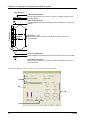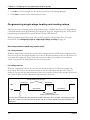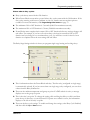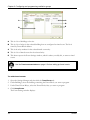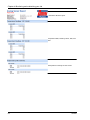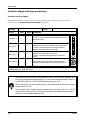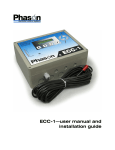
1
user manual © 2008 Phason Inc. All rights reserved. Printed in Canada 20040101 2008-05-06 i Limited warranty Software Phason Inc. (Phason) warrants for a period of 90 days from the date of purchase that the software product will execute its programming instructions when properly installed on the personal computer or workstation indicated on this package. Phason does not warrant that the operation of the software will be uninterrupted or error free. Should this software product fail to execute its programming instructions during the warranty period, the purchaser’s remedy shall be to return the software CD (media) to Phason for replacement. Should Phason be unable to replace the media within a reasonable amount of time, the purchaser’s alternate remedy shall be a refund of the purchase price upon return of the product and all copies. Media Phason warrants the media upon which this product is recorded to be free from defects in materials and workmanship under normal use for a period of 90 days from the date of purchase. Should the media prove to be defective during the warranty period, the purchaser’s remedy shall be to return the media to Phason for replacement. Should Phason be unable to replace the media within a reasonable amount of time, the purchaser’s alternate remedy shall be a refund of the purchase price upon return of the product and all copies. Notice of warranty claims The purchaser must notify Phason in writing of any warranty claim no later than 30 days after the warranty period expires. Limitation of warranty Phason makes no other express warranty, whether written or oral, with respect to this product. Any implied warranty of merchantability or fitness is limited to the 90 days of this written warranty. Some states or provinces do not allow limitations on how long an implied warranty lasts, so the above limitation or exclusion may not apply to you. This warranty gives specific legal rights and you may have other rights, which vary from state to state, or province to province. Exclusive remedies The remedies provided above are the purchaser’s sole and exclusive remedies. Phason shall not be liable for any direct, indirect, special, incidental, or consequential damages (including lost profit) whether based on warranty, contract, tort, or any other legal theory. Some states or provinces do not allow the exclusion or limitation of incidental or consequential damages, so the above limitation or exclusion may not apply to you. Warranty service Warranty service may be obtained from the Phason office location indicated in the user manual or service booklet. ii Service and technical support Phason will be happy to answer all technical questions that will help you use your OMNI-4000 system. Before contacting Phason, collect the following information: A description of the problem A description of what you were doing before the problem occurred The model(s) and serial number(s) of the devices Any messages displayed by the OMNI-4000 software My dealer’s name: How to contact my dealer: Street/PO Box City State/Province Zip/Postal Phone Fax E-mail Web site 2 Terracon Place Winnipeg, Manitoba Canada R2J 4G7 Phone Fax E-mail Web site 204-233-1400 204-233-3252 [email protected] www.phason.ca iii About the manual This manual describes the features of OMNI-4000 and how to use them. In addition to reading this manual, you should be familiar with the following. Microsoft Windows™—how to perform basic Windows functions such as opening and closing windows, finding and opening files, saving and closing files, as well as using a mouse and keyboard. OMNI-4000 hardware and equipment—devices such as the OMNI-Server and Power Blocks. You should also be familiar with the equipment connected to them, such as fans, actuators, and so on. Styles The following styles are used in the manual. All buttons and tabs are bolded. For example: click OK to save the changes. All filenames and directories are in a monospace font. For example, the default directory is C:\OMNI4000. Hint/tip This is a hint or tip. It contains helpful information that may make it easier for you to set up or use OMNI-4000. Note This is a note. It contains important information that may help you better understand OMNI-4000. A copy of the manual is also on the OMNI-4000 installation CD. The PDF (Adobe Acrobat™ Portable Document Format) file installs in C:\OMNI4000\HelpDocs during a normal installation. You can view the file by opening it using Adobe Acrobat Reader™, version 5 or higher, or by clicking any of the Help buttons in the software. iv Table of contents Chapter 1: Introducing OMNI-4000 .................................................................................................1 Introducing OMNI-4000.............................................................................................................................2 OMNI-Ventilation...................................................................................................................................3 OMNI-4000 computer requirements.....................................................................................................3 OMNI-4000 windows.................................................................................................................................4 Communication Center.........................................................................................................................4 Configuration Manager .........................................................................................................................5 Settings Manager..................................................................................................................................6 Reports Utility........................................................................................................................................7 OMNI-4000 security ..................................................................................................................................8 Shutting down OMNI-4000 ...................................................................................................................8 Installing OMNI-4000.................................................................................................................................9 Chapter 2: Configuring your site structure....................................................................................11 Configuring users and user groups ........................................................................................................12 Understanding the OMNI-4000 site structure .........................................................................................17 Configuring buildings..............................................................................................................................18 Adding, editing, and removing buildings ...........................................................................................20 Assigning and removing devices from buildings ...............................................................................21 Adding, editing, and removing ventilation groups..................................................................................23 Adding, editing, and removing production environments ......................................................................26 Configuring site options..........................................................................................................................30 Changing the Communication Center options...................................................................................32 Viewing farm information ....................................................................................................................33 Configuring analog sensors ...............................................................................................................34 Programming analog sensor alarms ..................................................................................................35 Chapter 3: Configuring and programming ventilation groups .....................................................37 Configuring Power Blocks ......................................................................................................................38 Configuring variable stages ................................................................................................................40 Configuring relays for actuators .........................................................................................................41 Configuring relays for single-stage heating or cooling ......................................................................42 Configuring relays for curtains............................................................................................................44 Configuring relays for timed events....................................................................................................45 What you need to know before programming ventilation groups ..........................................................46 Programming group settings ..................................................................................................................48 Programming the group set point ......................................................................................................49 Programming ventilation curves .........................................................................................................50 Programming alarm settings ..............................................................................................................54 Programming the temperature setback..............................................................................................56 Using normal and empty room modes...............................................................................................58 Programming equipment settings ..........................................................................................................60 Programming variable stages.............................................................................................................61 Programming actuator relays .............................................................................................................65 Programming curtain control relays ...................................................................................................69 Programming single-stage heating and cooling relays......................................................................72 Programming timed events ................................................................................................................75 Chapter 4: Monitoring and maintaining your site .........................................................................79 v Monitoring your site ................................................................................................................................80 Monitoring the Communication Center ..............................................................................................80 Viewing the status of a Power Block...................................................................................................81 Viewing charts .........................................................................................................................................82 Viewing Analog Temperature Charts..................................................................................................82 Viewing Vent Group Temperature Charts...........................................................................................83 Viewing Vent Group Status Reports ...................................................................................................85 Zooming and panning charts .............................................................................................................87 Selecting a date range........................................................................................................................88 Creating reports ......................................................................................................................................88 Creating log reports ............................................................................................................................89 Creating Site Structure Reports ..........................................................................................................92 Creating Analog Sensor Reports ........................................................................................................93 Creating Ventilation Group Temperature Reports ..............................................................................96 Maintaining your information ..................................................................................................................98 Using the Backup and Restore Utility .................................................................................................98 Using the Data Archive Utility ...........................................................................................................100 Appendixes ................................................................................................................................. 103 Appendix A: Worksheets.......................................................................................................................104 Group settings worksheet.................................................................................................................105 Variable stage settings worksheet ....................................................................................................106 Actuator settings worksheet .............................................................................................................108 Curtain worksheet .............................................................................................................................110 Heating and cooling elements worksheet ........................................................................................111 Timed events worksheet ...................................................................................................................112 Appendix B: Communication troubleshooting guide ...........................................................................113 Introduction to OMNI-4000 communications ...................................................................................113 Troubleshooting phase 1: create a site map ....................................................................................114 Troubleshooting phase 2: test the computer, RS-485A Converter, and OMNI Server ....................114 Troubleshooting phase 3: correct any communication wiring problems.........................................116 Troubleshooting phase 4: run OMNI-4000 .......................................................................................119 Appendix C: Glossary ...........................................................................................................................123 Index......................................................................................................................................................127 vi Chapter 1: Introducing OMNI-4000 This chapter introduces you to OMNI-4000. Read chapter 1 before reading the rest of the manual. Introducing OMNI-4000 OMNI-4000 windows OMNI-4000 security Installing OMNI-4000 2008-05-06 1 Chapter 1: Introducing OMNI-4000 Introducing OMNI-4000 All of us at Phason want to welcome you to the OMNI-4000 Integrated Production Management and Control System, Phason’s flagship product line. OMNI-4000 has been developed over several years to provide producers with the most comprehensive automated monitoring and control system available. The OMNI-4000 suite of modules is a personal computer-based system of hardware (controls and monitoring devices) and software. The software constantly monitors the hardware and automatically collects information about the barn environment. You can customize OMNI-4000 to suit your specific need and easily add modules that are important to your operation. Phason continually develops new modules and adds new features to existing modules, all in an effort to provide you with the most advanced and powerful system available. This means your OMNI-4000 system will never become obsolete. OMNI-4000 does more than just collect information; each module comes with powerful charts or reports to help you analyze and add intelligence to your vital production information. OMNI-4000 is an ‘enabling platform’; it does not force you to follow specific production methods. Instead, the software helps you manage and control your operation according to your strategy. OMNI-4000 operates using existing personnel skill levels. Once set up, the system can operate without user input for extended periods. When OMNI-4000 requires attention, such as when an alarm condition occurs, information about the situation displays in the main window. 2 Phason Introducing OMNI-4000 OMNI-Ventilation The OMNI-4000 Ventilation module has the flexibility to satisfy almost every barn type and ventilation strategy. OMNI-Ventilation, as with all other OMNI-4000 modules, is completely user configurable. The system fits the site instead of forcing the site to fit the system. You can configure OMNI-Ventilation for either natural or forced ventilation in strategies from tunnel ventilation, side-wall forced ventilation, curtain ventilation, or chimney ventilation systems. OMNI-Ventilation automatically controls the barn environment, regardless of the ventilation strategy. Power Blocks OMNI-4000 Power Blocks work with OMNI-Ventilation to control equipment according to your programmed settings. Power Blocks can control virtually any type of load from variable and singlespeed fans, to feed augers, to lights and more. No matter what your ventilation or control strategy is, there is a Power Block that suits your needs. There are six models of Power Blocks. Model Variable stages Relay stages PB-1 1 3 PB-2 PB-3 PB-4 PB-5 PB-6 2 0 0 0 1 9 3 9 5 0 The variable stage on a PB-6 is for heat mat control. OMNI-4000 computer requirements Customers who need to purchase a new computer to run OMNI-4000 must purchase one that meets certain requirements. For the latest computer and system requirements, contact Phason Customer Support at 204-233-1400 or [email protected]. 2008-05-06 3 Chapter 1: Introducing OMNI-4000 OMNI-4000 windows There are several windows in OMNI-4000 that you should be familiar with before you begin working with the program. The four main windows are: Communication Center Configuration Manager Settings Manager Reports Utility Communication Center The Communication Center is the main window for OMNI-4000. The Communication Center displays all the communication messages from the OMNI-4000 software and devices. Opens the Settings Manager Opens the Configuration Manager Opens the Ventilation Group Status Reporter Opens the Reports Manager For more information about the Communication Center, see Monitoring the Communication Center on page 80. 4 Phason OMNI-4000 windows Configuration Manager The Configuration Manager is where you create and configure the structure of the site and devices. From the Configuration Manager, you can: Configure users and user groups (on page 12) Configure site options (en page 30) Assign or remove devices from buildings (on page 18) Add, edit, and remove ventilation groups (on page 23) Add, edit, and remove production environments (on page 26) Each OMNI-4000 module has one or more tabs you use for configuring the module. The following tabs are on all OMNI-4000 systems. Options Users/Groups Buildings Production Environments Ventilation Timed Events All other tabs display only if your site has additional modules installed. 2008-05-06 5 Chapter 1: Introducing OMNI-4000 Settings Manager The Settings Manager is where you program settings for Power Blocks and other OMNI-4000 devices. From the Settings Manager, you can: Change Communication Center options (en page 32) Program ventilation group settings (starting on page 48) Program ventilation equipment and timed event settings (starting on page 60) View the status of Power Blocks (on page 81) Each OMNI-4000 module has one or more tabs you use for programming the module. The following tabs are on all OMNI-4000 systems. Options Analog Sensors Ventilation Timed Events All other tabs display only if your site has additional modules installed. 6 Phason OMNI-4000 windows Reports Utility The Reports Utility is where you view charts and create reports. Below are the charts and reports you can create in the main OMNI-4000 and Ventilation modules. There are detailed descriptions later in the manual. Power Block Status Viewer (on page 81) Analog Temperature Chart (on page 82) Vent Group Temperature Chart (on page 83) Vent Group Status Report (on page 85) Log Reports (starting on page 89) Site Structure Report (on page 92) Analog Sensor Report (on page 93) Ventilation Group Temperature Report (on page 96) Each OMNI-4000 module has a tab you use for viewing charts or creating reports for the module. The General and Ventilation tabs are on all OMNI-4000 systems. All other tabs display only if your site has additional modules installed. 2008-05-06 7 Chapter 1: Introducing OMNI-4000 OMNI-4000 security Security is very important, especially in a life-support ventilation system. All OMNI-4000 users must have a user name and password. Security helps prevent unauthorized access and allows OMNI-4000 to track which users have performed certain tasks within the program. OMNI-4000 stores the information in the audit log. Each time you open one of the main windows or exit the program, the Security Check displays. For more information about the audit log, see Creating log reports starting on page 89. For more information about user names and passwords, see Configuring users and user groups on page 12. To enter your user name and password 1. Beside User Name, type your user name. 2. Beside Password, type your password. 3. Click OK. Shutting down OMNI-4000 OMNI-4000 should be running at all times. When you exit OMNI-4000, the Power Blocks operate at their last set points, but OMNI-4000 cannot collect data or change set points for growth curves. If you have to shut down OMNI-4000, start the program again as soon as possible. OMNI-4000 keeps track of who shuts down the program. You can view this information in the audit log. 8 Phason Installing OMNI-4000 Installing OMNI-4000 OMNI-4000 has an installation wizard that guides you through the installation. Make sure you have all the hardware installed before configuring it in the OMNI-4000 software. To install OMNI-4000 1. Insert the OMNI CD into your computer’s CD-ROM drive. The Installation Wizard should start automatically. If it does not start automatically, find and then start the file LAUNCH.EXE on the CD-ROM. 2. Follow the instructions on the screen. 2008-05-06 9 Chapter 1: Introducing OMNI-4000 10 Phason Chapter 2: Configuring your site structure Chapter 2 explains how to configure your OMNI-4000 site structure and any site-wide options. Topics in Chapter 2 include: Configuring users and user groups Understanding the OMNI-4000 site structure Configuring buildings Adding, editing, and removing ventilation groups Adding, editing, and removing production environments Configuring site options 2008-05-06 11 Chapter 2: Configuring your site structure Configuring users and user groups All users must have a user name and password to use OMNI-4000. Each time a user opens one of the main windows or shuts down the program, OMNI-4000 asks for a user name and password. The security helps prevent unauthorized access and allows OMNI-4000 to track which users have performed certain tasks within the program. User groups User groups are collections of users that have the same access levels (permissions). A user must belong to a user group and can belong to more than one group. OMNI-4000 comes with a default user group named OMNI ADMIN and a default user named SYSADMIN. The OMNI ADMIN user group has access to all areas of OMNI-4000. You must have at least one user in the OMNI ADMIN user group. The password for the SYSADMIN user is omni4000. After adding your own users and user groups, Phason recommends removing the SYSADMIN user from all user groups. Permission levels for user groups For each user group, you need to assign the permission levels for the modules. There are four permission levels in OMNI-4000. Tasks Permissions None Create charts and reports View settings (Settings Manager) Change settings (Settings Manager) View and change configuration (Configuration Manager) Shut down OMNI-4000 Change site options Add, edit, and remove users, user groups, and buildings (---) View only (V) — — — — — — — — — — — Modify settings (S) Modify config. (C) — — — — — Users in the OMNI ADMIN group can perform all tasks. Only users in the OMNI ADMIN group may perform these tasks. 12 Phason Configuring users and user groups There are three steps to configuring users and user groups. 1 Add users 2 Add user groups 3 Assign users to user groups The Users/Groups tab of the Configuration Manager is where you configure users and user groups. D A E B C F G H I A This is a list of user groups at your site. The OMNI ADMIN group is a default group; you cannot edit or remove it. B These buttons open the User Group Setup window, which is where you add or edit user groups. C This button removes the selected user group. D This is a list of users that are not in the selected user group. E This is a list of users that are in the selected user group. F These buttons add and remove the selected user from the selected user group. G This is a list of users at your site. The SYSADMIN user is a default user. H These buttons open the User Identification window, which is where you add or edit users. I This button removes the selected user. 2008-05-06 13 Chapter 2: Configuring your site structure To add user groups 1. Open the Configuration Manager and then click the Users/Groups tab. 2. Click Add Group. The User Group Setup window displays. 3. Beside User Group, type a name for the group. 4. Beside each module, select the permissions for the group. 5. Click OK to save the group and return to the Configuration Manager. 6. Click Close to return to the Communication Center. To edit user groups 1. Open the Configuration Manager and then click the Users/Groups tab. 2. Under User Groups, select the group you want to edit. 3. Click Edit Permissions. The User Group Setup window displays. 4. Make the permission changes. 5. Click OK to save the changes and return to the Configuration Manager. 6. Click Close to return to the Communication Center. 14 Phason Configuring users and user groups To remove user groups 1. Open the Configuration Manager and then click the Users/Groups tab. 2. Under User Groups, select the group you want to remove. 3. Click Remove Group. A Confirmation window displays. 4. To remove the group, click Yes. To cancel and return to the Configuration Manager, click No. 5. Click Close to return to the Communication Center. To add users User names and passwords are not case sensitive. You can type them in uppercase or lowercase letters. Passwords can contain a combination of letters or numbers. 1. Open the Configuration Manager and then click the Users/Groups tab. 2. Click Add User. The User Identification window displays. 3. Beside User Name, type the person’s name. 4. Beside Password and Confirm Password, type a password for the user. The numbers and/or characters you type must be the same in both. 5. Click OK to save the user and return to the Configuration Manager. 6. Click Close to return to the Communication Center. 2008-05-06 15 Chapter 2: Configuring your site structure To edit user passwords User names and passwords are not case sensitive. You can type them in uppercase or lowercase letters. Passwords can contain a combination of letters or numbers. 1. Open the Configuration Manager and then click the Users/Groups tab. 2. Under Users, select the user you want to edit. 3. Click Edit Password. The User Identification window displays. 4. Beside Password and Confirm Password, type a new password for the user. The numbers and/or characters you type must be the same in both. 5. Click OK to save the change and return to the Configuration Manager. 6. Click Close to return to the Communication Center. To remove users 1. Open the Configuration Manager and then click the Users/Groups tab. 2. Under Users, select the user you want to remove. 3. Click Remove User. A Confirmation window displays. 4. To remove the user, click Yes. To cancel and return to the Configuration Manager, click No. 5. Click Close to return to the Communication Center. To assign or remove users from user groups 1. Open the Configuration Manager and then click the Users/Groups tab. 2. From the User Groups list, select the group to which you want to assign or remove users. To assign a user to the group, select a user that is not already in the group and then click . To remove a user from the group, select a user that is in the group and then click . 3. Click Close to return to the Communication Center. 16 Phason Understanding the OMNI-4000 site structure Understanding the OMNI-4000 site structure All OMNI-4000 modules (Ventilation, Water, Feed, and so on) have similar site structures. The site structure includes several ‘virtual layers’, which are explained below. Site The site includes all the buildings at your site that OMNI-4000 monitors and/or controls. Building A building contains one or more groups. Equipment Equipment is any item connected to an OMNI-4000 control or device. Equipment includes fans, heaters, feed augers, water meters, and so on. 2008-05-06 17 Chapter 2: Configuring your site structure Group A group belongs to (must be created in) a building. A group represents the device, such as a Power Block, that monitors and/or controls the equipment. The group also contains all the configuration and settings OMNI-4000 uses to monitor and control the equipment. A ventilation group contains… Equipment Power Block Fans, actuators, curtain machines, heaters, and so on Configuration Group name and Power Block address Group settings: group set point, alarms, growth and minimum ventilation curves, and so on Equipment settings: temperature set points, idle speeds, and so on Settings To set up a ventilation group, you need to… 1. 2. 3. 4. 5. Add the Power Block and then assign it to a building. Add the group and assign a Power Block to it. Configure the Power Block variable stages and/or relays. Program the group settings Program the equipment settings This is where you do it Configuration Manager Settings Manager Configuring buildings In OMNI-4000, the buildings layer of your site structure helps to organize your groups, similar to how directories help organize your files on a computer. A “building” is usually single structure such as a barn. However, it does not have to be. Having one building with many groups, or many buildings with one group in each can be difficult to organize. Ideally, you will have several buildings, each with a manageable amount of groups in them. The following diagrams show three different examples for configuring buildings and ventilation groups. Your site might be like one of the examples, or it might be a combination of them. 18 Phason Configuring buildings One barn = one building The diagram on the right shows a site with four barns, each divided into four rooms. Each room is controlled by a single Power Block. One way to configure the buildings for a site similar to this is to create one building for each barn. Then, because each room is controlled by one Power Block, you would create one group for each room. Several barns = one building The diagram on the right shows a site with eight barns. Each barn is one large room that is controlled by two Power Blocks. One way to configure the buildings for a site similar to this is to create one building for a group of barns. Then, because each barn is controlled by two Power Blocks, you would create two groups for each barn. One barn = several buildings The diagram on the right shows a site with one very large barn, divided into 2 wings and 16 rooms. Each room is controlled by a single power Block. One way to configure the buildings for a site similar to this is to create one building for a group of rooms. Then, because each room is controlled by one Power Block, you would create one group for each room. 2008-05-06 19 Chapter 2: Configuring your site structure Adding, editing, and removing buildings The Buildings tab of the Configuration Manager is where you add, edit, and remove buildings, as well as assign and remove devices from buildings. A B E F G C D A This is a list of buildings at the site. B These buttons open the Building window, which is where you add or edit buildings. C This button removes the selected building. D This button opens the Add Device window, which is where you add new devices. E This is a list of devices that are available (have not been assigned to a building). F This is a list of devices assigned to the selected building. G These buttons assign/remove the selected device from the building. To add buildings 1. Open the Configuration Manager and then click the Buildings tab. 2. Click Add Building. The Building window displays. 20 Phason Configuring buildings 3. Type a name for the building. 4. Click OK to save the building and return to the Configuration Manager. 5. Click Close to return to the Communication Center. To edit buildings 1. Open the Configuration Manager and then click the Buildings tab. 2. Under Buildings, select the building you want to edit. 3. Click Edit Building. The Building window displays. 4. Type a new name for the building. 5. Click Close to return to the Configuration Manager. 6. Click Close to return to the Communication Center. To remove buildings Before you can remove a building, you must remove all groups and assigned devices from that building. 1. Open the Configuration Manager and then click the Buildings tab. 2. Under Buildings, select the building you want to remove. 3. Click Remove Building. A Warning window displays. 4. To continue, click Yes. To cancel and return to the Configuration Manager, click No. A Confirmation window displays. 5. To remove the building, click Yes. To cancel and return to the Configuration Manager, click No. 6. Click Close to return to the Communication Center. Assigning and removing devices from buildings Before you can create ventilation groups, you need to assign the devices (Power Blocks, Feed Level Sensors, and so on) to the buildings in which they are installed. For example, if a barn has three 2008-05-06 21 Chapter 2: Configuring your site structure Power Blocks installed in it, you need to assign those three specific Power Blocks to the building representing that barn. Addresses When you assign a device to a building, you need to know its address. Addresses are a combination of numbers and letters. Power Blocks have four-digit addresses; all other devices have eight-digit addresses. If you do not know where to find the address of a device, see the installation guide for that specific product. To add new devices 1. Open the Configuration Manager and then click the Buildings tab. 2. Click Add Device. The Add Device window displays. 3. Beside Address, type the address of the new device. You must type the address exactly as it displays on the device. For more information, read the installation guide for the particular device. 4. Under Device Type, select the type of device you are adding. 5. Click OK to return to the Configuration Manager. 22 Phason Adding, editing, and removing ventilation groups To assign devices to buildings 1. Open the Configuration Manager and then click the Buildings tab. 2. Under Buildings, select the building where the device is installed. 3. Under Available, select the device you want to assign and then click The device moves to the Assigned list. . 4. Click Close to return to the Communication Center. If a device you want to assign to a building is not in the Available list, make sure it is not already assigned to a different building. To remove devices from buildings 1. Open the Configuration Manager and then click the Buildings tab. 2. Under Buildings, select the building from which you want to remove the device. 3. Under Assigned, select the device you want to remove and then click . A confirmation window displays. 4. To remove the device, click Yes. To cancel and return to the Configuration Manager, click No. 5. Click Close to return to the Communication Center. Adding, editing, and removing ventilation groups After you assign the Power Blocks to buildings, you need to add ventilation groups. A ventilation group belongs to (must be created in) a building. A ventilation group represents the Power Block that monitors and controls the equipment in the room or zone. In addition, the group contains all the configuration and settings OMNI-4000 uses to monitor and control the equipment. For more information about buildings and groups, see Understanding the OMNI-4000 site structure on page 17 The Ventilation tab of the Configuration Manager is where you configure ventilation groups. 2008-05-06 23 Chapter 2: Configuring your site structure A B C D E F A This is a list of buildings at the site. B This is a list of ventilation groups in the selected building. C This is the type and address of the Power Block for the selected group. D These buttons open the Ventilation Group Description window, which is where you add or edit groups. E This button removes the selected group. F This button opens the Power Block Information window, which is where you configure the variable stages and relays. For more information, read Configuring Power Blocks on page 38. If you have not assigned Power Blocks to buildings, see Assigning and removing devices from buildings on page 21. 24 Phason Adding, editing, and removing ventilation groups To add ventilation groups 1. Open the Configuration Manager and then click the Ventilation tab. 2. Click Add Ventilation Group. The Ventilation Group Description window displays. 3. Under Building, select the building in which you want to create the group. 4. Under Group Name, type a name for the group. 5. Under Power Block, select the address of the Power Block you want to assign to the group. 6. Click OK to save the group and return to the Configuration Manager. 7. Click Close to return to the Communication Center. To edit ventilation groups 1. Open the Configuration Manager and then click the Ventilation tab. 2. Under Buildings, select the building containing the group you want to edit. 3. Under Ventilation Groups, select the group you want to edit and then click Edit Ventilation Group. The Ventilation Group Description window displays. 4. Type a new name for the group. 5. Click OK to save the change and return to the Configuration Manager. 6. Click Close to return to the Communication Center. 2008-05-06 25 Chapter 2: Configuring your site structure To remove ventilation groups 1. Open the Configuration Manager and then click the Ventilation tab. 2. Under Buildings, select the building containing the group you want to remove. 3. Under Ventilation Groups, select the group you want to remove and then click Remove Ventilation Group. A confirmation window displays. 4. To remove the group, click Yes. To cancel and return to the Configuration Manager, click No. 5. Click Close to return to the Communication Center. Adding, editing, and removing production environments A production environment is a collection of environmental variables (feed, water, ventilation, etc.) to which a group of animals (a population group) will be exposed. Production environments allow you to track data for a single group of animals while using multiple feed, water, sort, or other groups. For example, you might have a single population group that is fed from two feed bins (two feed groups). Production environments allow you to treat the two feed groups as part of a larger group of variables, basically combining the consumption of both groups into one. This makes it easier to track all the variables that a group of animals has been exposed to during their stay at the site. Production environments are optional in OMNI-4000. If you are not using population groups, you do not need to create production environments. To create population groups, you need the Herd Information System. For more information, read the OMNI-Feed module. A production environment must contain at least one group of any type. A group can be in more than one production environment. For example, one water meter serving two production environments. The diagram on page 27 shows one possible way to set up a production environment. 26 Phason Adding, editing, and removing production environments Production environment example medium pigs Pen 1 medium pigs medium feeders A heavy pigs light pigs heavy feeders heavy pigs D light pigs feeders wash down water G I C B light feeders E feeders water cups water cups H Pen 2 F A Sort group 1—a PS-1 scale head controls and monitors the sorter for pen 1. B Sort group 2—a PS-1 scale head controls and monitors the sorter for pen 2. C D E F G H I Feed group 1—a Feed Level Sensor monitors the feed disappearance for the bin containing feed for the ‘medium’ animals. Feed group 2—a Feed Level Sensor monitors the feed disappearance for the bin containing feed for the ‘heavy’ animals. Feed group 3—a Feed Level Sensor monitors the feed disappearance for the bin containing feed for the ‘light’ animals. Water group 1—pulse counter 1 on the OMNI Water Monitor (item I) is connected to a water meter and monitors the water usage for the barn’s main water line. Water group 2—pulse counter 2 on the OMNI Water Monitor) is connected to a water meter and monitors the water usage for pen 1’s water line. Water group 3—pulse counter 3 on the OMNI Water Monitor) is connected to a water meter and monitors the water usage for pen 2’s water line. Water flow group 1—pulse counters 1, 2, and 3 on the OMNI Water Monitor monitor the water flow rates for all three water meters in the barn. The Production Environments tab of the Configuration Manager is where you add, edit, or remove production environments. 2008-05-06 27 Chapter 2: Configuring your site structure A C D B A This is a list of production environments at your site. B This is a list of groups in the production environment. C These two buttons open the Production Environment Editor, which is where you add or edit production environments. D This button removes the selected production environment. To add production environments 1. Open the Configuration Manager and then click the Production Environments tab. 2. Click Add. The Production Environment Editor displays. 3. Under Production Environment Name, type a name for the production environment. 28 Phason Adding, editing, and removing production environments 4. Under Groups, select a group you want to add to the production environment and then click Add. The group displays in the Groups in Production Environment list. 5. Repeat step 4 for each group you want to add to the production environment. If you need to remove a group from a production environment, select it from the Groups in Production Environment list and then click Remove. 6. Click OK to save the production environment and return to the Configuration Manager. 7. Click Close to return to the Communication Center. To edit production environments 1. Open the Configuration Manager and then click the Production Environments tab. 2. Select the production environment you want to edit and then click Edit. The Production Environment Editor displays. 3. Make the changes to the production environment: To change the name of the production environment, delete the existing name and then type a new one. To add a group to the production environment, select the group and then click Add. To remove a group from the production environment, select the group and then click Remove. 4. Click Close to return to the Configuration Manager. 5. Click Close to return to the Communication Center. To remove production environments 1. Open the Configuration Manager and then click the Production Environments tab. 2. Select the production environment you want to remove and then click Remove. A confirmation window displays. Before you remove a production environment, make sure you do not need any data from it and that you do not have any open population groups in that production environment. For more information about population groups, see the OMNI-Feed user manual. 3. To remove the production environment, click Yes. To cancel and return to the Configuration Manager, click No. 4. Click Close to return to the Communication Center. 2008-05-06 29 Chapter 2: Configuring your site structure Configuring site options The Configuration Manager is where you configure the site options. Site options include the following: Site name and location Units of measure Alarm system options OMNI-4000 startup option Serial port Site name and location You can enter a site name and location. The site name displays at the top of the Communication Center and in most reports. Units of measure The units of measure affect how you enter and view configuration, settings, and information in OMNI-4000. Even if you do not have modules that require some units of measure, it is a good idea to set them anyway. The units of measure you select apply to all OMNI modules. Alarm system options Enabling the alarm system starts OMNI-Alert (if installed) when OMNI-4000 starts and allows OMNI-4000 to send alarm conditions to OMNI-Alert. For more information, read the OMNI-Alert user manual. Enabling or disabling the alarm system does not affect how OMNI-4000 posts information to the alarm log or the Communication Center. The repeat interval defines how often OMNI-4000 sends alarm condition notifications to OMNIAlert (if the alarm is not acknowledged the first time it is sent out) and how often OMNI -4000 posts information to the alarm log and the Communication Center. The repeat interval can be from 30 to 240 minutes, in 15-minute increments. OMNI-4000 startup option You can set OMNI-4000 to start automatically when your computer starts. If your computer is set to restart when the power returns after a power failure, enabling the startup option helps prevent losses of data and communication. To get the most out of your OMNI-4000 system, the software should always be running. 30 Phason Configuring site options Serial port The serial port is what OMNI-4000 uses to communicate with the OMNI Server. The first time OMNI-4000 starts, it searches the computer’s communication ports until it finds the OMNI Server. After finding the Server, it stores the port location (COM1, COM2, and so on) and displays it. The next time OMNI-4000 starts, it first looks for the Server on the same port it used the previous time. If there are third-party devices connected to the computer’s COM ports and OMNI-4000 is having trouble locating the OMNI-Server, or if searching for the Server on the other ports interferes with the third-party devices, changing the port information might help the problem. The Options tab of the Configuration Manager is where you configure the site options. A B G H C D E F A This is where you enter the site name and location B This is where you select the different units of measure. C This is where you enable or disable OMNI-Alert, as well as set the repeat interval. D This is where you select whether or not you want OMNI-4000 to start automatically when the computer starts. E This button opens the Select Port window, which is where you select the port to which the OMNI Server is connected. F This button saves any changes you made to the above options. G This button opens the Analog Sensors window, which is where you configure any sensors connected to the OMNI Server. For more information, read Configuring analog sensors on page 34. H This button opens the Farm Information window. For more information, read Viewing farm information on page 33. 2008-05-06 31 Chapter 2: Configuring your site structure To configure the site options 1. Open the Configuration Manager and then click the Options tab. To enter a farm name and/or location, type the information in the appropriate text box. To change the units of measure, below each type of measure (temperature, distance, and so on), select the unit you want to use. To change the alarm system options: To enable or disable the system, below Alarm System, select Enabled. When enabled, there is a check mark in the box. To change the repeat interval, beside Repeat Interval, click Up or Down. To change the startup option, below Start OMNI-4000, select or deselect Enabled. When enabled, there is a check mark in the box. 2. Click Apply to save the change. 3. Click Close to return to the Communication Center. Changing the Communication Center options Background color—the background color in the message area. Text attributes—the color, size, style, and font of the text in the message area. Logo—the image in the bottom-left corner of the Communication Center. The image must be in bitmap (.bmp) format and should be 69 x 53 pixels. Number of lines—the number of lines of text in the message area. The default is 200 and the range is 100 to 1000. The Options tab of the Settings Manager is where you change the Communication Center options. 32 Phason Configuring site options To change the Communication Center options 1. Open the Settings Manager and then click the Options tab. To change the background color, click Background Color. To change the text attributes, click Text Font. To change the logo, click Bitmap. To change the number of lines, type a number between 100 and 1000. 2. Click Close to return to the Communication Center. Viewing farm information The Farm Information window displays all the groups assigned in each building. You can “browse” through the buildings and groups. When you click on a group, the window displays the address of the device assigned to the group. You cannot make any changes to buildings or groups from the Farm Information window. To display farm information 1. Open the Configuration Manager and then click the Options tab. 2. Click Farm Information. The Farm Information window displays. 3. In the list on the left, select a device you want to view. The device address is displayed in the right side. 4. Repeat step 3 for each device you want to view. 5. Click Close to return to the Configuration Manager. 6. Click Close to return to the Communication Center. 2008-05-06 33 Chapter 2: Configuring your site structure Configuring analog sensors Typically, analog sensors are temperature probes you have connected to the OMNI Server. The OMNI Server comes with a 30-foot probe for monitoring outdoor temperatures. You can monitor temperatures in up to 5 additional areas by connecting additional probes. OMNI-4000 displays the temperatures for the probes in the Communication Center. You can also create charts and reports for the probes. For each sensor, you can enter a description and enable or disable the Server’s alarm relay for that sensor. Enabling the alarm relay allows you to program alarm settings for the relay. For more information, read Programming analog sensor alarms on page 35. The sensor connected to the AN1 terminal (Probe 1) must be an outdoor temperature probe. For any sensors connected to the other five terminals, you need to select the type of sensor. Phason temperature probes are “Temperature Sensor 3K”. To configure analog sensors 1. Open the Configuration Manager and then click the Options tab. 2. Click Configure Sensors. The Analog Sensors window displays. 3. Beside each probe you have connected to the OMNI Server, enter a description, select the type (3K for Phason probes), and select whether or not you want to enable the alarm relay for that probe. 4. Click OK to save the changes and return to the Configuration Manager. 5. Click Close to return to the Communication Center. 34 Phason Configuring site options Programming analog sensor alarms For each analog sensor, if you enable the relay, you can set high and low alarm set points. When enabled, if the temperature goes above the high set point, or below the low set point, the alarm relay activates. Unlike most other OMNI-4000 alarms, OMNI does not post analog sensor alarms in the Communication Center or the Alarm Log. The OMNI Server must be able to communicate with the computer for the alarm relay to activate/deactivate. For information about connecting an alarm system to the alarm relay, see the OMNI-4000 installation guide. The Sensor Relay Settings window is where you program the sensor relay settings. A C B A This is information about the sensor. B This is the ambient temperature. C These are the high and low temperature alarm settings. If there is an alarm condition, the Alarm indicator will be red. To change a setting, click and drag the slider, or click it and then press the up or down key on your keyboard. 2008-05-06 35 Chapter 2: Configuring your site structure To program analog sensor alarms 1. Open the Settings Manager and then click the Analog Sensors tab. 2. Under Sensors, select the sensor you want to program. 3. Click Set up Alarm. The Sensor Relay Settings window displays. 4. Click and drag the slider for the setting you want to change, or click it and then press the up or down key on your keyboard. 5. Click OK to save the changes and return to the Settings Manager. 6. Click Close to return to the Communication Center. 36 Phason Chapter 3: Configuring and programming ventilation groups Chapter 3 explains how to configure Power Blocks and program ventilation groups. Topics in Chapter 3 include: Configuring Power Blocks What you need to know before programming ventilation groups Programming group settings Programming equipment settings 2008-05-06 37 Chapter 3: Configuring and programming ventilation groups Configuring Power Blocks Configuring Power Blocks means selecting the function—actuator, curtain, and so on—for each variable stage and relay. To put it another way, configuring is telling OMNI-4000 what is connected to each stage or relay on the Power Block. The following table shows the variable stages and relays available on the different Power Block models. Power Block models Model PB-1 PB-2 PB-3 PB-4 PB-5 PB-6 Variable stages Relay stages 1 2 0 0 0 1 3 9 3 9 5 0 The variable stage on a PB-6 is for heat mat control. Configuring Power Blocks contains the following topics. Configuring variable stages (on page 40) Configuring relays for actuators (on page 41) Configuring relays for single-stage heating or cooling (on page 42) Configuring relays for curtains (on page 44) Configuring relays for timed events (on page 45) Use the Installation and configuration worksheets when configuring Power Blocks. The worksheets are in the back of the OMNI-4000 hardware installation guide. 38 Phason Configuring Power Blocks The Power Block Information window is where you configure Power Blocks. A B C E D A This shows the Power Block’s available features. You cannot change this information. B These boxes are where you enter descriptions for the Power Block, variable stages, and actuators. Giving the items meaningful descriptions helps to identify them in the software. Only items that are available are enabled. For example, if the Power Block has no variable stages, the description boxes for those will not be enabled. C This button opens the Curtain Configuration window, which is where you configure relays for curtain control. For more information, read Configuring relays for curtains on page 44. D This button opens the Relay Configuration window, which is where you configure relays for single-stage heating or cooling. For more information, read Configuring relays for single-stage heating or cooling on page 42. E This button opens the Actuator Configuration window, which is where you configure relays for actuator control. For more information, read Configuring relays for actuators on page 41. For information about configuring relays for timed events, see Configuring relays for timed events on page 45. 2008-05-06 39 Chapter 3: Configuring and programming ventilation groups Configuring variable stages Variable stages control elements that operate with gradually increasing voltage, such as variable speed fans, or gradually decreasing voltage, such as heat mats. For more information about how variable stages work, see Programming variable stages on page 61. Variable-speed fan example Increase voltage Decreased heat Temperature Temperature Increased speed Heat mat example Decrease voltage The PB-1 and PB-2 variable stages are cooling stages. The PB-6 variable stage is a heating stage, specifically designed for heat mat control. Configuring variable stages means entering a description for the stage. Use the Installation and configuration worksheets when configuring Power Blocks. The worksheets are in the back of the OMNI-4000 hardware installation guide. To configure variable stages 1. Open the Configuration Manager and then click the Ventilation tab. 2. Under Buildings, select the building containing the group (Power Block) you want to configure. 3. Under Ventilation Groups, select the group you want to configure and then click Configure Power Block. The Power Block Information window displays. 4. If you have not already named the Power Block, under Power Block Description, type a name for it. 5. For each variable stage, type a description/name in the appropriate box. 6. If you have other items to configure, follow the instructions for configuring them. Configuring relays for curtains on page 44 Configuring relays for single-stage heating or cooling on page 42 Configuring relays for actuators on page 41 40 Phason Configuring Power Blocks 7. Click Close to return to the Configuration Manager. 8. Click Close to return to the Communication Center. Configuring relays for actuators Each actuator you connect requires one relay for opening and one for closing. Power Blocks PB-1/3 can control one actuator. Power Blocks PB-2/4/5 can control two actuators. Use the Installation and configuration worksheets when configuring Power Blocks. The worksheets are in the back of the OMNI-4000 hardware installation guide. Because actuators require specific pairs of relays, configure actuator relays before configuring other relays. To enable the actuator relays, you must have the jumpers in place on the circuit board. When the jumper is in place, you cannot configure the relay set for any other purpose. To disable actuator relays (so you can configure them for other uses), remove the jumpers. For more information, read the actuator section of the OMNI-4000 hardware installation guide. To configure relays for actuators 1. Open the Configuration Manager and then click the Ventilation tab. 2. Under Buildings, select the building containing the group (Power Block) you want to configure. 3. Under Ventilation Groups, select the group you want to configure and then click Configure Power Block. The Power Block Information window displays. 4. If you have not already named the Power Block, under Power Block Description, type a name. 5. Click Configure Actuators. 2008-05-06 41 Chapter 3: Configuring and programming ventilation groups The Actuator Configuration window displays. 6. To enable the actuator relays, select the check box beside the actuator. To disable the actuator relays, deselect it. When enabled, there is a check mark in the box. 7. Click OK to save the configuration and return to the Power Block Information window. An Information window displays, reminding you about the actuator jumper. 8. For each actuator, type a description/name in the appropriate box. 9. If you have other items to configure, follow the instructions for configuring them. Configuring variable stages on page 40 Configuring relays for curtains on page 44 Configuring relays for single-stage heating or cooling below 10. Click Close to return to the Configuration Manager. 11. Click Close to return to the Communication Center. Configuring relays for single-stage heating or cooling Relays configured for cooling can control single-speed fans, misters, or other cooling equipment that can be either on or off. The relays switch on when the temperature rises above the set point and off when it drops below. Relays configured for heating can control equipment such as electric or gas heaters that can be either on or off. The relays switch on when the temperature drops below the set point and off when it rises above. Use the Installation and configuration worksheets when configuring Power Blocks. The worksheets are in the back of the OMNI-4000 hardware installation guide. 42 Phason Configuring Power Blocks This section is for ON/OFF relays. For information about variable-powered heating and cooling elements, see Configuring variable stages on page 40. To configure relays for single-stage heating and cooling 1. Open the Configuration Manager and then click the Ventilation tab. 2. Under Buildings, select the building containing the group (Power Block) you want to configure. 3. Under Ventilation Groups, select the group you want to configure and then click Configure Power Block. The Power Block Information window displays. 4. If you have not already named the Power Block, under Power Block Description, type a name for it. 5. Click Configure Relays. The Relay Configuration window displays. 6. Under Relays, select the relay you want to configure. 7. Under Relay Use, select the configuration for the relay. If the relay is already configured as an actuator, timed even, curtain, or timed feeding, the relay use section will be unavailable. 8. Beside Relay Name, type a description/name for the relay. 9. Repeat steps 6 to 8 for each relay you want to configure. 10. Click Close to save the configuration and return to the Power Block Information window. 11. If you have other items to configure, follow the instructions for configuring them. Configuring variable stages on page 40 Configuring relays for curtains on page 44 Configuring relays for actuators on page 41 12. Click Close to return to the Configuration Manager. 13. Click Close to return to the Communication Center. 2008-05-06 43 Chapter 3: Configuring and programming ventilation groups Configuring relays for curtains Curtains are usually controlled by equipment called curtain machines (sometimes referred to as winches). Curtains are opened and closed to let in more air or less air, the idea being more air cools the building. Each curtain machine requires two relays: one for opening the curtain, and one for closing the curtain. Use the Installation and configuration worksheets when configuring Power Blocks. The worksheets are in the back of the OMNI-4000 hardware installation guide. To configure relays for curtains 1. Open the Configuration Manager and then click the Ventilation tab. 2. Under Buildings, select the building containing the group (Power Block) you want to configure. 3. Under Ventilation Groups, select the group you want to configure and then click Configure Power Block. The Power Block Information window displays. 4. If you have not already named the Power Block, under Power Block Description, type a name for it. 5. Click Configure Curtains. The Curtain Configuration window displays. 6. Select the curtain you want to configure. 7. Under Open Relay, select the relay for opening the curtain. 8. Under Close Relay, select the relay for closing the curtain. 9. Under Curtain Description, type a description/name for the curtain. 44 Phason Configuring Power Blocks 10. If you have additional curtains to configure, click Apply and then repeat steps 6 to 9. If you are finished, click OK to save the configuration and return to the Power Block Information window. 11. If you have other items to configure, follow the instructions for configuring them. Configuring variable stages on page 40 Configuring relays for single-stage heating or cooling on page 42 Configuring relays for actuators on page 41 12. Click Close to return to the Configuration Manager. 13. Click Close to return to the Communication Center. Configuring relays for timed events Relays configured for timed events can be used to switch lights on and off or control equipment that must operate at specific times each day, regardless of temperature. An example of a timed event would be would be switching the yard lights on at 8:00 PM and off at 7:00 AM. The Timed Events tab of the Configuration Manager is where you configure relays for timed events. C A D E B F A This is a list of buildings at the site. B This is a list of Power Blocks (addresses) in the selected building. C This is a list of relays on the selected Power Block that are available (unassigned). D This is a list of relays on the selected Power Block that are configured for timed events. E These buttons assign ( ) or remove () the selected relay from timed events. F This is the description of the selected assigned relay. 2008-05-06 45 Chapter 3: Configuring and programming ventilation groups Use the Installation and configuration worksheets when configuring Power Blocks. The worksheets are in the back of the OMNI-4000 hardware installation guide. To configure timed event relays 1. Open the Configuration Manager and then click the Timed Events tab. 2. Under Buildings, select the building containing the Power Block you want to configure. 3. Under Power Blocks, select the address of the Power Block you want to configure. 4. Under Available Relays, select the relay you want to assign to timed events and then click The Relay Description window displays. . 5. Type a description/name for the relay. 6. Click OK to save the change and return to the Configuration Manager. 7. Click Close to return to the Communication Center. What you need to know before programming ventilation groups The difference between configuring and programming is that configuring is “telling” OMNI-4000 what is connected to each stage or relay on the Power Block, while programming is telling OMNI4000 how to control the equipment. There are two main programming areas. Programming group settings means programming settings that apply to all the equipment in the ventilation group. Group settings include the group set point, temperature alarm settings, ventilation curves, and more. The group settings section starts on page 48. Programming equipment settings means programming settings for variable stages, actuators, curtains, and so on. The equipment settings section starts on page 60. 46 Phason What you need to know before programming ventilation groups Program the group settings before programming the equipment settings. Settings changes can take up to two minutes to take effect at the Power Block. The Ventilation tab of the Settings Manager is where you program ventilation groups. D A B F E G H C A This is a list of buildings at the site. B This is a list of ventilation groups in the selected building. C This is the description and address of the Power Block for the selected group. D These are the ambient and group set point temperatures. If there is an alarm condition, the Alarm indicator will be red. The mode indicators show which mode the group is using. E This button opens the Ventilation Group Settings window, which is where you program the settings for the group as a whole, including set point, ventilation curves, alarm settings and more. Program the group settings before programming the equipment settings. For more information, read Programming group settings on page 48. F These buttons open the equipment settings windows, which are where you program the settings for the individual equipment elements (actuators, fans, and so on). Program the group settings before programming the equipment settings. For more information, read Programming equipment settings on page 60. G This button opens the Power Block Status window, which is where you can view the status of the stages. For more information, read Viewing the status of a Power Block on page 81. H This button opens the Ventilation Group Chart. For more information, read Viewing Vent Group Temperature Charts on page 83. 2008-05-06 47 Chapter 3: Configuring and programming ventilation groups Programming group settings Programming group settings means programming settings that apply to all the equipment in the ventilation group (in other words, all the equipment connected to the Power Block). Programming group settings contains the following topics. Programming the group set point on page 49 Programming ventilation curves on page 50 Programming alarm settings on page 54 Programming the temperature setback on page 56 Using normal and empty room modes on page 58 The Ventilation Group Settings window is where you program the group settings. When you open the window, the settings for the active mode display. A B C H G F D A E This is information about the group and Power Block. B This is the active mode (normal or empty room). The drop-down list is where you select the mode OMNI-4000 uses to control the equipment. For more information, read Using normal and empty room modes on page 58. C This is where you select the settings the window is displaying so that you can program either mode without switching the active mode. However, each time you open the Ventilation Group Settings window, it displays the active mode’s settings. Selecting Normal Operation or Empty Room changes the displayed settings only, it does not change the active mode. 48 Phason Programming group settings D These are the ambient and group set point temperatures. To change the group set point, click and drag the slider, or click it and then press the up or down key on your keyboard. For more information, read Programming the group set point below. If the group set point curve is enabled (see item H), you will not be able to manually adjust the group set point. E These are the high and low temperature alarm settings. If there is an alarm condition, the Alarm indicator will be red. To enable or disable an alarm setting, select or deselect Enabled. When enabled, there is a check mark in the box. To change a setting, click and drag the slider, or click it and then press the up or down key on your keyboard. You must enable the setting before you can change it. For more information, read Programming alarm settings on page 54. F This is the high temperature alarm biasing setting. To enable or disable biasing, select or deselect Enabled. When enabled, there is a check mark in the box. To change the setting, click and drag the slider, or click it and then press the up or down key on your keyboard. You must enable the setting before you can change it. For more information, read Programming alarm settings on page 54. G This button opens the Temperature Setback window, which is where you program the temperature setback (DIF and power save) settings. If temperature setback is enabled, one or both of the indicators will be green. For more information, read Programming the temperature setback on page 56. H This button opens the Ventilation Curve Settings window, which is where you program the group set point curve (also called “growth curve”) and minimum ventilation curves (for variable cooling stages only). If a curve is enabled, its indicator will be green. For more information, read Programming ventilation curves on page 50. Programming the group set point The group set point is the desired or target temperature for the room or zone. Make sure you program the group set point before programming the equipment set points. If you adjust the group set point, OMNI-4000 adjusts the set points for each variable and relay stage relative to the group set point. For example, say the group set point for zone 1 is 80°F, a variable-stage fan set point is 85°F, and a single-stage heater set point is 73°F. If you lower the group set point by 5 degrees to 75°F, OMNI-4000 lowers the set points for the fan and heater by 5 degrees to 80°F and 68°F respectively. 2008-05-06 49 Chapter 3: Configuring and programming ventilation groups You cannot manually adjust the group set point if the group set point curve is enabled. For more information, read Programming ventilation curves below. Use the Group settings worksheet on page 105 when programming group settings. To program the group set point 1. Open the Settings Manager and then click the Ventilation tab. 2. Under Buildings, select the building containing the group you want to program. 3. Under Ventilation Groups, select the group you want to program. 4. Click Set up Group. The Ventilation Group Settings window displays, showing the active mode's settings. 5. If the mode you want to program is not displayed, under Settings Display, select the mode you want to program. The selected mode’s settings display. 6. Under Group Set Point, click and drag the slider. To adjust the temperature by smaller 0.1 degree or 1 percent increments, click the slider and then press the up or down key on your keyboard. 7. Click OK to save the change and return to the Settings Manager. 8. Click Close to return to the Communication Center. Programming ventilation curves As animals grow, their temperature and ventilation requirements change. Younger, smaller animals require higher temperatures than more mature animals. More mature animals require more ventilation (airflow) than younger animals. OMNI-4000 has two types of ventilation curves, group set point curves (also called “growth curves”) and minimum ventilation curves. Both the group set point and minimum ventilation curves allow you to automatically adjust settings over time, as your animals grow. 50 Phason Programming group settings Group set point curves A group set point curve is an extension of the group set point concept. The curve automatically adjusts the group set point temperature over time. In hog production, newborn piglets require a high temperature for comfort and health. As they grow older, they need a steadily lower temperature. Using the group set point curve, you can have OMNI4000 automatically adjust the temperatures as the animals grow. Minimum ventilation curves In hog production, minimum ventilation is very important for controlling humidity and getting rid of gases (methane, carbon dioxide, and others). Insufficient ventilation can cause high humidity, high gas levels, and stagnant air. As animals grow older, they require more fresh air, but produce more humidity and gases. Using the minimum ventilation curve, you can have OMNI-4000 automatically adjust the minimum ventilation as the animals grow. Ventilation groups using PB-1 or PB-2 Power Blocks can use minimum ventilation curves. Curve points/resolution There are three curve resolutions. Daily – there is one point at the start, plus one for each day. Use daily if you need lots of detail, or for a short curve. Weekly – there is one point at the start, plus one every seven days. Use weekly if you need some, but not too much detail. Weekly works well for medium and long curves. Batch – there is one point at the start and one point at the end. Use batch if you need a simple, linear adjustment. Curve duration and current day Curve duration is the number of days in the curve. Curves can be from 15 to 366 days. Current day defines which settings OMNI-4000 is currently using. You cannot change curve points that are before the current day, in other words, “that have already happened”. How ventilation curves work OMNI-4000 reads the curve(s) each day at 00:00 (midnight) and sends the settings for the current day to the Power Block. The Power Block controls the temperature and/or minimum ventilation according to the settings for that day. 2008-05-06 51 Chapter 3: Configuring and programming ventilation groups If you change the settings for a curve, the program sends the settings to the Power Block when you click OK on the Ventilation Curve Settings window. At the end of the curve, OMNI continues using the settings from the last day of the curve. The Ventilation Curve Settings window is where you program ventilation curves. A B C D F E A This is where you adjust the points on the curves. The chart shows colored lines for all available curves. The vertical orange line shows the current day. You must enable the curves for them to be active. For more information, read item C. The chart shows up to 30 points for each curve. If there are more than 30 points, there will be a scroll bar along the bottom of the chart area. The left axis is for the group set point curve, the right axis is for the minimum ventilation curves, and the bottom axis is the timeline. B This is where you select how many points you want for the curves. For more information, read Curve points/resolution on page 51. C This is where you enable or disable curves. When enabled, there is a check mark in the box beside the curve. D This is the current day. To change the current day, type a number in the box, or click the Up or Down arrow. E This is the curve duration. To change the duration, type a number in the box, or click the Up or Down arrow. F This button allows you to copy curves from a different ventilation group. 52 Phason Programming group settings Tips for working with curves Left or right-click a point to display information about that point. Left click displays the information in the lower-right corner of the window; right-click displays it in the chart area. Left-click and drag a point up or down to adjust its value. Double-click a point and then click Up or Down to adjust the value more precisely. Use smoothing to “draw” a straight line between two points. 1. Right-click on a white area of the chart and then select Smooth Growth Curve. 2. Click the first point of the line. 3. Click the second point of the line. The chart adjusts all the points between the selected ones. Copy curves from similar ventilation groups to save time. Copying a curve copies the points and duration, but not the current day and enabled/disabled status. 1. Click Copy Curve. 2. Select a building and then a ventilation group. 3. Click Copy. The chart displays the new curves. If the group set point curve is enabled, you cannot manually adjust the group set point for that group. For more information, read Programming the group set point on page 49. If a minimum ventilation curve is enabled, you cannot manually adjust the equipment settings for that variable stage. For more information, read Programming variable stages starting on page 61. The settings display must be “normal operation” to program ventilation curves. Use the Group settings worksheet on page 105 when programming group settings. 2008-05-06 53 Chapter 3: Configuring and programming ventilation groups To program curves 1. Open the Settings Manager and then click the Ventilation tab. 2. Under Buildings, select the building containing the group you want to program. 3. Under Ventilation Groups, select the group you want to program. 4. Click Set up Group. The Ventilation Group Settings window displays, showing the active mode's settings. 5. Click Edit Curves. The Ventilation Curve Settings window displays. 6. Make the changes to the curve(s). For information about editing curves, see Tips for working with curves on page 53. To enable or disable a curve, below Enable Curves, select or deselect the one you want. When enabled, there is a check mark in the box. To change the current day, beside Current Day, type a number in the box, or click the Up or Down arrow. To change the curve duration, beside Curve Duration, type a number in the box, or click the Up or Down arrow. 7. Click OK to save the changes and return to the Ventilation Group Settings window. 8. Click OK to return to the Settings Manager. 9. Click Close to return to the Communication Center. Programming alarm settings The Ventilation module has temperature alarms that can notify you of undesirable temperature conditions. When there is an alarm condition, the Power Block alarm relay immediately activates. When there is an alarm condition present for two continuous readings (about two minutes), OMNI posts a message in the Communication Center and alarm log. If OMNI-Alert is installed and enabled, OMNI sends the alarm information to the notification system. If the alarm condition does not go away, OMNI continues to post messages and notify the notification system at regular intervals. For more information about the repeat interval, see Configuring site options on page 30. There is an alarm condition when: The low alarm is enabled and the temperature is lower than the low set point When the high alarm is enabled and the temperature is higher than the high set point 54 Phason Programming group settings How alarm biasing works The purpose of alarm biasing is to prevent the alarm from sounding on very hot days. If the outdoor temperature is higher than the high temperature alarm setting, OMNI adds the bias temperature to the high temperature alarm setting, creating a “new setting”. When the outdoor temperature drops below the high alarm settings, OMNI removes the bias. For example, if the high temperature alarm setting is 80°F and the bias is 5°F, when the outdoor temperature is over 80°, OMNI adds the bias to make the “new” alarm setting 85°. A C D B A A C D The outdoor temperature is higher than the high alarm setting; OMNI-4000 adds a bias temperature of 5°F. The room temperature exceeds the normal alarm temperature. No alarm occurs because the room temperature is lower than the high temperature alarm, plus the alarm bias. The room temperature is greater than the high alarm setting plus the bias (80+5=85°F); a high temperature alarm occurs. The room temperature drops below the alarm bias and the alarm condition ends. Use the Group settings worksheet on page 105 when programming group settings. To program alarm settings 1. Open the Settings Manager and then click the Ventilation tab. 2. Under Buildings, select the building containing the group you want to program. 3. Under Ventilation Groups, select the group you want to program. 2008-05-06 55 Chapter 3: Configuring and programming ventilation groups 4. Click Set up Group. The Ventilation Group Settings window displays, showing the active mode's settings. If the mode you want to program is not displayed, under Settings Display, select the mode you want to program. To enable or disable an alarm or alarm biasing, select or deselect Enabled for that specific feature. When enabled, there is a check mark in the box. To change an alarm or the biasing setting, click and drag the slider, or click it and then press the up or down key on your keyboard. You must enable the setting before you can change it. 5. Click OK to save the changes and return to the Settings Manager. 6. Click Close to return to the Communication Center. Programming the temperature setback Temperature setback automatically “changes” the temperature set point for a specific period (called the setback period) during the day. The setback amount can be from 0.1 to 25°F (0.1 to 14°C). Temperature setback works for both group set points and group set point curves. There are two types of temperature setback, DIF and power save. DIF setback DIF stands for differential method. During the setback period for DIF, OMNI-4000 actively cools the area to try to lower the temperature to the new set point. DIF is similar to manually setting the group set point back by a number of degrees for a certain time every day. For example, if the group set point is 70°F and the setback is 5°, during the setback period, the following happens. When the temperature is above the setback, there is active cooling; OMNI operates fans and other cooling equipment. When the temperature is below the setback, there is active heating; OMNI operates heating equipment. 56 Phason Programming group settings Power save setback Power save affects only heating equipment. During the power save setback period, OMNI-4000 allows the temperature to fall to the new set point. OMNI-4000 maintains minimum ventilation, but does not actively cool the area unless the temperature is above the normal group set point. For example, if the group set point is 70°F and the setback is 5°, during the setback period, the following happens. When the temperature is above the group set point, there is active cooling; OMNI operates fans and other cooling equipment. When the temperature is in the setback range, OMNI maintains minimum ventilation, but does not otherwise operate heating or cooling equipment When the temperature is below the setback, there is active heating; OMNI operates heating equipment. The Temperature Setback window is where you program the DIF and power save setbacks. DIF A Power save B A C This chart shows the baseline and setback amounts during the day. B These are the DIF settings. When enabled, there is a check mark in the box. To change a setting, click the Up or Down arrows beside that setting. C These are the power save settings. When enabled, there is a check mark in the box. To change a setting, click the Up or Down arrows beside that setting. 2008-05-06 57 Chapter 3: Configuring and programming ventilation groups Use the Group settings worksheet on page 105 when programming temperature setback. If DIF and power save are active at the same time, the following occurs. If the DIF adjustment is greater than the power save adjustment, power save has no effect. If the power save adjustment is greater than the DIF adjustment, power save is active only when the temperature is below the DIF adjustment. To program the temperature setback 1. Open the Settings Manager and then click the Ventilation tab. 2. Under Buildings, select the building containing the group you want to program. 3. Under Ventilation Groups, select the group you want to program. 4. Click Set up Group. The Ventilation Group Settings window displays, showing the active mode's settings. 5. Click Edit Setback. The Temperature Setback window displays. 6. Make the changes. To enable or disable a setback mode, below Setback Status, select or deselect the mode. When enabled, there is a check mark in the box. To change a setback amount, start time, or stop time, click the Up or Down arrows beside the setting. As you change the settings, the chart adjusts. 7. Click OK to save the changes and return to the Ventilation Group Settings window. 8. Click OK to return to the Settings Manager. 9. Click Close to return to the Communication Center. Using normal and empty room modes OMNI-4000 has two modes of operation for group settings, normal and empty room. Each mode has its own, separate settings (set point, alarm settings, and so on). 58 Phason Programming group settings Normal mode When the room or zone requires cooling, OMNI operates the cooling equipment. When the zone requires heating, OMNI operates the heating equipment. Growth curves, minimum ventilation curves, and temperature setback all function normally. Use normal mode when you want to control your equipment as you “normally” would during dayto-day operations. Empty room mode Empty room mode is a power saving feature that allows you to put a ventilation group into an ‘idle state’ and adjust all the settings, without having to change your normal, operational settings. Empty room mode has its own group set point, high and low temperature alarms, and high temperature biasing. When you place a group in empty room mode, it uses the “empty settings”. When you return the group to normal mode, it returns to using the normal settings. In empty room mode, OMNI maintains minimum ventilation only; there is no active cooling, no ventilation curves, and no temperature setbacks. OMNI operates heating equipment only if needed to keep the temperature at or above the set point. Each type of equipment has different settings it uses to operate during empty room mode. For more information about equipment settings, read the applicable sections, starting on page 60. Variable heating equipment – all settings are available. Equipment operates only if needed to keep the temperature at or above the set point. Variable cooling equipment – only the idle speed setting is available. Equipment operates only to maintain minimum ventilation. Single-stage cooling equipment – no settings are available. Cooling equipment does not operate. Single-stage heating equipment – the set point is available, but duty cycles are not. Heating equipment operates only if needed to keep the temperature at or above the set point. Actuators – only the inlet position is available. Inlets maintain the programmed position. Curtains – no settings are available. Curtains are closed. There are two sets of settings, one for normal mode, the second for empty room mode. When you first use empty room as the "active" mode, make sure you program and verify the equipment settings. Program the empty room set point to a low, but safe temperature. For example, if there are water lines in the room and there is a risk of freezing, set the set point to 40°F; do not set it to 20°F. 2008-05-06 59 Chapter 3: Configuring and programming ventilation groups To change active modes 1. Open the Settings Manager and then click the Ventilation tab. 2. Under Buildings, select the building containing the group you want to change. 3. Under Ventilation Groups, select the group you want to change. 4. Click Set up Group. The Ventilation Group Settings window displays showing the active mode's settings. 5. Beside Active Mode, select the mode you want OMNI to use. The active mode’s settings display. 6. Click OK to change the mode and return to the Settings Manager. 7. Click Close to return to the Communication Center. Programming equipment settings Programming equipment settings means programming settings for variable stages, actuators, curtains, and so on. For example, for a single-speed fan set for cooling, you might say “Switch on when the temperature rises above 80°F.” Programming equipment settings contains the following topics. Programming variable stages (on page 61 Programming actuator relays (on page 65) Programming curtain control relays (on page 69) Programming single-stage heating and cooling relays (on page 72) Programming timed events (on page 75) Use the Programming worksheets starting on page 104 when programming the variable and relay stages. 60 Phason Programming equipment settings Programming variable stages Programming up the variable stages means setting the following: For a cooling stage: Differential Set point Idle range Idle speed For a heating stage: Heat cutoff Set point Differential Minimum load Before setting up the variable stages, make sure you have properly configured them. For more information, read Configuring variable stages on page 40. 2008-05-06 61 Chapter 3: Configuring and programming ventilation groups How variable cooling stages work When the temperature is below the “idle range” temperature, the fan is off. When the temperature rises above the idle range, the fan runs at the idle speed. The fan continues to run at the idle speed until the temperature rises to the “set point” temperature. When the temperature is between the set point and the “differential” temperature, the fan increases or decreases proportionally with the temperature. When the temperature is above the differential, the fan runs at full speed. The fan runs at full speed Differential Fan speed increases as the temperature rises, or decreases as the temperature falls. Temperature Set point The fan runs at idle speed Idle range The fan is off Idle speed Fan speed If you need to connect more cooling elements than you have relays available and you have an unused variable stage, you can use it as an ON/OFF stage (for 115/230 VAC-powered equipment only). Set the idle speed to 100% and idle range to the temperature at which you want the stage to switch on/off. You no longer have “variable” speed or power; you have either “full on” or “full off”, the same as a cooling relay. The set point and differential settings have no effect when you use a variable stage this way. 62 Phason Programming equipment settings How variable heating stages work When the temperature is above the “heat cutoff” temperature, the heater is off. When the temperature drops below the heat cutoff, the heater is at the minimum load. The heater continues to operate at minimum load until the temperature drops to the “set point”. When the temperature is between the set point and the “differential” temperature, the heater output increases or decreases proportionally with the temperature. When the temperature is below the differential, the heater is at full output. Heater output Temperature The heater is off. Minimum load Heat cutoff The heater is at its min heat output. Set point Heater output increases as the temperature drops, or decreases as the temperature rises. Differential The heater is at full output. 2008-05-06 63 Chapter 3: Configuring and programming ventilation groups The Variable Stage Settings window is where you program the variable stage settings. The following example is for cooling stages. The window for heating stages is similar. A B A C This is information about the Power Block and variable stage. B These are the ambient temperature and group settings. If a DIF setback is active, a message displays next to the group set point. If a minimum ventilation curve is active, the Status indicator is green. For more information, read Programming ventilation curves on page 50. C These are the equipment settings. To change a setting, click and drag a slider, or click it and then press the up or down key on your keyboard. The chart corresponds to the settings. The blue area shows when the fan fill be on. The red line shows the ambient temperature. After the room or zone is properly set up and balanced, you should not need to change the variable stage settings. Changing the settings after the room is set up can affect the ventilation balance in the room. If you need to change settings after the room is set up, you should change the group settings. For more information, read Programming group settings starting on page 48. If the group is in empty room mode: Variable heating stages – all settings are available. Equipment operates only if needed to keep the temperature at or above the set point. Variable cooling stages – only the idle speed setting is available. Equipment operates only to maintain minimum ventilation. 64 Phason Programming equipment settings Use the Variable stage settings worksheet on page 106 when programming variable stages. You cannot manually adjust the ventilation settings if the minimum ventilation curve is enabled. For more information, read Programming ventilation curves on page 50. To program variable stages 1. Open the Settings Manager and then click the Ventilation tab. 2. Under Buildings, select the building containing the group you want to program. 3. Under Ventilation Groups, select the group you want to program. 4. In the equipment list, click the stage you want to program (VSP1, VSP2, or VHS1). The Variable Stage Settings window displays. 5. Program the settings: To change the temperature or speed/output settings, click and drag the appropriate slider. To adjust the values by smaller, 0.1 degree or 1 percent increments, click the slider and then press the up or down key on your keyboard. The chart changes as you adjust the settings. 6. Click OK to save the changes and return to the Settings Manager. 7. Click Close to return to the Communication Center. Programming actuator relays Before programming the actuator relays, make sure you have properly configured the relays and calibrated the actuators. For more information, read Configuring relays for actuators on page 41 and the calibrating actuators section in the OMNI-4000 hardware installation guide. Do not use OMNI-4000’s actuator control function to control curtains. This can burn out the curtain machines. Set up curtains using relays and timers. For more information, read Programming curtain control relays on page 69. 2008-05-06 65 Chapter 3: Configuring and programming ventilation groups Programming actuators means setting the temperature set points, differential, and position for each stage of the actuator. Each actuator has four stages. For each actuator you are setting up you need to program: Minimum set point temperature Minimum position Set point temperature, differential temperature, and position for stages 1 to 4 How actuators work While the temperature is below the minimum set point, the actuator is closed. When the temperature rises to the minimum set point, the actuator moves to the minimum position. As the temperature rises, the actuator has four stages it moves through until it reaches its maximum open position. This method lets you gradually open inlets instead of fully opening them when the temperature rises above a single set point. Example You want the actuator open to 40 percent at stage 1, 60 percent at stage 2, 80 percent at stage 3, and 100 percent at stage 4. However, you do not want the actuator to open directly to 40 percent. That is why there are two temperature settings for each stage. The first setting is the stage set point. This is where the actuator starts opening. The second setting is the differential. This is where the actuator reaches the stage position. In other words, “when the temperature is here (stage set point), I want the actuator to start opening. When the temperature reaches here (stage differential), I want the actuator to be at this position (stage position) percent.” 66 Phason Programming equipment settings Actuator position Stage 4 differential Stage 4 set point Temperature Stage 3 differential Stage 3 set point Stage 2 differential Stage 2 set point Stage 1 differential Stage 1 set point Stage 4 position Stage 3 position Stage 2 position Stage 1 position Stage 0 position (minimum position) Stage 0 set point (minimum set point) The Actuator Settings window is where you program the actuator settings. A B C D 2008-05-06 67 Chapter 3: Configuring and programming ventilation groups A This is information about the Power Block and actuator. B These are the ambient temperature and group set point. If a DIF setback is active, a message displays next to the group set point. C This is where you select the actuator stage you want to program. D These are the settings for the selected actuator stage. To change a setting, click and drag a slider, or click it and then press the up or down key on your keyboard. The chart corresponds to the settings. The blue line shows where the actuator will be. The green section is the stage you are currently programming. The red line shows the ambient temperature. Use the Actuator settings worksheet on page 108 when programming actuator relays. After the room or zone is properly set up and balanced, you should not need to change the actuator settings. Changing the settings after the room is set up can affect the ventilation balance in the room. If you need to change settings after the room is set up, you should change the group settings. For more information, read Programming group settings starting on page 48. If the group is in empty room mode, only the inlet position is available. Inlets maintain the programmed position. To program actuators 1. Open the Settings Manager and then click the Ventilation tab. 2. Under Buildings, select the building containing the group you want to program. 3. Under Ventilation Groups, select the group you want to program 4. In the equipment list, click the actuator you want to program (ACT 1 or ACT 2). The Actuator Settings window displays. The min stage is automatically selected. 5. Under Stage, select the actuator stage you want to program. 6. Program the settings: To change the temperature or position settings, click and drag the appropriate slider. The settings must be higher than the previous stage or lower than the next stage. To adjust the values by smaller, 0.1 degree or 1 percent increments, click the slider and then press the up or down key on your keyboard. You cannot adjust the setting lower than the previous stage or higher than the next stage. The chart changes as you adjust the settings. 68 Phason Programming equipment settings 7. Click OK to save the changes and return to the Settings Manager. 8. Click Close to return to the Communication Center. Programming curtain control relays Curtains control the temperature by adjusting the airflow into the facility. Before setting up the curtains, make sure you have properly configured the relays. For more information, read Configuring relays for curtains on page 44. Programming curtain control relays means programming the following settings. Set point – the temperature at which the curtain holds its position. Idle band – the buffer around the set point within which the curtains hold their position. Open run duration – the duration the curtains open during the OPEN cycle Open idle duration – the duration the curtains pause during the OPEN cycle Close run duration – the duration the curtains open during the CLOSE cycle Close idle duration – the duration the curtains pause during the CLOSE cycle How curtains work Curtains hold their position while the temperature is within the idle band of the set point. For example, if the set point is 80°F and the idle band is 2°F, the curtain holds its position when the temperature is between 79°F and 81°F. If the temperature rises above the idle band (above 81°F in our example), the curtain opens for the open run duration. After opening, it holds its position for the open idle duration. If the temperature is still above the idle band, the curtain again opens for the open run duration and the process repeats. If the temperature drops below the idle band (below 79°F in our example), the curtain closes for the close run duration. After closing, it holds its position for the close idle time. If the temperature is still below the idle band, the curtain again closes for the close run duration and the process repeats. 2008-05-06 69 Chapter 3: Configuring and programming ventilation groups Time (duration) Open idle (02:00 mm:ss) After the curtain opens for the “open run” duration, it holds its position for the open idle duration. Temperature Open run (00:30 mm:ss) If the temperature rises above the idle band, the curtain opens for the open run duration. Set point (80°F) Idle band (+/– 1°F) When the temperature is within the idle band, the curtain remains in its current position. Close run (01:00 mm:ss) If the temperature drops below the idle band, the curtain closes for this duration. Close idle (01:00 mm:ss) After the curtain closes for the “close run” duration, it holds its position for the close idle duration. The Curtain Settings window is where you program the curtain settings. A B D C 70 Phason Programming equipment settings A This is information about the Power Block and curtain. The first set of curtain relays is automatically selected. If you have more than one curtain configured, you can select others from the Curtain list. B These are the ambient temperature and group set point. If a DIF setback is active, a message displays next to the group set point. C These are the curtain set point and idle band settings. To change a setting, click and drag a slider, or click it and then press the up or down key on your keyboard. D These are the open and close run and idle durations. To change a setting, click the Up or Down arrow beside that setting. The Status indicators are yellow when the relay is activated (in other words, opening/closing the curtain). Use the Curtain worksheet on page 110 when programming curtain control relays. After the room or zone is properly set up and balanced, you should not need to change the curtain settings. Changing the settings after the room is set up can affect the ventilation balance in the room. If you need to change settings after the room is set up, you should change the group settings. For more information, read Programming group settings starting on page 48. If the group is in empty room mode, settings are not available and curtains are closed. To program curtains 1. Open the Settings Manager and then click the Ventilation tab. 2. Under Buildings, select the building containing the group you want to program. 3. Under Ventilation Groups, select the group you want to program 4. In the equipment list, click CURTAIN. The Curtain Settings window displays. The first set of curtain relays is automatically selected. 5. Under Curtain, select the curtain you want to program. 6. Program the settings: To change the set point or idle band settings, click and drag the appropriate slider. To adjust the values by smaller, 0.1 degree or 1 percent increments, click the slider and then press the up or down key on your keyboard. To change the run or idle durations, click the appropriate Up or Down arrows. 2008-05-06 71 Chapter 3: Configuring and programming ventilation groups 7. Click OK to save the changes (for all curtains) and return to the Settings Manager. 8. Click Close to return to the Communication Center. Programming single-stage heating and cooling relays There are two types of heating and cooling element setups: ‘standard’ and ‘duty cycle’. Programming a standard element means programming the temperature set point. Programming duty cycles means programming the temperature set point and the ON and OFF durations. Before programming the relays, make sure you have properly configured the relays. For more information, read Configuring relays for single-stage heating or cooling on page 42. How temperature-based duty cycles work For cooling elements When the temperature is below the set point, the cooling element is off. When the temperature rises above the set point, the element switches on for the on duration and then off for the off duration. If at any time the temperature drops below the set point, the duty cycle switches off and will not switch on again until the temperature rises above the set point. For heating elements When the temperature is above the set point, the heating element is off. When the temperature drops below the set point, the element switches on for the on duration and then off for the off duration. If at any time the temperature rises above the set point, the duty cycle switches off and will not switch on again until the temperature drops below the set point. All ON durations are the same ON OFF ON duration ON duration 5 minutes 5 minutes OFF duration OFF duration 10 minutes 10 minutes All OFF durations are the same The relay does not switch ON until a temperature condition has been met. For example, if the temperature rises above 85°F, switch on a mister for 5 minutes and then OFF for 10 minutes. Repeat this until the temperature is below 85°F. 72 Phason Programming equipment settings Notes about duty cycles Duty cycles always start with the ON duration. When Power Blocks restart after a power failure, duty cycles restart with the ON duration. If the duty cycles resetting could cause a problem at your site, timed events are another option to consider. For more information, read Programming timed events on page 75. The minimum ON or OFF duration is 5 seconds (0:00:05 hours:minutes:seconds). The maximum ON or OFF duration is 5 hours (5:00:00 hours:minutes:seconds) Power Blocks must complete their current ON or OFF duration before any settings changes will take effect. For example, if you have a five-hour duty cycle that just started an ON or OFF duration and you change it to a ten-minute duty cycle, you will have to wait for the five-hour duration to complete before the new settings will take effect. The Relay Stage Settings window is where you program single-stage heating and cooling relays. A B D C A This is information about the Power Block and relay. The first relay (configured as single-stage) is automatically selected. If you have more than one single-stage relay configured, you can select others from the Relay Number list. B These are the ambient temperature and group set point. If a DIF setback is active, a message displays next to the group set point. C This is the relay’s set point. To change the setting, click and drag the slider, or click it and then press the up or down key on your keyboard. If a power save setback is active, the information displays to the left of the relay set point. D These are the duty cycle settings. To enable and change the settings, select Duty Cycle Enabled, and then click the Up or Down arrows. 2008-05-06 73 Chapter 3: Configuring and programming ventilation groups Use the Curtain worksheet on page 110 when programming curtain control relays. After the room or zone is properly set up and balanced, you should not need to change the relay set point. Changing the set point after the room is set up can affect the ventilation balance in the room. If you need to change the set point after the room is set up, you should change the group settings. For more information, read Programming group settings starting on page 48. If the group is in empty room mode: Cooling equipment – no settings are available. Equipment does not operate. Heating equipment – the set point is available, but duty cycles are not. Equipment operates only if needed to keep the temperature at or above the set point. To program single-stage heating and cooling elements 1. Open the Settings Manager and then click the Ventilation tab. 2. Under Buildings, select the building containing the group you want to program. 3. Under Ventilation Groups, select the group you want to program 4. In the equipment list, click STAGE. The Relay Stage Settings window displays. The first relay (configured as single-stage) is automatically selected. 5. Under Relay Number, select the relay you want to program. 6. Program the settings: To change the set point, click and drag the slider. To adjust the values by smaller, 0.1 degree increments, click the slider and then press the up or down key on your keyboard. To enable or disable duty cycle, select Duty Cycle Enabled. When enabled, there is a check mark in the box. To change the on or off durations, click the appropriate Up or Down arrows. 7. Click OK to save the changes (for all single-stage relays) and return to the Settings Manager. 8. Click Close to return to the Communication Center. 74 Phason Programming equipment settings Programming timed events Timed event relays control equipment such as lights that need to be switched ON or OFF during certain times of the day. Programming timed events means setting the “on” and “off” times. Timed events must occur in pairs. This means that every time you set a relay to switch on, you must set a time for it to switch off. Before setting up the timed events, make sure you have properly configured the relays. For more information, read Configuring relays for timed events on page 45. OMNI-4000 uses 24-hour time. When you program a time, make sure you enter it in 24-hour time. The following table shows some common standard times and their 24-hour equivalents. Standard time 24-hour time Standard time 24-hour time 12:00 AM 00:00 12:00 PM 12:00 01:00 AM 01:00 01:00 PM 13:00 02:00 AM 02:00 02:00 PM 14:00 03:00 AM 03:00 03:00 PM 15:00 04:00 AM 04:00 04:00 PM 16:00 05:00 AM 05:00 05:00 PM 17:00 06:00 AM 06:00 06:00 PM 18:00 07:00 AM 07:00 07:00 PM 19:00 08:00 AM 08:00 08:00 PM 20:00 09:00 AM 09:00 09:00 PM 21:00 10:00 AM 10:00 10:00 PM 22:00 11:00 AM 11:00 11:00 PM 23:00 The Timed Events tab of the Settings Manager is where you program timed events. 2008-05-06 75 Chapter 3: Configuring and programming ventilation groups A C D B A E This is a list of buildings at the site. B This is a list of relays in the selected building that are configured as timed event. The list is sorted by Power Block address. C This is the relay number for the selected timed event relay. D This is a list of timed events for the selected relay. E This button opens the Event Settings window, which is where you add, edit, or remove timed events. Use the Timed events worksheet on page 112 when setting up timed events. To add timed events 1. Open the Settings Manager and then click the Timed Events tab. 2. Under Buildings, select the building containing the Power Block you want to program. 3. Under Timed Event Relays, select the Power Block/relay you want to program 4. Click Set up Events. The Event Settings window displays. 76 Phason Programming equipment settings 5. Under Time, click the Up or Down arrows to adjust the hour and the minute. 6. Select ON for an event that switches the load on, or OFF for an event that switches it off. 7. Click Add. The event is added to the list. 8. Repeat steps 5 to 7 for each event you want to program. Events must be in pairs; for every ON event, there must be an OFF event. 9. Click OK to save the changes and return to the Settings Manager. 10. Click Close to return to the Communication Center. To edit timed events 1. Open the Settings Manager and then click the Timed Events tab. 2. Under Buildings, select the building containing the Power Block you want to program. 3. Under Timed Event Relays, select the Power Block/relay you want to program 4. Click Set up Events. The Event Settings window displays. 5. Under Timed Events, select the event you want to edit. 6. Under Time, click the Up or Down arrows to adjust the hour and then the minute. 7. Select ON for an event that switches the load on, or OFF for an event that switches it off. 8. Click Edit. 9. Click OK to save the changes and return to the Settings Manager. 10. Click Close to return to the Communication Center. 2008-05-06 77 Chapter 3: Configuring and programming ventilation groups To remove timed events 1. Open the Settings Manager and then click the Timed Events tab. 2. Under Buildings, select the building containing the Power Block you want to program. 3. Under Timed Event Relays, select the Power Block/relay you want to program 4. Click Set up Events. The Event Settings window displays. 5. Under Timed Events, select the event you want to remove. 6. Click Remove. 7. Click OK to save the changes and return to the Settings Manager. 8. Click Close to return to the Communication Center. 78 Phason Chapter 4: Monitoring and maintaining your site Chapter 4 explains how to view and analyze the data OMNI-4000 collects. Topics in Chapter 4 include: Monitoring your site Viewing charts Creating reports Maintaining your information 2008-05-06 79 Chapter 4: Monitoring and maintaining your site Monitoring your site One of the benefits and advantages of OMNI-4000 is that it constantly collects information about your site. Along with the charts and reports, the Communication Center and Power Block Status viewer (Ventilation module) display valuable site information. OMNI-4000 collects, displays, and stores information only when it is running. When OMNI-4000 is not running, Power Blocks function according to their settings, but the software cannot collect information from or send settings to the Power Blocks. Keep the monitor on and do not use any screen savers or power management schemes. Other OMNI-4000 modules have additional viewers for monitoring other aspects of your site. For information about other OMNI-4000 modules, see www.phason.ca. Monitoring the Communication Center The Communication Center, the main window for OMNI-4000, displays information from the software and devices. In addition to communication messages, the Communication Center displays: Status information – for example, current temperatures Audit information – for example, program startup or shutdown Alarm information – for example, high or low temperature Check the Communication Center regularly to help ensure all your controls are functioning normally and to see if there are problems or potential problems in a building, room, or zone. 80 Phason Monitoring your site Viewing the status of a Power Block The Power Block Status viewer, an important monitoring tool, is where you view the status of the Power Block’s variable and relay stages. Check the Power Block Status viewer regularly and make sure the controls are functioning normally. OMNI-4000 calculates and displays information based on the ambient temperature and settings. For variable stages, the display shows the expected speed of the fan or percentage of output. For actuators, the display shows the expected position (percentage open). For relays, the display shows the expected state: on, off, or cycling. Cycling is for duty cycle or curtain relays only; it means the temperature condition has been met and the relay is in an “on duration” or “off duration”. The Power Block Status Viewer does not automatically update; it displays the status as of the time the window was opened. To view the status of a Power Block 1. Open the Settings Manager and then click the Ventilation tab. 2. Under Buildings, select the building containing the Power Block you want to view. 3. Under Ventilation Groups, select the group representing the Power Block you want to view. 2008-05-06 81 Chapter 4: Monitoring and maintaining your site 4. Click View PB Status. The Power Block Status window displays. 5. Click Close to return to the Settings Manager. 6. Click Close to return to the Communication Center. Viewing charts OMNI-4000 has one chart; the Ventilation module has two others. Analog Temperature Chart (below) Ventilation Group Temperature Chart (on page 83) Vent Group Status Report (on page 85) Viewing Analog Temperature Charts The Analog Temperature Chart displays historical temperatures for the analog sensors (temperature probes) connected to the OMNI Server. The Analog Temperature Chart is a line chart. The chart automatically displays information for all probes configured and connected to the OMNI Server. The OMNI Server comes with a 30-foot temperature probe for monitoring outdoor temperature. You can connect up to five additional probes for monitoring temperatures in additional areas. D E A F B C 82 G Phason Viewing charts A These drop-down boxes open the date selector, which is where you select the date range. B This button updates the chart and resets the zoom level. If you change the date range, you need to click the button to update the chart. C This button updates the chart and leaves the zoom level the same. D This is the chart for all probes (up to six). You can zoom in and scroll along the chart. For more information, read Zooming and panning charts on page 87. E This is the legend for the chart. F This allows you to change the width of the lines in the chart. G This button prints the chart. You cannot save charts, but you can view them again as long as the information remains in the database. To view Analog Temperature charts 1. Open the Reports Utility and then select the General tab. 2. Click Analog Chart. The Analog Temperature Chart displays. 3. Select a date range. For more information, read Selecting a date range on page 88. If you change the date range, you need to click Load Data (updates the chart and resets the zoom level) or Refresh (updates the chart using the same zoom level) to update the information in the chart. 4. Click Close to return to the Reports Utility. Viewing Vent Group Temperature Charts You can view charts that display historical ambient, outdoor, and set point temperatures for a Ventilation group. Vent Group Temperature Charts are line charts. The charts are useful for tracking down problems that have occurred in a group, analyzing the effects of different ventilation strategies, and monitoring environmental conditions. 2008-05-06 83 Chapter 4: Monitoring and maintaining your site E A F B G C D A H This is a list of groups at the site, sorted by building. B These drop-down boxes open the date selector, which is where you select the date range. C This button updates the chart and resets the zoom level. If you change the date range after selecting a group, you need to click the button to update the chart. D This button updates the chart and leaves the zoom level the same. E This is the chart for the selected group and date range. You can zoom in and scroll along the chart. For more information, read Zooming and panning charts on page 87. F This is the legend for the chart. G This allows you to change the width of the lines in the chart. H This button prints the chart. You cannot save charts, but you can view them again as long as the information remains in the database. To view Vent Group Temperature Charts 1. Open the Reports Utility and then select the Ventilation tab. 2. Click Temperature Chart. The Vent Group Temperature Chart displays. 3. Select a date range. For more information, read Selecting a date range on page 88. 84 Phason Viewing charts 4. Under Vent Groups, select the group you want to view. Your chart displays. If you change the date range after selecting a group, you need to click Load Data (updates the chart and resets the zoom level) or Refresh (updates the chart using the same zoom level) to update the information in the chart. 5. Click Close to return to the Reports Utility. In the Settings Manager, you can view a Vent Group Temperature chart that displays the last seven days of data for the selected group. 1. Open the Settings Manager and then select the Ventilation tab. 2. Under Buildings, select the building containing the group you want to view. 3. Under Ventilation Groups, select the group you want to view. 4. Click View Chart. Viewing Vent Group Status Reports The Ventilation Group Status Report is a combination chart and report that provides an “information snapshot” of the selected ventilation group. Status reports are helpful for analyzing problems in rooms or zones. The chart section at the top includes the last seven days of ambient, outdoor, and set point temperatures. You can zoom (magnify) and pan (scroll along) the chart the same as the other OMNI-4000 charts. The text section includes an ambient temperature summary for the period, followed by the current configuration and settings. 2008-05-06 85 Chapter 4: Monitoring and maintaining your site B A D C F E G H A This is a list of buildings at your site. Select a building and then select a group. B This is a list of groups in the selected building. C This is the chart containing the last seven days of temperature information. You can zoom in and scroll along the chart. For more information, read Zooming and panning charts on page 87. D This is the legend for the chart. E This allows you to change the width of the lines in the chart. F This is the report. The top section contains a summary of the last seven days of temperature information. Below the temperature summary are the Power Block configuration and settings. Scroll down to see the configuration and settings. G This button prints the chart and report for the current group. H This button prints a chart and report for all groups. You cannot save Vent Group Status Reports, but you can view them again as long as the information remains in the database. 86 Phason Viewing charts To view Vent Group Status Reports 1. Open the Reports Utility and then select the Ventilation tab. 2. Click Status Report. The Vent Group Stats Reporter displays. 3. Beside Building, select the building containing the group you want to view. 4. Beside Group, select the group you want to view. Your report displays. 5. Click Close to return to the Reports Utility. Zooming and panning charts You can zoom in on (magnify) or pan (scroll along) a chart. This is useful if you have a chart that covers a large date range and you want to zoom in on a specific day or small date range. To zoom in on charts 1. Click and drag to select the area you want to magnify. 2. Release the mouse button. The chart magnifies the area you selected. To zoom out from charts Click on the chart, drag to the top-right and then release the mouse button. The chart returns to normal magnification. To pan charts Right-click the chart and drag the mouse in the direction you want the chart to move. 2008-05-06 87 Chapter 4: Monitoring and maintaining your site Selecting a date range OMNI-4000 charts and reports have an easy way to select a date range for the data you want to display. A date range consists of a start date and an end date. The end date cannot be before the start date. To select date ranges 1. Below (or beside on some windows) Start Date, click The calendar displays. . 2. Select a start date: To move forward and backward through the months, click or . To select a specific month, click the month on the calendar and then select the month you want to go to. To move forward and backward through the years, click the year on the calendar and then click or . 3. Repeat steps 1 and 2 for the end date. Creating reports OMNI-4000 has five reports and the Ventilation module has one other. Site Structure Report (on page 92) Log reports—Alarm Log, Communications Log, and Audit Log—(starting on page 89) Analog Sensor Report (on page 93) Ventilation Group Temperature Report (on page 96) 88 Phason Creating reports Most OMNI-4000 reports are available in either HTML or CSV format. HTML You can view HTML reports using a web browser, print them, or e-mail them off-site for evaluation. The following is an example of an HTML report. CSV You can import CSV reports into a third-party reporting, database, or spreadsheet program, or email them off-site for evaluation. CSV reports are not suitable for normal viewing. Creating log reports OMNI-4000 maintains three system logs. Audit Log Alarm Log Communications Log Audit Log The Audit Log is a list of system shut-down times and changes that have been made to settings or configuration. The list includes manual changes—changes users have made—and automatic changes—changes OMNI-4000 has made. An example of an automatic change is a growth curve making changes to ventilation settings. 2008-05-06 89 Chapter 4: Monitoring and maintaining your site Information about the report A list of events, sorted by date and time Alarm Log The Alarm Log is a list of alarm messages for all modules during the selected period. Information about the report A list of alarm notices, sorted by date and time 90 Phason Creating reports Communications Log The Communications Log is a list of all messages posted to the Communication Center during the selected period. Information about the report A list of communication messages, sorted by date and time To create log reports 1. Open the Reports Utility and then select the General tab. 2. Click Log Reports. The Log Reports Utility displays. 3. Select a date range. For more information, read Selecting a date range on page 88. 4. Under Output Type, select the format for the report. 5. Under Data Type, select which log report you want to create. 6. Click Create. The Save As dialog displays. Unless you select a different directory, OMNI-4000 saves reports to C:\OMNI4000\Reports\. 7. Click Save. Your report displays. 2008-05-06 91 Chapter 4: Monitoring and maintaining your site Creating Site Structure Reports Site Structure Reports list the structure and configuration of your site. Depending how many modules and devices you have installed at your site, the Site Structure Report can be long. Below are some small sections of a report. 92 Phason Creating reports To create Site Structure Reports 1. Open the Reports Utility and then select the General tab. 2. Click Site Structure Report. Your report displays. Creating Analog Sensor Reports Analog Sensor Reports provide detailed temperature history information. In addition to selecting which probes you want in the report, you can select a sampling interval and type. Sampling interval and type OMNI-4000 automatically collects and stores information at regular intervals. In the Ventilation Group Temperature and Analog Sensor Reports, sampling interval and sampling type define how you display the information in the reports. Sampling interval Sampling interval is how often there is a temperature entry in the report. You can select a sampling interval of between 10 minutes and 24 hours. In the following example, the sampling interval is 10 minutes. 9:10 9:20 9:30 68.0°F 69.5°F 70.5°F Sampling type Sampling type is how you read the data at the sampling intervals. If you select “point data”, you will get the exact reading for that interval. If you select “average”, you will get the average of the data during that interval. In the example above, if you select “point data” for sampling type and “30 minutes” for sampling interval, the temperature in the report would be 70.5°F, the actual reading at the 30minute interval. If you select “average” for sampling type and 30 minutes for sampling interval, the temperature in the report would be 69.3°F, the average of the three readings during the 30 minutes. 2008-05-06 93 Chapter 4: Monitoring and maintaining your site Information about the report Temperature data, sorted by sensor, date, and time A temperature summary for each sensor 94 Phason Creating reports The Analog Sensor Reports Utility is where you create Analog Sensor Reports. A B D C E F A These drop-down boxes open the date selector, which is where you select the date range. B This is where you select the sensor(s). You can select as many sensors as you want. C This is where you to select the type of output. D This is where you select the sampling interval, which can be from 10 minutes to 24 hours. E This is where you select the sampling type. F This button creates the report. To create Analog Temperature Reports 1. Open the Reports Utility and then select the General tab. 2. Click Analog Report. The Analog Sensor Reports Utility displays. 3. Select a date range. For more information, read Selecting a date range on page 88. 4. Under Sensors Available, select one or more sensors you want to display. 5. If you want to change any other report options: Output type: select the type Sampling interval: click and drag the slider to adjust the interval Sampling type: select the type 6. Click Create. The Save As dialog displays. Unless you select a different directory, OMNI-4000 saves reports to C:\OMNI4000\Reports\. 7. Click Save. 2008-05-06 95 Chapter 4: Monitoring and maintaining your site Your report displays. Creating Ventilation Group Temperature Reports Ventilation Group Temperature Reports provide detailed temperature history information. In addition to selecting the groups and temperature types—ambient, outdoor, and set point—you want in the report, you can select a sampling interval and type. For more information about sampling, see Sampling interval and type on page 93. Information about the report Temperature data, sorted by ventilation group, date, and time A temperature summary for each ventilation group 96 Phason Creating reports The Temperature Reports Utility is where you create Ventilation Group Temperature Reports. A C B E D F G A These drop-down boxes open the date selector, which is where you select the date range. B These check boxes are where you to select the type(s) of temperatures. C This is where you select the group(s). You can select as many groups as you want. D This is where you to select the type of output. E This is where you select the sampling interval, which can be from 10 minutes to 24 hours. F This is where you select the sampling type. G This button creates the report. To create Ventilation Group Temperature Reports 1. Open the Reports Utility and then select the Ventilation tab. 2. Click Temperature Report. The Temperature Reports Utility displays. 3. Select a date range. For more information, read Selecting a date range on page 88. 4. Under Data Types, select the types(s) of temperatures you want to display. 5. Under Group Selection, select one or more groups you want to display. 6. If you want to change any other report options: Output type: select the type Sampling interval: click and drag the slider to adjust the interval Sampling type: select the type 2008-05-06 97 Chapter 4: Monitoring and maintaining your site 7. Click Create. The Save As dialog displays. Unless you select a different directory, OMNI-4000 saves reports to C:\OMNI4000\Reports\. 8. Click Save. Your report displays. Maintaining your information OMNI-4000 stores information in a database on your computer’s hard disk. OMNI has two utilities to help you protect and maintain your database. Backup and Restore Utility (below) Data Archive Utility (on page 100) Using the Backup and Restore Utility The OMNI-4000 Backup and Restore Utility backs up all configuration and settings, as well as seven days of historical data. If the computer crashes, or your database becomes corrupt, you can restore the configuration, settings, and data using the utility. Phason recommends backing up your information at least once per week. It is a good idea to idea to keep a copy of the file on a removable media, such as a CD, DVD, USB storage device, or external hard disk. Backing up your hard disk is an alternate way of protecting your OMNI-4000 information. Backing up your complete hard disk preserves all configuration, settings, and historical information. For information about backing up your hard disk, contact a local computer retailer. 98 Phason Maintaining your information C A B E D A This button starts the backup process. B This button starts the restore process. C This area displays information about the Backup and Restore Utility. During a backup or restore, this area displays information about the process. D This button prints the contents of the information area. E This button saves the contents of the information area as a text (.txt) file. You cannot run the Backup and Restore Utility while OMNI-4000 is running. Shut down OMNI-4000 before starting the Utility. When finished, start OMNI-4000. Restoring your database from a backup removes all the existing information and replaces it with the information from the backup. To back up information 1. Start the Backup and Restore Utility; on the Start menu, click Programs, OMNI-4000, Backup – Restore). 2. Click Backup. The Save As dialog displays. By default, OMNI-4000 names the files in the format yyyymmdd.bkp, with yyyymmdd being the current year, month, and date. 3. Click Save. The Utility backs up your information to the file. The status area displays messages during the backup. 4. When complete, the Utility asks if you want to create a copy of the file. To create a copy, click Yes. To skip the step, click No. 2008-05-06 99 Chapter 4: Monitoring and maintaining your site To restore information 1. Start the Backup and Restore Utility; on the Start menu, click Programs, OMNI-4000, Backup – Restore. 2. Click Restore. The Select file dialog displays. 3. Select the backup file to use for restoring the database and then click OK. An Information window displays. 4. To restore the database from the selected file, click Yes. To cancel, click No. Using the Data Archive Utility Each day OMNI-4000 collects information. Eventually the database gets large and performance (speed) decreases. Archiving older data helps improve performance and keeps your database at a manageable size. A B C D E A This is a list of active months of data in the database. B This is a list of archived months of data. C This button starts the archive process. D This button starts the restore process E During an archive or restore, this area displays information about the process. Phason recommends archiving data as soon as you no longer need them. For example, after a batch of animals is complete, every six months, or after one year; use a strategy that works best for your site. 100 Phason Maintaining your information To archive data 1. Start the Data Archive Utility; on the Start menu, click Programs, OMNI-4000, Data Archiver. The Security Check displays 2. Enter your user name and password. The Data Archive Utility displays. 3. Under Active Months, select the month you want to archive. To select more than one month, press and hold the CRTL or SHIFT key while selecting. 4. Click Archive. A Confirmation window appears. 5. To archive the selected month(s), click Yes. To cancel, click No. The Utility archives the data. When complete, it moves the selected month(s) to the Archived Months list. 6. Click Close to shut down the Utility. To restore archived data 1. Start the Data Archive Utility; on the Start menu, click Programs, OMNI-4000, Data Archiver. The Security Check displays 2. Enter your user name and password. The Data Archive Utility displays. 3. Under Archived Months, select the month you want to restore. To select more than one month, press and hold the CRTL or SHIFT key while selecting. 4. Click Restore. A Confirmation window appears. 5. To restore the selected month(s), click Yes. To cancel, click No. The Utility restores the data. When complete, it moves the selected month(s) to the Active Months list and an Information window displays. 6. Click OK to close the Information window. 7. Click Close to shut down the Utility. 2008-05-06 101 Chapter 4: Monitoring and maintaining your site 102 Phason Appendixes Appendix A: Worksheets Appendix B: Appendix C: Glossary 2008-05-06 103 Appendixes Appendix A: Worksheets Appendix A contains worksheets to help you program OMNI-4000. Group settings worksheet (on page 105) Variable stage settings worksheet (on page 106) Actuator settings worksheet (on page 108) Curtain worksheet (on page 110) Heating and cooling elements worksheet (on page 111) Timed events worksheet (on page 112) There is one copy of each worksheet. If you need more than one copy, make additional copies of the blank worksheets before filling them in. 104 Phason Appendix A: Worksheets Group settings worksheet Record your group settings in the table below. Info Use the information in the table to program your group settings in the OMNI-4000 software. Power Block address Power Block description Building Group Group set point and ventilation curves Group settings Enabled? Set point Group set point Yes No This is the target temperature. Group set curve Yes No VSP1 min. vent Yes No VSP2 min. vent Yes No There are too many details to show curve settings here. You can have either “group set point” or “group set point curve” enabled, but not both. Alarm settings The lowest temperature to which you can safely allow the zone to fall—cannot be higher than high temperature alarm The highest temperature to which you can safely allow the zone to rise—cannot be lower than low temperature alarm The maximum difference allowed between the zone temperature and the high temperature alarm Low temp. High temp. High temp. bias Temperature setback Enabled? Start time Stop time DIF Yes No : : Power save Yes No : : Setback Temperature in °F/°C, range: 22.0 to 120.0°F, –10.0 to 48.0°C Temperature in °F/°C, range: 0.0 to 18.0°F, 0.0 to 10.0°C Temperature in °F/°C, range: 0.0 to 25.0°F, 0.0 to 13.9°C Time in 24-hour format 2008-05-06 105 Appendixes Variable stage settings worksheet Variable cooling stages Programming variable cooling stages means programming the following settings. For more information, read Programming variable stages on page 61. Building Group Setting VSP1 Differential Set point Idle range Idle speed VSP2 Description The fan is at full speed when the temperature is at or above this value. Fan speed increases when the temperature is between this value and the differential temperature. The fan is at idle speed when the temperature is between this value and the idle range. The fan is at idle speed when the temperature is between this value and the set point. The fan is off when the temperature is below this value. The speed the fan is at when the temperature is between the idle range and set point temperatures Temperature in °F/°C, range: 22.0 to 120.0°F, –10.0 to 48.0°C Idle speed in %; range: 0 to 100 % If you need to connect more cooling elements than you have relays available, and you are not using both variable stages, you can use an available variable stage as an ON/OFF stage (for 115/230 VAC-powered equipment only). Set the idle speed to 100% and idle range to the temperature at which you want the stage to switch on/off. You no longer have “variable” speed or power; you have either “full on” or “full off”, the same as a cooling relay. The set point and differential settings have no effect when you use a variable stage this way. 106 Phason Appendix A: Worksheets Variable heating stages Programming variable heating stages means programming the following settings. For more information, read Programming variable stages on page 61. Building Setting Minimum load (output) Group VHS1 Description The output the heater is at when the temperature is between the heat cutoff and set point temperatures Heat cutoff The heater is at minimum output when the temperature is between this value and the set point. The heater is off when the temperature is above this value. Set point The heater is at minimum output when the temperature is between this value and the heat cutoff. Heater output increases when the temperature is between this value and the differential temperature. Differential The heater is at full output when the temperature is at or below this value. Temperature in °F/°C, range: 22.0 to 120.0°F, –10.0 to 48.0°C Output in %; range: 0 to 100 % 2008-05-06 107 Appendixes Actuator settings worksheet Programming actuator relays means programming the following settings. For more information, read Programming actuator relays on page 65. Actuator position Stage 4 differential Stage 4 set point Temperature Stage 3 differential Stage 3 set point Stage 2 differential Stage 2 set point Stage 1 differential Stage 1 set point 108 Stage 4 position Stage 3 position Stage 2 position Stage 1 position Stage 0 position (minimum position) Stage 0 set point (minimum set point) Phason Appendix A: Worksheets Building Setting Minimum set point Position Stage 1 set point Differential Position Stage 2 set point Differential Position Stage 3 set point Differential Position Stage 4 set point Differential Position Group ACT 1 ACT 2 Description The actuator will close completely when the temperature is below this value. The actuator is at this position when the temperature is between the minimum and stage 1 set points. When the temperature is at this value, the actuator starts opening for stage 1. When the temperature is at this value, the actuator is at the stage 2 position. When the temperature is at the differential value, the actuator is at this position. When the temperature is at this value, the actuator starts opening for stage 2. When the temperature is at this value, the actuator is at the stage 2 position. When the temperature is at the differential value, the actuator is at this position. When the temperature is at this value, the actuator starts opening for stage 3. When the temperature is at this value, the actuator is at the stage 3 position. When the temperature is at the differential value, the actuator is at this position. When the temperature is at this value, the actuator starts opening for stage 4. When the temperature is at this value, the actuator is at the stage 4 position. When the temperature is at the differential value, the actuator is at this position. Temperature in °F/°C, range: 22.0 to 120.0°F, –10.0 to 48.0°C Position in %, range: 0 to 100 % 2008-05-06 109 Appendixes Curtain worksheet Programming curtain control relays means programming the following settings. For more information, read Programming curtain control relays on page 69. Building Setting Set point Idle band Open run Open idle Close run Close idle Group Curtain 1 Curtain 2 Curtain 2 Curtain 3 Description When the temperature is at the set point +/– half the idle band, the curtain holds its position. If the temperature rises above the idle band, the curtain opens for the open run duration. After the curtain opens for the open run duration, it holds its position for the open idle duration. If the temperature drops below the idle band, the curtain closes for the close run duration. After the curtain closes for the close run duration, it holds its position for the close idle duration. Temperature in °F/°C, range: 22.0 to 120.0°F, –10.0 to 48.0°C Temperature in °F/°C, range: 1.0 to 10.0°F (0.6 to 6.0°F) Duration in mm:ss, range: 5 seconds to 10 minutes, in 1 second increments 110 Phason Appendix A: Worksheets Heating and cooling elements worksheet There are two types of heating and cooling element setups: ‘standard’ and ‘duty cycle’. Programming a standard element means programming the temperature set point. Programming a duty cycles means programming the temperature set point and the ON and OFF durations. For more information, read Programming single-stage heating and cooling relays on page 72. Building Setting Group Relay 1 Relay 2 Relay 3 Relay 4 Relay 5 Set point On duration Off duration Setting : : : : : : : : : : : : : : : : : : : : Relay 6 Relay 7 Relay 8 Relay 9 Set point On duration Off duration : : : : : : : : : : : : : : : : Temperature in °F/°C, range: 22.0 to 120.0°F, –10.0 to 48.0°C For duty cycle relays, duration in h:mm:ss, range: 5 seconds to 5 hours, in 1 second increments 2008-05-06 111 Appendixes Timed events worksheet Timed event relays control equipment such as lights that need to be switched on or off during certain times of the day. Setting up timed events means setting the “on” and “off” times. For every on time, there must be an off time. For more information, read Programming timed events on page 75. Building Building Power Block Power Block Relay Relay On time Off time On time Off time : : : : : : : : : : : : : : : : : : : : : : : : : : : : : : : : : : : : : : : : : : : : : : : : : : : : : : : : : : : : Time in 24-hour format For every “on time”, there must be an “off time”. 112 Phason Appendix B: Communication troubleshooting guide Appendix B: Communication troubleshooting guide Introduction to OMNI-4000 communications All OMNI-4000 devices, such as Power Blocks, Feed Level Sensors, and so on, communicate with the computer along “communication channels.” A communication channel is a continuous line of cable connecting all devices in series, in other words, a “daisy chain”. Each device connects to the communication channel as shown below. The last device on a communication channel must have the termination resistors in place or a termination module installed. For the location of the termination resistors, see the device’s installation guide. The OMNI Server is the control center for the OMNI-4000 hardware. The OMNI-Server's eight communication channels transfer data between the computer and the devices. Each communication channel can communicate with up to 32 devices, for a total of 256 (8 x 32=256). 2008-05-06 113 Appendixes Troubleshooting phase 1: create a site map A site map shows the layout of the OMNI-4000 devices on your communication system. The site map should list the device type and address, the physical location (the building name, for example), and the group name. It is also important to note the sequence of the devices on each communication channel. Print a Site Structure Report. Use the report to help identify the device addresses and locations. For more information, read Creating Site Structure Reports on page 92. Use the site map template at the end of the troubleshooting guide. Fill in the template and use it as your site map. There are two sheets provided; if you need more, make copies before you start. Create a site map 1. At the OMNI Server, select a communication channel (COM1 to COM8). On the site map template, print the communication channel number in the space provided. 2. Follow the cable to the first device. 3. On the template, print the building name, device type, device address, and group name in the space provided. 4. Follow the cable to the next device. 5. Repeat steps 3 and 4 until you have finished printing the information for the last device on the channel. 6. Repeat steps 1 to 5 for each communication channel that is in use (has devices connected). Troubleshooting phase 2: test the computer, RS-485A Converter, and OMNI Server Test the OMNI Server login When OMNI-4000 is running, the TROUBLE light on the front cover of the OMNI Server should not be on. If the light is on, there has been no communication between the OMNI Server and computer for at least 10 minutes. It is possible the RS-485A Converter might not be working or plugged in, or the computer’s COM port is not working. 1. Reset the OMNI Server and then restart the computer. 2. After the computer is running, start OMNI-4000 (if it does not start automatically). The OMNI Server should log in within a few seconds after OMNI-4000 starts. 114 Phason Appendix B: Communication troubleshooting guide Test the daisy chains A daisy chain is a continuous line of cable connecting the devices in series to a communication channel on the OMNI Server. The daisy chain test verifies that all devices are properly connected to the communication channel. The OMNI Server has eight communication channels, labeled COM1 to COM8. Active communication channels are channels that have devices installed on them. For example, if you have a Power Block connected to COM8, then channel 8 is an active communication channel. 1. Shut down OMNI-4000. 2. On the OMNI Server, unplug all except one of the connectors from the active channels. 3. Start Test Bench – click Start, Programs, OMNI-4000, Diagnostics, Test Bench. COM port used for the search Status of the OMNI Server Number of Power Blocks logged in Number of other OMNI-4000 devices logged in 4. Under Available Ports, select the communication port that has the OMNI Server connected. 5. Click Start Search. The login starts and should take seconds rather than minutes. The login is complete when the lights at the bottom of the window stop flashing red and green, and instead stay red. 6. Verify that all devices on the daisy chain have logged in. For a basic summary, see the System Information section. For detailed information about Power Blocks, click the PB Controls tab. For detailed information about other OMNI-4000 devices, click the NG Controls tab. 7. If all devices log in, repeat the test three times to check reliability. To repeat the test, click Clear Search (on the General tab) and then start at step 4. 8. When you are finished testing the daisy chain, close Test Bench. 9. Unplug the connector for the daisy chain you have been testing and then connect the next active channel. 2008-05-06 115 Appendixes 10. Repeat steps 4 to 9 for each active communication channel. When you are finished testing all active communication channels, reconnect all the connectors. Test the OMNI Server communication channels Repeat the daisy chain test using a daisy chain that you know is working properly. Connect the daisy chain to a different communication channel each time you run the test until you have tested all eight channels. If a test fails on a channel but passes on others, the OMNI Server is failing at that specific channel. Troubleshooting phase 3: correct any communication wiring problems The tests in this section require a loopback tester. Loopback testers are available from your dealer or Phason. If a tester is not available, you can create a temporary loopback by inserting wires into the connectors as shown to the right. Be careful not to damage the connectors. Loopback tests help verify the integrity of the communication line. During the tests, the computer sends out information along the communication cable. The information “bounces back” when it gets to the loopback connector. The computer compares the information it receives back; if it is the same as the information sent out, then both the send (TX) and receive (RX) lines are intact. Verify the daisy chain is wired correctly 1. Unplug all devices from the daisy chain. 2. At the end of the chain, farthest from the OMNI Server, connect a loopback connector. 3. Start the OMNI-4000 Loopback Tester – usually Start, Programs, OMNI-4000, Diagnostics, Loopback. 4. Click Options, Find Serial Ports. The program scans the system for available serial ports. 5. Beside COM Port, select the port to which the OMNI Server is connected. 6. Click Loopback. The program checks for a loopback and then displays the results. 116 Phason Appendix B: Communication troubleshooting guide When working from the end of the communication channel, toward the OMNI Server, when the program detects a loopback, that means the wiring is good from the Omni server up to that point. 7. Repeat step 6 at each device, moving closer to the OMNI Server, until you find the wiring problem. Test for problems communicating with the devices 1. If there is a loopback at one of the connections, unplug it. 2. Connect the last device on the daisy chain. Make sure the two termination resistors are installed. For more information, read the installation guide for the specific device. 3. Unplug the daisy chain from the OMNI Server. 4. Measure the resistance at the OMNI Server-end of the cable. The measurement from “A to B” or “C to D” should be 120 to 160 ohms. If the resistance is higher, there might be corrosion or poor connections at the devices. If the resistance is lower, there might be more than one device with termination resistors. 5. Connect the daisy chain to the OMNI Server. 6. Connect the devices one at a time, starting with the device closest to the OMNI Server. Make sure the wiring is consistent at each connector. 2008-05-06 117 Appendixes Each time you add a device, test the login using Test Bench. If adding a device slows down the login time by more than 30 seconds, the device likely has communication problems. Leave devices with communication problems disconnected for now and continue along the daisy chain until you have connected all properly communicating devices. You can speed up the process by using two people with two-way radios. One person can check and connect the devices; the other can test the logins. Test Power Blocks for microboard problems 1. Remove the microboard from the Power Block with communication problems and set it aside for now. 2. Connect a microboard to the Power Block. Use one from a different Power Block that you know works. 3. Connect the Power Block to the daisy chain. 4. Test the communications using Test Bench. Remember to look for the address of the current microboard, not the original. If the Power Block has no more communication problems, the problem is the original microboard. Order a replacement microboard. If the Power Block still has communication problems, the problem is likely the main (bottom) board. Remove the microboard and reconnect the original one. 5. Reconnect the microboard you used in step 2 to its original Power Block. Check Power Blocks for bottom board problems 1. Check the Power Block for enclosure damage or improper sealing. Corrosion caused by exposure to the barn atmosphere can cause the bottom board to fail. If the enclosure has damage or does not seal properly, replace the entire Power Block. 2. Keep the microboard from the new Power Block for future use. Instead, connect the original microboard. 3. Test the communications using Test Bench. If the Power Block still has communication problems, remove the original microboard and then connect the new one. Discard the original microboard. 118 Phason Appendix B: Communication troubleshooting guide Checking other OMNI-4000 devices The LEM, OWM, OWS, FLS, and MLS have only one circuit board. For the FLS and MLS, power and communications are in the control units. If you have one of these devices, the wiring is OK, and there is power to the board, but Test Bench cannot find it, replace the circuit board using a kit. Troubleshooting phase 4: run OMNI-4000 Remove obsolete device addresses 1. Start OMNI-4000 2. Open the Configuration Manager and then click the Buildings tab. 3. Remove obsolete device addresses – under Available, select a device and then press DELETE. 4. Repeat step 3 until you have removed all obsolete addresses. Configure the new addresses If you replace a device that has communication problems, or you replace the microboard in a Power Block, the address of the device changes. When the address changes, you need to: 1. Add the new device to OMNI-4000. 2. Assign the device to a building. 3. Edit the group the old device belonged to so that the group represents the new device. 4. Verify that OMNI-4000 can communicate with the new device. A good way to do this is to check the appropriate tab in the Settings Manager, or check the viewer if one is available for that type of device. For more information about any of the above steps, see the OMNI-4000 user manual, or the manual for the specific module. Check the Site Structure Report 1. Print a Site Structure Report. 2. Compare the report to your site map. In particular, check the number of devices; if the report shows more devices than exists, there are obsolete device addresses in the system. For more information about any of the above steps, see the OMNI-4000 user manual. 2008-05-06 119 Appendixes 120 Phason Appendix B: Communication troubleshooting guide 2008-05-06 121 Appendixes Back up your configuration and settings After correcting any problems, back up your configuration and settings using the Backup and Restore Utility. For more information, read OMNI-4000 user manual. 122 Phason Appendix C: Glossary Appendix C: Glossary actuator A device that has a mechanical arm that extends and retracts. Actuators control elements that are not OFF or ON. Instead, they vary by a percentage. For example, inlets can be open various distances from 0 to 100 percent. Typically, linear actuators connect directly to the inlets, or connect using cables and pulleys. Inlets are usually located in ceilings or walls. Inlet systems are often spring loaded to help close the inlets, or counter weighted to help open the inlets. actuator set point When the temperature is below the minimum set point, the actuator is closed. When the temperature rises to the minimum set point, the actuator moves to the minimum position. As the temperature rises, the actuator has four stages it moves through until it reaches its maximum open position. This lets you gradually open inlets instead of fully opening them when the temperature rises above a single set point. In other words, “when the temperature is here (stage set point), I want the actuator to start opening. When the temperature reaches here (stage differential), I want the actuator to be at this position (stage position) percent.” For more information, read Programming actuator relays on page 65. See also curtain set point and relay set point. alarm condition For the Ventilation module, there is an alarm condition when the low alarm is enabled and the temperature is lower than the low set point, or when the high alarm is enabled and the temperature is higher than the high set point. Other OMNI-4000 modules have different alarms and alarm conditions. For more information, read the user manual for the specific modules. comma separated value (CSV) CSV is a tabular data file consisting of fields stored as text and separated by commas. You can import CSV files into programs such as databases and spreadsheets. control elements Control elements are devices connected to Power Blocks, such as fans, heaters, actuators, and so on. 2008-05-06 123 Appendixes curtain idle band Curtain idle band is a temperature buffer around the curtain set point. When the temperature is within the idle band, the curtains hold their position. When the temperature is outside the band, the curtains cycle open or closed. Idle band is one of six curtain settings. For more information, read Programming curtain control relays on page 69. curtain set point Curtain set point is the target temperature for the curtains. When the temperature is between the curtain set point and idle band limits, the curtains hold their position. Set point is one of six curtain settings. For more information, read Programming curtain control relays on page 69. See also actuator set point and relay set point. different method (DIF) DIF is a mode of temperature setback. During the setback time DIF mode, OMNI-4000 actively cools the area to try to lower the temperature to the new set point. For more information, read Programming the temperature setback on page 56. differential (for actuators) When the temperature reaches the differential temperature setting, the actuator reaches its final position for the stage. For more information, read Programming actuator relays on page 65. differential (for variable stages) For variable cooling stages, when the temperature is above the differential temperature setting, the fan runs at full speed. For variable heating stages, when the temperature is below the differential temperature setting, the heater is at full output. For more information, read Programming variable stages on page 61. duty cycle Duty cycle is a temperature-based method of controlling heating or cooling elements using ‘on durations’ and ‘off durations’. For cooling elements, when the temperature is below the set point, the cooling element is off. When the temperature is above the set point, the element switches on for the ‘on duration’ and then off for the ‘off duration’. For heating elements, when the temperature is above the set point, the heating element is off. When the temperature is below the set point, the element switches on for the ‘on duration’ and then off for the ‘off duration’. For more information, read Programming single-stage heating and cooling relays on page 72. 124 Phason Appendix C: Glossary empty room Empty room mode is a power saving feature that allows you to put a ventilation group into an ‘idle state’ and adjust all the settings, without having to change your normal, operational settings. Empty room mode has its own group set point, high and low temperature alarms, and high temperature biasing. In empty room mode, OMNI maintains minimum ventilation only; there is no active cooling, no ventilation curves, and no temperature setbacks. OMNI operates heating equipment only if needed to keep the temperature at or above the set point. For more information, read Using normal and empty room modes on page 58. group set point The group set point is the desired temperature for the ventilation group (zone). For more information, read Programming the group set point on page 49. group set point curve A group set point curve is an extension of the group set point concept. The “curve” automatically adjusts the group set point temperature over time. For more information, read Programming ventilation curves on page 50 growth curve See group set point curve or minimum ventilation curve. high temperature biasing High temperature biasing helps prevent alarm conditions on days when the outdoor temperature is above the high alarm temperature. For more information, read Programming alarm settings on page 54. HTML Hypertext markup language (HTML) is one of the languages web browsers read and use to display information. idle range Idle range is a temperature setting for variable cooling stages. When the temperature is below the idle range, the fan is off. When the temperature rises above the idle range, the fan runs at the idle speed until the temperature rises to the “set point” temperature. For more information, read Programming variable stages on page 61. idle speed Idle speed is the percentage of full speed a variable stage fan is at when the temperature is between the idle range and set point temperatures. For more information, read Programming variable stages on page 61. inlet actuator See actuator. inlets Inlets are shutter-like devices mounted on a wall or ceiling that control airflow in a building. 2008-05-06 125 Appendixes minimum idle See idle speed. minimum position Minimum position is the percentage an actuator will be open when the temperature is at the minimum set point. For more information, read Programming actuator relays on page 65. minimum set point Minimum set point is the temperature at which an actuator is at its minimum position. When the temperature is below the set point, the actuator closes completely. For more information, read Programming actuator relays on page 65. minimum ventilation curve A minimum ventilation curve automatically adjusts the idle speed for a variable speed fan over time. For more information, read Programming ventilation curves on page 50 power save Power save is the type of temperature setback that affects only heating equipment. During the setback period, OMNI-4000 allows the temperature to fall to the new set point. OMNI-4000 maintains minimum ventilation, but does not actively cool the area unless the temperature is above the normal group set point. For more information, read Programming the temperature setback on page 56. relay A relay is an electromagnetic switch that is either on (closed) or off (open). relay set point Set point is the temperature at which a relay stage switches on or off. For more information, read Programming single-stage heating and cooling relays on page 72. See also actuator set point and curtain set point. temperature setback Temperature setback automatically changes the temperature set point for specific periods during the day. There are two setback types, DIF and power save mode. For more information, read Programming the temperature setback on page 56. timed event A timed event switches equipment on or off at certain times of the day. For more information, read Programming timed events on page 75. ventilation curve 126 See group set point curve or minimum ventilation curve. Phason Index A active mode ........................ See empty room actuators configuring relays............................ 41–42 programming .................................. 65–69 adding production environments ................ 26–29 timed events.................................... 75–78 users or user groups....................... 12–16 ventilation groups............................ 23–26 addresses ..................................................22 alarm biasing .............................................55 Alarm Log ............................................ 89–91 alarm settings ...................................... 54–56 alarm system .......................See site options alarms .................... See also analog sensors Configuration Manager.5, 13, 20, 23–24, 27, 31 configuring actuator relays.................................41–42 analog sensors ................................34–36 buildings.............................. 18–21, 21–23 curtain relays ...................................44–45 Power Blocks...................................38–39 production environments ................26–29 single-stage cooling/heating ...........42–43 site options ......................................30–32 temperature-based duty cycles.......42–43 timed events ....................................45–46 users or user groups .......................12–16 variable stages ................................40–41 ventilation groups............................23–26 cooling element .........See variable stages or single-stage assigning devices to buildings ............ 21–23 creating Analog Sensor Reports ...................93–96 log reports .......................................89–91 Site Structure Reports .....................92–93 Ventilation Group Temperature Reports ....................................................96–98 Audit Log ............................................. 89–91 current day...................................See curves Analog Sensor Reports ....................... 93–96 analog sensors .................................... 34–36 Analog Temperature Chart .................. 82–83 archiving data .................................. 100–101 Backup and Restore Utility ................ 98–100 curtains configuring relays............................44–45 programming...................................69–72 biasing ..............................See alarm biasing curves ..................................................50–54 B buildings .................... See also site structure assigning and removing devices .... 21–23 configuring ...................................... 18–21 C charts ................................See specific chart Communication Center ............. 4, 32–33, 80 Communication Log ............................ 89–91 D Data Archive Utility...........................100–101 date ranges............................................... 88 devices.................................................21–23 DIF mode .............. See temperature setback duty cycles. See time-based or temperaturebased computer requirements ...............................3 2008-05-06 127 E power save mode . See temperature setback editing passwords....................................... 12–16 production environments ................ 26–29 timed events.................................... 75–78 users or user groups....................... 12–16 ventilation groups............................ 23–26 probes....................See also analog sensors production environments.....................26–29 growth curve................................See curves programming actuator relays.................................65–69 alarm settings ..................................54–56 analog sensors ................................35–36 curtain relays ...................................69–72 curves ..............................................50–54 equipment settings............................... 60 group set points ..............................49–50 single-stage cooling/heating elements72– 74 temperature setback .......................56–58 temperature-based duty cycles.......72–74 timed events ....................................75–78 variable stages ................................61–65 ventilation groups............................46–47 H-I R heating element .........See variable stages or single-stage removing devices from buildings ....................21–23 production environments ................26–29 users or user groups .......................12–16 ventilation groups............................23–26 empty room ......................................... 58–60 end dates............................ See date ranges equipment.....................17, See also devices equipment settings .......... See programming F-G farm information ........................................33 group set points................................... 49–50 groups .........See users or ventilation groups high temperature biasing .See alarm biasing installing OMNI-4000 ...................................9 L-N log reports ........................................... 89–91 maintaining information ..................... 98–101 minimum ventilation curves.........See curves normal mode ...................... See empty room O-P outdoor temperature ........................... 34–36 passwords .....................................See users permissions ...................................See users port ......................................See site options Power Block Status Viewer........................81 Power Blocks configuring ...................................... 38–39 types..................................................3, 38 viewing status.................................. 81–82 128 reports............................. See specific report Reports Utility.............................................. 7 S sampling interval/type............................... 93 security............................... 8, See also users sensors ......................... See analog sensors serial port .............................See site options settings ............................ See programming Settings Manager.................6, 32, 47, 75–76 single-stage cooling/heating elements configuring relays............................42–43 programming...................................72–74 site options ..........................................30–32 site structure ........................................17–18 Site Structure Reports..........................92–93 Phason Index S (continued) V-Z start dates ........................... See date ranges variable stages configuring ......................................40–41 programming...................................61–65 startup..................................See site options status viewerSee Power Block Status Viewer T temperature set points..... See programming temperature setback............................ 56–58 temperature-based duty cycles........... 72–74 configuring ...................................... 42–43 timed events configuring relays............................ 45–46 programming .................................. 75–78 Vent Group Temperature Charts .........83–85 ventilation curves .........................See curves Ventilation Group Status Report ..........85–87 Ventilation Group Temperature Reports..96– 98 ventilation groups ................................23–26 about ...............................................17–18 programming...................................46–47 units of measure ..................See site options viewing Analog Temperature Charts ............82–83 Power Block status..........................81–82 Vent Group Status Report ...............85–87 Vent Group Temperature Charts.....82–83 users .................................. See also security zones ...................................................48–49 U understanding OMNI-4000 .................. 17–18 users and user groups ........................ 12–16 2008-05-06 129