1
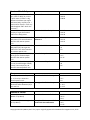
Pintuck Pinny for Women and Girls Use measurements to create a cute and practical pinafore that’s just the right size for you or a child. Front and Back Band Your Dimensions Examples A: Measure around body, under arms, above breast. A: Upper Body Circumference B: Multiply A (Upper Body Circumference) by .28 to get width of top band. Round to nearest quarter inch. C: Multiply B (Width of Top Band) by 3 and add 1. B: Width of Top Band K=36.5 L=33 P=23 K=10.25 L=9.25 P=6.5 C: Width of Pintucked Top Band and 2 Pockets Before Trimming to Size D: Finished Height of Top Band K=31.75 L=28.75 P=20.5 K=3.5 L=3.0 P=2.25 E: Height of Top Band with Seam Allowance K=8 L=7 P=5.5 F: Height of Top Band and Top Pockets Before Trimming to Size K=9 L=8 P=6.5 Front and Back Body G: Measure from under arm to mid thigh, or where you want the smock to end. Round to nearest quarter inch. H: Add 1.5 inches to G (Finished Height of Body Pieces) for seam allowance and hem. I: Measure around the widest part of your body. (Hips for me, but belly for my little one. Could be chest.) G: Finished Height of Body Pieces K=24 L=22 P=16 H: Height of Body Pieces with Seam Allowance I: Circumference of Hips, Chest or Belly K=25.5 L=23.5 P=17.5 K=43 L=32.5 P=22 D: Divide B (Width of Top Band) by 3 to get the finished height of the top band. Round to nearest quarter inch. E: Multiply D (Finished Height of Top Band) by 2 (it will be folded in half) and add 1” for seam allowance. F: Add 1” slack to E (Height of Top Band with Seam Allowance) for pintucks. Copyright 2012 Sew,Mama,Sew! This project originally appeared in Sew Beautiful magazine June, 2012. Front and Back Body J: Multiply I (Circumference of Hips, Chest or Belly) by 1.10 to 1.30 for ease. (If there is a big difference between your upper and lower body, use only 1.10. I used 1.10 for myself, 1.25 for my older daughter and 1.30 for the little one.) K: Divide J (Circumference with Ease) by 2 to get the finished width of the body pieces. J: Circumference with Ease K=47.3 L=40.65 P=28.60 K: Finished Width of Body Pieces K=23.65 L=20.32 P=14.30 L: Add 1” to K (Finished Width of Body Pieces) for seam allowance. Round to the nearest quarter inch. M: Multiply K (Finished Width of Body Pieces) by .20 to get the width of the arm hole. Round to the nearest quarter inch. N: Multiply M (Armhole Width) by .40 to get the armhole depth. Round to the nearest quarter inch. O: Subtract N (Armhole Depth) from G (Finished Height of Body Pieces), then multiply by .40. Round to nearest quarter inch. L: Width of Body Pieces with Seam Allowance K=24.75 L=21.25 P=15.25 M: Armhole Width K=4.75 L=4 P=3 N: Armhole Depth K=2 L=1.5 P=1.25 O: Placement of Top of Pocket K=9 L=8 P=6 Straps P: Multiply B (Width of Top Band) by .15, then by 4. Round to nearest quarter inch. Q: Multiply E (Height of the Top Band with Seam Allowance) by 2 then add 1.5. P: Width of Unfinished Strap K=6.25 L=5.5 P=4 K= 17.5 L= 15.5 P= 12.5 Q: Height of Unfinished Strap Bottom of Pocket R: Transfer the value from B (Width of Top Band). R: Width of Bottom Half of Pocket S: Add 1 to D (Finished Height of the Top Band.) S: Height of the Bottom Half of Pocket with Seam Allowance K=10.25 L=9.25 P=6.5 K=4.5 L=4.0 P=3.25 Copyright 2012 Sew,Mama,Sew! This project originally appeared in Sew Beautiful magazine June, 2012. Procedures Diagram 1. CUT FABRIC FOR FRONT BAND AND TOPS OF POCKETS. Since you are going to make pintucks for the front band and pockets along the length of the fabric, you can sew the pintucks along the length of one long piece, then cut it in thirds. The pintucks will gather some of the fabric together, so slack is included in the value of F. Cut one piece that is the value of C (Width of Pintucked Top Band and 2 Pockets Before Trimming to Size) by the value of F (Height of Top Band and Top Pockets Before Trimming to Size.) 2. SEW PINTUCKS. Fold the piece from step 1 in half lengthwise and press a hard crease. Using a double needle and a pintuck foot on your machine, sew your first row of pintucks along the crease. (See the video at http://jemimabean.blogspot.com/2010/08/se
w‐beautiful‐blog‐tour‐pt‐5‐pintucking.html or your machine’s user manual for instructions.) Use the first row as a guide and sew all subsequent rows beneath it. Keep sewing pintucks until the combined rows equal the value of D (Finished Height of Top Band.) 3. CUT FRONT BAND AND TOPS OF POCKETS. From the fabric with the finished rows of pintucks, cut three pieces that are the value of B (Width of Top Band) by the value of E (Height of Top Band with Seam Allowance.) (There will be 1/2” of fabric below the pintucks, which is the seam allowance.) Re‐
press fabric along the crease with right sides out. Copyright 2012 Sew,Mama,Sew! This project originally appeared in Sew Beautiful magazine June, 2012. 4. CUT AND PREPARE FABRIC FOR BACK BAND. The back is a blank canvas. Use plain fabric, appliqued fabric, embroidered or cross –
stitched fabric or printed cotton. Keep in mind that the straps are going to cover up part of the fabric on each side (value of P/4.) Cut one piece for the back that is the value of B (Width of Top Band) by the value of E (Height of Top Band with Seam Allowance.) Fold in half length‐wise with right side out and press a crease. (Image shows three pintucked pieces, and the back band for each of three smocks.) 5. CUT BODY PIECES. Cut 2 pieces that are the value of L (Width of Body Pieces with Seam Allowance) by the value of H (Height of Body Pieces with Seam Allowance.) 6. MEASURE AND CUT ARM NOTCHES. Fold your two body pieces in half width‐wise. From the top outside corner, measure in toward the fold the value of M (Armhole Width) and mark with a fabric pen. From the same corner, measure down and mark the value of N (Armhole Depth). Draw a slight curve between these two marks. Cut along curve through all four layers. Copyright 2012 Sew,Mama,Sew! This project originally appeared in Sew Beautiful magazine June, 2012. 7. SEW THE BODY PIECES. With right sides together, sew the sides of the two body pieces using a ½” seam allowance. (You can serge these seams or finish them with a zig‐zag stitch to prevent fraying.) 8. HEM THE ARMHOLES. Finish the armholes with a ¼” double fold hem. 9. GATHER FRONT AND BACK OF BODY PIECES. Sew two rows of basting stitches along the top edge of both the front and the back body pieces between the armholes. Gather the fabric and distribute evenly until it is the width of the front and back bands. 10. ATTACH THE FRONT AND BACK BANDS. Once the gathers of the body pieces are the same width as the top bands, place the front band face down along the gathers (right sides together) and pin in place. Make sure the decorative side of the band is at the top edge, pinned to the body. Sew using a ½” seam allowance. Repeat with the back band. Remove basting stitches. Copyright 2012 Sew,Mama,Sew! This project originally appeared in Sew Beautiful magazine June, 2012. 11. SEW THE BACK OF THE BAND TO THE BODY. Fold the band over so the right side is out and the back of the band is on the inside of the garment. Carefully fold the bottom edge of the back band over approximately ½” so it covers the seam and stitches you sewed in the previous step. Press well. Machine or hand stitch in place. (I chose to use the machine from the front side of the garment, making sure to catch the bottom edge of the back in my stitches.) Repeat with the other band. 12. CUT AND PRESS STRAPS. Cut two pieces that are the value of P (Width of Unfinished Straps) by the value of Q (Height of Unfinished Straps.) Fold each end up ½” and press well. Fold strap in half and press. Fold each side in toward the middle and press again. Fold in half and press again, so you are left with a strap which is ¼ the original width and all the raw edges are folded inside. Repeat with other strap. 13. SEW STRAPS TO BODY. Pin a strap in place over one of the outside edges of the front band. Make sure the bottom edge of the strap lines up with the bottom of the band and the raw edges of the band and the top of the armholes are sandwiched well between the folds of the strap. Hand‐stitch the bottom edge of the strap to both the front and back of the band in place using small, hidden stitches. Repeat with the other three ends of the straps. 14. SEW EDGES OF STRAPS. Pin the open edges of the straps closed. Edge stitch each strap from the bottom of one band, all the way across the strap to the bottom of the other band. Copyright 2012 Sew,Mama,Sew! This project originally appeared in Sew Beautiful magazine June, 2012. 15. HEM SMOCK. Try the smock on. Sew a double fold hem along the bottom edge. 16. CUT BOTTOMS OF POCKETS. Cut 4 pieces that are the value of R (Width of Bottom Half of Pocket) by the value of Q (Height of the Bottom Half of Pocket with Seam Allowance.) 17. SEW POCKETS. Open the top bands of pockets and press flat. Place one piece of the bottom of the pocket facedown on the top band of pocket (right sides together ) and sew in place with a ½” seam allowance. Place another piece of pocket bottom on the opposite side and sew in place. Fold pocket in half with right sides together. Using a ¼” seam allowance, sew the two sides of the pocket and part of the bottom edge of the pocket, leaving approximately 2” for turning. Trim seams and clip corners. Turn pockets right side out and press well, making sure to tuck and press the opening into the seam. (This will be closed when you attach it to the body.) 18. ATTACH POCKETS TO BODY. With right side out, place smock down, centering one of the side seams. Measure from the armhole down the seam the value of O (Placement of Top of Pocket) and mark with a pin. Fold the pocket in half width‐wise and finger press a crease. Now place the top center of the pocket on the pin and center the rest of the pocket on the seam. Pin in place. Stitch pocket to body along the two sides and the bottom. Repeat with other pocket. Copyright 2012 Sew,Mama,Sew! This project originally appeared in Sew Beautiful magazine June, 2012. 19. Trim threads , press and you are done! Copyright 2012 Sew,Mama,Sew! This project originally appeared in Sew Beautiful magazine June, 2012.