1
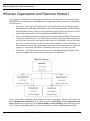
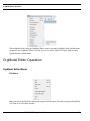
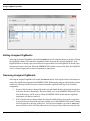
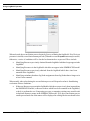
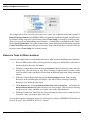
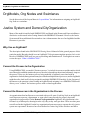
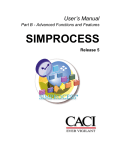
OrgModel Manual SIMPROCESS Release 1 Copyright © 2010-2015 CACI, INC.-FEDERAL. All rights reserved. No part of this publication may be reproduced by any means without written permission from CACI. The information in document is believed to be accurate in all respects. However, CACI cannot assume the responsibility for any consequences resulting from the use thereof. The information contained herein is subject to change. Revisions to this publication or new editions of it may be issued to incorporate such change. SIMPROCESS is a registered trademark of CACI, INC.-FEDERAL. Table of Contents Organization of the SIMPROCESS Documentation Set ......................... 4 CHAPTER 1 SIMPROCESS Organization and Resource Models .................... 7 What are Organization and Resource Models? ......................... 8 Overview of This Manual............................................................. 9 CHAPTER 2 SIMPROCESS OrgModel Editor ................................................ 10 Launching the OrgModel Editor............................................... 10 OrgModel Editor Operation ...................................................... 11 OrgModel Component Properties ............................................. 18 CHAPTER 3 Assigning OrgModels................................................................... 22 The Assign… Menu Item ........................................................... 22 Assign OrgModel Operation...................................................... 23 CHAPTER 4 Using OrgModels with SIMPROCESS ....................................... 30 OrgModels, Org Nodes and Resources ..................................... 30 SIMPROCESS Models and Resources ..................................... 32 OrgModels, Org Nodes and Swimlanes .................................... 35 Justice System and Demos/CityOrganization .......................... 35 SIMPROCESS Metadata Manual 3 Organization of the SIMPROCESS Documentation Set The SIMPROCESS documentation set consists of four manuals: • • • • Getting Started With SIMPROCESS SIMPROCESS User’s Manual SIMPROCESS Metadata Manual SIMPROCESS OrgModel Manual All of the manuals can be opened directly from the Help/SIMPROCESS Manuals menu. Also, each manual includes this section which provides links to the chapters in every manual. Press the Control key when clicking any link to open the linked file in a new window. For Windows systems, in order for links between manuals to work properly, Adobe Acrobat or Acrobat Reader must be used to view the manuals. Getting Started The Getting Started With SIMPROCESS manual is a must for first time SIMPROCESS users. This manual can also be used for evaluation purposes. The chapters are • • Business Process Modeling With SIMPROCESS Installation 6 • • • Building Your First Model With SIMPROCESS Evaluating Alternatives With SIMPROCESS Demonstration and Reference Models User’s Manual The User’s Manual is divided into four parts with each part being a separate file. Part A is an excellent reference for beginners and casual users. This part contains detailed documentation of the basic and intermediate functions of SIMPROCESS. The chapters are • • • • • • • • Process Modeling and Analysis with SIMPROCESS SIMPROCESS Basics Statistical Modeling Constructs Activity Modeling Constructs Resource Modeling Constructs Graphical Modeling Constructs Activity-Based Costing Statistical Output Reports Part B is a reference intended for advanced users of SIMPROCESS. This part contains detailed documentation of the programming and library management functions in SIMPROCESS Professional Edition. The chapters are • • • • Reusable Templates and Libraries Customizing a Model with Attributes and Expressions More Advanced Model Building Exporting Results Part C describes the integrated tools included with SIMPROCESS Professional. The chapters are • • • • • • • • Advanced Data Analysis SIMPROCESS Database Experiment Manager OptQuest for SIMPROCESS SIMPROCESS Dashboards Model Bundles Custom Reports Scenarios 7 The Appendices are • • • • • • • • • • • Importing Version 2.2.1 Models Activity Summary Table SIMPROCESS File Structure Statistical Distributions Statistical Tools Glossary SIMPROCESS System Attributes and Methods External Event Files Simulation Results File UML Interfaces Running Models Without GUI SIMPROCESS and External Java Classes Metadata Manual The Metadata Manual describes how to build and edit SIMPROCESS metamodels, assign metamodels to a SIMPROCESS model, and enter metadata in a SIMPROCESS model. The chapters are • • • • • SIMPROCESS Metadata SIMPROCESS Metamodel Editor Assigning Metamodels Entering Metadata BPEL Metadata OrgModel Manual The OrgModel Manual describes how to build and edit SIMPROCESS Organization and Resource Models (OrgModels) and assign OrgModels to a SIMPROCESS model. The chapters are • • • • SIMPROCESS Organization and Resource Models SIMPROCESS OrgModel Editor Assigning OrgModels Using OrgModels with SIMPROCESS 8 CHAPTER 1 SIMPROCESS Organization and Resource Models This chapter presents an overview of SIMPROCESS Organization and Resource Models and introduces the subsequent chapters of this OrgModel Manual. SIMPROCESS OrgModel Manual 7 What are Organization and Resource Models? What are Organization and Resource Models? At its simplest, a SIMPROCESS Organization and Resource Model (referred to here and in other SIMPROCESS documentation as an OrgModel) is an organization chart. It consists of components described below. • Org Nodes - Each Org Node represents part of the organization structure being modeled, which might be an individual, department, or other entity. Each Org Node contains fields for defining and describing it in the overall organization, and each can carry Resources with a subset of the characteristics of those defined in a SIMPROCESS model. • Links - Links connect Org Nodes and represent the relationships between them. The two types of Links are solid and dotted. A solid Link represents a direct reporting relationship between two Org Nodes, where one is the superior and the other is a subordinate. An Org Node may have only one direct superior; it may have an unlimited number of direct subordinates. A dotted Link represents a support relationship. There are no limits to the number of "supported superior" or "supporting subordinate" relationships that can exist for any Org Node. • Text Nodes - Text Nodes provide a convenient way of putting textual information on the graphical OrgModel to help document it and improve its appearance. Above is an example OrgModel which includes all of these components. There's a Text Node with the text Big Box Store Operations at top. The Org Node for Sarah Payer of the Corporate Payroll Dept demonstrates a supporting Link to John Q. Public, the Store Manager, while other Org Nodes have solid Links indicating that they are direct subordinates. Additional information about the SIMPROCESS OrgModel Manual 8 Overview of This Manual properties of each of these types of components can be found in Chapter 2 (see “OrgModel Component Properties,” beginning on page 18). Overview of This Manual Chapter 2 of this manual will provide detailed documentation of the operation and use of the SIMPROCESS OrgModel Editor. Chapter 3 will address assigning OrgModels to SIMPROCESS models so that OrgModel Org Nodes and Resources defined in OrgModels are available for use in SIMPROCESS models. And finally, Chapter 4 provides a detailed discussion of the how and why of using OrgModels with SIMPROCESS models. SIMPROCESS OrgModel Manual 9 CHAPTER 2 SIMPROCESS OrgModel Editor This chapter describes the SIMPROCESS OrgModel Editor and its operation. Launching the OrgModel Editor The SIMPROCESS OrgModel Editor is a separate application installed with SIMPROCESS. It can be launched from within SIMPROCESS by choosing Launch OrgModel Editor from the Define/OrgModel menu. SIMPROCESS OrgModel Manual 10 OrgModel Editor Operation When launched in this way, the OrgModel Editor opens to an empty OrgModel with a default name assigned. If the OrgModel Editor is already open, a new editor window will open with an empty OrgModel and a default name. OrgModel Editor Operation OrgModel Editor Menus File Menu New opens a new OrgModel for editing and assigns it a default name. Note that each opened OrgModel will open in its own editor window. SIMPROCESS OrgModel Manual 11 OrgModel Editor Operation Open… opens a previously saved OrgModel for editing. OrgModel files have a file extension of .orm and must be stored in the orgmodel directory located in the SIMPROCESS working directory. (The SIMPROCESS working directory is located in the user’s home directory. See “SIMPROCESS Working Directory”.) This menu item displays OrgModel files located in that directory or any included subdirectory; it excludes any OrgModel file which is already open. Open Recent displays a list of up to five previously opened OrgModels for easy access. The last item on the menu is Clear Menu, which removes all recently opened OrgModels from the list. Items which no longer exist are automatically removed from this menu when the OrgModel Editor is opened. Save saves the current OrgModel to a file within the orgmodel directory beneath the SIMPROCESS working directory. It will only be enabled when the OrgModel has unsaved changes. The first time Save is invoked on a new OrgModel, the Save As… command will be used instead to allow assignment of a meaningful name. On subsequent uses, it will save the current OrgModel to the file from which it was read, thereby disabling the Save menu item until further changes occur. Save As… allows saving the current OrgModel to a different file within the orgmodel directory, making it possible to copy one OrgModel to another name. The .orm extension will be applied to the file name if omitted. A standard file selection dialog is displayed for saving OrgModels. It allows navigation within the orgmodel directory but not above or outside it, and it allows creation of subdirectories within it. Create OrgModel Report… will only be enabled if the OrgModel is not empty. When selected, it generates a report listing selected portions of the OrgModel currently in the editor. It begins by displaying a Report Settings dialog as shown here: When first displayed, Scale OrgModel to One Page is selected by default. This setting will cause the graphical portion of the OrgModel to be scaled so that it fits onto a single page in the Report Viewer. (See “Report Viewer” in the SIMPROCESS User's Manual for more information on Report Viewer operation and options.) If deselected, the OrgModel will be output at full size and broken into as many parts as needed to include all of it in the output report. The pages will be ordered from left to right, with additional rows added as necessary, and some blank pages may be necessary to form a complete visual image. The selection state of Scale OrgModel to One Page will be remembered on subsequent uses of the Create OrgModel Report… menu item until all OrgModel Editor frames have been closed. When first displayed, Include Org Node Details is unselected by default. This setting means that only the graphical portion of the OrgModel will be sent to the Report Viewer. When selected, the resulting SIMPROCESS OrgModel Manual 12 OrgModel Editor Operation report will list every Org Node in the OrgModel. For each Org Node it will list the key information displayed in the graphical OrgModel, along with other fields such as Description and Role, superior and/or subordinate Org Nodes, and all Resources present on the Org Node. The selection state of Include Org Node Details will be remembered on subsequent uses of the Create OrgModel Report… menu item until all OrgModel Editor frames have been closed. Create HTML Report… will only be enabled if the OrgModel is not empty. When selected, it begins by prompting for the selection of a directory into which it should write the two files it will create. Once a directory has been selected, it will check to determine if either of those files exists and, if so, request permission to overwrite them. The first file created will be a graphic image in the form of a JPEG file. The extension .jpg will be used, and the primary file name will be the same as that displayed in the OrgModel Editor's window except that any slashes representing directory names will be replaced by underscore characters. The second file will use the same naming convention and have an extension of .html. This file should open in any modern Web browser and not require any special considerations or capabilities. This simple, two-file approach will simplify inclusion of these HTML reports into published SIMPROCESS models once an OrgModel is assigned for use there. Close closes the current OrgModel. If changes have been made since the last save, there will be a prompt to save the OrgModel. If no other OrgModel frames remain open, this will terminate the OrgModel Editor. Exit closes the all open OrgModels. Each frame will prompt to save if necessary. Selecting Cancel in response to any save prompt will stop the exit process. Edit Menu Undo reverses any edit consisting of a single action. Creating a new Org Node, which presents a dialog for initial assignment of properties and creation of Resources, constitutes an edit that can be undone since that is a single action. Changing any/all properties of an existing Org Node via the Edit Org Node Properties dialog; removing one or more Org Nodes, Text Nodes and Links by keyboard or mouse selection; using the Delete, Cut or other actions; and dragging selected items to a new location in the SIMPROCESS OrgModel Manual 13 OrgModel Editor Operation OrgModel are considered single action edits. Undo will only be enabled when an edit that can be undone has taken place. Redo reverses in a single step any edit which was undone using Undo. Redo will only be enabled when an Undo has taken place. When Redo is used to recreate an edit, it can be undone again using Undo. Cut removes the selected items in an OrgModel and places them on the clipboard. Cut will only be enabled when conditions allow its use. For instance, it is not possible to Paste a single Link into an OrgModel, so Cut will not be enabled when only a Link is selected. Other actions may also result from invoking Cut. For example, selecting any Org Node and cutting it to the clipboard means that any Links that existed between it and subordinates and/or superiors are no longer sustainable, so they are removed. They do not get put onto the clipboard with the selected Org Node, though their removal can be reversed using Undo. (The clipboard used is shared across all OrgModel Editor frames in a single session.) copies the selected items in an OrgModel to the clipboard without removing them from the OrgModel. The same restrictions listed for Cut apply to Copy, such as being unable to copy a single Link to the clipboard. (The clipboard used is shared across all OrgModel Editor frames in a single session.) Copy Paste puts items on the clipboard into the active OrgModel. When pasting Org Nodes, any Resources defined will have their names modified if necessary to ensure that Resource names are unique across the entire OrgModel. Any pasted Org Node or Text Node will land at the exact same graphical coordinates from which it was copied, whether from the current OrgModel or another; as a result, they may overlap others and need to be moved. Note that Links retrieved from the clipboard are attached to Org Nodes at both ends. (The clipboard used is shared across all OrgModel Editor frames in a single session.) Delete removes the selected items in an OrgModel without placing them on the clipboard for subsequent pasting. Similar to the Cut and Copy commands, there are side effects when Delete is used. For example, selecting two Org Nodes without selecting the Link between them will still necessitate removal of the Link since it cannot be sustained without both its source and target Org Nodes. Select All selects all items displayed in the OrgModel. This item is always enabled and selects all Org Nodes, Links and Text Nodes in the OrgModel. edits the properties of selected items in the OrgModel. Which item is edited depends on selection order. That is, when multiple items are selected, the one which is considered the first selected item will be editable. When using rubber band (or marquee) selection techniques with a mouse, it's not always immediately obvious which is the first item selected. Pointing and clicking to select individual items is more precise. Most of the time, simply double-clicking the item to be edited will suffice. Properties SIMPROCESS OrgModel Manual 14 OrgModel Editor Operation View Menu provides a closer view of the OrgModel by scaling the graphical view. This can be helpful for gaining finer control over the placement of items on the display. Note that the zoom setting is applied only to the current OrgModel Editor frame and is not stored with the OrgModel, nor is it applied to any reports or HTML. Zoom In provides a more distant view of the OrgModel by scaling the graphical view. This can be helpful for larger models which might not be fully visible even if the frame is maximized. Note that there is a limit to how far out an OrgModel will zoom, after which this command will be ignored. Like the Zoom In command, this setting only applies to the current OrgModel Editor frame and is not persistent. Zoom Out Reset Zoom automatically resets the scaling of the graphical view of an OrgModel to its default setting. Snap to Grid causes newly added items, or items moved by mouse actions, to snap to a grid of alignment points, making it easier to accomplish alignment of OrgModel components. This setting applies only to the current OrgModel Editor frame. Show/Hide Grid causes the grid of alignment points used in Snap to Grid to toggle between visible and invisible. This setting applies only to the current OrgModel Editor frame. Node Menu Add Org Node creates a new Org Node not linked to any others. When invoked, it will first present a new Edit Org Node Properties dialog with some default values for the new Org Node. Once data has SIMPROCESS OrgModel Manual 15 OrgModel Editor Operation been entered and all edits passed, selecting OK will create the new Org Node and place it in the OrgModel. Every new Org Node created in this fashion assumes the same initial coordinates internally. If the rectangle for the new Org Node is entirely inside of or exactly matches another Org Node or Text Node, it will be moved down and right until it no longer does so. The newly created Org Node will automatically be selected on creation to make moving it easy. More details on the properties of an Org Node can be found [somewhere else]. will only be enabled when an Org Node is selected. When enabled, it will say Add the value in the Name field of the selected Org Node (or the Org Name field if Name is empty) will appear in the menu item. When invoked, a new Edit Org Node Properties dialog with default values will be displayed. When editing is completed and OK is selected, the new Org Node will be added to the OrgModel and a Link created between it and the designated superior Org Node. Add Subordinate Subordinate to [Name], where Add Superior will only be enabled when an Org Node is selected which does not already have a direct superior. When enabled, it will say Add Superior to [Name], where the value in the Name field of the selected Org Node (or the Org Name field if Name is empty) will appear in the menu item. When invoked, a new Edit Org Node Properties dialog with default values will be displayed. When editing is completed and OK is selected, the new Org Node will be added to the OrgModel and a solid Link created between it and the chosen Org Node. The new superior Org Node will derive its initial position from the selected subordinate, and that position will be adjusted if it results in the rectangle being beyond the top or left of the OrgModel to ensure that it's entirely visible. Add Supporting Subordinate will only be enabled when an Org Node is selected. When enabled, it will say Add Supporting Subordinate to [Name], where the value in the Name field of the selected Org Node (or the Org Name field if Name is empty) will appear in the menu item. A new Edit Org Node Properties dialog with default values will be displayed. When editing is completed and OK is selected, the new Org Node will be added to the OrgModel and a "dotted" Link created between it and the Org Node which it will support. Add Supported Superior will only be enabled when an Org Node is selected. When enabled, it will say Add Supported Superior to [Name], where the value in the Name field of the selected Org Node (or the Org Name field if Name is empty) will appear in the menu item. A new Edit Org Node Properties dialog with default values will be displayed. When editing is completed and OK is selected, the new Org Node will be added to the OrgModel and a "dotted" Link created between it and the Org Node which will provide support to it. The new superior Org Node will derive its initial position from the selected subordinate, and that position will be adjusted if it results in the rectangle being beyond the top or left of the OrgModel to ensure that it's entirely visible. Add Text Node is enabled at all times and adds a new Text Node to the OrgModel. A new Edit Text Node Properties dialog with default values is displayed. When values are entered and OK selected, the new Text Node will be placed in the OrgModel. It will be selected upon creation, so that its boundaries can be adjusted as necessary. Its text content will wrap to fit within the specified boundaries. SIMPROCESS OrgModel Manual 16 OrgModel Editor Operation Link Menu Change Superior will only be enabled when exactly two Org Nodes are selected and when the second selected Org Node is allowed to be designated as the new direct superior of the first selected Org Node. (Note that an Org Node may have only one direct superior, while it may have any number of direct subordinates.) When enabled, it will say Change Superior of [Name], where the value in the Name field of the first selected Org Node (or the Org Name field if Name is empty) will appear in the menu item. When selected, the existing solid Link between the second selected Org Node and its current direct superior will be removed, after which a new solid Link will be created emanating from its newly designated direct superior. Make Direct Link between Selected Org Nodes will only be enabled when exactly two Org Nodes are selected and when the first selected Org Node is allowed to be a direct subordinate of the second selected Org Node. (Note that an Org Node may have only one direct superior, though it may have support relationships with any number of Org Nodes.) When enabled, it will say Make [Name1] a Direct Subordinate of [Name2], where the values in the Name fields of the selected Org Nodes (or the Org Name field if Name is empty) will appear in the menu item. When selected, a solid Link will be created between the selected Org Nodes. Make Supporting Link between Selected Org Nodes will only be enabled when exactly two Org Nodes are selected and when the first selected Org Node is allowed to be a supporting subordinate of the second selected Org Node. (Note that an Org Node may have only one direct superior, though it may have support relationships with any number of Org Nodes.) When enabled, it will say Make [Name1] a Supporting Subordinate of [Name2], where the values in the Name fields of the selected Org Nodes (or the Org Name field if Name is empty) will appear in the menu item. When selected, a dotted Link will be created between the selected Org Nodes. Window Menu This menu contains a list of open OrgModels. Selecting one causes the appropriate OrgModel Editor frame to come to the front. Help Menu SIMPROCESS Manuals will include menu items that provide direct access to the SIMPROCESS OrgModel Manual (this document) and each part of the SIMPROCESS User's Manual. About SIMPROCESS OrgModel Editor will display information about the OrgModel Editor, including version, copyright and contact information. SIMPROCESS OrgModel Manual 17 OrgModel Component Properties OrgModel Editor Toolbar Below the menu is the toolbar. Each icon on the toolbar corresponds to a menu item previously described. These buttons will often be more convenient than using the menus, and it will be readily apparent when each is enabled due to appearance changes. Place the mouse pointer over any icon to display a tooltip indicating its purpose. The toolbar icons here are also on the corresponding menus to help clarify which ones have matching functions. The first six icons correspond to the menu items on the Node menu; separators seen here correspond to separators also present on that menu. The Name field values (or the Org Name field when Name is empty) will appear in the tooltips for these icons just as they do in the corresponding menu items. The next three icons, resembling a magnifying glass, correspond to the first three items on the View menu. The remaining icons correspond to those found on the Edit menu, except that there is no toolbar icon for Select All. OrgModel Component Properties Org Node Properties Each Org Node appearing on the graphical display includes three fields which are its primary identifying information. These are the Org Name, Name and Title fields. The Org Name field may not be empty and must be no more than 50 characters in length (any leading or trailing space characters are removed). The Name and Title fields may be empty, but they too are limited to not more than 50 characters in length. In addition, the appearance of these three fields can be changed via font settings in the Edit Org Node Properties dialog. There are, however, additional fields available to provide further SIMPROCESS OrgModel Manual 18 OrgModel Component Properties information about the organizational entity represented by the Org Node, affect how it is displayed in the graphical OrgModel, and to create Resources it owns (which can be available once the OrgModel has been assigned to a SIMPROCESS model). Description This field must be designated as Text (the default), File, or URL. When File is selected, a Browse button is enabled that allows navigation to any file available in the file system, after which its complete path will be placed into the Description field. When the field is designated as File or URL, its contents are not validated and are therefore not guaranteed to be an actual file path or valid URL. Role This is a text field into which any meaningful information may be entered to describe this Org Node's role in the organization being modeled. Display Settings Org Node border and fill colors are selected here. The default border color is black, meaning that the Org Node will be outlined in black. The default fill color is white, so that no color will be used for the Org Node. The available colors are listed in the SIMPROCESS Color Table, which can be found in Appendix F of the SIMPROCESS User’s Manual (SIMPROCESS Color Table). Resources This tab is based on the dialog used in SIMPROCESS to define and edit Resources in a SIMPROCESS model. (See “Resource Modeling Constructs” for a full discussion of SIMPROCESS Resources.) Not all of the properties seen on a Resource in SIMPROCESS are present in an Org Node, as they are only meaningful in a simulation context. As a result, items such as statistics collection and downtimes will be available once a Resource is assigned for use within a SIMPROCESS model. The properties which are visible in the table can be edited there directly; in addition, all properties of a Resource can be edited in a separate Resource Properties dialog. The Name of a Resource must be unique among all Resources in the OrgModel. Numeric fields which support statistical distributions will support only the standard set of predefined distributions available in SIMPROCESS. Text Node Properties A Text Node exists solely to provide useful information on the graphical OrgModel. Its text content can be essentially anything. The Edit Text Node Properties dialog allows you to enter text of any length; it also allows you to specify the font name and size, along with indicating whether to use bold or italics. In addition, the alignment of the text (Left, Center, or Right) is specified. One thing that cannot be set via this dialog, however, is the actual location of the Text Node and control over its boundaries. For SIMPROCESS OrgModel Manual 19 OrgModel Component Properties that, use the mouse to select the node, then click and drag to change its appearance. When you click on the Text Node, a set of "handles" will appear indicating its current rectangular bounds. Hover the mouse pointer over any handle and wait for the cursor to change to one with arrows at both ends. When this occurs, click and drag the outline into a different shape. The text content will automatically wrap as necessary to take advantage of the newly defined rectangle. Note that it's entirely possible to have some text invisible if you drag the boundaries in certain ways. You'll also note that each individual drag operation can be undone or redone using the Undo/Redo features on the Edit menu or the toolbar. Link Properties A Link indicates the relationship between a pair of Org Nodes. By default, a Link will be solid or dotted (depending on how it's created) and use automatic routing. But there are other settings available for each Link. Link Label This field is empty by default, but text can be entered. Once populated, its default location will depend somewhat on its length and on the route taken by the Link on the graphical display. After the Edit Link Properties dialog is closed and the label text displayed, it can also be dragged to a new location by clicking and dragging using the mouse. This location will change if either Org Node attached to the Link is moved so that it is approximately "centered" along the Link. When both Org Nodes and the Link between them are moved in a single action, relative location of the label will remain unchanged. Style These buttons allow you to toggle between Solid and Dotted styles to indicate the relationship between two Org Nodes. However, since an Org Node may have no more than one direct superior (a Solid line style for the Link), this setting will be disabled when the Link being edited is a Dotted style and the target Org Node already has a Link to a direct superior. Routing By default, a new Link will use Automatic routing. This means the Link will be routed using line segments that are always vertical or horizontal, with 90-degree turns at various points along the way. No line segment will overlay the boundary of any Org Node, though some might overlay other Links. Alternatively, however, Manual routing can be used. When this selection is made, you'll see that the Link will simply take the shortest distance between its source and target Org Nodes. When Manual routing is in effect, you have the added ability to place control points along the Link at spots you select. To do this, right-click at any point along the Link and a new control point will appear. Conversely, right-clicking on any control point you've previously added will remove it from the Link. When a Link using Manual routing is selected, all control points are visible and can be clicked and dragged to change SIMPROCESS OrgModel Manual 20 OrgModel Component Properties their locations. Be aware that these control points are at absolute locations. That is, they do not move when either the source or target Org Nodes are moved. They will, however, maintain their relative positions when the selection being dragged includes the Link and both its source and target Org Nodes. Experiment to see how this works. Finally, be aware that switching from Manual to Automatic routing will discard all control points created on a Link. The application once again takes complete control of deciding whether and when any control points are needed. Description You can describe a Link in the same way as an Org Node. The Description field must be designated as Text, File or URL, and selecting File enables a Browse button to let you choose any file available to you. As with an Org Node, there's no validation of the Description field's content for a File or URL. SIMPROCESS OrgModel Manual 21 CHAPTER 3 Assigning OrgModels This chapter describes how to assign one or more OrgModels to a SIMPROCESS model. The Assign… Menu Item Assigning OrgModels to a SIMPROCESS model can only be done from the Define/OrgModel/ menu item. This menu item is only active when a SIMPROCESS model is open. Assign… SIMPROCESS OrgModel Manual 22 Assign OrgModel Operation Selecting Assign… displays the Assign OrgModels dialog showing a list of OrgModels assigned to the current SIMPROCESS model. If no OrgModels have been assigned, the list is empty. Assign OrgModel Operation Adding OrgModels Select Add to assign an OrgModel to the current SIMPROCESS model. A file selection dialog will display the OrgModel files available in the orgmodel directory, which is located in the SIMPROCESS working directory (see “SIMPROCESS Working Directory”). Any OrgModels already assigned to the current model will not appear for selection. SIMPROCESS OrgModel Manual 23 Assign OrgModel Operation If the selected OrgModel file is in some way damaged, an error dialog will advise that it is not valid and the assignment will be rejected. If any of the Resources defined in the OrgModel have the same names as Resources in the SIMPROCESS model, a dialog will appear that lists those names and the assignment will be rejected. The names of Resources in either the OrgModel or the SIMPROCESS model can be modified before trying again to assign it. If neither of these problems occurs, the newly added OrgModel will be placed on the list. Once assigned, all Resources defined in the selected OrgModel will be added to the SIMPROCESS model. When using the Define/Resources menu item (or the Define Resources button on the Model Toolbar) in SIMPROCESS, their names will appear in the resulting dialog with an icon next to them indicating that they originated in an OrgModel, as shown below. Their names will not be editable in that dialog or in any Resource Properties dialog, and they cannot be removed via that dialog. Otherwise, they will be available for use in SIMPROCESS in virtually the same way as locally defined Resources. Assigned OrgModels are also available for use with swimlanes. An Org Node from an assigned OrgModel can be associated with a swimlane in the SIMPROCESS model. SIMPROCESS OrgModel Manual 24 Assign OrgModel Operation Editing Assigned OrgModels Selecting an assigned OrgModel will enable the Edit button. Selecting this button (or double-clicking the OrgModel's name) will launch the OrgModel Editor and open the selected OrgModel. If the OrgModel Editor is already open, a new frame will open with the selected OrgModel. If already open, its frame will come to the front. When the SIMPROCESS window returns to the front, the OrgModel will be validated again and its status text updated if appropriate. Removing Assigned OrgModels Selecting an assigned OrgModel will enable the Remove button. Selecting this button will attempt to remove the OrgModel assignment from SIMPROCESS. What actually happens will depend on certain conditions with regard to the Resources obtained from the OrgModel and Org Node swimlane assignments. • If none of the Resources obtained from the selected OrgModel have been used (assigned to Activities, Resource Downtimes, Resource Shifts, etc.) in the SIMPROCESS model, then all such Resources will be removed from the SIMPROCESS model and the OrgModel assignment will then be removed. • If all of the Resources obtained from the selected OrgModel have been used (assigned to Activities, Resource Downtimes, Resource Shifts, etc.) in the SIMPROCESS model, a dialog will be displayed to advising of that fact. You'll be asked whether you want to Cancel the removal action or allow all of those Resources to be kept as if they had been created locally. SIMPROCESS OrgModel Manual 25 Assign OrgModel Operation If they are kept, they will be indistinguishable from those actually created in the SIMPROCESS model. In addition, the OrgModel cannot be assigned again unless every Resource it contains is renamed, or the ones previously imported from it are renamed in the SIMPROCESS model. • If only a portion of the Resources obtained from the selected OrgModel have been used in the SIMPROCESS model and others have not, a dialog will be displayed advising of that fact. You'll be asked whether you want to Keep the unused Resources, Remove them, or Cancel the removal action. If Keep is selected, they will become indistinguishable from Resources created in the SIMPROCESS model. Selecting Remove will remove them from the SIMPROCESS model. In either case, the Resources which have been used will be kept as if they had been defined in the SIMPROCESS model. And finally, the assigned OrgModel will be removed from the list unless Cancel is selected. • If an Org Node from the selected OrgModel has been assigned to a swimlane, a notice will be displayed stating that there are swimlane assignments from the OrgModel and that removing the OrgModel will remove the swimlane assignments. At that point you have the option of continuing or canceling the removal. Reconcile an Assigned OrgModel At various times, an assigned OrgModel will be validated. It will be read to determine if the Save Date it contains matches what is stored in the SIMPROCESS model, and further checks will be performed on its Resources if that date matches. (This is done to speed the validation process, though it's highly unlikely that a matching Save Date can occur if there are further changes among Resources.) If the Save Date has changed or if there are differences between the Resources found in the OrgModel and those in SIMPROCESS which originated in the OrgModel, the Reconcile button will be enabled. SIMPROCESS OrgModel Manual 26 Assign OrgModel Operation When selected, the reconciliation process begins by first re-validating the OrgModel. If its file is not present or is invalid, reconciliation cannot proceed. (When this occurs the Update button may be useful.) Otherwise, a series of conditions will be checked to determine how to proceed. These include: • Identifying Resources previously obtained from the OrgModel which no longer appear in the OrgModel • • Identifying Resources in the OrgModel which do not appear in the SIMPROCESS model • Identifying swimlanes that have Org Node assignments from Org Nodes that no longer exist or have been renamed. Identifying Resources previously obtained from the OrgModel which have since been renamed in the OrgModel What actually takes place during the reconciliation process will depend on what is found during evaluation of these conditions. • If there are Resources present in the OrgModel which have not previously been imported into the SIMPROCESS model, or Resources there which have been renamed in the OrgModel, a check is performed to see if importing new ones or renaming existing ones would result in duplicate Resource names in the SIMPROCESS model. If so, the reconciliation process cannot proceed and a list of the names will be displayed in a dialog like the one shown below. SIMPROCESS OrgModel Manual 27 Assign OrgModel Operation • If the number of new Resources to be imported from the OrgModel would cause the total number to exceed what's allowed by some restricted SIMPROCESS licenses, the reconciliation process cannot proceed. • • If neither of the two conditions just described has occurred, then reconciliation can proceed. • Resources previously obtained from this OrgModel which are no longer present in the OrgModel but which are used locally in the SIMPROCESS model will be converted to appear as if they had been locally defined. • Resources previously obtained from this OrgModel which have been renamed there will have their names changed to match in the SIMPROCESS model. • Swimlane assignments will be removed if an Org Node no longer exists or the assignments will be updated if an Org Node name has changed. Resources previously obtained from this OrgModel which are no longer present in the OrgModel will be removed if not used locally. Finally, the current Save Date in the OrgModel will be placed in the SIMPROCESS model. Update an Assigned OrgModel At various times an assigned OrgModel will be validated. Among other things, it will be read to determine if the file is present and readable. If the file associated with the OrgModel is not in its expected location in the orgmodel directory (located in the SIMPROCESS working directory), its status will indicate a "File Error" and the Update button will be enabled. SIMPROCESS OrgModel Manual 28 Assign OrgModel Operation In the above example, an OrgModel named CityOrganization was assigned but was later moved into a subdirectory named Demos. In the Assign OrgModels dialog, CityOrganization is in red because its file (named CityOrganization.orm) is not directly in the orgmodel directory. When Update is selected, SIMPROCESS tries to find CityOrganization.orm at some other location within the orgmodel directory (e.g., in a subdirectory). If successful, the OrgModel assignment is changed to reflect the new file location (e.g., "Demos/CityOrganization"). If the file cannot be found, a dialog will so advise and, at that point, the assignment can be removed or kept despite the status. SIMPROCESS OrgModel Manual 29 CHAPTER 4 Using OrgModels with SIMPROCESS This chapter discusses the relationship between OrgModels and SIMPROCESS models. OrgModels, Org Nodes and Resources It was previously stated that an OrgModel is essentially an organization chart. It's useful, however, to understand how Resources figure into these models and are then available for use in SIMPROCESS models. Any Org Node can have Resources defined. The organization depicted in an OrgModel is hierarchical. Each Org Node can have no more than one direct superior; it may have any number of direct subordinates. This hierarchy is then reflected in the "ownership" of Resources that exist within the OrgModel. SIMPROCESS OrgModel Manual 30 OrgModels, Org Nodes and Resources A portion of the sample OrgModel Demos/CityOrganization is displayed above to illustrate the relationship between the Org Nodes and Resources within the OrgModel. In it, the Org Node representing Mayor Clark Kent has no Resources defined. Neither does City Manager Pete Ross have any Resources. Police Chief Douglas Parker, however, has three defined Resources. Because of the hierarchical nature of the OrgModel, his direct superior, City Manager Pete Ross, "owns" his three Resources. Likewise, Mayor Clark Kent owns these same three Resources. City Attorney Lois Lane has a single Resource, as does Administrator Jimmy Olsen. Therefore, Lois Lane owns both her Resource and Jimmy Olsen's. Mayor Clark Kent, however, is also the owner of those same Resources in addition to those he owns as a direct superior of the City Manager. Ownership of Resources, then, is "rolled up" to all direct superior Org Nodes. SIMPROCESS OrgModel Manual 31 SIMPROCESS Models and Resources Below Police Chief Douglas Parker, you'll see the Org Nodes Records and Photo Office. They each have a single Resource defined. But the Police Chief is not their direct superior, as evidenced by a dotted Link between them showing that they are supporting subordinates. In an organizational sense, they merely provide support to the Police Chief. As a result, he does not have ownership of their Resources, and they are therefore also not owned by his direct superiors. SIMPROCESS Models and Resources With the introduction of OrgModels as a source of Resource definitions, it's no longer sufficient when creating a SIMPROCESS model to simply list all its defined Resources and allow selection of them for use in the various Activities which support it. Instead, a new way of selecting Resources was needed so that the OrgModel structure could be used, and multiple OrgModels could be involved if appropriate. Of course, it's still possible to define Resources in a model as before, so those need to be available for selection as well. Resource Requirements in Activities A number of Activities available in SIMPROCESS models have a Resources tab on their properties dialogs which allows Resource requirements to be specified. To illustrate how the hierarchy described above impacts the selection process, consider the example below taken from the Justice System model included with SIMPROCESS. It shows a tree view of all available Resources and has been partially collapsed here in order to highlight ownership relationships discussed earlier. This tree makes it possible to select multiple Resources at once and to consider their hierarchical Org Node "ownership" in the selection process. The folder icon represents a group of Resources. Some high-level group items will be displayed as a "dot" symbol if no Resources exist there for selection or if all have already been selected and added to the Activity. Some lower-level group items will be omitted when it has no Resources available for selection. Here's an overview of the selection capabilities provided by this tree. • At the top is a single group item named Resources from which it is possible to select all available Resources from the SIMPROCESS model itself and from all assigned OrgModels. SIMPROCESS OrgModel Manual 32 SIMPROCESS Models and Resources • In the Justice System model, there are no locally created Resources so nothing is available to select beneath its group item. If there are locally defined Resources available in a model, then the model's name will display as a folder with all its available Resources listed below it for selection. • Each assigned OrgModel will appear as a group item. Note the presence of Demos/ CityOrganization above, which makes it possible to select every available Resource defined in that OrgModel at one time. • Note the folder named Metropolis Citizens, defined in Demos/CityOrganization. This item is collapsed to demonstrate that the citizens have ownership of all the Resources directly subordinate to them, but not those of the Photo Office and Records Org Nodes, for reasons previously explained. Selecting this item would select every available Resource owned by the citizens, whether directly or by virtue of the rollup process. • Once all Resources under any particular group item are added to the Activity, then that folder may disappear from the tree or change to the "dot" depicted above, depending on its level in the hierarchy. If all Resources beneath it are removed from the list of requirements, it will reappear or change from the "dot" back to a folder. Resources and Resource Downtimes When defining Resource Downtimes in a SIMPROCESS model, a similar tree is displayed, but it has a different behavior. Those Resources which have been applied to the downtime will show that they have been selected. High-level group items, such as the Justice System model itself, will appear as dots if they have no Resources to select. Lower-level group items without Resources will not appear at all. The group items displayed in this tree allow automatic selection or de-selection of Resources below them. It's possible, therefore, to select all available Resources from the model and all assigned OrgModels by clicking the Resources folder at top. Scrolling down through the tree after this would show that every Resource is now selected. Similarly, clicking the name of an assigned OrgModel would select every Resource it contains. Be aware, however, that this would de-select all others already selected. You can use a Control-click to select or de-select without affecting other items outside the hierarchy of what's being clicked. SIMPROCESS OrgModel Manual 33 SIMPROCESS Models and Resources The example above shows how the selection process works. The OrgModel used in this example is Demos/CityOrganization. In a SIMPROCESS model with this OrgModel assigned, a new Resource Downtime is being created. First the Resource named Court Judge is selected by clicking its entry. Then to keep it selected while adding more Resources, a Control-click is performed on the "folder" labeled Court Clerk Office. The result, displayed here, is that all Resources defined at the Org Node Court Clerk Office and all those Resources it owns by virtue of the hierarchy are selected, while the Resource named Court Judge also remains selected. Resource Trees in Other Locations A tree for selecting Resources can be found in numerous other locations including but not limited to: • Resource Shift creation allows selecting Resources using a tree which behaves the same as that described for Resource Downtimes. • Defining a Custom Report and choosing the Resource button for selecting values will also display a tree. This one, however, only allows selecting a single Resource at a time, so that a set of available values can then be selected from an additional pane in the dialog containing the tree. • Defining a Custom Report and choosing the Report Categories button, then selecting Resources in the left-hand pane will display a tree which allows selecting of multiple Resources to be included in the report. • On the Report menu, selecting Define Real-Time Plots and then Resources… will display the Define Resource Reports dialog that includes a tree in its left pane. This one allows selecting one Resource at a time, and then an available value in the right-hand pane. • Defining Custom Real-Time Plots also allows selecting Resources one at a time in a tree to choose the values you want to place into a plot. You can find complete information on the use of Resources in all these SIMPROCESS facilities in Parts A, B, and C of the SIMPROCESS User’s Manual. SIMPROCESS OrgModel Manual 34 OrgModels, Org Nodes and Swimlanes OrgModels, Org Nodes and Swimlanes See the discussion of the Layout Menu in “Layout Menu” for information on assigning an OrgModel Org Node to a swimlane. Justice System and Demos/CityOrganization Many of the models installed with SIMPROCESS and found in the Demos and ExpressionDemos directories are discussed in the Getting Started with SIMPROCESS manual. However, the Justice System model bears additional discussion here since it demonstrates the use of an OrgModel and the Resources it provides. Why Use an OrgModel? The description found in the SIMPROCESS Getting Started Manual tells the general purpose of this particular model. But why should it use an OrgModel? To begin answering that question, let's revisit the role of SIMPROCESS itself as a process modeling and simulation tool. You might even want to review the topic “What is SIMPROCESS?”. Connect the Process to the Organization Using SIMPROCESS, you model a "business process," to include its resources and the entities which move through it, and then simulate the process in order to learn things about it and, ultimately, improve the process. However, the business process being modeled is frequently associated with an organization. Indeed, that organization may be related to multiple business processes, and its OrgModel might therefore lend itself to being assigned in multiple SIMPROCESS models. So the first part of the answer to the question is that creating an OrgModel and assigning it to a SIMPROCESS model allows you to "connect" the business process with a related organization. Connect the Resources in the Organization to the Process An organization often has Resources associated with specific parts. Each Org Node in an OrgModel could represent a person, a department, or some other concept needed to properly depict the organization being modeled. In the Demos/CityOrganization OrgModel, the organization is the fictional city of Metropolis, showing how the city's day to day work gets done. There are other parts not reflected in this OrgModel, but the key organizational parts necessary to operate the city's justice system are represented. Resources have been defined at various Org Nodes which are needed to SIMPROCESS OrgModel Manual 35 Justice System and Demos/CityOrganization accomplish the business of the city's justice system. Once an OrgModel is assigned to a SIMPROCESS model, its Resources will appear in that model alongside those which were locally defined. (In the Justice System model, all of its Resources came from the assigned Demos/CityOrganization OrgModel.) It then is possible to change these Resources' costs, unit availability or other values originally set in the OrgModel Editor, and to specify additional properties supported directly in SIMPROCESS such as statistics collection, downtime and more. See the Results Having done this, not only is the organization from the OrgModel "connected" to the business process in SIMPROCESS, but the Resources themselves are now associated with the appropriate organizational parts. Having specified what statistics to collect, the costs of various Resources and other details, you can then simulate the model to gather the needed information and examine it via the Standard Report and other tools provided in SIMPROCESS. You now have the ability to connect this data back to the organization behind the business process. SIMPROCESS OrgModel Manual 36