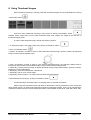
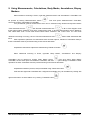
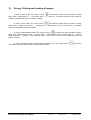
1
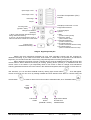
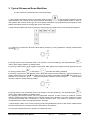
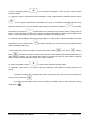
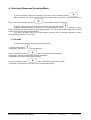
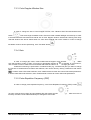
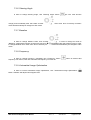
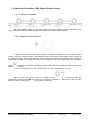
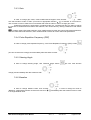
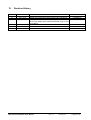
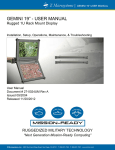
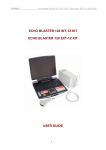
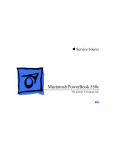
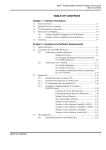
TELEMED
SmartUs - ClarUs - LS128
128 - LS64 - Echo Blaster 64 - Echo Blaster 128
Echo Wave II Software
LB-2
Ultrasound Consolle
User Manual
TELEMED
Ultrasound Medical
Systems
Telemed Medical Systems WEB:
Telemed Office E-mail:
Customer Care:
Telemed UAB Vilnius WEB:
www.telemedultrasound.com
[email protected]
[email protected]
www.telemed.lt
TELEMED
LB2 Ultrasound Keyboard User Manual
Ver. 1.2
2011.06.16
Page 2 of 38
Content
1.
2.
3.
4.
Introduction ............................................................................................................................................... 5
Ultrasound Keyboard Layout .................................................................................................................... 6
Typical Ultrasound Exam Workflow .......................................................................................................... 9
Selecting Ultrasound Scanning Mode ..................................................................................................... 11
4.1.
B mode ........................................................................................................................................... 11
4.2.
Dual mode (B+B) ............................................................................................................................ 12
4.3.
Quad mode (4B) ............................................................................................................................. 13
4.4.
B+M mode ...................................................................................................................................... 14
4.5.
M mode........................................................................................................................................... 15
4.6.
Color Doppler mode ....................................................................................................................... 16
4.7.
B+PW mode, Duplex ...................................................................................................................... 17
4.8.
PW mode ........................................................................................................................................ 18
4.9.
Color Doppler + PW mode, Triplex ................................................................................................ 19
4.10. Color Doppler and PW mode ......................................................................................................... 20
5.
Using Ultrasound Scanning Presets ....................................................................................................... 21
6.
Using Cine............................................................................................................................................... 21
7.
Adjusting Ultrasound Image Quality........................................................................................................ 22
7.1.
Adjusting B Mode Controls ............................................................................................................. 24
7.1.1.
Softmenu Controls ................................................................................................................. 24
7.1.2.
Scanning Depth ..................................................................................................................... 24
7.1.3.
Gain ....................................................................................................................................... 24
7.1.4.
Frequency .............................................................................................................................. 24
7.1.5.
Power ..................................................................................................................................... 24
7.1.6.
Change Scan Direction .......................................................................................................... 25
7.1.7.
Focusing Mode ...................................................................................................................... 25
7.1.8.
Focusing Depth...................................................................................................................... 25
7.1.9.
Time Gain Compensation (TGC) ........................................................................................... 25
7.1.10.
View Area .............................................................................................................................. 25
7.1.11.
Brightness .............................................................................................................................. 26
7.1.12.
Contrast ................................................................................................................................. 26
7.1.13.
Zoom ...................................................................................................................................... 26
7.1.14.
Automatical Image Optimization ............................................................................................ 26
7.2.
Adjusting M Mode Controls ............................................................................................................ 27
7.2.1.
Softmenu Controls ................................................................................................................. 27
7.2.2.
Line Position .......................................................................................................................... 27
7.2.3.
Sweep Speed ........................................................................................................................ 27
7.3.
Adjusting Color Doppler (CFM, PDI) Mode Controls ..................................................................... 28
7.3.1.
Softmenu Controls ................................................................................................................. 28
7.3.2.
Color Doppler Window Position ............................................................................................. 28
7.3.3.
Color Doppler Window Size ................................................................................................... 29
7.3.4.
Gain ....................................................................................................................................... 29
7.3.5.
Pulse Repetition Frequency (PRF) ........................................................................................ 29
7.3.6.
Steering Angle ....................................................................................................................... 30
7.3.7.
Baseline ................................................................................................................................. 30
7.3.8.
Frequency .............................................................................................................................. 30
7.3.9.
Automatical Image Optimization ............................................................................................ 30
7.4.
Adjusting Pulsed Wave (PW) Doppler Mode Controls ................................................................... 31
7.4.1.
Softmenu Controls ................................................................................................................. 31
7.4.2.
Sample Volume Position ....................................................................................................... 31
7.4.3.
Gain ....................................................................................................................................... 32
7.4.4.
Pulse Repetition Frequency (PRF) ........................................................................................ 32
7.4.5.
Steering Angle ....................................................................................................................... 32
7.4.6.
Baseline ................................................................................................................................. 32
7.4.7.
Correction Angle .................................................................................................................... 33
7.4.8.
Sweep Speed ........................................................................................................................ 33
7.4.9.
Sound Volume ....................................................................................................................... 33
7.4.10.
Automatical Image Optimization ............................................................................................ 33
7.4.11.
Automatical Trace .................................................................................................................. 33
TELEMED
LB2 Ultrasound Keyboard User Manual
Ver. 1.2
2011.06.16
Page 3 of 38
8.
9.
10.
11.
12.
Using Thumbnail Images ........................................................................................................................ 34
Using Measurements, Calculations, Body Marks, Annotations, Biopsy Markers ................................... 35
Saving, Printing and Loading of Images ............................................................................................. 36
References ......................................................................................................................................... 37
Revision History .................................................................................................................................. 38
TELEMED
LB2 Ultrasound Keyboard User Manual
Ver. 1.2
2011.06.16
Page 4 of 38
1. Introduction
This document ("LogicScan 64/128 and ClarUs Series Ultrasound Systems Echo Wave II Software
LogicBoard Ultrasound Keyboard User Manual") describes LogicBoard ultrasound keyboard that can be
connected to TELEMED Ultrasound Systems based on Echo Blaster, LogicScan and ClarUs series
ultrasound scanners and "Echo Wave II" ultrasound scanning software. Ultrasound keyboard is connected to
USB (Universal Serial Bus) port.
This document describes only LogicBoard ultrasound keyboard and how it can be used to control
"Echo Wave II" software. "Echo Wave II" software itself is described in "Echo Wave II Software User
Manual" and we strongly recommend to read it before starting to use ultrasound keyboard with
"Echo Wave II" software. It is important to note that when to "Echo Wave II" is connected ultrasound
keyboard, software may adjust some functions (like functional Fn keys) to correspond to keyboard layout.
Before using above mentioned keyboard, software and scanners, you must be trained in
clinical procedures for conducting ultrasound exams. This guide does not provide guidelines for
clinical aspects of performing the exam or for interpreting the medical ultrasound images.
Also you must be familiar with the use of laptop or desktop computer and Microsoft Windows
XP (Windows Vista, Windows 7) operating system.
TELEMED
LB2 Ultrasound Keyboard User Manual
Ver. 1.2
2011.06.16
Page 5 of 38
2. Ultrasound Keyboard Layout
In this section is presented general ultrasound keyboard overview and brief description of its
controls.
Image 1. Overall keyboard view
Patient information
B Power
Multifunctional softmenu encoders
Brightness Contrast
Presets
View
Area
Keyboard powering
indicator
Main
menu
Automatical User
Image
manual
Optimization
PW Sound
Volume
Softmenu
mode
Probe
port
Frequency
(B, CFM)
Image 2. Top keyboard part
TELEMED
LB2 Ultrasound Keyboard User Manual
Ver. 1.2
2011.06.16
Page 6 of 38
Image 3. Alphanumerical computer keyboard
B+B B+M
M B+PW
mode mode mode mode
B mode
Indicators of encoder's
function:
CFM mode
Gain (CFM, PDI, PW)
PDI mode
Line Position (PW, M)
Baseline (CFM, PW)
PW mode
PW Correction Angle
Buttons with color
indication that change
encoder's function
Multifunctional
encoder with
indicators and
buttons for
changing Doppler
mode parameters
Steering PRF Sweep
Angle
Speed
(PW, M)
Image 4. Left keyboard part
1) Second measurement tool
2) CFM, PDI Window Size (trackball mode)
First measurement tool
1) Measurements
2) Calculations
Delete all measurements
and drawings
1) Body Marks
2) Annotations
3) Biopsy
Enter
trackball
mode
Left mouse
button
Pointing
device
(trackball / mouse)
Right mouse button
and exit from
trackball mode
Image 5. Central keyboard part with pointing device (Trackball / Mouse)
TELEMED
LB2 Ultrasound Keyboard User Manual
Ver. 1.2
2011.06.16
Page 7 of 38
Open image or cine
Save image or cine
Time Gain Compensation (TGC)
controls
Print image
Report
Dual (B+B) mode freeze / run and
image selection buttons
Focusing mode
(dynamic / static)
1) Scanning Depth
2) Zoom
Change scan direction
(Reverse)
1) Gain
(rotate in running mode)
2) Cine Play / Pause
(click in freeze mode)
3) Cine frame selection
(rotate in freeze mode)
4) Thumbnail selection
(rotate in thumbnail selection mode)
5) Thumbnail opening
(click in thumbnail selection mode)
1) Show / hide panel with thumbnail images
during ultrasound scanning
2) Turn on / off thumbnail selection mode of
Gain encoder when software is in freeze mode
Freeze / Run
ultrasound scanning
Image 6. Right keyboard part
Please note that ultrasound keyboard has only most important controls that are required for
ultrasound scanning. If you need to use some "Echo Wave II" control that is not present in the ultrasound
keyboard, you can still access this control using computer keyboard or mouse (pointing device).
When ultrasound scanning is frozen, pointing device works as traditional mouse with left and right
mouse buttons. When ultrasound scanning is running, pointing device (mouse) is in trackball mode and
mouse cursor is not visible. If you temporarily need to use mouse in order to change some ultrasound
scanning parameter that does not have control in the ultrasound keyboard, but has control in "Echo Wave II"
user interface, you can exit from trackball mode by clicking right mouse button
. Then will appear
mouse cursor that you can move by rotating trackball and click desired "Echo Wave II" controls using left
mouse button
. In order to return from mouse mode to trackball mode, click "Trackball" button
.
Enter
trackball
mode
Left mouse
button
TELEMED
LB2 Ultrasound Keyboard User Manual
Pointing
device
(trackball / mouse)
Ver. 1.2
Right mouse button
and exit from
trackball mode
2011.06.16
Page 8 of 38
3. Typical Ultrasound Exam Workflow
In order to perform ultrasound exam, follow these steps:
1. Open Patient Information window by pressing "Patient" button
on the ultrasound keyboard. Inside
opened window use pointing device (mouse and its left button) and click "New Patient" button in order to
clear patient data. Choose exam type and enter patient information using alphanumerical keyboard. Close
Patient Information window by clicking with mouse "OK" button.
2. Select desired ultrasound scanning mode by clicking button(s) of that mode on the ultrasound keyboard.
3. If scanning is performed in M mode, adjust M-line position by moving trackball or rotating multifunctional
encoder
.
If pointing device is not in trackball mode or its function is not line positioning, click trackball button
in
order to start using trackball in its default mode.
If scanning is performed in Color Doppler mode (CFM, PDI), adjust Color Doppler window position and size
by clicking position button
or size button
and after that rotating trackball.
If scanning is performed in PW Doppler mode, adjust PW sample volume position by moving trackball or by
rotating multifunctional encoder
. Make sure that encoder's line position indicator
is turned on. If
indicator is not turned on, click encoder while line position indicator will be turned on and after that rotate
encoder in order to change PW line position.
If pointing device is not in trackball mode or its function is not line positioning, click trackball button
in
order to start using trackball in its default mode.
For changing PW sample volume size use appropriate softmenu encoder. Clicks on softmenu encoder
change controlled item (first softmenu row or second softmenu row). Rotation of encoder changes the value
of scanning parameter that corresponds to selected softmenu item. The number of softmenu columns
corresponds to the number of keyboard softmenu encoders.
4. Adjust image quality of the chosen scanning mode using dedicated controls of that mode, multifunctional
encoders and softmenu encoders that will be described in next sections.
5. Use proper medical protocols to perform the ultrasound exam.
TELEMED
LB2 Ultrasound Keyboard User Manual
Ver. 1.2
2011.06.16
Page 9 of 38
6. Press "Freeze/Run" button
ultrasound image.
on the ultrasound keyboard in order to freeze currently visible
7. If required, perform measurements and calculations. Using measurements ControlBar selection button
can be opened measurements ControlBar (first click) or calculations ControlBar (second click).
General measurement tool can be selected using primary measurement tool button
or secondary
measurement tool button
. Measurements are performed using pointing device (mouse) with its
buttons. Left mouse button is used to set endpoint of created measurement or drawing object. Right mouse
button is used to edit endpoint of previously created measurement or drawing object.
8. If required, add annotations and body mark (pictogram). In order to open required ControlBar, click body
mark button for one or several times
marks, annotations and biopsy.
. By clicking this button you can loop through ControlBars of body
9. Save and/or print ultrasound image and report using "Save" button
, "Print" button
, "Report"
button
. These buttons perform functions that were last used by appropriate multifunctional buttons in
"Echo Wave II" software. You can change their function by moving with mouse to "Echo Wave II" autohide
bottom ToolBar and selecting desired items from menus of buttons.
10. Press "Freeze/Run" button
in order to start ultrasound scanning again.
11. Optionally, repeat steps 2-10 in order to perform examination using different scanning positions and
modes.
If ultrasound scanner has connected two probes at the same time, next probe can be selected by
clicking "Probe port" button
.
If you will need information how to use "Echo Wave II" software, open its user manual by clicking
"Help" button
.
TELEMED
LB2 Ultrasound Keyboard User Manual
Ver. 1.2
2011.06.16
Page 10 of 38
4. Selecting Ultrasound Scanning Mode
In order to freeze/run ultrasound scanning in any mode, click "Freeze/Run" button
.
Before selecting any scanning mode, ultrasound image must be unfrozen. If ultrasound image is
frozen, then click "Freeze/Run" button
in order to start ultrasound scanning.
In order to enter B (2D) mode from any other mode, click "B mode" button
.
Available scanning modes may depend on the used ultrasound scanner type. Selection of some
scanning modes may require several clicks of different buttons. In order to enter some modes you may need
to start mode selection from B mode (default).
This section describes only how to enter desired scanning mode. Scanning parameters of each
mode will be described in next sections.
4.1. B mode
In order to enter B mode, perform the following actions:
1. Click "B mode" button
.
2. Optionally, adjust B mode scanning parameters.
3. Click "Freeze/Run" button
in order to freeze ultrasound scanning.
4. Optionally, perform measurements and add annotations.
5. Optionally, print and/or save ultrasound image.
6. Click "Freeze/Run" button
in order to start ultrasound scanning again.
7. Optionally, repeat steps 2-6 in order to scan more B mode images.
TELEMED
LB2 Ultrasound Keyboard User Manual
Ver. 1.2
2011.06.16
Page 11 of 38
4.2. Dual mode (B+B)
In order to enter Dual mode, perform the following actions:
1. If ultrasound image is frozen, unfreeze it by clicking "Freeze/Run" button
2. If current mode is different than B mode, click "B mode" button
3. Optionally, adjust B mode scanning parameters.
.
in order to enter B mode.
4. Click “Dual" button
in order to enter Dual mode and see two ultrasound images. Left-side image will
be running, and right-side image will be frozen. If at "Echo Wave II" top ToolBar this button was configured to
enter Quad (4B) mode, then for entering Dual mode use dual left freeze/run button
.
5. In order to freeze one image and run other image (change active image), click “Dual” button
(if at
"Echo Wave II" top ToolBar this button is configured for Dual mode). Selected (active) image is denoted by
small rectangle around scanning direction marker or different marker color. Perform this operation for any
number of times in order to get desired ultrasound images.
The status of left image also can be changed using dual left freeze/run button
image also can be changed using dual right freeze/run button
selection of active (selected) image when both images are frozen.
. The status of right
. These buttons can also be used for
6. Click "Freeze/Run" button
in order to freeze ultrasound scanning.
7. Optionally, perform measurements and add annotations.
8. Optionally, print and/or save ultrasound image.
9. Optionally, use “Dual” button
image.
or dual left/right buttons
in order to select desired frozen
10. Optionally, click "Freeze/Run" button
in order to start scanning at selected image.
11. Optionally, repeat steps 5-10 in order to scan more Dual mode images.
TELEMED
LB2 Ultrasound Keyboard User Manual
Ver. 1.2
2011.06.16
Page 12 of 38
4.3. Quad mode (4B)
If Dual/Quad mode button at "Echo Wave II" top ToolBar was configured for Quad mode, in order to
enter Quad mode perform the following actions:
1. If ultrasound image is frozen, unfreeze it by clicking "Freeze/Run" button
2. If current mode is different than B mode, click "B mode" button
3. Optionally, adjust B mode scanning parameters.
.
in order to enter B mode.
4. Click “Quad" button
in order to enter Quad mode and see four ultrasound images. Left-top image
will be running, and other images will be frozen.
5. In order to freeze one image and run other image (change active image), click “Quad” button
.
Selected (active) image is denoted by small rectangle around scanning direction marker or different marker
color. Perform this operation for any number of times in order to get desired ultrasound images.
6. Click "Freeze/Run" button
in order to freeze ultrasound scanning.
7. Optionally, perform measurements and add annotations.
8. Optionally, print and/or save ultrasound image.
9. Optionally, use “Quad” button
in order to select desired frozen image.
10. Optionally, click "Freeze/Run" button
in order to start scanning at selected image.
11. Optionally, repeat steps 5-10 in order to scan more Dual mode images.
TELEMED
LB2 Ultrasound Keyboard User Manual
Ver. 1.2
2011.06.16
Page 13 of 38
4.4. B+M mode
In order to enter B+M mode, perform the following actions:
1. If ultrasound image is frozen, unfreeze it by clicking "Freeze/Run" button
2. If current mode is different than B mode, click "B mode" button
3. Optionally, adjust B mode scanning parameters.
.
in order to enter B mode.
4. Click "B+M mode" button
in order to show B mode image with M line on it.
5. Adjust M-line position by moving trackball or rotating multifunctional encoder
.
If pointing device is not in trackball mode or its function is not line positioning, click trackball button
order to start using trackball in its default mode.
in
6. Click "B+M mode" button
in order to show B+M mode image.
7. Optionally, adjust M-line position.
8. Optionally, adjust M mode scanning parameters.
9. Click "Freeze/Run" button
in order to freeze ultrasound scanning.
10. Optionally, perform measurements and add annotations.
11. Optionally, print and/or save ultrasound image.
12. Click "Freeze/Run" button
in order to start ultrasound scanning again.
13. Optionally, repeat steps 4-12 in order to scan more B+M images.
14. Click "B mode" button
in order to enter B mode.
TELEMED
LB2 Ultrasound Keyboard User Manual
Ver. 1.2
2011.06.16
Page 14 of 38
4.5. M mode
In order to enter M mode, perform the following actions:
1. If ultrasound image is frozen, unfreeze it by clicking "Freeze/Run" button
2. If current mode is different than B mode, click "B mode" button
.
in order to enter B mode.
3. Click "M mode" button
in order to show B mode image with M line on it.
4. Adjust M-line position by moving trackball or rotating multifunctional encoder
.
If pointing device is not in trackball mode or its function is not line positioning, click trackball button
order to start using trackball in its default mode.
5. Click "M mode" button
in
in order to show M mode image.
6. Optionally, click "M mode" button
in order to show B mode image with M line on it, adjust M-line
position, and then again click "M mode" button
7. Optionally, adjust M mode scanning parameters.
in order to show M mode image.
8. Click "Freeze/Run" button
in order to freeze ultrasound scanning.
9. Optionally, perform measurements and add annotations.
10. Optionally, print and/or save ultrasound image.
11. Click "Freeze/Run" button
in order to start ultrasound scanning again.
12. Optionally, repeat steps 4-11 in order to scan more M mode images.
13. Click "B mode" button
in order to enter B mode.
TELEMED
LB2 Ultrasound Keyboard User Manual
Ver. 1.2
2011.06.16
Page 15 of 38
4.6. Color Doppler mode
In order to enter Color Doppler mode, perform the following actions:
1. If ultrasound image is frozen, unfreeze it by clicking "Freeze/Run" button
2. If current mode is different than B mode, click "B mode" button
3. Optionally, adjust B mode scanning parameters.
4. Click "CFM mode" button
enter PDI mode.
.
in order to enter B mode.
in order to enter CFM mode or click "PDI mode" button
5. Adjust Color Doppler window position and size by clicking position button
and after that rotating trackball.
6. Optionally, adjust Color Doppler mode scanning parameters.
in order to
or size button
7. Click "Freeze/Run" button
in order to freeze ultrasound scanning.
8. Optionally, perform measurements and add annotations.
9. Optionally, print and/or save ultrasound image.
10. Click "Freeze/Run" button
in order to start ultrasound scanning again.
11. Optionally, repeat steps 6-10 in order to scan more Color Doppler mode images.
12. Click "B mode" button
in order to enter B mode.
TELEMED
LB2 Ultrasound Keyboard User Manual
Ver. 1.2
2011.06.16
Page 16 of 38
4.7. B+PW mode, Duplex
In order to enter B+PW mode, perform the following actions:
1. If ultrasound image is frozen, unfreeze it by clicking "Freeze/Run" button
2. If current mode is different than B mode, click "B mode" button
3. Optionally, adjust B mode scanning parameters.
.
in order to enter B mode.
4. Click "B+PW mode" button
in order to show running B and PW images.
5. Adjust PW sample volume position by moving trackball or by rotating multifunctional encoder
. Make
sure that encoder's line position indicator
is turned on. If indicator is not turned on, click encoder while
line position indicator will be turned on and after that rotate encoder in order to change PW line position.
If pointing device is not in trackball mode or its function is not line positioning, click trackball button
in
order to start using trackball in its default mode.
For changing PW sample volume size use appropriate softmenu encoder. Clicks on softmenu encoder
change controlled item (first softmenu row or second softmenu row). Rotation of encoder changes the value
of scanning parameter that corresponds to selected softmenu item. The number of softmenu columns
corresponds to the number of keyboard softmenu encoders.
6. Optionally, click "B+PW mode" button
again in order to freeze B image and run only PW image. If in
this mode is moved trackball, software temporarily runs B image and freezes PW image in order to allow
positioning of PW sample volume. When trackball movement stops, software freezes B image and runs PW
image.
7. Optionally, adjust PW mode scanning parameters, for example, PRF (Pulse Repetition Frequency).
8. Optionally, click "B+PW mode" button
again in order to show both running B and PW images.
9. Optionally, adjust PW sample volume position, size and other scanning parameters.
10. Repeat steps 6-9 in order to get image of desired quality.
11. Click "Freeze/Run" button
in order to freeze ultrasound scanning.
12. Optionally, perform measurements and add annotations.
13. Optionally, print and/or save ultrasound image.
14. Click "Freeze/Run" button
in order to start ultrasound scanning again.
15. Optionally, repeat steps 4-14 in order to scan more B+PW images.
16. Click "B mode" button
in order to enter B mode.
NOTE. Depending on selected software options, "B+PW mode" button may loop through the following states:
1) B running + PW running (Duplex), B frozen + PW running; 2) B running + PW frozen, B frozen + PW
running.
TELEMED
LB2 Ultrasound Keyboard User Manual
Ver. 1.2
2011.06.16
Page 17 of 38
4.8. PW mode
In order to enter PW mode, perform the following actions:
1. If ultrasound image is frozen, unfreeze it by clicking "Freeze/Run" button
2. If current mode is different than B mode, click "B mode" button
.
in order to enter B mode.
3. Click "PW mode" button
in order to show running B mode image with PW line on it.
4. Adjust PW sample volume position by moving trackball or by rotating multifunctional encoder
. Make
sure that encoder's line position indicator
is turned on. If indicator is not turned on, click encoder while
line position indicator will be turned on and after that rotate encoder in order to change PW line position.
If pointing device is not in trackball mode or its function is not line positioning, click trackball button
in
order to start using trackball in its default mode.
For changing PW sample volume size use appropriate softmenu encoder. Clicks on softmenu encoder
change controlled item (first softmenu row or second softmenu row). Rotation of encoder changes the value
of scanning parameter that corresponds to selected softmenu item. The number of softmenu columns
corresponds to the number of keyboard softmenu encoders.
5. Click "PW mode" button
in order to show PW mode image.
6. Optionally, click "PW mode" button
in order to show B mode image with PW line on it, adjust PW
sample volume size and position, and then again click "PW mode" button
image.
7. Optionally, adjust PW mode scanning parameters.
in order to show PW mode
8. Click "Freeze/Run" button
in order to freeze ultrasound scanning.
9. Optionally, perform measurements and add annotations.
10. Optionally, print and/or save ultrasound image.
11. Click "Freeze/Run" button
in order to start ultrasound scanning again.
12. Optionally, repeat steps 4-11 in order to scan more PW mode images.
13. Click "B mode" button
in order to enter B mode.
TELEMED
LB2 Ultrasound Keyboard User Manual
Ver. 1.2
2011.06.16
Page 18 of 38
4.9. Color Doppler + PW mode, Triplex
In order to enter Color Doppler + PW mode, perform the following actions:
1. If ultrasound image is frozen, unfreeze it by clicking "Freeze/Run" button
.
2. If current mode is different than B mode, click "B mode" button
in order to enter B mode.
3. Optionally, adjust B mode scanning parameters.
4. Select desired Color Doppler mode like it was described in "Color Doppler mode" section, adjust Color
Doppler window size and position. Adjust Color Doppler mode scanning parameters.
5. Click "CFM+PW mode" button
in order to show running Color Doppler mode image and PW mode
image.
6. Adjust PW sample volume position by moving trackball or by rotating multifunctional encoder
. Make
sure that encoder's line position indicator
is turned on. If indicator is not turned on, click encoder while
line position indicator will be turned on and after that rotate encoder in order to change PW line position.
If pointing device is not in trackball mode or its function is not line positioning, click trackball button
in
order to start using trackball in its default mode.
For changing PW sample volume size use appropriate softmenu encoder. Clicks on softmenu encoder
change controlled item (first softmenu row or second softmenu row). Rotation of encoder changes the value
of scanning parameter that corresponds to selected softmenu item. The number of softmenu columns
corresponds to the number of keyboard softmenu encoders.
7. Optionally, click "CFM+PW mode" button
in order to show frozen Color Doppler mode image and
running PW mode image. If in this mode is moved trackball, software temporarily runs B+CFM image and
freezes PW image in order to allow positioning of PW sample volume. When trackball movement stops,
software freezes B+CFM image and runs PW image.
8. Optionally, adjust PW mode scanning parameters, for example, PRF (Pulse Repetition Frequency).
9. Optionally, click "B+PW mode" button
again in order to show both running B+CFM and PW images.
10. Optionally, adjust PW sample volume position, size and other scanning parameters.
11. Optionally, repeat steps 5-10 in order to get desired image quality.
11. Click "Freeze/Run" button
in order to freeze ultrasound scanning.
12. Optionally, perform measurements and add annotations.
13. Optionally, print and/or save ultrasound image.
14. Click "Freeze/Run" button
in order to start ultrasound scanning again.
15. Optionally, repeat steps 4-14 in order to scan more B+CFM+PW images.
16. Click "B mode" button
in order to enter B mode.
NOTE. Depending on selected software options, "B+PW mode" button may loop through the following states:
1) B+CFM running + PW running (Triplex), B+CFM frozen + PW running; 2) B+CFM running + PW frozen,
B+CFM frozen + PW running.
TELEMED
LB2 Ultrasound Keyboard User Manual
Ver. 1.2
2011.06.16
Page 19 of 38
4.10.
Color Doppler and PW mode
Software supports switching between Color Doppler and PW mode. In order to use switching
between Color Doppler and PW mode, perform the following actions:
1. If ultrasound image is frozen, unfreeze it by clicking "Freeze/Run" button
.
2. If current mode is different than B mode, click "B mode" button
in order to enter B mode.
3. Optionally, adjust B mode scanning parameters.
4. Select desired Color Doppler mode like it was described in "Color Doppler mode" section, adjust Color
Doppler window size and position. Adjust Color Doppler mode scanning parameters.
5. Click "PW mode" button
in order to show running Color Doppler mode image with PW line on it.
6. Adjust PW sample volume position by moving trackball or by rotating multifunctional encoder
. Make
sure that encoder's line position indicator
is turned on. If indicator is not turned on, click encoder while
line position indicator will be turned on and after that rotate encoder in order to change PW line position.
If pointing device is not in trackball mode or its function is not line positioning, click trackball button
in
order to start using trackball in its default mode.
For changing PW sample volume size use appropriate softmenu encoder. Clicks on softmenu encoder
change controlled item (first softmenu row or second softmenu row). Rotation of encoder changes the value
of scanning parameter that corresponds to selected softmenu item. The number of softmenu columns
corresponds to the number of keyboard softmenu encoders.
7. Click "PW mode" button
in order to show PW mode image.
8. Optionally, "PW mode" button
in order to show Color Doppler mode image with PW line on it, adjust
PW sample volume size and position, and then again click "PW mode" button
mode image.
9. Optionally, adjust PW image using PW mode scanning parameters.
in order to show PW
10. Click "Freeze/Run" button
in order to freeze ultrasound scanning.
11. Optionally, perform measurements and add annotations.
12. Optionally, print and/or save ultrasound image.
13. Click "Freeze/Run" button
in order to start ultrasound scanning again.
14. Optionally, repeat steps 4-13 in order to scan more PW mode images.
15. Click "B mode" button
in order to enter B mode.
TELEMED
LB2 Ultrasound Keyboard User Manual
Ver. 1.2
2011.06.16
Page 20 of 38
5. Using Ultrasound Scanning Presets
In order to apply ultrasound scanning preset, perform the following actions:
1. Open left-side Presets ControlBar by clicking "Presets" button
2. Move (rotate) trackball down/up in order to select desired preset.
Left mouse
button
.
Pointing device
(trackball / mouse)
3. Click left mouse button in order to apply preset.
4. Optionally, repeat steps 1-3 in order to apply some other preset.
When you apply preset, at first software enters appropriate scanning mode that was used during
preset saving, and then sets scanning parameters for controls of that mode.
If left-side and right-side ControlBars are configured as autohide, they can be hidden by clicking with
right mouse button on their headers or by clicking "Trackball" button
.
6. Using Cine
Software automatically records last scanned ultrasound image frames to cine memory (buffer).
When cine memory is full, newly scanned frames overwrite oldest frames. Cine memory is organized in such
special way, that the user will always see last scanned and recorded frames.
Usually cine is used in the following way:
1. Select desired scanning mode and scan anatomy of interest.
2. Click "Freeze/Run" button
in order to freeze ultrasound scanning.
3. Select desired ultrasound frame by rotating "Cine" encoder.
4. Optionally, click "Cine" encoder in order to play cine and then click the same "Cine" encoder in order to
pause cine.
5. Optionally, perform post-processing of selected frame (image enhancement, gamma correction,
brightness, contrast adjustment).
6. Optionally, perform measurements, calculations.
7. Optionally, print or save current image.
8. Click "Freeze/Run" button
in order to start ultrasound scanning again. This will clear cine
buffer and will start recording of new scanned frames.
9. Optionally, perform steps 1-8 in order to scan more images.
TELEMED
LB2 Ultrasound Keyboard User Manual
Ver. 1.2
2011.06.16
Page 21 of 38
7. Adjusting Ultrasound Image Quality
For changing ultrasound scanning parameters, ultrasound keyboard has dedicated controls (buttons)
of appropriate modes. For example, dedicated control is "Sound Volume" control
that changes
only PW mode sound volume, "Brightness" control
that changes B mode brightness. If some
parameter is changed by two buttons, click on left button ("-") decreases parameter's value and click on right
button ("+") increases parameter's value.
Also ultrasound keyboard has multifunctional buttons that can change their function depending on
the used scanning mode. For example, "Frequency" button
changes B mode frequency if scanning is
performed in B mode and changes Color Doppler frequency if scanning is performed in CFM/PDI mode.
Another kind of controls are multifunctional encoders that can have different function depending on
the used scanning mode, freeze/run state and also different function depending on selected encoder's mode.
Encoder's mode is usually selected by clicking this encoder or some button near it. For example, the same
encoder can be used to change scanning depth
and zoom
. Current encoder's function
(what parameter will be changed when we will rotate encoder) is usually indicated by turned on appropriate
indicator near it. Parameter values are increased when encoder is rotated clockwise and decreased when
encoder is rotated counterclockwise.
Ultrasound keyboard also has a group of multifunctional softmenu encoders that perform different
function depending on the used scanning mode and depending on selected encoder's mode. The functions
of softmenu encoders are indicated by softmenu texts that are shown in "Echo Wave II" user interface below
ultrasound image. Scanning mode (B, M, CFM, PDI, PW) of softmenu controls is shown at left softmenu
side. When ultrasound keyboard is connected to "Echo Wave II", software makes its bottom ToolBar
autohide and in its place is displayed softmenu. Please note that autohide bottom ToolBar can still be
accessed using mouse.
Displayed softmenu items can have the following states:
Enabled and selected (rotation of softmenu encoder will change its value);
Enabled, but not selected (can be selected by clicking softmenu encoder);
Disabled (cannot be selected and cannot be changed).
Color scheme of softmenu items depends on the used user interface skin.
In order to change the value of selected softmenu item, rotate appropriate encoder (e.g., second
encoder in order to change "Dynamic Range"). In order to change what parameter is controlled by some
encoder (select different softmenu item), click this encoder. For example, the click on second encoder will
cause that will be controlled either "Dynamic Range" or "Rotation" (of course, if these parameters are
enabled in current scanning state).
If ultrasound scanning is performed in combined mode (e.g., B+CFM+PW) and you want to change
the function of multifunctional encoders and softmenu, this can be done by clicking "Softmenu mode" button
. Clicks of this button will loop through B/CFM/PW softmenus. For example, if in B+CFM+PW (Triplex)
mode is displayed PW mode softmenu and you want to change some CFM mode parameter, click "Softmenu
mode" button
in order to see CFM mode softmenu. This click will also change ultrasound scanning
TELEMED
LB2 Ultrasound Keyboard User Manual
Ver. 1.2
2011.06.16
Page 22 of 38
parameters (from PW to CFM) that are controlled by multifunctional Doppler mode encoder
allowing to change, for example CFM Gain.
,
Next sections will present the list of parameters that can be controlled by ultrasound keyboard in
each ultrasound scanning mode using different kinds of controls. For detailed description of ultrasound
scanning parameters and their relationships please read "Echo Wave II Software User Manual".
TELEMED
LB2 Ultrasound Keyboard User Manual
Ver. 1.2
2011.06.16
Page 23 of 38
7.1. Adjusting B Mode Controls
7.1.1. Softmenu Controls
B mode softmenu allows to control the following scanning parameters: Focuses Number, Focus Set,
Dynamic Range, Rotation, Speckle Reduction, Image Enhancement, Gamma, Palette, Frame Averaging,
Lines Density.
7.1.2. Scanning Depth
In order to change scanning depth, rotate "Depth" encoder
. If depth indicator
(small
lamp) is not turned on (e.g., because previously was used zoom), click this encoder in order to make depth
indicator to turn on. That is, change encoder's mode from "Zoom" to "Depth". When rotating encoder,
observe changed numerical depth value at right side of the ultrasound image. When this value will reach
desired one, stop rotating encoder and after some time software will change scanning depth.
7.1.3. Gain
In order to change gain, rotate "Gain" encoder
.
7.1.4. Frequency
In order to change frequency, repeatedly click "Frequency" button
frequency from the list, next click will select first frequency from the list.
. When is reached last
7.1.5. Power
In order to adjust power, click "Power" buttons
TELEMED
LB2 Ultrasound Keyboard User Manual
.
Ver. 1.2
2011.06.16
Page 24 of 38
7.1.6. Change Scan Direction
In order to change scanning direction, click "Reverse" button
.
7.1.7. Focusing Mode
In order to change focusing mode (set static or dynamic), click "Focusing mode"
button. In
order to change focus set and the number of focuses in static focusing mode, use appropriate softmenu
encoder.
7.1.8. Focusing Depth
In B mode default function of trackball is adjustment of focusing depth. In order to change focusing
depth, rotate trackball up/down and observe focus markers near scale lines of the ultrasound image. If
trackball is not in its default mode, click "Trackball" button
and after that rotate trackball in order to change focusing depth.
in order to set trackball to its default mode
7.1.9. Time Gain Compensation (TGC)
In order to adjust Time Gain Compensation, click TGC buttons ("-" or "+") at appropriate depths.
Observe ultrasound image and small horizontal markers on TGC curve. Each horizontal marker on TGC
curve corresponds to appropriate TGC control
7.1.10.
.
View Area
In order to change view area, repeatedly click "View Area" button
area from the list, next click will select first view area from the list.
TELEMED
LB2 Ultrasound Keyboard User Manual
Ver. 1.2
. When is reached last view
2011.06.16
Page 25 of 38
7.1.11.
Brightness
In order to adjust ultrasound image brightness, click "Brightness" buttons
7.1.12.
Contrast
In order to adjust ultrasound image contrast, click "Contrast" buttons
7.1.13.
.
.
Zoom
In order to change zoom, click "Depth"/"Zoom" encoder in order to set its mode to "Zoom"
.
Zoom indicator
(small lamp) must become turned on. That is, need to change encoder's mode from
"Depth" to "Zoom". When encoder is in "Zoom" mode, rotate it and observe changed numerical zoom value
at right side of the ultrasound image. When this value will reach desired one, stop rotating encoder and after
some time software will change zoom to selected one.
In order to return to default zoom and fit image to the centre of the screen, change zoom value to
"100%", stop rotating encoder and wait while software will set default zoom.
7.1.14.
Automatical Image Optimization
In order to invoke automatical image optimization, click "Automatical Image Optimization"
button. Software will adjust B mode Gain, TGC and Dynamic Range.
TELEMED
LB2 Ultrasound Keyboard User Manual
Ver. 1.2
2011.06.16
Page 26 of 38
7.2. Adjusting M Mode Controls
7.2.1. Softmenu Controls
M mode softmenu allows to control the following scanning parameters: M Line Position, Focus
(Focusing Depth), Dynamic Range, Rejection, Brightness, Gamma, View Area.
7.2.2. Line Position
In B+M mode default function of trackball is adjustment of M-line position. In order to change
position, rotate trackball left/right, observe movement of M-line on the ultrasound image, stop rotating
trackball. Scanning with newly selected M-line position is started when trackball is not rotated for some time.
If trackball is not in its default mode, click "Trackball" button
and after that rotate trackball in order to change M-line position.
in order to set trackball to its default mode
M-line position also can be changed by rotating encoder
. Please make sure that
appropriate encoder's indicator
is turned on. If indicator is not turned on, click encoder in order to make
it turn on. That is, change encoder's mode to M-line positioning.
7.2.3. Sweep Speed
In order to change sweep speed, click "Sweep Speed" button
and immediately after that rotate encoder
automatically be changed to M-line positioning mode.
TELEMED
LB2 Ultrasound Keyboard User Manual
(its color must become orange)
. After some time of inactivity encoder's mode will
Ver. 1.2
2011.06.16
Page 27 of 38
7.3. Adjusting Color Doppler (CFM, PDI) Mode Controls
7.3.1. Softmenu Controls
Color Doppler (CFM/PDI) mode softmenu allows to control the following scanning parameters: Pulse
Repetition Frequency (PRF), Dynamic Range (only for PDI mode), Color Map, Invert Map, Power, Lines
Density, Packet Size, Pulse Length, Color Averaging, B/Color Priority.
7.3.2. Color Doppler Window Position
In Color Doppler mode default function of trackball is adjustment of Color Doppler window position.
In order to change position, rotate trackball, observe movement of Color Doppler window on the ultrasound
image, stop rotating trackball. Scanning with newly selected window position is started when trackball is not
rotated for some time. If trackball is not in its default mode, click "Trackball" button
in order to set
trackball to its default mode and after that rotate trackball in order to change Color Doppler window position.
TELEMED
LB2 Ultrasound Keyboard User Manual
Ver. 1.2
2011.06.16
Page 28 of 38
7.3.3. Color Doppler Window Size
In order to change the size of Color Doppler window, click "Window Size"/"Second Measurement"
button
. This will change trackball's mode. After that rotate trackball left/right and down/up in order
to decrease/increase horizontal and vertical size of Color Doppler window. Ultrasound scanning with newly
selected window size will be started when for some time trackball will not be rotated. In order to change
trackball's mode to window positioning, click "Trackball" button
.
7.3.4. Gain
In order to change gain value, rotate multifunctional Doppler mode encoder
. Make
sure that encoder's mode is "Gain" (is turned on appropriate indicator
). If indicator is not turned on,
click encoder in order to make it turn on and after that rotate encoder in order to change gain value.
If ultrasound scanning is performed in combined mode (e.g., B+CFM+PW) and you want to change
the function of multifunctional encoders and softmenu, this can be done by clicking "Softmenu mode" button
. If will be visible CFM mode softmenu, then multifunctional encoder will control CFM mode parameters.
If will be visible PW mode softmenu, then multifunctional encoder will control PW mode parameters.
7.3.5. Pulse Repetition Frequency (PRF)
In order to change pulse repetition frequency, click "Pulse Repetition Frequency (PRF)" button
(its color must become orange) and immediately after that rotate encoder
inactivity encoder's mode will automatically be changed to Gain mode.
TELEMED
LB2 Ultrasound Keyboard User Manual
Ver. 1.2
. After some time of
2011.06.16
Page 29 of 38
7.3.6. Steering Angle
In order to change steering angle, click "Steering Angle" button
orange) and immediately after that rotate encoder
mode will automatically be changed to Gain mode.
(its color must become
. After some time of inactivity encoder's
7.3.7. Baseline
In order to change baseline value, click encoder
in order to change its mode to
"Baseline". Appropriate indicator must become turned on
. Immediately after that rotate encoder in order
to change baseline value. After some time of inactivity encoder's mode will automatically be changed to Gain
mode.
7.3.8. Frequency
In order to change frequency, repeatedly click "Frequency" button
frequency from the list, next click will select first frequency from the list.
. When is reached last
7.3.9. Automatical Image Optimization
In order to invoke automatical image optimization, click "Automatical Image Optimization"
button. Software will adjust Color Doppler Gain.
TELEMED
LB2 Ultrasound Keyboard User Manual
Ver. 1.2
2011.06.16
Page 30 of 38
7.4. Adjusting Pulsed Wave (PW) Doppler Mode Controls
7.4.1. Softmenu Controls
PW mode softmenu allows to control the following scanning parameters: Power, Wall Filter, Color
Map, Invert Map, Frequency, Scale, Sample Volume (SVL) Size, Invert, Dynamic Range.
7.4.2. Sample Volume Position
In B+PW (B+CFM+PW) mode default function of trackball is adjustment of PW sample volume
position. In order to change position, rotate trackball, observe movement of PW sample volume position on
the ultrasound image, stop rotating trackball. Scanning with newly selected PW sample volume position is
started when trackball is not rotated for some time. If trackball is not in its default mode, click "Trackball"
button
in order to set trackball to its default mode and after that rotate trackball in order to change PW
sample volume position.
In order to change the size of PW sample volume, use "SVL Size" softmenu encoder.
PW-line position also can be changed by rotating encoder
. Please make sure that
appropriate encoder's indicator
is turned on. If indicator is not turned on, click encoder in order to make
it turn on. That is, change encoder's mode to PW-line positioning.
TELEMED
LB2 Ultrasound Keyboard User Manual
Ver. 1.2
2011.06.16
Page 31 of 38
7.4.3. Gain
In order to change gain value, rotate multifunctional Doppler mode encoder
. Make
sure that encoder's mode is "Gain" (is turned on appropriate indicator
). If indicator is not turned on,
click encoder in order to make it turn on and after that rotate encoder in order to change gain value.
If ultrasound scanning is performed in combined mode (e.g., B+CFM+PW) and you want to change
the function of multifunctional encoders and softmenu, this can be done by clicking "Softmenu mode" button
. If will be visible CFM mode softmenu, then multifunctional encoder will control CFM mode parameters.
If will be visible PW mode softmenu, then multifunctional encoder will control PW mode parameters.
7.4.4. Pulse Repetition Frequency (PRF)
In order to change pulse repetition frequency, click "Pulse Repetition Frequency (PRF)" button
(its color must become orange) and immediately after that rotate encoder
.
7.4.5. Steering Angle
In order to change steering angle, click "Steering Angle" button
orange) and immediately after that rotate encoder
(its color must become
.
7.4.6. Baseline
In order to change baseline value, click encoder
"Baseline". Appropriate indicator must become turned on
to change baseline value.
TELEMED
LB2 Ultrasound Keyboard User Manual
in order to change its mode to
. Immediately after that rotate encoder in order
Ver. 1.2
2011.06.16
Page 32 of 38
7.4.7. Correction Angle
In order to change correction angle value, click encoder
to "Correction Angle". Appropriate indicator must become turned on
encoder in order to change correction angle value.
in order to change its mode
. Immediately after that rotate
7.4.8. Sweep Speed
In order to change sweep speed, click "Sweep Speed" button
and immediately after that rotate encoder
(its color must become orange)
.
7.4.9. Sound Volume
In order to adjust sound volume, click "Sound Volume" buttons
7.4.10.
.
Automatical Image Optimization
In order to invoke automatical image optimization, click "Automatical Image Optimization"
button. Software will adjust PW PRF, Invert and Baseline.
7.4.11.
Automatical Trace
When PW mode scanning is in progress (running), you can click secondary measurement tool button
in order to add automatically detected PW trace.
TELEMED
LB2 Ultrasound Keyboard User Manual
Ver. 1.2
2011.06.16
Page 33 of 38
8. Using Thumbnail Images
When ultrasound scanning is running, panel with thumbnail images can be shown/hidden by clicking
"Thumbnails" button
.
Every time when ultrasound scanning is fully frozen by clicking "Freeze/Run" button
,
software stores single frame of last visible ultrasound data. New images are added at the left side of
thumbnail images panel.
In order to load thumbnail image, perform the following actions:
1. If ultrasound image is not frozen, freeze it by clicking "Freeze/Run" button
.
2. Click "Thumbnails" button
.
3. Rotate "Thumbnails" encoder in order to select desired thumbnail image. Observe markers at thumbnail
image corners inside thumbnails panel.
4. Click "Thumbnails" encoder in order to open selected thumbnail image. Last opened (visible) image is
indicated by green markers at thumbnail image corners inside thumbnail images panel.
5. Optionally, perform post-processing of opened thumbnail image (image enhancement, gamma correction,
brightness, contrast adjustment).
6. Optionally, perform measurements, calculations.
7. Optionally, print or save current image.
8. Optionally, perform steps 3-7 in order to process other thumbnail images.
9. Start ultrasound scanning by clicking "Freeze/Run" button
.
Thumbnail images are deleted when is changed probe or selected new patient.
Please note that thumbnail stores and loads all ultrasound scanning parameters of all modes (like
during preset saving), no matter what mode was used during thumbnail creation. That is, even if thumbnail is
created in B mode, it will also store and load parameters of all available modes (B, M, CFM, PDI, DPDI, PW).
TELEMED
LB2 Ultrasound Keyboard User Manual
Ver. 1.2
2011.06.16
Page 34 of 38
9. Using Measurements, Calculations, Body Marks, Annotations, Biopsy
Markers
When ultrasound scanning is frozen, right-side "Measurements" and "Calculations" ControlBars can
be opened by clicking "Measurements" button
. First click opens "Measurements" ControlBar,
second click opens "Calculations" ControlBar.
Two pre-defined general measurement tools can be selected using ultrasound keyboard buttons
"First measurement tool"
and "Second measurement tool"
. In B or Color Doppler mode
these buttons select "Distance" and "Area" measurement tools. In M mode these buttons select "Distance"
and "Heart Rate" tools. In PW mode these buttons select "Distance" and "Trace" tools. If in PW mode
ultrasound scanning is running, clock of "Second measurement tool"
button adds automatical PW
trace.
Other operations (selection of measurement tools and their options, selection of calculation fields) in
these ControlBars must be performed using mouse and its left button.
All painted measurement objects are deleted using "Delete All" button
.
When ultrasound scanning is frozen, right-side "Body Marks", "Annotations" and "Biopsy"
ControlBars can be opened by clicking "Body Marks" button
. First click opens "Body Marks"
ControlBar, second click opens "Annotations" ControlBar, and third click opens "Biopsy" ControlBar. Further
operations in these ControlBars must be performed using mouse and its left button.
All painted annotations (arrows, texts) are deleted using "Delete All" button
.
If left-side and right-side ControlBars are configured as autohide, they can be hidden by clicking with
right mouse button on their headers or by clicking "Trackball" button
TELEMED
LB2 Ultrasound Keyboard User Manual
Ver. 1.2
.
2011.06.16
Page 35 of 38
10.
Saving, Printing and Loading of Images
In order to save image, click "Save" button
that performs image saving operation ("Image
Quick Save", "Image Save As…", "Cine Quick Save", "Cine Save As…") that was last used in "Echo Wave II"
software (corresponding button at bottom ToolBar).
In order to print image, click "Print" button
that performs image printing operation ("Image
Quick Print", "Image Print Preview…", "Image Print…") that was last used in "Echo Wave II" software
(corresponding button at bottom ToolBar).
In order to print/save/view report, click "Report" button
that performs report operation ("Report
Quick Print", "Report Print Preview…", "Report Print…", "Report Quick Save", "Report Save As…", "Import
Ultrasound Data…", "Report…") that was last used in "Echo Wave II" software (corresponding button at
bottom ToolBar).
In order to load previously saved ultrasound image or cine, click "Open" button
"File Open" dialog and allows to select desired file and open it.
TELEMED
LB2 Ultrasound Keyboard User Manual
Ver. 1.2
2011.06.16
that shows
Page 36 of 38
11.
References
1. Echo Wave II Software User Manual.
File: "EchoWaveII_Software_User_Manual.*".
TELEMED
LB2 Ultrasound Keyboard User Manual
Ver. 1.2
2011.06.16
Page 37 of 38
12.
Revision History
Revision
1.0
1.1
1.2
Revision Date
2010.11.02
2011.04.27
2011.06.16
Description of Revision
Initial release.
Added more information about Doppler Gain adjustment.
Added section "Quad mode (4B)", updated information
about Dual (B+B) mode, added information how to hide
ControlBars.
TELEMED
LB2 Ultrasound Keyboard User Manual
Ver. 1.2
2011.06.16
Revision Author
V.Perlibakas
V.Perlibakas
V.Perlibakas
Page 38 of 38