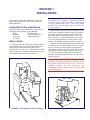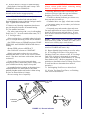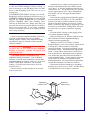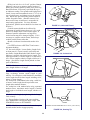
1
I-EC-351B
Installation, Setup
and Operation
INSTRUCTIONS
IL-2460
for
SUNNEN POWER STROKED HONING MACHINE
Model: EC-3500
READ THE FOLLOWING INSTRUCTIONS THOROUGHLY AND CAREFULLY BEFORE UNPACKING,
INSPECTING, OR INSTALLING THE SUNNEN POWER STROKED HONINGMACHINE.
SUNNEN PRODUCTS COMPANY • 7910 MANCHESTER AVENUE • ST. LOUIS, MO 63143, U.S.A. • PHONE: 314-781-2100
GENERAL INFORMATION
The Sunnen equipment has been designed and engineered for a wide variety of parts within the capacity and limitation of the equipment. With proper care
and maintenance this equipment will give years of service.
READ THE FOLLOWING INSTRUCTIONS CAREFULLY AND THOROUGHLY BEFORE UNPACKING, INSPECTING, OR INSTALLING THIS EQUIPMENT.
IMPORTANT: Read any supplemental instructions BEFORE installing this equipment. These supplemental instructions give you important information to
assist you with the planning and installation of your Sunnen equipment.
Sunnen Technical Service Department is available to provide telephone assistance for installation, programming, & troubleshooting of your Sunnen
equipment. All support is available during normal business hours, 8:00 AM to 4:30 PM Central Time.
Review all literature provided with your Sunnen equipment. This literature provides valuable information for proper installation, operation, and maintenance
of your equipment. Troubleshooting information can also be found within the Instructions. If you cannot find what you need, call for technical support.
Where applicable, programming information for your Sunnen equipment is also included. Most answers can be found in the literature packaged with your
equipment.
Help us help you. When ordering parts, requesting information, or technical assistance about your equipment, please have the following
information available:
• Have ALL MANUALS on hand. The Customer Services Representative or Technician will refer to it.
• Have Model Number and Serial Number printed on your equipment Specification Nameplate.
• Where Applicable: Have Drive model and all nameplate data. Motor type, brand, and all nameplate data.
For Troubleshooting, additional information may be required:
• Power distribution information (type - delta, wye, power factor correction; other major switching devices used, voltage fluctuations)
• Installation Wiring (separation of power & control wire; wire type/class used, distance between drive and motor, grounding).
• Use of any optional devices/equipment between the Drive & motor (output chokes, etc.).
For fast service on your orders call:
Sunnen Automotive Customer Service toll free at: 1-800-772-2878
Sunnen Industrial Customer Service toll free at: 1-800-325-3670
Customers outside the USA, contact your local authorized Sunnen Distributor.
Additional information available at: http://www.sunnen.com or e-mail: [email protected]
NOTE: Sunnen reserves the right to change or revise specifications and product design in connection with any feature of our products contained herein.
Such changes do not entitle the buyer to corresponding changes, improvements, additions, or replacements for equipment, supplies or accessories
previously sold. Information contained herein is considered to be accurate based on available information at the time of printing. Should any discrepancy of
information arise, Sunnen recommends that user verify the discrepancy with Sunnen before proceeding.
ESD PREVENTION REVIEW
Let's review the basics of a sound static control system and its effective implementation. First, in the three step plan:
1.
Always ground yourself when handling sensitive components or assemblies.
2.
Always use a conductive or shielded container during storage or transportation. These materials create a Faraday
cage which will isolate the contents from static charges.
3.
Open ESD safe containers only at a static safe work station.
At the static safe work station, follow these procedures before beginning any work:
A.
Put on your wrist strap or foot grounding devices.
B.
Check all grounding cords to make sure they are properly connected to ground, ensuring the effective dissipation of static charges.
C.
Make sure that your work surface is clean and clear of unnecessary materials, particularly common plastics.
D.
Anti-static bubble wrap has been included for use at the machine when an ESD safe workstation is not available.
You are now properly grounded and ready to begin work. Following these few simple rules and using a little common sense will go a long
way toward helping you and your company in the battle against the hazards of static electricity. When you are working with ESD sensitive devices, make sure you:
GROUND
ISOLATE
NEUTRALIZE
SUNNEN LIMITED PRODUCT WARRANTY
Sunnen Products Company and its subsidiaries (SPC) warrant that all new SPC honing machines, gaging equipment, tooling, and related equipment will be
free of defects in material and/or workmanship for a period of one year from the date of original shipment from SPC.
Upon prompt notification of a defect during the one-year period, SPC will repair, replace, or refund the purchase price, with respect to parts that prove to be
defective (as defined above). Any equipment or tooling which is found to be defective from improper use will be returned at the customer's cost or repaired
(if possible) at customer's request. Customer shall be charged current rates for all such repair.
Prior to returning any SPC product, an authorization (RMA#) and shipping instructions must be obtained from the Customer Service Department or items
sent to SPC will be returned to the customer.
Warranty Limitations and Exclusions This Warranty does not apply to the following:
• Normal maintenance items subject to wear and tear: (belts, fuses, filters, etc).
• Damages resulting from but not limited to:
› Shipment to the customer (for items delivered to customer or customer's agent F.O.B., Shipping Point)
› Incorrect installation including improper lifting, dropping and/or placement
› Incorrect electric power (beyond +/- 10% of rated voltage) including intermittent or random voltage spikes or drops
› Incorrect air supply volume and/or pressure and/or contaminated air supply
› Electromagnetic or radio frequency interference from surrounding equipment (EMI, RFI)
› Storm, lightning, flood or fire damage
› Failure to perform regular maintenance as outlined in SPC manuals
› Improper machine setup or operation causing a crash to occur
› Misapplication of the equipment
› Use of non-SPC machines, tooling, abrasive, fixturing, coolant, repair parts, or filtration
› Incorrect software installation and/or misuse
› Non-authorized customer installed electronics and/or software
› Customer modifications to SPC software
THE LIMITED WARRANTY DESCRIBED HEREIN IS EXPRESSLY IN LIEU OF ALL ANY OTHER WARRANTIES. SPC MAKES NO REPRESENTATION OR WARRANTY OF ANY
OTHER KIND, EXPRESS OR IMPLIED, WHETHER AS TO MERCHANTABILITY, FITNESS FOR A PARTICULAR PURPOSE OR ANY OTHER MATTER. SPC IS NOT
RESPONSIBLE FOR THE IMPROPER USE OF ANY OF ITS PRODUCTS. SPC SHALL NOT BE LIABLE FOR DIRECT, INDIRECT, INCIDENTAL, OR CONSEQUENTIAL
DAMAGES INCLUDING BUT NOT LIMITED TO: LOSS OF USE, REVENUE, OR PROFIT. SPC ASSUMES NO LIABILITY FOR PURCHASED ITEMS PRODUCED BY OTHER
MANUFACTURERS WHO EXTEND SEPARATE WARRANTIES. REGARDLESS OF ANY RIGHTS AFFORDED BY LAW TO BUYER, SPC's LIABILITY, IF ANY, FOR ANY AND
ALL CLAIMS FOR LOSS OR DAMAGES WITH RESPECT TO THE PRODUCTS, AND BUYER'S SOLE AND EXCLUSIVE REMEDY THEREFORE, SHALL IN ALL EVENTS BE
LIMITED IN AMOUNT TO THE PURCHASE PRICE OF THAT PORTION OF THE PRODUCTS WITH RESPECT TO WHICH A VALID CLAIM IS MADE.
Shipping Damages
Except in the case of F.O.B., Buyer's destination shipments, SPC will not be liable for any settlement claims for obvious and/or concealed shipping damages.
The customer bears the responsibility to unpack all shipments immediately and inspect for damage. When obvious and/or concealed damage is found, the
customer must immediately notify the carrier's agent to make an inspection and file a claim. The customer should retain the shipping container and packing
material.
SUNNEN SOFTWARE LICENSE AGREEMENT
This document is a Legal Agreement between you, as user and licensee (Licensee), and Sunnen Products Company (SPC) with respect to preprogrammed
software (Software) provided by SPC for use on SPC Equipment. By using the Software, you, as Licensee, agree to become bound by the terms of this
Agreement.
In consideration of payment of the license fee (License Fee) which is part of the price evidenced by your receipt (Receipt), SPC grants to you as Licensee
a non-exclusive right, without right to sub-license, to use the particular copy of the SPC Software licensed hereunder only on the particular equipment sold with
the Software. SPC reserves all rights including rights not otherwise expressly granted, and retain title and ownership to the Software including all subsequent copies or updates in any media. The Software and all accompanying written materials are covered by copyrights owned by SPC. If supplied on
removable media (floppy disk), you, as Licensee, may copy the Software only for back up purposes; or you may request that SPC copy the Software for you
for the same purposes. All other copying of the Software or of the accompanying written materials is expressly forbidden and is in violation of the Agreement.
The Software and accompanying written materials (including the user's manual, if any) are provided in an "as is" condition without warranty of any kind
including the implied warranties of merchantability and fitness for a particular purpose, even if SPC has been advised of this purpose. SPC specifically does
not warrant that it will be liable as a result of the operation of the Software for any direct, indirect, consequential or accidental damages arising out of the
use of or inability to use such product even if SPC has been advised of the possibility of such use. It is recognized that some states do not allow the exclusion or limitation of liability for consequential or accidental damages and to the extent this is true, the above limitations may not apply.
Any alteration or reverse engineering of the software is expressly forbidden and is in violation of this agreement.
SPC reserves the right to update the software covered by this agreement at any time without prior notice and any such updates are covered by this
agreement.
SAFETY INSTRUCTIONS
READ FIRST
This machine, like any equipment, may be dangerous if used improperly. Please
read all warnings and instructions before attempting to use this machine.
Always disconnect power at main enclosure before servicing machine.1
Always wear eye protection when operating this machine.
NEVER open or remove any machine cover or protective guard with power "ON."
Always disconnect power at main enclosure before servicing this equipment.1
DO NOT attempt any repair or maintenance procedure beyond those described in
this book. Contact your Sunnen Field Service Engineer or Technical Services
Representative for repairs not covered in these instructions.
Due to the wide variety of machine configurations, all possibilities cannot be
described in these instructions. Instructions for safe use and maintenance of
optional equipment ordered through Sunnen, will be provided through separate
documentation and/or training provided by your Sunnen Field Service Engineer or
Technical Services Representative.
DO NOT attempt to defeat any safety device on this machine or on any of the
optional equipment.
If specially built automation components are added to this system, be sure that
safety is not compromised. If necessary, obtain special enlarged work area safety
system from Sunnen Products Co.
Indicates CE version ONLY.
1
DO NOT touch electrical components until main input power has been turned off and CHARGE
lamps are extinguished. WARNING: The capacitors are still charged and can be quite dangerous.
iv
TABLE OF CONTENTS
Page
TABLE OF CONTENTS . . . . . . . . . . . . . . . . . . . . . . . . . . . . . . . . . . . . . . . . . . . . . . . . . . . . . . . . . . . . . v
LIST OF ILLUSTRATIONS . . . . . . . . . . . . . . . . . . . . . . . . . . . . . . . . . . . . . . . . . . . . . . . . . . . . . . . . . . v
GENERAL INFORMATION & SPECIFICATIONS . . . . . . . . . . . . . . . . . . . . . . . . . . . . . . . . . . . . . . . vi
INTRODUCTION . . . . . . . . . . . . . . . . . . . . . . . . . . . . . . . . . . . . . . . . . . . . . . . . . . . . . . . . . . . . . . . . . vi
INSTALLATION
Purpose . . . . . . . . . . . . . . . . . . . . . . .
Tools & Materials . . . . . . . . . . . . . . .
Installation . . . . . . . . . . . . . . . . . . . .
Electrical . . . . . . . . . . . . . . . . . . . . .
Conversion . . . . . . . . . . . . . . . . . . . .
Pneumatics . . . . . . . . . . . . . . . . . . . .
Coolant System . . . . . . . . . . . . . . . . .
Opto-Electronic Screen Installation
Automatic Size Control . . . . . . . . . . .
Side Tray . . . . . . . . . . . . . . . . . . . . .
.
.
.
.
.
.
.
.
.
.
.
.
.
.
.
.
.
.
.
.
.
.
.
.
.
.
.
.
.
.
.
.
.
.
.
.
.
.
.
.
.
.
.
.
.
.
.
.
.
.
.
.
.
.
.
.
.
.
.
.
.
.
.
.
.
.
.
.
.
.
.
.
.
.
.
.
.
.
.
.
.
.
.
.
.
.
.
.
.
.
.
.
.
.
.
.
.
.
.
.
.
.
.
.
.
.
.
.
.
.
.
.
.
.
.
.
.
.
.
.
.
.
.
.
.
.
.
.
.
.
.
.
.
.
.
.
.
.
.
.
.
.
.
.
.
.
.
.
.
.
.
.
.
.
.
.
.
.
.
.
.
.
.
.
.
.
.
.
.
.
.
.
.
.
.
.
.
.
.
.
.
.
.
.
.
.
.
.
.
.
.
.
.
.
.
.
.
.
.
.
.
.
.
.
.
.
.
.
.
.
.
.
.
.
.
.
.
.
.
.
.
.
.
.
.
.
.
.
.
.
.
.
.
.
.
.
.
.
.
.
.
.
.
.
.
.
.
.
.
.
.
.
.
.
.
.
.
.
.
.
.
.
.
.
.
.
.
.
.
.
.
.
.
.
.
.
.
.
.
.
.
.
.
.
.
.
.
.
.
.
.
.
.
.
.
.
.
.
.
.
.
.
.
.
.
.
.
.
.
.
.
.
.
.
.
.
.
.
.
.
.
.
.
.
.
.
.
.
.
.
.
.
.
.
.
.
.
.
.
.
.
.
.
.
.
.
.
.
.
.
.
.
.
.
.
.
.
.
.
.
.
.
.
.
.
.
.
.
.
.
.
.
.
.
.
.
.
.
.
.
.
.
.
.
.
.
.
.
.
.
.
.
.
.
.
.
.
.
.
.
.
.
.
.
.
.
.
.
.
.
.
.
.
.
.
.
.
.
.
.
.
.
.
.
.
.
.
.
.
.
.
.
.
.
.
.
.
.
.
.
.
.
.
.
.
.
.
.
.
.
.
.
.
.
.
.
.
.
.
.
.
.
.
.
.
.
.
.
.
.
.
.
.
.
.
.
.
.
.
.
.
.
.
.
.
.
.
.
.
.
.
.
.
.
.
.
.
.
.
.
.
.
.
.
.
.
.
.
.
.
.
.
.
.
.
.
.
.
.
.
1
1
1
2
2
3
4
5
6
7
PREPARING FOR OPERATION
General . . . . . . . . . . . . . . . . . . . . . . . . . . . . . . . . . . . . . . . . . . . . . . . . . . . . . . . . . . . . . . . . . . . . . . . . . . . 9
Major Components . . . . . . . . . . . . . . . . . . . . . . . . . . . . . . . . . . . . . . . . . . . . . . . . . . . . . . . . . . . . . . . . . . 9
Operator Controls . . . . . . . . . . . . . . . . . . . . . . . . . . . . . . . . . . . . . . . . . . . . . . . . . . . . . . . . . . . . . . . . . . . 9
SETUP & OPERATION . . . . . . .
General . . . . . . . . . . . . . . . . . . . . .
Safety Precuations . . . . . . . . . . . . .
Operating Tips . . . . . . . . . . . . . . .
Manual Honing - Setup . . . . . . . . .
Manual Honing - Operation . . . . . .
Power Stroked Honing - Setup . . . .
Power Stroked Honing - Operation
.
.
.
.
.
.
.
.
.
.
.
.
.
.
.
.
.
.
.
.
.
.
.
.
.
.
.
.
.
.
.
.
.
.
.
.
.
.
.
.
.
.
.
.
.
.
.
.
.
.
.
.
.
.
.
.
.
.
.
.
.
.
.
.
.
.
.
.
.
.
.
.
.
.
.
.
.
.
.
.
.
.
.
.
.
.
.
.
.
.
.
.
.
.
.
.
.
.
.
.
.
.
.
.
.
.
.
.
.
.
.
.
.
.
.
.
.
.
.
.
.
.
.
.
.
.
.
.
.
.
.
.
.
.
.
.
.
.
.
.
.
.
.
.
.
.
.
.
.
.
.
.
.
.
.
.
.
.
.
.
.
.
.
.
.
.
.
.
.
.
.
.
.
.
.
.
.
.
.
.
.
.
.
.
.
.
.
.
.
.
.
.
.
.
.
.
.
.
.
.
.
.
.
.
.
.
.
.
.
.
.
.
.
.
.
.
.
.
.
.
.
.
.
.
.
.
.
.
.
.
.
.
.
.
.
.
.
.
.
.
.
.
.
.
.
.
.
.
.
.
.
.
.
.
.
.
.
.
.
.
.
.
.
.
.
.
.
.
.
.
.
.
.
.
.
.
.
.
.
.
.
.
.
.
.
.
.
.
.
.
.
.
.
.
.
.
.
.
.
.
.
.
.
.
.
.
.
.
.
.
.
.
.
.
.
.
.
.
.
.
.
.
.
.
.
.
.
.
.
.
.
.
.
.
.
.
.
.
.
.
.
.
.
.
.
.
.
.
.
.
.
.
.
.
.
.
.
.
.
.
.
.
.
.
.
.
.
.
.
.
.
.
.
.
.
.
.
.
.
.
.
.
.
.
.
.
.
.
.
.
.
.
.
.
.
.
.
.
.
.
.
.
.
.
.
.
.
.
.
.
.
.
.
.
.
.
.
.
.
.
.
.
.
.
13
13
13
13
13
15
16
25
ROUTINE MAINTENANCE
General . . . . . . . . . . . . . . . . . . . . . . . . . . . . . . . . . . . . . . . . . . . . . . . . . . . . . . . . . . . . . . . . . . . . . . . . . . 27
Lubrication . . . . . . . . . . . . . . . . . . . . . . . . . . . . . . . . . . . . . . . . . . . . . . . . . . . . . . . . . . . . . . . . . . . . . . . 27
Routine Maintenance Schedule . . . . . . . . . . . . . . . . . . . . . . . . . . . . . . . . . . . . . . . . . . . . . . . . . . . . . . . . 27
TROUBLESHOOTING
General . . . . . . . . . . . . . . . . . . . . . . . . . . . . . . . . . . . . . . . . . . . . . . . . . . . . . . . . . . . . . . . . . . . . . . . . . . 31
Operational Troubleshooting . . . . . . . . . . . . . . . . . . . . . . . . . . . . . . . . . . . . . . . . . . . . . . . . . . . . . . . . . . 31
Machine Operation Troubleshooting . . . . . . . . . . . . . . . . . . . . . . . . . . . . . . . . . . . . . . . . . . . . . . . . . . . . 32
APPENDIXES
A
B
C
D
Special Topics . . . . . . . . . . . . .
General Honing Information . . .
Coolant Flow Diagram . . . . . . .
Coolant System Troubleshooting
.
.
.
.
.
.
.
.
.
.
.
.
.
.
.
.
.
.
.
.
.
.
.
.
.
.
.
.
.
.
.
.
.
.
.
.
.
.
.
.
.
.
.
.
.
.
.
.
.
.
.
.
.
.
.
.
.
.
.
.
v
.
.
.
.
.
.
.
.
.
.
.
.
.
.
.
.
.
.
.
.
.
.
.
.
.
.
.
.
.
.
.
.
.
.
.
.
.
.
.
.
.
.
.
.
.
.
.
.
.
.
.
.
.
.
.
.
.
.
.
.
.
.
.
.
.
.
.
.
.
.
.
.
.
.
.
.
.
.
.
.
.
.
.
.
.
.
.
.
.
.
.
.
.
.
.
.
.
.
.
.
.
.
.
.
.
.
.
.
.
.
.
.
.
.
.
.
.
.
.
.
.
.
.
.
.
.
.
.
.
.
.
.
.
.
.
.
.
.
.
.
.
.
.
.
.
.
.
.
.
.
.
.
35
43
49
51
GENERAL INFORMATION & SPECIFICATIONS
Sunnen Power Stroked Honing Machines - Model EC-3500
Diameter Range (I.D.) Manual Stroking:
Power Stroking:
Range of Standard Probes for Automatic Sizing:
Stroke Length:
Spindle Speeds:
Stroke Rate:
Spindle Motor:
Stroker Motor:
Feed System Type (Patented Constant
Feed Force System with):
Size Control:
Pump Motor:
Coolant Pump:
Coolant Capacity:
Coolant Requirements:
Floor Space Deep:
Wide:
Height:
Color:
Machine Weight (Less Coolant Cart):
Coolant Cart Weight (Dry):
Pneumatic Requirements:
Power Requirements:
Voltage:
Maximum Current Load:
Noise Emission:
1.5 - 165 mm (.060 - 6.5")
1.5 - 100 mm (.060 - 3.94")
3.1 - 51 mm (.125 - 2.0")
6 - 170 mm (.24 - 6.7")
200-3000 rpm - Variable in fine increments
60-500 strokes / min - Variable in fine increments
4.0 KW (5.5HP)
1.1 KW (1.5HP)
- Two-Stage Feed Force (Roughing &Finishing in 1-cycle)
- Variable Maximum Feed Rate Regulator
- Automatic Stonewear Compensator
Zero Shut-Off or Automatic Size Control (ASC)
Coolant System (Roll Out Coolant Cart with):
- Integral Work Area Drip Tray
- Pump
- Filtration System
.18 KW (1/4HP)
5.6 L/Min (1.5 GPM)
120 L (32 Gal.)
Sunnen Industrial Honing Fluids
1.6 m (64")
1.2 m (44")
1.9 m (75") with covers open
Pearl Gray / Pewter Gray / Burgundy Trim
725 kg (1600 lbs.)
125 kg (275 lbs.)
0.55 MPa (80 PSI)
EC-3500D
EC-3500E
208 - 230 v
380 - 460 v
3 Phase
3 Phase
50/60 Hz
50/60 Hz
30 A
16 A
Less than 72 db(A) continuous
Less than 74 db(A) peak
load (max. noise) condition in a typical factory environment.
INTRODUCTION
This Instruction Manual provides information required to install, operate, and maintain Sunnen EC-3500
Power Stroked Honing Machine.
When ordering parts for, or requesting information about your Machine, include model and serial numbers,
located on Electrical Enclosure of your Machine.
In this book symbol
indicates steps or information that are only for CE version of this machine. The CE
version is constructed to meet highest level of safety standards as required by European Machinery Directive.
Required for European market, this CE version is available for any customer. The regular version of this machine
is quite safe for any operator exercising a normal degree of caution associated with machine tool use. The CE
version provides an extra level of protection by minimizing risks of operator carelessness.
READ THE FOLLOWING INSTRUCTIONS CAREFULLY AND THOROUGHLY BEFORE UNPACKING,
INSPECTING, OR INSTALLING THE SUNNEN POWER STROKED HONING MACHINE.
The EC-3500 Production Honing Machine is to be used for finishing bores in small workpieces. In finishing
bores, this machine can achieve any or all of following results: fast stock removal, consistent final size, a
high degree of cylindricity, fine surface finish. To achieve best results and ensure safe operation, ONLY
Sunnen Tools and Abrasives are to be used in EC-3500.
vi
SECTION 1
INSTALLATION
PURPOSE
CAUTION
Foot Pedal and its conduit to machine are located
loosely in front opening of machine. Be careful not
to pinch conduit with forks. Place Foot Pedal
assembly on a fork so that it does not drag when
moving machine.
Consult this section when unpacking, inspecting,
and installing Sunnen EC-3500 Power Stroked
Honing Machine.
SUGGESTED TOOLS & MATERIALS
The following tools and materials are required for
unpacking and installing of your Machine:
Knife
Hex Wrenches
Hammer
Open End Wrenches
Crow Bar
Cleaning Solvent
Tin Snips
2. After machine is placed in desired location, it will
be necessary to stabilize machine with screw located
on bottom of right rear corner of machine base. For
best results place a small block of steel, 5 to 8 mm
thick (3/16 to 5/16"), under stabilizing screw. Adjust
screw until machine cannot be made to rock on two
corners. Then tighten jam nut to lock screw in place.
3. Remove any packing materials from outside and
inside machine. To open machine covers use a 4mm
hex key wrench to release quarter turn latch near
rear corner of each cover. Place hood prop securely
into bracket on hood to hold it open (see Figure 1-2).
4. After removing packing material from inside
machine, close both hoods and make sure hoods are
latched securely.
INSTALLATION
1. To lift and move EC-3500, fork only from front or
rear of machine. Place one fork under machine base
and one under electrical enclosure but close to
machine base (see Figure 1-1.). (Structural steel under
electrical enclosure is welded to machine base to prevent actually lifting machine by enclosure.)
WARNING
Hoods do not need to be opened for setup. Never
have hoods open when power is on. Access to
internal systems is only necessary for
maintenance which should only be done with
power turned off.
FIGURE 1-1, Placement of Forks for Lifting
FIGURE 1-2, Hood Prop
1
ELECTRICAL POWER SUPPLY
1. Connect Electrical Supply Cord and Oil Tight
Fitting (not supplied) to Machine as follows (see
Figure 1-3):
ELECTRICAL
DISCONNECT
BLOCK
NOTE: Model EC-3500D requires a #10/4, Type
SJO or SO, 600V (6.0mm2) electrical supply cord.
(This machine requires 208 or 230 V, 3 phase, 50 or
60 Cycle Power. Maximum current load is 30 amp.)
Model EC-3500E requires a #12/4, Type SJO or SO,
600V (3.5mm2) electrical supply cord. (This
machine requires 380/400/460 V, 3 phase, 50 or 60
Cycle Power. Maximum current load is 16 amp.)
CAUTION
Do not attempt to connect machine if supply voltage
is not within following acceptable limits:
Model EC-3500D: between 200 and 255 V
Model EC-3500E: between 380 and 480 V
If supply voltage is not within these limits
MACHINE WILL BE DAMAGED.
FIGURE 1-3, Electrical Connection
Machine ConveRSion
2. Verify supply voltage is same as voltage on
ELECTRICAL SPECIFICATION PLATE.
Conversion of machine to a different voltage than
stated on Electrical Specification Plate.
NOTE: If supply voltage does not match voltage
stated on Electrical Specification Plate but is within
acceptable limits, electrical connection can proceed but
Machine Conversion below will be necessary.
CAUTION
Do not attempt to convert machine to a voltage
outside acceptable limits given above.
3. Unlock doors to Electrical Control Enclosure,
using key supplied with machine. Door to Enclosure
is equipped with Key-Lock Safety Latches.
4. Turn Master ON/OFF Switch to OFF position
and open doors. (Doors will not open unless Master
ON/OFF Switch is in OFF position.)
5. Insert Electrical Supply Cord through Entrance
Hole and Oil Tight Fitting.
6. Route to Electrical Disconnect Block (see Figure 3).
7. Strip 250mm (10") off cable’s outer jacket.
8. Strip 6mm (1/4") of insulation off each wire.
9. Connect Green Wire (GRN) to Ground Terminal PE.
10. Connect other three wires to Electrical
Disconnect Block.
11. Route and secure cord inside of Enclosure.
Tighten Oil Tight Fitting.
12. Close and lock Door to Electrical Control
Enclosure
13. Route and connect Electrical Supply Cord to
power source.
1.
2.
3.
4.
Turn disconnect at machine off.
Verify Coolant Cart is not installed.
Open Electrical Control Enclosure.
Set Overload (1OL) to:
1.6 A (for 208 V supply)
0.9 A (for 380 V supply)
360÷voltage (for other voltages)
5. Use a wrench to turn shaft of Main Disconnect
Switch a quarter turn clockwise to ON position.
WARNING
Power is now on inside Enclosure. Only touch key
pad of DRIVE as instructed.
NOTE: Remaining steps in Machine Conversion
Procedure depend on brand of drives that are in your
machine. Identify brand of drives and then follow
appropriate section below:
Saftronics or Magnetek GPD-515 Drives:
This procedure gives step-by-step instructions on
configuring a GPD-515 drive, in a EC-3500 low
voltage machine, so that it can operate at 208V.
When a EC-3500 low voltage machine leaves factory, it is programmed to operate at 230V.
Complete steps 1 thru 5, Machine Conversion.
NOTE: If supply voltage matches voltage stated on
Electrical Specification Plate, then proceed to
Connect Air Supply.
2
KEYPAD SEQUENCE
NOTE: Before programming operating voltage,
reconfigure drive to allow keypad interface to operate
in “advanced level.” During normal operation machine’s
keypad interface operates in “operation only” level.
Press
... 3 Times
Press
RESET
IMPORTANT
If machine is currently in powered up state; turn OFF
machine and allow display screens to extinguish.
Press
Press
6. Release E-Stop Switch on console and press
Power ON Button. Display on drives 1 & 2 screens,
inside enclosure, should now be ON.
7. On Drive 1 - Change keypad interface to
“advanced level” as described in following chart:
KEYPAD SEQUENCE
DISPLAY AFTER KEY IS PRESSED
... 8 Times
Press
... 4 Times
SELECT LANGUAGE
ENGLISH
MAX VOLTAGE
200.0VAC
The first "0" will be
flashing
MAX VOLTAGE
200.0VAC
The middle "0" will
be flashing
MAX VOLTAGE
208.0VAC
The "8" will be
flashing
... 3 Times
... 8 Times
ACCESS LEVEL
OPERATION ONLY
A1 - 01 =
0***
OPERATION ONLY
DATA
ENTER
DATA
ENTER
MAX VOLTAGE
E1 - 05 = 208.0VAC
MENU
**MAIN MENU**
OPERATION
DATA
ENTER
FREQUENCY REF.
U1 - 01 = 0.00HZ
Press
Press
A1 - 01 =
4
ADVANCED LEVEL
Press
Press
DATA
ENTER
ACCESS LEVEL
ADVANCED LEVEL
MENU
**MAIN MENU**
OPERATION
DATA
ENTER
FREQUENCY REF.
U1 - 01 = 0.00HZ
Press
Press
9. GPD-515 drive is now configured for 208V. Return
keypad interface to “operation only” level as follows:
KEYPAD SEQUENCE
8. Change voltage setting to “208V” as follows:
Press
MENU
KEYPAD SEQUENCE
Press
Press
... Twice
Press
Press
Press
Press
Press
**MAIN MENU**
PROGRAMMING
... 3 Times
Press
GROUP E
MOTOR
FUNCTION E1
V/F PATTERN
DATA
ENTER
INPUT VOLTAGE
E1 - 01 = 230VAC
DATA
ENTER
INPUT VOLTAGE
230VAC
The "2" will be
flashing
Press
INPUT VOLTAGE
230VAC
The "3" will be
flashing
Press
Press
RESET
DATA
ENTER
Press
3
**MAIN MENU**
OPERATION
SELECT LANGUAGE
ENGLISH
ACCESS LEVEL
ADVANCED LEVEL
DATA
ENTER
Press
DATA
ENTER
DISPLAY AFTER KEY IS PRESSED
**MAIN MENU**
INITIALIZE
Press
GROUP B
APPLICATIONS
DATA
ENTER
Press
NOTES
**MAIN MENU**
OPERATION
MENU
Press
DISPLAY AFTER KEY IS PRESSED
MAX VOLTAGE
E1 - 05 = 230.0VAC
The "3" will be
flashing
RESET
Press
Press
The "8" will be
flashing
MAX VOLTAGE
230.0VAC
Press
Press
INPUT VOLTAGE
208VAC
RESET
**MAIN MENU**
INITIALIZE
DATA
ENTER
The last "0" will be
flashing
The "2" will be
flashing
Press
Press
INPUT VOLTAGE
200VAC
MAX VOLTAGE
230.0VAC
Press
Press
The middle "0" will
be flashing
NOTES
**MAIN MENU**
OPERATION
MENU
INPUT VOLTAGE
200VAC
DATA
ENTER
Press
Press
NOTES
INPUT VOLTAGE
E1 - 01 = 208VAC
DATA
ENTER
Press
DISPLAY AFTER KEY IS PRESSED
A1 - 01 =
4
ADVANCED LEVEL
A1 - 01 =
0***
OPERATION ONLY
DATA
ENTER
ACCESS LEVEL
OPERATION ONLY
MENU
**MAIN MENU**
OPERATION
DATA
ENTER
FREQUENCY REF.
U1 - 01 = 0.00HZ
NOTES
10. Repeat steps 6 thru 9 for Drive 2.
11. Press E-Stop Button.
12. Use a wrench to turn Main Disconnect Switch
OFF (1/4 turn counterclockwise).
13. Close and lock door to Electrical Enclosure.
Telemechanique Drives:
Complete steps 1 thru 5, Machine Conversion.
6. Verify that Display / Adjustment Controller
(keypad) is installed on Drive 1. (If not, move it to
Drive 1 with Power OFF.)
7. Release E-Stop Switch on console and press
Power ON.
8. On Drive 1 press down arrow until "uns" is
displayed.
9. Press DATA. Nominal motor voltage is now
displayed.
10. Press up or down arrow until desired voltage is
displayed.
11. Press PROG. New nominal motor voltage is saved.
12. Press E-Stop on console.
13. Wait until green LEDs on both drives are no
longer illuminated.
14. Using a screwdriver, remove Display /
Adjustment Controller from Drive 1.
15. Remove programming cover plate from Drive 2.
FIGURE 1-4, Air Line Routing
NOTE: Elbow has 1/8 NPT threads. Elbow and
adapter can be removed to access R 1/8 (BSPT)
threads in inlet port of filter-regulator.
2. Filter-regulator has been factory set to .55 MPa
(80 psi). Air supply to machine must be at least this
or machine will not operate properly. With air
supply connected, check regulator gage for .55 MPa
(80 psi). If not set correctly, lift knob on top of
regulator and turn to adjust. After setting correct
regulated pressure push knob down to lock.
Coolant System
WARNING
HAZARDOUS VOLTAGE: Do not remove any
other cover besides programming cover plate
when installing controller.
1. Remove packing materials from coolant system.
Pump and motor are mounted on flexible vibration
isolators. Packing materials have been added to
secure pump and motor during shipping. Make sure
all such material is removed and assembly is free to
float on isolators. To remove packing materials
inside reservoir, lift out plastic work area liner, open
reservoir cover and lift out sediment tray. Make
sure all packing material is removed from coolant
level float so it is free to function properly.
2. Remove filter cover clamp and filter cover.
3. Remove filter element from its protective bag
and insert it into filter canister. Rotate filter element
slightly while inserting to make it slide down center
post more easily.
4. Make sure that sealing ring in filter cover is
seated properly in its groove, then replace filter cover.
5. Replace filter cover clamp and tighten. Close air
vent (all way clockwise), then crack it open 1/4 to 1/2
turn to vent canister during filling.
6. Move coolant cart close enough to machine to
connect coolant system cable from machine. Close
latch on fixed connector base to secure connection.
Attach coiled Airline on rear of Coolant Cart to the
bulkhead fitting on the front inside face of the machine
base (see flow diagram packaged with your machine).
16. Install programming cover on Drive 1.
17. Plug Display / Adjustment Controller in Drive 2.
18. Repeat steps 7 - 12 for DRIVE 2
19. Press E-Stop.
20. Use a wrench to turn Main Disconnect Switch
off (1/4 turn counterclockwise).
21. Close and lock door to Electrical Enclosure.
Connect Air Supply
CAUTION
Do not connect EC-3500 to any air supply with a
pressure greater than 1,4 MPa (200 psi).
1. Route a 6 mm or 1/4" ID air supply line through
slot in bottom of machine base, up through openings in
top of base to air filter-regulator (see Figure 1-4.). Do
not route air supply line over top of base or hood will
not be able to close properly and will pinch air supply
line. Filter-regulator has a hose barb fitting where air
supply line can be fastened with a hose clamp. If another style of fitting is desired, hose barb can be removed.
4
WARNING
Never remove foot pedal cover with power on.
Machine cycle will start any time foot pedal is
depressed with power on.
13. Squeeze lower front corners of foot pedal cover
together to disengage it from foot pedal assembly and
lift it off. Lift safety latch with a finger and depress
foot pedal by hand. Release safety latch and then
release pedal. Pedal will be locked in an intermediate
position so that whole assembly can slide underneath
coolant cart.
14. Pull foot pedal assembly under coolant cart so
that it is in front of cart.
15. Push down on foot pedal. Lift foot pedal safety
latch and hold it up while releasing foot pedal. Let go
of safety latch and replace foot pedal cover. When
replacing cover, reach inside and hold safety latch up.
Make sure that latch will be held up by brace on
inside of foot pedal cover (see Figure 1-5.). Squeeze
lower front corners of cover together to insert pins on
cover in holes on foot pedal base plate.
16. Push coolant cart into machine. Be sure that
flexible conduit retracts into opening in machine
base as cart is pushed in.
17. Place cart in a position where no coolant can
escape work area and where operator has comfortable access to front panel and work area. Lock casters on coolant cart to keep it from moving during
operation.
FIGURE 1-5, FOOT PEDAL SAFETY LATCH
7. Fill coolant system with coolant until coolant level
gage is somewhere between full and -20 liters.
NOTE: Use only Sunnen Industrial Honing Fluids.
Substituting other cutting fluids or diluting Sunnen
Honing Oil can adversely affect workpiece surface
finish and stone/tool life. If using Sunnen Coolant
Concentrate, dilute with water as specified and check
concentration daily.
8. On operator station turn coolant selector to
CONSTANT and turn machine power on
momentarily to check pump motor rotation. An
arrow marked on pump indicates proper direction
for rotation. If pump is rotating backwards, turn
power off and turn off main power supply to
machine. Reverse any two leads from electrical
supply cord coming into machine. Do not change
any machine or motor wiring or pump may not
rotate in right direction if coolant system is moved
to another machine.
9. Turn POWER on. With air vent slightly open,
air will bleed out of filter canister. When oil appears
in partially open vent (about 1 to 2 minutes), close
vent (clockwise).
10. Place sediment tray in top of coolant system.
Note that orientation is import. Lower discharge side
should be to back of coolant system
11. Pour additional coolant into reservoir by filling
sediment tray and allowing it to overflow. Watch
coolant level gage during filling. Do not overfill
coolant system. Level of main reservoir must be
below top of clean coolant reservoir or oil delivered
to work area will not be clean.
12. Foot pedal assembly must slide under coolant
cart as coolant cart is pushed in. First, make sure
machine power is off.
OPTO-ELECTRONIC SCREEN INSTALLATION
(CE Machines Only)
1. Fastening Mirror Assemblies to coolant cart (see
Figure 1-6).
• Set Mirror Assembly on coolant cart in position
shown. Match two alignment pins on cart (not shown)
with two holes in bottom of Mirror Assembly.
• Fasten each Mirror Assembly to coolant cart by tightening three Hex Cap Screws with a 10mm open end
wrench as shown. Tighten Hex Cap Screws a little at a
time in rotation so Mirror Assembly is not put into a
bind.
2. Aligning Mirror Assemblies
• Turn on power to machine.
• Place a hand in sensing field and then remove it to initialize system. ACTIVE light on Sender should now be
lit and GUARD light on Receiver should be lit. If these
lights are not on, move coolant cart from side to side to
align beam. If Opto-Electronic Screen is still not active
then realign mirrors.
• Mirrors are adjusted by rotating and tilting them to
proper position. To rotate Mirror Assembly, slightly
loosen Locking Set Screws and Base Positioning
5
Sender Unit lights
OPTO-ELECTRONIC
SCREEN RECEIVER
START: lights approximately 10 seconds until
Sender and Receiver are synchronized.
MIRROR
ASSEMBLY
ACTIVE: remains on to show Sender and
Receiver are synchronized and operational.
Receiver Unit lights
LOCKING
SET SCREWS
GUARD (green): sensing field is uninterrupted
and active.
CLEAR (yellow): sensing field is uninterrupted
but System is awaiting initializing beam break.
BREAK (red): sensing field has been
interrupted or is inactive.
BASE POSITIONING
SET SCREWS
WEAK SIGNAL (orange): signal strength
is low for upper or lower beams. Check
alignment and lens cleanliness.
CAPSCREWS
FIGURE 1-6, Opto-Electronics Screen
loosen spindle side Base Positioning Set Screw and
tighten side Base Positioning Set Screw. Lastly, retighten Locking Set Screws.
A technique for aligning mirrors is to look from
Sender Unit into mirrors and position mirrors so
Receiver Unit mirror reflection can be seen. Do
same for Sender Unit mirror reflection.
Screws then turn Mirror Assembly to proper position
and retighten set screws. To tilt Mirror Assembly, first
slightly loosen (2) Locking Set Screws. To tilt Mirror
Assembly towards operator, loosen operator side Base
Positioning Set Screw and tighten spindle side Base
Positioning Set Screw. To tilt Mirror Assembly away
from operator, loosen spindle side Base Positioning Set
Screw and tighten operator side Base Positioning Set
Screw. To tilt Mirror Assembly to right or left away
from machine, loosen side Base Positioning Set Screw
and tighten spindle side Base Positioning Set Screw. To
tilt Mirror Assembly to right or left toward machine,
AUTOMATIC SIZE CONTROL
Install Automatic Size Control (ASC) Unit as follows (see Figure 1-7):
1. Unpack Automatic Size Control (ASC) Unit.
PROBE BODY
BUMPER
PROBE CLAMP
BODY
ACTUATOR
ARM
BUMPER SCREW
ANGLE PLATE
FINE POSITION ROD
CLAMP
KNOB
BASE
SCREWS
CLAMP PIVOT
BLOCK
ANGLE
PLATE
SCREW
FIGURE 1-7, Automatic Size Control
6
NOTE: Following steps 4 & 5 are used to adjust ASC
unit to machine. They are listed here because they need
only be done once. However it may be easier to do this
during first setup where ASC will be used. (See Section 3,
Setup: Power Stroked Honing, step 49.)
4. Set coarse vertical position of Probe:
Select and install honing unit according to
instructions. Adjust runout of tool using concentric
part or alignment bushing. Lock bushing onto
mandrel with EXPAND switch leaving about 12mm
(1/2") of bore extended past tool.
Select ASC probe of correct size to fit bushing hole
size and screw onto stud on Probe Body. Center
Probe Body in ASC Arm by loosening Probe Clamp
Knob, repositioning, and reclamping.
Turn ASC PROBE selector switch to UP. Loosen
Clamp Knob and slide ASC unit forward until
Probe meets bushing bore. Retighten Clamp Knob.
Loosen Angle Plate screw and reposition Angle
Plate to set Probe at same height as bushing hole.
Retighten Angle Plate screw. To help guide Probe
toward work piece, loosen Bumper screw, slide
Bumper to contact Fine Position Rod and retighten
screw.
5. Set horizontal position of Probe:
Note distance from center of Probe to center of
bushing.
Loosen Clamp Knob and slide ASC unit toward front
of machine to access two Base screws. Loosen two
Base screws and slide Base along screw slots distance
noted. Retighten Base screws and slide ASC unit
forward to bring Probe in front of bushing. Probe
should be centered in front of bushing.
Set this horizontal position so that Clamp Knob will
not touch machine frame when ASC Unit is slid
along Rail.
FIGURE 1-8, Side Tray
Turn Clamp Knob on ASC unit counter-clockwise
and pivot Clamp Pivot Block clockwise to open
clamp. Position clamp on Rail as shown and tighten
clamp to secure ASC unit to machine frame.
2. Check that ASC unit movement will not interfere
with stroker or fixturing. Turn ASC PROBE
selector switch to DOWN. Pull Actuator Arm away
from machine so that cylinder is extended and Arm
is horizontal. Plug in and thread on keyed Cable
End to connector at back lower left corner of work
area. Connect white air line by pushing into place
into air fitting with white washer. Connect black air
line to other fitting.
WARNING
Keep hands away from ASC unit when turning
ASC PROBE selector to move ASC probe up or
down.
Side Tray
Unpack side tray. Place mat provided into tray. Tray
can hang on either side of machine or on side of
coolant cart. Plastic spacers on bottom of tray
bracket can be placed in two different positions to
accommodate different widths of machine side and
coolant cart side (see Figure 8). Only one tray is
provided as standard. If needed, a second tray can
be ordered (Sunnen part # EC-6510).
3. Turn ASC PROBE selector switch back and
forth between UP and DOWN. ASC unit movement
should be smooth and crisp without bouncing. If
necessary, adjust speeds by turning flow control
valves on black and white air lines inside left hood
of machine.
7
14 SPINDLE
SPEED
15 STROKER
12 FINISHING
SPEED
FEED FORCE
13 EXTRA STROKES
10 SIZE CONTROL
11 STROKING
9 EMERGENCY
STOP
6 COOLANT
8 FEED
5 CYCLE START
4 CYCLE STOP
2 POWER ON
3 STROKER JOG
7 ASC PROBE
FIGURE 2-1, OPERATOR CONTROL
8
1 POWER OFF
SECTION 2
CONTROLS
LOCATION & FUNCTION
ZERO SHUT-OFF - Honing cycle will end
when needle on Honing Indicator reaches zero. This
corresponds to a consistent feed system position. If
stone and shoe wear are negligible or properly compensated, then this position will correspond to a
consistent final bore size.
ASC - Automatic Size Control unit will
determine when honing cycle is complete by
checking workpiece bore size with a plug gage type
probe once every stroke.
11. STROKING - Three position selector switch
sets stroking mode:
MANUAL - Stroker will not operate in this
mode. Stroking must be done manually. Honing
cycle can be started only with Foot Pedal.
UNLATCH - In this mode Stroker Carriage is
disengaged from power stroking unit. This mode is
used only during setup. Machine will not run in
this mode.
AUTOMATIC - Stroker will operate during
honing cycle at speed and stroke length selected.
Cycle can be started with Foot Pedal or CYCLE
START button.
12. FINISHING FEED FORCE - Three position
selector switch sets Finishing Feed Force mode:
OFF - Finishing Feed Force is not used. Feed
Force remains at level set with Roughing Feed
Force Dial throughout entire honing cycle. If
selected, feed system will be at roughing feed force
level when not honing.
AFTER ROUGH TO FINISH DIAMETER Feed Force will switch from roughing level to finishing level at point set by Rough to Finish
Diameter Dial on front panel. This point corresponds to a consistent feed system (Honing
Indicator) position. If stone and shoe wear are negligible or properly compensated then this position
corresponds to a consistent bore diameter. If selected, feed system will be at finishing feed force level
when not honing.
DURING EXTRA STROKES ONLY - Feed
Force will switch from roughing level to finishing
level when honing dial reaches zero if ZERO
SHUT-OFF is size control mode, or when ASC
probe enters workpiece bore if ASC is size control
mode. Feed Force is only at finishing level during
Extra Strokes. If selected, feed system will be at
finishing feed force level when not honing.
For location, function, and descriptions of Machine’s
major controls refer to Figures 2-1 thru 2-3.)
1. POWER OFF - Turns machine power off. All
functions are disabled, however spindle speed,
stroker speed, and extra stroke settings are retained.
2. POWER ON - Turns machine power on.
Lighted button is an indication of power on status.
3. STROKER JOG - Pressing this and holding it
down causes stroker carriage to move slowly to one
end of stroke. Repeating this will cause stroker to
move slowly to other end of stroke. Releasing
button will stop stroker immediately even though
end of stroke may not have been reached.
4. CYCLE STOP - Stops honing cycle.
5. CYCLE START - Starts honing cycle if
STROKING selector is set to “POWER”.
6. COOLANT - Two position selector switch:
CONSTANT - Coolant flow at all times when
power is on.
CYCLE ONLY - Coolant flow only during
honing cycle.
7. ASC PROBE - Two position selector switch:
UP - Automatic Size Control actuator lifts
probe into gaging position.
DOWN - Automatic Size Control actuator
moves probe to its retracted position.
8. FEED - Two position selector switch:
EXPAND - Used for setup only. Expands honing tool until stone contacts workpiece for setting
Stock Removal amount. Locks an alignment bushing on honing tool for checking and adjusting tool
runout. Honing cycle cannot be started when
“EXPAND” is selected.
RETRACT - Retracts honing tool.
9. EMERGENCY STOP - Opens electrical circuits
to stop all machine functions. Cancels all setup
information requiring operator to re-enter setup
before continuing. Button must be rotated
clockwise until it pops up before machine can be restarted with POWER ON button.
10. SIZE CONTROL - Two position selector
switch sets size control mode:
9
13. EXTRA STROKES - After size control device
(either Zero Shut-Off or ASC) signals completion of
honing cycle, honing cycle will continue for number
of strokes shown on display before stopping. Returnto-center selector switch changes number of extra
strokes up or down to a maximum of 99.
If dip switch A2 is set to stroker positioning on,
honing cycle will always finish with stroker stopped at
front end of stroke. If switch A2 is set to off, machine
will stop immediately following the honing cycle.
(Refer to DIP Switch Settings, on page 40.)
If ASC mode of size control is selected, but ASC unit
is disconnected, then honing cycle will be a “timed”
cycle lasting for only number of strokes displayed on
counter.
14. SPINDLE SPEED - Return-to-center selector
switch changes spindle speed setting displayed above
switch. Chart below recommends spindle speed in
RPM based on workpiece bore diameter.
15. STROKER SPEED - Return-to-center selector
switch changes stroker speed setting displayed above
switch. Chart below recommends stroker speed in
SPM (strokes per minute) based on stroke length.
16. STROKE LENGTH INDICATOR & LOCK Index mark on clear piece indicates stroke length
setting. Tightening handle locks stroke length in
place. Loosening handle frees stroker for setting a
different stroke length with STROKE LENGTH
Handwheel.
17. STROKE LENGTH - Handwheel changes stroke
length as indicated by index piece when handle is
unlocked. A Stroke Length Guide printed on front panel
shows how to use bore length and stone length to
determine proper stroke length for most applications.
18. ROUGHING FEED FORCE - Sets roughing
feed force level as indicated on dial above knob.
properly compensated then this position corresponds
to a consistent bore diameter. Turning clockwise
makes feed force change at a smaller diameter
(more finishing). Turning counterclockwise makes
feed force change at a larger diameter (less
finishing). Light to left of knob will be on when
machine is in finishing during honing cycle. During
setup, light will be on anytime needle on honing
dial is below selected change position, or it will be
on if DURING EXTRA STROKES ONLY is
selected.
21. HONING TOOL / INDICATOR SCALE
SELECTOR - Four position selector switch sets
Honing Indicator for honing tool used and indicator
scale desired.
22. HONING INDICATOR - Needle shows feed
system position. This position corresponds to
amount of stock to be removed from bore diameter
if Zero Shut-Off is size control mode. Two scales
have different levels of magnification. “A” scale
shows stock removal up to 240µ (.009") and “B”
scale shows stock removal up to 480µ (.018").
23. STONE FEED - Handwheel feeds up tool to set
amount of stock removal, to adjust final bore size, and
to compensate for stone wear manually. Three scales
are color coded to match three sets of tool families
displayed in HONING TOOL box above.
Counterclockwise rotation (increasing numbers) feeds
tool to a larger diameter.
24. AUTOMATIC STONEWEAR
COMPENSATOR ADJUSTMENT - When used,
Automatic Stonewear Compensator will
automatically index Stone Feed Dial to compensate
for stonewear. If size control mode is Zero ShutOff, this indexing will occur at beginning of each
cycle. (Unless previous cycle was halted by
depressing CYCLE STOP.) If size control mode is
ASC, this indexing will occur only when needle on
Honing Indicator reaches zero. Rotating adjustment
knob counterclockwise increases amount of
stonewear compensation. Rotating adjustment knob
clockwise decreases amount of stonewear
compensation. Rotating clockwise until knob stops
will turn off Automatic Stonewear Compensator.
25. AUTOMATIC STONEWEAR
COMPENSATOR CHECK - To check amount of
Automatic Stonewear Compensation, press this
button and hold it in until Stone Feed Dial stops
moving. Observe amount of feed up on dial.
26. FEED REGULATOR MAXIMUM RATE - Feed
Regulator is a system to limit maximum rate of feed.
MAXIMUM RATE dial is turned to set maximum
feed rate limit. On numbered scale larger numbers
indicate faster maximum rates. Setting dial to “9” or
higher will effectively turn off regulator. (Note: This
system is similar to STONE SAVER feature on earlier
model Sunnen Honing Machines.)
NOTE: Knob may be difficult to turn if OFF is
selected on FINISHING FEED FORCE selector
switch. Also, Roughing Feed Force Dial can never be
set to a value below value shown on Finishing Force
Dial, even if Finishing Force is not being used.
19. FINISHING FEED FORCE - Sets finishing
feed force level as indicated on dial above knob.
NOTE: Knob may be difficult to turn if AFTER
ROUGH TO FINISH or DURING EXTRA
STROKES ONLY is selected on FINISHING FEED
FORCE selector switch. Also, Finishing Feed Force
Dial can never be set to a value above value shown
on Roughing Force Dial.
20. ROUGH
> FINISH DIAMETER - When
AFTER ROUGH TO FINISH is selected on
operator station, this knob sets feed system position
at which feed force changes from roughing to
finishing. If stone and shoe wear are negligible or
10
20 ROUGH
>
FINISH DIAMETER
19 FINISHING
18 ROUGHING
FEED FORCE
FEED FORCE
17 STROKE
LENGTH
21 HONING TOOL /
INDICATOR SCALE
SELECTOR
37 STROKER
DISABLE SWITCH
23 STONE FEED
16 STROKE
LENGTH
INDICATOR
24 AUTOMATIC
STONEWEAR
COMPENSATOR
ADJUSTMENT
25 AUTOMATIC
STONEWEAR
COMPENSATOR
CHECK
27 FEED REGULATOR
INITIAL DIAMETER
22 HONING
INDICATOR
26 FEED REGULATOR
MAXIMUM RATE
FIGURE 2-2, Front Panel
30 STROKE
POSITION
HANDWHEEL
36 SPINDLE
SPLASH
GUARD
29 STROKE
POSITION
LOCK
31 MASTER
ON/OFF
SWITCH
32 ASC UNIT
CLAMP
33 ASC FINE
POSITION
SCREW
35 COOLANT
MANIFOLD
28 FOOT
34 PROBE BODY
PEDAL
CLAMP KNOB
FIGURE 2-3, Machine Controls
11
31. MASTER ON/OFF SWITCH - Disconnects
power from switch to components in electrical
enclosure. Enclosure doors cannot be opened with
this switch in ON position.
32. ASC UNIT CLAMP - Turning this knob
clockwise locks Automatic Size Control unit in
place. Counterclockwise rotation frees unit so that it
can be positioned to gage workpiece at end of
stroke. With further loosening, entire ASC unit can
be removed from machine.
33. ASC FINE POSITION SCREW - Adjusts
position of ASC unit. Clockwise rotation moves
ASC unit closer to workpiece 1mm per revolution.
This direction of rotation is matched to STROKE
POSITION HANDWHEEL rotation for easy
adjustment after making a stroke position
adjustment. A knurled locknut holds screw in place
after making adjustment.
34. PROBE BODY CLAMP KNOB - Locks ASC
Probe Body to actuator arm. When loosened probe
body can be aligned with workpiece bore, then
locked in position.
35. COOLANT MANIFOLD - Valves regulate flow
of coolant through each of four coolant lines, and one
Main Valve controls total amount of coolant flow.
36. SPINDLE SPLASH GUARD - Attaches to rear
of stroker carriage with a knurled thumb screw.
Contains coolant spinning off spindle in most
applications. May have to be removed if stroker
carriage must stroke too close to spindle housing.
37. STROKER DISABLE SWITCH (Models
EC-3500CE and EC-3500CD only) - With a key this
switch can be turned to disable stroker for manual
honing. When DISABLE is selected automatic
stroker cannot run and light curtain is also disabled.
27. FEED REGULATOR INITIAL DIAMETER This knob sets feed system position at which Feed
Regulator begins to limit maximum feed rate. If
stone and shoe wear are negligible or properly
compensated then this position corresponds to a
consistent tool diameter. Counterclockwise rotation
reduces diameter where Feed Regulator starts
(longer regulated honing cycle). Clockwise rotation
increases diameter where Feed Regulator starts
(shorter regulated honing cycle). Turning knob
clockwise until it stops will turn off Feed Regulator
System.
28. FOOT PEDAL - Depressing Foot
Pedal will start honing cycle if power is
ON. Feed system (wedge) travel is
controlled by foot pedal so that speed at
which stone contacts workpiece bore is related to
speed of operator’s foot. Likewise, raising foot will
move wedge back. If STROKING is set to
MANUAL, spindle will run only when Pedal is
depressed and honing cycle will stop when Foot
Pedal is released. If STROKING is set to
AUTOMATIC, Foot Pedal will control feed until it
is completely depressed. As soon as Foot Pedal is at
bottom of its travel, feed system will be controlled
by machine and foot pedal can be released without
stopping cycle. Releasing foot pedal prior to that
point will stop cycle.
29. STROKE POSITION LOCK - This hand lever
tightens a screw to lock stroker in position. To
adjust stroke position, this hand lever screw must be
loosened.
30. STROKE POSITION HANDWHEEL - When
Stroker Position Lock is loosened, this handwheel
changes position of stroke relative to spindle and honing
tool. Graduations are in millimeters. Turning in
direction of increasing numbers moves carriage out
away from spindle.
12
SECTION 3
SETUP & OPERATION
GENERAL
OPERATING TIPS
This section gives step-by-step setup and operating
procedures.
The EC-3500 can be setup and operated a number
of different ways. The use of many features is
optional. Not all features are beneficial in any given
application. Appendix A explains some of these
optional features and outlines some guidelines for
determining when they might be beneficial. Usually
experimentation will be required to find optimum setup.
Although EC-3500 is intended for production
honing, manual stroked honing is possible. Manual
honing should only be used for honing a very small
number of workpieces such as for tooling or repairs.
The ease of setting up stroker and fixture makes it
practical to power stroke even as few as five or ten
workpieces. Power stroking is always more precise,
more consistent, and safer.
SAFETY PRECAUTIONS
The following precautions should be observed to ensure
maximum safety while working on or around the Unit.
1. Wear proper Safety Items (such as safety glasses
and other personal safety equipment, as necessary
or required).
2. DO NOT wear loose fitting clothes or jewelry
while working on or around Workstation.
3. Keep area around Workstation free of paper, oil,
water and other debris at all times.
4. Keep Workstation and area cleaned of excessive
lubricant and lubricant spills.
5. Keep Workstation clear of tools and other
foreign objects.
6. Keep Tools clean and in their proper storage
compartments, to maintain them in proper working
condition and to prolong tool life.
7. Inspect Tools before using. Check for cracks,
burrs or bent parts that might effect operation.
8. DO NOT force Tools when operating. Tools will
do a better and safer job when operated at the rate
for which they were designed.
9. Use proper lifting procedures when loading and
unloading the Workstation.
10. Keep hands clear of air cylinder and moving
parts at all times to avoid pinch hazards, which may
lead to loss of limb.
11. DO NOT use this Workstation or Power Head
for applications other than those for which it was
designed – cylinder head assembly and disassembly.
12. Safety glasses must be worn at all times when
using this workstation.
13. Use care when advancing or retracting Power
Head to ensure tools do not damage head or create
an unsafe condition.
14. Be careful of dropping heavy items onto feet.
15. Always tighten lock handle securely so that
the table is locked securely prior to cylinder head
assembly or disassembly.
16. Be sure to work in a well lit area and to use the
light supplied to avoid dangerous unseen conditions
which may exist otherwise.
Manual Honing
Manual Honing Safety Instructions
READ FIRST
• Follow ALL steps in this section carefully.
• ALWAYS start with Feed Force set to no more
than 1.1 and Spindle Speeds set to no more than 1/2
of recommended speeds. The danger of manual
honing increases as speed or feed force is increased.
• (For Models EC-3500CE and EC-3500CD): When
finished manually honing, return Stroker Key Switch
to ENABLE and remove Key, so that spindle can not
start if an operator is in work area.
1. Press Emergency Stop to clear any previous setup.
2. Turn OFF coolant supply by turning Main Valve
on Coolant Manifold fully clockwise.
3. If ASC unit is attached to machine, loosen
Clamp and slide unit out away from spindle. Turn
ASC PROBE selector to DOWN. (Unit can also be
removed from machine entirely.)
4. Set FINISHING FEED FORCE selector to OFF.
5. Set SIZE CONTROL selector to ZERO SHUT-OFF.
6. Set STROKER key switch to DISABLE. Set
Stroking selector to MANUAL.
7. Set FEED selector to RETRACT.
8. Turn FEED REGULATOR off by turning
INITIAL DIAMETER knob fully clockwise.
9. Turn AUTOMATIC STONEWEAR
COMPENSATOR off by turning knob fully clockwise.
10. Remove Spindle Splash Guard.
13
EXTRA STROKES ONLY, then Finishing Force
Dial may be difficult to turn. During setup only you
may turn this selector to position that frees feed force
dial you are trying to turn. If you do this, remember
always to return this selector to its original position
after setting feed force.
11. Disengage Stroker Carriage from power
stroking unit:
Turn STROKING selector to UNLATCH.
Pull Stroker Carriage forward to provide access to
spindle.
12. Select correct honing unit and stone from
Sunnen Honing Supplies Catalog.
13. Assemble Honing Unit according to
instructions.
14. Set HONING TOOL / INDICATOR SCALE
selector to position that matches tool being used and
scale you wish to read.
CAUTION
When manually honing, always start at a low feed
force for safety.
24. Reduce Mandrel Runout: Reducing mandrel
runout by following simple method is all that is
usually required for truing and manual honing. For
more accurate elimination of runout refer to “Setup
for Power Stroking,” step 33.
• Select a concentric alignment bushing or truing
sleeve with a bore size close to final honed bore size
(see Sunnen Honing Supplies Catalog). Place
alignment bushing on mandrel so that it is centered on
stone and shoe section of mandrel.
NOTE: It is recommended that “A” scale be used
unless stock removal is expected to be more than
240µ (.009"). Finer resolution on “A” scale gives a
clearer indication of honing rate.
15. Turn STONE FEED dial clockwise until you
meet resistance, then advance it counterclockwise
approximately 10 turns.
WARNING
Do NOT step on foot pedal to lock alignment
bushing on mandrel. Spindle will turn if foot
pedal is depressed.
CAUTION
Do not force STONE FEED DIAL or damage to feed
system may result.
• Turn FEED selector to EXPAND to lock
alignment bushing on mandrel. Look to Honing
Indicator. If needle reads somewhere on scale then
alignment bushing is properly locked on. If not turn
STONE FEED DIAL until there is an indicator
reading. (Turn Dial same direction as you wish
needle to move.)
• Turn FEED selector to RETRACT.
• Set Spindle Speed to 200 rpm.
16. Pull Mandrel Wedge straight back as far as
possible.
17. If required, install Spindle Sleeve (LN-570A,
not supplied with machine) on Honing Unit.
18. Rotate spindle by hand until large set screw is
up (12 o’clock position).
19. With set screw indentation on honing unit in 9
o’clock position, insert honing unit as far as it will go.
Rotate honing unit 1/4 turn clockwise to engage
wedge with feed rod, then push honing unit all way in
until it bottoms.
20. Test wedge hookup by pulling honing unit
straight out (do not rotate). If wedge is hooked up it
will not allow unit to come out. If honing unit
comes out, repeat step 19. Push honing unit back in
until it bottoms.
21. Tighten large set screw in spindle.
22. Release Emergency Stop and turn power on.
23. Set Roughing Feed Force Dial to desired level.
WARNING
Do not attempt to adjust mandrel runout at any
speed higher than 200 rpm.
• Depress Foot Pedal fully to start spindle with
alignment bushing on mandrel. If runout does not
seem excessive proceed to step 25. If runout is
excessive, center honing unit as follows:
• With bushing or sleeve rotating on honing unit,
touch a marking pencil to sleeve to indicate high
side. Turn FEED selector to EXPAND. This stops
spindle while keeping sleeve locked on mandrel.
This also will disable Foot Pedal to prevent
accidental starting.
• Loosen numbered set screw on spindle nose that
is on same side as high pencil mark and tighten
screw on opposite side.
• Turn FEED selector to RETRACT and repeat
steps e-g as necessary until minimum runout is
obtained.
NOTE: Roughing Feed Force cannot be adjusted to
a value lower than Finishing Feed Force setting. It
may be necessary to turn Finishing Feed Force Dial
down so that Roughing Feed Force can be set to
desired level.
If FINISHING FEED FORCE selector is set on OFF,
Roughing Feed Force dial may be difficult to turn. If
FINISHING FEED FORCE selector is set to AFTER
ROUGH TO FINISH DIAMETER or to DURING
14
• If honing indicator needle is not moving and
feed force feels too light, then stop and increase
Roughing Feed Force by a small amount.
• If needle on honing indicator goes below zero,
then stop and feed stone up.
• If mandrel dries out, apply a little more coolant.
• Concentrate truing on area where you feel most
pull or resistance.
• Frequently stop and examine shoes and stone.
For most applications at least a full line of contact
should be seen on stone and both shoes. If wear
does not show sufficient contact use truing sleeve
some more.
25. Set Spindle Speed. Use chart on operator
station as a guideline for determining speed.
WARNING
Recommended speeds may not be suitable for all
applications. For MANUAL HONING always
start with a speed that is no more than half speed
recommended on chart, then increase speed in
small increments only when job seems to be
running safely. Never exceed recommended speed
when manually honing.
26. Position Stroker Carriage for manual honing:
• Push Stroker Carriage back until it stops. Turn
STROKING selector to MANUAL.
NOTE: When using keyway mandrels, stone and
shoes must be fully radius to within .13 mm (.005")
of final size before bores with keyways can be honed.
NOTE: Hand lever on stroker shaft must be up for
internal stroker latch to engage properly.
30. Set coolant lines to supply a continuous supply
of coolant to front and back of bore. Coolant
nozzles are attached to small aluminum bases that
can be attached to stroker carriage. Turn
COOLANT selector to CONSTANT and adjust
valves on coolant manifold. Use as much coolant as
possible without losing any to splashing or spraying
out of machine.
• Set STROKER LENGTH to 6 mm (1/4 in).
• Loosen Stroke Position Lock and turn Stroke
Position Handwheel to move Stroker Carriage in
until it stops. Tighten Stroke Position Lock.
27. Remove any fixturing components that do not
provide adequate clearance for manual honing.
28. Install and position Torque Bar on stroker
carriage so that work holding fixture can bear
against it to resist honing torque.
29. True mandrel and stone:
• For safety start truing with a very low Roughing
Feed Force, (“1” for tools smaller than 6 mm (.25"),
“1.2” for larger tools).
• Place a truing sleeve, or suitable undersized workpiece, in a torque absorbing fixture and on mandrel.
• Set FEED selector to EXPAND and turn STONE
FEED DIAL until HONING INDICATOR shows
a reading.
• Return FEED selector to RETRACT.
• Set COOLANT selector to CONSTANT.
• Slowly open main coolant valve on coolant
manifold until there is flow at one or more coolant
nozzle. Wet shoes and stone with coolant, then turn
coolant off.
• Center truing sleeve over stone and shoes.
Grasp truing sleeve and holding fixture firmly with
your left hand and slowly depress foot pedal.
• As mandrel begins its rotation, stroke truing sleeve
forward and back. Use short strokes at first, then
gradually lengthen strokes until stroke is about as long
as sleeve or stone whichever is longer.
• Reverse truing sleeve frequently.
NOTE: There are two sizes of coolant nozzles provided.
Black nozzles have small openings for delivering a
steady narrow jet of coolant from a distance. Use these
if it is difficult or inconvenient to place nozzle close to
workpiece. Orange nozzles have larger openings and can
deliver a larger volume of oil with less splash. Larger
nozzles are preferred if they can be positioned close to
workpiece.
Operation: Manual Honing
NOTE: Before honing, review your setup of
machine.
1. Gage bore size using Sunnen Precision Bore
Gage to determine amount of stock to be removed.
2. Install workpiece in workholding fixture.
WARNING
To prevent personal injury and possible damage
to machine, DO NOT hone without installing
workpiece in a workholding fixture that transmits
honing torque to a solid machine member. Never
try to absorb honing torque by holding workpiece
with your hand.
3. Slide workpiece on mandrel and center
workpiece over stone. It may be necessary to back
off Stone Feed Dial (clockwise) to get workpiece on
mandrel.
4. Turn POWER ON.
WARNING
Always release pedal before removing truing
sleeve or workpiece from tool.
15
12. Gage hole size. If workpiece was correctly
seated on mandrel when stock removal was set, and
if Stone Feed Dial or Roughing Feed Force dial has
not been moved, then bore should be undersized by
amount that stone has worn. Advance Stone Feed
Dial by this amount and hone again to zero.
13. If more than one workpiece is to be honed, then
place next workpiece on mandrel and repeat honing
operation. Do not advance Stone Feed dial at
beginning of a cycle unless you are confident that
stone will wear at least that much. If you feed up
more than stone actually wears then bore will be
oversized when you hone to zero.
5. Make sure that Roughing Feed Force is set to
desired setting and then turn FEED selector to
EXPAND. Turn workpiece several revolutions on
mandrel to seat workpiece on stone.
WARNING
Do NOT step on foot pedal to set stock removal
amount. Spindle will turn if foot pedal is
depressed.
6. Turn Stone Feed Dial until needle on Honing
Indicator shows amount of stock to be removed. Make
sure that Honing Tool / Indicator Scale Selector is set to
appropriate mandrel family.
7. Turn FEED selector to RETRACT.
8. Check Spindle Speed setting and verify that
STROKING selector is set to MANUAL.
Setup: Power Stroked Honing
1. Press Emergency Stop to clear any previous setup.
2. Turn OFF coolant supply by turning Main
Control Valve on Coolant Manifold fully clockwise.
3 . If ASC unit is attached to machine, loosen
Clamp and slide unit out away from spindle. Turn
ASC PROBE selector to DOWN. (Unit can also be
removed from machine entirely.)
4. Set FEED selector to RETRACT.
5. Turn FEED REGULATOR off by turning
INITIAL DIAMETER knob fully clockwise.
6. Turn AUTOMATIC STONEWEAR
COMPENSATOR off by turning knob fully
clockwise.
7. Remove Spindle Splash Guard.
8. Disengage Stroker Carriage from power
stroking unit:
Turn STROKING selector to UNLATCH.
Pull Stroker Carriage forward to provide access to
spindle.
9. Select correct honing unit and stone from
Sunnen Honing Supplies Catalog.
10. Assemble Honing Unit according to
instructions.
11. Set HONING TOOL / INDICATOR SCALE
selector to position that matches tool being used and
scale you wish to read.
WARNING
Recommended speeds may not be suitable for all
applications. For MANUAL HONING always
start with a speed that is no more than half speed
recommended on chart, then increase speed in
small increments only when job seems to be
running safely. Never exceed recommended speed
when manually honing.
9. Slowly depress Pedal while stroking workpiece. If
bore is rough or out of round DO NOT fully depress
Pedal until bore has smoothed out as evidenced by
diminishing vibration. Use same Overstroke at each
end of stroke. If possible, frequently stop machine and
reverse workpiece on mandrel.
NOTE:
If bore is shorter than stone, then
“Overstroke” is amount bore extends past stone at end
of stroke. If stone is shorter than bore, then
“Overstroke” is amount that stone extends past end of
bore at end of stroke. Overstroke should be 1/3 to 1/2
of bore length or stone length, whichever is shorter.
10. If needle on Honing Indicator appears to be
moving too slowly, then increase Roughing Feed
Force. But never increase feed force to point that it
is difficult to stroke workpiece smoothly and
consistently by hand.
NOTE: For most applications, it is recommended
that “A” scale be used unless stock removal is
expected to be more than 240µ (.009"). Finer
resolution on “A” scale gives a clearer indication of
honing rate.
CAUTION
Very small mandrels may break before you encounter
significant resistance to stroking. With very small
mandrels, do not increase feed force unless needle on
Honing Indicator shows that cutting has virtually
stopped.
12. Turn STONE FEED dial clockwise until you
meet resistance, then advance it counterclockwise
approximately 10 turns.
11. Hone until needle on Honing Indicator reaches
zero. Do not hone below zero. Below zero feed
force drops from set value which can cause glazed
stones, poor accuracy, and an unnecessarily long
honing cycle.
CAUTION
Do not force STONE FEED DIAL or damage to feed
system may result.
16
13. Pull Mandrel Wedge straight back as far as
possible.
14. If required, install Spindle Sleeve (LN-570A,
not supplied with machine) on Honing Unit.
15. Rotate spindle by hand until large set screw is
up (12 o’clock position).
16. With set screw indentation on honing unit in 9
o’clock position, insert honing unit as far as it will
go. Rotate honing unit 1/4 turn clockwise to engage
wedge with feed rod, then push honing unit all way
in until it bottoms.
17. Test wedge hookup by pulling honing unit
straight out (do not rotate). If wedge is hooked up
it will not allow unit to come out. If honing unit
comes out, repeat step 16. Push honing unit back in
until it bottoms.
18. Tighten large set screw in spindle.
19. Release Emergency Stop and turn power on.
24. Reduce Mandrel Runout:
• Select a concentric alignment bushing or truing
sleeve with a bore size close to final honed bore
size (see Sunnen Honing Supplies Catalog). Place
alignment bushing on mandrel so that it is centered
on stone and shoe section of mandrel.
WARNING
Do NOT step on foot pedal to lock alignment
bushing on mandrel. Spindle will turn if foot
pedal is depressed.
• Turn FEED selector to EXPAND to lock
alignment bushing on mandrel. Look to Honing
Indicator. If needle reads somewhere on scale then
alignment bushing is properly locked on. If not turn
STONE FEED DIAL until there is an indicator
reading. (Turn Dial same direction as you wish
needle to move.)
• Turn FEED selector to RETRACT.
• Set Spindle Speed to 200 rpm.
NOTE: Steps 20 through 29 are instructions for
truing stone and shoes of honing tool. Truing is not
always necessary. If you don’t need to true mandrel,
then skipping these steps can save considerable time
in set-up. See Appendix A for guidelines on when
truing is necessary and when it can be considered
optional.
CAUTION
Do not attempt to adjust mandrel runout at any speed
higher than 200 rpm.
• Depress Foot Pedal fully to start spindle with
alignment bushing on mandrel. If runout does not
seem excessive proceed to step 25. If runout is
excessive, center honing unit as follows:
• With bushing or sleeve rotating on honing unit,
touch a marking pencil to sleeve to indicate high
side. Turn FEED selector to EXPAND. This will
stop spindle while keeping sleeve locked on
mandrel. This also will disable foot pedal to
prevent accidental starting by stepping on foot
pedal.
• Loosen numbered set screw on spindle nose that
is on same side as high pencil mark and tighten
screw on opposite side.
• Turn FEED selector to RETRACT and repeat
steps e-g as necessary until minimum runout is
obtained.
25. Set Spindle Speed for truing. Use chart on
operator station as a guideline for determining speed.
20. Set STROKING selector to MANUAL.
Set STROKER key switch to DISABLE.
21. Turn SIZE CONTROL selector to ZERO
SHUT-OFF.
22. Set Roughing Feed Force Dial to some low value
(approximately “1” for tools smaller than 6 mm
(.25"), “1.2” for larger tools).
NOTE: Roughing Feed Force cannot be adjusted to
a value lower than Finishing Feed Force setting. It
may be necessary to turn Finishing Feed Force Dial
down so that Roughing Feed Force can be set to
desired level.
If FINISHING FEED FORCE selector is set on OFF,
Roughing Feed Force dial may be difficult to turn. If
FINISHING FEED FORCE selector is set to AFTER
ROUGH TO FINISH DIAMETER or to DURING
EXTRA STROKES ONLY, then Finishing Force
Dial may be difficult to turn. During setup only you
may turn this selector to position that frees feed force
dial you are trying to turn. If you do this, remember
always to return this selector to its original position
after setting feed force.
WARNING
Recommended speeds may not be suitable for all
applications.
For MANUAL HONING and
TRUING always start with a speed that is no more
than half speed recommended on chart, then
increase speed in small increments only when job
seems to be running safely. Never exceed
recommended speed when manually honing or
truing.
CAUTION
When truing, always start at a low feed force for safety.
23. Turn FINISHING FEED FORCE to OFF.
17
26. Position Stroker Carriage for manual honing:
• Push Stroker Carriage back until it stops. Turn
STROKING selector to MANUAL.
WARNING
Always release pedal before removing truing
sleeve or workpiece from tool.
NOTE: Hand lever on stroker shaft must be up for
internal stroker latch to engage properly.
• If honing indicator needle is not moving and
feed force feels too light, then stop and increase
Roughing Feed Force by a small amount.
• If needle on honing indicator goes below zero,
then stop and feed stone up.
• If mandrel dries out, apply a little more coolant.
• Concentrate truing on area where you feel most
pull or resistance.
• Frequently stop and examine shoes and stone.
For most applications at least a full line of contact
should be seen on stone and both shoes. If wear
does not show sufficient contact use truing sleeve
some more.
• Set STROKER LENGTH to 6 mm (1/4 in).
• Loosen Stroke Position Lock and turn Stroke
Position Handwheel to move Stroker Carriage in until it
stops. Tighten Stroke Position Lock.
27. Remove any fixturing components that do not
provide adequate clearance for manual honing.
28. True mandrel and stone:
• For safety start truing with a very low Roughing
Feed Force, (“1” for tools smaller than 6mm (.25"),
“1.2” for larger tools).
• Place a truing sleeve, or suitable undersized workpiece, in a torque absorbing fixture and on mandrel.
• Set FEED selector to EXPAND and turn STONE
FEED DIAL until HONING INDICATOR shows a
reading.
• Return FEED selector to RETRACT.
• Set COOLANT selector to CONSTANT.
• Slowly open main coolant valve on coolant
manifold until there is flow at one or more coolant
nozzle. Wet shoes and stone with coolant, then turn
coolant off.
• Center truing sleeve over stone and shoes.
Grasp truing sleeve and holding fixture firmly with
your left hand and slowly depress foot pedal.
• As mandrel begins its rotation, stroke truing sleeve
forward and back. Use short strokes at first, then
gradually lengthen strokes until stroke is about as long
as sleeve or stone whichever is longer.
• Reverse truing sleeve frequently.
NOTE: When using keyway mandrels, stone and
shoes must fully radius to within 0,13 mm (.005")
before bores with keyways can be honed.
• When finished truing return STROKER key
switch to ENABLE and remove key.
29. Return Spindle Speed setting to zero for safety.
30. If Two-Stage Feed Force is not desired, set
Finishing Feed Force selector to OFF. If Two-Stage
Feed Force is desired, select mode of operation:
either “After Rough to Finish Diameter” or “During
Extra Strokes Only”. (Refer to Appendix A, for
guidelines to determine when Two-Stage Feed Force
is useful and how to determine best mode of
operation.)
31. Set Roughing Feed Force to desired level.
32. If using Two-Stage Feed Force, set Finishing
Feed Force to desired level.
PIVOT LOCK
LEVER
SLIDING
BLOCK
ALIGNMENT
BUSHING
FIGURE 3-1, Runout Indicator
18
• Attach RUNOUT INDICATOR supplied with
machine to threaded stroker drive shaft as shown
(see Figure 3-1). Position aluminum indicator base
so that letters “EC” are up and facing you, with that
surface approximately level. Move clamp handle
until plastic cone on cam grips threaded stroker
drive shaft.
• Note reference gaging point and indicating gaging
point on indicator (see Figure 3-2). They should be
spaced as far apart as possible without exceeding
length of alignment bushing. If necessary, remove
Knob A (reference gage point) by unscrewing it and
inserting it in another hole. Sliding Block will slide
out to provide even greater separation of gaging
points.
• Position stroker carriage so that gaging points
will contact alignment bushing.
• Move pivot lock lever to “Release” position so that
entire indicator will follow alignment bushing by
contact of reference gaging point.
• With pivot lock lever in “Release” position,
Runout Indicator is now set to measure conical runout
of honing unit. Rotate spindle by hand while
observing indicator. If necessary turn Knob A to get
an indicator reading. Turn spindle until high point is
found. Loosen nearest lettered screw (A-B-C-D) on
front of spindle nose, and tighten screw on opposite
side. Repeat this procedure until conical runout is
within acceptable limits. (Conical runout of less than
two divisions on indicator is acceptable for most
honing applications. For close tolerance applications,
conical runout should be less than one division.)
• With runout indicator remaining on alignment
bushing, move pivot lever to “Lock”, and turn Knob
A counterclockwise two or three revolutions.
NOTE: Roughing Feed Force cannot be adjusted to
a value lower than Finishing Feed Force setting. It
may be necessary to turn Finishing Feed Force Dial
down so that Roughing Feed Force can be set to
desired level.
If FINISHING FEED FORCE selector is set on OFF,
Roughing Feed Force dial may be difficult to turn. If
FINISHING FEED FORCE selector is set to AFTER
ROUGH TO FINISH DIAMETER or to DURING
EXTRA STROKES ONLY, then Finishing Force
Dial may be difficult to turn. During setup only you
may turn this selector to position that frees feed force
dial you are trying to turn. If you do this, remember
always to return this selector to its original position
after setting feed force.
33. Eliminate conical and parallel spindle runout:
• Select a concentric alignment bushing with a bore
size close to final honed bore size (see Sunnen
Honing Supplies Catalog). Place alignment bushing
on mandrel so that it is centered on stone and shoe
section of mandrel.
WARNING
Do NOT step on foot pedal to lock alignment
bushing on mandrel. Spindle will turn if foot
pedal is depressed.
• Turn FEED selector to EXPAND to lock
alignment bushing on mandrel. Look to Honing
Indicator. If needle reads somewhere on scale then
alignment bushing is properly locked on. If not turn
STONE FEED DIAL until there is an indicator
reading. (Turn Dial same direction as you wish
needle to move.)
• Release stroker carriage and pull it out toward
front of work area.
REFERENCE
GAGING POINT
INDICATING
GAGING POINT
ALIGNMENT
BUSHING
FIGURE 3-2, Runout Indictor Gaging Point
19
• With pivot lock lever in “Lock” position, Runout
Indicator is now set to measure parallel runout of
honing unit. Rotate spindle by hand while observing
Runout Indicator. If necessary turn Knob B to get
an indicator reading. Turn spindle until high point is
found. Loosen nearest numbered screw (1-2-3-4) on
rear of spindle nose, and tighten screw on opposite
side. Repeat this procedure until parallel runout is
within acceptable limits. (Parallel runout of less
than two divisions on indicator is acceptable for
most honing applications. For close tolerance
applications, parallel runout should be less than one
division.)
• Conical runout should not be affected by
adjustment of parallel runout, however it is a good
practice to double check conical runout again. If
amount of parallel adjustment was large then
conical runout may have changed slightly. If it is
necessary to readjust conical runout, then always
recheck parallel runout after that.
• Remove indicator from threaded stroker drive
shaft.
• Set FEED selector to RETRACT and remove
alignment bushing.
34. Set stroke length: Loosen Stroke Length Lock
on front panel (1/4 turn is usually sufficient) and
turn Stroke Length Handwheel until Stroke Length
Indicator is aligned with desired stroke length. For
most applications, set stroke length to a value that is
95% of bore length or abrasive length, whichever is
longer. (See Stroke Length Guide printed on front
panel of Machine.)
FIGURE 3-3, Universal Fixture
FIGURE 3-4, Coolant Line
NOTE: Maximum stroke length is bore length or
stone length whichever is longer
NOTES: If workpieces have long counterbores or
large overhangs, shorten stroke length to gain
stability. For workpieces with blind holes, maximum
stroke length should be bore length, including relief,
minus 2/3 stone length.
For workpieces with tandem holes using a solid line
of stones, stroke length should equal total stone
length minus tandem distance.
For workpieces with tandem holes using separated
tandem stones, maximum stroke length is tandem
land length or individual stone length, whichever is
longer.
FIGURE 3-5, Coolant Line
SENSING TIP
35. Lock stroke length by tightening Stroke Length
Lock securely.
36. Engage Stroker Carriage with power stroking
unit: Push Stroker Carriage back until it stops. Turn
STROKING selector to AUTOMATIC.
ADJUSTMENT
SCREW
NOTE: Hand lever on stroker shaft must be up for
internal stroker latch to engage properly.
SENSING TIPS FOR DIAMETERS 1/8 to 1-1/64 in. (3,18 to 26 mm)
FIGURE 3-6, Sensing Tip
20
TABLE 3-1, ASC Sensing Tips
SENSING TIP
PART NUMBER
ASC-0125
ASC-0141
ASC-0415
ASC-0172
ASC-0188
AC-0203
ASC-0219
ASC-0234
ASC-0250
ASC-0266
ASC-0281
ASC-0297
ASC-0312
ASC-0328
ASC-0344
ASC-0359
ASC-0375
ASC-0391
ASC-0406
ASC-0422
ASC-0438
ASC-0453
ASC-0469
ASC-0484
ASC-0500
ASC-0516
ASC-0531
ASC-0547
ASC-0562
ASC-0578
ASC-0594
ASC-0609
ASC-0625
ASC-0630
ASC-0641
ASC-0656
ASC-0672
ASC-0688
ASC-0703
ASC-0719
ASC-0734
ASC-0750
ASC-0766
ASC-0781
ASC-0797
ASC-0812
ASC-0828
ASC-0844
ASC-0859
ASC-0875
ASC-0891
ASC-0906
ASC-0922
ASC-0938
ASC-0953
ASC-0969
ASC-0984
ASC-1000
ASC-1016
NOMINAL
DIAMETER
1/8
9/64
5/32
11/64
3/16
13/64
7/32
15/64
1/4
17/64
9/32
19/64
5/16
21/64
11/32
23/64
3/8
25/64
13/32
27/64
7/16
29/64
15/32
31/64
1/2
33/64
17/32
35/64
9/16
37/64
19/32
39/64
5/8
--41/64
21/32
43/64
11/16
45/64
23/32
47/64
3/4
49/64
2s/32
51/64
13/16
53/64
27/37
53/64
7/8
57/64
29/32
54/64
15/16
61/64
31/32
63/64
1
1-1/64
INCHES
DIAMETER RANGE
LOW
HIGH
.120
.139
.135
.154
.150
.169
.166
.185
.180
.l99
.191
.210
.211
.230
.226
.245
.240
.259
.256
.275
.269
.288
.2B7
.306
.304
.323
.318
.337
.334
.353
.347
.366
.365
.384
.383
.402
.396
.415
.412
.431
.426
.445
.443
.462
.461
.480
.474
.493
.490
.509
.505
.524
.521
.540
.540
.559
.552
.571
.568
.587
.583
.602
.599
.618
.615
.634
.620
.639
.631
.650
.646
.665
.661
.680
.678
.697
.697
.716
.709
.728
.724
.743
.740
.759
.756
.775
.775
.794
.787
.806
.802
.821
.818
.837
.834
.853
.853
.872
.86s
.884
.881
.900
.896
.915
.912
.931
.932
.951
.943
.962
.959
.978
.972
.991
.930
1.009
1.011
1.030
NOMINAL
DIAMETER
3,18
3,57
4,00
4,36
4,76
5,00
5,56
6,00
6,35
6,75
7,00
7,54
8,00
8,33
8,73
9,00
9,53
10,00
10,32
10,72
11,00
11,51
12,00
l2,30
l2,70
13,00
13,50
14,00
14,29
14,68
l5,00
15,48
15,88
16,00
16,27
16,67
17,00
17,46
18,00
18,26
18,65
19,00
19,45
20,00
20,24
20,64
21,00
21,43
22,00
22,22
22,62
23,00
23,42
24,00
24,21
24,61
25,00
25,40
26,00
NOTE: No standard fixture is provided to grip
workpiece to transmit honing torque to torque bar.
Several optional fixtures are available. Also some
types of workpieces are easily fixtured with common
hardware items. Contact your Sunnen Sales
Representative for fixturing.
MILLIMETERS
DIAMETER RANGE
LOW
HIGH
3,05
3,53
3,42
3,91
3,81
4,29
4,22
4,70.
4,57
5,05
4,85
5,33
5,36
5,84
5,74
6,22
6,10
6,58
6,50
6,99
6,83
7,32
7,29
7,77
7,72
8,20
8,0
8,56
8,48
8,97
8,81
9,30
9,27
9,75
9,73
10,21
10,06
10,54
10,47
10,95
10,82
11,30
11,25
11,74
11,71
12,19
12,04
l2,52
12,45
12,93
12,83
13,31
13,23
13,72
13,72
14,20
14,02
14,50
14,43
14,91
14,81
15,29
15,22
15,70
15,62
16,10
15,75
16,23
16,03
16,51
16,41
16,89
16,79
17,27
17,22
17,70
17,70
18,19
18,01
18,49
18,39
18,87
18,80
19,28
19,20
19,69
19,69
20,17
19,99
20,47
20,37
20,85
20,78
21,26
21,18
21,67
21,67
22,15
21,97
22,45
22,38
22,86
22,76
23,24
23,17
23,65
23,67
24,16
23,95
24,44
24,36
24,84
24,69
25,17
25,15
25,63
25,68
26,16
39. If using standard Universal Fixture, adjust fingers
on gate and on stroker carriage to contact workpiece as
close to tool as possible without risking accidental
contact with tool. Position gate so that workpiece is
captured, but not held tightly between fingers. There
should be only a small amount of clearance between
fingers and workpiece. Less than 1 mm (.04") is
preferable, but more is acceptable if workpiece length is
expected to vary.
40. If using standard Universal Fixture, position
Torque Arm to resist torque of workpiece as shown
(see Figure 3-3). Adjust bar so that torque is taken
as far from honing tool as possible but with out risk
of workholding fixture slipping past torque bar
(refer to Appendix A).
41. If using an optional fixture purchased from Sunnen
Products, carefully follow all setup instructions supplied
with that fixture. If constructing your own special fixture
make sure that honing torque will be resisted adequately,
and that workpiece is captured axially for stroking but
free to “float” and align itself on tool.
42. Set stroke position: With hands clear from
work area, press Stroker Jog and hold it in until
stroker carriage stops at one end of stroke.
Measure overstroke, distance from end of stone to end
of workpiece bore. (Place workpiece in fixture or hold it
next to tool to measure.) Press Stroker Jog and hold it in
until stroker carriage moves to other end of stroke.
Measure overstroke on that end. If overstroke is not
equal on both ends, then adjust stroke by loosening
Stroke Position Lock and then turning Stroke Position
Handwheel. Handwheel is graduated in millimeters with
numbers increasing as carriage is moved away from
spindle. Tighten Stroke position Lock and recheck
overstroke on each end.
43. Set coolant lines to supply a continuous supply of
coolant to front and back of bore. Coolant nozzles are
attached to small aluminum bases that can be attached
to stroker carriage (see Figure 3-4). Turn COOLANT
selector to CONSTANT and adjust valves on coolant
manifold. Use as much coolant as possible without
losing any to splashing or spraying out of machine.
37. If Stroker Carriage is very close to spindle, then
loosen Stroke Position Lock and turn Stroke Position
Handwheel to move lt away from spindle.
38. Install Workpiece Fixturing. Workpiece must be
fixtured to resist honing torque and to drive workpiece
back and forth for stroking. EC-3500 includes following standard fixturing components: A Universal Fixture
with Fingers for stroking, and small Torque Arm to
absorb honing torque. These can be used for most
applications, however other fixturing components are
available from Sunnen Products Company for certain
types of applications such as square honing. See
Catalogs or contact your Sunnen Sales Representative
for more information.
NOTE: There are two sizes of coolant nozzles provided.
Black nozzles have small openings for delivering a
steady narrow jet of coolant from a distance. Use these
if it is difficult or inconvenient to place nozzle close to
workpiece. Orange nozzles have larger openings and can
deliver a larger volume of oil with less splash. Larger
nozzles are preferred if they can be positioned close to
workpiece.
21
For convenience one coolant nozzle can be clamped
in back of stroker carriage on a rib nearest spindle
pointing up to rear of workpiece bore (see Figure 3-5).
Note that almost all workpieces will be positioned
with rear of bore in this location, so this one nozzle
will not require adjusting when changing setups.
44. Return COOLANT selector to CYCLE ONLY.
45. Replace Spindle Splash Guard on back of
Stroker Carriage. Press STROKER JOG to check
Splash Guard clearance.
46. Set STROKING selector to AUTOMATIC.
47. Set SIZE CONTROL selector to desired size
control mode.
48. Set FINISHING FEED FORCE to desired mode.
FIGURE 3-7, Sensing Unit Setting Fixture
NOTE: Refer to Appendix A, for guidelines on when
Two-Stage Feed Force feature is beneficial.
If using ZERO SHUT-OFF go to step 50.
49. Set Automatic Size Control (ASC) Unit:
a. If ASC Unit has been removed from machine,
then it must be installed.
FIGURE 3-8, Attachment of Sensing Tip
NOTE: If setting up ASC for first time on a new
machine, it may be necessary to adjust ASC unit. (Only
necessary for a new machine or a new ASC unit.)
d. Determine proper micrometer setting for ASC-50
Setting Fixture or ASC-50M Metric Setting Fixture
by following formula:
[ Desired Bore Size - 1" (or 25,4mm) ] ÷ 2
Set micrometer to this size and lock micrometer
spindle.
e. Adjust sensing screws in sensing body so that size
is somewhat smaller than desired bore size. Insert
sensing unit into setting fixture (see Figure 3-7).
f. Line up one of four screws with micrometer
spindle and tighten clamp screw on setting fixture.
As you tighten clamp screw, press downward on
sensing unit as shown (see Figure 3-7). Downward
force assures that sensing unit is flat against frame of
setting fixture. This is necessary for best accuracy.
With wrenches provided, adjust sensing screw to
just touch micrometer spindle tip and tighten
locking nut.
Repeat step for each sensing screw.
g. Note micrometer reading. Loosen micrometer
spindle lock, and back off spindle. Check each of
four sensing screws with micrometer ratchet. All
sensing screws should read within 0,03 mm (.001").
Be sure to hold sensing unit flat on setting fixture
frame each time you tighten clamp screw.
h. Back off adjustment screw slightly so that
first part honed will be undersized rather than
oversized if there was any inaccuracy in setting.
b. Select and adjust proper Sensing Tip or Sensing
Tip Unit for final bore size to be gaged (see Table
3-1 & Figure 3-6).
NOTE: A sensing tip is adjustable to any size within
its diameter range. However, once adjusted to a bore
size near maximum, sensing tip may take a
permanent set and not return to minimum sizes.
Therefore it may be necessary to have more than one
sensing tip if you have more than one application
with different sizes within same diameter range.
Also, changeover time from one job to next will be
minimized if, once adjusted, a sensing tip is
dedicated to one particular application only.
All four segments of sensing tip or sensing unit must
contact taper on adjustment screw. If one or more segments has been bent away from screw, then back out
screw and squeeze sensing tip back into shape.
If final bore size is smaller than 26 mm (1.03") skip
steps c through j and go to step k.
c. If using Sensing Unit, back out adjustment screw
until it is loose in sensing body. Then tighten this
screw one full turn after initial contact is made
between tapered portion of adjusting screw and
sensing body. This initial setting of adjustment
screw will allow you to increase or decrease sensing
unit size when final size adjustment is made.
22
i. Sensing tip or sensing unit is adjusted by turning
adjustment screw inside stem of tip with a 1/16"
hex wrench. Sensing tip or sensing unit can be set
to size with a micrometer or by inserting it into a
workpiece that has already been honed to final size.
Set adjustment screw so that sensing tip lightly
drags on honed bore. Then back off adjusting screw
about 1/4 turn. This will make first part honed
undersized by approximately 0,025 mm (.001").
NOTE: STROKER JOG will not operate if FEED
selector is set to EXPAND.
r. Return ASC PROBE selector to DOWN.
50. Set EXTRA STROKES to desired value.
NOTES: If Size Control is Zero Shut-Off, Extra
Strokes will only occur if FINISHING FEED FORCE
is set to DURING EXTRA STROKES ONLY.
Otherwise machine control system will disregard any
numerical value displayed.
If Size control is ASC, Extra Strokes can be used
with Finishing Feed Force in either mode or with
Finishing Feed Force off.
Regardless of Size Control mode selected, following feature of Extra Strokes display is always
active: If a numerical value is displayed, stroker
will always stop at a consistent end of stroke (front
or back). If display shows “—” then stroker will
stop immediately once size control device is triggered. The “—” feature is only necessary when trying to obtain extremely high size repeatability when
using Zero Shut-Off or when it is feared that stroker
motion at end of cycle may cause scratches on
extremely fine finishes. If using the “—” feature
with ASC, note that all size corrections must come
from adjusting screw in sensing tip body.
If ASC size control mode is selected but ASC Unit
is disconnected, machine control will begin counting down extra strokes 1-1/2 seconds after honing
cycle begins. This produces honing cycles of consistent duration, lasting only specified number of
strokes. This can be useful when only some deburring or polishing is required.
Changing amount of Extra Strokes is an easy way to
compensate for ASC sensing tip wear. However,
keep in mind that more extra strokes there are more
final bore size can vary, since bore is being plug
gaged before extra strokes. If honing rates vary over
time more or less extra material may be removed
during finishing. If final size tolerances are close,
keep amount of extra strokes to a minimum.
NOTE: Final size can be adjusted after first
workpiece by either turning adjustment screw or by
changing number of Extra Strokes displayed on
operator panel.
j. Screw Sensing Tip or Sensing Unit on to stud on
Probe Body (see Figure 3-8). If required, use Probe
Extension to reach into counterbore in workpiece or
reach past fixturing.
k. Press STROKER JOG and hold in to get stroker
to front of stroke
l. Turn spindle by hand until shoes are up and then
place a workpiece on mandrel.
WARNING
Keep hands away from ASC unit when turning ASC
Probe Selector to move ASC probe up or down.
m. Make sure that ASC unit is a safe distance from
honing tool, and with hands away from work area,
turn ASC PROBE selector to UP.
n. Loosen Clamp Screw on ASC unit and slide unit
up to workpiece. Sensing Tip should be depressed
about 3 mm (1/8"). Tighten Clamp Screw.
NOTE: If desired, use Stop Clamp supplied with
ASC unit to allow quick return to ASC setup position
again if unit needs to be moved back along Rail for
honing tool runout adjustment or replacement.
Attach Stop Clamp to ASC Rail against back of ASC
unit with supplied brass tipped set screw.
o. Loosen locknut on ASC Fine Position Screw.
Look through hole near top of ASC arm to red light
on proximity switch. Turn ASC Fine Position
Screw until point is reached where light is just
turned on. From that point, turn ASC Fine Position
Screw 1-1/2 turns clockwise. Tighten locknut on
Fine Position Screw.
p. Loosen Probe Body Clamp Knob and move whole
Probe Body to center Sensing Tip on workpiece bore.
Tighten Probe Body Clamp Knob.
q. Press STROKER JOG repeatedly to see how
Sensing Tip engages bore and to see if Proximity
Switch is being made at end of stroke. It may be
necessary to reposition Probe Body or to adjust Fine
Position Screw.
51. Using Sunnen Precision Bore Gage, measure
bore size of a workpiece and place it on honing tool.
WARNING
Do NOT step on foot pedal to lock alignment
bushing on mandrel. Spindle will turn if foot
pedal is depressed.
52. Turn Feed Selector to EXPAND. Rotate workpiece
by hand some to get it to seat fully on mandrel.
53. Make sure FINISHING FEED FORCE selector
is set to desired position.
23
• Turn ROUGH —> FINISH DIAMETER knob
slowly clockwise until light next to it just turns on.
Trigger point is now set.
• Turn then FINISHING FEED FORCE selector to
AFTER ROUGH TO FINISH DIAMETER.
• Turn stone feed dial until needle on Honing
Indicator reads amount of stock to be removed from
diameter of workpiece on mandrel.
NOTE: If FINISHING FEED FORCE mode is
AFTER ROUGH TO FINISH DIAMETER, skip
steps 54 and 55 and go to step 56.
54. Turn stone feed dial until needle on Honing Indicator
reads amount of stock to be removed from diameter of
workpiece on mandrel.
NOTE: There is some backlash in STONE FEED
dial. For best accuracy in setup, always turn dial
until Honing Indicator reads some amount less than
stock removal and then feed up (counterclockwise)
until needle reads correct amount of stock removal.
NOTE: There is some backlash in STONE FEED
dial. For best accuracy in setup, always turn dial
until Honing Indicator reads some amount less than
stock removal and then feed up (counterclockwise)
until needle reads correct amount of stock removal.
55. Skip step 56 and go to step 57.
56. Set ROUGH to FINISH DIAMETER and stock
removal amount by following procedure:
57. Set FEED REGULATOR:
NOTE: Use of FEED REGULATOR is optional. If it is
not to be used on this application, then skip this step and
go to step 58. (See Appendix A for guidelines on when
Feed Regulator may be beneficial.)
NOTE: Changing level of feed force changes
amount of compression in feed rod inside machine.
This makes needle on Honing Indicator move. The
following steps are necessary to compensate for this
needle movement when feed force changes from
roughing to finishing.
• Turn MAXIMUM RATE dial to slowest speed.
• Turn INITIAL DIAMETER knob
counterclockwise about two turns.
• With workpiece removed from tool, turn FEED
selector to EXPAND while watching Honing
Indicator. Needle will drop quickly to initial
diameter point and then move very slowly. If point
that needle stops is not desired point, then turn
FEED selector to RETRACT, adjust INITIAL
DIAMETER knob, and expand again while
watching indicator.
• With a measured workpiece seated on mandrel,
turn STONE FEED dial until needle on Honing
Indicator is near zero.
• Turn FINISHING FEED FORCE selector to
OFF and then again to AFTER ROUGH TO
FINISH DIAMETER a couple of times to help
“seat” feed system and wedge. Return selector to
AFTER ROUGH TO FINISH DIAMETER.
• Turn STONE FEED dial up until needle on
Honing Indicator reads amount of stock that you
want removed during finishing stage.
NOTE: To use FEED REGULATOR efficiently,
initial diameter should be set to a point just smaller
than smallest starting bore diameter that you expect
to encounter. It may be necessary to measure several
workpieces to know how they will vary. Set initial
diameter to point where Honing Indicator reads
difference between initial diameter and final bore
size. There are trade-offs to setting this initial
diameter. If it is too large, a workpiece slightly
smaller than expected may be contacted at full feed
force, possibly damaging stone or tool. If initial
diameter is set too small, cycle time gets excessively
long with significant time spent just “cutting air”.
Use your best judgement based on your knowledge
of variability of starting diameter of workpieces.
When using Feed Regulator at higher feed forces,
“Initial Diameter” (where needle begins to slow
down on Honing Indicator) may appear different during a cycle than it did when it was set by recommended procedure. This is normal behavior caused
by amount of compression in feed system. However,
this indicates that stones are contacting workpiece
bore immediately after cycle begins although not at
full feed force selected. If this initial contact still seems
NOTE: See Appendix A for guidelines on how
much finishing stock to set.
• Turn FINISHING FEED FORCE selector to OFF.
Needle on Honing Dial will drop some. Do not turn
STONE FEED dial to move it up again.
• Turn ROUGH —> FINISH DIAMETER knob
fully counterclockwise. Light next to knob should
now be off. If it is not on then try using “B” indicator
scale. Turn INDICATOR SCALE / HONING TOOL
selector to “B” scale for tool you are using and go
back to step 55a. If indicator scale selected is already
“B” and light is not off with ROUGH —> FINISH
DIAMETER knob rotated fully counterclockwise,
then either Finishing Force selected is too low, or
finishing stock removal amount is too small for this
finishing feed force mode to work properly. If this is
case you must either increase finishing stock removal,
or decrease difference between roughing and finishing
forces, or use “During Extra Strokes Only” method.
24
relative to cutting rate, or else it will not be able to
keep up with rate of stock removal.
When using ASC with FINISHING FEED FORCE
set to AFTER ROUGH TO FINISHING DIAMETER,
compensator should be set to approximately 1/4 to
1/2 of expected stonewear to keep Two-Stage Feed
Force feature operating properly every cycle.
Compensator will probably actuate more than once
each cycle, but amount of stock removed during
finishing will be relatively consistent. However, be
careful not to set compensator too low relative to
cutting rate, or else it will not be able to keep up with
rate of stock removal.
too rough, then turn Initial Diameter knob counterclockwise some to make Feed Regulator begin at a
smaller diameter.
When using FINISHING FEED FORCE set to
AFTER ROUGH TO FINISH DIAMETER: When
feed force changes from roughing to finishing needle
on honing indicator rises, as observed when setting
ROUGH —> FINISH DIAMETER. Amount of this
needle shift can be subtracted from initial diameter
when setting FEED REGULATOR. This will save
cycle time.
• Turn FEED selector to EXPAND. Watching
Honing Indicator, turn up MAXIMUM RATE dial
until desired speed is reached.
• Turn FEED selector to RETRACT.
58. Set AUTOMATIC STONEWEAR
COMPENSATOR
• Return STONE FEED dial to position it was at
when you started.
NOTE: STONE FEED dial has some backlash.
When you feed back down, always feed down
beyond and then up to point desired.
NOTE: Use of AUTOMATIC STONEWEAR
COM-PENSATOR is optional. If it will not be used,
then skip this step and go to step 59.
If using ASC, it is recommended that Automatic
Stonewear Compensator be used. If it is not, it will be
necessary to manually advance STONE FEED dial to
keep feed system operating in a range where needle on
Honing Indicator can be observed and where feed system
can deliver its full selected feed force.
When starting a new application where stonewear is
not known, it is recommended that several
workpieces be honed without Compensator on so that
an accurate estimate of stonewear can be determined.
59. Set Spindle Speed. Use chart below knob to
determine spindle speed based on bore diameter.
60. Set Stroke Speed. Use chart below knob to
determine stroke speed based on stroke length.
WARNING
Recommended speeds may not be suitable for all
applications and for all fixtures. Always start a new
setup with speeds that are much lower than
recommended to test stability of tooling and
fixturing.
OPERATION: POWER STROKED HONING
• Write down or make a mental note of position of
STONE FEED dial.
• Turn Knob on AUTOMATIC STONEWEAR
COMPENSATOR counterclockwise some to turn it
on.
• Press “check” button and hold it in until STONE
FEED dial stops moving. Release button and note
new Feed Dial Position.
NOTE: Before honing, review your setup of
machine.
1. Install workpiece in workholding fixture.
WARNING
To prevent personal injury and damage to
machine DO NOT hone without installing
workpiece in a workholding fixture.
NOTE: Be sure to read appropriate scale for honing
tool family selected.
2. Install workpiece with workholding fixture in
Gate Fixture or other stroking fixture and close
fixture so that workpiece is captured for stroking.
3. Turn POWER ON.
4. Turn COOLANT to CONSTANT to check flow
of coolant to tool and workpiece. Return selector to
CYCLE ONLY if that is desired mode of operation.
5. Start cycle by either pressing Cycle Start or
stepping on Foot Pedal. In general it should be not
necessary to use Foot Pedal for operation.
However, by using it on first workpiece you can
make feed system engage workpiece slowly to
possibly prevent damage from an improper setup.
• If amount STONE FEED dial moved was not
amount of stonewear expected for each workpiece,
then adjust knob accordingly and press “check”
button again. Repeat until compensator is
advancing STONE FEED dial by correct amount.
NOTE: When using ASC with FINISHING FEED
FORCE set to OFF or EXTRA STROKES ONLY it
is not necessary to have Compensator set to exact
stonewear amount. Compensator will actuate any
time that needle on Honing Indicator reaches zero,
provided that compensator is not turned off.
However, be careful not to set compensator too low
25
9. Is finished bore tapered from one end to other,
with direction of taper consistent with workpiece’s
orientation in stroking fixture? If so, loosen Stroker
Position Lock and adjust stroke by turning Stroke
Position Handwheel slightly to move stroker
carriage in direction that workpiece bores are larger.
NOTE: Cycle stop can interrupt any cycle before
final size has been reached.
6. When cycle stops automatically, gage final bore
size.
WARNING
To avoid personal injury, allow stroker and
spindle to come to a complete stop before
removing workpiece.
WARNING
NEVER adjust stroke length or stroke position
while machine is running.
7. If you are using ZERO SHUT-OFF for size
control, then move STONE FEED dial to adjust size
if size is not correct.
10. If using Zero Shut-Off, do you have to advance
STONE FEED dial by a consistent amount after
each cycle? If so and AUTOMATIC STONEWEAR
COMPENSATOR is OFF, then see Setup-Power
Stroking, step 58 to turn it on and adjust it. If it is
already on, adjust amount of automatic stonewear
compensation by turning AUTOMATIC
STONEWEAR COMPENSATOR knob
counterclockwise some. Write down or make a
mental note of STONE FEED dial position. Press
“check” button and hold in to check amount of
compensation. Adjust if necessary. Return STONE
FEED dial to original position.
11. If using Two-Stage Feed Force, Is amount of
finishing too long or too short? If using AFTER
ROUGH TO FINISH mode, amount of finishing can
be increased by turning AFTER ROUGH —>
FINISH knob clockwise slightly. If using DURING
EXTRA STROKES ONLY, amount of finishing can
be increased by adding extra strokes. However, if
using extra strokes with ASC, this may change final
bore size and sensing tip may have to be adjusted.
12. Is honing rate reasonable? Is cylindricity of
finished bore acceptable? Feed forces may have to
be adjusted. In general, increase Feed Force if
honing is too slow and finished bores are round and
straight and of consistent size. Also, in general,
decrease Feed Force if bores are not as cylindrical
as desired, if size is inconsistent or if stonewear is
excessive. If not using Two-Stage Feed Force, it
may be beneficial.
13. Is stroker stopping at desired end of stroke?
End of stroke that stroker will stop on can be
changed by pressing STROKER JOG and holding in
until stroker stops at opposite end. Every cycle
thereafter will stop at that end.
14. To correct other problems with workpiece
bores, see Troubleshooting
NOTE: STONE FEED dial has some backlash. If
you must feed down, always feed down beyond and
then up to point desired.
CAUTION
Advancing STONE FEED dial while machine is
running is not recommended. If you must advance
dial while machine is running, be careful not to have
your hand on dial when Automatic Stonewear
Compensator is about to actuate (at beginning of
cycle if using Zero Shut-Off; when needle reaches
zero if using ASC).
8. If you are using ASC, then adjust final bore size
by either adjusting screw in sensing tip or by
changing number of extra strokes. Large
adjustments should be made by adjusting sensing
tip. Small adjustments can be quickly and
conveniently made by changing number of extra
strokes. Over time, as sensing tip wears, size can
be adjusted easily with this feature.
NOTE: In general if workpiece is honed slightly
undersized, you may adjust STONE FEED dial and
immediately rehone that workpiece. However when
using Two-Stage Feed Force or Extra Strokes
feature, it is not recommended that you try to hone
workpieces that are only slightly undersized. In time
it takes for finishing force to actuate or for extra
strokes to count off, workpiece will probably go
oversize.
It is recommended that any such
workpieces be set aside until end, and then honed
with finishing force off but with roughing feed force
set to same value as finishing force had been, and
with no extra strokes.
The following adjustments may require running several
cycles to observe pattern of stonewear, cutting rate, etc.
26
SECTION 4
ROUTINE MAINTENANCE
GENERAL
The following procedures are given as guides only
and are not to be construed as absolute or invariable. Each machine must be maintained individually
according to its particular requirements.
LUBRICATION
WARNING
Some troubleshooting procedures require examining
parts inside machine enclosure. ALWAYS have power
OFF when hoods are open. If problem cannot be
diagnosed by Power Off inspection, then consult a
Sunnen Service Technician.
FIGURE 4-1
Spindle Only:
Lithium complex base grease
Viscosity: ISO VG 150
NLGI Grade: 0 Tribol Molub-Alloy #860/150-0
or equivalent.
Sunnen SML-110 (1 Gal. Can)
All other lubrication:
Lithium complex base grease
Viscosity: ISO VG 220
NLGI Grade: 1 Tribol Molub-Alloy #860/220-1
or equivalent.
Sunnen SML-120 (Cartridge)
FIGURE 4-2
Feed Regulator Oil:
ISO VG 150 Oil
ROUTINE MAINTENANCE SCHEDULE
Daily:
• Check coolant level (Gage on front of Coolant
System), and add coolant as necessary.
CAUTION
DO NOT overfill system.
FIGURE 4-3
• If using Sunnen Coolant Concentrate, check concentration and add water or concentrate as necessary.
Every 500 Hours:
CAUTION
Over filling spindle can cause it to run hot.
• Apply two or three pumps of grease to spindle
(see Figure 4-1).
• Apply grease to Feed Force Screw Stop Blocks
(see Figure 4-2).
• Apply grease all other grease fittings (see
Figure 4-2 & 4-3).
FIGURE 4-4
27
• Apply grease to contact points on Indicator
Assembly (see Figure 4-4).
• Apply grease (see Figure 4-5) to Cam Assembly
Connection Pins.
Every 1000 Hours:
• Clean and repack feed rod thrust bearings.
NOTE: This service period can be stretched to 2000
hours if machine is only used at low speeds (less than
1500 rpm) and low feed forces (less than 6).
• Inspect belts for cracks and excessive wear.
Coolant System:
Replace Filter when flow to work area is insufficient
(see Figure 4-6):
1. To change filter it will be necessary to remove
Sediment Tray. Scoop sediment out of tray before
attempting to remove it from coolant system. If
Sediment Tray is nearly full it may be too heavy to
lift out. Furthermore, cleaning this tray every time
filter is changed will maximize filter life.
2. Filter Canister can be raised by loosening clamp
handle securing canister to reservoir wall. Lift
canister as far up as it will go, and then rotate it
slightly. Then let it down until it’s two protrusions
on side of canister rest on canister bracket. In this
position, drain valve at bottom of canister can be
opened. Also open air vent at top to allow air into
canister as coolant drains out bottom.
FIGURE 4-5
3. Open Filter Canister and replace filter element.
It may be necessary to clean inside of canister.
4. Close drain valve and canister and lower it back
into reservoir. Close air vent after bleeding air out
of canister with pump running.
5. Replace sediment tray.
NOTE: Omission of Sediment Tray will reduce life
of filter.
COOLANT
MANIFOLD
SEDIMENT TRAY
HIGH PRESSURE
RELIEF VALVE
(40 PSI MAX.)
FILTER
CANISTER
FLOW CONTROL
ON/OFF VALVE
LOW PRESSURE
RELIEF VALVE
(13 PSI MAX.)
FLUID
PUMP
DIRTY FLUID
FILTER
ELEMENT
FIGURE 4-6, Coolant System
28
Pump Maintenance:
• Loosen screw in end of feed rod holding bearing
in place.
• Pull bearings off of feed rod. Note back-to-back
arrangement of these bearings. (Wide faces of outer
races are in contact.)
• Clean and repack.
• Replace bearing keeping same back-to-back
arrangement.
Dirty honing coolant which must pass through
pump before it can be filtered contains many
aggressive abrasive Fparticles. The progressing cavity pump used on coolant system provides superior
life when compared with other common types of
pumps. However, some of pump components can be
expected to wear in this difficult application. The
most common part to wear is Nitrile Stator,
although eventually Rotor and Seal will also wear
out. All of these parts are available from Sunnen or
directly from pump manufacturer.
Stator and Rotor can be replaced easily without
having to remove pump from coolant system. All
that is required is removing four screws on suction
housing.
NOTE: One bearing takes a much greater load than
other. Bearing life will be extended if both bearings
held together are reversed when they are replaced so
that over time both bearings wear evenly.
8. Reverse steps above to reassemble. When
tightening two screws fastening cover, alternate
between two to seat bearings evenly.
9. Use screw against wedge to tension belt before
tightening screws on base plate. Tension belt so that
deflection at midway between pulleys is
approximately 4mm (.158in) when a 33N (7.4 lb)
load is applied.
NOTE: Because pump is below coolant level, break
hose connections near top of coolant system
(preferably inside) to prevent hoses from acting as a
siphon when suction housing is opened.
Replace Spindle Belt:
Replace Stroker Belt:
1. Remove two screws holding feed rod thrust
bearing cover to thrust bearing housing.
2. Slide feed rod and thrust bearings forward out
of thrust bearing housing.
3. Loosen four screws holding spindle motor base
plate to deck.
4. Loosen one screw on wedge that bears against
motor base plate.
5. Slide spindle motor in toward spindle to loosen
belt.
6. Remove and replace belt.
7. It is recommended that feed rod thrust bearings be
cleaned and repacked with grease at this time:
1. Loosen four screws holding stroker motor base
plate to stroker frame.
2. Loosen one screw on wedge that bears against
motor base plate.
3. Slide stroker motor up to loosen belt.
4. Remove and replace belt.
5. Reverse steps above to reassemble. Use screw
against wedge to tension belt before tightening
screws on base plate. Tension belt so that deflection
at midway between pulleys is approximately 4mm
(.158in) when a 33N (7.4 lb) load is applied.
29
NOTES
30
SECTION 5
TROUBLESHOOTING
GENERAL
OPERATIONAL TROUBLESHOOTING
Refer this section when troubleshooting your
machine.
For suggestions on correcting problems with bore conditions or with honing operation, consult Table 5-1.
TABLE 5-1, Operational Troubleshooting
CONDITION TO BE CORRECTED
STONE GLAZED*
STONE
Stone surface looks
NOT
clean but cutting
CUTTING
grains are dulled
(Honing dial
needle moves
too slowly)
STONE LOADED*
Stone surface looks
smeared and
clogged with chips
SLOW STOCK REMOVAL*
(Honing dial needle moves too slowly)
POOR STONE LIFE*
(Honing dial needle moves too fast)
BELLMOUTH
Standard Sunnen Tooling and Procedures will satisfy all ordinary honing requirements. If problems are encountered, they can usually
be solved by following procedure suggested below. For detailed information on difficult or unusual honing problems contact
your local Sunnen Field Engineer or Sunnen Customer Service Department in St. Louis, Missouri, USA.
STEP 1
STEP 2
STEP 3
STEP 4
STEP 5
Sharpen A or J stone
Increase cutting
Increase stroking
Use a softer stone
Check oil to be
with MAN-700
pressure
speed
(one with a lower
sure you are using
diamond dresser; use
hardness number)
Sunnen Industrial
LBN-700 dressing stick
Honing Oil*
on all other stones
Clean stone with
Increase stroking
Use a softer stone
Use a coarser grit
Check oil to be
LBN-700 dressing
pressure
(one with a lower
stone (one with a
sure you are using
stick
hardness number)
lower grit number)
Sunnen Industrial
Honing Oil*
Increase spindle speed
Increase cutting
Check oil to be
Use a softer stone
Use a coarser grit
pressure
sure you arc using
(one with a Lower
stone (one with a
Sunnen Industrial
hardness number)
lower grit number)
Honing Oil*
Decease cutting
Use faster spindle
(one with higher
stone (one with lower
Check oil to be sure
pressure
speed
hardness number
grit number)
you are using Sunnen
Industrial Honing Oil*
True stone and shoes
Use softer stone
If Bore is LONGER
Shorten STONE only
If bellmouth persists
with truing sleeve
(OK with lower
than 2/3 stone length:
(or row of stones)
shorten stones still
If part is short or
hardness number)
slightly on both ends
more but do not shorten
unbalanced, shorten
shoes any further
stroke length
If Bore is SHORTER
Shorten STONES and
CAUTION:
than 2/3 stone length:
SHOES equally to
Overcorrection of
1-1/2 times bore
bellmouth will lead
length
to barrel condition
True stone and shoes
Use finer grit stone
Use longer stone or
Use mandrel with
CAUTION:
with truing sleeve
(one with higher grit
shorten guide shoes
longer stone and shoe
Overcorrection of
number)
on both ends
barrel will lead
to bellmouth condition
{
{
BARREL
TAPER IN
OPEN HOLE
True stone and shoes
with truing sleeve
TAPER IN
BLIND HOLE
Shorten stone and
If hole has insufficient
shoes to about 3/4
or no relief at bottom,
shorten stone more
use hard tip stone
if taper persists
Make sure honing
Thoroughly true stone
If thin wall part,
tool is recommended
and shoes to exact
decrease cutting
size for diameter to
hole diameter
pressure
be honed
Use honing tool with sufficient stone length to bridge waviness
(or Iands and ports in bore)
Use L, BL, or multi-stone mandrel. Stone
Use shorter stroke
length should be at least 1-1/2 times the
length
length of bore for best bow correction
(less overstroke)
OUT-OF-ROUND
WAVINESS
RAINBOW
FINISH TOO ROUGH*
For extremely fine
RANDOM SCRATCHES
Change stroke so tight
end of bore is stroked
over stone further
True stone and shoes
frequently with truing
sleeve
Reverse work on
mandrel more often
If power stroking, make
sure spindle and stroker
are in alignment
Provide sufficient
relief at bottom of
hole
Provide adequate oil
flow at bottom of hole
to wash cutting out
If stone stops cutting
at decreased pressure
use stone with lower
hardness number
If power stroking
make sure spindle
and stroker are in
alignment
Use stone with lower
hardness number to
avoid part flexing
Decrease cutting
Use finer grit stone
Check oil to be sure
Thoroughly true shoes
pressure
(one with higher grit
number)
you are using Sunnen
Industrial Honing Oil*
to exact hole diameter
Decrease cutting
pressure
Use finer grit stone
(one with higher grit
number)
Use softer stone
(one with lower
hardness number)
If hard steel mandrel is
being used, change to
soft steel mandrel. If
soft steel mandrel or
shoes are being used,
change to bronze
mandrel or shoes
finishes in soft or
exotic material, use
bronze mandrel or
bronze shoes
Check oil to be
sure you are using
Sunnen Industrial
Honing Oil*
*Many honing problems, such as poor cutting action, poor stone life, and rough finish are caused by wrong honing oil, insufficient honing oil, dirty honing oil, or
contaminated honing oil. Use only clean, full-strength Sunnen Industrial Honing Oil. Make sure that honing oil is neither diluted or "cut" with other oils. Keep solvents
and cleaning fluids away from honing machine.
31
MACHINE OPERATION TROUBLESHOOTING
Error Messages:
EC-3500 has built in error messages that will appear
in the spindle speed screen to alert operator when
machine has stopped due to an error or incorrect
setup. The following is a list of errors and directions
on how to clear them. Once the problem is resolved,
pressing the "Cycle Stop" button will clear the error
from the display.
Error 1: Unexpected Start Signal.
- When power is turned on, the machine verifies
that the foot pedal/cycle start button is not pressed
down to prevent any unexpected start up.
Error 2: Switch Has Changed During a Cycle.
- In order for this error to occur, one of the following
switches was changed while the machine was honing
Expand/Retract, Size Control Mode, Stroker Mode,
Finishing Feed Force Mode, or Stroker Enable.
These switches cannot be moved during a honing
cycle.
Error 3: Spindle or Stroker Speed Set to Zero.
- A speed must be set for both the spindle and
stroker before the machine can start a cycle.
Error 4: Safety System Was Triggered.
- The safety system determined that an unsafe condition
has occurred. I.e. the light curtain was broken.
Error 5: Workpiece Oversized.
- The original workpiece was oversized. The ASC
probe never stuck the workpiece. If the ASC is not
being used, this error should be bypassed (See
Appendix A, "Dip Switch Settings")
Error 6: ASC is Not Aligned Properly.
- Extra Strokes count had decrement by three or more
when an additional ASC probe hit was detected.
Error 7: Feed System is Expanded.
- A honing cycle cannot be started with the feed system
expanded. Place the feed selector switch to Retract.
Error 8: Stroker Was Unlatched.
- A honing cycle cannot be started with the stroker
unlatched. Place the stroker mode selector switch to
Auto.
Error 9: In Manual Honing Mode.
- A honing cycle cannot be started with the stroker
mode in manual. Place the stroker mode selector
switch to Auto.
Error 10: Stroker Enable Key is Off.
- A cycle will not be started when the stroker enable
key is in the OFF position. Turn the stroker enable
key to the ON position.
Error 11: Electrical Fault.
- The machine has had an electrical fault. Check circuit
breakers, drives, overloads and motor temperature.
FIGURE 5-1, Stroker Pivot Free Play
Error 12: Stroker at Back of Stroke
- The machine was started with the stroker carriage
at the front of stroke. If starting from the front or
stroke is needed, this error should be bypassed. (See
Appendix A - "Dip Switch Settings")
Problems / Solutions:
WARNING
Some troubleshooting procedures require examining
parts inside machine enclosure. ALWAYS have
power OFF when hoods are open. If problem cannot
be diagnosed by Power Off inspection, then consult a
Sunnen Service Technician.
PROBLEM: Machine does not start when Cycle
Start is pressed.
SOLUTIONS:
- Is power on?
- Is FEED selector set to RETRACT?
- Is foot pedal cover in place?
- Is STROKING selector on AUTOMATIC?
For Models EC-3500CE and EC-3500CD only:
- Is STROKER key switch set to ENABLE?
- Is green LED on Light Curtain lit?
If red LED is lit, then something is blocking a
light beam.
If yellow LED is lit, then light curtain needs to do
its startup self check routine. Put your hand through
light beam path and then pull it out again to trigger
self check routine.
PROBLEM: One or more of switches on operator
panel do not seem to work.
SOLUTION: Some setup functions such as
STROKER JOG will not work if other switches are
set improperly. Check following:
- Is power on?
- Is FEED selector set to RETRACT?
- Is foot pedal cover in place?
- Is STROKING selector on AUTOMATIC?
32
still cannot reach required position, it may be necessary to make a special pin for indicator to pivot on,
mounting to front of stroker carriage.
PROBLEM: When attempting to hone a workpiece
with only a very small amount of material to
remove (1 to 5µ), cycle stops immediately without
removing required amount of material.
SOLUTION: Feed System normally feeds up rapidly and there is somewhat of an impact when stone
contact workpiece. Sensitive electronic transducer
that reads feed rod position will sometimes pick up
this vibration and read a position that is less than
zero for a fraction of a second, thus ending cycle.
To prevent this, turn Feed Regulator Initial
Diameter knob on (counterclockwise) about 2-1/2 to
3 turns, and turn Maximum Rate knob to fastest
speed (about 9-1/2). This will damp any feed rod vibration without lengthening cycle time and allow even
very small amounts of material to be removed accurately.
PROBLEM: When using Two-Stage Feed Force,
Roughing Feed Force slowly increases over time,
OR Finishing Feed Force slowly decreases over
time.
SOLUTION: Force Screw attached to that Feed
Force dial is too free. Some drag must be applied
to that Force Screw. Drag adjustment screw is provided for each Force Screw. Drag screw to tighten
Finishing Force Screw is located down a hole on
left side of top surface of casting that Force Screws
thread into. Drag screw to tighten Roughing Force
Screw is located up a hole on right side of bottom
surface of that casting. Tighten drag screw 1/4 turn
only and then see if problem persists. If so tighten
screw another 1/4 turn and recheck. DO NOT tighten more than 1/4 turn at a time without rechecking
to see if problem exists. Too much drag will make
knob difficult to turn and components will wear out
faster.
PROBLEM: Needle on Honing Indicator will not
go all way to top of scale when Feed is Retracted.
SOLUTION: Is Indicator Scale / Honing Tool selector set to red “D2” tool family? If so, it is normal
for needle to rest about three quarters from bottom
of scale when retracted. This will not interfere with
honing when using these tools. If selector is not set
to red “D2” scale, then Stone Feed dial has been
turned back too far. Advance Stone Feed dial
(counterclockwise) until needle goes up past maximum scale reading.
PROBLEM: When using Zero Shut-Off, when Feed
Force is changed, final bore size is different from
previous workpiece.
SOLUTION: This is normal. Components in Feed
System compress to a greater degree when feed
force is greater. This means anytime you reduce
feed force, needle on honing dial will rise, and sub-
For Models EC-3500CE and EC-3500CD only:
- Is STROKER key switch set to ENABLE?
- Is green LED on Light Curtain lit?
If red LED is lit, then something is blocking a
light beam.
If yellow LED is lit, then light curtain needs to do
its startup self check routine. Put your hand through
light beam path and then pull it out again to trigger
self check routine.
PROBLEM: Stroke Length slowly changes over time.
SOLUTION: Check Stroke Length Clamp Handle
for tightness. If handle is already tight, then
stroking load is exceeding capacity of stroking
mechanism. Reduce stroking load by one or more
of following:
- Reduce Stroker Speed
- Reduce Feed Force
- Reduce weight of fixturing
Also, check Stroker Pivot Assembly free play:
- With power OFF, open right hood.
- Move large stroker pulley by hand until
Crossbeam is vertical (see Figure 5-1).
- Lift end of Pivot Assembly lightly with a finger and
let go. It should drop between 4 and 10mm.
(Measured at nut.) If drop is greater than 10, loosen
jam nut and then loosen nut slightly and retighten jam
nut against it. Recheck freeplay.
PROBLEM: Stroker knocks at one or both ends of
stroke.
SOLUTIONS:
- Is anything in work area being struck by carriage
or fixture? (Press STROKER JOG to check)
- Is stroke length set to a point above 170mm?
- Is Stroke Position Lock tightened? If so, try turning Stroke Position Handwheel. If it turns easily see
solution to next listed problem.
- Stroking load may be excessive, see solution
above to “Stroke length changes over time”.
PROBLEM: Cannot set stroke speed to anything
above 200 SPM.
SOLUTION: Look at stroke length setting. If it is at
90mm or above, machine control will not allow stroke
speed to be set over 200 SPM, which would be dangerous to operator and destructive to stroker.
PROBLEM: When setting up to adjust conical and
parallel tool runout, stroker carriage cannot be
placed in a position where runout indicator can pick
up concentric bushing centered on abrasive section
of tool.
SOLUTION: Runout indicator can be pulled off of
pin that it pivots on, and aluminum base that holds
that pin can be turned upside down and rotated so
that pin is in a different position when aluminum
base is clamped on threaded stroker shaft. If indicator
33
by recommended procedure.
SOLUTION: This is normal behavior caused by
amount of compression in feed system. However,
this indicates that stones are contacting workpiece
bore immediately after cycle begins although not at
full feed force selected. If this initial contact still
seems too rough, then turn Initial Diameter knob
counterclockwise some to make Feed Regulator
begin at a smaller diameter
PROBLEM: Turning INITIAL DIAMETER knob
on FEED REGULATOR smaller (-) does not seem
to change point where FEED REGULATOR begins
working.
SOLUTION: Damper Cylinder inside machine may
be low on oil. Fill cylinder and try again. To fill
cylinder without removing it from machine requires
a long spout with a flattened tip to fit in fill slot in
cylinder.
PROBLEM: Spindle and/or Stroker seems to stall
under high honing load.
SOLUTION: Check belt tension. If deflection
midway between pulleys is greater than 4mm
(.158in) when a 33N (7.4 lb) load is applied, then
belts can be tightened. Loosen four bolts holding
motor assembly in place. Tighten belt tightening
screw against its wedge slightly until appropriate
tension is achieved. Retighten mounting bolts.
If belt tension is correct and Spindle Stroker is still
stalling, then reduce feed force being used.
Continued operation under these loads can be
detrimental to machine life.
PROBLEM: Machine stops during or at
end of a cycle and power to machine is
automatically turned off.
SOLUTIONS:
Are Spindle and Stroker Drives configured for
voltage that 18 being supplied to machine? (See
“Machine Conversion” in “Installation” section at
beginning of this book.)
For Models EC-3500CE and EC-3500CD only:
Did something enter Opto-Electronic Screen during
honing cycle? If so, machine will turn its power off
so that operator will be aware that workpiece in
machine has not been honed to completion.
PROBLEM: No Coolant flow or insufficient coolant
flow.
SOLUTIONS: First check coolant level gage for
sufficient coolant in reservoir, and check plastic
valves in work area to be sure they are open. Pull
coolant system out far enough to view it but leave it
connected electrically. Open reservoir cover and
remove sediment tray to view inside of coolant
system. Turn machine power on and set coolant
selector to CONSTANT. Refer to Appendix C
sequently final bore size will be greater than previous part. (Assuming stonewear is negligible or
properly compensated.) Opposite is true when feed
force is increased. Therefore, to avoid making
oversized bores, never reduce feed force by more
than 0.5 without turning Stone Feed dial back
(clockwise) some to compensate for this change in
compression.
PROBLEM: Needle on Honing Indicator hangs up
(cutting appears to stop) at very low feed force.
SOLUTION: With Feed Regulator off and no
workpiece on tool, turn Feed selector to Expand. If
needle goes immediately to a position below zero,
then there is no machine problem. Feed force selected
is probably too low for application, try increasing
feed force. If needle stops at some position above
zero try following:
- Are you trying to feed up past maximum size of
tool you are using?
- Is tool running out? Try adjusting tool runout.
Spindle runout can make feed system “stick” at low
feed force.
- Lubricate feed rod at grease fitting inside machine.
- Try using a slightly higher feed force.
- If problem persists contact a Sunnen Service
Technician (see next problem).
PROBLEM: An application that ran well at a
certain feed force, on another EC-3500 or at another
time on this machine runs differently now.
SOLUTION: Small differences in honing performance
can be attributed to slight differences in individual
machines, machine changes over time, or usually to
normal variations in cutting performance of abrasive.
Machines are calibrated to exact specifications before
leaving factory. Over time they may change slightly.
It will be easiest to merely adjust feed force to get
optimum performance. If you suspect that honing
performance has changed significantly or if you find it
to be significantly different from another EC-3500
machine, then contact a Sunnen Service Technician to
check Feed System calibration.
PROBLEM: Increasing roughing pressure makes no
difference in honing rate.
SOLUTION: Is Feed Regulator turned on? If so,
increasing pressure may make no difference in
honing rate because honing rate is limited by
maximum rate selected on Feed Regulator.
- If Feed Regulator is turned off, then check Air
Pressure Regulator. Pressure should be 0.55 MPA/ If
it is low, then adjust it, by turning knob on top of
Regulator.
PROBLEM: When using Feed Regulator at higher
feed forces, “Initial Diameter” (where needle begins
to slow down on Honing Indicator) appears
different during a cycle than it did when it was set
34
APPENDIX A
SPECIAL TOPICS
TWO-STAGE FEED FORCE GUIDELINES
Selecting Finishing Force & Finishing
Stock Removal
Feed System of EC-3500 can be set for a Two-Stage
Feed Force honing cycle. With this feature honing
begins at a selected roughing feed force, and then
later switches to a lower finishing feed force to
complete cycle. Both magnitude of finishing force
and amount of stock removed during finishing stage
are selectable by operator.
Although this feature is not always necessary, many
applications perform better with addition of Finishing
Feed Force Stage. Two-Stage Feed Force has three
potential benefits:
1. Improved surface finish. When feed force is
reduced toward end of cycle, surface finish may
improve. A few applications have been found where
using Two-Stage Feed Force can reduce RA surface
finish to half value generated by roughing feed
force alone. But usually improvement is not that
dramatic. Amount of improvement in finish is limited by grit size of honing stone, and many applications will still require a secondary operation with a
finer stone.
2. Improved cylindricity. When removing material
quickly with a relatively high feed force, a workpiece
with a non-uniform cross section or a thin wall can
distort. Reduction of feed force also reduces distortion
but increases cycle time. With Two-Stage Feed Force,
often majority of material can be removed quickly at
a relative high feed force, then finishing force can be
used to improve cylindricity while taking workpiece
to its final size.
3. Improved size control. ASC system can only
check size once a stroke. Therefore, its accuracy is
limited by amount of stock being removed each stroke.
(In some applications, material is removed so rapidly
that more than 3µ (.00015") is being removed every
stroke.) Likewise accuracy of using “Extra Strokes”
to compensate for probe wear is reduced if stock
removal rates are excessive relative to stroke rate.
Even when using Zero Shut-Off, variations in spindle
and stroker stopping time can cause size variations if
stock removal rate is very high. Switching to
Finishing Force right before end of cycle will slow
cutting rate and improve repeatability of final size.
Any of three benefits above translate to reduced
cycle time and reduced cost. Even applications that
run acceptably well with only a single feed force
can potentially be improved by changing to a harder
abrasive and then using Two-Stage Feed Force to
correct finish, cylindricity, or size control problems
usually associated with higher feed forces required
for harder abrasive. With harder abrasive, stonewear
is often reduced and productivity improved.
Optimum finishing force and optimum amount of stock
removal during finishing depends on application and
can only be determined by experiment. However,
following guidelines can help:
1. If Finishing Force is being used primarily to
improve finish: Only a small amount of Finishing
Stock Removal is required to improve finish,
typically 15-30µ (.0006-.0012"), maybe more if a
large reduction is necessary. More important is
selection of finishing force. Typically, finishing
force should be no more than half of roughing force
for any significant improvement in surface finish.
For dramatic improvements in finish (reducing
surface finish by more than half) finishing pressure
needs to be extremely low compared to roughing
force.
2. If Finishing Force is used primarily to improve
cylindricity: Amount of Finishing Stock Removal
must be at least as much as cylindricity defect that
must be corrected during finishing stage. For
example, a bore 50µ out of round, or with 50µ
bellmouth will take at least 50µ of stock removal to
correct. Finishing force will probably need to be
significantly lower than roughing force. A very
crude rule of thumb is that distortion will probably
be proportional to feed force. So, for example, a
bore distorted to 50µ out of round at a force of 10
will probably be close to 25µ out of round if
finished at a force of 5.
3. If Finishing Force is used primarily for size control:
In this case feed force is reduced only so that cutting
rate is not too fast when size control device finds its
target bore size. It is only necessary to reduce feed
force when bore is just a few microns from finish size.
Also, Finishing Feed Force need not be much lower
than Roughing Feed Force (sometimes only reduced to
80% of roughing value) to slow cutting rate sufficiently
to achieve size control repeatability required.
Setting Two-Stage Feed Force Feature
The change to Finishing Force can be triggered in
two ways:
- “Rough to Finish Diameter”: When needle on
honing indicator reaches a trigger point, set by
operator, feed force switches from roughing to
finishing. Assuming that stonewear is either
negligible or properly compensated (either manually
or automatically), then zero represents a consistent
final bore size and trigger point represents a
consistent bore diameter where finishing force starts.
35
APPENDIX A
NOTE: Trigger point cannot be set to any point
higher than half of full indicator scale. If you need
to have finishing force for more stock removal than
that, and you have selected “A” scale, then switch to
“B” scale for tool you are using and go back to step 5.
- “During Extra Strokes Only”: In this case, trigger
point is size control device selected by operator,
either zero on honing indicator or point where ASC
sensing tip enters bore.
The second method of triggering is easy to set-up.
Merely set Finishing Feed Force to desired
setting, select “During Extra Strokes Only”, and set
extra stroke counter to some desired value.
The first method of triggering is less intuitive to set
up. The following procedure is recommended:
1. Set Roughing and Finishing Feed Force to
desired values.
2. Measure a workpiece and place it on tool over
abrasive.
3. Select After Rough to Finish Diameter on
Finishing FEED Force selector.
4. Expand tool.
5. Turn STONE FEED dial until needle on Honing
Indicator is approximately on zero.
6. Turn Finishing Force Selector from Rough to Finish
Diameter to Off and back again a couple of times to
seat workpiece on tool, ending with selector in After
Rough to Finish Diameter position.
11. Turn then FINISHING FEED FORCE selector
to AFTER ROUGH TO FINISH DIAMETER.
12. Turn stone feed dial until needle on Honing
Indicator reads amount of stock to be removed from
diameter of workpiece on mandrel.
NOTE: There is some backlash in STONE FEED
dial. For best accuracy in setup, always turn dial
until Honing Indicator reads some amount less than
stock removal and then feed up (counterclockwise)
until needle reads correct amount of stock removal.
13. Ready to hone.
NOTE: When actually honing, trigger point or
actual finishing stock removal amount may vary
from settings made while spindle was off. Watch
honing dial carefully during first cycle to see how
much stock is removed after feed force changes and
needle shifts up. If it is different from desired
amount then move Rough to Finish Dial some to
adjust, keeping in mind that “+” and “-” refer to
diameter at which trigger point will occur.
NOTE: Needle on honing dial will move as feed
force is switched. This is normal. Higher feed force
compresses wedge and feed rod more, which results
in a different indicator reading.
Deciding Which Trigger Method Is Best
For Application
7. Turn STONE FEED dial up until needle on
Honing Indicator reads amount of stock that you
want removed during finishing stage.
8. Turn FINISHING FEED FORCE selector to
OFF. Needle on Honing Dial will drop some. Do
not turn STONE FEED dial to move it up again.
9. Turn ROUGH —> FINISH DIAMETER knob
fully counterclockwise. Light next to knob should
now be off. If it is not on then try using “B” indicator
scale. Turn INDICATOR SCALE / HONING TOOL
selector to “B” scale for tool you are using and go
back to step 5. If indicator scale selected is already
“B” and light is not off with ROUGH —> FINISH
DIAMETER knob rotated fully counterclockwise,
then either Finishing Force selected is too low, or
finishing stock removal amount is too small for this
finishing feed force mode to work properly. If this is
case you must either increase finishing stock removal,
or decrease difference between roughing and finishing
forces, or use “During Extra Strokes Only” method.
10. Turn ROUGH —> FINISH DIAMETER knob
slowly clockwise until light next to it just turns on.
Trigger point is now set.
Test trigger method to use depends on size control
method being used and which of three benefits of
Finishing Force is most important to achieve.
1. If improvement of surface finish is only reason
for using Two-Stage Feed Force, then “During Extra
Strokes Only”, will almost always be best trigger
method, regardless of size control method. Best
improvement in finish occurs only with drastic
reductions in feed force. At these low feed forces,
stone essentially “stops cutting”, nearly glazing.
Cutting rate becomes so slow that it would require an
inordinate amount of time to hone to zero shut-off
point or to ASC probe diameter if “After Rough to
Finish Diameter” method is used. With extremely low
feed force and “During Extra Strokes Only”, effectively
there is a timed sparkout stage before stopping.
Exception: Although stone may appear to “stop cutting”
there must in reality be some stock removal for finish to
improve. If this final slow rate of feed is not consistent
over time or from one part to next, then addition of a
significant amount of extra strokes after size control
device has tripped can introduce inconsistencies in
final bore size. If this is unacceptable then “After
Rough to Finish” method must be used.
36
APPENDIX A
Note: Only a very small amount of finishing stock
removal is necessary for improvement of size
control, but if ASC is used, it is subject to same
limitations listed above. Therefore a fairly generous
amount of finishing stock removal should be used to
avoid potential problems.
Note about Honing Workpieces that are Only
Slightly Undersize
When honing without Two-Stage Feed Force or
Extra Strokes it is common to take a part that was
honed slightly undersize and re-hone it immediately
to bring it right to size. However with these new
special features in use, this is inadvisable. In time it
takes for finishing force to actuate or for extra
strokes to count off, workpiece will probably go
oversize. It is recommended that any such workpieces be set aside until end, and then honed with
finishing force off but with roughing feed force set
to same value as finishing force had been, and with
no extra strokes.
2. If improvement of cylindricity is primary reason
for using Two-Stage Feed Force, and Zero-Shut Off
is to be used, then “After Rough to Finish
Diameter” will probably be best method. To
improve cylindricity, a significant amount of stock
must be removed during finishing stage. If “Extra
Stroke” method is used, a large count will be
required and, again, this can introduce
inconsistencies in final bore size.
3. If improvement of cylindricity is primary reason
for using Two-Stage Feed Force and ASC is being
used, then “After Rough to Finish Diameter”
method is recommended, but there are some limitations:
- With ASC selected, Automatic Stonewear
Compensator will actuate when indicator reaches
zero. Therefore, trigger point must be set above zero
or else trigger point will never be reached.
- Note amount of indicator needle movement when
feed force is changed from roughing to finishing. It
is impossible to consistently remove less stock in
finishing stage than amount of this needle movement.
- Amount of stock removed during finishing will
vary somewhat due to stonewear. To keep this variation to a minimum, stonewear compensation must
be set exactly to actual stonewear. However this is
difficult to do. A more practical method is to set
compensator to some small amount since compensator can work more than once per cycle as needed.
Be careful not to set compensator too low relative to
cutting rate, or else it will not be able to keep up
with rate of stock removal.
Therefore best applications for using ASC with “After
Rough to Finish Diameter” trigger will be where
Finishing Stock Removal can acceptably be significantly larger than stonewear and significantly larger than
indicator needle rise for desired feed force change, and
where some variation in amount of stock removed during finishing is acceptable.
If application does not meet these criteria, then
“During Extra Strokes Only” method must be used.
However this is only practical for small amounts of
finishing stock removal because, again, a large extra
stroke count can introduce inconsistencies in final
bore size.
4. If improvement of size control is reason for
using Two-Stage Feed Force, then “After Rough to
Finish Diameter” method must be used because cutting rate must be slowed before size control device
(whether zero shut-off or ASC) finds its target size.
FEED REGULATOR
Feed Regulator on EC-3500 is a feed rate limiter.
(On earlier model Sunnen Honing Machines this
feature was called Stone Saver.)
Without Feed Regulator, at beginning of each cycle
machine feeds rapidly until stone contacts
workpiece. This high speed contact at full feed
force in a rough bore can cause some stone breakdown resulting in greater stonewear. Without Feed
Regulator, EC-3500 Feed System is a constant force
feed system, cutting rate will varying depending on
condition of bore (fully or partially cleaned up),
hardness of bore, and condition of stone (free
cutting or glazing).
Feed Regulator can provide three benefits:
1. Stone Saving: Limiting feed rate just before
stone contacts bore can eliminate excessive stone
breakdown.
2. Very Low Feed Force Honing: There are practical
limitations in applying a very low feed force consistently
while tool expands very slowly. In many applications
with extremely small mandrels (D2 family) optimum
feed force is somewhere less than machine minimum
of “1”. Using Feed Regulator set at a very slow speed
restrains feed system and effectively delivers less than
a feed force of “1” to stone.
3. Elimination of glazing: If stones are glazing, first
recommendation is to use a softer stone or to increase
feed force. If this is not possible or produces unacceptable results, then setting Feed Regulator to
desired cutting rate and increasing feed force significantly will produce cycles of consistent duration without glazing.
37
APPENDIX A
- Disconnect electrical cable and two air lines where
they enter machine to left of spindle. Air fittings
here are self sealing so there is no need to plug ports.
- Loosen Clamp Screw on ASC unit several turns
until unit can be lifted free from its guiding rail.
2. Timed honing cycles
For applications where some deburring or polishing
is required for just a small amount of time,
EC-3500 can be setup to produce cycles of
consistent duration. This type of operation is
available by placing dip switch B3 in the ON
position. See Appendix A, "Dip Switch Settings"
before making any dip switch changes. Set EXTRA
STROKES to:
Feed Regulator has an adjustable MAXIMUM RATE
control and an INITIAL DIAMETER setting knob.
INITIAL DIAMETER knob should be set so that
feed system feeds rapidly at its normal rate up to
some point slightly smaller than smallest bore you
expect to encounter. At this initial diameter Feed
Regulator takes over, slowing feed to rate that is set
with MAXIMUM RATE dial. From that point, feed
will continue at that rate or slower if normal cutting
rate at selected feed force is slower than maximum
rate selected.
For details on setting Feed Regulator see SetupPower Stroking.
TRUING
Sunnen mandrels, shoes, and stones are manufactured
to close tolerances so that in many low to medium
precision applications it will not be necessary to
true stone and shoes. A proper setup will generate
and maintain parallelism between stone and shoes.
If you choose not to true honing unit remember following:
- Hone first workpiece undersize by a fair amount
so that you can check straightness of bore. If is not
acceptable, you will have to adjust stroke length or
stroke position or stop honing cycle frequently and
flip part end for end. Continue to hone parts undersized until bore straightness is acceptable. If bores
do not straighten out after a few workpieces, then
truing should be considered.
- A new stone, or a used stone placed in an application with a different bore size, will not make full
contact with bore until it has worn a radius to match
bore. Before it does this, stonewear will be high
and cutting rate may be excessively fast. Turn feed
force down until stone has worn to where it is making full contact with bore. Also, be careful setting
up Automatic Stonewear Compensator before stone
is making full contact because actual stonewear may
be less after that point is reached.
STROKES = (Desired cycle time - 1.5) x (Stroker Speed) ÷ 60
(seconds)
(SPM)
WORKPIECE & FIXTURE WEIGHT LIMITS
On EC-3500, workpiece and fixture is mounted on
Stroker Carriage. Because all this has to stroke during
honing process, it is desirable to keep weight of fixture
to a minimum. If fixture and workpiece weigh too
much, stroker speed may have to be reduced. A general
rule of thumb is: If combined mass of workpiece and
all fixturing mounted to carriage is less than 5 kg (11
lb), then strokes speeds recommended on chart on
operator panel will be acceptable. If combined mass of
fixture and workpiece is greater than 5 kg (11 lb) then
stroke speed recommendations should be reduced by
10% for every kilogram over 5 kg (5% for every pound
over 11 lb).
NOTE: For safety always start heavy setups at 60
strokes per minute, then while cycle is running, turn
stroke speed up slowly to desired speed. If, at any
point, stroker begins to knock, labor, or vibrate
excessively then reduce stroke speed to a point that is
no more than 80% of that speed.
UNIVERSAL FIXTURE
NOTE: Truing should NOT be considered optional
in following situations:
- Honing bores with keyways or similar interruptions where full contact is required for stones to
bridge keyway.
- Very close tolerance work where a high degree of
cylindricity is required.
- When stone and shoes have worn grossly out of
parallel from continued use of a bad setup.
EC-3500 is equipped with a standard Universal
Fixture (see Figure A-1). Universal Fixture is
completely adjustable so that virtually all
workpieces can be stroked automatically.
workpieces are captured axially but not held rigidly
so that they can “float” on tool so that tool can
follow existing hole without moving its centerline.
Fixture includes a torque arm so that a rigid torque
absorption point is provided for workpiece or a
special workholding fixture to bear against during
honing cycle.
Universal Fixture is configured at factory to be a
“Finger Fixture,” where a small lever can be used to
quickly open outside fingers with a scissors type
motion. This configuration will probably be most
ASC UNIT NOTES
1. Disconnecting and Removing
If Automatic Size Control Unit is not necessary for
an application, it can be removed from machine if it
is in way of fixturing.
38
APPENDIX A
NOTE: To mirror fixture from left to right requires
removing components from gate, reversing gate and
then reattaching components. If entire assembly is
simply reversed, then fingers will end up in a
position where they are not adequately supported to
resist high stroking loads.
Adjusting Finger Fixture:
• Set fixed fingers on carriage to contact workpiece
as close as possible to tool, leaving enough
clearance between tool and fingers so that there is
no danger of contact during honing.
• Likewise set moveable fingers on fixture. First
make sure that fingers are closed (move hand lever
in toward tool). Then loosen two knurled lock nuts
on bottom of fixture and turn finger stop screws
until fingers are positioned in desired position.
Tighten knurled lock nuts.
• There are two aluminum collars on each fixture
support bar backing up Hinge and Latch. Loosen
screws holding these collars and move
collars out of way.
FIGURE A-1, Universal Fixture
FIGURE A-2 Finger Fixture Configuration
NOTE: Collars with Hinge have a loose pin spacing
them apart. This pin may be omitted when using
Finger Fixture configuration but it will be necessary
for use with Gate Fixture configuration.
• Move finger fixture assembly on fixture support
bars to a position where workpiece will be held with
minimal end clearance (approx. 1mm, more if
workpiece length is expected to vary widely).
• Move collars to back up both sides of Hinge and
Latch and tighten them in place.
Changing to Gate Fixture Configuration:
• Remove all components that are attached to gate
piece of fixture.
NOTE: Use caution when disassembling, there are
several small loose pieces. Store all these parts
together in such a way that they can be reassembled
to gate if required.
FIGURE A-3, Gate Fixture Configuration
convenient for small and medium sized workpieces
(see FIgure A-2). However, if a larger opening is
required to load workpieces, fixture can be quickly
reconfigured to be a “Gate Fixture,” where entire
gate can be lifted 90º to clear work area (see Figure
A-3). Extra pieces that are packed with fixture are
used in this configuration.
Universal Fixture is designed for maximum
flexibility. In both configurations fixture can be
reversed from left to right to suit operator’s
preference. Also Hinge and Latch may be
unscrewed from outside of gate piece and reattached
on inside for longer workpieces.
• Detach gate from Hinge and Latch and turn it
upside down. Reattach it to Hinge and Latch.
• Attach two extra fixed fingers provided to inside
of gate.
• Loosen aluminum collars on fixture support bar.
• Move Gate Fixture assembly on fixture support
bars to a position where workpiece will be held with
minimal end clearance (approx. 1mm, more if
workpiece length is expected to vary widely).
39
APPENDIX A
• Move collars to back up both sides of Hinge and
Latch and tighten them in place. Leave just enough
clearance for gate to open and close freely.
To Change a DIP Switch Setting:
1. Turn main disconnect off.
2. Open console
3. Locate DIP switches.
4. Move switch to desired setting.
- Example: A2 is ON - Stroker positioning is ON.
NOTE: Position pin between two collars backing up
Hinge so that it holds gate upright when gate is opened.
Torque Arm:
BANK A
ON
Torque arm is shipped assembled to a split collar on
left fixture support bar. For very short workpieces
there may not be room for this collar. Collar may be
removed and torque arm can be attached to top of
stroker carriage. An extra screw of appropriate length
is provided for that purpose.
1
2 3 4
5 6
7
8
BANK B
ON
1
2 3 4
5 6
7
8
5. Close and fasten Console.
6. Turn main disconnect on.
Switches Bank A
A1: Slow Extra Strokes
- This causes the Stroker to run a Jog speed for the
number of Extra Strokes selected. The program will
limit the number of Extra Strokes to 10.
A2: Stroker Positioning ON
- When this is selected, the machine will return the
stroker carriage to the front of stroke at the end of
every cycle. When this switch is off, the machine
will stop immediately following the honing cycle.
A3: ASC Up Before Cycle or Square Honing
- This switch prevents interference between the
ASC arm and large fixtures and or Square Honing
fixtures. At the beginning of a cycle, the ASC arm
will rise
0.5 seconds before the spindle and stroker are started. The ASC arm will stay up at the end of a cycle
until the stroker stops.
A4: Start at The Back of Stroke
- This switch will require the operator to start a
cycle with the carriage at the back of stroke. If the
carriage is at the front of stroke when cycle start is
pressed, an "Error 12 will be reported on the operator station display.
A5: Ignore Oversize Workpiece
- In ASC mode, if the plunger fails to strike the
workpiece within the first few strokes, the machine
determines that the workpiece is oversize. Turning
this switch on will prevent the EC-3500 from
reporting an "Error 5" condition.
Hints:
• If there is difficulty in reassembling Finger
Fixture, refer to exposed view in Repair Parts
Catalog.
• If you need to change frequently between applications requiring finger fixture and applications
requiring gate fixture, you may purchase an extra
Gate, Hinge and Latch and keep each fixture built
up and ready to change. Order Sunnen Part
Numbers:
Hinge
EC-6116A
Gate
EC-6117A
Latch
EC-6118A
• If you need to hone very long workpieces and
standard fixture support bars are not long enough,
longer bars are available as an option. (370mm long
- Sunnen Part Number: EC-7190).
STROKER STOP POSITION MODIFICATION
EC-3500 is wired to stop at end of stroke any time
EXTRA STROKES counter is set to some number
0-99. If set to “---” then stroker will stop immediately.
When set to stop at end of stroke, sometimes stroker
must move slightly after spindle has stopped rotating.
In fine finishing applications this can sometimes
cause axial scratches that are unacceptable. To avoid
this, change Dip Switch S1-2 to set machine to stop
immediately regardless of number showing on
EXTRA STROKES counter.
Dip Switch Settings
There are two sets of DIP switches located on the
PED-1081 console board that select different modes
of operation. Do not attempt to change any settings
while power is on.
40
A6: Limit ASC Wear
- When using ASC mode, and placing this switch to
the ON position, the ASC arm will NOT raise at the
beginning of the cycle. The arm will rise at the
point set by the Rough-Finish Diameter knob.(when
the green LED illuminates) This mode limits the
amount of wear on the ASC probe.
A7: Stroker Front Proximity Switch Installed
- When this switch is in the ON position, it informs
the machine that a second proximity switch is
installed on the stroker pulley. The proximity switch
allows the machine to determine the difference
between the front and back of stroke.
If this DIP switch setting is in the OFF position, the
machine will ignore the second proximity switch.
This is used when it is desirable to have the
machine seek the back of stroke at the completion
of a honing cycle.
A8: Delay Stonewear Compensation
- During ASC operation, the EC-3500 normally
advances the Stonewear Compensator when the
honing indicator needle reaches zero. Turning this
switch on will delay the advancing of the Stonewear
Compensator until the beginning of the next cycle.
Switch Bank B
B1-B2: Factory Settings
These switches should be left in the default factory
position. DO NOT attempt to change these settings
unless specified by a Sunnen Representative.
B3: Stroke Count Honing
Turning this switch on tells the EC-3500 to hone for
the number of strokes set in the "Extra Strokes" display. This is useful for deburring or polishing
operations. The machine must be in the ASC mode
of operation for this switch setting to take effect.
B4-B8: Not used
These switches are not currently used by the EC3500. They should be placed in the OFF position.
41
NOTES
42
APPENDIX B
GENERAL HONING INFORMATION
GOOD HONING PRACTICES
surface finishes. A free flow of honing oil should be
provided, both for Sunnen Honing Machines and for
Sunnen Portable Hones. Do not dilute, cut, or
change honing oil in any way.
LONGER STONE LIFE - May be obtained by “easing” stone into bore when starting honing operation.
When in use, feed regulator does this automatically.
When not using feed regulator stone can be damaged by “tramping” on pedal, especially in a rough
bore.
KEEP STONE CUTTING PRESSURE LIGHT Just heavy enough to get good cutting action.
Excessive stone pressure will only increase stone
wear; it will not make stone cut faster.
UNUSUAL HONING PROBLEMS - Can be
referred to Sunnen Honing Laboratory. Be sure to
include all data concerning problem, such as tolerances, surface finish requirements, stock removal,
type of material, material hardness, and production
quantities.
REMOVING WORKPIECE FROM MANDREL Never begin removing workpiece from mandrel
until spindle stops. When pedal is released or automatic shutoff occurs, your spindle should also stop.
HONING DIAL - Each number on dial indicator is
equal to a certain amount of stone expansion. To
determine this, refer to chart on front of machine.
HONING STONE - Select from Honing Supplies
Catalog, from stone cabinet, or from SMOPS Guide.
WORN-OUT MANDRELS - When truing sleeve or
workpiece makes contact with any part of mandrel
other then shoe, replace mandrel or guide shoes.
ALWAYS DEBURR A ROUGH HOLE - If a bore is
rough or has burrs prior to honing, a quick
deburring operation with a very hard “deburring”
stone prevents damage to stock removal or finishing
stone, reduces stone costs and speeds up production.
HONE BEFORE HARDENING - When a part is to
be hardened, always hone first, leaving only as little
stock as necessary to correct heat-treat distortion.
When needed, use a deburring stone to remove heat
treat scale prior to sizing and finishing operation.
AMOUNT OF STOCK FOR HONING - Previous
operation should leave just enough stock so that tool
marks can be cleaned up and bore inaccuracies
corrected. Less stock allowance is needed for Sunnen
honing because Sunnen Honing Units are selfcentering in bore. When going from a stock removal
to a surface finishing operation leave only enough
stock to remove cross-hatch pattern of coarser stone,
usually only a few ten-thousandths of an inch.
RELIEF
PROVIDE RELIEF IN BLIND HOLES - Honing of
a blind hole can be greatly assisted by providing
relief in bottom corner of bore. This allows for at
least some overstroking. The relief need be only a
few thousandths deep and can even “blend in’’ as
hole is honed. The ideal length of relief is 1/3 stone
length. Any length of relief is much better than none.
PARTS CAN BE STACKED - Frequently parts with
short bores can be ‘’stacked’’ and honed as one long
bore. Parts must have flat and parallel faces.
KEEP YOUR HONING TOOLS TRUE - Cutting
surface of stone and guide surfaces of shoes must be
kept straight and parallel to produce accurate work.
Occasional use of a truing sleeve will assist in
keeping tools true.
USE ONLY PROPER HONING OIL - Best honing
results are obtained only when proper Sunnen
Industrial Honing oil is used. Cutting oils, coolants,
and other fluids are generally not satisfactory for
honing and may result in excessive stone wear or
glazing, low stock removal rates and poor surface
finish, and frequently cause galling or scoring of
part. Sunnen Industrial Honing Oil is especially
compounded for honing needs. It keeps stone clean
and sharp, reduces stone wear, increases rate of
stock removal, and is invaluable in producing fine
TECHNICAL DATA
GUIDE SHOES - INTEGRAL SHOE MANDRELS Soft shoe mandrels are recommended for all general
honing operations. Mandrels with hardened steel
shoes can be used for honing carbide, ceramic, or
glass; for extremely rough holes; and for some long
production jobs. Where extremely fine finishes are
required and a 600-grit stone is used, solid bronze
mandrels with integral shoes are required. Occasionally
unusual specifications do not permit use of honing
oils that contain sulfur, and it may be necessary to
use bronze mandrels to prevent galling.
GUIDE SHOES - REPLACEABLE SHOE
MANDRELS - General purpose guide shoes are
supplied as original equipment on mandrels with
replaceable shoes. Guide shoes of other materials
are available and can frequently be beneficial in
certain specific applications.
43
APPENDIX B
ALTERATION OF HONING UNITS
While it is desirable to provide guide shoes of material with long wearing qualities, they must be soft
enough to be trued in for any particular job. Sunnen
general purpose shoes meet these requirements.
When work being honed is unusually rough or outof-round or has burs or wire edges, hardened steel
guide shoes are usually more economical. Hardened
shoes are also more economical when CBN/
Borazon or diamond honing stones are being used.
When material being honed is very soft or subject to
galling or if very fine finish is required, bronze
guide shoes are recommended.
Should your particular application require special
guide shoes not described in our catalog, please
contact Customer Service Department - Industrial
Division in St. Louis or your local Field Engineer.
HOW TO ALTER STONES, MANDREL AND
SHOES: When alteration of honing stone is
necessary, cut through abrasive with an old hacksaw
blade and break unwanted section of stone from
stoneholder with a pair of pliers. Do not cut into die
cast stoneholder (except as described under blind
hole alterations). Use a file or bench grinder to
shorten guiding surfaces of shoe. Both stone and
guide shoe should be altered identically and in same
relative position.
ALTERATIONS FOR SHORT OPEN HOLES:
Always consider possibility of stacking parts with
short bores so that they may be honed as one long
bore using standard honing units. Individual parts
(if they have at least one flat face) with bore lengths
of 1/4 diameter, or less, can also be honed by
holding parts flat against face plate of square
honing fixture. For precision sizing of short open
holes, STONE AND GUIDE SHOE LENGTH
SHOULD BE BETWEEN 2/3 and 1-1/2 TIMES
BORE LENGTH to be honed.
IMPORTANT
Guide shoes of different materials should never be
mixed on a multi-stone length mandrel. When shoes
are removed from a mandrel to be used later, they
should be re assembled in their original position.
WEDGES - Wedges are subject to wear, and to
assure best performance they should be replaced
when they show signs of wear. Old wedges should
be discarded. Wedges supplied with all permanent
type mandrels have long life but should be inspected regularly and replaced if showing any wear. This
is especially important in AK20, BAL20, AL20, and
Y32 honing unit groups.
WEDGE PLATES - High and low wedge plates are
supplied with Y (Keyway) mandrels of 35 mm
(1.365") size and larger to provide coverage of mandrel diameter range, even with worn guide shoes and
stones. Use low wedge plate (e.g., Y56L-W) unless
stone cannot be expanded far enough to reach diameter to be honed (within range of honing unit). Use
high wedge plate (e.g., Y56H-W) when necessary to
reach diameter to be honed.
MANDREL SHIMS - Furnished with all P28
honing units. They are inserted between mandrel
body and guide shoe when necessary to reach
ALTERATION FOR SHORT OPEN HOLES
COMPLETED ALTERATION FOR SHORT OPEN HOLES
ALTERATION OF HONING STONE
STONE
WEDGE CONTACTS
GUIDE SHOE
REMOVE STONE AS SHOW
REMOVE GUIDE SHOE
AS SHOWN
ALTERATION OF INTEGRAL GUIDE SHOE
SHIM
maximum diameter, especially when guide shoes are
worn. They can also be used to help compensate for
mandrel runout.
REMOVE GUIDE SHOE
AS SHOWN
ALTERATION OF REPLACEABLE GUIDE SHOE
44
APPENDIX B
shallow or short blind holes, it may be necessary to
cut back die cast stoneholder (as well as abrasive),
mandrel, shoes and wedge tip so that only 1.5 mm
(1/16") extends beyond front wedge contact. Pressure
from wedge is then applied evenly to stoneholder.
When alteration is necessary, both stone and guide
shoe must be shortened by same amount. Any alteration
of this type should shorten stone and shoe equally
from both ends so that honing area remaining is
centered over wedge contacts on stoneholder.
If greater accuracy is required than is obtained after
alteration, refer to Troubleshooting Chart on page
31. Additional information is provided in Data File
102, “Honing Short Bores”. Write for free copy.
ALTERATIONS FOR BLIND HOLES: If at all
possible, provide a relief (undercut) at closed end of
hole to permit stone to overstroke honed surface.
Relief does not have to be more than a few
thousandths deep and can actually blend in with
bore when finish honed, but it should be as long as
possible, preferably 1/3 length of stone.
Sunnen honing units in K, J-K, AK, J-AK, BL, L,
BAL, AL and P28 groups can be utilized for honing
bores that have one end closed. In honing blind
holes, it is necessary for stone and guide shoe to
extend flush with tip of honing unit. If your
application utilizes one of P28 group of honing
units, install blind hole wedge and R28 honing
stones (see Honing Supplies Catalog). Remaining
mandrel groups have a tip which extends slightly
beyond front end of stone and guide shoe. For all
blind hole work this tip must be cut off, as illustrated
below. Mandrels which have been altered in this
manner can still be used for honing open holes
using a full length stone and guide shoe. Blind hole
Y mandrels are available on special order, but P20
and D Honing Unit groups are not adaptable for
honing blind holes.
NOTE THAT AT LEAST
HALF OF STONE
LENGTH IS BEHIND
FRONT WEDGE
CONTACT.
3/4 BORE
LENGTH
FRONT WEDGE CONTACT
1/16 in. (1,5 mm) SEE TEXT
ALTERATION FOR BLIND HOLES (Extremely Short)
Some improvement can be obtained in honing blind
holes where no relief is possible at blind end by
using a “HARD-TIP” stone. Front section of abrasive
has a harder bond than rest of stone. This harder
abrasive reduces excessive wear that stone tip is
exposed to when no relief is present. We can supply
hard-tip stones - in most stone sizes. Minimum order
quantity is one standard package of any individual part
number. Allow one week for shipment. A “customer
made” alteration can achieve same results as a hardtip stone. Select a stone considerably harder than
one normally used for job, and alter as illustrated.
For additional techniques on blind hole honing,
refer to “Troubleshooting Guide” and request copies
of Sunnen Bore Sizing & Finishing Technology
Data Files #102 and #103.
3/4 BORE
LENGTH
ALTERATION OF
INTEGRAL
SHOE MANDREL
ALTERATIONS FOR TANDEM HOLES: Sunnen
honing units can be used to size two or more “inline” or tandem bores in perfect alignment. Stone
and guide shoes must be of proper length so that
entire stone surface will contact one or other of
bores at some time during honing stroke. To keep
honing unit true during operation, STONES AND
GUIDE SHOE LENGTH MUST BE AT LEAST
TWICE CENTER-TO-CENTER TANDEM
DISTANCE OF BORES (see illustration). When
honing unit meets this requirement, alteration is not
required. It may be necessary to reverse part end for
end on honing unit to obtain identical bore sizes.
Never stroke either of tandem bores completely off
stone and guide shoes.
ALTERATION FOR BLIND HOLES
In honing blind holes, STONE AND GUIDE SHOE
LENGTH SHOULD BE 2/3 to 3/4 OF BLIND
HOLE LENGTH (including relief length). This is
necessary to provide for proper stroking. When
alteration of stone and shoe length is necessary,
remove material only from back end as shown. To
maintain stability of stone in mandrel, it is
important that at least 50% of stone be behind
forward wedge contact on stoneholder. Otherwise
stone could rock, causing bore inaccuracies as work
is stroked over honing unit. To avoid any chance for
stoneholder to “rock” when honing extremely
45
APPENDIX B
ALTERATIONS FOR SHORT BORES USING
AUTOMATIC SIZE CONTROL Always consider
possibility of stacking parts with short bores so that
they may be honed as one long bore using standard
honing units. For precision sizing of open holes,
stone and guide shoe length should be between 2/3
and 1-1/2 times bore length to be honed.
CENTER TO CENTER
TANDEM DISTANCE
IF STONE AND GUIDE SHOE
LENGTH IS EQUAL TO AT LEAST
TWICE TANDEM DISTANCE,
ALTERATION IS NOT REQUIRED.
2/3 TO 1/2
THE BORE
LENGTH
ALTERATION OF
INTEGRAL SHOE
MANDREL
TOOLING FOR TANDEM BORES
Should stone and guide shoe length be less than
twice tandem distance, center area of stone and
guide shoe will not wear and a resulting “hump” in
honing unit will bellmouth inside ends of both bores
of tandem. In some tandem applications, it is
necessary to alter honing unit by cutting away area
of stone and guide shoe that would become
‘’hump”. Remove from center of both stone and
guide shoe, an amount equal to amount stone (and
guide shoe) is short of being twice tandem distance.
For example, a part having a 2-3/4" tandem spacing
would require a 5-1/2" stone and guide shoe, but
honing unit has a stone and guide length of only 41/2". This honing unit can be used by removing 1"
from center of 4-1/2" stone and guide shoe length.
Multiple-stone honing units P20 and P28) can
sometimes be used by setting up honing unit to
leave out center stones and shoes.
Special tandem type mandrels can generally be
supplied for those applications which have too long
a tandem distance for honing with altered honing
units. Contact your Sunnen Field Engineer or
factory. Additional discussion on honing tandem
and multiple land bores is contained in Data File
106. Write for free copy.
Mandrels can be altered as illustrated to hone short
bores using automatic size control. Alteration allows
sensing tip to be positioned closer to end of honing
stone. Alteration is necessary if overstroke of a short
bore does not depress sensing tip a sufficient amount
to allow automatic size control to work.
GLOSSARY OF TERMS
ADAPTER - A part used with certain mandrels to
adapt them to fit spindle on honing machine.
ALTERED STONE - A standard honing stone
which has been shortened or otherwise changed for
a specific application.
ALUMINUM OXIDE - An abrasive material
generally most suitable for fast stock removal in
tough materials such as most types of steel. It is
designated by letter “A” in Sunnen stone code
(example: K17-A57).
BARREL SHAPE - A condition where extreme
ends of a bore are smaller in diameter than middle.
CENTER TO CENTER
TANDEM DISTANCE
BELLMOUTH - A condition where extreme end or
ends of a bore are larger in diameter than middle.
IF STONE AND GUIDE SHOE
LENGTH IS LESS THAN
TWICE TANDEM DISTANCE,
ALTERATION IS REQUIRED.
SEE TEXT.
OR
REMOVE
BLIND HOLE - A bore that is constricted or closed
at one end.
BOND - Material that holds abrasive grains together
in a honing stone.
REMOVE
ALTERATION FOR TANDEM BORES
46
APPENDIX B
HONING - Abrasive machining process primarily
used for stock removal, precision sizing and surface
finishing of internal and external cylindrical surfaces. Characterized by use of a self-sharpening
abrasive stone, a relatively large area of contact
with work, and relatively low cutting speeds.
HONING LENGTH - Actual length of surface
being honed.
HONING STONE - Abrasive stick consisting of
thousands of small abrasive grains bonded together,
cemented to metal holder.
HONING UNIT - Complete honing tool consisting of
adapter (if required), mandrel and wedge, stone(s),
guide shoe(s), truing sleeve, and stone retainer or
tension block.
LOADED STONE - Honing stone with cutting
action impaired due to cutting surface being partially covered with foreign material, usually material
being honed. This condition is sometimes encountered when honing soft materials.
MANDREL - Part of honing unit which holds and
positions honing stone and guide shoes in their correct relative positions.
METAL BOND - Metallic bond used with diamond
or CBN/Borazon grit to provide a very long lasting
honing stone.
CBN (Cubic Boron Nitride) - A synthetic abrasive
that is second in hardness to, more chemically
stable than, and as costly as diamond. CBN is best
suited for steels, especially tool steels, high-speed
steels and superalloys. General Electric tradename
for CBN is Borazon. CBN is designated by letter
“N” in Sunnen stone code (example: K12-NR53).
CONICAL RUNOUT - Honing unit not parallel to
rotation centerline which causes eccentric motion of
one end of workpiece.
CORK BOND - Bonding material for abrasive,
composed of powdered cork and a phenolic resin.
Cork bonded honing stones are used where extremely
fine finishes (say, 2 to 4 microinches) on non-ferrous
materials are required.
DEBURRING - Honing process used to remove burrs,
sharp edges or similar material from rough bores.
DIAMOND - Hardest abrasive known to man, but
chemically not suited for honing materials such as
steel. Diamond is only Sunnen abrasive capable of
honing very hard materials such as tungsten carbide,
ceramics, and glass. It is designated by letter “D” in
Sunnen stone code (example: K12-DV57).
DIAMOND STONES - Honing stone made with
crushed diamond particles bonded together. It is only
abrasive material capable of honing very hard materials
such as tungsten carbide, glass, and ceramics.
DIAMOND DRESSER - Diamond abrasive used to
dress aluminum oxide and silicon carbide honing stones.
GLAZED STONE - Stone with cutting action
impaired because abrasive particles failed to break
out of bond when cutting edges wore off. This
condition shows up when bond is too hard and/or
cutting pressure is too low.
GUIDE SHOES - Part of honing unit that stabilizes
bore being honed on tool.
HARDNESS - As applied to honing stone, describes
strength of bond that holds abrasive particles together.
A hard bond will hold abrasive grains longer; a soft
bond will permit stone to “break down” faster,
exposing new sharp abrasive grains.
HARD-TIP STONE - Honing stone having a tip or
end of harder abrasive than remaining length of
stone. Used for honing blind holes where sufficient
relief cannot be provided. See “Alterations for Blind
Holes’’ for how to make hard-tip stones.
WORKPIECE
(AT ONE END OF STROKE)
B
A
MANDREL (TYPICAL)
A = STONE OVERSTROKE
B = PART OVERSTROKE
OVERSTROKE - Distance that workpiece is
stroked over end of stone; it can also be distance
stone extends beyond end of workpiece at end of
each stroke. This distance is generally one-half
length of stone (or of part, whichever is shortest). If
for any reason a shorter stroke is used, the following formulas are useful:
Stone (or shoe) overstroke (on either end) =
Stroke length + Stone length - Part length
2
Part overstroke (on either end) =
Stroke length + Part length - Stone length
2
47
APPENDIX B
STACKING - Technique for honing short parts.
Faces of parts must be square with bore prior to
honing. A holding fixture is necessary for aligning
and holding parts on a common center.
PARALLEL RUNOUT - Off-center rotation of
honing unit which causes eccentric motion of
workpiece.
RAINBOW (or bow) - Sometimes called camber or
banana shape. Condition where a bore’s diameter
may be same over its full length but whose axis or
center-line is curved.
TAPER - Bore condition where diameter of bore
gradually increases from one end of bore to other.
TRUING SLEEVE - Cylinder or workpiece whose
purpose is to make guide shoes and stone straight
and parallel to each other, and radius to approximate
diameter to be honed.
RELIEF
RELIEF - Enlargement of diameter at bottom of blind
hole which makes it possible for end of honing stone
to pass beyond bottom end of surface being honed.
SILICON CARBIDE - Hard and brittle synthetic
abrasive for stock removal in soft materials such as
brass, bronze, aluminum. cast iron, etc. and in
extremely hard material such as tool steel.
Silicon Carbide is also used for obtaining fine finishes in all materials. It is designated by letter ‘J’ in
Sunnen stone code (example K12-J85 ).
WAVINESS - Longitudinal wave, series of waves or
ripple in a bore surface.
WEDGE - Part of Honing Unit that expands honing
stone and applies cutting pressure.
48
APPENDIX C
COOLANT FLOW DIAGRAM
IL-2460
COOLANT
MANIFOLD
SEDIMENT TRAY
HIGH PRESSURE
RELIEF VALVE
(40 PSI MAX.)
FILTER
CANISTER
FLOW CONTROL
ON/OFF VALVE
LOW PRESSURE
RELIEF VALVE
(13 PSI MAX.)
FLUID
PUMP
DIRTY FLUID
FILTER ELEMENT
FIGURE C-1, COOLANT FLOW DIAGRAM
49
NOTES
50
APPENDIX D
COOLANT SYSTEM
TROUBLESHOOTING
IS
PUMP
ROTATING
?
IS
OVERLOAD
10L TRIPPED
?
NO
NO
CHECK WIRES
& CONNECTIONS
IF NOT
REPLACE MOTOR
YES
YES
DOES
PUMP
ROTATION
CORRESPOND TO
ARROW
ON
PUMP?
RESET
10L
REVERSE 2
LEADS ON
SUPPLY CORD
TO MACHINE
NO
YES
LEVEL OF
CLEAN
COOLANT
RESERVOIR (OPEN
CANISTER)
?
EMPTY
OR
FALLING
IS
RELIEF
VALVE DUMPING
SIGNIFICANT
COOLANT
?
NO
OVERFLOWING
OR
RISING
IS
EITHER
FUSE 4 FU
OR 5 FU
BLOWN
?
PUMP COMPONENTS
ARE WORN.
(SEE PUMP
MAINTENANCE)
YES
HAS
FILTER BEEN
REPLACED
RECENTLY
?
YES
YES
REPLACE
BLOWN
FUSE *
REPAIR OR
REPLACE
RELIEF VALVE
CHECK WIRES &
CONNECTIONS.
IF NOT REPLACE
CLEAN COOLANT PUMP
* NOTE: 4FU AND 5FU MUST BE 1-AMP
FUSES. OLDER MACHINES MAY HAVE
SMALLER FUSES BUT MUST BE
REPLACED WITH 1-AMP FUSES.
51
ON
REPLACE
FILTER
FRACTION / DECIMAL / MILLIMETER EQUIVALENTS CHART
INCH
FRACTION
DECIMAL
MILLIMETER
INCH
FRACTION
DECIMAL
MILLIMETER
INCH
FRACTION
DECIMAL
MILLIMETER
0,1000
9/32
.281250
7,1438
21/32
.656250
16,6688
....
.007874
0,2000
19/64
.296875
7,5406
....
.669291
17,0000
....
.011811
0,3000
5/16
.312500
7,9375
43/64
.671875
17,0656
1/64
.015625
0,3969
....
.314961
8,0000
11/16
.687500
17,4625
....
.015748
0,4000
21/64
.328125
8,3344
45/64
.703125
17,8594
....
.019685
0,5000
11/32
.343750
8,7313
....
.708661
18,0000
....
.023622
0,6000
....
.354331
9,0000
23/32
.718750
18,2563
....
.027559
0,7000
23/64
.359375
9,1281
47/64
.734375
18,6531
....
.003937
1/32
.031250
0,7938
3/8
.375000
9,5250
....
.748031
19,0000
....
.031496
0,8000
25/64
.390625
9,9219
3/4
.750000
19,0500
....
.035433
0,9000
....
.393701
10,0000
49/64
.765625
19,4469
....
.039370
1,0000
13/32
.406250
10,3188
25/32
.781250
19,8438
3/64
.046875
1,1906
27/64
.421875
10,7156
....
.787402
20,0000
1/16
.062500
1,5875
....
.433071
11,0000
51/64
.796875
20,2406
5/64
.078125
1,9844
7/16
.437500
11,1125
13/16
.812500
20,6375
....
.078740
2,0000
29/64
.453125
11,5094
....
.826772
21,0000
3/32
.093750
2,3813
15/32
.468750
11,9063
53/64
.828125
21,0344
7/64
.109375
2,7781
....
.472441
12,0000
27/32
.843750
21,4313
....
.118110
3,0000
31/64
.484375
12,3031
55/64
.859375
21,8281
1/8
.125000
3,1750
1/2
.500000
12,7000
....
.866142
22,0000
9/64
.140625
3,5719
....
.511811
13,0000
7/8
.875000
22,2250
5/32
.156250
3,9688
33/64
.515625
13,0969
57/64
.890625
22,6219
....
.157480
4,0000
17/32
.531250
13,4938
....
.905512
23,0000
11/64
.171875
4,3656
35/64
.546875
13,8906
29/32
.906250
23,0188
3/16
.187500
4,7625
....
.551181
14,0000
59/64
.921875
23,4156
....
.196850
5,0000
9/16
.562500
14,2875
15/16
.937500
23,8125
13/64
.203125
5,1594
37/64
.578125
14,6844
....
.944882
24,0000
7/32
.218750
5,5563
....
.590551
15,0000
61/64
.953125
24,2094
15/64
.234375
5,9531
19/32
.593750
15,0813
31/32
.968750
24,6063
....
.236220
6,0000
39/64
.609375
15,4781
....
.984252
25,0000
1/4
.250000
6,3500
5/8
.625000
15,8750
63/64
.984375
25,0031
17/64
.265625
6,7469
....
.629921
16,0000
1
1.000000
25,4000
....
.275591
7,0000
41/64
.640625
16,2719
1-1/16
1.062500
26,9880
FORMULAS:
MULTIPLY
INCHES (in)
FEET (ft)
x
x
BY
25.4
0.3048
Sunnen reserves the right to change or
revise specifications and product design
in connection with any feature of our
products contained herein. Such
changes do not entitle the buyer to
corresponding changes, improvements,
additions, or replacements for equipment,
supplies or accessories previously sold.
Information contained herein is considered
to be accurate based on available
information at the time of printing.
Should any discrepancy of information
arise, Sunnen recommends that user
verify the discrepancy with Sunnen
before proceeding.
PRINTED IN U.S.A.
0111
=
=
TO GET
MILLIMETERS (mm)
METERS (m)
MULTIPLY
MILLIMETERS (mm)
METERS (m)
SUNNEN PRODUCTS COMPANY
7910 Manchester Ave., St. Louis, MO 63143 U.S.A.
Phone: 314-781-2100
Fax: 314-781-2268
U.S.A. Toll-Free Sales and Service –
Automotive: 1-800-772-2878 • Industrial: 1-800-325-3670
International Division Fax: 314-781-6128
http://www.sunnen.com
e-mail: [email protected]
x
x
BY
0.03937
3.281
=
=
TO GET
INCHES (in)
FEET (ft)
SUNNEN PRODUCTS LIMITED
No. 1 Centro, Maxted Road
Hemel Hempstead, Herts HP2 7EF ENGLAND
Phone: ++ 44 1442 39 39 39
Fax: ++ 44 1442 39 12 12
SUNNEN AG
Fabrikstrasse 1
8586 Ennetaach-Erlen, Switzerland
Phone: ++ 41 71 648 16 16
Fax: ++ 41 71 648 31 31
SHANGHAI SUNNEN MECHANICAL CO., LTD.
889 Kang Qiao East Road, PuDong
Shanghai 201319, P.R. China
Phone: 86 21 5 813 3322
Fax: 86 21 5 813 2299
SUNNEN ITALIA S.R.L.
Via Stelvio 12/15
20021 Ospiate di Bollate (MI)
Phone: 02 33301580
Fax: 02 33301572
©COPYRIGHT SUNNEN PRODUCTS COMPANY 2001, ALL RIGHTS RESERVED