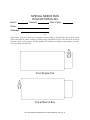
1
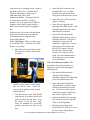
School Bus Driver
PRESERVICE
COURSE
Trainee Manual
Unit 12
Wheelchairs
©
©N
NY
YS
SE
ED
D 22001100
New York State School Bus Driver Pre-Service Manual Unit 11 p. 1
This page intentionally left blank.
New York State School Bus Driver Pre-Service Manual Unit 12 p. 2
Acknowledgements
We could not have prepared this curriculum without the ideas, enthusiasm, and guidance of the
following people:
Marion Edick, State Director of Pupil Transportation
NYSED SBDI Advisory Committee: Jim Brown, Robert Brown, Jason Burrick, Jorge DeJesus,
Lorraine Misciagno, Susan Soudant, Faye Stevens, Peter Brockmann, Betty Hughes, Patricia
Martell, Paul Mori, Chuck Paquette, Joseph Van Aken, Patricia Bailey, Lenny Bernstein (chair),
Ted Finlayson-Schueler, Kathy Furneaux, Peter Lawrence, Peter Montalvo, James Rogan, and
Maureen Ryan
Safety Rules! Curriculum Advisory Committee: Lance Frieberger, Cliff Berchtold, Joe Van
Aken, Paul Mori, Mike Dello Ioio, Faye Waxman, Robin Parks, Teena Fitzroy, Deanna Adams,
Peter Lawrence, Deb Stevens, Greg Jenne, and Judy Clarke
Moravia CSD School Bus Drivers, Attendants, and Mechanics
Attendees at Syracuse focus group: Tyronne Worrell, Luther Everson, Cindy Raulli, Deb Lilley,
Deb Stevens, Tammy Payne, Chuck Paquette, Barb Biddlecome, Terri Kuss, Shelly O’Riley, and
Pat Bailey
Attendees at Rochester focus group: Peter Lawrence, Michael Proukou, and Kitty Rhow
Lee Comeau, retired, author of the original (1989) Pre-Service Course
- JE & TFS, June, 2010
Title: School Bus Driver Pre-Service Course – Trainee Manual Unit 12
Authors: Jim Ellis and Ted Finlayson-Schueler
Copyright June 30, 2010
The University of the State of New York
The New York State Education Department
Office of Pupil Transportation Unit
EBA, Room 876
Albany, NY 12234-0001
Phone: (518) 474-6541 • Fax: (518) 474-1983
New York State School Bus Driver Pre-Service Manual Unit 12 p. 3
INTRODUCTION
Welcome, new New York State school bus driver!
The School Bus Driver Pre-Service Course has one goal: to prepare you to safely transport
children on a school bus.
You are entering a proud profession. New York State’s school bus drivers have established an
admirable safety record over the past generation. Statistically, New York’s school buses
represent the safest form of ground transportation ever devised. Children riding in school buses
are approximately 24 times safer than when they’re riding in the family car!
However, student safety is never assured. Your responsibility for safety will be serious from the
first day you drive a bus with children on board. What you learn in this course can save a child’s
life.
This Trainee Manual will prepare you for the course. Read it carefully before the course begins.
Complete the review questions at the end of each Unit before you come to class. Write down
any questions you have for your instructor. If you don’t understand something, say so. Asking
questions is one sign of a professional.
Again, welcome to our New York State school bus safety community!
Marion Edick
New York State Education Department
State Director of Pupil Transportation
New York State School Bus Driver Pre-Service Manual Unit 12 p. 4
OPTIONAL UNIT
12:
TRANSPORTING
STUDENTS
USING
WHEELCHAIRS
Unit 12 Topics
12.1 Types of Mobility Devices
12.2 Using the Wheelchair Lift
12.3 Securement
12.4 TLC
12.5 Evacuation Planning
12.6 Unit 11 Review
Introduction
Many children use wheelchairs to get
around. Wheelchairs and other types of
mobility devices provide children with
physical disabilities the opportunity to
participate fully in school and school
activities.
Safe transportation of children using
wheelchairs demands exceptional attention
to detail. A lapse of attention while loading
or securing a student using a wheelchair
could result in a spill and, possibly, a
serious injury to the child.
This unit will teach you how to use a
wheelchair lift and how to secure a
wheelchair and its student passenger in a
school bus. You will also learn how and
why to practice “TLC driving” when
transporting children with orthopedic
disabilities.
12.1 Types of Mobility Devices
12.1.1 Older wheelchairs. A generation
ago, almost all wheelchairs were “hospital”
type chairs. This traditional wheelchair
design features large rear wheels and
smaller front wheels, a tubular folding
frame, removable foot pegs and arm rests, a
fabric seat, and no securement belt for the
passenger.
Special care must be
taken when transporting
a student using an older
hospital-type chair.
While hospital wheelchairs are familiar to
most people and are still in use by both
adults and children, they were not originally
intended for transporting on vehicles.
Special care must be taken when
transporting a student using an older
hospital-type chair. Selecting the
appropriate “securement points” on the chair
frame takes careful consideration. Some
areas on the frame of older designs may not
be
strong enough to keep the chair secure in a
crash. Specific guidelines for selecting
appropriate securement points are included
in Section 12.3 below.
Hospital type wheelchairs are often used
as back-ups when a child’s more modern
personal chair is being serviced.
New York State School Bus Driver Pre-Service Manual Unit 12 p. 5
“Loaner” wheelchairs are not always in
the best
condition: heel spokes may be broken or
bent, foot or arm rests or hand grips may
be loose or missing altogether, and
brakes may not hold the chair.
12.1.2 Modern Wheelchairs. Hundreds
of different types of wheelchairs are in use
today. To better meet the needs of children,
mobility devices are constantly being
changed and improved.
alleviate breathing problems;
tilting forward may help with
swallowing difficulties.
Passengers in tilt-in-space chairs
should ride with the backrest
positioned at an angle of 30
degrees or less from vertical. Ask
your supervisor for advice if you
encounter a child who needs to be
tilted back further than that – it
may be necessary to move the
shoulder belt anchor point rearward
so the belt maintains contact with
the child’s shoulder and chest.
Hundreds of different
types of wheelchairs are
in use today.
Common types of modern mobility
devices include:
• Transit chairs. Unlike traditional
hospital wheelchairs, transit-style
mobility devices are intentionally
engineered to be transported on a
vehicle, including a school bus.
Transit chairs are much stronger
than traditional hospital chairs. In
compliance with a national
wheelchair safety design standard
known as “WC-19”, transit chairs
are designed to remain intact and
protect their passengers in a crash.
Appropriate securement points are
clearly designated by the chair
manufacturer. “D-rings” are usually
provided for attaching securement
straps. If D-rings are present, use
them. They represent the safest
securement points for that chair.
• “Tilt-in-space” mobility devices.
Chairs with adjustable passenger
frames accommodate children with
physical or medical problems who
require frequent repositioning of
the seat. Tilting a child back may
Tilt-in-space chairs can be tricky to
secure. On older tilt-in-space chairs,
securement straps should be
attached to the main wheelchair
frame, not the tiltable passenger
portion of the device. If the straps
were secured to the tiltable
passenger portion in a crash, it
could move and the chair could
come loose. The main chair frame,
which is suitable for attaching
securement straps, must be
distinguished from the tiltable
passenger seat portion, which isn’t.
•
Power wheelchairs. Batterypowered mobility devices provide
wonderful independence for the
user. However, they can be very
difficult to load and secure on a
school bus. Appropriate
New York State School Bus Driver Pre-Service Manual Unit 12 p. 6
securement points may be difficult
to access on older power chairs.
(Your
supervisor, an SBDI, or the child’s
occupational therapist may be able
to help locate suitable securement
points on powered mobility
devices.) A power chair with
passenger can weigh several
hundred pounds. Additional
securement straps may be needed
because of the additional weight.
Power chairs are usually operated
with a joystick-like control. Learn
how to operate the steering,
accelerator, and brakes. Usually,
the child will be proud to show you.
2. Raising/lowering the
wheelchair platform that carries the
passenger in the wheelchair.
Both functions are driven by powerful
hydraulic or electrical machinery. An
inattentive operator could easily be hurt.
Hands are especially vulnerable. A hand
(the
student’s or the adult operator’s) caught in
one of the lifting or folding mechanisms
12.2 Using the Wheelchair Lift
12.2.1 Lifts can be dangerous. Children
using mobility devices usually ride on
“lift- equipped” school buses. The
purpose of the lift is to raise and lower
children so they can enter or exit the bus.
You need to know how to safely operate a
wheelchair lift.
Wheelchair lifts must be treated with respect
at all times. The stakes are high when
operating a lift. Children using wheelchairs
have been seriously injured and even killed
in accidents involving wheelchair lifts. Bus
attendants and bus drivers have also been
hurt.
There are many different types of
wheelchair lifts, but they all share one thing
in common: they are complicated pieces of
machinery with the potential for injury for
anyone not paying careful attention.
Wheelchair lifts operate in two stages:
1. Folding/unfolding the platform from
its stowed position inside the bus.
could be
pinched or severed. An operator’s feet could
be crushed as the lift platform drops to the
ground.
Long drawstrings on jackets or sweatshirts,
and dangling jewelry or long hair, are
dangerous when working with wheelchair
lifts. They can get tangled in the lift
mechanisms.
12.2.2 Safe lift zone. When
approaching a bus stop where a student
using a wheelchair will board or exit,
stop your bus so the lift is positioned over
a safe, level area. The ideal lift zone is a
paved surface. Avoid barriers such as
curbs or steps.
Pull to the right side of the road when
stopping to load or unload a student in a
wheelchair. Avoid dropping the lift into the
roadway. If there’s room to safely pull
completely off the road, for instance into a
New York State School Bus Driver Pre-Service Manual Unit 12 p. 7
loop driveway or a parking area in a front of
the child’s house, do so. It takes much
longer to load/unload a child using a
wheelchair than it does with
ambulatory children. Tying up traffic for
several minutes should be avoided if
possible. Ask your supervisor or SBDI for
guidance about exactly where to make a
child’s stop when driving a lift-equipped
bus.
If the bus stop is in an area with pedestrian
traffic, take caution to prevent someone
from running into or tripping on the
lowered lift platform.
12.2.3 Lift design. There are many types
of wheelchair lifts. Controls and safety
features vary widely:
•
•
Some lifts won’t run unless the
parking brake is set. A safety
interlock prevents the bus from
being moved when the lift is in use.
•
Some lifts won’t work unless the
engine is running.
•
Some lifts are equipped with
passenger belts, others aren’t. Lifts
with passenger belts won’t work
unless the belt is latched.
•
Newer lifts often incorporate
additional safety features, such as
proximity shut-offs. If anyone is
standing too close to the lift
machinery, a light beam or sensor
plate triggers a kill switch, and
the lift won’t operate. Always
take the time to learn all the
features of the lift you will be
using. Don’t be embarrassed to
ask a supervisor or a mechanic
for an orientation.
Most lifts won’t work unless a main
lift control is activated. The button
is usually
12.2.4 Lift safety procedures. The
procedures will prevent an injury to a
student or yourself when operating a
wheelchair lift:
located on the vehicle control panel
near the driver’s seat. Some lift
systems have another switch located
near the lift door.
•
The Raise/Lower and Fold/Unfold
controls may be mounted on the bus
wall just inside the lift door, or on
the inside of the lift door itself.
Some are mounted on a removable
pendant, and some are fixed to the
door.
•
Red student flashers must be
activated when loading or
unloading a student in a wheelchair,
just as for students who walk.
•
Open and secure the lift door.
Typically there’s a latch or chain
to hook it against the side of the
bus. If it’s not secured, a breeze
could catch it and it could swing
back into the deployed lift.
•
Students in mobility devices must
face outward, away from the bus,
while on the lift platform.
•
Position the passenger in the
wheelchair close to the bus – not at
the outer edge of the platform.
New York State School Bus Driver Pre-Service Manual Unit 12 p. 8
Center the chair in relation to the
sides of the lift platform. Some
lifts have a chair positioning guide
on the platform grid to show you
where to place the chair.
steps, but it is not safe to use a lift for a
child who is not sitting down. Standing
passengers –
especially children – can easily lose
their balance on the lift.
•
Chair brakes should be set while the
lift is being raised or lowered.
•
Do not ride the lift with the student.
•
There is absolutely no place for
distraction while operating a lift. Do
not engage in distracting
conversations with anyone else –
child, child’s parent, teacher,
attendant – while operating the lift.
The best way to prevent a fall is to provide
a wheelchair for the ride up on the lift,
even if the child can stand with crutches or
a walker. Once inside the bus, the child
can transfer from the wheelchair used on
the lift to a regular bus seat. If the empty
chair is then
•
•
Attendants are assigned to many, but
not all, runs transporting students
using wheelchairs. If there’s an
attendant on the run, one of you
should remain inside the bus while
the other operates the lift controls
outside. Ask your supervisor what
your operation’s policy is on this
issue. While the chair is on the lift,
either you or your attendant should
have a firm grasp on the wheelchair
at all times. Grasp the wheelchair by
the frame, not by an arm rest, wheel,
or other removable component. As a
safety measure while the lift is being
raised, the chair should be passed
from whoever is outside the bus to
whoever is inside– vice-versa when
it’s being lowered.
Clear communication with the
attendant is important when loading
or unloading a student using a
wheelchair. Work together as a team
to provide the highest level of
protection to the child.
transported on the bus, it must be secured.
Ask your supervisor about your school
district’s or bus company’s policy about
this issue.
12.3 Securement
Follow the procedures listed below to
position and secure a wheelchair and the
passenger in the your bus:
12.3.1 Position the mobility device in
the bus. Wheelchair lifts and wheelchair
securement stations can be located in
various locations in a school bus: front,
midbus, or rear. School bus floor plans
vary widely.
•
Select the securement station.
There’s not always a choice, but
when there is, students using
wheelchairs are best positioned
between the axles, near the center
portion of the bus. The center of the
bus provides a much smoother ride
than the rear. This is especially
important for children who are
physically or medically fragile.
12.2.5 Ambulatory passengers on the lift.
A child using crutches or a walker may
have difficulty getting up or down the bus
New York State School Bus Driver Pre-Service Manual Unit 12 p. 9
If there’s a choice,
students using
wheelchairs are best
positioned between the
axles, near
the center of the bus.
•
•
Forward facing. The wheelchair
and its passenger must face forward.
On a school bus, transporting a
wheelchair facing sideways is
against the law.
12.3.2 Secure the mobility device. There
are many different types of securement
systems. Designs are constantly evolving.
Specific features vary widely. You must
learn how to correctly use the features of the
system on
your bus. Instructions should be mounted
on the wall of the bus. Your supervisor or
SBDI may have additional material, such
as a video or DVD, that shows you exactly
how to use the securement system on your
bus.
The procedures listed below should be
regarded as a starting point for
securing a wheelchair safely:
Center the mobility device in the
securement station. Once you’ve
selected a location to secure the
wheelchair, center it in the station.
• Secure the mobility device before
securing the passenger. It’s best to
secure the wheelchair to the bus
floor first, before starting to secure
the passenger with the lap-shoulder
belts. Trying to complete both tasks
at the same time is confusing.
• Floor mounts. Insert securement
straps into the floor mounts,
pockets, or tracks. Rear straps
should be mounted so they’re
inside the tracking path width of
the devices wheels; front straps
should be slightly outside the
tracking path. Rear and front
straps should be mounted in the
floor far enough from the device
so they rise to the securement
points on the chair at a 30-60
degree angle. This configuration
keeps the device stable in a crash.
Center it in relation to the floor
mounts or tracks. Center the chair
from side to side and front to back
in the station. Avoid placing a
wheelchair so close to the bus
interior wall that a child could hit
his or her head.
• When the chair is positioned where
you want it, ask the student if
everything’s okay. Set the device
brakes temporarily so that it will stay
put as you hook up the securement
straps.
Mount the least accessible straps in
the floor first. It’s sometimes best
to insert the least accessible straps
into the floor before moving the
wheelchair into its station. It’s
harder to get at the floor mounts
when the device is in the way.
•
Double-check floor mounts. Make
New York State School Bus Driver Pre-Service Manual Unit 12 p. 10
sure the straps are securely locked
into place in the floor mounts. They
can be tricky. Before attaching the
straps to the wheelchair, pull on
them from several directions.
Make sure the
securement straps are
securely locked into
place in the floor
mounts– they can be
tricky.
•
Select securement points on the
mobility device. When securing an
older hospital- style wheelchair,
attach the securement straps at welded
junctions on the main wheelchair
frame. Do not attach straps to
removable or moving components
such as foot pegs or arm rests or the
wheel, or to folding cross-members
under the chair. Look for securement
points as close as possible to the
bottom of the passenger seat. Start
under the seat and move down from
there. Securement straps should be at
a 30-60 degree angle to the floor.
•
Use four straps. At least four
securement straps should be
attached to suitable securement
points on every mobility device.
•
Heavier chairs. Heavy power
wheelchairs may need additional
straps. Check with your supervisor.
•
Tighten the straps. Once all straps
are attached to the wheelchair,
release the wheelchair brakes –
this avoids a “false positive” when
you are tightening the chair.
Tighten the straps until the chair
won’t move on the floor.
•
If you have an attendant, work as a
team as you secure the chair. Two
sets of eyes are better than one.
Both driver and attendant should be
fully involved in securing each
wheelchair. Even a small mistake
could result in a serious injury when
transporting children using
wheelchairs.
12.3.3 Securing the passenger. When
you’re certain the mobility device is
adequately secured on the bus floor, secure
the student using the lap-shoulder belts.
Lap-shoulder belts are required for every
type of wheelchair securement system.
They must be used even
if the mobility device has its own lap belt
or harness. Failing to use the passenger
lap- shoulder belt could result in a child
falling out of the device and being hurt.
It’s happened many times.
Lap-shoulder belts can be complicated.
You can’t be in a hurry.
•
Lap belt first. With most securement
systems, it’s best to secure the
passenger lap belt first before
attempting the shoulder belt. Route
the lap belt as close as possible to
the passenger’s body. Don’t route
the belt over or against wheelchair
components such as arm rests or
wheels.
•
Shoulder belt. When the lap belt is
attached and adjusted snugly across
the passenger’s hips, attach the
shoulder belt. The shoulder belt
should run over the passenger’s
outboard shoulder, across the collar
bone and chest, attaching to the lap
belt at the passenger’s inboard hip.
The shoulder belt should be snug,
but not tight. Make sure it’s not
New York State School Bus Driver Pre-Service Manual Unit 12 p. 11
cutting into the passenger’s neck.
•
•
•
•
•
Newer “WC-19” wheelchairs offer
the option of a crash-tested lap belt
that is anchored to the wheelchair
frame. If the wheelchair does have
such a lap belt, complete the belt
system by attaching the lower end
of the shoulder belt to it.
If possible, remove hard trays from
the wheelchair and secure them
elsewhere in the vehicle to reduce
the chance of rider injury from
contact with the tray. In some
cases, a foam tray may be
substituted for a rigid tray during
the bus ride. If it is not possible to
remove a hard tray, place padding
between the child and the tray.
Make sure the tray is securely
attached to the wheelchair so it will
not break loose and cause injury to
other occupants in a crash.
A properly positioned headrest can
help protect the passenger’s neck in a
rear impact. If a child needs head and
neck support during the bus ride, a
soft, light neck collar is best. Stiff
collars and head straps are more
likely to cause neck injury in a crash.
Secure the child’s medical or other
equipment to the wheelchair or
vehicle to prevent it from breaking
loose and causing injuries in a crash.
A lap belt on an unoccupied bus seat
may be suitable for securing
equipment the child needs at school.
Sensitivity. Sensitivity toward the
child while attaching and adjusting
the lap and shoulder belts is
important.
12.3.4 Safety check. Always carefully
check securement before leaving the bus
stop. Explain what you’re doing so you
don’t startle the child.
Always carefully check
securement before
leaving the bus stop.
Grasp the chair and see if it will move.
Double-check that everything’s hooked
up properly.
If you have an attendant, conduct the safety
check together. You can’t be too careful
when transporting children in mobility
devices.
Attendants should check securement
periodically during the ride, too. A
securement strap might wiggle loose
during bumps and turns. Most wheelchair
spills occur during the bus ride, not right
at the bus stop.
If you don’t have an attendant, keep an eye
on wheelchair and passenger securement
whenever it’s safe to do so during the route,
such as while stopped at a red light. If
you’re not sure the wheelchair’s still tightly
secured,
pull the bus over in a safe location, activate
your 4-way flashers, secure the bus, get out
of your seat, and check.
12.4 TLC (Tender Loving Care)
12.4.1 How would you feel? All children
deserve respect, caring, and sensitivity.
Children with orthopedic disabilities or
children who have severe medical
conditions require special caution. The
best way to understand how a child using a
mobility device feels is to experience it –
try it!
•
Riding in a wheelchair over uneven
New York State School Bus Driver Pre-Service Manual Unit 12 p. 12
pavement, curbs, drains, snow and
other barriers can be unnerving.
“What if the person pushing me
isn’t paying attention? What if my
chair tips over?”
•
Maneuvering a walker or crutches to
and from a bus stop and on or off a
bus is anything but easy. “What if I
fall backwards on the steps? What if
I lose my grip on the walker?”
•
Riding on a wheelchair lift is never
routine for the passenger in the
wheelchair. Lifts seldom operate
smoothly. As it’s raised, the
platform may lean with the load.
Audible groans and whines may
emerge from the lift mechanism. “Is
the lift platform going to break? Am
I going to fall off the lift?”
• Having a stranger leaning across your
body to thread belts and straps across
your hips and chest is uncomfortable. “I
feel so embarrassed and ashamed. I
don’t know where to direct my eyes.”
12.4.2 Driving. School bus drivers who
drive lift-equipped vehicles must drive even
more slowly and defensively than other
school bus drivers.
• Starts, turns, and stops must be
gentle. “Jackrabbit” starts, whipping
around corners, late braking, and
abrupt stops are more dangerous
when transporting fragile children.
•
Bumps caused by potholes,
washboarding, speed bumps, and
frost-heaved culverts are not only
uncomfortable for fragile children –
They are dangerous! A child with
brittle bones could be hurt from going
over a bump too fast. TLC driving
means driving slow and constantly
scanning the roadway ahead for
bumps and potholes.
•
Whenever possible, seat fragile
children near the center of the bus.
The ride is gentler. Unless there’s no
other alternative, avoid placing
children using mobility devices in the
very rear of the bus. This area is
sometimes called the “catapult seat”
because it is so bumpy. If you must
seat a fragile child in the back of the
bus, TLC driving is even more
important.
12.5 Evacuation Planning
12.5.1 Two minutes or less. Emergency
preparation is important for all school bus
drivers, but it’s even more critical when
transporting children with physical
disabilities. Evacuating students who can’t
walk may take significantly longer.
Buses can burn quickly under certain
conditions. Heat and toxic gases can make
the passenger compartment unsurvivable in
less than two minutes.
12.5.2 Planning for two scenarios. An
evacuation plan should be created for
every special needs bus run. You need
to know exactly what to do in the two
most common fire scenarios:
1. An engine-generated fire at the front
of your bus.
2. A fire at the rear caused by
another vehicle crashing into your
bus.
Plans must be specific to each run.
Every special needs run is different.
There is no “one size fits all”
evacuation plan.
New York State School Bus Driver Pre-Service Manual Unit 12 p. 13
Questions to be taken into account in creating an evacuation plan include:
Is there an attendant on board? If so, the
attendant’s role must be carefully
determined ahead of time. Two people can
evacuate a bus load of children much
quicker than one – if they’re organized.
However, two people can actually slow the
evacuation down if the individual roles
aren’t precisely defined.
• What happens if there’s no power to
the lift – how long would it take to
operate the lift manually?
• How many children are assigned
to each adult?
• Where are the children seated
(including children using child
who uses a wheelchair in or out of
the wheelchairs), and how would
that affect the ability to get
everyone out?
• Might a child’s condition create a
bottleneck that prevents others
from getting out an exit?
•
•
•
•
What’s the best sequence for
getting children out for each
scenario?
Is there any way to evacuate the
child while he or she is still in the
wheelchair? Through which exit?
How can it be done without risk of
dropping the child? How long
would it take to operate the
wheelchair lift? the bus, what is the
nature of their special needs and
how would their conditions affecting
them in an emergency?
Can all the children walk to an exit
and away from the bus on their own,
or will they need assistance? Will
they need to be carried, or dragged?
Are there any medical conditions
that could jeopardize the child if he
or she is removed from the chair?
These are not simple questions. They need careful thought. As a new school bus driver,
your supervisor, an SBDI, or a veteran driver experienced with special needs
transportation should be fully involved in helping you create an evacuation plan. Using a
chalkboard to sketch out the seating arrangement of your bus – noting exits and where
each child is seated – may help to visualize each emergency scenario and come up with a
workable plan.
Use the Evacuation Plan form on the next page to write down your finished plan. Plans
should be kept on the bus.
New York State School Bus Driver Pre-Service Manual Unit 12 p. 14
SPECIAL NEEDS RUN
EVACUATION PLAN
Bus #:
Route #:
Date of plan:
Driver:
Attendant:
***
Instructions: For each of the two evacuation scenarios below, sketch in the exits of the bus and
where each child is seated. Indicate children using wheelchairs by WC. Next, draw an arrow to
the best exit for each scenario. Finally, number the children according to the sequence you will
use to get them out of the bus.
Front Engine Fire
Fire at Rear of Bus
New York State School Bus Driver Pre-Service Manual Unit 12 p. 15
12.5.3 Specialized emergency equipment for
children with special needs. All New York
State school buses that transport children using
wheelchairs must be equipped with at least one
seat belt cutter and one fire blanket. You need
to know how to use them.
Seat belt cutters work most effectively when
drawn at an angle across a tight belt. Practice
doing this with discarded seat belts. Cutting a
slack belt straight across the webbing is
difficult.
The main purpose of a fire blanket is dragging
someone who can’t walk to an exit in an
emergency. You might be able to carry a
young child to an exit, but older children may
be too heavy to carry, especially in the tight
confines of a school bus. (Blankets can also
be used to smother a small fire.)
To drag a child, place the child on a fire
blanket. The child should be lying on his or
her back. Drag children head first. If you
attempt to drag them by their feet, their arms
will catch on the seats as you move down the
aisle.
Crouch on one knee at the child’s head.
Bunch the blanket around the child’s head and
grasp it firmly in both hands. Cradle the
child’s head between your forearms.
On your knees, “winch” your way backwards
toward the exit, one tug at a time. It’s possible
for even a small person to drag a heavy child
in this fashion.
be difficult to find. Sometimes they are
stowed under a protective console.
Ask your Head Mechanic or an SBDI to
demonstrate how to operate the lift manually.
Practice it yourself. However, even when you
know how to do it, manual lift operation is
often too slow to be of use in an actual
emergency evacuation.
Knowing how to operate the lift manually may
be useful if you lose power to the lift during a
run. In some cases you may be able to get a
student using a wheelchair safely off the bus at
their stop or at school by using the lift
manually, but always call base first. You may
be directed to wait until a mechanic can check
out the lift.
12.5.4 Practice. Evacuation plans that are
not actually practiced mean little. This means
a hands-on evacuation drill with your students.
Students with special needs are not exempt
from drills. If anything, drills are more
important for children who might take longer
to get out of the bus.
If students have severe special needs or are
medically fragile, teachers or parents should
be present during the drill to ensure children’s
safety. Do everything you can to prevent an
injury to a child during a drill. But the more
severe the condition of the children on the bus,
the more important practice becomes.
You should also know how to operate the
wheelchair lift manually. All power
wheelchair lifts can be operated manually
when necessary. There are many different
types of manual overrides. Most work like a
hydraulic car jack, with a simple valve to
release hydraulic pressure and lower the lift,
and a jack handle to pump it back up.
However, both the valve and the handle may
New York State School Bus Driver Pre-Service Manual Unit 12 p. 16
12.6 Unit 12 Review
Write down the correct answer or answers.
1. TRUE or FALSE? “Wheelchair designs
have changed little over the years.”
2. Which of the following are appropriate
securement points on a traditional hospitalstyle wheelchair?
a. Foot peg or arm rest.
b. At a welded joint on the frame.
c. Folding cross-members.
d. Wheel.
3. TRUE or FALSE? “If ‘D-rings’ are
present on a transit-style chair, use them.
They represent the safest securement points
for that chair.”
4. TRUE or FALSE? “Whenever possible,
ride the lift along with the passenger using the
wheelchair.”
5. Wheelchair lifts operate in two stages.
What are they?
1.
2.
6. TRUE or FALSE? “On school buses,
passengers using wheelchairs must face
sideways.”
10. What is the minimum number of
securement straps required to secure a
wheelchair?
11. TRUE or FALSE? “Route the lap belt
as close to the passenger’s body as possible.”
12. TRUE or FALSE? “Lap-shoulder belts
are optional for children using wheelchairs.”
13. Which of the following statements are
true?
a. Always conduct a safety check of
wheelchair securement before moving the bus.
b. If you have an attendant, conduct the safety
check together.
c. Most wheelchair spills occur during the
run, not right at the bus stop.
d. All statements are true.
14. TRUE or FALSE? “Jackrabbit starts
and abrupt stops are dangerous when
transporting fragile children.”
15. TRUE or FALSE? “The most effective
way to cut a belt is at an angle, with the belt
pulled tight.”
UNIT 12 NOTES & QUESTIONS
7. TRUE or FALSE? “You must activate
red student flashers when loading or
unloading a student using a wheelchair.”
8. TRUE or FALSE? “If you have an
attendant, it is the attendant’s responsibility
alone to secure the wheelchair.”
9. TRUE or FALSE? “Securement straps
should be a 30-60 degree angle to the floor.”
New York State School Bus Driver Pre-Service Manual Unit 12 p. 17