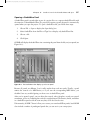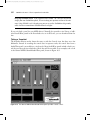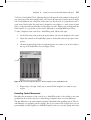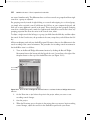
1
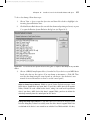
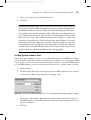
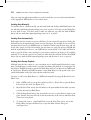
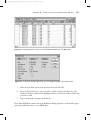
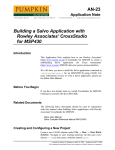
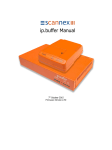
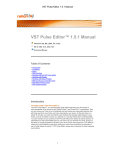
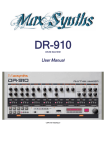
*gajendra* D:/Thomson_Learning_Projects/Garrigus_163132/z_production/z_3B2_3D_files/Garrigus_163132_ch16.3d, 14/11/08/16:25:58, 16:26, page: 631
16
Studio Control with
StudioWare and Sysx
M
ost of today’s modern appliances are computer controlled. Need to cook a meal?
Push a few buttons on the stove, and it automatically sets the right time and temperature for your recipe. Need to wash your clothes? Yada, yada, yada… It’s the same
thing with modern recording-studio gear—almost everything is computer-controlled, and the
gear supports MIDI, too. I’m not just talking about MIDI instruments (such as synthesizer keyboards), but also about audio processing equipment and mixing boards.
Why would these products include support for MIDI? Because like MIDI instruments, they have
internal parameters that you can change and store. Because these products provide support for
MIDI, their parameters become accessible to other MIDI devices, such as your computer. This
means that it is now possible to control almost every piece of equipment in your studio via your
computer, provided the equipment supports MIDI and you have the right software. Lucky for
you, you don’t need to buy any additional software because SONAR has some built-in features
for controlling and storing the parameters for any outboard MIDI gear. All you have to do is
connect your MIDI devices to your computer (just as you would any MIDI instrument), and they
can “talk” to each other. This chapter will do the following:
n
Show you how to work with System Exclusive data.
n
Teach you how to use the Sysx view.
n
Introduce StudioWare.
n
Explain how to take Snapshots with StudioWare.
n
Teach you to record control movements in StudioWare.
System Exclusive
MIDI devices (other than MIDI instruments) usually don’t provide standard musical functions,
so their internal parameters are not compatible with standard MIDI messages, such as Note On
messages. Instead, they have to communicate using special MIDI messages called System Exclusive messages. They give you access to any special functions that a manufacturer includes in a
MIDI instrument or device.
631
*gajendra* D:/Thomson_Learning_Projects/Garrigus_163132/z_production/z_3B2_3D_files/Garrigus_163132_ch16.3d, 14/11/08/16:25:58, 16:26, page: 632
632
SONAR 8 Power!: The Co mprehensive Guide
Not only do you have access to these functions, but also by utilizing System Exclusive messages,
you can send all the data from the MIDI instruments and devices in your studio to SONAR to be
stored in your projects. Why is this capability important? Because you can set up all your equipment with specific settings for a project, store the data in the project, and then send the data
back to the devices at the beginning of your next recording session. This means that the next
time you open the project, you can have all the equipment in your studio set up automatically,
and you won’t have to touch a single knob.
The Sysx View
SONAR gives you access to System Exclusive data via the Sysx view (see Figure 16.1). Using the
Sysx view, you can store up to 8,191 banks, each of which can contain any number of System
Exclusive messages (limited only by the amount of memory in your computer system). For example, you could dedicate a different bank to store the data for each separate piece of equipment in
your studio. You could also store different sets of patch data for a single MIDI instrument in
separate banks. Then, at different times in your project, you could send specific patch data to
change the sounds in the instrument for that part of the song.
Figure 16.1 The Sysx view lets you store System Exclusive data within the current project.
Receiving System Exclusive Data
To store System Exclusive data in a bank in the Sysx view, you need to do a data dump. Essentially, the MIDI device from which you want to grab data dumps (or sends) it to your computer
to be stored in one of the Sysx view banks.
The Record System Exclusive Setting Be sure to check SONAR’s global MIDI options to see
whether the Record System Exclusive Data setting is activated. To do so, choose Options
4 Global to open the Global Options dialog box and then select the MIDI tab. In the
Record section, click System Exclusive to place a check mark next to it. If this setting
isn’t turned on, SONAR will block all incoming System Exclusive data. By default,
SONAR has this option activated.
*gajendra* D:/Thomson_Learning_Projects/Garrigus_163132/z_production/z_3B2_3D_files/Garrigus_163132_ch16.3d, 14/11/08/16:25:58, 16:26, page: 633
C h ap t e r 1 6
S t u d i o Co n t r o l wi t h St u d i o Wa r e and S ys x
633
To do a data dump, follow these steps:
1.
Choose View 4 Sysx to open the Sysx view and then click a bank to highlight it for
incoming System Exclusive data.
2.
Click the Receive Bank button (the one with the downward-pointing red arrow) or press
C to open the Receive System Exclusive dialog box (see Figure 16.2).
Figure 16.2 You use the Receive System Exclusive dialog box to request a data dump from your MIDI
device.
3.
Choose a DRM (Dump Request Macro) from the list. If you don’t see your MIDI device
listed, select the very first option: <You start dump on instrument4. Click OK. Then
start the data dump using the control panel on your device. (See the device’s user
manual for more information on how to use the control panel.)
What Are Dump Request Macros? DRMs are special System Exclusive messages. Some
MIDI devices support them and some don’t. If you have a MIDI device that supports
DRMs, SONAR can send a DRM to the device, asking it to send back its parameter
data. If you have a MIDI device that doesn’t support DRMs, you have to initiate the
data dump manually from the control panel on the device.
Adding New Dump Request Macros If your MIDI device isn’t listed in the Receive System
Exclusive dialog box, it doesn’t necessarily mean the device doesn’t support DRMs. You
need to look in the device’s user manual to see whether it has DRMs available. If it does,
*gajendra* D:/Thomson_Learning_Projects/Garrigus_163132/z_production/z_3B2_3D_files/Garrigus_163132_ch16.3d, 14/11/08/16:25:58, 16:26, page: 634
634
SONAR 8 Power!: The Co mprehensive Guide
you can set them up to be used within SONAR. To do so, open the file C:\Documents and
Settings\<Username4\Application Data\Cakewalk\SONAR 8 Producer Edition\Cakewalk.ini (in Windows XP) or C:\Users\<Username4\AppData\Roaming\Cakewalk
\SONAR 8 Producer Edition\Cakewalk.ini (in Windows Vista) using Windows Notepad.
Inside that file, you’ll find instructions for how to add new DRMs to the list in the Receive
System Exclusive dialog box.
4.
If you see your device listed, select the appropriate DRM and click OK. The DRM
might ask you for additional information. For instance, if the DRM requests that the
device send the data for a single sound patch, you need to input the patch number you
want it to send. This process is pretty straightforward; you can simply follow the
prompts.
5.
Whichever method you use to initiate the data dump, SONAR ultimately displays the
Sysx Receive dialog box when it’s ready to receive the data (see Figure 16.3). The dialog
box shows the number of bytes of data being received as the dump takes place.
6.
When the count stops, click Done.
Figure 16.3 The Sysx Receive dialog box displays a count of the System Exclusive data.
Transfer Troubleshooting If the number of bytes stays at zero for more than a few seconds,
most likely something is wrong. Your MIDI device might not be hooked up properly, or
you could have given the wrong answers for the additional DRM questions. Those
answers differ, depending on the MIDI device, so you’ll need to consult its user manual.
In any event, if you have this problem, click Cancel and then check your connections and
try the procedure again.
After the dump is complete, the Sysx view will show the bank you selected with a new name and
length (in bytes).
Changing the Name of a Bank
If you want to change the name of a bank, follow these steps:
1.
Select the bank.
2.
Click the Name button (the one with the lowercase abc on it) or press N to open the
Sysx Bank Name dialog box.
*gajendra* D:/Thomson_Learning_Projects/Garrigus_163132/z_production/z_3B2_3D_files/Garrigus_163132_ch16.3d, 14/11/08/16:25:58, 16:26, page: 635
C h ap t e r 1 6
S t u d i o Co n t r o l wi t h St u d i o Wa r e and S ys x
3.
Type a new name in the Sysx Bank Name field.
4.
Click OK.
635
Recording System Exclusive Data You can also record System Exclusive data directly to a
track, just as you would any other MIDI data. To do so, just set up your track parameters,
start SONAR recording, and then manually initiate a data dump from your MIDI device.
You should be aware of some limitations, though. When you’re recording directly to a
track, SONAR stores the data in Sysx Data Events instead of banks. Each Sysx Data
Event can hold a single System Exclusive message of only 255 bytes in length. This
means that if your MIDI device sends a message longer than 255 bytes, the message
will be cut off, and it won’t work when you try to send back the data. Plus, you won’t
get any warning that this has happened—it just won’t work. Essentially, you’re better off
using the Sysx view and banks to handle System Exclusive data. It’s much easier and more
efficient, and you can still send data back to a device during playback.
Sending System Exclusive Data
After you set up your banks in a project, you can send the data back to your MIDI devices. Before
you do, though, you should be sure that each bank being sent is first set to the appropriate MIDI
output. Just as you can set each track in the Track view to send data to a particular MIDI output
on your MIDI interface, you can set each bank in the Sysx view to a specific output as follows:
1.
Select the bank.
2.
Click the Output button (the one with the picture of a MIDI connection on it) or press P
to open the Sysx Bank Output dialog box (see Figure 16.4).
Figure 16.4 In the Sysx Bank Output dialog box, you can change the MIDI output assigned to a bank.
3.
Type a new output number. Remember that the data in this bank will be sent only to
this MIDI output, so be sure the number is the same as the output number to which your
device is connected.
4.
Click OK.
*gajendra* D:/Thomson_Learning_Projects/Garrigus_163132/z_production/z_3B2_3D_files/Garrigus_163132_ch16.3d, 14/11/08/16:25:58, 16:26, page: 636
636
SONAR 8 Power!: The Co mprehensive Guide
After you assign the right output numbers to each of your banks, you can easily transmit the data
to the appropriate MIDI devices in one of three ways.
Sending Data Manually
To send the data in a bank manually, just select the bank and click the Send Bank button (the
one with the single black upward-pointing arrow on it) or press S. You also can send all the data
in every bank at once. You don’t need to make any selections; just click the Send All Banks
button (the one with three upward-pointing arrows on it) or press L.
Sending Data Automatically
Each bank in the Sysx view has an option called Auto. If you activate this option for a bank, that
bank will be sent automatically every time you open the project. For example, if you store all the
parameter data from all your MIDI devices in a number of banks using the Sysx view, and you
set the Auto option on each of those banks, the next time you open your project, SONAR will
send the System Exclusive data to your MIDI devices automatically. Your studio will then be
ready to go with all the correct settings for your project, without your having to do anything
manually. To set the Auto option for a bank, just select the bank and click the Auto Send Bank
button (the one with the black upward-pointing arrow and the letter A on it) or press A.
Sending Data During Playback
Although using the Auto option is a very convenient way to send System Exclusive data, sometimes you might want to send a bank at a specific time during the playback of your project. For
this purpose, SONAR provides a special Sysx Bank Event that you can place in any MIDI track
in your project. Whenever SONAR encounters a Sysx Bank Event, it looks up the event’s associated bank number in the Sysx view and then sends that bank.
You have to add a Sysx Bank Event to a MIDI track manually by using the Event List view.
Here’s how:
1.
Select a MIDI track in your project and choose View 4 Event List to open the Event
List view for that track (see Figure 16.5).
2.
Move the Now Time cursor (the red outline) to the point within the list where you want
to insert the new Sysx Bank Event.
3.
Click the Insert Event button (the one with the star on it) or press Insert to insert a new
event. Initially, the event will take on the characteristics of the event at which the Now
Time cursor was placed.
4.
To change the event to a Sysx Bank Event, move the Now Time cursor over to the
Kind column and press the Enter key to open the Kind of Event dialog box
(see Figure 16.6).
*gajendra* D:/Thomson_Learning_Projects/Garrigus_163132/z_production/z_3B2_3D_files/Garrigus_163132_ch16.3d, 14/11/08/16:25:58, 16:26, page: 637
C h ap t e r 1 6
S t u d i o Co n t r o l wi t h St u d i o Wa r e and S ys x
637
Figure 16.5 Using the Event List view, you can add Sysx Bank Events to your MIDI tracks.
Figure 16.6 In the Kind of Event dialog box, you can change the type of the current event.
5.
Select the Sysx Bank option in the Special section and click OK.
6.
Move the Now Time cursor over to the Data column and press the Enter key. The
number in the Data column will be highlighted. Here, you enter the number of the bank
you want to send.
7.
Type a bank number and press the Enter key.
Now, when SONAR encounters that Sysx Bank Event during playback, it will send the appropriate System Exclusive data to your MIDI device.
*gajendra* D:/Thomson_Learning_Projects/Garrigus_163132/z_production/z_3B2_3D_files/Garrigus_163132_ch16.3d, 14/11/08/16:25:58, 16:26, page: 638
638
SONAR 8 Power!: The Co mprehensive Guide
Too Much Information MIDI is meant to transmit only one piece of data at a time. Of
course, it transmits the data so fast that it sounds as if all the data in the tracks is playing
simultaneously. But MIDI does have its limits, and if you try to transmit huge amounts of
data in a short amount of time, playback will be interrupted. This happens quite often with
System Exclusive data, so if you’re going to send banks of data during playback, try to
send only one bank at a time throughout your project and also try to keep each bank short.
You’ll have to do a little experimenting, but if you keep each bank between 100 and 255
bytes, you shouldn’t have any problems.
Editing Bank Data
The Sysx view provides a feature that edits the data in a bank. To edit this data, select a bank
and click the Edit Data button (the one with the list box window on it) or press E on your
computer keyboard. Clicking this button opens the Edit System Exclusive Bytes dialog box
(see Figure 16.7).
Figure 16.7 In the Edit System Exclusive Bytes dialog box, you can edit the data in a bank.
In the dialog box, you’ll see a list of numbers. Each number represents one byte of System
Exclusive data in hexadecimal format. You can change the numbers just as you would text in a
word processor. If the bank contains more than one System Exclusive message, the beginning of
each message is designated by the number F0, and the end of each message is designated by the
number F7. This way, System Exclusive data stays compatible with standard data in the MIDI
language.
*gajendra* D:/Thomson_Learning_Projects/Garrigus_163132/z_production/z_3B2_3D_files/Garrigus_163132_ch16.3d, 14/11/08/16:25:58, 16:26, page: 639
C h ap t e r 1 6
S t u d i o Co n t r o l wi t h St u d i o Wa r e and S ys x
639
Whenever a MIDI device sees the number F0, it automatically knows that this number designates the beginning of a System Exclusive message. But that’s as far as it goes in terms of identifying the data. All the bytes in a System Exclusive message that fall between F0 and F7 are
different, depending on which MIDI device they are associated with, so there’s really not much
else I can explain about this feature. If you want to learn more about the System Exclusive
messages your MIDI device supports, consult the user manual for the device.
If you want to delete a bank in the Sysx view, just select the bank and click the Clear Bank
button (the one with the big red X on it) or press D. SONAR will ask whether you really
want to delete. Be careful, because you cannot undo this procedure. When a bank is deleted,
you cannot get it back without doing a data dump all over again.
Sharing with Friends
Even though all the data in the banks of the Sysx view is stored along with the data in your
current project, you also can load and save banks individually in a special System Exclusive data
file format. This file format is the same one used by the public domain System Exclusive data dump
software utility called MIDIEX. MIDIEX is such a popular program that its file format has become
a standard for storing System Exclusive data on disk. What’s great about the file format is that
SONAR and many other sequencers support it, so you can easily share your System Exclusive
data with your friends. Of course, being able to share won’t matter much if you don’t own the
same MIDI devices, but if you do, you can easily share sound patch data for your MIDI instruments
and so on.
Saving
To save the data in a bank, follow these steps:
1.
Select the bank.
2.
Click the Save Bank to File button (the one with the floppy disk on it) or press V to open
the Save As dialog box.
3.
Type a name for the file. The file should have an .SYX extension; SONAR should
append this extension to the name automatically.
4.
Click Save.
Loading
To load data into a bank, follow these steps:
1.
Select a bank.
2.
Click the Load Bank from File button (the one with the open folder on it) or press O on
your computer keyboard.
*gajendra* D:/Thomson_Learning_Projects/Garrigus_163132/z_production/z_3B2_3D_files/Garrigus_163132_ch16.3d, 14/11/08/16:25:58, 16:26, page: 640
640
SONAR 8 Power!: The Co mprehensive Guide
3.
If the bank you selected already has some data in it, SONAR will ask whether you want
to append the data from the file to the existing data. Click Yes to append the data or
click No to replace the data. SONAR will display the Open dialog box.
4.
Select an .SYX file to load and click Open.
The data from the file will be loaded into the bank you selected, and the bank will be named
after the file. You can change the name of the bank, as you learned earlier.
Copying a Bank There’s no easy method for copying a bank either within the same project
or from one project to another, but you can copy using the Save Bank and Load Bank
features. Just save a bank to a .SYX file from the current project. If you want to have a
copy of that bank in the current project, just load it into another bank. If you want to have
a copy of that bank in another project, open the other project and then load the bank into
the Sysx view of that project.
Introducing StudioWare
Being able to store all the parameter settings for your MIDI gear within a project is great. You
can have your entire studio set up in a matter of seconds. But to set those parameters initially,
you still have to fiddle with the knobs and controls on the MIDI gear. Because some MIDI
devices have a limited number of controls, the only way to change their parameters is to
wade through an endless maze of menus on a small (and sometimes cryptic) LCD screen.
SONAR provides a feature called StudioWare that lets you adjust all the parameters in your
MIDI devices without ever leaving your computer. More important, it lets you access those
less-than-accessible parameters in a very intuitive and easy manner.
Using StudioWare, you can adjust the parameters for any of your MIDI devices remotely from your
computer. Basically, you can have virtual buttons, knobs, and faders on your computer screen that
represent each of the adjustable parameters in your MIDI devices. When you move a knob or fader
on your computer screen, it changes the value of an assigned parameter in a MIDI device. Not only
can you store MIDI device parameters, but you also can adjust them. Using the Sysx view and
StudioWare, you may never have to touch your MIDI gear again (except maybe to turn it on).
Plus, you can record the adjustments you make to any on-screen controls and then play them
back in real time, which means you can automate parameter changes for a MIDI device as well.
The StudioWare View
StudioWare uses what are known as panels to represent your external MIDI devices. A panel can
contain any number of controls (such as buttons, knobs, and faders), depending on the number
of parameters your MIDI device provides. To start using StudioWare, you need to open a StudioWare panel file, which is displayed in the StudioWare view.
*gajendra* D:/Thomson_Learning_Projects/Garrigus_163132/z_production/z_3B2_3D_files/Garrigus_163132_ch16.3d, 14/11/08/16:25:58, 16:26, page: 641
C h ap t e r 1 6
S t u d i o Co n t r o l wi t h St u d i o Wa r e and S ys x
641
Opening a StudioWare Panel
A StudioWare panel is stored either as part of a project file or as a separate StudioWare file with
the extension .CakewalkStudioWare. If a project file contains a panel, the panel is automatically
opened when you open the project. To open a StudioWare file, just follow these steps:
1.
Choose File 4 Open to display the Open dialog box.
2.
Select StudioWare from the Files of Type list to display only StudioWare files.
3.
Choose a file.
4.
Click Open.
SONAR will display the StudioWare view containing the panel from the file you just opened (see
Figure 16.8).
Figure 16.8 The StudioWare view displays your chosen panel.
Because all panels are different, I can’t really explain how each one works. Usually, a panel
mimics the controls of a MIDI device, so if you own the corresponding MIDI device, you
shouldn’t have any trouble figuring out how to use its StudioWare panel.
After you’ve opened a panel, you can adjust the controls, take a Snapshot, record your control
movements, and so on. Adjusting the controls is straightforward. The buttons, knobs, and faders
in a StudioWare panel work the same way they do in the Console view.
Unfortunately, SONAR 7 doesn’t allow you to create your own StudioWare panels, but SONAR
does include a number of predesigned panels that you can use in your own projects.
*gajendra* D:/Thomson_Learning_Projects/Garrigus_163132/z_production/z_3B2_3D_files/Garrigus_163132_ch16.3d, 14/11/08/16:25:58, 16:26, page: 642
642
SONAR 8 Power!: The Co mprehensive Guide
Designing StudioWare Panels If you upgraded from SONAR 1 or 2 and you still want to
design your own StudioWare panels, be sure to keep your previous version of the software. Using SONAR 1 or 2 is the only way you can access the StudioWare design mode,
which has been removed from SONAR version 3 or higher.
If you can’t find a panel for your MIDI device, Cakewalk also provides a nice library of additional StudioWare panels in the Downloads area on its Web site; you can download them for
free.
Taking a Snapshot
The Snapshot function works almost the same as with the Console view, but there are a few
differences. Instead of recording the control data in separate tracks, the control data from a
StudioWare panel is recorded into a single track. Most StudioWare panels include a knob control that sets the track into which the control data will be recorded. As an example, take a look
at the General MIDI.CakewalkStudioWare panel, shown in Figure 16.9.
Figure 16.9 The General MIDI.CakewalkStudioWare panel provides a track control.
*gajendra* D:/Thomson_Learning_Projects/Garrigus_163132/z_production/z_3B2_3D_files/Garrigus_163132_ch16.3d, 14/11/08/16:25:58, 16:26, page: 643
C h ap t e r 1 6
S t u d i o Co n t r o l wi t h St u d i o Wa r e and S ys x
643
You’ll see a knob labeled Track. Adjusting that knob changes the track number for the panel. If
you open some of the other sample panels, you’ll notice the same type of track control. It might
look a little different, but it functions in the same way. By the way, if a panel doesn’t have a
track control knob, either the panel wasn’t designed to record data to a track (some of them
don’t), or the panel will automatically record its data to track 1. When you’re working with this
kind of panel, it’s a good idea to leave track 1 dedicated to recording MIDI control data.
To take a Snapshot of the controls in a StudioWare panel, follow these steps:
1.
Set the Now time to the point in the project where you want the Snapshot to be stored.
2.
Adjust the controls in the StudioWare panel to the desired values for that part of the
project.
3.
Click the Snapshot button (the one with the picture of a camera on it) in the toolbar at
the top of the StudioWare view (see Figure 16.10).
Snapshot
Figure 16.10 Click the Snapshot button to take a Snapshot in the StudioWare view.
4.
Repeat Steps 1 through 3 until you’ve created all the Snapshots you need for your
project.
Recording Control Movements
Recording the movements of the controls on a StudioWare panel is also similar to the same
procedure in the Console view, but as with taking a Snapshot, there are a few differences.
The first difference is the track number procedure I described in the preceding section. The second difference is in grouping controls together. Just as you can do in the Console view, you can
group multiple controls together in a StudioWare panel so that you can easily change more than
*gajendra* D:/Thomson_Learning_Projects/Garrigus_163132/z_production/z_3B2_3D_files/Garrigus_163132_ch16.3d, 14/11/08/16:25:58, 16:26, page: 644
644
SONAR 8 Power!: The Co mprehensive Guide
one control simultaneously. The differences here are in how controls are grouped and how single
controls in a group are adjusted.
For grouping controls, instead of right-clicking on a control and assigning it to a colored group,
you simply select an initial control, hold down the Ctrl key on your computer keyboard, and
click one or more additional controls in the panel. Those controls are then grouped. Grouping
controls in a StudioWare panel is much less sophisticated. StudioWare controls don’t have any
grouping properties like those that exist in the Console view, either.
To adjust a single control that belongs to a group, just hold down the Shift key and then adjust
the control. In the Console view, the procedure is the same, except that you hold down the Ctrl
key.
All these techniques work with any StudioWare panel. However, there are also differences in the
actual recording of the control movements. The procedure for recording control movements in
the StudioWare view is as follows:
1.
Turn on the Record Widget Movements function by clicking the Record Widget
Movements button (the button with the big red dot on it), located just to the right of the
Snapshot button at the top of the StudioWare view (see Figure 16.11).
Record Widget
Movements
Figure 16.11 Click the Record Widget Movements button to activate the Record Widget Movements
function.
2.
Set the Now time to just before the point in the project where you want to start
recording control changes.
3.
Start the project.
4.
When the Now time gets to the point in the project where you want to begin recording
control changes, adjust the controls in the StudioWare panel with your mouse.
*gajendra* D:/Thomson_Learning_Projects/Garrigus_163132/z_production/z_3B2_3D_files/Garrigus_163132_ch16.3d, 14/11/08/16:25:58, 16:26, page: 645
C h ap t e r 1 6
S t u d i o Co n t r o l wi t h St u d i o Wa r e and S ys x
645
5.
When you’re finished, stop the playback of the project.
6.
Because you’re manipulating on-screen controls with your mouse, you can make only
one change at a time. What if you want to have two different controls change at the
same time? For every control that you want to change in the same timeframe, you must
repeat Steps 2 through 5.
Try Looping Instead Instead of starting and stopping playback each time you want to rec-
ord additional control changes, try setting up a loop so that SONAR will just play the project (or section of the project) over and over again.
7.
After you’ve finished recording all the control changes that you need, be sure to turn off
the Record Widget Movements function.
Updating Widget Values If you want the controls in your StudioWare panel to move
according to the changes you recorded, activate the Update Widget Values function by
clicking the Update Widget Values button (the button with the picture of a slider on it),
located just to the right of the Record Widget Movements button at the top of the StudioWare view.
*gajendra* D:/Thomson_Learning_Projects/Garrigus_163132/z_production/z_3B2_3D_files/Garrigus_163132_ch16.3d, 14/11/08/16:25:58, 16:26, page: 646