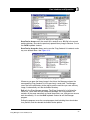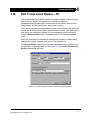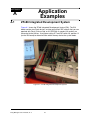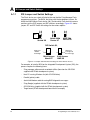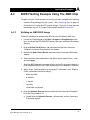
1
ZFx86™
Z-tag Manager
User’s Manual
Software V 1.9
November 27, 2001
P/N 9100-0060-01 Rev C
Z-tag Managers User’s Manual V 1.9
1
Legal Notice
THIS DOCUMENT AND THE INFORMATION CONTAINED THEREIN IS PROVIDED “AS-IS”
AND WITHOUT A WARRANTY OF ANY KIND. YOU, THE USER, ACCEPT FULL RESPONSIBILITY FOR PROPER USE OF THE MATERIAL. ZF MICRO DEVICES, INC. MAKES NO REPRESENTATIONS OR WARRANTIES THAT THIS DATA BOOK OR THE INFORMATION
CONTAINED THERE-IN IS ERROR FREE OR THAT THE USE THEREOF WILL NOT
INFRINGE ANY PATENTS, COPYRIGHT OR TRADEMARKS OF THIRD PARTIES. ZF MICRO
DEVICES, INC. EXPLICITLY ASSUMES NO LIABILITY FOR ANY DAMAGES WHATSOEVER
RELATING TO ITS USE.
LIFE SUPPORT POLICY
ZF MICRO DEVICES' PRODUCTS ARE NOT AUTHORIZED FOR USE AS CRITICAL COMPONENTS IN LIFE SUPPORT DEVICES OR SYSTEMS WITHOUT THE EXPRESS WRITTEN
APPROVAL OF THE PRESIDENT AND GENERAL COUNSEL OF ZF MICRO DEVICES, INC.
As used herein:
1. Life support devices or systems are devices or systems which, (a) are intended for surgical
implant into the body, or (b) support or sustain life, and whose failure to perform when properly
used in accordance with instructions for use provided in the labeling, can be reasonably
expected to result in a significant injury to the user.
2. A critical component is any component of a life support device or system whose failure to
perform can be reasonably expected to cause the failure of the life support device or system, or
to affect its safety or effectiveness.
© 2001 ZF Micro Devices, Inc. All rights reserved.
ZFx86, FailSafe, FailSafe Boot ROM, Z-tag ZF-Logic, InternetSafe, OEMmodule SCC, ZF
SystemCard, ZF FlashDisk-SC, netDisplay, ZF 104Card, ZF SlotCard, and ZF Micro Devices
logo are trademarks of ZF Micro Devices, Inc. Other brands and product names are trademarks
of their respective owners.
Z-tag Managers User’s Manual V 1.9
2
Table of Contents
Table of Contents
Using The Z-Tag Manager ......................................................................................................... 5
1.1 Introduction .................................................................................................................... 5
1.1.1 What are the Z-TAG, BUR, “Dongle” and “Z-tag Manager”?........................................... 5
1.1.2 Z-tag Functionality and Commands .................................................................................. 7
1.2 Z-tag Manager Software ................................................................................................ 8
1.2.1 Onboard Dongle ................................................................................................................10
1.2.2 PassThrough Dongle ........................................................................................................10
1.2.3 Memory Dongle..................................................................................................................11
Setup and Start ........................................................................................................................ 13
2.1 Z-tag Program Installation .......................................................................................... 13
2.1.1 Windows NT/CE or 2000 Installation ...............................................................................14
2.2 Host Computer Hardware Settings ............................................................................ 15
2.2.1 COM Port Settings.............................................................................................................15
User Interface and Operation .................................................................................................. 17
3.1 Using The Z-Tag Manager ........................................................................................... 17
3.1.1 Z-tag Contents List ............................................................................................................19
3.1.2 New Command Templates................................................................................................20
3.1.3 Saved Command Definitions List ....................................................................................21
3.1.4 Mode Selection Area .........................................................................................................21
3.1.4.1 Z-tag Dongle .............................................................................................................21
3.1.4.2 Onboard Chip ...........................................................................................................22
3.1.4.3 PassThrough Mode..................................................................................................22
3.1.5 Read and Write Operation ................................................................................................23
3.2 Writing To Memory Overview ..................................................................................... 25
3.3 Z-tag Pulldown Menus ................................................................................................. 26
3.3.1 File Menu ............................................................................................................................26
3.3.2 Edit Menu ...........................................................................................................................28
3.3.3 View Menu ..........................................................................................................................29
3.3.4 Commands Menu...............................................................................................................29
3.3.5 Tools Menu.........................................................................................................................30
3.3.6 Help Menu ..........................................................................................................................30
Z-tag Managers User’s Manual V 1.9
3
Table of Contents
Command Editing .................................................................................................................... 31
4.1 The Command Editing Menu ...................................................................................... 31
4.1.1 Refresh Bodies ..................................................................................................................32
4.2 Start/Resume ZFiX Console – 00 ................................................................................ 33
4.3 Upload & Execute Code – 01 ...................................................................................... 34
4.4 Select Serial Device – 02 ............................................................................................. 35
4.5 Execute Console Command Line – 03 ....................................................................... 36
4.6 Add Command To Console – 04 ................................................................................. 37
4.7 Stop Processing – 05................................................................................................... 38
4.8 Parameter Definition – FE ........................................................................................... 39
4.9 Basket – FF ................................................................................................................... 40
4.10 RLE Compressed Basket – F0 .................................................................................. 41
Application Examples .............................................................................................................. 43
A.1 ZFx86 Integrated Development System .................................................................... 43
A.1.1 IDS Jumper and Switch Settings .....................................................................................44
A.2 BIOS Flashing Example Using The AMD Chip ......................................................... 45
A.2.1 Building an AMD BIOS Image ..........................................................................................45
A.2.2 Writing The BIOS Image Using The PassThrough Dongle ...........................................48
A.3 Advanced Flashing Examples.................................................................................... 49
A.3.1 Flashing Various Chips and BIOS Examples .................................................................51
A.3.1.1 Flashing Phoenix BIOS to 16Mb Intel E28F128 StrataFlash................................52
Z-tag Managers User’s Manual V 1.9
4
CHAPTER
1
1.1
Using The Z-Tag
Manager
Introduction
ZF Micro Devices, Inc. designed the Z-tag Manager to help designers use the
unique features present in the ZFx86 System-on-a-chip. The Z-tag Manager
provides control of the ZFx86 dongle’s contents and allows you to download data
into your ZFx86-based target system.
Typical systems, using the ZFx86, use external Flash memory devices that
contain the BIOS and application images. Although Flash devices, available in
DIP packages, can be socketed, removing and reflashing them during
development, manufacturing, or in the field is not convenient. In-system Serial
interfaces used for updating Flash are often slow, usually limited to a 115 kbps
speed. To remedy these issues, ZF includes a Z-TAG high-speed serial interface
for fast and convenient in-system Flash updating.
This User’s Guide gives you a basic understanding of how to use the Z-tag
Manager and the Dongle. The examples provided use the ZFx86 Integrated
Development System (IDS), but the tools and methods discussed apply to any
target design using a ZFx86 chip.
To use the Dongle, your design must contain a 14-pin connector. Use any
JTAG-style connector available on the market, as an example, the 3M connector
part number 2514-6002UB, or equivalent.
1.1.1
What are the Z-TAG, BUR, “Dongle” and “Z-tag Manager”?
Z-TAG, a proprietary high-speed serial interface (typically 1.2 Mbps), enables you
to download your Flash programming and any binary image directly into your
Flash device. When using the ZF Z-tag Manager in PassThrough mode, the
speed is reduced and synchronization is provided. This function is described in
detail in the “Z-tag and BUR” chapter of the ZFx86 Data Book.
BIOS Update ROM (BUR) is a 12-kbyte masked ROM internal to the ZFx86 chip.
BUR contains the initialization code required by the ZFx86 to interface with the
Flash device, and enables the ZFx86 to work with the Flash programming utility.
BUR includes a simple command shell and the ability to interface with external
devices through the ZFx86 serial port.
Use the ZFx86 PassThrough Dongle, supplied with the ZFx86 IDS system, to
make a physical connection from your PC to your target system.
Z-tag Managers User’s Manual, V 1.9
5
1
Introduction
The PassThrough Dongle contains three LEDs (two green and one red) that
indicate power, busy, and status. See Figure 1.1.
Figure 1.1 Z-tag “PassThrough” Dongle
An optional ZFx86 “Memory Dongle” contains 256Kbytes of memory. This Dongle
contains two LEDs (green and red) that indicate status, plus two configuration
jumpers. See Figure 1.2.
•
Jumper JP1 sets write protection for the Dongle’s onboard SEEPROM(s),
when set in position 2-3.
•
Jumper JP2 selects PassThrough or Normal operation mode. Jumpering
2-and-3 enables PassThrough Mode, while 1-and-2 selects Normal Mode.
Figure 1.2 Optional Z-tag “Memory Dongle”
6
Z-tag Managers User’s Manual, V 1.9
Using The Z-Tag Manager
1
Z-tag Manager is a Windows-based utility program that runs on your host PC,
managing the process of writing flashable data and Flash programmers to either
the Z-tag Memory Dongle or directly to a target system using the fast
PassThrough Dongle.
1.1.2
Z-tag Functionality and Commands
We include this explanation here for completeness, but please refer to the BUR
Programming Guidelines for a detailed explanation of the Z-TAG functionality.
If the ZFx86 detects a Z-tag dongle or target-board chip when the BUR starts up,
the ZFx86 fetches a series of command records from the dongle and executes
them. Because the Z-tag dongle is a serial stream device, the execution is
performed on a record-by-record basis starting from offset 0 with new records
fetched and executed until a STOP record (command type 05) is read. Seeking
inside the dongle is not performed.
The Z-tag dongle data is divided into command-records that contain a header and
a CRC character. BUR understands and executes the following command types.
Note: This information included here for reference.
•
00 – Start/Resume ZFiX console. After this command, BUR drops into console
mode and will not fetch or process any additional data from the Z-tag dongle.
Note that by default there is no Serial output defined for BUR, so the
command 02 (Select Serial Device mode) must be executed before command
00.
•
01 – Upload & Execute code. This function finds a "best fit" available memory
location and then uploads the code specified in the command body from the
dongle to the memory location. ZFx86 executes the data after loading and
when the executable returns with a RETF instruction, it then resumes data
fetch from the Z-tag Manager.
•
02 – Select Serial Device mode. When fetching data from the Z-tag Manager,
your design may not have a Serial Port data display. By default, the output is
disabled. This command allows you to enable data output to the serial port.
The console setting remains selected until the next execution of this
command, so you only execute this command when changing or disabling the
output device.
•
03 – Execute Console Command line. Useful when command scripting is used
during board debugging. Specify a command line, and BUR executes it on the
ZFiX console. If you wish to display the command results through the serial
port, then execute command 02 first. This command is generally used only for
executing Flash programmers.
Z-tag Managers User’s Manual, V 1.9
7
1
Z-tag Manager Software
•
04 – Add Command to Console. This function creates an internal command
for the BUR console, so users can specify new commands they need during
the debugging process and then upload them using the Z-tag dongle. If you
type "help," the new command definition will be seen (the help line is defined
in the command definition data). The details about how to define commands
can be found in the BUR Programming Guidelines document.
•
05 – Stop Processing. This lights the RED LED on the Z-tag dongle and
freezes BUR. It may be useful to place this command as a final command;
thereby notifying the operator when everything completes and preventing
infinite execution of the data fetch/exec procedure.
•
FF – This command code is reserved for developers and intended for generic
payload data when needed (such as the BIOS images). This is generally
called “a basket.”
Any other command code is ignored and BUR execution continues without
interruption.
In addition to the commands that BUR recognizes, the Z-tag Manager also
recognizes two additional commands:
1.2
•
F0 – FLE Compressed Basket. It is basically the same as the FF-command,
only the payload data is compressed using a RLE compression algorithm.
•
FE – Parameter Definition command is a so-called parameter basket, for use
by applications such as Flash programmers. It holds only one 4-byte integer
value, which could be used, for example, to set the programming start address
in Flash.
Z-tag Manager Software
Using the Z-TAG interface to download a BIOS requires a Host PC with an
available parallel port and cable. Use the Dongle and Z-tag Manager software
supplied with the ZFx86 Integrated Development System (IDS). Both the
PassThrough and the Memory Dongles contain a parallel connector on one end
(used to connect to the host PC) and a 14-pin Z-TAG connector on the other (for
connection to the target system). Figure 1.3 shows the Z-tag Dongle connected to
the IDS board.
8
Z-tag Managers User’s Manual, V 1.9
Using The Z-Tag Manager
1
Figure 1.3 Z-tag Dongle Connected to the IDS Board
Use the Z-tag Manager to create a command sequence in the Z-tag Contents
window (upper left). Drag commands from the New Command Templates window
(upper right) and then drop them into the Z-tag Contents window, where they
comprise a command list that is later down-loaded to the Dongle or on-board
SEEPROM(s), or sent to the target system. See Figure 1.4. These commands
contain fields, parameters, or payloads that you can vary (see 1.1.2 "Z-tag
Functionality and Commands" on page 7 for a list and descriptions of the
commands).
Select any of three download destinations from the Z-tag Manager:
•
Onboard Dongle (both reading and writing are possible)
•
PassThrough Device (sending data to the target is only allowed)
•
Z-tag Dongle (both reading and writing are possible)
Z-tag Managers User’s Manual, V 1.9
9
1
Z-tag Manager Software
Figure 1.4 Z-tag Manager Main Menu
1.2.1
Onboard Dongle
Similar to a SEEPROM chip used on the Memory Dongle, but it instead resides on
the ZFx86 target board (if your design is so equipped).
1.2.2
PassThrough Dongle
The PassThrough Dongle serves as an adapter that connects the Host PC to your
target board. The Z-tag Manager software manages the transfer of data directly to
the target system, emulating the behavior of the SEEPROM(s) on the Z-tag
Dongle from within the software. An advantage of PassThrough mode is that it
handles larger-sized transfer images, because the data is not written into the
Dongle’s SEEPROM(s), but instead transfers directly to the target system’s
memory chip(s).
10
Z-tag Managers User’s Manual, V 1.9
Using The Z-Tag Manager
1.2.3
1
Memory Dongle
Selecting the Z-tag Dongle operation gives you the ability to use a stand-alone
Dongle as a data transport device. Once the host PC programs the Dongle, you
can plug it directly into the Z-tag interface connector on the target board for the
download process to begin. The Dongle gets power from the target board and the
BUR reads the code from the Dongle’s SEEPROM (for example, this could be for
flashing the BIOS). Use this method for in-service programming where a host PC
is not available or practical. The main limitation in using a stand-alone Dongle is
that the size of the code transferred to the Dongle is limited to 256 kilobytes of
memory.
Z-tag Managers User’s Manual, V 1.9
11
1
12
Z-tag Manager Software
Z-tag Managers User’s Manual, V 1.9
CHAPTER
2
2.1
Setup and Start
Z-tag Program Installation
Find the Z-tag Manager application on the CD ROM shipped with the IDS system
or download the Z-tag Manager current version 1.8 from the ZF Micro Devices
website: http://www.zfmicro.com
If you received the Z-tag Manager installation set in a .zip format, then
uncompress it to any desired directory and run the Z-tag Setup.exe application.
Figure 2.1 Z-Tag Installation Welcome Menu
While Setup is running, please take a moment to read the Readme Information
screen where you find details about the version history and any recent changes to
the tool. See Figure 2.2.
Z-tag Managers User’s Manual, V 1.9
13
2
Z-tag Program Installation
.
Figure 2.2 Z-tag Readme Information Menu
On the next install software screens, it prompts you for the Destination Directory
and Program Folders location. It is generally safe to use the default values
provided. By default the program installs the “C:\Program Files\Z-tag Manager”
directory where all the needed subfolders are created.
2.1.1
•
To launch the Z-tag Manager, use Start > Programs >Z-tag Manager menu
item. The Z-tag Manager item should appear there after successful software
installation.
•
Or execute the ZTAGWIN.EXE directly from your installation destination
directory.
•
For future convenience, create a shortcut of ZTAGWIN.EXE on your desktop.
Windows NT/CE or 2000 Installation
If you are using Windows NT/CE/2000, you need to install the DLPortIO driver to
get direct access to the computer’s hardware I/O ports. Find the DLPortIO driver
in the Z-tag Manager directory’s subfolder called DriverLINX (typically located in
the following path: C:\Program Files\Z-tag Manager\DriverLINX).
•
Run the Install.exe in the DriverLINX directory, and reboot your machine.
Note: Note that Administrator privileges maybe required to install the DLPortIO
driver on some systems.
14
Z-tag Managers User’s Manual, V 1.9
Host Computer Hardware Settings
2.2
2
Host Computer Hardware Settings
The Z-tag Manager uses the parallel port (printer port LPT1) at I/O address 378H.
Please verify proper parallel port using the computer's BIOS Setup. In
Windows 2000, see Start > Programs > Accessories > System Tools >
System Information.
2.2.1
•
The parallel port should be set to Standard Parallel Port (SPP) mode or
Enhanced Parallel Port (EPP, bidirectional) mode.
•
The ECP mode has been found to work also, but the SPP mode is
recommended.
COM Port Settings
In order to use the BUR's (BIOS Update ROM) command console, a COM Port
must be available on both the ZFx86 and on the host PC.
•
Connect the COM Ports with a serial communication cable (null-modem
cable).
•
On the host computer, run a Hyper Terminal or a similar terminal emulation
program.
•
Then configure the terminal software for "direct cable connection" via the
COM Port being used.
•
The default serial port parameters for the ZFx86 BUR console are as follows
•
9600 baud
•
No parity
•
1 stop-bit
•
No handshake
See the ZFx86 Data Book, Z-tag and BUR Chapter, for detailed information.
Z-tag Managers User’s Manual, V 1.9
15
2
16
Host Computer Hardware Settings
Z-tag Managers User’s Manual, V 1.9
CHAPTER
User Interface
and Operation
3
3.1
Using The Z-Tag Manager
When you launch the Z-tag Manager application, the main menu appears. See
Figure 3.1.
Z-tag Contents
List Window
New Command
Template List
Saved Z-tag Command
Descriptions List
Figure 3.1 Z-tag Manager Main Menu
The Main Menu’s working area consists of 3 submenus:
•
‘Z-tag Contents List’ on page 19
•
‘New Command Templates’ on page 20
•
‘Saved Command Definitions List’ on page 21
In addition, the drive and directory selection boxes displays on the menu’s lower
right corner. Use this navigation tool to select or create a Saved Commands
directory. See Figure 3.2.
Figure 3.2 Saved Commands Selection
Z-tag Managers User’s Manual, V1.9
17
3
Using The Z-Tag Manager
Use the radio buttons in the Main Menu’s lower left corner to select a Destination
Device, Onboard Chip type, and a Dongle type. See Figure 3.3.
Figure 3.3 Destination, Onboard Chip, and Dongle Selections
Below the radio buttons are Read and Write buttons.Use these buttons to read or
write data to the Dongle’s SEEPROMS or target board, or to write data directly to
the target board using the PassThrough mode. See Figure 3.4.
Figure 3.4 Read and Write Buttons
At the bottom of the main window, a two-sided status bar displays status and
progress messages, and confirmation regarding user selections.
In the picture above, a sample instructional message is displayed on the status
bar. The PassThrough Write instruction is shown below:
18
Z-tag Managers User’s Manual, V1.9
User Interface and Operation
3.1.1
3
Z-tag Contents List
The Z-tag Contents list provides the main working area for defining and modifying
Z-tag or target-board chip contents and defining the data sent to the PassThrough
device. See Figure 3.5.
Figure 3.5 Z-tag Contents list
When either the Z-tag or an onboard device is read, the available commands
display in the Z-tag Contents list. Save the Command list to disk using the File >
Save Device Image As command, or write it directly to the device using the
Ctrl-W keyboard shortcut or click the Write button.
Edit the commands using the Commands > Edit pulldown menu, or by pressing
Ctrl-Enter, or by double-clicking the desired command you want to edit.
This list has multi-selection capability, that is, multiple commands can be selected
for deleting or copying to the Saved Commands list.
Add items to this list by clicking and dragging selected commands from the New
Command Templates or the Saved Commands menu area.
•
When you drag-and-drop commands into either list, the Manager always
places the command above the command previously located at the drop
location.
•
When you drop a command on an empty space at the end of the list, the
Manager places the newly dropped item(s) at the end of the list.
•
If you right click the mouse button on a command, a popup menu displays the
Cut, Copy, Paste, Delete and Refresh Bodies commands. See Figure 3.6.
Z-tag Managers User’s Manual, V1.9
19
3
Using The Z-Tag Manager
Figure 3.6 Popup menu
For each command in the various lists, the following information displays:
•
Command ID
•
Name
•
Version
•
CRC (displays BAD! if the CRC value is not correct, or 0000 if the command
has been edited) Valid only for commands read from a device or extracted
from a previously saved binary file.
•
Date
•
Time
•
Body length
Enlarge the window by dragging it from the corner if this information is not visible.
3.1.2
New Command Templates
Use the New Command Templates list as a starting point when creating new
Z-tag commands. Drag and drop any commands needed in the desired sequence
onto the Z-tag Contents list and edit them to suit your needs. See Figure 3.7.
Figure 3.7 New Command Templates list
Command templates cannot be added to, or deleted from the New Command
Templates list. Drag the templates to the Saved Command Definitions list to edit
and save commands without interfering with the current Z-tag Contents list.
20
Z-tag Managers User’s Manual, V1.9
User Interface and Operation
3.1.3
3
Saved Command Definitions List
The Saved Command Definitions list offers a place to store frequently used
user-defined commands. Drag-and-drop the commands from the Z-tag Contents
or New Command Templates lists to the desired location in the Saved Commands
list. See Figure 3.8.
Figure 3.8 Saved Command Definitions List
When you drop commands onto the list, the Manager drops the command above
the command at the dropped location. When dropping to an empty place at the
end of the list, the Manager places the newly dropped item at the end of the list.
Commands in the list can be edited by double-clicking on them or by selecting
them and pressing Ctrl-Enter.
Select a Saved commands folder from the folder selection list and drive selection
pulldown box, or click the New Folder button and enter a name to create a new
folder (directory) under the currently selected directory.
3.1.4
Mode Selection Area
The Destination area contains three radio buttons that determine the Z-Tag
Manager’s operating mode: Z-tag Dongle, Onboard Chip, and PassThrough.
3.1.4.1
Z-tag Dongle
When you select the Z-tag Dongle in the Destination box, the Manager disables
the Onboard Chip selection box. See Figure 3.9.
Figure 3.9 Z-tag Dongle Destination Enabled
Z-tag Managers User’s Manual, V1.9
21
3
Using The Z-Tag Manager
3.1.4.2
Onboard Chip
By selecting Onboard chip, the Z-tag Manager’s identifies the SEEPROM memory
chips on the target board. The PassThrough Dongle, using a parallel port
extension cable, acts as a connection element between the host computer and
the target platform. After reading or writing to the Onboard chip using this mode,
the target board must be power cycled (powered down and up again). See
Figure 3.10.
Figure 3.10 Mode Selection Boxes showing Onboard Chip destination
Because the target board’s memory chip cannot be automatically detected, you
must select the appropriate chip from the adjoining Onboard Chip selection box.
3.1.4.3
PassThrough Mode
When you use the PassThrough dongle select the PassThrough mode. The
Manager enables the Dongle to act as a connection element between the target
board and the host computer, and the CPU on the target board clocks in data
directly from the host computer, instead of from the Dongle or Onboard chips. See
Figure 3.11.
Figure 3.11 Mode Selection Boxes Showing PassThrough Device Destination
When you select PassThrough in the Destination box, the Manager disables the
Onboard Chip selection box.
22
Z-tag Managers User’s Manual, V1.9
User Interface and Operation
3.1.5
3
Read and Write Operation
If you’ve selected either the Z-tag Dongle or Onboard Chip mode, clicking the
Read button initiates the SEEPROM reading process, while clicking the Write
button initiates the SEEPROM(s) writing process.
In PassThrough mode, the Write button is available only; pressing it starts a
process where the host PC waits for clock signals from the target board and then
outputs data bits according to the resultant clock cycles. If you use the Super Fast
Dongle, the dongle controls the serial data clocking and handshaking. The host
computer simply writes the data to the dongle when the dongle is not in the busy
state. See Figure 3.12.
Figure 3.12 Read and Write buttons
The Z-tag Contents list must contain information before starting the write
operation, because its contents define the data to be written.
When Writing using either the Z-tag Dongle or Onboard Chip function, the
Manager requires confirmation before overwriting the current memory device’s
content.
In the case of a Read operation, you are asked for confirmation about overwriting
the current Z-tag’s Contents list.
When a Read or Write operation is in process, the Progress Bar is visible. Read
and Write operations are cancelled by pressing the Cancel button on the
Progress bar or by pressing the ESC key on the keyboard. See Figure 3.13.
Figure 3.13 Z-tag Dongle Read Progress Bar
Z-tag Managers User’s Manual, V1.9
23
3
Using The Z-Tag Manager
When a Read operation completes, the downloaded data stream is analyzed and
extracted into different commands that are visible in the Z-tag Contents list. See
Figure 3.14.
Figure 3.14 Z-tag Contents List with Extracted Commands After Dongle Reading
After you press the Write button and prior to actually writing to the SEEPROM(s)
on the Dongle or PassThrough device, the Manager creates a binary container file
using the existing Z-tag Contents list and then writes it to the selected device.
The Manager pads the created file’s size to the nearest kilobyte boundary, and in
the case of SEEPROM devices, it always overwrites the memory even if less
space is required (such as with a 1-kilobyte command). In this a case, the
Manager fills the device’s empty memory space with 0xFFs.
When writing in PassThrough mode, the Manager never exits data clocking mode
until you press the ESC key or the Close/Stop button on the Progress bar menu.
This facilitates successive uploads. Therefore, when you reset the target board,
the data clocking starts from the container file’s beginning, and the Progress bar
returns to the beginning again.
Note: In PassThrough mode, the Progress Bar might not reach its end, because
the target board’s CPU can stop data clocking at any time, according to
the commands it receives. Also, the transmitted container file can be
bigger than the actual data file size found in the Z-tag Contents list due to
the kilobyte boundary padding.
24
Z-tag Managers User’s Manual, V1.9
User Interface and Operation
3.2
3
Writing To Memory Overview
Use either the following procedure to download your program to the target
system’s Flash memory, or follow the detailed example procedure “Building an
AMD BIOS Image” found on page 45 of this document.
1. Use a parallel port extension cable to connect the host computer's parallel port
and the Z-tag Dongle's DB25 connector.
2. Connect the Z-tag Dongle's 14-pin connector to the appropriate pins on your
target board.
3. The fast PassThrough dongle is designed specifically for PassThrough mode
and no jumper settings are required. If you use the Memory Dongle enable the
PassThrough Mode by jumpering JP2 positions 2 to 3.
4. Verify that the Z-tag Contents list contains your program parameters, because
the binary file that acts as a virtual Z-tag memory program is created from the
Contents list.
5. Select the PassThrough, and Superfast radio button.
6. Click the Write button.
The Z-tag Manager downloads the program through the Dongle into your
target board.
7. Power reset the target board.
After reset, when the BUR (BIOS Update ROM) software is running in the
target board, it will try to clock in data from the Z-tag interface (in this case
directly from host computer) and look for any recognizable commands. If it
finds valid commands, they will be executed by BUR.
8. Option: To exit from PassThrough mode, press the ESC keyboard key or
Close/Stop button on the Progress Bar.
Figure 3.15 PassThrough Progress Bar
Z-tag Managers User’s Manual, V1.9
25
3
Z-tag Pulldown Menus
3.3
Z-tag Pulldown Menus
The Z-tag Manager’s pulldown menus display across the top of the main window.
See Figure 3.16. The following text describes each pulldown menu item.
Figure 3.16 Z-tag Manager’s Pulldown Menu Bar
3.3.1
File Menu
The following text describes the items found in the File pulldown menu.
See Figure 3.17.
Figure 3.17 File Pulldown Menu
New Device Image clears the current Z-tag Contents list. It does not affect the
currently connected Z-tag Dongle’s contents or onboard chip contents.
Open Device Image allows the user to select a previously created and saved
Z-tag binary image file using a standard file-open dialog-box. If the device image
is successfully opened, its content displays in the Z-tag Contents list and the
device image's filename displays in the window's title-bar.
The Manager saves the last used directory to the windows registry and the next
time you open the binary image, the frequently needed source directory
automatically sets the default file structure. The opened image file name will be
saved to the registry, and when the program is closed and reopened, the Manager
identifies the previously opened image file name and directory structure. See
Figure 3.18.
When you open a binary image and the Z-tag Contents list is not empty, the
Manager prompts you before clearing the list.
26
Z-tag Managers User’s Manual, V1.9
User Interface and Operation
3
Figure 3.18 Open Device Image Menu
Save Device Image saves the current list's contents as a .BIN file in the current
working directory, or under the previously opened binary image's filename. Or use
the Ctrl-S keyboard shortcut.
Save Device Image As allows you to save the Z-tag Contents list contents under
any user defined name. See Figure 3.19.
Figure 3.19 Save Device Image As... Menu
Whenever you open the binary image in the future, the Manager restores the
corresponding Z-tag Contents list to its previously saved state. The Manager
saves the last used directory to the registry and the next time you save a binary
image, it automatically sets the destination directory.
Exit quits the Z-tag Manager program. The Z-tag Contents list is left intact for
future use, so the next time you invoke the Manager, the Z-tag Contents list
contains all the same commands as found the previous run, and you can resume
work immediately. Or use the Alt-X keyboard shortcut to exit the Manager
program.
Exiting the program saves the current program state including the main window
size, position, and the selected destination device options.
Z-tag Managers User’s Manual, V1.9
27
3
Z-tag Pulldown Menus
3.3.2
Edit Menu
The Edit menu offers standard Cut, Copy, Paste and Delete menu items. Use
these functions on any selected commands in any Z-tag Manager list. The same
functions are also available in a popup context menu (by right-clicking the mouse)
in all of the Manager lists. See Figure 3.20.
Figure 3.20 Edit Menu
Note: In the New Command Templates list, you cannot delete and paste new
commands.
Use these standard keyboard shortcuts:
•
Ctrl-C for Copy
•
Ctrl-X for Cut
•
Ctrl-V for Paste
•
Del for Delete
Copy and Cut place the selected commands on the clipboard, where you can
later retrieve them as needed.
When you Paste from the clipboard to either the Z-tag Contents or Saved
Commands list, the Manager places the newly pasted item in front of the
previously selected item in the list. When pasting to the empty area at the end of
the list, it pastes the item at the list’s end.
Note: You cannot paste to the New Command Templates list.
28
Z-tag Managers User’s Manual, V1.9
User Interface and Operation
3.3.3
3
View Menu
This menu has only one menu item that allows you to refresh the contents of all
the lists in the case of display corruption. See Figure 3.21.
Figure 3.21 View Menu
3.3.4
Commands Menu
The following text describes the contents of the Commands Menu. See
Figure 3.22.
Figure 3.22 Commands Menu
Add to Z-tag Dongle adds (copies) selected command(s) from the Saved
Commands or New Command Templates list to the Z-tag Contents list. This
function can also be accomplished by dragging selected items to the Z-tag
Contents list.
Save to "Saved Commands" copies selected command(s) from the Z-tag
Contents list to the Saved Commands list. This function can also be accomplished
by dragging selected items to the Saved Commands list.
Delete removes selected command(s) from either the Z-tag Contents list or the
Saved Commands list. The Del key also performs this function. The Manager
prompts before the deletion occurs.
Edit brings up the Command Editing menu with the selected command properties
shown, allowing you to redefine them. You can also edit a command by doubleclicking on one in the list or by pressing Ctrl-Enter when one is selected.
Refresh Bodies is described in detail in ‘Refresh Bodies’ on page 32. Basically, it
allows you to refresh the previously user-selected body-files for commands in the
Z-tag Contents list.
Z-tag Managers User’s Manual, V1.9
29
3
Z-tag Pulldown Menus
3.3.5
Tools Menu
The following text describes the Tools menu selections. See Figure 3.23.
Figure 3.23 Tools Menu
Repair Damaged Dongle attempts to revive the SEEPROM chips on the
standard Dongle by re-writing their Manufacturer and Chip IDs. Use this command
if the Z-tag Manager does not recognize the Dongle’s chips and the Dongle’s
Read and Write operation failed. If repairing the Dongle does not help, then the
problem is typically a hardware issue, and you should replace the Dongle or the
cable.
Set LPT Port Base Address allows you to have multiple LPT ports in your
machine and you to select which parallel port the Z-tag Manager uses by entering
the port’s base I/O address.
3.3.6
Help Menu
The following text describes the Help menu items. See Figure 3.24.
Figure 3.24 Help Menu
Contents displays the main Z-tag Manager Help screen. The Z-tag Manager Help
system is context sensitive. Press F1 while an item is selected to access the
online help information.
About displays an About menu indicating the Z-tag Manager version and release
date.
30
Z-tag Managers User’s Manual, V1.9
CHAPTER
Command
Editing
4
4.1
The Command Editing Menu
The Command Editing Menu displays whenever you double-click or press
Ctrl-Enter on a selected command in either the Z-tag Contents or Saved
Commands lists. The Command Editing menu’s contents vary depending on
which command is currently selected for editing. See Figure 4.1 for an FF –
Basket command Editing Menu example.
Figure 4.1 Z-tag Manager With The Command Editing Menu Open
In the Command Header section, change the command's date and time,
description, and version. Consider this information as an extended "comment"
area.
Based on the command type, change the items in the command body found under
the command "PayLoad" area. For example, in the Basket command (command
code FF) the Browse push button is enabled so that you can browse to locate and
select the command’s payload.
Clicking Apply causes all changes to be applied before the Editing menu closes.
If you press the Esc key or Cancel, the Command Editing menu closes without
saving any changes.
Z-tag Managers User’s Manual, V1.9
31
4
The Command Editing Menu
4.1.1
Refresh Bodies
Figure 4.2 shows the Refresh Bodies function in the Commands pulldown menu.
Figure 4.2 Refresh Bodies Function
After you select an executable or other command payload file, the Z-tag Manager
completes the following two processes:
•
It saves the edited payload file’s path
•
It copies the payload file into a subdirectory named “dongle”
If you update the payload file (for example, an .exe file on your hard drive), the
contents of the updated .exe file is not copied into the "dongle" subdirectory until
you perform the Refresh Bodies operation. Do this by following the following
steps:
1. Select one or more edited commands, and click the right mouse button.
2. In the pop-up menu, select Refresh Bodies.
This refreshes the payload file and recopies it to the dongle subdirectory, and
all selected command bodies update to the newer version.
Use the Refresh Bodies operation to facilitate your Z-tag Manager software
development process. When you compile another version of a command's
payload, you do not need to redefine the already defined Z-tag command in the
Z-tag Contents list using the Manager’s editing features. But rather you need only
select Refresh Bodies in the popup menu or in the Commands pulldown menu,
and the Manager refreshes the payload file previously saved in the “dongle”
directory.
32
Z-tag Managers User’s Manual, V1.9
Command Editing
4.2
4
Start/Resume ZFiX Console – 00
After the Start/Resume ZFiX console command, BUR drops into console mode
and will not fetch or process any additional data from the Z-tag dongle.
Note: By default there is no Serial Output defined for BUR, so the command
02 – Select Serial Device must be executed before the command 00.
See Figure 4.3 for the Start ZFiX Console command 00 edit menu.
Figure 4.3 Start ZFix Console Command 00 Editing Menu
Note: This command does not usually require editing.
Z-tag Managers User’s Manual, V1.9
33
4
4.3
Upload & Execute Code – 01
Upload & Execute Code – 01
The Upload & Execute code function finds a "best fit" available memory location
and then uploads code specified in the command body from the Z-tag dongle to
the specified memory location. ZFx86 executes the data after loading, and when
the executable returns with a RETF instruction, it then resumes data fetch from
the Z-tag Manager.
The Upload and Execute code command allows you to select an executable
binary code for upload, such as a Flash programmer. See Figure 4.4 for the
Upload & Execute code command 01 edit menu.
Figure 4.4 Upload & Execute Code Command 01 Editing Menu
34
Z-tag Managers User’s Manual, V1.9
Command Editing
4.4
4
Select Serial Device – 02
The Select Serial Device command allows you to select the output device for
BUR messages and prompts using the radio button selections at the bottom of the
menu.
Note that the Z-tag radio button is not functional. Do not select it. Enable only the
Serial Port option. See Figure 4.5 for the Select Serial Device command 02 edit
menu.
Figure 4.5 Select Serial Device Command 02 Editing Menu
Z-tag Managers User’s Manual, V1.9
35
4
4.5
Execute Console Command Line – 03
Execute Console Command Line – 03
The Exec Console Cmd Line command allows you to execute BUR internal
commands while processing the incoming data stream. When BUR finds this
command, it executes the internal command as defined in the corresponding text
box. This feature is rarely used by software developers, but is useful when
command scripting is used during board debugging. If command results must be
displayed through the serial port, then execute command 02 first. See Figure 4.6
for the Exec Console Cmd Line command 03 edit menu.
Figure 4.6 Execute Console Command Line 03 Editing Menu
36
Z-tag Managers User’s Manual, V1.9
Command Editing
4.6
4
Add Command To Console – 04
The Add Command to Console function creates an internal command for the
BUR console, so you can specify new commands as needed during the
debugging process and then upload them using the dongle. For example, if you
type "help" in the Execute Console Command Line, the new command definition
is displayed (the help line is defined in the command definition data). See
Figure 4.4 for the Add Command to Console command 04 edit menu.
Figure 4.7 Add Command to Console Command 04 Editing Menu
Note: This command is rarely used. It allows you to add a user-defined BUR
internal command to the BUR’s Console command list. The command’s
payload needs to be in a specific format for this purpose.
Z-tag Managers User’s Manual, V1.9
37
4
4.7
Stop Processing – 05
Stop Processing – 05
The Stop Processing command lights the red colored LED on the Z-tag dongle
and freezes BUR. It may be useful to place it after all other commands to notify
the operator when the download completes; thereby preventing an infinite
execution of the data fetch/exec procedure. See Figure 4.8 for the Stop
Processing command 05 edit menu.
Figure 4.8 Stop Processing Command 05 Editing Menu
38
Z-tag Managers User’s Manual, V1.9
Command Editing
4.8
4
Parameter Definition – FE
The Parameter Definition function is a so-called parameter basket, for use by
applications such as Flash programmers. It holds only one 4-byte integer value,
which could be used to set the programming start address in Flash. See
Figure 4.9 for the Parameter Definition command FE edit menu.
Figure 4.9 Parameter Definition Command FE Editing Menu
Z-tag Managers User’s Manual, V1.9
39
4
4.9
Basket – FF
Basket – FF
This command provides a generic container for BIOS images or other data. Used
by Flash programmers (uploaded by BUR as an Upload&Execute-type command)
who themselves can clock in data from the Z-tag Manager.
If you select a payload by using the Browse-button, then the actual file name and
its full path are saved in the hidden command data structure. This allows you to
refresh the command’s payload (if it has been changed on the disk) just by using
the Refresh Bodies item in the popup menu or the Command pulldown menu.
See Figure 4.10 for the Basket command FF edit menu.
Figure 4.10 Basket Command FF Editing Menu
40
Z-tag Managers User’s Manual, V1.9
Command Editing
4.10
4
RLE Compressed Basket – F0
This command provides a RLE-compressed container for BIOS images or other
data for use by special Flash programmers (uploaded by BUR as
Upload&Execute-type commands) who themselves can clock in data from the
Z-tag interface and then decompress the payload on-the-fly.
If you select a payload by using the Browse-button, then the actual file name and
full path are also saved in the hidden command data structure. This allows you to
later refresh the command’s payload (if it has changed on the disk) simply by
using the Refresh Bodies item in the popup menu or the Command pulldown
menu.
When you click Apply, the selected file automatically compresses before being
copied to the “dongle” directory used for the Z-tag Contents list.
The Refresh Bodies action for this command also performs the re-compression
of a previously selected payload file. See Figure 4.11 for the RLE Compressed
Basket command F0 edit menu.
Figure 4.11 RLE Compressed Basket Command F0 Editing Menu
Z-tag Managers User’s Manual, V1.9
41
4
42
RLE Compressed Basket – F0
Z-tag Managers User’s Manual, V1.9
APPENDIX
Application
Examples
A
A.1
ZFx86 Integrated Development System
Figure A.1 shows the ZFx86 Integrated Development System (IDS). The IDS
board contains two Flash devices, and two extra 32-pin DIP sockets that you can
populate with Flash, Disk-on-Chip, or UV EPROMs as needed. All sockets are
connected to the ISA bus. Use jumper setting JP7 and DIP switch S3, position 12
(on the IDS board) to determine from which memory device the system boots.
Figure A.1 ZFx86 Integrated Development System
Z-tag Manager User’s Manual, V1.9
43
A
IDS Jumper and Switch Settings
A.1.1
IDS Jumper and Switch Settings
The Flash device you select will also be the one that the Z-tag Manager Flash
programmer accesses. The BIOS, that ships with the development system, fits
within the AMD 2Mbyte Flash device (U8). Decide which Flash device to access
and then set the IDS’ jumpers and DIP switches accordingly. Figure A.2 shows
jumper JP7 and DIP switch S3 settings for the various options.
JP7
Extra
Socket U6
Atmel 64Kb
Device U7
AMD 2Mb
Device U8
DIP Switch S3,
White part of
i h to
closest
board edge
12
16-bit Access
Atmel U7
White part of
to the right side
(from board edge)
12
8-bit Access
AMD U8
Figure A.2 Jumper and DIP Switch Settings for Flash Device Access
For example, to install a BIOS on the Integrated Development System (IDS), the
process requires the following items:
44
•
Z-tag manager software and associated utilities (found on the CD-ROM
supplied with ZFx86 development system)
•
Host PC running Windows 9x (with CD ROM drive)
•
Parallel (printer) cable
•
Serial Null-Modem cable for seeing BUR diagnostic messages
•
Z-tag Dongle (supplied with the ZFx86 development system)
•
CD-ROM drive (supplied with the ZFx86 development system)
•
Target board (ZFx86 development board for this example)
Z-tag Manager User’s Manual, V1.9
Application Examples
A.2
A
BIOS Flashing Example Using The AMD Chip
To begin using this Flash example, ensure that you have completed the following:
A.2.1
•
Install the Z-tag Manager on your system – See “Setup and Start” on page 13.
•
Check the S3-12 switch and JP7 jumper settings – Place S3-12 away from the
board edge, and set JP7 jumper in the position identified in Figure A.2.
Building an AMD BIOS Image
Follow this procedure to download the BIOS into the IDS board’s AMD chip.
1. Launch the Z-tag Manager using Start > Programs >Z-tag Manager menu
item, or execute the ZTAGWIN.EXE directly from your installation destination
directory.
2. Drag the Select Serial Device – 02 command from the New Command
Templates list into the Z-tag Contents list window.
3. Double-click Select Serial Device command and the Command Edit widow
displays.
4. Select the Serial Port radio button in the Select Serial Output Device... area
and click Apply.
Since the BUR diagnostic messages display to the IDS serial port, connect a
serial cable between the IDS COM1 port and your host computer’s COM port.
5. Start a Hyper Terminal program on the target PC and make a new “Direct to
COMx” connection with these settings:
•
Baud rate 9600
•
8 data bits
•
1 stop bit
•
No parity
•
Handshake set to none
6. Drag the Upload & Execute command from the New Command Templates
list to the Z-tag Contents list.
a. Double-click the Upload & Execute – 01 command, and the Command
Edit widow displays.
Z-tag Manager User’s Manual, V1.9
45
A
Building an AMD BIOS Image
b. Use the Browse button to locate the AMD Flash Programmer Binary file
on the IDS CD ROM disk. Look in the following directories for the
ATM29xxx.rom file:
IDS CD ROM/FLASH Programmers/Amd/AM29xxx.rom
c. Option: Change the Description text box to read the following: AMD Flash
programmer
Your screen should then look like Figure A.3.
Figure A.3 Adding AMD Flash Programmer Code To The Upload & Execute Command
7. Add the Parameter Definition – FE command to determine the programming
start address in the Flash device. In this example, download the BIOS into the
last 256K of the device starting at memory address 0x1C0000.
a. Type 0x1C0000 in the Define Parameter Value text box.
b. Option: Change the Description field text to something descriptive.
c. Click Apply.
8. Drag the RLE Compressed Basket – F0 command from the New Command
Templates list to the Z-tag Contents list and attach the desired BIOS image to
the basket.
46
Z-tag Manager User’s Manual, V1.9
Application Examples
A
Writing the Phoenix BIOS directly to the Dongle using the RLE Compressed
Basket command is essential, because the Dongle’s two SEEPROM chips
define its maximum memory at 256Kbytes, and this uncompressed Flash
image exceeds the available IDS memory.
a. Use the Browse button to locate the AMD Flash Programmer Binary file
on the IDS CD ROM disk. Look in the following directory for the
zfx10600.rom file: IDS CD ROM/ZFx86 BIOS Set 1.06/zfx10600.rom
Note that the .rom file name changes with each BIOS release. For
example, the file name zfx8610600.rom reflects the ZF BIOS release 1.06.
b. Change the Description field text to something appropriate, and click
Apply. See Figure A.4.
Figure A.4 RLE Compressed Basket Command
9. Drag the Stop Processing – 05 command from New Command Templates to
the Z-tag Contents list. This command tells BUR to stop clocking any further
data from the Dongle.
10. You now have your Dongle contents for BIOS updating. To save time in the
future, save this dongle image using the File > Save Device Image As...
menu, storing it under a descriptive name. See Figure A.5.
Z-tag Manager User’s Manual, V1.9
47
A
Writing The BIOS Image Using The PassThrough Dongle
Figure A.5 Saving the Device Image
After the Image content is ready, write the BIOS image to the Dongle (see Writing
The BIOS Image Using The PassThrough Dongle text) and store it for later
downloads. Or use the Dongle in PassThrough mode, and send the image directly
to the IDS using the parallel port extension cable.
A.2.2
Writing The BIOS Image Using The PassThrough Dongle
To write the current image through the Dongle and into the target system, follow
this procedure:
1. Connect the Dongle to the host computer’s Parallel port.
2. Check that the Destination is set to PassThrough on the Z-tag Manager main
menu. See Figure A.6.
Figure A.6 Verify the Z-tag Dongle is Enabled
3. Verify that Super-fast mode is selected, and click the Write button. See
Figure A.7.
Figure A.7 Click the Write buttons
48
Z-tag Manager User’s Manual, V1.9
Application Examples
A
The Z-tag Manager downloads the image through the Dongle and into the
target system. You see diagnostic messages reporting on how the Flash
programming is progressing, or any error messages—if things are not going
well.
4. When the download completes, close the “Z-tag Manager is busy...” menu by
clicking on the Close/Stop button.
5. Now remove the Dongle and power-reset the target board. It now boots with
the new BIOS running.
A.3
Advanced Flashing Examples
Occasionally, you may need to place a BIOS, a OS kernel, and a file system into
your target board’s Flash. In order to do this, we developed a special BIOS that
would boot the OS kernel directly from Flash. If you are unfamiliar with using the
ZF Linux loader, we recommend that you read the Booting Linux From Flash
document (P/N 9150-0017) for additional details. Download this document from
the ZF Micro Devices’ website: http://www.zfmicro.com
In the example below, we downloaded the Linux kernel operating system and all
the needed data into the target board’s Flash using the Z-tag Manager set to
PassThrough mode. The entire downloadable image size was about 2.2 Mbytes.
The Linux example’s Z-tag Contents list is shown in Figure A.8.
Figure A.8 Flashing A Linux OS Into An Intel StrataFlash Chip
We used the Select Serial Device command – 02, so that the BUR would output
its diagnostic messages to the serial port.
Z-tag Manager User’s Manual, V1.9
49
A
Flashing Various Chips and BIOS Examples
The Upload & Execute command is the same 01 command as in the previous
example, only we renamed it Strataflash Programmer. In this example, we use a
special Strataflash programmer that requires defining two parameters:
•
a programming start address (note the Kernel Image/BIOS/Initrd Image
Start commands)
•
a zero or 1 flag indicating whether or not to erase the Flash memory block
(note the Erase Sector command in the Contents list). Use this command to
patch or write a small amount of data to the memory while preserving the
surrounding data.
These two parameter definitions are inserted just after each of the StrataFlash
Programmer commands.
The third programmer parameter needed is the binary data itself, which is added
using the renamed Basket – FF command. We wrote these three things to the
Flash:
•
Kernel Image Start command downloaded the OS Kernel to memory
offset 0x000000
•
BIOS Start command downloaded the BIOS to memory offset 0xFF0000
•
Initrd Image Start command downloaded the Initrd image at memory
offset 0x080000.
Each of the above items required a separate Upload & Execute Code – 01
command using different parameters, because each of the parts were written to
different memory locations in the Flash.
We always set the Parameter Definition – FE command to 1. We renamed this
command Erase Sector.
Then we set the PassThrough jumper (JP2) on the Dongle to the proper position,
selected PassThrough mode on the Z-tag Manager’s main menu, and started the
flashing process by power-resetting the target board. The download status was
monitored using a Terminal Emulation program and a serial connection between
the host computer and the target board.
A.3.1
Flashing Various Chips and BIOS Examples
The following are some practical Z-tag Contents List examples for various flashing
applications. Verify that, before downloading the image, the Flash chip select
jumper JP7 is set correctly, and that Switch S3 Bootstrap 12 is set according to
the selected Flash chip’s data path width. Refer to Figure A.2 on page 44.
When using the Intel StrataFlash device, set the S3 Switch Bootstrap 12 position
correctly by selecting the appropriate memory data width.
50
Z-tag Manager User’s Manual, V1.9
Application Examples
A.3.1.1
A
Flashing Phoenix BIOS to 16Mb Intel E28F128 StrataFlash
Although, the 16M Intel E28F128 StrataFlash is not normally used on the IDS, you
can solder it to a custom designed system, or add a Flash submodule connected
to the Offboard Flash header J10 on the IDS.
The StrataFlash programmer needs 2 parameters after it. First FE-command
determines the programming start address in the Flash device, and the second
FE-command defines whether to erase corresponding Flash sector or not.
In this example, we use a special Strataflash programmer that requires defining
two parameters:
•
a programming start address (note the BIOS Start FC0000 command)
•
a zero or 1 flag indicating whether or not to erase the Flash memory block
(notice the Erase Sector =1 command below). Use this command to patch or
write a small amount of data to the memory while preserving the surrounding
data.
These two parameter definitions are inserted just after each of the StrataFlash
Programmer command.
The Manager writes the Phoenix BIOS into the last 256K of the 16M Flash chip starting at
address 0xFC0000. Because, in our example we used the normal Basket command to
hold the BIOS image and it therefore exceeds the Dongle’s available memory, you can
only use the Dongle in PassThrough mode.
However, if you use the RLE Compressed Basket command, you can write this image to
the 256Kb Dongle. See Figure A.9.
Figure A.9 Flashing The 16M Intel StrataFlash With The Phoenix BIOS
Z-tag Manager User’s Manual, V1.9
51
ZF Micro Devices, Inc.
1052 Elwell Court
Palo Alto, California 94303
(650) 965-3800 · Fax 965-4050
www.zfmicro.com
Z-tag Managers User’s Manual V1.9
52