1
User Manual Picturepark 8.9
Version: 20.11.2015
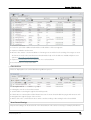
Contents
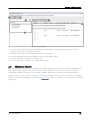
Table of Contents
Basics
1 User...............................................................................................................................................
Interface
6
2 Basic...............................................................................................................................................
Functions
8
3 File...............................................................................................................................................
Types
12
4 Languages
............................................................................................................................................... 13
5 User
...............................................................................................................................................
Menu
15
6 Rights
............................................................................................................................................... 17
How to...
1 Search
............................................................................................................................................... 20
2 Download
............................................................................................................................................... 25
3 Share
............................................................................................................................................... 27
4 Ordering
............................................................................................................................................... 35
5 Saving
...............................................................................................................................................
Collections
36
6 Manage
...............................................................................................................................................
Mappings
37
7 Manage
...............................................................................................................................................
Presentations
39
8 Statistics
............................................................................................................................................... 40
9 Report
............................................................................................................................................... 43
10 Subscriptions
............................................................................................................................................... 45
11 Widget
...............................................................................................................................................
Dashboard
48
12 Video
...............................................................................................................................................
Cue Points
55
13 Notifications
............................................................................................................................................... 55
Import & Editing
1 Import
............................................................................................................................................... 58
2 Single
...............................................................................................................................................
Edit
65
3 Batch
...............................................................................................................................................
Edit
70
4 Categories
............................................................................................................................................... 74
5 Version
...............................................................................................................................................
Management
78
6 Picturepark
...............................................................................................................................................
Desk
82
7 Conversion
............................................................................................................................................... 85
Modules
1 Office
...............................................................................................................................................
Connector
90
2 Creative
...............................................................................................................................................
Extensions
94
3 Review
...............................................................................................................................................
Manager
96
4 Asset
...............................................................................................................................................
Classes
101
www.picturepark.com
2
Contents
System Administration
1 User
...............................................................................................................................................
Management
107
2 Rights
...............................................................................................................................................
Management
113
Groups
and Rights
..........................................................................................................................................................................................
115
Rights
Templates
..........................................................................................................................................................................................
118
3 Managing
...............................................................................................................................................
Sharings
122
4 Managing
...............................................................................................................................................
Orders
126
5 Duplicates
............................................................................................................................................... 128
6 Metadata
...............................................................................................................................................
Import
129
7 Management
...............................................................................................................................................
Console
136
Configuration
.......................................................................................................................................................................................... 138
.............................................................................................................................................................................................
Channels
138
.............................................................................................................................................................................................
Global scripts
141
.............................................................................................................................................................................................
Icons
143
Authentication
.......................................................................................................................................................................................... 144
.............................................................................................................................................................................................
Identity Providers
144
Metadata
fields
..........................................................................................................................................................................................
147
.............................................................................................................................................................................................
Indexing
147
.............................................................................................................................................................................................
Index Rebuild Batches
148
.............................................................................................................................................................................................
Exclusive Assignments
149
Asset
handling
..........................................................................................................................................................................................
150
.............................................................................................................................................................................................
Order recipients
150
Rendering
.......................................................................................................................................................................................... 150
.............................................................................................................................................................................................
Rendering States
150
User
Interface
..........................................................................................................................................................................................
151
.............................................................................................................................................................................................
UI elements
157
.............................................................................................................................................................................................
Ports
163
.............................................................................................................................................................................................
Templates
166
.............................................................................................................................................................................................
Skins
171
.............................................................................................................................................................................................
File Management
173
8 Desktop
...............................................................................................................................................
Clients
174
Browser Compatibility
Index
www.picturepark.com
3
Basics
1
Basics
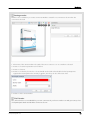
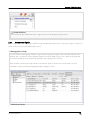
Picturepark is a simple to use, fast and powerful solution for the management, distribution and integration of media
assets such as photographs, graphics, presentations, videos and other files. With Picturepark media assets are easily
managed and exchanged in a controlled manner.
Additional Links
Picturepark Website
Youtube Channel
Support
http Connection
Unsecure http connections onto Picturepark Cloud will no longer be supported from January 1, 2016 on. All
remaining unsecure http connections will be rejected or forwarded to secure https connections.
Core Functions
Metadata tagging
Classification of assets and adaptive metadata
Tagging of assets with tagging tree (controlled vocabulary)
Conversion into various formats
Distribution via email link
Publication on websites or intranets
Notification - and approval processes
Drag & drop in Office
Web service with SOAP/XML
LDAP/ADFS connection
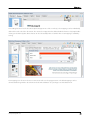
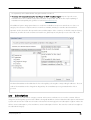
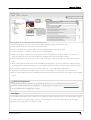
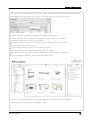
Organisation
The channels and tree make up the basic Picturepark structure. The tree can have Asset classes for classification
of assets and tags (categories) for easy tagging with drag & drop. The configuration can look different
depending on your Picturepark setup:
www.picturepark.com
4
Basics
www.picturepark.com
5
Basics
Assets and Derivatives
Files that have been imported to picturepark are known as assets. On import into Picturepark derivatives that
have been configured for the file type are automatically created. Derivatives are formats that have been
adjusted for a specific purpose. In this way office or print formats can be configured for an image file. The office
format is used for Office applications and is therefore not as high res or high quality as the print format of the
asset.
The user can then select the desired format in various functions, for example when sending or downloading
assets.
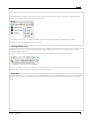
List of all the available formats of an asset for the user currently logged in.
1.1
User Interface
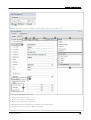
The Picturepark user interface can be used intuitively and offers many customisation options.
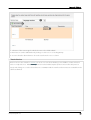
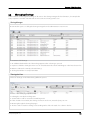
Overview
Picturepark is divided into three main areas: search/classes and tags (categories), asset browser and toolbars
and Sidebar with preview/basket. The top navigation (incl basket), as well as a toolbar are also available.
www.picturepark.com
6
Basics
The right and left area (classes and categories / basket) can be hidden by clicking on the arrows, which in turn
enlarges the centre area.
Toolbars
There are different toolbars available in the centre area - the asset browser:
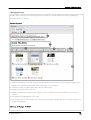
View Toolbar
This toolbar contains all the tools which allow you to change the display of the assets shown in the asset
browser. For example the following points can be changed:
Type of view (list view or small, medium and large thumbnails)
Number of assets shown per page (choose from 20, 40, 60, 200 or 500)
Sorting and/or removal of the sorting of the search results
Incorporation of the assets from all subcategories in the view with a click on the
icon. If this feature is not
activated, then the subcategories are shown as folder icons in the asset browser.
www.picturepark.com
7
Basics
Inclusion of language versions and other version types in the view (if configured)
Jump to the next / previous page
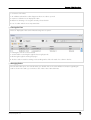
Asset Toolbar
This toolbar contains all the tools you need to interact with the assets in Picturepark. The following tools, for
example, are available:
Select or deselect all assets
Edit, dowload, mail or put the selected assets in the basket
Create a metadata report for the selected assets
Import new assets
Filter Toolbar
In the filter toolbar you can see where the currently shown assets are located. A filer search is also available. With
this filter search individual file types can be filtered in the view.
Detail View
The detail view of an asset is opened with a double click on that asset. The metadata, different formats and
further information about the asset are available in this view.
1.2
Basic Functions
Working with Picturepark is facilitated by several features.
www.picturepark.com
8
Basics
Personal Settings
Each user can now save their own settings, which will be loaded automatically if the user logs in to Picturepark.
Besides the number of displayed assets per page the metadata in the list view, the last opened category and
the view for the asset browser will also be saved per channel. The user can reset these settings in their user
profile.
Multi-function Buttons
Buttons often have several functions. These multi-function buttons are marked with an arrow on the right side.
The different functions of the button can be displayed with a click on this arrow.
www.picturepark.com
9
Basics
Context Menus
The context menus can be called up with a right mouse-click. The most important functions are always available
in this way.
Context Help
Tooltips appear, when the mouse pointer stays on the tool.
Basket
The cart is used like a clipboard. It helps with functions that are carried out on multiple assets at once such as
the mailing or ordering of assets or the saving of whole basket. Assets can be added to the baskets by clicking
on the basket icon on the bottom right, over the context menu or simply via drag and drop on the basket area or
the button in the upper navigation. Assets which are in the basket are indicated with a shopping cart symbol with
a minus sign and can be removed from the basket again by clicking on this symbol.
www.picturepark.com
10
Basics
The remaining menu items can be shown via the arrow. The whole basket can be emptied, or individual assets
can be removed from the basket via the context menu.
The basket can be opened in the right sidebar as well as the upper navigation. The basket in the upper
navigation can be resized and positioned at will.
Selecting Multiple Assets
Multiple assets can be selected together by pressing the shift key. If the assets are not adjacent they can be
selected using the Ctrl key.
You can use the corresponding button in the toolbar to select all the assets in the asset browser.
As soon as at least one asset is selected you can use Ctrl+A to select all the assets on the page. A click in the
background of the asset browser will deselect all the assets again.
Drag & Drop
Assets can be moved or copied from one category to another, for example, or put into the basket with drag &
drop.
www.picturepark.com
11
Basics
Working with Windows
Windows can be minimised, maximised and closed. The minimised windows are shown in in the task bar.
Fenster können minimiert, maximiert und wieder geschlossen werden.
1.3
File Types
The assets in Picturepark may be made up of various types of files. Each of these filetypes has file type dependant
properties.
Images
Images are available in Picturepark in various different formats. These formats differ from one another,
amongst other things, by their size, resolution or colour space. The purpose of these different formats is that
the images are available in appropriate formats for different areas.
PDF
You can link images that are in a PDF document through links/mappings directly with the original image in
Picturepark. PDF documents are visualised page by page in the preview. The whole text of a PDF file is
indexed and can be searched with the full-text search.
www.picturepark.com
12
Basics
Office
Office Documents (Word-Documents, PowerPoint presentations, Excel spreadsheets) can all contain links/
mappings. I.e images used in Office documents can be directly linked with assets in Picturepark.
Furthermore, for multiple page Office documents an own preview is generated for each page. The whole
text of an Office file is indexed and can be searched with the full-text search
Preview for Office documents
The preview of Office documents in Picturepark is dependent upon the definition of the print area in
office for the corresponding document.
Presentations
The single slides of presentations can be managed in the detail view. This makes it possible to centrally
manage Powerpoint templates and if desired combine these into new presentations. The single slides of a
presentation can be assembled in the baske and downloaded as a complete presentation.
The entire text of a PowerPoint file is indexed and can be searched.
Multimedia
Multimedia files such as movies or audio files can be viewed and listened to directly in Picturepark. The
detail view of multimedia assets includes a player for playing the multimedia files. You can now also create
cue points for video formats.
1.4
Languages
There are several areas in which the language can be changed in Picturepark. This distinction is helpful for optimal
use of these areas. The number of available languages in the examples below may differ to yours depending on your
license.
Metadata Languages
The metadata languages refer to the information displayed in the assets in Picturepark. All language information
can be edited and directly viewed on the respective asset.
Category Languages
www.picturepark.com
13
Basics
The category languages refer to the translations of the individual categories. Depending on the selection the
category tree and the corresponding category descriptions are shown in the appropriate language.
System Languages
The system language refers to the Picturepark user interface. It determines the language in the menus and
windows. The standard system language can be individually defined in each user profile.
Content Languages
The collection of appropriate metadata and category languages for different languages are made available.
The individual languages can also be changed individually after selecting a content language.
Language Versions
www.picturepark.com
14
Basics
The language versions refer to separately configurable languages (independent from other language
configurations) for the versioning of assets. An asset can have various versions assigned to it, which are then
automatically attached to the respective asset.
1.5
User Menu
The user menu is called up via a click on the user symbol on the top right. Different functions are available.
Adminstrative options are described in the "system administration" area.
User Profile
The user profile can be opened by clicking on the email address of the logged in user. Fields with an asterisk are
mandatory.
www.picturepark.com
15
Basics
In your user profile you can also:
Change your password
Change the language of the user interface
Deactivate the auto login if your Picturepark has such
Reset Personal Settings to the Picturepark default (e.g. changes of the metadata in the list view, default views
per channel etc.)
Languages
Depending on the Picturepark configuration the user interface is available in three languages, German, English
and French. The language can be changed at any time by the user. The default language is set in the user profile.
www.picturepark.com
16
Basics
Further information regarding the languages available in Picturepark can be found in the separate language
area.
Skin
Picturepark can be displayed in either gray or blue
1.6
Rights
Rights are defined at various points in Picturepark, which ultimately all affect the user.
Additional Links
Video: Granular Permissions Management
Related Topics
Rights Management
Groups and Rights
Rights Templates
User Management
www.picturepark.com
17
Basics
The various stages of rights assignments in Picturepark are:
User Rights
There are no user rights directly on individual users, but on user groups. User groups are thereby understood as
roles, that can carry out specific functions in Picturepark for example editors and adminstrators. The allocation of
rights to the user takes place via the assignment of a user to one or more user groups. The user receives all the
accumulated rights from all the user groups he is assigned to.
The rights of the user groups control general functions (editing and creation of assets and the management of
Picturepark) and are further restricted by category and asset rights.
Category Rights
The category rights define, which areas of the structure (asset classes, tags/categories) are visible and/or editable for
the user groups. If a user group does not have the rights to see a category, then the contents of the category are also
not available (even when the asset rights allow the viewing of the contents). Nevertheless category rights are not
inherited to the assets in a category.
Asset Rights
Asset rights pertain directly to the asset. They control which assets a user group can see and edit. Therefore, assets in
the same category can be assigned different rights. So for example in the "Year-2013" category, user group A only
sees assets with the "public" right, whereas user group B can see all the assets in this category.
Derivative Rights
Derivative rights control the access of user groups on the individual derivatives of an asset and are set on individual
assets. In this way it is possible to only give a user group access to the watermark format of an image.
Important
A rights dependency is created:
www.picturepark.com
18
Basics
Without rights to see the categories, the assets in the category cannot be seen
Without rights to see the asset, the derivatives cannot be seen
www.picturepark.com
19
How to...
2
How to...
This section addresses the most common Picturepark applications:
Search: Searching through assets with different functions
Download: Downloading of assets and their various derivatives
Sharing: Sharing of assets to internal and external contacts
Order: Ordering of derivatives on which you don't have rights
Saving collections: Saving of baskets and search queries
Manage mappings: Associating documents and the images contained therein
Statistics: Calling of global and asset specific statistics
Report: Creating metadata exports for selected assets
Subscriptions: subscribing to category contents with notifications regarding changes
Widget Dashboard: Overview over current information regarding the system. For example news, newly created
assets etc.
Video Cue Points: The setting of cue points in a video to divide this into chapters/scenes
Notifications: Information about completed imports (files/metadata) and other actions
2.1
Search
Assets can be found quickly and easily with the help of various search functions in Picturepark.
Additional Links
Video: Advanced Searching
Blog post: Structured Metadata Strategies for Search Interfaces
Related Topics
Saving Collections
Simple Search
Different operators can be used in the simple search. With the "AND" operator, assets are found that have both
"Man" and "Woman" contained in their metadata. This is the default search behaviour in Picturepark if no
operator is entered. With the "OR" operator, asests are found that contain either "Man" or "Woman" for
example. The use of an asterisk * as a placeholder for unknown characters or terms creates a "contains" search.
Terms can also be specifically excluded. For example apple -fruit finds assets that contain the word apple but
not the word fruit. A combination of operators is also possible. To receive meaningful search results you should
alway use meaningful search queries (e.g. searching for "manual" instead of "ma". The case of the query term is
ignored. Search suggestions, that are made up of the available classes/tags (categories) in Picturepark are
shown during each search.
www.picturepark.com
20
How to...
Operators
Dog A ND cat is equal to dog cat: Resulting assets contain both the terms dog and cat
Dog OR Cat: Resulting assets contain either dog or cat
cat*:Resulting assets contain either cat or catalogue or category, for example.
dog -cat Resulting assets contain dog but not cat
Options
The following options can be selected to influence the search results
Always search everything: If you activate this, then not only your currently selected, but also all the other
categories/classes in the current channel will be searched through.
Enable multi-select: Allows you to select multiple categories/classe via checkbox.
Sort Order
The search results in the simple search are, per default, sorted by relevance (search ranking). This means that
assets with a higher relevance are shown first. This sorting can be changed by using the sort order button in
the view toolbar.
Search & rights
The search for assets is based on the asset rights, whereby in a simple search all assets are found that the
user has rights on. The category rights are ignored.
www.picturepark.com
21
How to...
Hyphenation
When assets are indexed hyphenation occurs by the relevant search terms. Hier words such as "Manual"
are split into "Ma" "nu" "al". In order to get meaningful search results, you should therefore use
meaningful search queries such as "Manual", instead of single syllables (e.g. "ma")
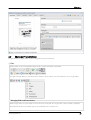
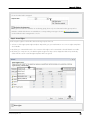
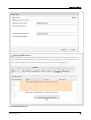
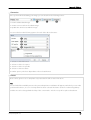
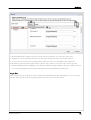
Field Specific Search
The extended field search allows the combination of different keywords. Assets can be searched through for any
metadata information. Different combinations allow for a very precise search. The extended search is found via
the "Extended" and then "Field Search" buttons under the simple search field.
In the below example, all assets that have "Cloud" in the title and/or are assigned to the categories "Sky" or
"Blue" and/or have an expiry date in the next 30 days.
1. Saved extended searches can be called and edited using this dropdown
2. The available metadata fields can be searched through using this search field.
3. The metadata fields can be added to the operand group (AND/OR) via drag & drop.
4. Removal of the selected entry or the deletion of all entries
5. Switching of the selected operand / Addition of an operand group
6. Restriction of the extended search to specific categories by using the corresponding metadata fields.
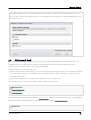
A yellow bar is shown in the asset browser after you have executed the search. The options for the search are
www.picturepark.com
22
How to...
shown in this bar: The search can be cancelled, edited or saved.
If you use the operand "contains exact list values" or "contains list values", then an analysis of the number of
hits of the assets in the current search can be shown and directly edited (edit all, put all in basket and export as a
csv file) by clicking on the report icon (second from the right in the screenshot above).
Searching for a user
For user fields you can select the desired user from a dropdown for the search. The list only contains users
for the logged in user has rights to.
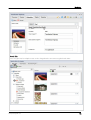
Category Search
After running a category search, only the categories that contain the search term (and their super categories) will
be shown in the category tree. The category search can be found above the category tree.
Multi-Select Search
www.picturepark.com
23
How to...
As soon as the multiselect search has been activated, checkboxes will appear in front of each category/class. If
multiple checkboxes are then only the assets that are in the selected classes are shown.
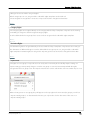
Tip
If a checkbox is selected for a sub- class or category, then this is shown in the super- class or category as
below:
Filter
The view in the asset browser can be filtered for pictured file types with the filter toolbar. By clicking on the filter
icon on the far right you can also combine the file type filters. You will also find all the public searches, which
have been saved by users. Depending on your rights a right click on a public search allows you to edit or delete
www.picturepark.com
24
How to...
the search. The filters can be customised.
The following filters are set as default (left to right):
All: Searches through all file types
Images: Only shows images
PDF: Only shows PDF files
Office: Only shows Office files
Multimedia: Only shows multimedia files
Other: Shows all other file types
2.2
Download
There are many ways to download. Depending on the case a single or multiple download may be best. When
downloading multiple assets a zip file with all the assets is created.
Context Menu
Assets can be downloaded via right click using the context menu. By clicking on Download you open the format
selection window with which you can download multiple formats at once. You can select a format directly under
Formats to shorten the download process. This second possibility is only available when only one asset is
selected.
www.picturepark.com
25
How to...
Asset Toolbar
All selected assets can be downloaded to your local computer as a zip file by using the Download button in the
asset toolbar.
Basket
All the assets in the basket can be downloaded to the local computer by using the Download button in the
basket:
Detail View
www.picturepark.com
26
How to...
The asset can be downloaded in the detail view of the asset. The formats can be downloaded directly from the
format are in the overview tab (marked with a corresponding download icon)
If additional assets are mapped to an asset then these can be downloaded directly together with the master
asset. This method is only available via the download button in the asset overview
2.3
Share
Assets can be sent to recipients separately or together via the basket. You can select the formats and language
versions you would like to send. The assets themselves are not sent, however a link to download these from a portal
or directly to the asset in Picturepark is sent. The recipient(s) can then view and/or download the required assets.
Additional Links
Video: Sharing and requesting digital assets
Video: Digital Asset Mailing
Related Topics
Manage sharings
Different Types
Individual and multiple assets can be made available in a portal or individually via links. There are various
www.picturepark.com
27
How to...
options available:
Email:The assets are displayed in a portal. The link to this portal can be sent via email directly from Picturepark
to the desired recipients.
Link: You can create links to a portal or single assets, which can then, for example, be integrated into websites,
newsletter etc.
There are various settings available for each sharing:
www.picturepark.com
28
How to...
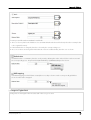
1. Add your subject here (is only used for the "email" type and portal links)
2. Enter your message text (is only used for the "email" type and portal links)
3. Selection of a template that should be used for the portal. Templates define sort order and design of the
portal for available elements such as title, message and asset list. This selection field only appears once more
than one template is available.
4. Selection of the mailing language. System specific texts in emails and portals are then shown in this
language.
5. Selection of an expiry date for the sharing. Once the expiry date has been reached you can no longer access
the assets in the sharing. If a sharing should not expire then you can select "Unlimited accessibility". .
6. An overview of all the assets contained in a sharing is shown in the lower part of the window. You can change
the sort order of the asset here via drag & drop. This sort order is then taken over for the sharing portals.
www.picturepark.com
29
How to...
Sharing via email
All the fields that you can fill out in the sharing that is sent via email appear in the email that goes to the recipient
as well as the sharing portal. The options for this sharing type are explained below. General options are
explained in "Different types".
1. Selecting your recipient (s). You can type in email addresses or you can select from a list of registered
Picturepark users by clicking on "To". When you start to enter the address you will get suggestions for
registered users, as well as users that have already received a sharing from Picturepark. The external user
suggestions can be individually removed via the backspace button.
2. When you select the "send through system" checkbox, then an automatically generated email is sent via
Picturepark. You also have the option of deselecting this check box in which case you can then inform
recipients via another method. The corresponding link appears after you have completed the mailing when
you click on send.
3. By activating the "Copy to Sender" option, a copy of the email is sent to the currently logged in user.
After a sharing has been sent an overview of what was sent opens again.
www.picturepark.com
30
How to...
1. Information regarding, send date, expiry date and sender
2. List of recipients
3. The context menu is opened by clicking on the recipioent. The specific portal link and the statistics for the
selected recipient are shown here
4. Subject and messasge which is shown in the portal
5. Assets that are contained in the Sharing. Using the "Add" or "Remove" buttons you can add or remove
assets at a later date.
6. The sharing can be edited or deleted right after sending. All the settings for each sharing type can be
adjusted, however changing the sharing type or changing the recipient of a mail sharing is not possible.
This overview of each sharing can be opened again later via the sharing management.
Sharing Links
When generating sharing links all the options that are shown below can be defined. You can select various link
types:
www.picturepark.com
31
How to...
1. Show through portal: A link to a sharing portal is generated, in which the selected assets are shown.
2. Direct download links: A download link is created, that contains all the selected assets in a zip archive. Direct
links to the individual assets in a sharing are thereby also created.
Tip
The fields "Template" and "Language" are only available for the options "Show through Portal".
After sending a sharing a window will open with an overview of the sharing you have sent.
www.picturepark.com
32
How to...
1. Link to the portal or zip file of the sharing (depending on the selection of the link type)
2. Information regarding the send date, expiry date and sender
3. Subject and message which is shown in the portal
4. Assets which are contained in the sharing
5. Links for each derivative of the currently selected asset. You can change between "Download" and "View"
links by using the "Change link type" button. If the preview derivative was shared for a video, then an
additional button appears, over which an Embed code for the corresponding video can be shown.
6. The sharing can be edited or deleted directly after sending it. All the settings for each sharing type can be
adjusted, however changing the sharing type or changing the recipient of a mail sharing is not possible.
This overview can also be opened again via the sharing management.
Download and view links
www.picturepark.com
33
How to...
Tip: Download links contain a "D", which starts a direct download. Using the "Change link type" button
you can switch between download and preview links, upon which the "D" is replaced with a "V". Preview
links can be displayed directly in the browser, as long as the browser supports this. If the browser does not,
then a download will also be started over a link containing a "V". Examples:
Download link: https://client.picturepark.com/Go/AX4DlIKG/D/1/1
Derivative preview in the browser: https://kunde.picturepark.com/Go/AX4DlIKG/V/1/1
Sharing Portal
The assets along with their selected derivatives can be shared with other people via a portal. A portal contains
the subject and meassage defined by the user, but also information about the creation and expiry dates.
Depending on the rights of the user different templates can be selected for a portal on creating a sharing.
Example "Press Portal"
Video Preview
In order to guarantee a preview for videos in sharing portals, the preview derivative of a video is
automatically shared, if the original is contained in the sharing. The preview format is however not
downloadable as long as it isn't explicitly shared via the format selection.
Manage Sharings
Registered users can see and edit their sharings in Pictuepark. The sharing management can be opened via the
www.picturepark.com
34
How to...
user menu.
2.4
Ordering
The order process is available to users that do not have rights to a specific format of an asset for example the
original image or a high resolution print format. Assets can be ordered using the basket or in the detail view of an
asset. The administrators are automatically notified of each new order and can then manage these.
Additional Links
Video: Mailing and Ordering
Related Topics
Manage orders
You can specify when the assets and in what form they should be delivered when ordering. In addition to a text
message you can also choose the desired delivery method.
www.picturepark.com
35
How to...
2.5
Saving Collections
Each user can save individual collections of assets, that can be accessed again at a later date. You can save search
queries as well as whole baskets. The saved collections are only visible to the user that saved them.
Saving Baskets
You can save the basket by clicking on save as soon as one or more assets are put in the basket. The name and
description of the basket can be entered in the window that opens when you click save. The entry is now visible
in the MyAssets structure under saved baskets.
Saving a Search
You can save simple as well as extended searches. You can save a search as a MyAssets entry by clicking on the
www.picturepark.com
36
How to...
save icon as soon as a search as been carried out. You can enter a name and description for the new entry in the
window that opens as soon as you hit the save button. The following search types can be selected for extended
searches:
Extended Search: Personal search, which is only shown for the current user
Workflow Search: Search which can be used as a filter for workflows
Public Search: Public search which is shown in the filter search to users with sufficient rights. You can give the
rights to see and edit a public search to individual user groups over the "rights" tab.
The entry (extended and workflow search type) is only shown in the MyAssets structure under saved searches.
Editing Entries
The name and description of each entry in MyAssets can be edited. The entries can also be deleted. You can
edit and delete using the context menu.
2.6
Manage Mappings
With mappings you can reference another asset in a document. In this way for example you can reference images
that are in a brochure to the corresponding assets in Picturepark.
Managing Mappings
Mappings can be edited in the preview of the asset.
www.picturepark.com
37
How to...
The editing functions for the document preview appear via a click on Links (1). The mappings can be individually
defined for each side of the document. The area to be mapped is first defined with the frame tool (2). By doubleclicking on the frame (3) the desired asset can be selected (4) in the asset field. The asset mapping is added by
saving.
The mappings are shown in the asset overview as well as in the page previews. The links/mappings can be
downloaded along with the document via the download button as a package out of the detail view.
www.picturepark.com
38
How to...
2.7
Manage Presentations
For presentations single slides can be managed in the preview window.
Filter
All the slides can be activated/deactivated in the current view with the slide filter.
Using the file type filter you can filter for presentations in the current view. This filter also shows single slides.
Managing Slides and Presentations
All the single slides of a presentation are shown in the Slides tab. The single slides can be mailed or added to
the basket from this view. Further options are available in the context menu.
www.picturepark.com
39
How to...
Updating
All the slides will be overwritten if a presentation is updated. If a single slide is update, then only that asset will
be updated in Picturepark, the original presentation however, will remain the same.
Rights
The rights of a presentation are automatically inherited by its slides.
Merging
Single slides can be merged into a new presentation and downloaded. The desired slides should be added to
the basket and then download. All slides with the same file extension will be merged into a new presentation.
2.8
Statistics
Statistics are available globally over the whole Picturepark as well as for each individual Asset. The global statistics
are used for the evaluation of views, downloads, logins, traffic and disk space. Authorised users can put together
individual statistic reports and export these if required. The asset statistics capture all the actions that are performed
on an asset. These statistics can be viewed in the detail view of every asset.
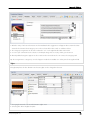
Global Statistics: Statistic Windows
The desired data can be selected in the left pane of the window. These are then displayed in the right pane and
can be filtered.
www.picturepark.com
40
How to...
1. To increase the right hand size you can use the arrows to collapse the left hand side
2. You can filter the selected data using the different filters
3. The data are displayed as diagrams in the statistic tab
4. The data can be listed in the journal tab by stating an asset id, action or size amongst other options.
5. The filtered data can be refreshed or filtered in the menu
6. A tooltip with more detailed information to the data is shown when you mouse over a bar in the chart
7. The asset statistics provide information on the creation of new assets, downloads of derivatives and asset
views
8. The user statistics provide information on the creation of new users, the logins of all users, as well as the
number of ReadWrite users in the system.
9. The disk space statistics show how much total disk space and how much disk space is used for the different
asset types, derivative types and user groups
10. The traffic statistics provide information over the total data transferred and show the division of traffic into
individual actions and user groups
Extended user statistics
You can show the simple search queries via the "Extended" function in the user statistics. This can be
helpful when creating meaningful tags/keywords.
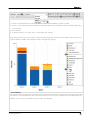
Global Statistics: Filtering the View
It is possible to use filters on the statistic data. This facilitates the evaluation of the data.
www.picturepark.com
41
How to...
1. Selection of the time frame for which the data should be returned (daily, monthly or yearly)
2. Selection of the criteria by which the data should be grouped. There are different criteria available depending
on the statistic. .
3. Date selection
4. To apply the filter you need to click on refresh after each change
If a grouping criterion (see 2 above) was selected, a legend appears next to the chart. With a single click (1) on an
entry the data are hidden in the diagram and the entry appears gray (2).
Asset Statistics
The statistics show the different actions that were performed on an asset in a diagram. The data displayed in the
diagram can be set using the different options above the diagram.
www.picturepark.com
42
How to...
Asset Statistics: Journal
The statistic data are shown as a list in the journal. This list shows which user carried out which action. The
display can be individually adjusted with the help of the date and action filters. The currently shown entries can
be exported (1) as a csv file. You also have the option of copying (2) all the email addresses in the list.
2.9
Report
Metadata exports for selected assets can be created with the reporting function.
www.picturepark.com
43
How to...
Related Topics
Metadata Import
Calling the Function
The reporting function can be called using various methods:
over the asset browser - after calling the function you can select if all or only the selected assets should be
included in the report
by right-clicking on a category - all the assets in the category are included in the report
using the basket - all the assets that are in the basket are included in the report
Methods
There are two methods available for the metadata export:
HTML file: A HTML table is generated with the selected metadata. With this method the possibility exists to
also add thumbnails to the list.
Excel/CSV file: With this method an Excel or CSV file that can be downloaded is generated This method is
particularly suitable when data is going to be processed further. The field separator, with which the metadata
www.picturepark.com
44
How to...
are separated, can be defined when using the CSV file as method.
Template with selected assets for later Excel- or CSV metadata import: Export of specific asset
metadata which can be edited locally in Excel and then re-uploaded. This allows the simple updating of
metadata in Picturepark by using a Excel or CSV file (Metadata import)
The additional option category translations to excel file is available if an export is carried out on a class or a
category. The selection of export as Excel or CSV file is available, whereby for CSV files the desired field
separator can be selected. In the export the name and description of the container, on which the export is being
carried out, as well as the sub containers are listed. For a global export carry the report out on the "All" node.
The desired metadata can be added to the list on the right by selecting the corresponding checkboxes. The sort
order of the metadata can be changed via drag & drop. The metadata export is generated with a click on
generate.
2.10
Subscriptions
Authorised users can subscribe to category contents and receive a notification as soon as the contents of these
categories are changed (e.g. new assets added or changed). Workflows can be initiated via subscription and external
system calls can also be made. A user needs to at least have the manage personal subscriptions right in order to be
able to create a subscription, or for an admin to create a subscription for him. The user also needs to have rights to
the subscribed category.
www.picturepark.com
45
How to...
Additional Links
Video: Subscriptions
Document: Picturepark Event Subscription Service
Creating Subscriptions
Subscriptions can be created in various ways:
Right click on the corresponding category, on which the subscription should be created
Creation in the subscription manager in the administration menu
Creation in the subscription manager in the user menu
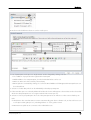
Settings
Different configurations can be made when a new subscription is created:
1. A unique and clear name and meaningful description should be selected so that you have a good overview
www.picturepark.com
46
How to...
of the configured subscription.
2. The status can either be set to active or inactive. If a subscription is currently no longer being used, but
shouldn't be deleted then the status can be set to inactive and no notifications will be sent.
3. The defined actions can be executed either every few minutes, hourly, daily (at midnight) or weekly (midnight
Sunday). The execution only takes place if one of the selected events takes place. If a user has more than one
subscription then these are summarized.
4. Various triggers can be selected, for example for the creation of new assets, new category assignments etc.
All the conditions that are necessary for an action can be selected via a saved search:
5. Selection of currently saved searches. If the subscription is created via the context menu on a category then
the search is automatically created for this category.
6. The current selection can be updated via the extended search UI. Each change must first be saved before it is
adopted.
7. The selected search is carried out in the asset browser by clicking on the magnifying glass. This is useful if you
would like to see what assets will currently be found by your search.
8. At least one action must be defined for each subscription that will be trigged as soon as the defined
conditions are true:
8.1.Email Notification: Sends an email with a report of the assets found. The notification can be defined for
either a user or an entire user group.
8.2.Workflow trigger: Initiates a workflow and communicates the assets found.
8.3.External system call: Calls an external system in a standardized way and and provides an ID for that
system for retrieving asset and subscription details.
You can also select a start condition for each action, so that when you have multiple actions the following action
can be defined depending on the success or failure of the previous action e.g. if the last action "Workflow
Trigger" was successful, then send an email to the administrators, if the last action failed, then send an email to
the workflow admin.
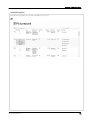
Managing Subscriptions
www.picturepark.com
47
How to...
Each user, that has the rights to create subscriptions can also manage them. Each subscription can later be
changed or deleted completely. The overview shows all the important information regarding the subscription at
a glance. To take a closer look at a subscription or to change it you just need to double click on the
corresponding subscription.
Changing the View
The subscription view can be changed with different functions:
1. Filter all the subscriptions by status
2. Filter all the displayed subscriptions by the type of action.
3. With the corresponding rights you can show the subscriptions of all users or just your own.
4. The list of displayed subscriptions can be sorted ascending or descending after each field.
2.11
Widget Dashboard
The widget dashboard can be activated per channel and can be opened as default every time the channel is loaded
if desired.
Opening / Closing
The dashboard can be opened with the "Dashboard" button and closed via the "Sidebar" button.
Tip
By double-clicking on the widget title, a widget can be displayed larger as a separate window. This opton
www.picturepark.com
48
How to...
can be helpful for example for the editing of the widget rights in the sidebar.
Management
Authorized users can open the dashboard management by clicking the gear icon as soon as the dashboard is
open.
1. Addition of widgets that are not already included in the dashboard. This menu item only appears when there
are still widgets available that have not as yet been created & added to the dashboard
2. Creation of new widgets
3. Deletion of a widget
4. Adjustment of the number of columns in the dashboard, that defines how many widgets can be placed next
to each other (1-4)
5. Saving of the current view as the basic configuration for all users
6. Resetting the last saved base configuration
The individual widgets can be configured via the gear icon.
www.picturepark.com
49
How to...
The following parameters can be adjusted for each widget:
Name: Title and description for all available system languages
Rights: per user group for widget specific actions (e.g. view and manage)
Settings: Possible configuration for the current widget (e.g. selection of activities for activity widget)
Position and height of a widget can be change via drag & drop.
www.picturepark.com
50
How to...
Rights
The following rights can be defined per user group:
View: Users can see this widget in the dashboard
Manage: Users can change the configuration of the widget
Additionally there are rights that can only be applied for the Blog widget:
Reply: Users can comment on answers
Rate: Users can rate entries and comments from other users
Different Widgets
There are various widgets available:
Preview and basket: These two widgets are shown in the sidebar per default. The position and size of these
widgets can be changed. The removal of the preview widget is also possible.
Blog: Discussion of topics between users and the rating of blog entries. This widget can also be used for the
display of news (e.g. new product images) in the sidebar, as it supports text marking (bold, colored) and links.
Activities: Overview of the last activities in Picturepark
IFrame: The embedding of content from an external source via iFrame e.g the display of news from the
website
Asset rights: the assignment of asset rights to assets via drag and drop onto the corresponding template in
the widget. You can show the assets corresponding to the asset right by clicking on the asset right. The box in
the upper area, allows you to restrict the asset rights shown to a specific user group.
Blog
You can create an new entry via the plus icon in the menu bar of the widget as soon as the blog widget is
created and saved. There are various text and formatting options available, as well as the option to link the
www.picturepark.com
51
How to...
assets, categories and external
www.picturepark.com
52
How to...
1. Creation of a new entry
2. Editing of the new entry including formatting options
3. Currently existing entries are always shown under the input form.
4. Creation of a new comment
5. Rating of an entry/comment
6. Editing functions for your own entries/comments are shown by clicking on the arrow
Tips
You cannot rate your own entries or comments.
Entries can only be edited as long as no comments have been made. Comments can not be
retrospectively edited
Activities
The activities widget shows a list of assets and/or actions, which can be defined via a filter. A filter can be
configured out of actions from the following filter groups:
User actions: Actions which pertain to the creation and editing of users
Asset actions: Actions which pertain to the creation and editing of assets
Review actions: Actions which pertain to the creation and editing of reviews
Other actions: Actions such as the sending or ordering of derivatives
www.picturepark.com
53
How to...
Time period: The definition of a point in time from which the assets should be filtered
You can also make changes to the display of your results list:
Filter for current user only: Only actions are from currently logged in users are shown
Records per page: Number of entries per page
Row height in pixel: The row height can be adjusted for the information displayed
Iframe
The following specifications can be made for iFrame widgets:
Iframe URL: Website which should be shown. Absolute URLs must always start with http:// or https://.
Append security token: If this option is activated, then a Picturepark generated security token is added to the
URL. The corresponding website must then process this security token)
Append basic user information: As soon as this option is activated specific Picturepark user information (email
address, name, surname) are passed via query string to the URL
Asset rights
The rights assignment was simplified via the addition of the asset rights widget. Assets can now be selected and
dragged and dropped onto an asset right template in this widget. Picturepark will then assign the
corresponding asset right template to the assets to which the user has edit rights. You can select one or more
user groups using the box in the upper area, upon which only the asset right templates of these user groups will
be shown. By clicking on one of the templates the view will be filtered for the assets that have this template. In
this way you can quickly and efficiently filter for all "archived" assets for example.
This widget can only be shown in the sidebar and not in the dashboard.
User groups: filtering of the available templates by user groups. Only the template, that the user groups have
access to will be shown. If more than one user group is selected then the templates are cumulated.
Templates: All available templates, filtered by user groups. If no user group is selected, then all templates are
shown.
Only the templates and user groups that the currently logged in user has access to are shown.
By clicking on a template the current view can be filtered for assets, that have the selected template assigned.
www.picturepark.com
54
How to...
You can edit a template by right clicking on it.
2.12
Video Cue Points
Cue Points are markes in a video in order to be able to access specific points more quickly and to separate long
videos into chapters or scenes. These cue points can also be shown in sharings and ports.
Rights
Certain rights are necessary to access and manage cue points
View Cue Points: The user requires the asset right "View Metadata"
Edit Cue Points: The user requires the asset right "Edit Metadata"
You can see the cue points list directly next to the video preview.
1. Addition of individual cue points and removal of all current cue points
2. Filtering of the available cue points according to their descriptions. The entered search term does not need to be
supplemented with wildcards, as the search also searches inside individual terms per default. If you enter the
search term "class" for example, then the entry "Asset Classes" would also be found
3. The video will play at the designated time code when you click on a cue point
4. Further options are available and can be carried out via the context menu.
4.1.Pause the video at the cue point.
4.2.Edit the cue point. You can also edit via double-click.
4.3.Deleting the selected cue point.
2.13
Notifications
Notifications affect the currently logged in user. There are various notification types:
User message: Message from another user that was sent via Picturepark
www.picturepark.com
55
How to...
File import:A notification appears as soon as the import is complete. This notification informs about the imported
assets and any errors that may have occured on import
Checkout: If a file is checked out in Picturepark Desk for local editing, an information is shown here with the local
path under which the file was saved
User import: A notification appears as soon as an import/update of user data has completed. This notification
informs about the affected users and any errors that may have occurred on import
Asset Metadata update: A notification will appear as soon as an import/update of metadata has completed. This
notification informs about the affected assets and any errors that may have occurred on import.
Classes/categories import: A notification will appear as soon as an import/update of containers has completed.
This notification informs about the affected containers as well as any errors that may have occurred on import.
A toast appears and the icon in the menu is marked with a counter (number of unread notifications) as soon as a
notification arrives. Unread notifications can be opened directly by clicking on the menu.
The UI offers the following elements:
www.picturepark.com
56
How to...
1. Filters for notification types, read/unread notifications, and errors/warnings.
2. Functions to mark all notifications as read or delete these.
3. Changing of the sort order (newest/oldest first)
4. Functions for single notifications, e.g. to mark these as read, delete, edit affected assets or put these in the
basket.
5. General information regarding the notification
6. List of affected items
7. List of any errors that may have occurred such as a failed import
www.picturepark.com
57
Import & Editing
3
Import & Editing
The different possibilities for importing and editing metadata are listed in this area:
Import: Importing of new assets via the browser or batch import
Single Edit: Editing of single assets
Batch Edit: Editing of multiple assets
Categories: Editing of categories
Version Management: Managing the asset versions
Picturepark Desk: Management of assets using a locally installed application
Conversion The editing of images in an editor
3.1
Import
You can import new assets into Picturepark using the browser or the batch import.
Additional Links
Video: Uploading Digital Assets and Editing Metadata
Related Topics
Picturepark Desk
Single Edit
Batch Edit
Rights
File name
The filename of the file you are importing should not contain the following special characters (this list is not
exhaustive): " * / \ ' < > : |
Large number of files
If you upload a large number of files please be aware that your session needs to be active & session timeout
could occur. Please use Picturepark Desk or FTP and File Import for large uploads.
Browser Import
Assets can be imported directly into Picturepark using your browser. The browser import can be used by clicking
on Upload in the asset toolbar.
The import can be completed in 5 steps in the window that opens.
FTP Import
www.picturepark.com
58
Import & Editing
In a batch import the desired assets are first uploaded to an FTP directory and then imported using the file
import function in the administration menu in Picturepark.
1. The FTP login details can be viewed under FTP A ccess Data
2. You can click on reload after the files have been uploaded into the FTP directory to refresh the list of
uploaded files in the lower area.
3. Once you have made your selection of the files you would like to import from the files in the list you can
import these by clicking on continue.
Import directories
In step 2 you can choose if you would like to import all folders from the import directory into Picturepark or
import only the files without structure in the selected category.
Step 1 - Selecting Files
You select the files you would like to import in the first step.
www.picturepark.com
59
Import & Editing
1. The files you would like to import can be selected by clicking on the add button. Files can also be added to
the import window directly from Windows Explorer or the Mac Finder via drag & drop.
2. Duplicates are files that have already been imported into Picturepark. Depending on your requirements, there
are different options available for how these duplicates should be handled:
2.1.Import as new: The existing asset in Picturepark is ignored and the selected asset is uploaded as a new
asset.
2.2.Replace duplicates: The existing asset in Picturepark is replaced with the selected file. The asset Id is
retained.
2.3.Skip: The file is excluded from the import.
You can either make a selection for all the assets that are to be imported (Duplicate Button), or individually for
each file (drop down for each file in the duplicate column). If more than 500 assets are imported at a time, then
the duplicate search is not carried out automatically. An additional button appears in this case with which the
duplicate search can be manually started.
3. The desired versions can be assigned to the assets on upload. The assignments can be made for all the
assets at once or for each file individually.
Duplicate search
The duplicate search only checks assets on which the logged in user has rights. If a user does not have
rights on all assets, then duplicates can not completely be excluded.
Step 2 - Defining the Metadata
www.picturepark.com
60
Import & Editing
The metadata can be defined in the second step. All the files are tagged with the same metadata. Each asset
can be edited individually after import.
1. Here you can fill out the metadata for each field.
2. This icon shows, that for this field there is a standard default value that is filled out (in the above example this
is the original file name).
3. If the default value is changed, then this is shown by the corresponding icon.
4. As soon as values are changed for fields that do not have a default value, then this icon is shown.
5. If there is an XMP mapping for a field, then this is shown using this icon.
6. You can select the categories you would like to add your assets to in the "Category" panel. Depending on
the Picturepark configuration the menu items can vary.
www.picturepark.com
61
Import & Editing
7. Already added categories are displayed as a box and kann be removed via the "X" next to the category
path.
8. Suggestions for the keywords entered are automatically shown. You can now select an entry from the list.
9. The category assignments can be removed with the "X" on the right border.
10.You can open a window to select more than one category at a time by clicking on the arrow.
11.By clicking on "Import now" the further steps for rights assignment can be skipped and the import can be
started directly. In this case the first standard rights templates, on which the user has rights, are assigned.
Default values
In some fields default values have already been entered. For example [OriginalFileName] or
[XMPMetadata]. These fields are automatically filled with the corresponding values.
Reset default values
If a default value is overwritten, then this can by reset by deleting the values in the field or via the menu with
the corresponding icons. The placeholder [DefaultValue] or[XMPMetadata] is then shown.
XMP mapping
If an XMP mapping for the field was created, then a tooltip is shown over the corresponding field that
www.picturepark.com
62
Import & Editing
shows how the field is mapped.
Exclusive Assignments
If categories/classes are added to an exclusivity group, then only one element from this group can be
added to a field. If the limit is exceeded then a corresponding message is shown. Exclusive Assignments
can be defined in the management console.
Step 3 - Asset Rights
In this step the rights for all the files that are being imported are set.
1. Selection of the appropriate right template. Depending on your authorization one or more rights templates
are available.
2. By clicking on "Extended Search" the overview of the rights can be extended so that all details are visible.
3. By clicking on "Import now", the further rights assignment steps can be skipped and the import directly
started. In this case the standar right template will be assigned.
Alter rights
www.picturepark.com
63
Import & Editing
Depending on the rights of the logged in user right templates can be individually altered using the alter
rights button. This function should however be avoided as a rule for the sake of clarity.
Step 4 - Derivative Rights
The derivative rights are different depending on the file type. The desired derivative right needs to be
individually selected for each file type.
1. Selection of the file type
2. Selection of the appropriate rights template. Depending on your rights one or more rights templates will be
available.
Alter rights
Depending on the rights of the logged in user right templates can be individually altered using the alter
rights button. This function should however be avoided as a rule for the sake of clarity.
Import
You can see the progress of the import during the import. After the import has completed the new assets can be
processed further directly by adding these to the basket or editing them with the batch edit.
www.picturepark.com
64
Import & Editing
Close/minimize window
The import is canceled on closing the window. The window can however be minimized if you would like the
import to continue in the background.
3.2
Single Edit
Each asset can be individually edited in the detail view.
Additional Links
Video: Uploading Digital Assets and Editing Metadata
Related Topics
Batch Edit
Metadata Import
Metadata
The metadata of an asset can be edited in the Metadata tab. Metadata can be divided into different menu items
(Metadata, Category etc.) and panels (Basic, Rights&Usage etc.) which group similar metadata.
www.picturepark.com
65
Import & Editing
1. Changes are only saved once you click on save
2. Appropriately configured fields can be translated via this button
3. Panels group similar metadata fields and can be opened and closed
4. Fields for the assignment of asset classes appear in the upper area. Depending on the selection of asset
class in this area, the metadata in the area below can change. This area is not available in every Picturepark
and can contain different fields depending on the congfiguration of your Picturepark.
Exclusive Assignments
If categories/classes are added to an exclusivity group, then only one element from this group can be
added to a field. If the limit is exceeded then a corresponding message is shown. Exclusive Assignments
can be defined in the management console.
Icons next to the metadata fields
www.picturepark.com
66
Import & Editing
1. Here you can fill out the metadata for each field.
2. This icon shows, that for this field there is a standard default value that is filled out (in the above example this
is the original file name).
3. If the default value is changed, then this is shown by the corresponding icon.
4. As soon as values are changed for fields that do not have a default value, then this icon is shown.
Default value
If a default value is overwritten, then this can by reset by deleting the values in the field or via the menu with
the corresponding icons. The placeholder [DefaultValue] or [XMPMetadata] is then shown.
XMP mapping
If an XMP mapping for the field was created, then a tooltip is shown over the corresponding field that
shows how the field is mapped.
Categories/Tagbox fields
Categories are managed in the Metadata tab in the Categories area.
www.picturepark.com
67
Import & Editing
1. After the entry of at least 3 characters in the metadata fields suggestions will appear that contain the data
entered. The desired class/category can now be selected from the search to add it to the list.
2. The category assignment can be removed via the "X" on the right hand border of the field.
3. You can open a window for the selection of multiple categories at once by clicking on the arrow.
4. Already added categories appear as a box and can be removed via the "X" next to the category path.
Tip: The assignment to categories, can also happen inside the metadata or in other panels via tag box fields.
Rights
The right templates for the derivative and asset rights can be changed in this area.
1. Changing between the asset and derivative rights view
2. Selecting the desired rights template
www.picturepark.com
68
Import & Editing
3. You can extend the overview of the rights by clicking on "Extended Rights" so that all the details are visible.
4. In the Sharings area you can see in which sharings the current asset is contained. You can also remove the
asset from a sharing here. You can get more information regarding this in the sharing management.
The changes are applied by clicking on save.
Alter rights
Depending on the rights of the logged in user right templates can be individually altered using the alter
rights button. This function should however be avoided as a rule for the sake of clarity.
Updating Assets
The original of an asset can be easily replaced. The previews are automatically generated after updating the
asset.
The function can be called over the arrow on the right next to the editing icon.
Files do not have to be of the same type to be replaced, however a derivative right template must exist for the
asset type and the default derivative right template will be assigned. Asset field panels restricted to an asset
type may change on replacement.
Tip
When updating the original file these points must be taken into account:
Integrations and workflows can be affected
A re-rendering is kicked off, which means all derivatives are also re-rendered
New metadata fields can be displayed and/or current metdata fields may no longer be visible if these are
dependent on this file type.
If a specific derivative was shared via a sharing link, this link becomes invalid if the derivative is no longer
available for a file type
We recommend that you always create a historic version when updating a file, as otherwise this file will be
irrevocably replaced.
Repairing Assets
The repair of an asset can be useful if no previews or thumbnails were created for an asset.
www.picturepark.com
69
Import & Editing
The function can be called over the arrow on the right next to the editing icon.
Change Thumbnails
The displayed thumbnail can be changed for each asset. In this way you can create thumbnails for files for which
no thumbnails are automatically created (for example zip files). For videos you can either upload an external
image or select an image directly from the video.
The function can be called over the arrow on the right next to the editing icon.
Manage Derivatives
Placeholder derivatives can be defined in addition to the static derivatives if this function is activated. These
derivatives are not automatically created by the Picturepark rendering service, but are subsequently added to
the asset.
The function can be called using the arrow on the right hand side of the Edit icon
3.3
Batch Edit
To edit multiple assets at once you can select the assets you would like to edit and click on the edit button (1). You
can also optionally edit all the assets in 500 batches or just the displayed by clicking on Edit selected (2). Editing in
the basket is also possible, through which asset from different areas can be edited easily (3).
www.picturepark.com
70
Import & Editing
Additional Links
Video: Uploading Digital Assets and Editing Metadata
Video: Batch Editing of Media Assets
Related Topics
Single Edit
Metadata Import
Synchronization of XMP metadata
The synchronization of the XMP metadata will take some time to complete when batch editing multiple large
files. If the synchronization has not yet been completed or an asset and its derivatives then a black icon appears
as shown below.
The window that opens is divided into different areas in which different asset information can be edited. Important
tip: to save changes you need to click on the save button in each area.
Metadata
In the left part of the window a list of available metadata fields which can be edited is shown. A field is added to
the list on the right hand side by activating a checkbox in front of the metadata field name.
www.picturepark.com
71
Import & Editing
The metadata can now be edited using different functions:
1. Manual entry of the entries per asset and metadata field by clicking on the current entry
2. Replacing all entries for all assets for a metadata field.
3. Insertion of additional content for all assets in a metadata field at a specific position.
4. Search and replace of entries for all assets for a metadata field.
5. Editing of category assignments, for example, for all assets (addition of single assignments, removal of
single assignments, removal of all assignments. Editing is the same for all tag box fields).
6. Already assigned assets are shown as a box and can be removed by clicking the "X" next to the category
path.
7. After entering at least 3 characters in the metadata field suggestions for entries with these character strings
are displayed. The desired category can now simply be selected out of the search results to add it to the list.
8. The category assignments can be removed using the "X" on the right border of the field.
9. By clicking on the arrow the window for the selection of more than one category at a time is opened.
10.Assets can be edited in groups of 500. By using the arrow above the asset list you can change to the next 500
assets.
Exclusive Assignments
If categories/classes are added to an exclusivity group, then only one element from this group can be
added to a field. If the limit is exceeded then a corresponding message is shown. Exclusive Assignments
can be defined in the management console.
Asset Rights
On the left hand side the assets for which the asset rights should be changed can be selected using the checbox
in front of each asset. To select all the assets you can activate the Select all checkbox up the top. The rights
templates can be adjusted on the right hand side.
www.picturepark.com
72
Import & Editing
Alter rights
Depending on the rights of the logged in user the rights templates can be adjusted over the alter rights
button. This function should however be avoided as a rule for the sake of clarity.
Derivative Rights
The assets for which the derivative rights should be changed can be selected on the left hand side using the
checkbox in front of each asset. To select all assets you can activate the checkbox next to "Select all". The rights
templates can be adjusted on the right hand side.
In the derivative
www.picturepark.com
73
Import & Editing
Alter rights
Depending on the rights of the logged in user the rights templates can be adjusted over the alter rights
button. This function should however be avoided as a rule for the sake of clarity.
3.4
Categories
Categories can be managed by right clicking on the category:
Additional Links
Blog post: Controlled Vocabulary Support in Picturepark
Related Topics
Icons
Metadata Import
Rights
Different actions can be applied to the categories:
Info
The info function displays the direct link to the selected category. If a user clicks on this link he first needs to be
logged in and posess the rights to view the contents of the category.
The link is opened in the browser by clicking on the icon on the right next to the URL.
Creating
You can create a subcategory of the current category by selecting create from the context menu. The title and
description can entered in all available category languages in the window which opens.
www.picturepark.com
74
Import & Editing
www.picturepark.com
75
Import & Editing
1. If you would like to create additional categories then you can activate the Open a new category window on
save checkbox. This options opens a new window in which further categories can be created after creating a
new category.
2. In the "Icon" area you can now select an icon for the category.
3. You can choose between defined icons, which can be managed in the icon manager.
4. When editing a category you can also apply all icons to a subcategory.
5. All the subcategories in this category are sorted alpabetically on activating the function "Sort alphabetically".
6. You can also apply the alphabetical sorting to all subcategories in edit mode for a category.
Special characters
The use of special characters in category names is not allowed (\ / : * ? " < > |).
Editing
You can rename the category and edit the description, as well as the icon assignment by selecting edit. The
data can be changed for all available category languages and confirmed by clicking on save.
Search
The description of the categories is taken into account by the search. The entry of synonyms in the category
description for example can therefore extend the category with important keywords.
Copying
With the copy function categories, including subcategories, can be copied to a new location in Picturepark. In
addition to the selection of the category to which the structure should be copied (1), you can, if desired, activate
the option that all the assets from the current structure are also assigned to the new structure.
Moving
www.picturepark.com
76
Import & Editing
The selected category can be moved with its contents to another part of the category tree. You can select a
category in which the selected category should be moved to in the window that opens on calling this function.
The category is always added in the last position.
Alternatively categories can be moved via drag & drop. The selected categories can be precisely placed in the
desired location using this method. You can drag the category to the desired locating by left clicking on it.
Various markers are shown for orientation as to where the category will be moved to. When the desired location
is found the category can be dropped.
Deleting
The category can be permanently removed from the system with delete. You will need to confirm that the
category should be deleted after making this selection. All assets that are not also assigned to another category
will be put in the undefined folder (only visible to administrators).
Rights
You can set the rights for the selected category and if desired propagate these to all sub categories with this
function.
www.picturepark.com
77
Import & Editing
3.5
Version Management
Different versions can be created for each asset.
Possible version types
Language versions: Managment of language versions for all assets
Historic Versions: Managing the life cycle of an asset.
Associated Versions: Management of associated assets such as product images from different perspectives
Quality versions: Management of different qualities or print kits
An asset can have different versions per version type. Assets with versions are known as "Master Assets". The
master asset must thereby also be declared as a version. Every version is again an independant asset which has its
own metadata and can be freely categorized if required. The version is always connected to the master asset.
Depending on the configuration of the version type a master asset can only have one specific version. For example
you could only have one french version and not several.
Version Filters
Versions can be shown as individual assets or hidden. Versions are hidden by default and are available over the
master asset. It can be custom defined what versions a filter is available.
Managing Versions
The versioning of assets can be managed in the detail view in the V ersions tab. All the existing versions of the
asset are listed here.
www.picturepark.com
78
Import & Editing
1. Filtering the displayed versions by version type
2. Further processing of selected versions using different functions
3. Adding, editing and deleting of versions
4. Master assets are marked with an orange background
5. There are two separate links for every language versions: one for downloading the asset (with the
and one for viewing the asset (with a
symbol)
symbol). The links for the selected version appear in each case.
Adding and Editing Versions
To add further versions to an asset these further versions first need to be imported into Picturepark. You can add
new versions to a master asset or edit existing versions by clicking on Add & Edit.
www.picturepark.com
79
Import & Editing
1. Selection of the version type for which the version should be edited
2. New versions can be added either by clicking on add versions or via drag & drop
3. You can select the desired version for each asset from the version column
Historic Versions
Historic versions are created on updating an asset. You can select whether you would like to create an historic
version on upload or not. After entering a version name and description (for the new as well as the previous
asset) and clicking on save the selected asset is overwritten with the new file and a new asset is created from the
old file and linked.
www.picturepark.com
80
Import & Editing
Restoring Older Versions
If an older historic version of an asset should be restored as the current version, then this can be done via
the "Add & Edit" menu. Right-click on the desired version and select "Restore as new current version". The
name and description of the current as well as the new current version can be adjusted.
Downloading of Versions
www.picturepark.com
81
Import & Editing
On downloading an asset or creating mailings and orders all the versions of the selected (master) assets are
shown in the selection dialog. All the versions are normally listed first and then possibly related derivatives such
as image formats.
3.6
Picturepark Desk
Picturepark Desk allows the management of assets with a locally installed application. The same functions are
available as they are in the browser. In addtion Picturepark Desk offers the following additional functions:
An import process that is optimised for large data handling
Pause and resume of the import process
Infinite scrolling replaces the browsing of assets via single pages. The page navigation for showing the number of
assets per page is therefore not available in Picturepark Desk. Also the option "Select All" selects only all the
currently loaded assets.
Importing of complete directory structures via drag & drop in the asset browser.
Checkout function to save assets locally in order to edit and reimport them.
Related Topics
Creative Extensions
Desktop Clients
Picturepark Desk can be downloaded from the desktop clients window in the administration menu. It is available for
Windows and Mac. Picturepark Desk must be installed for the use of the creative extensions.
Data Limit
www.picturepark.com
82
Import & Editing
We recommend not importing more than 100'000 files / 20 GB at the same time, as the upper limit of the system
may otherwise be reached. For a larger data amount we recommend separating the import into batches and
carrying it out in several batches.
Login and Settings
After opening Picturepark Desk a window appears prompting the entry of the Picturepark URL. The URL must
start with https:// or http:// (e.g. https://client.picturepark.com). In addition you can select if the same URL should
be used for your next login. In this case the user is forwarded directly from the URL entry window to the login
form.
After the URL entry the login form appears (as it does in the browser)
The settings for Picturepark Desk can be changed in the user menu:
www.picturepark.com
83
Import & Editing
1. Basic: Activating "Always use this" on entering the system URL will save the Picturepark URL for this field. This
value can be changed or deleted, whereby the forwarding of the window for the entry of the URL to the login
is stopped.
2. Checkout: The configuration for the checkout directory, derivative selection for checkout and handling of
checked out and in files can be made here.
3. InDesign: If InDesign files contain mappings to assets in Picturepark, then these can be checked out directly
with the InDesign file. Various options exist for the handling of these "links".
4. Transfer: Number of possible parallel downloads/uploads for the increase of performance
Checkouts
Assets can be checked out for local editing. This is possible with the "checkout" button in various areas (Asset
browser, detail view, basket). When using Creative Extensions assets can be checked out via special plugins
directly from Adobe Photoshop, Indesign or Illustrator.
Over "Checkouts" (1) a window with the list of all currently checked out files can be opened. If there are any
discrepancies for one or more checked out files to the local or server version then a synchronisation is possible
(2). When synchronising it is possible to choose if the local or server version should be overwritten or if the local
www.picturepark.com
84
Import & Editing
version should be imported as a new asset.
The following options are available in this field:
3. Possible actions that can be carried out on the currently selected asset.
4. Information regarding the current synchronisation process. Possible stati: current, deleted locally, changed
locally, changed on server, conflict (both local and changed on server)
5. Options for opening these assets in Picturepark or opening in the directory in which the asset is saved locally.
3.7
Conversion
Depending on a users rights, each asset of the type image can be edited with the editor. The editor offers the most
important editing functions in addition to the most important file information, as well as the possibility of saving the
changed asset or importing it as a new asset. Single conversions can be saved as a template and made available to
various users.
Editing
Images can be edited using various functions:
www.picturepark.com
85
Import & Editing
1. Cropping the image (more information below)
2. Resizing the image
3. Rotate image to the left
4. Rotate image to the right
5. Flip image vertically
6. Flip image horizontally
7. Blur
8. Sharpen
9. Adjust brightness
10.Adjust colour saturation
11.Adjust contrast
12.Reset all actions
13.Undo last action(s)
Cropping an image
There are many different options available for cropping an image. For the current selection you can select the
size of the selection as well as the distance to the top and left border under "Crop dimensions". The red border
on the image marks the current selection and can be moved via drag & drop.
The following options are possible:
Normal: Changing the selection without inputs by manually pulling on the corners
FixedRatio: Specification of a ration such as 1:3 for example (the selection is 3 times as wide as it is high)
FixedSize: Specification of a fixed size
FixedRatioAndResize: Specification of the desired size of the selection, which then also server as a ratio,
through which the selection can be enlarged and reduced, however the size of the output remains fixed.
www.picturepark.com
86
Import & Editing
Conversion
Once you have finished editing your image you can select from the following actions:
1. Download the edited image
2. Create a new asset from the edited image
3. Update the current asset with the image
You can select from the following options for each of the above functions:
1. Selection of the file format
2. Selection of the color space
3. Selection of the color profile
4. Selection of the resolution
5. Further options, which are dependant on the selected format
Presets
Users can be given access to templates only instead of the full conversion functions.
Use
You can find all the available presets in the preset dropdown. A red frame will appear, with which you can make
your desired selection, as soon as a dropdown has been selected. The frame can be moved via drag & drop
and the size can be changed with the help of the corner marks. A click on crop will crop the selected area.
www.picturepark.com
87
Import & Editing
Management
If a user has rights to manage the presets, then he will see the edit preset menu item.
You can make various selections in the Manage Presets window:
www.picturepark.com
88
Import & Editing
1. Addition of new and deletion of current presets
2. Definition of the name and description of a template
3. Specificaiton of the cropping style and corresponding values
4. If predefined export options should be defined then these can be defined here. If this option is not activated,
then the user can define his own export options.
5. Definition of the rights for the current preset
www.picturepark.com
89
Modules
4
Modules
The following modules can be additionally licensed:
Office Connector: Inserting of images and editing of documents out of Picturepark directly in Microsoft Office
Creative Extensions: Local access to Picturepark for example via InDesign or Photoshop for layouting or editing of
assets. Check in/out, monitoring of changes, mass import etc.
Review Manager: Initiation and management of processes for the checking of assets by people with proof and
approval rights
Asset Classes: Management and correct application of classes for the assignment of specific metadata fields and
values
4.1
Office Connector
Pictures can be imported from Picturepark to Office at the touch of a button. Picturepark Office Connector is installed
locally and can be downloaded in the administration menu from the Desktop Programs window. Picturepark Office
Connector is available for Microsoft Outlook, Microsoft Word and Microsoft PowerPoint.
ADFS
The login via ADFS is not available for the Office Connector.
Internet Explorer Security Settings
To ensure the error free functionality of the Office connector, specific security settings are required, as Internet
Explorer is used by default for the Office Connector. The option "Display mixed content" must be set to
"Enabled".
Toolbar
After the installation a new tab "Picturepark" appears:
1. Insertion of assets into the opened document
2. Opening of documents from Picturepark for local processing
3. Saving the currently opened document in Picturepark
4. Changing the login data
5. Display of the currently open document or the current selected asset in Picturepark
www.picturepark.com
90
Modules
Image insertion
The Picturepark asset selector opens when you click on "Insert". Here you can select the images you would like
to insert. After the selection of one or more assets you can select the formats you would like to insert by clicking
on "Import". The selected formats (2) can then be inserted into the document (3).
Alternatively, you can open the asset in detail view by double-clicking on it and then selecting import. (4).
www.picturepark.com
91
Modules
Opening an image in Picturepark
As soon as an image that was inserted with the Picturepark Office Connector is selected, the function
"Show selected image" becomes available, with which you can show the selected image in Picturepark.
Basket
Assets can be collected via the basket and then the complete basket can be imported. To do this the
basket can be opened on the right hand side and the desired assets can be added to the basket via drag &
drop.
Editing a document from Picturepark
www.picturepark.com
92
Modules
By clicking on open and then import you can "Import" (1) selected Word or PowerPoint documents from
Picturepark into Microsoft Office.
Assets opened from Picturepark can be reimported into Picturepark after they have been edited. You have
various options in this case:
Overwrite: Overwriting of the asset in Picturepark with the current local version
Save as a version: Creation of a new version from the current local version, which is linked to the opened asset
from Picturepark
Save as new: Creation of a new asset in Picturepark using the current local version
Versioning
The available version types are dependant on the Picturepark configuration.
Opening the document in Picturepark
As soon as the document has been opened from Picturepark with the Office Connector the "Show
document" option is available. With this you can show the opened asset in Picturepark.
www.picturepark.com
93
Modules
4.2
Creative Extensions
With the Creative Extensions assets can be edited in Adobe InDesign, Photoshop and Illustrator and later
reimported into Picturepark. As soon as assets are opened via the Creative Extensions, a Checkout via Picturepark
Desk is carried out. To use Creative Extensions Picturepark Desk must be installed. Both the Creative Extensions as
well as Picturepark Desk can be downloaded via the adminstration menu in the desktop clients window and are
available for both Windows and Mac. The plugins can be installed via the Adobe Extension Manager and are then
available straight after installation.
Important
To use the plugins Picturepark Desk must be running and cannot be closed during their use.
The plugins are supported from version CS6 and there are separte plugins for the Creative cloud version
The http://zxpinstaller.com is required for installing Adobe CC 2015
Additional Links
Video: Creative Suite Connector
Related Topics
Picturepark Desk
Desktop Clients
Managing Mappings
Display Plugin
If the new panel for the plugin is not shown straight away, you can activate it under W indow - Extensions -
Picturepark Creative Extensinos.
InDesign Plugin
www.picturepark.com
94
Modules
The plugin provides several ways to interact with Picture Park:
1. The opening of an InDesign file from Picturepark. On opening the file the save location is selected, in which all
the data (InDesign file and corresponding links) are cached.
2. Placing of an asset from Picturepark into the open InDesign document.
3. Importing of a new InDesign file or a file opened from Picturepark. In the second case the old file in
Picturepark is updated. If images are also placed that are not available in Picturepark, then these will also be
imported and mapped directly to the preview of the InDesign file.
4. Details, e.g the currently selected image.
5. Either the path or the asset id for the current image are shown. If the asset id is shown then the image was
added with the InDesign plugin. All the assets which are added to the document will be saved in the links
folder in the selected location from 1.
PDF Preset
As soon as a document is imported via the "Upload" button in Picturepark, a PDF preset with the name
"Picturepark" is automatically created. This preset can be adjusted e.g. for crop marks or resolution,
however should not be deleted. If this preset is missing there will be import issues.
Photoshop & Illustrator Plugin
www.picturepark.com
95
Modules
1. Opening an image file from Picturepark. When you open a file the save location is selected.
2. Saving the opened file will overwrite the existing asset in Picturepark.
3. Importing the open file as a new asset.
4. Details for the open image.
4.3
Review Manager
Review and approval processes on selected assets can be carried out with the Review Manager. This allows for the
editing and approval process to be expedited and simplified. Both registered users as well as external persons can
take part in the review. All participants receive permissions that are tailored to them and are kept up to date via email
notifications. Comments that are created by various participants during the review processs can be added directly to
each asset with various available markings, and can thereby be directly connected in context.
User rights
To start a review or manage an existing review process you need to have the user right "Create Reviews".
Additional Links
Blog post: Picturepark Facilitates Approval and Review Workflows
Starting a review
A review can either be started from the asset browser (1) or the basket (2). In either case all the currently selected
or the assets in the basket will be included in the review process.
www.picturepark.com
96
Modules
A window in which different selections can be made opens:
1. List of participants in the process. Single entries can be changed by clicking on them.
1.1.To: Addition of people that are registered in Picturepark
1.2.Add: Addition of a new participant, for which individual values can be set
1.3.Remove: Removal of the currently selected entry
1.4.A Dropdown is activated by clicking on a cell in the Email Address field. Registered Picturepark users can
be selected here.
2. Selection of a due date, which can be individually selected per participant.
3. If the reminder option is selected, additional fields and columns will appear so that a date can be selected at
which time the participants are once again notified of the review process.
4. Selection of a role per participant. The role of the participants has an influence on the actions that they can
take.
4.1.Moderator: The user that starts a review is automatically given the moderator role, and as such has access
to all options during the process, including deletion or closing of the review.
4.2.Reviewer: People that can comment on the individual assets.
www.picturepark.com
97
Modules
4.3.Approver: People, that can approver or reject comments in order to make final decisions.
5. Further information regarding the review processs, which is sent to the participants. The language selection
determines in which language the later emails and pages, on which the review takes place, are shown.
Reviewing Assets
Each participant receives a link to the overview of a review, in which different actions can be carried out. The
availabilty of different functions is dependant on the role of the participant and is controlled via the received link.
In the overview you can see:
1. Information regarding the process including sending and global expiry date as well as the message
2. A list of all participants in the process, including individual expiry dates, roles and the number of current
comments
3. A list of all assets in the process and the comments that belong to the currently selected asset
Depending on the role of the participant there are different options available. All roles have the following
options:
4. Creation of comments including the marking of assets
5. Answering existing comments
6. Selection of "like" for commments. The option "like" is not available for your own comments, because that
would be wrong people.
www.picturepark.com
98
Modules
Creating a marker
Markers can be added as you create comments. Markers created for a comment are shown when the
comment is selected.
1. Placement of the current marker. The symbol becomes active as soon as a marker is selected.
2. Insertion of a text in a particular color and font
3. Insertion of arrows
4. Insertion of a border, for which a color and width can be defined via double-click. If a participant is
registered in Picturepark and is currently logged in, then they can also link assets here.
5. Deletion of the current marker
"Like"function
The "Like" function is not available for your own comments. If you hover over the icon with your cursor, a list
of all participants that have liked this comment is shown.
www.picturepark.com
99
Modules
Approver functions
7. Approval or rejection of individual comments
Moderator functions
7. Approval of rejection of individual comments. Depending on the selection the comment block is shown as
either green or red.
8. Deletion and closing of the process. On closing the process the moderator has the possibility of sending a
message to all participants.
9. Editing of comments. The editing of comments is only possible as long as no comments have already been
made on the comment you want to edit.
10.Deletion of comments
Notifications
Certain actions trigger notifications, which are sent to participants via email:
Invitations to the process
Reminders on the corresponding reminder date, if this was set during the creation of the process
Creation of comments
Expiry of the process on the corresponding expiry date
Premature closing of the process by the moderator
Managing Reviews
All the reviews in the system are listed under "Reviews" in the administration menu.
www.picturepark.com
100
Modules
1. Filtering of the displayed review by the state
2. Searching through the subject and message of the currently filtered reviews
3. Deletion of the currently selected reviews. After deletion a review is no longer shown in the list
4. Closing of the currently selected reviews. The review receives the status "Closed"
5. The selected review can be opened in a new tab by double-clicking on it. The view and functions in this tab
are the same as those in "Reviewing Assets"
4.4
Asset Classes
By the assigning of asset classes specific metadata fields and values can be added to assets. Classes are organised
in their own structure above the category tree and are basically to be managed like Categories.
User Rights
Please note that specific Rights must be given for the management of asset classes.
Additional Links
Video: Adaptive Metadata from Asset Classes
Video: Adaptive Metadata for Digital Asset Management
Blog post: What is Adaptive Metadata?
Blog post: Content Lifecycle Management via Adaptive Metadata
Blog post: Controlled Vocabulary Support in Picturepark
Related Topics
Exclusive assignments
Classes/tags (categories)
www.picturepark.com
101
Modules
Field Management
The field management for each class can be opened via the context menu.
1. You can switch between classes via the dropdown menus
2. Searching the fields
3. Addition or deletion of fields
4. By activating this option the fields which are assigned to classes above the selected class and are
automatically inherited by the subclass are shown. Fields that are not inherited are shown in bold.
5. If a field is inherited from a super class, then the path to this superclass is shown here.
6. Fields that are marked as being mandatory must be filled out by users
7. Fields that are marked as "Read Only" cannot be edited by users
8. If a default value is overwritten and is no longer the same as the super class - then a tick appears here.
9. Shows the default value which is assigned to the assets in this class. If a default value is shown, a tick is shown
in the "Overwritten" Column.
www.picturepark.com
102
Modules
10.Information about the selected field.
11.Shows by how many assets, which are assigned to the selected class, the value of this field is not the same as
the default value. By clicking on "Edit" you can edit the assets with deviating values in the Batch Editor.
12.Overwrites the default value for the selected field
Default values
Default values can not be generated for every field type.
XMP mapping
New XMP mappings are created in the Picturepark Management Console. If you have any questions please
ask your Picturepark contact.
Create fields
Only fields that already exist in the system can be added and removed via the field management. New
fields are created in the Picturepark Management Console. If you have any questions please ask your
Picturepark contact.
Assigning Classes
Classes can be assigned directly in the import or after the import. With the assignment of classes the
corresponding fields are automatically assigned and if a default value exists then this will be assigned.
Exclusive Assignments
If categories/classes are added to an exclusivity group, then only one element from this group can be
added to a field. If the limit is exceeded then a corresponding message is shown.Exclusive Assignments
can be defined in the management console.
Removing classes
When removing a class, the class specific fields are also removed but the filled out values of these fields are
not lost.
Import
After you have selected the assets you would like to import you come to 2. step in the import process. The asset
classes can be assigned here. The field label can be different for each Picturepark, depending on the
configuration.
www.picturepark.com
103
Modules
1. Already added classes appear as a box and can be removed via the "X" next to the class name.
2. Suggestions for the keywords entered are shown automatically and can be selected from the list.
3. You can remove the asset class assignments by clicking on the "X" on the right border of the field.
4. By clicking on the arrow the window for the selection of more than one asset as a time can be opened.
5. If new metadata fields are added by a class that are marked as being mandatory, then these will be shown in
the corresponding panel in which these fields appear. The panel will then be marked red.
Single Edit
Class assignments for single assets can be made in their detailed view in the "Metadata" area. You can select
assets in the area at the top, the assignment behaviour is the same as for the import.
www.picturepark.com
104
Modules
Batch Edit
Class assignments for multiple assets can be changed at the same time using the batch editor.
www.picturepark.com
105
Modules
1. By clicking on the plus icon a field opens in which new class assignments can be added, which are then used
for all the assets in the batch editor.
2. Assignments can also be changed on the individual asset.
3. If the assignment of an asset means that there are new mandatory fields, then these are shown in the list in the
left hand area with an exclamation mark. In order to finish your editing you will need to have filled out all the
mandatory fields for the selected assets.
4. You will need to save the changes for these to be taken over.
Depending on the asset class assignment, a field may or may not be available for the asset.
Moving of classes
When classes are moved inheritance of fields and default values can be changed. As soon as a class is moved
inherited fields and default values are removed from the moved class. If the class is moved into a class that has
default values that already exist in the moved class, then these will be assigned to the moved class and the old
default values will be deleted. If an asset, that is assigned to the moved class, already has default values that
were overwritten then these will be kept.
www.picturepark.com
106
System Administration
5
System Administration
The system administration function can be called via the administration menu:
1. Users: Management of all the users in the system
2. Group & rights: Management of user groups and their rights
3. Rights templates: Management of templates for asset, category and derivative rights
4. File import: Import of new assets via FTP
5. Metadata import: Importing of metadata for selected assets and new users
6. Duplicates: Finding of assets with the same properties
7. Statistics: Global statistics on the usage of Picturepark
8. Management Console: Management of different configuration options (including the user
interface)
9. Desktop clients: Download of all available desktop applications
Some options are available for all users. For users with sufficient rights these can also be managed globally:
10.Sharings: Sharing management
11.Orders: Management of all orders received
12.Reviews: Management of all reviews
13.Subscriptions: Management of all subscriptions
5.1
User Management
In the user management new users can be created and existing users can be managed. To give rights to a user, they
need to be assigned to one or more user groups.
User Management Window
A new window is opened when you click on user management in the administration menu.
www.picturepark.com
107
System Administration
1. Overview of all users
2. If a user is opened an additional tab with the email address of the user appears
3. Options to filter the user list view
4. Menu for the creation of new and deletion of existing users as well as for the sending of messages to users.
The functions work on the users that are selected with the help of the checkboxes. Additionally there is an
option to export all or only selected users.
5. Option for resetting all personal settings for one or selected users
6. User list with the most important data
Filter the View
The list of displayed assets can be filtered using different options.
1. Filtering the view for a selected user group
2. Filtering the view for a selected user status
3. Search field for searching through the list with keywords
4. If this button is activated, then all the filtered users are shown and not divided into pages with 20 users each
5. Navigation through the pages of the user list
6. With a click on the column title the list is either sorted ascending or descending for the selected field
Reset Personal Settings
The personal settings can be reset for all or for selected users. This can be necessary, for example, if fields are
www.picturepark.com
108
System Administration
newly added to the list view, or if a user has issues with his view.
Export Users
The user export can on the one hand be used for later updates in Picturepark, but also for import into a third
party system. All user fields, for all or the selected users, are exported. Single users can be selected via
checkboxes in the list.
You have the option of choosing to export the values either as ideas or plain text. This option pertains to fields
such as user group names, languages or countires.
Subsequent Update
If the export will be used for a later update of the user data in Picturepark, then the values need to be
exported as ids.
Filtering Users
We recommend filtering the view in order to select specific users.
Editing Users
New users can be created using the new button in the user overview.
www.picturepark.com
109
System Administration
Existing users can opened for editing via double click on the corresponding user.
1. Change the password of the user
2. Send a message to the user
3. Approve or reject the current user
4. Browse to the previous or next user
5. Mandatory fields are marked with an asterisk and must be filled
6. This function allows a user to edit his own profile
www.picturepark.com
110
System Administration
7. Indication of expiration, lock and renewal dates. If an expiration date is set then the user can no longer log in
after the given date. To reapprove a user the lock date needs to be deleted and the user must be saved
again.
8. Information regarding the user status (see user status below).
9. Assigning of user groups - multiple assignments are possible
Root Site
The root site is entered automatically on user registration and can be changed after the fact. This entry
determines which Port or start page will be used for links in mails to the corresponding user. If for example
"PressPortal" is selected in thie field then all links are set to http://client.picturepark.com/Site/PressPortal by
default. If no option is selected then the default http://client.picturepark.com will be used.
This option does not define which page a user should be redirected to if he logs out or his session runs out.
The logout URL can either be defined globally or per channel. More information regarding this can be
found under "Basic Settings" and "Channel" in the Management Console section.
User Status
Users can be filtered in user management with the help of the user status. We differentiate between the
following statii:
Active: all users which can actively log into the system.
Waiting for email identification: All users who have registered, but have not yet confirmed their registration
by clicking on the link in the email confirmation they would have received. After confirmation by the user the
status changes waiting for confirmation by admin or waiting for confirmation by contact.
Waiting for confirmation by admin: All users who have already confirmed their registration by clicking on
the link in the email but have not as yet been approved by the administrator
Waiting for confirmation by contact: This status only applies to Pictureparks, that have a registration
workflow in which an internal contact where the internal contact hast to approve the user first, before an admin
approval is required.
Registration rejected by admin: All users, whose registration has been rejected by the administrator.
Renewal rejected by admin: All users, whose renewal has been rejected by the admin.
Registration rejected by contact: All users, whose registration has been rejected by the internal contact.
Renewal rejected by contact: All users, whose renewal was rejected by the internal contact.
Renewal expired: The user has not renewed themselves within the allotted time.
Waiting for renewal by admin: All users which are waiting for their account to be renewed by the
www.picturepark.com
111
System Administration
administrator.
Waiting for renewal by contact: All users which are waiting for their account to be renewed by the contact.
Locked: The user was locked, because the number of incorrect password attempts has been exceeded
during login.
Expired: The user account has reached the expiration date that was set in the profile. To reactivate the user
the expiry date needs to be deleted.
The administrator and/or internal contact need to approve users that have registered in Picturepark to allow
them access Picturepark.
Sending Messages to Users
If required a message can be sent to all or selected users. You can send a message to all the selected users in
the list by clicking on the message button in the overview.
User Journal
www.picturepark.com
112
System Administration
You can see which actions a user has carried out in their journal. Successful logins, deletion of assets or viewing
of assets are captured in this way for example. The list can be filtered for a desired action.
5.2
Rights Management
The rights in Picturepark are defined at various points and allow for individual customisation to your rights
requirements. We distinguish between:
User Rights
In Picturepark rights are not given directly to users, but to individual user groups. A user is granted rights by
adding them to one or more user groups.
The user group rights are divided into the following areas:
User group rights: Rights to other user groups and their users
Derivative rights: Rights to order individual derivatives
User rights: Rights of the user to administrative functions, the importing and editing of assets, orders and
other functions.
Field rights: Rights on metadata fields, whereby we distinguish between view and edit rights
More...
Asset Rights
The asset rights are assigned directly to an asset with the help of templates. They apply to the viewing and
www.picturepark.com
113
System Administration
editing of the assets and the assigned rights.
Which usergroups can see, assign and also edit which rights templates can be defined.
The asset rights are assigned to new assets on import and can be changed at a later date.
More...
Category Rights
The category rights are assigned directly on the category with the help of templates. They refer to the viewing
and editing of categories and the assigned category rights.
It can be defined which user groups have access and can assign and also edit which rights template.
More...
Derivative Rights
The derivative rights are assigned directly to the asset with the help of templates. They relate to the viewing of
the derivatives of different file types. It can be defined which user group can see, assign and also edit which
rights template. Derivative rights are assigned on importing new assets and can be changed at a later date.
More...
Impersonate
The rights of a user group or a specific user can easily and conveniently be checked by impersonating. On
impersonating you temporarily change to another user group or user and user Picturepark with the rights
asssigned to this user group / user. The impersonate function can be called in the user menu under impersonate
.
After selecting a user or user group, they will appear on the top right in the menu area (for groups you will see
"impersonated groups"). To deactivate the function you only need to click on the name of the user or on
"impersonated groups":
www.picturepark.com
114
System Administration
Saved collections
The saved searches and baskets of the original user are shown during an impersonation.
5.2.1
Groups and Rights
The management of the user groups and their assigned rights takes place in the user groups & rights management
which can be accessed in the administration menu.
Managing User Groups
You can create new user groups, delete or copy current use groups using the menu in the left hand area of the
window. The copy function can be called by clicking on the arrow. With copy you can copy the user group with
your selected settings. User assignments (members of the group) are not copied.
A list of all the users that are assigned to the selected user group is shown in the members tab. The user
information can be viewed and changed by double clicking on a user.
Default User Groups
www.picturepark.com
115
System Administration
Under Settings, the name as well as the translation can be entered or changed and a standard user group can
be defined. Every new user that is registered is automatically assigned to this user group. Fast access to
Picturepark is guaranteed in this way. The administrator can then still make any necessary adjustments in order
to add the new user to any other groups they require.
User Group Rights
Derivative Rights
You can define which derivatives are allowed to be ordered by the selected group in derivative rights.
User Rights
The user rights control the availability of functions to which a user group has access. The user rights are divided
into different groups:
www.picturepark.com
116
System Administration
Administration: functions which concern the configuration of Picturepark. The configuration is mainly done via
the Picturepark Management Console
Asset Conversion: Rights for the use of asset conversion and the management of presets
Orders: Rights with regard to personal and global orders as well as configuration of the administrator for
orders
Dashboard: Rights for accessing and managing the Dashboard
Create & edit: Rights for the creation of user groups and the assigning of rights, which differ from the
defined rights templates
Import: Rights for the creation of assets with a browser or batch import
Sharings: Rights regarding personal and global sharings as well as reviews
Personalization: Rights to Subscriptions and Saved Baskets and Searches
Statistics: Rights to the global statistics and statistic exports
All the rights can be de / activated by clicking on the checkbox next to enable.
Field Rights
The access of the selected user group on the available metadata fields can be defined in the field rights. We
distinguish between three rights:
View: The field and the value in it is shown, but cannot be edited. If the field does not have any data entered,
then it will not be shown.
Edit: The field is shown with its value and can be edited
Edit options: The available options for the field (dropdown list, radio buttons) can be edited
www.picturepark.com
117
System Administration
5.2.2
Rights Templates
Rights templates are a series of pre-defined user group / rights combinations and are available for category, asset
and derivative rights. They simplify the rights management and prevent a rapidly growing number of the most
different rights combinations. Asset and derivative rights are assigned directly on import and can later be changed
via single or batch edit. Category rights can be assigned on creating the category in the rights area of the category.
Edit rights without template
If a user group has the edit rights without templates right (see creating and editing in user rights), then this user
can edit rights templates. If a template is edited and propagated in the rights template management (see
managing) then all the changes are overwritten.
Managing
The rights for the asset, category and derivative rights can be managed in the rights template manager.
www.picturepark.com
118
System Administration
1. This function is used for migration purposes and should only be used by VIT.
2. Menu for the addition of new and deletion or copying of existing templates. The copy function can be called
by clicking on the arrow.
3. Important: Changes to the template are only taken over on new assignments - saving the template is not
enough. Already assigned templates can be updated with the help of the propagate button.
4. You can add descriptions and explanations for each template in the Notes field.
5. The standard template is always displayed on the top of the selection list of rights templates and is
automatically selected. There can be more than one default template, as not every usr group has rights to
every rights template. If a user group has more than one standard template assigned then the top template in
the list in the rights management is used as the standard template
6. Which user groups can view and assign the selected template can be controlled with access rights. If the edit
option is activated, then the template can be adjusted for individual assets, categories or derivatives.
The rights can be adjusted in second tab of the selected rights template.
www.picturepark.com
119
System Administration
1. If this function is activated, then the sub rights of each right are shown. For example the edit right is divided
into edit, edit metadata, delete etc
2. The selected rights can be de / activated for all user groups with the help of this checkbox
3. By right clicking on a user group from the context menu function de / activated all rights for this user group
can be called.
4. If only some and not all the sub rights are filled out (see 1) then the checkbox is filled out. A tick in the
checkbox shows that all the rights are activated.
Asset Rights
Asset rights determine which user groups have the rights to see, edit or assign rights to an asset as well as see
the statistics. To show all the rights the button extended rights can be activated. A tooltip appears with detailed
information to the corresponding right on mouseover.
1. Rights to see an asset and its metadata, category assignments and versions
2. Rights to edit metadata, previews, categories and versions, as well as for deleting and updating an asset
3. Rights to see and edit asset and derivative rights
4. Rights to the statistics and journal of an asset
www.picturepark.com
120
System Administration
Category Rights
The category rights refer to the viewing and editing of the categories and their assigned asset rights. To show all
the rights you can activate the extended rights checkbox. A tooltip appears which gives you more detailed
information to the corresponding right on mouseover.
1. Rights to see a category and its contents
2. Rights to edit, delete and move a category, as well as assign assets to the corresponding category
3. Rights to see and edit the assigned asset rights
4. All the categories that have been assigned the selected rights templates are shown under A ssignments.
Derivative Rights
The derivative rights refer to the viewing of derivatives of different file types. Each template can be assigned a
selection of asset types. The template will only be available if the asset is one of the assigned asset types.
1. List of all available asset types. Important: Only asset types that have the same derivatives (e.g. bitmap and
vector graphic) can be used together in the same template
2. Selection of all the available derivatives of the selected asset types
www.picturepark.com
121
System Administration
5.3
Managing Sharings
Administrators can manage the sharings of all users. In the sharing manager all the information, for example the
state, recipient or number of downloads of an asset from a sharing can be seen.
Sharing Manager
A new window opens on calling the sharing manager from the administrator or user menu.
1. Overview of all sharings
2. An additional tab with the id of the mailing appears when a sharing is opened
3. Options to filter the sharing list view. You can switch between the email and link types in the first selection list.
4. Button to delete the currently selected sharing
5. Sharing list with the most important data
Filtering the View
The list of sharings can be filtered using different options.
1. Filter of the view by type (email or link)
2. Filtering the view by the mailing state
3. Search field in order to search the list with keywords
4. If this checkbox is activated, the sharing of all users are shown, instead of just your own
5. Browsing through the sharing list pages
6. The list is either sorted ascending or descending with a click on the title of a column in the list
www.picturepark.com
122
System Administration
Managing Sharings
Double click to open the selected sharing from the overview in a new tab. All the information regarding the
sharing are shwon in this tab.
General Options
1. Deletion and editing of currently opened sharings. All the entries for the corresponding sharing type can be
edited here, except for the changing of the sharing type or the recipients.
2. Overview over the sent date, expiry date, subject and message
3. Further processing of the assets sent
4. Addition and removal of assets to the mailing. You can see which assets where added or removed in the
statistics.
5. Changing the view (thumbnails or list view)
6. List of all sent assets. The sorting of the assets can be changed via drag & drop. The sort order is taken over
for the sharing pages.
Sharings of the type "E-Mail"
www.picturepark.com
123
System Administration
1. List of all recipients with information regarding the time the recipient clicked on the link and if wether or not he
has downloaded any of the assets.
The context menu can be opened by clicking on the recipient. There are further options available here:
2. Opening the portal link for this specific recipient
3. Options for copying the link without opening it in the browser
4. Detailed download statistics
5. Precise time at which the recipient first clicked on the link
Sharings of the type "Links"
www.picturepark.com
124
System Administration
1. Link to the portal or to the zip file of the sharing. Depending on the selection of the link type
2. Links for every derivative of the current asset. You can change between the download and view links using the
"Links" button. If the preview derivative was shared for a video, then an additional button over which you can
see the embed code for the corresponding video is available.
Sharing statistics per asset
You can check in which sharings each assets is contained in the detail view of each asset.
www.picturepark.com
125
System Administration
1. If no sharing is selected, then the asset can be removed from all sharings via the "Remove" button. If one or
more sharings are selected, then the asset is only removed from the selected sharings. The removal is only
possible, if the user has the required rights over the sharing.
2. By double-clicking on a sharing you can open the detail view of the sharing.
5.4
Managing Orders
All received orders can be managed in order management.
Order Management Window
A new window opens when you select the order manager from the administrator or user menu.
www.picturepark.com
126
System Administration
1. Overview of all orders
2. An addition tab with the order id appears when an order is opened.
3. Options to filter the list of displayed orders
4. Button for deleting or closing the currently selected order
5. List of orders with the most important data
Filtering the View
The list of displayed orders can be filtered using various options.
1. Filtering the view for a selected state
2. Search field for searching through the list using keywords
3. Browsing through the mailing list pages
4. The list is either sorted ascending or descending with a click on the title of a column in the list
Managing Orders
The selected order opens in a new tab when you double click on the order. All the information regarding an
order is shown in this tab e.g. comments to the order or the ordered formats.
www.picturepark.com
127
System Administration
1. Approve and send the order with the selected formats to the orderer
2. Reject the order with a reason as to why it was rejected
3. Close the order
4. List of all users that can make decisions regarding the order. Depending on the configuration this might only
be the administrator or the responsible users of the selected assets
5. Overview of all the orderers details (desired delivery method, email address, order date, subject and
message
6. Menu for further processing of the assets ordered
7. Individual or multiple assets can be selected / unselected with this function
8. Selection of the formats ordered. This selection can be changed for each asset before approving the order
5.5
Duplicates
The duplicate search allows you to find assets with the same properties. The search can be individually customised
with the selection of various criteria. A duplicate search on the checksum is automatically done when the duplicate
manager is opened.
www.picturepark.com
128
System Administration
1. Running of the duplicate search with the selected criteria.
2. Cleaning of the duplicates found: all old duplicates are deleted, the newest file is kept and receives all the
category assignments of the deleted duplicates.
3. Keyword search, with which the appropriate criteria can be found
4. List of all available criteria, by which duplicate assets can be differentiated
5. Menu for further processing of the selected assets
6. List of all duplicates found, which are combined into groups
5.6
Metadata Import
Metadata for particular assets can be updated or created by using an Excel or CSV file using the metadata import.
You can also create categories and classes, assign assets to categories and classes, or import new users into
Picturepark. In addition the options exist to create or update categories and classes, assign default values for
classes, assign assets to categories and classes, or import and update users via an Excel or CSV file in Picturepark.
After a competed import/update a corresponding notification is sent (incl. notification of any errors that occur during
the import).
www.picturepark.com
129
System Administration
Tip
Metadata imports should always be tested first with a small set of test data. This guarantees that the results of
the import are correct and no date is lost.
Update metadata
The import of metadata allows the tagging of Picturepark assets via a Excel or CSV file. The metdata of an asset
(asset fields and tag boxes) can be created or updated. The report function can be used to create a template, for
later import with the desired metadata, that can then be updated. Please note that using (NULL) in a field in the
CSV file will delete the current content of that field. Leaving a field empty in your CSV file will leave the data
entered in that field in Picturepark as is.
The import file for the metadata update needs to have a unique identifier in the first column. When generating a
template via the report function the Picturepark AssetId is usually the unique identifier. This unique identifier is
necessary, to ensure a correct update of the metadata.
In the rest of the columns the metadata can be updated/changed.For tags the values can be entered and
separated with a | (for example Speaking|Standing). Empty tags are represented by (NULL).
Download example file
Tag box values
www.picturepark.com
130
System Administration
Tags in Picturepark represent areas of the structure. You need to take note of the following for the metadata
import with tags:
Tags are always completely overwritten (current tags are therefore replaced)
Case is ignored in the tag import
Empty tags are ignored in the import file
It won't find subcategories if you have:
Cars
- BMW
- 3 Series
- VW
- 3 Series
because it doesn't know which "3 series" is meant - we don't give a full path here.
Update all matches
If a field value in the first column has more than one match in Picturepark (e.g for fields such as AssetName
or OriginalFilename) then by activating the option "Update all matches" you can ensure that all assets that
match this value will be updated. If this option is not activated then the entry in the import file is skipped, if
more than one match is found.
Create/update tree elements (classes/categories)
The following points need to be taken into account on creation of an import file for the creation of tree
elements:
Required column "FullPath"
The first column with the title "FullPath" contains the path of the new tree element from the root channel
respectively ("All", "Admin Channel") inclusive the new tree element.
Example: "All\Tags\Activities\Think". Please note:
This column must be present in the import file. All other columns are optional. If you do not have a name for a
particular languagethen the FullPath value is taken automatically.
The path does not have to end with a backslash, the import can be carried out with or without the final
backslash.
Name from FullPath
In the following example the default value for the name is read out of the fullpath for all languages.
www.picturepark.com
131
System Administration
As the value in the column "NameDE" is overwritten for German, the names in a system with the category
languages German, English and French will be imported as follows:
English: Think, Sit
German: Denken, Sitzen
French: Think, Sit
Creation of superelements
If a superelement - which is referenced in the FullPath - does not yet exist it will be created automatically.
The example above would result in the following structure even if the container "Activities" does not yet
exist:
Optional columns
The second column with the title "Name" + ISO Language code (e.g. NameEN or NameDE) contains the
name of the tree element that should be created in the corresponding language. Example: "Think".If a value
in the columns or the whole column is missing then the values from the FullPath are used automatically. If the
title does not contain "Name" then the import will fail.
o Important:You cannot create multiple tree elements with the same path and name
o Important:Analogue to the creation in the browser various special characters must be
avoided (\ / : * ? " < > |)
All further columns for the setting of name (e.g. NameDE) and Description (e.g.
DescriptionDE) can be selected in the desired languages. The order is not relevant. If a cell
in a "Name" colmn is empty then the value will be taken from the FullPath. The same holds true if a language
is not listed in the file.
If two columns have the same title then the import will fail.
Case is not observed for the column names.
Example of an import file
Download example file
www.picturepark.com
132
System Administration
After a successful import, the imported structure in Picturepark looks like this:
Subsequent Translations
The translations of the names and the description can be updated at a later date using the method "
Translate tree elements (classes/categories)" .
Translate tree elements (classes/categories)
The following points need to be taken into account for the updating of translations for tree elements:
The first column with the "AssetContainerId" title holds the ids of the already existing tree elemens
All further columns can be used to set the names and descriptions in the desired languages. The order is not
relevant and not all languages in the system must be listed. The naming always begins with "Name" or
"Description" with a following ISO language code. Example: NameEN, Description EN, NameDE,
Description DE.
There are three possibilities for the updating of translations:
o Cell holds a value: the existing value in Picturepark is overwritten with a value from the import file
o Cell is empty: the existing value in Picturepark remains
o Cell contains Zelle "(NULL)": the existing value in Picturepark is deleted. This option is not allowed for the
"Name" columns, as the "Name" column is mandatory for a tree element.
If two columns have the same title then the import will fail.
More than one tree element cannot be created with the same path
Analogue to the creation in the browser various special characters are not allowed (\ / : * ? " < > |)
Case is not observed for the column titles.
Example of an import file:
Download example file
www.picturepark.com
133
System Administration
Export Category/Class Names
An Export of the Translations is recommended before you being translating tree elements. The generated
Excel can then be easily adjusted and the changes can be imported via the Picturepark metadata import.
Insert default field values for classes
The default values for fields can be defined with this import type, which are not assigned to the corresponding
class yet. With this import the class therefore is assigned the field and the default value.
The following points need to be taken into account for the creaton of the import file for the addition of default
values for asset fields:
The first column with the "AssetContainerId" title holds the Id of an existing class. If a cell in this column is
empty or the value is not a whole number (e.g. text, or decimal instead of 1337) then the import will fail.
The second column with "FieldId" title holds the Id of the metadata field, that should be assigned the default
values. If a cell in this column is empty or the value is not a whole number (e.g. text or decimal instead of 1234),
then the import will fail. It is possible for the same field to have multiple default values, if it appears in multiple
classes.
The third column with the "DefaultValue" title holds the default values, which should be entered for the
corresponding field for the corresponding class. The following holds true:
o The cells in this column cannot be empty
o The values must correspond to the data type of each metadata field. For example text cannot be entered
for a field with an integer data type. If the value does not conform to the datatype for that field then the
import will fail.
For "Tagbox" fields the following special rules apply for the specification of default values:
o Only tagbox fields with a "Base Asset Container" can have default values added via the import
o The specification of the tree elements that are to be assigned is done by name and not by Id
o It needs to confirmed that all the sub elements of the "Base Asset Containers" have a unique name. This is
because if a name is used multiple times then incorrect assignments may occur.
o Multiple tree elements can be separated with a pipe (e.g. Blue | Red ). Important: There has to be a space
between value and pipe!
If more than one column has the same name then the import will fail.
Default values can only be initially set with this import. Existing values cannot be overwritten!
Case is not observed for the column names Für die Spaltentitel.
Example of an import file:
www.picturepark.com
134
System Administration
Download example file
Users
With this method new users can be created and existing users updated. The following should be taken into
account when creating the import file:
The following fields are mandatory. The import will fail if one of these fields or values for these fields is
missing : EmailAddress (string), Password (string - Klartext), FirstName (string), LastName (string), UserGroups
(Ids)
Required fields
Required are: EmailAddress (string), Password (string - Klartext), FirstName (string), LastName (string),
UserGroups (Ids)
Except for the fields mentioned above it is not checked if a value is filled out or not. It is therefore pssible
that users are imported without their mandatory fields being filled out.
The values for the "Password" column are only required if the user does not yet exist. If a user already
exists then you do not need to put any values in this column. If the import file only has users that already
exist then this column can be completely removed.
Multiple user groups are separated by a pipe. Example: 123|234|345
For passwords the per Picturepark configured password requirements need to be met. Per default these are a
password with 6 characters, two of which need to be digits.
If an email address in the import file already exists in the system then the user will be updated.
The column order is not important
If two columns have the same title then the import will fail
Values can be entered as text and not as id for client specific fields of the "Combobox" type. All the available
translations for a value can be used (e.g. blue or blau).
For the field "CountryId" values can be entered as text and not with an id. All available translations for a value
can be used (e.g. Switzerland or Schweiz).
Case is not observed for the column titles
It is recommended to use UTF-8 encoding, so that values with apostrophes or umlauts are interpreted
correctly.
Example of an import file:
Beispiel-Datei herunterladen
www.picturepark.com
135
System Administration
Further system fields
The following system fields can be included in an import file and are available in Picturepark
per default (in some cases independtly to the configuration):
LanguageId: System language, that is denoted by a number, 1 is for German, 2 for English, 3 for French. If
the system langauge is not set, then the default value is automatically taken.
Language4ContentId: Combination of system language, metadata language and category language - 1
can be defined as standard for the import. How many of these combinations are available is dependent
on the system.
CanChangeOwnProfile: A number, that allows the user to edit his own profile in Picturepark. 0 stands for
no and 1 stands for yes
LoginOnlyWithSecurityToken: A 1 for yes needs to be put for PAS SSO users and a 0 for Picturepark
users.
ExpirationDate: Expiration date of the user- after this date access to Picturepark will be blocked
LockDate: Lock date of the user - on this date access to Picturepark will be blocked.
RenewalUntilDate: Definition of a date for the renewal of the registration. This is done so that you can
more easily identify inactive users. A specific configuration is required for this.
CanBeInternalContact: Specification if the user can be an internal contact for the registration, whereby 0 is
for no and 1 is for yes. The corresponding configuration is necessary for this.
UseLdapAuthentication: For LDAP users a 1 needs to be specified for yes or a 0 for no.
LoginOnlyWithClaimsIdentity: For ADFS users you need to put a 1 for yes or a 0 for no.
ExcludeFromTraffic: User actions can be excluded from the statistics. Put a 1 for yes or a 0 for no.
1/0 or True/False
Instead of 1 or 0, you can also use "True" or "False" on import, whereby 1 equals "True" and 0 equals
"False". In the user export the values are per default exported with "True" and "False".
5.7
Management Console
You can make various Picturepark configurations here.
Help areas
In various areas there is contextual help available. Bei clicking on the question mark you can open the help for
the corresponding area. The help area appears on the right hand side and is also collapsible if desired.
www.picturepark.com
136
System Administration
General configuration
Basic settings: Basic configuration for the whole system for example name, date formats, ftp access, search
options and available modules
Download settings: Creation of file names for single downloads and multiple downloads collected in a zip archive
Channel: Configuration of channels (represented as tabs in the UI) in Picturepark, for the creation of independent
structures.
Global scripts: You can insert JavaScript in Picturepark for the display of thumbnail overlays here for example.
Icons: Management of icons used in Picturepark
Authentication
Login and Registration: Configuration of password, registration and renewal options
Identity Providers: Configuration of ADFS 2.0 Servers for SSO via claims-based authentication
LDAP: Configuration of LDAP connections.
Metadata fields
Indexing: Status indicator letting you know if the search is up to date or not. The index is necessary for the search.
You have the possibility here of starting and indexation
Index Rebuild Batches: Area where the indexing of assets can be started in batches. The automatic indexing is
deactivated after a certiain number of assets that are affected by an action.
Exclusive assignments: Management of exclusivity groups for categories and classes
Asset handling
Orders recipients: Define the recipients of order notifications
Rendering
Output: Management of derivatives that should be created from the imported original files
www.picturepark.com
137
System Administration
Document settings: Configuration of the size and path for rendering of document previews
Rendering states: Overview of all the rendering states of individual derivatives
User Interface
UI Elements: Editing of headers, start pages, terms of use, sharing portal templates, individual help pages and
authentication pages
Ports: Creation and editing of ports
Templates: Management of templates, that can be used for sharing portals and ports
Skins: Editing of html and css assignments, which can be used for individual ui elements and ports
File Management: Management of files for use in UI elements.
UI Panels: Configuration of the panels for the overview in the asset detail view
Traces & administration
Cache: Display of the cached elements in Picturepark (this is done for performance optimisation). You can also
clear this cache here.
5.7.1
Configuration
Channels are the tabs shown in the UI for the display of independent structures that are also administered
independantly e.g. different departments, regions, clients or tenants (in the Picturepark vernacular). The number of
channels you can make is regulated by the license.
User rights
The channels can be managed in the Web Management Console under "General Configuration". To do this
one of the groups the logged in user belongs to needs to have "Manage Channels" and "Manage start pages
& header" rights.
There are two areas in the "Channel" configuration menu under "User Interface":
Area on the Left: Addition of new channels (if the license allows), Removal of existing channels and changing of the
sort order via drag & drop
Area on the Right: Configuration of the channels selected in the area on the left. For example selection of the asset
www.picturepark.com
138
System Administration
container, the desired header etc.
Manage Channels
1. Addition of a channel of the type:
1.1.Asset Browser for the display of the tree and assets inside the new channel. On creation, an element from
the tree needs to be selected as the base for the new channel.
1.2.URL for the integration of a URL as an iFrame inside the new channel (please check if the URL can be
integrated inside an iFrame and bear in mind the certificate eg. use https:// for a Picturepark running over
https:// - in order to avoid insecure content error messages inside your channel)
2. Removal of an existing channel
Sorting
The sort order of the channels can be changed via drag&drop. Just select the channel and drag it to the correct
position.
Tree elements
A channel is bound to a tree element (category / class). Therefore a tree element needs
to be available for the creation of a channel. The tree is not moved or copied, but rather
referenced in the new channel. Any changes to the tree in the new channel are also taken
over in the tree of the "All" channel and vice versa.
Channel Id
The number in the brackets behind the channel name corresponds with the channel Id.
www.picturepark.com
139
System Administration
Configure Channels
The configuration becomes active when the channel is selected and the name of the chanel is shown in the title
of the page. Any changes you make to the configuration need to be saved once you are done or they will be
lost. The number in the brackets behind the channel name corresponds with the channel ID
Basic
1. Selection of the tree element that is used as a base for this channel
2. Selection of the an icon, that is shown in front of the title of the channel. The available icons can be configured
in the icon manager.
3. Selection of a header, where the dropdown shows the ui elements of the type header. If no header is selected
the default header which is configured for this Picturepark will be used.
4. A logout URL can be defined per channel, as long as the general logout url from Picturepark should not be
used (generally this is: customer.picturepark.com)
URL channel
In a URL channel an additional field, for the entry of the external URL that should be displayed in the iframe,
is shown. Please note that a URL with http:// in a Picturepark running via https:// will result in browser error
messages regarding insecure content.
Configuration (asset browser only)
The standard configuration for the channel is configured here. The user can adjust these to his needs in the UI (
view toolbar).
www.picturepark.com
140
System Administration
5. Selection of the standard view in Picturepark. For example listview or small thumbnails.
6. With the checkbox "Show all items" you can define if assets from the sub items of the selected tree element
should be shown, or only those of the selected tree element. If this option is disabled sub items will be
displayed as folder icons in the asset browser.
7. Configuration of the number of layers opened per default in the tree.
8. Settings to show the dashboard (enabled (=displayed by default), expanded by default, disabled)
9. Definition of the sort order, whereby the second sort order only comes into play if the first sort order has
identical values. Application: if the newest assets should always show first, then it is recommended to have
the first sort order as "AssetID DESC", if assets with "A" in the title should be shown first, then it is
recommended to select "AssetName ASC" for the first sort order.
Advanced
A JavaScript, that is carried out every time the channel is selected, can be added under "Advanced". You can
add an overlay for the thumbnails here, for example, using JavaScript. The JavaScript defined in the channel
always takes precedence over the global scripts (you will find JavaScript examples under global scripts)
Favorites (asset browser only)
You can reference tree elements from other channels in this area. If a tag tree from the "All" channel or similar,
for example, should be shown in the new channel. In this way a universally applicable structure can be defined (e.
g. tags for year, color, country) and this structure can be shown as favourites in different channels. In this way
changes to the structure (eg. by adding a new year) are directly taken over in all channels. Please note, only the
assets that are tagged in the channel you are in will be visible in that channel.
In cases where particular scripts should be carried out for all channels you can enter these directly into the
managment console. Scripts that should only be carried out on specific channels can be configured in the
Management Console too. Global scripts, unlike scripts per channel, are easier to maintain and are also more
performant. If both a global and an individual script are defined for a channel, then the global script is overwritten by
the channel script.
www.picturepark.com
141
System Administration
Tip
Scripts can result in erroneous behaviours of the system. Please be careful.
Example scripts
Make message required for shares and orders
controller.mailingMessageRequired = true;
Add text to previews depending on the assigned rights template
In the below example a text is added to the preview, if the asset is assigned a defined rights template. The
background is also made red, should the template have been manually modifed. The code can be expanded,
by copying, inserting and adjusting the corresponding code .
var style = "<style> .ux-explorerview-custom-medium, .ux-explorerview-custom-small, .ux-explorerviewvar divEnd = "</span></div>";
PP.common.Tpl.setCustomRenderer(function(values, thumbSize) {
var custBgColor = "";
if(values.IsAssetRightTemplateOverridden == "1") {
custBgColor = "background:rgba(204,0,0,0.6);filter:progid:DXImageTransform.Microsoft.gradient(
custBorderColor = "aa1919";
custFontColor = "ffffff";
}
else {
www.picturepark.com
142
System Administration
custBgColor = "background:rgba(227,227,227,0.6);filter:progid:DXImageTransform.Microsoft.gradi
custBorderColor = "999999";
custFontColor = "000000";
}
var divStart = "<div style='position:absolute;width:100%;height:15px;border-bottom:1px solid #" +
if(values.AppliedAssetRightTemplateId == "Archived") {
return style + divStart + 'Archived' + divEnd;
}
else {
return '';
}
});
Adding an icon to the preview depending on the assigned rights template
PP.common.Tpl.setCustomRenderer(function(values, thumbSize) {
if(values.AppliedAssetRightTemplateId == "Archived")
return style + '<div style="position:absolute;width:100%;background:#e9e9e9;opacity:0.6;height:
else
return '';
});
Changing the text if a container is empty or there are no search results
This script overwrites the text that is shown per default in the asset browser, if a container is empty (NoResults) or
a search has no results (NoSearchResults). The text can be overwritten for every configured UI language. In the
below example, the text for German (1), English (2) and French (3) is overwritten.
switch(controller.getConfiguration().getUserLanguageId()) {
case 1:
Locale.AssetBrowserStore.NoResults = "No Results de";
Locale.AssetBrowserStore.NoSearchResults = "No Search Results de";
break;
case 2:
Locale.AssetBrowserStore.NoResults = "No Results en";
Locale.AssetBrowserStore.NoSearchResults = "No Search Results en";
break;
case 3:
Locale.AssetBrowserStore.NoResults = "No Results fr";
Locale.AssetBrowserStore.NoSearchResults = "No Search Results fr";
break;
}
The icons that are used in the Picturepark can be added and managed in the icon manager. Icons always need to be
created here, so that they can then be assigned to categories/classes. The different icons are divided into the
following groups:
www.picturepark.com
143
System Administration
1. Tab: Icons that can be used for channels
2. Version Type: Icons that can be used for the filters of different version types
3. Media Type: Icons used for the filters of media type
4. File Format: Icons, which classify the different file formats on thumbnails
5. Asset Container: Icons for the management of categories and classes
Tips
The following points need to be considered for the management of icons:
Depending on the icon type the assets must be of the corresponding size (see "Icon size")
If an icon has the status "true" in "Static", then the name cannot be changed
5.7.2
Authentication
Claims in general can be described as a mapping of an active directory field into a claim and are usually expressed
with a URI (Uniform resource identificator). For example http://schemas.xmlsoap.org/ws/2005/05/identity/claims/
emailaddress). More information regarding claims can be found here: http://technet.microsoft.com/en-us/library/
ee913589.aspx
As soon as at least one identity provider is configured, you can show an area on the start page (configuration
required) or in the login window, in which you can login with the selected identity provider (right).
www.picturepark.com
144
System Administration
Identity providers can be created in the left hand area of the configuration by clicking on "Add". Existing identity
providers can be deleted by clicking on "Delete". The configuration for the selected identity provider can be made in
the right hand area, and needs to be saved using the "Save" button.
www.picturepark.com
145
System Administration
1. Name of the identity provider (e.g. "fs.vit.ch")
2. Importing of an image that is shown to the user in the login form (see screenshot above). The image cannot be
larger than 220 x 75 pixels.
3. Link to the FederationMetadata.xml: the link under which the FederationMetadata.xml can be found. In our
specific case the metadata xml contains the claims that Picturepark requires. This simplifies the setup of your
relying party (in ADFS).
WS Federation:
4. Set as Default: You can set a default identity provider which will be selected first when you have more than one
identity provider
5. Audience URI: Sets the Picturepark URL. Tells the application for which url the token is valid - the url gets wrapped
into the token
6. Realm URI: Would be used if you use subdomains - the realm URI is the top domain URI.
7. TrusedIssuerName: Name of the Issuer - just for display purposes
8. Issuer URI: URL of the ADFS server which creates the token
9. TrustedIssuer Thumb Print: Used for the authentication between ADFS Server and Picturepark Server (Token
Signing certificate)
Group Mapping Settings - can be defined per identity provider:
10.Claims User Group Mapping Enabled: Enables group mapping. The user groups don't have to be configured as
an additional seperate claim
11.Join Default User Group: Select if the authenticated user should also be added to the default user group defined
in groups & rights
12.User Group Claim URI: From where the user groups are mapped for example: http://schemas.microsoft.com/
www.picturepark.com
146
System Administration
ws/2008/06/identity/claims/groupsid or your can use your own.
13.User Field Mapping: Add the mapping for the claims (See Claim Description on the ADFS Server for existing
claims).
5.7.3
Metadata fields
The asset index is created for the optimization of search queries. As soon as a rebuild is necessary the
corresponding message is shown in this area. A recreation of the index becomes necessary due to certain editing of
metadata fields.
1.Current state of asset index. If no index rebuild is needed there is no status box.
2.Index definitions are documents that are stored in the search database, they define which fields
are searched with which analyzers for example. You will need to recreate index definitions after
you check the analyzed checkbox for a field in the PPMC for example. The PPMC will however
suggest that you perform an asset index rebuild if it is necessary and then links to this
"Indexing" site in the web managment console.
3.Goes looking for all the assets in the SQL databases, reads the metadata and stores these in
the search asset documents. The contents of the index are also adjusted here for any
documents that have changed.
4.Compares assets document in the search with those on the SQL server. Only inserts missing
assets. This is generally useful in cases such as timeouts etc.
These options are separated as each of these actions can take a long time for large databases
and it may not be necessary to both recreate index definitions and add assets.
Tip
Your PPMC and the management console will show you a message when an index rebuild is necessary after
changes to the fields in the PPMC and automatically select the type of rebuild necessary.
Once you have started an index rebuild you will have to wait for it to finish before you are able to start it again.
This restriction was implemented as multiple rebuilds over and over can corrupt the indexes.
www.picturepark.com
147
System Administration
Although performance of the asset index rebuild has greatly improved, for larger Pictureparks we stil advise that
it is best to do this outside of business hours to avoid inconveniencing your users.
In this area the indexing for large amounts of assets can be started. The threshold at which the automatic indexing is
disabled can be configured under "Customer Settings" in the Global Manager. By default, the
following values are provided:
Assets limit (after which manual approval of indexing required): 100’000
Asset batch size: 50’000
Rights
To acess this area in the management console the right "Execute maintenance tasks" is required.
Assets are always indexed in batches in order to provide better load-balancing for multiple batch jobs running at the
same time. By using such a batch method, existing large indexing processes can no longer stall smaller indexing
jobs.
This new indexing logic applies only to certain operations executed through users of the UI that can
potentially lead to re-indexing of all or large amounts of assets in a Picturepark:
Delete Asset Container
Save Asset Container Translations
Save Field Sets in Classes
Move Asset Container
Save Assets Metadata
Replace Right Template
Save Right Template
Remove Users
Save Derivative Rights
Copy User Group
The logic does not apply to the following operations:
Add or Remove Versions
Excel Metadata Update
Metadata Updates from Workflows
API Calls (Update Metadata)
Add Asset to Asset Container
Update Original
Import Asset
www.picturepark.com
148
System Administration
Update Cue Points
You can ensure that users can only assign a category or a class from such a group e.g the site of a building can only
have one site assignment, as the same building cannot currently be standing both in German and Switzerland for
example. The asset an also be added to further categories and classes that are not part of the exclusivity group.
www.picturepark.com
149
System Administration
1. Addition or deletion of exclusivity groups
2. Saving your changes
3. Addition and removal of categories or classes from the exclusivity groups. To add new entries the corresponding
categories/classes can be added in the "Add" window via the checkboxes.
5.7.4
Asset handling
The recipients for different orders,which can be processed further directly in the system, can be configured in this
area. The users, which can be selected from a list, can be entered as a "To"- or "CC" contact.
5.7.5
Rendering
A separate rendering state is logged for each derivative.
You can search through the list using various criteria:
You can enter a specific Asset ID here
Selection of a derivative type
www.picturepark.com
150
System Administration
Selection of a time span (from/to)
Filter by rendering state
Tips
When changing the configuration of a derivative (dimenstions, name etc) the rendering state for this derivative
is automatically set to "Pending".
Currently no report can be generated, but the asset ids can be copy & pasted from her into the repair
manager in the PPMC client.
5.7.6
User Interface
Various UI elements as well as Picturepark ports can be managed and customised here. .
General layout
The structure for UI elements, ports, templates and skins is basically the same:
www.picturepark.com
151
System Administration
1. List of all the available elements (Sites, Templates, Skins) in Picturepark
2. Configurations for the selected site or skin on the left
2.1.Settings: Definition of naming, design and rights
2.2.Preview/Edit: Preview of the current site with further editing functions, depending on the site type (edit
options are only available for start pages, sharings and ports)
2.3.Skin Script: Editor for the directe editing of HTML and CSS, that can be saved as a Skin
2.4.Code: Editor for the editing of the code (JavaScript or for sites without skin directly HTML or CSS)
2.5.Journal/Archive: History of all the changes to the selected site.
Open Site
You can directly open ui elements and ports from the overview by right clicking.
www.picturepark.com
152
System Administration
Saving on changing between skin and code tabs
On changing between the skin and code tab (available for UI elements and ports) the data must first be
saved, otherwise it will be lost.
Settings
General
Type: Different site types can be shown inside the UI
o Header: Area which is shown above the channels in Picturepark.
o Start Page: Startseiten für Picturepark, Ports usw.
o Terms of use: Terms of use can be integrated directly in start pages and ports as well as other areas
o Sharing: You can create different templates for sharings, which can be made accessible to different user
groups
o Help: The integration of client specific help pages for different user groups that can be shown instead of or
in addition to the default Picturepark help.
o Sign-on: Sites for scripts for authentication, e.g. for the integration in third-party systems, that are then
shown in a channel in Picturepark.
o Login: Area in the standard login window of Picturepark, which appears when the URL with "\Website" is
called, e.g vit.picturepark.com/Website.
o Port: Ports, that allow the read access of files from Picturepark with a reduced version of the Picturepark
components (browser, tree). Ports can be adapted per client with respect to their design.
o Template Sharing: Templates, including configuration and design of sites of the type "sharing", that can be
selected on creating an email or link sharing.
o Template Port: Templatees including configuration and design for sites of the type "port".
Name: Name of the site, that will be used for the call via the URL e.g. https://vit.picturepark.com/Site/
PictureparkPort. Valid characters: a-z/A-Z, 0-9 (no spaces or special characters can be used)
Title: Title which is shown in the lists and in the title of the browser
Load core configuration: The Picturepark components referenced in the code are loaded when this options is
selected. The deactivation of this option can cause performance improvements, however prevents the loading
of picturepark components in start pages and ports for example.
Search engines are allowed to index this site. If the option is deactivated, then the corresponding site will not
be found over search engines such as Google.
www.picturepark.com
153
System Administration
Design / Layout
Skin: Assignment of a specific skin (HTML and CSS). You can also choose not to assign a skin.
Color: Selection of a color scheme (which is used for windows and loading bars)
User Data for Public Access
If users should be logged into a page automatically with a special Picturepark user account, then the details of
this account can be entered here. The visitors of the pate then automatically take over the right of the defined
user an do not need to log in. Public access is only available for ports and not for UI elements. If no public
access is configured for a port, then the rights of the currently selected user are used for the preview in the editor
anyway. For a pot with public access we recommend opening the port in a browser in which there is no current
session.
Rights
Special rights for each page can be given for each user group:
Use: The user can see the entry but not edit it. Example:
o If a user has "Use" rights for a skin then he can apply this skin for UI Elements and Ports for which he has
"Manage" rights
o If a user has "Use" rights to a sharing template, then he can select it in the sharing process
Manage: The user can edit the entry.
Skins
For skins only the name and rights are configurable.
User Rights
Users need specific user rights for the management of UI elements and ports.
Load Core Configuration
If this option is activated, then the following code is automatically added to the "Code" tab. This code is
required for further editing of the site via the editor.
window.publisher = new PP.publisher.StandardPublisher({ controller: controller });
Depending on your manual creation or expansion of the code you will need to make sure that this code is
present and correctly positioned.
Preview/Edit
If the selected site contains Picturepark integrated components, the preview is shown in the "Edit" Tab (not
available for the skins menu). In this area the configuration for the current site can be edited via the configuration
dropdown. The configuration options differ for the start pages, ports, and sharings.
www.picturepark.com
154
System Administration
If no Picturepark components are available, then a simple preview is shown in the "Preview" tab.
Configured components
The pencil icon in front of the components in the list shows, that configurations have already been made for
the corresponding components.
Saving
In order for the changes you have made to be taken over you need to click on save. With a click on reset you
can reset all the changes that have been made since you last saved.
Code
Your own JavaScript code (in UI elements, ports, and templates) or HTML and CSS (in skins) can be entered
here. It is possible to undo or redo the last action. You can (1) enter the path to a selected file by clicking on
"Insert file Link" (2) at the current cursor point (3) by clicking on "Insert". The inserted path reads as follows "/
File/Start/Logo/logo.png"
www.picturepark.com
155
System Administration
Path changes
When moving or renaming folders or files in the file manger any references in the sites are not automatically
updated.
Spaces in paths
Spaces in paths are automatically replaced with the string "%20" when using the "Insert Link" function. If
you choose to enter paths manually then you will need to make sure to replace spaces.
Journal/Archive
All code changes made are visible here. In each entry the changed code is shown, and if necessary can be
copied and readded to the corresponding area.
www.picturepark.com
156
System Administration
Pages of the type start page, header, sharing, authentication and terms of use can be managed in this area.
Licence Tip
The number of sites of the type start page, header, help and authentication are limited to the number of licensed
channels. Sites of the "sharing" type are unlimited.
Core Configuration
The selection of the core configuration checkbox defines whether or not the complete Picturepark Javascript is
loaded. In the case of the start pages for example you can then place the Picturepark login form. If you do not
load the core configuration then the loading of the page is faster, so only choose this if you need to make use of
Picturepark components. You cannot load core configurations for sites of the type header and terms of use and
the checkbox is therefore not available for these site types.
If this option is activated, the following code is automatically added in the "Code" tab. This code is required for
further editing of the page using the editor.
window.publisher = new PP.publisher.StandardPublisher({ controller: controller });
Depending on manual creation or expansion of the code you will have to make sure that this code is present
and correctly positioned.
Starts Pages
Start pages can be created for Picturepark as well as for individual ports. A skin and code are necessary for a
start page.
Code
When creating a new start page standard code is added, which is required for editing in the editor, when you
www.picturepark.com
157
System Administration
activate the checkbox "Load core configuration"
Skin
The following can be defined in the skin depending on the desired configuration:
Login form (entire)
Individual functions inside the login form
System messages
Version
By defining 'target="picturepark"' you ensure that the area can be later selected in the configuration. For
example:
<div id="login_form" target="picturepark"></div>
<div id="system_message" target="picturepark" style="display:none;"></div>
<div id="version" target="picturepark"></div>
Configuration
The following configurations can be made per start page:
1. You can select the are of the skin in which single elements should be shown
using "Target area" (login form as a block, individual functions of the login
form, system messages, version number). Only areas that have the option
'target="picturepark"' in the skin can be selected. If a login function is
activated, but no target area is selected, then the function will automatically be
entered in the target area that is selected under "Layout"
2. Compilation of the single options that are available in the login form. If none of
these options is selected then only the standard fields "Email", "Password",
"Language" (if more than one Picturepark UI language is available) and the
login button are shown. The individual functions can be separately placed by
the selection of a target area. If access via ADFS is configured for a Picturepark
then the normal login form and/or the ADFS login form can be activated. These
options have no effect if no ADFS access is configured.
3. For each start page you can define to which page a user is redirected after a
successful login. Possible options are:
3.1.Picturepark: The user is forwarded to the Picturepark (URL: customer.
picturepark.com/Website)
3.2.Port: Selection of site of type port
3.3.Channel: Selection of a special Picturepark channel
3.4.Custom URL: Definition of a special URL which you would like the user to be
forwarded to
4. The system messages contain information regarding upcoming releases or
other restrictions to the usage of Picturepark.
5. You can select either an external URl or a page of type "Terms of use". The
www.picturepark.com
158
System Administration
terms of use can be individually configured via further options and all the texts
can be defined per available UI language.
5.1.Content source: Selection of either an external URL or a page of the type
"Terms of use" (per language). Only pages of the type terms of use are
available to which the logged in user has rights.
5.2.Target: Terms of use can either be opened in a pop up directly on the start
page or in a new window
5.3.Height/Width: Selection of the height and widht of the pop up in pixels
5.4.Link name: Text, which is shown after the checkbox and is verlinkt with the
terms of use (per language) e.g. " I accept..."
5.5.UI Element/URL: Selection of the url for externally linked terms of use (per
language)
6. The Picturepark version number can be shown and is helpful during support
queries.
7. The options "Remember login" and "Next time log in automatically" cannot
be placed separately and are automatically placed in the target area that is
defined under "Layout" as soon as these options are activated. An auto-login
is only possible when the option "Remember login" is activated first.
8. If one or more identity providers are configured for a Picturepark, then an
additional connect panel will be shown next to the standerd login form. If
desired this can also be removed from the start page.
Multiple Languages
Texts for multiple languages can be added to the skin. For example for German you can define language
specific content by using 'pplanguageid="1"' The contents must then also be hidden via CSS. As soon as
the language is read on loading the page the corresponding contents are shown. For example:
<div
<div
<div
<div
<div
style="display:none;"
style="display:none;"
style="display:none;"
style="display:none;"
style="display:none;"
pplanguageid="1">German Text</div>
pplanguageid="2">English Text</div>
pplanguageid="3">French Text</div>
pplanguageid="78">Spanish Text</div>
pplanguageid="198">Portuguese Text</div>
Standard Start Page
The page with the name "Start" is used as the default start page which is shown when the Picturepark URL
is called (customer.picturepark.com).
Links in the body text
The calling of the registration and forgotten password forms can also be implemented directly in the
HTML:
<a onclick="javascript:window.publisher.loginPanel.showRegistrationWindow()" href="javascript:void(
<a onclick="javascript:window.publisher.loginPanel.showLostPasswordWindow()" href="javascript:void(
www.picturepark.com
159
System Administration
Logout URL
To make sure that the user goes back to the correct start (page) on logout you can set the logout url. This
can be defined for the entire Picturepark, for individual channels and also for single ports. This configuration
can be made in the management console or directly in the port management.
User Settings
If a user registers via a special start page, then this is saved in his user profile. The url to this page will then
be used as a reference in future emails e.g. during renewal processes.
Header
The are above the channels can be changed with site of the type "header".
It is possible to create multiple header sites. You can define which header is shown in which channel using the
Picturepark Management Console.
Login
Sites of the "Login" type, which are shown above the Picturepark login form can be changed. In order for the UI
element to be shown above the login, the name "Login" needs to be given to this site.
www.picturepark.com
160
System Administration
The measurements for this area are 416 x 73 pixels. If the ADFS login is activated, then the login form is
automatically widened to 696px.
The use of a UI element for this area needs to be activated in the Picturepark Management console.
Sharing Templates
Sharing templates can be selected during the creation of sharings by authorized users. The selected assets are
then available in the corresponding design. In order to simplify the creation of sharing templates, there are predefined templates available, via which a new sharing template can be created with just a few clicks.
Minimum code requirements / configuration
When creating a new sharing template the standard code, which is required for the editing in the editor, can be
activated by selecting the option "Load Core Configuration". The code always needs to be placed in front of
the view port.
The following areas need to be defined in the code:
PictureparkMailing
An area with an id in which the asset browser can be loaded. This area needs the definition
'target="picturepark"' (HTML) or 'target: 'picturepark'' (script).
The corresponding are can be selected in the "Edit" tab in the "Render to" option.
www.picturepark.com
161
System Administration
Standard template
A default template is used if there are no customer specific sharing templates in the system. The "Sharing" skin
is included in the system per default and is used for the default template of the sharings. For a new sharing
template you can either use no skin or create a new skin.
Example Code
A simple code:
var viewPort = new Ext.Viewport({
layout: 'border',
items: [
{region:'center', layout:'border', items: [
{region: 'north', autoHeight: true, bodyCfg: {id: 'PictureparkMailing'}},
{region: 'center', bodyCfg: { id: 'AssetBrowser', target: 'picturepark'}}
]}
]
});
window.publisher = new PP.publisher.StandardPublisher({
controller: controller
});
viewPort.doLayout();
You can take a look at the code in the templates for further examples.
Rights
All user groups which have "Use" rights on a sharing template, can select this template during the creation of a
Sharings.
If more than one sharing template is defined per user group then the sort order is taken from the management
of the UI elements in which the entries are sorted alphabetically.
Make message required for shares and orders
Add the following code to the tab "Code" to make the measse required for shares and orders:
controller.mailingMessageRequired = true;
Open Graph Support
Sharings contain OpenGraph (OG) Metatags, which play a role in sharing on social networks. The standard
www.picturepark.com
162
System Administration
description is used as "OG Title" and the message from the sender as "OG Description". The preview image
of the first asset in the sharing is used as "OG Key Visual" . The asset sort order can be changed via drag and
drop in the sharing management. The usage of Open Graph within Picturepark is officially supported for
Facebook, Twitter and LinkedIn. Please note: For Facebook the preview image will not be visible while sharing
but will be displayed on Facebook anyway once the link has been shared.
Important: Social networks save the values of these metatags as soon as a link is first shared. Therefore any
subsequent changes to the subject, title and sort order will most likely not be updated if a link is shared again.
Please double check these entries before sharing.
Help Pages
The Picturepark-own help pages are shown per default when clicking on the help in the Picturepark
As soon as at least one page of the type help is created as a UI element, then this page is automatically shown
for the corresponding user groups. It is possible to use the "Use" right to make different help pages available
to different user groups.
With Ports you can make assets available via individually configured Picturepark components.
License
The number of available pages of the type "Port" are controlled by the license.
www.picturepark.com
163
System Administration
User Settings
If a user is registered via a port, then this is saved in his user profile. The URL to this page with be shown as a
reference in the future for example during the renewal process.
Core Configurations
On activating this checkbox, the following code is automatically added in the "Code" tab. This code is required
for the further editing of the page via the editor.
window.publisher = new PP.publisher.StandardPublisher({ controller: controller });
Depending on the manual creation or expansion of the code, you will need to take care that this code is present
and correctly positioned.
Creating ports
In order to simplify the creation of ports we have made multiple predefined templates available from which you
can create a new port with just a few clicks. Customer specific scripts can be entered directly in the "Code" tab.
You will need to take note of the following minimum requirements:
The following code is required, and is automatically inserted by the activation of the "Load core
configuration" checkbox. The code is required so you can edit in the editor and needs to always be placed
under the view port.
(window.publisher = new PP.publisher.StandardPublisher({ controller: controller });)
An area with an ID in which the components can be loaded needs to be defined in the code for all the desired
components. This area needs the definition 'target="picturepark"' (HTML) or 'target: 'picturepark'' (script), in
order to be selectable in the configuration of the Picturepark components.
Example code
A simple code:
var viewPort = new Ext.Viewport({
layout: 'border',
items: [
{ region: 'center', layout: 'border', items: [
{ region: 'center', bodyCfg: { id: 'AssetBrowser', target: 'picturepark'} }
]}
]
});
window.publisher = new PP.publisher.StandardPublisher({
controller: controller
});
You can take a look at the code in the templates for more examples.
Configuring components
www.picturepark.com
164
System Administration
You need to select a component from the list in the "Edit" tab and then select the area (e.g. HTML div with ID
and target="picturepark") in which the component should be shown in the "Render to" field.
Different configuration options are available for the different components:
Tree (1): Definition of the categories you would like to shown and the options for these
Basket (2): Definition of the options for the basket
Asset Browser (3): Definition of the available functions and displays in the asset browser
Search (4): Definition of search options
User Profile (5): Activation of the user profile and logout links
Asset Details: Options for the asset preview e.g. above the basket
Asset Preview: Options for the window for larger previews and metadata for single assets
Basic Configuration: Definition of the logout URL and disclaimer
Selection of the corresponding areas, for example HTML divs with ID and target="picturepark":
<div id="PictureparkTree" target="picturepark"></div>
www.picturepark.com
165
System Administration
Removing components
To completely remove a component click on Remove in the lower part of the component configuration window.
The component is then removed alonlg with all the configurations made for the selected page.
Make message required for shares and orders
Add the following code to the tab "Code" to make the measse required for shares and orders:
controller.mailingMessageRequired = true;
Place Import Link
The import function can be added as link in the html code independent from the asset browser toolbar:
<a onclick="javascript:publisher.assetBrowserPanel.showUpload()" href="javascript:void(0);">Import</a
Root Container
If there is no channel configured for the tree, then the import to the root container isn't possible. A specific
class/category has to be selected for this in the tree (manually or directly with the option "selected
container (Id)" for the component "Tree").
Templates simplify the creation of sharing pages and ports. Customer specific templates and standard templates
can be created.
Template Management
www.picturepark.com
166
System Administration
You can create customer specific templates in addition to the standard templates. Here we distinguish between
two types:
Port Template: All templates of this type are shown to users with the corresponding rights in the "Template"
field when creating a page of the type "Port".
Sharing Template: All templates of this type are shown to users with the corresponding rights in the
"Template" field when creating a page of the type "Sharing".
Creating pages from templates
A template field will appear as soon as page of the type "Sharing" or "Port" is selected in the settings:
When you click on save all the code and configurations from the temlate are copied from the template into the
newly created page and saved.
Important
After a page is created from a template no further connections between the page and template exist.
Changes to the template will not influence already created pages.
Templates can only be selected on creation of new pages and cannot be applied to already existing
pages.
Updates
Standard templates are automatically updated during every release and all changes to these are thereby
overwritten. Newly created templates are not overwritten. Therefore new templates should always be
created for your own custom templates.
www.picturepark.com
167
System Administration
Standard Templates
The following templates are currently available in the system:
List
www.picturepark.com
168
System Administration
Simple list for the display of assets with a focus on metadata and download possibility
Available components: Header, Asset Browser, Asset Preview with preview and metadata
Available for port and sharing templates
Press Center
www.picturepark.com
169
System Administration
Gallery of assets with a focus on the preview of assets
Available components: Asset Browser, Asset Preview with a preview without metadata
Available for ports and sharing templates
Port
www.picturepark.com
170
System Administration
Available components: Search, category tree, asset browser, asset preview with preview and metadata,
basket, user profile
Available for ports
Updates
Templates for which the standard naming was not changed can be updated automatically during an
update.
The design of individual UI elements and ports can be defined in "Skins". A skin is not necessary for every UI element
or port, especially when a template is being used. You can create HTML and CSS definitions in a skin.
Important
A skin always needs to be created for terms of use and be assigned to the corresponding UI Element. The
contents of the terms of use window is then entered into the skin.
Editing UI elements/ports
Skins can be managed in the "Skins" area or directly in the corresponding UI element or port. In the "skin script"
tab the assinged skin is shown for editing.
www.picturepark.com
171
System Administration
1. A new skin can be created by clickin on "Save as", and is automatically assigned to the port or UI element.
The new skin contains the curent HTML and CSS code from the editor. This is especially useful, when no skin
has been assigned or the currently logged in user has no edit rights to the assigned skin.
2. The information regarding the assignments of the current skin shows if the change of skin has effects on other
UI elements or ports.
Multiple Languages
Texts can be added for multiple languages. With the definition of 'pplanguageid="1"' (german example)
language specific contents can be defined. The contents then also need to be hidden via css. As soon as the
language is identified on loading the page then the corresponding contents is shown. Example:
<div
<div
<div
<div
<div
style="display:none;"
style="display:none;"
style="display:none;"
style="display:none;"
style="display:none;"
pplanguageid="1">German text</div>
pplanguageid="2">English text</div>
pplanguageid="3">French text</div>
pplanguageid="78">Spanish text</div>
pplanguageid="198">Portuguese text</div>
Open contents in a pop up
You can use the following code to open a url directly in the corresponding UI element in a Picturepark pop up.
<a onclick="window.publisher.openUrlInWindow('http://www.URL.com', { title: 'Title', width: 500, heig
Parameters
URL: the URL must start with http:// or https://. If a page does not allow the integration in iFrames, then it will
not be displayed correctly.
Title: enter a window title for the pop up
Width/Height: enter the width and height in pixels
Maximizable: True or False - if this option is activated then the pop up can be maximised to the whole window
width.
Page assignments
All the assignments of a port or UI element can be seen in the settings of a skin. The list only contains pages, to
which the currently logged in user has rights.
www.picturepark.com
172
System Administration
You can manage files that will be used in the UI elements here. All users with the appropriate user rights can access
the file manager.
Simple folder structures (1) can be added - you can edit the name of a new folder by double-clicking. By selecting a
folder, all the files contained in it (2) are displayed and can be managed. Some functions of the file manager:
Changing of assignments via drag & drop
Batch import of files
Preview of single files directly in the browser
Tips
When managing files and folders you should pay attention to the following points:
Files and folders on the same level cannot have the same name.
To update a file you need to rename or delete the existing file and then import a new version.
You cannot import files to the root folder.
The file size is limited to 5MB. If you try to import large files you will receive a message letting you know that
this is not possbile.
When moving and renaming folders or files the reference in UI Elements will not be automatically updated.
www.picturepark.com
173
System Administration
5.8
Desktop Clients
All the available desktop applications for Picturepark can be downloaded in this area. The available downloads are
license and rights dependent.
www.picturepark.com
174
Browser Compatibility
6
Browser Compatibility
Basically, Picturepark only requires a web browser and works with almost all current web browsers, as per the browser
compatibility matrix below.
A dmin means that administrative users can use this browser version without significant issues for all administrative
tasks e.g. in the Global Manager, Management Console or in the administrative menu of the Picturepark Core-UI.
Use means that general users can use this browser version without significant issues for all standard functions in
Picturepark Core-UI and Ports. Please note that for convenience of editing users, a Web browser that supports
administration well is beneficial.
As a general requirement, JavaScript must be activated and allowed.
Browser version
Window
s
Admin
Use
Firefox
Notes
Single file upload-limit: 2 GB
Internet Explorer 7
X
X
Support discontinued
and 8
Internet Explorer 9,
(
)
10 and 11
Single file upload-limit: 2 GB
Some UI and performance issues
No support for IE compatibility mode
Mac OS
Safari
Single file upload-limit: 2 GB
Chrome
Single file upload-limit: 2 GB
Firefox
Single file upload-limit: 2 GB
Safari
Single file upload-limit: 2 GB
Chrome
= compatible, ( ) = limited compatibility, X = not supported
If no specific version is mentioned then the latest current versions are meant.
Important
Please note that even for browsers declared to be compatible some minor inconveniences for certain browser
versions and/or platforms cannot be excluded and are not subject to warranty. Please also take into
consideration that IT policies and new minor browser versions might restrict certain features required for working
properly.
We strongly encourage you to use a Picturepark test system prior to purchase for validating compatibility with
your specific web browser version and network settings.
www.picturepark.com
175
Index
-A Accessible 27
Active 107
Address book 27
Administration 107
Administrator 136
Air 82
Approve 107, 126
Asset 4, 40, 113, 118
Asset Browser 6
Asset rights 17, 58, 70, 118
Asset type 118
Audio 12
Auto login 15
-BBasket 6, 8, 25
Batch 58, 70
Batch Edit 58, 70
Batch import 58
Border 37
Browser 58
Business Cards 90
Button 8
-CCategories 70, 74, 129
Categorisation 58
Categorize 58
Category 13, 20, 58, 113, 118
Category rights 17, 118
CC 136
Channel 4
Checkout 94
Checksum 128
Collections 20
Configuration 107, 136
Connector 58, 82, 94, 174
Content 13
Context help 8
Context menu 8, 25
Conversion 85
Copy 115, 118
Core Functions 4
www.picturepark.com
Create 74
Creative 94
Creative Connector
Crop 85
CSV 43, 129
90
-DDefault 115, 118
Delete 74
Derivative 4, 113, 115, 118
Derivative rights 17, 58, 70, 118
Description 74
Desktop 58, 82, 174
Detail 6
Detail view 25
Detailed view 6
Direct link 74
Document 37
Download 20, 25, 27, 78, 82, 174
Download centre 27
Drag 8
Drop 8
Duplicate 58, 128
Duplicates 58, 107, 128
-EEdit 58, 107
Entry 36
Event 45
Excel 12
Expired 107
Expiry 27, 107
Expiry date 107
Extended 20, 36
-FField rights 115
Field specific 20
Fields 115
File 136
File types 12
Filter 6, 39, 78, 107, 122, 126
Filters 20
Format 27
Forward 122
FTP 58
176
MyAssets
-GGlobal
40
45, 90
-NNotification
-HHistoric 78
History 122
-IIllustrator 94
Image 12
Impersonate 113
Import 43, 58, 107, 129
InDesign 94
Individual 25
Info 74
Install 82
Installation 82
Interval 45
45
-OODers 107
Office 12
Office Connector 90, 174
Omport 58
Options 115
Order 20, 35, 115
Orders 126, 136
Organisation 4
Originial 35
-P-
Language 15, 58, 78
Lock 107
Locked 107
Login 82
Page preview 37
PDF 12
Photoshop 94
Plugin 94
PowerPoint 12
PPMC 174
Presentation 12, 39
Preset 85
Preview 6, 37
Print 43
Printable list 43
Profile 15
Propagate 118
Public 20, 36
-M -
-Q-
Mail 20, 27, 122
Mailing 20, 27, 107, 122
Manager 136
Mapping 20, 37
Merge 39
Message 107, 122
Metadata 13, 43, 65, 70, 107, 129
Methods 43
Move 74
Multi-function 8
Multimedia 12
Multiple 70
Multiple download 25
Quality
-J Journal
40
-L-
www.picturepark.com
35, 78
-RRecipient 27
Registration 136
Reject 107, 126
Rejected 107
Renew 107
Renewal 107
Repair 65
Report 20
Resize 85
177
Right templates 107
Rights 17, 58, 65, 70, 74, 107, 113, 115
Rotate 85
-SSave 20, 136
Search 13, 20, 36
Send 126
Settings 82
Simple search 20
single 65
Single edit 58, 65
Skin 15
Slide 39
Slide Browser 90
Sort 20
Startsite 136
Statistics 20
Subscription 45
System language 13
-W Warenkorb 36
Window 8
Word 12
Workflow 36
-T Task bar 8
Taskbar 6
Template 58
Templates 107
Thumbnail 65
To 136
Toolbar 25
-UUI 13
Update 65, 107
user 107
User group 107, 113, 115
User group rights 115
User menu 27
user rights 17, 115
-V Version 78
Versions 13, 58, 78
VIdeo 12
www.picturepark.com
178