1
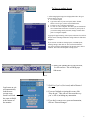
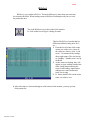
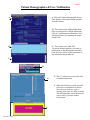
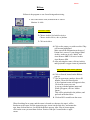
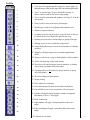
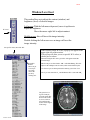
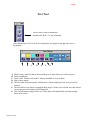
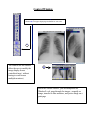
PACS
v6.0
RI (Rational Imaging)
Manual Overview
Provided by Cannon
The PACS website is very helpful in using our PACS
http://www.pacs.tju.edu/ :
Message of the Day
PACS Support Information
Additional PACS Information
PACS/Stentor Access Request
Stentor Documentation
PACS Documentation including RImanuals and Updates
and other documents
RiView
Canon
1. Lt. Click on the RiView Icon (lt. Side of monitor)
2
2. Lt. click on Select Patient.
3. Lt. click on desired tab, located on the left Tabs
side of the patient list. The “all” tab lists all the
patients on the hard drive. The “current” tab
lists all the patients that have not been marked
as dictated. The patients Name or ID may also
be inserted (A)to access that patient in the list
or on the jukebox
List Series
Insert name/ID to
locate
A
Click to locate archived exams
B
Load Pt.Exam
4. Lt. click on the exam you want to view.
Double clicking on the exam will load it
immediately.
You will see the exam loading at the bottom of
the Image RiView bar.(C)
Images will pop up on monitor when loaded A
Tool Bar will appear on the left side of the
monitor
It is now possible to retrieve a comparison
exam from the jukebox directly from the
Patient List (B)
Click or type Pt. Name/ID, then click on tape
icon. (this will take you to a new screen)
choose the old exam by double clicking on it,
then add to Queue (D)
C
Pt.Name Se 2 Im 34
E
The Refresh button will update and load any
additional images/series of the exam you are
currently viewing. E
D
Version 1.15.00
1
To Save or update layout
5. After arranging the images in a display that wish to keep, we
will save this as a layout.
a) Lt. Click on Layout
b) Type in the name of your new layout, under “Format
Name”or it will give you the closest match name.
c) Lt click on “Save Current Load Format”
d) Lt. Click on “Save Template- The name you see listed under
Save Format Name will be the new name of your layout. If
you wish to change the layout name, change it in this field
prior to saving the template
A popup will appear stating “New layout on bottom of scroll list”
This list can be rearranged under the configs. Menu in “Edit load
templates.”
If you want to override an existing layout, Load that layout,
rearrange images, then click on “Save current load format”
You’ll get a message stating that the file already exists, click to
continue. This will override/update existing layout.
b
c
6. When your finished RiViewing an exam,
Lt. click on Save. This will bring up a
Sub-menu.
Save
Load exam on exit
will automatically
load the next
current exam
listed. It will load
the exam in RAM,
at the bottom of
the monitor.
7. Click Yes if you’ve, Reviewed, and/or Dictated
the exam
8. If you are finished reviewing this exam, click
“Save & quit.” This will save the exam the way
you’ve left it, including any annotation.
9. If you don’t want to save exam and annotation,
click on “Discard changes.”
3
Canon
RiSelect
RiSelect is very similar to RiView. The main difference is more then one exam may
be selected in RiSelect. When loading exams in RiSelect, Radiologists only have to view
the patient list once.
This is the RiSelect icon on the rt.side of the monitor.
Lt. click on this icon will give a listing of exams.
This list, like RiView, has tabs that list
different modalities, body parts, Dr.’s,
etc….
1. From the list of exams click on the
exams you wish to view. Once all
the exams are chosen, click “Load
exam.” I recommend only loading
about eight exams. The rest load up
in “Standby.” Standby won’t use up
the RAM.
2. As the exams are loading, they will
appear as icons with the patients last
name. Small letters indicates the
exam is still loading, capitol letters
indicates the exams loaded and
ready for viewing.
3. Lt. mouse double click on the exam
name you wish to view.
4. After all exams are chosen and appear at the bottom of the monitor, you may quit out
of the patient list.
Version 1.15.00
Canon
Patient Demographics & User Notification
A. This is the Patient Demographic Screen.
This displays patient information obtained
from the scanner.
A
B. This section is for adding information.
Once you add specific clinical information,
click on “Update patient information,” this
will then become a permanent part of that
patient’s file.
B
C. This section is an Audit Trail.
Everytime that this patient is accessed, or
information on the demographic sheet has
been altered, it will be kept as a permanent
log attached to this patients file.
C
D
E
D. This ( ? ) allows us to access the User
Communication field.
E. When this field is activated, a specific
user/users or workstation is chosen.
Once the user is chosen, type a
message, then click on e-mail or notify.
This will then either e-mail that user or
post a notify (F) notice on that
workstation.
F
Version 1.15.00
Canon
RiStore
RiStore is the program we use for archiving and retrieving.
1.This is the Ristore icon, located on the rt. side of
Monitor. Lt. click
To archive exams
2. Choose Archive Set, Initial or Active.
Choose Archive Drive, dat. or jukebox
3 Click on Archive.
4. Click on the exams you wish to archive.They
will become highlighted.
Make sure all the information at the top of
Patient list is correct. If your doing a Initial
Archive, make sue it says “Initial” and
Auto-Remove OFF. For Active Archive
Auto-Remove ON.
5. After selecting the exams, click on Archive
and Quit,in the rt. upper corner of patient list
Retrieving an exam off the jukebox.
6. Click on Search, located on the RiStore
pop-up.
7. Type in exam name, number, date,or ID
number. Then click Start Search.
A list of patients/exams will appear in box,
Click on the exam you want.
A pop-up with that patients name and
Exam will appear, click on “Add to
Queue.”
This will be prioritized in the jukebox, and
put back on the hard drive.
8. Click on RiView and locate the exam.
When Searching for an exam, and the exam is located on a dat tape, the tape # will be
listed next to the exam. Pull the appropriate tape, insert it in the tape drive, and mount the
tape, then click on Retrieve, located in the RiStore pop-up. After a list of exams appear,
click on the exam you want then click on “Retrieve and quit“ located in the rt. upper
corner.
Tool Bar
1. View is used to step through the images. Lt. mouse pages up
through images, Mid.mouse pages back down through images.
1.
2.
3.
2. View 2 is used for large X-rays,CR and DR viewing. Lt.
Mouse controls contrast, Rt. mouse mags image.
3. Text is used for annotation and graphics. See Page VI-24 in the
user manual
4.
4. Print is used to select and create a print images.
5.
6.
7.
8.
9.
5. Windowing is used to set brightness and contrast levels.
6. Isolates a region of interests .
7. Cropping is used to clip an image to a specific area of interest.
Lt. mouse draws area. Mid.mouse perfoms the crop.
8. Pointing is used to select certain images or groups of images
9. Panning is used to view outside the cropped area.
10.
11.
10* Image display .Rt mouse to select desired number of columns
and rows.
11* Magnify will adjust image size to selected magnification
factor.
12.
12* Rt.mouse will create a copy or delete,display or hide windows.
13.
13* Arrow will undo any of the listed options.
14
14* Rt. mouse will transfer images between monitors, or display
active image on another network monitor
15
15* Grouping will view like planes by image number, or group
offset like planes.
16
16* Rt. mouse Image rotation options.
17* Image Sorting
17
18. Next window/level intensity
18
19. Cross-referencing will show slice location on all planes.
19
20. Cine will allow you to view in real-time with a set speed.
20
21. Number will display image numbers, scanner, and patient
information. This is a 3 way toggle.
21
22. Mask Subtraction.
22
23. Edge enhance will apply a sharpening filter to the active
image.
23
24. Edge smoothing will apply a smoothing filter to the active
image.
24
* Rt. Mouse for sub-menu.
2
Canon
Window/Level tool
This mode allows us to adjust the contrast (window) and
brightness (level) of selected images.
W/L tool
Left mouse-With the left mouse depressed, move it up/down to
adjust the brightness.
Move the mouse right /left to adjust contrast.
Middle mouse- this will invert the image intensity.
Double clicking the left mouse over an image will reset the
image intensity
Set specific values, then click W/L
When clicking on the W/L tool, a pop-up will appear in the
upper right area of the monitor.
This pop-up will allow you to set specific W/L values, or
choose pre-set values.
When choosing the W/L tool a green box will appear around the
selected image
Click W/L
with Lt.
Mouse to get
a list of presets. Then
choose the
pre set by
clicking on it
MR-Use the pre set listed under –MR—called MedianImg. This will
improve the technique between exams, when saved with the layout.
CT-Choose a pre set that represents the anatomy you wish to view.
All CT pre sets start with CT_ and all MR auto W/L’s start with MR_
The green box is a
region of analysis,
set in the square W/L
mouse mode. If this
is not set , RiView
will automatically
use the central region
of the image
Version 1.28.00
Canon
Text Tool
The text tool is used for annotation,
measurement, ROI’s. Lt. side of monitor.
After clicking on the Text Tool, the Text Option bar will appear in the upper Rt. area of
the monitor.
A
A.
B.
C.
D.
E.
B
C
D
E
F
G
Draws arrows. Hold Lt. Mouse down and drag away from object you wish to point to.
Draws straight line
Draws circle. Double click (with Lt. Mouse) in middle of circle to delete.
Drag to draw square.
This tool used for measurements. Hold down Lt. Mouse and drag across area you wish to
measure.
F. This tool allows us to obtain a rectangular ROI, drag Lt. Mouse over selected area, then release,
An average greyscale intensity will be displayed.
G. This tool will measure angles. Draw out 2 lines and it will automatically calculate an angle
between the 2 lines
Version 1.15.00
Control Window
When clicking the Lt. mouse on this tool (A), a Control
Window (B) will appear displaying a thumbnail for each series.
A
The controls for the window
allow the user to modify the
image display from a
centralized area ( without
having to scroll across
multiple monitors)
B
Inside the control window, you can manipulate the
Window/Level, page through the images , magnify an
image, transfer to other monitors, and put an image on a
print page