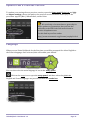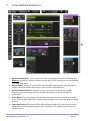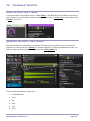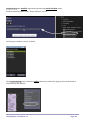
1
User Manual v2.0b By Yan Le Déan and Shane Hull Table of Contents 1. Introduction ...................................................................................................................................... 7 Conventions Used in this Manual ............................................................................................................. 8 2. Installation ......................................................................................................................................... 9 Activate Your Copy ......................................................................................................................................... 9 Update from a Previous Version ............................................................................................................ 10 Language ......................................................................................................................................................... 10 3. Hardware Device Configuration .............................................................................................. 11 Select an Audio Sound Card ..................................................................................................................... 11 Activate MIDI Devices ................................................................................................................................ 11 4. Start page ......................................................................................................................................... 12 Menu Icons ..................................................................................................................................................... 12 Quick Access Buttons ................................................................................................................................. 12 Templates ....................................................................................................................................................... 13 Recent............................................................................................................................................................... 13 Demos............................................................................................................................................................... 13 5. How to Find Help........................................................................................................................... 14 The Help Icon ................................................................................................................................................ 14 The Hints Panel............................................................................................................................................. 14 The Forum ...................................................................................................................................................... 15 6. What is a Workspace? ................................................................................................................. 16 7. Usine Hollyhock Interface ......................................................................................................... 17 8. Advanced Description of the Interface.................................................................................. 19 The Main Icon Menu Bar ........................................................................................................................... 19 The Master Panel ......................................................................................................................................... 20 Audio and MIDI VU-Meters ...................................................................................................................... 20 The Master Synchronization Panel ....................................................................................................... 22 The Panel Menu ............................................................................................................................................ 22 The Contextual Menu ................................................................................................................................. 23 9. What is an Audio Rack? .............................................................................................................. 24 Rack input/output ....................................................................................................................................... 25 10. What is a Patch? .......................................................................................................................... 26 The Patch Editor Window ........................................................................................................................ 26 ____________________________________________________________________________________ Usine Hollyhock - User Manual v.2 Integrated Help Files .................................................................................................................................. 27 11. Tutorial: Workspace Introduction and the Normal Sampler .................................... 28 Quick Overview of the Controls for this Template ......................................................................... 29 Changing Synchronization Modes ......................................................................................................... 30 Creating Your First Sample List ............................................................................................................. 31 Adding an FX Patch to the Rack.............................................................................................................. 32 Creating Automation .................................................................................................................................. 33 Creating Automation with Sampler Curves ....................................................................................... 33 Recording Automation for Control Objects ....................................................................................... 34 Adding a New FX Patch to a Second Rack .......................................................................................... 35 Using the Synthetic View .......................................................................................................................... 37 Saving Your First Workspace .................................................................................................................. 38 12. Overview of the Sampler Templates ................................................................................... 40 The Normal Sampler................................................................................................................................... 40 The Grain Sampler....................................................................................................................................... 40 Common Settings for Normal and Grain Sampler Templates .................................................... 41 The Midi Sampler......................................................................................................................................... 42 The Joggle Sampler...................................................................................................................................... 43 The Cross Fade Loop Sampler ................................................................................................................ 43 13. Devices ........................................................................................................................................... 44 Devices Overview ........................................................................................................................................ 44 Audio Devices are Patches ....................................................................................................................... 44 How to Create a Mono Device ................................................................................................................. 44 Example: Use an Audio Device in an FX Rack ................................................................................... 46 Example: MIDI Device with the Template MIDI Sampler............................................................. 47 14. Patch ............................................................................................................................................... 49 Build a Delay Patch ..................................................................................................................................... 49 Add a Random Module............................................................................................................................... 52 15. Modules ......................................................................................................................................... 53 The Settings Panel for Modules .............................................................................................................. 53 Where ............................................................................................................................................................... 53 Min / Max Values ......................................................................................................................................... 53 Symbol and Precision ................................................................................................................................. 53 Expand Modules ........................................................................................................................................... 54 16. General Concepts........................................................................................................................ 55 ____________________________________________________________________________________ Usine Hollyhock - User Manual v.2 Using the Trash Bin ..................................................................................................................................... 55 The Toolbar .................................................................................................................................................... 55 Other Concepts ............................................................................................................................................. 57 Changing the Colors of an Object ........................................................................................................... 57 Rename an Object ........................................................................................................................................ 57 Edit a Value (Double-Click) ...................................................................................................................... 57 Reset a Value Ctrl+Click ............................................................................................................................ 57 Zoom ................................................................................................................................................................. 58 17. Tips and Tools for Workspace Organization .................................................................... 60 Minimize Several Racks............................................................................................................................. 60 Change the Order of the Racks ............................................................................................................... 61 Duplicate a Rack ........................................................................................................................................... 61 Duplicate a Patch ......................................................................................................................................... 61 Change the size and position of an object .......................................................................................... 62 Save Your Workspaces, Racks, and Patches ...................................................................................... 62 Save a Rack or a Patch................................................................................................................................ 63 18. Direct to Disk ............................................................................................................................... 64 Example ........................................................................................................................................................... 64 19. Plug-ins (VST/AU) ...................................................................................................................... 67 Setup ................................................................................................................................................................. 67 Installing Plug-ins ........................................................................................................................................ 67 How to Use an Audio FX Plug-in ............................................................................................................ 68 Adding Controls to a Plug-in.................................................................................................................... 69 Changing the Plug-in Order ..................................................................................................................... 70 Using a VSTi Plug-in .................................................................................................................................... 70 Add a Random Module............................................................................................................................... 73 20. Automation Curves .................................................................................................................... 75 Editing the Curves ....................................................................................................................................... 76 21. Settings Panel .............................................................................................................................. 78 Overview of the Main Tabs ...................................................................................................................... 78 The General Properties Tab ..................................................................................................................... 78 Panels ............................................................................................................................................................... 78 Control Objects and Modules .................................................................................................................. 79 The Design Tab ............................................................................................................................................. 79 ____________________________________________________________________________________ Usine Hollyhock - User Manual v.2 The Size and Position Tab ........................................................................................................................ 79 The Snapshots Icon ..................................................................................................................................... 80 The Remote Tab ........................................................................................................................................... 80 The Curves Tab ............................................................................................................................................. 81 Sampler ............................................................................................................................................................ 81 Control Panel Objects ................................................................................................................................. 81 Pre-Recorded Curves ................................................................................................................................. 81 22. The Master Synchronization Panel ...................................................................................... 82 Create a Customized Synchronization Panel .................................................................................... 82 Use of Several Time Signatures in a Workspace .............................................................................. 82 23. The Grid ......................................................................................................................................... 83 First Grid Example....................................................................................................................................... 83 The Properties of a Section ...................................................................................................................... 85 The Properties of a Grid Element .......................................................................................................... 85 The Section Icons ......................................................................................................................................... 87 Adding Automation Curves ...................................................................................................................... 88 The Contextual Menu for the Grid ......................................................................................................... 91 24. The Browser................................................................................................................................. 92 Browser Icons ............................................................................................................................................... 92 25. The Trash Bin .............................................................................................................................. 93 26. The Playlist Panel....................................................................................................................... 94 27. The Synthetic View .................................................................................................................... 96 28. The Interface Builder (IB) ....................................................................................................... 97 29. The Toolbox Panel ..................................................................................................................... 98 30. The Mixer Panel .......................................................................................................................... 99 31. Midi Learn ................................................................................................................................... 100 MIDI Control: A Simple Assignment Example ............................................................................... 100 MIDI Feedback (Motorized or Visual Feedback) .......................................................................... 101 32. Key Learn .................................................................................................................................... 102 Key Control: A Simple Assignment Example .................................................................................. 102 Key Learn: Assigning the Increment and Decrement of an Object ........................................ 102 33. The Remote Tab of the ........................................................................................................... 103 Invert a MIDI /KEY Learn ...................................................................................................................... 103 Quantize the Midi / Key Learns........................................................................................................... 103 ____________________________________________________________________________________ Usine Hollyhock - User Manual v.2 Reset a Key or MIDI Learn ..................................................................................................................... 104 34. OSC Learn .................................................................................................................................... 105 OSC Control: A Simple Assignment Example ................................................................................. 106 OSC Control: Assigning OSC to a 2-Dimensional Object (XY) .................................................. 107 35. Video ............................................................................................................................................. 108 Creating a Video Player .......................................................................................................................... 108 36. Additional Workspace ............................................................................................................ 109 Useful for Improvisation ........................................................................................................................ 109 Helpful for Workspace Organization ................................................................................................ 109 37. Bindings ....................................................................................................................................... 110 What is a Bus? ............................................................................................................................................ 110 The Target Parameter ............................................................................................................................. 111 The Different Buses Type ...................................................................................................................... 111 Send MIDI with Bus.................................................................................................................................. 112 Send Audio .................................................................................................................................................. 113 Send Audio to an Existing Bus ............................................................................................................. 114 Use the Bindings........................................................................................................................................ 114 38. Remote Share – Patches via the LAN ................................................................................. 117 Share Patches: Quick Configuration .................................................................................................. 117 Sharing a Patch .......................................................................................................................................... 118 39. The Physics Engine .................................................................................................................. 120 40. The Data Types in Usine ........................................................................................................ 123 Audio.............................................................................................................................................................. 123 Data ................................................................................................................................................................ 123 MIDI ............................................................................................................................................................... 124 Array .............................................................................................................................................................. 124 Text................................................................................................................................................................. 124 Bitmap ........................................................................................................................................................... 125 Editing Values ............................................................................................................................................ 126 Flow Assignment of a Module .............................................................................................................. 126 Mapping and Dual Control .................................................................................................................... 127 Data flows types ........................................................................................................................................ 128 Control Objects and numeric values ................................................................................................. 128 41. Appendix ..................................................................................................................................... 129 42. Keyboard Shortcuts ................................................................................................................. 130 ____________________________________________________________________________________ Usine Hollyhock - User Manual v.2 1. Introduction Welcome to the Usine Hollyhock User’s Manual. Usine Hollyhock is a unique piece of software which introduces several revolutionary concepts that you will discover how to use along with this manual. Even if you are fluent with older Usine versions it is highly recommended to read through carefully. The first thing to understand is that Usine is dedicated to live music and real-time installations. It’s not a traditional Digital Audio Workstation, so it has a very specific approach. Moreover it is a modular environment, which means that even if you can find many ready-to-use examples, the main goal is to create and customize your live set to fit it exactly to your needs. Olivier Sens & the Sensomusic Team Hollyhock is still in evolution, so some colors and details are subject to change depending on the version being used. Usine Hollyhock - User Manual v.2 Page 7 Conventions Used in this Manual This manual provides indicators to help guide the user when performing procedures and when pointing out important key concepts, terms, or actions. Indicates an Action such as a Double-Click, or to Drag-and-Drop. Indicates a key-term or concept such as a Patch, Rack, or Workspace. Italics indicates a dialogue or location path to navigate such as Library/Audio FX. INDICATES KEYBOARD SHORTCUTS SUCH AS [CTRL/CMD +S] Icons such as the gear to the left help guide the user to locate the similar icon available on the Usine Interface. Generally this prompts an action to interact with the icon, and/or provide a description of the related function. Illustrations/Screenshots such as the one below generally indicate an action related to the procedure has taken place, and is used to help guide the user to perform the same or similar action. This indicates a related note, or sub-topic that is being discussed; or to provide some extended or advanced description. Usine Hollyhock - User Manual v.2 Page 8 2. Installation Usine is a “portable application”. This means that there are no installer applications or set locations that it must be installed to. Just unzip the downloaded file into your defined location and play. Several versions of Usine can be installed on the same computer. A common usage example would be to have several installations, one for each custom performance setup. Windows: Unzip the downloaded file and execute Usine.exe Mac OSX: Unzip the downloaded file (avoid third-party software, use the default Mac unzip utility) and Double-Click on the extracted file (application package*). *Some MAC users report this type of messages: “Usine.app can’t be opened because it is from an unidentified developer” Don’t worry, this came from Gatekeeper, not Usine. Gatekeeper is a new feature since OS X Mountain Lion, here how to solve this: 1. In Finder, control+click or use a Right-Click on the icon of the app. 2. Select Open from the top of contextual menu that appears. 3. Select Open in the dialog box. If prompted, enter your administrator name and password. Activate Your Copy In order to activate Usine Hollyhock you must have an active connection to the Internet. To prevent connection issues you might need to disable anti-virus and firewall software temporarily while activating. This activation only needs to be performed once, then Usine is able to function without an active internet connection. There are two ways to activate: Click this icon on the main icon menu bar to open the setup panel. Select the about tab. 1. If you are correctly registered in the forum, simply enter your forum user name and password (Don't forget to press the Enter key after each one), then Click the activate button. 2. Alternatively if you have received an activation key, enter this activation key and Click the activation key button. Usine Hollyhock - User Manual v.2 Page 9 Update from a Previous Version To update your settings from a previous version, open the Setup panel Global tab and Click on import settings, choose the path to the previous version location folder (PC) or the precedent .app file (Mac). When asked, restart Usine. We send only a few newsletters, generally for major updates or promotions, but you can also subscribe to the RSS feed of the news forum to receive all updates news. Use this link in your Rss reader: http://www.sensomusic.org/forums/rss.php?cid=4 Language When you run Usine Hollyhock for the first time you will be prompted for either English or the French language. Once selected, this will remain your default. You can also select the main language to use in the setup panel. Click on the setup icon to open the setup panel, and then select the global tab. English and French languages are provided within the combo box. Usine Hollyhock - User Manual v.2 Page 10 3. Hardware Device Configuration Select an Audio Sound Card Select this icon to access the setup panel. Once the setup panel is opened, you can also configure your Audio Sound Card. Select the audio tab and choose your soundcard in the devices combo box. Once your device is enabled, the corresponding inputs and outputs will be shown. To enable the inputs and outputs, click the enable-radio button next to each one that is to be used to turn it green. Activate MIDI Devices The next step is to activate any MIDI hardware that you want to use within Usine. Select the MIDI tab to display the available MIDI devices. If the devices were just recently connected and/or they are not shown in the list press the rescan devices button. In some cases the hardware driver might need a full-reset; in this situation a soft-reset can be done by pressing the reset devices button. Again to enable the inputs and outputs, Click the enableradio button next to each one that is to be used to turn it green. Here the Akai LPD8 MIDI controller is activated: Usine Hollyhock - User Manual v.2 Page 11 4. Start page The Start Page is the first page you see when you open Usine. Menu Icons 1 Navigation: You can navigate between your workspaces and this start page at any moment with this icon. 2 Browser: Opens the Usine browser to open a workspace directly from the factory library or from your personal folders, 3 Help: Opens a web browser to display a help page about this start page, 4 Setup: Opens the setup panel for the main configuration (Audio/MIDI and more) 5 Quit Usine, Quick Access Buttons The Quick-Access Buttons provide a simple and efficient way to start your workspace and access the forum. 1 Click to create a new empty workspace and switch to the workspace view. 2 Click to open a previously saved workspace, 3 Click to open your web browser to visit our discussion forum. Usine Hollyhock - User Manual v.2 Page 12 Templates This column contains workspace templates. There are a few templates which are initially available such as the Audio file player and surround examples. You can easily create your own templates by saving your workspace to the Usine directory: Usine / Resources / Templates / Default / Workspaces Recent This column will not be present on the first-launch of Usine, however it will display the most recent workspace saved when you return to Usine. The trash-bin provides the ability to delete all entries from the Recents column. Demos This column contains demo workspaces available to inspire and help you explore Usine’s endless-possibilities. Simply click on any of the pictures to explore these ready-made examples. Usine Hollyhock - User Manual v.2 Page 13 5. How to Find Help If ever in need of assistance, there are many methods to obtain help, inspiration, and direction when exploring Usine Hollyhock. This section provides several key items to look out for when in need of help. The Help Icon All objects within Usine have their own small help icon that can be accessed in the settings panel or the contextual menu. This will open a wiki page in your web browser. The Hints Panel The integrated hints panel, if activated in the global setup can also provide a first quick help when the mouse is over an object. Here you can see the hint panel for the trash bin: The Hints Panel can be enabled or disabled in the global setup tab. The hint panel is a contextual panel that displays a short help text about the selected object. Above you can see an example with the rack input selected, or an example of the trash bin to the right. Usine Hollyhock - User Manual v.2 Page 14 The Forum Of course our forum is a good place to ask all questions and share experiences with the user’s community. This one is directly accessible from the start page with this icon: You can also find more information in the online manual. The online manual contains the help pages you can access directly from Usine, but also includes some general pages with more details about the concepts. [email protected] (Preferably for issues related to the License, the access to the forums, workshops, etc.). Usine Hollyhock - User Manual v.2 Page 15 6. What is a Workspace? A Workspace refers to the overall environment, in other words the main window where you organize your work. In your Workspace you decide which panels are visible, which sounds to add, effects to use, and automation to tie it all together. Within the Workspace there are two other important items that will be shown and demonstrated: Racks and Patches. To summarize: A Workspace is the overall environment that contains Racks and Patches. In the Start Page select the icon shown below to open your first workspace named 13 Rack example. This is an example of a common Workspace: Usine Hollyhock - User Manual v.2 Page 16 7. Usine Hollyhock Interface 1 Main Icon Menu Bar: This icon menu is used to display several panels including the Browser, and also to activate features like the MIDI /OSC learn mode, the automation recording, and more. 2 Master Panel: This panel contains the main ON/OFF switch (audio and calculation engine), the main volume fader/meter, and several useful indicators. 3 Synchronization Panel: This panel is where you can set your tempo for MIDI sequencers, piano roll, the grid, and all quantized objects in Usine and SMPTE parameters. 4 Panel Menu: The icons displayed within this menu give access to panels such as the mixer, direct to disk, and Devices panel, which displays your audio and MIDI activated devices. 5 Contextual Menu: This menu will be different depending of the selected object and will display several commands (open, save, and delete for example) specific to the selected object. Usine Hollyhock - User Manual v.2 Page 17 6 Rack: Racks are where you create your Audio, MIDI, DMX, and Video chains. You add inputs (external or internal), add sounds, FX’s, and automation curves and finally your Audio/MIDI outputs. 7 Rack Input: Input zone of the Rack, for example a microphone, or a MIDI device. 8 Rack Output: Output zone of the Rack, generally your sound card output, or a MIDI device. 9 Patch: A multi-function set. For example produce or process sound, send DMX commands, and everything you can imagine. 10 Automation Curve: Example of an automation curve you can create and edit for all visible elements. 11 Hints Panel: This panel is a contextual panel, displaying a short help text about the selected object. 12 Colors Palette: A quick way to change the color of an object. Usine Hollyhock - User Manual v.2 Page 18 8. Advanced Description of the Interface The Main Icon Menu Bar The Main Icon Menu Bar is located on the left-hand side of the workspace and provides keyelements in the design, navigation, and control of your workspace performance. Start page: Navigates between your Workspace and the Start Page. Browser: Opens the Browser window to display any recognized type of files, in order to load them. Grid: Displays the grid window, the main Usine sequencer. IB: Switches to the IB (Interface Builder) window to display your personal interface Show/hide menu: Displays/Hides the Contextual Menu and the help panel. Settings panel: Displays the Setting Panel to edit main, design, remote properties, of the selected object. Synthetic view: Gives an overview of your racks routing. Hide all: Hides all panels like the browser, settings panel, patches, etc., if they are opened. MIDI/key/OSC learn: Turns Usine in MIDI/ OSC / Key learn mode. Rec automation: Activates the automation recording for objects like the knobs, faders and so. Lock: Locks/unlocks object to change their sizes and positions. Reset Zoom: Restores the default Zoom scale. Zoom: Zooms (in or out) the selected object. Setup: Displays the main Setup panel to adjust global settings like Audio sound card, MIDI Devices, personal folders, Plug-ins folders, etc. Trash bin: Drag-and-Drop any object directly on this icon to delete it. A Left-Click will open it to restore deleted objects. Usine Hollyhock - User Manual v.2 Page 19 The Master Panel Master controls are located within this panel. The audio engine enable and the main volume fader are two of the most commonly associated controls with this panel. Among these several other useful master functions are available on this interface. 1 Main Usine’s engine ON/OFF switch (audio engine). Must be active to run Usine. 2 Workspace selector switch (main/additional, discussed later within this manual). 3 CPU usage indicator. 4 Panic button to send an all note OFF message to plug-ins and MIDI outputs. 5 Remote Update button to force MIDI remote faders & knobs positions. 6 Solo racks indicator. 7 Vu-meters for all inputs/outputs (MIDI/OSC and Audio). 8 Master volume fader. Audio and MIDI VU-Meters The master panel has audio and MIDI VU-meters, which allow you to monitor the activity and verify your devices are running smoothly. The number of visible VU-meters corresponds to the selections made in the setup panel. Here we have two audio inputs and two audio outputs enabled in the audio tab of the setup panel. With this selection, the master panel now displays two VUmeters for input and two for the outputs. Usine Hollyhock - User Manual v.2 Page 20 If we activate two additional inputs of our sound card in the setup panel, this will be reflected automatically in the master panel: With four inputs selected, you can now see that four input VU-meters are visible on the master panel. A closer look: As you can see below, this system of displaying meters is also available for MIDI devices. Here two MIDI inputs and one MIDI output are activated, which adds a corresponding meter to the master panel. The MIDI VU-meter does not indicate a volume-unit, but it provides an activity indicator that reacts in response to incoming and outgoing MIDI messages. Usine Hollyhock - User Manual v.2 Page 21 The Master Synchronization Panel Here is the main synchronization panel where you can choose your tempo and SMPTE settings to drive the samplers, MIDI sequencers, piano roll, the grid and all sequenced objects in Usine. 1 Synchronization ON/OFF switch. Must be active to run all sequenced objects. 2 Current position in the cycle (top number) and in the bar (bottom number). 3 Global tempo fader. 4 Button to restart the synchronization from the beginning of the cycle. 5 Tap tempo button. Click several times to create a personal tempo. 6 Tempo divider or multiplier by 2. 7 SMPTE current position. 8 SMPTE time code ON/OFF. 9 Button to restart the SMPTE from the beginning. The Panel Menu When the contextual menu is shown, the icons of this menu are displayed just to the top of the contextual menu. Several important functions and panels are available through these selections such as the mixer, the direct to disk, and the primary devices panel. The devices panel displays active audio and MIDI devices for use as inputs and outputs in your racks. Devices panel: Displays active devices. Toolbox: A panel which can be customized to place any control you want available within the panel. Trace panel: Displays debug and system information such as incoming MIDI/network or internal messages. Mixer: Displays a personalized mixer. Playlist: List to organize several workspaces in a Playlist format. Usine Hollyhock - User Manual v.2 Page 22 Chat panel: Messaging platform to communicate with other connected members. Direct to disk: Records your performance and concerts directly to your computer’s hard-disk. The Contextual Menu By definition, this menu will be different depending of the selected object. In the example below a patch is selected: At the top of the menu there are shortcuts available to access the settings panel tabs. In order: properties, design, size, network, remote, and the help icon. You’ll also find standard commands such as delete, open, save, save as, etc. Usine Hollyhock - User Manual v.2 Page 23 9. What is an Audio Rack? The concept of an audio Rack is very similar to that of a guitar player’s effect pedals, or an effects rack in professional studio where you can manage routing by cables. The basic concept of a Rack: 1. An audio input source (microphone or instrument) (MIDI Controller or Audio Input) 2. Some effects or processing chain (Effects)(Samplers, FX, Processing) 3. An audio output (Speakers, Console) (Audio Output) 1) Source As we’ll see later, you can Drag-and-Drop any device (audio or MIDI) on inputs/outputs of a rack. 2) FX Racks 3) Outputs Usine Hollyhock - User Manual v.2 Page 24 Rack input/output Rack input: You can Drag-and-Drop any devices from the devices panel on the input of a rack. Here a stereo audio input and a MIDI controller have been placed. Incoming messages will be indicated by activity on the blue vu-meter when using this controller. Usine Hollyhock - User Manual v.2 Rack output: Works the same manner as the Rack input. Here a stereo audio output and the same controller, for example to provide MIDI feedback for motorized controls or synchronization. Page 25 10. What is a Patch? A Patch is like a building kit where you can add and combine Modules (the smallest part within the Usine hierarchy) and connect them together with virtual wires. The structure of a patch can contain non-visible processing, math, or functions as well as interface design objects such as knobs, faders, buttons, etc… A Patch consists of two things: 1. The underlying Patch structure which is visible in the Patch Editor. 2. The visible design objects or the Control Panel. (1) A simple filter Patch made of a filter module and a knob module (2) The visible part (Control Panel) contains the filter design and a knob The Patch Editor Window We will see later how to create patches, but for a first overview, you can Double-Click on any control panel of a patch to see its structure and open the Patch window, here you will see the panner patch: Usine Hollyhock - User Manual v.2 Page 26 Integrated Help Files In the properties panel of several objects you can see blue buttons located under help files. Once clicked, each one of them provides a usage example to help guide: Usine Hollyhock - User Manual v.2 Page 27 11. Tutorial: Workspace Introduction and the Normal Sampler Here is a first exercise in which you will discover more about the Usine environment. If a workspace is already open, return to the Start Page. At the Start Page select the empty workspace icon to start a blank workspace. Select this icon from the left-hand side, Main Icon Menu Bar to open the browser. Select the sound tab and choose the sound named femal piece from the various/Voice folder. Drag-and-Drop this sound file directly onto the empty patch in the default rack as shown: A pop up window will appear with several available templates. For this demonstration select the Normal sampler; the Normal sampler is the most basic sampler choice available in Usine. Usine Hollyhock - User Manual v.2 Page 28 Once the template has been selected it will create the sampler in place of the patch as shown: The next step is to make sure that the audio engine is enabled (if not already done so). This can be done by pressing the [SPACE BAR] of your keyboard, or by the audio engine switch in the Master Panel as shown: Quick Overview of the Controls for this T emplate Play Pause (loop and auto restart options must be disabled in order to pause) Enables and starts the continuous loop mode. Plays the sound in a reverse mode. Opens the samples list window for the sampler (Currently we only have one available sample within our list. To add additional sounds; files can be dropped onto the sampler waveform or managed with the sample list window.) Navigation buttons for the samples list. Locks the sample view to avoid any changes. Gain fader: Volume as applied to the output. Pitch fader: Pitch transposition value (in semitones). Usine Hollyhock - User Manual v.2 Page 29 Changing Synchronization Modes On the header of the sampler patch, selecting this icon will open a pop up settings window. This window will give access to additional parameters, and in this case synchronization modes. Click on the loop mode combo box to select the different synchronization modes. Although we will not go much into detail regarding all the available parameters of the pop up within this section, note that various options may be available such as the loop mode in this specific case. Here are the different synchronization modes that are available: Loop mode: (Synchronization options) Loop: The sample is played in a continuous loop mode. Cycle: The sample is played at the beginning of the cycle. Bar: The sample is played at the beginning of each bar. Beat: The sample is played on the beat. Eighth note: The sample is played on each eighth note. Sixteenth note: The sample is played each sixteenth note. 2/4/6/8/10/12/14/16 bars: The sample is played at the bar count as indicated. Loop on bar: The sample is played entirely as in loop mode. At the end of the loop however, the sample will restart at the beginning of the next bar. Loop on beat: The sample is played entirely as in loop mode. At the end of the loop however, the sample will restart at the beginning of the next beat. Usine Hollyhock - User Manual v.2 Page 30 Creating Your First Sample List If you want to change the currently selected sample, or add additional samples; simply Dragand-Drop a new sample onto the wave display of the template: Select this icon to open the samples list: In this samples list window you will find several commands to add, remove, sort, and rename your samples. The option also exists to save a list and to reload them easily into another workspace, or even to copy and paste between different lists altogether. On the sampler patch you can also use the icons (previous and next) as shown below to navigate through the list: Usine Hollyhock - User Manual v.2 Page 31 Adding an FX Patch to the Rack We can now add our first audio effect patch. Once again the Drag-and-Drop method will be used to add this patch to our Rack. Open the browser by Clicking on this icon (or by using the shortcut [CTRL/CMD+B]). Within the Usine Library/Audio FX/Delay hierarchy, choose the patch named DLY Simple and Drag-and-Drop it just below the sampler we previously created. A new empty patch will be created and a pop up window will appear. Here we will choose the option open patch. The new delay patch will be automatically created below our sampler within the Rack as shown: Take some time to familiarize yourself with the parameters that are available. Usine Hollyhock - User Manual v.2 Page 32 As with most of the library patches, this delay patch has several pre-recorded presets available. These presets can be used to help quickly audition and discover the possibilities of the patch. On the header of the delay patch, Click on this icon to display the preset panel. Once opened, you can use the navigation icons to test several different presets. Creating Automation To animate the rack we will demonstrate and use two different methods for adding automations. The first method will be shown directly on the wave display of the sampler, while the second demonstration will be done on the delay patch. Creating Automation with Sampler Curves The sampler provides five internal curves. First, click on the wave display of the sampler. The contextual menu will display the available curve commands as shown: For this example, Click on show pan to display this panoramic curve directly on the waveform: Usine Hollyhock - User Manual v.2 Page 33 Double-Click on the line to add a point. (Another Double-Click will delete it) Click and move each point to create an interesting pan curve. Recording Automation for Control Objects A second way to create automation in Usine is to use the movement recording. For this example we will demonstrate on the delay patch we previously added to the Rack. Click this icon that is located on the left-hand side Main Icon Menu Bar. Once selected it will turn red to indicate recording has been enabled. Slowly move the dry/wet knob from 0 to 1. Again click the icon to stop the recording. A curve is created and added as shown: You can edit this new curve in the same way we had done to the pan curve of the sampler (Double-Click to create or delete new points, or Click and move to change the position) Usine Hollyhock - User Manual v.2 Page 34 Adding a New FX Patch to a Second Rack In Usine you can easily route a rack into the input of another one. This can be useful to have independent FX or to route several racks into one. This common method provides the ability to bus, parallel route, or create a master rack. This section will demonstrate a simple routing example to add a parallel reverb to this first workspace tutorial. Use the shortcut [CTRL/CMD+T] to create a new rack or Click on an empty part of the workspace and choose add a new audio rack from the contextual menu. Once the new rack has been created, open the Browser by selecting the icon. Navigate to the Usine Library/Audio FX/Reverb/ within the browser and Drag-and-Drop the reverb patch to the newly created rack as shown: Usine Hollyhock - User Manual v.2 Page 35 For a better visualization of our workspace, we can add colors to each rack. Click on the header or in an empty place of the rack to select it, and then click on a color of the quick palette. Once the two racks have been colorized, we can now route the first one to the input of the second. Click on the header or an empty place again to select the rack 1 and Drag-and-Drop it on the input of the rack 2 as shown below: Again, make sure that the audio engine is enabled (if not already done so). This can be done by pressing the [SPACE BAR] of your keyboard, or by the audio engine switch in the Master Panel as shown: Usine Hollyhock - User Manual v.2 Page 36 With the engine enabled, you will see that the output vu-meters of 1-rack are also in movement within the input of 2-rack. To improve the organization of your workspace you can rename these racks using the shortcut [ALT + CLICK] on the rack header. Using the Synthetic View Usine provides a tool to visualize your workspace routing called the synthetic view. Select this icon from the left-hand Main Icon Menu bar to open the synthetic view. We can now see within the synthetic view the following: Rack 1 and rack 2 are routed to the stereo output. Rack 1 is routed to the input of rack 2. Usine Hollyhock - User Manual v.2 Page 37 Saving Your First Workspace This first workspace is now finished. Within this tutorial we have discovered several of Usine’s concepts and it is now time to save. Click somewhere in an empty area of the workspace to display the contextual menu, and select the save workspace button; a standard query window will open to provide details of the location and name of your workspace. A good idea would be to create a specific personal directory to save all your patches and workspaces. You can then add this personal folder into your preferences in the setup panel. Open the setup panel with this icon and select the setup/Global configuration tab Add this new directory as your patch library path: Usine Hollyhock - User Manual v.2 Page 38 Usine Hollyhock - User Manual v.2 Page 39 12. Overview of the Sampler Templates When you drop a sound on a workspace, rack, or patch, Usine prompts with a choice of samplers via a pop up menu: This section details the different characteristics of each of these samplers. The Normal Sampler The normal Sample player provide an array of quantization tools with common modifiers such as pitch, gain control, and reversal to alter sample content. So it can be used for many situations when you need to trigger/ loop sounds with quantization options. The Grain Sampler The Grain Sample player and the Grain Sample player recorder provide similar functionality as the normal sampler, however with the addition of a powerful granular engine. Grain options include things such as the Grain size duration, speed synchronization, manual percentage adjustments, and the ability to choose windowing options to shape the grains. Usine Hollyhock - User Manual v.2 Page 40 The granular engine allows the ability to modify the speed of the sample playback without affecting the pitch of the content. It can be used for example, to adapt a drum loop to a different tempo while maintaining pitch and the original percussive elements. Interestingly, the Grain Sampler can also be used to create really particular sounds, drones, and more. For Drums loops, the grain sampler works well for speed modification between 80% and 150% of the sample’s originally recorded tempo. Common Settings for Normal and Grain Sampler Templates The Normal and Grain sampler templates have a common settings panel. You can use this icon in the header of either of these samplers to open it: Play button mode Play-replay: First Click plays the sample (One-Shot); Second Click restarts the sample. Play-stop: First Click plays the sample (One-Shot); Second Click stops the sample. On activation These options are useful for grid activated racks and patches to trigger on-activation. Do nothing: When the patch activated it’s played according the loop mode status. Play once: When patch activated the sample is played once and stops at the end. At the end Do nothing: When the sample reaches the end, it stops. Next grid line: When the sample reaches the end, the grid moves to the next line. Mode The Mode options provide a means to sequentially or randomly iterate through the sample list. This provides interesting results as several sample files can be sequentially or randomly played one after the other. Usine Hollyhock - User Manual v.2 Page 41 Single: The selected file is played in a loop. Next: The sample is played through, then the next file is selected to play. Previous: The sample is played through, then the previous file is selected to play. Random: Plays files in a random order. Auto restart: Restart when the main audio engine is turn ON. Audio thru: Audio thru level. The Midi Sampler The MIDI Sampler can be used to directly interface with incoming MIDI. Like classic samplers, these modules/patches provide key-to-pitch playback of the sample material. You can also create a multi-layer sampler where you map several samples to create a full range instrument from several source files or Drum kits. This allows the use of any MIDI keyboard or MIDI enabled module such as the Sequenced Step MIDI, Random MIDI Out, and Piano Roll to control triggering and playback of the sampled audio. Usine Hollyhock - User Manual v.2 Page 42 The Joggle Sampler With the joggle sampler, you use only one fader to interact with the speed and direction of the sample. This function is useful to smoothly play a sample in forward and reverse direction, while controlling how fast or slow the playback speed responds. The Cross Fade Loop Sampler The cross fade sampler is useful to create a smooth loop from a portion of an audio file that is placed between these two markers. Usine Hollyhock - User Manual v.2 Page 43 13. Devices Devices Overview We can now easily understand that an audio device in Usine corresponds to our sound card however, this notion is sometimes more advanced than it appears. So far in our workspace examples we have used a simple stereo audio output. In the following example we will create a secondary device that utilizes the same sound card, while providing a different configuration of inputs and outputs. Along with this tutorial, a basic Audio Rack routing can be clearly visualized. Audio Devices are Patches The first thing to understand is that devices in Usine are also patches and can be edited, modified, and saved like any other patch. To illustrate this concept open the devices panel with this icon: Double-Click on the default audio input device named stereo in, this will open the corresponding patch edit window and confirm our entry corresponds to the 2 first physical inputs of our sound card (audio 1 and audio 2). How to Create a Mono Device In a live situation we often need mono devices for microphone or instrument inputs. To create a mono device: Select the devices panel and Click on add audio in within the contextual menu: Usine Hollyhock - User Manual v.2 Page 44 A new audio in device is created with a random name. By default a stereo device is created. Double-Click on the new device to open the patch editor window. Select the Audio to Usine module audio_2 and delete it: We have now created a mono device using the first entry of your soundcard. You can rename the device using an [ALT+CLICK] directly on the device name as shown below: Usine Hollyhock - User Manual v.2 Page 45 Example: Use an Audio Device in an FX Rack To illustrate this device exercise, Drag the patch named PAN 1-2 on the empty patch of a new audio rack. We can add a second FX patch below, such as the reverb: Open the devices panel again and Drag your new mono device onto the rack input panel: Usine Hollyhock - User Manual v.2 Page 46 We have now completed the example while demonstrating the following basics of an Audio Rack: 1 A Mono Audio input device 2 Some FX’s patches in series 3 A stereo Audio output device Example: MIDI Device with the Template MIDI Sampler First, activate your MIDI device in the setup panel/MIDI tab Drag this MIDI device directly on the rack input Usine Hollyhock - User Manual v.2 Page 47 Next drag a sample onto the first empty patch of your rack. (FB19.wav file from the browser/sounds/Various/Leap/) In the pop up window select the Midi Sampler: When you play this sample with your MIDI keyboard you will see 3 indicators: 1 A MIDI led in the master panel which tell us the MIDI device sent MIDI messages. 2 A second one in the rack to confirm the MIDI entered into this rack through the device panel. 3 The last indication that the MIDI Sampler is playing: The rack device Stereo Out, will display a change of the vu-meter levels as you play. Usine Hollyhock - User Manual v.2 Page 48 14. Patch With Usine you have the ability to modify any of the library patches that are provided. This approach allows creation by example and can be used to build a personal and modified library that is tailored to your own designs. Build a Delay Patch First Click on an empty zone of an empty workspace and use the new audio rack button in the contextual menu to add a new rack; you can also use the shortcut [CTRL/CMD+T]. First we will create a normal sampler by using the Drag-and-Drop method as shown before. Select the Tombend file from the Drums/Aonghus kit folder. Once created, click on the rack to select it and to display the contextual menu. Click on add new patch. Usine Hollyhock - User Manual v.2 Page 49 Double-Click on this new empty patch to open the corresponding patch editor window. In the browser open the modules tab and navigate to All modules/Audio/Delays. Then Dragand-Drop the delay audio module into the patch editor window. A pop up will appear and ask us how many audio channels (inputs/outputs) we want. Select stereo as shown: Once the module is created we will see several inputs/outputs. These are called inlets/outlets. If we mouse-over one of these outlets we will see the connection type. In our example here we have mouse-over the out 1, which shows us that is of type audio. Usine Hollyhock - User Manual v.2 Page 50 Click on this outlet out 1 and Drag a wire and release this wire into an empty space. A pop-up menu will appear. Choose audio output as the output module. A new Audio Out module has been be created Repeat this procedure for the second output and for the two corresponding inputs to create the audio input and output needed. Using this same method, choose a knob for the inlet delay and a horizontal fader for the feedback parameter: On the control panel we will see our knob and fader created. You can now start the sampler in loop mode and test your new delay patch. Usine Hollyhock - User Manual v.2 Page 51 Add a Random Module To “animate” this effect, we can add random values for the feedback parameter. Drag a new wire from the fader inlet and choose the random data module: To have a more interesting result, select this new random module to display its settings panel and experiment with the synchronization value for this module. Here we chose bar: You can also save this patch into your personal library using the save and save as commands of the patch’s contextual menu Along with the standard commands of the contextual menu, you will notice two unmentioned commands below: Reload: This can be useful when you want to go back to the original state of the saved patch. Export: This is useful for sharing a patch with someone else. This export command will create the patch with all the samples included and saved in a separate folder. Usine Hollyhock - User Manual v.2 Page 52 15. Modules The Settings Panel for Modules The settings panel will be different for each module, however this section will cover some of the common parameters you will use frequently. Where The where option lets you decide where your module will be visible. As shown a knob of the reverb patch, was set by default to the control panel. We decided to set the control’s where option to make this knob only visible within the toolbox. With this setting, when a reverb patch is minimized, the knob parameter is always accessible and visible in the toolbox. Use this icon in the panel menu to open the toolbox Min / Max Values If you need to set minimum and maximum values for a module you can change these in the settings panel. Symbol and Precision Symbol and precision factors (from integer up to five decimal) are often useful to clarify your patches. The precision allows a higher or lower resolution depending on the specific needs of a control. The symbol defines the unit of change such as percentage or time in ms or sec. Usine Hollyhock - User Manual v.2 Page 53 Expand Modules As we have seen before, patches are made of various modules in which we can connect with wires. Generally a module contains a limited number of inlets and outlets which are predefined. Some of these parameters cannot be directly connected within the patch. For example by default, a fader is displayed in the patch as shown below: The module only displays one inlet/outlet which correspond to the fader value. In some cases it can be useful to have total access to all available parameters of the fader. As an example: To change the color in real-time. Click on the expand button as shown below: Now the fader module will display all of the available parameters so you can connect all inlets/outlets. If you want, you can make complex or absurd patches like changing the size of a list box to the rate of the tempo! Once a module is expanded in your patch, or even if it was too big to begin with, you can minimize it again. You have the choice to hide the inlet/outlet or just display the connected ones. As shown below your patch editing options allow you to manage your design efficiently. Usine Hollyhock - User Manual v.2 Page 54 16. General Concepts Using the Trash Bin The main menu provides a trash icon. We can drop a patch, a rack, or a browser element directly on top of this icon to delete it. A Left-Click on this trash icon will open the window. You are able to restore the contents if needed (with a simple Drag-and-Drop). Note that you will find the old versions of your rack, patch, and workspaces here as well. You also have the ability to empty the trash bin (1) and set its maximum capacity (number of files) (2). The Toolbar Above the patches and in some modules you can find some controls available in the header section. This portion of the header is called the toolbar. Used to Expand/Reduce the patch. Usine Hollyhock - User Manual v.2 Page 55 Displays the preset panel. Open a settings pop up for this patch. Such as we have seen in our previous examples for the normal sampler: On/Off: Activate/Inactivate the patch. The patch will be darker when off. This will also act like a bypass for this patch. Lock/Unlock. Prevents changes when locked. Usine Hollyhock - User Manual v.2 Page 56 Other Concepts Changing the Colors of an Object To change the color of an object select it (it will be surrounded by a gray line) and Click on a color within the quick palette. Rename an Object Use the shortcut [ALT + CLICK] to change the caption of an object, patch, or rack. Here we are changing the fader name from fader1 to volume. Edit a Value (Double-Click) Double-Click on a value to enter a precise value using the keyboard. Reset a Value Ctrl+Click The shortcut [CTRL/CMD+CLICK] will reset the current value of an object to the default value. Usine Hollyhock - User Manual v.2 Page 57 Multiple creation with the SHIFT+CTRL shortcut When patching, you’ll sometimes need to create multiple outputs or link several inlets/outlets. Usine provide in this case a powerful shortcut with [SHIFT+CTRL] Here are 2 examples: You can automatically create multi-outs. Simply hold [SHIFT+CTRL] when creating your outlet, and this will place all the available outputs for your module. Here an example of a sampler with 8 audio outputs being created in this manner. This method also works when you want link several outputs to inputs (from same family), Here, we link an array module to a point curve module. Simply press [SHIFT+CTRL] and maintain it when creating your outlets, this will link all the outputs available. Zoom Usine Hollyhock provides several ways to zoom both the interface or object individually. The mouse wheel: Click on the header of a patch, container, or rack and then use the mouse wheel to zoom it in/out. Usine Hollyhock - User Manual v.2 Page 58 Zoom out Zoom in The zoom icon: Click on an object like a patch or rack and use this knob to zoom in/out the object. You can also assign a MIDI learn to this knob. The restore icon in the main menu resets the zoom size factor to its default size: Left-Click = resets the last clicked panel. Double-Click = resets all panels simultaneously. Usine Hollyhock - User Manual v.2 Page 59 17. Tips and Tools for Workspace Organization When you have several racks in a workspace, it’s interesting to organize your work to provide better focus. Here are some useful tools and tips for organization. Minimize Several Racks One of the first things you can do for better visibility of your workspace is to minimize unused racks. You can use the expand/un-expand icons on each rack to minimize them individually. The second way is to use the [UP/ DOWN ARROW] on your keyboard. This will minimize all the racks except one and navigate between them. Usine Hollyhock - User Manual v.2 Page 60 Change the Order of the Racks You can also move each rack with a simple Drag-and-Drop. Click on the header or an empty place of a rack and move it over another one to take its place Duplicate a Rack To create some variations or to create a new rack from a template, it can be useful to duplicate a rack. This can be done with one Click in the contextual menu of a selected rack. The new rack will be added to the right of the existing racks. Duplicate a Patch The best way to duplicate a patch is to drag and drop it onto another rack while holding down the [CTRL] key. Usine Hollyhock - User Manual v.2 Page 61 Change the size and position of an object When using a touch screen it may become important to focus on organization and the visual layout of your workspace. Changing the size of the objects for touch screen applications helps distinguish the desired object from others, and improve playability of the target parameter. Unlock the patch with this icon. Now, all objects can be moved and resized using their handles Save Your Workspaces, Racks, and Patches The workspace is the most used way to save your work with Usine. Here is what is saved within this file: 1) All the grid settings. 2) All the patches and racks are stored in a single file. 3) Rack Mixer input and output information (volumes, pan, etc.). 4) Synchronization information (tempo, bar length, etc.). When you save a workspace or a patch, old versions are stored automatically in the Trash bin. So you can retrieve old versions by Clicking on the trash icon. Usine Hollyhock - User Manual v.2 Page 62 Save a Rack or a Patch It is good practice to save a rack or a patch you use regularly. Once these have been added to your personal library, they can be reused in subsequent designs. Once selected Click on their respective save or save as button in the contextual menu. If you want to share a patch or a workspace with someone else, you can also use the export command within the contextual menu. The export functions saves the Workspace or patch normally, but also exports all the Waves, MIDI files used in the Sampler, and the Piano roll modules. It creates a supplementary folder in the same directory. This folder contains the Wave and MIDI files. To distribute this exported workspace or patch (for example in the Add-ons library), just create an archive (zip) with the supplementary folder and all created patches or workspace files that are associated. Usine Hollyhock - User Manual v.2 Page 63 18. Direct to Disk You can record your performances and concerts directly onto the hard disk of your computer with the Direct to Disk. This functionality turns Usine into a powerful real-time audio recorder. The recording is made in a background process with a minimum impact (in CPU charge terms) to your current live session. Example For this example we have a workspace consisting of two racks. The first one has a mono audio input device, some FX’s patches, and a stereo output. The second one is only composed of a sampler and the stereo output. To be able to edit our recording later, such as the case in stems. We want to record: 1) The mono input device alone (to keep the signal rough with no FX’s). 2) Each rack on separate files for a post mixing process. 3) The main stereo out device as a witness file of our performance. Usine Hollyhock - User Manual v.2 Page 64 First open the global configuration tab of the setup panel and choose your default record folder in the personal folders zone. If no folder is chosen, the record folder will be Usine/Record out (Windows) or on the desktop (Mac OSX) Now click on the direct to disk icon to open the panel. Open the device panel and Drag the Mono in device onto the direct to disk panel. Do the same for the stereo out device. Usine Hollyhock - User Manual v.2 Page 65 Now drag the two racks below the Audio device we put in the direct to disk panel. You can start your workspace and Click on the record switch on the direct to disk panel. To stop the record, click the switch again to deactivate. A query window will open in order to choose the path and a name for your file. You can cancel the process in the query window if you decide not to keep the performance take. Date, hour, and name of the racks or devices are automatically added to the filename: Usine Hollyhock - User Manual v.2 Page 66 19. Plug-ins (VST/AU) Setup Usine Hollyhock can also host AU, VST, and VSTi plug-ins. These plug-ins are software that can be used in conjunction with Hollyhock patches to add 3rd party synthesizer instruments and audio/MIDI effects within your performance. Installing Plug-ins You can create personal folder to install your plug-ins to, or use the default locations specified by the individual plug-in installers. On Microsoft Windows the default VST Plug-ins folder is generally C:\Program Files\VSTPlugIns. On a Macintosh folders are located at /Library/Audio/Plug-Ins/. To manage these varying configurations, you can specify up to 4 different folders within the setup panel/plug-ins tab: VST folder locations are only related to Windows VST files. AU (MACOSX) plugin locations must be located at /Library/Audio/Plug-Ins/. If you change this folder or install a new plug-in while Usine is running, you can update the Plugin folder without having to restart the program. To update the configuration of plug-ins press the rescan change button. This function scans only newly added plug-ins. The rescan all button is used to start a full scan of your folders, or when you have added a new version of a plug-in that was previously not supported. This scan will reset and completely rescan the entire plug-in folders specified. Usine Hollyhock - User Manual v.2 Page 67 How to Use an Audio FX Plug-in Setup a normal sampler as shown below. Open the browser and in the plug-in tab, drag an FX plug-in below the sampler: Usine will automatically create a patch with only two controls: a bypass switch and a show button to display/hide the plug in interface: Here the plug-in used is the free compressor Rough Rider from audio damage. Usine Hollyhock - User Manual v.2 Page 68 If you Double-Click on this new patch, you will see that Usine has created the two audio inputs and outputs needed for this plug-in: Adding Controls to a Plug-in If you want add some control objects to your plug-in, for example if this one does not provide MIDI learn features: Move the knob or fader directly on the plug-in, this will create a new inlet/outlet that will now be available in the patch editor window. Drag a wire from this inlet and drop the wire onto an empty space. In the pop up menu select a knob. In the control panel of your patch you now have a new knob where you can assign a MIDI or OSC learn easily (see MIDI learn chapter ) Usine Hollyhock - User Manual v.2 Page 69 Changing the Plug-in Order Note also that if you have several plug-ins in your rack, you can easily change their order. Simply drag one over another to change their place in the rack: Using a VSTi Plug-in For this exercise we decide to use a freeware plug-in named Free Alpha from Linplug (thanks a lot to the team) available as an Au and VST for MAC OS X and as VST for Windows. Download AU/VST MAC version here: http://www.linplug.de/stock/alpha/FreeAlpha%20Installer%20330.dmg Download VST Windows version here: http:/www.linplug.de/stock/alpha/FreeAlpha%20Installer%20320.exe You can Drag-and-Drop a synthesizer plug-in in the same manner as a VST. A pop up window will ask you to confirm you want overwrite the current patch: Usine Hollyhock - User Manual v.2 Page 70 Usine Hollyhock - User Manual v.2 Page 71 Usine will create a similar patch to the FX one, with two controls: a bypass switch and a show button to display/hide the plug in interface: To send MIDI notes and messages to this plug-in we can use an external MIDI keyboard. Be sure it is activated in the setup/Midi tab (you can check the Midi setup chapter if needed) Open the Devices panel by selecting this icon. Drag-and-Drop your MIDI keyboard onto the rack input Usine Hollyhock - User Manual v.2 Page 72 As we’ve seen with the MIDI sampler, If you play some notes on your MIDI keyboard, you can see the 3 indicators: 1 A MIDI led in the master panel which tells us the MIDI device sent MIDI messages. 2 A second one in the rack to confirm the MIDI enters this rack. 3 The last one at the end of this rack chain indicates the audio level from the synthesizer. Add a Random Module To create variations to this sound you can add random values to the plug-in. Open the patch editor window with a Double-Click on the control panel of the patch. Usine Hollyhock - User Manual v.2 Page 73 Move the Oscillator mixer on the plug-in to display the corresponding inlet. Drag a wire from this inlet and select the random data module in the pop up window. Right-Click on the random data module to display its settings panel and set, for example, the synchronization value to 8th. Select a preset on the synthesizer with different oscillators like the preset named Dynopad to experience interesting results. Usine Hollyhock - User Manual v.2 Page 74 20. Automation Curves This function allows us to record the movement of any of the design objects, like the knobs, faders, switches, and more. Click on the record icon in the main menu. It will turn red indicating it is recording. Now move a fader, for example the pitch of a sampler: Once done, turn OFF this record icon and the fader will repeat the movement. A new panel will be created in the rack with an automation curve: If we change our mind, we can record a new movement to overwrite the first one. Usine Hollyhock - User Manual v.2 Page 75 Editing the Curves As all objects in Usine, a curve panel has its own contextual menu where you can reset or delete the curve: In its settings panel we will find other options such as the ability to synchronize this curve to the sampler (by default). If you deactivate this option some new parameters appear to change the format and duration for this curve. Note that the waveform will be displayed behind the curve only when the option sync to sampler is active. The curve tab allows you to adjust the minimum and maximum values , here we chose a value of -12 to 7 semitones: Usine Hollyhock - User Manual v.2 Page 76 To create or delete a new point, Double-Click on a line or on an existing point. Another possible option is the type of curve used; here for example, we have created automation by Clicking repeatedly on the reverse switch of our sampler. For better readability of this curve, the trigger curve type will provide interesting results: The trigger curve: As a reference overview of the possible curve types: Curve Curve with Bezier option Step Trigger Usine Hollyhock - User Manual v.2 Page 77 21. Settings Panel Overview of the Main Tabs The settings panel is an important panel which contains several tabs for general properties, design, and remote settings. This panel is contextual and will be different according to the selected object. Here is an overview of some settings you can find within. To hide/show the panel select the icon shown above. Once opened, a Left-Click on any object will display the corresponding settings panel. The second way to access the panel is to Right-Click on any object (panels, rack, patch). Again, once opened you can now use a single Left-Click on any other object to display its settings panel. If you want lock the settings panel to an object, for example to study a value when you change a parameter elsewhere, you can use the pin icon. If you Click on another object with the pin icon activated the current settings panel will stay opened. The General Properties Tab Depending of the selected object, this tab refers generally to visibility and value options. Panels As an example with the synchronization panel: you can choose which elements are visible: 3 parameters are disabled to create a custom version of the synchro panel. Usine Hollyhock - User Manual v.2 Page 78 Control Objects and Modules For controls objects like faders, knobs, and button, the properties tab contains settings to change caption, visibility, minimum/maximum values, and more. With an (A x B) math module you can set its main values when working within the patch editor window. This allows direct setting of values such as constants when not wired. The Design Tab The design tab of the settings panel is the place to customize the visual properties of an object. Here you can set all colors (background, captions, and borders), opacity, and rotation parameters for your objects. The Size and Position Tab Regarding the design of an object, a second tab is available and accessible using this icon. In this tab you can adjust the settings for size, rotation, and position of objects. This can be done in conjunction to unlocking the interface to view the size and positional values of the object within the design. Usine Hollyhock - User Manual v.2 Page 79 Shown is an example with a knob where the background is transparent, a green border has been added, and the border has been rounded. The Snapshots Icon This icon is visible in the design tab. When you have created a layout for an object you can save a snapshot. Click on this icon and enter a name to save this design. This snapshot will be saved and can be recalled later. The snapshot once saved, can be seen in the lower part of the design tab. To modify the design of another object using the saved snapshot, select the object to be modified and then click the saved snapshot at the bottom of the design tab. The Remote Tab The remote tab is where you manage all the MIDI, OSC , and Key learn as we have seen in the Midi learn chapter. Other parameters like binds and movement recording are also managed here. Usine Hollyhock - User Manual v.2 Page 80 The Curves Tab This icon is contextual and will have different settings depending on the selected object: Sampler A sampler has five editable curves: volume, pitch, pan and two user curves. This tab provides access to edit the minimum / maximum values. Control Panel Objects You can specify an object to always record on Click by enabling the auto record on click option, rather than pressing the record icon of the main menu. Pre-Recorded Curves Once you have created automation curves you can edit several values and parameters similar to the sampler examples shown. Usine Hollyhock - User Manual v.2 Page 81 22. The Master Synchronization Panel Beside the main features we have seen in the master synchronization description, there are some others tools you will find within the main synchronization panel. Create a Customized Synchronization P anel Sometimes it can be useful to personalize the master synchronization panel to suit your needs. For example if you don’t use SMPTE or never use the tempo x2 or tempo/2 buttons. Example of a mini panel in comparison to the standard panel. To select the elements you want be displayed use a Right-Click on the synchronization panel to open its settings panel. You will find the visible controls zone where you can select which elements will be visible. Here we decided to keep only the main ON/OFF switch, the tempo fader, and the two indicators for time signature: Use of Several Time Signatures in a Workspace In the settings panel you can also find another zone named list of bars. To edit this text panel Double-Click. This allows you to create a sequence of different time signatures you want to use for your workspace. Usine Hollyhock - User Manual v.2 Page 82 23. The Grid We can consider the grid as a powerful sequencer for our racks, with the possibility to add automation curves in addition to each automation within. First Grid Example We will create a workspace for this example with two racks, first one with a sample player, and the second with a granular sampler and effect. Here we chose the Audio FX/delays/DLY Multi x8 Once the workspace is created, display the grid with this icon: You will notice 3 zones available for this Grid panel: 1 The transport bar with the main play commands that are detailed below. 2 The grid zone where you can drag your racks to sequence them horizontally. 3 The racks which become visible when activated in the sequence. Usine Hollyhock - User Manual v.2 Page 83 We'll start with dragging rack 1 to the first line and first section (column) of our grid. This part will be highlighted: Once done, go over this new grid element and use the double arrow to extend it until the end of the second section. Now drag rack 2 onto the second row / section 2 Usine Hollyhock - User Manual v.2 Page 84 The Properties of a Section Now we will focus on the properties of our first section. For this, as any element of Usine, use the Right-Click on the top of our section to display its settings panel /properties tab. In this panel we can change the duration and choose a format of time (seconds, minutes, milliseconds, cycles, bar, or beat) for this section. Here we will choose the bar as a unit and opt for a length of 8 bars. We can also take the opportunity to give a name (intro) to this section by Clicking next to the word caption. Note that if you change the Loop mode to next section, a new repetition fader will appear, allowing you to repeat the section before moving on to the next one. A new button will be displayed in the section to reflect the repetitions. The Properties of a Grid Element Right-Click on the grid element to display the settings panel. A Left-Click will enlarge this element and display, by default, the volume curve. But first, we will use another function to soften the beginning of our sequence, the fade in function. Usine Hollyhock - User Manual v.2 Page 85 As for the section, we have several choices for the format; here we choose again bar and the value of 3 so our sequence begins with a fade of 3 bars. Two other options are available for this grid element: Sync to sampler: This will link the element to the synchronization of the related sampler, and will also display the waveform within the grid. Section sync: This option synchronizes the entire section and will display the waveform above the grid elements, and under the section header. The waveform is visible even when the elements are minimized. The section then becomes synchronized to the duration of the sampler. Usine Hollyhock - User Manual v.2 Page 86 The Section Icons Click the Play icon on the grid to start the sequence (we will notice that this also activates the main audio engine so we do not need to activate it beforehand). The first section is played and by default it is looped. We can change this with the loop icon: This icon has three possible states; Click it to toggle between the choices: Play this section in loop mode. Play the section once and put in break. or Play the section and continue on to the next one. Or apply the selected repetition To hear our second section we selected the continue icon: The playback continues past section 1, and goes until the end of section 2, where it has its own state icon. You will notice that when you play this sequence the racks are visible only when they are active in the sequence. The rack 1 is initially visible and then on section 2, the two racks are visible. This default setting can be changed in the settings panel of each rack with the option show when active on grid: Usine Hollyhock - User Manual v.2 Page 87 Adding Automation Curves Now select section 2. We will change its length and its format. We keep bar for the format and choose 16 bars for the length. We can take the opportunity to change the color of this section in its settings panel/design tab to clarify our overview: Now Click on rack 2 in the grid to select it (you will notice that rack 1 has resumed its normal size). We will use this new tab that lists all the parameters of a rack that can be automated using a curve: Here we have activated the curve of the sampler reverse and the setting dry / wet of the patch DLY Multi tapx8. Usine Hollyhock - User Manual v.2 Page 88 Once these curves are activated, we can expand a little up our grid element using the dotted line (1), we also see that the buttons corresponding to each curve were created in the contextual menu (2) (the volume curve, which is created by default and the two curves that we just created). Select the curve dry / wet (1). The goal here is to create a progressive effect. Just Double-Click on the curve to create additional points (2). Another Double-Click on the point will delete it. When you move a point the value is displayed in the upper left for precise control (3). For the reverse curve of our sample we first change its type. We have a choice of 3 types of curves similar to what is available for recording automation. 1 Step: Suitable for sequencing different values or toggling a switch on and off. 2 Curve: Suitable for creating progressive point to point values. 3 Trigger: Suitable for a trigger flow. (For example, a button). Step Usine Hollyhock - User Manual v.2 Curves Trigger Page 89 To change this curve type use the curves tab of our grid element, here we chose the step type. We can now create several steps when our sample will need to be played in reverse mode: If necessary and for a better editing convenience, it is possible to zoom the grid with the mouse wheel by Clicking on the header section (1) or by Clicking in an empty area of the screen to zoom the entire grid (2). To restore the size of all the elements of the grid; Click the restore icon. Usine Hollyhock - User Manual v.2 Page 90 The Contextual Menu for the G rid Like all Usine objects, the grid has its own contextual menu. You will find basic commands that allow you to add a row or section. There are also standard commands that are especially useful to test variations of your grid: the save and open commands: Save a grid means that you can create a backup of your grid and this one will be independent of your workspace. The first use is to create variations within the same workspace. In this case you open your workspace and then you can open different backups of the grid for this particular workspace. But you can also create reusable empty templates. For example, a series of sections with a particular number of bars, colors and custom names, etc. that you can insert into an existing workspace to use as a base that is already organized. Now you have the main tools to create and expand your own grid. To close this chapter, here's a reference of the grid icons and their descriptions: Summary of transport icons Play the sequence. Restarts the grid since the beginning (section 0). Restarts the current section from the beginning. Previous section in the sequence. Next section in the sequence. Continue to the next section (overrides the loop mode). Restores the size of the grid. Summary of the 3 states of a section icon Play this section in loop mode. Indicate the repetition number Play the section once and toggle in pause mode. Play the section and continue to the next. Summary of editing tab Edit the settings of an existing curve. Usine Hollyhock - User Manual v.2 List of editable curves available for this grid item (rack) Page 91 24. The Browser This section provides a reference to the types of files and their respective icons used within the Browser. The browser provides a central point to access many different types of files as well as access to the standard Usine library. Browser Icons Modules User module Plug-ins (AU/VST) Script Midi file Sample Patch Device Workspace Playlist Rack Video file Device Set Fixture Sample bank (for the Midi sampler) Usine Hollyhock - User Manual v.2 Page 92 25. The Trash Bin The main menu provides a trash icon that you can drop a patch, a rack, or a browser element directly onto to delete it. A Left-Click on this trash icon will open its window. You can revert the contents if needed with a simple Drag-and-Drop. Note that you will find the old version of the rack, patch, and workspaces here too. You also have the ability to empty the bin (1) and choose its maximum capacity (number of files) (2). Usine Hollyhock - User Manual v.2 Page 93 26. The Playlist Panel If your live set is made of several workspaces you can use the Playlist panel to order your own set list. With the Playlist you can determine the order of your sets and recall them very easily. This can be achieved quickly without any prompt or confirmation dialog. The Playlist can even be controlled with a simple MIDI learn or a Keyboard assignment. Open the playlist panel by selecting this icon: Drag-and-Drop your workspaces directly onto this panel: You can switch to the next workspace with the navigation button or directly with a DoubleClick on the workspace. You can also change the order of the workspaces by moving a workspace over another one: Usine Hollyhock - User Manual v.2 Page 94 You can also decide if you want confirmation before Usine runs the workspace. This option is available in the settings panel of the playlist: Playlists can be saved into your personal library for later recall. These files will be of *.playlist format type. Once you have created your first playlist it appears on your start page. This allows quick acces by selecting the respective picture to start the workspace and playlist. Usine Hollyhock - User Manual v.2 Page 95 27. The Synthetic View As we see before in the first workspace tutorial, the synthetic view offers a general view of the routings within your workspace. You can quickly check that all your routings are as intended: This view also offers some quick access to manage the levels of each rack routing. As you can see below, the master rack is selected and within the settings panel you can set each gain level of the incoming racks. Usine Hollyhock - User Manual v.2 Page 96 28. The Interface Builder (IB) The Interface Builder (IB) is a display mode particularly suited for on-stage use. This interface provides a clean layout space where it is useful to see only the minimum controls needed for a performance. In this mode the menu and the objects you select will be the only things shown. To put an object into IB mode, Right-Click it to view the properties panel and change the visibility option (where) from rack to interface builder. An example with DLY Random is shown below: Next select the Interface Builder icon to view the objects placed there. It is also possible to apply this option to an individual object. In this case the shape knob of the SEQ Cut patch is the only object of the patch placed in IB mode. In IB mode we can also display the menu commands by pressing this icon. Usine Hollyhock - User Manual v.2 Page 97 29. The Toolbox Panel The toolbox is a floating panel where we can add objects and panels to have quick access and to have them always visible within our workspace. Use this icon to open the toolbox panel. Here we have a reverb patch in a rack and we want to have access to these parameters in a separate window. We can choose to display the reverb in the toolbox. For this we select the option where and set this to toolbox. In the combo box, select toolbox. We can also display only one element of a patch in this Toolbox. Shown below is the fader stereo width of a PAN Stereo Enhancer patch; as a single displayed object in the Toolbox. Usine Hollyhock - User Manual v.2 Page 98 30. The Mixer Panel Usine also contains a mixer panel to organize and manage our performance levels. Start by opening the mixer panel by clicking the icon in the panel menu: We can Drag-and-Drop each rack we want to control into the mixer panel: Here is an example where we added our three racks to create the mixer panel. Several controls are visible when the mixer object is created: A knob to set the audio input level. A vertical fader for the audio output level. ON/OFF switch. Mute and Solo switches. Usine Hollyhock - User Manual v.2 Page 99 31. Midi Learn MIDI Control: A Simple Assignment Example To enable MIDI Learn mode Click on the icon or use the keyboard command [CTRL/CMD+M]. When MIDI Learn is activated the control interface will be disabled, however each object will turn purple indicating it can be taught a MIDI or Key command. An example of this behavior can be seen below: To apply MIDI Learn to an object, select the object and turn the respective MIDI controller knob or fader to send the message. A small blue led in the top right will confirm that the assignment has been made to an object. On the top left of the object you will see an indicator whenever the message is received. Usine Hollyhock - User Manual v.2 Page 100 MIDI Learn mode will remain active until disabled. During learn mode, multiple objects can be assigned sequentially. When MIDI Learn is disabled the control interface will once again be accessible along with any assignments that had been made. MIDI Feedback (Motorized or Visual Feedback) To use MIDI controllers which have a motorized feature (i.e. BCR2000, BCRF2000 and so), or if you need visual feedback at your controller (Launchpad type, LPD8, nanokontrol2…), you must setup the device MIDI output as well as the MIDI object used (fader, knob and so…) to provide this feedback. Set your MIDI controller as an input and as an output in the Setup panel/Midi tab: Open the devices panel and Right-Click on the MIDI out device. Select the motorized device option in the settings panel: All interface objects that are to be controlled or require feedback also need their motorized options set. Right-Click on each of the objects to open the settings panel and activate the motorized option. Usine Hollyhock - User Manual v.2 Page 101 32. Key Learn Key Control: A Simple Assignment Example Locate the grain impact hi sample from the sounds/various/selection folder and Drag-and-Drop this to a rack. When prompted select the grain sampler template. Activate the learn function with the same icon as shown before in the MIDI Learn example. Click on the loop switch of the grain sampler to select it and press the Q key on your keyboard to assign the key. Open the remote tab of the and you will see the key that was assigned. Just as was done in the MIDI section, once assigned the object will have a blue led on the loop switch. Key Learn: Assigning the Increment and Decrement of an Object On a fader or list box you can assign a key to increase and another to decrease the value of the control. The two key values must be separated by the character [-] (minus). First assign the S key from the keyboard to the pitch fader. In the remote tab, Double-Click on the S to edit this value and add [-X]. This means that now the [S] is used to increase and the [X] is used to decrease the pitch value. Usine Hollyhock - User Manual v.2 Page 102 33. The Remote Tab of the Invert a MIDI /KEY Learn It can be useful to invert the action of a MIDI fader or the MIDI XY pad of a MIDI controller in a live situation. You will find a simple solution for this in the / remote tab for this object. Here a knob is inversed: Quantize the Midi / Key Learns Another useful tool is the ability to quantize the input of your control. Here we decided to quantize to a bar for the play switch of a normal sampler (1). When quantization occurs you will see a blue quantize panel flashing below the color palette (2). The possible quantization values are:: 1 no quantization 2 cycle 3 bar 4 beat 5 1/8 6 1/16 Usine Hollyhock - User Manual v.2 Page 103 Reset a Key or MIDI Learn There are two methods to reset a MIDI or Key Learn: The first way to reset the assignment is to enter learn mode and Double-Click on the object you want to reset. This will remove the blue led indicator, effectively removing the assignment. A second way to reset the assignment is to Right-Click on the object and select the remote tab of the setting panel. You can now reset by pressing the clear learn button: Usine Hollyhock - User Manual v.2 Page 104 34. OSC Learn Usine also offers an OSC learning mode. Here are some exercises that will help introduce this function. First OSC needs to be enabled in the setup panel, network tab: Set the OSC port to the same port as the remote OSC device. We will use the TouchOSC application to demonstrate. The port number displayed in TouchOSC: Once the port configured you will be able to view the message communication. In the setup panel / network tab activate the option "trace OSC messages in". Whenever an OSC message is received you will see a red LED indication in the master panel as well as the actual incoming messages in the trace panel: Select this icon to view the trace panel. Usine Hollyhock - User Manual v.2 Page 105 OSC Control: A Simple Assignment Example For this exercise add the patch named delay from the browser/Audio FX/delay folder. We want to use a fader from TouchOSC to modify the dry/wet parameter of the delay. Select the remote icon as was done before for the MIDI learn: Next select the knob dry/wet and move the fader on your TouchOSC device: A second method to learn the OSC message is to Right-Click on the knob to display the properties panel and select the Remote tab. You can then Click on the OSC learn button and move a fader in TouchOSC to assign the OSC message: Once the TouchOSC control is released the OSC parameter will be displayed as the "OSC Message" and you will now be able to control this parameter. Usine Hollyhock - User Manual v.2 Page 106 The osc mode option allows the ability to receive the actual value sent from the OSC device, or convert them to a common Usine [0..1] range. OSC Control: Assigning OSC to a 2 -Dimensional Object (XY) Another option available is the “osc tag order”. This option is utilized when receiving multiple values simultaneously. An example of this can be seen when an object of the XY type is used in TouchOSC. The received values will be received as one line: OSC in from 192.168.1.94: /4/xy (ff) The tag order allows us the ability to separate these values so that they can be applied to multiple Usine objects. To demonstrate the tag order, we will again use our previous example of assigning OSC to the delay module. In this example we would like to set the X value to the dry / wet, and the Y value to the fbk parameter of the delay module. Without the tag order enabled if you would assign the XY individually to two knobs, they would not respond correctly. This response is problematic when learning as the message is combined as explained above. To correct this problem we will assign a tag number to each object to differentiate which part of the message will control the specified object. To do this set the option osc tag order to the value 2 for the second knob named fbk (feedback) and leave the option to 1 for the first knob. Usine Hollyhock - User Manual v.2 Page 107 35. Video Creating a Video Player Video integration in Usine Hollyhock is really quite easy. You can create a video player by a simple Drag-and-Drop from the browser in the same fashion as creating a sampler template. Videos now have their own tab from within the browser as well: Once created you can use the standard transport buttons to play your video file. You will also notice new available tools within the header for video applications. Besides the standard transport icons and the SMPTE indicators there are two useful icons: Display/Hide the video player window. Toggle the video to full screen (Use the escape key of the keyboard to return) Utilizing the video player requires compatible codecs. If problems are encountered you can download the latest tested codec pack such as the K lite. Usine Hollyhock - User Manual v.2 Page 108 36. Additional Workspace Usine Hollyhock version 2 now has the possibility to utilize two workspaces at the same time. To switch between the two workspaces in parallel, use the switch main / additional located within the master panel: Here two examples showing how this new function can be useful: Useful for Improvisation During an improvisation session with Usine, you have always had the ability to add patches or racks “on-the-fly" to create variations. Sometimes this particular rack you would like to add belongs to a workspace and was not saved individually. Previously it was not possible to open another workspace without interrupting our current one. This is now possible by switching to additional mode: The same switch will toggle to navigate from one workspace to another. These two workspaces share the same audio engine, main volume, tempo, etc. Helpful for Workspace Organization The wonderful thing about having simultaneous workspaces is the ability to manage and organize your set. In many setups Hollyhock could be used to provide direct effects to other artists such as a vocalist or another guitarist while you are also managing your performance in Usine. In previous versions this could bring confusion as rack management could become cumbersome while managing multiple-use situations. Such examples of this situation could be described as a vocalist who would like to utilize the compressors and reverb of Hollyhock, while you are performing direct through the interface with plugins and library patches. With the additional workspace it becomes easier to manage different-use applications while maintaining your own direct performance through Hollyhock. Now you are able to utilize one workspace for external sources while performing your own parallel set. Usine Hollyhock - User Manual v.2 Page 109 37. Bindings Another way to remotely control objects is what we call bindings. Bindings along with defined buses, provide a quick way to route movement and modulation from a parameter to another anywhere within the workspace. What is a Bus? A bus is like a wireless system where you can link two controls regardless of their location within a workspace: To demonstrate how a bus works: Use the shortcut [CTRL+T] to create a new rack and Double-Click the patch to open the patch editor window. In this new patch create two faders and Drag a wire from the fader 1 outlet. Choose Send to Data Bus. Then from the fader 2 inlet drag a new wire and this time choose Get from existing Data Bus. In the query window choose our previously created bus named fader 1. Now if we move the fader 1 object, the fader 2 value will follow the movement: Usine Hollyhock - User Manual v.2 Page 110 The Target Parameter Here the two faders are in the same patch, but this method will work regardless of the location of the second fader/object within your workspace. You can set the target destination to determine if the bus will be active only in the current patch, or higher in the Usine hierarchy. The available target destinations are as shown below: Global (all Usine). Works regardless of the place where you put your fader. Rack only. Only works inside the rack where your bus is located. Top parent patch. Will operate only up to the main parent patch. Current patch. Will operate only in the current patch. The Different Buses Type In Usine Hollyhock you can utilize up to three different types of buses: Data and Array MIDI Audio Usine Hollyhock - User Manual v.2 Page 111 Send MIDI with Bus Shown below is a Step Midi module which sends a MIDI sequence directly to an instance of the Free Alpha synthesizer. This Step Midi module can also be sent to a MIDI bus by dragging a wire and selecting Send to Midi Bus. A second instance of the Free Alpha VSTi is placed in another rack, again dragging a wire and selecting Get from existing Midi Bus. Rack 1: Send to MIDI bus. Rack 2: Get from existing MIDI bus. Our two buses now share the same name (we’ll see this concept in more detail later) and can communicate between each other. Buses can be of great use to clarify the layout of a patch or to communicate between different racks and patches. Although the concept of buses can be useful in remote patching, it is not desirable to use systematically when designing. The bus functionality is more intensive and requires much more CPU than the standard wiring method, therefore this function should be approached with a specific use and not just for cleaning up the patching interface. Usine Hollyhock - User Manual v.2 Page 112 Send Audio Buses can also be used with the Audio Data Type: Rack 1 Send to new Audio Bus. Rack 2: Get from existing Audio Bus. It is of course possible (and advisable) to rename these buses. This allows you to quickly organize your patch and save time, while preventing confusion with generic titles. Usine Hollyhock - User Manual v.2 Page 113 Send Audio to an Existing Bus You can also choose to send audio to a specific audio stream or channel. In the example below the sub-patch soft distortion is being displayed and routed to the AUDIO BUS RIGHT channel of an existing bus. Buses are not case sensitive and will connect regardless of the case that is input. Buses will default to upper case when entered, and will be displayed in upper case when prompted to connect to an existing one. Use the Bindings This section provides an example of how to apply a bus to understand the Usine binding concept. First Click on an empty zone of an empty workspace to see the contextual menu and Click on the button add new audio rack. Once the rack is created open the patch window with a Double-Click. Usine Hollyhock - User Manual v.2 Page 114 Drag-and-Drop the module sequenced step into the patch window from: Browser/modules/data/Lines, Steps, Switches, Curves: In the query window choose no fader: Next Click-and-Drag a wire from the outlet named out and in the pop up choose the Send to Data & Array Bus option. Usine Hollyhock - User Manual v.2 Page 115 A new Send Bus module will be created, and if you open the devices panel you will see that a new bind object has been created in the binds panel: Note: If you rename the Send Bus module the binding will be renamed as well. If you access the of the Send Bus module you will also find an option called add to bind list. Here you can specify if you want the module to be represented in the binds panel. Now that the bus is represented in the binds panel, you can Drag-and-Drop this new bind to another object. As shown above and to the right, we have assigned the bind output to the dry/wet knob of a SEQ Cut patch. As with the MIDI Learn assignments, a small blue LED will be applied to the object that the bind has been applied to. When the object is controlled by the remote binding object, again a blue LED will indicate the reception of the value. Assigned to a bind. Usine Hollyhock - User Manual v.2 Bind controlling object. Page 116 38. Remote Share – Patches via the LAN Usine Hollyhock can share patches with all computers connected to a local network. This capability allows the distribution and remote control of the performance by multiple computers. The purpose of this chapter is not meant to discuss local networks in-depth, but to demonstrate the ability to easily share patch functionality. This capability allows multiple installations for academic training and allows the ability to network multiple computers for a combined performance. Share Patches: Quick C onfiguration Open the setup panel and choose the network tab. Enable share active and select a common port number you want to use. This port number must be the same for all computers and instances of Usine Hollyhock to communicate. All connected computers can also be seen in the setup panel network tab. Usine Usine Hollyhock user’s manual V 2 .0b Page | 117 Sharing a Patch Right-Click on the panel (1) of a patch and in the /network tab enable the shared option (2). On the second computer connected to the network this patch will appear automatically in the workspace (if enabled and sharing the same port number as in the setup of the first computer). You can now move a fader on this shared patch to modify parameters of the original one located at the first computer. Note: Only the preset manager module is not cloned. Remember that this module is only a kind of remote so we don’t really need it here. The preset manager module does not clone on the remote computer. In the setup/ network tab the option show hostname in caption is useful to identify which computer is currently sharing a patch. The host name will be shown in the caption of the patch. Usine Usine Hollyhock user’s manual V 2 .0b Page | 118 Two other options are also available in the setup: Send tempo & synchro info: Sends the synchronization and tempo information to the connected computers. High speed out: Use this option if you want to send precise data or if you plan on sending a lot of information to the connected computers. Usine Usine Hollyhock user’s manual V 2 .0b Page | 119 39. The Physics Engine We will demonstrate the physics engine, by providing an exercise to create a self-evolving audio drone. Start with a sound from the Various/Udrone folder named 5667940.wav. Choose the template named Cross Fade loop sampler: Add two FX patches below the sampler : 1 The ring modulator from the Audio FX/Ring/ folder. 2 The reverb patch from the Audio FX/Reverb/ folder. Double-Click the ring modulator patch to open the patch editor window. Notice the two knobs square and dry/wet: Usine Usine Hollyhock user’s manual V 2 .0b Page | 120 Add the module XY Pad from the Modules/Interface design/ folder and select two objects in the pop up menu: Now connect the X-1 and Y-1 outlets of the XY Pad to the two knobs square and dry wet In the of the XY Pad module change the nb object (number of objects) to 1 because we will only need one ball for this module. Usine Usine Hollyhock user’s manual V 2 .0b Page | 121 In this select the size tab and enable the physics engine option: To have direct control of the physics options you can expand the XY pad module and look for the inlets corresponding to the physics engine: Here we have selected: 1 Physics enabled: A switch to turn on/off the physics engine. 2 Physics speed: A knob to sets the physics speed for the elements. 3 Friction: A knob for the friction factor. 4 Elasticity: A knob for the elasticity factor. Click to expand the module. Adding knobs and a switch. Once activated the physics engine will provide movement to the two parameters of the ring modulator patch. Usine Usine Hollyhock user’s manual V 2 .0b Page | 122 40. The Data Types in Usine This section is by far the most complex section of this manual. Usine is a very intuitive program in which, you will not need to understand all of the concepts when you first begin. As you progress to becoming an expert with Hollyhock however, it will be necessary to understand the Data Types used within. The most important thing with Usine is to understand that the input sound is sliced and processed into blocks of samples. The block size is set by default to 128, but can be changed in the setup panel /audio tab. At a 44.1 kHz sample rate with a 128 sample block size (128÷44100), patches will be recalculated each at 2.9ms or at approximately 345 time per second! There are five main flow types within Usine that are easily recognizable by their display color. Through the following sections you will be introduced to each of these Data Types and their usage. Audio Yellow contains audio information as a block of samples at the defined sampling rate frequency. Typically audio flows are blocks of numbers from -1 to +1 which describe the audio wave. Generally audio levels are expressed in decibels (typically from -80db to +12Db). Data Purple contains any sort of data information at various sample rates depending on the data itself. For example delay, feedback values, etc. These flows can handle any type of scaled numeric values. Usine Usine Hollyhock user’s manual V 2 .0b Page | 123 MIDI Blue contains polyphonic MIDI message information (i.e. note, channel, velocity, etc). Array Red contains a data array. An array is a set of data assembled together. (ex: 0,0,0,1,0,0,1,0). Arrays are present in step, matrix modules, and more. Text Light blue contains text information. These can be expressed as a single text string, or as a comma separated text. This type is used in captions, lists, and so on. Usine Usine Hollyhock user’s manual V 2 .0b Page | 124 Bitmap White contains bitmap and graphic information. Here you can see an example with a waveDisplay (from a sampler module) displayed in another module. All flows are essentially compatible, and you can connect any kind of flow to any kind of input to make unusual and sometimes creative patches. Usine provides protection against unexpected data ranges, therefore the routing of different data types or scaled ranges can be done without concern. Below you can see an example of the internal protection provided by Usine: In this example the audio input modulates the delay parameter! The audio flow provides variance between -1 to 1. In this case the delay will vary from 0 to 1 and negative values are ignored. Usine also allows multiple connections to a single inlet/outlet: In this case Usine performs a simple addition of the input flow. The patch above is fully equivalent to utilizing the + math module as shown below: Usine Usine Hollyhock user’s manual V 2 .0b Page | 125 Editing Values There are several ways to modify the value of a control: [CTRL + CLICK] Reset the control to the default value specified. [SHIFT + CLICK + MOVE] Increases the mouse precision when modifying a value. [DOUBLE-CLICK] Allows you edit the current value using the keyboard. Flow Assignment of a Module Module parameters have logical input/output flows indicated by the inlet/outlet position. The left side of a module is the inlet, while the right side is the outlet. Some parameters also contain both an input and output and as you will see below with the file number they are logically placed and directly across from one another. 1 Play button mode is an input parameter. 2 Re-starting is an output parameter. 3 File number an input and output parameter. Usine Usine Hollyhock user’s manual V 2 .0b Page | 126 Mapping and Dual Control The correspondance between patch flow and parameters looks something similar as shown below: Once an object such as a knob is wired to the input of a module, the knob becomes the master control and the controls will not override the value of the knob. (1) Master knob control (2) control To provide the ability to control the parameter of the module by both the control and the master knob control; a pass only if has changed module must be added. This will present a -1 value on the input until the knob sends a different value, effectively allowing control from the as well. Usine Usine Hollyhock user’s manual V 2 .0b Page | 127 Data flows types Data flows carry numeric values or arrays of numeric values. A flow passes through the wire each time the patch is recalculated at about 350 times per second. There is always something that passes through the wire even if the value has not changed. Control Objects and numeric values A fader and a knob are shown below. Fader and knob objects receive or send flows with a data range that can be determined by the displayed values. This is a switch shown below. By default the switch provides a value of 0 for OFF and 1 if it is ON. The controls below are the List box, List Box Buttons, and Combo Box. Each of these controls provide a list of available choices. Each value or choice corresponds to a number that is essentially an index. As an example, the first parameter (A) has the numeric value 0, the second (B) has a value of 1, the third (C) the value 2 and so on. If nothing is selected the output value is -1. In all list objects the index values are specified as sequential numbers starting from zero. The button is shown below. The output of the button can be seen as a pulse transition from 0 to 1, back to 0 when pressed, and remains at 0 until pressed again. The Led functions the same as the switch, however provides a different graphical design. Usine Usine Hollyhock user’s manual V 2 .0b Page | 128 41. Appendix Menu icons and shortcut reference: Play /Stop audio Engine Hides all opened menus and patch windows Alternate between the workspace and the Start page Activates the MIDI/key learn mode Opens the Browser window Activates automation record Displays the grid window Locks /unlocks the design modules Displays the IB (Interface Builder) mode Resets all the panels zoom (Double-Click) Displays the contextual menu commands Zoom +/- the selected object Opens the Settings panel Opens the setup panel Displays the synthetic view Drag any device/patch or rack here to delete it Opens the Devices panel Displays the toolbox Opens the Trace panel Opens the Mixer panel Opens the Playlist panel Opens the Chat panel Opens the Direct to Disk panel Displays the properties tab Displays the design tab Displays the remote tab Displays the network tab Displays the help page Displays the curves tab and the curves list tab (for grid elements) Usine Usine Hollyhock user’s manual V 2 .0b Page | 129 42. Keyboard Shortcuts General START USINE [SPACE] START GRID [SHIFT + SPACE] QUIT USINE [CTRL/CMD+Q] SAVE CURRENT WORKSPACE [CTRL/CMD +S] NEW WORKSPACE [CTRL/CMD +N] OPEN WORKSPACE [CTRL/CMD +O] RELOAD THE CURRENT WORKSPACE [CTRL/CMD +R] CREATE A NEW RACK [CTRL/CMD +T] LOCK_UNLOCK [CTRL/CMD +L] SHOW BROWSER [CTRL /CMD +B] SHOW GRID [CTRL /CMD +G] SHOW SETUP [CTRL /CMD + U] MIDI LEARN [CTRL /CMD + M] SHOW SYNTHETIC VIEW TOGGLE FULL SCREEN [CTRL /CMD Y] [CTRL+F](win only) EDIT REMOTE [CTRL /CMD +M] EDIT DESIGN [CTRL /CMD + D] EDIT SETTINGS NAVIGATE BETWEEN RACKS MULTIPLE INPUTS/OUTPUTS CREATION [CTRL /CMD +I] [ARROW UP / ARROW DOWN] HOLD [SHIFT+CTRL] Patch Commands PATCH OPEN [CTRL /CMD ALT + O] PATCH SAVE [CTRL /CMD ALT + S] PATCH SAVE AS PATCH CLEAR PATCH RELOAD [SHIFT CTRL /CMD ALT + S] [CTRL /CMD + DEL] [CTRL /CMD + R] Editing UNDO [CTR /CMD + Z] REDO [SHIFT+CTRL /CMD + Z] DELETE [DEL] CUT [CTRL /CMD + X] COPY [CTRL /CMD + C] PASTE [CTRL /CMD + V] SELECT_ALL [CTRL /CMD + A] Usine Usine Hollyhock user’s manual V 2 .0b Page | 130 Script COMPILE SCRIPT COMPILE AND_INIT_SCRIPT Usine Usine Hollyhock user’s manual V 2 .0b [CTRL /CMD+F9] [CTRL /CMD + F10] Page | 131