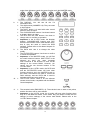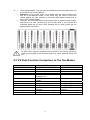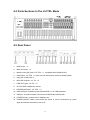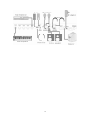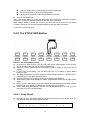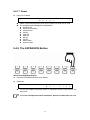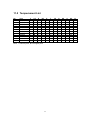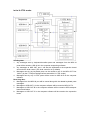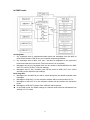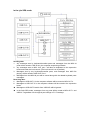
1
Intelligent MIDI Master Keyboard Users’ manual ————————————————— Model: VX5/6/7/8 (Firmware 2.0) Read “Precautions” on page 4 before use Please read this manual carefully before use. Please keep this manual for reference. Thank you for choosing CME VX Intelligent MIDI Master Keyboard Controller Please keep all the important information here Attach your invoice or receipt here ~~~~~~~~~~~~~~~~~~~~~~~ For reference Purchase date Dealer’s name and addr. Dealer’s tel. Serial(on the back of the keyboard) Warning: z Improper connection may cause damage to the device. Copyright z Copyright of the manual belongs to Central Music Co. Anyone must get a written permission from Central Music Co. before copying any part of the manual to any kind of media. © Central Music Co. 2008 Package list Please check all the items in your VX keyboard package: z z z z USB MIDI Master keyboard 1 pcs USB cable 1 pcs User’s manual 1 pcs AC adaptor 1 pcs 1 Special Message Section This product utilizes batteries or an external power supply (adapter). Do NOT connect this product to any power supply or adapter other than one described in the manual, on the product, or specifically recommended by CME. NOTICE: Service charges incurred due to a lack of knowledge relating to how a function or effect works (when the unit is operating as designed) are not covered by the manufacturer’s warranty, and are therefore the owners responsibility. Please study this manual carefully and consult your dealer before requesting service. WARNING: Do not place this product in a position where anyone could walk on, trip over, or roll anything over power or connecting cords of any kind. The use of an extension cord is not recommended! If you must use an extension cord, make sure that the cord has the ability to handle maximum current needed by this product. Please consult a local electrician when possible. ENVIRONMENTAL ISSUES: CME strives to produce products that are both user safe and environmentally friendly. We sincerely believe that our products and the production methods used to produce them, meet these goals. In keeping with both the letter and the spirit of the law, we want you to be aware of the following: This product should be used only with the components supplied or recommended by CME. When used with any components, please observe all safety markings and instructions that accompany the accessory product. Battery Notice: SPECIFICATIONS SUBJECT TO CHANGE: This product MAY contain a small non-rechargeable battery which (if applicable) is soldered in place. The average life span of this type of battery is approximately five years. When replacement becomes necessary, contact a qualified service representative to perform the replacement. The information contained in this manual is believed to be correct at the time of printing. However, CME reserves the right to change or modify any of the specifications without notice or obligation to update existing units. This product, either alone or in combination with an amplifier and headphones or speaker(s), may be capable of producing sound levels that could cause permanent hearing loss. Do NOT operate for long periods of time at a high volume level or at a level that is uncomfortable. If you experience any hearing loss or ringing in the ears, you should consult an audiologist. This product may also use “household” type batteries. Some of these may be rechargeable. Make sure that the battery being charged is a rechargeable type and that the charger is intended for the battery being charged. When installing batteries, do not mix batteries with new, or with batteries of different type. Batteries MUST be installed correctly. Mismatches of incorrect installation may result in overheating and battery case rupture. IMPORTANT: The louder the sound, the shorter the time period before damage occurs. Warning: Some CME products may have stands and/or accessory mounting fixtures that are either supplied with the product or as optional accessories. Some of these items are designed to be dealer assembled or installed. Please make sure that stands are stable and any optional fixtures (where applicable) are well secured BEFORE using. Do not attempt to disassemble, or incinerate any battery. Keep all batteries away from children. Dispose of used batteries promptly and as regulated by the laws in your area. Note: Check with any retailer of household type batteries in your area for battery disposal information. Stands supplied by CME are designed for the respect products only. No other uses are recommended. Disposal Notice: Should this product become damaged beyond repair, or for some reason its useful life is considered to be at an end, please observe all local, state, and federal regulations that relate to the disposal of products that contain lead, batteries, plastics, etc. If your dealer is unable to assist you, please contact CME directly. 2 FCC INFORMATION (U.S.A) 1. IMPORTANT NOTICE: DO NOT MODIFY THIS UNIT! This product, when installed as indicated in the instructions contained in this manual, meets FCC requirements. Modifications not expressly approved by CME may void your authority, granted by the FCC, to use the product. 2. IMPORTANT: When connecting this product to accessories and/or another product use only high quality shielded cables. Cable(s) supplied with this product MUST be used. Follow all installation instructions. Failure to follow instructions could void your FCC authorization to use this product in the USA. 3. NOTE: This product has been tested and found to comply with the limits for a Class B Digital device, pursuant to Part 15 of the FCC Rules. These limits are designed to provide reasonable protection against harmful interference in a residential environment. This equipment generates, uses and can radiate radio frequency energy and, if not installed and used according to the instructions found in the users manual, may cause interference harmful to the operation of other electronic devices. Compliance with FCC regulations does not guarantee that interference will not occur in all installations. If this product is found to be the source of interference, which can be determined by turning the unit “OFF” and “ON”, please try to eliminate the problems by using one of the following measures: Relocate either this product or the device that is being affected by the interference. Utilize power outlets that are on different branch (circuit breaker or fuse) circuits or install AC line filter(s). In the case of radio or TV interference, relocate/reorient the antenna. If the antenna lead-in is 300 ohm ribbon lead, change the lead-in to co-axial type cable. If these corrective measures do not produce satisfactory results, please contact the local retailer authorized to distribute this type of product. If you cannot locate the appropriate retailer, please contact CME. The above statements apply ONLY to those products distributed in the USA. 3 PRECAUTIONS IMPORTANT Always follow the basic precautions listed below to avoid the possibility of serious injury or even death from electrical shock, damages, fire or other hazards. These precautions include, but are not limited to, the follows: 1. Read and understand all the instructions. 2. Always follow the instructions on the instrument. 3. Before cleaning the instrument, always remove the electric plug from the outlet as well as the USB cable. When cleaning, use a soft and dry cloth. Do not use gasoline, alcohol, acetone, turps or any other organic solutions; do not use liquid cleaner, spray cleaner or too wet cloth. 4. Do not use the instrument near water or moisture, such as bathtub, washbasin, kitchen sink, or similar places. 5. Do not place the instrument in an unstable position where it might accidentally fall over. 6. Do not jam sinks or holes of the instrument; those sinks of holes are used for air circulation to prevent the instrument from overheating. Do not place the instrument near heat sink or any places with poor air circulation. 7. Do not place anything on the power cord. Make sure the power cord is set on a safe place so nobody will step on it and/or trip over it. 8. Do not overload the outlet and the AC cable to avoid fire or electrical shock. 9. Do not insert anything in the instrument, which may cause fire or electrical shock. Do not splash any kind of liquid on the instrument. 10. Do not disassemble the instrument. Doing so risks possible accidental electrical shock. 11. If repair is necessary always take the instrument to a qualified service center. You will place yourself in danger if you open or remove the cover. Improper assembly may cause electrical shock in future use. 12. Unplug all the connectors and take the instrument to a qualified service center if anything in the below listed happens: A. The power cord or connector is damaged or worn out. B. Any liquid gets into the instrument. C. The instrument gets rain or water splashed on it. D. The instrument does not work properly after following all the instructions regarding troubleshooting. E. The instrument falls down or breaks. F. The instrument functions poorly. 13. Do not use the instrument during a thunderstorm. Lightening may cause long-distance electrical shock. 14. Do not use the instrument when there is a gas leak nearby. ★ Keep this manual in safe place. 4 CAUTION: z z z z Do not connect the instrument during a thunderstorm. Do not connect the power cord to an outlet located in a moist environment unless the outlet is properly designed for such situations. When the power cord is connected to an AC outlet, do not touch the naked part of the cord or the connector. Always follow the instructions carefully when setting up the instrument. WARNING: z Do not expose the instrument to rain or moisture, to avoid fire or electrical shock. Other precautions: z z z z z z z Keep the instrument away from electrical interface sources, such as fluorescent lights and electrical motors. Keep the instrument away from dust, heat and vibration. Do not expose the instrument to sunlight. Do not place heavy objects on the instrument; do not place containers with liquid on the instrument. Do not touch the connectors with wet hands Central Music Co. is not responsible for any damage or data loss caused by improper operation to the instrument. All the pictures and the LED display in the manual are used for demonstration; they may be different from the real instrument. Features z World’s first MIDI keyboard with motorized faders. z World’s first MDI keyboard with multifunction expansion slot (for the firewire expansion board, the sound module expansion board, etc…). z World’s first MIDI keyboard with a lot of song data inside in padstyle format, and song data can be updated via USB. z VX5/6/7 are equipped with professional half weighted velocity sensitive keyboard with aftertouch. z VX8 is equipped with professional Graded Hammer Action velocity sensitive keyboard with aftertouch. z 9 motorized faders. z 12 pads. z 17 knobs. z Ribbon control. z 32-bit high-speed CPU. z MIDI and digital Audio function. z Scale and temperament function. z U-CTRL mode by CME, to use with your music software for total control. z USB plug&play. 5 Content 1 Notes For VX Firmware 2.0 Update............................................................................. 8 2 Important Hints For VX ................................................................................................ 8 3 General Introduction Of VX.......................................................................................... 9 3.1 The VX Theme “Hardware Fusion”................................................................................9 3.2 The Touch Response Of VX.........................................................................................10 3.3 The VX Control Parts .....................................................................................................10 3.4 The USB Audio Interface In VX....................................................................................11 4 Introduction To VX Parts .............................................................................................11 4.1 The Two Modes Of VX...................................................................................................11 4.2 Front Panel ......................................................................................................................12 4.3 VX Parts Function Comparison In The Two Modes ..................................................15 4.4 Parts Sections In The U-CTRL Mode ..........................................................................16 4.5 Rear Panel.......................................................................................................................16 5 Installation Guide ....................................................................................................... 17 5.1 Power Supply ..................................................................................................................17 5.2 Power On In Proper Order ............................................................................................17 5.3 Connections ....................................................................................................................17 6 Turning On And Port Settings .................................................................................... 19 6.1 Normally Turning On ......................................................................................................19 6.2 Driver Installation............................................................................................................19 6.3 USB MIDI Port Function ................................................................................................19 6.4 Turning On With Initializing ...........................................................................................20 6.5 Playing A Demo Song ....................................................................................................20 7 Basic Operation ......................................................................................................... 21 8 The MASTER Mode................................................................................................... 22 8.1 General Description .......................................................................................................22 8.1.1 User Bank Of VX........................................................................................... 22 8.1.2 Voice Navigation Using The Favorite Folders................................................ 23 8.1.3 Common Control Change#............................................................................ 24 8.1.4 Non-Common Control Change# .................................................................... 24 8.1.5 Pads, Faders, Encoders and SEQ Transportation In the MASTER Mode..... 25 8.2 The Favorite Folders In F1-F8......................................................................................25 8.2.1 The F1-F8 Display......................................................................................... 25 8.2.2 Tips For the F1-F8 Favorite Folders .............................................................. 26 8.3 Auto-display.....................................................................................................................26 8.3.1 About Auto-display ........................................................................................ 26 8.3.2 Auto-display When the F1-F8 Button Is On................................................... 27 8.4 MENU Buttons In The MASTER Mode .......................................................................29 8.4.1 The MASTER Button..................................................................................... 29 8.4.2 The ASSIGN Button ...................................................................................... 30 8.4.3 The ZONE Button.......................................................................................... 37 8.4.4 The AUTOMATION Button ............................................................................ 39 8.4.5 The STYLE SEQ Button................................................................................ 40 8.4.6 The PERFORMANCE Button........................................................................ 44 8.4.7 The UTILITY Button ...................................................................................... 46 8.4.8 The EXPANSION Button ............................................................................... 48 9 U-CTRL ..................................................................................................................... 49 10 Update ....................................................................................................................... 51 11 Appendix.................................................................................................................... 52 11.1 Assignable Controller List .............................................................................................52 11.2 GM Voice List ..................................................................................................................55 11.3 Scale List .........................................................................................................................56 11.4 Note List...........................................................................................................................61 11.5 Temperament List...........................................................................................................62 6 11.6 Velocity Curve List..........................................................................................................63 11.7 Aftertouch Curve List .....................................................................................................64 11.8 MIDI Route ......................................................................................................................65 12 Troubleshooting ......................................................................................................... 69 13 Specifications............................................................................................................. 70 14 MIDI Implementation Chart ........................................................................................ 71 7 1 Notes For VX Firmware 2.0 Update The major changes of the VX firmware 2.0 compared with the produced units are: z GENERAL: F1-F8 knobs can be used to store 8 different preset parameters. This makes live shows easier and slicker. User can rename the F1- F8 functions, making it easier to recall them Adds User Bank automatic memory function. Adjusts the MIDI Route, making it easier to control external devices. Octave and transpose buttons can be used for automatic confirmation mode. Holding down the Dec/Inc button will continue the data change. Adds turn off function for program change(Msb/Lsb/Program Change) Adds manually save User bank function. (Shift+Enter) Adds manually switch User bank function. (Shift+Page) 16 control knob lights can be selected individually z Assign: Removes Keyboard Channel Select when assigning channels. Removes Z1-Z4 Select when assigning ports. Removes assignability of F1-F8 buttons. Puts all Detail Assign functions into Assign Mode. Removes assignability of Pitch Bend and Modulation wheels z Adds mode selection for Drum Pads. z Zone: Adds program change information for Zone mode. Improves the velocity layer parameter. z Automation: Removes the original note and time display Adds loop play mode Adds auto-stop function Adds fades to Select Recording Channels function. z StyleSEQ: Adds Auto or Manual modes for motorized faders Optimises the demo songs information. Optimises the demo songs MIDI route. z Performance: Fixes the incorrect pitch and order in Scale and Temperament list z Utility: Optimises the keyboard’s velocity curves. Fixes some parameter errors which cannot be memorised automatically. z U-CTRL: Improves U-CTRL function z Fixes known bugs and errors 2 Important Hints For VX You must update the VX firmware to Version 2.0 or higher before you can use VX with this manual. To know more about the firmware update, refer to the chapter “Updating VX firmware”. You have to use VX with an external power supply. If you use USB power only, VX will not work properly, you will experience such malfunction as the motorized faders do not move, or the expansion board does not work. 8 There are two basic modes for VX: The MASTER mode and the U-CTRL mode. It is in the MASTER mode in the case that the U-CTRL button LED is off, or in the U-CTRL mode when the U-CTRL button is on. In the U-CTRL mode, most of the control parts (such as fader, knobs, buttons) will be used for the U-CTRL functions, which is different than in the MASTER mode. You will find more details in the related chapter about the two modes. The HEADPHONE jack and LINE OUT jack are the output ports for the computer audio signal, not for the VX expansion board. If VX has no connection to a computer, the HEADPHONE jacks, LINE OUT jacks and MIC/LINE ports do not work. To use VX properly with a computer or a sound module, you need to make the right setup. If you cannot get the system running well, please see the related setup or troublesome shooting section. When the motorized faders are moving, please do NOT press of hinder it, which may cause damage to the product even electric shock or fire. (However, in the U-CTRL mode, you can touch the fader softly for the manual mode). 3 General Introduction Of VX 3.1 The VX Theme “Hardware Fusion” The VX may look like its only a MIDI keyboard, but actually it has functions that far surpass those of a MIDI keyboard. It’s definitely NOT a simple MIDI keyboard. There are plenty of low-priced, simple plastic frame MIDI keyboards, but the VX is something completely different. The theme of the VX is “Hardware Fusion”. The VX keyboard has a great touch, but that’s only one of its three selling points – it’s got even more going for it. So what does “Hardware Fusion” mean? It means that, VX integrates a lot of functions that you cannot find in other keyboards before, of which you can see immediately are the Favorite folder, U-CTRL function and the general multi-function expansion interface. The Favorite folder is a new concept for the MIDI keyboard. The F1-F8 buttons are used to save the 8 favorite folders. When you connect a lot of sound modules to the VX, and find one of the favorite voices, you can save the settings related to this voice to one of the favorite folder buttons. After that, as soon as you press the button, you will have the voice and all the related settings ready right away. It is the first time that the “one-button-for-all” concept was integrated to the MIDI keyboard. By this means, you can locate the need voice immediately in the vase collection of the voices with the related settings. With this function, we can minimize the time used to locate the right voice for live performance, music making or whatever application, just as convenient as the way we use the favorite folder to browse our favorite web sites. There are 50 User Banks in VX, and each bank contains 8 favorite folders, which means there are total 400 folders available! (You will find more details about favorite folders and User Banks in later chapters). VX is alto the worlds’ first MIDI keyboard with motorized faders, which make the U-CTRL function of VX almost the same to MCU, which means you have a MCU control panel inside your MIDI keyboard, and you can control all the functions in your DAW software when play the keyboard! 9 The expansion board is another important function of VX, and it will expand the VX function greatly. Not only has it the wave sampler expansion board, but also the ANALOG SYNTH PLUG-IN board by DSP calculation, and more in the future. There are two basic modes in VX: the MASTER mode and the U-CTRL mode. You can access the above three functions in the two modes. Below is the general usage of VX: MASTER Mode MIDI keyboard with good touch response F1-F8 buttons for the 8 favorite folders MIDI Controller function provided by pads, faders and encoders AUTOMATION button for the function similar to MIDI Motion Sampler STYLE SEQ button for the sequencer function ZONE button for keyboard split PERFORMANCE button for different scales and temperaments Multi-function expansion. (The expansion boards includes audio board, voice board and more) U-CTRL Mode Keyboard with good touch response MCU New concept MIDI keyboard + MCU + Expansion, that is the VX, the 3-IN-1 Hardware Fusion keyboard. 3.2 The Touch Response Of VX The popular CME-UF series MIDI keyboards feature fantastic keyboard touch, and are favorite instruments among many top-notch keyboardists. The VX uses the same highly-advanced keyboard. This VX-80 has Graded hammer action weighted keyboard touch, and has a really great, comfortable piano feel to it. The VX50 60 70 has standard synth touch, and is also really comfortable, and easy on the hands. The VX keyboard is specially designed with long performance times in mind. With ordinary MIDI keyboards, a half hour of playing leaves your hand worn out, on the verge of carpal tunnel syndrome. But with the VX, we can go on playing all night with almost no hand fatigue. Lots of people learned to play on a weighted action keyboard, so they enjoy playing a synth keyboard that puts up a bit of a fight. Synth players will appreciate the tight, consistent feel of the VX50 60 70's action, and there's enough resistance to satisfy piano players, as well. The VX brain allows you to adjust the velocity curve of the keyboard. When you’re satisfied with the settings, you can save it to the keyboard. And of course, all four models have the aftertouch feature, and you can even select the aftertouch curve. 3.3 The VX Control Parts The VX panel features a wide range of controllers; 9 autofaders, 9 encoders, 8 knobs, 8 function buttons, 12 drum pads, 1 ribbon control, 1 set of sequence transports, and 1 breath control input. Further more, it has 1 USB port, 4 MIDI outputs, 1 MIDI input, and 2 pedals. All these controllers are readily assignable for controlling the computer or sound module. A blank template overlay is provided for you to write down the assigned parameters, to make them easier to remember. With the VX we can play… slide… twist… press… strike… rub… blow... Not bad for a MIDI keyboard, right? 10 3.4 The USB Audio Interface In VX But wait, there’s more! The VX also has a built-in USB Audio Soundcard, featuring 2 mic/line inputs, 2 line outputs , 2 earphone outputs, and even a USB hub. You can plug in a mouse, a flashdisk, and so on. Of course, your software can use this built-in soundcard. Just plug in the microphone and you’re ready to record, easy as 1, 2, 3. We recommend you use the ASIO driver. You can download the ASIO-4-All driver for free. We do NOT recommend you use any other drivers. Please note that the VX earphone line-out outputs the audio signal from the COMPUTER, not the signal from the VX internal soundcard. When the VX is not connected to the computer, there is no output from either the line-out or the mic/line-in. 4 Introduction To VX Parts 4.1 The Two Modes Of VX There are two basic modes in the VX: the MASTER mode and the U-CTRL mode, which are totally different. In the MASTER mode, you can assign any control part a function, and all the settings will be saved to a USER BANK of the VX, including the 8 favorite folder settings in the F1-F8 buttons. You can change the USER BANK in the MASTER mode. You should use the MASTER mode in the following condition: When the VX is used with a hardware sound module or sequencer and without a computer, because in the MASTER mode, you can use the control parts in the VX to control the hardware sound module or sequencer. When the VX is used with a computer, but you would prefer not to use it like a MCU to control the DAW software, because in the MASTER mode, you can use all the controllers in the VX to control the sound module in the DAW software. In the U-CTRL mode, on the other hand, most of the control parts in the VX will be limited for a corresponded function control in the DAW software, and the function assignment in the MASTER mode will be substituted except for the 8 potentiometer knobs from the U-CTRL mode, the 8 knobs will remain the same function in the MASTER mode.. You cannot change the USER BANK in the U-CTRL mode. Anyway, you can take advantage of the U-CTRL mode: you can control the DAW software by VX like you are using a MCU! For examples, AUTOMATION control, Seq transportation, opening a mixer window, ZOOMing in the DAW window, selecting tracks, SOLOing tracks, etc… Further more, you can assign a special function in the DAW software to a number button of VX. VX brings you the convenience that you have never experienced before, you can control nearly all the DAW functions in detail by the MIDI keyboard. So, U-CTRL really makes you excited, because it makes a MCU in your VX! All the major DAW software can be controlled in this way, including Logic, ProTools, Nuendo, Cubase, Sonar, ACID Pro, Audition, Live, Reason, Tracktion, Samplitude, Soundtrack Pro, Final Cut Pro, etc… There are three sub-modes in the U-CTRL mode, which are “U-CTRL MC”, “U-CTRL Pro Tools” and “U-CTRL Logic” for different DAW software, in which U-CTRL ProTools is for ProTools, U-CTRL logic for Logic, and U-CTRL MC for the other ones. You will find more information in the U-CTRL related chapters. 11 The U-CTRL button is used to switch between the two modes. When the U-CTRL button is off, the VX is in the MASTER mode. Light the button on by pressing it once, the VX is in the U-CTRL mode and the LCD shows “U-CTRL MC”. Press the U-CTRL button again, the LCD shows “U-CTRL ProTools”; press the button the third time, the LCD shows “U-CTRL Logic”. Press the button the fourth time, it will go off, and the VX is back to the MASTER mode. If you light on the U-CTRL button accidentally and want to quit from the U-CTRL mode, you should press the U-CTRL button three times to get if off and back to the MASTER mode. 4.2 Front Panel 1. The keyboard There are 4 models in the VX series: VX50-49keys, VX60-61keys, VX70-76keys, VX80-88 keys. All the keyboards in the VX series are equipped with velocity response and aftertouch. Velocity response means when you play the keyboard, it will respond to the initial force used to strike the keys. Aftertouch means after you press and hold a key, it will continue to respond to additional pressure applied to the keys. 2. The pitch bend wheel: By default it can change the pitch up and down for a total two semi-notes, and you can change the default range. The modulation wheel: By default it will make the sound vibrant, and you can change its function. The ribbon control: You can press and move on it to send out control change messages. The default cc is brightness and can be changed. 12 3. 4. 5. 6. 7. The OCTAVE button: It is used to change the pitch by octaves. The TRANSPOSE button: It is used to change the pitch by semi-notes. Important: Keyboard, pitch wheel, modulation wheel, ribbon control, octave buttons, transpose buttons will not change function in the U-CTRL mode. Even the U-CTRL button is on, their functions will remain as above. SEQ TRANSPORT: They are used for sequence control and the function can be changed. Important: the MIDI data sent is different from in the U-CTRL mode to the MASTER mode. Refer to the related chapter. The pads (PAD 1-12): They are velocity sensitive, you can define them to trigger drum notes, or use them as control buttons, or use them to play songs. Important: In the U-CTRL mode, you cannot play the pads or use them to send preset MIDI messages, because in this mode the pads are used to control the DAW software. Please refer to related chapter for more detail. Important: In the U-CTRL mode, the pads function is locked, so you cannot assign any pad to control a function of your software. However, you can still assign shortcut buttons in this mode, like you can assign the DAW functions to “number button+ number button 1-8” for total 16 buttons. Please refer to the related chapter for more detail. The MENU buttons: in the MASTER mode, they are used to switch between the VX function menus. The favorite folder buttons (F1-F8): In the MASTER mode, the F1-F8 buttons are used to switch to the 8 favorite folders. Those buttons are exclusively used for favorite folder switch than other functions like sending MIDI control messages. To send MIDI control messages, MIDI note messages, you can use the 12 pads of VX. Important: In the U-CTRL mode, the above buttons work in total different ways, that is, the MENU buttons are used as the track selectors of the current track bank of the software, and the F1-F8 buttons are used to SOLO the 8 tracks of the current track bank. Please refer to related chapters for more detail. The potentiometer knobs (KNOB 1-8): Those knobs have left-mid-right locators, and can be used for real time control and sound changes, the functions can be re-defined. Important: Those 8 knobs do not join the U-CTRL mode, that is, in the U-CTRL 13 mode those 8 buttons remain the same function as in the MASTER mode. 8. 9. 10. 11. The DISPLAY: You will see all the VX information here. The digit buttons (NUMBER 0-9): They are used to input values. The SHIFT button: It is used with other control parts for more functions. The CURSOR/PAGE buttons: Use those buttons to locate a place you want. The DEC INC/ NO YES buttons: Use them to change value or confirm an operation. Important: In the U-CTRL mode, the Number buttons, CURSOR/PAGE buttons and DEC INC/NO YES buttons work in total different ways, that is, they are used to control the DAW software. Please refer to the related chapter for more detail. The DATA dial: Use it to change the value quickly. The EXIT/ENTER buttons: Use them to confirm or cancel an operation. Important: In the MASTER mode you will find two useful shortcut buttons: SHIFT+EXIT is the shortcut to send the reset message SHIFT+ENTER is the shortcut to save all the settings of the current BANK. However, you cannot use the two shortcut buttons in the U-CTRL mode. Important: In the U-CTRL mode, the DATA dial and the EXIT/ENTER button will have other functions that they do in the MASTER mode. In this mode, the buttons are used to control the DAW software, and the DATA dial is used to navigate to different song positions. The U-CTRL button: Press it for the software remote control mode, compatible with the Mackie Control templates. The encoder knobs (ENCODER 1-9): Those knobs have no start or end points, and the functions can be user-defined. Important: In the U-CTRL mode, the 9 knobs will have other functions than they do in the MASTER mode. In this mode, they are used to control the Pan settings (or other settings) of the current track BANK. Please refer to the U-CTRL related chapter. 14 12. The motorized faders: They can move according to the incoming MIDI data, and the functions can be user-defined. Important: In the U-CTRL mode, the 9 faders will have other functions than they do in the MASTER mode. In this mode, they are used to control the volume settings (or other settings) of the current track BANK. Please refer to the U-CTRL related chapter. Important: The motorized faders work properly with an external power supply, and they do not when powered only by the USB cable. If you find that the motorized faders do not move when powered only by USB, please get the external power connected. Do NOT hold or stop the motorized motors while they are moving, which may cause great damage to the instrument and may cause electrical shock and fire! 4.3 VX Parts Function Comparison In The Two Modes Part name 1: Keyboard 2: Pitch/modulation/ribbon 3: Octave/transpose 4: Seq transport 5: Drum pads 6: MENU/F1-F8 buttons 7: Potentiometer knobs 8: Number buttons 9: DATA dial, EXIT/ENTER 10: U-CTRL 11: Encoder knobs 12: Motorized faders MASTER mode Keyboard Pitch/modulation/ribbon Octave/transpose Seq transport Sending note/controller messages, etc Switching to functions / favorite folders Sending controller messages Number buttons DATA dial, EXIT/ENTER MASTER/U-CTRL modes switching Sending controller messages Sending controller messages 15 U-CTRL mode Keyboard Pitch/modulation/ribbon Octave/transpose U-CTRL Seq transport Sending U-CTRL commands Track selector / SOLO Sending controller messages Sending U-CTRL commands Sending U-CTRL commands MASTER/U-CTRL modes switching Control track Pan settings Control track Vol settings 4.4 Parts Sections In The U-CTRL Mode 4.5 Rear Panel 1. MIDI IN port ×1. 2. MIDI OUT ports ×4. 3. Breath control (BC) jack: 1/8" TRS ×1, compatible with YAMAHA BC3. 4. Pedal jacks: 1/4" TRS ×2, each one can be used for volume or sustain pedal. 5. Input gain for Mic/Line in. 6. MIC/LINE IN jacks: 1/4" TS ×2. 7. LINE OUT jacks: 1/4" TS ×2. 8. HP VOLUME: Headphone volume. 9. HEADPHONE jacks: 1/4" TRS ×2. 10. USB HUB port: compliance with standard USB 1.1 for USB expansion. 11. USB port: to make computer connection for MIDI/Audio data transfer. 12. POWER IN port: connect the AC adaptor here. 13. POWER ON/OFF switch: press down the switch to turn the instrument on; press again and release the switch to turn it off. 16 5 Installation Guide 5.1 Power Supply 1. 2. 3. Make sure the power switch is set to OFF. Connect the AC adaptor to the POWER IN port in the rear panel. Make sure the AC requirement of the AC adaptor is compliant with the local AC supply, then connect the AC adaptor to the power supply outlet. Make sure the AC requirement of the AC adaptor is compliant with the local AC supply, otherwise it will cause severe damage to the AC adaptor or the instrument, and it may cause electrical shock! Only the AC adaptor that goes with the VX should be used. If you cannot find the VX AC adaptor or the adaptor does not work, please contact local CME dealers. The VX AC adaptor varies from country to country. If you take your VX from one country to another, please make sure your AC adaptor compliant with the local power supply. 5.2 Power On In Proper Order When you have your VX connected to a system, please set all the volume to minimum then follow the proper order to turn all the devices on: master MIDI device (which sends out MIDI data), slave MIDI device (which receives MIDI data), audio devices (mixer, amplifier, speakers). When you follow this order, all the signals (MIDI and audio) will go properly from the beginning to the end. If you will turn off the system, please follow the reverse order (turn off audio devices first, then MIDI devices). 5.3 Connections Before you make these connections, please turn off all devices to avoid possible damage. The headphone and LINE OUT of VX are used for the computer signal other than for the expansion board. If VX is not connected to the computer, LINE OUT and MIC/LINE IN do not work. Please refer to the fig. below to make connections: 17 18 6 Turning On And Port Settings 6.1 Normally Turning On M a s t e C r M E K V e X y b o a r d When you turn on the instrument, all the motorized faders will move to run a self-test and reset in turn. At the same time, all the pads will light on and off. Do NOT hold or stop the motorized motors while they are moving. This may cause great damage to the instrument and may cause electrical shock and fire! When turned on, the VX will remain at the same F1-F8 display as it is previously turned off. 6.2 Driver Installation After you connect the VX to your computer via USB and turn the VX on, the computer will find the VX device and install the driver automatically. You can plug and play the VX on WINDOWS XP or Mac OSX. When the driver installation is finished, your VX will be recognized as the ”USB Audio Device”. In the DAW software, VX offers 1 in and 1 out audio interface function. It is recommended to use the Asio-4-All program as the VX audio driver. In the MIDI software, VX offers 2 USB IN ports and 3 USB OUT ports. In the Windows system and VX is the only connected USB device, you will find two VX ports in your MIDI software [MIDI-in] settings, which are “USB Audio Device” and “USB Audio Device [2]”. Similarly, you will find three VX ports in your MIDI software [MIDI-out] settings, which are “USB Audio Device”, “USB Audio Device [2]” and “USB Audio Device [3]”. Please notice: despite the port name like “USB Audio Device”, in fact they are “MIDI Device”. In Mac OS, the VX MIDI port will be displayed as “CME VX” During the first installation, you may need to turn off the product then turn it on again for the OS to recognize the product. 6.3 USB MIDI Port Function Port name(Win/Mac) MASTER mode U-CTRL mode Port name (Win/Mac) MASTER mode VX USB MIDI OUT USB Audio Device / CME VX USB Audio Device [2] / CME VX 1 Sending keyboard related N/A message Sending keyboard related Sending U-CTRL related message message VX USB MIDI IN USB Audio Device / CME VX USB Audio Device [2] / CME VX USB Audio Device [3] / CME VX 1 2 Route to VX MIDI OUT 4 N/A Route to VX expansion board 19 U-CTRL mode Route to VX MIDI OUT 4 Receive message U-CTRL related Route to VX expansion board You must select “USB Audio Device / CME VX” as the MIDI in port in your MIDI software before you can record MIDI messages properly. If you select other port or select “All”, it is possible that you cannot record MIDI messages properly. The port “USB Audio Device [2] / CME VX 1” is used for U-CTRL message transfer only, do not use it in the MIDI software. If the port “USB Audio Device / CME VX” is selected as the MIDI out port in the MIDI software, the output messages will be routed to VX MIDI OUT 4. If the port “USB Audio Device [3] / CME VX 2” is selected as the MIDI out port in the MIDI software, the output messages will be routed to the expansion board. In this case please set LOCAL to off to avoid duplicated sounds. 6.4 Turning On With Initializing If you want to initialize the instrument, please press and hold both 【OCTAVE-】 and【OCTAVE+】 buttons while turning on the instrument, then the instrument will enter the initialization mode and show the below message: F a c t o r y S e t A r e y o u s u r e ? Press the【YES】or【ENTER】button to clear all the user settings and user data, then return to the MASTER mode. (MIDI songs transferred to VX will not be cleared) Press the【NO】or【EXIT】button to cancel initialization and return to the MASTER mode. The initializing operation will clear all the user settings, please be careful! 6.5 Playing A Demo Song 1. 2. 3. 4. Connect the VX MIDI OUT1 to the sound module MIDI IN, or connect VX to your computer via USB and select a GM compatible software sound module. Press the 【STYLE SEQ】button for style sequence mode. Press the【PLAY】button to play the song. You will hear the song. When the song is being played, some faders may move according to the MIDI messages in the song. 20 7 Basic Operation 【<PAGE PAGE>】buttons For the editable contents on the LCD, you can use the【<PAGE PAGE>】buttons to move the cursor to the place you want and edit the content. When you see the arrow “← →” in the bottom right on the LCD, press and hold 【SHIFT】then press【<PAGE PAGE>】buttons for another page. 【DEC/NO INC/YES】and【EXIT/ENTER】buttons To edit the value, you can use the data dial, the 【DEC/NO INC/YES】buttons, or the number buttons. To confirm or cancel an operation, you can use the 【DEC/NO INC/YES】and 【EXIT/ENTER】buttons. Press and hold 【DEC/NO INC/YES】for a while, and the values will keep changing quickly. z To rename a Bank or favorite folder: Use the 【<PAGE PAGE>】buttons to locate the name that you want to change. Use the DATA dial or the【DEC】 【INC】 / buttons to change the current letter in the name. Use【<PAGE PAGE>】buttons to locate the next letter and change it. When all the letters in the name are selected, press【ENTER】to confirm and save the name. A maximum of 8 letters can be used in the name of the favorite folder button. A maximum of 13 letters can be used in the BANK name. 21 8 The MASTER Mode 8.1 General Description 8.1.1 User Bank Of VX Below you will see the functions available in the MASTER mode. All the related settings and information can be stored in the USER BANK of your VX. MIDI keyboard with good touch response 8 Favorite Folders in F1-F8 buttons MIDI Controllers by pads, motorized faders and encoders Function similar to MIDI Motion Sampler by the AUTOMATION button STYLE SEQ buttons for the sequencer function ZONE button for keyboard splitting PERFORMANCE button for scales and temperaments Multiple expansion boards. (including audio, voices, etc…) All the VX panel buttons and other control parts (except for the U-CTRL button) are available in the MASTER mode. You can assign a function to any one of the control parts, and save all the related settings to the USER BANK, including the 8 favorite folders in the F1-F8 buttons. The favorite folders are designed for use with selecting voices, playing voices and controlling voices, thus most of the parts settings are saved to F1-F8 favorite folders. However, settings for pads, motorized faders and encoder knobs will not be saved to the favorite folders, instead, they will be saved to the USER BANK. In this way, we can use the pads, faders and encoders as a separate set of MIDI CONTROLLERS. In fact, VX can be seen as the combination of a MIDI keyboard and a controller. In the stage, you can use the MIDI keyboard section for voice navigation, and at the same time you can use the controller section for track manipulation. The two sections work together and will not interfere with each other. Anyway, if you would like, you can set the same MIDI port/channel for encoder knobs and faders as for one of the favorite folders, then you can use the two sections to control the voice. Other settings in the MASTER mode will not be saved to the favorite folders either, so the content in the USER BANK can be divided into the below items: Parts related to the favorite folders, including: F1-F8 buttons, keyboard, aftertouch, potentiometer knobs 1-8, pitch bend wheel, modulation wheel, ribbon controller, pedals, and breath controller. So the port/channel settings in F1-F8 buttons will also work for those parts. 22 Parts related to MIDI controllers, including: pads 1-12, encoder knobs 1-9, motorized faders 1-9, SEQ transportation buttons. Those parts will use their own port/channel settings. Recorded fader movements when the AUTOMATION button is on. MIDI files ready for play when the STYLE SEQ button is on. Keyboard split settings when the ZONE button is on. Scale/temperament settings when the PERFORMANCE button is on. Multiple expansion board settings. 8.1.2 Voice Navigation Using The Favorite Folders The 8 favorite folders in F1-F8 buttons can be used to save a lot of settings, in which the most settings include MIDI port/channel and voice settings. When we have the VX connected to a hardware or software sound module, and ready to play it in the MASTER mode, the first thing to do is selecting port/channel and voice before we can play. You can make those settings in the first page of the F1-F8 favorite folders. You can use the 8 buttons to select the 8 most favorable voices. When a voice is selected, you can use all the other control parts to send MIDI control messages for this voice, to improve the voice or get some special effects and enrich your performance. For faders and encoders, you have to specify port/channel settings separately. 23 According to a specific sound module, the ways for voice selecting and controller settings varies, so you have to get familiar with your sound module before you can use it freely. Also please keep in mind all the favorite folder related parts settings will be automatically saved when the product is powered off. Those parts that always follow the same output port/channel as F1-F8 favorite folder settings include: keyboard, pitch bend wheel, modulation wheel, pedals, breath control, potentiometer knobs, ribbon control, aftertouch, octave +/-, and transpose +/-, so you cannot make the port/channel settings for those parts separately. However, you can make the port/channel settings separately for parts like pads, encoder knobs, motorized faders and SEQ transportation buttons. 8.1.3 Common Control Change# There are some common control change numbers, such as cc#74 for CUTOFF settings, and most of the sound modules respond to this cc#, so this cc# is fixed at the 4th potentiometer knob. This cc# work almost for all voices, and you will find other common cc# for ATTACK, DECAY, RELEASE, RESONANCE. Since most sound modules respond to the 5 cc#s, they are made in VX as the 5 default settings as the 5 potentiometer settings. Generally you can use the 5 knobs to change the voice, but there may be exceptions that a few of sound modules do not respond to those cc#s, please refer to the sound module’s manual. The ribbon control will also send cc74# message, the same as potentiometer 4. The pitch bend wheel and the modulation wheel will also work for most of the sound modules. Below is the list of the default cc# settings for the related parts: Part name Cc# Cc name Alias KNOB 1 073 ATTACK Attack Time KNOB 2 075 DECAY Decay Time KNOB 3 072 RELEASE Release Time KNOB 4 074 CUTOFF Brightness KNOB 5 071 RESONANCE Harmonic/Timbre RIBBON CONTROL 074 CUTOFF Brightness PITCH BEND 128* PITCH BEND Pitch Bend MODULATION 001 MODULATION Modulate * cc#128 and above are used for VX only, please see the related appendix for detail. The OCTAVE +/- and TANSPOSE +/- buttons work for all sound modules. 8.1.4 Non-Common Control Change# Many advanced GM sound modules respond to the messages sent by potentiometer knobs 6,7,8, but many non-GM sound modules do not. Part name KNOB 6 KNOB 7 Cc# 132* 133* Cc name VIB. RATE VIB. DEPTH KNOB 8 134* VIB. DELAY Alias Vibrato Rate-NRPN Vibrato Depth-NRPN Vibrato Delay-NRPN * cc#128 and above are used for VX only, please see the related appendix for detail. 24 8.1.5 Pads, Faders, Encoders and SEQ Transportation In the MASTER Mode In the MASTER mode the drum pads can be used to send note messages or control change messages. By default, pads are used to play drum voices, and the drum note messages will be sent to channel 10 of your sound module. So you are ready to play drums when the sound module is connected and channel 10 is set to drum voice. By default, all the faders send cc#007 for volume control, each fader works for a channel. Since almost all sound modules respond to volume control messages, if the faders do not work, please check the channel settings. By default, all the encoder knobs send cc#010 for pan control, each knob works for a channel. Since almost all sound modules respond to pan control messages, if the knobs do not work, please check the channel settings. 8.2 The Favorite Folders In F1-F8 8.2.1 The F1-F8 Display The F1-F8 buttons are used to select one of the 8 preset favorite folders. When powered on, one of the F1-F8 buttons will be on. If you press any one of the buttons, it will send all the voice setting messages. Only one of those buttons can be on at one time. The F1-F8 button display: F M z z z z z z z z 1 0 0 0 L 0 0 0 P P 1 C : C 0 0 0 1 0 【F1】 is the button name, you can rename it, and a maximum of 8 characters can be used for the name. 【P1】 is the port setting for the favorite folder ranged from P1-P4 for MID OUT 1-4 in the rear panel. Messages to P1 will also be duplicated to the expansion board. If you have both an expansion board and a sound module at MIDI OUT 1, the expansion board and the sound module will receive the same voice change messages and performance messages. When you use an expansion board, please notice the LOCAL settings. Usually LOCAL should be set to ON. Please refer to related chapter. The P value will not affect the USB MIDI OUT port of VX. All the F1-F8 voice messages will be sent to USB MIDI OUT 1. 【C01】 is the channel setting to sent MIDI messages ranged from C01-C16. 【M000】means bank MSB CC#0=0, and the range is 000-127, Off. When set to off, VX will not send MSB message. 【L000】means bank LSB CC#32=0, and the range is 000-127, Off. When set to off, VX will not send LSB message. 【PC:000】 means the Program Change#=0, and the range is 000-127, off. When set to off, VX will not send Program Change message. All the settings in the display will be save to the current USER BANK automatically. F1-F8 buttons can only send voice related messages, and cannot send note message and other cc messages except for MSB/LSB. 25 z z By default, the cursor is on the PC item, and you can change it by using the data dial and confirming by ENTER. To change other settings, please move the cursor using <PAGE and PAGE> buttons then edit the item and confirm by ENTER. Each time you confirm the setting by ENTER or press a F1-F8 button, the three messages including BANK MSB + BANK LSB + Program Change will be sent to the specific port/channel. 8.2.2 Tips For the F1-F8 Favorite Folders Tip1: You can connect 4 hardware sound modules to the 4 MIDI OUTs of VX, and select 8 favorite voices from those sound modules and save them to F1-F8, then you can use F1-F8 to navigate your favorite voices, which is very convenient in performance. Tip2: You can connect the 4 VX MIDI OUTs to 4 MIDI INs of the computer MIDI interface, then in your computer settings, “connect” those 4 MIDI Ins to 4 software sound modules, and select 8 favorite voices then save them to VX F1-F8. After that, you can use VX F1-F8 to select your favorite voices from your software sound modules. Tip3: As a combination of tip1 and tip2, you can connect two hardware modules and two software modules using the above method, and also select 8 favorite voices from those modules then save them to F1-F8. After that, you can use F1-F8 to select your favorite voices from two hardware modules and two software modules. Tip4: As an extension of tip3, if you have an expansion board in your VX, besides the way in tip3, you can assign some F-buttons for the expansion board voices, thus you can navigate voices from 2 hardware modules, 2 software modules and an expansion board. Tip5: If 8 favorite voices are not enough for you, you can switch to another VX USER BANK for more voices. To do so, when the F1-F8 button is on, please press and hold the SHIFT button and press PAGE left/right for previous/next USER BANK. 8.3 Auto-display 8.3.1 About Auto-display z z z z z z Auto-display means: when you operate a VX part(such as turning a knob or moving a fader), the LCD will automatically display that part-related settings, so you can quickly know the controller name and value. The auto-display function works perfectly in the MASTER mode. In the U-CTRL mode, on the other hand, auto-display only shows the part name, and will not show more detailed information such as function name or value. When the F1-F8 button is on, auto-display will be triggered by: faders, potentiometer knobs, encoder knobs, pads, seq transportation, octave/transpose. Auto-display will not be triggered by: pitch bend wheels, modulation wheels, pedals, breath control, ribbon control or keyboard aftertouch. When the F1-F8 button is on, when auto-display is triggered by faders, potentiometer knobs, encoder knobs or pads, you can also assign the parts functions and the settings will be automatically saved to the current BANK. See the ASSIGN related chapters for detail. When the ASSIGN buttons is on, auto-display will be triggered by most of the control parts to assign functions. See related chapter for detail. 26 z z When the MASTER, PERFORMANCE, or UTILITY button is on, auto-display will be disabled. When the ZONE, AUTOMATION, or STYLE SEQ buttons is on, please refer to the related chapter for the auto-display information. 8.3.2 Auto-display When the F1-F8 Button Is On 8.3.2.1 Auto-display For Knobs/Faders z z Knobs/faders will send specific MIDI messages to the designate MIDI port/channel. Auto-display for faders is shown as below: S C z 1 : : 0 0 7 6 3 4 - C T A H T : A 0 C 1 K P 1 SL1-9 is the fader#(SLIDER#). CH means the MIDI channel, range is 01-16. P means port, range is 1-4 for 4 MIDI OUTPUTs. CC means control change, see related appendix for detail. Faders only send cc messages, and cannot send notes, voices or other messages. Press an F-button for the F1-F8 display. If you press the current working F-button, it will not send the voice messages, otherwise it will send corresponded voice messages. Auto-display for encoders is shown as below: E C z L C N C 1 : : 0 0 7 6 3 4 - C T A H T : A 0 C 1 K P 1 EN1-9 is the encoder# from 1-9. CH means the MIDI channel, range is 01-16. P means port, range is 1-4 for 4 MIDI OUTPUTs. CC means control change, see related appendix for detail. Encoder knobs only send cc messages, and cannot send notes, voices or other messages. Auto-display for potentiometers is shown as below: K C N C 1 : : 0 0 7 6 3 4 - A T T A C K KN1-8 is the potentiometer knob# from 1-8. CC means control change, see related appendix for detail. Potentiometer knobs only send cc messages, and cannot send notes, voices or other messages. The potentiometer port/channel always follows the F1-F8 settings and cannot be set separately. 27 8.3.2.2 Auto-display For Drum Pads z z The velocity-sensitive pads will send specific MIDI messages to the designate MIDI port/channel. Auto-display for pads is shown as below: P N a o d t : e 0 : 1 0 0 1 ( C # - 2 ) Pad means pad#01-12. Note indicates the note# and name, the note# range is 000-127. In the favorite folder mode, you cannot change port/channel or change the pad function from note to controller, however, you can to it in the Assigning mode. Press an F-button for the F1-F8 display. If you press the current working F-button, it will not send the voice messages, otherwise it will send corresponded voice messages. Note: if pads function is controller instead of note, the displayed content will be different than showed above. 8.3.2.3 Auto-display For SEQ Transportation Buttons z z z z The SEQ transportation buttons will send specific MIDI messages to the designate MIDI port/channel. The keyboard indicator LED display may differ from the indicators in the computer software, in that case please use the indicators in the computer software. In the F1-F8 mode, after pressing the SEQ buttons and auto-display works, you cannot assign the button functions. To do so, please enter the ASSIGNing mode. Auto-display for the 6 SEQ buttons is shown below: S T T e O m P p o : 1 2 0 As you press the 6 SEQ buttons, the display will change accordingly to: Return to Zero(RTZ), Rewind(REW), Fast forward(FF), Record(REC), Stop(STOP) and Play(PLAY). Tempo is the song tempo, default value is 120, range is 20-250. Press an F-button for the F1-F8 display. If you press the current working F-button, it will not send the voice messages, otherwise it will send corresponded voice messages. 8.3.2.4 Auto-display For Octave / Transpose z z z The Transpose function will change the keyboard pitch by semi-notes. The Octave function will change the keyboard pitch by octaves. The VX 50/60/70/80 default keyboard range is shown below: 28 z Auto-display for the Octave/Transpose buttons is shown as below: O c t a v e : 0 0 T r a n s p o s e : 0 0 When the Octave/Transpose value is changed, the corresponded LED is ON. Press the Octave/Transpose button to increase/decrease the value. Octave range is -04~00~+04. Press the two octave buttons at the same time for default value 0 and the LED is off. Transpose range is -12~00~+12 semi-notes. Press the two transpose buttons at the same time for default value 0 and the LED is off. After Octave/Transpose value is set, the display will be automatically turned back for F-button settings. 8.4 MENU Buttons In The MASTER Mode 8.4.1 The MASTER Button Function of the MASTER button: Save to / load from the VX User Bank. z BANKs are used to save all the parts assignments/settings and fader positions. Before you switch to another Bank, please remember to save the current Bank, or the settings in the current bank will be lost. The shortcut button for saving to a bank is Shift+Enter. z Press the MASTER button for the VX Bank display, press the button again to quit to the F1-F8 display. z In the User Bank display, you can also quit by pressing the F1-F8 button or other MENU buttons. z When the MASTER button is pressed, current Bank# and name will be shown: 0 0 - V X B A N 29 K Use Data dial or inc/dec button to change the bank# and confirm by Enter. Press Shift+Enter to save the Bank: S 0 a 3 v - e V T X o B : A N K ? Here you can select a Bank# and rename the bank, then press Enter to save, or press EXIT to cancel the operation. Hint: When F1-F8 is on, there is a shortcut to switch VX User Bank: Press and hold the SHIFT button, then press PAGE left/right buttons for the Bank you want. When the PAGE button is released, the display goes back for the F1-F8 settings. 8.4.2 The ASSIGN Button Notes for the ASSIGN function: z You can use the ASSIGN function to re-define all the assignable parts of the instrument. Press the ASSIGN button for the assigning display, press it again to quit to the F1-F8 display. z In the assigning display, you can also press the F1-F8 button or other MENU buttons to quit. z To assign a part, first turn the ASSIGN button on, then move the part for its auto-display, after that use SHIFT+PAGE to navigate all the assigning options. z Even if you do not use the auto-display, you can still use SHIFT+PAGE for the needed assigning page. z You cannot change the port/channel settings for the favorite folder related parts, because those parts share the same port/channel with the F1-F8 button settings, so there is no entry for port/channel changes for those parts, which include: Keyboard, pitch bend wheel, modulation wheel, pedals, breath control, ribbon control, aftertouch. z You can change the port/channel settings for other parts than mentioned above, which include: SEQ buttons, pads, encoder knobs, faders. z The pitch bend wheel and modulation wheel have fixed functions and cannot be changed to other functions. z Please refer to the assignable parts with auto-display below:: Assignable data list Assignable data type Part name Page range Port Channel Cc - - - - - Pitch Bend Wheel - - Modulation Wheel - - - - - Sustain Pedal 1-1~1-2 30 √ Note - Expression Pedal 2-1~2-2 - - √ - Aftertouch 3-1~3-2 - - √ - Ribbon Control 4-1~4-2 - - √ - 5-1~5-2 - - √ - 6-1~6- √ √ √ √ 7-1~7-3 - - √ - 8-1~8-4 √ √ √ √ 9-1~9-3 √ √ √ - 10-1~10-3 √ √ √ - Breath Control Sequencer Potentiometer Knob Pad Encoder Knob Fader (Slider) Refer to the appendix <Assignable controller list>, <Notes list>. 8.4.2.1 Assigning Sustain Pedal z Sustain Pedal: P 0 d 4 a - l S u A s l 1 2 A 7 t a i 1 - 1 → 1 ← 2 → 2 n ← 1 → 2 ← 2 → 3 h ← 1 → n Set the CC #. P 0 e 6 e 0 d 0 a - Set the value range. 8.4.2.2 Assigning Expression Pedal z Expression Pedal: P 0 d 1 a - l E x B p l 1 2 B 7 r e s s i o Set the CC #. P 0 e 1 e 0 d 0 a - Set the value range. 8.4.2.3 Assigning Aftertouch z Aftertouch: A 1 f 4 t 7 e - r A t f o t u e c r 31 h t o u c Set the CC #. A 0 f 0 t 0 e - r 1 t 2 o 7 u c h 3 ← 2 → 4 s ← 1 → Set the value range. 8.4.2.4 Assigning Ribbon Control z Ribbon Control: R 0 b 4 b - o B n r C i t g r h l t o 1 n 2 C 7 t r l 4 ← 2 → n e s Set the CC #. R 0 i 7 i 0 b 0 b - Set the value range. 8.4.2.5 Assigning Breath Control z Breath Control: B 0 e 2 a - t B h r C e t a r t l h 5 ← 1 → t 1 h 2 C 7 t r l 5 ← 2 → 6 ← 1 → ← 2 → ← 3 → Set the CC #. B 0 r 0 r 0 e 0 a - Set the value range. 8.4.2.6 Assigning SEQ Buttons z SEQ buttons S T e y q p e R : T C Z o n t r o l Select one of the 6 buttons(RTZ,REW,FF,REC,STOP,PLAY) Set the type: control or note. If type is “Control”, the next page will be: S e q R T Z 6 0 1 6 G e n e r a l Set the CC #. S 1 e 2 q 7 / R O T f Z f 6 32 Set the value range: The first value is the data sent when button pressed; the second value is the data sent when button released. Off means sending no data. S P e o q r t R : T 1 Z C H Set the MIDI port and channel. If the type on page 6-1 is set to “Note”: S T R : ← 4 → 6 ← 1 → T N Z o R C T 4 Z 6 ← 2 → R 0 T 0 Z 0 6 ← 3 → t e e 6 q 0 - e 2 q 7 / Set the trigger data: The first value is the trigger info. when button pressed; the second value is the trigger info. when button released, and the trigger value can be set to OFF. S P e 6 1 Set the note #. S 1 q p 0 The next page will be: S 0 e y : e o q r t R : T 1 Z C H : 0 6 ← 4 → 7 ← 1 → 7 ← 2 → 8 ← 1 → 0 Set the MIDI port and channel. 8.4.2.7 Assigning Potentiometer Knobs z Potentiometer knob: K 0 o 2 b - U 1 n d e f i n e d Select one of the 8 potentiometer knobs. Set the CC #. K 0 n 5 n 0 o 0 b - 1 1 2 7 Set the value range. 8.4.2.8 Assigning Pads z Pad: P T a y d p e 0 : 1 N o t e 33 Select one from the 12 pads. Type can be note or control. If type is “Note”, the next page will be: P 0 d 3 - 0 G 1 2 0 1 1 2 a 0 d 0 - 7 a o d r t 0 : 1 1 Set the MIDI port and channel. If type is “Control”: P a d 0 T y p e : W : O f 8 f ← 3 → 1 C o C H : 1 0 n t r o l D e f i n e S W : O f 8 ← 4 → 8 ← 1 → a 5 d 2 - 0 N 1 o 8 ← 2 → a 2 d 7 / 0 O 1 f f 8 f ← 3 → Set the data to send: The first value is the one when pad pressed; the second value is the one when pad released. Off means sending no data. Sw(Switching) determines whether use the switching mode to send notes. When sw is off, pressing pad for Note on and releasing pad for Note off. When sw is on, pressing pad for Note on and releasing pad for null; pressing pad again for Note off and releasing pad for null. When SW is On the previous two values cannot be set to Off. P P S Set the CC #. P 1 2 → Select one from the 12 pads. Type is set to “Control”. P 0 ← Set the velocity range. Off means sending no data. Sw(Switching) determines whether use the switching mode to send notes. When sw is off, pressing pad for Note on and releasing pad for Note off. When sw is on, pressing pad for Note on and releasing pad for null; pressing pad again for Note off and releasing pad for null. When SW is On the previous two values cannot be set to Off. P P 8 Set the note #. P 0 a 4 a o d r t 0 : 1 1 8 C H Set the MIDI port and channel. 34 : 0 1 ← 4 → 8.4.2.9 Assigning Encoder Knobs z Encoder knobs: E 0 n 1 c 0 o - d P e a r n - 1 9 ← 1 → 9 ← 2 → 9 ← 3 → Select one from the 9 encoder knobs. Set the CC #. E 0 n 0 c 0 o - d 1 e 2 r 7 - 1 e 1 r C 1 H Set the value range. E P n o c r o t d : : 0 1 Set the MIDI port and channel. If there is no channel data in the MIDI message, you cannot set the channel #. 8.4.2.10 Assigning Faders (Sliders) z Fader (Slider): S 0 l 0 i 7 d - e V r o l 1 u m 1 0 ← 1 → 1 0 ← 2 → 1 0 ← 3 e Select one from the 9 faders (sliders). Set the CC #. E 0 n 0 c 0 o - d 1 e 2 r 7 - 1 e 1 r C 1 H Set the value range. E P n o c r o t d : : 0 1 Set the MIDI port and channel. 8.4.2.11 Data List In the MASTER Mode Below is the data list in the MASTER mode by default: Part name Panel ID Data type Data sent Keyboard - Note on & Note Off Note on & Note Off Aftertouch - After Touch After Touch Pitch wheel PITCHBEND Pitch Bend Pitch Bend Modulation wheel MODULATION Modulation CC-001 Ribbon control RIBBON CONTROL Brightness CC-074 35 Pedal A PEDAL A Sustain CC-064 Pedal B PEDAL B Expression CC-011 Breath control B.C Breath CC-002 CH/MSB/LSB/Program Change CH/MSB/LSB/Program Change CH/MSB/LSB/Program Change CH/MSB/LSB/Program Change CH/MSB/LSB/Program Change CH/MSB/LSB/Program Change CH/MSB/LSB/Program Change CH/MSB/LSB/Program Change Favorite folder button F1 Favorite folder button F2 Favorite folder button F3 Favorite folder button F4 Favorite folder button F5 Favorite folder button F6 Favorite folder button F7 Favorite folder button F8 Seq transport (RTZ) Controller CC-115 Seq transport (REW) Controller CC-116 Seq transport (FF) Controller CC-117 Seq transport (REC) Controller CC-114 Seq transport (STOP) Controller CC-118 Seq transport (PLAY) Controller CC-119 Remote control LOCATE 1 Controller CC-112 & CC-115 Remote control LOCATE 2 Controller CC-113 & CC-115 Pad PAD 1 Note 43-Tom-Low Pad PAD 2 Note 47-Tom-Mid Pad PAD 3 Note 48-Tom-Mid Pad PAD 4 Note 50-Tom-High Pad PAD 5 Note 52-Cymbal Pad PAD 6 Note 57-RideCymbal Pad PAD 7 Note 35-Kick Pad PAD 8 Note 36-Side Stick Pad PAD 9 Note 38-Snare Pad PAD 10 Note 40-Hi-Hat–Closed Pad PAD 11 Note 42-Hi-Hat Pedal Pad PAD 12 Note 46-Hi-Hat–Open Knob(Encoder) ENCODER 1 Controller Channel-1,CC-10 Knob(Encoder) ENCODER 2 Controller Channel-2,CC-10 Knob(Encoder) ENCODER 3 Controller Channel-3,CC-10 Knob(Encoder) ENCODER 4 Controller Channel-4,CC-10 Knob(Encoder) ENCODER 5 Controller Channel-5,CC-10 Knob(Encoder) ENCODER 6 Controller Channel-6,CC-10 Knob(Encoder) ENCODER 7 Controller Channel-7,CC-10 Knob(Encoder) ENCODER 8 Controller ENCODER 9 System Messages Knob(Encoder) 36 01/000/000/001 01/000/000/006 01/000/000/019 01/000/000/023 01/000/000/026 01/000/000/049 01/000/000/066 01/000/000/074 Channel-8,CC-10 Exclusive GM MASTER Balance Knob(Encoder) KNOB 1 Controller CC-73 Knob(Encoder) KNOB 2 Controller CC-75 Knob(Encoder) KNOB 3 Controller CC-72 Knob(Encoder) KNOB 4 Controller CC-74 Knob(Encoder) KNOB 5 Controller CC-71 Knob(Encoder) KNOB 6 Controller CC-76 Knob(Encoder) KNOB 7 Controller CC-77 Knob(Encoder) KNOB 8 Controller CC-78 Fader SLIDER 1 Controller Channel-1,CC-07 Fader SLIDER 2 Controller Channel-2,CC-07 Fader SLIDER 3 Controller Channel-3,CC-07 Fader SLIDER 4 Controller Channel-4,CC-07 Fader SLIDER 5 Controller Channel-5,CC-07 Fader SLIDER 6 Controller Channel-6,CC-07 Fader SLIDER 7 Controller Channel-7,CC-07 Fader SLIDER 8 Controller Channel-8,CC-07 Fader SLIDER 9 System Messages Exclusive GM MASTER Volume 8.4.3 The ZONE Button Notes for the ZONE function: z Press the zone button for the ZONE function display. Press the button again to quit to the F1-F8 display. z In the ZONE display, you can also press the F1-F8 button or other MENU buttons to quit. z When the zone function is on, the keyboard can be divided into as many as 4 zones, and each zone’s data will be sent to a different MIDI OUT, so you can control and play 4 MIDI devices at the same time. z Except for pads, encoders, faders and SEQ buttons, all the other parts will send messages to all open ZONEs. In other words, those parts including pedals, breath control, pitch wheel, modulation wheel, ribbon control, potentiometer knobs and aftertouch will control all ZONEs at the same time. z If you want to send messages to a specific ZONE, please turn off the other ZONEs beforehand. z In the ZONE display, auto-display for fads, faders, potentiometer knobs and encoder knobs will work, and it will turn back to the ZONE display after the part movement 37 z stops. When the ZONE function is on, the port/channels settings of F1-F8 will be substituted by the ZONE settings. z ZONE on/off settings: Z O z 2 N Z O 3 N Z O 4 N 1 → Setting the port, channel and keyboard range of ZONE 1~4: 1 0 0 P 0 1 L C 0 0 H 0 0 1 P C 0 0 1 ← 2 → Z: ZONE#. By default, ZONE 1 = Port1/CH1, ZONE 2 = Port2/CH, ZONE3 = Port3/CH1, ZONE 4 = Port4/CH1. P: MIDI OUT port, 1-4. CH: MIDI channel, 01-16. M: MSB#. Cc#000, value range is 000-127. L: LSB#. Cc#032, value range is 000-127. PC: program change #. Setting the keyboard range and velocity range of ZONE: Z z Z O It is the on/off settings of ZONE 1~4. Z M z 1 N 1 R V a e n l : : 0 0 0 0 0 0 - 1 1 2 2 7 7 ← 3 → Ran: keyboard Range of ZONE1~ZONE4. There is a shortcut to set the Key#, that is, when the value flashes, you can play a key in the keyboard to specify the key #. Vel: Velocity range of ZONE1~ZONE4. Octave and transpose of ZONE: Z T 1 r a O n c s t p a o v s e e : : 0 0 0 0 4 ← You can set the octave and transpose value for each of the 4 zones respectively. When the ZONE function is on, the octave and transpose buttons work on all zones. The zone octave range is -04~00~+04. The zone transpose range is -12~00~+12 semi-notes. 38 8.4.4 The AUTOMATION Button Notes for the AUTOMATION function: z You can use this function to record and play back the fader 1-9 movement, so you can make the faders move automatically, just like you have a “MIDI Motion Sampler”. Press the button again to quit to the F1-F8 display, and the fader movement will stop. z In the AUTOMATION display, you can also press the F1-F8 button or other MENU buttons to quit. z Faders 1-9 are map to tracks 1-9, each time you can record the movement of one fader, and you can play all the faders movement later. z Move a fader to select it for recording, and auto-display for this fader will be activated. Press the Record button to start recording. During the recording, the display will be locked, and all the other auto-display is disabled. z During the stop, auto-display for pads, faders, potentiometer knobs and encoder knobs can work properly. z During the playing, only auto-display for pads, potentiometer knobs and encoder knobs works, auto-display for faders and the other parts does not work. z First page of the AUTOMATION display: S C z 1 : = 0 0 0 9 7 8 - C o V H l : u 0 m 1 e P 1 SL1 means current track# is 1 by fader (Slider 1), range is 1-9. You can set it to another value simply by moving another fader. CH: 01(Channel 01), you can change it in the ASSIGN mode. P1: Port 1, you can change it in the ASSIGN mode. The recording display: S z L C L 1 = 0 9 8 R C c e H : 0 1 P 1 Press the Record button to start recording until you press the Stop button. During the recording, only one fader can be recorded. The playing display: S l i d P e l r a 39 : y 1 - 9 Press the Play button to start playing the fader movements. Use the encoder#9 to adjust the playing tempo. Playing goes repeatedly until the Stop button is pressed. z Hints for AUTOMATION: Hint1: First assign fader1 to control the Wah effect, then record the movement of fader1. After that you can play the keyboard along with the fader movement. Hint2: Assign fader2 to control the volume of the Wah effect, then record the movement of fader2. After that you can play the keyboard along with the fader movement. Try the above hints and enjoy. 8.4.5 The STYLE SEQ Button Notes for the STYLE SEQ function: z In the STYLE SEQ function, you can use pads and/or SEQ buttons to play a song, and at the same time you can also play the keyboard. z Press the STYLE SEQ button for its display. Press it again to quit to the F1-F8 display. z In the STYLE SEQ display, you can also press the F1-F8 button or other MENU buttons to quit. z The MIDI file played in the STYLE SEQ function will only be sent to VX MIDI OUT1, USB MIDI OUT1 and the expansion board. z When a MIDI file is being played, all the auto-displays are disabled. z When playing stops, auto-display for faders, potentiometer knobs and encoder knobs works. z During STYLE SEQ playing, only auto-display for potentiometer knobs and encoder knobs works, auto-display for faders and the other parts is disabled. z During SEQ stop and playing, if there is no part movement, the LCD will go to the first page of the STYLE SEQ display. 8.4.5.1 Song Select z Press the STYLE SEQ button and you will see the first page of the display, then you can select a song and adjust related settings: S T o e n m g p : o 0 : 0 1 2 D 0 40 e m o 4 / 4 1 → Song: Song name and number. You can change it during playing. Tempo: Song tempo. 4/4: Time signature. You cannot change it in VX. The MIDI file played in the STYLE SEQ function will only be sent to VX MIDI OUT1, USB MIDI OUT1 and the expansion board. 8.4.5.2 Song Parts (Channel) Select And Pad Settings z Below is the display page 2 for song parts (channel) and pad settings: K P e a y d b H o o a l r d d : O C f H f : 0 1 ← 2 → Keyboard CH: The output channel for keyboard playing, which is one of the MIDI file channels and will have the same voice settings as in the MIDI file. If the keyboard channel voice settings are not specified in the MIDI file, you need to select a voice in the F1-F8 display before you play the MIDI file. For example, if channel 01 is the keyboard channel, and there is no voice settings in channel 01 in the MIDI file, firstly you should select a voice for channel 01 in the F1-F8 display, then you go to the STYLE SEQ display to play the MIDI file and play the keyboard. However, if there is any reset message at the beginning of the MIDI file, the above method may not work. PadHold: You can set PadHold to on/off. 8.4.5.3 Faders Channels And Mode Settings z In page 3 you can set the faders channels and mode: S M l o i d d e e : r C H : 1 - 8 ← 3 → Slider CH: the faders channels can be set to 1~8 or 9~16. Mode(Slider Mode): The faders mode can be set to Auto or Manual. 8.4.5.4 The 6 SEQ Transport Buttons z Use those buttons for SEQ transport like playing or stopping a song. You can use the following play modes: Song play mode: play all the phrases of the song. ¾ Press the PLAY button, it will play the song from start to end then stop. ¾ While playing, the STOP, FF, REW, RTZ buttons are available. ¾ While playing all the pads blink. ¾ While playing you can hit any pad for the single-loop play mode. ¾ While playing you can hit two pads at the same time for the multi-loop play mode. Single-loop play mode: ¾ Hit a pad to play the corresponding phrase. ¾ The pad light is on. ¾ Hit the same pad again to stop the playing. ¾ The FF and REW buttons work within the phrase. 41 The RTZ buttons will return to the phrase start. If another pad is triggered while a previous pad is being played, the instrument will play the new pad after finishing one bar of the previous pad. ¾ While playing the PLAY button blinks. ¾ While playing you can hit two pads at the same time for the multi-loop play mode. Multi-loop play mode: ¾ Hit two pads at the same time to play the two pads and all the pads between the two pads. (The region) ¾ The region will be played repeatedly. ¾ All pads in the region will light on and the current pad being played will blink. ¾ While playing the PLAY button blinks. ¾ While playing you can hit any pad for the single-loop play mode. ¾ While playing the STOP button is available. ¾ While playing the FF, REW and RTZ buttons work within the region. ¾ ¾ z If you encounter unexpected continuous long sound during playing, you can press SHIFT+EXIT for PANIC to send the reset messages to all output ports to stop all sounds, the display will look like below: . . . . . P . A . N . I . C . . . . . . . If PANIC is applied during song playing, song playing will stop. After PANIC, the display will go back to the first page. 8.4.5.5 Notes For the PAD STYLE File Format z z z z z z z z For the MIDI files in the PAD STYLE file format, VX will recognize all the loops in the song, so you can use the PAD STYLE mode for song play. Refer to the General specification of the PAD STYLE file format below: File format: standard MIDI file format 0. File size: Within 64KB per song. PAD STYLE ID: In the beginning position 000 add Marker ”cme style” The settings section at the song start: this settings section begins at position 000 with the Marker ”SetStart”, then fill in all the parts heading data, after that it ends with the Marker ”SetEnd”. Please make this settings section as short as possible. Make all Markers for the loops: LoopStart1 LoopEnd1 LoopStart2 LoopEnd2 LoopStart3 LoopEnd3 LoopStart4 LoopEnd4 LoopStart5 LoopEnd5 LoopStart6 LoopEnd6 LoopStart7 LoopEnd7 LoopStart8 LoopEnd8 LoopStart9 LoopEnd9 LoopStart10 LoopEnd10 LoopStart11 LoopEnd11 LoopStart12 LoopEnd12 The previous LoopEnd can be at the same position of the next LoopStart. Each loop will be at least one measure. VX can recognize a maximum of 12 pairs of the loop Marker. Use MIDI channels 8 to 16 as below: ch 8---Melody & Chord Marker 42 z ch 9---Bass ch 10---Drums & Percussion ch 11---Rhythm chord 1 (ex. Guitar) ch 12---Rhythm chord 2 (ex. Keyboard) ch 13---Pad chord 1 (ex. Organ, Strings) ch 14---Pad chord 2 (ex. Synth) ch 15---Others 1 ch 16---Others 2 If there is any cc message like expression, volume or pitch bend in the song, it is recommend to add the corresponding default value at the start of each loop. You can play a MIDI file that is not in PAD STYLE format in VX, but you cannot use the pads for loop select. With the VX Brain program, you can transfer song data from computer to the instrument via USB. To get the newest VX Brain program, please visit http://www.cme-pro.com 8.4.5.6 STYLE SEQ Data List Part name Panel ID Data type Data sent Keyboard - Note on & Note Off Note on & Note Off Aftertouch - After Touch After Touch Pitch wheel PITCHBEND Pitch Bend Pitch Bend Modulation wheel MODULATION Modulation CC-001 Ribbon control RIBBON CONTROL Brightness CC-074 Pedal A PEDAL A Sustain CC-064 Pedal B PEDAL B Expression CC-011 Breath control B.C Breath CC-002 Seq transport RTZ Return to start point - Seq transport REW Fast rewind - Seq transport FF Fast forward - Seq transport REC - - Seq transport STOP Stop song playing - Seq transport PLAY Play the song - Remote control LOCATE 1 - - Remote control LOCATE 2 - - Pad PAD 1 Song phrase1 - Pad PAD 2 Song phrase2 - Pad PAD 3 Song phrase3 - Pad PAD 4 Song phrase4 - Pad PAD 5 Song phrase5 - Pad PAD 6 Song phrase6 - Pad PAD 7 Song phrase7 - Pad PAD 8 Song phrase8 - Pad PAD 9 Song phrase9 - Pad PAD 10 Song phrase10 - 43 Pad PAD 11 Song phrase11 - Pad PAD 12 Song phrase12 - Knob(Encoder) PART 1 Part1 volume Channel-1,CC-7 Knob(Encoder) PART 2 Part2 volume Channel-2,CC-7 Knob(Encoder) PART 3 Part3 volume Channel-3,CC-7 Knob(Encoder) PART 4 Part4 volume Channel-4,CC-7 Knob(Encoder) PART 5 Part5 volume Channel-5,CC-7 Knob(Encoder) PART 6 Part6 volume Channel-6,CC-7 Knob(Encoder) PART 7 Part7 volume Channel-7,CC-7 Knob(Encoder) PART 8 Part8 volume Channel-8,CC-7 Knob(Encoder) TEMPO Song tempo F8 Knob(Potentiometer) ATTACK Controller CC-73 Knob(Potentiometer) DECAY Controller CC-75 Knob(Potentiometer) RELEASE Controller CC-72 Knob(Potentiometer) CUTOFF Controller CC-74 Knob(Potentiometer) RESONANCE Controller CC-71 Knob(Potentiometer) VIB.RATE Controller CC-76 Knob(Potentiometer) VIB.DEPTH Controller CC-77 Knob(Potentiometer) VIB.DELAY Controller CC-78 Fader BASS Controller Channel-9,CC-07 Fader DRUM Controller Channel-10,CC-07 Fader CHORD 1 Controller Channel-11,CC-07 Fader CHORD 2 Controller Channel-12,CC-07 Fader PAD 1 Controller Channel-13,CC-07 Fader PAD 2 Controller Channel-14,CC-07 Fader PHRASE 1 Controller Channel-15,CC-07 Fader PHRASE 2 Controller Channel-16,CC-07 Fader - System Exclusive Messages GM MASTER Volume 8.4.6 The PERFORMANCE Button Notes for the PERFORMANCE mode: 44 z z z z z z In the Performance mode, you can set some unique scales and temperaments. Press the PERFORMACE button for its display, and press it again to quit to the F1-F8 display. In the PERFORMANCE display, you can also press the F1-F8 button or other MENU buttons to quit. The scales or temperament you select in the PERFORMANCE mode will keep working in all the other modes, no matter the PERFORMANCE button is on or off. You can use scale and temperament at the same time. When the scale or temperament function is on, the keyboard will be in monophonic mode. Auto-display for all parts is disabled when the PERFORMANCE button is on. 8.4.6.1 Scale z The first page in the PERFORMACE display is for the scale setting: S c a l e : O f f → The default scale type is 12 tones. However, you can change the scale type to meet your music style. When the scale function is on, it will show the below information: S 0 c 1 a - l M e a : j O o n r → When the scale function is on, the default scale type is 01-Major, refer to the appendix <scale list>. 8.4.6.2 Temperament z The next page is for the temperament setting: T m p e r a m e n t : O f f ← 2 → You can change the temperament other than the default equal one. When the temperament function is on, it will show the below information: T 0 e e 0 m - p A e R r A a B m I e C n t : O n 2 ← The default temperament is 00-ARABIC, refer to the appendix <Temperament list>. 45 8.4.7 The UTILITY Button Notes for the UTILITY function: z You can use the UTILITY function to adjust the global settings of the instrument. Press the UTILITY button for the UTILITY display, press it again to quit to the F1-F8 display. z In the UTILITY display, you can also press the F1-F8 button or other MENU buttons to quit. z You can set or adjust the parts in this mode. z All the settings made here will not be saved to the USER BANK, because those are global settings and will be saved elsewhere. z In the UTILITY display, auto-display for all parts is disabled. 8.4.7.1 Velocity Curve z The first page in the UTILITY display is for velocity curve: V N e o l r m C a u l r v e : K B 1 → The Velocity Curve works for both the keyboard and pads. You can try different velocity curves to find your favorite one. Refer to the appendix <Velocity curve list>. In the VX Brain software you can adjust more details for the velocity curve. Please refer to the VX Brain help. 8.4.7.2 After Touch z Page 2 is for aftertouch A N f o t r e m r a t l o u c h ← 2 → Press and hold a key then change the pressure to send aftertouch data. You can try different aftertouch types to find your favorite one. Refer to the appendix <Aftertouch list>. If aftertouch is set to Off, the aftertouch function is disabled. 46 8.4.7.3 Breath Control z Page 3 is for Breath Control Adjust B 0 r 0 e 0 a : t h A d j u s t : ← 3 → When the breath controller is connected, use this function to adjust (calibrate) it. By turning the gain and fine tune knobs in the breath controller, set the BC basic value to 000, and set the data range to 000-127. 8.4.7.4 Local Control z Page 4 is for local control L o c a l : O n ← 4 → The local control decides if the MIDI data will be sent to the expansion board. Refer to the appendix <MIDI route>. 8.4.7.5 Pedal Type and Polarity z Page 5 is for Pedal Type P P z e e d d a a l l 1 2 : : S C w o i n t t c i h n u ← 5 → ← 6 → ← 7 → ← 8 → The pedal type of pedal1/2 can be Switch or continuous. Page 6 is for Pedal Polarity P P e e d d a a l l 1 2 : : - - Here you can switch the pedal polarity. 8.4.7.6 MIDI Filter z Page 7 is for the MIDI Filter C O l f o f c A O f n t e k r t o u A O c f c h t f i v e You can enable or disable the below MIDI messages for the instrument to send: Clock: MIDI clock, by default it is disabled. Active: MIDI active, by default it is disabled. Aftertouch (page 8): Channel aftertouch, by default it is enabled. 47 8.4.7.7 Reset z Page 9 is for Reset [ A l l N o S t e e n s d O f f ] ← ? Select a reset message then press YES or ENTER to send it to all ports. The available reset messages are listed below: z All Notes Off z Reset All Controllers z All Sound Off z GM On z CME On z GM2 On z XG On z GS On z MMC Reset z System Reset 8.4.8 The EXPANSION Button About the EXPANSION display: z Press the EXPANSION button for its display. z Expansion E x p a n s i o n N : o t L i n k You will see related information when an expansion board is connected to the instrument. For more VX expansion board information, please visit www.cme-pro.com 48 9 U-CTRL Notes for the U-CTRL mode: z You can control popular computer software in the U-CTRL mode. In this mode, Pads and knobs will send out preset control data along with the SHIFT button. z Press the U-CTRL button repeatedly to switch between the below remote control modes: z Mackie Control: for the CUBASE software or similar z HUI: for the PRO TOOLS software or similar z Logic Control: for the LOGIC software or similar z Below you will see the U-CTRL related parts: z z Operation steps: Press the U-CTRL button to turn it on. Launch your computer software, and follow the software’s manual to load the MackieControl template. Set the remote control port in the template as “USB AUDIO DEVICE(2)” (Device name for the instrument) Please refer to the list below regarding the MackieControl function map: Mackie Control & Logic VOLUME 1 VOLUME 2 VOLUME 3 VOLUME 4 VOLUME 5 Mackie Hui VOLUME 1 VOLUME 2 VOLUME 3 VOLUME 4 VOLUME 5 49 VX part SLIDER 1 SLIDER 2 SLIDER 3 SLIDER 4 SLIDER 5 VOLUME 6 VOLUME 7 VOLUME 8 MASTER VOLUME PAN 1 PAN 2 PAN 3 PAN 4 PAN 5 PAN 6 PAN 7 PAN 8 TIME LINE SELECT 1 SELECT 2 SELECT 3 SELECT 4 SELECT 5 SELECT 6 SELECT 7 SELECT 8 SOLO 1 SOLO 2 SOLO 3 SOLO 4 SOLO 5 SOLO 6 SOLO 7 SOLO 8 BANK LIFT BANK RIGHT CHANNEL LIFT CHANNEL RIGHT LIFT RIGHT PREVIOUS NEXT MIXER GLOBAL VIEW CYCLE PUNCH F1 F2 F3 F4 F5 VOLUME 6 VOLUME 7 VOLUME 8 MASTER VOLUME PAN 1 PAN 2 PAN 3 PAN 4 PAN 5 PAN 6 PAN 7 PAN 8 TIME LINE SELECT 1 SELECT 2 SELECT 3 SELECT 4 SELECT 5 SELECT 6 SELECT 7 SELECT 8 SOLO 1 SOLO 2 SOLO 3 SOLO 4 SOLO 5 SOLO 6 SOLO 7 SOLO 8 BANK LIFT BANK RIGHT CHANNEL LIFT CHANNEL RIGHT IN OUT TRANSPORT SUSPEND SEND INSERT LOOP ONLINE EDIT MIX TRANSPORT MEM LOC ALT VIEW 50 SLIDER 6 SLIDER 7 SLIDER 8 SLIDER 9 ENCODER 1 ENCODER 2 ENCODER 3 ENCODER 4 ENCODER 5 ENCODER 6 ENCODER 7 ENCODER 8 ENCODER 9 DATA DIAL BUTTON MASTER BUTTON ASSIGN BUTTON ZONE BUTTON AUTOMATION BUTTON STYLE SEQ BUTTON PERFORMANCE BUTTON UTILITY BUTTON EXPANSION BUTTON F1 BUTTON F2 BUTTON F3 BUTTON F4 BUTTON F5 BUTTON F6 BUTTON F7 BUTTON F8 PAD 1 PAD 2 PAD 3 PAD 4 PAD 5 PAD 6 PAD 7 PAD 8 PAD 9 PAD 10 PAD 11 PAD 12 NUMBER 1 NUMBER 2 NUMBER 3 NUMBER 4 NUMBER 5 F6 F7 F8 SCRUB ZOOM UP DOWN LIFT RIGHT READ WRITE SHIFT REW FF REC STOP PLAY CUT SEPARATE PASTE SCRUB ZOOM UP DOWN LIFT RIGHT FADER MUTE SHIFT REW FF REC STOP PLAY NUMBER 6 NUMBER 7 NUMBER 8 NUMBER 9 NUMBER 0 <PAGE PAGE> DEC INC EXIT ENTER SHIFT RTZ REW FF REC STOP PLAY To get the information about how to set common music software in the U-CTRL mode, please visit www.cme-pro.com and download the <U-CTRL_manual>. 10 Update About the UPDATE function: z With the VX Brain program, you can update the program and data of the instrument via USB connection. To get the newest VX Brain program, please visit www.cme-pro.com 51 11 Appendix 11.1 Assignable Controller List # 000 001 002 003 004 005 006 007 008 009 010 011 012-015 016 017 018 019 020-031 032 033-037 038 039-063 064 065 066 067 068 069 070 071 072 073 074 075 076 077 078 079 080 081 082 083 084 085-090 091 092 Controller name Bank Select Modulation wheel Breath control Undefined Foot controller Portamento time Data Entry Channel Volume Balance Undefined Pan Expression Controller Undefined General Purpose Controller #1 General Purpose Controller #2 General Purpose Controller #3 General Purpose Controller #4 Undefined Bank Select Undefined Data entry Undefined Sustain pedal Portamento on/off Sustenuto on/off Soft pedal Undefined Hold 2 Undefined Timbre/Harmonic Intens. Release Time Attack Time Brightness Decay Time Vibrato Rate Vibrato Depth Vibrato Delay Undefined General Purpose Controller #5 General Purpose Controller #6 General Purpose Controller #7 General Purpose Controller #8 Portamento Control Undefined Reverb Send Level Tremolo Depth Abbr Bank MSB Modulate Breath Undefined Foot PtmtTime Data MSB Volume Balance Undefined Pan Express Undefined GenCtrl1 GenCtrl2 GenCtrl3 GenCtrl4 Undefined Bank LSB Undefined Data LSB Undefined Pdl-sust Portamnt Pdl-stnt Pdl-soft Undefined Hold 2 Undefined Harmonic Release Attack Bright Decay VibRate VibDepth VibDelay Undefined GenCtrl5 GenCtrl6 GenCtrl7 GenCtrl8 PtmtCtrl Undefined Reverb Undefined 52 Remark 093 094 095 096 097 098 099 100 101 102-119 120 121 122 123 124 125 126 127 128 129 130 131 132 133 134 135 136 137 138 139 140 141 142 143 144 145 146 147 148 149 150 151 152 153 154 155 156 157 158 159 160 161 162 163 164 Chorus Send Level Celeste/Detune Depth Phaser Depth Data entry +1 Data entry -1 NRPN LSB NRPN MSB RPN LSB RPN MSB Undefined All Sound Off Reset All Controllers Undefined All notes off Omni mode off Omni mode on Poly mode off Poly mode on Pitch Bend Pitch Bend Sensitivity-RPN Fine Tuning-RPN Coarse Tuning-RPN Vibrato Rate-NRPN Vibrato Depth-NRPN Vibrato Delay-NRPN Low Pass Filter Cutoff Frequency-NRPN Low Pass Filter Resonance -NRPN High Pass Filter Cutoff Frequency-NRPN EQ Low Gain-NRPN EQ High Gain-NRPN EQ Low Frequency-NRPN EQ High Frequency-NRPN EG Attack Time-NRPN EG Decay Time-NRPN EG Release Time-NRPN RPN NRPN Channel Pressure Polyphonic Key Pressure MASTER Volume(System Exclusive) MASTER Balance(System Exclusive) MASTER Tuning(System Exclusive) CME ON(System Exclusive) GM ON(System Exclusive) XG ON(System Exclusive) GS ON(System Exclusive) GM2 ON(System Exclusive) Tempo ProgramChange Song Position Pointer Song Select(Song #) Tune request Timing clock Start Continue 53 Chorus Celeste PhaDepth RPN Inc RPN Dec NRPN LSB NRPN MSB RPN LSB RPN MSB Undefined SoundOff Rst ctrl Undefined NotesOff OMNI Off OMNI On Mono Poly Pit Bend PitB Sen Fine Tun Coar Tun Vib Rate VibDepth VibDelay LPFCFreq LPFReson HPFCFreq EQ LGain EQ HGain EQ LFreq EQ HFreq EG AttTi EG DTime EG RTime RPN NRPN Chan Pre PKey Pre Mast Vol Mast Bal Mast Tun CME ON GM ON XG ON GS ON GM2 ON Tempo ProgChan S PPoint S Selectr Tune req TimClock Start Continue Not for pads or buttons Not for pads or buttons Not for pads or buttons Not for pads or buttons Not for pads or buttons Not for pads or buttons Not for pads or buttons Not for pads or buttons Not for pads or buttons Only for pads, knobs and pedals Only for pads, knobs and pedals Only for pads, knobs and pedals Only for pads, knobs and pedals Only for pads, knobs and pedals Only for encoders Not for wheels Not for pads, buttons or wheels Not for pads, buttons or wheels Not for pads, buttons or pedals Not for pads, buttons or pedals 165 166 167 168 169 170 171 172 173 174 175 176 177 178 179 Stop System Reset Stop PLAY DEFERRED PLAY FORWARD REWIND RECORD STROBE RECORD EXIT RECORD PAUSE PAUSE EJECT CHASE COMMAND ERROR RESET MMC RESET Stop S Reset Stop PLAY DF PLAY FORWARD REWIND R STROBE R EXIT R PAUSE PAUSE EJECT CHASE CE RESET MMCRESET 54 Not for pads, buttons or pedals Not for pads, buttons or pedals Not for pads, buttons or pedals Not for pads, buttons or pedals Not for pads, buttons or pedals Not for pads, buttons or pedals Not for pads, buttons or pedals Not for pads, buttons or pedals Not for pads, buttons or pedals Not for pads, buttons or pedals Not for pads, buttons or pedals Not for pads, buttons or pedals Not for pads, buttons or pedals Not for pads, buttons or pedals Not for pads, buttons or pedals 11.2 GM Voice List Voice# Name Voice# Name Voice# Name Voice# Name 001 GrandPno 033 Aco.Bass 065 SprnoSax 097 Rain 002 BritePno 034 FngrBass 066 Alto Sax 098 SoundTrk 003 El.Grand 035 PickBass 067 TenorSax 099 Crystal 004 HnkyTonk 036 Fretless 068 Bari.Sax 100 Atmosphr 005 E.Piano1 037 SlapBas1 069 Oboe 101 Bright 006 E.Piano2 038 SlapBas2 070 Eng.Horn 102 Goblins 007 Harpsi. 039 SynBass1 071 Bassoon 103 Echoes 008 Clavi 040 SynBass2 072 Clarinet 104 Sci-Fi 009 Celesta 041 Violin 073 Piccolo 105 Sitar 010 Glocken 042 Viola 074 Flute 106 Banjo 011 MusicBox 043 Cello 075 Recorder 107 Shamisen 012 Vibes 044 Contrabs 076 PanFlute 108 Koto 013 Marimba 045 Trem.Str 077 Bottle 109 Kalimba 014 Xylophon 046 Pizz.Str 078 Shakhchi 110 Bagpipe 015 TubulBel 047 Harp 079 Whistle 111 Fiddle 016 Dulcimer 048 Timpani 080 Ocarina 112 Shanai 017 DrawOrgn 049 Strings1 081 SquareLd 113 TnklBell 018 PercOrgn 050 Strings2 082 Saw Lead 114 Agogo 019 RockOrgn 051 Syn Str1 083 CaliopLd 115 SteelDrm 020 ChrchOrg 052 Syn Str2 084 Chiff Ld 116 WoodBlok 021 ReedOrgn 053 ChiorAah 085 CharanLd 117 TaikoDrm 022 Acordion 054 VoiceOoh 086 Voice Ld 118 MelodTom 023 Harmnica 055 SynVoice 087 Fifth Ld 119 Syn Drum 024 TangoAcd 056 Orch.Hit 088 Bass&Ld 120 RevCymbl 025 NylonGtr 057 Trumpet 089 NewAgePad 121 FretNoiz 026 SteelGtr 058 Trombone 090 Warm Pad 122 BrthNoiz 027 Jazz Gtr 059 Tuba 091 PolySyPd 123 Seashore 028 CleanGtr 060 Mute Trp 092 ChoirPad 124 Tweet 029 Mute.Gtr 061 Fr. Horn 093 BowedPad 125 Telphone 030 Ovrdrive 062 BrasSect 094 MetalPad 126 Helicptr 031 Dist.Gtr 063 SynBrss1 095 Halo Pad 127 Applause 032 GtrHarmo 064 SynBrss2 096 SweepPad 128 Gunshot 55 11.3 Scale List Scale No. 001 002 003 004 005 006 007 008 009 010 011 012 013 014 015 016 017 018 019 020 021 022 023 024 025 026 027 028 029 030 031 032 033 034 035 036 037 038 039 040 Pitch name Note number: Pentatonic Major Scale Blues Major Scale Minor Scale Melodic Minor Scale Harmonic Minor Scale Pentatonic Minor Scale Blues Minor Scale Augmented Scale Be-Bop Scale Whole-Half Scale Half-Whole Scale Whole Tone Scale Augmented fifth Scale Algerian Scale Arabian Scale Balinese Scale Bartok Scale Byzantine Scale Egyptian Scale Enigmatic Scale Spanish Scale Spanish 8 Tone Scale Gypsy Scale Hungarian Gypsy Scale Hindu Scale Iwato Scale Japanese Scale Javanese Scale Hawaiian Scale Hirajoshi Scale Hungarian Minor Scale Hungarian Major Scale Leading Whole Tone Scale Mohammedan Scale Mongolian Scale Neapolitan Minor Scale Neapolitan Major Scale Oriental Scale Pelog Scale Persian Scale C 1 C C C C C C C C C C C C C C C C C C C C C C C C C C C C C C C C C C C C C C C C C# 2 C C C C C C C C C C C# C C C C C# C C# C C# C# C# C# C C C# C# C# C C C C C C C C# C# C# C# C# D 3 D D# D D D D# D# D# D D C# D D D D C# D C# D C# C# C# C# D D C# C# C# D D D D# D D D C# C# C# C# C# 56 D# 4 D D# D# D# D# D# D# D# E 5 E F 6 E E F F F F F F F F# F# E G F F F D# D# D# D# D# E E E D# E E E D# E D# E E D F E D D# D# D D D# D D# D D E E E E D# E C# F C# D# D# D# D# D# F E D# E D# D D# D D# D# E D# E D# D# D# D# E E D# E D# D# E D# E E E F# 7 F F F F F# F# F# F F F# F# F# F D# G E F# F F F E F# F F F F# F F F F F D# F# E E F F F# F F# F F# F F F G F# F# F# F F E G F F F D# F F F F# G F# G 8 G G G G G G G G G F# G F# G G F# G G G G F# G F# G G G F# G G G G G G F# G G G G F# G F# G# 9 G A 10 A A G# A G# A A G A# G A# A# A# G# G# B G A# G# A A A G# A G# G# G# A G# G G G# G# G# G# G G G# G# G G# G# G# G# G# G G# G# G A G# G# F# G# G# G A A G# G# A G# G# A# G# A A A# G# G G# G# G G# G# G G# G A G G# G# A# G# A# 11 B 12 A A A A A# A# A B B A# A# B B B A# A# B B A# G# A# B A# B A# A# A# A# A# A# G# A# B G# B A# B B A# B B A# A# B A A# A# A B A# G# A# B A# A# A# A# A# A# A# A# G# A# A G# B A# A# B A# B A A# A# B 57 58 59 60 11.4 Note List Note # 000 001 002 003 004 005 006 007 008 009 010 011 012 013 014 015 016 017 018 019 020 021 022 023 024 025 026 027 028 029 030 031 Name C-2 C#-2 D-2 D#-2 E-2 F-2 F#-2 G-2 G#-2 A-2 A#-2 B-2 C-1 C#-1 D-1 D#-1 E-1 F-1 F#-1 G-1 G#-1 A-1 A#-1 B-1 C0 C#0 D0 D#0 E0 F0 F#0 G0 Note # 032 033 034 035 036 037 038 039 040 041 042 043 044 045 046 047 048 049 050 051 052 053 054 055 056 057 058 059 060 061 062 063 Name G#0 A0 A#0 B0 C1 C#1 D1 D#1 E1 F1 F#1 G1 G#1 A1 A#1 B1 C2 C#2 D2 D#2 E2 F2 F#2 G2 G#2 A2 A#2 B2 C3 C#3 D3 D#3 Note # 064 065 066 067 068 069 070 071 072 073 074 075 076 077 078 079 080 081 082 083 084 085 086 087 088 089 090 091 092 093 094 095 61 Name E3 F3 F#3 G3 G#3 A3 A#3 B3 C4 C#4 D4 D#4 E4 F4 F#4 G4 G#4 A4 A#4 B4 C5 C#5 D5 D#5 E5 F5 F#5 G5 G#5 A5 A#5 B5 Note # 096 097 098 099 100 101 102 103 104 105 106 107 108 109 110 111 112 113 114 115 116 117 118 119 120 121 122 123 124 125 126 127 Name C6 C#6 D6 D#6 E6 F6 F#6 G6 G#6 A6 A#6 B6 C7 C#7 D7 D#7 E7 F7 F#7 G7 G#7 A7 A#7 B7 C8 C#8 D8 D#8 E8 F8 F#8 G8 11.5 Temperament List No. 1 2 3 4 5 6 7 8 9 10 11 12 Type ARABIC ARABIC ARABIC ARABIC ARABIC ARABIC ARABIC ARABIC ARABIC ARABIC ARABIC ARABIC C △ △ △ △ △ △ △ △ △ △ △ △ C# △ ▲ △ ▲ △ △ △ ▲ ▲ △ △ △ D △ △ △ △ ▲ ▲ △ △ △ △ △ △ D# △ △ △ △ △ △ ▲ △ △ △ △ △ E ▲ △ △ △ △ △ △ △ △ ▲ △ △ Note: △=Normal pitch, ▲=Changed pitch 62 F △ △ △ △ △ △ △ △ △ △ △ △ F# △ △ ▲ ▲ △ △ △ △ △ △ △ △ G △ △ △ △ ▲ △ △ △ △ △ △ △ G# △ △ △ △ △ △ ▲ ▲ △ △ △ △ A △ △ △ △ △ ▲ △ △ △ △ ▲ △ A# △ △ △ △ △ △ △ △ ▲ △ △ △ B ▲ △ ▲ △ △ △ △ △ △ △ △ ▲ 11.6 Velocity Curve List Normal Soft 1 Soft 2 Hard 1 Hard 2 Expand Compress Fixup 1 Fixup 2 Fixup 3 63 11.7 Aftertouch Curve List Normal Soft 1 Soft 2 Hard 1 Hard 2 Expand Compress Fixup 1 Fixup 2 Fixup 3 64 11.8 MIDI Route In the F1-F8 mode (and the Master/Assign/Automation/Performance/Utility/Expansion mode) Sending data: 1. Any messages sent by keyboard/controller parts and messages from the MIDI IN ports will be routed to USB IN A in the computer sequencing software. 2. Any messages sent to MIDI OUT port 1 will also be duplicated to the expansion board and under the local control. (The local control is on by default) 3. Messages sent by any keyboard parts can be routed to one of the MIDI OUT Port 1/2/3/4. (by the F1-F8 port settings) 4. Messages sent by any controller parts will be routed to MIDI OUT Port 1/2/3/4 according to the respective port settings. Receiving data: 5. Messages from the MIDI IN port will be routed along with the related keyboard parts messages. 6. Messages to USB OUT A in the computer software will be routed to MIDI OUT 4. 7. Messages to USB OUT C in the computer software will be routed to the expansion board. 8. Messages to USB OUT B and/or from USB IN B will be ignored. 65 In the U-CTRL mode: Sending data: 1. Any messages sent by keyboard/controller parts and messages from the MIDI IN ports will be routed to USB IN A in the computer sequencing software. 2. Any messages to MIDI OUT port 1 will also be duplicated to the expansion board and under the local control. (The local control is on by default) 3. Messages sent by any keyboard parts can be routed to one of the MIDI OUT Port 1/2/3/4. (by the F1-F8 port settings before entered the U-CTRL mode) 4. Messages sent by any U-CTRL parts will be routed to USB IN B in the computer software. Receiving data: 5. Messages from the MIDI IN port will be routed along with the related keyboard parts messages. 6. Messages to USB OUT A in the computer software will be routed to MIDI OUT 4. 7. Messages to USB OUT B in the computer software will be routed to SEQ transport buttons and faders. 8. Messages to USB OUT C in the computer software will be routed to the expansion board. 66 In ZONE mode: Sending data: 1. Any messages sent by keyboard/controller parts and messages from the MIDI IN ports will be routed to USB IN A in the computer sequencing software. 2. Any messages sent to MIDI OUT port 1 will also be duplicated to the expansion board and under the local control. (The local control is on by default) 3. Messages sent by any keyboard parts can be routed to one/several/all of the MIDI OUT Port 1/2/3/4. (by the F1-F8 port settings) 4. Messages sent by any controller parts will be routed to MIDI OUT Port 1/2/3/4 according to the respective port settings. Receiving data: 5. Messages from the MIDI IN port will be routed along with the related keyboard parts messages. 6. Messages to USB OUT A in the computer software will be routed to MIDI OUT 4. 7. Messages to USB OUT C in the computer software will be routed to the expansion board. Messages to USB OUT B and/or from USB IN B will be ignored. In the ZONE mode, the ZONE settings for channels and voices will substitute those settings in F1-F8 mode. 67 In the tyle SEQ mode: Sending data: 1. Any messages sent by keyboard/controller parts and messages from the MIDI IN ports will be routed to USB IN A in the computer sequencing software. 2. Any messages sent to MIDI OUT port 1 will also be duplicated to the expansion board and under the local control. (The local control is on by default) 3. Messages sent by any keyboard/controller parts, and messages from MIDI file playing, will be routed to MIDI OUT Port 1. 4. Messages from the MIDI IN port will be routed along with the related keyboard parts messages. Receiving data: 5. Messages to USB OUT A in the computer software will be routed to MIDI OUT 4. 6. Messages to USB OUT C in the computer software will be routed to the expansion board. Messages to USB OUT B and/or from USB IN B will be ignored. In the Style SEQ mode, messages from any parts will be routed to MIDI OUT 1 and USB IN 1 regardless of their original port settings or F1-F8 settings. 68 12 Troubleshooting Trouble with possible reasons and solution z After turning on the power switch, the instrument is not powered on: 1. Make sure you have connected the instrument to its AC adaptor with the proper AC supply. 2. z z z Make sure the power connector is firmly connected to the power outlet. No sound when playing the instrument 1. Check the volume settings of the tone generator and speaker system 2. Check the MIDI connection and the audio cable 3. Check Master Volume fader 4. Check Channel Volume knobs 5. Check Channel Expression Knobs 6. Check the attack time of the filter 7. Make sure you have the right settings in you music software 8. Check the MIDI route settings 9. Check the Controller Pedal position Continuous long sound: 1. Check Sustain pedal (Damper pedal) 2. Check the release time of the filter 3. Use All notes off or Reset Improper voice Tone generator not set properly, please Initialize or Reset. z z Wrong pitch 1. Check the transpose or octave settings. 2. Pitch bend message not returned to default, please reset. 3. Check the scale or temperament settings. Tempo knob does not work 1. Check the MIDI filter and enable the MIDI clock message. 2. Make sure your sequencer software supports this function with the right settings (Refer to the Sync section of your software manual) z Some functions do not work It is possible that your tone generator or music software does not support those functions z You hear two sounds when playing one key Please disable the ZONE mode. z Cannot select voice Read the data list of your tone generator for voice select detail, and properly set the tone BANK MSB and LSB z The motorized faders do not move automatically Check the fader’s settings and song data. 69 13 Specifications z Keyboard: VX5: 49 keys(C1 - C5), velocity sensitive and aftertouch. VX6: 61 keys(C1 - C6), velocity sensitive and aftertouch. VX7: 76 keys(A-1 - C6), velocity sensitive and aftertouch. VX8: 88 keys(C-1 - C7), Graded Hammer Action Keyboard, velocity sensitive and aftertouch. z Functions: Basic functions: USB MIDI, USB AUDIO, Octave shift, Transpose, Pitch bend wheel, Modulation wheel, Ribbon control, Pedals, Breath control, Audio In, Audio Out, Headphone out, MIDI IN, MIDI OUT. MIDI Data: Sequence control, MIDI clock, bank select, Program change, GM System On, GS System on, XG System On, Control change, All Notes Off, etc. Parameters: Transpose, Octave, MIDI out ports and channels, Velocity curve, Pitch bend, Breath control, Modulation, Brightness, Aftertouch, Aftertouch curve, etc. z Panel Controls and Indicators: Function buttons with light x 8, Function shortcut buttons with light x 8. Potentiometer knobs x 8, Encoder knobs x 9, Motorized faders x 9. Data dial x 1, Switch button with light x 1, Number buttons x 10, Cursor/ Inc/Dec/Confirm buttons x 6. Seq transport buttons x 6, U-CTRL button with light x 1. Transpose buttons with light x 2, Octave buttons with light x 2. Pads with light x 12. z Display: 16 digs, two lines LCD display. z Input/Output Terminals: POWER ON/OFF switch x 1, POWER IN connector x 1. USB port x1, USB HUB port x 2. HEADPHONE jack 2, HP VOLUME knob x 1. LINE OUT jack x 2. LINE IN jack x 2, INPUT GAIN knob x 1. PEDAL jack x 2, BREATH Control jack x 1. MIDI OUT port x 4, MIDI IN port x 1. z Power Supply: AC Power Adaptor included. AC Power Adaptor requirement: 16V 2.6A DC. z Dimensions (W x D x H) and Weight VX 5: 859 x 348 x 113mm, 9.62kg VX 6: 1022 x 348 x 113mm, 11.30kg VX 7: 1232 x 348 x 113mm, 13.38kg VX 8: 1408 x 372 x 150mm, 26.94kg ★ Specifications and appearance are subject to change without notice. 70 14 MIDI Implementation Chart Model: CEM VX Keyboard Function Basic Default Channel Changed Default Mode Messages Altered Note Number: True voice Velocity Note ON Note OFF Aftertouch Key’s Ch’s Pitch Bend Control Change Prog Change: True # System Exclusive System Clock Real Time Commands System command Aux Messages ○: Yes z Song position Active Sense MIDI Implementation chart Ver: 1.0 Transmitted Recognized 1 1~16 1~16 1~16 × × *********** 0~127 × *********** ○ v=0~127 × ○ v=0~127 × × × ○ × ○ × 0~127 ○ ○ × *********** ○ ○ ○ × ○ × ○ × ○ × ×: No CME is continually improving its products, and every attempt is made to ensure the information in the user’s manual is current and accurate. CME cannot be responsible for possible discrepancies between the manual and the real product. 71 2008-10 Central Music Co. Tel: +86-10-8580 1115 Fax: +86-10-8580 1114 Web: www.cme-pro.com E-mail for support: [email protected]