1
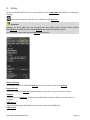
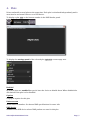
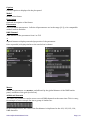
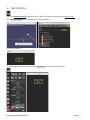
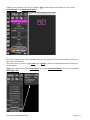
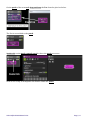
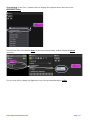
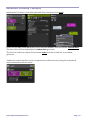
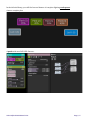
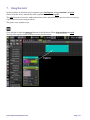
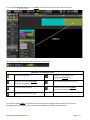
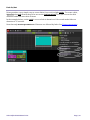
DMX manual v1.01 By Olivier Sens and Shane Hull. Table of Contents 1. Introduction ..................................................................................................................................... 3 2. Setup ................................................................................................................................................... 4 3. DMX Header Panel ......................................................................................................................... 6 4. Plots .................................................................................................................................................... 7 Plot Contextual Menu ....................................................................................................................................... 8 5. Fixtures Properties ........................................................................................................................ 9 Fixtures Contextual Menu ............................................................................................................................ 11 Modify Dimmer Values with the Mouse Wheel .................................................................................. 11 6. Our First Plot ................................................................................................................................. 12 Advanced Patching Concepts ..................................................................................................................... 16 7. Using the Grid ................................................................................................................................ 18 Fade In/Out ........................................................................................................................................................ 20 ____________________________________________________________________________________ Usine Hollyhock Manuel de l’utilisateur V0.1c 1. Introduction Usine Hollyhock II introduces a new Artnet/DMX light management engine. Working on stage also means working with lighting, and we have met a lot of light technicians and artists looking for a simple and efficient solution to manage this part of the show. In response to this demand, Usine Hollyhock now provides DMX tools which are totally synchronized with your audio patches. Before you start reading this manual please carefully study the Usine User manual. The basic concepts of Usine should be understood before proceeding. The DMX layer in Hollyhock II communicates using the Artnet/DMX protocol and supports several common devices. This includes devices connected by Ethernet, Enttec USB pro, and Enttec Open DMX devices connected via USB. Hollyhock is still in evolution, so some colors and details are subject to change depending on the version being used. Usine Hollyhock DMX Manual V1.0 Page | 3 2. Setup Before use DMX within Usine you must enable it in the setup panel and define several global settings. Open the setup panel with this icon, and choose the DMX tab. Important Officially, the Usine DMX layer can manage Enttec Open DMX, Enttec USB pro Enttec USB Pro MK2 devices as well as all Artnet-‐DMX devices connected to the Ethernet port. But normally all Open DMX protocol devices should work. Rescan devices Rescans all connected USB DMX devices. Usine can connect up to four devices. Reset devices Resets all connected devices (shutdown and restart). Use it if you encounter issues. Outputs List of Connected devices. An Enttec Open DMX and an Enttec USB pro are shown as an example. DMX active Turns the DMX engine ON. Must be activated to run Usine’s DMX layer. DMX speed Usine Hollyhock DMX Manual V1.0 Page | 4 Sets the maximum DMX frame rate (packets sent per second). Usine will send packets only if necessary. Artnet active Turns the Artnet engine ON. Usine can be used with USB devices and Artnet simultaneously. Artnet IP address IP address of the connected Artnet device. Set this to 127.0.0.1 for local host. Broadcast All Artnet packets are sent in broadcast mode (to all connected clients). Depending on the router this option can cause much slower speeds. This option is only necessary is certain conditions where a broadcast is required. Artnet port Port used for the Artnet communication. By default the port is 6454. Usine Hollyhock DMX Manual V1.0 Page | 5 3. DMX Header Panel Once DMX has been activated in the setup panel, the DMX main panel appears in the top header of Usine. This panel shows various global actions and parameters for the DMX layer. 1 Plots selector. Displays the selected plots, 1, 2, etc. 2 DMX activity indicator. This led lights when a DMX packet is sent to the output. 3 Master dimmer. Allows the modification of the global lightness. Affects all master parameters (see fixtures definitions below). 4 Panic. Sends an x00000… packet to all connected devices to switch OFF all fixtures. Usine Hollyhock DMX Manual V1.0 Page | 6 4. Plots Usine can handle several plots at the same time. Each plot is calculated independently and is associated to an Artnet Universe or a USB device. To display a plot, click on the button number in the DMX header panel. To display the settings panel of the selected plot, right click on an empty area. Enabled By default plots are enabled but you do have the choice to disable them. When disabled the calculation of the plot is also disabled. Caption Displayed caption for this plot. Universe num Artnet universe number. See Artnet DMX specifications for more info. DMX device Number of the USB device where DMX packets are sent for this plot. Usine Hollyhock DMX Manual V1.0 Page | 7 The device number is shown in the DMX setup tab: In the example above, the Enttec USB pro device is n° 2 and the Enttec Open DMX is n°1. Plot Contextual Menu Clear Clears the current plot and deletes all the fixtures. Open Opens a previously saved plot. Save as Saves the plot into a file to be reopened later. Undo Undo the last operation. Redo Redo the last operation. Usine Hollyhock DMX Manual V1.0 Page | 8 5. Fixtures Properties Usine contains a complete set of ready to use fixtures, which covers almost all real life situations. They are compatible with DMXIS fixture’s files. See http://www.dmxis.com/tag/fixture-‐editor/ Open the browser panel and choose the fixtures tab. Then Drag-‐and-‐Drop the file Par.dmx onto the plot panel: You should obtain: Once dropped onto the plot panel, a right click on the fixture will display the settings panel: Example of the settings for a simple Par fixture: Usine Hollyhock DMX Manual V1.0 Page | 9 Caption Fixture Caption as displayed in the plot panel. Model Model of the fixture. Description Optional description of the fixture. Parameters List of available parameters. In Usine all parameters are in the range [0..1], to be compatible with all built-‐in modules. DMX Channel DMX channel of the parameter from 1 to 512 + Expand button to display extended properties of the parameter. Once expanded, a display similar to the one below is shown: Master Define this parameter as a master, and affected by the global dimmer of the DMX header panel, and fades of the grid (see below). Additional channels The value of a parameter can be sent to several DMX channels at the same time. This is a way, for example to turn a simple Par into a group of similar Par. In the example above, the value of the Par dimmer is duplicated to the 101, 102, 103, 104, DMX channels. Usine Hollyhock DMX Manual V1.0 Page | 10 Inverse The value of the Parameter is inverted, goes from 100% to 0% Range min Mapping range minimum value. The output value cannot be lower than this value. Range max Mapping rage maximum value. The output cannot be higher than this value. Curve coeff Mapping curve coefficient to adjust the curve shape. Fixtures Contextual Menu Delete Deletes the selected fixture. Cut Deletes the selected fixture and copies it in the clipboard Duplicate Duplicates the selected fixture. Undo Undo the last operation. Redo Redo the last operation. Modify Dimmer Values with the Mouse Wheel You can use the mouse wheel to modify a dimmer value directly in the plot panel. Usine Hollyhock DMX Manual V1.0 Page | 11 6. Our First Plot Open the browser panel with this icon of Usine’s left menu and choose the fixtures tab. Then Drag-‐and-‐Drop the file Par.dmx onto the plot panel: You should obtain: To adjust the size and position, use the lock/unlock icon of Usine’s left menu: Usine Hollyhock DMX Manual V1.0 Page | 12 Finally, set a personal color for this fixture. Click on the fixture and change its color in the color palette of the contextual menu: We have created a very basic plot with only one Par fixture. Of course the number of fixtures in a plot is not limited. The next step is to create a light rack with a patch in order to manipulate fixtures inside the Usine engine. Click on an empty area of your workspace and in the contextual menu choose the command new light rack. Usine Hollyhock DMX Manual V1.0 Page | 13 On the patch of the new rack, Drag-‐and-‐Drop the Par from the plot1 as below. The Par is now added to the patch. Double click on the patch control panel to show the patch structure. Now we are ready to manipulate the fixture within the patch. Usine Hollyhock DMX Manual V1.0 Page | 14 Click-‐and-‐Drag on the Par1 / dimmer inlet to display the template menu and choose the Horizontal Fader: You will now have a horizontal fader in the control panel and a module within the patch structure: You are now able to change the lightness of the Par by manipulating the fader. Usine Hollyhock DMX Manual V1.0 Page | 15 Advanced Patching Concepts Add another Par fixture in the Plot panel and drop it inside the first patch: On the second Par (called Par2) drag a wire from the dimmer inlet and choose random data. This Par will be driven randomly by a random data generator. The first Par is affected only by the horizontal fader, and the second one by a random generator. Finally the control interface can be reorganized for efficient access (using the lock/unlock menu command) as shown below. Usine Hollyhock DMX Manual V1.0 Page | 16 In the default library you will find several demos of complete lighting workspaces. A more complex plot: A patch with two RGB LED fixtures: Usine Hollyhock DMX Manual V1.0 Page | 17 7. Using the Grid Usine provides an efficient way to organize your workspace along a timeline: the grid. Please read the User’s manual for more explanations about the grid. The grid is made of sections, and each section can be played during a precise time or in a loop if you don’t know how long it will be. The grid is very simple to use. First, display it with the show grid button in the left menu. Then Drag-‐and-‐Drop any rack directly onto a grid section as shown on the picture below: Usine Hollyhock DMX Manual V1.0 Page | 18 You can also Drag-‐and-‐Drop several racks on different sections to provide a sequence. We are now ready to use the grid with basic commands: Summary of transport icons Plays the sequence. Restarts the grid since the beginning (section 0). Restarts the current section from the beginning. Return to the previous section. Go to the next section. Continue to the next section (overrides the loop mode). Restores the size of the grid. You will see that racks are automatically activated according to their position in a section. Using the grid can simplify live performances while providing complex results. Usine Hollyhock DMX Manual V1.0 Page | 19 Fade In/Out Usine provides a very simple way to create fades (in or out) on light racks. To create a fade, Right-‐Click the rack item in the grid to access the settings panel. Here you can set the fade duration within the auto fade sections. In the example below, on the rack 1 we set a fade in duration of 10 seconds and a fade out duration of 15 seconds. Note that only master parameters of fixtures are affected by fades. See Fixtures properties. Usine Hollyhock DMX Manual V1.0 Page | 20