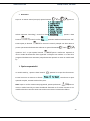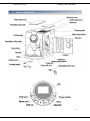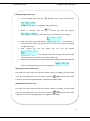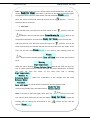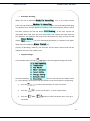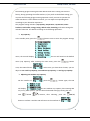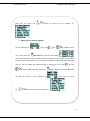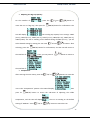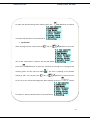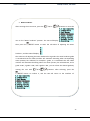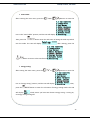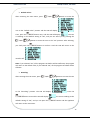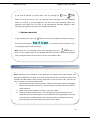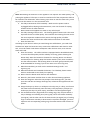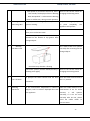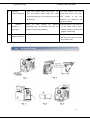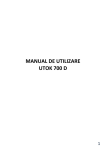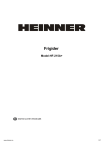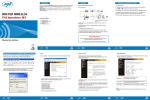
1
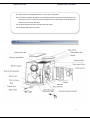
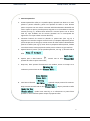
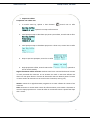
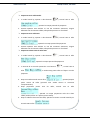
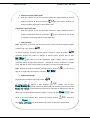
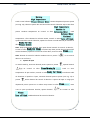
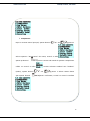
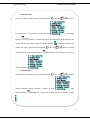
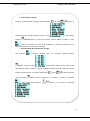
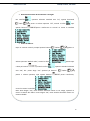
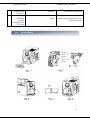
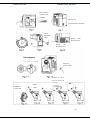
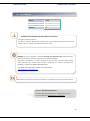
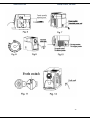
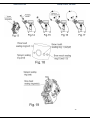
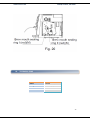
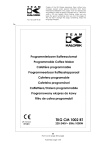
ESPRESSOR AUTOMAT www.heinner.ro Model: HEMA-2500 Espressor automat cu afisaj LCD Sonneo 2500 Capacitate rezervor de apa: 1.8 L Putere: 1300W Culoare: Inox www.heinner.com 1300W, 50-60Hz, 220-240V Va multumim pentru alegerea acestui produs! I. INTRODUCERE Va rugam sa cititi cu atentie instructiunile si sa pastrati manualul pentru informari ulterioare. Acest manual este conceput pentru a va oferi toate instructiunile necesare referitoare la instalarea, utilizarea si intretinerea aparatului. Pentru a opera unitatea corect si in siguranta, va rugam sa cititi acest manual cu instructiuni cu atentie inainte de instalare si utilizare. II. CONTINUTUL PACHETULUI DUMNEAVOASTRA Espressor Manual de utilizare Certificat de garantie 1 www.heinner.com 1300W, 50-60Hz, 220-240V III. MASURI DE SIGURANTA 1. Cititi toate instructiunile inaintea utilizarii aparatului. 2. Inainte de a utiliza aparatul verificati daca voltajul prizei de perete corespunde cu voltajul de pe placuta de caracteristici a aparatului. 3. Acestui aparat i-a fost incorporat un stecher cu impamantare. Asigurati-va ca priza de perete din casa dvs. este impamantata. 4. In cazul in care cablul de alimentare este deteriorat, acesta trebuie schimbat cu un cablu special, care este disponibil la producator sau la service-ul autorizat. 5. Pentru a va proteja impotriva incendiului, electrocutarii si a vatamarilor corporale, nu introduceti cablul de alimentare sau stecherul in apa sau in alte lichide. 6. Scoateti stecherul din priza inainte de a curata aparatul sau cand nu-l folositi. Permiteti aparatului sa se raceasca complet inainte de a-l utiliza din nou, de a atasa componente sau de a-l curata. 7. Conectati intotdeauna cablul de alimentare intai in aparat si apoi in priza de perete. Pentru deconectare, puneti toate butoanele in pozitia “off” si scoateti aparatul din priza. 8. Nu operati niciun aparat care are cablul de alimentare sau stecherul deteriorat sau un aparat care este scapat pe jos sau avariat in orice fel. Returnati aparatul la cel mai apropiat service autorizat pentru examinare, reparatie sau reglaje electrice sau mecanice. 9. Utilizarea accesoriilor care nu sunt recomandate de catre producatorul aparatului poate duce la incendiu, electrocutare sau vatamare corporala. 10. Asezati aparatul pe o masa sau pe o suprafata plana, nu atarnati cablul de alimentare de marginea mesei. Scoateti aparatul din priza cand iesiti afara. 11. Asigurati-va ca acest cablu de alimentare nu atinge suprafetele aparatului care se incalzesc. 12. Poate izbucni un incendiu daca aparatul este acoperit sau intra in contact cu material inflamabil. 13. Nu amplasati aparatul de cafea pe sau langa un arzator electric sau cu gaz, sau intr-un cuptor incins. 14. Amplasati aparatul la o distanta de 2 inci fata de perete sau alte obiecte. 2 www.heinner.com 1300W, 50-60Hz, 220-240V 15. Nu atingeti niciodata pinii stecherului atunci cand introduceti sau scoateti cablul din priza. 16. Temperatura mediului de operare si depozitare trebuie sa fie mai mare de 0ºC, si mai mica de 45ºC, iar mediul trebuie sa fie uscat si ventilat. 17. Nu utilizati niciodata aparatul de cafea in conditii de temperaturi inalte, campuri magnetice ridicate si umiditate, nu asezati aparatul pe suprafete fierbinti sau langa surse de foc sau alte aparate electrice, cum ar fi deasupra frigiderului, deoarece exista riscul ca acestea sa se deterioreze. De asemenea nu amplasati alte obiecte pe aparatul de cafea. 18. Pentru a-l deconecta de la reteaua electrica scoateti stecherul din priza de perete. Apucati intotdeauna de stecher, nu trageti niciodata de cablu. 19. Nu folositi aparatul in alt scop in afara celui destinat si amplasati-l intr-un mediu uscat. 20. Este nevoie o supraveghere atenta a aparatului cand acesta functioneaza. Nu lasati aparatul in stand-by pentru mult timp. Nu permiteti niciodata copiilor sau persoanelor cu handicap sa opereze aparatul. 21. Aveti grija sa nu va ardeti cu aburii. 22. Unele parti ale aparatului devin fierbinti in timpul functionarii (precum placa din inox, tava pentru ceasca, tubul pentru aburi si dispozitivul pentru spuma, etc.) , asadar nu le atiugeti direct. Atingeti doar manerele si butoanele. 23. Curatati cu regularitate aparatul de cafea urmand instructiunile din sectiunea “Curatare si intretinere” pentru a obtine o buna calitate cafelei si a prelungi durata de viata a aparatului. De asemenea adaugati cu regularitate ulei lubrifiant pe piesele de functionare. 24. Daca nu utilizati aparatul pentru mai mult timp, curatati intai toate componentele detasabile si uscati-le pentru depozitare. 25. Daca aparatul de cafea este in stadiul de preparare a cafelei, a apei calde sau a aburilor, nu deschideti niciodata usa de serviciu pentru a scoate componenta. Detaliile despre aceasta operatie le gasiti in manual. 26. Nu utilizati aparatul cand acesta afiseaza o eroare. Nu introduceti obiecte straine in aparat. 27. Acest aparat nu este destinat utilizarii de catre persoane (inclusiv copii) cu capacitati fizice, senzoriale sau mentale reduse, sau lipsite de experienta sau putere de intelegere, daca nu sunt supravegheati sau daca nu li se ofera instructiuni referitoare la utilizarea aparatului de catre o persoana responsabila. cu siguranta lor. 3 www.heinner.com 1300W, 50-60Hz, 220-240V 28. Copiii trebuie supravegheati pentru a nu se juca cu aparatul. 29. Nu folositi niciodata detergent sau apa fierbinte pentru curatarea componentelor de functionare pentru a evita ca aceste componente sa se deterioreze de la temperatura ridicata sau sa ramana fara ulei. 30. Nu lasati aparatul de cafea sa functioneze fara apa. 31. Nu utilizati aparatul in aer liber IV. DESCRIEREA PRODUSULUI 4 www.heinner.com V. 1300W, 50-60Hz, 220-240V INSTRUCTIUNI DE UTILIZARE Prima utilizare: 1. Scoateti aparatul de cafea din ambalaj, verificati daca ati primit toate accesoriile conform listei. Asamblati tava de scurgere in aparat. (vezi Fig. 1) 2. Asigurati-va ca protectia prajitorului este indepartata inainte de utilizare. (vezi Fig. 2) 3. Curatati toate componentele detasabile conform sectiunii “CURATARE SI INTRETINERE”. Apoi asamblati-le complet. 4. Scoateti rezervorul de apa detasabil (vezi Fig. 3) si umpleti-l cu apa proaspata pana la nivelul MAX (vezi Fig. 4). Nu-l umpleti niciodata cu lapte, apa minerala sau alte lichide. Apoi introduceti-l inapoi in aparat. Nota: Rezervorul de apa este detasabil si este recomandat sa-l scoateti din aparat atunci cand il umpleti cu apa, apoi sa-l introduceti corespunzator inapoi in aparat. 5. Deschideti rasnita (vezi Fig. 5), umpleti-o cu boabe proaspete de cafea si inchideti capacul. 6. Inainte de operare, puteti regla cantitatea cafelei de la butonul corespunzator (vezi Fig. 6), (de exemplu, pentru prepararea unei cesti mari de cafea), intoarceti butonul in directia “+”, cafeaua va fi tare, respectiv zatul va fi mai gros; in caz contrar intoarceti butonul in directia “-“, cafeaua va fi mai putin tare iar zatul va fi mai subtire. Este recomandat ca in timpul operarii normale butonul sa fie in pozita de mijloc. 5 www.heinner.com 1300W, 50-60Hz, 220-240V Pornirea aparatului: 3. Asezati aparatul de cafea pe o suprafata plana, aparatul este dotat cu o masa plianta in partea inferioara, puteti roti aparatul de cafea in orice directie pentru o operare cat mai usoara. Conectati cablul de alimentare detasabil mai intai in aparat si apoi in priza de perete. Asigurati-va ca il asamblati in ordinea corecta (vezi Fig. 7). Verificati daca infuzorul si sertarul pentru zat se afla la locul lor, apoi inchideti usa de serviciu (aparatul are un intrerupator de siguranta si nu va porni daca usa este deschisa). 4. Intoarceti butonul de control al aburilor in pozitia OFF (vezi Fig. 8) si asigurati-va ca tava de scurgere se afla la locul ei, indreptati dispozitivul pentru spuma inspre tava de scurgere, asezati ceasca de cafea sub duza detasabila de picurare a cafelei (vezi Fig. 9). Daca doriti sa preparati cafea espresso, trebuie sa incalziti inainte ceasca pe plita de incalzit pentru a obtine un gust mai bun. 5. Apasati butonul “power” (de pe spatele aparatului, vezi Fig. 7). Ecranul LCD va afisa . 6. Apasati apoi o data butonul , ecranul LCD va afisa , aparatul de cafea va porni auto testul; 7. Dupa test, daca aparatul functioneaza cum trebuie, acesta va incepe sa se incalzeasca, ecranul LCD va afisa 8. Cand LCD-ul afiseaza Dupa curatare ecranul LCD va afisa , aparatul incepe procesul de curatare. , dupa o perioada va afisa (modul este stand by) si va informeaza ca puteti folosi aparatul. In acest moment puteti incepe sa preparati cafea. 6 www.heinner.com 1300W, 50-60Hz, 220-240V Prepararea cafelei: Prepararea unei cafele mari. 1. In modul stand by, apasati o data butonul ecranul LCD va afisa , aparatul va incepe sa functioneze. 2. Cand pompa incepe sa distribuie apa pentru prima data, ecranul LCD va afisa: . 3. Cand pompa incepe sa distrbuie apa pentru a doua oara, ecranul LCD va afisa . 4. Dupa ce apa este pompata, ecranul LC va afisa . 5. Dupa prepararea cafelei, ecranul LCD va afisa , aparatul se afla in modul stand by. Reglati densitatea cafelei macinate: Realizati acest lucru invartind de butonul rasnitei in timul procesului de macinare. Cu cat invartiti mai mult cu atat este cafeaua mai densa sau mai putin densa in functie de directia de rasucire. Butonul poate fi invartit in sensul acelor de ceasornic sau in sensul invers al acestora, vezi Fig. 10). Atentie: Inainte de a regla densitatea, asigurati-va ca toata cafeaua din rasnita a fost macinata. Nota: Deoarece in rasnita raman resturi de cafea macinata, noua setare a densitatii va avea loc dupa prepararea a 2-3 cesti de cafea iar urmatoarea setare o puteti face dupa alte 2-3 cesti. 7 www.heinner.com 1300W, 50-60Hz, 220-240V Prepararea unei cafele medii: 1. In modul stand by, apasati o data butonul , ecranul LCD va afisa , aparatul va incepe procesul de preparare. 2. Aceasta operatie este similara cu cea din sectiunea anterioara, singura diferenta tine de marimea cafelei, afisajele de pe ecran vor fi aceleasi. Prepararea unei cafele mici 1. In modul stand by, apasati o data butonul , ecranul LCD va afisa , aparatul va incepe procesul de preparare. 2. Aceasta operatie este similara cu cea din sectiunea anterioara, singura diferenta tine de marimea cafelei, afisajele de pe ecran vor fi aceleasi. Prepararea a doua cesti de cafea mari 1. In modul stand by, apasati o data butonul , ecranul LCD va afisa , aparatul va incepe procesul de preparare. 2. In interval de 5 secunde apasati din nou butonul afisa , ecranul LCD va , in acelasi timp prima cafea va fi deja in curs de preparare. 3. Dupa 2 secunde ecranul LCD va afisa , aparatul prepara prima ceasca de cafea (procesul este acelasi descris in sectiunea corespunzatoare). 4. Dupa prepararea primei cesti de cafea, ecranul LCD va afisa , aparatul va incepe prepararea celei de-a doua cafele (acelasi proces ca si pentru prima ceasca). 5. Dupa ce obtineti doua cesti de cafea, aparatul va reneni in modul stand by iar ecranul LCD va afisa . 8 www.heinner.com 1300W, 50-60Hz, 220-240V Prepararea a doua cafele medii: 1. Pasii sunt similari cu cei din sectiunea anterioara, singura diferenta este ca trebuie sa apasati de doua ori butonul in interval de 5 secunde, iar afisajul va indica prepararea a doua cafele medii. Prepararea a doua cafele mici 1. Pasii sunt similari cu cei din sectiunea anterioara, singura diferenta este ca trebuie sa apasati de doua ori pe butonul in interval de 5 secunde, iar afisajul va indica prepararea a doua cafele mici. Incalzirea apei: Nota: Daca doriti sa incalziti apa si sa faceti aburi, intoarceti butonul pentru spuma (aratat in Fig. 11) in pozitia In modul stand by, intoarceti butonul pentru spuma in pozitia in pozitia Intoarceti butonul de control al aburilor in pozitia pornit, ecranul LCD va afisa , apa calda va iesi din dispozitivul pentru spuma, cand s-a obtinut cantitatea dorita de apa calda intoarceti butonul de control al aburilor in pozitia oprit, aparatul va inceta sa mai produca apa calda si va reveni in modul stand by. Nota: butonul de control al aburilor trebuie intors in pozitia apa nu va curge afara iar ecranul nu va indica: , in caz contrar . Producerea aburilor: Intoarceti butonul pentru spuma in pozitia In modul stand by, apasati o data butonul , ecranul LCD va afisa: cand procesul de pre-incalzire se termina ecranul LCD va afisa , intoarceti butonul de control al aburilor in pozitia pornit (Fig. 8), aburii vor iesi din dispozitivul pentru spuma si ecranul va afisa doriti sa nu mai produceti aburi, apasati din nou pe butonul afisa . Daca , ecranul va , intoarceti butonul de control al aburilor in pozitia oprit. 9 www.heinner.com 1300W, 50-60Hz, 220-240V Cand ecranul afiseaza , scoateti dispozitivul pentru spuma (vezi Fig. 12), trebuie sa porniti din nou butonul de control al aburilor. Apa va iesi afara pentru scaderea temperaturii iar ecranul va afisa , cand temperatura a fost coborata la valoarea setata, ecranul va indica , opriti butonul de control al aburilor, aparatul va reveni in modul stand by iar ecranul va afisa . Nota: Dupa producerea aburilor, daca opriti direct butonul de control al aburilor , ecranul va afisa , in acelasi timp daca porniti din nou butonul de control al aburilor, aparatul va continua sa faca aburi, ecranul va afisa . Nota: butonul de control al aburilor trebuie intors in pozitia , in caz contrar aburii nu se vor forma. F. Spuma de lapte In modul stand by, intoarceti butonul pentru spuma in pozitia Apasati butonul iar ecranul va afisa: . Cand s-a atins temperatura de pre-incalzire, ecranul va afisa , introduceti tubul de absorbtie a laptelui in lapte, intoarceti butonul pentru spuma (vezi Fig. 11) in pozitia Porniti butonul de control al aburilor si spuma de lapte va curge prin dispozitivul pentru spuma iar in acelasi timp ecranul va afisa vreti sa opriti producerea aburilor, apasati butonul . Daca iar ecranul va afisa , inchideti butonul de control al aburilor. 10 www.heinner.com 1300W, 50-60Hz, 220-240V Cand ecranul afiseaza , scoateti dispozitivul pentru spuma (Fig. 12), porniti butonul de control al aburilor pentru a elibera apa si a reduce temperatura, ecranul va afisa , cand temperatura este suficient de scazuta ecranul va afia , opriti butonul de control al aburilor, apoi aparatul va reveni in modul stand by, ecranul va afisa . Nota: Daca doriti sa faceti din nou spuma de lapte, nu apasati niciodata pentru a iesi, opriti doar butonul pentru aburi, ecranul va afisa , repetati procesul de formare a spumei intorcand butonul pentru aburi in pozitia , ecranul va afisa . Detartrare automata: Cand ecranul afiseaza aburilor, ecranul va afisa , intoarceti butonul de control al , pictograma pentru detartrare va fi afisata intr-o forma dinamica. Aparatul va pompa apa neregulat, dupa ce a fost pompat 1 l de apa ecranul va afisa , in acel moment scoateti rezervorul de apa detasabil, umpleti-l cu apa proaspata si reasezati-l la loc. Aparatul va pompa iarasi neregulat apa si ecranul va afisa , pictograma pentru detartrare va fi afisata intr-o forma dinamica. Cand ecranul indica , inseamna ca procesul de detartrare s-a terminat, puteti opri butonul de control al aburilor iar aparatul va reveni in modul stand by. 11 www.heinner.com 1300W, 50-60Hz, 220-240V Setarile programelor: In modul stand by, apasati o data butonul setari al programelor, ecranul va afisa pentru a accesa meniul de , programul standard selectat (1. 1 cup capacity). Functiile butoanelor de pe panoul de control sunt urmatoarele: 1. Apasati butonul pentru a confirma meniul selectat sau pentru a accesa urmatorul meniu; 2. Apasati butonul pentru a iesi din meniul curent sau pentru a va intoarce la meniul anterior; 3. Apasati butonul sau pentru a alege meniul dorit. Exista si setarile standard venite din fabrica, daca preferati aceste setari puteti sari peste aceasta operatie de setare a programelor. Dar daca doriti sa operati aparatul de cafea intr-o maniera mai eficienta puteti face setarile in functie de dorinta si experienta dumneavoastra Setarile includ optiunile: 1. 1 cup capacity (capacitate 1 ceasca) 2. Temperature (temperatura) 3. Cup warmer (incalzire ceasca) 4. Water hardness (duritatea apei) 5. Total coffee (cafea totala) 6. Energy saving (economisirea energiei) 7. Default value (valori standard) 8. Descaling (detartrare), iar unele optiuni au un sub meniu. Detaliile pentru setari sunt urmatoarele: 12 www.heinner.com 1300W, 50-60Hz, 220-240V Capacitatea cestii: In modul stand by, apasati o data butonul pentru a accesa meniul principal al aparatului, ecranul va afisa , setarea standard va fi selectata (1. 1 cup capacity). Apasati apoi o data butonul , ecranul va afisa . Aveti trei optiuni la dispozitie, puteti sa setati one small cup capacity (capacitatea unei cesti mici) sau one medium cup capacity (capacitatea unei cesti medii) sau one big cup capacity (capacitatea unei cesti mari). Reglati cantitatea unei cesti medii de cafea: Din interfata , apasati din nou butonul , ecranul va afisa si veti vedea ca exista 6 setari pentru cantitatea unei cafele medii: 80ml (2.7 oz), 90 ml (3.0 oz), 100 ml (3.4 oz), 110 ml (3.7 oz), 120 ml (4.0 oz), 130 ml (4.4 oz), puteti alege setarea dorita apasand butoanele selectare apasati butonul interfata interfata si , dupa pentru confirmare, ecranul va reveni la , apoi apasati butonul pentru a va intoarce la . 13 www.heinner.com 1300W, 50-60Hz, 220-240V Reglati cantitatea unei cesti mici de cafea: Din interfata , apasati cup”, apoi apasati butonul sau pentru a selecta “Small , ecranul va afisa , si veti vedea ca exista 6 setari pentru cantitatea unei cafele mici: 30 ml (1.0 oz), 40 ml (1.4 oz), 50 ml (1.7 oz), 60 ml (2.0 oz), 70 ml (2.4 oz), 80 ml (2.7 oz), cantitatea selectata standard va fi cea de 40 ml (1.4 oz), dvs. puteti alege cantitatea dorita cu ajutorul butoanelor si , dupa selectare apasati butonul confirmare, ecranul va reveni la interfata pentru , apoi puteti apasa butonul pentru a va intoarce la interfata . Reglati cantitatea unei cesti mari de cafea: Din interfata , apasati cup”, apoi apasati butonul sau pentru a selecta “Big , ecranul va afisa , si veti vedea ca exista 6 setari pentru cantitatea unei cafele mari: 150 ml (5.0 oz), 160 ml (5.4 oz), 170 ml (5.7 oz), 180 ml (6.0 oz), 190 ml (6.4 oz), 200 ml (6.8 oz), cantitatea selectata standard va fi cea de 150 ml (5.0 oz), dvs. puteti alege cantitatea dorita cu ajutorul butonului si , dupa selectare apasati butonul pentru confirmare, ecranul va reveni la interfata puteti apasa butonul , apoi pentru a va intoarce la interfata 14 www.heinner.com 1300W, 50-60Hz, 220-240V . Temperatura: Dupa ce accesati meniul principal, apasati butonul sau selecta optiunea “Temperature” din meniu, ecranul va afisa apasati pe butonul pentru a , pentru a accesa sub meniul de ajustare a temperaturii cafelei iar ecranul va afisa (mediu), apasati butonul apoi apasati butonul , setarea selectata standard este “medium” sau pentru a selecta setarea dorita pentru confirmare, ecranul va reveni la interfata . 15 www.heinner.com 1300W, 50-60Hz, 220-240V Incalzirea cestii: Dupa ce accesati meniul principal, apasati butonul sau selecta optiunea “Cup warmer”, ecranul va afisa butonul pentru a , apoi apasati pentru a accesa sub meniul de unde puteti alege pornirea sau oprirea functiei de incalzire a plitei iar ecranul va afisa cea de “off” (oprit), puteti apasa pe butonul optiunea dorita, apoi apasati butonul reveni la interfata , optiunea standard este sau pentru a selecta pentru confirmare iar ecranul va . Duritatea apei: Dupa accesarea meniului principal, apasati butonul selecta optiunea “Water hardness”, ecranul va afisa apasati butonul sau pentru a , apoi pentru a accesa sub meniul optiunii iar ecranul va afisa . 16 www.heinner.com 1300W, 50-60Hz, 220-240V Aceste 4 grade sunt disponibile pentru setarea duritatii apei. In functie de gradul de duritate al apei, aparatul incepe procesul de detartrare dupa o anumita cantitate de apa, de exemplu in cazul gradului 1, aparatul va incepe automat procesul de detartrare dupa ce s-au folosit 80 l de apa, in cazul gradului 2 dupa 60 l apa, in cazul gradului 3 dupa 50 l apa iar in cazul gradului 4 dupa 40 l apa. Puteti selecta gradul dorit cu ajutorul butonului apasati butonul sau , dupa selectare pentru confirmare iar ecranul va reveni la interfata . Total cafea: Dupa ce accesati meniul principal, apasati butonul selecta optiunea “Total coffee”, ecranul va afisa butonul sau pentru a , apoi apasati pentru a accesa sub meniul optiunii pentru a vizualiza numarul total de cesti de cafea pe care l-a preparat utilizatorul. Ecranul va afisa . Dupa vizualizare, apasati butonul interfata pentru a reveni la . 17 www.heinner.com 1300W, 50-60Hz, 220-240V Economisirea energiei: Dupa ce accesati meniul principal, apasati butonul sau selecta optiunea “Energy saving”, ecranul va afisa butonul pentru a , apoi apasati pentru a accesa sub meniul acestei optiuni, ecranul va afisa , ceea ce inseamna ca aveti doua posibilitati si anume sa activati sau sa dezactivati modul de economisire a energiei. Activati modul de economisire a energiei: Din interfata setarea standard este “on” (activat), apasati butonul , ecranul va afisa . Puteti seta 6 valori: 15 min, 30 min, 45 min, 60 min, 90 min, 120 min, valoarea selectata standard este cea de 60 min. Puteti selecta valoarea dorita cu ajutorul butoanelor apasati butonul si , dupa selectare pentru confirmare iar ecranul va reveni la interfata , apoi puteti apasa butonul pentru a va intoarce la interfata . 18 www.heinner.com 1300W, 50-60Hz, 220-240V Dezactivarea functiei de economisire a energiei: Din interfata si optiunea selectata standard este “on”, apasati butoanele pentru a selecta optiunea “off”, ecranul va afisa apasati butonul , apoi pentru confirmare iar ecranul va reveni la interfata . Setari din fabrica: Dupa ce accesati meniul principal apasati butonul sau selecta optiunea “Default value”, ecranul va afisa o data pe butonul , ecranul va afisa , apasati apoi , optiunea standard selectata este “No”, dvs. puteti alege “Yes” apasand pe butonul pentru a selecta optiunea, apoi apasati butonul pentru a sau pentru confirmare, ecranul va reveni la interfata . Nota: Daca alegeti “Yes”, toate setarile efectuate inainte se vor sterge, aparatul va reveni la setarile din fabrica. Daca alegeti “No”, toate setarile efectuate inainte vor ramane valabile. 19 www.heinner.com 1300W, 50-60Hz, 220-240V Detartrare: Dupa ce ati acesat meniul principal, apasati butonul sau selecta optiunea “Descaling”, ecranul va afisa butonul , ecranul va afisa Puteti apasa pe butonul pentru a , apasati o data , optiunea standard selectata este “No”. si reveniti la meniul principal sau daca doriti sa porniti operatiunea de detartrare selectati cu ajutorul butoanele optiunea “Yes” si apoi apasati butonul si pentru confirmare. Aparatul va intra in modul de detartrare fortat (operatia si afisajele sunt aceleasi ca si cele de la programul de detartrare automata). Dupa detartrare aparatul va reveni in modul stand by. Oprirea aparatului: In modul stand by , apasati o data butonul Ecranul LCD insa va continua sa afiseze , aparatul se va opri din functionare. . Daca doriti sa opriti aparatul complet, scoateti stecherul din priza. Nota: Dupa ce au fost setate toate programele, apasati pe butonul pentru a reveni in modul stand by iar toate schimbarile efectuate vor fi salvate. Acestea se vor modifica doar daca veti face setari noi sau daca veti reveni la setarile din fabrica. 20 www.heinner.com 1300W, 50-60Hz, 220-240V VI. INTRETINEREA SI CURATAREA Pastrati aparatul curat pentru a imbunatati calitatea cafelei si pentru a-i prelungi durata de viata. Trebuie sa retineti sa nu spalati nicio componenta in masina de spalat vase. Dupa ce le curatati, stergeti-le cu o carpa uscata sau asteptati sa se usuce, nu le uscati niciodata deasupra prajitorului de paine sau in cuptorul cu microunde. 1. Intretinerea zilnica a aparatului: asigurati-va ca stecherul este scos din priza inainte de curatare si intretinere, nu folositi niciodata curatatori chimici pentru curatarea suprafetelor aparatului. Nu introduceti niciodata aparatul in apa sau in alte lichide. 2. Curatarea zilnica a rezervorului: Curatarea rezervorului cu apa reprezinta cel mai important factor pentru obtinerea unei cafele de calitate. Mentineti rezervorul curat si astfel veti obtine o cafea de calitate. Scoateti rezervorul de apa din aparat si spalati-l cu apa. 3. Curatati rasnita: Atunci cand doriti dvs. sau cand trebuie sa schimbati boabele de cafea, trebuie sa curatati rasnita. Deschideti capacul cutiei, scoateti boabele de cafea cu mana sau cu o alta ustensila, retineti ca un pic de cafea se va depozita sub capacul rasnitei, nu o indepartati niciodata cu mana. 4. Curatati infuzorul: Aparatul de cafea este dotat cu un infuzor detasabil iar pentru a asigura calitatea cafelei si stabilitatea functionarii aparatului, curatati acest infuzor zilnic. Clatiti-l in apa. Nu folositi niciodata curatatori sau substante de dezinfectare. Stergeti-l cu o carpa uscata apoi montati-l inapoi in aparat. Filtrul din grupul de infuzare poate fi dezasamblat pentru curatare (vezi Fig. 13 – Fig 17). Daca infuzorul este blocat, cand vreti sa-l dezasamblati sau asamblati, contactati service-ul autorizat pentru reparatie. Nu curatati niciodata infuzorul folosind curatatori sau substante de dezinfectare. Nu uscati niciodata infuzorul cu uscatorul de par sau alte aparate electrice de incalzire. 5. Curatati sertarul de colectare a zatului: cand ecranul LCD afiseaza mesajul, deschideti usa laterala si goliti sertarul de colectare a zatului, in caz contrar aparatul nu va mai functiona. 6. Goliti tava de scurgere: in tava de scurgere exista un obiect rosu, acesta este pluta de indicare a nivelului apei. Odata ce pluta se afla la vedere, tava de scurgere trebuie golita si apoi montata inapoi in aparat. 7. Punga cu accesorii include patru garnituri de etansare. Acestea sunt parti care se deterioreaza usor (vezi Fig. 18), doua pentru ansamblul de infuzare (vezi Fig. 19) si celelalte doua pentru gura de infuzare (vezi Fig. 20). Daca oricare din aceste garnituri se deterioreaza trebuie schimbata cu una de rezerva iar apoi aparatul va functiona normal. 21 www.heinner.com VII. NR. 1 2 3 1300W, 50-60Hz, 220-240V PROBLEME POSIBILE SI REZOLVAREA ACESTORA AFISAJ AVERTIZARE Warning Door Open (Atentie usa deschisa) Warning Miss Brew Group (Atentie eroare grup infuzare) Warning Brew Group Block (Atentie grupul de infuzare este blocat) Warning Miss 4 Dregs Box (Atentie lipseste sertarul pentru zat) STAREA DE FUNCTIONARE SI CAUZELE Va avertizeaza ca usa nu este inchisa corespunzator Va avertizeaza cand grupul de infuzare nu este asezat corespunzator sau lipseste. Utilizatorul a deschis usa de serviciu si a scos afara din greseala grupul de infuzare in timpul functionarii. Alimentarea cu apa a grupului de infuzare s-a conectat cu duza de infuzare, grupul de infuzare nu poate fi scos afara. Dupa ce aparatul este pornit si motorul functioneaza, dupa cateva secunde ecranul va afisa “Warning Brew Group Block”. Inseamna ca intrerupatorul nu functioneaza corespunzator in timpul operarii normale. Dupa ce aparatul este pornit, motorul nu functioneaza, ecranul va afisa “Warning Brew Group Block”. Inseamna ca motorul grupului de infuzare este defect. Va avertizeaza ca grupul de infuzare nu este fixat corect sau lipseste. REPARATII SI SOLUTII Inchideti usa si aparatul va incepe sa functioneze Asezati grupul de infuzare corespunzator si aparatul va reveni la starea de functionare. 1. Scoateti aparatul din priza; 2. Intoarceti manerul grupului de infuzare in pozitia initiala, apasati grupul de infuzare folosind un pic de forta, asigurati-va ca acesta este conectat cu axul de transmisie al reductorului si inchideti intrerupatorul de infuzare (daca acesta nu poate fi inchis, trimiteti aparatul in service pentru reparatii). 3. Operati aparatul conform instructiunilor din sectiunea “Pornirea aparatului”, aparatul va functiona normal. Trimiteti aparatul la service pentru reparatie si schimbarea intrerupatorului. Trimiteti aparatul in service pentru schimbarea motorului grupului de infuzare. Aparatul porneste doar dupa ce grupul de infuzare este fixat corespunzator. 22 www.heinner.com Warning Fill 5 Water tank (Atentie umpleti rezervorul cu apa) 6 7 8 Please turn off knob (Va rugam opriti butonul) Warning No Sensor (Atentie niciun senzor) Warning Water Pipe Block (Atentie teava de apa blocata) 1300W, 50-60Hz, 220-240V Avertizeaza ca rezervorul a ramas fara apa. Cantitatea de apa depaseste 250 ml. Pluta este blocata la fund. Exista obiecte straine in aparat. Aparatul va incepe sa functioneze normal dupa ce obiectele straine sunt indepartate. Verificati pluta daca pluteste. Cantitatea de apa depaseste 250 ml. Pluta pluteste mai agil. Va avertizeaza ca butonul de control al aburilor este pornit. Duceti aparatul la service pentru schimbarea detectorului. Intoarceti butonul de control al aburilor in pozitia “0”. Daca temperatura ambientala este sub 0 grade, ecranul va afisa “no sensor” dupa pornirea aparatului. Aparatul a fost depozitat pentru o perioada lunga de timp si nu functioneaza. Aparatul nu a fost curatat inainte de depozitare. Ca urmare gaurelele filtrului s-au infundat. Dupa ce porniti aparatul, pompa va distribui apa de trei ori iar prin dispozitivul de curgere a cafelei nu va curge cafea, dupa cateva secunde pe ecran va aparea eroarea “Warning Water Pipe Block”. Aparatul a fost depozitat pentru o perioada lunga, porniti aparatul, sunetul pompei este mai puternic, pomparea apei nu se efectueaza de trei ori, cafeaua nu curge iar pe ecran apare afisat dupa cateva secunde “Warning Umpleti cu apa rezervorul. Amplasati aparatul intr-un mediu cu temperatura de 25º pentru 10-20 minute, acesta va functiona normal; daca nu poate functiona normal dupa 20 de minute, aparatul trebuie dus la service. 1. Apasati butonul “ESC” pentru a reveni in modul stand by, scoateti grupul de infuzare si curatati filtrul. 2. Operati aparatul conform sectiunii “Pornirea aparatului”, aparatul va functiona normal. 1. Apasati butonul “ESC” pentru inapoi, atunci cand aparatul intra in modul stand by deschideti butonul de control al aburilor si faceti apa fierbinte pentru 10 secunde, apoi opriti-l, repetati acest proces de 4-5 23 www.heinner.com 1300W, 50-60Hz, 220-240V Water Pipe Block”. 9 Warning Clean Dregs Box (Atentie curatati sertarul de coletare a zatului) 10 Warning Sensor Short (Atentie senzor defect) 11 Energy Saving Any Key Run (Economisire energie, apasati orice tasta) 12 Warning High Temperature (Atentie temperatura ridicata) 13 Warning Clean brew group (Atentie curatati grupul de infuzare) 14 Warning Ready For Descaling (Atentie aparat In timpul procesului de clatire sau de preparare a cafelei, pompa functioneaza normal dar nu pompeaza apa de trei ori iar prin duza de cafea curge foarte putina cafea, dupa cateva secunde apare afisat pe ecran “Warning Water Pipe Block”. Debimetrul este defect. Exista obiecte straine in aparat, rezervorul de apa nu poate fi pozitionat corect la locul sau, valva anti-picurare nu poate fi deschisa. Ecranul va afisa acest mesaj dupa fiecare zece cesti de cafea preparate. ori, aparatul de cafea va functiona normal. Trimiteti aparatul la service pentru schimbarea debimetrului. Indepartati toate obiectele straine din aparat. Trebuie sa deschideti usa laterala si sa scoateti sertarul de colectare a zatului si sa-l goliti, apoi sa-l asezati inapoi in aparat iar acesta va functiona normal. Va avertizeaza ca senzorul de temperatura din aparat s-a defectat. Trimiteti aparatul la service. Va avertizeaza ca aparatul a intrat in modul de economisire a energiei. Apasati orice tasta pentru ca acesta sa revina la modul de functionare. Va avertizeaza ca temperatura din aparat este prea ridicata. Opriti alimentarea electrica a aparatului si asteptati ca acesta sa se raceasca. Dupa fiecare douazeci de cafele Trebuie sa scoateti grupul de preparate, ecranul LCD va afisa infuzare, sa-l curatati in chiuveta si mesajul “clean dregs box”, dupa apoi sa-l asezati inapoi in aparat. indepartarea sertarului de colectare a Aparatul va functiona normal. zatului ecranul va afisa mesajul “clean brew group”. Atunci cand cantitatea de apa a atins In acelasi timp, trebuie sa intoarceti valoarea preconfigurata, aparatul va butonul de control al aburilor in porni programul de detartrare pozitia pornit si aparatul va incepe 24 www.heinner.com 15 pregatit pentru detartrare) Warning Please Add Beans (Atentie adaugati boabe de cafea) VIII. 1300W, 50-60Hz, 220-240V automata. programul de detartrare. Va avertizeaza ca rasnita de cafea este Adaugati boabe de cafea in rasnita goala. si apasati orice tasta pentru a reveni in modul stand by. FIGURI ATASATE Scoateti cardul de protectie inainte de folosire 25 www.heinner.com 1300W, 50-60Hz, 220-240V Buton ajustare cantitate cafea macinata Buton power Cablu alimentare detasabil Duza detasabila cafea Numar mare, densitate mare Numar mic, densitate mica Intrerupator frontal Dispozitiv pentru spuma Rasuciti in sensul invers al acelor de ceasornic Surubelnita cu cap indoit Maner rotativ 26 www.heinner.com 1300W, 50-60Hz, 220-240V Garnitura pulverizator Gura Garnitura cap Garnitura infuzare cap infuzare garnitura (rosie) (rosie) Garnitura Gura infuzare pulverizator garnitura (rosie) (rosie) (S) Garnitura gura infuzare I (rosie) (M) infuzare (L) I II Garnitura gura infuzare II (rosie) (S) 27 www.heinner.com 1300W, 50-60Hz, 220-240V IX. FISA TEHNICA Putere 1300W Alimentare 220-240V, 50/60Hz Nivel de zgomot <78dB Culoare: Inox ELIMINAREA DESEURILOR IN MOD RESPONSABIL FATA DE MEDIU Poti ajuta la protejarea mediului! Va rugam sa respectati regulamentele si legile locale: duceti echipamentele electrice nefunctionale catre un centru de colectare al echipamentelor electrice uzate. HEINNER este marca inregistrata a companiei Network One Distribution SRL. Celelalte branduri, denumirile produselor sunt marci înregistrate ale respectivilor deţinători. Nicio parte a specificatiilor nu poate fi reprodusa sub orice formă sau prin orice mijloc, utilizata pentru obtinerea unor derivate precum traduceri, transformari sau adaptari, fara permisiunea prealabila a companiei NETWORK ONE DISTRIBUTION. Copyright © 2013 Network One Distibution. All rights reserved. http://www.heinner.com, http://www.nod.ro Acest produs este proiectat si realizat in conformitate cu standardele si normele Comunitatii Europene Importator: Network One Distribution Europolis Logistic Park, Italia Street, 1-7, Chaijna, Ilfov, Romania Tel: +40 21 211 18 56, www.heinner.ro , www.nod.ro 28 www.heinner.com 1300W, 50-60Hz, 220-240V AUTOMATIC ESPRESSO MAKER www.heinner.com Model: HEMA-2500 Automatic espresso maker with LCD display Sonneo 2500 Capacity: 1.8 L Power: 1300W Color: Stainless steel 29 www.heinner.com 1300W, 50-60Hz, 220-240V Thank you for purchasing this product! I. INTRODUCTION Before using the appliance, please read carefully this instruction manual and keep it for future reference. This instruction manual is designed to provide you with all required instructions related to the installation, use and maintenance of the appliance. In order to operate the unit correctly and safety, please read this instruction manual carefully before installation and usage. II. CONTENT OF YOUR PACKAGE Automatic espresso maker User manual Warranty card III. SAFETY PRECAUTIONS 1. Before using check that the voltage of wall outlet corresponds to rated voltage marked on the rating plate. 2. This appliance has been incorporated with a grounded plug. Please ensure the wall outlet in your house is well earthed. 3. If the supply cord is damaged, it must be replaced by a special cord or assembly available from the manufacturer or its service agent. 4. To protect against fire, electric shock and injury to persons do not immerse cord, plug, in water or other liquid. 30 www.heinner.com 1300W, 50-60Hz, 220-240V 5. Remove plug from wall outlet before cleaning and when not in use. Allow appliance cool down completely before taking off, putting on components or before cleaning. 6. Always connect plug to appliance first, then plug cord in the wall outlet. To disconnect, turn all the control to “off”, then remove plug from wall outlet. 7. Do not operate any appliance with a damaged cord or plug or after the appliance malfunctions, or is dropped or damaged in any manner. Return appliance to the nearest authorized service facility for examination, repair or electrical or mechanical adjustment. 8. The use of attachments not recommended by the appliance manufacturer may result in fire, electric shock or injury to person. 9. Place appliance on flat surface or table, do not hang power cord over the edge of table or counter. Please unplug the power outlet when you go out. 10. Ensure the power cord do not touch hot surface of appliance. 11. A fire may occur if the coffee machine is covered or touching flammable material. 12. Do not place the coffee machine on or near a hot gas or electric burner, or in a heated oven. 13. Place the coffee machine where far from the wall or other parts for 2 inches. 14. Never touch the pins of plug when plugging or unplugging the power outlet. 15. The environmental temperature of operating or storing shall be more than 0℃, and be less than 45℃,the environment shall be dry and good ventilation. 16. Never use the coffee machine in high temperature, high magnetic field and humidity, do 17. not place the coffee machine on hot surface or beside fire or another electrical appliance, such as on the top of refrigerator, avoid to be damaged. And also never place another objects on the top of coffee machine. 18. To disconnect, remove plug from wall outlet. Always hold the plug and never pull the cord. 19. Do not use appliance for other than intended use and place it in a dry environment. 20. Close supervision is necessary when your appliance is operating. Do not let the appliance 21. on the standby state for a long time. And never allow the children or inform persons to operate the appliance. 22. Be careful not to get burned by the steam. 23. Some parts of appliance are hot when operated (such as stainless decorated plate, cup shelf, top cover, steam tube and froth unit and so on), so do not touch directly. Only use the handle or knob. 31 www.heinner.com 1300W, 50-60Hz, 220-240V 24. Clean and maintain the coffee machine regularly according to the section of “Cleaning and maintenance” to ensure the good quality of coffee and the life of appliance. And add lubricant oil on the running parts regularly. 25. If the appliance will not be used for a long time, firstly clean all the detachable components, and dry them for storage. 26. If the coffee machine is in the states of making coffee, making hot water and making steam, never open the side door to remove the component and shut off the power. The detail operation refers to the operation manual. 27. When the appliance prompts trouble, never operation the appliance, do not place any foreign object into the brewer. 28. This appliance is not intended for used by persons (including children) with reduced physical, sensory or mental capabilities, or lack of experience and knowledge, unless they have been given supervision or instruction concerning use of the appliances by a person responsible for their safety. 29. Children should be supervised to ensure that they do not play with the appliance. 30. Never use the detergent or hot water for cleaning the brewing component, to avoid the running component is lack of lubricant oil and the component will be distortion as the high temperature. 31. Do not let the coffee machine operate without water. 32. Do not use outdoors. 33. Household use only. 32 www.heinner.com 1300W, 50-60Hz, 220-240V IV. PRODUCT DESCRIPTION 33 www.heinner.com V. 1300W, 50-60Hz, 220-240V USING INSTRUCTIONS For the first use: 1. Remove the coffee machine from the package, and check if the accessories conform to the list. Assemble the drip tray to the appliance (see Fig.1) 2. Make sure the protection insert on the brewer is removed before operation (see Fig.2). 3. Clean all the detachable components according to the section of “CLEANING AND MAINTENANCE”. Then assemble them completely. 4. Remove the detachable water tank (see Fig.3), and fill it with fresh water to the MAX level (see Fig.4), never fill in milk, mineral water or other water. Then assemble the water tank with water into the appliance properly. Note: the water tank is detachable, when fill water, it is strongly recommended to remove it for filling water. Then assemble the water tank in place completely. 5. Open the bean box cover (see Fig.5), then fill bean box with fresh coffee beans and close the cover. 6. Before operation, you can adjust the powder quantity adjusting knob (see Fig.6), under the same mode (for example, make big cup coffee), turn it to the “+” direction, the coffee will be strong, namely, the dregs cake will be thicker; in reverse, turn it to the “-” direction, the coffee strength will be light, and the dregs cake will be thinner. It is recommended to turn it on the medium position during normal operation. Start appliance: 1. Place the coffee machine on a flat surface, the appliance is equipped with a turntable on the bottom, you can rotate the coffee machine in any direction for convenient operating. Connect the detachable power cord into the appliance firstly, then plug it into the power outlet. Make sure the power cord is assembled in correct order (see Fig.7). Make sure the brewer and dregs box are in position, then close the side door (The appliance has an interlock switch, the appliance will not operate if the side door is opened). 2. Turn the steam control knob to the OFF position (see Fig. 8), make sure the drip tray is in place, and make the froth unit toward the drip tray, place the coffee cup under the detachable coffee outlet (see Fig.9), if you want to make espresso coffee, you shall warm the cup firstly on the warming plate for better taste. 34 www.heinner.com 1300W, 50-60Hz, 220-240V 3. Turn on the power switch (on the back of appliance, see Fig.7), make sure the end of power switch with “O” is tilting. And the LCD will display . 4. Then press , button once the LCD will display , the coffee machine will begin to self test. 5. After testing, if the appliance is normal, the appliance will start heating, the LCD will display 6. When the LCD is displaying , the appliance will enter the cleaning process. After cleaning, the LCD will display while, the LCD will display , after a (we consider the state is standby state, on the following, we use “standby state” instead of it) it prompts you to use the appliance. And at the time, you can make coffee. Making coffee: Making one big coffee cup: 1. On the standby state, press the display button once, button once, the LCD will , the appliance will start brewing. 2. When the pump starts pumping water for the first time, the LCD will display: . 3. When the pump starts pumping water for the second time, LCD will display: . 35 www.heinner.com 1300W, 50-60Hz, 220-240V 4. After pumping water, the LCD will display: . 5. After making the coffee, the LCD will display: , the appliance is on stand-by state. Adjust the thickness of coffee powder: The means of adjusting is that turn the knob in the bean box on the duration of grinding beans. The larger number, the rougher powder; the smaller number, the thinner powder. The knob can be turned in clockwise or anti-clockwise, see Fig.10). Caution: Before adjusting the thickness, first make sure all the coffee bean in the bean box has been ground. Note: Because some residue coffee powder deposit in the grinder, the adjusted coffee powder can be brewed after making 2-3 cups coffee, you may conduct the second adjustment after making 2-3 cups coffee and then judge whether the thickness is satisfied. Making one medium coffee cup: 1. On the stand-by state, press the button once, the LCD will display: , the appliance will start brewing. 2. The following operation and display is similar with the above section of “Making one big cofee cup”, the only difference is that the one is one big coffee cup, the other is one medium cup coffee, the corresponding display will change. Making one small coffee cup: 1. In the standb-y state prest the button, the LCD will dsiplay , the appliance will start brewing. 2. The following operation and display is similar with the above section of “Making one big coffee cup”, the only difference is that one is one big coffee cup, the other is one small coffee cup, the corresponding display will change. 36 www.heinner.com 1300W, 50-60Hz, 220-240V Making two big coffee cups: 1. In the stand-by state press the button once, the LCD will display , the appliance will start brewing. 2. Within 5 seconds, press the button, the LCD will display: , at the same time the first coffee cup is brewing. 3. After 2 seconds the LCD will display , the appliance is brewing the first coffee cup (the process is the same as the one for “Making one big coffee cup). 4. After making the first big coffee cup, the LCD will display , the appliance will start brewing the second coffee cup (the process is the same as for the first coffee cup). 5. After the two coffee cups have been obtained, the appliance will automatically return to standy-by state and the LCD will display: . Making two medium coffee cups: The steps are similar with the ones from above section of “Making two big coffee cups”, the only difference is that you have to press the butoon twice within 5 seconds, and the coresponing display is changed to medium coffee. Making two small coffee cups: The steps are similar with the ones from above section of “Making two big coffee cups”, the only difference is that you have to press the butoon twice within 5 seconds, and the coresponing display is changed to small coffee. 37 www.heinner.com 1300W, 50-60Hz, 220-240V Making hot water: Note:If you want to make hot water and make steam, turn the froth switch (showed in Fig.11) to the position. On the standby state, turn the froth switch to the control knob, the LCD will display position. Turn on the steam , the hot water will come from the froth unit outlet, when the desired hot water has been obtained, turn off the steam control knob, the appliance will stop making hot water, and return to the standby state. Note: the steam control knob should be turned over to the water will not flow out and the LCD will not show: position, if not so, . Making steam: Turn the froth switch to the position. In the stand-by state press the button once, the LCD will display: when the preheating process is finished, the LCD will display: , then turn on the steam control knob (Fig. 8), the steam will come out from the froth unit outlet and the LCD will display: want to stop making steam, press the . If you button again, the LCD will display , then turn off the steam control knob. When the LCD is displaying , take off the frouth unit (see FIG.12), you shall turn on the steam control knob again and the water will come out for lowring the temperature and the LCD will display: ; when the temperature has been lowered to the setting value, the LCD will display: , then turn off the steam control knob. The appliance will return to stand-by state and the LCD will display: . 38 www.heinner.com 1300W, 50-60Hz, 220-240V Note: after making steam, if you turn off the steam control knob directly, the LCD will display , at the time, if you turn on the steam control knob again, the appliance will continue to make steam, the LCD will display . Note: the steam control knob should be turned over to position, if not so, the steam will not come out. Froth milk: In the standby state, you shall turn the froth switch to the position. Press the button and the LCD will display: . When it got the preheat temperature, LCD will show: , insert the suck milk tube into the milk, turn the froth switch (see Fig.11) to position. Turn on the steam control knob, and frothed milk will flow out from the froth unit outlet, at this time, the LCD will show . If you want to stop steaming press the button and the LCD will display: , turn off the steam control knob. When the LCD is showing: , take off the froth unit (Fig. 12), turn on steam control knob to release the water and lower temperature, and water will come out from the outlet, at the same time LCD is showing . When the temperature is low enough, LCD will show , turn off the steam control knob, then the appliance will return to the standby state, and LCD will show: Note: If you want to froth milk again, never press the . button to exit, only turn off the steam knob and the LCD will display: , repeat the frothing milk by turning the steam knob to the position and the LCD will display: . 39 www.heinner.com 1300W, 50-60Hz, 220-240V Automatic descaling: When the LCD is displaying: , turn on the steam control knob, the LCD will display , the icon of descaling will display in a dynamic form. And the appliance will pump water discontinuously, when 1L water has been pumped, the LCD will display , at the time, remove the detachable water tank, then fill it with fresh water, then replace the water tank into the appliance. The appliance will pump water discontinuously again and the LCD will display , the icon of descaling will display in a dynamic form again. When the LCD is displaying , the process of descaling is finished, you shall turn off the steam control knob and the appliance will return the standby state. Program settings: In the standby state, press the the LCD will display: to enter the program setting main menu, , the icon will stand on the default menu (1. 1 cup capacity), the function of all the buttons on the control panel is as following: 1. Press the to confirm selected menu or enter next menu; 2. Press the to exit current menu,or return above menu; 3. Press the or button to select the desire menu, turn up or turn down. 40 www.heinner.com 1300W, 50-60Hz, 220-240V The following program setting has itself default value when coming out from the factory, during operating the coffee machine, if you prefer to the default setting, you can omit the following program setting operation. But if you want to operate the coffee machine in a more effective manner, you can adjust corresponding data according to your desired or experience. The program setting includes: (cup capacity, temperature, cup warmer, water hardness, total coffee, energy saving, default value, descaling, and some setting also includes sub-menu. The details of setting are as following operations: Cup capacity: In the standby state, press the button once to enter the program settings menu, the LCD will display: , the icon will stand on the default menu (cup capacity). After entering the main menu, press the once, the LCD will show: button . At this time, you have three choices; you can adjust to one small cup capacity, one medium cup capacity, or one big cup capacity. Adjusting one medium cup capacity: On the interface of: , press the button again, the LCD will display: . The one medium cup capacity has 6 settings: 80 ml (2.7 oz), 90ml (3.0 oz), you can select the desired setting by moving the icon with and buttons, after selecting, press the button to confirm it and the LCD will return to the interface of: , 41 www.heinner.com 1300W, 50-60Hz, 220-240V Then you can press the button to return to the interface of: . Adjusting one small cup capacity: On the interface of cup”, then press the , press the or buttons “Small button, the LCD will display: , One small cup capacity has 6 settings: 30ml (1.0oz), 40ml (1.4 oz), 50ml (1.7oz), 60ml (2.0oz), 70ml (2.4 oz), 80ml (2.7 oz), the icon is standing on the default setting of 40ml (1.4 oz). You can select the desired setting by moving the icon with button. After selecting, press the the LCD will return to the interface of: the button to return to the interface of: and button for confirmation and , then you can press . 42 www.heinner.com 1300W, 50-60Hz, 220-240V Adjusting one big cup capacity: On the interface of: , press the or move the icon to “Big cup”, then press the LCD will display: button to button for confirmation. The . The one big cup capacity has 7 settings: 140ml (4.7oz), 150ml (5.0 oz), 160ml (5.4 oz), 170ml (5.7 oz), 180ml (6.0 oz), 190ml (6.4 oz), 200ml (6.8oz). The icon is standing on the default setting of 150ml (5.0 oz) , you can select desired setting by moving the icon with selecting, press the and buttons. After button for confirmation, and the LCD will return to the interface of: . Then, you can press the the interface of: Temperature: button to return to . After entering the main menu, press the or buttons to move the icon to the “Temperature” position. The LCD will display: press the , then button to access the sub-menu of adjusting the coffee temperature, and the LCD will display: setting of “Medium”. Press or , the icon is standing on the default buttons to move the icon 43 www.heinner.com 1300W, 50-60Hz, 220-240V to select the desired setting. After selecting press the button to confirm it and the LCD will return to the interface of: . Cup warmer: After entering the main menu press the or buttons to move the icon to the “Cup warmer”, position; the LCD will display: press the , then button to enter the sub-menu of turning on or turning off the warming plate, and the LCD will display: setting of “Off”. You can press the , the icon is standing on the default or buttons to move the icon to turn on or turn off the warming plate. After selecting, press the to confirm it, and the LCD will return to the interface of: button . 44 www.heinner.com 1300W, 50-60Hz, 220-240V Water hardness: After entering the main menu, press the or icon to the “Water hardness” position. The LCD will display: Then press the button to move the . button to enter the sub-menu of adjusting the water hardness , and the LCD will display: . The sub-menu of adjusting the water hardness has 4 grades. The water hardness grade is considered that the coffee machine will automatic descaling when corresponding water quantity has achieved, for example 1 grade, it is considered that the coffee machine will automatic descaling when the water quantity has achieved 80L, and 2 grade is 60L, 3 grade is 50L, and 4 grade is 40L, you can select the desired grade by moving the icon with or buttons. After selecting, press the button to confirm it, and the LCD will return to the interface of: . 45 www.heinner.com 1300W, 50-60Hz, 220-240V Total coffee: After entering the main menu, press the or buttons to move the icon to the “Total coffee” position, and the LCD will display: Then, press the . button enter the sub-menu of seeing the total cups which user has made. The LCD will display: . After viewing, press the button to return to the interface of: . Energy saving: After etering the main menu, press the or icon to “Energy saving” position, and the LCD will display: press the buttons to move the . Then, button to enter the sub-menu of energy setting mode. The LCD will display: , which means you have two choices: Energy saving – turning on, or Energy saving turning Off. 46 www.heinner.com 1300W, 50-60Hz, 220-240V Turning on the energy saving mode: On the interface of: the the icon is standing on the default setting of “On”. Press button once and the LCD will display: . The energy saving mode has 6 values: 15 Min, 30 Min, 45 Min, 60Min, 90 Min, 120 Min. The icon is standing on the default setting of 60Min and you can select desired value by moving the icon with and buttons. After selecting, press the button to confirm it. The LCD will return to the interface of: you can press the button to return to the , then interface of: . Turning off the energy saving mode: On the interface of: or display: mode the icon is standing on the default setting of “On”, press buttons to move the icon tot the “Off” position and the LCD will . Then, press the button once to turn off the energy saving and the LCD will return to the interface off: . 47 www.heinner.com 1300W, 50-60Hz, 220-240V Default values: After enetering the main menu, press or butons to move the icon to the “Default value” position and the LCD will display: , Then, press the button once, and the LCD will display: . The icon is standing on the default setting of “No”, and you can select yes by pressing the or button to move the icon to the “Yes” position. After selecting, you shall press the interface off: button to confirm it and the LCD will return to the . Note: If you selected “Yes”, all the programs set before will be ineffective, the program will return to the default value, if you selected “No”, all the program set before will be effective. Descaling: After entering the main menu, press or to the “Descaling” position. The LCD will display: buttons to move the icon . Press the button once and the LCD will display: , the icon is standing on the defaullt setting of “No”, and you can press the button and the appliance will return to the main menu. 48 www.heinner.com 1300W, 50-60Hz, 220-240V If you want to descale, you shall select “Yes” by pressing the or button to move the icon to the “Yes” position. After selecting, press the button to confirm it and the appliance will enter the force descaling mode (the operation and display are the same as the automatically descaling program), after descaling, the appliance will return the standby state directly. Oprirea aparatului: In the standby state, press the button once and the appliance will stop operating. The LCD will still display: . If you want to stop the machine, you can unplug the power cord from outlet. Note: After all of the programs have been adjusted, press the button to return to the standby state, all the adjusted data will be stored. It will not be changed until you adjust them in the next time or return to the default value. VI. CLEANING AND MAINTENANCE Note: Maintaining the cleanness of the appliance can improve the coffee quality, and prolong the appliance’s life-span. It must be noted that all of the components shall not be cleaned in the dishwasher. After cleaning, wipe them or wait for them to dry, never dry in/ over the toaster or in the microwave oven. 1. The daily maintenance of full assembly:Make sure the power outlet is unplugged before cleaning and maintenance, never use cleanser for wiping outside surface of coffee machine. 2. Never immerse the appliance in water or any other liquid. 3. The daily cleaning of water tank:The cleaning grade of water tank is the most important factor for coffee quality. Then maintain the cleaning of water tank is the most important condition which assures the high quality of coffee. Remove the water tank from the coffee machine and clean it with water. 49 www.heinner.com 1300W, 50-60Hz, 220-240V Note: Maintaining the cleanness of the appliance can improve the coffee quality, and prolong the appliance’s life-span. It must be noted that all of the components shall not be cleaned in the dishwasher. After cleaning, wipe them or wait for them to dry, never dry in/ over the toaster or in the microwave oven. 4. The daily maintenance of full assembly:Make sure the power outlet is unplugged before cleaning and maintenance, never use cleanser for wiping outside surface of coffee machine. 5. Never immerse the appliance in water or any other liquid. 6. The daily cleaning of water tank:The cleaning grade of water tank is the most important factor for coffee quality. Then maintain the cleaning of water tank is the most important condition which assures the high quality of coffee. Remove the water tank from the coffee machine and clean it with water. 7. Clean the bean box: According to your desire or when you need change the coffee beans, you need clean the bean box. Open the bean box cover, remove the coffee beans with hand or other tool, it must be noted a little beans will deposit under the box cover, never remove them with hand. 8. Clean the brewer:The coffee machine is equipped with a detachable brewer, to ensure the offee quality and the stability of running, please cleaning the brewer daily. Rinse the brewer in the water for cleaning. Never use cleanser and disinfector for cleaning. Wipe the brewer with dry cloth, then assemble it into the coffee machine. The filtrating sheet in the brew group assembly shall be disassembled for cleaning if you do not want to use for a long time, 9. When disassembled, you shall use the attached rotating handle(see Fig.13-Fig.17). 10. When disassemble and assemble the brewer, if it is blocked, please contact with our authorized service facility for repairing. 11. Never clean the brewer with cleanser and disinfector. 12. Never dry the brewer with hair drier or other electrical heating appliance. 13. Clean the dregs box: when the LCD prompts clean the dregs box, you shall open the side door and empty the dregs box, otherwise the appliance will not operate. 14. Empty the drip tray: there is a red object in the drip tray, it is buoy, it will sense the water level automatically. Once the buoy is fully exposed, it prompts you shall empty the drip tray, after empty, assemble it into the appliance again. 15. The attached accessory bag include four sealing rings, they are parts which is easy to damage and standby parts (see Fig.18), two for the brewer assembly (see Fig.19), and the other two for the brew mouth (see Fig.20). Any of sealing rings on the brewer assembly or brew mouth is missed or damaged, you must replace it with corresponding sealing ring, the coffee machine will continue to work. 50 www.heinner.com VII. 1300W, 50-60Hz, 220-240V TROUBLESHOOTING NO. ABNORMAL WORKING STATES AND CAUSES REPAIR AND CORRECTIONS It prompts that the door is not closed well Close the door, the DISPLAYS AND SYMPTOMS 1 Warning Door open and appliance will begin to work 2 Warning Miss Brew Group It prompts that the brew group is not placed in Position the brew group place or is missing. properly, and the coffee maker will return to normal state. The user open the side door and draw out the 1. Unplug the power outlet; brew group by mistake when the brew group is 2.Turn the brew group handle running, at the time, the water inlet of brew to make the clip of brew group group has connected with brewing outlet, the on the original state, press the brew group cannot be removed out. brew group bracket with a little force, make the brew group is connected transmission with shaft the of reducer, and close the brewing switch( if the brewing switch cannot be closed, please send the machine to the service center for repairing) 3.Operate according to the section of START APPLIANCE, the coffee machine will operate normally. 3 Warning Brew Group Block After power on, and the motor is running, but Send to the service center for after a few seconds, the display is showing repairing and changing the "Warning Brew Group Block". It means that the journey switch. journey switch is malfunction, during normal operation. 51 www.heinner.com 1300W, 50-60Hz, 220-240V After power on, the motor will not run, after a few seconds, the display will show "Warning Send to the service center for changing the brewing motor. Brew Group Block". It is because the brewing motor is malfunction, during normal operation. 4 Warning It prompts the brew group is not placed in Only the brew group is placed Miss Dregs Box place or missing. in place completely, the appliance will operate; It prompts the water tank is lack of water, the Fill the water tank with water.; buoy is not on the best state. The water quantity exceeds 250ml. The buoy is blocked on the bottom of slip groove. Have foreign objects. 5 Warning The coffee maker will operate Fill Water tank normally after removing out the foreign objects. Check the buoy whether is floating The water quantity exceeds 250ml,the buoy is Send to the service center for 6 Please Turn off knob 7 floating more agility. changing the sensing switch It prompts the steam control knob has been Turn the steam control knob to turned on. the“ 0 ” position. Warning If the environment temperature is below 0 Place the coffee machine in the No Sensor degree, it will “no sensor” displayed after start environment of 25° for 10-20 the appliance. minutes, it will operate normally; If it can not work normally after 20 min, please send the coffee maker to service center. 52 www.heinner.com 8 1300W, 50-60Hz, 220-240V Warning Water Coffee machine is stored for a long time and 1.Press the"ESC" button Pipe Block not work. The machine is not cleaning before to return to the standby state, storing. Result the holes of filter is blocked. remove the brew group and After start appliance, the pump will pump clean the filter water for three times, and the coffee outlet will 2.Operate according to the not be water flowing out, after a few seconds, section of START APPLIANCE, the display is showing"Warning Water Pipe the coffee machine will operate normally. Block" The machine is stored for a longtime, when 1.Press the"ESC" button to start appliance, the noise of pump has return , when the machine obviously increase, and the pumping water is enters the standby state, turn not three times, the coffee outlet has not water on the steam control knob to flowing out, after a few seconds, the display making hot water for 10s, then will show “Warning Water Pipe Block". turn off it, repeat for 4~5 cycles, the coffee machine will operate normally. When rinse machine state or making coffee Send to the service center for state, the pump is working normally, but it will changing the flow meter. not pump water for three times, the coffee outlet has a little coffee flowing out, after a few seconds, the display will show “Warning Water Pipe Block " . The flow meter is malfunction The four orientation grooves has foreign Removing objects, the water tank cannot be positioned in objects. out the foreign place properly, the anti-drip valve cannot be opened 9 Warning After every making ten cups coffee,the LCD You shall open the side door Clean Dregs Box will display it. and remove the dregs box and empty the dregs, then replace it into the machine, the appliance will operate normally. 10 11 12 Warning It prompts the temperature sensor in the Sensor short coffee machine is short circuit. Send it to service center. Energy Saving It prompts the machine is on the energy saving Press any key to return to the Any Key Return mode working state. Warning It prompts the temperature in the appliance is Cut the power off, and wait it High temperature too high. cool down. 53 www.heinner.com 13 1300W, 50-60Hz, 220-240V Warning After every making twenty cups coffee,the You shall remove the brew Clean brew group LCD will prompt “clean dregs box”, after group, then clean it in the tap, removing dregs box, the LCD will prompt clean then brew group machine, the appliance will replace it into the operate normally. 14 Warning When the water quantity has achieved At the same time, you shall turn Ready For presetting value, the machine will enter the on the steam control knob, Descaling program of automatic descaling and the machine will enter the program of descaling 15 Warning It prompts the coffee beans box is lack of beans Please Add Beans Add coffee beans into the box and press any keys to return the standby state VIII. ATTACHED FIGURES 54 www.heinner.com 1300W, 50-60Hz, 220-240V 55 www.heinner.com 1300W, 50-60Hz, 220-240V 56 www.heinner.com IX. 1300W, 50-60Hz, 220-240V TECHNICAL FICHE Power 1300W Voltage 220-240V, 50/60Hz Noise level <78dB Color: Stainless steel 57 www.heinner.com 1300W, 50-60Hz, 220-240V Environment friendly disposal You can help protect the environment! Please remember to respect the local regulations: hand in the non-working electrical equipment’s to an appropriate waste disposal center. HEINNER is a registered trademark of Network One Distribution SRL. Other brands and product names are trademarks or registered trademarks of their respective holders. No part of the specifications may be reproduced in any form or by any means or used to make any derivative such as translation, transformation, or adaptation without permission from NETWORK ONE DISTRIBUTION. Copyright © 2013 Network One Distibution. All rights reserved. www.heinner.com, http://www.nod.ro http://www.heinner.com, http://www.nod.ro This product is in conformity with norms and standards of European Community Importer: Network One Distribution Europolis Logistic Park, Italia Street, 1-7, Chaijna, Ilfov, Romania Tel: +40 21 211 18 56, www.heinner.com , www.nod.ro 58