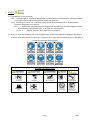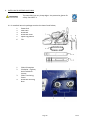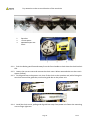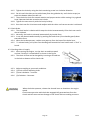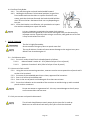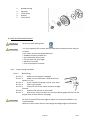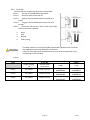
1
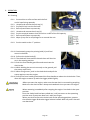
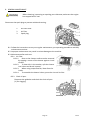
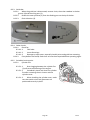
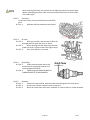
OPERATION NOTES Read these notes before you start working with the chainsaw, and keep the notes for future reference. Read the instructions carefully and familiarise yourself with all of the control elements so that you are able to safely operate the device. Always keep these operating instructions together with the chainsaw Risk of hearing defects. Under normal operating conditions this device can expose the operator to a noise level of 80 dB (A) or more. Noise protection must be worn (SEE NOTE 1). Please observe local regulations when operating this device. Intended/Not intended use. This product is designed to for use by a trained operator for cutting logs and felling trees. The chainsaw is used to; o Saw trunks o Square timbers o Cutting branches o Only material’s form wood may be worked on. Operators of this machine, MUST read this operators manual and be fully trained and familiar with this chainsaw and think over all possible dangers. Sufficient Personal Protective Equipment (PPE) is to be worn and according to the operating instructions during use. Damage or injuries resulting from mis-use are the responsibility of the operator. No liability shall be taken by the supplier or manufacturer for mis-use. Only use saw chains and guide bars recommended in the operating instructions for the model of machine. Any modifications to the machine will void the manufacturer’s warranty. This equipment is designed for use in the home garden. Page 2 Rev 2 CONTENTS Page No/No’s Section Description OPERATION NOTES 2 1. SAFETY 4-6 2. SAFE OPERATION 6-9 3. MACHINE PARTS 10 4. INSTALLING GUIDE BAR AND CHAIN 11 - 14 5. FUEL & CHAIN OIL 14 6. OPERATION 15 - 16 7. SAWING 17 - 19 8. GENERAL MAINTENANCE 20 - 25 9. STORAGE 26 10. ENVIROMENTAL DISPOSAL 26 11. WARRANTY 26 12. TROUBLE SHOOTING 27 13. SPECIFICATIONS 28 14. GENPOWER CONTACT DETAILS 29 15. DECLARATIONS 30 NOTE 1 31 Page 3 Rev 2 1. SAFETY. 1.1. The operator of the machine; 1.1.1. Is responsible for and has a duty of care in making sure that the machine is operated safely and in accordance with the instructions in this user manual. 1.1.2. Should never leave it in a condition which would allow an untrained or unauthorised person/s to operate this machine. 1.1.2.1. Should take care and show due diligence for the safety of and with regard to those around whilst using the machine, to include but not limited to; 1.1.2.1.1. Elderly, children, pets, livestock and property. 1.2. Some or all of the following PPE, Warning Signs and symbols may appear throughout this manual and you must adhere to their warning/s. Failure to do so may result in personal injury. SEE NOTE 1. Personal Protective clothing (PPE) Warning Signs and Symbols Page 4 Rev 2 1.3. Carbon Monoxide 1.3.1. Carbon monoxide is a colourless and odourless gas. Inhaling this gas can cause death as well as serious long term health problems such as brain damage. 1.3.2. The symptoms of Carbon monoxide poisoning can include the following; 1.3.2.1. Headaches, Dizziness, Nausea, Breathlessness, Collapsing or Loss of consciousness. 1.3.2.2. Carbon monoxide symptoms are similar to flu, food poisoning, viral infections and simply tiredness. That’s why it’s quite common for people to mistake this very dangerous poisoning for something else. 1.3.3. To avoid Carbon monoxide poisoning DO NOT Use Petrol/Diesel powered equipment inside a home or garage even if doors and windows are open. 1.3.4. If you think you or someone around you has been affected by carbon monoxide poisoning; 1.3.4.1. Get fresh air immediately. 1.3.4.2. Open doors and windows, turn off machine and leave the affected area. 1.3.4.3. See your doctor immediately or go to hospital - let them know that you suspect carbon monoxide poisoning. 1.3.5. DO NOT use in an enclosed area or a moving vehicle. 1.4. General fuel safety. 1.4.1. Fuel Safety additional information can be obtained from the Health and Safety Executive (HSE) document SR16. 1.4.2. All fuels are Flammable. 1.4.3. Keep away from all ignition sources i.e. Heaters, Lamps, sparks from Grinding or welding. 1.4.4. Hot work on tanks that have contained fuel is extremely dangerous and should not be carried out. 1.4.5. Keep work area clean and tidy. 1.4.6. Clean up all spills promptly using correct methods i.e. absorbent granules and a lidded bin. 1.4.7. Dispose of waste fuels correctly. Page 5 Rev 2 1.5. Petrol safety. 1.5.1.1. Always fuel and defuel in well-ventilated area. 1.5.1.2. Always wear correct, suitable and fit for purpose Personal Protective Equipment (PPE), suggested items are as follows, but are not limited too. 1.5.1.3. Hand protection. 1.5.1.4. Protective clothing. 1.5.1.5. Respiratory protective equipment should be used when in an unventilated area. 1.5.1.6. When defueling always use a propriety fuel retriever. 1.5.1.7. Always carry fuel in the correct and clearly marked container. 2. SAFE OPERATION 2.1. Keep your body warm, especially your head, neck, feet, ankles, hands and wrists. 2.2. Maintain good blood circulation by performing vigorous arm exercises during frequent work breaks. Keep the saw chain sharp and the saw, including the AV (Anti-Vibration) system, well maintained. 2.3. A blunt chain will increase cutting time, and pressing a blunt chain through wood will increase the vibrations transmitted to your hands. 2.4. A saw with loose components or with damaged or worn AV buffers will also tend to have higher vibration levels. 2.5. Limit the hours of operation. 2.6. All the above mentioned precautions do not guarantee that you will not sustain white finger disease or carpal tunnel syndrome. Therefore, continual and regular users should monitor closely the condition of their hands fingers. If any of the above symptoms appear, seek medical advice immediately. Before using our products, please read this manual carefully to understand the proper use of your chainsaw. Never operate a chainsaw when you are tired, ill, upset, or under the influence of medication that may make you drowsy, or if you are under the influence of alcohol or drugs. Operate the chainsaw only in well ventilated areas. Never start or run the engine inside a closed room or building or a poorly ventilated area. Exhaust fumes contain dangerous carbon monoxide which can kill. Never use in high wind, bad weather, when visibility is poor or in very high or low temperatures. Always check the tree for dead branches which could fall during the felling operation. Page 6 Rev 2 Use safety and slip-resistant footwear, protective trousers, snug fitting clothing and eye, hearing and head protection devices. Use the anti-vibration (AV) glove. It is believed that a condition called Raynaud’s phenomenon, which affects the fingers of certain individuals may be brought about by exposure to vibration and cold. Loss of colour and numbness in the fingers. The following precautions are strongly recommended because the minimum exposure which might trigger the ailment is unknown. Always use caution when handling fuel. Wipe up all spills and then move the chain saw at least 3 metres from the fuelling point before starting the engine. Eliminate all sources of sparks or flame (e.g. smoking, open flames, or work that can cause sparks) in the areas where fuel is mixed, poured, or stored. Do not smoke while handling fuel or while operating the chain saw. Do not allow other persons to be near the chain saw when starting the engine or cutting a wood. Keep bystanders and animals out of the work area. Children, pets, and bystanders should be a minimum of 10 metres away when you start or operate the chain saw. Never start cutting until you have a clear work area, secure footing, and planned retreat path from the falling tree. Always hold the chainsaw firmly with both hands when the engine is running. Use a firm grip with thumb and fingers gripping the chain saw handles. Keep all parts of your body away from the saw chain when the engine is running. Before you start the engine, make sure the saw chain is not contacting anything. Always carry the chain saw with the engine stopped, the guide bar and saw chain to the rear, and the muffler away from your body. Always inspect the chain saw before each use for worn, loose, or changed parts. Never operate a chain saw that is damaged, improperly adjusted, or is not completely and securely assembled. Be sure that the saw chain stops moving when the throttle control trigger is released. All chainsaw service, other than the items listed in the Operator’s Manual, should be performed by competent chainsaw service personnel. (e.g., if improper tools are used to remove the flywheel, or if an improper tool is used to hold the flywheel in order to remove the clutch, structural damage to the flywheel could occur which could subsequently cause the flywheel to disintegrate). Always shut off the engine before setting it down. Page 7 Rev 2 Use extreme caution when cutting small size brush and saplings because slender material may catch the saw chain and be whipped toward you or pull you off balance. When cutting a branch that is under tension, be alert for spring back so that you will not be struck when the tension in the wood fibres is released. Keep the handles dry, clean and free of oil or fuel mixture. Guard against kickback. Kickback is the upward motion of the guide bar which occurs when the saw chain at the nose of the guide bar contacts an object. Kickback can lead to dangerous loss of control of the chain saw. When transporting your chain saw, make sure the appropriate guide bar cover is in place. Securely place the machine during transport to prevent loss of fuel, damage or injury. KICKBACK 2.7. Kickback may occur when the nose or tip of the guide bar touches an object, or when the wood closes in and pinches the saw chain in the cut. 2.8. Tip contact in some cases may cause a lightning fast reverse reaction, kicking the guide bar up and back towards the operator. 2.9. Pinching the saw chain along the top of the guide bar may push the guide bar rapidly back towards the operator. 2.10. Either of these reactions may cause you to lose control of the saw which could result in serious personal injury. 2.11. Do not rely exclusively on the safety devices built into your saw. 2.12. As a chain saw user you should take several steps to keep cutting jobs free from accident or injury. With a basic understanding of kickback you can reduce or eliminate the element of surprise. Sudden surprise contributes to accidents. Keep a good grip on the saw with both hands, the right hand on the rear handle, and the left hand on the front handle, when the engine is running. Use a firm grip with thumbs and fingers encircling the chain saw handles. A firm grip will help you reduce kickback and maintain control of the saw. Don’t let go. Page 8 Rev 2 Make certain that the area in which you’re cutting is free from obstructions. Do not let the nose of the guide bar contact a log, branch, or any other obstruction which could be hit while you are operating the saw. Cut at high engine speeds. Do not overreach or cut above shoulder height. Follow manufacturers sharpening and maintenance instructions for saw chain. Only use replacement bars and chains specified by the manufacturer or the equivalent. 3. MACHINE PARTS 3.1. All Models. 1 2 3 4 5 6 7 8 Guide Bar Scabbard Guide Bar Chain Front Hand Guard and Chain Brake Lever Front Handle Air Filter Cover Air Filter Lock Nut Choke Knob 9 10 11 Oil Tank Filler Cap Starter Pull Cord Fuel Tank Filler Cap 12 Engine Switch 13 14 15 16 Throttle trigger Throttle Tigger Lock-out Primer Bulb Chain adjuster Page 9 Rev 2 4. INSTALLING GUIDE BAR AND CHAIN The saw chain has very sharp edges. Use protective gloves for safety. See NOTE 1. 4.1. A standard saw unit package contains the items listed below; 1 2 3 4 5 6 Power Unit Saw Chain Guide Bar Guide Bar Cover Spark Plug Socket File 1 2 Chain Orientation Clockwise = Tighten, Anti-Clockwise = Loosen. Chain Tensioning Screw Guide Bar Securing Nuts 3 4 Page 10 Rev 2 Pay attention to the correct direction of the saw chain 1 2 3 Sprocket Transit Spacer Spiked Bumper and Cover 4.1.1. Push the Brake guard forwards away from the front handle to check that the chain brake is ON. 4.1.2. Loosen the nut two nuts and remove the chain cover. When removed take out the transit spacer (Yellow). 4.1.3. Fit the guide bar to the power unit, then fit the chain to the sprocket and, while fitting the saw chain around the guide bar, mount the guide bar to the power unit. 4.1.4. Install the chain cover, pulling end of guide bar away from power unit fasten the mounting nuts to finger tightness. Page 11 Rev 2 4.1.5. Tighten the chain by using the chain tensioning screw in a clockwise direction. 4.1.6. Do this until the chain can be pulled away from the guide bar by until the tie straps just touch the bottom side of the bar rail. 4.1.7. Then check the chain for smooth rotation and proper tension while moving it by a gloved hand. Operate the brake to make sure it locks. 4.1.8. Tighten the nuts securely with the bar tip held up. 4.1.9. Run chain saw for 10 minutes and readjust with the chain until correct tension is achieved. 4.2. Chain Brake. 4.2.1. The chain brake is a device which stops the chain instantaneously if the chain saw recoils due to kickback. 4.2.2. Normally, the brake is activated automatically by inertial force. 4.2.3. It can also be activated manually by pushing the brake lever (Front handle guard) down toward the front. 4.2.4. When the brake operates, a white cone pops up from the base of the brake lever. 4.2.5. To release brake, pull up the front handle guard toward the front handle until a “click” is heard. 4.3. Checking chain oil supply. 4.3.1. After starting the engine, run the chain at medium speed and see if chain oil is scattered off as shown in the figure. 4.3.2. The chain oil flow can be changed by inserting a screwdriver in the hole on bottom of the clutch side. 4.3.3. 4.3.4. 4.3.5. 4.3.6. Adjust according to your work conditions. (1) Chain oil flow adjusting shaft. (2) Anti-clockwise – Increase. (3) Clockwise – Decrease. When the brake operates, release the throttle lever to slow down the engine speed. Continuous operation with the brake engaged will generate heat from the clutch and will cause serious damage to the clutch and surrounding structure. Page 12 Rev 2 4.4. Confirm Chain Brake. 4.4.1. Turn off the engine and push brake handle forward. 4.4.2. Holding the chainsaw in a horizontal position, let go of the front handle and rest the chain on a piece of wood or tree stump, push the chainsaw forward, the brake should hold the chain firm on the bar. Resistance level can vary depending on bar size. 4.4.3. If the chain brake is not effective, ask your dealer to inspect the machine and adjust or repair the brake. It is very important to maintain the proper chain tension. Rapid wear of the guide bar or the chain coming off easily can be caused by improper tension. Especially when using a new chain, take good care of it since it may stretch when first used. 5. FUEL & CHAIN OIL The fuel is highly flammable. Do not smoke or bring any flame or sparks near fuel. The use of without 2 stroke oil cause severe damage to the engine inner parts. DO NOT use 4 stroke engine oil. 5.1. Fuel Mixture ratios. 5.1.1. Pre-mix 2-stroke oil with fresh unleaded petrol as follows: 5.1.1.1. Mineral based 2-stroke oil : 25:1 (40ml of oil per 1 litre of petrol) 5.1.1.2. Synthetic 2-stroke oil: 40:1 (25ml of oil per 1 litre of petrol) 5.2. How to mix Fuel and Oil. 5.2.1. Using the correct measuring container, measure out the correct quantities of petrol and 2stroke oil to be mixed. 5.2.2. Put some of the unleaded petrol into a clean, approved fuel container. 5.2.3. Pour in all of the oil and shake well. 5.2.4. Pour in the rest of petrol and shake again for at least one minute. 5.2.5. Put a clear indication on the outside of the container to avoid mixing up with unmixed petrol or other containers. Do not use waste or regenerated oil - this may cause damage to the oil pump and increase chain and bar wear. 5.3. Only use correct and special chainsaw oil. The oil tank should become nearly empty by the time fuel is used up. Make sure to refill the oil tank every time you re-fuel the chainsaw. Page 13 Rev 2 6. OPERATION 6.1. Starting 6.1.1. Put machine on a flat surface with the fuel and oil caps facing upwards. 6.1.2. Untwist and remove the fuel cap (1). 6.1.3. Put fuel/oil mix into the fuel tank. 6.1.4. Refit cap and fasten cap securely. 6.1.5. Untwist and remove the oil cap (2). 6.1.6. Put the required amount chain oil tank or to 80% of the full capacity. 6.1.7. Refit cap and fasten cap securely. 6.1.8. Wipe up any fuel or oil spillages on or around the unit. 6.1.9. Put the switch to the “I” position. 6.1.10. Continuously pump the priming bulb (1) until fuel comes in the bulb. 6.1.11. Pull out the choke knob (2). 6.1.12. The choke will close and the throttle lever will then be set in the starting position. 6.1.13. Push the front handle guard forward to activate the chain brake. 6.1.14. While holding the saw unit securely on the ground, pull the starter rope firmly. 6.1.15. When firing occurs, push in the choke knob and pull the starter again to start the engine. 6.1.16. Pull up the front handle guard toward the front handle to release the chain brake. Then, allow the engine to warm up with the trigger pulled slightly. Before you start the engine, make sure the saw chain is not touching anything. Make sure the chain brake is always activated each time you start the engine. When restarting immediately after stopping the engine. Set choke in the open position. Once the choke knob has been pulled out, it will not return to the operating position even if you press down on it with your finger. When you wish to return the choke knob to the operating position, operate the throttle trigger & throttle trigger lockout instead. NB It will push in but will not deactivate. Page 14 Rev 2 6.2. Checking the functionality of the Clutch. 6.2.1. Before each use, you should confirm that there is no chain movement when the engine is running at idling speed. 6.3. Adjusting carburettor. 6.3.1. The carburetor on your unit has been factory adjusted, but may require fine tuning due to change in operating conditions. 6.3.2. If the carburettor needs to be adjusted, contact your dealer. 6.3.3. Before adjusting the carburettor, make sure that air/fuel filters are clean and you are using fresh, properly mixed fuel. Be sure to adjust the carburettor with the bar and chain attached. 6.3.4. Limit the to ¼ turn 6.3.5. Start engine and allow it to warm up in low speed for a few minutes. 6.3.6. Turn idle adjusting screw (T) counter-clockwise so that saw chain does not turn. 6.3.7. If idling speed is too slow, turn the screw clockwise. 6.3.8. Make a test cut adjust the H needle for best cutting power, not for maximum speed. 6.4. Stopping the engine. 6.4.1. Release the throttle lever to allow the engine to idle for a few minutes. 6.4.2. Move the engine switch to the ‘OFF’ position. Page 15 Rev 2 7. SAWING Before proceeding to your job, read “Safe Operation” section. It is recommended to first practice sawing easy logs. This also helps you get accustomed to your chainsaw. Always follow all the safety regulations applicable to this machine. The chainsaw must only be used for cutting wood. It is forbidden to cut other types of material. Vibrations and kickback vary with different materials and the requirements of the safety regulations would not be respected. Do not use the chain saw as a lever for lifting, moving or splitting objects. Do not lock it over fixed stands. It is forbidden to hitch tools or applications to the P.T.O. that are not specified by the manufacturer. It is not necessary to force the saw into the cut. Apply only light pressure while running the engine at full throttle. It is recommended that the user carries out a daily inspection before use, after dropping or other impacts to identify significant damage or defects. Racing the engine with the chain seized in a cutaway can damage the clutch system. When the saw chain is caught in the cut, do not attempt to pull it out by force, but use a wedge or a lever to open the cut. 7.1. Guarding against Kickback. 7.1.1. This saw is also equipped with a chain brake that will stop the chain in the event of kickback if operating properly. 7.1.2. You must check the chain brake operation before each usage by running the saw at full throttle for 1 or 2 seconds and pushing the front hand guard forward. 7.1.3. The chain should stop immediately with the engine at full speed. If the chain is slow to stop or does not stop then replace the brake band and clutch drum before use. 7.1.4. It is extremely important that the chain brake is checked for proper operation before each use and that the chain is sharp in order to maintain the kickback safety level of this saw. 7.1.5. Removal of the safety devices, inadequate maintenance, or incorrect replacement of the bar or chain may increase the risk of serious personal injury due to kickback. Page 16 Rev 2 8. GENERAL MAINTENANCE Before cleaning, inspecting or repairing your chainsaw, make sure the engine has stopped and is cool. Disconnect the spark plug to prevent accidental starting. 1 2 3 Air filter cover Air filter Spark plug 8.1. Follow the instructions to carry out regular maintenance, pre-operating procedures and daily maintenance routines. 8.2. Improper maintenance may result in serious damage to the machine. 8.3. Maintenance after each use. 8.3.1. Air Filter. 8.3.1.1. Dust on the cleaner surface can be removed by tapping a corner of the cleaner against a hard surface. 8.3.1.2. To clean dirt in the meshes, split the cleaner into halves and brush in petrol. 8.3.1.3. When using compressed air, blow from the inside. 8.3.1.4. To assemble the cleaner halves, press the rim until it clicks. 8.3.2. Chain oil port. Dismount the guide bar and check the chain oil port (1) for clogging. Page 17 Rev 2 8.3.3. Guide bar. 8.3.3.1. When the guide bar is dismounted, remove chain, then clear sawdust in the bar groove (4) and the oiling port (1). 8.3.3.2. Grease the nose sprocket (2) from the feeding port on the tip of the bar. 8.3.3.3. Chain direction (3). 8.3.4. Other checks. 8.3.4.1. Check for; 8.3.4.1.1. Fuel leaks. 8.3.4.1.2. Loose fastenings. 8.3.4.1.3. Damage to major parts, especially handle joints and guide bar mounting. 8.3.4.2. If any defects are found, make sure to have them repaired before operating again. 8.3.5. Periodical service point. 8.3.5.1. Cylinder fins. 8.3.5.1.1. Dust clogging between the cylinder fins (1) will cause overheating of the engine. 8.3.5.1.2. Periodically check and clean the cylinder fins after removing the air cleaner and the cylinder cover. 8.3.5.1.3. When installing the cylinder cover, make sure that switch wires and grommets are positioned correctly in place. Page 18 Rev 2 After removing the filter, use a pinch tool to hold the end of the suction pipe. When assembling the filter, take care not to allow filter fibres or dust inside the suction pipe. 8.3.5.2. Fuel Filter. Using a wire hook, take out the filter from the filler port. 8.3.5.2.1. Remove the filter and wash with petrol. 8.3.5.3. Oil tank. 8.3.5.3.1. With a wire hook, take out the oil filter (1) through the filler port and clean in petrol. 8.3.5.3.2. When putting the filter back into the tank, make sure that it comes to the front right corner. 8.3.5.3.3. Also clean off dirt in the tank. 8.3.5.4. Spark Plug. 8.3.5.4.1. Clean the electrodes with a soft brass brush or spark plug cleaner and reset the gap to 0.65mm. 8.3.5.4.2. Spark plug type NHSP LD L8RTF or CHAMPION RCJ7Y or NGK BPMR7A. 8.3.5.5. Sprocket. 8.3.5.5.1. Check for cracks and for excessive wear interfering with the chain drive. 8.3.5.5.2. If the wear is found, replace it with a new one. 8.3.5.5.3. Never fit a new chain on a worn sprocket, or a worn chain on a new sprocket. Page 19 Rev 2 1 2 3 4 5 Needle bearing Sprocket Clutch drum Washer Clutch block 8.4. BAR & CHAIN MAINTENANCE Be sure to wear safety gloves. It is very important for smooth and safe operation to keep the chain sharp at all times. Your cutters need to be sharpened when: • Sawdust becomes powder-like. • You need extra force to saw. • The cut does not go straight. • Vibration increases. • Fuel consumption increases. 8.4.1. Cutter setting standards. 8.4.1.1. Before filing; 8.4.1.1.1. Make sure the engine is stopped. 8.4.1.1.2. Make sure the saw chain is held securely as shown in a vice. 8.4.1.1.3. Use a round file of proper size for your chain. 8.4.1.1.4. Chain type: Oregon 8.4.1.1.5. Place your file on the cutter and push straight forward. 8.4.1.1.6. Keep the file position as illustrated. 8.4.1.1.7. After every cutter has been set, check the depth gauge and file it to the proper level as illustrated on next page. Be sure to round off the front edge to reduce the chance of kickback or tiestrap breakage. Make sure every cutter has the same length and edge angles as illustrated. Page 20 Rev 2 Page 21 Rev 2 8.4.2. Guide bar. Reverse the bar occasionally to prevent partial wear. 8.4.2.1. The bar rail should always be square. 8.4.2.2. Check for wear of the bar rail. 8.4.2.3. Apply a ruler to the bar and the outside of a cutter. 8.4.2.4. If a gap is observed between them, the rail is normal. 8.4.2.5. Otherwise, the bar rail is worn. Such a bar needs to be corrected or replaced. 1 2 3 4 Ruler Gap No gap Chain tilting The table contains a list of all possible combinations between bar and chain. For replacement use only above bars and chains. If you use non-approved combinations it may cause serious personal injury and damage to the machine. 8.4.2.6. Pitch Length Inches/ cm Guide Bar Groove width Inches/mm 0.325” 16”/40cm 0.058”/1.5mm 0.325” 18”/45cm 0.058”/1.5mm 0.325” 20”/50cm 0.058”/1.5mm Page 22 Chain Code Code Oregon 168PXBK095 Oregon 188PXBK095 Oregon 208PXBK095 Oregon 21BPX066X Oregon 21BPX072X Oregon 21BPX078X Rev 2 9. STORAGE 9.1. Empty the fuel tank and run the engine out of fuel. 9.2. Empty the oil tank. 9.3. Clean the entire unit. 9.4. Store the unit in a dry place out of the reach of children. 10. EVIROMENTAL DISPOSAL 10.1. Never pour remainders of chain lubricant or 2-stroke fuel mixture in the drain or sewerage system or soil, but dispose of it in a proper, environmentally friendly way, e.g., at a special collecting point or dump. 10.2. At the end of your chainsaw’s life, dispose of it in an environmentally friendly manner. 10.3. Thoroughly empty the oil/lubricant and fuel tanks and dispose of the remainders at a special collecting point or dump. 10.4. Please also dispose of the device itself at a collecting/recycling point. 10.5. By doing so, plastic and metal parts can be separated and recycled. Information concerning the disposal of materials and devices are available from your local authority. 11. WARRANTY 11.1. For this petrol tool, the company provides the end user - independently from the retailer‘s obligations resulting from the purchasing contract - with the following warranties: 11.2. The warranty period is 24 months beginning from the hand-over of the device which has to be proved by the original purchase documents 11.3. For commercial use the warranty period is reduced to 11.4. 12 months and rental 90 days. Wearing parts and defects caused by the use of non-genuine parts, use of force, impact damage as well as mischievous overloading of the motor are excluded from this warranty. 11.5. Warranty replacement does only include defective parts, not complete devices. 11.6. Warranty repair shall exclusively be carried out by authorized service partners or by the company‘s customer service. 11.7. In the case of any intervention of non-authorized personnel, the warranty will become void. 11.8. All postage or delivery costs as well as any other subsequent expenses will be borne by the customer. Page 23 Rev 2 12. TROUBLESHOOTING PROBLEM Engine does not start Lack of Power or Poor acceleration or Rough Idling Oil does not come out PROBABLE CAUSE/S Water in fuel or sub-standard mixture Engine Flooding No or bad spark ignition Water in fuel or sub-standard mixture Clogged Air Filter Clogged Fuel Filter Badly adjusted carburettor Poor Quality Oil Clogged Oil Passage Page 24 CORRECTIVETION ACTION/S Replace Fuel Remove and dry the spark plug. Start engine without choke Replace Plug Replace Fuel Clean and/or replace Clean and/or replace Adjust speed needles Replace Clear blockage Rev 2 13. SPECIFICATIONS MODEL HYC3816 HYC4618 HYC5620 Engine Type 1E41F Air cooled 2 stroke petrol. 1E43F Air cooled 2 stroke petrol. 1E46F Air cooled 2 stroke petrol. Engine Size - cc 37 45 56 Maximum engine power - kw 1.2 1.7 2.4 Ignition system C.D.I. with timing advance function C.D.I. with timing advance function C.D.I. with timing advance function Spark plug NGK BPMR7A NGK BPMR7A NGK BPMR7A Fuel Type Unleaded Petrol/Oil mixture. Unleaded Petrol/Oil mixture. Unleaded Petrol/Oil mixture. Fuel Mixture Ratio Mineral based 2-stroke oil : 25:1 (40ml of oil per 1 litre of petrol) Synthetic 2-stroke oil: 40:1 (25ml of oil per 1 Litre of petrol) Mineral based 2-stroke oil : 25:1 (40ml of oil per 1 litre of petrol) Synthetic 2-stroke oil: 40:1 (25ml of oil per 1 Litre of petrol) Mineral based 2-stroke oil : 25:1 (40ml of oil per 1 litre of petrol) Synthetic 2-stroke oil: 40:1 (25ml of oil per 1 Litre of petrol) Oil tank capacity - ml 260 260 260 Fuel tank capacity - ml 550 550 550 Chain Lubrication Chain Oil Chain Oil Chain Oil Chain Lube-Oil Capacity - ml 210 260 260 Handle Type Anti Vibration Handle Anti Vibration Handle Anti Vibration Handle Carburettor Walboro (Diaphragm) Walboro (Diaphragm) Walboro (Diaphragm) Fuel consumption at maximum engine power - g/kwh 460 460 480 Idling speed range - rpm 3000 ± 300 3000 ± 300 3000 ± 300 11000 11000 11000 21.2 21.2 21.2 Oil feeding system Mechanical plunger pump with adjuster Mechanical plunger pump with adjuster Mechanical plunger pump with adjuster Sprocket Teeth x Pitch - T x in 7 x 0.375 7 x 0.375 7 x 0.375 Fully Assembled Dimensions (L x W x H) - mm 760 X 240 X 265 850 x 240 X 280 900 X 240 X 280 Box Dimensions (L x W x H) - mm 410 x 270 x 310 470 x 270 x 310 530 x 280 x 320 Dry weight (without guide bar and chain, empty tanks) - kg 5.5 8 8.5 Gross Weight - kg 5.8 8.3 8.8 Sound level - dB (A) 109 114 112 Vibration value m/s2 Front handle 8.9 - Rear handle 10.7 Front handle 9.9 - Rear handle 9.9 Front handle 8.7 - Rear handle 9.9 HYC3816 HYC4618 HYC5620 Type Sprocket nose Sprocket nose Sprocket nose Bar Size Inches - in 16 18 20 Cutting Length - in 15 3/8 17 5/16 19 9/32 Saw Chain Type Oregon 21BPX066X Oregon 21BPX072X Oregon 21BPX078X Bar Type Oregon 168PXBK095 Oregon 188PXBK095 Oregon 208PXBK095 Pitch - in 0.325 0.325 0.325 Gauge - in 0.058 0.058 0.058 Maximum speed with cutting attachment - rpm Maximum Chain Speed HYC3816/4618/5620 - m/s Cutting Head Page 25 Rev 2 14. GENPOWER CONTACT DETAILS 14.1. Postal address; Genpower Limited, Isaac Way, Pembroke Dock, Pembrokeshire, SA72 4RW, UK. 14.2. Telephone contact number; Office 14.3. Email contacts; Technical 14.4. +44 (0) 1646 687880 [email protected] Web site; www.hyundaipowerequipment.co.uk Page 26 Rev 2 15. DECLARATIONS 15.1. Genpower Ltd confirms that this Hyundai petrol chainsaw conforms to the following CE directives: • 2006/42/EC Machinery directive • 2004/108/EC EMC directive • 2000/14/EC Noise emissions directive • 97/68/EC NRMM Emissions directive Page 27 Rev 2 NOTE 1 Suitable personal protective equipment (PPE) should always be worn, no matter how small the job. European standards for chainsaw PPE are published as part of EN 381 Protective clothing for users of hand-held chainsaws. EN 397. (Arborists working from a rope and harness may use a suitably adapted Safety helmet rock-climbing helmet.) Hearing EN 352-1. protection Eye protection Mesh visors to EN 1731 or safety glasses to EN 166. Upper body Chainsaw jackets to BS EN 381-11 protection EN 381-7. The use of appropriate gloves is recommended under most circumstances. The type of glove will depend on a risk assessment of the task and Gloves the machine. Consider the need for protection from cuts from the chainsaw, thorny material and cold/wet conditions. EN 381-5. (All-round protection is recommended for arborists working in trees and Leg protection occasional users such as those working in agriculture.) BS EN ISO 20345:2004 and bearing a shield depicting a chainsaw to show compliance with EN 381-3. (For occasional users working in even ground where Chainsaw boots there is little risk of tripping or snagging on undergrowth or brash, protective gaiters conforming to EN 381-9 worn in combination with steel-toe-capped safety boots.) Page 28 Rev 2 NOTES Page 29 Rev 2 NOTES Page 30 Rev 2 NOTES Page 31 Rev 2 GENPOWER LTD Isaac Way, London Road Pembroke Dock, UNITED KINGDOM, SA72 4RW T: +44 (0) 1646 687 880 F: +44 (0) 1646 686 198 e: [email protected] www.hyundaipowerequipment.co.uk