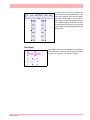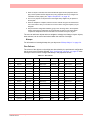
1
Manual Edition 06/2011 Display recorders SIREC D Screen Designer sirec Siemens Aktiengesellschaft Automation and Drives (A&D) Sensors and Communication Process Sensors 76181 KARLSRUHE GERMANY A5E01001789-03 A5E01001789D-03 GN: 30410_SirecD www.siemens.com/processinstrumentation 43-TV-25-36 Iss.5 GLO May 11 UK A5E01001789-05 Table of Contents Software License ............................................................................... v Notices and Trademarks ................................................................ xiii Year 2000 Compliance Statement .......................................................................... xiii Trademarks ................................................................................................. xiii Protocols ..................................................................................................... xiii Safety .......................................................................................................... xiv Section 1: Preface ............................................................................. 1 This Manual ................................................................................................... 1 Supplementary documentation ................................................................................. 1 Notes .............................................................................................................. 2 SIREC D Screen Designer software overview ............................................. 2 Section 2: Introduction & Installation ............................................... 5 CD Contents ................................................................................................... 5 Learning about Screen Designer .................................................................... 5 Read this Manual...................................................................................................... 5 System Requirements .................................................................................... 6 Recorder Requirements: ........................................................................................... 6 Installation ..................................................................................................... 7 Start up...................................................................................................................... 7 Section 3: SIREC D Screen Designer Interface ................................ 9 SIREC D Screen Designer Interface .............................................................. 9 Main Toolbar .......................................................................................................... 10 Status Bar................................................................................................................ 14 Design Window ........................................................................................... 14 Design window toolbar........................................................................................... 14 Design window tabs................................................................................................ 15 File Browser Window .................................................................................. 16 File Types................................................................................................................ Layout File.............................................................................................................. Template File .......................................................................................................... Setup File ................................................................................................................ Properties Window ...................................................................................... 22 Template Properties ................................................................................................ Screen Properties................................................................................................... Widget Properties ................................................................................................... Object Properties.................................................................................................... Toolbox Window 18 19 20 21 22 23 24 25 ......................................................................................... 26 Widgets Tab............................................................................................................. 26 Objects tab .............................................................................................................. 27 43-TV-25-36 Iss.5 GLO May 11 UK A5E01001789-05 iii Templates ......................................................................................................29 Template Tabs.......................................................................................................... 30 Association with a Screen........................................................................................ 30 Template Toolbar..................................................................................................... 30 Screens ..........................................................................................................31 Screen Tabs.............................................................................................................. Screen Configuration .............................................................................................. Screen Toolbar......................................................................................................... Screen Properties Window ...................................................................................... Widgets 31 32 32 32 .........................................................................................................32 Widget Details ......................................................................................................... 32 Types of Widgets ...................................................................................................... 32 Widget Properties Window ...................................................................................... 33 Objects ..........................................................................................................33 Object Details.......................................................................................................... Types of Objects ...................................................................................................... Object Properties Window....................................................................................... Association with a Widget ....................................................................................... Linking Objects ....................................................................................................... 33 33 38 38 38 Section 4: Designing a Layout ........................................................ 39 Starting a Layout ..........................................................................................39 Designing a Template.............................................................................................. 39 Designing a Widget ................................................................................................. 40 Object Properties .................................................................................................... 42 Design Rules .................................................................................................50 ................................................................................................................................. Layers within a Template ........................................................................................ Object Z - Order ...................................................................................................... Linking Objects ....................................................................................................... Properties Precedence............................................................................................. Configuring a Screen............................................................................................... Animation ................................................................................................................ Saving Templates and Layouts ................................................................................ Loading a Template into a Recorder ....................................................................... Loading a Setup from a Recorder into Screen Designer......................................... Loading a Setup from the SIREC D software.......................................................... 50 51 51 54 55 55 56 57 57 58 58 Index ................................................................................................ 59 iv 43-TV-25-36 Iss.5 GLO May 11 UK A5E01001789-05 Software License NOTICE OF LICENSED SOFTWARE END USER LICENSE AGREEMENT This End User License Agreement (“Agreement”) is a legal contract between SIEMENS, and Licensee. The right to use the Licensed Software is granted only on the condition that Licensee agrees to the following terms. IF LICENSEE DOES NOT AGREE TO THE TERMS OF THIS AGREEMENT, THEN SIEMENS AND ITS LICENSORS ARE UNWILLING TO LICENSE THE LICENSED SOFTWARE TO LICENSEE, IN WHICH CASE LICENSEE MAY RETURN THE PACKAGE WITHIN THIRTY (30) DAYS AFTER SHIPMENT TO THE ENTITY FROM WHICH THE LICENSE WAS PURCHASED, AND THE AMOUNT LICENSEE PAID FOR THE LICENSED SOFTWARE WILL BE REFUNDED. 1. DEFINITIONS. 1.1 “Authorized User” means an individual Licensee employee or independent contractor authorized by Licensee to access and use the Software provided by SIEMENS, subject to the terms of this Agreement. 1.2 “Confidential Information” means: (i) the Licensed Software; (ii) the technology, ideas, know how, documentation, processes, algorithms and trade secrets embodied in the Licensed Software; (iii) any software keys related to the Software; and (iv) any other information, whether disclosed orally or in written or magnetic media, that is identified (if oral) or marked (if written) as “confidential,” “proprietary” or with a similar designation at the time of such disclosure. Confidential Information shall not include any information that is: (a) published or otherwise available to the public other than by breach of this Agreement by Licensee; (b) rightfully received by Licensee from a third party without confidential limitations; (c) independently developed by Licensee as evidenced by appropriate records; or (d) known to Licensee prior to its first receipt of same from SIEMENS as evidenced by appropriate records. If any Confidential Information must be disclosed to any third party by reason of legal, accounting or regulatory requirements beyond the reasonable control of Licensee, Licensee shall promptly notify SIEMENS of the order or request and permit SIEMENS (at its own expense) to seek an appropriate protective order. 1.3 “Documentation” shall mean SIEMENS published user documentation for the Licensed Software, which may be in the form of user manuals and/or other related documentation, in written or electronic object code form. 1.4 “Intellectual Property Rights” means all copyrights, trademarks, trade secrets, patents, mask works and other intellectual property rights recognized in any jurisdiction worldwide, including all applications and registrations with respect thereto. 1.5 “Licensee” means the entity that purchased the license to the Licensed Software solely for use of the Licensed Software at the Licensed Site. 1.6 “Licensed Processor” means a SIEMENS-approved processor (which may be a control system or product, a computer, or a specific number of computing devices in a network environment), which processor is owned, leased, or otherwise controlled by Licensee and on which Licensee is authorized to install and use the Software pursuant to the terms and conditions of this Agreement. 1.7 “Licensed Site” means the specific address of Licensee’s facility where the Licensed Processor is located, as specified in Licensee’s Purchase Order. 43-TV-25-36 Iss.5 GLO May 11 UK A5E01001789-05 v 1.8 “Licensed Software” means the Object Code of the Software identified in Licensee’s Purchase Order and/or for which Licensee has purchased a license under this Agreement, including all updates, revisions, modifications, or changes thereto to the extent licensed by Licensee under this Agreement, and all full or partial copies thereof. 1.9 “Licensed Use” means use of the Object Code form only of Licensed Software by the Authorized Users. 1.10 “Object Code” means computer programming code in a form not readily perceivable by humans and suitable for machine execution without the intervening steps of interpretation or compilation. 1.11 “Purchase Order” means an order form submitted by Licensee to obtain rights to use Licensed Software under this Agreement. 1.12 Software” means computer programming code, in Object Code and/or Source Code, and Documentation, in written or electronic form, including updates (if any), and all modifications thereto and full or partial copies thereof. For the avoidance of doubt, Software may include Licensed Software and Unlicensed Software. 1.13 “Source Code” means computer programming code in human readable form that is not suitable for machine execution without the intervening steps of interpretation or compilation. 1.14 “Unlicensed Software” means Software that may be included on electronic storage media containing the Licensed Software provided by SIEMENS that Licensee is not authorized to access or use under this Agreement. 2. LICENSE GRANT. Subject to Licensee’s compliance with the terms and conditions of this Agreement and payment of any applicable fees, SIEMENS hereby grants to Licensee and Licensee accepts a restricted, personal, non-transferable, non-exclusive, internal-use only license, without the right to sublicense, to: (i) use Licensed Software, solely for Licensee’s internal purposes in accordance with the Licensed Use, on Licensed Processor(s), at the Licensed Site; and (ii) make up to two (2) copies (or the number of copies allowed under applicable law) of the Licensed Software in non-printed, machine-readable form, to be used solely for archival or backup purposes (“Archival Copies”). Licensee shall include all copyright and trade secret notices and serial numbers on the Archival Copies, which shall be owned solely by SIEMENS or its third-party suppliers. 3. RESTRICTIONS. 3.1 General. Except as expressly permitted by this Agreement, Licensee may not: (i) modify the Licensed Software; (ii) translate, reverse engineer, decompile, disassemble (except to the extent applicable laws specifically prohibit such restriction) or attempt to derive the Source Code of Software provided to Licensee in Object Code, or create derivative works of the Licensed Software or let any third party do any of the foregoing; (iii) reproduce the Licensed Software other than as specified above; (iv) sublicense, rent, lease, loan, timeshare, sell, distribute, disclose, publish, assign or transfer any rights, grant a security interest in, transfer possession of the Licensed Software or electronically transfer the Licensed Software from one computer to another over a network other than Licensee’s internal network as permitted under this Agreement; or (v) alter or remove any of SIEMENS or its licensors’ copyright or proprietary rights notices or legends appearing on or in the Licensed Software. Licensee shall reproduce such notices on any copies of the Licensed Software Licensee is permitted to make. Licensee is responsible for informing all Authorized Users of the restrictions set forth in this Agreement with respect to use of the Licensed Software. vi 43-TV-25-36 Iss.5 GLO May 11 UK A5E01001789-05 3.2 Keys and Access. SIEMENS agrees to provide to Licensee any Software keys necessary to permit Licensee to gain access to the Licensed Software contained on the media shipped to Licensee. Notwithstanding anything to the contrary in this Agreement, Licensee hereby acknowledges that Licensee shall have no right or license to any Unlicensed Software, that any Unlicensed Software is included therein solely as a matter of administrative convenience, and Licensee further agrees not to attempt to gain access to, or permit any third party to attempt to gain access to, such Unlicensed Software. Licensee shall not disclose the Software keys to any third party. Licensee shall not circumvent, or attempt to circumvent, any license management, security devices, access logs, or other measures provided in connection with the Licensed Software, or permit or assist any Authorized User or any third party to do the same. 3.3 Third Party Software. The Licensed Software may contain or be derived from materials of third party licensors. Such third party materials may be subject to restrictions in addition to those listed in this Section 3.0, which restrictions, if any, are included in the documents accompanying such third party software. 4. OWNERSHIP. SIEMENS and its licensors shall retain exclusive ownership of all worldwide Intellectual Property Rights in and to the Licensed Software. Licensee hereby assigns to SIEMENS any such rights Licensee may have or obtain in and to the foregoing. All rights in and to the Licensed Software not expressly granted to Licensee in this Agreement are expressly reserved for SIEMENS and its licensors. 5. CONFIDENTIAL INFORMATION. Licensee shall not use or disclose any Confidential Information, except as expressly authorized by this Agreement, and shall protect all such Confidential Information using the same degree of care which Licensee uses with respect to its own proprietary information, but in no event with safeguards less than a reasonably prudent business would exercise under similar circumstances. Licensee shall take prompt and appropriate action to prevent unauthorized use or disclosure of the Confidential Information. 6. TERM AND TERMINATION. This Agreement shall continue for so long as Licensee uses the Licensed Software, provided that this Agreement will immediately terminate upon Licensee’s entry into bankruptcy, receivership, insolvency or dissolution proceedings; or upon Licensee’s breach of this Agreement, unless Licensee cures such breach within ten (10) days after SIEMENS provides written notice of such breach. Upon termination, Licensee agrees: (i) not to use the Licensed Software for any purpose whatsoever; (ii) to return or destroy the Licensed Software and any copy then in Licensee’s possession, at the direction of SIEMENS; and (iii) to certify to SIEMENS that such destruction has taken place. Upon termination SIEMENS may repossess all copies of the Licensed Software then in Licensee’s possession or control. These remedies shall be cumulative and in addition to any other remedies available to SIEMENS. The following Sections shall survive any termination of this Agreement: Sections 1, 3.1, 3.3, 4, 5, 6, 8, 9.2, 10, 11, and 12. 7. SUPPORT. The Software license fees do not include support, installation or training. Support, installation and training services, to the extent offered by SIEMENS, may be separately purchased at SIEMENS then-current rates. 43-TV-25-36 Iss.5 GLO May 11 UK A5E01001789-05 vii 8. LICENSEE OBLIGATIONS. 8.1 Records. Licensee shall maintain complete, current and accurate records documenting the location of the Licensed Software (in all forms) in Licensee’s possession. 8.2 Compliance Verification. To ensure compliance with the terms of this Agreement, SIEMENS or its designated representative shall have the right to: (i) request that Licensee send a written certification of compliance with the terms and conditions of this Agreement within thirty (30) days of SIEMENS request; and (ii) conduct an inspection and audit upon reasonable notice of the records set forth in Section 8.1 of this Agreement, electronic logs of access to the Software, and the relevant books and records of Licensee, and to obtain true and correct photocopies thereof, during regular business hours at Licensee’s offices and in such a manner as not to interfere unreasonably with Licensee’s normal business activities. In no event shall such certifications be requested or audits be conducted hereunder more frequently than once every six (6) months. If any such audit should disclose any underpayment of fees, Licensee shall promptly pay SIEMENS such underpaid amount, together with interest thereon at a rate of one and onehalf percent (1.5%) per month or partial month during which such amount was owed and unpaid, or the highest rate allowed by law, from the date such amount originally became due until finally paid. If the audit reveals that Licensee has underpaid SIEMENS by five percent (5%) or more of the amount owed, Licensee shall immediately reimburse SIEMENS for its reasonable costs and expenses associated with such audit. 9. LIMITED WARRANTY; WARRANTY DISCLAIMER. 9.1 Limited Warranty. If the license to the Licensed Software was purchased from a party other than SIEMENS, SIEMENS disclaims all warranties for the Licensed Software (as further described in Section 9.2) and the warranty, if any, shall be provided solely by the party from which the license was purchased. If the license to the Licensed Software was purchased directly from SIEMENS, SIEMENS warrants that the media on which the Licensed Software is delivered will be free from defects in materials or workmanship for a period of ninety (90) days from the date of shipment of such media to Licensee (“Warranty Period”). If during the Warranty Period the media on which Licensed Software is delivered proves to be defective, SIEMENS will repair or replace such media, at SIEMENS option, as Licensee’s sole remedy for any breach of warranty hereunder. Licensee assumes full responsibility for: (i) the selection of the Licensed Software; (ii) the proper installation and use of the Licensed Software; (iii) verifying the results obtained from the use of the Licensed Software; and (iv) taking appropriate measures to prevent loss of data. SIEMENS does not warrant that the quality or performance of the Licensed Software will meet Licensee’s requirements or that Licensee will be able to achieve any particular results from use or modification of the Licensed Software or that the Licensed Software will operate free from error. 9.2 Warranty Disclaimer. EXCEPT AS EXPRESSLY SET FORTH IN THIS SECTION 9, SIEMENS AND ITS LICENSORS DISCLAIM ALL WARRANTIES, EXPRESS, IMPLIED AND STATUTORY INCLUDING, WITHOUT LIMITATION, THE IMPLIED WARRANTIES OF MERCHANTABILITY, FITNESS FOR A PARTICULAR PURPOSE, TITLE AND NON-INFRINGEMENT OF THIRD PARTY RIGHTS. NO ORAL OR WRITTEN INFORMATION OR ADVICE GIVEN BY SIEMENS, ITS DEALERS, DISTRIBUTORS, AGENTS OR EMPLOYEES SHALL IN ANY WAY INCREASE THE SCOPE OF THIS WARRANTY. Some jurisdictions do not allow the limitation or exclusion of implied warranties or how long an implied warranty may last, so the above limitations may not apply to Licensee. This warranty gives Licensee specific legal rights and Licensee may have other rights that vary from jurisdiction to jurisdiction. viii 43-TV-25-36 Iss.5 GLO May 11 UK A5E01001789-05 10. INFRINGEMENT INDEMNITY. SIEMENS will defend any suit against Licensee to the extent based on a claim that the Licensed Software as delivered by SIEMENS infringes a valid United States patent or copyright, and indemnify for any final judgment assessed against Licensee resulting from such suit, provided that Licensee notifies SIEMENS at such time as it is apprised of the third-party claim, and agrees to give sole and complete authority, information and assistance (at SIEMENS expense) for the defence and disposition of the claim. SIEMENS will not be responsible for any compromise or settlement made without SIEMENS consent. The foregoing notwithstanding, SIEMENS shall have no liability for any claim of infringement based on: (a) use of other than the current release of the Licensed Software if such claim would have been avoided by the use of the then-current release provided SIEMENS has announced the release prior to the initiation of the infringement claim; (b) any modification of the Licensed Software by an entity other than SIEMENS; (c) any use or combination of the Licensed Software with any program, data or equipment not supplied by SIEMENS; (d) any use of the Licensed Software other than as expressly permitted in this Agreement; (e) products or processes developed pursuant to Licensee’s direction, design, or specification; or (f) any settlement or compromise of such claim made without SIEMENS written consent. Further, Licensee agrees to indemnify and defend SIEMENS to the same extent and subject to the same restrictions set forth in SIEMENS obligations to Licensee as set forth in this “Infringement Indemnity” section for any suit against SIEMENS based upon a claim of infringement resulting from (a), (b), (c), (d), (e), or (f) above. In the event that the Licensed Software is held in any such suit to infringe such a right and its use is enjoined, or if in the opinion of SIEMENS the Licensed Software is likely to become the subject of such a claim, SIEMENS at its own election and expense will either (i) procure for Licensee the right to continue using the Licensed Software or (ii) modify or replace the Licensed Software so that it becomes non-infringing while giving substantially equivalent performance. In the event that (i) or (ii) above are not, in SIEMENS sole determination, obtainable using reasonable commercial efforts, then SIEMENS may terminate this Agreement and refund the amount Licensee paid SIEMENS under this Agreement for the Licensed Software which is the subject of such claim, less a reasonable charge for Licensee’s past beneficial use based on depreciation of the Licensed Software on a straight line basis over a period of five (5) years from the Effective Date. THIS SECTION STATES LICENSEE’S SOLE RECOURSE AND EXCLUSIVE REMEDY AND SIEMENS ENTIRE LIABILITY FOR ANY CLAIM OF INFRINGEMENT. 11. LIMITATION OF LIABILITY. SIEMENS AND ITS LICENSORS SHALL NOT BE LIABLE FOR ANY INCIDENTAL, SPECIAL, CONSEQUENTIAL OR INDIRECT DAMAGES OF ANY KIND (INCLUDING DAMAGES FOR INTERRUPTION OF BUSINESS, PROCUREMENT OF SUBSTITUTE GOODS, LOSS OF PROFITS, OR THE LIKE) REGARDLESS OF THE FORM OF ACTION WHETHER IN CONTRACT, TORT (INCLUDING NEGLIGENCE), STRICT PRODUCT LIABILITY OR ANY OTHER LEGAL OR EQUITABLE THEORY EVEN IF SIEMENS HAS BEEN ADVISED OF THE POSSIBILITY OF SUCH DAMAGES. IN NO EVENT WILL SIEMENS AGGREGATE CUMULATIVE LIABILITY FOR ANY CLAIMS ARISING OUT OF OR RELATED TO THIS AGREEMENT EXCEED THE AMOUNTS PAID BY LICENSEE FOR THE LICENSED SOFTWARE. THE LIMITED WARRANTY, LIMITED REMEDIES, WARRANTY DISCLAIMER AND LIMITED LIABILITY ARE FUNDAMENTAL ELEMENTS OF THE BASIS OF THE BARGAIN BETWEEN SIEMENS AND LICENSEE. SIEMENS WOULD NOT BE ABLE TO PROVIDE THE SOFTWARE WITHOUT SUCH LIMITATIONS. 43-TV-25-36 Iss.5 GLO May 11 UK A5E01001789-05 ix 12. GENERAL. 12.1 Governing Law and Forum. This Agreement shall be governed in all respects by the laws of the United States of America and the State of New York without regard to conflicts of law principles. The parties agree that the United Nations Convention on Contracts for the International Sale of Goods is specifically excluded from application to this Agreement. All disputes arising under this Agreement shall be brought exclusively in the state or federal courts in New York, New York, as permitted by law. Licensee consents to the personal jurisdiction of the above courts. 12.2 Injunctive Relief. It is understood and agreed that, notwithstanding any other provisions of this Agreement, breach of the provisions of this Agreement by Licensee may cause SIEMENS irreparable damage for which recovery of money damages would be inadequate, and that SIEMENS shall therefore be entitled to obtain timely injunctive relief to protect SIEMENS rights under this Agreement in addition to any and all remedies available at law. 12.3 Notices. All notices to SIEMENS shall be in writing and shall be directed to: SIEMENS 12.4 No Agency. Nothing contained herein shall be construed as creating any agency, employment relationship, partnership, principal-agent or other form of joint enterprise between the parties. 12.5 Force Majeure. Neither party shall be liable hereunder by reason of any failure or delay in the performance of its obligations hereunder (except for the payment of money) on account of strikes, shortages, riots, insurrection, fires, flood, storm, explosions, acts of God, war, governmental action, labour conditions, earthquakes, material shortages or any other cause which is beyond the reasonable control of such party. Except for payment obligations, neither party will be liable to the other for any failure to meet its obligations due to any cause beyond the non-performing party’s reasonable control. If the inability to perform continues for longer than 90 days, either party may terminate this Agreement by providing written notice to the other party and Licensee will pay SIEMENS for products delivered and services performed prior to termination. Force majeure events may include but are not limited to: (1) government embargoes, (2) blockades, (3) seizure or freeze of assets, (4) delays or refusals to grant an export license or the suspension or revocation thereof, (5) any other acts of any government that would limit the ability for contract performance, (6) fires, earthquakes, floods, severe weather conditions, (7) any other acts of God, (8) quarantines or regional medical crises, (9) labour strikes or lockouts, (10) riots, strife, insurrection, civil disobedience, armed conflict, terrorism or war, declared or not (or impending threat of any of the foregoing, if such threat might reasonably be expected to cause injury to people or property), (11) shortages or inability to obtain materials or components and (12) inability or refusal by Licensee’s directed third party suppliers to provide SIEMENS parts, services, manuals, or other information necessary to the goods or services to be provided by SIEMENS under this Agreement. 12.6 Waiver. The failure of either party to enforce at any time any of the provisions of this agreement shall not be construed to be a continuing waiver of any provisions hereunder nor shall any such failure prejudice the right of such party to take any action in the future to enforce any provisions hereunder. 12.7 Severability. In the event any provision of this Agreement is determined to be illegal, invalid, or unenforceable, the validity and enforceability of the remaining provisions of this Agreement will not be affected and, in lieu of such illegal, invalid, or unenforceable provision, there will be added as part of this Agreement one or more provisions as similar in terms as may be legal, valid and enforceable under applicable law. 12.8 Headings. The section headings appearing in this Agreement are inserted only as a matter of convenience and in no way define, limit, construe, or describe the scope or extent of such section or in any way affect this Agreement. x 43-TV-25-36 Iss.5 GLO May 11 UK A5E01001789-05 12.9 Government End Users. The Software is a “commercial item” as that term is defined in 48 C.F.R. 2.101, consisting of “commercial computer software” and “commercial computer software documentation” as such terms are used in 48 C.F.R. 12.212. Consistent with 48 C.F.R. 12.212 and 48 C.F.R 227.7202-1 through 227.7202-4, Licensee will provide the Software to U.S. Government End Users only pursuant to the terms and conditions therein and herein. 12.10Assignment. Licensee may not delegate, assign or transfer this Agreement, the license(s) granted or any of Licensee’s rights or duties hereunder, including by way of merger (regardless of whether Licensee is the surviving entity) or acquisition, and any attempt to do so, without SIEMENS express prior written consent, which shall not be unreasonably withheld, shall be void. SIEMENS may assign this Agreement, and its rights and obligations hereunder, in its sole discretion. Any attempt to assign or delegate in violation of this clause will be void. 12.11Compliance with Laws Software and technical information delivered under this Agreement is subject to U.S. export control laws and may be subject to export or import regulations in other countries. Licensee agrees to strictly comply with all such laws and regulations. Licensee will obtain import, export, re-export approvals and licenses required for Software, services and technical data delivered and will retain documentation to support compliance with those laws and regulations. SIEMENS will not be liable to Licensee for any failure to provide Software, services, transfers or technical data as a result of government actions that impact SIEMENS ability to perform, including (1) the failure to provide or the cancellation of export or re-export licenses; (2) any subsequent interpretation of applicable import, transfer or export law or regulation after the date of any order or commitment that has a material adverse effect on SIEMENS performance; or (3) delays due to Licensee’s failure to follow applicable import, export, transfer, or re-export laws and regulations. Licensee shall not sell, transfer, export or re-export any Software, services or technical data for use in activities that involve the design, development, production, use or stockpiling of nuclear, chemical or biological weapons, or missiles, nor use Software, services or technical data in any facility which engages in activities relating to such weapons or missiles. In addition, Software, services or technical data may not be used in connection with any activity involving nuclear fission or fusion, or any use or handling of any nuclear material until Licensee, at no expense to SIEMENS, has insurance coverage, indemnities, and waivers of liability, recourse and subrogation, acceptable to SIEMENS and adequate in SIEMENS opinion to protect SIEMENS against any type of liability. 12.12Language. This Agreement is in the English language only, which language shall be controlling in all respects, and all versions of this Agreement in any other language shall be for accommodation only and shall not be binding on the parties to this Agreement. All communications and notices made or given pursuant to this Agreement, and all documentation and support to be provided, unless otherwise noted, shall be in the English language. Entire Agreement; Modification. This Agreement constitutes the entire agreement between Licensee and SIEMENS and supersedes in their entirety any and all oral or written agreements previously existing between Licensee and SIEMENS with respect to the subject matter hereof. The terms and conditions of any purchase order or other instrument issued by Licensee in connection with this Agreement shall be of no force or effect. This Agreement may only be amended or supplemented by a writing that refers explicitly to this Agreement and that is signed by duly authorized representatives of Licensee and SIEMENS. THE LICENSED SOFTWARE AND ACCOMPANYING DOCUMENTATION ARE PROTECTED BY UNITED STATES COPYRIGHT LAW AND INTERNATIONAL TREATY. UNAUTHORIZED REPRODUCTION OR DISTRIBUTION IS SUBJECT TO CIVIL AND CRIMINAL PENALTIES. BY INSTALLING OR USING THE LICENSED SOFTWARE, YOU ACKNOWLEDGE THAT YOU HAVE READ THIS AGREEMENT, UNDERSTAND IT AND AGREE TO BE BOUND BY ITS TERMS AND CONDITIONS. 43-TV-25-36 Iss.5 GLO May 11 UK A5E01001789-05 xi xii 43-TV-25-36 Iss.5 GLO May 11 UK A5E01001789-05 Notices and Trademarks Issue 4 - August 2009 Issue 5 - May 2011 Year 2000 Compliance Statement The SIREC D - Screen Designer software is Year 2000 compliant in accordance with the BSI DISC PD2000-1 definition, provided that the host PC, its BIOS, operating system and any other active applications are also Year 2000 compliant. Trademarks • Microsoft, MS-DOS, Windows, Windows 2000, Windows XP, Windows CE, Windows Vista and Windows 7 are all registered trademarks of Microsoft Corporation. • Compact Flash and CF are trademarks of the SanDisk Corporation. • For the purpose of this manual the and symbols will not follow their own trademark names or registered trademark names Company names and Product names mentioned in this manual are trademarks or registered trademarks of their individual owners. Protocols Safety and Symbol Identification Table 1.1 : Symbol 43-TV-25-36 Iss.5 GLO May 11 UK A5E01001789-05 Description WARNING The WARNING symbol indicates a potentially hazardous situation, which, if not avoided, could result in death or serious injury. CAUTION This CAUTION symbol may indicates a potentially hazardous situation, which, if not avoided, may result in property damage. NOTICE A NOTICE symbol indicates important information that must be remembered and aids in job performance. xiii Safety NOTICE Screen Designer for safety indication When adding charts on custom screens whenever a pen value could be relied on for safety, a chart must be accompanied by one of the other indicators - pen pointer, bar or DPM. This is to meet the safety standard's requirements to provide out-of-range indication. xiv 43-TV-25-36 Iss.5 GLO May 11 UK A5E01001789-05 Section 1: Preface TheSIREC D300 and D400 graphics recorders are the latest development in solid-state replacement for traditional paper recorders. With many more options, features and functions available, these recorders are able to meet a wide range of applications and requirements including: Power, Water Treatment, Thermal Processing, Food and Beverage, Pharmaceutical/Biotech and Manufacturing industries. This Manual This manual explains how to use the SIREC D Screen Designer software, which has been specially developed to create fully customisable screens for the SIREC D300 and SIREC D400 recorders. The software is very intuitive and easy to use. There is design sequence to ensure a quick and easy design that involves an order in which layouts need to be created. It is highly recommended that the user reads the manual before using the software. This will familiarise the user with the SIREC D Screen Designer user Interface, the terminology and tools used to create layouts and the rules of designing. This manual provides information to the user about SIREC D Screen Designer tools, commands and design techniques. It provides step by step instructions for using SIREC D Screen Designer on Windows. See “System Requirements” on page 6. The SIREC D Screen Designer software will auto run on installation from the CD or download from the web. Follow the instructions for “Installation” on page 7. SIREC D Screen Designer documentation and software assumes the user has working knowledge of Windows and its conventions. The first step is to read the manual. Supplementary documentation Supplementary documentation to accompany these recorders are: Table 1.1 : Supplementary documentation Manual Part number SIREC D Display Recorder Manual 43-TV-25-35 SIREC D Software Display Recorder Manual 43-TV-25-18 43-TV-25-36 Iss.5 GLO May 11 UK A5E01001789-05 1 Notes • The contents of this manual are correct at the time of issue. The contents may change at any time without prior notification. This is due to continuous developments to the recorder and its functionality. • Every effort has been made to ensure the accuracy of this document; however, should there be any anomalies found, please contact SIEMENS . • All rights are reserved. No part of this manual should be copied or reproduced, stored on a retrieval system or transmitted in any form without the prior written permission from SIEMENS . SIREC D Screen Designer software overview SIREC D Screen Designer enables the user to design unique layouts for transfer on to a recorder. Overview Layouts, which represent the screens shown on a recorder, are designed by placing widgets and objects onto templates, which represent the recorder’s screens. Widgets are graphical containers for objects; objects display elements that represent data in different graphical forms. Objects can be shown in a combination of display devices eg. Bargraph, Chart, Digital or combinations of these. Widgets and objects are placed on a template from which multiple screens can be created. The screens based on this template all look alike, but they can show different data. The completed design is then saved as a layout (.lay file), which can be loaded into the recorder. The SIREC D Screen Designer User Interface is easy to use and provides a user-friendly environment containing: • The Design window - shows the area for creating layouts using templates and screens. • The File Browser window - helps the user manage and navigate the open files • The Toolbox window - contains the Standard widgets and objects the User can use the create templates and screens. • The Properties window - shows the user all the characteristics associated with an object, widget, template or screen: The SIREC D Screen Designer software design package is compatible with both SIREC D300 and SIREC D400 recorders. Layouts can be transferred onto single or multiple recorders giving continuity and standardisation of process data. Why do you need SIREC D Screen Designer? SIREC D Screen Designer has been developed to meet the ever increasing demand for instant information which is customised for efficient operator interpretation. This software tool enables the user to quickly develop totally customised screens displaying easy to read data. 2 43-TV-25-36 Iss.5 GLO May 11 UK A5E01001789-05 How does it work? The SIREC D Screen Designer software is a familiar Windows based environment displaying information in separate window areas around the main design space. Toolbars, menus, drag and drop, undo/redo and left/right mouse click actions are used in the application interface. The simple process of creating a layout is as follows: Blank template A Horizontal Bar widget added Scale object added to the widget Screen added from a template • The user starts with a blank template. The template represents a screen (or screens) to be shown on the recorder. • Select either a blank widget or a pre-defined widget from the widgets tab in the Toolbox window. Drag and drop the widget onto the template. • If a blank widget is selected it will not contain any objects. Note that you can resize the blank widget or any of the pre-defined widgets. Select an object from the objects tab in the Toolbox window. Drag and drop an object from the Toolbox window onto the widget. Objects can be added to a blank widget or a pre-defined one. Objects display the data in various graphical forms, such as a Scale, Pen Pointer, Alarm Marker, Text, Bar or Digital etc. • Each widget and object, when selected, has a detailed list of properties that can be extensively modified to suit the user’s requirements. The properties are displayed in the Properties window. Green resize handles appear around a widget when it is selected and blue resize handles appear around an object when it is selected. • Many objects can be placed onto a widget; many widgets can be placed onto a template. • When the template is finished, a screen can be created from it. The screen can show the Pens, Alarms or Inputs/Outputs, as required. To do this, select the screens tab and select the Add Screens icon. Add the new screen based on the template. These are saved together as a layout (.lay file). • The layout can then be loaded into the recorder via, Compact Flash card, USB key, FTP interface or Network Share folder (NAS). Note that in order to load layouts into a recorder, the recorder must have the Custom Screens option active. Refer to the recorder’s User manual for more details on firmware options. 43-TV-25-36 Iss.5 GLO May 11 UK A5E01001789-05 3 4 43-TV-25-36 Iss.5 GLO May 11 UK A5E01001789-05 Section 2: Introduction & Installation SIREC D Screen Designer is compatible with SIEMENS SIREC D software for the SIREC D300 and D400 recorders CD Contents • Screen Designer Installation Setup • Screen Designer Demos • Documentation (Manual Pack) • Recorder Firmware • Recorder Installation Instructions Learning about Screen Designer Read this Manual This user manual gives an overview of the SIREC D Screen Designer Interface, details of the components within Screen Designer and easy step by step instructions on how to create new layouts. Take time to read through each section of the manual. Start at the “Installation” on page 7, before loading on the software, then go to “Section 3: SIREC D Screen Designer Interface” on page 9. Here you will find full explanations of each component in the Screen Designer interface. Finally go to “Section 4: Designing a Layout” on page 39. This will describe how to design and build custom screens. 43-TV-25-36 Iss.5 GLO May 11 UK A5E01001789-05 5 System Requirements The system pre-requisites stated below are in line with the minimum required to run Screen Designer for the SIREC D recorders. • 1GHz Pentium processor or higher • CD - ROM drive • Monitor recommended screen resolution 1024 x 768mm (min), high colour • Windows™ 2000, 2003, XP, Vista and Windows 7 (32 and 64 bit Professional and Ultimate Edition) • 4GB or more of RAM (min 4GB recommended) • 16 bit colour graphics (24 bit recommended) • 50 Mbyte free hard disk space • a Mouse • Compact Flash card reader or USB connector Recorder Requirements: To transfer Screen Designer layouts onto the recorder, the credits for the Customs Screens firmware option is required for the recorder. To use a recorder in Designer Mode, a USB mouse is required to be connected directly to the recorder (front or rear) and Designer Mode activated by clicking on the Screen button and then the Edit button in the recorder’s Menu bar. Another way to use the Designer Mode is via the Remote Viewer. The firmware option for the Remote Control Tool needs to be active in the recorder and Passwords must be enabled in the recorder. The user then needs to browse the recorder by entering the recorder’s IP address into an Internet browser. The web page will be password protected and will have the Remote Viewer download button. 6 43-TV-25-36 Iss.5 GLO May 11 UK A5E01001789-05 Installation Before installing the software onto your PC, it is recommended to close down all other applications, including any programs that automatically load during your PC’s start up procedure. Place the CD in the drive and the software should Auto Run. If this does not occur within 30 seconds follow the instructions below: • place CD into drive • go to ‘My Computer’ • double-click CD ROM drive • double-click Screen Designer icon • Follow the installation instructions on the screen During installation you will be asked to confirm the drive and directory into which you would like the software installed. The default drive and file path is C:\Program Files\Sirec D Software\Screen Designer. Start up The SIREC D Screen Designer software has been installed on the hard drive of your computer (C) in ‘Program Files’ unless during set up you change the destination folder. Screen Designer To start the program go to the Start button at the bottom left of your screen and select Programs (or All Programs) and go to the SIEMENS folder. Place the cursor over the Screen Designer program and click. Right click on this icon to create a shortcut that can be placed on the desktop for quick access. 43-TV-25-36 Iss.5 GLO May 11 UK A5E01001789-05 7 8 43-TV-25-36 Iss.5 GLO May 11 UK A5E01001789-05 Section 3: SIREC D Screen Designer Interface SIREC D Screen Designer Interface The SIREC D Screen Designer User Interface consists of: 1. “Design Window” on page 14 - Shows the contents of a layout and is the design area for creating templates and screens to produce layouts 2. “File Browser Window” on page 16 - shows hierarchical structure of each open file eg. screens, templates, layout files. 3. “Toolbox Window” on page 26 -2 tabs that contain widget and object libraries the user can “Drag and Drop” into an open template in the Design window 4. “Properties Window” on page 22 - displays the characteristics of a selected item eg. widget, object, template or screen. Figure 3.1 Screen Designer user interface Design window toolbar Main Toolbar 2. File Browser Window 1. Design window 3. Toolbox Window Object and widget tabs 4. Properties Window Design window outer tabs. Switch between templates and screens 43-TV-25-36 Iss.5 GLO May 11 UK A5E01001789-05 Design window inner tabs display template or screen names 9 Main Toolbar The Main Toolbar provides the user with the standard Windows user interface features including: File, Edit, View, Window and Help. No Help files are currently available for this version of Screen Designer. Listed below are the items that appear in the Main Toolbar. • New - a new blank template to create a D300 or D400 layout • Open - opens a previously saved template file (.tpl) or layout file (.lay) • Save - saves the active template document or layout document. • Validate Layout - checks for overlapping or off-screen widgets in the layout. A layout having such widgets cannot be run on the recorder. A dialogue box will appear describing what errors are present. • GO! Animate Layout - Launches a Desktop simulation of the recorder that mimics signal activity to the layout. screens in the layout should have their widgets set up with pen information. See “Animation” on page 56. • Browse Bitmaps - Bitmap library for adding and selecting bitmaps • Cut - removes the selected item to the clipboard for pasting • Copy - copies the selected item to the clipboard for pasting • Paste - paste an item from the clipboard • Undo - undoes one or more previous commands • Redo - redoes one or more previous commands • Sticky Widgets - A mode that allows widgets and objects to align more easily. The mode can be toggled on or off. • Expert Mode - A mode that enables the user to select the objects contained in a widget. The mode can be toggled on or off. Normal Mode just allows the widget to be selected. Default is Normal Mode. • File Browser - toggles the File Browser window on and off from the application interface • Toolbox Window - toggles the Toolbox Window on and off from the application interface • Properties Window - toggles the Properties Window on and off from the application interface 10 43-TV-25-36 Iss.5 GLO May 11 UK A5E01001789-05 File Menu Listed below are the items that appear in the File menu. • New - a new blank template to create a D300 or D400 layout • Open - opens a previously saved template file (.tpl) or layout file (.lay) • Close - closes the layout currently being displayed • Save - saves the active template document or layout document. • Save As - saves the active template document or layout document. Allows you to specify a different location or name for the file. • Load Setup - loads a recorder setup to use its settings for all open template documents and layout documents • Unload Setup - unloads the currently loaded setup file and reverts to the default setup • Validate Layout - checks for overlapping or off-screen widgets in the layout. A layout having such widgets cannot be run on the recorder. A dialogue box will appear describing what errors are present. • Animate Layout - Launches a Desktop simulation of the recorder that mimics signal activity to the layout. screens in the layout should have their widgets set up with pen information. See “Animation” on page 56. • Browse Bitmap Library - Bitmap library for adding and selecting bitmaps • Properties - displays the number of templates and screens used and available for a layout • Most Recently Used File List - A list of the latest previously opened files. Select a file to open it. • Exit - closes Screen Designer (a prompt to save any unsaved layouts will appear if required) 43-TV-25-36 Iss.5 GLO May 11 UK A5E01001789-05 11 Edit Menu The contents of the Edit drop down menu will change depending on whether a template or screen is being displayed in the Design window. For example, if a template is being displayed, then the Edit menu will offer Add template, Delete template and Re-order templates or screens, depending of what is currently displayed in the Design window. Listed below are the items that appear in the Edit menu • Undo - Undoes one or more previous commands • Redo - Redoes l one or more previous commands • Cut - removes the selected item to the clipboard for pasting • Copy - copies the selected item to the clipboard for pasting • Paste - paste an item from the clipboard • Delete - deletes selected item • Menu Bar - shows or hides the menu bar on the template or screen currently being displayed. • Sticky Widgets - A mode that allows widgets and objects to align more easily. The mode can be toggled on or off. • Expert Mode - A mode that enables the user to select the objects contained in a widget. The mode can be toggled on or off. Normal Mode just allows the widget to be selected. Default is Normal Mode. • Link Object - links objects having a scale to maintain their relative zero and span relationship. Objects having a scale include the alarm markers object, the bar object, the chart object, the pen pointers object, and the scale object. Objects must be of the same orientation. • Unlink Object - un-links an object from another object • Add Template/Screen - adds a template/screen to an open file in the Design window • Delete Template/Screen - deletes the template/screen that is currently being displayed • Re-Order Templates/Screens - specify the display order of the screens or templates in a layout • Insert Template From File - (only avalable when you are in the template tab). Inserts just a template, stored as a template (.tpl) file from a location of your choice into the open layout. • Save Template - (only avalable when you are in the template tab). Just saves the selected template to a template (.tpl) file to a location of your choice. Does not save any screen information in the layout. 12 43-TV-25-36 Iss.5 GLO May 11 UK A5E01001789-05 View Menu The contents of the View menu are: • File Browser - toggles the File Browser window on and off from the application interface • Toolbox Window - toggles the Toolbox Window on and off from the application interface • Properties Window - toggles the Properties Window on and off from the application interface • Toolbar - toggles the main Toolbar on and off at the top of the application interface • Status Bar - toggles the status bar on and off at the bottom of the application interface Window Menu Contents of the Window menu are: • Cascade - will display multiple Design windows overlapping each other • Tile Horizontally - will display multiple Design windows underneath each other • Tile Vertically - will display multiple Design windows side by side • Arrange All - arranges all minimised Design windows at the bottom of the design area. • Close All - closes all template documents and layout documents that are open • Lists all of the template documents and screen documents open in Screen Designer. A tick mark is shown against the document that is currently active. Help No Help files are currently available for this version of Screen Designer. • About - license and version information 43-TV-25-36 Iss.5 GLO May 11 UK A5E01001789-05 13 Status Bar This is the grey bar that runs along the bottom of the interface. On the left it displays the status “Ready” or the prompt for a Toolbar button or menu command. In the middle the first pair of co-ordinates refer to the realtime horizontal and vertical position, in pixels, of the selected object or widget in relation to the top left corner of the template or screen. The second pair of co-ordinates to the right refer to the width and height, in pixels, of the selected object or widget. Drag the object or widget to resize/reposition it or type in the dimensions or the position into the boxes and press enter to ensure exact size and position. On the far right of the status bar is displayed NUM, which indicates that NUM Lock is set on the PC’s keyboard. CAP is also displayed, and if shown, indicates that CAP Lock is set on the PC’s keyboard When a widget or object is selected its Left, Top, Right, and Bottom co-ordinates are displayed in the Properties window. These co-ordinates can be changed by entering new values in the Properties window. Design Window The Design window is the area where a layout is created. This is started by selecting a new template from the Design window to which widgets and objects are added. When this is complete, a screen can be added using the template. Next, pen/channel mapping configuration can be performed on the screen. Finally, the layout document can be saved as a layout (.lay) file. These files can all be viewed in the File Browser window. The same template can be used to create many screens. Design window toolbar Along the top of the Design window is a toolbar that will display similar sets of buttons depending on whether the templates or screens outer tab is selected. Add Screen/ Template 14 Delete Screen/ Template Re-order Screens/ templates Insert Template From File Save Link Template Object Un-link Object 43-TV-25-36 Iss.5 GLO May 11 UK A5E01001789-05 Design window tabs The Design window has tabs to display the different areas of the layout. There are two sets of tabs at the bottom of the window. The outer set of tabs switches between templates and screens. The inner set of tabs displays all the templates or screens depending on which of the outer tabs has been selected. Multiple Design windows can be open at the same time. Figure 3.2 Templates outer and inner tabs Templates outer tab Template inner tabs Figure 3.3 Screens outer and inner tabs Screen outer tab 43-TV-25-36 Iss.5 GLO May 11 UK A5E01001789-05 Screen inner tabs 15 File Browser Window Figure 3.4 File Browser Window Layout File Templates Folder Templates File Screens Folder Screens Select an entry from the File Browser Window and it will display in the Design window. The File Browser Window shows the hierarchical structure of each open file in SIREC D Screen Designer. It lists templates and screens in separate sections. Each section can be expanded or collapsed as denoted by a + or - symbol. Click on a + symbol to expand a section. Click on a - symbol to collapse a section. The names of templates and screens are displayed in the File Browser Window. Each template and screen can be re-named for ease of identification. To rename a template or screen, select the template or screen entry and wait a second. Select the same entry again and an edit box will appear around it. Enter a new name then press the enter key on the keyboard when the entry is finished. Right click on a template or screen entry in the File Browser window to show a menu of allowable commands that apply to that template or screen. Right click template commands 16 Right click screen commands 43-TV-25-36 Iss.5 GLO May 11 UK A5E01001789-05 Table 3.1 : Right click template and screen commands Template commands Screen commands Cut - removes the template to the clipboard for pasting Cut - removes the screen to the clipboard for pasting Copy - copies the template to the clipboard for pasting Copy - copies the screen to the clipboard for pasting Paste - pastes the template on the clipboard to the same layout or to a different layout Paste - pastes the screen from the clipboard to the same layout or to a different layout Add Template - adds a new template Add Screens - Adds one or more new screens. You specify the template for each screen that you add. Delete Template - deletes this template Delete Screen - deletes this screen Re-order Templates - allows the user to change the display order of the templates that are shown in the File Browser window and in the Design window Re-order Screens - allows the user to change the display order of the screens that are shown in the File Browser window and in the Design window. Insert Template From File - opens the Insert template dialog to search for a template in an existing template (.tpl) file to insert into the active layout Save Template - opens the Save As dialog to specify the location in which to save this template to a template (.tpl) file. 43-TV-25-36 Iss.5 GLO May 11 UK A5E01001789-05 17 File Types • “Layout File” on page 19 - contains one or more templates, zero or more screens • “Template File” on page 20 - contains a single template • “Setup File” on page 21 - contains a single setup only (imported from SIREC D software, not created in Screen Designer ). . Figure 3.5 Example of what a Layout File can consist of Layout File (.lay) **Setup File (.set) *Add Screen *Add Screen *Add Screen Template File (.tpl) Widget Widget Object Object Object Object Object Object Widget Object Object Object A minimum of one template and one screen is enough to create a layout file. *A screen is not a file type but a pen/channel mapping device that is saved together with the template(s) as a layout file (.lay). ** A Setup file cannot be opened or created in Screen Designer. The setup file is loaded into the Screen Designer software and includes all the recorder setup information such as the pen and pen/channel configuration. 18 43-TV-25-36 Iss.5 GLO May 11 UK A5E01001789-05 Layout File Table 3.2 : Layout File (.lay) Purpose Contains the screen configuration (objects, widgets, templates and screens) of a recorder. The user can load the screen configuration into the recorder separately from its setup. Contents Contains one or more templates Note that there is always at least one template (even if it is empty) in a layout, and the user cannot delete the only template remaining in a layout. Contains zero or more screens File Creation Details In order to create a layout file, Screen Designer prompts the user for the recorder type. Screen Designer uses the recorder type to determine the screen size of the templates to be created in the layout. Screen Designer saves the recorder type that was specified by the user in the layout file. Tabs in Design window Templates tab Template #1 Name tab to template #n Name tab Screens tab Screen #1 Name tab to screen #n Name tab Contents Shown in File Browser Window 43-TV-25-36 Iss.5 GLO May 11 UK A5E01001789-05 The recorder type and file name is shown for each layout file as shown in the example below. A setup that has been loaded into Screen Designer is associated with every layout open in Screen Designer . The first entry shown in the File Browser window is the setup being used (either the default setup or a user specified setup). Each template listed shows the template number and name, and each screen listed shows the screen number and name. 19 Template File Table 3.3 : Template File (.tpl) Purpose Contains a single template. The user can load this template into a recorder and set up screens in the recorder based on it. A template can be inserted into a layout open in Screen Designer . Contents Contains a single template File Creation Details A template file can be created from a template being displayed in Screen Designer by clicking on the Save Template button on the File Design window toolbar or by selecting the Save Template command on the Edit menu. The template can also be saved by right clicking on the template entry in the File Browser window and selecting the Save Template command from the menu. Screen Designer saves the recorder type that was specified by the user in the template file. Tabs in Design window Contents Shown in File Browser Window 20 Templates tab Template #1 Name tab Screens tab No Screens Configured tab The recorder type, template name, and file name is shown for each template file as shown in the example below. 43-TV-25-36 Iss.5 GLO May 11 UK A5E01001789-05 Setup File The Setup File contains a single setup for a recorder. A Setup file is not opened or viewed by Screen Designer. A setup file can be loaded into Screen Designer and will apply to all layouts open in Screen Designer. When a setup file is loaded into Screen Designer, its settings, such as pen tag and unit information, will be used in displaying all of the layouts open in Screen Designer and for the animation of any layout open in Screen Designer Table 3.4 : Setup File (.set) Purpose Contains the physical configuration (a setup) of a recorder (pens, I/O, and communications). The user can load a setup to the recorder separately from its screen configuration. Loading a setup in screen Designer allows Screen Designer to display the actual userentered pen information on templates and screens, such as the pen tag, pen units, or pen description, rather than generic text, such as “Pen 1”, “%”, or “”, respectively. Only one setup at time can be loaded into Screen Designer and the loaded setup will apply to all layouts in use. Contents Contains a single setup File Creation Details A Setup file cannot be created by Screen Designer . Tabs in Design window There is no Design window shown for a setup. The user does not open or close a Setup file in Screen Designer . Contents Shown in File Browser Window The first entry listed in the File Browser window shows which setup is being used for all layouts open in Screen Designer . This is either the default setup or a user specified setup. . 43-TV-25-36 Iss.5 GLO May 11 UK A5E01001789-05 21 Properties Window The Properties Window can be dragged and docked to any edge of the application interface. It can also float in the application interface. The same is true for the File Browser Window and the Toolbox Window, although they can be docked only to the left or right edge of the application interface. When a template, screen, widget or object is selected in the Design window a full list of characteristics for that item is displayed in the Properties window. The characteristics can be changed in the Properties window and the changes can be seen immediately in the Design window. The Properties window will display: • Template Properties - See “Template Properties” on page 22. • Screen properties - See “Screen Properties” on page 23. • Widget properties - See “Widget Properties” on page 24. • Object properties - See “Object Properties” on page 25. Template Properties Table 3.5 : Example of Template Properties General Name - Select to Change the name Menu bar - Toggles the recorder menu bar on and off at the top of the template and at the top of all screens based on the template. Replay Orientation - Select Horozontal or Vertical orientation for Replay mode. 22 43-TV-25-36 Iss.5 GLO May 11 UK A5E01001789-05 Screen Properties Table 3.6 : Example of Screen Properties General Name - Select to Change the name Enabled - Toggle On and Off to enable or disable this screen. A disabled screen will not be shown on the recorder. Template Type - Select from a list of all templates in the layout. Select By - Pen or Groups. Showing (Pens) - Only available if Select By - Pen is selected. Add and remove Pens, Max Mins anor Totals for this screen. Showing Replay Pens - Only available if Select By - Pen is selected. Add and remove Pens to show on Replay Screen Group Name - Only available if Select By - Group is selected. Select a Group# Show Max Min - Only available if Select By - Group is selected. Toggle On and Off to enable or disable. Show Totals - Only available if Select By - Group is selected. Toggle On and Off to enable or disable. Orientation - (Not DPMs). Set the orientation to Vertical or Horizontal for Scales and Charts. 43-TV-25-36 Iss.5 GLO May 11 UK A5E01001789-05 23 Widget Properties Table 3.7 : Example of a Properties window for a Digital Widget in a Screen General Name - each widget instance can be given its own name Category - A widget category (such as Bar widget) can contain different types of widgets in that category (such as Horizontal, for a horizontal bar widget, or Vertical, for a vertical bar widget) Type - of widget from the Toolbox Background Colour - colour palette for the widget background Pen No. - a quick way to assign a single pen to all objects in a widget rather than having to specify individually the same pen for each object. For example, if a widget contains a bar, scale, digital, and alarm markers object, all of these objects can be set up to use the same pen by just specifying Pen No. Channels - Channels specify where objects in the widget get their data from DIG 1 - First Digital shown on this widget TEXT 1 - First Text item shown on this widget Rect. Dimensions - Dimensions of the widget Left - position of the left edge of the widget on the template Top - position of the top edge of the widget on the template Right - position of the right edge of the widget on the template Bottom - position of the bottom edge of the widget on the template Border - edge around the widget Border On - turns the border on around the widget Border Style - Raised, Flat or Inset Border Colour - colour palette for the widgets border Border Width - enter border width, up to 15 pixels For more information see “Designing a Widget” on page 40 24 43-TV-25-36 Iss.5 GLO May 11 UK A5E01001789-05 Object Properties Table 3.8 : Example of properties for a Digital Object in a Screen General Buffering - redraws off line to reduce screen flicker if this is set to double-buffered Transparency - inactive part of the object becomes transparent Alpha Blending - semi transparent state for overlaying objects Fix Foreground Colour - Tick to fix colour for the active part of the object Fix BackColour - Tick to fix colour for the background of the object Background Colour - Colour palette for the background of the object Showing - None set. This will display the pen showing on this object Enable Alarm - Enables an Alarm for that Digital object Flash Foreground on Alarm - Foreground flashes when alarm active Flash Bkground on Alarm - Background flashes when alarm active Change ForeClr on Alarm - Change the colour of the foreground alarm Foreground Alarm Clr - Colour palette for the foreground alarm Fix Number Format - Number format options appear when ticked Rect. Dimensions - Dimensions of the object Left - position of the left edge of the object on the template Top - position of the top edge of the object on the template Right - position of the right edge of the object on the template Bottom - position of the bottom edge of the object on the template Border - edge around the object Border On - turns the border on around the object Border Style - Raised, Flat or Inset Border Colour - colour palette for the object border Border Width - enter border width, up to 15 pixels For more detailed information see “Object Properties” on page 42 43-TV-25-36 Iss.5 GLO May 11 UK A5E01001789-05 25 Toolbox Window The Toolbox Window, in the middle left of the screen, has two tabs for widgets and objects. Sets of pre-defined widgets and objects have been created and loaded into the Toolbox library. Widgets Tab The widgets tab has been divided up into folders containing a selection of pre-designed widgets. Each folder will expand displaying each variation of a particular widget type. Each widget is different. For example, in the “Indicators Horizontal” folder there are 8 widgets,.There are 4 widgets for the SIREC D300 and 4 widgets for the SIREC D400 recorder. This list shows the type of variations: • D300 Bar Type 1 - contains Bar and Scale objects • D300 Bar Type 2 - contains a Bar, a Scale and Alarm Markers objects • D300 Bar Type 3 - contains Bar and Scale objects with alpha blending and transparency switched on • D300 Bar Type 4 - contains a Bar, a Scale and Alarm Marker objects with alpha blending and transparency switched on Select the most suitable widget from the list and Drag and Drop the pre-defined widgets onto a template. Or select the Blank re-sizable widget and add your own objects from the objects tab. 26 43-TV-25-36 Iss.5 GLO May 11 UK A5E01001789-05 A widget on a template can be renamed for ease of identification in the Properties window. Figure 3.6 Toolbox window - Widgets tab Objects tab The objects tab has been divided up into folders containing a selection of pre-designed objects. Each folder will expand displaying each variation of a particular object type. Each object is different. For example, in the “Charts” folder there is a “Chart Horizontal” object and a “Chart Vertical” object. Select the desired object from the list and Drag and Drop it onto a blank widget or a predefined widget. Select the objects tab to display a list of pre-deifined objects that the user can Drag and Drop into a widget. 43-TV-25-36 Iss.5 GLO May 11 UK A5E01001789-05 27 Figure 3.7 Toolbox window - Objects tab 28 43-TV-25-36 Iss.5 GLO May 11 UK A5E01001789-05 Templates A template is the area where widgets are placed to create a layout. Adding a screen based on a template will enable channels to be mapped and pen information to be displayed on the screen. The same template can be used in many layouts if they are required to look the same. For example: Template #1 has 4 DPMs. Add Screen 1 which has pens 1 to 4 configured. Template #1 can be used again with Screen 2 which has pens 5 to 8 confgured. A template can be saved on its own as a Template (.tpl) file. The template file can be loaded into a recorder an the pen/channel configuration can be set up on the recorder. To start a new layout design go to New in the main tool bar, or to open an existing layout file go to Open and browse for the desired layout (.lay). When you start a new layout there are two sizes to choose from depending on the type of recorder. Select one from the list and a new Design window will appear in the middle of the PC’s screen displaying Template #1. Up to 32 templates can be used per layout. For more information on the template file specification see “Template File” on page 20 Figure 3.8 Design window showing a new template and a Vertical bar widget from the Toolbox Outer tabs to switch between templates and Screens 43-TV-25-36 Iss.5 GLO May 11 UK A5E01001789-05 Inner tabs show all the templates available for this layout 29 CAUTION IMPORTANT NOTICE FOR TEMPLATES AND SCREENS Any changes to a template will affect all screens which use the template. Also be aware that any design changes made in a screen will affect all of the other screens using that template and will change the template itself. This CAUTION symbol may indicates a potentially hazardous situation, which, if not avoided, may result in property damage. Template Tabs At the bottom of the Design window are two sets of tabs. The outer tabs are to swap between viewing templates or screens. When templates are selected on the outer tab then the inner tabs will display just templates. From the toolbar at the top of the Design window there are icons to add, delete and re-order templates. A layout can consist of many templates. It is when you add a screen to the layout that you choose which template is going to be used for that screen. A layout with many templates can be loaded into the recorder and different templates can be selected at the recorder level to create new screens. See “Loading a Template into a Recorder” on page 57. Association with a Screen To see which screens use which template go to the Properties Window for each screen and check the template Type property. The purpose of adding a template to a screen is so the user can set up channel/pen configuration. When the screen and the template are complete the two are saved as a layout (.lay). To add a screen click on the screens tab and go to the toolbar and select Add Screens. Template Toolbar The Design window toolbar changes depending on if a template or screen is being displayed in the Design window. The toolbar runs along the top of the Design window when a layout has been opened. See “Design window toolbar” on page 14. 30 43-TV-25-36 Iss.5 GLO May 11 UK A5E01001789-05 Screens A screen is added to a template and provides pen/channel configuration for each object or widget on the template. Screen Tabs At the bottom of the Design window are two sets of tabs. The outer tabs are to swap between viewing templates or screens. The inner tabs will display the names given to the screens. From the toolbar at the top of the Design window there are icons to add, delete and re-order screens. Outer tabs to switch between templates and screens Inner tabs show all the screens available for this layout Add a Screen When a template is complete select the screens (outer) tab and go to the screen toolbar at the top and select Add Screens. The Add Screens box will appear with a list of templates that can be chosen for the screens to be added. At the bottom of the Add screens box is where you can rename each screen to be added. By default the template you have selected from the list will appear in here. The user can add multiple screens using this dialog before deciding to close it. Up to 32 screens can be used in one layout. 43-TV-25-36 Iss.5 GLO May 11 UK A5E01001789-05 31 Screen Configuration Screen configuration is assigning each object and/or widget to a pen/channel. See “Configuring a Screen” on page 55. Screen Toolbar The Design window toolbar changes depending on if a template or a screen is being displayed in the Design window. The toolbar runs along the top of the Design window when a layout has been opened. See “Design window toolbar” on page 14. Screen Properties Window When a blank area of the screen is selected the characteristics of the screen will be displayed in the Properties window. Some of the individual characteristics can be changed in the Properties window, including the screen name, see Table 3.4 on page 21. Widgets Widget Details • Up to 64 widgets can be used per template. • You can cut, copy, paste and delete widgets on a template. • Widgets can be resized using the green coloured blocks that appear around the edge when it is selected, known as resize handles. • Objects are confined to the boundaries of a widget for moving and resizing. • A widget cannot contain another widget, only objects. For details of widget properties see “Widget Properties” on page 24 . Types of Widgets Standard Widgets Standard widgets are found in the widgets tab in the Toolbox window. The widgets tab will contain several styles of pre-designed widgets for immediate use. They can be dragged & dropped onto a template to aid in designing the template quickly. Standard widgets in the Toolbox are: Table 3.9 : Widget 32 Description Bars A selection of Horizontal and Vertical Bars with Scales & Alarm Markers Bitmap Blank for own design; can be re-sized. Contains a blank bitmap object Blank Widget Blank for own design; can be re-sized Chart Horizontal and Vertical Chart object plus pen pointers, alarm markers. Digital Panel Meter A selection of Digital Panel Meters Indicators A selection of Horizontal and Vertical transparent Indicators (Bars with Scales & Alarm Markers) designed for use with Bitmaps 43-TV-25-36 Iss.5 GLO May 11 UK A5E01001789-05 User Defined Widgets User defined widgets are ones that the user has created and saved or by taking a blank widget or a standard widget and modifying it to create a new widget. The user can create a new widget from scratch by selecting a blank widget from the widgets tab in the Toolbox window and dragging and dropping it onto a template. Add objects to the widget to create the desired design. Widgets have to be saved as a part of a template. Association with an Object A widget is a graphical display container for objects. Up to 64 objects can be placed into a widget. None of the objects can be resized beyond the boundaries of the widget. See “Objects” on page 33. Widget Properties Window When a blank area of the widget is selected the characteristics of the widget will be displayed in the Properties window. Any objects on the widget will also appear on the properties window, listed under Channels. When the widget is selected, green resizing handles will appear around the edge of the widget. The individual characteristics of the widget can be changed in the Properties window, see “Properties Window” on page 22 NOTICE If a widget has many objects in it, it is sometimes difficult to know where to select a blank area of the widget. It is easy to select an object by mistake instead. You can force selecting the widget instead of an object in it by holding down the Ctrl key on the keyboard while you click anywhere in the widget. Objects Object Details • Up to 64 objects can be used per widget. • You can cut, copy, paste and delete objects from a widget. • Objects can be resized using the blue coloured handles that appear around the edge when it is selected. • Objects can also be linked to other objects, see “Linking Objects” on page 38. • For details of object properties see See “Object Properties Window” on page 38.. Types of Objects Alarm Markers Object The Alarm Markers object will appear only if the Alarms are enabled for the pen that it uses. Alarm markers can be set to flash when an alarm is active. The colour of the alarm marker can also be set. When an alarm markers object has its Height property set to greater than 15, the alarm number will appear in the marker. 43-TV-25-36 Iss.5 GLO May 11 UK A5E01001789-05 33 High Alarm active on a DPM Vertical and Horizontal Alarm Marker objects Low Alarm active on a DPM Bar Object A Bar object is a Bargraph indicator representing the input signal in a graphical form, ascending or descending in a vertical orientation or increasing to the right or the left in a horizontal orientation. To read a bar measurement accurately use a Digital object and or a Scale object. Examples of a vertical and horizontal bars Bitmap Object Bitmaps can be added to a bitmap object on a template to create a background image. Other widgets can be placed on top to depict activity within that image. They can also be used to enhance a screen design, such as adding a company or product logo. Either drag and drop a bitmap widget onto the design area (it already contains a blank bitmap object) or drag and drop a bitmap object onto any existing widget. When resizing the bitmap, hold the shift key down to keep the aspect ratio. Bitmap Library First, make sure you have the blank bitmap object selected then you can browse the bitmap library in the toolbar or in the File menu. Select a new bitmap and this will be insterted into the blank bitmap object. See “Adding Bitmaps” on page 35. 34 43-TV-25-36 Iss.5 GLO May 11 UK A5E01001789-05 Bitmap inserted into a blank object on a blank widget Bitmap inserted onto a widget in an existing layout Adding Bitmaps The bitmap library contains a few examples. To add your own bitmaps select the Add button and browse to the location of the bitmap you require on your PC. To insert a bitmap you must first have a bitmap object selected in the layout. Go to the library, highlight the desired bitmap and press Select. Bitmaps can be added and deleted from the library as required. Ensure that you do not delete any bitmaps from the library that are used in a layout, as they will disappear from the layout. To Re-size a bitmap and maintain the aspect ratio of the original image hold down the Shift key on the keyboard when resizing using the grab handles Chart Object The Chart object can display multiple pen traces. The chart object has no Pen Pointers or Scale; it is just a Chart. Chart object 43-TV-25-36 Iss.5 GLO May 11 UK A5E01001789-05 Chart widget If a Chart, Scale and Pen Pointers object are required, select a Chart widget instead of a Chart object. 35 Chart object Pen Pointers object Chart object linked to the Pen Pointers object and aligned with the edge of the chart Digital Object A Digital object is a numeric reading of the input signal. Used on their own or with a Bar object. Pen Pointers Object Pen Pointers can show multiple pens and are mainly used with charts to follow the exact position of the last reading with the pen number marked on each pointer. A pen pointer can be set to flash when an alarm is active on that pen. Scale Object 36 43-TV-25-36 Iss.5 GLO May 11 UK A5E01001789-05 The Scale object can be set to display any numeric value (max 23 decimal places). This is set in the “Showing” item in the Properties window for a Scale object in a screen tab. A Scale object is usually associated with a bar. This example shows a horizontal scale with the label position at the top. The two vertical scales display left and right graduation and label direction Text Object Text objects can be used for adding the Pen tag/units, Labels, Max/Min, Totals or any text required. Choose a single line Text Label or a multiline Text Box. 43-TV-25-36 Iss.5 GLO May 11 UK A5E01001789-05 37 Object Properties Window When an object is selected the characteristics of the object will be displayed in the Properties window on the right. When the object is selected blue resizing handles will appear around the edge of the object. The individual characteristics of the object can be changed in the Properties window, see “Object Properties” on page 42. Association with a Widget A widget is a container for objects. Up to 64 objects can be placed into a widget. None of the objects can be resized beyond the boundaries of the widget. See “Widget Details” on page 32. Linking Objects Objects containing a scale can be linked together so that they are locked at the same size and will resize together. For more information see “Linking Objects” on page 54 38 43-TV-25-36 Iss.5 GLO May 11 UK A5E01001789-05 Section 4: Designing a Layout Starting a Layout A layout can consists of one or more templates. The template(s) have widgets placed on them and objects can be added to the widgets. When the template design is complete a screen is added to the layout where the pen/channel configuration is set up. The layout is then saved as a .lay file type. To start a new layout design: 1. Open Screen Designer 2. Click on New from the main toolbar. 3. Choose from two recorder types in the drop down list. 4. This will produce a layout with a blank template. By default this template will be named Template #1. Designing a Template The template area is the design area that is equivalent to the recorder screen size. The idea is to create a design by placing widgets onto the template and then placing objects on to the widgets. Widgets are just containers for objects. Objects will graphically represent the data on the recorder’s screen. Standard widgets are available from the widgets tab in the Toolbox. These are pre-designed widgets that can be used just as they are. See “Standard Widgets” on page 32. . Figure 4.1 Template, Widget and Object Blank template A standard vertical Bar widget and a blank widget The blank widget has a Chart, a Scale and two DPM objects added In this example we will start with a blank template: 1. From the Toolbox window select, drag and drop a blank widget or a standard widget from the widgets tab in the Toolbox. Drag this onto the template. 43-TV-25-36 Iss.5 GLO May 11 UK A5E01001789-05 39 2. When the widget is selected green resize handles appear around the edge and its properties will display in the Properties window. At this stage you may wish to change the background colour, border details etc. 3. One or many widgets may be placed onto the template, but must not overlap or go outside the template area. 4. Validate the layout to ensure there are no overlapping widgets 5. When the template is complete, select the screens outer tab and go to the Add Screens icon in the toolbar and add one or more screens that use the template. 6. Add pen configuration details and save the layout. Expert Mode To select objects on a widget, Expert Mode must be active. The Expert Mode icon is in the Main Toolbar at the top of the Design window. To select the widget in Expert Mode and not an object in the widget, hold down the Ctrl key on your keyboard and select as normal with the mouse cursor. This is useful when there are many objects in the widget, and it is difficult to find an empty area of the widget to click on to select the widget. Shortcuts Right click on an object or widget and select Cut, Copy, Paste or Delete. Object Order When placing objects on top of each other it can become difficult to select an object that is overlapped by another. The order of how the objects overlap can be changed by right-clicking on the object and selecting Order; this is known as the Z-Order. • Bring Forward: - moves an object one step higher in the Z-order • Send Backward: - moves an object one step lower in the Z-order • Bring to Front: - moves an object to the top of the Z-order • Send to Back - moves an object to the bottom of the Z-order Charts and Bitmaps should always stay behind other objetcts. For more information see “Object Z - Order” on page 51. Designing a Widget Widgets are graphical containers for objects; objects display elements that represent data in different graphical forms. Widgets are built up using a selection of standard objects from the objects tab in the Toolbox. Only objects can be placed in a widget; a widget cannot be placed in another widget. Widgets, when selected, have green resize handles and can be moved and resized within the confines of the design area of the template. Adding Objects Drag and Drop a blank or standard widget to the template: 1. From the Toolbox window, select, drag and drop an object from the objects tab onto the widget. 40 43-TV-25-36 Iss.5 GLO May 11 UK A5E01001789-05 2. When an object is selected, blue resize handles will appear and its properties will display in the Properties window. Objects have many properties that can be changed. For a definition of each property see “Object Properties” on page 25 . 3. One or many objects can be placed onto the widget. Many widgets may be placed on the template. 4. When the template is complete, select the screens outer tab and go to the Add Screens icon in the Toolbar. Here you can add one or more screens using the template you just designed. 5. Add pen/channel configuration details by going to the “Showing” item in the Properties window. Pen/channel configuration can be performed per object or per widget. When complete the template and screen information can be saved as a layout (.lay) file. The user can add more objects and more widgets to a design and change a layout. objects, when selected, can be moved and resized within the confines of a widget. Bitmaps For information on inserting bitmaps into your layout see “Bitmap Object” on page 34. Pen Colours The colours of the objects on the widget are determined by the pen/channel configuration that is set up in the Properties Window. See “Configuring a Screen” on page 55. Alternatively the colours can be changed individually in the properties window. Table 4.1 : Pen colours Pen # Colour RGB 1 Red 225/0/0 17 Red Tint 255/39/87 33 Red Tint2 255/39/87 2 Magenta 225/0/225 18 Dark Purple 109/81/139 34 Dark Purple 2 109/81/139 3 Green 0/128/0 19 Olive 87/146/76 35 Olive 2 87/146/76 4 Blue 0/0/225 20 Light Navy 0/94/118 36 Light Navy 2 0/94/118 5 Dark Red 196/0/0 21 Light Orange 253/83/48 37 Light Orange 2 253/83/48 6 Dark Magenta 128/0/128 22 Light Purple 174/113/211 38 Light Purple 2 174/113/211 7 Dark Green 0/74/0 23 Light Olive 139/168/0 39 Light Olive 2 139/168/0 8 Dark Blue 0/0/137 24 Cyan 83/174/172 40 Cyan 2 83/174/172 9 Mid Red 235/39/87 25 Mid Orange 255/100/0 41 Mid Orange 2 255/100/0 10 Mid Magenta 109/81/142 26 Aqua 0/231/157 42 Aqua 2 0/231/157 11 Mid Green 87/146/76 27 Salmon 211/148/133 43 Salmon 2 211/148/133 12 Mid Blue 0/94/118 28 Dark Sand 201/144/41 44 Dark Sand 2 201/144/41 13 Light Red 253/83/48 29 Dark Olive 0/59/44 45 Dark Olive 2 0/59/44 14 Light Magenta 174/116/209 30 Lime Green 111/255/109 46 Lime Green 2 111/255/109 15 Light Green 139/168/0 31 Light Slate 74/74/81 47 Light Slate 2 74/74/81 16 Light Blue 83/174/255 32 Brown 96/0/0 48 Brown 2 96/0/0 43-TV-25-36 Iss.5 GLO May 11 UK A5E01001789-05 Pen # Colour Pen # Colour 41 Object Properties Practically all the elements of an object can be changed: Size, Foreground Colour, Background Colour, Orientation, Alpha Blending, Transparency, position on the template, Border, plus many more properties that are individual to each type of object. The following tables give examples of each type of object and a list of their properties that can been changed. Chart Object Properties Table 4.2 : Example of a Chart Object properties window in the Screen tab General Alpha Blending - semi transparent state for overlaying objects Fix Foreground Colour - Tick to fix colour for the horizontal and vertical graph lines of the chart. Foreground Colour - Set foreground colour using colour palette Fix BackColour - Tick to fix colour for the background of the object Background Colour - Colour palette for the background of the object Showing - Specify which pens to show on the chart Orientation - Horizontal or Vertical Chart traces Chart Speed - Fast, Medium or Slow Fix Alarm Colour - Tick to fix the alarm background colour for the Chart Bkg Alarm Colour - Colour palette for the background of the chart when an alarm is triggered Fix Message Colour - Tick to fix the colour for any Messages on the Chart Message Colour - Colour palette for the Message Colour Fix Font Colour - Tick to fix the colour of the Font for Text on the Chart (eg. date/time stamp) Font Colour - Colour palette for the Font Colour Height - Change the Font height for Text used on the Chart Rect Dimensions Left - position of the left edge of the object on the template Top - position of the top edge of the object on the template Right - position of the right edge of the object on the template Bottom - position of the bottom edge of the object on the template Border Border On - turns the border on around the object Border Style - Raised, Flat or Inset Border Colour - colour palette for the object border Border Width - enter border width, up to 15 pixels 42 43-TV-25-36 Iss.5 GLO May 11 UK A5E01001789-05 Bar Object Properties Table 4.1 : Example of Object Properties for a Bar in the Screen tab General Buffering - redraws off line to reduce screen flicker Transparency - inactive part of the object becomes transparent Alpha Blending - semi transparent state for overlaying objects Fix Foreground Colour - Tick to fix colour for the active part of the object Foreground Colour - Set foreground colour using colour palette Fix BackColour - Tick to fix colour for the background of the object Background Colour - Colour palette for the background of the object Showing - Set up channel as - Data from Pen, Alarm for Pen or Input Channel Bar Type - direction of active object: Up, Down, None or Based (from a set point) Bar Style - Solid, Fade, Dynamic or Traffic Light (*see below) Orientation - of the bar: Horizontal or Vertical Level Cap - Line at the top of the active part of the object Level Cap Colour - Colour of the line at the top of the active part of the object Fix Top Limit - Tick to set the top limit of the object. eg. to set up a traffic light effect Top Limit - Set top limit of object Fix Bottom Limit - Tick to set the bottom limit of the object Bottom Limit - Set bottom limit of object Rect Dimensions Left - position of the left edge of the object on the template Top - position of the top edge of the object on the template Right - position of the right edge of the object on the template Bottom - position of the bottom edge of the object on the template Border Border On - turns the border on around the object Border Style - Raised, Flat or Inset Border Colour - colour palette for the object border Border Width - enter border width, up to 15 pixels Markers Show Max Markers - Tick to display Max markers Show Min Markers - Tick to display Min markers Reset Markers - Clears the Max and Min values Marker Colour - Colour palette to set marker colour 43-TV-25-36 Iss.5 GLO May 11 UK A5E01001789-05 43 Bar Style Solid A solid bar is all one colour of the active part of the bar Fade Once active the Gradient Start/End Colour Select will display below. Using the colour palette select the colours to start and end the colour fade of the active part of the bar Traffic light The Bar Style called Traffic Light consists of three colours; Red, Amber and Green in one bar object. Screen Designer only needs to know the two break points: Traffic Breakpoint Green, where the bar changes from green to amber and Traffic Breakpoint Amber, where the bar changes from amber to red. 100 80 Traffic Breakpoint Green is set to 40, Traffic Breakpoint Amber is set to 80. 60 40 20 0 Dynamic The Bar Style called Dynamic consists of three colours: Red, Amber and Green in one bar object. Unlike the Traffic light, which will show all three colours on the active part of the bar at the same time, the Dynamic style will change the whole bar to just one colour. Screen Designer only needs to know the two break points: Dynamic Breakpoint Green, where the whole bar changes from green to amber and Dynamic Breakpoint Amber, where the whole bar changes from amber to red. 44 43-TV-25-36 Iss.5 GLO May 11 UK A5E01001789-05 Digital Object Properties Table 4.2 : Example of a Digital Object properties window in the Screen tab General Buffering - redraws off line to reduce screen flicker Transparency - inactive part of the object becomes transparent Alpha Blending - semi transparent state for overlaying objects Fix Foreground Colour - Tick to fix colour for the active part of the object Foreground Colour - Set foreground colour using colour palette Fix BackColour - Tick to fix colour for the background of the object Background Colour - Colour palette for the background of the object Showing - Set up channel as - Data from Pen, Alarm for Pen or Input Channel Enable Alarm - Enables any alarm features for the digital Flash Foreground on Alarm - Foreground (number) will flash in alarm Flash Bkground on Alarm - Background will flash when in alarm Change ForeClr on Alarm - Colour of numbers will change in alarm Foreground Alarm Clr - Set foreground (number) colour when in alarm Fix Number Format - Tick to activate Numb Format options Numb Format Notation - Toggle between Scientific or Normal number format. Auto - Toggle Between Auto and User Defined. Auto is set to 2 decimal places, User Defined allows one or more decimal places After Decimal - Enter the number of decimal places. Rect Dimensions Left - position of the left edge of the object on the template Top - position of the top edge of the object on the template Right - position of the right edge of the object on the template Bottom - position of the bottom edge of the object on the template Border Border On - turns the border on around the object Border Style - Raised, Flat or Inset Border Colour - colour palette for the object border Border Width - enter border width, up to 15 pixels 43-TV-25-36 Iss.5 GLO May 11 UK A5E01001789-05 45 Scale Object Properties Table 4.3 : Example of a Scale Object properties window in the Screen tab General Buffering - redraws off line to reduce screen flicker Transparency - inactive part of the object becomes transparent Alpha Blending - semi transparent state for overlaying objects Fix Foreground Colour - Tick to fix colour for the scale numbers Foreground Colour - Set foreground colour using colour palette Fix BackColour - Tick to fix colour for the background of the object Background Colour - Colour palette for the background of the object Showing - Set up channel as Data from Pen, Alarm for Pen or Input Channel BaseLine - Switch on or off. The main line the graduations line up against Fix BaseLine Clr - Fix the colour of the BaseLine BaseLine Colour - Colour palette for BaseLine colour Full Width - All graduations become the full width of the object Fix Grads Clr - Fix the colour of all the graduations Grads Colour - Colour palette for graduation colour Grads Direction - Set the graduation direction to the Baseline Label Limits - Switch the zero and span labels on or off Label Majors - Switch on or off the labels for the major graduations (not limits) Label Position - Position all labels to the Baseline Major Graduations - Switch Major graduations on or off Major Grad Length - Enter the length in pixels of the Major graduations Minor Graduations - Switch Minor graduations on or off Minor Grad Length - Enter the length in pixels of the Minor graduations Orientation - Horizontal or Vertical object orientation Major Font Height - Set text height for Major graduations Limit Font Height - Set text height for zero and span labels Fix Number Format - Set Notation and Auto or User Defined decimal places Numb Format Notation - Toggle between Scientific or Normal number format. Auto - Toggle Between Auto and User Defined. After Decimal - Select and enter the number of decimal places. Rect Dimensions Left - position of the left edge of the object on the template Top - position of the top edge of the object on the template Right - position of the right edge of the object on the template Bottom - position of the bottom edge of the object on the template Border Border On - turns the border on around the object Border Style - Raised, Flat or Inset Border Colour - colour palette for the object border Border Width - enter border width, up to 15 pixels 46 43-TV-25-36 Iss.5 GLO May 11 UK A5E01001789-05 Text Object Properties Table 4.4 : Example of a Text Object properties window in the Screen tab General Buffering - redraws off line to reduce screen flicker Transparency - inactive part of the object becomes transparent Alpha Blending - semi transparent state for overlaying objects Fix Foreground Colour - Tick to fix colour for the object text Foreground Colour - Set foreground colour using colour palette Fix BackColour - Tick to fix colour for the background of the object Background Colour - Colour palette for the background of the object Showing - Set up channel as Data from Pen, Alarm for Pen or Input Channel Fix Text Objects String - Tick to enter User Defined text Fix Text - Enter User Defined text using the keyboard WordWrap - Wraps Multi-line text to the next line within the object IsTag - Text will read what is entered as a Tag IsUnits - Text will read what is entered as Units Center - Centralises the text in the object Rect Dimensions Left - position of the left edge of the object on the template Top - position of the top edge of the object on the template Right - position of the right edge of the object on the template Bottom - position of the bottom edge of the object on the template Border Border On - turns the border on around the object Border Style - Raised, Flat or Inset Border Colour - colour palette for the object border Border Width - enter border width, up to 15 pixels Font Typeface - Select a font typeface from the drop down list Height - Type in a font height. Applies when Word wrap is ticked Quality - Choose from Default, Antialiased or Cleartype Weight - Choose from Normal, Medium, Semi-bold, Bold 43-TV-25-36 Iss.5 GLO May 11 UK A5E01001789-05 47 Pen Pointers Object Properties Table 4.5 : Example of a Pen Pointers Object properties window in the Screen tab General Buffering - redraws off line to reduce screen flicker Transparency - inactive part of the object becomes transparent Alpha Blending - semi transparent state for overlaying objects Fix Foreground Colour - Tick to fix colour for the pen pointer numbers Foreground Colour - Set foreground colour using colour palette Fix BackColour - Tick to fix colour for the background of the object Background Colour - Colour palette for the background of the object Showing - Enter the pens that the pen pointers object will show. ForeGround Alarm Colour - Set foreground (pen pointer symbol) colour when in alarm Flash Foreground On Alarm - Foreground (pen pointer symbol) will flash in alarm Fix Foreground Alarm Colour - Tick to fix the alarm colour when in alarm Height - height of the Pen Pointer. A height over 15 will show the Pen number in the Pen Pointer Orientation - Horizontal or Vertical orientation Rect Dimensions Left - position of the left edge of the object on the template Top - position of the top edge of the object on the template Right - position of the right edge of the object on the template Bottom - position of the bottom edge of the object on the template Border Border On - turns the border on around the object Border Style - Raised, Flat or Inset Border Colour - colour palette for the object border Border Width - enter border width, up to 15 pixels 48 43-TV-25-36 Iss.5 GLO May 11 UK A5E01001789-05 Alarm Markers Object Properties Table 4.6 : Example of an Alarm Markers Object properties window in the Screen tab General Buffering - redraws off line to reduce screen flicker Transparency - inactive part of the object becomes transparent Alpha Blending - semi transparent state for overlaying objects Fix Foreground Colour - Tick to fix colour for the active part of the object Fix BackColour - Tick to fix colour for the background of the object Background Colour - Colour palette for the background of the object Showing - Set up channel as data from a single Alarm for Pen Height - Height of the Alarm Marker triangle. A height over 15 will show the alarm number in the alarm marker In Alarm Not Acked Flash Clr - Colour palette for non acknowledged alarm In Alarm Acked Flash Clr - Colour palette for acknowledged alarm Out of Alarm Not Acked Flash Clr - Colour palette for flash out of alarm that is not acknowledged Out of Alarm Acked Flashing Clr - Colur palette for flash out of alarm that is acknowledged Orientation - Horizontal or Vertical orientation In Alarm Not Acked Flashing - Tick to flash alarm that is not acknowledged In Alarm Acked Flashing - Tick to flash alarm that is acknowledged Out of Alarm Not Acked Flashing - flash out of alarm that is not acknowledged Hide Inactive Alarm - If ticked, alarms which have been acknowledged and which go out of alarm will have their alarm marker hidden. Select Flash Colour Source - If ticked, allows you to specify the colours to be used for certain flashing conditions (see the flashing colour properties above). Otherwise, default flashing colours will be used. Rect Dimensions Left - position of the left edge of the object on the template Top - position of the top edge of the object on the template Right - position of the right edge of the object on the template Bottom - position of the bottom edge of the object on the template Border Border On - turns the border on around the object Border Style - Raised, Flat or Inset Border Colour - colour palette for the object border Border Width - enter border width, up to 15 pixels 43-TV-25-36 Iss.5 GLO May 11 UK A5E01001789-05 49 Bitmap Object Properties Table 4.7 : Example of a Bitmap Object properties window in the Screen tab General Alpha Blending - semi transparent state for overlaying objects Name - Name of bitmap selected Rect Dimensions Left - position of the left edge of the object on the template Top - position of the top edge of the object on the template Right - position of the right edge of the object on the template Bottom - position of the bottom edge of the object on the template Border Border On - turns the border on around the object Border Style - Raised, Flat or Inset Border Colour - colour palette for the object border Border Width - enter border width, up to 15 pixels Design Rules CAUTION IMPORTANT NOTICE FOR TEMPLATES AND SCREENS Any changes to a template will affect all screens which use the template. Also be aware that any design changes made in a screen will affect all of the other screens using that template and will change the template itself. This CAUTION symbol may indicates a potentially hazardous situation, which, if not avoided, may result in property damage. CAUTION SCREEN DESIGNER FOR SAFETY INDICATION When adding charts on custom screens whenever a pen value could be relied on for safety, a chart must be accompanied by one of the other indicators - pen pointer, bar or DPM. This is to meet the safety standard's requirements to provide out-of-range indication. This CAUTION symbol may indicates a potentially hazardous situation, which, if not avoided, may result in property damage. 50 43-TV-25-36 Iss.5 GLO May 11 UK A5E01001789-05 Layers within a Template Figure 4.1 Template Layers side view Foreground: Objects - un-buffered Alpha Blend objects Layout Z-Order Middleground: Objects - double buffered Background - Static or fixed objects, eg. Charts or bitmaps When an object is placed onto a widget it automatically displays in the foreground “unbuffered”. If two objects overlap, the buffering flag must be set in the Properties window. By setting the buffering flag, the overlapping objects move from the foreground to a middleground. This enables Screen Designer to process the overlapping data more efficiently and reduce redraw time and any flicker effect on the screen. This allows the non-overlapping objects to stay in the foreground, un-buffered, as they do not require as much processing. For the Z-order of overlapping objects see “Object Z - Order” on page 51. For example, a Scale or Pen Pointer may be required to be placed on top of the chart object to save space. This is known as overlapping. There may be many overlapping objects on a widget (eg. a scale may have a bar, pen pointers and alarm markers on top of it). If this is the case then it would be advisable to link the objects together so if they get resized or moved, they all maintain their zero and span position in relation to each other. Linking objects together attaches them in either a horizontal (X-axis) or vertical (Y-axis) orientation only. Objects do not have to be overlapping to be linked together. See “Linking Objects” on page 54. Alpha Blending As explained above, when two objects are overlapping and double-buffered, they will reside in the middle layer. If one of those is Alpha blended, it will be at the top of the middle layer. All Alpha blend objects automatically are double buffered. See Figure 4.1, “Template Layers side view,” on page 51. Object Z - Order The Z-order determines the sequence in which overlapping objects are displayed on the widget. Again, using the same example of a Scale with a bar, pen pointers and alarm markers on top of it, the user can put these overlapping objects in a sequence order. The foreground only has one layer and does not have overlapping objects so is not concerned with the Z-order of objects. The background may have one or two overlapping objects, such as two bitmaps, so minimal Z-order needs to be defined. A bitmap on top of a chart would not be recommended. It is the middleground where most of the overlapping objects will be that the Z-order comes into use. 43-TV-25-36 Iss.5 GLO May 11 UK A5E01001789-05 51 The order of how the objects overlap can be changed by right-clicking on the object and selecting Order; this is known as the Z-Order. • Bring to Front: - moves an object to the top of the Z-order • Send to Back - moves an object to the bottom of the Z-order • Bring Forward: - moves an object one step higher in the Z-order • Send Backward: - moves an object one step lower in the Z-order Bring to Front and Send to Back moves the object within its layer eg.Middleground. 52 43-TV-25-36 Iss.5 GLO May 11 UK A5E01001789-05 Figure 4.2 Example of Overlapping Objects Z-order in the Middleground Pump 1 User defined text % 100 Bar 80 This shows the objects overlapping. These will be in the Middleground and need to be double buffered in the Properties window. Each object has a Z-order that can be changed Alarm Markers 60 Pen Pointer 40 20 Scale 0 A Change the Z-order by right clicking on an object and selecting Order. Use the Bring Forward or Send Backward menu commands. Each click will move the object one step forward or backwards in the Z-order User Defined Text Bar Alarm Markers Pen Pointers Scale View on Arrow A Pump 1 % 100 80 60 40 20 User Defined Text object Bar object Alarm Markers object Pen Pointers object 0 Scale object The same objects shown here individually and not overlapping 43-TV-25-36 Iss.5 GLO May 11 UK A5E01001789-05 53 Linking Objects Certain objects can be linked together so that they are locked at the same size, in one orientation, and will resize or move together. For example, a Bar and a Scale can be linked as long as they are in the same orientation as each other. The bar and the scale can be apart, side by side or on top of each other. The linking will line up the top and bottom graduations of the scale with the top and bottom limits of the bar. The objects are linked only in the orientation at which they are set. Only objects within the same widget can be linked together; you cannot link objects across widgets. In the bar and scale example in Figure 4.3 on page 54, the two objects are linked only in the vertical plane. Resizing or moving these objects horizontally will not affect their link positions but resizing or moving them vertically will affect their link positions. Link button Unlink button Select the first object, click the “Link Object” button in the template tool bar and then select the object you wish to link to. To unlink a linked object, select the linked object and click on the Unlink Object button from the template toolbar. Figure 4.3 Linking Objects A bar and scale object placed on the template. Select the first object, click the Link Object button in the template tool bar and then select the object you wish to link to. To unlink a linked object, select the linked object and click on the Unlink Object button from the template toolbar. Objects that can be linked are: Bar, Scale, Chart, Pen Pointers and Alarm Markers (any object that has a zero and span position). Objects that are already linked can be linked to other objects (eg. a Scale is linked to an Alarm Markers object can then be linked to a bar). When Alarm Markers are linked to a Scale, the Alarm Markers will position themselves at the correct level for where the alarm is set. 54 43-TV-25-36 Iss.5 GLO May 11 UK A5E01001789-05 Properties Precedence Colour A colour picker is available for those properties that have colour changes available. Certain properties will have their colour properties “Fixed” eg. Fix Foreground Colour, Fix Background Colour. A manual change to the pen colour will over-write a fixed pen colour. Configuring a Screen Channel Mapping Widgets Channel configuration can be done per widget or per object (i.e., either in the widget's properties window or in the object's properties window). Configure the widget if all the objects on the widget are to be mapped to the same channel. Select the widget and go to the “Channels” section in the properties window. Each object contained in the selected widget will appear in the channels section of the properties window. Each object in the widget can be assigned to the same or different Pen as a widget, Alarm for Pen or Input Channel. For widgets and objects the setup box looks the same. Configure • Data from: Pen - set the pen number what the object is going to be showing: Current Value, Minimum value, Maximum value, Average pen reading or Total.Data from: Alarm for Pen - set the pen number and the alarm number(s) • Data from: Input Channel - set the channel number and what the object is going to be showing: Analogue, Digital, Hi Pulse or Lo Pulse • Number: of the Pen, Alarm for Pen or Input Channel • Showing: For Pen - Current Value, Minimum, Maximum, Average or Total value. For Alarm for Pen - List of available Alarms For Input Channel - Analogue, Digital, Hi Pulse or Lo Pulse. Screen configuration is assigning each object and/or widget to a channel/pen. Select an object or widget and go to the properties window. Channel Mapping Objects Channel mapping for an object is set up either in the properties window of the object itself (look for the property called "Showing") or in the properties window of the widget which contains the object (look for the object in the "Channels" section)..This will display which channel that object is currently assigned to, or where the data is coming from eg. Pen No.1. 43-TV-25-36 Iss.5 GLO May 11 UK A5E01001789-05 55 To change channel mapping for a Scale, Bar, Digital or Text object, select the object and click in the box to the right of the “Showing” item in the properties window and select either Pen, Alarm for Pen or Input Channel. If a Pen or Alarm for Pen is required, select either the Pen number or the Parent Pen. See “Parent Pens” on page 56. If the object is an Alarm Markers object the data will always be from “Alarm for Pen”. Select the Pen number and which alarm number(s) will be showing. Charts and Pen Pointers just need to be mapped to one or more pens. Figure 4.4 Properties window - Pen/Channel mapping Object pen/channel mapping Widget pen/channel mapping Parent Pens Does not apply to charts or pen pointers as they normally have more than one pen displayed. The parent channel is the initial channel to be configured on a widget. All objects added to a widget (except charts and pen pointers) automatically default to using the parent channel. The parent itself allows the user to quickly make all of its objects update to use the pen number indicated by the parent. To configure the parent pen of a widget, go to "Pen No." in the properties window for the widget. To use the parent pen of a widget, go to "Channels" in the properties window for the widget or go to "Showing" in the properties window of an object. Animation Before Loading your new layout onto a Recorder, you can use the Animation feature in Screen Designer to simulate the layout on the Recorder’s screen. When your layout is complete, select the Go! button from the Main Toolbar to start the simulation tool. This feature can also be activated from the File menu (select Animate from the list). If any of the pens appear in grey, this means the Demo traces in the setup being used have not been activated. In the simulator go to Menu > Configure > Setup > Edit > General > Factory > Demo Traces and change the Demo Traces to “Sim. if board not fitted”. By default demo traces will be active and all pens will be displayed in their default or assigned colours. 56 43-TV-25-36 Iss.5 GLO May 11 UK A5E01001789-05 Saving Templates and Layouts Saving a Template Save Template A template can be saved on its own. The template can then be loaded onto the recorder via removable media, such as Compact Flash card, USB key or a Network Share folder (NAS) if set up, see “Network Share Path (NAS)” on page 57. Screens can then be created by adding the pen/channel configuration on the recorder that use that template.. See “Loading a Template into a Recorder” on page 57. To save a template, go to the Save Template icon in the Design window toolbar. Network Share Path (NAS) This can be used for loading and saving layouts (.lay) and/or setup files (.set), saving (exporting) reports, any messages (Diagnostic, system etc), loading sound files from this network share to recorder. This can also be used to print to file and this file can be saved to this network shared folder. Note. The Network Share folder is not recommended for use with scheduled exports and should not be used for firmware upgrades Saving Layouts Layouts consist of one or more templates and zero or more screens, which have the pen/ channel configuration setup in it. The layout can be loaded onto the recorder via removable media, such as Compact Flash, USB key or Network Share folder (NAS). See “Loading a Template into a Recorder” on page 57. To save a layout go to the Save icon in the main toolbar. Loading a Template into a Recorder Loading a Template The Custom Screens firmware option has to be active in a recorder in order to accept templates from Screen Designer. One or more templates can be loaded into a Recorder one at a time, screens added using them and displayed. Save the .tpl file as described in “Saving a Template” on page 57. Fit the removable media into the recorder and go to Main Menu > Configure > Layout and select Load. The Device selection menu will appear for you to select USB key, Compact Flas or Network Share folder (NAS) and select the template file. Press the Load button after you have selected the desired template file to load. To add a screen based on a template that you loaded, go to Main Menu > Configure > Layout > Edit and select Add Screen. A new standard screen will be added, which you will need to change. Go to the template Type option and select it and your template will be listed here. Select your template and your new screen will use that template. Re-name the screen as required. No pen/channel configuration is held in a template file. To display the new screen go to the Screen button in the Main menu bar at the top of any process screen and select the Next button to scroll through the screens. Or select the List button to show the list of screens in the recorder and select your new screen. 43-TV-25-36 Iss.5 GLO May 11 UK A5E01001789-05 57 Loading a Layout into a Recorder Loading a Layout The Custom Screens firmware option has to be active in a recorder in order to accept layouts from Screen Designer. A single layout can be loaded into a Recorder and displayed. Save the .lay file as described in “Saving Layouts” on page 57. Fit the removable media into the recorder and go to Main Menu > Configure > Layout and select Load. The Device selection menu will appear for you to select USB key, Compact Flas or Network Share folder (NAS) and select the layout file. Press the Load button after you have selected the desired layout file to load. Go to Main Menu > Configure > Layout > Edit if you need to edit any of the recorder screens you just loaded from the new layout. To display the new layout go to the Screen button in the Main menu bar at the top of any process screen and select the Next button to scroll through the screens. Or select the List button to show the list of screens in the recorder. Pen/channel configuration can be changed in the recorder for layouts loaded from Screen Designer. Loading a Setup from a Recorder into Screen Designer A setup from the recorder can be saved onto a removable storage device such as a Compact Flash card, USB key or into a Network Share folder (NAS). In the recorder go from the Main Menu to Configure > Setup > Save. Select the desired storage device and save the setup with a suitable file name. The file type extension is .set. Now to load the setup into Screen Designer, fit the CF card, USB key into your PC, or navigate to the Network Share folder (NAS), and select Load Setup from the File menu. The setup file will be loaded into Screen Designer to be used by all layout documents and template documents open in Screen Designer and be visible at the top of the File Browser window. Loading a Setup File into Screen Designer A Setup file can be imported from a recorder in order to display the actual user-entered pen information into Screen Designer. The pen information displayed will depend on what has been configured for the recorder, eg. pen tag and pen units. Screen Designer will use the recorder pen colours specified in the setup as the default pen colours. See “Setup File” on page 21. Loading a Setup from the SIREC D software Setups from SIREC D software can be loaded into the Screen Designer software where layout changes can be made as required. No setup changes can be made in Screen Designer. Layouts from Screen Designer can be loaded into TMP where pen/channel configuration and pen assignments can be modified. 58 43-TV-25-36 Iss.5 GLO May 11 UK A5E01001789-05 Index A D Add a Screen ............................................................31 Adding Bitmaps ......................................................35 Adding Objects .......................................................40 Alarm Marker Object ..........................................33 Alarm Marker Object Properties ............49, 50 AlphaBlend ...............................................................51 Animation ..................................................................56 Design ......................................................................... 50 Design Rules ............................................................ 50 Configuring a Screen .............................................. 55 Linking Objects ....................................................... 54 Object Z - Order ...................................................... 51 Design Window ...................................................... 14 Design Window Tabs .............................................. 15 Design Window Toolbar ........................................ 14 Design Window Tabs ........................................... 15 Template and Screen Tabs (outer) ........................ 15 B Bar Object .................................................................34 Bar Object Properties .........................................43 Bar Style ....................................................................44 Bar Style .....................................................................44 Bitmap Library .......................................................34 Bitmap Object .........................................................34 Adding Bitmaps .......................................................35 Bitmap Library .........................................................34 Resize .........................................................................35 C CD Contents ...............................................................5 Channel Mapping Objects ................................55 Parent Pens ................................................................56 Channel Mapping Widgets ...............................55 Chart Object ............................................................35 Chart Object Properties .....................................42 Configuring a Screen ...........................................55 Channel Mapping Objects ......................................55 Channel Mapping Widgets .....................................55 Parent Pens ................................................................56 43-TV-25-36 Iss.5 GLO May 11 UK A5E01001789-05 Design Window Toolbar Designing a Layout .................................... 14 Adding Objects ........................................................ 40 AlphaBlend ............................................................... 51 Configuring a Screen .............................................. 55 Design Rules ............................................................ 50 Designing a Template ............................................. 39 Designing a Widget ................................................. 40 Expert Mode ............................................................. 40 Layers within a Template ....................................... 51 Linking Objects ....................................................... 54 Load a Setup from SIREC D software ................ 58 Load a Setup from a Recorder .............................. 58 Loading a Layout into a Recorder ........................ 58 Loading a Setup File ............................................... 58 Loading a Template into a Recorder .................... 57 Object Order ............................................................. 40 Object Properties ..................................................... 42 Object Z - Order ...................................................... 51 Pen Colours .............................................................. 41 Saving Templates and Layouts ............................. 57 Shortcuts ................................................................... 40 Starting a Layout ..................................................... 39 Designing a Template ......................................... 39 Expert Mode ............................................................. 40 Object Order ............................................................. 40 Shortcuts ................................................................... 40 Designing a Widget .............................................. 40 Adding Objects ........................................................ 40 Object Properties ..................................................... 42 Pen Colours .............................................................. 41 Digital (DPM) Object ......................................... 36 Digital Object Properties .................................. 45 59 E Edit Menu .................................................................. 12 Expert Mode ............................................................ 40 Loading a Setup File ............................................58 Loading a Template ..............................................57 Loading a Template into a Recorder ...........57 Loading a Template .................................................57 M F Main Toolbar File Browser Window .......................................... 16 File Menu .................................................................. 11 File Types .................................................................. 18 Layout File ............................................................... 19 Setup File .................................................................. 21 Template File ............................................................ 20 Finishing a Layout Load a Setup from SIREC D software ................ 58 Load a Setup from a Recorder .............................. 58 Loading a Setup File ............................................... 58 ...........................................................10 Edit Menu ..................................................................12 File Menu ..................................................................11 View Menu ................................................................13 Window Menu ..........................................................13 N NAS Share Path ..................................................................57 Network Share Path (NAS) ...............................57 H Help .............................................................................. 13 O Object Details ..........................................................33 Object Order ............................................................40 Object Properties .............................................25, 42 I Installation ................................................................. 7 Start up ........................................................................ 7 Introduction & Installation ................................ 5 CD Contents ............................................................... 5 Learning about Screen Designer ............................. 5 Recorder Requirements ............................................ 6 System Requirements ............................................... 6 L Layers within a Template AlphaBlend ............................................................... 51 Layout File ............................................................... 19 Learning about Screen Designer .................... 5 Linking Objects ................................................ 38, 54 Load a Setup from SIREC D software ........ 58 Load a Setup from a Recorder ........................ 58 Loading a Layout .................................................. 58 Loading a Layout into a Recorder ............... 58 Alarm Marker Object Properties .....................49, 50 Bar Object Properties ..............................................43 Chart Object Properties ...........................................42 Digital Object Properties ........................................45 Pen Pointer Object Properties ................................48 Scale Object Properties ...........................................46 Text Object Properties .............................................47 Object Properties Window ................................38 Objects ........................................................................33 Alarm Marker ...........................................................33 Association with a Widget ......................................38 Bar ..............................................................................34 Bitmap ........................................................................34 Chart ...........................................................................35 Digital ........................................................................36 Linking Objects ........................................................38 Object Details ...........................................................33 Object Properties Window .....................................38 Pen Pointers ..............................................................36 Scale ...........................................................................36 Text .............................................................................37 Types of Objects .......................................................33 Z-Order ......................................................................51 Objects Tab ...............................................................27 Loading a Layout .................................................... 58 60 43-TV-25-36 Iss.5 GLO May 11 UK A5E01001789-05 P Screen Designer software overview ............... 2 Screen Properties .................................................. 23 Parent Pens ..............................................................56 Pen Colours .............................................................41 Pen Pointer Object Properties .......................48 Pen Pointers Object .............................................36 Preface ..........................................................................1 Screen Properties Window ................................32 Screen Toolbar ........................................................32 Screens ........................................................................31 Replay Pens .............................................................. 23 Notes ............................................................................2 Screen Designer software overview .......................2 Supplementary documentation ................................1 This Manual ................................................................1 V6 Recorder Products ...............................................1 Properties Precedence ........................................55 Colour ........................................................................55 Properties Window ...............................................22 Object Properties .....................................................25 Properties Precedence .............................................55 Screen Properties .....................................................23 Template Properties .................................................22 Widget Properties ....................................................24 Protocols Add a Screen ............................................................ 31 Screen Configuration .............................................. 32 Screen Properties Window ..................................... 32 Screen Toolbar ......................................................... 32 Screens Tab ...............................................................31 Setup File .................................................................. 21 Loading a Setup File ...............................................58 Share Path (NAS) .................................................. 57 Shorcuts, Cut, Copy, Paste or Delete .......... 40 Showing Replay Pens .......................................... 23 Software License ......................................................v Status Bar .................................................................. 14 System Requirements .............................................6 ...................................................................xiii Safety and Symbol Identification .........................xiii R Recorder Requirements ........................................6 Replay Orientation ...............................................22 Resize a Bitmap ......................................................35 T Template File ........................................................... 20 Template Layers ..................................................... 51 Template Properties .............................................22 Template Toolbar ................................................... 30 Template and Screen Tabs (outer) ................15 Templates ...................................................................29 Aplha Blend .............................................................. 51 Association with a Screen ......................................30 Layers within a Template ....................................... 51 Template Tabs ........................................................... 30 Template Toolbar ..................................................... 30 S Safety and Symbol Identification ..................xiii Saving Layouts .......................................................57 Saving Templates ...................................................57 Saving Templates and Layouts .......................57 Saving Layouts .........................................................57 Saving Templates .....................................................57 Scale Object .............................................................36 Scale Object Properties .....................................46 Screen Configuration ..........................................32 Screen Designer Main Toolbar ............................................................10 Screen Designer Interface ..................................9 Design Window ........................................................14 File Browser Window .............................................16 Objects .......................................................................33 Properties Window ..................................................22 Screens .......................................................................31 Status Bar ..................................................................14 Templates ..................................................................29 Toolbox Window .....................................................26 Widgets ......................................................................32 43-TV-25-36 Iss.5 GLO May 11 UK A5E01001789-05 Text Object ................................................................ 37 Text Object Properties ........................................ 47 Toolbox Window ..................................................... 26 Objects Tab ...............................................................27 Widgets Tab .............................................................. 26 Trademarks ..............................................................xiii Type of Objects ....................................................... 33 Alarm Marker ........................................................... 33 Bar ..............................................................................34 Bitmap ....................................................................... 34 Chart ........................................................................... 35 Digital ........................................................................36 Pen Pointers .............................................................. 36 Scale ........................................................................... 36 Text ............................................................................. 37 Types of Widget ....................................................... 32 Types of Widgets Standard Widgets ..................................................... 32 User Defined Widgets .............................................33 61 U,V View Menu .................................................................13 W Widget Properties ..................................................24 Widget Properties Window ................................33 Widgets ........................................................................32 Association with an Object ....................................33 Standard Widgets .....................................................32 Types of Widget .......................................................32 User Defined Widgets .............................................33 Widget Details ..........................................................32 Widget Properties Window ....................................33 Widgets Tab ...............................................................26 Window Menu ..........................................................13 X, Y, Z Year 2000 Compliance Statement ................ xiii Z - Order ....................................................................51 62 43-TV-25-36 Iss.5 GLO May 11 UK A5E01001789-05 Manual Edition 10/2006 Display recorders SIREC D Screen Designer sirec Siemens Aktiengesellschaft Industry Automation (IA) Sensors and Communication Process Instrumentation 76181 KARLSRUHE GERMANY A5E01001789-05 A5E01001789D-03 GN: 30410_SirecD www.siemens.com/processinstrumentation