1
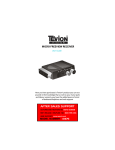
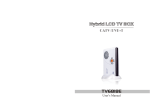
Remote control
LOCATION OF CONTROLS
1
M-229 TV
6
7
8
9
10
2
5
5
Portable TV
User Manual
3
4
11
12
13
14
Main Unit
1.
2.
3.
4.
5.
6.
7.
8.
9.
10.
11.
12.
13.
14.
15.
16.
17.
18.
19.
20.
Please read the instruction carefully
before operating the unit
* Using the rechargeable battery
To recharge the battery (built-in 7.4V/2000mAh Li-battery).
- Charge the rechargeable battery before using it for the first time. The normal charging time
is at least 4-6 hours.
- The charging indicator will flash when it is charging; will light up when it is fully charged; will
go off when the unit is being operated.
-Cannot be charged by car power adaptor.
Warning:
- Battery replacement should only be made by a trained technician.
- To reduce risk of injury, use only rechargeable batteries recommended by the manufacturer
for this product. Other types of batteries may burst causing damage and personal injury.
- Do not short-circuit the terminals.
- Do not disassemble the rechargeable battery, refer servicing only to qualified service personnel.
Condition and attention:
- The battery life is about 2 hours. When battery is low, player will stop playing.
- Recharge the battery when you are ready to use it again.
- While using the rechargeable battery, the environmental temperature should be 5°C (41°F)
to 35°C (95°F).
- To get the longest service life of the rechargeable battery, charge at indoor-temperature.
- Never dispose the battery in fire or water. Never heat up the rechargeable battery.
CONNECTIONS
Disconnect all devices from the mains supply before connecting.
1. Connecting external antenna
*Connect with DVB-T antenna (for outdoor reception)
GB - 4
PTM-3102 IB MUSE 001 REV0 - GB.i1
1
19
18 17 16 15
TFT-LCD display
CH+/-, ▲ / ▼ : Channel selection;Upward / downward keys.
OK: To confirm the selection.
VOL+/-, ◄ /► : Volume adjustment; leftward / rightward keys.
Speakers
Exit(Return Key): To exit current menu and return to previous Menu.
MENU: To access the main menu
STANDBY /MODE: To turn on/off the unit;
To select different operation mode: DTV/AV.
Remote Sensor
Power Indicator Light (Red: Standby Mode; Green: Power On)
Antenna Input Jack
Battery Compartment
Flute For Installing The Supporting Stand
Earphones Jack
DC INPUT(12V)JACK
ON/OFF POWER SWITCH
AV INPUT JACK
AV OUTPUT JACK
SD/MMC/MS CARD SLOT
USB PORT
English
The 12V car power adaptor is designed for use with vehicles that have a 12V, negative
ground electrical system.
Cautions:
- Use only the included 12V car power adaptor. Use of any other 12V car power adaptors
could damage the unit.
- The 12V car power adaptor is for use with this unit only. Do not use it with other equipment.
- Make sure the unit is fastened correctly to prevent from falling in the vehicle in the event of
an accident.
- When the inside of the cigarette lighter socket is dirty with ashes or dust, the plug section
may become hot due to poor contact. Be sure to clean the cigarette lighter
socket before use.
- After use, disconnect the 12V car power adaptor from both the unit and cigarette lighter
socket.
Warning: In the interests of the traffic safety, do not perform operations on the unit or view
video software while driving a vehicle.
20
H1.
H2.
H3.
H4.
H5.
Standby mode.
0…9: Number entry.
SEARCH:To start searching the channels (for DTV mode).
FAV: To show your favorite channel (for DTV mode).
CH+/-, ▲ /▼ : Channel selection ;
Upward/ downward keys.
H6. VOL+/-, ◄ / ► : Volume adjustment;
leftward / rightward keys.
H7. MENU: To access the main menu.
H8. LIST:Nine picture guide function.
H9. COLOR buttons (red, green, yellow, blue):
To activates the function according to different
color shows on the display.
H10.
:To cut off or restore the sound.
H11. INFO: To show the information of current program.
H12. TEXT: To turn on / off the teletext information
(for DTV mode).
H13. AUDIO: To select different sound mode((for DTV mode).
H14. TV/RADIO: To switch between TV and radio
channels. (for DTV mode).
H15.
:To return to last channel.
H16. EPG (Electronic program guide): To show
the preview of the program picture (for DTV mode).
H17. OK: To confirm the selection.
H18. EXIT: To exit current menu and return to previous menu.
H19. LANG: To select different OSD languages.
H20. SUBTITLE: To turn on / off the subtitle (for DTV mode)
H21. ► : To PLAY and PAUSE playback.
H22. P.ADJ: Picture adjustment(for DTV mode)
H23. PICT: To select the different picture modes (Standard, Soft, Vivid, Light, Per
sonal)
H24. SLEEP: To set the time to turn off the unit automatically
H25. MODE: To select different operation mode (DTV/AV)
Installing Batteries
Insert 2 “AAA”(“UM-4”/”R03") batteries to the remote control prior to use.
Before throwing any batteries away, consult your distributor who may be able
to take them back for specific recycling.
NOTE:
- Never recharge batteries, apply heat to them or take them apart.
- In order to avoid leakage, always remove the batteries when unit will not be used for a long
period of time.
- If the remote control is not going to be used for a long time, remove the battery to avoid
damage caused by battery leakage corrosion.
CAUTION: Danger of explosion if battery is incorrectly replaced. Replace only with the same
or equivalent type.
If you connect the DVB-T antenna, please set the antenna setting “ON”; while
connect 75 ohm transferring antenna, set the antenna setting “OFF”. (Please refer
to the “INSTALLATION” guide in the section of “DVB-T MENU”.)
2. Connecting the A/V cable
Connect the A/V cable to the AV OUT jack or AV IN jack. The yellow, white and red end of this
cable will be connected to video/audio accordingly. Press MODE button to select “AV”.
Note: AV OUT is only available in DTV or card mode.
POWER SUPPLY
Using the AC adaptor
Back view
2
To AC outle
AC ADAPTOR
12V,2A
DC
1.To DC IN 12V jack
This AC adaptor operates on AC between 100V ~ and 240V ~.
• The supplied AC adaptor is suitable for use on AC mains supplies of 100-240V ~ AC and
should only be connected to a mains supply within these parameters.
Cautions:
- The included AC adaptor is for use with this unit only. Do not use it with other equipment.
- When the unit is not going to be used for long time, disconnect the AC adaptor from the AC
outlet.
- Be sure to use it near the wall outlet. If a malfunction occurs, disconnect the plug from the
wall outlet at once.
- When the AC adaptor is plugged in, the apparatus is not completely disconnected from the
main power source, even when the unit is turned off.
WARNING:
- AC adaptor is used as the disconnect device. It shall remain readily operable and
should not be obstructed during intended use. To be completely disconnected, the AC adaptor
of the apparatus shall be disconnected from the mains socket outlet.
- When indicator is off, it indicates that the apparatus is completely disconnected from the
mains.
* Using the car power adaptor
Back View
1 To CAR PLUG - 12V jack
2 To the cigarette
lighter socket
GB - 1
* Connect with 75 ohm transferring antenna cable (for indoor cable TV)
Another end of this cable will be connected to public antenna for TV.
ACCESSORIES
Remote control (with 2x AAA batteries)
AC adapter, x1
Car adapter, x1
AV cable, x1
DVB-T antenna, x1
75 ohm transferring antenna cable, x1
Supporting Stand With Rubber Pad, X1
Earphones, X1
GB - 2
GB - 3
* Country Setting: To select the country according to your location.
Note: Less or even no channel could be received if “Country setting” is incorrect.
* OSD Language: To select the language of unit’s menu.
* Audio Language: To select the dialog language. (Noted: It depends on the languages supported by the received channels.)
* Subtitle language: To select the language of the subtitles. (Noted: It depends on the languages supported by the received channels.)
* LCN: To turn on/off for logical program list.
* GMT Usage: To turn on/off the Greenwich Mean Time.
Turn “OFF”, “Set Date” and Set Time” item can be set manually.
Turn “ON”, “Set Time” and “Set Date” item will be disabled.
* Time Zone: To select the correct time zone according to your selected country.
* Set Date: To adjust the date.
* Set Time: To adjust the time.
DVB-T MENU
Navigating the DVB-T menu
1. On the DVB-T mode, Press “MENU” button to enter MENU surface, there is five
menu(SETUP, TV, RADIO, MULTIMEDIA, GAME) can be selected , corresponding submenu is listed on the display.
2. Press ◄ / ►button to select the menu.
3. Press ▲ / ▼ button to select the sub-menu, press OK to confirm your selection.
4. Press EXIT button to return to previous menu.
5. Press MENU button to exit from the main menu.
SETUP
1.Installation
When the unit is first time used , DVB-T “Installation Guide” will default set on the display
once the unit is turned ON .
After completed the above setting, press "OK" button for “Auto scan” or press
"GREEN" button on remote control for manual scan.
* Auto scan:
Press OK(YES): to start auto scanning, existing database on Installation guide you
setting will be cleared, and channel with stronger signal which according to your selected
“COUNTRY” will be received and saved and a new program list will be build up.
Noted :It may take quite a while to complete the auto scan.
*Press EXIT: to stop auto scan.
* Manual scan:
Press GREEN button on remote control for manual scan.
Press "RED" button on the remote control to input the digit numbers, press again to confirm the channel number or insert the correct frequency and bandwidth, then press "OK" to
start Manual-Scan.
2. TV Setup
BASIC OPERATION
1. Connect the AC adapter to wall outlet and slide ON/OFF switch to turn on the unit.
2. Power indicator light
will turn GREEN(in ON mode), press the STANDBY/MODE button
repeatedly to select different source mode: DTV/ AV.
Notice : If the power indicator light is RED(in standby mode), press the STANDBY/MODE
button to turn the unit on;
3. In DTV mode, press CH+/- to change the TV channel,
4. Press VOL+/ ►, VOL-/ ◄ button to adjust the volume level, or connect your earphones with
3.5mm mini plug to the earphones jack. Before to connect, please turn down the volume.
The speakers are automatically cut off when earphones are in use. Press MUTE to cut off
the sound temporarily, press this button again to resume the sound.
5. Press and hold the STANDBY/MODE button for 3 seconds to switch the unit to
standby mode; slide the ON/OFF switch to turn off the unit; disconnect the AC adapter
from wall outlet, the unit will be completely power off.
GB - 5
Note: First time installation guide may not appear if:
- First time installation setting has been already finished;
- The program list is not empty.
• Press ▲ / ▼ button to select the different item.
• Press ◄ / ► button to adjust your local DVB-T standard setting.
• Press EXIT button to return to previous menu.
* Antenna Setting: To adjust the sensitivity when external antenna is connected.
When you connect the DVB-T antenna, please set the antenna setting to “ON”; while you connect the telescopic antenna or 75 ohm transferring antenna, please set the antenna setting to
“OFF”.
GB - 6
* TV Format: To set the display mode (16:9 LB, 16:9 FIT, 4:3 LB, 4:3 PS)
* TV Mode: To select the AV output system(PAL, NTSC, Auto).
* OSD Transparency: To adjust the transparency level of the display.
* Banner Display Timer: To adjust the duration of banner shows on the display.
* Video Enhancement: Enhance the color of the video by adjusting the flesh tone
and black/white extension items.
GB - 7
9/15/2011
3:32:37 PM
2. Radio Guide
Press ▲ / ▼ to select your desired channel in the list, and then press ◄ / ► to enter
the guide timer of the select channel.
Press RED button on remote control to move the channel to “Advance Timer” (refer to
the “Advance Timer” item under “SETUP” menu).
3. Password
MULTIMEDIA
This unit can supports MP3, MPEG4 and JPEG and video files recorded on USB flash
drive or SD/MMC/MS card. (USB device and SD/MMC/MS card not included)
Plug the USB flash drive into the USB port or insert the SD/MMC/SD card into the card
Slot.
* Setup Menu Lock: When this item set “ON”, user need to enter password when re-enter
the Menu.
* Channel Lock: When this item set “ON”, user need to enter password to implement auto
scan or manual scan for the TV/Radio list.
* Censorship Lock: To set “No block”, “Total block” or different age group to be restricted
for the setup.
* Change the password: Key in the old password then enter the new one. (The default
password is 0000.)
When the LCN setup is “OFF” (operate in “Installation”), the icons “Move” and “Sort” will
appear for the selection.
Note:
* This unit might not support all the SD cards or USB.
* The unit might not support all the multimedia files stored in SD card or USB because it includes some special playback procedure which might not be compatible with the procedure of
this unit.
Pictures preview mode(12pcs small preview pictures on the display) :
Press▲,▼, ◄ , ► to select a desired picture and press OK to view the picture.
Press blue button on remote control to return to the picture file list.
Press Exit to exit “My Album”.
2. My Music
Press INFO button on the remote control to select the drivers.
1. My Album
Press INFO button on the remote control to select the drivers.
Press ▲ / ▼ to select “Device” item, press ◄ / ► to choose “USB” or “Card Reader”.
Press OK to confirm your selection.
4. Advance Timer
Press ▲ / ▼ to select your desired picture, press OK button to start playing.
Press ▲ / ▼ to select a folder from the folder list, and press OK to open.
2. TV Guide
Press ▲ / ▼ to select your desired channel. Press ◄ / ► to enter the guide timer of the selected channel.
Press RED button on remote control to move the channel to “Advance Timer” (refer to the
“Advance Timer” item under “SETUP” menu).
Users can set up appointed time to watch appointed Channels, start and finish time can be
set according to the timer system for this unit (TV or radio). please confirm the timer system
on this unit is correct before setup.
5. SW Update
Update the software via external memory devices.
6. Set Default
Press OK to initialize the setting and clear the program list, press EXIT to return to the previous menu.
TV
RADIO
1. TV list
Press ▲ / ▼to select your desired channel, press ◄ / ► to select the icons with
corresponding function as following order: “Favorites”, “Lock”, “Edit”, “Invisible”, “Delete”,
“Search”.
Press yellow button on remote control to save your setting.
GB - 8
1. Radio list
Press ▲ / ▼ to select your desired channel, press ◄ / ► to select the icons with
following function: “Favorites”, “Lock”, “Edit”, “Invisible”,“Delete”,“Search”.
Press YELLOW button on remote control to save your setting.
When the LCN setup is “OFF”, the icons “Move” and “Sort” will appear for the selection.
3.My Movie
Press INFO button on the remote control to select the drivers.
2. SYSTEM
Press ▲ / ▼ to select the movie, press OK to start playing the movie.
Press ▲ / ▼ to select a folder from the folder list, press OK to open.
Press the following keys on remote control to activate corresponding function:
INFO: to display the player tools.
▲ / ▼: Select a previous or next movie.
OK: confirm to start playing.
◄ / ► : adjust the volume.
Red button: play/pause.
Green button: slowly play the movie step by step.
Yellow button: fast backward with 2x, 4x, 8x, 16x, 32x speed.
Blue button: fast forward with 2x, 4x, 8x, 16x, 32x speed.
EXIT: press once to stop playing, press again to exit ”My Movie”.
When movie is playing, press AUDIO button on remote control to switch left or right mono
sound.
GAME
Choose “Gomoku” (the game of go), “Calendar”, “Calculator” by▲ / ▼ button, then
press OK to enter.
Press EXIT to return to previous menu.
AV MENU
Press “STANDBY/MODE” button to switch to AV mode, connect the unit to external source
device by AV cable, press MENU to enter the main menu.
Press ▲ / ▼ button to select the item(picture, SYSTEM), press ► to enter the sub-menu.
Then press ▲ / ▼ to select an option under sub-menu, and press ◄ / ► to set the value.
1. PICTURE
GB - 12
2
Picture viewing mode,
press the following buttons on remote control to activate corresponding function:
INFO: to display the player tools.
▲ / ▼: select a previous or next picture.
◄ / ► : rotate the picture.
Red button: press to zoom in a picture, then press▲,▼, ◄ ,► to move from one area to
another area.
Green button: press to activate the background music. When the background music
is on, press ◄ / ► to adjust the volume. Press EXIT button to hide the music list.
Yellow button: to make the picture leftward or rightward.
Blue button: to make the picture upward or downward.
OK: To enter Picture playing mode and auto-slide to see the pictures with different view effect.
EXIT: to enter 12pcs picture preview mode.
GB - 9
The appliance does not switch on.
- Make sure it is plugged into a mains socket.
- Set ON/OFF switch to ON position. If unit is in standby mode, press STANDBY/MODE button to turn on the unit.
: Select different menu language.
CLOCK: Set the time before turn off automatically.
: Select the screen mode between 16:9 and 4:3.
: To rotate the display image.
BLUE BACK: To show the blue background when there is no signal received.
Specifications
DTV system:
Input frequency: UHF 474MHz 858MHz
Modulate: QPSK/16-QAM/64-QAM
Decode standard: MPEG-2: MP@ML
Audio decode standard: MPEG1: LAYER I/II/III, MPEG-2: LAYER I/II
General characteristic
Display: Colour TFT-LCD
Screen size: 9 inches
Resolution:800(H) X RGB X 480(V)
Speaker: 2 x 28mm
Power supply: DC 12V 20W
Connector: Input jack for external antenna; stereo earphones jack; audio/video (AV) input
&output jacks;
Supported power: Three options:
1. Alternative current power supply - AC adapter
2. Car adaptor 12V
3. Built-in battery (7.4V/2000mAh)
Dimension: 262 x 158 x 24(mm)
Weight: about 600 g
Working temperature: 0 C -40 C
Storage temperature: -20 C -60 C
GB - 13
Press ▲ / ▼ to select the music, press OK button to start playing music.
Press ▲ / ▼ to select a folder from the folder list, and press OK to open.
Press the following buttons on remote control to activate corresponding function:
OK: confirm to start playing.
◄ / ► : adjust the volume.
Red button: play/pause.
Green button: stop the music.
Yellow button: to select music repeat mode(Repeat all, Repeating, Random, Repeat OFF)
Blue button: fast forward with 2x, 3x, 4x speed.
EXIT: press once to stop playing, press again to exit ”My Music”
GB - 10
TROUBLE SHOOTING
BRIGHT: Adjust the brightness of picture
CONTRAST: Adjust the picture contrast
COLOUR: Adjust the picture color
RESET: to return the value of above items to 50.
PTM-3102 IB MUSE 001 REV0 - GB.i2
Picture auto-sliding mode,
press the following buttons on remote control to activate corresponding function:
INFO: to display the player tools.
▲ / ▼: select a previous or next picture.
Red button: play / pause.
Green button: activate the background music.
Yellow button: to select the sliding pictures once or keep repeating.
Blue button: press to set the scrolling speed of the pictures.
EXIT: to enter 12pcs picture preview mode.
The remote control does not work or works only intermittently.
- Check that batteries are inserted or change them.
- Aim the remote control at the appliance. The infrared beam must not be blocked or
interrupted.
- Operate the remote control within about 23ft (7m).
There is no sound or the sound is of poor quality.
- Check the connections.
- Make sure the MUTE function is not on.
The picture is poor quality.
- Check the connections.
- Adjust the brightness or contrast of your display.
- Adjust the length, angle and direction of antenna.
No signal
- Check if the channel is right or not.
- Auto reset the receiving channel.
- Move the unit to another place.
- Try to replace telescopic antenna with external antenna.
GB - 11
Cleaning
WARNING: Disconnect the unit from the mains supply before cleaning.
- Use a soft, dry, clean cloth. Regularly dust the vents at the back or sides.
- Using solvents, abrasive or alcohol-based products risks damaging the appliance.
- If an object or liquid enters inside the appliance, unplug it immediately and have it checked
by an authorized engineer.
SAFETY INFORMATION
ATTENTION: To reduce the risk of electric shock, do not remove
the cover or back. There are no user serviceable parts inside the
unit. Refer all servicing to qualified personnel.
The lightning flash with arrowhead symbol within the triangle is a warning sign alerting the user of "dangerous voltage" inside the unit.
The exclamation point within the triangle is a warning sign alerting the user of important instructions accompanying the product.
WARNING: TO PREVENT FIRE OR SHOCK HAZARD, DO NOT EXPOSE THIS APPLIANCE TO RAIN OR MOISTURE.
If at any time in the future you should need to dispose of this product please note
that Waste electrical products should not be disposed of with household waste.
Please recycle where facilities exist. Check with your Local Authority or retailer for
recycling advice.(Waste Electrical and Electronic Equipment Directive)
SAFETY PRECAUTION
- The set does not work in extremely high or low temperature.
- Do not attempt to modify the unit, modifying the unit may cause an accident.
- Do not put the remote control under high temperature or under the sunshine.
- Do not use your set immediately after transportation from a cold place to a warm place,
there may be condensation problems.
- Make sure that you keep your set away from water and high temperatures.
- The ventilation should not be impeded by covering the ventilation openings with
items such as newspapers, table-cloths, curtains, etc.
- No naked flame sources, such as lighted candles, should be placed on the apparatus.
- To use the apparatus in moderate climates.
- The apparatus should not be exposed to dripping or splashing.
- Ensure a minimum distance of 5cm around the apparatus for sufficient ventilation.
- Do not place objects filled with liquids, such as vases, on the apparatus.
- The marking plate is located on the back of unit.
- Attention should be drawn to the environmental aspects of battery disposal.
- Do not throw batteries in fire!
- Battery shall not be exposed to excessive heat such as sunshine, fire or the like.
- Excessive sound pressure from earphones and headphones can cause hearing loss.
- Under the influence of electrical fast transient or/and electrostatic phenomenon, the
product may malfunction and require user to power reset.
GB - 14
GB - 15
9/15/2011
3:32:40 PM