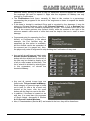
1
War in the Pacific
The Struggle Against Japan, 1941-45
TM
User Manual
© 2004 Matrix Games and 2by3 Games All Rights Reserved. Matrix Games and Matrix Games logo are
trademarks of Matrix Games and War in the Pacific is a trademark of Matrix Games and 2by3 Games. All other
trademarks and trade names are the properties of their respective owners and Matrix Games and 2by3 Games
make no claim thereto.
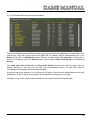
Table of Contents
1.0 Introduction......................................................................................................................... 8
1.1 MAIN MANUAL ................................................................................................................. 8
1.2 TUTORIAL GUIDE ............................................................................................................ 9
1.3 EDITOR MANUAL............................................................................................................. 9
1.4 INSTALLATION ................................................................................................................ 9
1.5 PRODUCT UPDATES .................................................................................................... 10
1.6 GAME FORUMS ............................................................................................................. 10
2.0 Getting Started.................................................................................................................. 10
2.1 Interface.......................................................................................................................... 12
2.2 Hotkeys ........................................................................................................................... 13
2.3 Main Game Menu............................................................................................................ 14
2.4 Realism Options Screen.................................................................................................. 15
2.4.1 Japanese Sub Doctrine ............................................................................................ 16
2.4.2 Fog of War................................................................................................................ 16
2.4.3 Advanced Weather Effects ....................................................................................... 16
2.4.4 Allied Damage Control.............................................................................................. 16
2.4.5 Historical First Turn................................................................................................... 17
2.4.6 Variable Turn One (Vary Setup) ............................................................................... 17
2.4.7 December 7th Surprise............................................................................................. 18
2.4.8 Reinforcement (Allied/Japanese).............................................................................. 18
2.5 Game Options Screen..................................................................................................... 19
2.5.1 Combat Reports ....................................................................................................... 19
2.5.2 Auto Sub Ops ........................................................................................................... 20
2.5.3 TF Move Radius ....................................................................................................... 20
2.5.4 Plane Move Radius................................................................................................... 20
2.5.5 Set All Facilities To Expand At Start ......................................................................... 20
2.5.6 Automatic Upgrade for Air Units ............................................................................... 20
2.5.7 Accept Air and Ground Replacements...................................................................... 20
2.5.8 Turn Cycle ................................................................................................................ 21
2.5.8.1 Continuous Play.............................................................................................. 21
2.5.9 AI Difficulty ............................................................................................................... 21
2.6 Preferences Menu........................................................................................................... 22
2.6.1 Map Style ................................................................................................................. 23
2.6.2 Hexside Details......................................................................................................... 23
2.6.3 Map Scroll Delay ...................................................................................................... 23
2.6.4 Delay Settings .......................................................................................................... 23
2.6.5 Show Combat Animations ........................................................................................ 23
2.6.6 Show Combat Summaries ........................................................................................ 23
2.6.7 Show Clouds ............................................................................................................ 23
2.6.8 Volume and FX......................................................................................................... 23
2.7 Begin a New Game ......................................................................................................... 24
2.7.1 A Note on Play-by-Email (PBEM) Games................................................................. 25
3.0 Sequence of Play.............................................................................................................. 26
4.0 The Main Display .............................................................................................................. 28
4.1 The Menu Bar ................................................................................................................. 28
4.2 The Map.......................................................................................................................... 30
4.2.1 Control Zones and Human versus Computer Control of Units .................................. 32
4.2.2 The Tactical Map ...................................................................................................... 35
4.2.2.1 Map Locations................................................................................................. 35
4.2.2.2 Location Pop-up Information ........................................................................... 36
2
4.2.2.3 Hex Command Display.................................................................................... 36
4.2.3 The Jump Map.......................................................................................................... 38
4.2.4 The Strategic Map .................................................................................................... 39
4.2.5 Map Icons ................................................................................................................. 40
5.0 Information Displays ........................................................................................................ 41
5.1 Intelligence Display ......................................................................................................... 41
5.1.1 Allied/Japanese Air Operations and Miscellaneous Information................................ 42
5.1.2 Scoring ..................................................................................................................... 42
5.1.3 Menu Buttons ........................................................................................................... 43
5.1.3.1 Aircraft Losses ................................................................................................ 44
5.1.3.2 Aircraft Reinforcement Schedule..................................................................... 44
5.1.3.3 Aircraft Replacement Pool............................................................................... 45
5.1.3.4 Leading Pilots.................................................................................................. 46
5.1.3.5 Pilot Replacements ......................................................................................... 47
5.1.3.6 Sunk Ships...................................................................................................... 47
5.1.3.7 Ship Availability ............................................................................................... 48
5.1.3.8 Ground Reinforcement Schedule .................................................................... 49
5.1.3.9 Industry/Resource Availability ......................................................................... 50
5.1.3.10 Industry/Troops/Resource Pool ..................................................................... 51
5.2 List All...Screens ............................................................................................................. 52
5.2.1 Land Based Air Units ................................................................................................ 52
5.2.2 Naval Air Units .......................................................................................................... 53
5.2.3 Land Based Units ..................................................................................................... 54
5.2.4 All Active Ships ......................................................................................................... 55
5.2.5 All Task Forces ......................................................................................................... 56
5.3 Database ScreenS .......................................................................................................... 58
5.3.1 Naval Database ........................................................................................................ 58
5.3.2 Plane & Weapon Database....................................................................................... 59
5.4 SigInt Screen................................................................................................................... 60
5.5 Ops Report...................................................................................................................... 61
THE UNITS...............................................................................................................................62
6.0 Naval Units ........................................................................................................................ 62
6.1 Task Forces and Ships.................................................................................................... 62
6.1.1 Task Force Symbols ................................................................................................. 64
6.1.2 Task Force Information Screen................................................................................. 65
6.1.2.1 Yellow Text Displays on Ships and Ship Column Headings ............................ 72
6.1.3 Ship Information Screen ........................................................................................... 73
6.1.4 Creating a Task Force .............................................................................................. 76
6.1.4.1 Mission Types and Ships Allowed ................................................................... 76
6.1.4.2 Task Force (TF) Size....................................................................................... 77
6.1.5 Assigning Missions ................................................................................................... 77
6.1.6 Disbanding Task Forces ........................................................................................... 77
6.1.7 Task Force Speed .................................................................................................... 77
6.1.7.1 Automatic Ship Separation From TF due to Damage and Loss of Speed........ 78
6.1.8 Patrol/Retreat and Max React Range ....................................................................... 78
6.1.9 Mission Types and their Impact on Movement .......................................................... 79
6.1.9.1 Air Combat ...................................................................................................... 79
6.1.9.2 Surface Combat .............................................................................................. 80
6.1.9.3 ASW Combat .................................................................................................. 80
6.1.9.4 Bombardment.................................................................................................. 81
6.1.9.5 Fast Transport................................................................................................. 81
6.1.9.6 Escort Mission................................................................................................. 82
3
6.1.9.7 Transport......................................................................................................... 82
6.1.9.8 Replenishment ................................................................................................ 83
6.1.9.9 Mine Warfare .................................................................................................. 83
6.1.9.10 Sub Patrol ..................................................................................................... 84
6.1.9.11 Sub Transport ............................................................................................... 84
6.1.9.12 Sub Minelaying ............................................................................................. 85
6.1.10 Movement Guideline Descriptions .......................................................................... 85
6.1.11 Impact of Roles on Auto-Created TF’s.................................................................... 89
6.1.12 Assigning TF Destinations ...................................................................................... 90
6.1.12.1 Follow Task Force......................................................................................... 90
6.1.13 Transferring Ships Between Task Forces ............................................................... 91
6.1.14 TF Returning to Home Base ................................................................................... 91
6.1.15 Routine Convoys and Computer-Controlled TF’s.................................................... 92
6.1.16 Submarines ............................................................................................................ 92
6.1.16.1 Auto Creation of Submarine Task Forces...................................................... 93
6.1.17 Ship Endurance ...................................................................................................... 93
6.1.17.1 Refueling in Port and at Sea ......................................................................... 95
6.1.17.2 Operation Points ........................................................................................... 95
6.1.17.3 Docking......................................................................................................... 95
6.1.18 Creating PT Boats and Barges ............................................................................... 96
6.1.19 Loading and Unloading Transports ......................................................................... 96
6.1.20 Naval Evacuations .................................................................................................. 99
6.1.21 Special Aircraft Carrier Movement ........................................................................ 100
6.1.22 Naval Ammunition and Retreat ............................................................................. 100
6.1.23 TF Officers............................................................................................................ 100
6.1.24 Shakedown Cruises.............................................................................................. 101
6.1.25 Naval Combat....................................................................................................... 101
6.1.25.1 Surface Combat .......................................................................................... 102
6.1.25.2 Ship-to-Shore Bombardment....................................................................... 104
6.1.25.3 Submarines and Anti-submarine Warfare.................................................... 104
6.1.25.4 Damage to Ships......................................................................................... 105
6.1.25.5 Operational Damage and Repairs at Sea.................................................... 105
6.1.25.6 Home Base for Refit/Repairs....................................................................... 106
6.1.26 Mine Warfare ........................................................................................................ 106
6.1.27 Submarine Warfare............................................................................................... 106
6.1.28 Coast Gun Fire at Passing Task Forces ............................................................... 107
6.2 British Withdrawal ......................................................................................................... 107
7.0 Air Units .......................................................................................................................... 108
7.1 Air unit Information Screen............................................................................................ 109
7.1.1 Atomic Bomb Attacks.............................................................................................. 118
7.1.2 Aircraft Restrictions................................................................................................. 118
7.1.3 Operational Losses to Aircraft................................................................................. 119
7.2 Aircraft .......................................................................................................................... 119
7.2.1 Air Sequence of Play .............................................................................................. 120
7.2.2 Assigning Aircraft Missions ..................................................................................... 121
7.2.2.1 Plane Type Limitations on Mission Selection ................................................ 122
7.2.2.2 Mission Types by Aircraft .............................................................................. 122
7.2.2.3 Day Air Operations........................................................................................ 123
7.2.2.4 Night Air Operations...................................................................................... 126
7.2.2.5 Morale and Air Missions ................................................................................ 126
7.2.2.6 Air HQs ......................................................................................................... 127
7.2.2.7 Aircraft Range ............................................................................................... 127
4
7.2.2.8 Air Unit Targets and Destinations .................................................................. 127
7.2.2.9 CAP, Nav Search, ASW Patrol and Training Levels ...................................... 128
7.2.2.10 Impact of Altitude Selection ......................................................................... 129
7.2.2.11 Coordinating Strikes .................................................................................... 130
7.2.2.12 Automatic Target Selection for Air Units Lacking a Set Target .................... 131
7.2.2.13 Weather and Aborted Missions ................................................................... 131
7.2.2.14 Failure to Find the Target ............................................................................ 132
7.2.2.15 Basing Carrier, Patrol, and Float Aircraft ..................................................... 132
7.2.2.16 Emergency Landings................................................................................... 133
7.2.2.17 Operational Losses ..................................................................................... 133
7.2.2.18 Withdrawing and Disbanding Air Units ........................................................ 133
7.2.2.19 Transfers..................................................................................................... 134
7.2.2.20 Automatic Air Unit Transfers........................................................................ 134
7.2.2.21 Mission Limitations from Size 1 Airfields ..................................................... 134
7.2.2.22 Captured Airfields........................................................................................ 134
7.2.2.23 Aircraft Carriers in Base Hexes ................................................................... 135
7.3 Air Combat .................................................................................................................... 135
7.3.1 Combat Air Patrol (CAP)......................................................................................... 135
7.3.2 Air-To-Air Combat................................................................................................... 136
7.3.2.1 Bombers in Combat....................................................................................... 137
7.3.2.2 Ohka Bombs and Kamikazes ........................................................................ 137
7.3.2.3 Altitudes ........................................................................................................ 138
7.3.2.4 Range ........................................................................................................... 138
7.3.2.5 Incidental Combat ......................................................................................... 138
8.0 Ground Units................................................................................................................... 139
8.1 Unit Types..................................................................................................................... 139
8.1.1 Headquarters.......................................................................................................... 140
8.1.2 Combat Infantry, Parachute Infantry, and Cavalry .................................................. 141
8.1.3 Engineers ............................................................................................................... 141
8.1.4 Air Defense Units.................................................................................................... 141
8.1.5 Artillery and Anti-Tank Guns ................................................................................... 141
8.1.6 Armor...................................................................................................................... 141
8.1.7 Coast Defense Units............................................................................................... 142
8.2 Ground Unit Information Screen.................................................................................... 142
8.3 Ground Unit Overland Movement.................................................................................. 148
8.3.1 Transporting Ground Units...................................................................................... 149
8.3.2 Japanese Movement .............................................................................................. 149
8.4 Ground Combat............................................................................................................. 150
8.4.1 Ground Combat Missions ....................................................................................... 152
8.4.2 Ground Units and Fortifications............................................................................... 153
8.4.3 Disruption ............................................................................................................... 153
8.5 Chinese Partisans ......................................................................................................... 153
8.5.1 Chinese Restrictions............................................................................................... 154
8.6 Russia and the manchukuo garrison ............................................................................. 154
8.7 Coastwatchers .............................................................................................................. 155
8.8 Indo-China Japanese Militia .......................................................................................... 155
9.0 Bases............................................................................................................................... 156
9.1 Base Information Screen............................................................................................... 156
9.2 Base Symbols ............................................................................................................... 160
9.2.1 Map Displays .......................................................................................................... 160
9.2.1.1 Beach............................................................................................................ 160
9.2.1.2 Base without Land, Air, or Naval Units Present ............................................. 160
5
9.2.1.3 Base with Air Unit Present............................................................................ 161
9.2.1.4 Base with Naval Unit Present........................................................................ 161
9.2.1.5 Base with Ground Unit Present ..................................................................... 161
9.2.1.6 Base Composition ......................................................................................... 162
9.3 Ports ............................................................................................................................. 163
9.3.1 Port Damage .......................................................................................................... 163
9.3.2 Ships Caught in Captured Ports ............................................................................. 164
9.4 Airfields ......................................................................................................................... 164
9.4.1 Airfield Damage ...................................................................................................... 165
9.4.2 Base Construction and Repair ................................................................................ 165
9.5 Command Organization of Bases.................................................................................. 166
10.0 Spotting Units ............................................................................................................... 167
10.1 Detection Levels (DLs)................................................................................................ 167
10.1.1 Changing Detection Levels ................................................................................... 168
10.1.1.1 DL of Naval Task Force............................................................................... 168
10.1.1.2 DL of a Base ............................................................................................... 168
10.1.1.3 DL of a Ground Unit .................................................................................... 169
10.1.1.4 DL of a Minefield ......................................................................................... 169
10.1.2 How Maximum Detection Levels Change ............................................................. 169
10.1.3 Recon Flights........................................................................................................ 170
10.1.4 Radar Detection Levels and Surface Combat ....................................................... 170
10.1.5 Information Given Regarding Enemy Units/Bases/Minefields ............................... 170
11.0 Political Points.............................................................................................................. 171
11.1 Changing Leaders....................................................................................................... 172
11.1.1 Task Force Leaders.............................................................................................. 172
11.1.2 British Ship Withdrawals ....................................................................................... 173
12.0 Weather ......................................................................................................................... 173
13.0 The Production System................................................................................................ 174
13.1 Production Buttons...................................................................................................... 174
13.2 Industrial Centers/Factories/Shipyards........................................................................ 178
13.2.1 Resources, Oil, and Manpower............................................................................. 178
13.2.2 Industry................................................................................................................. 179
13.2.3 Player Alterations to Production Capabilities (Japanese Only) ............................. 181
13.2.4 Aircraft Research.................................................................................................. 182
13.2.5 Capturing Industry ................................................................................................ 182
13.3 Ship Upgrades ............................................................................................................ 183
13.4 Ship Repairs ............................................................................................................... 183
13.5 Ground Units (Japanese Only) .................................................................................... 183
13.6 Japanese Scrapping of excess aircraft........................................................................ 184
13.7 Japanese Ships........................................................................................................... 184
14.0 Logistics........................................................................................................................ 185
14.1 Supply Operations....................................................................................................... 186
14.2 Naval Supply............................................................................................................... 186
14.2.1 Depots and Tenders ............................................................................................. 186
14.3 Ground Unit Supply..................................................................................................... 188
14.4 Supply/Fatigue Effects on Land Units ......................................................................... 189
14.5 Air Unit Supply ............................................................................................................ 189
14.6 Automatic Convoys ..................................................................................................... 191
14.7 Capturing Base Resources ......................................................................................... 192
14.8 Spoilage...................................................................................................................... 192
14.9 Burma Road............................................................................................................... 192
15.0 Reinforcements and Replacements ............................................................................ 193
6
15.1 Naval units .................................................................................................................. 193
15.1.1 Automatic Ship Replacements .............................................................................. 193
15.2 Air Units ...................................................................................................................... 193
15.2.1 Carrier Aircraft and Off-map Movement ................................................................ 195
15.2.2 Pilot Replacements............................................................................................... 195
15.2.3 Average Pilot Experience by Nationality ............................................................... 196
15.2.4 Aircraft Upgrades.................................................................................................. 196
15.3 Ground Units ............................................................................................................... 197
15.3.1 Ground Unit Weapon Upgrades............................................................................ 197
15.3.2 Special Chinese Replacements ............................................................................ 198
15.4 Base Force Replacements .......................................................................................... 198
15.5 Arrivals ........................................................................................................................ 198
16.0 Victory Conditions........................................................................................................ 199
16.1 Victory Levels.............................................................................................................. 201
16.1.1 Victory After 1945 ................................................................................................. 201
16.1.2 Using Atomic Bombs ............................................................................................ 201
16.2 Automatic Victory ........................................................................................................ 202
16.2.1 Automatic Victory in 1943 ..................................................................................... 202
16.2.2 Automatic Victory in 1944 ..................................................................................... 202
16.2.3 Automatic Victory in 1945 or Later ........................................................................ 202
17.0 Special Rules ................................................................................................................ 202
17.1 Realism Options.......................................................................................................... 202
17.1.1 Fog of War............................................................................................................ 202
17.1.2 Allied Damage Control Advantage ........................................................................ 203
17.1.3 Advanced Weather Effects ................................................................................... 203
17.1.4 Japanese Sub Doctrine......................................................................................... 203
17.1.5 Reinforcement Variability for Allied and Axis units ................................................ 203
17.1.6 Historical First Turn............................................................................................... 203
17.1.7 Variable Setup ...................................................................................................... 204
17.1.8 December 7th Surprise Rule................................................................................. 204
17.2 Emergency Rescue of Survivors ................................................................................. 205
17.3 High-Altitude Air Combat............................................................................................. 205
17.4 Early war zero advantage............................................................................................ 205
18.0 Notes on Combat .......................................................................................................... 206
18.1 Land Combat............................................................................................................... 206
18.2 Naval Combat ............................................................................................................. 206
18.3 Air-to-Air Combat ........................................................................................................ 206
19.0 Appendicies .................................................................................................................. 208
19.1 Appendix A - Glossary and Abbreviations ................................................................... 208
19.1.1 Glossary: Game Abbreviations ............................................................................. 208
19.1.2 Military Abbreviations............................................................................................ 208
19.2 Appendix B - PBEM Game Security ............................................................................ 209
19.2.1 Saved Game File .................................................................................................. 210
19.3 Appendix C – Styles of Play ........................................................................................ 210
19.3.1 Computer Controlled Japanese / Allied Forces ..................................................... 210
19.3.2 Computer vs. Computer........................................................................................ 210
19.3.3 Hot Seat................................................................................................................ 210
19.3.4 Play By E-Mail (PBEM) ......................................................................................... 210
19.4 Appendix D – Carrier Loadouts ................................................................................... 211
19.4.1 Standard Aircraft Load For Japanese Fleet Carriers ............................................. 211
19.4.2 Standard Aircraft Load For USN Fleet Carriers..................................................... 212
20.0 Credits ........................................................................................................................... 213
7
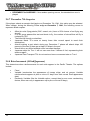
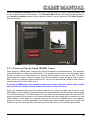
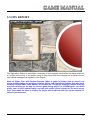
1.0 INTRODUCTION
The road that led to war in the Pacific was as long as the ocean is vast. Japan’s dreams of glory
and conquest came from lessons learned from Western countries (the U.K., France, Holland, and
even the United States) with regards to colonialism. Japan’s defeat of Russia in a short but violent
war in 1904 brought praise from the West and instilled a fierce determination in the Japanese that
they were now a modern world power. This led to further aggressions aimed at mainland China,
which began as a war in 1931.
When Japan’s aggressiveness began to concern other nations, Japan reacted violently: how
dare, they thought, the very countries that practiced blatant colonialism, imposing their own yokes
on lands throughout the Pacific banish us from doing the same? They thought of this as little more
than blatant hypocrisy.
Japan’s road to war has been covered at great length in many texts. In summary, Japanese fear
of reliance on foreign provision of resources, plus inroads made by many Western nations in
China and Southeast Asia, served to fuel the fires that had been long simmering in Japan’s
military. By December 7th, 1941, these fires burned out of control as a strike force took off from
the decks of the fleet carriers Akagi, Soryu, Hiryu, and Kaga to lay waste to much of the American
Pacific Fleet at Pearl Harbor. From then until mid-1942, Japan ran wild across the Pacific,
conquering large territories and sending a bewildered Allied foe reeling. Eventually, however, the
sheer size of their conquests made the Japanese military machine vulnerable.
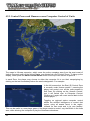
The War in the Pacific was a conflict of extreme sizes. The ocean itself covers more than a
quarter of the planet’s surface (over 155 million square miles) and is larger than all the land
masses combined. China and Southeast Asia totalled about five million square miles. Over much
of this vast territory Japan ruled for several years, an amazing feat considering Japan is not even
150,000 square miles in size. Also, Japan’s 1941 population was just over 71 million people; by
mid-1942, they ruled almost a quarter of a billion people.
In War in the Pacific - The Struggle Against Japan, 1941-45™, players may choose to direct the
Japanese or Allied war efforts in one of several scenarios that cover a portion of the war in the
Pacific, or may choose the dynamic campaign game that covers the entire map. With a strong AI
management system, a player may choose to hand over certain theatres in the Pacific to the
computer while they concentrate on a particular theatre of interest. This ability gives the player the
flexibility of playing a smaller portion of a large-scale game without losing the feel of being part of
something bigger.
1.1 MAIN MANUAL
War in the Pacific - The Struggle Against Japan, 1941-45™’s scope is as vast as the ocean it is
named after and will take an investment of time to learn. However, we know that some players
prefer to dive right in. In that case, in addition to this manual, the player will find a seperate
Tutorial Guide that provides a step-by-step experience that touches on the major aspects of War
in the Pacific - The Struggle Against Japan, 1941-45™. Players anxious to begin should read
through and follow the Tutorial Guide and then refer to this manual for more in-depth information.
8
1.2 TUTORIAL GUIDE
The Tutorial Guide (located on your CD-ROM disc) is a short but informative way of getting down
the basics of War in the Pacific - The Struggle Against Japan, 1941-45™. Not every aspect of the
game is covered in the tutorial; it serves as a means to learn some basic orders and guide you
through some of the most important screens in the game. Read through the Tutorial Guide first if
you want to dive right in to the game, then refer back to the Main Manual for added detail.
1.3 EDITOR MANUAL
War in the Pacific - The Struggle Against Japan, 1941-45™ has an editor feature that allows you
to create your own scenarios anywhere on the Pacific map. Describing this powerful tool within
the pages of the Main Manual would be inappropriate as there is quite a bit of information to
digest there. Please refer to the Editor Manual located on your CD-ROM disc for further
information.
Please note – when creating a scenario, DO NOT set the starting date of the scenario prior
to December 1, 1941, or the game will not function properly.
1.4 INSTALLATION
To install War in the Pacific - The Struggle Against Japan, 1941-45™ just insert your War in the
Pacific - The Struggle Against Japan, 1941-45™ CD into your CD-ROM drive. The installation
menu will pop up and allow you to install War in the Pacific - The Struggle Against Japan, 194145™ by clicking the “Install War in the Pacific” button.
Some Windows users may have problems with AutoPlay. If the AutoPlay screen does not
automatically appear after inserting your War in the Pacific - The Struggle Against Japan, 194145™ CD into your CD-ROM drive, please follow these steps
1. Close all running programms.
2. Insert the War in the Pacific - The Struggle Against Japan, 1941-45™ CD into your CD-ROM
drive.
3. double click My Computer on your desktop.
4. Double click the CD ROM icon.
5. Double click on the setup.exe icon to launch the installer menu.
6. Install War in the Pacific - The Struggle Against Japan, 1941-45™ by clicking the Install War in
the Pacific button in the installation menu.
War in the Pacific - The Struggle Against Japan, 1941-45™ will only work in 1024x768 mode;
800x600 is not supported.
9
1.5 PRODUCT UPDATES
In order to maintain our product excellence, Matrix Games releases updates containing new
features, enhancements, and corrections to any known issues. Keeping up with these updates is
made easy and is free by singing up for a Matrix Games Member account. When you’re signed
up, you can then register your Matrix Games products in order to receive access to these
important game-related materials. Doing so is a simple two step process:
Sign Up for a Matrix Games Member account – THIS IS A ONE TIME PROCEDURE;
once you have signed up for a Matrix account, you are in the system and will not need to
sign up again. Go to www.matrixgames.com and click the Members hyperlink at the top.
In the new window, select Register NOW and follow the on-screen instructions. When
you’re finished, click the Please Create My New Account button, and a confirmation email will be sent to your specified e-mail account.
Register a New Game Purchase – Once you have signed up for a Matrix Games
Member account, you can then buy any Matrix Games title and register it in your new
account. To do so, log in to your account on the Matrix Games website
(www.matrixgames.com). Click Register Game near the top to register your new Matrix
Games purchase.
Once you’ve registered your game, when you log in to the Members section you can view your list
of registered titles by clicking My Games. Each game title is a hyperlink that will take you to an
information page on the game (including all the latest news on that title). Also on this list is a
Downloads hyperlink that takes you to a page that has all the latest downloads, including
patches, for that particular title.
Remember, once you have signed up for a Matrix Games Member account, you do not have to
sign up again – at that point you are free to register for any Matrix Games product you purchase.
Thank you and enjoy your game!
1.6 GAME FORUMS
Our forums are one of the best things about Matrix Games. Every game has its own forum with
our designers, developers and the gamers playing the game. If you are having a problem, got a
question or just an idea on how to make the game better, post a message there. Go to
http://www.matrixgames.com and click on the Forums hyperlink.
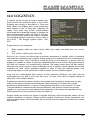
2.0 GETTING STARTED
"We must not again underestimate the Japanese."
- Admiral Chester W. Nimitz, Commander in Chief of the Pacific Fleet (stated after the bombing of
Pearl Harbor, 1941)
Playing War in the Pacific - The Struggle Against Japan, 1941-45™ is a task that may seem
daunting at first, with lots of information and the ability to direct the entire war in the Pacific all the
way down to individual air squadrons, ships, and ground units. With practice, the information
screens and orders to be issued will become second nature before long. However, playing this
10
simulation well requires a thorough knowledge of the rules. This manual will describe the various
game menus and mechanics involved in the game.
As mentioned in section 1.1 Manuals, above, if you’re new to War in the Pacific - The Struggle
Against Japan, 1941-45™ and want to dive right in, please refer to the Tutorial Guide that is
placed on your hard drive when the game is installed.
The War in the Pacific - The Struggle Against Japan, 1941-45™ system may seem daunting at
first; there are a lot of myraid details to keep in mind, and those details are spread out over many
units and sub-units, as well as vast distances. But at heart, the concepts described above are
quite simple. However, a few extra pointers would prove useful.
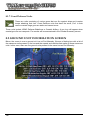
The War in the Pacific Ocean itself was a war over bases. The mainland conflict in China and
Burma/Southeast Asia was a different breed of war altogether; the Japanese were still conducting
grand land offensives into the depths of China even as 1944 drew to an end, while their Navy
bretheren literally ceased to exist under the hammer blows of the Allied navies. Keep in mind your
grand strategy in the South Pacific should be focused on base security. As you capture bases,
you can develop them (using engineers), stock them with supplies, and build up port facilities for
further strikes. Combat at sea is hinged on what bases are occupied by whom; if a battle takes
place deep within an Allied-controlled area of bases, for example, the Japanese will be at the
mercy of a never-ending stream of scout planes and land-based striking power. So to can this fate
meet with the Allies if they venture too far north into Japanese territory.
While capturing bases is of importance, denying their use to the enemy is just as important. If one
side cannot occupy a base for whatever reason, making sure the other side cannot use it is just
as much a victory as occupying it yourself. Keep in mind too that taking a base means needing to
build an infrastructure to support and defend it; Bases need supplies, troops to defend it, and
other facilities. It wouldn’t do to build a base from scratch, for instance, and then have the enemy
waltz in and take over your gleaming new facilities. When capturing or creating new Bases, be
sure that you have the power to back it up. Or, if making a bold move deep into enemy territory,
be sure you can back it up a lot.
The first order of business in any scenario is to look over your holdings. Examine each base and
determine each’s strengths and weaknesses. Strengths are, of course, land-based units and landbased airpower, or ships in port. Weaknesses could include proximity to enemy bases, being in
range of enemy airfields, being short on supplies, being off the beaten path, and the like. Also,
find all of your Task Forces at sea and examine them. Once you have a clear picture of your
available forces, examine your enemy’s setup (as best you can, as information on them is likely to
be rather slim). Guadacanal is a good focal point for both sides; depending on the scenario
chosen it is likely that both sides have a substantial force on or near the island, so it needs to be
determined quickly what forces are needed to commit there to overwhelm the enemy and deny
that important location to them. The AI is programmed to look for weaknesses, but it also has its
own designs on territory. Don’t become too enraptured or focused on one part of the South
Pacific, as you could easily lose sight of conflicts brewing in other island chains.
11
2.1 INTERFACE
The interface for War in the Pacific - The Struggle Against Japan, 1941-45™ is centered on four
types of input:
1.
2.
3.
4.
Toggle switches that turn on and off their associated options.
Icons, represented by the buttons in the Menu Bar. These buttons are on the left
of the Hex Information Display and on the right in the Base Information Screen. These
bring up lists or menu screens that may in turn take you to additional screens where
you give orders.
Icons in the Hex Information Display that represent individual units in the current
hex. Click on the icons to open Unit Information Screens.
Directional arrows, which are the small left and right arrows next to many items.
These scroll through a listing of available choices. When there is a single arrow
pointing to the right, it either launches another menu, as in “Form Task Force,” or it
toggles orders such as “Automatic Convoy Off/On.”
When text is yellow, it can be clicked on, either opening a menu screen if it is a ship or
unit, or sorting it if it is in the column heading of the various databases. However, if the
data concerns a unit’s supply or damage status, then the text is solely for information
(don’t bother clicking on it). This text will appear as orange or red.
Pressing the Esc key will close the current pop-up and either move back one window or
close all pop-up windows. This is true for pop-ups during the resolution phase as well.
Right-clicking on a TF icon in the Hex Information Display Area will also close any pop-up
and make that unit the active unit (and also displaying its Task Force Radius circles if this
option is on). The same applies to an air unit and its Air Radius circles.
12
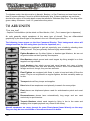
2.2 HOTKEYS
War in the Pacific - The Struggle Against Japan, 1941-45™ includes several hotkeys:
[F2]
[F3]
[F4]
[F5]
[F6]
[F7]
[F8]
[F9]
[A]
[B]
[C]
[D]
[E]
[F]
[G]
[H]
[I]
[L]
[M]
[N]
[O]
[P]
[Q]
[R]
[S]
[T]
[V]
[Z]
[1]
[2]
[3]
[Ctrl] [A]
[Ctrl] [J]
[?]
Toggles display between between not showing all computer
controlled TFs (auto-convoy and others), not showing human
TFs, and showing all TFs.
Toggle Plane Range Radius on/off
Toggle Task Force Move Radius on/off
Toggle combat animations on/off
Toggle detailed hexside info on/off
Toggle clouds on/off
Toggles combat summaries on/off but will retain combat reports
Allow human players to enter the Orders Phase at next
opportunity
Bring up the List All Land Based Air Units screen
Bring up the List All Bases screen
Bring up the Combat Report screen
View aircraft, troop and vehicle Database
End the orders phase
Save the game
Bring up the List All Ground/Land Based Units screen
Show the Auto Convoy System
Bring up the Intelligence Reports screen
Bring up the Signal Intelligence reports
View Game Credits
Bring up the List All Naval Air Units screen
Bring up the Operational Report screen
Bring up the Preference and Options screen
Quit game
Toggles colored rail/road/trail networks on/off
Bring up the List All Ships screen
Bring up the List All Task Forces screen
View Ship Database
Display the Control Zone Map
Toggles zone terrain text in each hex on the Tactical Map
Toggles zone location text in each hex on the Tactical Map
Toggles hex weather forecast
Show the Large Strategic Map
Toggles the Jump Map on or off in the full screen map mode
Orders selected unit to return to its Home Base
13
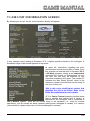
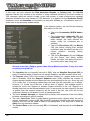
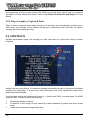
2.3 MAIN GAME MENU
This is where War in the Pacific - The Struggle Against Japan, 1941-45™ begins and where all of
your important game-defining decisions will be made (although some can be changed in game).
From here, all game parameters are defined including the selection of sides, various realism
options, and display preferences.
The options available on this screen are:
Gamestyle Options (select one of the five following toggle switches)
Japanese Computer – play as the Allies against a Japanese computer opponent
Allied Computer – play as the Japanese against an Allied computer opponent
Both Computer – observe the computer take both the Japanese and Allied sides
Head to Head – play a two-player hotseat game
Play By E-mail – play a game via e-mail
Note: To select a Gamestyle Option, click on the text and the dial will turn to indicate your
selection.
Game Parameter Options
14
Realism Options – select different rules affecting gameplay (section 2.4)
Game Options – select different options affecting the game’s display (section 2.5)
Preferences – select different options regarding message delay, sound volume, and
map appearance (section 2.6)
Miscellaneous Options
Scenario Selection – select to choose a scenario to play
Load a Saved Game – select to load a previously saved game
Exit Game – This toggle switch will, when clicked, exit War in the Pacific - The
Struggle Against Japan, 1941-45™ and return you to your desktop
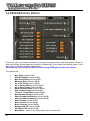
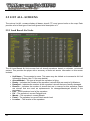
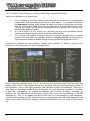
2.4 REALISM OPTIONS SCREEN
From here, select various rules that will affect the play balance of the game. Select an option by
clicking on the toggle and turning it’s status light (to the right of the switch) green. If the status
light is red, that option is not selected.
All options can be changed in-game (except during PBEM games) from the tool bar by
clicking the Preferences and Options button.
The options are:
Japanese Sub Doctrine (section 2.4.1)
Fog of War (section 2.4.2)
Advanced Weather Effects (section 2.4.3)
Allied Damage Control (section 2.4.4)
Historical First Turn (section 2.4.5)
Vary Setup (section 2.4.6)
December 7th Surprise (section 2.4.7)
Reinforcement – Allied or Japanese (section 2.4.8)
15
2.4.1 Japanese Sub Doctrine
“The Japanese policy was to use submarines primarily for attacking enemy naval forces.
Merchant ships were legitimate targets only when there were no warships to be considered.”
-Mochitsura Hashimoto, Japanese Submarine Commander
The Japanese Sixth Fleet (their submarine forces) was trained from before the War to engage
only warships. Japanese submarine commanders also had a strict torpedo expenditure rule that
allowed only a certain number of torpedoes to be expended per ship type; enemy battleships and
aircraft carriers could be fired on until out of torpedoes, while cruisers were allowed up to three
torpedoes each. However, merchantmen, destroyers, and other similarly small vessels only were
allowed one torpedo each, and were usually ignored in favor of the larger, more powerful enemy
vessels. This strict policy was adhered to even into the waning days of the war.
If this switch is turned on, Japanese submarine captains will very seldom attack cargo ships,
transports, and other smaller vessels, in accordance with their rigid training. If turned off, they will
attack any kind of vessel as opportunities present themselves, including merchantmen.
2.4.2 Fog of War
“Unless more efforts based upon long-range planning are put into military preparations and
operations, it will be very hard to win the final victory.”
- Admiral Isoroku Yamamoto, Commander in Chief of the Japanese Navy
This switch controls the amount of information that either side can receive regarding the enemy.
Historically, the commanders relied on spotty and often incomplete information to base their strike
decisions on. In War in the Pacific - The Struggle Against Japan, 1941-45™, the player may
select whether they wish to place themselves more fully in the same shoes as their historical
counterparts.
When turned on, both players will receive incomplete or faulty messages and reports concerning
enemy ship, troop, and air group damage, as well as limited data on enemy bases. If left off, all
enemy units will be visible on the map at all times.
2.4.3 Advanced Weather Effects
When Advanced Weather Effects are not in use, the weather forecasts will always be clear on
turn 1 and partly cloudy thereafter. This will result in generally better weather. When Advanced
Weather Effects are on, the weather forecasts will have greater variability and generally result in
worse weather. Forecasts impact the actual weather in the hex, but any particular hex can have
very bad weather even when the forecast is clear.
For more information on Weather, refer to Section 12.0.
2.4.4 Allied Damage Control
...fire was reported in #9 fireroom...All lights were extinguished. Boilers #8 and #9 were secured
and, because personnel were being overcome by gasses, firerooms were abandoned. Distant
controls were operated to secure blowers...To a question by the Commanding Officer...[w]hen
16
asked if the ship should slow, the answer was, "Hell no! We'll make it!" and at no time did the
speed drop below 24 knots until signalled from the bridge.
-From the USS Yorktown’s Action Report (CV5/A16-S/(CCR-10-hjs)), May 25, 1942
This switch toggles if superior Allied damage control is factored into the combat and repair
routines. If toggled on, Allied ships will repair damage more rapidly than Japanese ships.
2.4.5 Historical First Turn
This option gives the player a chance to start a game by immersing themselves into the historical
strategies selected by both sides for the forthcoming scenario chosen. With this option selected:
A human playing against the computer will not be able to issue orders on Turn One.
Neither player in a head-to-head (i.e., two human player) game will be able to issue
orders on Turn One.
Neither player in a PBEM game (i.e., two human player) game will be able to issue
orders on Turn One. Essentially, each player’s first turn is going to be skipped after
entering their password, with the player being asked to save the game immediately. After
both players have done this once, the second turn will begin by allowing the first player to
enter orders after seeing the first turn’s execution phase.
In a computer-versus-computer game, the player will be able to issue orders on Turn
One, if the player desires to.
2.4.6 Variable Turn One (Vary Setup)
If this option is selected along with Historical First Turn (section 2.4.5), and either scenario 8 (First
Year, 7 Dec 41 – 31 Dec 42) or scenario 15 (The War in the Pacific) is selected, the game will
have one of four possible random openings:
OPERATION OUTFIELD: If this random opening occurs, Kimmel sends forces to
Midway, Johnston Island, and Wake Island. These include ships and air groups. Some
Allied submarines are repositioned. There is a very good chance that all groups and antiaircraft batteries are put on alert, even if the December 7th surprise option has been
selected. The idea is that Kimmel has taken the dispatches from Washington seriously
and is spreading a force umbrella to protect the Hawaiian Islands. Due to the odd, out of
the way path the Japanese take to Pearl Harbor, this is unlikely to work. Still, some
forces begin the game in different places. In addition, there are some dispersal of Allied
air groups in the Central Pacific, Philippines, and Malay.
OPERATION INFIELD: If this random opening occurs, Kimmel forms a surface fleet
which he keeps in the Pearl Harbor area and brings both Carrier Task Forces close to
home port. Some air groups are repositioned and put on alert. Some Allied submarines
may be repositioned. In addition, there are some dispersal of Allied air groups in the
Central Pacific, Philippines, and Malay. This opening usually produces a fierce carrier
battle on turn one near Pearl Harbor.
OPERATION HOME PLATE: If this random opening occurs, Kimmel assumes the safer
course to be pulling all Task Forces into port. Surprise is likely, and the Japanese are
happy to find two American carriers in port, when they launch their attack.
17
DECEMBER 7th SURPRISE: If this random opening occurs, the standard turn one is
played.
2.4.7 December 7th Surprise
If the player selects a scenario that begins on December 7th, 1941, this option may be selected.
When chosen, during the Morning Phase only on December 7, 1941, the following occurs to
represent Allied surprise:
Allied air units flying patrols (CAP, search, etc.) have a 50% chance of not flying any
aircraft
If an air group passes this test and elects to fly, the number of aircraft that will fly is
reduced by 75%
The Allies will launch no airstrikes
Japanese Naval TFs move at twenty times thier normal speed to reach their
destinations
Aircraft making a port attack during any December 7 phase will attack ships 100
percent of the time if there are at least 10 ships in the port
Aircraft hit on any Allied airfields suffer increased damage
Japanese ships on Turn 1 will not use more than 3 hexes of fuel, representing their
tanker support
Japanese Fast Transport TFs do not receive a bonus movement rate on Turn 1
2.4.8 Reinforcement (Allied/Japanese)
This determines when reinforcements for each side appear in the Pacific Theater. The options
include:
18
Fixed
Variable (randomizes the appearance of troops, ships, and air groups; Variable
reinforcements appear at plus or minus 15 days from their normal fixed appearance
date)
Extremely Variable (like the Variable option, except there’s even more randomizing
factors; these can vary in appearance up to plus or minus 60 days)
2.5 GAME OPTIONS SCREEN
From here, select various rules that will affect the various in-game reports and displays. Select an
option by clicking on the toggle and turning it’s status light (to the right of the switch) green. If the
status light is red, that option is not selected.
All options can be changed in a game (except during PBEM games) from the tool bar.
The options are:
Combat Reports (section 2.5.1)
Auto Sub Ops (section 2.5.2)
TF Move Radius (section 2.5.3)
Plane Move Radius (section 2.5.4)
Set All Facilities To Expand At Start (section 2.5.5)
Automatic Upgrade for Air Groups (section 2.5.6)
Accept Air and Ground Replacements (section 2.5.7)
Turn Cycle (section 2.5.8)
AI Difficulty (section 2.5.9)
Main Menu – return to the main game menu (section 2.3)
2.5.1 Combat Reports
This switch toggles whether the combat report is created. If switched off, there will be no report
created.
19
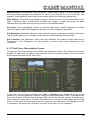
2.5.2 Auto Sub Ops
The Auto Sub Ops switch toggles whether the artificial intelligence that controls operations for the
player will automatically send out submarine patrols, during the game. The player may still choose
to change control of these submarines from computer to human at any time. The computer will
consider using bases with a port size of at least 8 or an AS at the base, and a minimum of 10000
fuel points on hand as potential sub bases. This option can be changed while playing the game,
from the tool bar.
2.5.3 TF Move Radius
The TF Move Radius switch toggles whether range circles appear on the game map around the
selected task force. If toggled on, a green circle will appear around the task force indicating the
maximum distance the task force will be able to travel at cruising speed during that turn and a
yellow one for the maximum distance at flank speed. This can be toggled playing the game by
pressing the F4 key.
2.5.4 Plane Move Radius
The Plane Range Radius switch toggles whether range circles appear on the game map around a
selected air group. If toggled on, a black circle will appear around the air group indicating
maximum range for normal operations, and a red for one indicating extended maximum range for
operations. This can be toggled while playing the game by pressing the F3 key.
2.5.5 Set All Facilities To Expand At Start
When selected, this option will tell all of the player’s factories to begin expanding their facilities.
While this will be a boon down the road, for the moment it will require a tremendous amount of
supplies. If this option is not selected, the player will have to manually select this option for each
factory they want to expand.
2.5.6 Automatic Upgrade for Air Units
When selected, the player’s air units will automatically look for replacement aircraft from the
Replacement Pool to replace their aircraft (replacing outdated or inferior equipment). While this
will ensure that air squadrons are up to date with the latest designs, it will, like Set All Facilities To
Expand at Start, the number of planes in the Replacement Pool will be reduced. If not selected,
each squadron will need to be ordered individually whether or not to accept updated equipment.
2.5.7 Accept Air and Ground Replacements
When selected, the player’s air and ground units will automatically accept any applicable items to
fill out their rosters if they are missing any or have lost any in combat. This will ensure that all your
units will do their best to remain filled to capacity (based on available supply), but will not give you
control over what units you want filled out first. Sometimes there may be a need to ensure that
certain units fill up their ranks first before others; if this option is selected all units will have equal
opportunity to do so. If this option is not selected, the player will need to order their air and ground
units individually to accept replacements.
20
2.5.8 Turn Cycle
The Turn Cycle selection arrows choose how many days each turn is. The options are 1 to 3 days
or continuous. Pressing the F9 key will suspend execution of combat resolution at the beginning
of the next day and return the player to the orders screen. This can be changed while playing the
game, from the tool bar, except in PBEM games.
A War in the Pacific - The Struggle Against Japan, 1941-45™ turn can consist of from one to
seven days of combat, with the exact number set in the Game Options Menu (this is called the
“turn cycle” or “turn length”). You can set the length of each turn in days (i.e. the number of days
the game will progress before it kicks into the Orders Phase). This number, in the Game Options
Menu, is set to one to seven days, or it can be set to Continuous Play (C). The Turn Cycle cannot
be set to continuous play for an email game, nor may it be changed in the middle of an email
game.
If the Turn Cycle is set for other than one day, Night and Day Resolution Phases will repeat until
the number of days resolved equals the current Turn Cycle setting (however, there is no night turn
during the first turn of all scenarios). Then, the game will begin a new turn. No matter what turn
length is selected, the game progresses through time by completing successive Night and Day
Resolution Phases. Turn length simply determines how many resolution phases will be completed
before entering the next Orders Phase. While the Day and Night Resolution Phases are mostly
identical (task forces move each phase, for example), ground combat and certain supply
operations only occur in the Day Resolution Phase.
2.5.8.1 Continuous Play
If the Continuous Play option is selected for the Turn Cycle, at game start the players (human and
AI) issue orders during their Orders Phases. The system then executes all orders simultaneously
during the Day and Night Resolution phases. The game will continue to progress without stopping
until a player interrupts the game (by pressing F9). When interrupted, the system finishes the
current day’s Day Resolution Phase and then starts the Orders Phases. This mode allows the
player to quickly resolve a period of many days when nothing important is happening (which can
be particularly convenient during a campaign game). Computer vs. Computer games are
automatically Continuous Play-type games.
2.5.9 AI Difficulty
The AI Difficulty selection arrows allow the player to extend an advantage to the computer
opponent. The options are:
Easy – Human player is given some advantages.
Historical (default) – Play is balanced with no advantages given to either side.
Hard – Computer is given some logistical advantages.
Very Hard – Computer is given some logistical and combat advantages.
After playing one or two games, experienced War in the Pacific - The Struggle Against Japan,
1941-45™ (or Uncommon Valor) players should play at the Hard level of difficulty.
21
2.6 PREFERENCES MENU
From here, you may further customize your game by setting delays and map details. Select an
option by clicking on the toggle and turning it’s status light (to the right of the switch) green. If the
status light is red, that option is not selected.
All options can be changed in-game (except during PBEM games) from the tool bar.
The options are:
22
Map Style (section 2.6.1)
Hexside Details (section 2.6.2)
Map Scroll Delay (section 2.6.3)
Message Delay (section 2.6.4)
Air to Air Delay (section 2.6.4)
Air to Ground Delay (section 2.6.4)
Air to Naval Delay (section 2.6.4)
Naval vs Naval Delay (section 2.6.4)
Sub vs Naval Delay (section 2.6.4)
Troop vs Troop Delay (section 2.6.4)
Bombardment Delay (section 2.6.4)
Show Combat Animations (section 2.6.5)
Show Combat Summaries (section 2.6.6)
Show Clouds (section 2.6.7)
Main Volume (section 2.6.8)
Music Volume (section 2.6.8)
Background FX (section 2.6.8)
Unit Sound FX (section 2.6.8)
Main Menu – return to the main game menu (section 2.3)
2.6.1 Map Style
The player should flip the switch in the direction of their desired choice:
If the switch is flipped up, the map will display with hexes.
If the switch is flipped down, the map will display without hexes.
With hexes displayed, it becomes easier to distinguish distance and location.
2.6.2 Hexside Details
This determines whether or not hex details (showing impassible hexsides, for example) appear on
the map. This option can be toggled while playing the game by pressing the F6 key and is useful
for determining ranges in hexes if the Map Style switch is set to Without Hexes (section 2.6.1).
2.6.3 Map Scroll Delay
This setting determines the speed at which the map scrolls. This is useful for slowing down the
scroll rate for extremely fast computers.
2.6.4 Delay Settings
The other delay values refer to the length of pause for the user to read the messages or watch the
animations for the appropriate events.
2.6.5 Show Combat Animations
When selected, each battle will be displayed with an animated display. This display will be
accompanied by text describing the results of the action taking place. Depending on the delay
settings chosen in this section, the messages may appear very quickly or the player may delay
them so as to have time to read them all. If this option is not selected, the game’s length will be
lessened by a large degree as the player will not have to wait for battles to fight themselves out.
2.6.6 Show Combat Summaries
When selected, after each battle a short summary of the battle will be displayed showing the
composition of the participants, any losses or damage suffered by either side (depending on your
Fog of War settings, your reports of enemy losses may be exaggerated or false), and the overall
results of the battle (e.g., if ships were damaged or sunk during a Naval Attack Mission).
2.6.7 Show Clouds
When selected, the Tactical Map (the main game display) will show clouds. If not selected, the
player’s map will appear weather-free but will still suffer the effects of weather good and bad.
2.6.8 Volume and FX
These values determine how loud the general sound, music, and sound effects (FX) are.
23
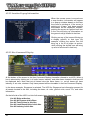
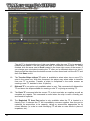
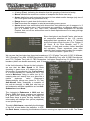
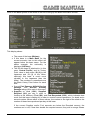
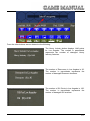
2.7 BEGIN A NEW GAME
To begin a new scenario, click Scenario Selection in the Main Game Menu screen. The
Scenario Menu screen will appear.
In this screen, two columns appear. The left-hand column lists all scenarios in the game, while the
right-hand column shows an overview of the currently selected scenario. Click on a scenario at
left to view the description on the right. To play a scenario, select it from the list at left and then
click Select Scenario. The Scenario Details Menu screen will appear.
24
Click the Historical Briefing button to bring up a brief synopsis of how the selected battle went
for the player’s historical counterparts. The Scenario Menu button will bring the player back to
the Scenario Selection screen, where another scenario may be selected. Click Start Game to
play the scenario.
2.7.1 A Note on Play-by-Email (PBEM) Games
When playing a PBEM game, both players will be prompted to create passwords. The Japanese
player then plots his orders and ends the turn. The program will ask him to save the game, which
he then e-mails to the Allied player (it is strongly recommended to first zip the file). The Allied
player loads the game, enters his orders and, when prompted, saves the game and e-mails it
back. When the Japanese player loads the file, the turn will automatically execute and create a
combat replay file in Save Game slot 1.
If starting a PBEM game with variable reinforcement times selected, neither player will be
able to view their reinforcements in their Intel screen on their first turn.
Again, the Japanese player plots his orders, ends the turn, saves the game and e-mails it to the
Allied player. In this case the Japanese player must send both the save file and the combat replay
file to the Allied player. The Allied player can then first load the combat replay file and view the
execution phase from the previous turn before loading in the save game file and entering the new
Orders Phase. These steps are repeated each turn. At the end of a PBEM game, the Japanese
player will need to send his password to the Allied player so the Allied player can load the final
save file, view the final execution phase and view the final victory score and end game status.
25
3.0 SEQUENCE OF PLAY
“Before Guadacanal the enemy advanced at his pleasure. After Guadacanal he retreated at ours.”
- Admiral William F. “Bull” Halsey, Commander – South Pacific
War in the Pacific - The Struggle Against Japan, 1941-45™ unfolds over a series of game turns;
each turn represents a certain number of days (as specified by the Turn Cycle option in the
Game Options screen). The sequence starts with the Japanese issuing orders, followed by the
Allies, and then a resolution of those orders carried out over subsequent Night and Day phases.
The number of Night and Day Resolution Phases that are resolved depends on the number
of days specified by the Turn Cycle option.
The sequence is as follows:
1)
Japanese Orders Phase - The Japanese player views the map and gives orders to his
units. Air units may be instantaneously transferred between bases if the destination is within
the air unit’s maximum range.
2)
Allied Orders Phase - The Allied player views the map and gives orders to his units. Air
units may be instantaneously transferred between bases if the destination is within the air
unit’s maximum range.
3)
Night Resolution Phase – The system processes all orders, which are resolved over a
night period of 12 hours.
This Phase is resolved by the computer and requires little interactivity. This list is given to
give the player a general idea of what happens when.
a)
b)
c)
d)
e)
f)
g)
h)
i)
j)
k)
26
Load/Unload - Transport Task Forces load and unload cargos. (Section 6.1.19)
Coastwatcher Check and Trigger Reactions - Coastwatchers attempt to sight
enemy Task Forces. Task Forces that have “React to Enemy” movement orders this
turn receive their new destinations. (Section 8.7)
Auto Minesweeping - Automated Minesweeping Task Forces (those set on computer
control) conduct minesweeping operations. (Section 6.1.26)
Naval Movement - Task Forces move towards their destinations. Ships expend
endurance points, check for system damage due to being at sea, and conduct mine
warfare operations (including being attacked by mines). (Section 6.1.26.4)
Night Air Operations* - All air movement and combat is resolved. (Section 7.2)
Surface Combat - Ship vs. ship surface combat is resolved. (Section 6.1.25.1)
Naval Bombardment - Naval bombardments of bases and ground units are resolved.
(Section 6.1.25.2)
Ground Unit Movement - Ground units move toward their destinations. (Section 8.3)
Repair Ships - Ships undergo repair. (Section 13.4)
Base Repair/Construction - Base repair and construction occur, along with
construction of fortifications at bases. (Section 9.4.2)
Supply Needs Calculation and Overland Supply Movement - The supply needs of
all units and bases are calculated and automatic overland movement of supplies
occurs. (Section 14.0)
l)
Task Force Adjustment - Crippled ships are automatically detached into their own
Task Forces. Certain Task Forces have their destinations set so that they will return to
base. (Section 6.1)
* This sub-phase occurs only during the Night Resolution Phase.
4)
Day Resolution Phase - The system continues to process all orders, which are resolved
over a day period of 12 hours.
This Phase is resolved by the computer and requires little interactivity. This list is given to
give the player a general idea of what happens when.
a)
b)
c)
d)
e)
f)
g)
h)
i)
j)
k)
l)
m)
n)
Load/Unload - Transport Task Forces load and unload cargos. (Section 6.1.19)
Coastwatcher Check and Trigger Reactions - Coastwatchers attempt to sight
enemy Task Forces. Task Forces that have “react to enemy” movement orders this
turn receive their new destinations. (Section 8.7)
Auto Minesweeping - Automated Minesweeping Task Forces (those set on computer
control) conduct minesweeping operations. (Section 6.1.26).
Naval Movement - Task Forces move towards their destinations. Ships expend
endurance, check for system damage due to being at sea, and conduct mine warfare
operations (including being attacked by mines). (Section 6.1.26.4)
Day Air Operations** - All air movement and combat is resolved (see Air Ops for
additional detail in section 7.2)
Surface Combat - Ship vs. ship surface combat is resolved. (Section 6.1.25.1)
Naval Bombardment - Naval bombardments of bases and ground units are resolved.
(Section 6.1.25.2)
Ground Combat** - Combat between ground units is resolved. (Section 6.1)
Ground Movement - Ground units move toward their destinations. (Section 8.3)
Repair Ships - Ships undergo repair. (Section 13.4)
Base Construction and Repair - Bases are built, repaired and fortified. (Section
9.4.2)
Supply Needs Calculation and Overland Supply Movement- The Supply needs of
all units and bases are calculated and automatic overland movement of supplies
occurs. (Section 14.0)
Supply Operations** - Supply Operations are conducted including supplying ground
and air units and repairing planes. (Section 14.0)
Task Force Adjustment - Crippled ships are automatically detached into their own
Task Forces. Certain Task Forces have their destinations set so that they will return to
base. (Section 6.1)
** This sub-phase occurs only during the Day Resolution Phase.
Several times during both the Night and Day Resolution Phases, the computer checks for
submarine contacts and submarine attacks. The computer also checks ships with fire or flotation
damage for an increase/decrease in the fire or flotation level and for any additional damage
caused by the fire or flooding.
27
4.0 THE MAIN DISPLAY
"We have resolved to endure the unendurable and suffer what is insufferable."
- Emperor Hirohito
4.1 THE MENU BAR
Many of the commands you issue will be given by clicking on the Menu Bar buttons at the top of
the Tactical Map. Alongside the Menu Bar is listed the current player, weather forecast for the
current hex, date, and coordinate for the currently selected hex. The Menu Bar buttons include
(from left to right):
Following is an explanation of each button:
Save game
Choose preferences and options (note that some options are frozen during
the game)
View Aircraft Database
View Ship Database
View Intelligence Reports
List all bases for the Allied player (note: for the Japanese player, this is a
red circle)
List all land based air units
List all naval air units
List all land units
28
List all active ships
List all task forces
Show the Control Zone Map
Show the Auto Convoy system
Show the Large Strategic Map
Display Combat Report
Display Operational Report
Display the Signal Intelligence Report
Display the Weather Report
End Orders Phase
Recenters the Tactical Map on the player’s Home Base (in full map
scenarios for the Allies, this will alternate between San Francisco and Pearl
Harbor, if repeatedly pressed)
Game Team Credits
Exit Game
29
4.2 THE MAP
War in the Pacific - The Struggle Against Japan,
1941-45™’s map is divided into hexagons
(hexes), at a scale of 60 miles per hex. There are
several types of hexes:
Clear: Areas of open terrain, with excellent visibility and few places to hide.
Mountains: Areas of steep, high terrain that is impassible to mechanized units and nearly
impassible to foot units.
Forest/Jungle: Areas of heavy foliage and nearly impassible terrain; this includes most of the
terrain you’ll be fighting over.
Desert: Arid, hot, and inhospitable, in game terms these hexes are relatively easy to traverse.
Desert hexes are therefore the same as Clear hexes for the purposes of movement.
Cultivated: Represents farms and other rural-type terrain. Units treat these hexes like Clear for
movement purposes. These areas are assumed to have trails going out in all directions.
Urban: Cities and towns that are relatively easy to move through. Urban hexes are treated like
Clear terrain.
Swamp: Areas of thick marshland and wetlands, they hinder movement greatly.
Atoll: Can have a dramatic affect on combat as any attacker assaulting an enemy-held Atoll will
suffer higher casualties.
30
Ocean: Both light (Shallow Water) and dark blue (Deep Water) hexes, representing the vast area
covered by the vast Pacific and Indian Oceans as well as the numerous smaller seas and other
bodies of water.
Shallow Water and Deep Water: The only difference between these two is with regards to
submarines and mines: submarines are easier to detect in Shallow Water than Deep Water, and
mines disperse faster in Deep Water than in Shallow Water.
Rail/Highway: Improved, paved roads and railroads, which are the best way for ground units to
move around.
Road: Smaller roads. Still a much faster way to move than cross country.
Trail: Utilitarian movement routes, ranging from poor goat paths to rudimentary unpaved roads.
Unit movement is faster down these than through the jungle or over the mountains.
Note: Any hex containing both land and ocean is considered to be a coastal hex. For
purposes of unloading ships, these hexes are referred to throughout the manuals as
„beaches.“
Coral Reef: Areas of built up coral that hinder naval movement. Coral Reefs are impassable
hexsides meaning no unit may cross.
River: Winding bodies of water that are usually difficult to pass over if doing so in the face of the
enemy. These hexsides will add disruption to troops crossing them into enemy occupied hexes.
Hexsides are normally black, but you can toggle Colored Hexsides off and on in the Preferences
Menu or with the F6 key. Colored hexsides comprise five colors:
Blue = Ocean/Lake hexside - Naval unit movement only
Dark Blue = River hexside - Ground unit movement only
Green = Ground unit movement only
White = Both Naval and Ground unit movement
Red = Impassable hexside - No Naval or Ground unit movement
See section 8.3 for the impact of terrain on ground movement.
Bases: Bases are marked by an Allied (either Russian, Chinese, Commonwealth, Dutch, or
American) or Japanese base symbol (refer to Section 4.2.5 Map Icons for the specific associated
map symbol), or as potential bases by a dot in a land hex. Only hexes with one of these symbols
can ever contain a base. No more than one base can be in any hex, although the base may
contain both a port and an airfield. Bases are always controlled either by the Allies or Japanese.
Potential bases can be built up by either side that owns it.
Friendly units appear on the map, as well as minefields and any enemy units that have been
detected. However, unspotted enemy units won’t appear until detected, and depending on the
Fog of War setting specified, even when spotted information may prove erroneous or utterly false.
To scroll around the map, drag the mouse pointer in any direction and the Tactical Map will shift
with it. Or, click anywhere on the Strategic map in the lower right corner and the map will center
on that spot.
31
4.2.1 Control Zones and Human versus Computer Control of Units
The maps in full-map scenarios, which cover the entire campaign area from the west coast of
India to the west coast of the United States, are divided into nine Control Zones. To bring up the
display, either press the Show Control Zones button at the top of the screen or press Z.
In each Zone, the player may choose to allow the computer AI to run their campaigning by
clicking on the text immediately below the area’s designation. For example:
In the left screenshot, the East (E) Control Zone
is currently under Human control – meaning the
player has control over all the units present in
that Zone. By clicking on the „Human Control“
text, it will switch over to Computer Control.
Clicking on it again will revert control back to the
human player.
Toggling on regional status computer control
allows the artificial intelligence to control that
region, using all assets found in the region,
towards its own ends and in its own fashion.
This can be useful in a one player game, if the player wants to control, say, the British in the India
area, while allowing the computer to play the Americans elsewhere
32
Each asset (ground unit, air unit, ship, etc.) in a given region under computer control can be
placed under human control. To do so, the player will need to select the asset and change its
control to Human. The asset orders screen will have a line of text which shows the region in
which the asset is located and who controls it, either the region (computer) or the human.
Please note that assets in a region controlled by the human cannot be placed under computer
control. If an asset under computer control finds itself in a region other than that of the region
controlling it, the artificial intelligence will not know how to find or use it (so, if you load up an
infantry battalion in the East region and haul it to the West region, the East commander will not
have control over it, nor will the West commander). This means that a player moving assets
from one region to another should place them under Human control, then move them, then
place them under Computer control again, once the new region is reached.
To ease difficulty of play, when an asset is toggled from Computer to Human control or vice
versa, all assets it controls are also toggled. So, if the player place the East region under
computer control, all groups, land based units, task forces and ships (assets) are switched to
Computer control. If within that region the player then toggles a base to human control, all assets
found at that base will automatically be toggled as well. If a ship or Task Force are toggled, all
aircraft located on the ships are also toggled.
TASK FORCES
A TF created and placed on the map by the AI will be shown to be under Computer Control (this
is indicated directly under the TF picture on the TF orders screen – note that a computer
generated auto convoy TF may have the text say Auto Convoy instead of Computer Control). A
TF can be placed under Human or Computer control using the following criteria:
1)
Computer generated auto convoy TFs can be placed under Human control. When
this occurs, all air units in the TF should also change to Human control. Once human
controlled, they can never be toggled back to auto convoy, but can be toggled to
Continuous Supply if they have a destination.
2)
Computer generated surface Transport TFs can be placed under Human control.
When this occurs, all air units in the TF should also change to Human control. Once
under Human control, it can be toggled between Human control and Continuous
Supply (CS:Destination) if they have a destination (only Transport TFs, currently there
is a known bug that Replenishment and Fast Transport TFs can be set to CS).
Continuous supply air units are under computer control.
3)
Computer generated surface non-Transport TFs can be placed under Human control.
When this occurs, all air units in the TF also change to Human control.
4)
Human controlled surface Transport TFs (only Transport, currently there is a known
bug that Replenishment and Fast Transport TFs can be set to CS) can be toggled
between human control and continuous supply. Continuous supply TF air units are
under computer control.
5)
Human controlled surface non-Transport TFs (always remain under human control. In
these TF all air units are under human control.
6)
Human and Computer controlled submarine TFs can be toggled between human
control and computer control. In computer controlled TFs, all air units are under
33
computer control. When under human control, all air units are also under human
control. This air unit issue is probably moot, as I don’t think we currently have air units
on subs.
CONTROL ZONES AND BASES
Bases under computer control can automatically make computer controlled task forces; assign air
targets, move troops and other such things. Air and ground assets at a base under computer
control can be individually toggled to human/computer control and when toggled to human
control, the artificial intelligence controlling the base should not have access to these assets.
34
1)
When a Control Zone is switched to computer control on the Control Zone Map, all air
units, land based units and bases located within the geographic boundaries shown on
the map should immediately change to computer control. All task forces home-based
at bases that switched should also change to computer control. The three exceptions
to the task force switching include submarine task forces, continuous supply and
automatic convoy task forces (these will not switch).
2)
When a Control Zone is switched to human control on the Control Zone Map, all air
units, land based units and bases within the geographic boundaries shown on the
map should immediately change to human control. All task forces home-based at
bases that switched should also change to human control. The three exceptions to
the task force switching include submarine task forces, continuous supply and
automatic convoy task forces.
3)
When a base is switched to computer control on the base orders screen, all air units
and land based units at the base immediately change to computer control. All task
forces home-based at the base should also change to computer control. The three
exceptions to the task force switching include submarine task forces, continuous
supply and automatic convoy task forces. Note that bases located in Control Zones
assigned human control cannot be switched to computer control, as the Control Zone
has no strategic artificial intelligence.
4)
When a base is switched to human control on the base orders screen, all air units and
land based units at the base immediately change to human control. All task forces
home-based at the base should also change to human control. The three exceptions
to the task force switching include submarine task forces, continuous supply and
automatic convoy task forces. Note that bases located in Control Zones assigned
human control cannot be switched to computer control, as the Control Zone has no
strategic artificial intelligence.
5)
When a task force is switched from computer to human control on the task force
orders screen, all air units in the task force should also switch. Note that task forces
may never be switched from human to computer control (the Control at the bottom of
the TF orders screen, not the computer control at the top under the TF painting), from
the task force orders screen.
6)
Armies and air units may be toggled from human to computer or computer to human
control, if they are located at a base or in a Control Zone that has been assigned to
computer control. They may not be toggled if they are located in a Control Zone
assigned to human control as the Control Zone has no strategic artificial intelligence.
SHIPS
1)
Ships may be placed in the automatic convoy pool or removed in the auto-convoy
system screen or on the ship display screen. On the latter, the phrase “Automatic
Convoy:” will have a “Yes” or “No” option following it. This can be toggled. Note that
any time a ship is placed in a task force by the human player, or is transferred from a
base or task force by the human player, it is removed from the automatic convoy pool.
Changing the Control Zone, task force or base control zone variable or
computer/human control variables will not change ship pool values.
4.2.2 The Tactical Map
This is the basic map screen. From
here all other menus can be accessed.
Across the top is the Menu Bar. In the
lower right corner is the Strategic Map,
with the current view outlined in yellow.
Clicking on a location on this map will
move the large map to that area. If the
scenario is a small map scenario, the
small strategic map will show the
boundaries of the map outlined in red.
4.2.2.1 Map Locations
Each hex on the map has potential to hold a base, port, airfield, ground units, ships, air units, and
industry. Some of these items are displayed with an icon. For example, if a base also has a Port,
an anchor symbol will appear next to the base. In the above screenshot we can see that the city
of Tokyo has a port with ships at anchor (the anchor icon), an airfield with air units present (the
airfield icon), and ground units present
(the ground unit icon – a box with an „X“
through it). The base itself is
represented by the nationality’s flag in
the center of the hex.
Some hexes have a dot in them, which
means they are potential bases. To
build there, the player must attack the
hex (although the defense ability of an
enemy dot is negligible), and then move
an engineer unit to that hex so that
construction may begin. Must attack it if
opposing unit.
35
4.2.2.2 Location Pop-up Information
When the mouse cursor is moved over
a map location, information will appear
in a pop-up window based on the item
the cursor is pointing at. If the cursor is
pointing at a base, only base specific
information will be displayed; likewise,
pointing the cursor at a ground unit icon
in the hex will bring up information on
the ground unit(s) located in that hex.
Clicking on any of the icons will bring up
a display specific to that type (for
example, clicking the anchor icon will
bring up a list of all ships at anchor,
while clicking the airfield icon will bring
up a list of all aircraft in that hex).
4.2.2.3 Hex Command Display
At the bottom of the screen is the Hex Command Display (hereafter referred to as HCD). When a
hex is selected by clicking on it, all units, bases, industry, and other items located in that hex will
be displayed here. Note that not all hexes have the same items, i.e. not all hexes will have
industry, or air units, etcetera. Only items present will be vieweable in the Hex Command Display.
In the above example, Singapore is selected. The HCD for Singapore has information present for
all assets located in the hex, including the base, air units, ground units, naval TFs, and other
information.
On the left side of the HCD is a list of all assets types located in the base. They are:
List All Ships at Anchor
See All Air Groups at this Base
See All Task Forces in this Hex
See All Land Based Units in this Hex
See All Industry in this Hex
36
Clicking on one of the above buttons will bring up an information screen similar in appearance to
the screens that appear in section 5.2 List All...Screens. For further information regarding
explanation of these screens, refer to the following sections:
List All Ships at Anchor
See All Air Groups at this Base
See All Task Forces in this Hex
See All Land Based Units in this Hex
See All Industry in this Hex
Refer to 5.2.4 All Active Ships
Refer to 5.2.1 Land Based Air Units
or 5.2.2 Naval Air Units
Refer to 5.2.5 All Task Forces
Refer to 5.2.3 Land Based Units
Refer to 13.0 The Production System
The player may scroll through multiple units in the hex, if present, by clicking on the arrows next
to each of the above buttons. The player may move their mouse over each of the icons in order to
get a brief overview of each:
Clicking on the arrows next to Singapore will let the player scroll through their available bases. In
the full map scenario this could take some time. If the current hex was a TF, these arrows would
allow you to scroll through your side’s available TFs.
The arrows next to the See All Air Groups at this Base button allows the player to scroll through
all of the air units located in this hex (whether a Land hex or Sea hex). In the above screenshot,
the first air unit icon (refer to 7.0 Air Units for a full list) has a red box around it, indicating it is the
selected air unit. 243 Sqadron is the name of the air unit that is currently selected. The player
may bring up the Air Unit Information Screen for this squadron by either clicking on the highlighted
icon or on the squadron name.
The arrows next to the See All Task Forces in this Hex button allows the player to scroll through
all of the TFs located in this hex. As with air units, the currently selected TF is highlighted with a
red box around its icon (refer to 6.1.1 Task Force Symbols for a full list) and can be selected by
clicking on the icon or on the TF identification (TF 503, which is docked – TFs automatically dock
if located in a friendly hex with a port; if no port is present, e.g. the TF is at sea, only the name will
appear here).
The arrows next to the See All Land Based Units in this Hex button allows the player to scroll
through all of the land based (ground) units in this hex. If the hex contains a TF at sea with ground
units loaded, this will still display. As with air units, the currently selected ground unit is highlighted
with a red box around its icon (refer to 8.1 Unit Types for a full list) and can be selected by
clicking on the icon or on the ground unit’s name (in this example, Malaya Army).
There are no arrows next to the See All Industry in this Hex button, as there is no need for it; all
possible industry type icons will be displayed in the Hex Command Display. Refer to 13.0 The
Production System for more details.
37
Along the top of the HCD is a list of all base assets along with a number indicating a measure of
that asset:
Port # (#) indicates the port size (to the left of the parenthesis) and the Standard
Potential Size (SPS) possible (in the parenthesis). A port can build up to the SPS at
normal engineer/supply cost, but can build up to 3 over the SPS by expending extra
engineers and supplies (although you can never build a size 10 port).
Airfield # (#) indicates the airfield size (to the left of the parenthesis) and Standard
Potential Size (SPS) possible (in the parenthesis). An airfield can build up to the SPS at
normal engineer/supply cost, but can build up to 3 over the SPS by expending extra
engineers and supplies (although you can never build a size 10 airfield).
Supply, Fuel, Ships in Port, and Aircraft each gives a total of the appropriate asset
located within the hex.
4.2.3 The Jump Map
In the lower right corner of the screen is a
thumbnail-sized map of the Pacific Ocean. A
small red-framed box denotes the play area view
in the Tactical Map. A larger red-framed box will
appear on this map when playing smaller
scenarios, denoting the boundaries of that
scenario.
To quickly access a certain part of the larger
map, click on the corresponding area on the
Jump Map to move the view in the Tactical Map
to that new location. Or, use the arrow keys or
scroll the mouse cursor to the Tactical Map’s
edges in order to move the map view. As the
view in the Tactical Map moves, so too will the
smaller red box move in the Jump Map display.
38
4.2.4 The Strategic Map
The Strategic Map can be displayed by clicking on the button in the top menu or pressing Ctrl and
A. This is essentially a larger view of the Jump Map. To exit this view, either right click with your
mouse or press the Escape key.
39
On the left-hand side of the Strategic Map is a list of all
Commands that are operating in the current Campaign.
Clicking on a Command name will deselect the units on
the Strategic Map that are attached to that Command.
Clicking on the Command name again will redisplay the
units. Use this feature to determine what Commands have
units and where they are located; some units found far
afield may stand being transferred to another Command
by spending the appropriate number of Political Points.
4.2.5 Map Icons
Below are the various map icons used to designate bases and units. Note that for ground units,
airfields and anchor symbols, darker colors indicate either more or stronger forces, while lighter
indicate fewer or weaker units.
Allied (Russian) Base
Allied (Chinese) Base
Allied (Commonwealth) Base
Allied (England) Base
Allied (Dutch) Base
Allied (American) Base
Japanese Base
40
Note that the following icons are the same whether Allied or Japanese; the only difference
will be their color.
Ground Unit (ground unit icon, lower left
of Base)
Ships at Anchor in Port (anchor icon,
upper left of Base)
Aircraft Currently Based on Airfield (air
icon, upper right of Base)
5.0 INFORMATION DISPLAYS
5.1 INTELLIGENCE DISPLAY
41
The Intelligence Screen is the most important status screen in the game, as it gives an overview
of all game items. It includes:
5.1.1 Allied/Japanese Air Operations and Miscellaneous Information
Allied/Japanese Sorties – The number of sorties (Missions) flown by both sides, totalled for the
current day (Today) and for the Campaign.
Air-to-Air Losses – Number of aircraft lost by both sides in air-to-air combat, totalled for the
current day (Today) and for the Campaign.
Destroyed on field – Number of aircraft lost by both sides while on the ground, totalled for the
current day (Today) and for the Campaign.
Destroyed by Flak – Number of aircraft lost by both sides from anti-aircraft guns, totalled for the
current day (Today) and for the Campaign.
British Withdraw – Indicates if any British ships need to be withdrawn from the game (refer to
6.2 British Withdrawal for details). This option appears for the Allied player.
Manchukuo Garrison (not pictured in screenshot, but for the Japanese player appears in the
place of British Withdraw) – Indicates two numbers; the number to the left of the slash is the
current total Assault Value of all Japanese ground units located in Manchukuo, while the number
to the right of the slash (always 8000) indicated the minimum Assault Value total that must be
maintained in Manchukuo, or the Japanese player risks Soviet intervention (refer to section 8.6).
Political Points – Indicates the player’s current total of Political Points in their Political Point Pool
(refer to 11.0 Political Points for details).
Japanese Score – Indicates the current Victory Point (VP) level of the Japanese side (refer to
16.0 Victory Conditions for details).
Allied Score – Indicates the current VP level of the Allied side (refer to 16.0 Victory Conditions
for details).
Soviets Active/Not Active (not pictured in screenshot, but for the Japanese player appears to
the right of the Allied Score) – Indicates of the Soviets are active or inactive (refer to section 8.6)
5.1.2 Scoring
Allied/Japanese Bases Controlled – The number of bases (in the current campaign) that are
owned by either side.
Allied/Japanese Base Points – The number of points scored for each side from controlling their
current bases. Note that some bases are worth more points than others.
Allied/Japanese Aircraft/Points Lost – The number of points lost from each side’s scoring due
to aircraft losses.
Allied/Japanese Army Loss Points – The number of points lost from each side’s scoring due to
land unit casualties.
42
Allied/Japanese Ships Sunk – The number of ships from each side that have been sunk.
Points for Sunk Allied/Japanese Ships – The number of points lost from each side’s scoring
due to ships sunk.
Allied/Japanese Strategic Losses – The number of Victory Points scored for
damaging/destroying industry (factories, resource/oil centers, manpower) by aerial bombing (refer
to 16.0 Victory Conditions for more details).
5.1.3 Menu Buttons
On the right side of the Information Display are
several buttons that will provide specific
information for various game functions.
43
5.1.3.1 Aircraft Losses
The Aircraft Losses Screen displays a breakdown of all aircraft lost to date in the current
campaign for the current side (playing as the Allies, for instance, will not allow you to view a list of
Japanese aircraft shot down, and vice versa).
Clicking on any of the yellow column headers at the top will sort the list by that item, e.g. clicking
Aircraft Type will sort the list alphabetically by aircraft type, while clicking Today will sort the list in
descending order by number of planes of each type shot down on the current day. A summary of
Sorties and Losses for the current day and Campaign are listed at right for reference.
5.1.3.2 Aircraft Reinforcement Schedule
44
The Aircraft Reinforcement Schedule lists the player’s new air squadrons that are expected to be
delivered in the near future. At left a list of the squadrons that are due to arrive, and information
pertaining to their Aircraft Type, Max A/C (or maximum number of aircraft allowed in that
squadron), Days Until Arrival (the number of game days that must pass before the squadron
arrives), and the Airfield of Arrival (the location the squadron will arrive).
Along the top of this screen is a list of abbreviations. Click on each to bring up a list that pertains
to that aircraft class:
F
FB
NF
DB
LB
RC
TR
PA
FP
FF
TB
Fighter
Fighter bomber
Night fighter
Dive bomber
Level bomber
Recon aircraft
Transport aircraft
Patrol aircraft
Float planes
Float fighters
Torpedo bombers
5.1.3.3 Aircraft Replacement Pool
The Aircraft Replacement Pool lists the expected aircraft replacements that are to be delivered to
the player. At left is a list of aircraft types that are currently being produced by the player’s
industry, along with their Engine Type, how many of that type are currently In Pool and available,
how many have been Used So Far, as well as
Avail (Availability) is the first date that the replacement rate will begin to deliver planes to the
replacement pool (the number shown is the expected number of planes to be delivered each
month). The replacement pool is assumed to be coming from “off map”.
The Production Rate is the total monthly production rate of all the on board factories. Assuming
they have the required factors to operate at 100%, this is the expected number of planes that will
be delivered to the Replacement Pool each month.
An aircraft factory will not produce aircraft before the availability date for the aircraft, but
instead will be assumed to be researching the aircraft and may move up the availability
date. Availability dates may move up, but never move back.
Clicking on any of the yellow column headers at the top will sort the list by that item.
45
5.1.3.4 Leading Pilots
The Leading Pilots list shows the player’s side’s current top pilots. As the Campaign moves on,
this list will change dramatically (as in the example above, only two pilots are listed since it is only
the second day of the war).
Each pilot’s Rank, Name, Experience (Exp), Fatigue (Fat), number of Missions flown (Mis),
number of Kills (or, air-to-air victories), their Fate, Unit assigned to, Nationality (Nat), and the
Type of aircraft they’re flying. Surprisingly, in our above example, a pilot flying a Buffalo I is
currently the top Allied pilot. Most likely this pilot will not live long enough to see Ace status flying
a Buffalo.
Clicking on any of the yellow column headers at the top will sort the list by that item.
46
5.1.3.5 Pilot Replacements
The Pilot Replacements Screen shows all of the pilots available to each nationality for the player’s
side (so, Japanese players will never see the Allied Replacements available, and vice versa).
From left to right on this list is displayed the Nationality, the number of pilots of that Nationality
Currently In Pool (or, currently available), their Experience, and their Replacement, the number
of new trained replacement pilots that will be added to the pool each month. See section 15.2.2
for more information on replacement pilots.
5.1.3.6 Sunk Ships
This list shows all ships that have been sunk by the enemy to date. From left to right, detail
includes the ship Type, the ship’s Name, the number of Victory Points the ship earned the
enemy player, the nationality of the Navy the ship was with, what it was Sunk By, and where the
47
ship was Near when it met its demise. Clicking on any of the yellow column headers at the top will
sort the list by that item.
5.1.3.7 Ship Availability
This displays a list of ships that are due to be delivered to the player, including the estimated time
of arrival on map and their point of entry.
From left to right is listed the Type of ship (or, the ship class, e.g. CV for Aircraft Carrier, DD for
Destroyer, etc.), the Name of the ship, the Estimated Time of Arrival (ETA) measured in days,
and the Base (or, location) that the ship will arrive on map at.
Along the top of the screen is a list of abbreviations. Click on each to bring up a list that pertains
to that ship type:
All Ships
CV/CVL
BB/BC
CA/CL
DD/DE
TK/AO
SS
AUX
Displays all ships
Aircraft Carriers and Light Carriers
Battleships and Battlecruisers
Heavy Cruisers and Light Cruisers
Destroyers and Destroyer Escorts
Tankers and Oilers
Submarines
Auxillary vessels
Clicking on any of the yellow column headers at the top will sort the list by that item.
48
5.1.3.8 Ground Reinforcement Schedule
The Ground Reinforcement Schedule lists all ground units that are expected to be delivered in the
near future. From left to right, each unit’s Type (INF for Infantry, HQ for Headquarters, etc.), unit
Name, which HQ it is Attached to when it arrives on map, what the Load cost is of this unit to
load it on transports, the unit’s Assault value, the number of Days Until Arrival, and its Port of
Arrival.
The Load cost, Port of Arrival, and Days Until Arrival columns can help the player plan on
having transport in that port for the day the reinforcements arrive, so that they may be
immediately loaded and moved wherever needed.
Along the top of the screen is a list of ground unit types, which are not abbreviated and are self
explanatory. Click on each to bring up a list that pertains to that ground unit type.
Clicking on any of the yellow column headers at the top will sort the list by that item.
49
5.1.3.9 Industry/Resource Availability
All resource and industry locations owned by the player are listed on the Industry/Resource
Availability screen. From here the player may see a list of each Location they own with resources
and/or industry, the Type of resource/industry the location has, and the Amount of
resources/industry it currently holds.
At far right is a Totals list that details all of the player’s resources and industry. From here each
asset is displayed, allowing the player to get a feel for their strengths and perhaps help guide
which direction their offensive plans should go in if they are lacking in a particular item.
Clicking on any of the yellow column headers at the top will sort the list by that item.
50
5.1.3.10 Industry/Troops/Resource Pool
All industrial items and troops are listed here. This list acts as a sister to the Industry/Resource
Availability screen by detailing asset availability such as different nationality’s infantry squads,
radar sets, engineer squads, and motorized support.
The Name of the item type is listed along with the number of that item that is In Pool Now, the
number Used From Pool so far in the Campaign, and its Build Rate.
The summary at right is the same as that found in the Industry/Resource Availability screen.
Clicking on any of the yellow column headers at the top will sort the list by that item.
51
5.2 LIST ALL...SCREENS
The various List All...screens display all bases, aircraft, TF’s and ground units on the map. Each
provides a list of that type of item and gives a brief description of it.
5.2.1 Land Based Air Units
The All Land Based Air Units screen lists all aircraft squadrons based on airbases, not aircraft
carriers. This provides the player with a summary of these air assets. Information on this screen
includes:
Unit Name – The squadron’s name. This name may be clicked on to access its Air Unit
Information Screen (see 7.0 for more details).
Aircraft Model – The type of aircraft the squadron is flying.
Ready – Indicates the number of the squadron’s aircraft that are ready to fly Missions.
Damaged – Indicates the number of the squadron’s aircraft that are currently damaged.
Reserve – Indicates the number of aircraft that are in reserve for this squadron (these
are aircraft that are used as replacements for damaged/destroyed aircraft in the
squadron).
Exp – The Experience level of the squadron.
Fat – The squadron’s current Fatigue level.
Morale – The squadron’s current Morale.
Patrol – The squadron’s current Patrol search level
Location – The location of the squadron.
52
Along the top of this screen is a list of abbreviations. Click on each to bring up a list that pertains
to that aircraft class:
F
FB
NF
DB
LB
RC
TR
PA
FP
FF
TB
Fighter
Fighter bomber
Night fighter
Dive bomber
Level bomber
Recon aircraft
Transport aircraft
Patrol aircraft
Float planes
Float fighters
Torpedo bombers
Clicking on any of the yellow column headers at the top will sort the list by that item.
5.2.2 Naval Air Units
The All Naval Air Units screen lists all aircraft squadrons based on ships, not land airbases. This
provides the player with a summary of these air assets. Information on this screen includes:
Unit Name – The squadron’s name. This name may be clicked on to access its Air Unit
Information Screen (see 7.0 for more details).
Aircraft Model – The type of aircraft the squadron is flying.
Ready – Indicates the number of the squadron’s aircraft that are ready to fly Missions.
Damaged – Indicates the number of the squadron’s aircraft that are currently damaged.
Reserve – Indicates the number of aircraft that are in reserve for this squadron (these
are aircraft that are used as replacements for damaged/destroyed aircraft in the
squadron).
Exp – The Experience level of the squadron.
Fat – The squadron’s current Fatigue level.
Morale – The squadron’s current Morale.
53
Patrol – The squadron’s current Patrol search level
Location – The location of the squadron.
Along the top of this screen is a list of abbreviations. Click on each to bring up a list that pertains
to that aircraft class:
F
FB
NF
DB
LB
RC
TR
PA
FP
FF
TB
Fighter
Fighter bomber
Night fighter
Dive bomber
Level bomber
Recon aircraft
Transport aircraft
Patrol aircraft
Float planes
Float fighters
Torpedo bombers
Clicking on any of the yellow column headers at the top will sort the list by that item.
5.2.3 Land Based Units
The Show Allied Ground Units screen details a list of all ground units currently under the player’s
control, providing a summary of these assets. Information on this screen includes:
54
Type – The type of ground unit (INF for Infantry, HQ for Headquarters, etc.)
Name – The name of the ground unit.
Attached To – The name of the command that the unit is attached to.
Load cost – The amount of space that the unit would take up on a transport.
Assault – The assault value of the unit.
Location – The unit’s current location.
Along the top of the screen is a list of ground unit types, which are not abbreviated and are self
explanatory. Click on each to bring up a list that pertains to that ground unit type.
Clicking on any of the yellow column headers at the top will sort the list by that item.
5.2.4 All Active Ships
The Active Ships screen shows a list of all active ships controlled by the player, providing a
summary of these assets. Information on this screen includes:
Type – The ship type (CV for Aircraft Carrier, BB for Battleship, etc. – refer to section
17.1.2 Military Abbreviations for a full list).
Name – The name of the ship.
Endurance – The Endurance of the ship.
Speed – The maximum speed (in knots) for this ship.
Ops – Each ship has 1000 Ops (Operations) points that can be used per 12 hour pulse.
If the ship does something (like refuel or load troops) during the Orders Phase, it will use
Ops Points (the points expended will be displayed). This will take away from the distance
the ship will be able to travel in the next 12 hour movement phase.
Cap – The ship’s capacity for hauling cargo and/or resources (refer to 6.1.20 Loading
and Unloading Transports for detailed information)
Sys – Current damage, if any, to the ship’s systems.
Flt – Current damage, if any, to the ship’s flight systems (not applicable if the ship is not
designed to carry planes for flight operations)
Fires – Current level of fires, if any, aboard the ship.
Sup – Current number of supplies being carried by the ship, if any.
Fuel – Current amount of fuel being carried by the ship (as cargo), if any.
Troops – Number of troops being carried by the ship, if any.
Location – The current location of the ship.
55
Along the top of the screen is a list of abbreviations. Click on each to bring up a list that pertains
to that ship type:
All Ships
CV/CVL
BB/BC
CA/CL
DD/DE
TK/AO
SS
AUX
Displays all ships
Aircraft Carriers and Light Carriers
Battleships and Battlecruisers
Heavy Cruisers and Light Cruisers
Destroyers and Destroyer Escorts
Tankers and Oilers
Submarines
Auxillary vessels
Clicking on any of the yellow column headers at the top will sort the list by that item.
5.2.5 All Task Forces
The Active Task Forces screen brings up a list of all active Task Forces under the player’s control
providing a summary of these assets. Information on this screen includes:
ID# – The idenfication number of the Task Force (e.g., Task Force 505)
Mission – The current Mission assigned to the Task Force (refer to 6.1.4 Creating a
Task Force for detailed information).
Endure – A measure of the Endurance of the Task Force, taken from the ship in it that
has the lowest Endurance.
Endure Needed – The amount of Endurance the Task Force needs to return safely to
the base it started from.
Speed: Max – The maximum speed, in knots, that the Task Force can travel.
Speed: Cruise – The cruising speed, in knots, of the Task Force.
A/C – The number of aircraft, if any, in the Task Force.
Cargo: Supply, Fuel, or Troops – Indicates the number of the appropriate item, if any,
loaded aboard the Task Force.
Total Ships – The total number of ships in the Task Force.
56
Location – The current location of the Task Force if at anchor; if it is moving, the location
it is moving to is listed along with „move to.“
Along the top of the screen is a list of Missions. Click on each to bring up a list of Task Forces
assigned to that Mission Type:
All TF
Air Ops
Surface
Bombard
Fast Trans
Transport
Replenish
Mine War
Sub Ops
All Task Forces
Air Operations
Surface Combat
Shore Bombardment
Fast Transport
Transport
Replenishment (of Task Forces)
Mine Warfare (laying and clearing)
Submarine Operations
In addition, the Show Ammo link at the top right of the screen allows the player to view vital
information regarding the Task Force’s current ammunition supply:
Gun – Percent of full capacity that the Task Force is at for main gun ammunition
AAA – Percent of full capacity that the Task Force is at for anti-aircraft (Flak)
ammunition.
Torp – Percent of full capacity that the Task Force is at for torpedo ammunition.
ASW – Percent of full capacity that the Task Force is at for anti-submarine warfare.
If a dash is listed, the Task Force does not have any weapons of that type.
The Show Ammo option replaces the Cargo information in the display; this can be toggled back
and forth.
57
5.3 DATABASE SCREENS
5.3.1 Naval Database
Every ship type, including their armaments, can be displayed in the Naval Database screen.
Select the side (Japanese or Allied), and the ship type from the list. For each ship type listed, it’s
performance and weapons mounts are displayed. For more information on the weapons mounts,
select the appropriate button at the top of the screen.
If a date appears after the ship’s name (e.g., Yamato 12/42), the numbers indicate the month and
year that particular ship class is available.
58
5.3.2 Plane & Weapon Database
Every aircraft, weapon, and ground unit type can be displayed in the Plane & Weapon Database.
Select a type of equipment to view (Allied Aircraft, Japanese Aircraft, Anti-Aircraft Weapons,
Artillery, Vehicles, or Infantry).
A list will display in a window below the selection area. Select the platform to view and a picture of
it will appear above the list, and the window will be replaced with data relevant to the selection.
59
5.4 SIGINT SCREEN
The SigInt (Signal Intelligence) Screen is used to get a feel for enemy movements and locations,
based on the interception of their communications. The list displayed will detail the reports
received since the last Orders Phase and will indicate possible enemy movements and/or
garrisons.
60
5.5 OPS REPORT
The Operations Report is essentially a summary of all messages received by the player while the
AI routine was running. If the player needs to step away from the computer for a period of time,
any missed messages will appear on this Report.
Note on SigInt, Ops, and Combat Reports: When a game is loaded (new or saved), the
player should always see whatever Combat, SigInt, and Operations Reports that were most
recently created when these buttons are clicked on. The player should be aware that they
may have nothing to do with the current game being played. In a PBEM game, the Allied
player can run the Combat Replay, and this will create correct reports for the most recent
turn. Then when the save is loaded, the player will be able to view the correct reports for
the turn just executed.
61
THE UNITS
"In the first six to twelve months of a war with the United States and Great Britain I will run wild
and win victory upon victory. But then, if the war continues after that, I have no expectation of
success."
- Admiral Isoroku Yamamoto, Commander in Chief of the Japanese Navy (1940)
The war in the Pacific can be likened to a rock-scissors-paper conflict. The navy needed landbased aircraft for long-range reconnaissance and attacks on enemy fleets and airfields. Land
based aircraft needed the navy to escort supply vessels laden with fuel and ammunition. Both the
navy and air force depended on soldiers to seize and hold the airfields and bases needed to
secure victory.
Victory depends on knowing the capabilities of your troops. War in the Pacific - The Struggle
Against Japan, 1941-45™ features the land, sea and air forces of the United States, Japan,
Australia, New Zealand, the Netherlands, India, China, and Russia. There are a huge number of
units each with a plethora of capabilities, but remember that the victorious commander is the one
who knows how to make full use of their forces. In the following sections, we will detail Naval
Units (6.0), Air Units (7.0), and Ground Units (8.0).
6.0 NAVAL UNITS
"It is the function of the Navy to carry the war to the enemy so that it will not be fought on U.S.
soil."
- Admiral Chester W. Nimitz, Commander in Chief of the Pacific Fleet
Naval units, the backbone of the Pacific campaign, carried the brunt of the conflict on their steel
shoulders. They took on a wide array of Missions that were as diverse as the tasks they were built
for; from the largest battleship to the smallest PT boat, each served a purpose and each
contributed their part to the war effort. Combat notwithstanding, the unseen yet vital services of
logistics (getting supplies from one point to another – refer to section 14.0) were almost
exclusively carried across the water. Whomever rules the waves controls the means of supplying
their troops on land, which ties in to success in the air and on the ground.
6.1 TASK FORCES AND SHIPS
Though War in the Pacific - The Struggle Against Japan, 1941-45™ accounts for individual ships,
they are not represented on the map unless they are part of a Task Force (hereafter referred to as
TF). If they are anchored at a port, you can find them by clicking on an anchor symbol next to a
base or by selecting them from the List All Ships Screen in the HCD. When a TF is docked in a
port, its ships are still listed as part of the TF.
There are four main types of ships:
62
Combat (surface) ships (Battleships, Aircraft Carriers, Destroyers, etc.). Surface ship
task forces can execute a wide variety of Missions, such as launching carrier air
strikes, bombarding ground targets and laying or sweeping minefields.
Submarines, usually sent on patrol as a TF, usually with only one sub in each. The
computer can give it patrol orders, or you can choose to give it a Destination Hex (DH)
yourself. Missions for sub TF’s are Sub Patrol, Sub Minelaying, and Sub Transport
(refer to sections 6.1.9.8, 6.1.9.9, and 6.1.9.10 respectively for more details). Subs
can attack enemy shipping as they move through the sub’s hex, in the same manner
as mines.
Transports
Auxiliaries such as oilers, mine sweepers, mine layers, etc.
A listing of ship types is provided in Appendix A.
Ships begin scenarios either in TFs, or “at anchor” in a port. Ships that are at anchor will not
move, but they will defend the base if attacked, adding half their AA firepower to the base in
defense of the port. During the process of creating a TF (either from a port or from an existing
TF), each is automatically assigned, or is given by the player, orders regarding:
1.
2.
3.
4.
5.
6.
7.
8.
Mission Type (one of 12 possible Missions)
Home Base (the port the ship will return to after it has completed its Mission or decided to
withdraw from the Mission)
Control Status (Human Control or Computer Control). Only Fast Transport, Transport,
Replenishment and Submarine Task Forces can be set to Computer Control.
Patrol/Retreat Status (i.e. either Patrol/Do not retire or Retirement Allowed).Submarine
Task Forces do not have a Patrol/Retreat Status.
Max React Range is only available to Air Combat and Surface Combat Task Forces. The
player sets a Max React Range for their appropriate TFs, which is the maximum number of
hexes the TF will move when reacting to an enemy’s presence (0 to 6). If the player does
not want the TF to react, he simply sets the Max React Range to 0.
Refueling, either Refueling Ok or Do Not Refuel.
Speed, either Mission Speed, Full Speed, or Cruise Speed.
Auto-Disband, either Auto-Disband or No Auto Disband.
63
6.1.1 Task Force Symbols
In War in the Pacific - The Struggle Against Japan, 1941-45™, the TF symbols on the game map
vary in appearance, based on the type of Mission it currently has assigned (for a list of these on
map symbols, refer to 4.2.5 Map Icons). The symbols below appear in the Hex Command
Display when the appropriate TF is selected on the Tactical Map. These will vary in appearance
depending on the side played (Allied or Japanese). The symbols appear as follows:
Task Force Mission
Air Combat. The vanguard of all naval offense had
at least one Aircraft Carrier (or ‘flattop’) with it,
projecting strength through their air components.
These Missions seek to destroy the enemy in any
form wherever he may be found – but especially
sought out enemy flattops.
Surface Combat. When air power fails, or a more
‘personal’ touch is required, these TF’s serve to allow
battlewagons (Battleships, Cruisers, and Destroyers,
as well as other specialist vessels) to seek out and
destroy enemy ships.
Anti Submarine Warfare (ASW) Combat
are used for hunting enemy submarines exclusively
and will not allow large warships in them (only SC,
PG, PC, APD, DE, DD type ships). The chance of
this TF contacting enemy subs in coastal hexes is
higher when compared to open water hexes. ASW
TFs will get a better chance of shooting first if a
contact is made.
Bombardment. These TFs differ from Surface
Combat TFs in that the assigned ships’ big guns are
destined to shell enemy-held bases, facilities, and
troop concentrations.
Fast Transport. These TFs revolve around the
transport of supplies and troops, but in faster, more
agile vessels (such as converted Destroyers).
However, these ships cannot carry payloads
anywhere near the size of regular Transports.
Escort. These TFs serve to protect the TF they are assigned to; this usually is to protect a TF
from enemy surface forces.
Transport. These TFs are tasked with moving vital supplies and ground troops to the ever-thirsty
front lines. They are slow and plodding, but carry a vast quantity of war materiel.
64
Replenishment. Vital Missions unto themselves, without which attack TFs would become little
more than floating airstrips and pillboxes for want of the precious fuel, oil, ammunition, and
supplies. These specialty vessels carry these exclusively for the fleets they operate with.
Mine Warfare. These task group Missions seek to either remove or lay the silent killers of the
seas – anti-ship mines. A well-placed minefield can cripple a mighty task group, so these
specialist ships can also trawl for enemy mines and remove them safely.
Sub Patrol. These (preferably) unseen and unheard task forces, usually comprised of a single
submarine each, gather vital intelligence and take out enemy targets of opportunity.
Sub Minelaying. Stealthier than their surface-bound cousins, a submarine minelaying task force
can lay mines quietly, but in numbers more limited than Mine Warfare surface groups.
Sub Transport. Like Minelayers, these task force Missions are harder to detect than that of
Transports or Fast Transports, but their capacity is limited when even compared to Fast
Transports.
6.1.2 Task Force Information Screen
Clicking on a Task Force brings up the Task Force Information Screen. The left side of this screen
displays TF data, while the upper center and right side are for giving orders. In the list at center
are the ships that make up the Task Force.
In this case, we are looking at Task Force 1001, a US Navy force, comprised of two aircraft
carriers (CV), the Lexington and Yorktown, along with numerous smaller ships – visible above are
five heavy cruisers (CA) and four destroyers (DD), but the list will only be able to display up to
twelve ships at a time; there’s 15 total in this Task Force. If more than twelve ships are in a Task
Force, use the scroll bar at the right of the list to view the list of other ships. The flagship of this TF
is indicated by the pound sign (#) next to it’s name; in this case, it is the Lexington.
65
Reading along the top, we see that TF 1001 is at
sea. This screen also indicates the following:
1. Mission: Air Combat indicates the TF’s
Mission is Air Combat – it is seeking to destroy
the enemy with air power.
Moves (m/c) 6 / 2 indicates the number of hexes
the TF can move is 6 at maximum speed and 2
at cruising speed. If the number of hexes for the
“Moves” data is not displayed in green, the TF
may not have enough supplies to reach its
destination or may not have movement orders
issued yet.
Fuel is 133 / 19 is an indication of the range of the TF with its current fuel load. The first number
(133) is the average endurance of all ships in the TF; the second number (19) is the total number
of hexes that the TF needs to move in order to both reach its destination and return to its base.
Carrier Aircraft is the number of currently available carrier aircraft that are attached to the TF
(136).
The MS rating next to this number is the Max Sorties, or maximum number of combat flights that
this Task Force can support. Right now, in this example, this Task Force can support 948 combat
flight sorties; it has enough aviation fuel and ordinance for that and no more. The number in
parenthesis is a percentage measurement of the remaining amount of sorties the Task Force can
undertake (right now it’s at 100, indicating it has not entered combat operations yet or has just
been replenished to capacity).
A Sortie is one aircraft flying from its base to target and back. If ten aircraft take off on a
strike against an enemy cruiser, for example, that’s 10 Sorties. If 100 aircraft take off on a
raid against an enemy port, return without loss, and refuel/rearm and take off to strike
again, that’s 200 Sorties. Essentially, this Task Force in our example can handle up to the
equivalent of 2,160 aircraft launching strikes. Of course, it does not have near that many
aircraft (only 242 at the present time), so doing some rough math one can determine that
each aircraft can fly a little less than 10 combat sorties before the Task Force runs out of
supply for their aircraft. CAP and Search Missions do not count against the max sortie
limit (they do not spend max sortie points).
1.
Float Planes is the number of float planes attached to the TF (usually located on
Battleships and Cruisers, used for scouting purposes).
2.
The Commander of this TF is Fitch, A..
3.
This leader’s Rank is RADM, or Rear Admiral.
4.
This Commander has a Leadership rating of 54 and Inspiration rating of 50.
5.
The loadout for the Task Force in terms of ammunition:
a.
66
Guns: 4752 (100) indicates the main guns of the Task Force (not antiaircraft guns, but large caliber support weapons such as 5-inch guns on
b.
c.
d.
light cruisers) have enough ammunition to fire 4,752 times, and are at
100% capacity.
AAA: 4756 (100) indicates the Task Force’s anti-aircraft guns have
enough ammunition to fire 4,756 times, and are at 100% capacity.
Torps: 64 (100) indicates the Task Force has 64 shipborne torpedoes
total, and is at 100% capacity.
ASW: 28 (100) indicates the Task Force has enough ammunition to fire 28
times in antisubmarine attacks, and is at 100% capacity.
As this ammunition is used, the numbers will dwindle and the percent capacity will lower.
The percent capacity gives the player an idea of how low the ammunition stock is for that
particular weapons system in sum for the entire Task Force.
6.
This TF is under Human Control (meaning the player has control over its operations)
and cannot be set to Computer Control, as it is grayed out.
7.
This TF has Retirement Allowed rating selected so that it will retreat to preserve its
ships and/or air components if faced with overwhelming odds. This can be clicked on
and changed to Patrol/Do Not Retire, which will tell the TF to not retreat.
8.
Mission Speed tells the TF to use the speed that is appropriate for the Mission based
on the type of Mission and other orders (Patrol, Retire, etc.) as described in section
6.1.9 and 6.1.10). Full Speed orders the TF to always move at full speed, while
Cruise Speed tells the TF to always move a cruising speed.
For most Missions it is advisable to let the TF decide the speed by selecting the Mission
Speed order.
9.
Currently, the TF has a Do Not Unload order set, indicating it is not to unload. Since
this is an Air Combat TF, it has no transportable items and therefore this order is not
an option. If the TF did have unloadable items, this order would tell the TF to not
unload upon reaching its destination. This command is useful when you want to move
a TF to a base to replenish its fuel and ammunition, but the base is not the final
destination of your TF.
10.
This TF has its Refueling: OK order set, indicating it will automatically refuel when
located in a base (with a port) hex. Setting this to OK will ensure your TF’s will fill up
when in a friendly port; selecting Do Not Refuel will tell the TF to not refuel when
docked.
11.
The No Auto Disband order tells the TF to not disband upon completing its current
orders (see section 6.1.6 Disbanding Task Forces). If this is is set to Auto Disband,
upon completing its Mission the TF will automatically disband once it has returned to a
friendly port.
67
68
12.
The Set TF Destination option
allows the player to determine a
destination hex for the current TF. To
change the TF’s Destination Hex,
click the arrow to the left of this title.
In the above example, Task Force
1001’s current destination hex is
56,94 (which is Gili Gili, on the
eastern tip of Port Moresby). To
cancel this action, click the right
mouse button before selecting a
destination hex.
13.
The Set TF to Follow option allows
the player to set the current TF to
follow another TF. In the above
example, Task Force 1001 is
currently not following another TF.
To set it to follow another, click the
arrow to the left of this title. The
screen will be replaced by a large
display of the tactical map; scroll
around and click on a TF for the
current one to follow. To cancel this
action, click the right mouse button
before selecting a TF to follow. Since
it is not following another TF at this
time, the TF Followed field displays
None. Otherwise, the TF number
being followed would be displayed
here.
14.
The Set Mission option allows the
user to select a Mission for the
current TF. Click the arrow to the left
of the title and a new window will
appear; then, click on a ship icon
next to the Mission type listed. Some
TF’s will be limited to the type of
Missions they can undertake. When
the arrow is clicked, a new window
will appear listing all the Mission
Types that can be created, based on
the ship types present. For example:
Task Force 505 can only select an Air Combat, Escort, or Transport Mission, since the
ships attached to it are only capable of executing these Missions.
15.
The Form New TF option is similar to the Form New TF option located in friendly
Ports. New TF’s formed from a TF screen may only use ships present in the current
TF. Click the arrow next to this title and a new window will appear, showing the
original TF and a new TF. Only one TF at a time may be created in this manner.
The computer automatically assigns the new TF a number (1004) and allows the
player to select from the list a Mission Type. Other options may or may not be set
depending on the current situation, including Human/Computer Control and
Retirement Allowed/Not Allowed. When a Mission Type and any desired options have
been selected, click the arrow next to the Done – Proceed to Ship Selection title at
the bottom of the screen. To cancel the TF creation, click Back (to return to the TF
screen) or Exit (to exit to the Tactical Map).
69
The old TF is located at the top of this new display, while the new TF to be created is
located at the bottom. Click on a ship from one TF to transfer it to the other TF. When
finished, click the arrow next to Done located in the lower right corner of the screen. If
you change your mind about creating the TF after you’ve selected ships to go into it,
simply select the ships from the bottom screen to move them back into the old TF and
then click Done to exit.
70
16.
The Transfer Ships to/from TF option is available to select when two or more TF’s
exist in the same hex. With this command, the player may select ships to transfter
from one TF to another. Transfer of ships is completed in the same manner as
creating a new TF, detailed in item 19 (above).
17.
Disband TF is an option only available when in port. This command will disband the
TF and leave the ships available for creating a new TF or joining an existing TF.
18.
The Dock TF command tells the current TF to dock and take on supplies as well as
complete any repairs. This command is useful when the ship is near a friendly port
and needs to replenish.
23.
The Replenish TF from Port option is only available when the TF is located in a
friendly Port. If selected the TF will immediately consume supplies from the port to
replenish its ammunition to its capacity, taking on ammunition appropriate for its
current Mission (i.e. subs in a sub minelaying TF will take on extra mines in place of
torpedoes, etc.).
19.
The Replenish TF at Sea option is available if the TF has replenishment vessels
within it. This command will tell the TF to slow down and immediately replenish all
ships that need fuel. The amount of time it takes to do so depends on the amount of
fuel that the ships are depleted. TFs will automatically refuel from their own ships in
their TF during the first 4 turns of any scenario. This will allow the TFs in scenario 1
that have moved long distances to fully move during the first few turns.
20.
Load Supplies tells the TF to load supplies from its current location. This option is
only available if the TF is located in a friendly Port that has supplies available to load
on the TF.
21.
Load Fuel tells the TF to load fuel from its current location. This option is only
available if the TF is located in a friendly Port that has fuel available to load on the TF.
22.
Load Troops tells the TF to load air units and ground units, as well as supplies to
sustain them. This option is only available if the TF is located in a friendly Port that
has troops available to load on the TF. Once ships are filled with ground units and/or
air units, any excess Capacity is filled up by supplies.
23.
Load Only Troops tells the TF to load only air and ground units, but not supplies (i.e.,
excess Capacity will not be filled with supplies).
24.
Load Oil/Resources tells the TF to load the sinews of war – oil and raw materials
needed for hungry factories at home. Any available oil and/or resources at the current
friendly Port are loaded to the capacity of the TF.
25.
Unload Cargo/Troops tells the TF to unload any cargo and/or troops that it has
aboard its ships. This option is only available if the TF is located in a friendly Port and
has cargo and/or troops to unload.
26.
Cargo Status: will be either Loading (taking on cargo), Unloading (dropping off
cargo), or Idle (neither loading or unloading).
27.
Total Load: # of # indicates the TF’s current load. The lefthand (first) number
indicates the current load that supplies, transported fuel, troops, and oil/resources are
taking up in the holds of the TF. The righthand (second) number indicates the
maximum capacity for this TF.
28.
Max React indicates the maximum distance the TF will travel when reacting to the
enemy. Enemy units outside of this range will not be reacted to.
29.
Activate Barges allows TFs and/or bases with supplies to convert those supplies into
barges. Barges must be available before they can be built (refer to your Ship
Availability Screen in your Intelligence Screen to check); if so, a new TF will be
created containing only barges.
30.
Activate PT Boats allows Allied (only) TFs and/or Allied (only) bases with supplies to
convert those supplies into PT Boats. PT Boats must be available before they can be
built (refer to your Ship Availability Screen in your Intelligence Screen to check); if so,
a new TF will be created containing only PT Boats.
71
6.1.2.1 Yellow Text Displays on Ships and Ship Column Headings
Yellow text indicates one of three things:
1.
2.
3.
If it is a heading of a column, clicking it will cause the column to sort and rearrange the
various listed units according to the criteria in that column. For example, clicking on
the Endurance heading would arrange all ships to be listed by remaining Endurance,
with the highest-rated ships listed first and followed by the next-lowest rated ships.
Clicking on it again will cause the lowest-rated ship to appear first, with the nexthighest ships appearing below.
If it is the name of a unit, clicking on it will bring up that unit’s Information Screen
(where more detailed reports can be found and orders issued).
If it is neither of the above, clicking on the text will cause a detailed report to appear
based on the text itself (for example, clicking on Carrier Aircraft will cause the Air
Unit Information Screen to appear, listing all Air Units that are assigned to the TF.
Furthermore, numbers are color-coded to indicate both quantities of material (such as fuel,
endurance, and ammunition), as well as damage levels.
As an example of damaged ships in a TF, we can see from this picture that Task Force 522 has
thirteen ships. This TF was created from all the damaged ships from the Pearl Harbor attack on
the December 7 turn in this game example, and therefore all ships are damaged. There are a
wide range of color-coded numbers here. Essentially, the more damaged a system is, the closer
to dark red it will become. As systems are repaired, the red color will lighten. Compare, for
instance, the Sys damage of the BB West Virginia (80) versus the Sys damage of the BB
Maryland (21). The ‚21’ is a lighter color than the ‚80’ since it is less damaged in that component.
A green-colored number is ideal, as that means an undamaged system. All of the displayed ships
have a green zero in their Fires category, indicating thankfully for the U.S. none of them are on
fire.
72
6.1.3 Ship Information Screen
To get information about any of the various ships in a Task Force, click on the name of the ship
(the same goes for Air and Land screens as well; click on the unit’s name to open up a more
detailed screen). Returning to the Air Combat TF and selecting the Lexington, we see that this is
a Lexington--class aircraft carrier, and that it is a Flagship (Flag) of TF 1001’s Air Combat
Mission.
The crew is decent at Day fighting (with an
experience of 71), but would be very poor at
Night (with an experience of 42). The ship’s
Captain, CPT Sherman, F., has a Leadership
rating of 65 and an Inspiration rating of 69.
Lexington’s weapons are mostly defensive in nature. We can see that she has eight 8-inch gun
batteries. Each weapon device is broken down as follows:
A number (Num) of devices of that type
73
A facing (Face), indicating the direction that this grouping of devices is facing.
Mount indicates the maximum number of weapons the device can carry
Armor details how well-protected the mount is from attack and/or damage (only two of
the 5-inch guns have any protection at all)
Range shows in yards how far the device can fire
Pen shows how the weapon is rated at penetrating enemy armor
Ammo shows how well-stocked with ammunition that particular set of weapons is. If
this number reaches zero, it will not provide any protection or offensive ability; a dry
gun is a useless gun. Any Task Force, especially those designated for Surface
Combat, that run low on ammunition need to seek replenishment or be easy pickings
for the enemy.
Since Lexington is an Aircraft Carrier, she has an
air component attatched to her. U.S. carriers
designated their squadrons with a “V” followed
by the first letter of their function (F for Fighter, S
for Scout, B for Dive Bomber, and T for
Torpedo). A dash and number further identified
the squadron. These squadrons were often
called by their function and number (for example,
“VF-1” would be called “Fighter One”).
We can see that Lexington has three total squadrons: VF-2 (Fighter Two) with 21 F4F-3 Wildcats,
VS-2 (Scouting Two) with 18 SBD Dauntlesses, VB-2 (Bombing Two) with 18 SBD Dauntlesses,
and VT-2 (Torpedo Two) with 12 TBD Devasators. Lexington therefore has 21 fighters, 36 dive
bombers (which can double as scouts), and 12 torpedo bombers – 69 aircraft in all.
In the Unit Information Screen for the Lexington,
we see that her Max Speed is 33 knots
(equating in game turns to 6 hexes per turn –
the number in parenthesis). Her Cruise Speed
is 15 knots (equating to 3 hexes per turn). The
carrier’s Maneuver rating is rather low at 15,
meaning she can’t exactly turn on a dime like a
nimble
destroyer
could
(Destroyer’s
Maneuverability ratings are closer to 70). Her
Anti-Aircraft value, essentially a measure of
her anti-air strength, is 824, and she has no
anti-submarine warfare capabilities so her AntiSubmarine shows None.
The Lexington’s Endurance is 9816 and her
Fuel is 5300. Both these numbers are indicated
in a green color, showing that her supply for
both these items is good. As they dwindle, the
color-coding will change from yellow (depleted)
to red (almost gone).
The ship’s Belt Armor, essentially the thickness
of her hull at and below the waterline, is 175.
Her Deck Armor, measuring the thickness of armor covering her topside deck, is 50. The Tower
74
Armor rating of 50 shows that the aircraft carrier’s island structure (or central structure in other
vessels) is as well-protected as her deck. Her Durability is an overall measure of the ship’s
seaworthiness, and is at 110.
The System Damage, Flood Damage, and Fires ratings are, thankfully for the Lexington’s crew,
all at 0 right now. Again, these numbers are color-coded; the ’0’ is in green because this is an
ideal setting; they can change to yellow (indicating damage) and red (indicating severe damage).
Lexington’s Aircraft Capacity is shown as 90 / 69, which means her maximum capacity is 90 but
only has 69 aircraft on board (as we saw a few paragraphs ago). Also, her ability to conduct
sorties is measured by Max Sorties, which we see is set at 414 / 414. The left-hand number
indicates the maximum number of sorties able to fly, while the right-hand number dwindles as
Lexington launches them. This number is added with other carrier’s Max Sorties ratings and
totalled in the Task Force Information Screen’s total.
Also, Lexington’s Victory Value is 380, which is the number of points scored for the Japanese
when this ship is sunk.
At the bottom of the Lexington’s screen are several orders that can be given:
Scuttle, which sinks the ship and is only available if the ship is suffering from serious
damage.
Next Ship in TF, which will change the information on the screen to reflect the next ship
(or previous ship, depending on the arrow clicked) in the TF.
Back, which will move the display back one screen.
Exit, which will exit to the Tactical Map.
The option to return to a major off map port (Return to Pearl Harbor) is only available in small
map scenarios. It is only selectable when the player’s ships are in one of the designated main
bases for the scenario. If not in a main base, this option is grayed out. In full map scenarios this
“off-map” movement is not an option and will not be on the display. The number in parenthesis
next to the “Return to Pearl Harbor” indicates the round trip travel time for this ship (in days) not
accounting for time to repair or upgrade the ship once it reaches the off map port.
Certain ships may upgrade by clicking on a button on the Ship Information Screen that brings up
a list of possible conversions. The ship must be in Osaka (for the Japanese) or San Francisco (for
the Americans) to have this button available. The upgrade will take 180 days (plus some for
damage) added to the delay for the ship being converted. The ship types that can convert are:
Large AK to AE, AR, AS, AV or MLE
Allied only – Large AK to AD
Allied only – PG or LST to AGP
Note that a „large AK“ is an AK with a Capacity of 5000 or greater.
The option to upgrade will appear in the Ship Information Display at the bottom left of the screen,
if the ship meets the above requirements.
75
6.1.4 Creating a Task Force
To create a Task Force, click on a base (either on the Tactical Map or the List All Bases Screen)
and then the Form New Task Force option. You will then see the Task Force Creation Screen.
There are twelve Primary Missions as well as several secondary ones (or, Roles). A TF may
contain a maximum of 25 ships (although 15 or less is most efficient for a combat TF) except for
Escort and Transport TFs, which have a maximum of 100 ships.
Right clicking on a ship’s name in the Form/Transfer TF display will show its name, class, main
battery gun size, number of torpedo tubes, number of anti-submarine devices and the relative
strength of its anti-aircraft guns, Every new TF created has:
Its home base defaulted to the port at which the TF was created.
Its control defaulted to human control (except Submarine TFs, Auto Convoy TFs, and
TFs created by the computer in Control Zones that are run by the computer).
Its Patrol/Retreat Status defaulted to Retirement Allowed. Note that submarine Task
Forces do not have a Patrol/Retreat Status.
Its Max React Range defaulted to React to enemy if the TF is an Air Combat or
Surface Combat Task Force. This defaults to a value of zero (0).
The Mission types and the ships that can make up task forces with those Missions are listed in
the table below (the abbreviations for ship types are standard U.S. Navy terminology and are
defined in the appendix). Many of these Missions are self-explanatory; common sense will tell you
that an aircraft carrier would not be in a Sub Patrol task force. But others are more complicated;
for example, Transport Missions can accommodate most warship types because the freighters
need an escort. Yet a TF with an Air Combat Mission cannot contain transport ships, because no
sane carrier skipper is going to sail into battle with a bunch of slow freighters clinging to his heels.
TF’s can be automatically selected using Auto Selection, or players can select the ships
themselves. Only ships that can be in a task force will be displayed in the selection menu.
6.1.4.1 Mission Types and Ships Allowed
A listing of all Ship Types is located in Appendix A.
Mission
Ship Types Allowed
Air Combat
CV, CVL, CVE, BB, BC, CA, CL, CLAA, CS, DD, DE
Surface Combat
BB, BC, CA, CL , CLAA, CS, DD, DE, APD, DM, DMS, PC, PG, PT, SC
Bombardment
BB, BC, CA, CL , CLAA, CS, DD, DE, APD, DM, DMS, PG
Transport
CVE, CA, CL, CLAA, CS, DD, DE, APD, ML, MSW, AV, DM, DMS, AO,
AP, PC, PG, P, T, SC, AG, AK, LSD, LST, LCI, LCM, LCVP, TK
Fast Transport
BB, BC, CA, C , CLAA, CS, DD, DE, APD, ML, MSW, AV, AVD, DM,
DMS, AO, AP, PC
Mine Warfare
CA, CL , CLAA, CS, DD, DE, APD, ML, MSW, AV, DM, DMS, AO, AP,
PC, PG
76
Replenishment
CVE, CL, CLAA, CS, DD, DE, PD, ML, MSW, AV, DM, DMS, AO, AP,
PC, PG, SC, TK
Sub Patrol, Sub
Transport, and Sub
Minelaying
SS
Escort
All Ship Types Allowed
ASW Combat
BB, BC, CA, CL , CLAA, CS, DD, DE, APD, DM, DMS, PC, PG, PT,
SC, MSW
6.1.4.2 Task Force (TF) Size
Task forces that consist of more than 15 ships suffer diminishing returns in effectiveness
defending themselves against air attack and fighting in surface battles.
6.1.5 Assigning Missions
From the Task Force Creation Screen you may select from 12 basic TF Missions. Also, an
additional eight Roles will appear in the right-hand column. Each Role uses a unique icon at the
bottom of the screen for the TF for easier identification. A TF may change its Mission at any time,
although the new Mission must be appropriate for all the ships in the TF (the list of Roles won’t
appear because the TF has already been built).
If there aren’t enough ships present to create a complete Task Force, the new TF won’t be
created. However, you can still select ships manually.
6.1.6 Disbanding Task Forces
A TF may disband itself if it is in a hex with a friendly port with a current size of at least 3. When a
TF is disbanded, each of the ships that were in the TF will replenish its ammunition. Ships at a
friendly port with a current size of at least 3 may exist in the port separate of a task force in which
case they will maximize their repair capability at the expense of additional vulnerability to enemy
air and ship bombardment attacks (this is considered being at anchor).
6.1.7 Task Force Speed
Every TF has a calculated Maximum TF Speed and a Cruising TF Speed. The Maximum TF
Speed is the maximum number of hexes the TF may move during a movement resolution phase,
if it is attempting to move at maximum speed. There are only a few situations where a ship will
move at maximum speed, as ships generally move at their cruising speed to minimize fuel usage
and operational damage. These speeds are calculated by taking the appropriate speed of the
slowest ship in the TF. The TF speed in hexes is equal to the slowest ship’s speed in knots
divided by 5, and is rounded up or down based on the computer’s calculations. Regardless of how
fast it is, no TF may move more than 6 hexes per turn.
77
All ships are given a movement allowance of at least 1 hex, even when out of fuel or badly
damaged. This has been done for playability purposes to avoid the need to tow ships to
port.
Over time, a TF will move the right number of hexes for it’s speed, but some pulses it will move 1
hex more than others (e.g. a TF with a speed of 11 will move 2 hexes 4 out of every 5 turns). This
speed applies to both 12 hour movement pulses. So on the turns that the TF has a speed of 2, it
will move 2 in both the day and night phases (4 total for the day), while on turns it moves a speed
of 3, it will move 3 in both the day and night phases (6 total for the day).
6.1.7.1 Automatic Ship Separation From TF due to Damage and Loss of Speed
A badly damaged ship may automatically split off from its current TF and form its own TF (so it
won’t slow the main force down). This will happen if a ship:
Is badly damaged, and is either in a Fast Transport TF or in a Surface Combat, Mine
Warfare, or Bombardment TF with a Patrol/Retreat status of Retirement Allowed. This
will happen if the ship’s maximum speed drops below 25 knots.
Belongs to any other type of TF (except Escort TF ships, which wil always stay with the
TF they’re escorting), and its maximum speed drops below 5 knots. This slow speed
could be due to either the ship always being slow, damage to the ship, and/or the ship
being considered low on fuel and unable to steam at the required speed (unless it is able
to immediately refuel).
Is damaged and has a significant speed differential from other ships in the TF (for this
purpose speeds over 25 are counted as 25).
A ship currently unloading will not split off until it is finished unloading. Nor will it split off if it is
carrying troops and is one hex from its destination. If a ship separates from its original TF, it will
be placed in a new TF with the same Mission and home base as its original TF. The new TF will
have its Destination Hex set to its home base, and it will have its Patrol/Retreat status set to
Retirement Allowed. Whenever a ship separates as described above, the ship’s original TF
checks to see if it will continue on its Mission or abort its Mission and return to base. This can
happen even when the TF has a Patrol/Retreat Status of Patrol/Do not retire. The TF makes its
decision based on how strongly its been attacked and how much damage its ships have taken.
Task Forces with a Patrol/Do not retire status are less likely to abort than Task Forces with a
Retirement Allowed status. Whenever a battleship or carrier detaches itself from a TF, the
computer will attempt to detach an additional ship to escort the capital ship. This ship will be some
kind of anti-submarine fighting ship (generally a destroyer). These two ships will never be
automatically separated from each other.
If the base the TF started from is captured by enemy forces, the option to Return to Base will be
grayed out and unavailable.
6.1.8 Patrol/Retreat and Max React Range
The Patrol/Retreat Status determines what the Task Force will do when it gets to its Destination
Hex and how likely the TF will abort its Mission in the face of enemy attacks. If it is set to
Patrol/Do not retire, the TF will try to press on to complete its Mission, regardless of enemy
attacks. It will remain at the Destination Hex while performing its Mission, then return when it is
low on endurance or seriously damaged. Task Forces set to Retirement Allowed will move to their
Destination Hex, perform their Mission, and immediately return home. If they are forcefully
78
attacked, they will likely abort their Mission and return to their base. Non-patrolling Task Forces
with certain Missions (such as Bombardment) will plan to arrive at their destination at night,
moving into and away from the destination at full speed for 12 hours each way.
Duplicating The Tokyo Express: During the Guadalcanal Campaign, Japanese ships
consistently sailed to Guadalcanal to bombard US forces and resupply their own ground
units. Due to the US aircraft on Guadalcanal, the Japanese ships would always arrive at
night, with their arrival timed so they could complete their Mission and sail out of range of
American aircraft by sunrise. To do this in the game you must make use of the Max React
status for TF’s moving into territory covered by enemy aircraft. Players should set the Max
React status to 0 (zero) for their Surface Combat and Air Combat TF’s as otherwise they
may alter course to intercept an enemy TF if it is spotted during its movement turn. Also
remember a TF with Follow Another TF orders will continue to follow the lead TF. A TF with
a Max React set to zero will not alter course from its DH to attack an enemy.
6.1.9 Mission Types and their Impact on Movement
Here is a brief description of each of the 12 possible TF Mission types. Each TF will follow certain
movement guidelines based on its Mission type and its Patrol/Retreat and React/Do Not React To
Enemy Status. These guidelines are listed for each Mission type and Patrol/Retreat status. The
following tables show which Orders are available to the following TF types with each of Patrol/Do
Not Reture or Retirement Allowed selected.
PT boats on patrol do not use fuel if they remain in one hex.
6.1.9.1 Air Combat
An Air Combat TF has a maximum compliment of 25 ships. A TF with an Air Combat Mission is
looking to use its carrier aircraft to engage enemy targets.
PATROL/DO NOT RETIRE
RETIREMENT ALLOWED
Cruise to DH
Cruise to DH
Remain at DH
Arrive at Night
React to Enemy Carriers (if Max React is set to a
number greater than 0)
Sprint Away From DH
Abort if Attacked
Avoid Potential Surface Combat
79
6.1.9.2 Surface Combat
A Surface Combat TF has a maximum compliment of 25 ships. A TF with a Surface Combat
Mission is looking to initiate surface combat with enemy Task Forces.
PATROL/DO NOT RETIRE
RETIREMENT ALLOWED
Cruise to DH
Cruise to DH (Exception: Move at
Maximum Speed if within 25 hexes of
destination)
Remain at DH
Sprint Away From DH
Initiate Surface Combat
Arrive at Night
React to Defend Friendly Base (if Max React
is set to a number greater than 0)
Abort if Attacked
Avoid Enemy Carriers
Initiate Surface Combat
6.1.9.3 ASW Combat
An ASW Combat TF has a maximum compliment of 25 ships. A TF with an ASW Mission is
searching for enemy submarines, with the intent to destroy them once they’re found.
PATROL/DO NOT RETIRE
RETIREMENT ALLOWED
Cruise to DH
Cruise to DH (Exception: Move at
Maximum Speed if within 25 hexes of
destination)
Remain at DH
Sprint Away From DH
Initiate Surface Combat
Arrive at Night
React to Defend Friendly Base (if Max React
is set to a number greater than 0)
Abort if Attacked
Avoid Enemy Carriers
Initiate Surface Combat
80
6.1.9.4 Bombardment
A Bombardment TF has a maximum compliment of 25 ships. A TF with a Bombardment Mission
is looking to bombard an enemy base and/or ground unit(s) when it reaches its Destination Hex. It
will also initiate surface combat
PATROL/DO NOT RETIRE
RETIREMENT ALLOWED
Cruise to DH
Cruise to DH (Exception: Move at
Maximum Speed if within 25 hexes of
destination)
Remain at DH
Arrive at Night
Bombard
Sprint Away From DH
Initiate Surface Combat
Abort if Attacked
Bombard
Initiate Surface Combat
Avoid Enemy Carriers
6.1.9.5 Fast Transport
A Fast Transport TF has a maxumum compliment of 25 ships. A TF with a Fast Transport Mission
is looking to load a small cargo of supply/fuel/ground units and then move at maximum speed to
its Destination Hex and unload its cargo. A Fast Transport TF may attempt to evacuate a ground
unit from its DH instead of carrying cargo to be unloaded at the DH
PATROL/DO NOT RETIRE
RETIREMENT ALLOWED
Cruise to DH (Exception: Move at Maximum
Speed if within 25 hexes of destination)
Cruise to DH (Exception: Move at Maximum
Speed if within 25 hexes of destination)
Arrive at Night
Arrive at Night
Sprint Away From DH
Sprint Away From DH
Fast Unload (Fast Load if Evacuation
Ordered)
Fast Unload (Fast Load if Evacuation
Ordered)
Abort if Attacked
Avoid Enemy Carriers
Avoid Potential Surface Combat
81
6.1.9.6 Escort Mission
An Escort TF has a maximum compliment of 100 ships. A TF with an Escort Mission needs to
have a target TF it will escort. This TF will then act to protect its assigned TF from enemy attack
using its compliment of ships (i.e., a Carrier assigned to an Escort TF would fly CAP Missions
over the protected TF, while one without would do its best to ward off enemy submarines and
surface ships, etc.)
PATROL/DO NOT RETIRE
RETIREMENT ALLOWED
Cruise to DH
Cruise to DH
Remain at DH
Arrive at Night
Sprint Away From DH
Abort if Attacked
Avoid Enemy Carriers
Avoid Potential Surface Combat
6.1.9.7 Transport
A Transport TF has a maximum compliment of 100 ships. A TF with a Transport Mission is
looking to move to load a cargo of supply/fuel/ground units to it’s Destination Hex and unload it’s
cargo.
If the Load Oil/Resources button is selected, all AK’s in the TF will load resources and all TK’s will
load oil. No other ships will load anything. Oil and Resources are listed on the TF orders screen
and the List all TFs screen under the Supply and Fuel columns. If they are oil and resources the
numbers will be displayed in red.
A Transport TF with a TK can load oil and will have a button on its screen for that; a Transport TF
with an AK can load resources and will have a corresponding button.
PATROL/DO NOT RETIRE
RETIREMENT ALLOWED
Cruise to DH
Cruise to DH
Remain at DH
Arrive at Night
Standard Unload
Sprint Away From DH
Standard Unload
Abort if Attacked
Avoid Enemy Carriers
Avoid Potential Surface Combat
82
6.1.9.8 Replenishment
The Replenishment TF has a maximum of 25 ships. A TF with a Replenishment Mission is looking
to refuel friendly ships at sea.
PATROL/DO NOT RETIRE
RETIREMENT ALLOWED
Cruise to DH
Cruise to DH
Remain at DH
Arrive at Night (if enemy bombers within
range)
Auto Replenish
Sprint Away From DH
Auto Replenish
Abort if Attacked
Avoid Enemy Carriers
Avoid Potential Surface Combat
6.1.9.9 Mine Warfare
The Mine Warfare TF has a maxumum of 25 ships. A TF with a Mine Warfare Mission is looking
to move to its Destination Hex and either lay a minefield or sweep enemy minefields, depending
on Task Forces Patrol/Retreat Status, highlighted below. (Patrol orders have the TF sweep a
minefield, while Retirement Allowed lays a minefield.) ML and DM ships may only load mines
when in the hex with a size 9 or 10 port with sufficient supplies or in a hex with an MLE ship and a
base with sufficient supplies. MLE must have no fire or float damage and less than 50% system
damage, and have Op points remaining for the function to be allowed.
PATROL/DO NOT RETIRE
RETIREMENT ALLOWED
Cruise to DH
Cruise to DH (Exception: Move at Maximum
Speed if within 25 hexes of destination)
Remain at DH
Arrive at Night
Sweep Minefield
Sprint Away From DH
Lay Minefield
Abort if Attacked
Avoid Enemy Carriers
Avoid Potential Surface Combat
83
6.1.9.10 Sub Patrol
The Sub Patrol TF has a maximum of 25 ships (although they always work best when operating
alone). A TF with a Sub Patrol Mission will attempt to attack enemy ships with torpedoes.
ALL SUB PATROL TF’S
Cruise to DH
Remain at DH
Initiate Submarine Combat
6.1.9.11 Sub Transport
The Sub Transport TF has a maximum of 25 ships. A TF with a Sub Transport Mission is looking
to move to load a cargo of supply/fuel/ ground units and then move to its Destination Hex and
unload its cargo. It will then return home. Subs performing sub transport have their torpedo
reloads replaced with supplies, 3 for every torpedo. They also load up 5 supplies for every A/C
Capacity the sub had (subs are not actually allowed to use aircraft in War in the Pacific - The
Struggle Against Japan, 1941-45™).
ALL SUB TRANSPORT TF’S
Cruise to DH
Standard Unload
Initiate Submarine Combat
84
6.1.9.12 Sub Minelaying
A TF with a Sub Minelaying Mission is looking to move to its Destination Hex and lay a minefield.
It will then return home. Sub minelaying Missions will have their torpedo loadout decreased to one
torpedo per torpedo tube due to having mines placed on board, unless the submarine is specially
fitted to always carry mines that don’t take space away from the normal torpedo load.
Subs may only load mines when in the hex with a size 9 or 10 port with sufficient supplies or in a
hex with an MLE ship and a base with sufficient supplies. MLE must have no fire or float damage
and less than 50% system damage, and have Op points remaining for the function to be allowed.
ALL SUB MINELAYING TF’S
Cruise to DH
Lay Minefield
Initiate Submarine Combat
6.1.10 Movement Guideline Descriptions
Cruise to DH
The TF is moving at its cruising speed and will
generally move along the shortest path to reach its
Destination Hex. Under some circumstances, TFs will
take a slightly longer path in order to avoid moving in
coastal waters (near land).
Move at Maximum Speed
The TF will move at maximum speed towards its DH,
unless it is making a movement adjustment as
described in Arrive at Night, below. Combined with
Arrive at Night, these simulate actions like the Tokyo
Express runs, and allows Task Forces to move at
maximum speed while avoiding air attacks by
sprinting into their destination during darkness and
sprinting out again before the sun comes up.
Sprint Away from DH
The TF will move at maximum speed towards its
home base during the first movement phase. This will
only occur if the DH is an enemy base or if the DH is a
friendly base that is considered to be in dangerous
territory. Otherwise, the TF will move at cruising
speed.
Arrive at Night
The TF will adjust its movement so that it will arrive at
its destination during a Night naval movement phase.
The TF will move at maximum speed to its DH during
the Night turn. Combined with Move at Maximum
Speed and Sprint Away from DH, these simulate
actions like the Japanese naval bombardments of
Henderson Field, and allows Task Forces to avoid air
85
attacks by sprinting into their destination during
darkness and sprinting out again before the sun
comes up. Ideally these kinds of Missions should be
limited to Task Forces with a maximum speed of at
least 11 hexes (27.5 knots) in order to minimize the
risk of being bombed by aircraft. Historically, the
Japanese limited their Fast Transport and
Bombardment Missions to their Battlecruisers,
Cruisers, and Destroyers, all of which had maximum
speeds of 30 knots or higher.
Remain at DH
The TF will remain at the Destination Hex until
something triggers a return to base (see “Returning to
Base Status”).
Avoid Enemy Carriers
The TF will temporarily move away at cruising speed
from sighted enemy aircraft carriers, if in the Task
Force’s opinion it is not protected by an adequate
amount of friendly carrier or land based aircraft. The
TF will move towards a friendly base, generally
towards the rear area, if it needs to move away from
enemy carriers. This temporary movement will cease
as soon as the enemy carriers are no longer
perceived to be a threat.
Abort If Attacked
If the TF is attacked by more than token enemy air or
surface forces (as determined by the computer), the
TF will return to its home base. The more friendly
aircraft in the TF, the larger the enemy attack must be
to trigger this abort effect. A TF that is aborting its
Mission may turn back to its original target if the
Destination Hex is reset during a subsequent Orders
Phase.
Avoid Potential Surface Combat
During a Night movement phase, the TF may
temporarily withdraw at cruising speed towards a
friendly base, generally towards the rear area, if it
needs to move away from enemy Surface Combat or
Bombardment TFs moving into its hex. If this
withdrawal occurs, the TF will return to its original
location on the next movement phase.
Initiate Surface Combat
The TF will attempt to initiate surface combat against
enemy Task Forces in the same hex.
Initiate Submarine Combat
The TF will attempt to launch torpedoes against
enemy ships in the same hex. If the escort of the
defending TF is weak or non-existent (as determined
by the computer), the submarine may surface and fire
its guns.
86
Lay Minefield
The TF will create a minefield in its Destination Hex
using all mines on any DM, ML, and SS ships in the
TF.
Sweep Minefield
Any DMS and MSW ships in the TF will attempt to
clear any enemy minefield in its Destination Hex and
any adjacent hex.
DMS and MSW ships will attempt to sweep every
hex they move into no matter what Mission and/or
Patrol/Retreat status their TF has.
Bombard
The TF will bombard an enemy base and/or visible
enemy ground units in its Destination Hex. If the TF is
following another TF, it will bombard whenever it is in
a hex with an enemy base and/or visible ground unit.
Bombarding ships tend to shoot more often at bases,
CD (coast defense) units, and ships at anchor, rather
than other ground units.
Auto Replenish
Any AO and TK ships in the TF will automatically
refuel friendly ships in the same hex that are low on
endurance.
Fast Unload
The TF will quickly unload its cargo in its Destination
Hex without incurring any movement delay and then
set its Patrol/Retreat Status to Retirement Allowed.
Up to 20% of the cargo may be lost when unloading
due to the need to get it done quickly and get away.
Standard Unload
The TF will unload its cargo at its Destination Hex,
and once fully unloaded it will set its Patrol/Retreat
Status to Retirement Allowed.
React to Enemy Carriers
The TF, as long as it is not following another friendly
TF, will move during an Day movement phase
towards spotted enemy carriers in an Air Combat TF
in order to attempt to get within range to launch an
airstrike. This will only happen if the enemy TF begins
the Day movement phase at least 4 hexes but no
more than 8 hexes distant from the reacting TF. The
reacting TF will never react if its Max React value is
set to 0.
The reacting TF will move directly towards the nearest
spotted enemy Air Combat TF containing a carrier,
attempting to get closer the enemy TF. The TF will not
react further than the number set for Max React. Also,
the automatic 1 hex movement of carriers to close on
enemy carriers will not happen if Max React is set to
0, but can happen on turns that a carrier has Reacted
to Enemy Carriers.
87
React to Defend Friendly Base
The TF will move to defend a friendly base that is
occupied by friendly forces (supplies and/or troops)
from any enemy TF that is spotted moving into the
friendly base hex.
If a TF’s Max React value is set to 0, however, it will
not react to defend a friendly base. If this value is
greater than 0 and the range is lower than or equal to
the TF’s Max React value, the TF will immediately
move to the base hex if it is within one movement
phase’s maximum speed of the base at the moment
the enemy TF enters the base hex. After a TF reacts
to defend a friendly base, it automatically resets its
Patrol/Retreat Status to Retirement Allowed. This
guideline lets a TF patrolling within 12 hours’
steaming distance of a friendly base to move in to
protect the base when intelligence reveals an
imminent attack. However, a TF may react to an
enemy TF that appears to be moving to a base but
not actually engage the enemy TF. This can occur if
the enemy TF follows the “avoid potential surface
combat” guideline and doesn’t actually move into the
base hex. There will be times when a Bombardment,
Surface Action, or Fast Transport Task Force can end
up in harm’s way as the dawn arises, however. These
include the task force being low on fuel or if the Task
Force spends too much time engaging enemy vessels
at the target location or if the Do Not Retire option is
selected. The player might note that some Task
Forces will not be able to approach closely enough to
attempt the Mission. These would include
Bombardment, Surface Action, or Fast Transport Task
Forces with the Retirement Allowed option selected,
which do not have sufficient speed to make it into and
out of the target area in one night. These will hover at
the best range they can reach and await further
orders. Ships of speed less than 25 knots will
frequently have this problem.
88
6.1.11 Impact of Roles on Auto-Created TF’s
When selecting to create a new TF from a base hex, an Automatic Ship Selection option
appears on the TF Mission selection window. When set to On, the computer selects your ships
during TF Creation and a list of eight Roles will appear next to the 12 Primary Missions. These
Roles only exist to allow the computer to better refine its ship selection when creating a TF. A PT
boat task force is always a role of a Surface Combat TF.
The eight Roles for TF Missions are:
Transport – Cargo
Transport – Barge
Transport – Air Transport
Air Combat – CV Escort
Transport – Amphibious
Surface Combat – PT boat
Transport – Tanker
Mine Warfare – Minesweeper
The following table illustrates how the above Roles influence the computer’s decisions when
automatically creating a TF for you:
Transport
All-purpose transport TF with transports and escorts
Transport-Cargo
Similar to Transport but not as well protected with escorts
Transport-Air Transport
Only CVE’s and escorts
Transport-Amphibious
Similar to Transport but with more escorts and prefers
amphibious type transports if available
Transport-Tanker
Similar to Cargo, but including TK’s
Transport-Barge
All barges.
Fast Transport
Destroyers and Japanese CL’s and APD’s
Replenishment
AO’s and escorts
Air Combat
All sizes of aircraft carriers plus surface escorts
Air Combat-CV/escorts
Only CVE’s and escorts
Surface Combat
Major warships for surface combat.
ASW Combat
Smaller than DD anti-sub ships, but will use DD’s if DE’s and
below are not available
Surface Combat-PT boat
All PT boats
89
Mine Warfare
Minelayers
Mine Warfare Minesweeper
One MSW or DMS ship
Bombardment
Major warships for bombardment
Sub patrol, sub
minelaying, sub transport
Single submarine
Escort
NOTE: The computer will not select ships for you automatically
with this Mission – they will have to be selected manually.
6.1.12 Assigning TF Destinations
Task Forces are assigned Destination Hexes in the TF Information Screen. Destinations can be
geographical, or a TF can be told to simply to follow another TF wherever it goes. Unless
following another TF, or simply a Surface Combat TF defending its home base, TF’s without a DH
set will not be able to carry out their Missions. The DH can be any coastal or ocean hex.
6.1.12.1 Follow Task Force
A TF given Follow Task Force orders has the same destination as the targeted TF, although the
TF Information Screen will not list a DH it. If Follow Task Force is selected, the Tactical Map is
brought up. Click on the TF icon that you want the current TF to follow, and it will return to the TF
Information Screen. During movement, it will always move so as to stay in the same hex as the
TF it is following if possible. If the following TF is not fast enough to keep up, it will try to stay as
close to the leading TF as it can. However, there are times when a TF might not move toward its
destination. In certain situations, A TF set to Retirement Allowed will ignore its DH in an attempt to
avoid enemy warships. If the TF is temporarily attempting to avoid the enemy, the DH will not
change on the TF’s Information Screen. As long as the enemy threat exists, the TF may continue
to ignore its DH. If you want the TF to ignore this danger, change the TF’s Patrol/Retreat Status to
Patrol/Do not Retire.
90
6.1.13 Transferring Ships Between Task Forces
Ships in Task Forces that are in the same port or sea hex may transfer ships between
themselves. TF’s may also transfer ships to bases and vice-versa. New TF’s may also be split off.
Only ships that are appropriate for a particular Mission will be allowed to be transferred into a TF.
To add ships from a port or TF to another
TF or port, click on the ship in the top half of the screen. If you make a mistake, you can click on a
ship in the bottom screen and reverse the process. For example, in the scenario ‘Road to Munda’
the screenshot above is the Noumea base with TF 209 and 208. TF 208 now has six vessels in it
– two Battleships and four Destroyers.
6.1.14 TF Returning to Home Base
There are several events that will cause a TF to automatically return to its home base. These
events are:
1.
If a TF is low on fuel and it cannot immediately refuel, or does not have a replenishment TF
attempting to follow it. If the TF is a Transport or Fast Transport Mission with cargo and in
its Destination Hex, it will not return to home base.
2.
At the moment a Transport or Fast-Transport TF unloads all of its cargo.
91
3.
If the TF is at its DH and none of the following conditions are true:
1) the DH is not its home base,
2) it is not following another TF,
3) it is not currently loading or unloading,
4) it is not a Sub Patrol Mission, and
5) its Patrol/Retreat status is not Patrol/Do Not Retire.
4.
A TF aborts its Mission due to being or having slow/damaged ships split off from the TF
attacked (much more likely in either case if the TF has a Retirement Allowed order).
5.
An Air Combat TF has no carriers that can launch aircraft remaining in the TF. When a TF
decides to return to its home base, it will set its DH equal to its home base and it will also
cause the TF’s Patrol/Retreat status to be set to Retirement Allowed. When a bombardment
TF decides to return to its home base it will automatically switch its Mission to Surface
Combat. Again, an aborted TF can be given a fresh destination and orders in the next
Orders Phase.
It is important to have a thorough understanding of the above conditions that will send a TF
heading for home. Also, keep in mind that you can redirect a TF that has aborted its Mission by
setting a new DH for the TF in your next Orders phase. Be sure to check the orders of TF’s that
have just been in combat or you may find them prematurely leaving the scene of action. TFs
6.1.15 Routine Convoys and Computer-Controlled TF’s
Task Forces with a Sub Patrol or Transport Mission can be placed on computer control (as are
any TF’s located in a Control Zone run by the computer).
A Transport Mission that has a destination set can be set to computer control. If this occurs the
TF will load its specified materials and move to the Destination Hex selected. At that point it will
automatically unload everything and then return to its home port to reload and begin the
procedure again. In this manner, the TF will enter ‚Continuous Supply’ mode and will continue to
transport the specified materials until told to do otherwise by the player. TFs in a Continuous
Supply mode will be set to Retirement Allowed, which cannot be changed.
This is a good way to keep rear-area bases supplied without a large fear of loss. However,
the player should not set a Transport TF to this mode and ignore the ships; system
damage, represented by wear and tear on the vessels, will accumulate and the ships will
need time to repair such damage periodically.
The TF Information Screen will display this order as CS: Base Name where it would normally
display Computer Controlled. In this way you can set up a convoy that will continue to repeat to a
specific location.
6.1.16 Submarines
Submarines are sent on patrol as a TF, usually with only one sub in each one. The computer can
assign patrol orders, or you can choose to give it a DH yourself. Missions for submarines are Sub
Patrol, Sub Minelaying, and Sub Transport. A good strategy for using submarines is to send them
to choke points, or patrol near major enemy supply areas. With the Automated Submarine
Operations option turned on, the computer will take care of creating sub TFs and will send them
92
on patrol so you don’t have to order them individually (although you can still take any sub TF off of
computer control). For greater realism, Japanese subs can be set to use the Japanese Sub
Doctrine (see section 2.2.1 Japanese Sub Doctrine).
6.1.16.1 Auto Creation of Submarine Task Forces
If the Auto Submarine Ops function in the Options Menu is activated, the computer will handle
submarine options by periodically sending submarines out on patrol from major bases, and
repositioning submarines into different home bases as it deems fit.
Submarines are much easier to locate and damage when they are in shallow water hexes
as opposed to deep water hexes.
When building a sub TF, the computer picks one submarine in port and places it in a Sub Patrol
TF. When these Task Forces are created, the computer will assign them a DH and it will be
placed under computer control. Submarine TFs created by the computer will already have a DH,
but you may at any time give them a new DH. However, once a computer controlled sub patrol TF
reaches its DH, it may decide on its own to move to a different shipping lane in an attempt to
locate targets (it will even attempt to follow enemy Task Forces that it spots). You need to switch
the TF to Human control in order to keep a sub patrol TF at a particular DH (at least until a good
target comes along that the sub TF decides to follow).
A good way of using Sub Patrol TF’s is to form a sub patrol TF with one submarine, give it a
Destination Hex within a few hexes of a major enemy base, and then put it on computer control.
The DH will serve as a starting point for the submarine, but it will then move on its own to where it
can best find a target. This can also be used in conjunction with the Auto Sub Ops preference, as
at any time you can change the DH’s of computer controlled TF’s already at sea in order to
concentrate your submarines at a critical area of operations. Japanese submarines were
historically very successful in late 1942 hunting Allied ships just southeast of Guadalcanal (an
area that became known as Torpedo Junction).
6.1.17 Ship Endurance
Ships use fuel whenever they move. In War in the Pacific - The Struggle Against Japan, 194145™, each ship is rated for how much fuel it can hold as well as its maximum endurance, which is
the number of miles the ship can travel at cruising speed. The TF display shows the amount of
endurance remaining for each ship in the TF. A ship with no endurance left will cause its TF to
have a maximum movement speed of one hex per naval movement phase.
93
Whenever a ship moves in a TF, it draws on its Endurance, which in turn subtracts from the
amount of fuel carried. Fuel is expended when:
A ship moves the entire turn at or below its Cruising Speed (the cruise speed for the ship
in hexes as specified on each Ship Information Screen); this ship will use up Endurance
equal to 60 times the number of hexes moved.
For each hex moved over the ship’s Cruising Speed, the ship will expend an additional
360 endurance per hex. The cruising speed of the TF in hexes is figured by the Cruising
Speed of the slowest ship in it. Since each ship checks the TF move against its own
Cruising Speed, ships in the same TF can use up different amounts of Endurance in the
same move.
Each ship in a TF that is not docked also expends a small amount of Endurance every
turn equal to 60 times the ship’s cruising speed in hexes (i.e. it is assumed they are
constantly moving at cruising speed even if they aren’t moving to other hexes).
For every plane that is launched on a Strike Mission from a TF, the ships in the TF
expend one Endurance.
For every three planes launched on a Search or CAP Mission, the ships in the TF
expend one Endurance.
Every ship in a TF that is involved in surface combat expends 200 Endurance.
Whenever a TF is bombed or strafed, all ships in the TF expend one Endurance per
attacking plane. If a ship in a TF is judged not to have enough Endurance remaining to
be able to move to its Destination Hex and then return to its home base (at Cruising
Speed), the TF is considered to be “Low on Fuel.”
The program will deduct a certain amount of fuel depending on how much Endurance a
ship has expended. Calculating fuel usage for your ships is unnecessary. More important
is to ensure that you send fuel to your advanced ports so your ships can replenish.
When Low on Fuel, the TF will attempt to refuel at sea, either from a Replenishment TF that is
following it or from any fuel source in its hex. If a TF judges itself to be Low on Fuel, it will not
move over Cruising Speed, even when its Mission and Patrol/Retreat Status would otherwise
have had the TF moving faster. This can seriously jeopardize a TF’s Mission as it may stay at a
distance from a DH that the TF intends to sprint towards at night and refuel rather than move
toward the DH. Under some circumstances this could repeat over several turns causing the TF to
never successfully complete its Mission (it heads for home once no ships are left to refuel low-fuel
vessels).
94
6.1.17.1 Refueling in Port and at Sea
Be sure not to put ships with low fuel capacity into TF’s that will not need to move at
maximum speed, especially when its DH is very far away. Ships with speeds of greater
than 25 and Endurance under 4,000 will have difficulty performing almost any Mission that
calls for maximum speed on the way to a DH further than 500 miles away. Also be very
careful sending Destroyers (especially Japanese DDs) on very long distance Missions that
will require maximum speed (unless they refuel from larger ships or oilers while en route
to their destination).
Ships can refuel in any friendly base that has fuel (the amount of fuel is listed in each Base
Information Screen). The act of refueling in port automatically docks the TF, fills each ship to its
maximum Endurance (assuming there is enough fuel at the port to do this), and replenishes each
ship’s ammunition. Ships may also refuel at sea, if there is a friendly ship in the same hex that
has sufficient fuel to be a source of fuel. When a TF refuels at sea, each ship in the TF, one at a
time, attempts to find another ship in the hex to serve as its fuel source. AO and TK ships can use
their fuel cargo to refuel ships at sea. Other ships carrying a large quantity of fuel (ships with high
endurance, not fuel cargo) may be used to refuel ships that are low on fuel, but the ship providing
the fuel will never give fuel such that it’s current fuel on board drops below the maximum fuel
capacity of the ship being refueled.
Refueling, both in port or at sea, takes time and may slow down or prevent the TF from moving
during the 12-hour period in which the refueling occurs.
Some refueling occurs automatically during the resolution phase, but refueling that is ordered
during the Orders Phase happens the instant the order is given (assuming a source of fuel is
available for refueling).
6.1.17.2 Operation Points
Operation Points (or OPs) reflect the time spent on refueling, replenishing ammo, and loading and
unloading of cargo. These actions reduce the movement of a TF during a Resolution Phase.
During an Orders Phase, if a TF refuels or is ordered to load troops, the TF Information Screen
will reflect the amount of time already used in Operation Points. Every TF has 1000 Operation
Points in each 12 hour Resolution Phase. Thus, if a TF refuels and the display shows a ship has
used 300 Operation Points, 30% of the 12 hours (300/1000) has been expended. This means the
Task Forces speed in hexes will be reduced by 30% for the first 12 hour Resolution Phase
resolved after exiting the Orders Phase. If a ship has any ammo replenished, it will use 1000
Operation Points. Ships that use 1000 OPs will still be allowed to move a minimum of 1 hex in the
phase.
6.1.17.3 Docking
TFs may dock at a friendly base (this is different from ships anchored at a port because they’re
not assigned to a TF). Any TF loading or unloading at a friendly base is automatically considered
to be docked. Ships that are docked do not suffer operational damage and will be able to repair
damage faster than if at sea, but they will also be easier to hit by attacking aircraft.
Docked TF’s do not use Endurance, but they will automatically respond to enemy naval forces
(both reaction moves and to engage an enemy fleet in the same hex), in which case they will no
longer be docked.
95
6.1.18 Creating PT Boats and Barges
Small combatants such as American PT boats were useful in narrow waters, while both sides
made use of barges (LCVPs, LCMs, and AGs) for short supply hops between islands. However,
these vessels had to be transported over the ocean to their new base.
To create a PT boat or barge:
Form a Transport TF and load supplies onto it. Once this is done, at any time the TF
may convert some of the loaded supplies to create a TF of barges or to create a TF of PT
boats (there are no Japanese PT boats in the game) by clicking on the appropriate
Create Barge or Create PT Boats arrow button. This is done from the TF Information
Screen of the TF carrying the supplies.
Build them from any base with a current port size of at least 1 and more than 10000
supplies.
When the barge or PT boat TF is created, it will consist of up to 15 barges or 12 PT boats if these
ships are currently available to be brought into the game. As long as there are supplies carried by
the creating TF and there are ships available, the TF can continue to create additional barge or
PT boat Task Forces.
Supplies are used up for each ship created as follows:
LCT – 60 Supply Points
PT Boat – 50 Supply Points
Large AG – 35 Supply Points
LCM – 25 Supply Points
Small AG – 20 Supply Points
LCVP – 10 Supply Points
The number of barges and PT boats available to you can be found on the Ship Availability Screen
accessed through the Intelligence Screen.
PT boats and barges act in all ways like all other ships. They can reload torpedoes at a port size 3
or greater as long as there are at least 20000 supplies at the port. Otherwise they can use PT
Boat Tenders (AGP’s) for supply (refer to 12.2.1 Depots and Tenders).
6.1.19 Loading and Unloading Transports
Ships with a cargo capacity may load ground units, supplies, and fuel when in the same hex with
the item being loaded (air groups and resources may be loaded on AK’s only and oil may be
loaded on TK’s only). A TF must be instructed to load either fuel, supplies or troops on the TF
Information Screen. TK and AO ships may only load fuel, and will always do so whenever part of
a TF that is conducting any kind of loading operation.
If a TF is ordered to load troops, you will be shown a list of possible units that can be loaded,
along with the carrying cost of each unit and the total cargo capacity of the TF. A TF loading
troops will also load supplies if there is any available space in the TF after all the selected troops
have been loaded, and if the base has abundant supplies. Transports can load troops without
supplies by selecting the “Load troops only” option. Ships with a cargo capacity, but not TK and
96
AO ships, use up 2 capacity points for every point of fuel loaded. Ships that do not have a normal
cargo capacity, but can carry cargo in Fast Transport Missions, use up 4 capacity points for every
point of fuel loaded. Each cargo carrying ship may carry a maximum of 1 ground unit. A ground
unit will be broken into many sub-units if necessary in order to be loaded onto a TF (1/144 Rgt,
2/144 Rgt., etc.). Whenever sub-units of the same ground unit find themselves on land and in the
same hex, they will automatically combine together.
The following table determines how much space each type of item takes up in each type of ship
(supply column also represents resources, fuel also represents oil). Note that the numbers
below represent how many capacity points it takes to load one unit of the indicated item.
So, on a Cargo Ship (AK), 1 supply point takes 1 capacity point, 1 fuel point takes 2 capacity
points, 1 infantry squad takes 6 capacity points, 1 artillery takes 2 capacity points, amd so on. No
indicates that the vessel may not transport that type of cargo.
Note that AP’s use only 1 capacity for 1 squad, but 3 capacity per supply point.
Ship Type
CL
DD
APD
AP
AG
LCM
LCT
LCVP
LSD
LST
LSV
LSM
LCI
AK*
AE
AO
TK
Resources/Supply
3
3
2
3
2
2
1
4
1
1
2
1
3
1
1
No
No
Oil/Fuel
No
No
3
3
8
8
8
8
2
2
2
2
No
2
No
1
1
Infantry
1
1
1
1
1
1
2
1
2
2
1
2
1
6
No
No
No
Artillery
3
3
2
3
2
2
2
2
1
1
1
1
No
2
No
No
No
Vehicle
No
No
3
3
3
2
1
1
1
1
1
1
No
2
No
No
No
Tank
No
No
No
6
6
2
1
2
1
1
1
1
No
4
No
No
No
*AK ships may only load one air group per ship, and this is an instantaneous occurance. A
player loading an air group as cargo in this manner will then need to immediately order
additional loading, if desired or if the TF is capable of loading extra materials.
As you can see, some ships are much more efficient at carrying certain cargoes than others (e.g.,
an LCI is much more adept at carrying infantry squads than an AK).
97
Other ships may transport items when assigned a Fast Transport Mission. The ships listed above
carry at the same rates listed there no matter what kind of Transport Mission it undertakes. The
following table details the carrying capacities of ships that can undertake Fast Transports:
Ship Type
CS
AV
ML
DM
DMS
SS
BB
BC
Supply
1
1
2
3
3
3
3
3
Fuel
2
2
3
No
No
No
No
No
Infantry
6
6
1
1
1
1
1
1
Artillery
2
2
2
3
3
3
3
3
Vehicle
2
2
3
No
No
No
No
No
Tank
4
4
No
No
No
No
No
No
Supplies are loaded at a rate of 200 times the port level (reduced by damaged but never less than
100) per day. Fuel is loaded at a rate of 1000 times the port level (reduced by damage, but not
less than 200) per day. On the first turn of every scenario, however, all Load orders will be carried
out instantaneously during the Orders Phase, accounting for preparation that goes back before
the scenario’s start.
On the first turn of all scenarios, all load orders will be completed on turn 1, accounting for
the preparation that occurred before the scenario began.
No ship may load more than 10% of the supplies located on a base. For example, if there are 100
supplies on a base, no more than 10 may be loaded in any ship at that time.
Once a TF has started loading, it will not move until the loading is completed or you cancel the
loading operation. The speed of the loading will depend on the size of the port (or lack of a port)
at which the units are being loaded. If there is a port where the loading is taking place, the TF will
dock. When a TF is ordered to load ground troops, it will begin loading the troops during the
Orders Phase. Some troop loading will actually happen at the instant the order to load is given,
and this will use up some of the Task Force’s operation points. In this way you can see how the
troop loading is going to be spread out among the transports. If a TF is ordered to load more
troops than the capacity of the TF, the TF will attempt to add transports to the TF from port that
will be sufficient to carry the troops to be loaded (up to the 25 ship maximum per TF).
Before the loading command is given, a Destination Hex should be set; if one isn’t, as
soon as the TF finishes loading, it will commence unloading (it thinks it’s arrived at its
destination). Once loading is complete, the TF will begin moving to its DH. Unloading
begins immediately if the Unload Cargo option is selected for the TF. If not, the TF will not
unload anything when it reaches its destination.
Fast-Transport Missions will only load what they can unload in one unloading phase, and they can
only attempt to load one ground unit per TF.
Task Forces carrying cargo will automatically begin unloading once they reach their Destination
Hex as long as it is a coastal hex. If unloading in a friendly port, the TF will dock. The speed of the
unloading is dependent on the size of the port; the unload rate of supplies from a ship is equal to
100 times the port level (modified by damage) +400 per turn. So, an undamaged size 5 port would
unload 900 units (troops, supplies, etc.) per turn.
98
Unloading over a beach is much slower than unloading at a port, but the units being unloaded will
do so in safety. Unloading over a hostile beach (i.e. a coastal hex that contains at least one
enemy unit, or an enemy base or potential base {beach} even if empty of enemy units) will cause
units being unloaded to suffer disruption, fatigue, and the disabling of some of their elements just
from landing. This can be minimized by several items. Each transport type has a value for its
amphibious capability. The better the value the faster the unloading time and the less the units
unloading will be adversely effected when unloading. Also, units can prepare to invade an
objective and build up prep points toward the target that will minimize the adverse effects. Also, a
HQ in the same hex as the target and that has the target designated will minimize the adverse
effects (both by its amount of preparation and its leader value).
An AGC type ship with the controlling HQ for the invasion (AGC’s can only load Amphibious
Force HQ’s) on board will help minimize the adverse effects when located in the same hex as the
invasion/unloading of troops. Amphibious Force HQs provide a special bonus if they are the
controlling HQ at the invasion.
The basic amphibious values for ship classes are as follows:
LST, LSD, LSV
LCVP, LCM, LCT, LSM, AG
AP, CS, APD
Japanese bonus through March 1942
100
75
50
+200
Units unloading in a hex where the base is not owned are shot at by coast guns, artillery and
other lighter weapons such as mortars and AA guns. These units have a chance to hit the
transport as well as a chance to hit the ground unit element(s) unloading. These enemy weapons
may shoot at some of the unloading ships when it is determined that these ships need to come in
close to the shore to unload their cargo. This is true for all the guns firing at ships. For example,
APs are assumed to be standing far offshore putting the men in smaller landing craft that are not
included in the game. Only large coast guns are likely to be able to reach these ships so they are
unlikely to be hit. An LCVP is a small ship that must come in to shore, so just about any weapon
could hit them. In addition to shots at the ships, troops are shot at separately by all enemy
weapons (they are shot at just after they unload from their ships).
Enemy fire can be reduced by placing fire support ships in the transport TF that is landing troops.
The best fire support ships are destroyers and various specialized landing craft equipped with
rockets and/or mortars. These ships must be in the transport TF to minimize the defensive fire
against unloading ground units and ships close to shore.
Once a TF begins unloading, no ships will split off from the TF due to damage or slow speed
until the TF has completed unloading all of its cargo. Fast Transports and submarines
unloading will not be slowed down by the act of unloading. Once a TF has finished unloading, it
will return to its home base by changing its Patrol/Retreat Status to Retirement Allowed and
setting its DH equal to its home base. Ships may, however, split off if they still contain cargo and
before the TF begins unloading.
6.1.20 Naval Evacuations
Evacuations are a special type of amphibious transport. A Fast Transport TF may attempt to
evacuate friendly forces from a location other than their current hex. To do this, order the TF to
Load Troops and choose the Pick Up Unit option. This will allow you to select any one friendly
99
ground unit on the map. The TF will automatically set its destination to the hex containing the unit
to be evacuated, and then conduct a Fast Transport Mission to that hex. It will arrive at night, and
sprint oward home after performing a load that won’t cost the TF any Operations Points. Only one
ground unit may be picked up per TF. If you subsequently order the TF to Load Troops or you set
a new Destination for the TF, the pick up will be canceled.
6.1.21 Special Aircraft Carrier Movement
Air Combat TF’s that have not aborted their Mission and have at least 30 aircraft may
automatically move one hex towards an enemy air combat TF after each Air Search Phase. Allied
Task Forces between 2 and 4 hexes of the enemy will automatically move and Japanese Task
Forces either 4 or 5 hexes from the enemy will automatically move. TF’s with a Max React set to
0 will not make this move.
6.1.22 Naval Ammunition and Retreat
If a TF is judged to be “Low on Ammo,” it will have its Patrol/Retreat status automatically set to
Retirement Allowed. If the TF is at its Destination Hex, this will result in the TF returning home. A
TF is considered to be “Low on Ammo” when the TF is an Air Combat, Surface Combat, or
Bombardment TF and it is in a surface combat engagement and a ship in the TF has less than 6
main gun ammunition
6.1.23 TF Officers
Every task force has an officer in command. If the Auto Commander Option is note being used,
no commander is assigned, and the captain of the flagship assumes the role. If the Auto
Commander is on, an appropriate leader will be selected by the computer at no political point cost
to the player. The player may see a written evaluation of the task force commander and may
choose to replace him any time the task force is docked at a port. Officers have several
characteristics, which can and will affect the TF’s performance in combat, task force fuel
consumption, morale, and other factors. These characteristics include aggressiveness, overall
competence, inspiration to subordinates, skill in surface actions, skill in carrier actions, skill in
invasion, and administrative skills. Although only overall competence and inspiration values are
displayed on the screen, a written evaluation of the officer is available, which is formed from the
other skills. This evaluation may change during the course of the campaign, depending on the
fortunes of war. Selecting the correct task force commander can have a significant effect on how
well the task force does.
The TF commander assignment menu can be accessed from the Task Force menu when the TF
is docked at a friendly port. At such time, the TF commander’s name will be printed in yellow.
Clicking on the name will evoke a screen with a listing of available commanders on the left and an
evaluation of the selected commander on the right side of the menu. All task forces will have, as
the first leader in the list, the current Task Force commander. Following that, there will be a listing
of all admirals of proper rank and time in grade to assume command. Clicking one of these
names and selecting Done is all that is required to change the commander as long as the
required political points are available. If the current leader is the ship captain of the flagship, it
requires no political points to relieve him of command, but you must pay political points equal to
10 minus the political value of the new commander. If the current commander is not the flagship
captain, additional political points equal to the current commander’s political rating must be paid to
relieve him.
100
Note that rank is not an in-game factor and can be ignored for the purposes of deciding on
whom to command your TF. Unlike the real world, none of your virtual officers have an ego
to bruise by placing a lower-ranking officer in a position over them. If an officer is on this
list, they are capable of command.
Clicking a name also reveals the written evaluation on the left of the menu. The evaluation will
indicate the overall competence and aggressiveness of the commander, as well as what type or
types of TFs he will be best suited to command, although any commander can assume command
of any type of task force, carrier, surface or invasion. Note that older, more experienced
commanders will frequently enhance performance more than younger, less experienced
commanders. Some task forces, such as surface task forces, may do better with more aggressive
commanders. Others, such as cargo task forces, will do better with a more cautious commander.
Creating TFs at sea, by splitting off some ships from another TF, will generate a commander from
the flagship in the new task force, generally the biggest ship. No commander may be assigned.
There is a 50% chance that a TF commander will be killed when the ship he is on sinks.
6.1.24 Shakedown Cruises
It is now useful to run a week or two long shakedown cruise, when a ship is first comMissioned.
Many ships come into the game with very small combat experience. Some of these include the
sub chasers and gun boats. Sub chasers and mine sweepers have depth charges, but their skill is
so low they never use them. It takes many attacks on the TFs they are escorting before they will
fight back. The same is true to a lesser extent with Allied warships and night battles. To allow
players to train their crews and gain experience, place them on a Shakedown Cruise.
A Shakedown Cruise is not a specific order that can be chosen, but rather an automatic action
undertaken by the computer on your behalf. At the end of each day that a ship in a TF is at sea
and has less than 15 Day or Night Experience, the deficient value is increased by +1. After that,
they have a 1 in 5 chance of increasing Day Experience by +1 or a 1 in 7 chance for Night
Experience by +1. The value keeps increasing until the minimum value for the ship class is
reached, as follows:
25 for civilian vessels (such as Cargo Ships)
35 for non-combat vessels (such as Seaplane Tenders)
45 for semi-combat vessels (such as Corvettes, Sub-chasers, and sloop-sized ships)
55 for combat ships (such as Destroyers and Cruisers).
6.1.25 Naval Combat
Naval combat in the Pacific was a complex affair. Japan tended to have more experienced
seamen as well as a remarkable proficiency in night fighting. However, the Americans learned
fast, and their radar sets could be a match for the sharpest Japanese eyes. Battles were usually
fought at night as surface ships avoided the daytime scrutiny of aircraft, and such combat often
became a bloody, confused melee of flaming ships.
Naval combat takes place during different phases. Mine attacks are conducted during Movement
Phases, submarine attacks can occur throughout the Resolution Phase (as ships and subs
become targets by crossing the sub’s path), naval bombardment occurs during Naval
101
Bombardment Phases, naval air combat only takes place during Air Operations Phases, and
Coast Defense units may fire at at enemy transport TF’s unloading in their hex during
Load/Unload Phases and enemy bombardment TF’s bombarding during Naval Bombardment
Phases.
There is a 50% chance that a TF commander will be killed when the ship he is on sinks.
Naval Combat Animations
If Combat Animations are turned on on, the Naval Combat screen will show surface actions as
they are fought out by the ships present in the battle. Each side of the screen will have the
appropriate ships present.
As shots are traded, the display indicates by water spouts, explosions, and text messages what is
occuring on the screen. If you do not wish to watch the entire spectacle and instead skip to the
end Combat Summary, click the Done button.
A combat results report will follow (if Reports are turned on) that details all participating
combatants in the battle, as well as the results of the combat.
Following are some important considerations when it comes to Naval Combat:
6.1.25.1 Surface Combat
Ship-to-ship surface combat between TFs occurs during Surface Combat Phases. This is different
than other types of combat in War in the Pacific - The Struggle Against Japan, 1941-45™.
Surface naval combat occurs when warships with certain orders are in the same hex as enemy
ships. Some basics of surface combat:
1.
2.
3.
4.
5.
6.
7.
TFs spot each other, and maneuver at different ranges during combat.
Surface combat occurs at shorter ranges at night. Thus, daylight favors battleships, while
nighttime favors ships carrying torpedoes.
Surface combat takes place as a series of rounds at different ranges as the forces close in
and then disengage. As the two TFs approach, the range is given, firing commences, and
the results are displayed.
TFs will attempt to close the range until enough damage has been taken without
endangering the TF. If the combatants close the range, then range will get shorter, and
attacks and damage will again be displayed. This will go on until one (or both) sides retire.
Surface combat involves the guns and torpedoes of both sides’ ships and considers gun
size, type of ship, armor, crew quality, radar, detection level, damage to ships, officer
ratings, ship speed, etc. and hits are registered accordingly.
Surface naval attacks can cause incredible amounts of damage to enemy ships, especially
if torpedoes strike home.
As TF’s move away gunnery and torpedo combat still takes place until both TFs are out of
range of each other.
You might wonder how ships fire at each other as they pass in the night. There are a number of
factors involved in naval combat. TF commander ratings, ship captain’s ratings, and crew
experience are the most important of these. Radar, proximity to shoreline, type of fleet,
ammunition loads, and a number of other factors are also considered.
102
Contact
Some TFs try to engage in surface combat, while others try to avoid such contact. Surface and
Bombardment TFs will seek out enemy shipping. Radar is of use in finding the enemy TFs, as is
the experience of the crew and aerial spotting. Once the TFs have closed, the range at which
combat occurs is determined. Night battles always begin at closer range. This is especially true
with Allied PT Boats, who try to hug the shore where possible and dart out at the last minute.
This, and their small size, makes spotting them visually or on radar very difficult. The TF
commander’s aggressiveness rating is important in determining if the fleet will try to engage, as is
the general condition of the TF and the perceived opposition. However, if the condition of one
combat TF is especially weakened the other combat force will usually be more anxious to engage.
Fleet Tactics
Every combat fleet will try to cross the “T” of the other fleet, thereby allowing most or all ships to
fire with full broadsides, while only some of the enemy’s ships can return fire (and not with all of
their guns). This is especially useful in night battles, where the back ships in a column may not
even be within spotting range of the enemy and thus will not take part. It is important to note that
even though all ships in the opposing TF’s are always shown on the combat screen, a ship can
find itself not participating in a given combat round. Surface Combat TF’s (including
Bombardment TF’s that determine they must abort their planned bombardment and immediately
switch to Surface Combat) and Fast Transport TF’s may attempt to cross the “T” if the range is
under 2000 yards. This chance of crossing the “T” is increased by the naval skill of the TF
commander.
The TF commander’s aggressiveness is the critical factor determining when a TF will try to
disengage and whether it will try to maintain contact with an enemy TF that is trying to disengage.
Non-combat TF’s will always try to disengage. It is also worth noting that Japanese combat TFs at
night are especially good at getting all their ships to participate, especially during the early war
period, and may have five or six ships firing while only one or two Allied ships return fire. Later, as
American radar becomes more common and effective and Allied crew experience increases, this
advantage is usually negated or reversed.
Gun Work
If and at whom a ship fires is determined by several factors. The size of a ship’s guns is a factor,
in that the ship will attempt to engage ships it can reach. So, for instance, Destroyers will fire at
those ships they can reach with their guns, usually other Destroyers or lesser craft, while Cruisers
will usually fire at ships they can reach, usually other Cruisers or lesser craft. Ships will try to fire
at the greatest perceived threat within gun range. In night battles, especially, the firing ships may
not have a line of sight to the best target or the ship’s skipper may decide to fire at a target of
lesser import, or a ship that is firing at him. The captain may also choose to fire at a vulnerable
target, such as a troop transport filled with troops, if the opportunity arises.
When the ship has a target and can fire, if the volley hits or not is dependent mostly on the
weapon firing and the range, but also on crew experience and the captain’s naval skill. System,
flooding, and fire damage to the firing ship affect hit chances as does the speed and size of the
target. Additionally, specific systems within the ship can be hit, so that once a gun is knocked out,
it can no longer fire.
Fire damage from non-penetrating hits is determinant on the ammunition type. General purpose
(HE), armor piercing (AP and APC), and semi-armor piercing (APHE) bombs, as well as
incendiary and napalm, are all accounted for by the computer. Extra damage dependant on
weapon type, penetration, and effect. Extra damage applies to bombs and gun fire. Nonpenetrating hits may also do system damage.
103
Note on Torpedo Duds
In January 1943, all torpedoes with a dud rate of greater than 49 have their dud rates reduced by
20. In September 1943, all torpedoes with an adjusted dud rate greater than 20 have their dud
rates lowered to 10. Allied torpedoes were notoriously inefficient in the early stages of the Pacific
War, and this rule reflects their slow but steady improvement over the years.
6.1.25.2 Ship-to-Shore Bombardment
This occurs during a special Bombardment Combat Phase. To perform ship to shore
bombardment, a TF must be operating with a Bombardment Mission. Bombardment combat
consists of naval gunfire on land targets and is similar to land combat. Naval bombardment
gunfire is more likely to target airfields, base structures, enemy ships at anchor, and coast
defense units than it is to target other ground units. Naval bombardment is the only means by
which ships may attack enemy ships at anchor.
6.1.25.3 Submarines and Anti-submarine Warfare
Submarines may attack any ships, although generally not PT boats and barges, in the same hex
as long as the ships are not docked or at anchor at a port with a current size of at least 3. They
may surface and shell barges. If Japanese Submarine Doctrine is selected, Japanese submarines
will attempt to attack combat ships and generally avoid attacking non-combat ships.
The sub attack sequence is as follows:
1.
2.
3.
4.
Chance for early detection of the sub by the TF escort
Sub attack
Sub dive to escape
Escort attack
If the sub is detected early, there is no attack by the sub, which dives and then suffers an ASW
attack.
The chance of a submarine attacking a TF varies with the:
1.
2.
3.
4.
Sub’s maximum speed
TF’s cruise speed
Sub crew’s experience
Prior detection of the sub
Most sub attacks will use torpedoes only, but the sub may conserve torpedoes and use its deck
gun against unescorted non-combat ships. The effectiveness of a TF’s escort is determined by its:
1.
2.
3.
4.
Maximum speed
Crew experience
ASW weapons
The total number of escorts in the TF
At night there is a small chance that the escort may use gunfire to attack a sub which is
considered to be running on the surface
104
Prior to 1944, Allied crews perform ASW functions during daylight at 114% of their crew rating,
and at night at 150% of their crew rating (except for British crews which get no bonus at night as
they generally already have extra high night experience). Prior to 1943, Japanese crews perform
their ASW functions at 67% of their crew rating, while in 1943 and thereafter they perform at 80%
of their crew rating.
6.1.25.4 Damage to Ships
Damage to ships is marked in orange (less than 50 percent damage) or red (more than 50
percent). Ships can sustain 6 types of damage:
1.
System Damage (Sys) is a number between 0 and 99. A rating of 0 indicates all systems
on the ship are functioning at full effect with no damage, while 99 indicates the ship’s
systems are 99% damaged. The greater the system damage, the less effective the ship will
be in all aspects of combat.
2.
Flotation Damage (Flt) is a number between 0 and 100. Flotation damage represents the
amount of flooding on a ship. When Flotation damage reaches 100, the ship will sink.
3.
Fire Level Damage (Fires) represent the intensity of any fires currently burning on a ship. A
0 indicates no fires burning while a value over 40 represents very large fires burning.
4.
Individual weapon systems may be destroyed. When a system is destroyed, it will no
longer be listed on the Ship’s Information Screen. These systems may be repaired if at
anchor in a port with a current size of at least 5 (the larger the port and the smaller the
weapon system, the quicker the repair time).
5.
The maximum speed of a ship may be reduced as a result of both system damage and
flotation damage. The maximum speed of the ship is updated every time the system
damage or flotation damage increases or decreases.
6.
Ships may suffer Critical Hits, which cause more damage than normal hits.
There is also a 4% chance that every Critical Hit endured by a ship will cause its immediate
destruction.
Ships too far away to target or hidden by fire, smoke or another ship will have no name printed on
screen until identified.
A ship with any flotation damage or fires on board may suffer additional damage of any kind as a
result of flooding/fire/explosions during each turn. Each turn all ships attempt to repair Sys, Flt
and Fires. It is much easier to repair damage in a port. The amount of repairs made as well as the
likelihood of additional damage is impacted by the amount of current damage, the experience of
the crew, and if the ship is in port, the size of that port.
6.1.25.5 Operational Damage and Repairs at Sea
Whenever a ship is at sea (not docked), it has a chance of suffering system damage due to wear
and tear on the ship. This damage can occur as the TF enters each new hex, and will immediately
affect the TF’s speed for the rest of the turn. Ships moving at maximum speed will suffer greater
105
Operational Damage than ships moving at Cruise Speed. In addition, ships always attempt to
repair fire, flooding, and system damage, even when at sea.
The chances of incurring System Damage during normal movement (representing normal wear
and tear on the ships) is 1 in 90 for every hex entered at Cruise Speed, and 5 in 90 for every hex
entered at Full Speed.
6.1.25.6 Home Base for Refit/Repairs
When the Production option is turned off and a partial map is being used, each nationality will
have a Home Base automatically assigned that the ship travels to when traveling off map:
Australian goes to Sydney
New Zealand goes to Auckland
Japanese goes to Tokyo
US types, China and Philippines goes to Pearl Harbor
Soviet Union goes to Murmansk
Other Allied nationalities goes to England
6.1.26 Mine Warfare
Minefields are created by DM, ML, and SS ships laying a minefield. Multiple minefields can exist
in the same hex, and whenever a TF enters a hex with minefields, each minefield in the hex has a
chance of causing damage to the ships in the TF. As minefields are detected, the chance they will
do damage to Task Forces declines. The greater the number of mines in a minefield, the greater
the chance a mine will hit an enemy ship (there is a small chance that a ship will hit a friendly
minefield, but this is very unlikely). Whenever a DMS or MSW ship enters a hex with an enemy
minefield, it attempts to clear the minefield by destroying the mines (they can also clear minefields
in adjacent hexes if they are patrolling in a Mine Warfare TF). If a Mine Warfare TF is clearing
mines in a hex that contains coastal guns, the TF may be fired on.
The number of mines in a minefield in deep water decays by 50% per day, in shallow water by 5%
per day, and in friendly bases with at least a size 1 port by 1% per day. Mine layers and
submarines may rearm at any level 9 or 10 port with supplies or at any base with an MLE ship.
The number of friendly mines are now displayed in a friendly port at ports of size 1 or greater (on
the base display screen).
6.1.27 Submarine Warfare
Submarines may attack on the surface or submerged. If the target of the attack does not look
threatening to the submarine’s skipper, he may attack on the surface. He is much more likely to
try this at night, when escorts have difficulty spotting him. Submarines may also attack
submerged if the taTF has surface combat ships or it is a day attack. The effectiveness of a
submarine attack depends on the weapons being used, the submarine captain’s naval skills and
the skill level of the crew. Unlike surface ships, most allied submarine crews start the war well
trained for night attacks. Escorts may spot a submarine before it makes an attack or afterwards
(or not at all) and will fire at a surfaced submarine, the periscope (seldom works) or may make a
depth charge attack. The escort’s weapons, captain’s naval skill and escort’s crew skill determine
the effectiveness of the anti-submarine attack. A submarine’s durability is a function of its
106
maximum diving depth, and this will greatly impact the effectiveness of any anti-sub attack as
well. When in coastal waters, submarines may not be able to take full advantage of their
maximum depth. Depth charges can be brutal and end a submarine very quickly. This makes
attacking a Surface Combat or Air Combat TF with many escorts far more dangerous than
attacking a small, unescorted cargo task force. Ships with anti-submarine weapons, such as
destroyers or patrol boats are always searching for submarines, but the submarine’s skipper
usually determines if an encounter occurs. Please note that submarines may also be used for
transporting supplies, fuel, troops or mines.
6.1.28 Coast Gun Fire at Passing Task Forces
Every time a TF enters an enemy base hex, enemy coast guns in the hex may fire at the ships in
the TF. TFs will generally try to avoid moving through enemy base hexes when selecting their
movement paths so as to avoid this kind of attack, if possible. A TF ordered to move to Manila
(43,52) would find that it must move through the Bataan (42,51) hex to get to Manila. This will
allow the coast guns of Bataan to shoot at these ships as they sail by.
6.2 BRITISH WITHDRAWAL
To reflect the desperate need for combat ships in the Atlantic by the British side, the player will
need to withdraw British ships from the game every month if it is deemed necessary by the
computer; on the first of each month it will calculate which ships, if any, the human player must
withdraw from the game for a period of time. This period ranges from 1 to 1.5 years. If a ship is
withdrawn and returned in this manner, it is subject to this Withdrawal rule again when it
reappears on the map.
This determination is done for each class of British ships operating in the Pacific (CV, CVL, CVE,
BB, BC,CA, CL, CLAA and DD). No more than 1 major (non-DD) ship must be withdrawn, and if 1
needs to be withdrawn, 2 DDs will need to be withdrawn with it as escorts.
If the ships are not withdrawn on time (by the end of the month that the withdrawal is called for by
the computer), then the player must pay Political Points as follows:
CV
CVL
CVE
BB
BC
CA
CL
CLAA
DD
2000
1200
1200
2000
2000
700
500
500
300
If the player does not withdraw the required ship(s) on time, whether on purpose or accidentally,
the above Political Point cost will be deducted from their Political Point pool, and the ship(s) will
remain in the Pacific. It is possible to go into negative Political Points in this manner, but this will
affect other actions requiring Political Points. On the Allied Intel Screen you is displayed a British
Withdraw section and a list of ship classes that require withdrawal with the number of the class
needed and the number of Political Points lost if one of the ships is not withdrawn..
107
To withdraw a ship, the ship must be in Karachi, Bombay, or San Francisco and must have less
than 50 system damage. It must be a British Nationality ship. If these conditions are met there
should be an option on the ship detail screen that allows for Withdraw Ship From. The ship will be
given a delay of between 1 and 1.5 years before they return.
7.0 AIR UNITS
"Tora, tora, tora!"
- Captain Fuchida Mitsuo (at the attack on Pearl Harbor, 1941; „Tora“ means tiger in Japanese]
Air units generally depict squadrons of the same type of aircraft. They are differentiated
graphically by the aircraft type of the planes in the unit. Aircraft types include:
The following icons appear on the Hex Command Display. Their background colors will
change based on the side using them (red for the Japanese, etc.)
Fighters are employed to gain air superiority over a battle by shooting down
enemy aircraft. They are generally fast and highly maneuverable.
Fighter-Bombers can fly either fighter- or bomber-type Missions, but are not
as good at either as their specialty counterparts.
Dive-Bombers attack ground and naval targets by diving straight in on their
targets from high altitude.
Level bombers also attack ground and naval targets, but carry a higher
payload of bombs than their dive bombing cousins. Since Level Bombers fly
straight and level, though, they are less accurate.
Float Fighters are equipped with floats in order to land and take off from the
ocean. They’re not as powerful as regular fighters, but their versatility make up
for this.
Transport aircraft ferry troops and supplies.
Patrol aircraft are seaplanes used primarily to search for enemy ships.
Float planes are ship-based planes used for antisubmarine patrol and naval
search.
Reconnaissance planes have extraordinarily long range and are used
exclusively to spot enemies.
Torpedo Bombers attack naval targets by flying in low to the water and
dropping thier torpedo payloads very close to the enemy.
Aircraft squadrons are never (except for some Float planes) found directly on the map.
They can only be seen at airfields or aircraft carriers and in battle.
108
7.1 AIR UNIT INFORMATION SCREEN
By selecting an air unit, the Air Unit Information Screen will appear.
In this example, we’re looking at Squadron VF-2, a fighter squadron based on the Lexington. A
thumbnail image of the aircraft appears at top center.
At upper left, information regarding the unit’s
nomenclature and service location is listed. From
this example we see that this is Squadron VF-2,
a US Navy squadron, acting as an Independent
command. By clicking on Independent, we can
see that this unit may be attached to any
command available in the game. The number 27
indicates the Max Ready Aircraft, which is the
maximum number of aircraft that can be ready at
one time for this unit.
1694 is this unit’s identification number that
identifies the unit in the Editor. Refer to the
Editor Documentation for more details.
VF-2 is Carrier Trained (meaning its pilots know
how to operate their planes from a carrier), is
stationed on the Lexington, and is comprised of
F4F-3 Wildcat fighters. There are 21 aircraft ready in the squadron (i.e., ready for combat
operations), and no aircraft are being repaired (having been damaged in combat) or in reserve
(extra aircraft to replace those lost or seriously damaged in combat).
109
The number of ready pilots is 19, and their average experience is 80 and morale is 90. Their
fatigue level is 2, and they have not made any kills (i.e. have not shot down any enemy aircraft)
yet.
At left bottom, we see that the commander of this
squadron is LCDR Ramsey, P., whose
Leadership rating is 65 and Inspiration rating is
71. He can be replaced by clicking on his name,
which brings up a new screen:
At left is a list of all the officers that can take control of this squadron, as well as each of their
Leadership and Inspiration ratings, Rank, and Political Point cost to assign them (which is the
cost of the current officer plus 10 minues the cost of the new officer incoming, if any – so, the
higher the Political Point cost for an officer, the cheaper he is to hire for the job, and the more
expensive he is to fire).
At right is a list of information for the current leader, which details his name, his Political Point
cost, how many Political Points are available to you, and a short evaluation of the leader. As we
can see in this example, Commander Ramsey, P. is evaluated as being best qualified to
command a fighter formation,“ To replace Commander Ramsey, click on a name from the list and
click the arrow next to Done at bottom right. The number of points the new officer cost will be
deducted from the player’s Political Points pool.
110
Continuing with the Information Screen example, we find that the squadron is located in Control
Zone SE (or Southeast), and is under Human control.
Note that Carrier Capable air units landing on a carrier will suffer higher operational losses
than a Carrier Trained units. Only Carrier Capable or Carrier Trained air groups may land
on a carrier.
Furthermore, at the bottom, a list of Pilots may be brought up by clicking on the Pilots text:
This list of pilots will show all currently assigned to the squadron, including their Rank, Name,
Experience (Exp), Fatigue (Fat), number of Missions flown (Mis), number of air-to-air victories
(Kills), and their nationality (Nat).
The central
information:
column
displays
the
following
A picture of the aircraft
Maximum Range in hexes and miles (in the
above example, 14 / 840, meaning
fourteen hexes and eight hundred forty
miles)
Extended Radius in hexes and miles (4
and 280, respectively)
Normal Radius in hexes and miles (3 and
210, respectively)
Maximum Altitude, displayed in feet
(34900)
Also, several orders may be given to the air unit in
this column, including:
Transfer to Base, which will bring up a new
list that allows the player to select a
destination from the list, or select a
111
destination from the map. If no destinations are listed, then none are in range for this
aircraft squadron.
If this option is selected a new screen will be displayed:
Any bases in range will be listed here, along with the number of Supplies located there,
the Range in hexes to that base from the squadron’s present location, the number of
other aircraft Groups (or squadrons) located at that base, as well as the base’s Size,
number of Aircraft present, and amount of available Support.
The –r designation identifies bases that the air unit can transfer to overland (by being
crated up and transported). Refer to section 7.2.1 for more details.
Disband Group, which will disband the squadron (if this is selected, the computer will
ask if the unit should be reformed; if so it is returned in 90 days as a reinforcement, using
available planes in the replacement pool to try to fill the unit up to full strength; if not, the
unit is permanently removed from play)
No Replacements/Accept Replacements, which will either not allow or allow,
respectively, replacements to be accepted by the squadron (this is useful to select when
you want certain squadrons to have a priority in receiving aircraft)
Do Not Upgrade/Upgrade – aircraft type, which will either block or allow any upgrading
of the squadron’s aircraft. If allowed, the name of the aircraft type that this squadron will
upgrade to is displayed (if available; this is not an indication that the new aircraft type will
be immediately transferred, but rather that this squadron is wanting to upgrade its aircraft
at the earliest possible opportunity). Upgrading aircraft requires a minimum of the
squadron’s Max Ready number of aircraft of the new aircraft type available in the
production pool.
Transfer to Ship, which allows the player to move the squadron to another carrier that is
in range and has room for it. A new list will be displayed of possible locations; if no
locations appear then there is no ship in range that can take on the squadron.
112
If this option is selected, a new screen will appear:
From here, all available ships that are within range and can take on the squadron will be
listed. The ship Type is shown, it’s Name, its Ops point value, the Range to that ship,
the number of Groups currently on it, the ship’s maximum aircraft Capacity, the current
number of Aircraft located on it currently, and its Location (a base or TF name).
The Withdraw Group option is just like Disband except the pilots remain with the unit
and return with it when it returns to the game; a Withdrawn air unit is not permanently
removed from the game bur rather returned in 60 days.
The Upgrade Now option allows the player to order an immediate upgrade of the aircraft
in the unit to a newer model aircraft (see section 15.2.4).
The next several commands allows the player to set orders for one squadron and then have those
orders apply to all other similar squadrons in the hex and/or Task Force:
Set All aircraft type in this hex allows the player to select orders for this particular
squadron and issue the exact same orders to every squadron of the same aircraft type in
the current hex. This saves time if the player wants to issue the same order to every such
squadron.
Set All plane type in this hex is similar to All aircraft type (above), but any selected
orders will apply to all of this plane type (fighter, torpedo bomber, etc.) in the hex, not just
of the currently selected squadron. For example, a Wildcat and a Corsair are both
fighters. If fighter squadrons of each of these types were located in the same hex,
selecting this order will set the order for both of them, since they’re all fighter type
aircraft.
Set All aircraft type in this TF is similar to the ‚in this hex’ command, but instead
selected orders will only apply to squadrons in the same TF. For example, if a TF is
located in a base hex and this base hex has aircraft squadrons, only the aircraft for the
TF will be affected.
Set All plane type in this TF is similar to the ‚in this hex’ command, but instead selected
orders will apply to all squadrons with the TF.
113
The Set All command DOES NOT set the upgrade status items (Upgrade Now and Upgrade/Do
not Upgrade), nor does it set the Accept Replacements item.
Finally, the player may change the squadron from Day Operations to Night Operations, or vice
versa. Squadrons that are assigned to Day Operations will suffer penalties undergoing Night
Operations, as will Night Operation squadrons operating in the Day.
The rightmost column displays the Group Misson
that the aircraft will be assigned to. By selecting
an arrow next to the Mission type, the player is
setting up that Squadron to conduct that
particular Mission in the target hex. The target
hex is also selected here.
Primary Missions include:
Escort – In this Mission, the aircraft will
attempt to escort bombers flying
airstrikes from the same airfield (and in
some cases from other airfields; fighters
from one base may escort bombers
from another base if the fighters are
closer to the target than the bombers).
Units given a Mission of Escort will not
initiate an airstrike by themselves, but
will instead join up with an offensive
strike being performed. If the strike the
escorting planes are covering has a low
detection level, there is a chance the
escort aircraft will bounce the enemy
CAP (receiving substantial bonuses to
combat). However, it is much more likely
that CAP will bounce than Escort, all things being equal.
Sweep – In this Mission the aircraft attempt to draw enemy CAP over the target hex into
an air to air engagement. The planes will also attempt to strafe the target if CAP does not
drive them off. Squadrons are limited to one Fighter Sweep per day; if weather keeps the
fighters from flying a Sweep Mission in the morning, they will be eligible to fly one in the
afternoon.
Airfield Attack – In this Mission the aircraft will arm with bombs and attempt to bomb an
enemy airfield and other targets at the airbase.
Port Attack – In this Mission the aircraft will arm with bombs and attempt to bomb an
enemy port’s facilities and other targets at the port including ships at anchor. If there are
a large number of ships in port, some torpedo bombers may arm with torpedoes to attack
them.
Naval Attack – In this Mission the aircraft will attempt to use bombs or torpedoes against
an enemy Task Force. (in the above example screenshot, the TBD Devastator torpedo
bomber squadron has Naval Attack highlighted in green, meaning this is the Mission that
114
is currently selected. Torpedo bombers do not do as well with other Mission types as the
one they are built to accomplish.
Ground Attack – In this Mission the aircraft will attempt to bomb an enemy ground unit.
Recon – The unit will send one plane to perform photoreconnaissance of an enemy
base, ground unit or TF. (Large recon air groups may fly 2 planes per Recon Mission
flown.) This can increase the detection level of the target. Recon Missions are especially
difficult to intercept with CAP or shoot down with Flak. Recon type planes are the best at
performing Recon Missions. Bombing Missions will automatically recon their target (take
pictures as they bomb), but this is less effective than flying a specific Recon Mission.
(Refer to 9.1.3 Recon Flights)
Naval Search – The aircraft will search for enemy Task Forces (subs or surface) in all
directions out to their extended range. They will carry an extended range bomb load in
case they spot a sub or surface ship, in which case they will attempt to attack unless
driven off by CAP or Flak. The chance of sighting the enemy is increased with the
number of planes searching. When a unit has a Nav Search Level set greater than zero,
then the set percentage of the unit will automatically fly this Mission, with the remainder
of the planes either flying the Mission set for the unit or resting (if the Mission is Naval
Search). Thus, if you wish to have a unit fly all of its planes on Naval Search you must
set the Nav Search Level to 100 (irrespective of the Mission selected for the unit).
Planes executing a Naval Search will only search out to the Maximum Range that has
been set for them. The shorter the range set, the greater the chance they will spot a TF
within their range setting.
ASW Patrol – An ASW (anti-submarine warfare) Mission is the same as a naval search
Mission except that the range flown is cut in half and the chance of attacking a
submarine once sighted is increased. The chance of sighting the enemy is increased with
the number of planes searching. Units given an ASW Patrol Mission will have their Nav
Search Level turned into their ASW Patrol Level. When a unit has an ASW Patrol Level
set greater than zero, then the set percentage of the unit will automatically fly this
Mission, with the remainder of the planes resting. Thus, if you wish to have a unit fly all of
its planes on ASW Patrol you must set the Mission to ASW Patrol and the ASW Patrol
Level to 100.
Planes executing an ASW Patrol will only search out to the Maximum Range that has
been set for them. The shorter the range set, the greater the chance they will spot a
submarine within their range setting.
City Attack. This option the player gets a pop up with a list of all cities within range.
When the city is selected, the specific industry items are listed on the right. One of each
must be picked. If the player selects commanders discretion for the target city, they still
must select a general type of industry to bomb.
When a city is attacked, there is a chance that a fire can be started. A fire level shows up
when the mouse cursor is rolled over a base, just above the list of enemy industry. City
attacks on Manpower have a chance of creating high fire levels that will cause damage to
any and all industry. The fire level can get as high as 40 million, and is divided by 10
each 12 hours as the fire is put out. Very high levels will continue to cause damage. The
greater the target manpower, the easier it is to get a fire storm going.
115
Also, air dropped mines are an option here if a city with a port is targeted. Air dropped
mine Missions may not be flown before 1943.
If the Production System (section 11.0) is turned off, no industry, resources, or oil may be
attacked.
Supply Transport – The unit will fly supplies to their DH, which does not necessarily
have to have an airfield (thus allowing the ability to airdrop supplies to ground units in the
field) The unit must have a friendly unit set as the destination in order for the Mission to
be flown. Transport Missions may be flown to destinations that are within 1.2 of the
aircraft’s maximum range. The amount of supplies carried is dependent on the capacity
of the transports.
Troop Transport – The unit will fly troops to their destination base (must have an airfield
of at least size 1 unless the unit being transported is a parachute unit). The option Pick
Up Troops will be available if a destination is set for the air group. This will allow you to
order the air group to fly to a base, pick up a ground unit at that base, and return it to the
air unit’s current location. For either a transport or a pick up of troops to occur, a ground
unit to be transported must be selected or no Mission will take place. Transport Missions
may be flown to destinations that are within half (50%) the aircraft’s maximum range. The
amount of troops carried is dependent on the capacity of the transports. Only items in a
ground unit with a load cost of less than 7 may be transported by air (examples are the
37mm AT gun or 120mm mortar as the biggest items a plane will carry). Units that
cannot be transported in a single sortie will be split into two units, with one remaining
behind while the other appears at its destination.
Training – Aircraft from the unit will fly training Missions in order to improve pilot
experience. The number of aircraft that will fly is based on the Training Level percentage
(i.e. if the Training Level is 30 then 30% of the planes in the unit will fly training). Planes
flying training Missions take Operational Losses and may stumble into combat with
enemy planes flying over their hex. Units given a Training Mission will have their CAP or
Nav Search Level turned into their Training Level.
However, Combat Missions are the best way to gain experience, while Supply,
Transport, and Training Missions yield less experience.
Training is also a way to rest your squadrons; if you want your pilots to recuperate, set
their Training Level to zero. Click the Stand Down button (detailed below) on the
Secondary Mission list to stop training.
CAP – Although this is not a Mission that is assigned to a unit, some types of aircraft will
fly Combat Air Patrol to protect all friendly units in the fighter unit’s hex from enemy air
attack. The CAP Level number to the right of the screen determines a percentage of the
squadron’s aircraft that will fly CAP instead of the unit’s Mission (unless a training
Mission is ordered).
When the CAP Level or Training for units that can fly CAP is set to 100, the
Mission automatically becomes Long Range CAP. Thus, when a unit is flying
Long-Range CAP, it always tries to use all of its aircraft in the Mission.
116
Long Range CAP – The air unit’s aircraft will fly combat air patrol over all friendly units in
a hex other than the one containing the air unit’s base. Long Range CAP will attempt to
intercept any enemy planes flying into the hex containing the Long Range CAP. The
amount of fighters protecting the friendly units at the moment of an enemy airstrike is
based on the range to the hex being protected and the normal radius of the aircraft flying
Long Range CAP. Long Range CAP over Air Combat TF’s is only 20% as effective as
over other units since it’s harder to coordinate with an Air Combat TF that is constantly
changing course and is using radio silence. When Long Range CAP is set as the
Mission, the unit’s CAP level is set to 100.
Rest – Aircraft with rest set as a Mission will fly only naval attack Missions, resting at
their base if there are no TF’s worthy of attack (by definition their primary Mission type
must be naval attack).
Air units that have Naval Attack set as the Primary Mission, may select a Secondary Mission in
case there are no TFs to attack as follows:
Airfield Attack (which happens to be our example’s selection)
Port Attack
Recon
Rest – If no Naval Attack is conducted, the unit will do nothing.
The Stand Down command is the easiest way to tell the squadron to stop flying.
Selecting this puts the unit into Training mode and sets its Training level to 0%, which will
stop all flights. This will help eliminate fatigue and allow the squadron to rebuild its
strength, if necessary.
The Target is initially set to Commander’s Discretion, meaning the choice of target is
left to the air group to decide what hex it will bomb. If an air group is set to Airfield
Attack but has no Target set, the air group will decide for itself which, if any, enemy
airfield to attack.. Clicking this arrow brings up the Tactical Map where the player can
select the hex that the squadron will attack; the player then selects a hex to target, or
right clicks to exit without setting a target.
The Nav Search Level option dictates the percentage of the aircraft that will fly Naval
Search while the rest of the unit attempts to carry out its selected Mission(s).
The Current Altitude displays the altitude that the aircraft will fly at when flying to and
from the target hex. The arrows next to the title correspond with fine-tuning this altitude;
the arrows closest to the title move the numbers slowly while the arrows farthest from will
move the numbers to their maximums and minimums. The arrows in between will move
the numbers in large increments.
The Maximum Range sets the maximum range in hexes that the squadron will travel in
order to reach the target. The air unit will not exceed this distance when picking a target
using Commander’s Discretion whether the target is for a strike Mission, escort, or
Long-range CAP. However, if the air unit is assigned a specific target (base or TF), then
the air unit will ignore this max range setting. Planes executing a Naval Search or ASW
Patrol Mission will only search out to the Maximum Range that has been set for them.
117
The shorter the range set, the greater the chance they will spot a TF within their range
setting.
Finally, at the bottom of the screen are several extra options and information.
Location is... tells the player right off where the squadron is located (TF, airbase, etc.)
Set TF to group location will center the player’s Tactical Map on that group’s location.
Show float planes will display the float planes attached to the TF
Next Group will move to the next squadron in the TF
Back will move the player back to the TF screen
Exit will exit the display and bring up the Tactical Map
Divide Unit, if available, will allow the player to divide the unit into three smaller units.
The first unit will have a designation /A displayed next to its name, the second /B, and the
third /C. If all three units are located in the same hex, the Divide Unit option will instead
display as Rebuild Unit. Clicking Rebuild Unit will then recombine the parts into one
whole unit. It is important that the recombining units have the exact same kind of
equipment; otherwise the recombination will not work.
7.1.1 Atomic Bomb Attacks
Atomic Bombs (or A-Bombs) are only utilized by the Allied player, and may only be used by the
393rd NBS unit (which is unit number 1618 in the database editor). The Atomic Attack option will
be displayed for this unit but only in 1945 or 1946 and only if an A-Bomb is available. A city and
industrial target must be selected, with the industrial target serving as ground zero. All industry in
the city may suffer damage.
The number of atomic bombs available to the Allied player are displayed in their Intel screen
listing.
Note that the usage of atomic bombs by the Allies will result in negative effects to their victory
level determination (16.0).
7.1.2 Aircraft Restrictions
Aircraft assigned to a restricted HQ may not be loaded on ships or transferred to a base that does
not report to its restricted HQ. These HQ’s are:
Japan
Home Defense Force
Kwangtung Area Army
China Expeditionary Army
Allies
118
Australia Command
West Coast
USAFFE
ABDA
Canada Command
New Zealand Command
7.1.3 Operational Losses to Aircraft
Operational Losses (or Op Losses) occur due to accidents or other untoward events that are not a
direct result of being shot at by the enemy. These losses occur to squadrons based on their
seceral factors, including the range of the Mission, the experience of the pilot, and if the aircraft is
flying from a carrier. Any long range Carrier-based aircraft strikes (of two or more hexes in
distance) will cause an extra chance of operational losses to be incurred. However, if a player’s
base has sufficient supplies they may note that any damaged aircraft will likely be repaired before
the next Orders Phase.
Op losses include planes lost returning to base and planes crashing, planes destroyed or
damaged on take off and landing, and pilots as a result getting killed, wounded, or captured.
CAP and Search Missions will suffer the lowest Op losses; however, 1 out of every 5 planes
assigned to CAP and Search Missions will return to their base damaged. The player may not
notice this as if the base has sufficient supplies and aviation support at the base, these damaged
planes may very likely be repaired by the next Orders Phase.
7.2 AIRCRAFT
Air units (also called air groups) generally depict squadrons or similar formations of the same type
of aircraft. They represent Squadrons and Groups for the Allied player and Chutais, Daitais,
Sentais, and Hikotais for the Japanese player. These range from 9 to 72 planes, although some
ship based floatplane groups can be smaller.
Each unit is made up of a number of planes of one particular aircraft model, with the maximum
number of planes that can be ready at one time dependent on many factors such as nationality,
type of plane, Japanese formation type, and ship capacity for planes based on ships.
Aircraft come in five varieties:
1.
2.
3.
4.
5.
Fighter
Attack
Level Bomber
Transport
Reconnaissance
Aircraft are not represented on the map as such, but rather are always located on airfields. During
the Air Movement/Combat phases, a line depicting the path of the aircraft will be shown that ends
at the target hex. Any actions taken by the air units, as well as losses, will show up in the Combat
Events screen. Furthermore, individual pilots are rated for Experience and Fatigue.
Air units rely on the support of Aviation Support squads, which are found in both Base Forces and
Special Aviation Units (like Aviation Regiments). These units contain support troops to service
aircraft and engineers to construct and maintain the base facilities. Without these base force units
present, the base can’t maintain aircraft and keep the base functioning in combat. Aviation
Support troops are not attached to any particular squadron - their presence at a base is enough to
support the air units present. All engineer squads and vehicles can construct and repair base
facilities.
119
7.2.1 Air Sequence of Play
Air Operations happen twice a day - there are Night and Day air operations sequences with the
Day sequence broken into morning, afternoon and air transport phases. The night sequence is
briefer because less aerial activity occurred at night. Only air units that have been given “Night
Operations” status will conduct operations during the night (the Japanese were especially fond of
night bombing Missions). What is common to both Day and Night are the launching of Combat Air
Patrols (CAP), the launching of strikes, resolution of strikes, and return of aircraft. This is when
aircraft move and when aerial combat and surface attacks occur. Other operations are confined to
Day, such as transporting of troops and supplies, naval searches, and reconnaissance.
Air units are located at a specific base or ship, and remain there unless transferred, disbanded, or
withdrawn. You may transfer air units between two friendly bases during your Orders Phase. This
kind of transfer occurs immediately, although onlyready aircraft will move. The remaining aircraft
will either be transferred to another unit with similar aircraft at the current base, or will form a new
air unit that is a sub-unit of its parent formation (i.e. 19th BS unit would form 1/19th BS unit).
You can also transfer air units to overland to bases that are too far to fly to. These bases will be
listed with a –r next to their names in the list of bases when you select the Transfer to Base
option. Units transferred overland arrive at their new base damaged (they were crated for
transfer). There is a limit in that only bases that can be reached by tracing a path of hexes with a
movement value of no greater than 100 where the following terrain costs apply per hex:
2 Rail/Highway
5 Road
25 Trail
50 Cross Country
For example, an air unit could transfer to a base 50 rail hexes away (50 x 2 = 100).
A unit may only execute one transfer per Orders Phase, and units that have transferred are free
to perform all normal operations from their new base in the immediately succeeding resolution
phase. All other air operations take place during the Air Ops segment of Day and Night Resolution
phases. The computer, based on the orders given to the air units by you during the Orders Phase,
determines these operations.
120
7.2.2 Assigning Aircraft Missions
During your Orders Phase, you may set the six components of an air unit’s orders:
1. Primary Mission.
2. Secondary Mission (this can only be set if the
Primary Mission is Naval Attack).
3. Either Target (Target), which can represent
the Target for a Primary Mission, a Secondary
Mission, or Long-Range CAP Mission, or
Destination (Dst) if an Air Transport Mission.
4. Either CAP Level, Naval Search Level, ASW
Patrol Level or Training Level.
5. Altitude.
6. Flying Day or Night Operations.
All air units begin scenarios with default values
set for each of these 6 items, although air units
are not automatically given a Target. Only bases
and ground units may be set as a Target, except
for aircraft flying Long Range CAP in which case
they can set a friendly TF as the Target. (This
means that enemy Task Forces can never be set
as targets of air units - the computer must
designate them as such during the resolution
phase) Air units without a specific Target
determine for themselves which targets they will
attack based on the computer’s best judgement
(called Commander Discretion on the Unit Information Screen). It is the interaction of these 6
items with the air unit’s current knowledge of enemy forces that will determine the air unit’s
operations during the resolution phase.
Air units will continue executing their assigned Mission until they are told otherwise.
Each air unit is limited to flying either Day or Night operations on any given day based on the
unit’s current orders. Air groups aren’t affected by Set All commands if they do not have the same
Day/Night setting as the air group whose orders are being duplicated (i.e. a group set for Night
Missions will not change its orders if a group set for Day orders uses one of the Set All air group
commands). There are fifteen different Missions that air units may be assigned (this includes CAP
which is not set as a Mission but is determined by the CAP Level for fighter, fighter bomber, floatfighter, and night-fighter aircraft).
121
7.2.2.1 Plane Type Limitations on Mission Selection
Each plane type is limited to a specific sub-set of Missions as listed below:
Offensive Missions (bombing, strafing or
point reconnaissance)
Escort Missions
CAP Missions
Patrol Missions
Transport Missions
Training Missions
Rest
Airfield Attack, Port Attack, Naval Attack,
Ground Attack, (Fighter) Sweep, Recon
Escort
Long Range CAP, CAP (not listed as a
Mission, just a level setting)
Naval Search, ASW Patrol
Supply Transport, Troop Transport
Training
Rest (Indicates no desired Role)
7.2.2.2 Mission Types by Aircraft
Float Fighters
Fighters, Fighter Bombers, and Night
Fighters
Dive Bombers, Torpedo Bombers, and
Float Planes
Level Bombers
Patrol
Transport
Recon
122
Sweep; Escort; Long Range CAP, CAP;
Training
Sweep, Airfield Attack, Port, Attack, Naval
Attack, Ground Attack; Escort; Long Range
CAP, CAP; Training; Rest
Airfield Attack, Port Attack, Naval Attack,
Ground Attack, Recon; Naval
Search, ASW Patrol; Training; Rest
Airfield Attack, Port Attack, Naval Attack,
Ground Attack, Recon; Naval Search, ASW
Patrol; Supply Transport; Training; Rest
Recon; Naval Search, ASW Patrol; Supply
Transport, Troop Transport; Training
Supply Transport, Troop Transport;
Training
Recon; Naval Search; Training
7.2.2.3 Day Air Operations
Sequence
1)
2)
3)
Morning Air Phase
a) Launch CAP and Search Missions
b) Conduct Air Search
c) Launch Air Strikes
d) Resolve Air Strikes
e) Land Aircraft
Afternoon Air Phase
a) Launch CAP and Search Missions
b) Conduct Air Search
c) Launch Air Strikes
d) Resolve Air Strikes
e) Land Aircraft
Air Transport and Auto Sub-group Movement Phase
a) Launch CAP
b) Execute Air Transport of Troops
c) Execute Air Transport of Supplies
d) Automatically move Air sub-groups toward their parent formations
e) Land all Aircraft
Flow of Air Operations
Air operations are automatic during the resolution phase but are greatly affected by the orders
you have given to your air units. Each Day Air Ops phase consists of Morning and Afternoon subphases followed by a Transport sub-phase. Units flying Patrol, CAP and Training Missions will fly
during both the Morning and Afternoon. Planes flying Offensive Missions can fly during both the
Morning and Afternoon phases (under some conditions a unit can fly two Offensive Missions per
Day by flying during both phases). Generally, during each Day morning, air phase aircraft will
attempt to execute their primary Mission against their Target if possible. If no appropriate Target
has been given, the aircraft will decide for themselves whether to fly a Mission at a target of their
choice that matches their primary Mission type.
In the afternoon, units will fly naval attack if there are no enemy Task Forces to attack. The only
time a unit can fly two offensive strikes during the same Day is if they fly an attack in the morning
and sufficient time remains for them to engage in a Secondary Mission or launch another naval
attack in the afternoon.
The computer does account for the flight time to targets in both the morning and afternoon
attacks, so it is much more likely that an air unit will fly two attacks in the same day if the targets
they are bombing are at closer ranges. Non-naval attack Primary Missions will never be flown in
the afternoon as they are only flown in the morning. However, planes that have flown a primary
Mission in the morning may join in a naval attack Mission in the afternoon. After the Morning and
Afternoon phases there is a Transport phase that resolves Transport Missions including
parachute operations. CAP and Long Range CAP will also fly during the Transport Phase.
123
Flow of Morning Air Ops
For a unit to initiate an airstrike in the morning, the following must all be true:
1.
2.
3.
4.
The unit has at least 2 ready aircraft.
Its Primary is Naval Attack and there is an enemy TF that has been spotted. Or, its Primary
Mission is an Offensive Mission but not Naval Attack and it either has a valid Target or a
Target it decides is worthy of being attacked (see auto target selection section below).
If the target is not the Target set for the air unit, then the expected enemy CAP must not be
too great for the expected escorts to handle (roughly 1 escort is needed for every 2 CAP,
but the ratio is greater for escorts for longer range Missions). If bombing the Target, escort
is not required. The computer assumes that half of the enemy fighters present in a hex are
flying CAP Missions for strike target selection purposes.
The target must be within the unit’s extended range.
Once an airstrike is initiated, other units at the same base/ship will join in if all of the following is
true:
1.
2.
3.
4.
5.
6.
The unit has at least 2 ready aircraft.
Its Primary Mission is Naval Attack and the target is a TF. Or, its Primary Mission is an
Offensive Mission but not Naval Attack and its Target matches the target being bombed. Or,
its Primary Mission is an Offensive Mission but not Naval Attack and it has no specific
Target set.
If the unit has a Primary Mission of airfield attack, the target has an airfield.
The initiating unit is not flying a Recon Mission.
If a naval attack, the number of aircraft already planning to fly the Mission is not considered
overkill against the target (i.e. a very small Task Force will not draw unnecessary bombers)
The target must be within the unit’s extended range.
Units will join the airstrike to fly escort if the following is true:
1.
2.
3.
4.
5.
6.
The unit has at least 2 ready aircraft.
The unit’s Primary Mission is Escort.
If the unit has a Target set, it is not different from the target.
The number of aircraft already planning to fly escort does not exceed the expected CAP by
approximately 2 to 1.
The unit is at the same base/ship as the initiating unit. Or, it is at another base/ship but with
a Target set that matches the target being bombed. Or, it is at another base/ship and it has
no Target set and it happens to decide that the target location should be the focus of the
unit.
The target must be within the unit’s extended range.
Multiple airstrikes aimed at different targets may be launched from the same base/ship. Once all
airstrikes have been planned, then they are launched and resolved, after which all planes flying
for any reason return to their bases.
Flow of Afternoon Air Ops
The Afternoon Air Phase is essentially similar to the Morning Air Phase, but there are several key
differences, especially in what Offensive Missions are flown, and against which targets. At the
beginning of the afternoon air phase all aircraft flying Patrol type Missions, Training Missions and
CAP are again launched. Air Searches are then resolved. Next, the computer begins to determine
which Offensive Missions will be flown by checking each air unit to determine if it is going to
initiate an airstrike. Once a unit has been found that will initiate an attack, other units at the same
124
base/ship decide whether to join that strike. This process continues until all units have been
checked.
For a unit to initiate an airstrike in the afternoon, the following must all be true:
1.
2.
3.
4.
5.
The unit has at least 2 ready aircraft.
Its Primary Mission is any Offensive Mission and there is a valid enemy TF to target; or if no
TF target is available and its Secondary Mission is any Offensive Mission and it either has a
valid Target or it has a target it decides is worthy of being attacked.
If the target is not the Target set for the air unit, then the expected enemy CAP must not be
too great for the expected escorts to handle (roughly 1 escort is needed for every 2 CAP,
but the ratio is greater for escorts for longer range Missions). If bombing the Target, escort
is not required.
The target must be within extended range, unless the target is a TF and the attacker does
not have Naval Attack as the Primary Mission in which case it must be within normal range.
If the unit has flown a Mission in the morning phase, it must still have sufficient time to be
able to reach its afternoon target (i.e. two Missions in a Day are restricted to shorter
Missions).
Once an airstrike is initiated, other units at the same base/ship will join in if all of the following is
true:
1.
2.
3.
4.
5.
6.
7.
The unit has at least 2 ready aircraft.
Its Primary Mission is any Offensive Mission and the target is a TF or if the unit has an
Offensive Secondary Mission and its Target matches the target being bombed or the unit
has an Offensive Secondary Mission and no Target set.
If the target is not a TF and the unit has a Secondary Mission of airfield attack, the target
has an airfield.
The initiating unit is not flying a Recon Mission.
If a naval attack, the number of aircraft already planning to fly the Mission is not considered
overkill against the target (i.e. a very small Task Force will not draw unnecessary bombers)
The target must be within extended range, unless the target is a TF and the attacker does
not have Naval Attack as the Primary Mission in which case it must be within normal range.
If the unit has flown a Mission in the morning phase, it must still have sufficient time to be
able to reach its afternoon target (i.e. two Missions in a day are restricted to shorter
Missions).
Units will join the airstrike to fly escort if the following is true:
1.
2.
3.
4.
5.
The unit has at least 2 ready aircraft.
The unit’s Primary Mission is Escort.
The number of aircraft already planning to fly escort does not exceed the expected CAP by
approximately 2 to 1.
The unit is at the same base/ship as the initiating unit or it is at another base/ship but with a
Target set that matches the target being bombed or it is at another base/ship and it has no
Target set and it happens to decide that the target location should be the focus of the unit.
If the unit has flown a Mission in the morning phase, it must still have sufficient time to be
able to reach its afternoon target (i.e. two Missions in a Day are restricted to shorter
Missions).
125
Multiple airstrikes aimed at different targets may be launched from the same base/ship. Once all
airstrikes have been planned, all airstrikes are launched, all airstrikes are resolved, and then all
planes flying for any reason return to their bases.
Flow of Transport and Sub-group Operations
During this phase aircraft flying CAP will take off and then transports will fly to their destinations
with their cargo. The only way to escort transports is to have long range CAP flying over the
destination of the transports. In this way you can escort transports that are carrying paratroops to
drop on an enemy base.
After transports fly their Missions, auto sub-group movement occurs. Finally, all units that have
flown during the phase now land.
7.2.2.4 Night Air Operations
Sequence
Launch CAP
Launch Air Strikes
Resolve Air Strikes
Land Aircraft
1.
2.
3.
4.
Air operations at Night are limited to CAP and certain Offensive Missions. Escort is not flown at
Night, and unlike during the Day, there is only one Air Phase. Each Air Group may be ordered to
fly its Missions at Night instead of during the Day (the default). Air units flying at Night may fly the
following Missions:
Float Fighters
Fighters, Fighter
Bombers, and
Night Fighters
Level Bombers,
Dive Bombers,
Torpedo
Bombers, Patrol,
and Float Planes
Sweep, Long Range CAP, CAP, None
Sweep, Airfield Attack, Port Attack, Naval Attack, Ground Attack, Long
Range CAP, CAP, None
Airfield Attack, Port Attack, Naval Attack, Ground Attack, Long Range,
None
Air units are not given Secondary Missions if flying at Night. In order to launch an Offensive
Mission at Night, an air unit must have at least 6 ready aircraft and morale of at least 50. Target
selection at Night is similar to the way it is done during the Day. It is much harder for CAP to
intercept enemy airstrikes at Night. Night fighters are better than other plane types at intercepting
enemy airstrikes at Night.
7.2.2.5 Morale and Air Missions
Every air group with a Morale under 50 that is about to fly an Offensive or Escort Mission must
pass a Morale Test in order to fly. The lower the Morale, the greater the chance the group will fail
the test and not fly that particular Air Phase. Also, air units flying a Naval Search, ASW Patrol, or
126
CAP Mission must pass two Morale Tests in order to fly all available planes on the Mission. For
each Test failed, the number of planes flying will be reduced by 25%.
Before Level Bombers fly an Offensive Mission, they must pass 3 tests in order to fly all of their
ready aircraft:
1.
2.
3.
An experience test
A leadership test
A morale test in order to fly all of their planes
For each test failed, the number of bombers that fly the Mission will be reduced by 25%.
7.2.2.6 Air HQs
Air HQ’s will help air operations within their Operational Radius. Level bombers not located within
an air HQ’s Command Radius will have their number of planes flying reduced by 25% for
Offensive Missions. All other air strike Missions by units outside an air HQ’s command radius will
have the flying planes reduced by 10%. The command radius for most air HQ’s is five hexes.
However, Japanese Air Division HQs have a Command Radius of three hexes, while Japanese
Air Brigade HQs have a command radius of one hex.
The Command Radius of an HQ is displayed on its Ground Unit Information screen in the top left
corner.
7.2.2.7 Aircraft Range
Each distinct naval and ground aircraft model is rated for its Maximum Range. This is the number
of hexes that the plane may move when transferring between bases. The maximum range is also
used to calculate the Transport Radius of the aircraft (1/2 of max range), the Extended Combat
Radius of the aircraft (1/3 of max range) and the Normal Combat Radius of the aircraft (1/4 of
max range). Range circles show the normal (black circle) and extended ranges (red circle) for the
currently active air group.
7.2.2.8 Air Unit Targets and Destinations
Targets and Destinations are Mission objectives, with Targets used in Offensive Missions and
Destinations in transport Missions. If a Destination has been set for a unit with a Transport
Mission, then that Destination will become the destination for the Transport Mission to be flown.
Without a Destination, transports will not fly a Mission.
The setting of a Target is a critical factor in determining where non-Naval Attack Offensive
Missions are flown and which attacks escorting fighters choose to accompany. Air units without a
target will determine their own target for these Missions (the computer chooses for you). Although
air units on the same base or carrier may have a mixture of Missions and targets, this may lead to
an unwanted dissipation of effort. If you wish to concentrate your airpower on a given target you
are advised to select this critical target as the Target for each air unit you want involved.
Only hexes containing bases or ground units may be set as the Target, except that
friendly Task Forces may be set as a Target by fighters flying a long range CAP Mission
127
Air units given Naval Attack orders will always be under computer control for the
selection of targets. Thus Targets are listed either as a hex number (with base/beach
name if there is a base/beach in the hex) or a TF number.
Targets can be set for units with Naval Attack Missions, though they won’t be enemy
TF’s. If a Target has been set for an air unit with Naval Attack as the Primary Mission
type, the Target will be used for any Role assigned, thus becoming the priority for the unit
if no Naval Attack Mission is flown.
Targets have no impact on planes flying Patrol or Training Missions.
Bombers attacking ports will attack any ships at anchor (however, TF’s docked in port will not be
attacked) 50% of the time. These attacks use bombs with only a small percentage of torpedo
bombers using torpedoes (as it is assumed these ships may be in dry dock or protected by
torpedo nets). If there are less than 10 ships at port, however, the chance of bombers attacking
ships lessens with each number less than 10 (so, bombers would be more likely to attack ships if
9 were in port as opposed to 4).
When planes bomb an airfield they can hit aircraft on the ground, support troops at the base
(Headquarters, Anti Air, Artillery, Engineers, etc.), supplies at the base, the airfield runway, and
the airfield service facility. They can also reduce the Morale of air units stationed at the base.
Planes that bomb a port can hit the port facilities, support troops at the base (HQ, AA, ART, ENG,
CD type ground units), ships at anchor in port, supplies at the base and fuel at the base. (Since
seaplanes do not use runways, they do not take op losses due to damaged runways,)
When flying Missions at extended range (that is further than the normal combat radius but less
than the extended combat radius), there is:
An increased chance of not finding the target.
Disruption caused by air to air combat is increased for aircraft flying at extended range.
Bombers carry fewer and/or smaller bombs at extended range, and they cannot carry
torpedoes at extended range (they substitute a reduced payload of bombs).
Level bombers flying out of a small airfield cannot fly at extended range, and will be
treated as if they are flying at extended range when bombing targets at normal range.
Planes flying a Naval or ASW Search Mission will carry an extended range bomb load.
In order to avoid these penalties, the size of the airbase needs to be equal to:
4 + (Max load of aircraft / 6500)
All fractions are rounded down.
Thus, an A-20B requires a minimum size 4 base, a B17-E requires a minimum size 5
base, and a B29 requires a minimum size 7 base.
7.2.2.9 CAP, Nav Search, ASW Patrol and Training Levels
Typically all ready aircraft in a unit will fly together when a unit is performing a Mission. However,
you may use the CAP, Nav Search, ASW Patrol, and Training Levels as a way to split off a
percentage of the unit’s aircraft to perform CAP, Naval Search, ASW Patro,l or Training
Missions. Air units other than Transports have either a CAP or Nav Search Level when not
designated to fly Training or ASW Patrol Missions. These levels can be set between 0 and 100
percent in increments of 10. CAP and Nav Search Levels dictate the percentage of the aircraft
128
that will either fly CAP or Naval Search while the rest of the unit attempts to carry out its selected
Mission(s).
When Long Range CAP is the selected Mission, the CAP level is always 100, meaning that all of
the planes in the unit will be used to cover the hex being defended. Long Range CAP over TFs
are less effective then normal CAPS.When Naval Search, ASW Patrol or Training is selected as
the Mission, the corresponding Nav Search, ASW Patrol or Training Level dictates the percentage
of the unit that will fly this Mission while the remainder of the unit rests.
7.2.2.10 Impact of Altitude Selection
You can set the altitude at which Missions will be flown. Higher altitudes soften the effects of flak,
but reduce bombing accuracy.
Altitude also affects airstrikes as follows:
Planes on a Search Mission will have a greater chance to bomb the target when flying at
lower altitudes, but will suffer from more flak.
Dive bombers and fighter bombers always automatically dive down to 2,000 feet to
release their bombs, which means that they will first suffer flak at their assigned altitude
and then take flak at their lower diving altitude (note that fighters bombers dive bomb, but
not as well as dive bombers).
Torpedo bombers must drop down to 200 feet to engage their targets, so they also suffer
flak at their assigned altitude and then eat flak again at 200 feet.
Fighters flying escort will automatically fly a few thousand feet above the bombers they
are escorting.
Planes that are assigned an attack Mission at an altitude of 100 feet will bomb and strafe
their target.
Planes on a Sweep Mission will always drop to 100 feet and strafe (taking flak at their set
altitude and again at 100 feet).
Planes flying Recon Missions are more likely to detect the enemy at lower altitudes.
Planes flying a Naval Attack Mission with an altitude of 100 feet will skip bomb and strafe
their target. Skip bombing is a very accurate way to bomb a ship if the experience of the
pilots is over 60, but the accuracy falls when their experience is below 60 and very
dramatically below 50. Of course, flak from ships will be very intense at 100 feet.
Planes that strafe a base will attack aircraft on the ground, support troops at the base
(HQ, AA, ART, ENG, and CD type ground units), ships at anchor in port, and they can
also reduce the morale of aircraft stationed at the base. Strafing occurs during a Sweep
Mission, or during an airfield or port attack where the altitude of the attacking planes is
set to 100 feet. Strafing may also occur during an attack on ships if the altitude is set to
100 feet, in which case they also attempt to skip bomb the target. Strafing may also
occur when attacking a ground unit and the altitude is set to 100 feet.
Aircraft that are not Fighter-bombers or Kamikazes must be given an altitude of 100 feet
in order to be eligible to attack a TF of all barges or PT boats. Fighter-bombers or
Kamikazes will automatically dive down to 100 feet when attacking one of these TFs.
When a group flying CAP attacks bombers, they reset their altitude to that of the
bombers.
When fighters attack other fighters, the fighters deemed to have initiative will change
their altitude to that of the fighters they are attacking.
129
If a group flying escort is flying over 3,000 feet above the nearest bomber group it will
drop down to 3,000 feet above the highest bomber group. If escorts are below the lowest
bomber group, they will rise up to the altitude of the lowest bomber group.
Other than impacting P-39 and P-400 performance, altitude does not impact air to air
combat with one exception: aircraft that are reinforcing CAP due to a radar contact of the
incoming strike may not be able to climb fast enough to engage the incoming bombers.
Level bombers attacking at below 5,000 feet will have their accuracy and effectiveness
reduced.
No level bomber will hit a ship with more than one of its bombs on any particular Mission
(they assumed to spread out over such a distance that at best one hit will occur from any
particular bomber).
Level bomber groups that have more damaged aircraft than ready aircraft near the end of
the Resolution Phase and are ordered to attack at an altitude of below 6,000 feet will
have the possibility of having a 30 point Morale loss.
Inexperienced bomber groups will jettison their bombs early
Planes attacking at 100 feet will climb to 1000 after the attack
Bombers flying too high for CAP will not be attacked.
7.2.2.11 Coordinating Strikes
Each base or ship containing an air unit is considered a unique entity for purposes of determining
offensive Missions and Escorts. Under certain circumstances planes flying different Missions and
planes flying from different starting points will coordinate their attacks.
During the Resolution Phase the computer forms up airstrikes from each base/ship depending on
the orders the air units have been given and the information those units have about the enemy’s
forces. Planes that are performing offensive Missions and their accompanying Escorts, all flying
from the same base/ship to the same target hex, will fly together even if they have different
Missions.
For example, you could have 3 bomber units flying together from the same airfield, with 1
each to bomb an airfield, a port and a ground unit within the same target hex. These
bombers could be accompanied by 2 fighter groups flying escort and another fighter
group flying a Sweep Mission. A plane flying a Recon Mission could also accompany them.
Airstrikes from different bases/ships flying to the same target hex will approach the Target
together if the range to the target hex is the same. This allows aircraft carriers to coordinate their
attacks. However, before the attacks are made, there is a chance that some of the units will
become separated from each other and this may result in piecemeal attacks on the target. In
addition, a unit may escort attacks originating at another base/ship if the escorting unit has a
Target that matches the target beingattacked, and the escorting fighter is closer to the target than
the aircraft being escorted. Occasionally this can occur even if no priority target is set for the
escorting unit.
The coordination of airstrikes is affected by how many Carrier aircraft are based in the TF
launching a strike. The chance of uncoordination is doubled under the following circumstances:
Allied TF in 1942 and the number of aircraft in the TF is greater than 100 + rnd (100).
Allied TF in 1943 and the number of aircraft in the TF is greater than 150 + rnd (150).
Allied TF in 1944 or later or a Japanese TF at any time and the number of aircraft in the
TF is greater than 200 + rnd (200).
130
Also, in 1942 Allied coordination is generally not as good as the Japanese’s.
7.2.2.12 Automatic Target Selection for Air Units Lacking a Set Target
When determining whether to initiate an airstrike, a unit with an offensive Mission but no Target
set must decide for itself which if any Target it wishes to strike. Units will always initiate a strike
against a valid TF if there is one spotted, and are more likely to attack a TF that is within 180
miles (3 hexes).
Units will not always initiate a strike against a base or ground unit if they deem them to be
unworthy of attack. The specific naval Target picked if there is more than one valid Target is
determined by the unit based on the importance of the ships in the TF spotted. Carriers are by far
the most important Targets, followed by Battleships, Cruisers, Transports, and other ships in that
order. For air units looking for an appropriate base or ground unit to attack, the following factors
are considered:
The greater the assault strength in a base/unit, the more likely the base/unit will be
picked as a Target.
The greater the current size of the port, the more likely the base will be picked as a
Target.
The greater the current size of the airfield, the more likely the base will be picked as a
Target.
The greater the number of enemy aircraft at a base, the more likely the base will be
picked as a Target.
The greater the amount of supplies in a base, the more likely the base will be picked as a
Target.
If a Target is targeted by another airstrike from another base, it is more likely to pick the
same Target in order to concentrate efforts.
If the target is at extended range, it is less likely to pick the Target.
If the number of potential escorts at the unit´s base is not sufficient to defend against the
expected CAP at a Target, the Target is less likely to be selected.
If the unit’s altitude is set to 100, then the Target’s AA defenses may deter the unit from
picking the Target and cause it to abort.
7.2.2.13 Weather and Aborted Missions
Offensive Missions can be aborted after all preparations have been made, but prior to take-off ,
due to bad weather over the air unit’s base or over the intended target. Hexes affected by bad
weather blocks any air units from launching an airstrike from the hex, and it blocks any target in
the hex from being attacked.
A line of bad weather will not stop an airstrike flying through the hex from a good weather hex to
a good weather hex. A no-fly symbol (a cloud) will appear on the tactical map if the Show Clouds
preference option is selected.
131
7.2.2.14 Failure to Find the Target
Aircraft can fail to find their Targets due to bad weather en route to or over their target, or due to
the inability of the planes to locate their Target before they are forced to return to base due to fuel
constraints.
The chance of missing the target depends on many factors:
The greater the range to the Target, the greater the chance of failing to locate the Target.
The chance of locating the Target is considerably increased if the Target is a base, a
ground unit, a TF that is docked, unloading or loading, or a TF at its DH and set to Patrol.
Planes flying to Targets beyond normal range but less than extended range have a
greater chance of failing to find the Target.
Planes with a faster cruising speed are more likely to fail to locate the Target.
The further a TF has moved during the turn the greater the chance of failing to locate the
TF as a Target.
The smaller the TF, the greater the chance of failing to locate. The lower the detection
level of the target and the lesser the experience of the attacking aircraft, the greater the
chance to fail to locate the Target.
In each airstrike, one air group is designated as the lead group for that strike. If the lead
air group fails to find the Target, all air groups in the airstrike will fail to locate the Target.
A message will be shown if a group fails to find a Target after takeoff.
7.2.2.15 Basing Carrier, Patrol, and Float Aircraft
Any fighter, fighter bomber, dive bomber, or torpedo bomber type plane can take off from an
Aircraft Carrier, but not necessarily land back on the Carrier.
Only aircraft that start scenarios on a Carrier will have Carrier Trained on their Air Unit Information
Screen. They function normally on Carriers, and may take off and land on a Carrier and perform
non-transfer Missions from it:
Certain other units will be listed as Carrier Capable on their Air Unit Information Screen. These
planes may be fully functional on Aircraft Carriers, but have a higher chance of suffering
Operational Losses during take-offs and landings. Just because an aircraft is Carrier Capable (i.e.
it is built for carrier operations, having a tailhook and other necessary equipment) does not mean
the pilot flying it is trained to land and take off from one.
If an aircraft squadron is a fighter, fighter bomber, dive bomber, or torpedo bomber and is not
Carrier Trained and Carrier Capable, and is located on a Carrier, it may only be transferred to a
Carrier in the same hex (loaded with cranes, as they could not land on a Carrier) or may only fly
from the Carrier when ordered to transfer to a base. Also, carriers may never carry more than 5
air units at one time.
Any Float plane or Float fighter may be based on a Battleship, Heavy Cruiser, CS, or other noncarrier type ship that has the capacity to carry aircraft. Aircraft Carriers (including Light Carriers
and Escort Carriers) cannot carry float planes. Float planes, float fighters, and patrol planes can
be based at any friendly airfield, including those that are size 0 as long as they are on a coastal
hex.
132
7.2.2.16 Emergency Landings
Planes attempting to return to a Carrier that has been damaged sufficiently to prevent aircraft
operations will instead attempt to land on another Carrier or airfield that is within its remaining
range. Planes won’t make an emergency landing on another Carrier in such a way as to cause it
to exceed 110% of the carrier’s aircraft capacity. Planes that are redirected in such a manner will
attempt to return to their parent Carrier when conditions are improved (see 7.2.2.20 Automatic
Air Unit Transfers).
7.2.2.17 Operational Losses
In addition to losses due to combat, aircraft may be damaged or destroyed every time they fly due
to operational losses. Every time an aircraft attempts to land it may be destroyed or damaged
based on:
Experience and Fatigue levels of the pilot
Size of airfield or Carrier
Damage to airfield or Carrier
Damage suffered by the plane in combat
The distance flown to the Target (this represents greater chance to get lost or have
damage/fatigue impact a long flight).
Missions at extended range double the chance of operational losses.
Patrol Missions and CAP (not-long range CAP) treat the range to the target as 1 hex.
Level bombers flying out of a small airfield cannot fly at extended range, and will be
treated as if they are flying at extended range when bombing targets at normal range.
Planes flying a Naval or ASW Search Mission will carry an extended range bomb load.
In order to avoid these penalties, the size of the airbase needs to be equal to:
4 + (Max load of aircraft / 6500)
All fractions are rounded down.
Thus, an A-20B requires a minimum size 4 base, a B17-E requires a minimum size 5
base, and a B29 requires a minimum size 7 base.
7.2.2.18 Withdrawing and Disbanding Air Units
You may order aircraft units at a base to be withdrawn or disbanded during the Orders Phase.
When they are rested and recuperated, the group will become available again (see below). The
aircraft left behind by a withdrawn/disbanded air group are distributed to the replacement pool.
Planes are merged into another unit at the airbase with similar planes (your choice) but the pilots
remain with the unit when withdrawn and will return when the unit reenters the game. In order for
a withdrawal or a disbanding to occur, there must be a friendly air unit at the same base with the
same model aircraft.
Disbanding means that pilots and aircraft are distributed to another group at the same location
and which is equipped with the same aircraft model. Disbanding is the same as withdrawing
except that the pilots are also merged with the unit thatreceived the aircraft. Once a unit is
disbanded or withdrawn, the computer will attempt to rebuild the unit again. This will be done 60
days after a withdrawal and 90 days after a disbanding. Planes and any needed pilots for this
rebuilding of the unit will come from the replacement pool. When Carriers are sent off map, their
133
aircraft will be placed in the replacement pool and will be available as replacements. The pilots
will remain with the air groups on the Carriers. When Carriers are recommitted to the map after
they have had their aircraft placed in the replacement pool, they will attempt to refill their air
groups from the replacement pool. Ship-based air groups are not allowed to disband.
7.2.2.19 Transfers
An air unit may only transfer once per turn and it can fly regular air Missions the turn it is
transferred (note that only the planes and pilots are transferred; aviation support units must be
moved like other ground units).
7.2.2.20 Automatic Air Unit Transfers
Certain air units will transfer-move automatically. If a Carrier air unit makes anemergency landing
on an airfield or another carrier and in so doing causes the creation of a sub-unit, the aircraft in
that sub-unit will automatically attempt to transfer back to its original Carrier. This will only happen
if the Carrier is in a base and is capable of launching and recovering aircraft. Non-Carrier aircraft
in a sub-unit that has split from its parent formation will attempt to automatically transfer so as to
rejoin their parent formation.
In either case, once the sub-unit reaches the parent unit’s hex, it will merge into the parent. Units
that begin scenarios or enter as reinforcements with a sub-unit designation will not attempt to
move to or merge with another formation (e.g., 11/ Yokahama Chutai, 1/ VCS-4 are treated as
parent formations, not sub-units). Both of these kinds of Automatic Transfer movements will only
occur if the parent formation (or original Carrier) is within two Transfer movements of the sub-unit.
Both of these kinds of Automatic movement may cause the creation of additional sub-units as
ready aircraft begin their movement and leave damaged and reserve aircraft behind. Damaged
aircraft will always create a new sub group when transferred.
7.2.2.21 Mission Limitations from Size 1 Airfields
The following Missions will not be flown from airfields with a current size of 1:
Airfield Attack
Port Attack
Naval Attack
Ground Attack
(Fighter) Sweep
These airfields were too small to support these kinds of offensive Missions.
7.2.2.22 Captured Airfields
When an airfield is captured, all aircraft at that base are destroyed. Air units destroyed in this
manner will return as reinforcements in 390 days. Captured bases do not change their nationality;
however, they will change their HQ that controls the base to one of the HQ’s of a ground unit
capturing the base, as determined by the computer.
Airfields that has been captured have a chance to sabotage their facilities before the capture
takes place. The damage done can be none, minor, or severe.
134
7.2.2.23 Aircraft Carriers in Base Hexes
Air operations by aircraft carriers are limited if the aircraft carrier is in a base hex. Aircraft
launching search, CAP or strike Missions from a carrier in a base hex will only launch 50% of the
normal amount they would have launched. If the CAP is reinforced due by fighters on the ship due
to the raid being spotted in time, only 50% of the fighters on the ship will reinforce the CAP.
7.3 AIR COMBAT
Aircraft was a central component of the Pacific campaign. Battles were fought to capture airbases
that could be used as springboards for further advances (ground troops fought desperately for
obscure but vital places such as Henderson Field on Guadalcanal). Warships and convoys plied
their trade warily under the cover of night, seeking to avoid the watchful gaze of aircraft. The
Americans and their allies fielded squadrons inexperienced yet backed up by ever more
sophisticated aircraft and pilots who were better trained. The Japanese squadrons and their welltrained pilots acted early on as a razor-sharp sword that became blunted as attrition took its toll.
Air combat occurs when opposing aircraft meet in the same hex, and may happen during attack
Missions such as Naval Attack, Ground Attack, Sweep, Escort, Search, and even Training and
Transport Missions. When an air strike has been launched, the Tactical Map will center on the
hex being attacked and a message box will flash telling you the aircraft that are in the strike, and
what they’re attacking. As they engage in combat, the results will be displayed.
Air to Air Combat results are based on aircraft type and performance, pilot skill level, number of
aircraft, and other factors. Aircraft can be damaged or destroyed. Each time a plane is damaged
or destroyed, it is added to the total reported on the Combat Summary. Thus, one plane can be
damaged 4 times and then destroyed and it would cause a report of 4 planes damaged and one
plane destroyed. Pilots on all sides were notorious for overclaiming kills.
Planes flying CAP from bases and TFs with radar will perform better at intercepting enemy
airstrikes.
Damage on the ground varies with the type of ordnance, the hardness of the target, the morale
and skill of the pilots as well as the defenders. Torpedoes will not be used to attack ships at
anchor, so only bombs will be carried during Port Attack Missions. Aircraft Carriers are particularly
vulnerable to damage from combat as they may suffer ammo or fuel storage hits that cause
additional fires on board. Ground units are not individually targeted by the player; when a hex is
targeted by an air unit that was given a Ground Attack Mission, the computer will determine which
unit is bombed. Generally this will be the one with the greatest known assault value (intel based
on the ground unit’s detection level plus a random factor will determine this).
7.3.1 Combat Air Patrol (CAP)
In this game, the most important characteristic for Combat Air Patrol (CAP) is climb rate.
Normally, only a few aircraft are in the air at once. When enemy aircraft are spotted by those
aircraft that are airborne or by radar or ground forces assigned to watch for enemy aircraft, all
planes available for CAP are scrambled.
CAP may react to defend a target as far as 2 hexes away. To do so, the hex to be defended must
be attacked by more aircraft then are defending the hex, and the hex the CAP is going to come
135
from must be under attack by less aircraft than are currently flying CAP over that hex (checked
for each air unit, one at a time).
The CAP that is going to fly out of their hex must have an extended range that would reach the
hex to be defended (but no more than 2 hexes away). Also, in order for this extra coverage to
happen, the attack must be detected by radar in time to allow for the CAP to reach the target (an
intercept is allowed 33% of the time even when there is no radar). The exact number of aircraft
that will cover outside their hex is dependent on how good the radar detection is on the incoming
strike.
The altitude at which CAP is assigned is not important in the game, as all aircraft will end up at
the same altitude, +/- 3,000 feet of the enemy bombers. But, planes being scrambled have to get
up to that altitude. A high climb rate allows the fighters to climb to combat altitude before the
bombers arrive at the target. Other factors include the experience of the pilots, the skill of the
squadron commander, the Morale and Fatigue of the squadron, the presence of friendly radar,
and the weather. The higher the plane’s climb rate, the more aircraft that will be able to intercept
the incoming force.
7.3.2 Air-To-Air Combat
Once aircraft have closed for combat, the most important factors include maneuverability and
speed. If a plane has a significantly higher maneuverability, the pilot will try to dogfight. If the
plane has a significantly higher speed, the pilot will try to make slashing attacks. Whether the pilot
succeeds or not is primarily dependent on his skill.
So, you will find that a trainer type aircraft, such as the Wirraway, will suffer horribly against a high
performance fighter, such as a Zero. The Zero is much faster and far more maneuverable. The
only saving feature of the Wirraway is its rear-firing gunner. The Wildcat is also in trouble against
a Zero, as it is not any faster and is less maneuverable. The Kittyhawk, on the other hand, is
significantly faster and quite durable. As a result, the Kittyhawk pilot will try for slashing attacks,
using his speed to fly by very quickly, fire his guns, and then dive or make a very lazy turn around
and come back. He also can go head to head with the Zero and stand a good chance of living to
tell the tale.
Later war Allied aircraft, such as the Lightning, Thunderbolt, or Corsair are adequately
maneuverable and extremely fast and rugged. Very few Japanese aircraft can stand up to these
planes. Pilot experience determines if the desired tactic can be achieved and squadron
commander’s air skill is influential. If the pilot’s skill is low, they are not as good at these tactics
and will not use them well. Fatigue and Morale are also important. It should also be noted that
although the Combat Animations reports the total number of fighter aircraft attempting to engage,
the actual number of planes that dogfight are usually much less. This is based on the temporary
disruption taken during previous combat rounds, or the inability of CAP aircraft to reach the
incoming strike in time. Also, it is possible for CAP to force a bomber group to abort its Mission
prior to the bomber group’s bomb run.
Air Combat Animations
If Combat Animations is turned on, a graphic of the air battle will be displayed. Attacking aircraft
are shown above the central dividing line, and defending aircraft are shown at the bottom.
Fighters will always be displayed closest to the line, while bombers follow behind them. The
number and type of aircraft is displayed underneath each aircraft icon, and may go down as the
battle rages. Flak bursts and damage to aircraft will indicate misses and hits, respectively.
136
The central dividing line details the current situation and gives a text reference to what is occuring
in the battle. The amount of delay between messages may be set in the Preferences and Options
screen. If you does not want to watch the entire battle unfold, click the Done button in the upper
right corner.
When the air strike reaches its target, this display will change depending on the type of raid,
whether it is a naval attack or ground attack:
Naval Attack
The display is similar to Air Combat, except individual ships that are defending themselves from
attack are displayed at the bottom. Flak bursts and water spouts will indicate misses while hits are
detailed by damage to aircraft and/or ships.
Ground Attack
Ground Attacks include attacks on any enemy unit or structure in a land hex, and includes Ground
Attacks, Airfield Attacks, Port Attacks, and City Attack Missions. The display is similar to Air
Combat and Naval Combat, except the ground is seen through a bombsight (the ground pictured
does not change, no matter the target). Hits on the area attacked are indicated by explosions in
the bombsight, and Flak bursts and damage to aircraft indicates misses and hits by anti-air units,
respectively.
When the battle is over, a summary of the combat will be displayed. This will detail the location
attacked, the Japanese and Allied aircraft involved in the attack (and defense, if any), the aircraft
losses suffered by both sides, and the resulting damage of the raid (if any). Click Done to exit out
of the display and continue the game.
7.3.2.1 Bombers in Combat
Endurance, speed, and bomb load are very important to the bomber. Aircraft such as the Flying
Fortress have almost no maneuverability and will usually become damaged on the Mission, if
opposed by interceptors or anti-aircraft artillery. However, damaged big bombers are lost more
often on landing than in air-to-air combat. Smaller, faster aircraft, such as the Havoc, might be
fast enough to avoid the better part of Flak and can maneuver against interceptors. This allows
medium bombers, like the Mitchell, to fly unescorted Missions against the Japanese with an
acceptable loss rate. Bombers without self-sealing fuel tanks, low durability, low speed, and only
moderate firepower such as the Nell will suffer losses much higher than replacement rate, if
unescorted and opposed. Bomb load is important, because it means more bomb damage and
fewer Missions needing to be flown over the same target.
7.3.2.2 Ohka Bombs and Kamikazes
G4M2e Betty bombers may carry the jet-powered Ohka (in English, „Cherry Blossom“) kamikaze
attack aircraft. These bombers are never subject to Flak when undergoing a Naval Attack
Mission, as they launch their payloads beyond the range of any TF antiaircraft fire range.
However, they will be subject to CAP attacks.
Kamikazes are activated if the Allies own a base within 15 hexes (traced by sea only) of either
Tokyo, Takao, or Saigon. However, these will never activate before January 1, 1944. Once
Kamikazes are activated, the Air Unit Information Screen for Japanese players will show a
Kamikaze option if no squadron has been converted to kamikaze yet this day and if the aircraft
137
squadron is of the appropriate type (essentially anything other than a Transport aircraft squadron
can become a Kamikaze squadron). The player is limited to one conversion per day, but may not
re-convert a kamikaze unit to regular status. The computer will prompt the player to confirm their
choice before proceeding, giving you a chance to reconsider.
Once a squadron is converted to Kamikaze, it may only conduct three Mission types – Kamikaze,
Training, and Stand Down. The Kamikaze Mission is a variant of the Naval Attack Mission, which
of course if successful means unit casualties. Training is not to imply that these pilots are training
by crashing their aircraft into ships, but that they are trying to learn better flight techniques. Stand
Down is detailed in section 7.1.
Think carefully before converting a squadron into a Kamikaze unit; sometimes the men in
the unit are experienced and more valuable to you in their „normal“ jobs. Likewise,
however, a higher-experience Kamikaze unit will fly better than one full of trainees.
7.3.2.3 Altitudes
If opposing bombers or flying escort, fighter altitude is determined pretty much by the bomber
altitude. The Airacobra, lacking a super-charger, does not perform well at high altitudes. To take
advantage of this, the Japanese player might make a high altitude fighter sweep at the same time
he launches an attack by bombers (from the same base). This would simulate high cover.
Otherwise, the escorts will fly close cover. The higher the bomber, the less chance it will take
damage from anti-aircraft artillery. However, with higher altitude, their chance of hitting anything is
reduced.
7.3.2.4 Range
Pilots and crews become fatigued as they fly. A long Mission will cause them to end up with a
high Fatigue and Disruption rate upon arriving at the target. For instance, flying a Zero from Truk
to Lunga is much more tiring than flying from Truk to Rabaul, and squadron performance suffers
accordingly.
Also, damaged planes will be less likely to return successfully to their base if they have to fly a
long return trip. Planes that are damaged in combat will show up as either Flak or air combat
losses if they don’t get home safely (and the enemy pilot will get credit for a kill). Planes that are
not damaged, but do not return safely are counted as operational losses. Long range Missions
will take a tremendous operational toll on pilots and aircraft.
7.3.2.5 Incidental Combat
Planes flying into a hex that contains enemy aircraft may at any point of combat resolution be
caught up in an air battle in that hex. Thus, while witnessing one set of planes fighting each other,
other planes not with that particular set may end up participating and becoming casualties in the
air to air fighting.
138
8.0 GROUND UNITS
"Goddam it, you'll never get the Purple Heart hiding in a foxhole! Follow me!"
- Captain Henry P. "Jim" Crowe, Guadalcanal, January 13, 1943
While most of the war in the Pacific was centered around the island-hopping campaigns and
fierce naval and air battles, the land war was no less important. Battles raged across stark, barren
atolls and the vast inner reaches of China and Southeast Asia. The small size and harsh terrain of
the Pacific islands, as well as the difficulties in transporting and supplying ground forces, meant
that the troops fielded by either side didn’t total more than a few divisions, while the large land
masses of Asia saw hundreds of divisions battling.
Yet while the lowly rifleman didn’t have the prestige of an Aircraft Carrier or a heavy bomber, he
could at least take pride that the Navy and Air Force couldn’t survive without him. Ground troops
were needed to seize and defend bases and ports needed by air and naval forces. Success in
War in the Pacific - The Struggle Against Japan, 1941-45™ depends on using what soldiers you
have well.
Ground units may move overland and may be transported by sea or by air. Parachute units can
be airdropped onto enemy bases. Ground units can also entrench in place to increase their
defensive abilities. Certain ground units may assault enemy ground units and in this way capture
enemy bases.
Ground units represent battalion and larger-sized maneuver formations. These are made up of
individual squads, guns, and vehicles, all of many different types. A typical infantry brigade has
support troops, numerous guns, and infantry squads. However, the orders you give will be to the
maneuver units rather than the individual squads and support troops. Maneuver units are
represented on the map as ground unit icons; the support troops associated with the maneuver
units move with them. Each of these maneuver units contain various types of squads that
determine their parent unit’s abilities. The various maneuver and HQ units you control are:
8.1 UNIT TYPES
Maneuver units consist of several different nationalities and forces:
IJ Army
IJ Navy
US Navy
US Army
US Marines
Australian
New Zealand
British
French
Dutch
Chinese
Soviet
139
Indian
Commonwealth
Philippines
Canada
There are seven basic ground unit types:
Headquarters
Infantry (including cavalry and parachute units)
Engineer (including base forces and aviation support troops)
Air Defense
Artillery and Anti-Tank Guns
Armor
Coastal Defense
Pictured below are icons from the Allied side for clarity purposes; symbols representing
the Japanese ground forces will appear with the same symbols but with a red background.
8.1.1 Headquarters
These are all support troops (the much-maligned “brass” sitting in the rear). However,
these rear-area troops earn their keep in War in the Pacific - The Struggle Against
Japan, 1941-45™ by providing large numbers of support personnel for construction
and logistics tasks. They give combat benefits to combat units who are within a certain range,
generally the same hex, and enable more bombers to fly Missions from bases under their control.
A unit can benefit from its HQ, of which there are five types:
Command - Help in several ways. They help in giving a bonus to ground combat. If no
Corps HQ is in range of a ground unit, the Command HQ can give a bonus like a Corps
HQ if it is in range of a ground unit. If there is a Corps HQ within range of the battle, and
the Command HQ is within 2 times its command range of the battle, it can add up to an
additional 90% bonus to the Assault Value of an attacking force for odds calculations.
The bonuses are impacted by the leaderships rating of the commander of the HQs.
Command HQs are also important for air replacements and upgrades (see those
sections for details).
Corps – Helps with ground combat. Ground units in range can gain up to a 10% bonus
to their Assault Value (whether attacking or defending).
Amphibious – Helps amphibious invasions suffer less losses.
Naval – Helps to speed ship repair time.
Air – Helps by allowing more aircraft to fly.
If a friendly base is in a hex with a Command HQ, the base will attempt to stockpile 25000 extra
supplies. This is in addition to whatever supplies would normally try to move to the base to meet
current and expected supply needs of the forces in the hex.
140
8.1.2 Combat Infantry, Parachute Infantry, and Cavalry
These maneuver units typically consist of multiple types of sub-units. For
example, the 30th Australian Brigade begins one scenario in the game
with: 117 ANZAC squads, 12 81 mm mortars, 16 37mm Guns, 12 25 lb.
Howitzers, and 143 support squads. On the top of the units’ information
screen, we find that this totals out to 1,287 infantrymen, no vehicles, 40 guns, and 3,144 secondline troops (cooks, armorers, etc.). Don’t be surprised that there are twice as many support as
combat troops. The grunts may complain about the lazy “garritroopers” in the rear, but without
them the infantry would have no food in their bellies or ammo in their guns.
8.1.3 Engineers
These units include Combat Engineers, Construction units (such as the famed U.S.
Navy Sea Bees), and Base Force units. All engineer squads and vehicles can
construct and repair base facilities. Combat Engineer units differ from regular
engineer units in that they have an extra name added to their name (e.g. IJA Engineer Squad).
Combat Engineers can also destroy enemy fortifications during combat.
Base Force and other Aviation ground units contain Aviation Support troops to service aircraft and
engineers to construct and maintain the base facilities. Without them, aircraft won’t be flying often.
Note that Aviation Support troops are not attached to any particular squadron – their presence at
a base is enough to support the air units present
8.1.4 Air Defense Units
These safeguard your bases and ground units. Without anti-aircraft guns, your bases
and troops are vulnerable to air attack. However, they don’t survive long in a ground
assault.
8.1.5 Artillery and Anti-Tank Guns
These units consist entirely of guns and their direct support troops. These are the big
guns backing up your infantry.
8.1.6 Armor
You won’t find many of these units in the Pacific as opposed to Europe (just try
blitzing through jungle and mountains). But in support of infantry, tanks are deadly
against an enemy lacking anti-tank weapons.
141
8.1.7 Coast Defense Units
These are units consisting of various guns that can fire against ships and invasion
troops attacking their hex. Coast Defense units that have the word „Fort“ in their
name or certain large guns are static and cannot move.
These units include USMC Defense Battalions or Coastal Artillery. A gun icon will appear when
coastal guns fire on transports. Fire results will be summarized in the Combat Summary screen.
8.2 GROUND UNIT INFORMATION SCREEN
Below, the cursor is over a ground unit icon at Port Moresby. We see a floating box with a list of
the maneuver units present in the hex and the squads and vehicles that make up these maneuver
units. In this case, there are five ground units present in the same hex as Port Moresby:
142
Clicking the Ground Unit icon will display a list of all units in the hex, as follows:
This screen displays the ground unit’s Type (e.g., Inf for Infantry, Eng for Engineers, etc.), the
Name of the ground unit, what command the unit is Attached to, as well as the Load Cost,
Assault Value, and number of Supplies for each unit.
To the right of this information is a summary of the base’s information (if the ground unit is located
in a base hex). From this information we can see that Port Moresby has a Fortification level of 3
and is expanding on that by building further, has 97 Engineers present in the hex along with 28
Engineer Vehicles, 3353 Infantry, 0 Vehicles (fighting vehicles, that is, such as tanks or
armored cars – not engineer-type vehicles), 182 Guns, 17267 Second-Line Troops (the support
personnel), and the combined Assault Strength (or Value) of all ground units present (294). Also
the number of supplies present and supplies required for maximum efficiency of all units in the
hex is displayed here.
Clicking on a specific unit’s name will bring up a new screen for that particular unit:
143
In this case, we have selected the 30th Australian Brigade, an Infantry Unit. The 102/102
indicates that the first number is the number of ready elements divided by the total number of
TOE elements, while the second number is the total number of ready elements and disabled
elements divided by the total number of TOE elements. It is attached to the Southwest Pacific
command, and is an Australian unit located in an area with 3 Forts (or, a Fortification level of 3,
as we saw on the summary screen earlier).
In the leftmost column, we can find the following
information on this unit:
The unit’s Commander (BGEN Hatton,
N.G.)
The commander’s Leadership (60) and
Inspiration (50) ratings (the higher
these ratings, the more efficient the
troops under his command are in
combat)
The unit’s Experience (65) and Morale
(70) (the former coming from combat
experience and the latter from the unit’s
current situation, including losses,
supply, etc.)
The unit’s Disruption (2) and Fatigue
(9) (the former from taking combat
losses, the latter from being involved in
any activity other than sitting still)
Ground units with a Fatigue greater than 90 and Morale less than 10 may not enter
an enemy occupied hex.
The Supplies the unit currently has with it (333), and the Supplies Required (323) to
keep it in combat shape (if there are not enough Supplies, the latter number will be red)
The Support value (152) is the amount of intrinsic support (i.e., support within the unit)
that is available, while the Support Required value (170) indicates the number of
support squads needed to fully support the men and equipment in the unit. Since this unit
is in a base hex, it is drawing support from the base and will not suffer any ill effects;
however, if it moves out of the hex, it will be short of support. One support squad is
needed for every non Support or Aviation Support element in the unit. Support in a
friendly base hex can be shared between units, so as long as the total support in the hex
is greater than the support needed by all the units in the hex, the units will be fully
supported. Support is not shared if not in a friendly base hex.
The unit’s Assault Strength (or, Assault Value), which is the measure of the unit’s ability
to attack and defend in ground combat.
The unit’s Load Cost, which is used against a transport unit’s capacity when the unit is
moved, measured in terms of AP, AK, and LST type ships (showing the total amount of
Capacity this one unit will need in order to be transported). If the load cost is listed as
Static, the unit cannot be loaded.
The Control Zone of the unit (currently SE, or Southeast), and the base is under Human
control.
144
In addition, there are three commands:
Divide Unit: Select the arrow to the left of this title in order to divide the unit into three
smaller units in the case of Divisions and Corps; the first unit will have a designation /A
displayed next to its name, the second /B, and the third /C. If it is a Brigade sized unit, it
can only divide into two parts (/A and /B). If all units are located in the same hex, the
Divide Unit option will instead display as Rebuild Unit. Clicking Rebuild Unit will then
recombine the parts into one whole unit. It is important that the recombining units have
the exact same kind of equipment; otherwise the recombination will not work.
Do not accept replacements/Accept replacements: Select the arrow to the left of this
title in order to either not allow or allow replacements to fill out losses it has. This
command is useful for priority in terms of theaters of war. Also, taking replacements uses
up supplies, so you may not want to take replacements in areas where supply is hard to
come by. Not accepting replacements will not impact upgrades, which may not be
stopped and will happen automatically.
Show unit TOE: Clicking this option will change how the central column displays. If this
option is selected, the central column will list the ideal composition of the unit; once
selected this option changes to Show unit values, which changes the column back to
showing the current inventory of each item.
TOE stands for Table of Organization and Equipment, which is a standard way of
describing a unit’s inventory. The original list of the unit’s TOE (as it appears at
the beginning of the scenario) will remain the same and will not change to reflect
new weapon types, but units can still upgrade.
The central column displays:
The
number of Infantry (1296)
(essentially, riflemen and support
gunners), Vehicles (0) (such as jeeps,
trucks, and halftracks), Guns (44), and
Second Line Troops (3566) (support
and supply personnel) in the unit
The unit’s composition, broken down by
unit type. The number at the far right is
the number of ready (healthy, combat
effective) elements. The number in
parenthesis is the number of disabled
(non-combat effective) elements.
145
In the above example, we see that the 25th Division
currently has 312 ready squads and 52 disabled
squads. If, however, the Show unit TOE selection is
made from the lower left corner of the screen, this
information will change:
This is the ideal composition of this unit.
The rightmost column displays the unit’s orders;
from here, movement commands may be issued
and combat commands set up:
The Set Destination Hex arrow button
may be clicked to order the current unit
to move to another location. Note that if
this other location is across ocean
hexsides, the order will not be carried
out; in this case, the player must set up
naval transport.
The unit’s Stance, which includes:
Defensive – The only option for a unit that is not conducting an attack. If an attack is
not possible (i.e., no enemy units to attack), none of the attack options will be
available.
Orders, including:
Order Bombardment Attack (see 8.4.1 Ground Combat Missions for details)
Order Deliberate Attack (see 8.4.1 Ground Combat Missions for details)
Order Shock Attack (see 8.4.1 Ground Combat Missions for details)
Do Not Pursue Enemy – Orders ground units in the hex to not pursue retreating
enemy units. Otherwise, units can be set to Pursue the enemy if they retreat.
Refer to section 8.4.1 for the impact of the Pursue order.
146
Set All to Defend – Will set all ground units in the hex to a Defensive stance, and will
cancel all movement orders for all ground units in the hex.
Set All to Attack – Orders all ground units in the hex to attack in the same manner as
the current unit (or bombardment if a unit is not capable of other types of attack, e.g.
artillery units).
Set All to Follow – Orders all ground units in the hex to follow the current unit. No
following unit will enter a new hex until the unit they were ordered to follow enters first.
For example, if Unit 1 is the current unit and Unit 2 and 3 are in the same hex, and this
command is selected, Unit 2 and Unit 3 will follow Unit 1. Units 2 and 3 will not enter a
new hex until Unit 1 does.
Set All to March – Orders all ground units in the hex to march to the same destination
hex that is set for the current unit.
The Set Future Objective command has to do with Planning for action at an Objective (or
Planning points). When the Set Future Objective button is pressed the map will appear and you
must click on a base/beach hex. This will set the unit’s future objective. The number in
parenthesis next to the objective is reset to 0 if the objective set is a new objective. This number
will increase 1 or 2 points per turn, with a maximum value of 100. The higher the number, the
greater the benefit when the unit participates in combat in the objective hex (whether attacker or
defender). There is also value obtained if a nearby HQ has Planning points accumulated towards
the objective when combat takes place there. Having a high planning value is critical in reducing
losses that are taken when amphibiously invading an enemy base (or non-base hex with enemy
units).
Once a unit reaches 100 planning points, it may conduct training to increase it’s experience
rating. Each nationality has a basic experience value that their units can train to without having to
be in combat. As long as you are under this value and have 100 planning points, there is a
chance the unit will gain experience.
The following table details the maximum level a unit may train to, based on it’s Nationality:
IJ Army
US Navy
US Marines
New Zealand
French
Chinese
Indian
Philippines
55
50
65
55
55
45
55
45
IJ Navy
US Army
Australian
British
Dutch
Soviet
Commonwealth
Canada
50
60
65
55
50
60
55
50
The Set All command sets all units in the hex to the same Future Objective as the current unit.
Finally, at the bottom are additional controls:
Next Ground Unit – Clicking the arrows to the left and right of this command will scroll
through the ground units present in the currently selected hex
Back – Select to return to the Tactical Map (if no previous windows exist).
Exit – Select to return to the Tactical Map.
147
There are numerous ground elements that are used to make up the maneuver formations. They
include:
Infantry squads
Individual artillery pieces
Mortars
Vehicles
Tanks
Tank Destroyers
Gun motor carriages
Support squads
Aviation Support squads
Engineer squads
If a number in parenthesis is displayed, it measures the number of disabled units of that type that
won’t fight until repaired/healed and brought back to operational status. While disabled, a ground
element will have its manpower counted in the infantry and second line troop totals as if it was at
half strength. Thus, the number of troops can be very misleading. A unit with 100 disabled infantry
squads of 12 men each would list as having 600 riflemen, not 1200; however, these 600 would be
of absolutely no value in combat.
8.3 GROUND UNIT OVERLAND MOVEMENT
The Speed of movement overland by ground units is dependent on the terrain being traveled. The
basic march speed of a ground unit is obtained from the following table, showing the maximum
number of miles moved per 24 hour period over each terrain type, depending on the type of unit.
For example, an infantry unit will move 10 miles over Clear terrain, or 30 miles on a road. These
are maximum numbers and could be lowered depending on fatigue of the unit; the higher the
unit’s Fatigue the less farther it will travel in each 24 hour period.
Atoll
Clear
Forest/
Jungle
Mountain
Desert
Swamp
Trail
Road
Rail/Highway
Artillery, AA,
Engineers
Infantry,
Airborne
Armor
0
10
0
10
0
30
All Other
(Non-Static)
Ground
Units
0
3
3
4
3
2
2
10
2
4
30
90
3
10
3
5
30
90
2
30
2
5
60
90
1
3
1
3
15
90
Units moving on trails over Clear terrain will move at the Clear terrain speed.
148
These speeds are the fastest speed possible, and actual speeds may be slower based on the
fatigue of the unit moving. Rivers do not slow travel speed, but moving across a river hexside into
a hex with enemy units will cause an increase in the disruption of the moving units.
Ground units can be ordered to move by giving them a Destination Hex (DH).
Units moving along a rail/highway, road or trail from one of these hexes to another hex will gain
the benefit of the rail/highway, road or trail speed that is in the hex being moved into. Because
each hex is 60 miles, the unit will stay in its current hex until it has marched 60 miles, at which
point it will move to the next hex along the path to the unit’s final destination. If a unit already
marching is given a new Destination Hex that entails an immediate change in direction towards a
different hex, the unit will need to double back and march 60 miles before it enters the new hex
(it’s current march distance traveled will be set to 0). No matter the fatigue of the unit, all units will
move a minimum of 1 mile every 24 hours.
Units can only be ordered to march to locations where they will be able to trace a valid supply
path. Units that begin a turn in an enemy occupied hex may only set a DH that is a friendly
base/beach hex, and only if a valid supply path can be traced from the unit to the base/beach hex.
To order a ground unit to move to a specific hex, the path of the move must generate a supply
path value of no more than 900 using these costs per hex to be moved:
Rail/Highway: 2
Road: 5
Trail: 25
Cross Country: 50
For example a unit cannot be ordered to move more than 18 hexes cross country.
Ground units will move along a path that provides the best possible supply route from their current
hex to their destination.
8.3.1 Transporting Ground Units
Ground units may be transported by any ship with a cargo capacity, except for AO and TK class
ships that can only carry fuel. Ships with an “emergency transport capacity” may also carry troops
in Fast Transport Missions and may rescue personnel that were on board a ship that sinks.
Transported ground units may be unloaded on any hex that contains land. Port size determines
the speed of unloading, so the process is very slow if coming ashore “over the beach.”
Ground units can also be carried by certain cargo carrying aircraft. Parachute battalions may be
dropped by transport aircraft on any base hex.
Units unloading in a hex where the base is not owned are shot at by dual purpose, artillery, and
other eligible weapon systems, if present. These units have a chance to hit the transport as well
as a chance to hit the ground unit element unloading.
8.3.2 Japanese Movement
If Japanese ground units move east of column 132 (inclusive), then all American and Canadian
air and ground reinforcements will have their delay reduced by 180 days. Also, several U.S.
infantry divisions will become immediately available.
149
If playing as the Japanese you will therefore find it near impossible to mount an effective invasion
of the American (or Canadian) West Coast. Air raids on this area, however, have no effect on this
rule, nor do Japanese ships prowling east of this column.
8.4 GROUND COMBAT
Ground combat in the Pacific theater, with few exceptions, tended to be a slow, bloody battle of
attrition. The terrain barred most use of armor, leaving the fighting to be done by the infantry and
whatever artillery could be manhandled through the terrain. Victory rarely came in a sudden spurt
of glory; defenders had to be rooted out of the difficult terrain, and usually at a high cost to the
attacker. The Allies tried to rely on whatever firepower they could muster; the Japanese relied on
the martial fervor of their troops, even if the most ardent fervor flickered under starvation and
disease.
In addition, combat taking place on atolls is more intense than in any other location due to their
small size. Units that do not own the base on the atoll being invaded (i.e., American forces
invading a Japanese-held atoll) automatically launch a Shock Attack, which usually means higher
casualties for the attacker. In addition to the Shock Attack, the combat formulas will make combat
on an atoll more costly in casualties to both sides than in other hexes.
Other terrain types affect combat, whether it be clear, forest, mountain, desert, or swamp; the
more thick and impassible the terrain, the more it favors the defense. Rivers disrupt units
attacking across them, making their efficiency in combat lower. In addition to it being harder to hit
defenders in cover terrain, the assault value of the defending force is multiplied by the following
for combat odds calculations:
Urban x4
Mountain or Swamp x3
Jungle/Forest x2
In addition, fortifications can multiply the defending force’s assault value for odds by up to three.
Ground combat occurs whenever at least one unit is ordered to attack. When combat takes place
in a hex, all units in the hex ordered to attack and all defending units in the hex will participate at
once. Ground combat can only occur between units in the same hex. Maneuver units can attack
individually, or if the Set All to Attack order is given, all units that can execute the current unit’s
attack order will be given that exact attack order. If the order is to execute a Deliberate or Shock
Attack, units that can only Bombard will be given the bombardment attack order instead.
Ground combat is resolved once a day during the Ground Combat Sub-Phase. If both sides have
been given attack orders, the Japanese attack is resolved first and than the Allied attack is
resolved. First, defending units fire at the attacker. Attacking units ordered to execute a
Bombardment attack will only be fired upon by defending artillery type elements. Support type
squads (support, aviation support, and engineers) will only fire if they are being attacked in close
combat by enemy troops (determined by the computer). Fortifications enhance the defensive fire
of ground units and also make defenders harder to hit; therefore, defenders are given some
advantages in the calculation of the odds.
150
After defensive fire, attacking units will fire at the defender, with attackers plotted to bombard
using their appropriate artillery elements. Defenders in fortifications are harder to hit. Attacking
combat engineer units (those with infantry type squads in the unit) attempt to reduce fortifications.
Once all fire is resolved, the survivors calculate an adjusted odds of attack (attacker strength
versus defender strength). The ground combat sequences proceeds as follows:
1.
2.
3.
Defender fires
Attacker fires
Assault values for surviving forces are determined, as well as the minimum odds for a
successful assault
Defending support type squads are counted as having an assault value of 1/10 for odds
calculations.
4.
5.
Combat Engineers reduce the value of the defender’s fortifications
Assault is resolved and the base holds or is captured
Weapons may only fire if they have successfully acquired a Target. Target acquisitionis affected
by the Target’s detection level, the firing unit’s fortification level and experience, and the
maximum range of both the firing and target unit. Success in firing at soft targets is determined by
the weapon’s anti-soft target rating, while success against armored targets is determined by
comparing the weapon’s penetration to the Target’s armor. Successful fire will result in the target
unit gaining disruption and the target weapon being disabled or destroyed.
Note that a unit marching into an enemy occupied hex will have its Detection Level raised
to a point where the enemy can automatically spot it.
The exact effectiveness of fire combat is determined by:
Weapon values
Unit leader values
Unit disruption
Unit fatigue
Unit supply level
Type of attack - defensive fire is doubled against shock attacks
Unit leaders and HQs that are within their command ranges of the battle heavily affect these
odds. Units executing a Shock Attack are doubled for odds calculation purposes. Based on these
odds, some fortifications may be destroyed, a base may be captured, and the defending side may
be forced to retreat or surrender. Unit Fatigue, Terrain, Disruption, Experience, Morale, and
Leadership directly impact combat firepower, losses, and the odds of attack. Losses taken in
combat include the destruction or disabling of squads, guns, and vehicles. Disabled elements are
not allowed to fire during combat, and may be destroyed. Disabled elements (the numbers listed
in parenthesis on the Ground Unit Information Screen) may be healed/repaired and listed again
normally (this requires supply, support troops, and a low Fatigue level) however, if all the ground
units on one side in a contested hex are disabled and cannot retreat, they will be destroyed.
When Bombarding or firing defensively at a unit that is Bombarding, only weapons with a range of
at least 3 and an anti-soft rating of at least 5 may fire. Coast defense naval guns and dual
purpose guns with a range less than 15,000 yards may not fire. Not all weapons will fire, but the
longer the range of the weapon the greater the chance of firing.
151
Bases may be captured due to ground combat based on the calculated odds at the end of the
combat. The higher the fortification level, the harder it is to capture a base. The adjusted combat
odds must exceed or equal the fortification level for the base plus two for the base to fall.
Example: a fort level of 5 requires 7 to 1 odds to capture.
If a unit is forced to retreat, but cannot, it will go into an elimination routine if the odds are high
enough vs. the amount of troops remaining or if it is an atoll. Once in the elimination routine, if the
defender is Allied, the force will surrender. If the defender is Japanese, each unit will make a
separate test as follows: If unit Assault value is < die (10) than the unit is destroyed. For each unit
that isn’t destroyed it’s fort level is set to 0 and it is shot at by all the attacking units and any
survivors then shoot at the attackers (this is a banzai charge).
Forts may never retreat, and are destroyed if forced to do so. Individual guns that are
static (i.e. immoble) are destroyed if their unit is forced to retreat.
Bases that have been captured have a chance to have their facilities damaged before the capture
takes place. The chance and amount damage done can be increased by the presence of
defending engineers.
Fortifications can be reduced in level by enemy ground attacks; the Fortification Level of a hex
drops by one if the combat odds are 1 to 1 or greater. If no units are using a Deliberate Attack (i.e.
all attacking are using Shock Attack or Bombardment Attack), than the Fortification Level will be
reduced by 1 for each odds level (i.e. 4 to 1 odds would reduce the Fortification Level by 4). Also,
combat engineers participating in attacks against bases can reduce fortifications by up to one
level per day, making it easier to take the base.
If during combat a defending unit suffers extremely high casualties or high odds are achieved, it
will automatically retreat to an adjacent hex. The hex retreated to must be able to trace a valid
supply path to a friendly base and cannot be solely occupied by enemy units. If there is no valid
hex to retreat to, the unit may surrender or if Japanese execute a banzai charge. Combat units
that retreat will lose their supplies.
Ground Combat Animations
If Combat Animations are turned on, the Ground Combat screen will detail combat between
enemy ground forces. As the battle rages, results will display in the center text area.
When finished, a Combat Summary screen will be displayed. This details the location, type of
attack made, composition of the attacking and defending forces, the assault odds for the attacker,
whether or not the attacker captures the base, and any casualties that were suffered by both
sides.
8.4.1 Ground Combat Missions
There are three types of ground combat Missions:
1. Bombardment Attack means the unit will toss artillery shells at the enemy from long range
(and possibly receive counter-battery fire). This will only do minor damage and disruption to
ground units. Weapon types with a range of 3 and an anti-soft rating of at least 5 may fire in
a Bombardment Attack. In order to plot a Bombardment the unit must have at least one
suitable weapon available and must be an Infantry, Armor, Artillery or Coast Defense unit.
152
Only the attacker’s artillery weapons may fire or be fired at; the defender’s artillery weapons
may also fire, but any defender weapon may not be targeted.
2. Deliberate Attack is the standard attack. In order to plot a deliberate attack the unit must
have an assault value of at least one.
3. Shock Attack is going all out, risking higher casualties in order to increase the chance to
overwhelm an enemy position. In order to plot a Shock Attack the unit must have an Assault
Value of at least one. Attack orders remain in effect from day to day. However, Deliberate
and Shock Attack orders are cancelled for any units participating in an attack executed at
odds of less than 1 to 1. This cancellation occurs after the battle is fully resolved.
You can toggle on/off the option Pursue Enemy and Do Not Pursue Enemy. If toggled on and
during an attack, and the unit forces a retreat of all enemy ground units, the attacking unit will
march toward the hex the enemy retreated to and should automatically move 15 miles toward that
objective unless it is an armored unit in which case it moves 30 miles.
8.4.2 Ground Units and Fortifications
Ground units that are in a base/beach hex assume the fortification level of the base/beach.
Ground units that are not in a base/beach and are not moving will automatically attempt to build
fortifications to protect themselves from attacking enemy ground units. Engineers in the hex will
help in the building of these fortifications. Although fortifications can be built by units without the
help of engineers, the work will proceed very slowly.
8.4.3 Disruption
Disruption represents a degradation to a ground unit’s combat capabilities caused by combat or
poor command control. Disruption may occur every turn depending on the state of the ground
unit:
Any kind of attack against a ground unit will inflict disruption.
Moving across a river hexside into a hex containing an enemy unit will inflict disruption.
Units remove Disruption every turn, and will generally remove even high levels of
Disruption within a few days (recovering Fatigue, however, takes far longer).
Attack at odds stated as 0 to 1 (less than 1 to 1) will cause a large amount of disruption
to the attacking units.
8.5 CHINESE PARTISANS
Partisans appear in China only during games in which a human player is playing the Japanese
player and only if the scenario is a full map scenario.
All Chinese Nationality bases that are controlled by the Japanese are subject to Chinese Partisan
attacks. The Japanese player must keep a total assault value at the base equal to:
The value of all industry at the base divided by 2 (not manpower, but including Resource
and Oil Centers) plus 10 times the combined airfield and port sizes of the base.
For example, Shanghai in the 1941 scenario has a total industry value of 570 (not including
manpower) and a combined airfield and port size of 12. So, this total would be:
153
570 / 2 + 120 = 405
If this value in assault troops is not kept at the base, then the base facilities and industry facilities
are subject to damage (similar to demolition upon capture). This includes damaging port and
airfield facilities, supplies, fuel, oil, resources, and all industry items (except manpower). The
number of assault points at a base and the number needed to properly garrison the base is listed
in the Base Screen at the top center and in the List All Ground Units in the Hex screen on the
right. It will appear in Shanghai as Garrison: 18 / 405. The number 18 is the current Assault
Value of all units in the hex, while 405 is the required Assault Value. As you can see here, the
Japanese don’t have anywhere near the required garrision and are sure to expect Partisan
activity.
8.5.1 Chinese Restrictions
Chinese units are not allowed to move into Russia/Mongolia.
8.6 RUSSIA AND THE MANCHUKUO GARRISON
The Japanese side (if played by a human player) must maintain a minimum garrison in
Manchukuo in order to avoid Soviet Union (Russia) Activation. Soviet neutrality limits their units’
movement and air strikes until they are at war with Japan. Activation is the equivalent of a Soviet
declaration of war on Japan.
As a result, a certain total assault value of Japanese ground units is required to occupy this area
to avoid a Soviet invasion. The Russians may not move any units (air or ground, including
launching air attacks or searches, even CAP) until they are activated. They also cannot change
HQ’s before being activated. However, they may conduct Training Missions. Japanese air units
may not target Soviet units until the Soviets are activated.
Any unit in the Northwest Control Zone counts toward this requirement. The assault value needed
is 8000 at all times. If the total is not met there will be a small chance each day that the Soviets
will activate.
On the Japanese Intel Screen you will find a line on the far left that lists Manchukuo Garrison:
8611 / 6000. The number to the left of the slash is the number of assault points in the current
garrison and the number to the right is the required assault value to avoid Soviet Activation.
Some scenarios, however, will already have Soviet activation set. Also, the Soviets will activate
automatically on August 1, 1945 if they have not been activated until that time.
No other Allied units may transfer to Soviet bases before the Soviets are activated.
If the Japanese player moves a unit into the Soviet Union or Mongolia, or in any way attacks a
Soviet unit or base, the Soviet Union is immediately activated.
154
8.7 COASTWATCHERS
Throughout the war in the Pacific, the Allies made valuable use of native populations and
commandoes inserted behind enemy sea lanes. These brave (and often lone) individuals watched
important narrows and sea channels for signs of enemy ships and aircraft, then reported them
back via radio to higher headquarters.
The Allies have Coastwatchers on non-atoll land coast hexes south of the line 1, 82 to 74,82
inclusive and south of the line 74,98 to 103,98 inclusive. Also, all of Hawaii, India, Alaska,
Canada, and the United States (but not Aleutian Islands) have Coastwatchers.
Japan has coastwatchers in Japan, Korea, Hainan, Formosa, Indo-China, and China.
8.8 INDO-CHINA JAPANESE MILITIA
Each time an Allied unit moves into a border hex inside Indo-China (the portion next to China all
the way down to even with Hue), the Japanese will receive a Japanese (representing
Vietnamese/Vichy French forces) militia division (up to a maximum of 4). Thus if 2 ground units
move into a border hex, and then 1 unit moves from one border hex to another, 3 militia divisions
will be formed. These militia divisions will be formed in Hanoi, Haiphong, Luang Prabang, and
Hue in that order, and they will be formed at 1/3 strength.
155
9.0 BASES
The war in the Pacific was fought for many reasons; one of the main ones was in order to secure
bases for ports and airfields. In War in the Pacific - The Struggle Against Japan, 1941-45™ only
certain specified hexes may contain a base. There can never be more than one base in any given
hex, although a base can contain both a Port and an Airfield.
Bases are important for their four primary functions:
1.
2.
3.
4.
5.
They can include a Port.
They can include an Airfield.
They can serve as a Supply Depot with stockpiled supplies and naval fuel.
They can minimize the impact of sustained combat and disease on ground troops.
They can contain numerous production facilities (factories, manpower centers, resource and
oil centers, etc.)
Troops at bases need support troops; be sure to have enough on hand. The Base Information
Screen (below) will display how many support troops are needed for the units in a base to be at
maximum efficiency. If it contains an airfield, then the Aviation Support personnel on hand, and
required, will be listed too. Also listed will be the amount of supplies and fuel on hand, and the
supplies needed to function properly will also be listed. Being undersupplied has many
ramifications; the base can’t be expanded as rapidly; combat units can’t be supplied as needed,
and will function below their abilities; and the base will be worth less when victory points are
counted.
9.1 BASE INFORMATION SCREEN
When the cursor is placed over a Base, a small
window will display that shows an overview of the
contents of the Base, including its X,Y coordinates,
Victory Point value to either side, capacities, and
supplies.
When the mouse is over a base, the information
window for the base will list the Air Balance at the
base. This is an indication of which side has air
superiority in the skies over that base. If the number
is positive the owner of the base has more airpower
within reach of the base (with the higher the number
the greater their air superiority), while if the number
is negative the enemy has more airpower within
reach. This is for information purposes only.
156
Click on the Base symbol in the center of the hex to bring up the Base Information Screen.
This display shows:
The name of the base (Midway).
If this base is a Main Base for the
current scenario, text to this effect will
appear below the base name. For the
above example, the nationality is
displayed (US Navy).
The HQ the base is attached to (in this
case, Central Pacific) and its Victory
Point value to both sides (39 (3) to the
Japanese and 13 (1) to the Allies;
obviously this base is much more
valuable to the Japanese than the
Allies). The numbers in parenthesis are
the Basic Victory Point values for each
side.
Current Port Damage, Airfield Service
Damage,
and
Airfield
Runway
Damage ratings (0 for each in this case)
Supplies on hand (1501), Supplies
Required (281) per day in order to
function at full efficiency, Fuel (200), and Fuel Requested (1500), which indicates how
much fuel this base is asking for in order to conduct normal operations. If a slash and a
second number follows either of these values, the number to the right of the slash is the
number of these items produced per day at this base.
If the current Supplies and/or Fuel amounts are below the Required amount, the
numbers are in red; if less than double the required amount, they are in orange. Bases
157
do not automatically need or use fuel; requirements and usage depend strictly on the
fuel-guzzling units located at the base.
Also, Oil Storage and Resource Storage will display the amount of each of these items
that are being stored at the base (0 in both cases).
Miscellaneous base information, including:
Support, the amount of support
currently available at this base (110).
Support Required, The amount of
support required in the hex for all
ground units in the hex to function at
full efficiency. (123).
Aviation Support, The amount of
aviation support required in the hex
for all air units in the hex to function
at full efficiency. (15),
Aviation Support Required, the minimum amount of support required for any Aviation
Support Units (0).
Engineers, the number of construction troops available to expand the base (12).
Engineer Vehicle, the number of construction vehicles used to help expand the base
(3).
Artillery, the number of artillery pieces available for the base’s defense (7).
Automatic Convoy On or Off – if production is on this will appear and allow you to put
the base into the auto convoy system by toggling to On.
Forecast – The weather forcast for this hex, including whether the base is in a
Temperate, Malaria, or Cold Zone.
Control Zone – if full map scenario it will denote the Control Zone the base is in (E, or
East).
Control: Human or Computer – if full map scenario it will denote whether the base is
controlled by a human player or the computer.
Facilities at the base. Midway has a
Port Capacity of 1 (which is at its SRS
of 1), and an Airfield Capacity of 6
(which has been expanded well past its
SRS of 3). Next, to both of these
numbers (if building on these areas) is a
percentage of completion if the base’s
engineers are working to expand that
158
particular facility; as long as there is room for expansion and the supplies are available,
the engineers will work to expand it. Right now the engineers on Midway are only
working on Fortifications...
The Fortifications level (here, currently 0). Next to this number is a percentage,
representing the progress of the work of the engineers on base to expand the base’s
protection.
If this base is located in mainland China and is occupied by the Japanese, it may be
subject to Chinese Partisans (refer to 8.5 Chinese Partisans). If it is, a Garrison item
will appear here with two numbers separated by a slash. The number to the left of the
slash is the current garrison size (Assault Value) while the number to the right is the
minimum assault value worth of units that must be kept in the hex in order to avoid
damage.
Commands exist for expanding the Port,
Airfield, or Fortifications. In the above
example, the Port facilities may be
expanded (as this option is available),
but the Airfield cannot be expanded at
the moment (as it is grayed out). Also,
the player may order to engineers to stop building the Fortifications if they wish.
Any and all aircraft here are listed under
Aircraft located at Midway. The small
button with the airfield icon to the left of
the title may be clicked to display a list
of all air units located at this base. This
list of aircraft is divided by aircraft type.
In this screenshot, no aircraft are
located at Midway.
Any and all ground troops here are
listed under Troops located at Midway.
Each category of ground troops is listed
out in total; to view a list of each unit
located at the base, click the small
button with the flag icon next to the title.
In addition, if the base is located on an
atoll hex, it is noted here (for purposes
of Shock Attack, discussed in Section
8.4.1 Ground Combat Missions.
Also, if Coastwatchers (Section 8.7) are located in the hex, they will be listed here.
159
Any and all ships here are listed under
Ships anchored at Midway. All ships at
anchor may be formed into new Task
Forces by clicking on the Form New TF
button. The small button with the anchor
symbol to the left of the title may be
clicked to display a list of all ships at
anchor. If the port can build Barges or
PT Boats, these options will be available
(in this example they are not). This list of
ships is divided by ship type.
9.2 BASE SYMBOLS
Each base is color coded to show which nationality currently controls it. Ground units must be
ordered to attack an enemy base in order to take control of it (this includes beaches designated
as potential bases).
9.2.1 Map Displays
9.2.1.1 Beach
This is a coastal location that has the potential to
be turned into a port and an airfield (designated
by the green or red dot in the center of the hex).
9.2.1.2 Base without Land, Air, or Naval Units Present
This is an operational base containing a Port
and/or an Airfield (designated by the side’s
nationality flag). The airfield and port symbol will
only display if an air unit or ship, respectively, is
located at the Base.
160
9.2.1.3 Base with Air Unit Present
This represents an operational base that
contains an airfield with an air unit (designated
by the crossed airfield symbol). It may or may not
contain a port.
9.2.1.4 Base with Naval Unit Present
This represents an operational base that
contains an airfield with operational aircraft and a
port with ships at anchor (designated by the
anchor symbol).
9.2.1.5 Base with Ground Unit Present
This represents a ground unit (or more than one
ground unit) in the same hex as the base.
161
9.2.1.6 Base Composition
A number represents the current size of each port and/or airfield at a base (maximum one of each
at a base) from 0 to 10. A size of 0 represents no port or airfield, while a size of 10 represents the
largest port or airfield possible on the map. The current size can be increased during a game (not
beyond size 9) through the construction work of engineers at the base.
Each base on the map is rated for the Standard Potential Size (SPS) an airfield can become at
the base. Base hexes on a coastal hex are also rated for the Standard Potential Size a port can
become at that base. The SPS is a number from 0 to 9, with the larger numbers representing a
better natural anchorage and/or better terrain for the existence of an extensive set of port or
airfield facilities. These SPS ratings are fixed for all bases. When viewing an information screen
for a base, you will see 5 key factors that relate to that base as follows:
Current Size of Port
SPS of Port (shown in parenthesis)
Current Size of Airfield
SPS of Airfield (shown in parenthesis)
Fortification Level of the Base
Airfields and Ports can be built up to a current value equal to the SPS using normal construction
costs. Airfields and Ports can be built up to a current value equal to 3 levels greater than their
SPS (up to a maximum of 9), but at a much higher construction cost. All bases have a
Fortification Level that gives protection for any friendly ground units that are in the hex and
defending against an enemy attack. All friendly ground units assume the Fortification Level of the
base whenever in the same hex with a base. Also, the higher the Fortification Level, the harder it
is to capture a base . This level is a number from 0 to 9.
Bases also can contain stockpiles of supplies, fuel, resources and oil (resources and oil only
when production is on). Fuel stockpiles are used to refuel ships, while supply stockpiles are used
to maintain aircraft, resupply ground units, and replenish naval ammunition. Each day, supplies
from a base’s stockpile are distributed to ground units in the same hex as needed. Supply, fuel,
resources, and oil stockpiles will also be moved automatically from bases overland to restock
other bases or ground units that are running low on these items if the two bases (or ground unit)
are linked by a valid supply path. When these items are automatically moved to another hex,
some of the items are expended during the transfer (never more than 20% will be expended).
Also, it is possible for supplies, resources and oil to automatically move between two adjacent
bases that are separated by an ocean hexside.
Once supplies move to a ground unit, any excess supplies over and above the supplies needed
for the ground unit will be shared with any other friendly ground units or base in the hex that are
short on supplies.
9.2.1.7 Base Ownership
The flag displayed on the map shows the ownership of the base. Refer to 4.2.5 Map Icons for a
complete list.
162
9.3 PORTS
Ports are represented on the game map with an anchor symbol; rolling your mouse cursor over
the symbol will provide information on that Port. Ports allow your ships to repair and resupply and
their size affects the speed of loading and unloading transports.
The size of a port greatly impacts loading and unloading times. Repair times required for ships in
port (or docked at the port as part of a TF) are directly related to the size of the port. However,
even a current size 10 port will not repair ships as quickly as a port with repair shipyards or an offmap port, so heavily damaged ships should be sent to these ports for extensive repairs. Specific
weapons systems that have been destroyed on a ship can only be repaired at a port with a
current size of at least 5.
Larger ports are harder to damage (reflected as a number from 0 to 100% damage), but once
damaged, take longer to repair. Ships can avoid operational system damage and improve their
repair capability if they are docked at a friendly base (including friendly beach hexes, which are
considered anchorages).
Ships that are docked expend no Endurance unless they are attacked. Ships at a friendly port
with a current size of at least 3 may exist in the port separate of a TF in which case they will
maximize their repair capability at the expense of additional vulnerability to enemy attacks (this is
considered being at anchor). Ships docked or at anchor at a port with a current size of at least 3
are immune to enemy submarine attacks.
9.3.1 Port Damage
Port damage slows the repair and refueling of ships, as well as the loading and unloading of ships
at the port. Engineer units in the hex will automatically attempt to repair any damage; the number
163
and experience of these troops present will affect how quickly these repairs can be completed
(provided no further attacks are made). Refer to 9.4.2 Base Construction and Repair for more
details.
9.3.2 Ships Caught in Captured Ports
When a base is captured some ships at anchor at that base are automatically scuttled (sunk),
while some may escape to the nearest friendly port. Submarines with less than 10 System
damage will automatically get away.
9.4 AIRFIELDS
Airfields accomodate, repair, and resupply air units, and serve as a point from which to launch
airstrikes.
Airfield size has many effects. It is easier to damage and destroy aircraft on the ground at smaller
airfields (less dispersion). It is also more likely that planes will suffer operational losses when
landing at smaller airfields.
Level bombers require an airfield equal to size 4 + ( bomb load / 6500 ) rounded down. So a B29
requires a size 7 airfield to avoid the penalties.
1.
2.
3.
164
Operational losses on takeoff.
A reduction in their range as they cannot fly combat Missions at greater than their normal
range.
A diminished (extended range) bomb load.
If the number of aircraft on a base is greater than the airfield size times 50 than the number of
planes that launch on any given Mission is reduced by 25%. If the number of aircraft is greater
than the airfield size x 100 than the number of planes launched Mission is reduced by 25% a
second time.
9.4.1 Airfield Damage
Airfields can suffer two types of damage; runway and service (both ranging from 0 to 100
percent). It is easier to damage smaller airfields than larger airfields, but once damaged larger
airfields take longer to repair. Less damage to the runway is required at smaller airfields in order
to prevent aircraft from being able to take off and land than at larger airfields.
Airfield service damage in combination with the availability of aviation support determines the
number of aircraft that can be repaired and may limit the number of planes that may be
operational (ready, not in reserve). Airfield service damage can also impact the morale of pilots.
Runway damage can limit the air operations at a base. A strike Mission may only be launched
from a base with runway damage less than 20+(Airfield Size *5). Patrol and CAP Missions may
only be launched from bases with runway damage less than 50+(Airfield Size *5).
9.4.2 Base Construction and Repair
Engineers can be used to increase the size of airfields, ports, and fortifications at bases, and they
can also be used to repair damage to airfields and ports.
Each engineering vehicle is the equivalent of five engineering squads for these purposes. Each
turn, engineers at a base automatically attempt to repair any damage existing to their bases,
repairing runways first, airfield service damage second and ports last.
The remaining engineers at a base that have not conducted repairs will, if the base has been
given the appropriate order, attempt to increase the size of the airfield and port and increase the
amount of fortifications protecting the base. This work often takes many days before a level
increase is accomplished. Engineering efforts will be split between these three items unless you
intentionally instruct the base to discontinue the construction efforts of a particular item.
At the beginning of every scenario, construction defaults to On for fortifications at all bases and
for ports and airfields with current sizes that are below their SPS values, if the Set All Facilities
To Expand At Start option is selected for the game. You must turn these off if you don’t want to
expend resources on the construction.
At the instant a base is captured from the enemy, all construction is immediately turned off.
Construction work consumes supplies, and if a base is low on supplies, construction efforts will
slow accordingly.
One supply point is consumed every twelve hours for each engineering squad (or
equivalent) that is involved in construction operations. It is very important that you realize
that construction consumes supplies, as it is often best to discontinue construction
(especially expensive construction over the SPS) rather than use up precious supplies.
165
Construction costs to increase an airfield or port by one increase as the current size of
the airfield or port increases (i.e. it takes longer to go from a size 6 to size 7 than from a
size 5 to a size 6).
Once a port or airfield reaches its SPS, the cost of additional construction increases
significantly, so you should consider halting construction or risk consuming large
quantities of supplies for possibly little benefit. In addition to the normal costs, it takes 10
times longer than normal to increase a current size 0 airfield with a SPS of zero to a size
of 1. These size zero locations were very unsuitable for airfields (such as Wau, which
was built on the side of a mountain).
Fortification construction costs are based on the SPS of the airfield and port in the base,
with longer time required for bases with larger potential. Construction costs also increase
as the current Fortification Level increases.
9.5 COMMAND ORGANIZATION OF BASES
Each base on the map is attached to a Command Organization. These organizations are
responsible for managing the units under them and operate best when their units are closer to
their HQ.
Allied commands are:
West Coast
North Pacific
Central Pacific
South Pacific
Southwest Pacific
Southeast Asia
China Com
Far East Front
ADBA
USFEE
Australia Com
New Zealand Com
Canadian Com
Japanese commands are:
Home Defense
Kwangtung Area
Northern Area
Southern Area
China Expedition
Burma Area
4th Fleet
Southeast Fleet
In small map scenarios, other HQs may be designated as a Command Organization and the HQs
listed may not be in the scenario. The above list of the command HQs applies only for the full map
scenarios. The easiest way to know what HQs are Command HQs in a scenario is to look at the
filter list on the Strategic Map.
166
10.0 SPOTTING UNITS
Detecting enemy ships in the Pacific’s vast reaches was difficult, and even amid the clustered
islands of some of the larger chains it was a challenge. There was a lot of water to cover in the
days before planes carried radar, as well as rough terrain in Asia and other land masses to sift
through. What can’t be seen can’t be destroyed, and reconnaissance is the eyes and ears of the
wise commander.
Spotting is an important aspect of the game. If you have the “Fog of War” settings On, only
enemy units that have been spotted will be visible on the map. Messages announcing enemy
ships sunk may not appear, depending on the Detection Level (see 9.1 Detection Levels), while
messages regarding enemy ships sinking should only come up sometimes, with the probability
equal to the DL times 10 percent. In addition, the Intel screen will not list sunk enemy ships for up
to 60 days, nor points for damaged enemy ships.
Spotting is performed in several ways:
Aerial reconnaissance Missions take photos of bases and ground troops, giving you
intelligence on what is there.
Bombing Missions also take photos of their combat Missions for bomb damage
assessment, though the results aren’t as good.
Naval spotter planes perform Naval Searches that can spot enemy ships. Note that TF’s
are less likely to be spotted when naval search aircraft are more than 300 miles from
their base.
Coast Watchers were civilians or soldiers that reported on enemy naval movements.
When a Coast Watcher spots an enemy unit, it’s noted during the special Coast Watcher
Spotting phase.
Ground units spot enemy ground units in their hex and all adjacent hexes.
10.1 DETECTION LEVELS (DLS)
When the Fog of War option is On, every ground unit, TF, and minefield on the map must be
spotted before it is visible for the enemy to see. If the Fog of War is Off then all these units are
always visible on the map to the enemy player, but the units in the game will not act as if they
have total knowledge of the enemy. In War in the Pacific - The Struggle Against Japan, 194145™, each of these units, as well as each base, has a Detection Level (DL) and a Maximum
Detection Level (MDL), both between 0 and 10. The DL indicates very recent intelligence about
the enemy and it is the DL that has an impact on combat results. The MDL represents a general
awareness of the enemy based on both recent and less current information, and it is this level that
is used to determine which enemy units are placed on the map.
An MDL of zero indicates the unit has not been spotted by the enemy and is not shown
on the map (enemy bases are always shown on the map even if a base has an MDL of
zero nothing but the name of the base will be known by the enemy).
MDL’s above zero indicate the unit has been spotted by the enemy. When Fog of War is
Off, all units have a minimum MDL value of one.
167
The greater the MDL, the more is likely to be known about the unit by the enemy and
displayed on the screen.
The greater the DL the easier it is to inflict damage on the enemy in combat. Often even
when the DL is zero, friendly forces will take action due to an MDL value that is higher
(i.e. even though an enemy TF disappears at night, expectations of enemy movements
based on following the enemy closely the previous day can lead to friendly forces
anticipating the enemy’s next move).
The DL of every unit changes constantly during the resolution phase based on the unit’s
activities and enemy actions.
10.1.1 Changing Detection Levels
The following items change the DL of a particular unit:
10.1.1.1 DL of Naval Task Force
Add 1 to DL
Add 2 to DL
Add 2 to DL
Add 1 to DL
Add 1 to DL
Add 1 to DL
Add 1 to DL
Add 1 to DL
Add 1, 2, or 4
to DL
Set DL to 0
TF spotted by search aircraft (per aircraft that spots the TF – only notified
of first plane each phase)
TF attacked by search aircraft
TF has Air Combat Mission and it reacts to an enemy TF
TF has carrier(s) launching a strike Mission (per air unit that
attacks/escorts from TF)
Japanese TF moves into coastal hex with y coordinate>30 and sighted
by coastwatcher during daylight 75% chance of sighting, during Night
50% chance of sighting, also if daylight phase then second chance of
adding 1 if DL is still 0 after first check). This also happens at the
beginning of each resolution phase for each Japanese TF in a coastal
hex.
TF spotted by enemy sub
TF attacked by enemy sub
TF is a sub TF that is attacked by an enemy ship
TF is spotted by a recon flight (see recon flight section below)
All Task Forces at the very beginning of each Day and Night resolution
phase
10.1.1.2 DL of a Base
Add 1, 2, or 4 to
DL
Subtract 1 from
DL
168
Base is spotted by a recon flight (see Recon Flight section, below)
End of each Day and Night Resolution Phase (essentially once every 12
hours)
10.1.1.3 DL of a Ground Unit
Add 1 to DL
Add 1 to DL
Add 1 or 2 to DL
Add 1, 2, or 4 to
DL
Halve DL
Set DL to 0
Subtract 1 from
DL
Add 1 to DL
If DL=0, set DL=1
Unit is involved in ground combat (attack or defense)
Unit fires AA weapon in defense of base or ground unit
Unit fires naval gun or dual purpose gun at enemy ships (randomly
adds 1 or 2)
Ground unit is spotted by a recon flight (see Recon Flight section,
below)
Unit enters a new hex by marching
Unit is air transported
End of each Day and Night resolution phase (essentially once every
12 hours)
Whenever in a hex with an enemy ground unit
Whenever in a hex adjacenet to an enemy ground unit
10.1.1.4 DL of a Minefield
Add 1 to DL
Add 1 to DL
Add 1 or more to
DL
Add 10 to DL
Ship hits mine in minefield
Minesweeper clears a path in the minefield
Minesweeper widens a path in the minefield
Enemy minefields in hex with enemy base when the base is captured
by friendly forces
10.1.2 How Maximum Detection Levels Change
MDL’s go up with the DL value, but they decline at a slower rate than the DL. Whenever any
enemy DL value increases, if the MDL of the enemy is lower than the new DL, the MDL is set
equal to the new DL.
Whenever an event causes a reduction in the DL (including ships with DL’s already at zero) and
the new DL value is zero, the MDL is reduced by one. In this way the MDL can remain a positive
number long after the DL has become zero. However, MDL’s for subs are cut in half (rounded
down)every 12 hours.
169
10.1.3 Recon Flights
Whenever a plane flying a recon Mission reaches its target hex, or an air unit bombs a target,
every enemy ground unit, TF or base (not minefield) in the hex has a possibility of having its DL
increased by 1, 2 or 4.
Each enemy unit is checked separately to see if the pilot has successfully spotted the unit:
If a recon aircraft type is flying a Recon Mission, the percentage chance that any given
unit will have its DL increased is equal to the Experience of the pilot. If the DL is
increased, it will increase by 4.
If a non-recon type plane is flying a Recon Mission, the percentage chance that any
given unit will have its DL increased is equal to the Experience of the pilot divided by 2. If
the DL is increased it will increase by 2.
If an air unit bombs any enemy target, the percentage chance that any given unit in the
target hex will have its DL increased is equal to the Experience of the one pilot chosen at
random to take reconnaissance photos divided by 2. If the DL is increased it will increase
by 1.
10.1.4 Radar Detection Levels and Surface Combat
When TFs enter into Surface Combat, each ship is given an individual DL for purposes of the
combat resolution only. Each ship with radar will attempt to use its radar to increase the DL of
enemy ships involved in the combat by checking its radar against each enemy ship. Each
successful radar check will increase the DL of an enemy ship by one. Ships that are on fire will
have high DL values at night. (The most dangerous place to be is on a burning ship during a night
surface engagement.) The higher a ship’s DL during surface combat, the more likely it is to
become the target of an enemy ship’s weapons.
10.1.5 Information Given Regarding Enemy Units/Bases/Minefields
During the Orders Phase, you are able to view information about enemy ground units, Bases,
Task TFs, and minefields that have a MDL greater than zero. Once detailed information is given,
the amount of error in the information will decline over time if the MDL level stays high as friendly
forces try to refine their estimates of the enemy.
When the MDL of an enemy unit is equal to 1, only the location and unit type information
is displayed.
If the MDL of a unit is greater than 1, than there is a chance that approximate numbers of
more detailed information will be revealed about the unit. The greater the MDL the
greater the chance that detailed information will be given.
If the MDL of a ground unit is above 1, an estimated number of troops, guns, and
vehicles may be provided. If the MDL of a base is above 1, the damage to the port and
airfield (average of runway and service damage) and the number of fighters, bombers
and auxiliary aircraft at the airfield may be provided.
If the MDL of a TF is above 1, then you will receive a list of ship classes of ships that
have been positively identified and an estimated total number of ships in the TF. If the
MDL of a minefield is above 1, the minefield will be displayed on the map. No additional
information is ever given about enemy minefields.
170
Production items have the DL of the base they are located at. Initially all Factory
information displayed in the rollover text for enemy factories is 100% correct. This
information will only be updated when the DL of a base increases. Thus, even though
Tokyo could have expanded and converted many of their factories, until the first recon
flight flies over Tokyo, the roll over text will show Tokyo with the production stats it had at
the beginning of the scenario.
Several minefields can exist within the same hex but minefields are represented on the map by
only one minefield symbol per hex.
11.0 POLITICAL POINTS
The Political Point system in War in the Pacific - The Struggle Against Japan, 1941-45™ is
implemented to reflect the need for the player to have flexibility when it comes to making
command assignments.
Initially, all units in the game have commanders, but as the game wears on the player may find
that some units would operate more efficiently under a leader that has a higher rating. For
example, a ship captain with a Leadership rating of 60 and an Inspiration rating of 55 would not
be as effective a commander of their vessel as an officer with a Leadership rating of 76 and an
Inspiration rating of 62.
Furthermore, some units need to be reattached to different HQ’s as the game moves on. A unit
operating under an HQ that is thousands of miles away is not nearly as efficient in its operations
as it would be were it attached to an HQ in the same hex (or a nearby one).
Each side (Japan and the Allies) begin with an initial pool of Political Points (based on the
scenario selected) and accumulate additional Points each day. Each day, each player has the
option to spend Political Points to:
Change the HQ that a ground, air unit, or base reports to
Replace a leader of a ground unit, air unit or task force with another leader from the
leader pool.
The larger the size of the unit, the greater the Political Point expenditure required to change the
HQ. Costs are as follows:
300 points to change a base’s HQ
4 times the number of planes to change an air unit (e.g, a squadron of 24 planes would
cost 96 Political Points to change)
the number of weapon systems/2 + assault value + artillery/10 for ground units
171
11.1 CHANGING LEADERS
All units (ground units, squadrons, bases, ships, etc.) are assigned a leader; each one has a
Political Point value from 1 to 9. To replace a leader, you must expend the Political Point value of
the leader being removed, select a new leader from the appropriate leader pool, and pay 10
minus the Political Value of the new leader.
In section 7.1 Air Unit Information Screen, we detail the leader replacement screen. This screen
is similar regardless of whether or not a leader for a base, squadron, or ground unit is being
replaced. Please refer to that section for details.
The player can fortunately make the decision to replace any leader with a more capable one, if
they have enough Political Points to make the change.
Both Chang Kai-Chek and Mao Tse-tueng are the only leaders in the game that may not be
replaced.
11.1.1 Task Force Leaders
The initial TF commandeer of any new TF is the ship captain of the flagship, unless the Auto
Commander option is turned on when the TF is formed. If the TF is docked in a port, a higher
level commander may be assigned to the TF using the Auto Commander option when it is formed,
or by replacing the current TF commander. The game does not charge political points for relieving
a ship captain from being the TF commander. However, points are charged for the new
commander assigned. If the commander is not the captain of the flagship, normal political points
are charged for replacing the commander.
172
11.1.2 British Ship Withdrawals
The computer will periodically check for British ships being recalled (for home island defense back
in England). The player may or may not allow these withdrawals, but must be prepared to pay a
Political Point penalty if they do not withdraw the ship. Refer to section 6.2 for more information
on British Withdrawals.
12.0 WEATHER
Certain areas of the map are prone to specific types of weather, which can have a drastic effect
on your units. There are three weather zones in the game: Malaria Zones, Cold Zones, and
Temperate Zones.
Malaria Zones (most areas of Burma, Malaya, Dutch Indies, French Indo-China, Siam,
Northern Australia, New Guinea, New Britain, and the Solomon Islands). – Units will take
extra fatigue in Malaria Zone hexes, although being in a friendly base can minimize the
impact of the Malaria Zone.
Cold Zones (Korea, Manchuria, Alaska, Siberia, the Aleutian Islands and Southern New
Zealand). The negative effects of these zones only function 4 months of the year (winter)
depending on the area; in the North they function November through February, while in
the South they function from May through August. Cold Zones during the winter impact
ground units the same way as Malaria Zones (above), with the following added penalties:
o
o
o
o
Ships moving in Cold Zones during the winter will suffer operational
system damage at double the normal rate.
All base construction in Cold Zones during winter takes twice as long
Air units will fly 25% less aircraft on strike-type Missions.
Ground units unloading at an enemy base/beach or into a non-base hex
with an enemy unit will suffer roughly three times the losses they would
normally suffer.
Temperate Zones (all other areas and certain major bases within otherwise Malaria
Zones) – No adverse impact to units.
In addition to these weather zones, the map has been divided into 9 quadrants on the Weather
Map. Each of these weather quadrants will generate a different weather forecast for all hexes in
their quadrant. Offensive Missions can be aborted after all preparations have been made, but
prior to take-off, due to bad weather over the air unit’s base or over the intended target. A
message will display if this occurs. The aircraft will not fly another Mission during that Air Strike
phase. The weather at each base or target is determined each air phase, and is not linked to prior
weather at that location. Each base is checked each air phase for its weather independent of all
other bases. Each day a weather forecast is generated for each hex on the map based on the
forecast in the hex’s quadrant. Also the forecasted weather in the current hex is given in the menu
bar at top and for a base hex on the base orders screen. This weather forecast impacts the check
that is done at each base each phase to see if the base will have weather bad enough to cause a
cancellation of Missions. The forecast levels from best weather to worst are clear, partly cloudy,
overcast, rain (snow in cold zones in winter), and thunderstorms (blizzard in cold zones in winter).
173
If the Advanced Weather Effects option is switched Off, the weather forecasts will always be
Partly Cloudy (except for turn 1 which will be clear). If it is switched on, a different weather
forecast will be generated every Day: Clear, Partly Cloudy, Overcast, Rain, Thunderstorms (turn 1
is always clear). The worse the weather that Day, the greater the likelihood of an air Mission
missing the target, or even of being grounded before takeoff. With advanced weather, the weather
forecast in each quadrant from day to day will generally change slowly (moving only up or down
one level), but sometimes it can change dramatically from one day to the next.
13.0 THE PRODUCTION SYSTEM
The Production System is unique to War in the Pacific - The Struggle Against Japan, 1941-45™
as opposed to Uncommon Valor; by implementing it, the player opens the door to an entire new
dimension to the game. Through this system, the player controls industrial production, repair,
replacement, and other vital needs of their sides’ war effort.
When the Production System is on, Japan can control all elements of their industry (aircraft,
armaments, shipbuilding, fuel refining, supplies, etc.). The Japanese can expand and convert
their factories whereas the Allies can’t.
When the Production System is on, the Allies are allowed certain on map production of aircraft,
supplies, and fuel along with having repair shipyards, but since most Allied material was going to
Europe, and most production was off map, most Allied material arrives through the Build
Rate/Replacement System (which brings items into the replacement pools on a regular basis from
off-map areas) and daily automatic arrival of supplies and fuel in key rear area bases.
If a pool is over 6 months of the pool’s replacement/build rate, the rate is reduced to 0 (this is for
the monthly rate only, not actual production by factories on board) until the pool value drops
below the 6 months level.
13.1 PRODUCTION BUTTONS
When a location is selected, any Production ability it has will be reflected in the bottom row of
buttons on the display. For example:
Los Angeles has several buttons along the bottom of the screen (six, in fact) representing the
production facilities it has.
174
The Production Buttons that can be found are as follows:
Manpower
Heavy Industry
Resources
Oil
Repair Shipyard
Aircraft Factories
Engine Factories
Armament Factories
Vehicle Factories
Merchant Shipyard
Naval Shipyard
175
Clicking on one of the buttons will bring up a display:
The above example is what appears when Los Angeles’ Manpower button is clicked on. The
information in the right column will remain the same for the current location no matter what button
is clicked on; it gives the Totals for all Industry located throughout the player’s controlled areas on
the map. This includes total Manpower, total Heavy Industry, total Resources, total Oil, and
total value of Shipyard Repair facilities. The value of Aircraft Assembly represents the player’s
industrial strength for building aircraft; in this example, 410 aircraft are being built per month, and
there are factories researching new aircraft models that will ultimately build another 830 aircraft
(the more factories that are researching, the sooner new plane types will go into active
production).
Finally, the number of Atomic Bombs the player has is listed here as well. A-Bombs are built (if
the scenario is set to produce them for the Allies) starting in July of 1945 at a rate of 1 per month.
The information on the left, though, will change to reflect the current button selected. In this
example, we can see that Los Angeles’ Manpower level is currently 67; the number in parenthesis
indicates the number of Manpower Centers that are damaged (Manpower is not created by a
factory per se, but the value is quatified representing the fact that strategic bombing a city causes
casualties and will reduce the amount of manpower produced, if this ‚industry’ is damaged). By
placing the mouse cursor over the button at the bottom of the screen, a pop-up window will
appear that displays this same information:
176
From the other buttons we can determine the following:
The Heavy Industry button displays 1440 points
for Los Angeles. The number in parenthesis
represents the number of damaged Heavy
Industry factories.
The number of Resources in Los Angeles is 30.
The number in parenthesis represents the
number of damaged Resource locations.
The number of Oil Points in Los Angeles is 150.
The number in parenthesis represents the
number of damaged Oil locations.
177
The Repair Shipyard level in Los Angeles is 100.
The Aircraft Factories (Assembly Facilities) in
Los Angeles are showing 75 each for ten
different aircraft types. To change an aircraft
type, click on it (this is not allowed for the Allied
player). The player may also select whether or
not to repair units of this type.
For more information, please refer to the next
section.
13.2 INDUSTRIAL CENTERS/FACTORIES/SHIPYARDS
There are many more different resource types to keep in mind when the production system is
turned on. The player will be concerned with resource and oil production, transport of these
supplies to industry, and industrial production of the means needed to continue to build the
weapons of war.
The playe may turn any industry item off or on. This option is next to the Expand option. If off, that
item will not function during the turn (it will not use anything and will not make anything). Next to
the Expand option, you will have the option to Halt. Once halted, you will have the option to
Restart (this will turn production back on). This helps to save resources if there is a need.
13.2.1 Resources, Oil, and Manpower
There are three types of ‚raw materials’ that the system uses to fuel building: Resources, Oil, and
Manpower.
Resources – Resources are essentially all of the raw materials, except fuel, needed by a modern
country to wage war. It is a measure of raw materials taken abstractly that equates into the
production of food, clothing, ammunition, weapons, vehicles, and the like.
Resources are produced by Resource Centers. These centers are located in base hexes and
each turn produce 1.25 resource points that go into storage at that location and 1 supply point
that is added to the base.
Oil – Oil represents the raw material that is refined into many different types of fuel – gasoline for
cars, aviation gas for airplanes, and the like.
178
Oil is produced at Oil Centers. Each day each oil center point produces 6 oil points that go into
storage at that location and 1 fuel point that are added to the base.
Manpower – This raw material is a representtaion of the portion of your nationality‘s population
that can be drafted into their armed forces. For every 10 resources expended, 5 Manpower Points
are created.
Manpower is produced at Manpower Centers. For manpower to be created each day, the number
of resources at a location must be at least equal to 10 times the number of Manpower Centers at
that location. If this requirement is satisfied, 5 times the number of Manpower Centers are added
to the manpower pool and twice this number of resources are expended. For example, if a base
has 30 Manpower Centers, 300 Resources must be available for the Centers to produce. If they
are, 300 Resources are expended and 150 Manpower is created.
Resource and oil centers will not produce resources, oil, fuel or supplies if an enemy
ground unit is in their hex.
13.2.2 Industry
Once the raw materials are gathered, they must be processed into useful items. Resources, Oil,
and Manpower are combined to build the weapons of war within each country’s industrial centers.
These centers are divided into many different categories, as follows.
Heavy Industry – This represents the large-scale production facilities that are unique to large
cities. Usually these are sprawling complexes that employ thousands of workers. While they
produce a lot of lifeblood to any war effort, they are prime targets for the enemy.
For heavy industry factories at a location to function each day, there must be more resources
stored at that location than heavy industry, and there must be more oil stored at that location than
two times the heavy industry. If these requirements are satisfied, than each heavy industry point
produces a supply point and 1.33 fuel points that are added to the base, at the cost of 1 resource
and 1 oil point.
Fuel is not produced by both Heavy Industry and Oil Centers at locations that do not have
at least a port size of 1.
In addition, heavy industry points equal to the number of heavy industry factories are added to the
heavy industry pool. Resources equal to the heavy industry points are expended and oil equal to
two times the heavy industry points are expended.
Aircraft Factories – These are the factories that mass produce the fighters, bombers, and other
specialty planes used in the war effort. Each day, aircraft factories that are producing aircraft that
are available for production (the date is equal to or later than their availability date) will attempt to
produce aircraft. The number of factories in a location represents a monthly production rate. All
aircraft produced are added to their country’s replacement pool.
For aircraft to be built, there must be Heavy Industry in the pool equal to 18 times the number of
engines required to build each plane; when a plane is built, the appropriate number of Heavy
Industry is consumed. For example, to produce a 2 engine plane, 36 Heavy Industry will be
consumed, while a single engine plane consumes 18 Heavy Industry.
179
Each day, each location will build a number of aircraft equal to:
(Number Of Aircraft Factories + random number between 1 and 30) / 30
Any fractions are rounded down.
In order for these aircraft to be added to the replacement pool, there must be an equal number of
aircraft engines of the appropriate type (see Engine Factories, below) required by the aircraft built
(only for Japanese aircraft, Allied aircraft do not require engines) and heavy industry points equal
to the number of engines required. These engines and heavy industry from their respective pools
are expended when the aircraft are produced and placed in the replacement pool.
This also displays the number of engines mounted by each aircraft for which the player may
exchange existing aircraft in the format “aircraft name (engine type x number of engines)”. In
addition, the currently selected aircraft on the left of the pop-out has the number of engines
mounted written immediately below the aircraft listing.
Engine Factories – These are specialty industry centers, smaller than their Aircraft Factory
cousins but no less important. For engine factories at a location to function each day, the number
of heavy industry points at the location must at least equal the number of Engine Factories. If this
requirement is met each day, each location will build engines equal to:
(Number Of Engine Factories + a random number between 1 and 30) / 30
Any fractions are rounded down. For each engine built, 18 heavy industry points will be
expended.
Vehicle Factories – This represents the production facilities for vehicles, including jeeps, trucks,
halftracks, and tanks. For vehicle factories at a location to produce one Vehicle Point each day,
there must be 6 Heavy Industry points available in the pool.
There are no fractions of consumption. For example, if there is a 20 point Vehicle Factory, there
must be 120 Heavy Industry available to produce one Vehicle Point worth of that vehicle.
If this requirement is met, the number of vehicle factories are added to the vehicle pool and this
number of heavy industry points are expended from the pool. When a vehicle is required to fill out
or replace a ground unit vehicle element, 1 vehicle point and 1 manpower point will be expended
from their pools for each load cost of the unit (For example, a newly created Type 95 Light Tank
will use up 10 vehicle points and 10 manpower points).
Armaments Factories – These are the facilities that manufacture the weapons (such as field
guns and rifles) needed for ground units to fight. For armaments factories at a location to function
each day, there must be at least an equal number of heavy industry points in the pool. If this
requirement is met, the number of armaments factories are added to the armaments pool and this
number of heavy industry points are expended from the pool (at a rate of 6 heavy industry points
per armament point created).
When a non-vehicle weapon or squad is required to fill out or replace a ground unit element, 1
armament point and 1 manpower point will be expended from their pools for each load cost of the
unit (For example, a newly created SNLF squad will use up 13 armaments points and 13
180
manpower points and a newly created 70mm Howitzer will use up 8 armaments points and 8
manpower points).
Naval and Merchant Shipyards (Japanese Only) – Each day, Naval and Merchant Shipyards
create Naval and Merchant shipyard points. Each day 3 heavy industry point is expended from
the pool to convert each Naval or Merchant Shipyard into a corresponding Naval or Merchant
shipyard point.
Naval shipyard points are used to complete new warships that being built and Merchant shipyard
points are used to complete new merchant ships being built. Each day, for a new ship’s
reinforcement delay to be reduced by 1 day, a number of appropriate shipyard points equal to the
ship’s durability must be expended from the pool.
Repair Shipyards – Each day, repair points are added to a location’s repair pool equal to the
number of shipyards at the location. These repair points may only be accumulated up to 4 times
the number of repair shipyards at a location. These repair points are used to speed up the repair
of ships in port, including the upgrading of ships that can occur during the game (improvements in
AA weapons, etc.). The repair points in the pool must be greater than a ship’s durability for the
possibility of speeded up repair, and if this speed up occurs, repair points equal to the durability of
the ship are expended.
13.2.3 Player Alterations to Production Capabilities (Japanese Only)
This represents the ability of the Japanese player to manipulate production capabilities to meet
their needs. Converting or „retooling“ factories causes them damage, which is not measured as
physical attack damage (such as that suffered in combat), but rather a measure of reduced
efficiency as a factory is turned into something it was not originally designed for.
Aircraft Factories – Players may convert an aircraft factory to create a different kind of aircraft.
This change will cause a reduction in the number of aircraft factories, and damage to the
remaining aircraft factories. Subtract the durability of the old aircraft from the durability of the new
aircraft and the larger the value the greater the reduction (negative values will still cause a
reduction).
Aircraft factories that exist prior to the availability date of the aircraft will be considered to be
researching the aircraft and may move up the availability date of the aircraft. Aircraft factories will
upgrade on their own to produce new models of aircraft when those aircraft become available
(instant upgrade with no damage to factories). However, this will not happen prior to 1942. On
January 1, 1942, all factories will upgrade if there is a new aircraft to upgrade to, and then
thereafter factories will upgrade as new planes become available.
For example, all A6M2 Zero factories convert to A6M5 Zeke factories immediately and at no cost,
once the A6M5 is available.
Vehicle and Armament Factories – Players may convert vehicle factories to armament
factories, and vice versa. This conversion will result in damage to the factories converted.
Shipyards – Players may convert Naval Shipyards to Merchant Shipyards, and Merchant
Shipyards to Naval Shipyards. This conversion will result in damage to the shipyards converted.
181
Engine Factories – Players may convert an engine factory from one type to another. This
conversion will result in damage to the engine factory.
Expanding a Factory – Any aircraft, engine, vehicle, armament, or heavy industry factory and
any naval, merchant, or repair shipyard may be expanded in size by expending heavy industry,
manpower, and supplies to do so. The number of new factories (which will start damaged) is
equal to the current number of factories but will not exceed 100. Expanding a factory will cost 1
manpower, 1 heavy industry, and 100 supply points per new factory (expended at the moment the
expansion is ordered).
The cost to expand a factory will be displayed in the text that appears when the mouse is moved
over the Expand text.
Note: Allied factories may NOT expand or convert.
Ship Construction – The Japanese player may give instructions to alter the construction rates of
ships under construction. Each ship under construction is defaulted to normal construction, but
each ship may be ordered to halt construction or to accelerate production. Ships with their
construction halted will not have their delay rates decrease (except as per section 13.7). Ships
with accelerated production may reduce their delay by an additional day, but this accelerated
production will use up double the shipyard points for the additional delay removed (3 times
durability for 2 days delay removed).
Special Japanese Ship Conversion – The Chitose and Chiyoda may undergo a major
conversion from a CS to a CVL. The Ise and Hyuga may undergo a major conversion to add a
large contingent of floatplanes (it remains a BB type ship).
These conversions occur if the ship is at anchor in Osaka after December 31, 1942. At that time
the ship enters the reinforcement pipeline. Assuming that normal, uninterrupted shipbuilding and
available Naval Shipyard Points, the Chitose or Chiyoda will take 180 days to convert, while the
Ise will take 330 days.
13.2.4 Aircraft Research
Aircraft not yet available with a production capacity will cause research and may move up the
availability of the new aircraft type. Whenever a plane would have been produced, 1
development point is gained by the new aircraft type. For every 100 development points the
availability of the aircraft type will be moved up one month.
13.2.5 Capturing Industry
When specialty (i.e., non-Heavy Industry) Industry hexes are captured by the enemy, the
computer make checks to see if they damage any facilities before capture. If engineers are
present in the hex, the chance and severity of damage is increased with the number of engineers
present. This damage impacts Resources, Oil, and other factory types. Otherwise:
Captured Manpower Centers are divided by 10. For example, if you capture an 30 point
enemy Manpower Center, it will be worth 3 to you.
Captured Japanese Naval or Merchant Shipyards by the Allies convert to Repair
Shipyards.
Captured Aircraft Factories convert to Vehicle Factories.
182
Captured Heavy Industry is halved each time it is captured. For example, a 50 point
Heavy Industry that is captured is reduced to 25; if it is captured again, it is reduced by
half again to 12 (fractions are rounded down).
13.3 SHIP UPGRADES
Ships that upgrade are given a new class and a small level of damage is added to the ship’s
system damage. Ship upgrades may only take place in ports with repair shipyards (or off map in
smaller scenarios).
The bigger the ship, the less the system damage will be; the range of system damage incurred is
generally 2-15%. Off map ships will fully repair this damage before they re-enter the map.
13.4 SHIP REPAIRS
When the production system is turned on, repairs can be made faster at ports with repair
shipyards. Each turn the port accumulates shipyard points equal to the repair shipyards. For
example, if you have 100 Repair Shipyards at Pearl Harbor, you get 100 Repair Points at Pearl
Harbor.
Unused points may be accumulated up to 4 times the number of shipyards. If the shipyards
unused are greater than the durability of the ship being repaired, the repair rate is doubled and
repair points equal to the durability of the ship are expended. A sub, PT, or DD tender may help
two ships per turn repair (they give a bonus equal to increasing the port size by 2).
A repair ship may help four ships per turn repair (bonus equal to increasing the port size by 1). A
Fleet HQ in the port gives a bonus equal to increasing the port by the support in the HQ divided
by 50 (generally 2 or 3). Ships at sea can never repair system damage below 50 and ships in a
docked TF can never repair system damage below 5. A ship has to be individually (i.e. apart from
a TF) docked at a base in order to repair its system damage down below 5.
Off map repair time is equal to:
System Damage * (2 + ( ( rnd (20) + ship durability) / 20 ) ) + round trip time
In small scenarios (i.e. not full map), the AI will send damaged ships off map.
13.5 GROUND UNITS (JAPANESE ONLY)
When production is turned on, all ground units arriving as reinforcements must be flushed out with
new elements from the production system. If the production system cannot produce enough
weapons to fill out the entire TOE of a new ground unit, then the unit will be placed on the map at
25% of its TOE, and these weapons will not be charged against the Production System (this
represents emergency mobilization).
183
13.6 JAPANESE SCRAPPING OF EXCESS AIRCRAFT
The Japanese scrap excess planes in their pool when production is turned on in a scenario. Add
the max ready values of all air units using a particular plane (include in this any reinforcement
groups not yet on the map but due to come in at some point). If the number of planes of that type
in the pool is greater than 99, then the computer scraps all planes in excess of 10 * ( max ready
value of all air groups using the plane), but always leave at least 99 in the pool.
When the planes are scrapped, they are removed from the pool and 1 resource for each engine
on the plane is added to Osaka for each plane scrapped.
For example: 2 Ki-27 units each with 36 max ready exist in the game and no new Ki-27 units are
due in. Any planes in the pool greater than 720 (72*10) will be scrapped. If 800 planes were in the
pool, then the pool is reset to 720 and 80 resources are added to Osaka (single engine plane
provides 1 resource per plane).
13.7 JAPANESE SHIPS
All ships remove 1 day of delay when the delay is greater than:
10 * Ship Durability
This automatic delay removal does not cost Naval or Merchant shipyard points. Those ships set
for normal construction with a delay less than 10 * Ship Durability require Naval or Merchant
shipyard points equal to their durability to remove 1 delay (each day). If set to accelerated
production, the ship will remove 2 days of delay (each day) for a cost equal to 3 times its
durability. A ship that has a delay over 10 * Ship Durability and less than 30 * Ship Durability
may be accelerated. It will remove 1 additional delay (other than the free 1 delay removal) each
day for a cost of appropriate shipyard points equal to the ship’s durability.
184
14.0 LOGISTICS
If logistics are the sinews of modern warfare, then
those sinews were stretched tightly in the Pacific.
Supplies were usually in abundance in Tokyo and
Pearl Harbor, but shipping them to the theater they
were needed in was no easy task, especially for
Japan. Even when they arrived, quartermasters
were faced with distributing supplies in perhaps the
most underdeveloped region on Earth at the time,
with few good ports and no real roads or airfields.
Yet managing logistics is the key to victory in War in
the Pacific - The Struggle Against Japan, 194145™.
Supply comes in two categories:
1.
2.
Basic supplies, which are used to feed, clothe, arm, repair, and build land, sea, and air
units.
Fuel, which is used only for naval units.
Each unit (Air, Ground, and Naval) has a minimum requirement of supplies which is constantly
calculated and updated by the computer. Supply needs are an estimate of future needs based on
recent supply usage. Thus, if aircraft at a base are flying a lot of Missions, or ground units are
engaging in combat at a base, or ships are replenishing ammo from a base, the supply needs of
the base will increase. As combat activity declines, the supply needs value will also decline,
although units always require a basic subsistence level of supplies. While supplies are actually
consumed as used, without adequate supplies on hand to meet the expected needs, units
instinctively begin to curtail operations in order to stretch out the available supplies.
Units that are undersupplied don’t perform at their maximum efficiency, and ships that are
underfueled are only able to move one hex every 12 hours. Units with no supplies operate at
about 25% of their peak efficiency.
Supplies are stockpiled at bases. Supplies are created via the production system and can also
come into the game at bases that are assigned a daily allotment. From there they can be
distributed to satellite bases in a variety of ways already described; via air transport, TFs with
Transport Missions, submarines with transport Missions, and overland. A base may transfer
supplies, oil, and resources to an adjacent base regardless of the terrain the separates the two
hexes (allows inland sea movement of resources and oil).
Support troops are required for a base to operate efficiently. Without engineers, bases can’t be
created, expanded, or repaired. Without aviation support, aircraft can’t remain operational, and
without support troops, units at the base will not recover from the fatigue they suffer from combat
and malaria.
185
14.1 SUPPLY OPERATIONS
Twice a day, during the Supply Needs Calculation and Overland Supply Movement Phases, the
computer calculates the supply needs of all the units and bases in the game. It then looks for
units and bases that need supplies, and which are near bases ((or ground units in the same hex)
that have an abundance of supplies. Supplies are then automatically transported overland to the
needy units and bases if there is a clear supply path on the ground. Many supply operations occur
during the daily Supply Operations Phase.
Ships are limited to loading 10% of the supplies at a base if the base either has less than 30,000
supplies present or its current supply level is less than four times its supply needs.
The Supply Operations Sequence is broken down as follows:
1.
2.
3.
4.
5.
6.
7.
8.
9.
Expend required supply points to maintain ground units and aircraft formations.
Repair aircraft and determine effect of available Aviation Support on the readiness of aircraft
formations. Add pilots to air units that need them.
Adjust Pilot Morale.
Adjust fatigue of ground units.
Units not at bases construct fortifications.
Add replacement aircraft to air formations.
Create ground unit replacement sub-units.
Perform Aircraft Unit Upgrades.
Perform Ground Unit weapon Upgrades.
14.2 NAVAL SUPPLY
Ships fire one round per weapon per round of combat. Once ammunition is expended, there are
two ways in which ships can replenish their ammunition.
If a TF disbands in a port, the port expends supplies to replenish the ammunition on each ship. If
a TF refuels in port, the port expends supplies to replenish the ammunition on each ship. The
supplies expended are based on the amount of ammo needed to replenish the ship and the type
of ammo needed.
14.2.1 Depots and Tenders
Tenders must be located in a hex with a port of at least size 1 in order to perform their duties.
Mine Depots/Tenders (MLE)
SS, ML, and DM ships may only load mines when in the hex with a size 9 or 10 port with sufficient
supplies or in a hex with an MLE ship and a base with sufficient supplies. MLE must have no fire
or float damage and less than 50% system damage, and have Op points remaining for the
function to be allowed.
Destroyer Depots/Tenders (AD)
Non-PT boat surface ships may only reload torpedoes when in the hex with a size 8, 9, or 10 port
with sufficient supplies or in a hex with an AD ship and a base with sufficient supplies. Destroyers
186
are also repaired faster when in a hex with an AD ship and a base. ADs must have no fire or float
damage and less than 50% system damage, and have op points remaining for the function to be
allowed.
PT Boat Depots/Tenders (AGP)
PT boats may only reload torpedoes when in the hex with a size 3 or larger port with at least
20,000 supplies or in a hex with an AGP ship and a base with sufficient supplies. PT boats are
also repaired faster when in a hex with an AGP ship and a base. AGPs must have no fire or float
damage and less than 50% system damage, and have op points remaining for the function to be
allowed.
Sub Depots/Tenders (AS)
Subs may only reload torpedoes when in the hex with a size 8, 9, or 10 port with sufficient
supplies or in a hex with an AS ship and a base with sufficient supplies. Subs are also repaired
faster when in a hex with an AS ship and a base. ASs must have no fire or float damage and less
than 50% system damage, and have op points remaining for the function to be allowed.
Ammunition (AE) Ships
In 1945 or later, a ship may replenish non-torpedo, non-mine ammo that has an effect less than
60 (mostly AA ammunition of 5” size or smaller) if at sea and in the same hex with an AE that is in
a replenishment TF. Before 1945 the AE ship will only function if in the same hex as a friendly
base with a port value of at least 1. AEs must have no fire or float damage and less than 50%
system damage, and have op points remaining for the function to be allowed. AE’s must have
supplies on board to perform these functions, and these supplies are expended as they replenish
the friendly ships.
Repair (AR) Ships
Ships in a hex with an AR ship and a base will repair faster. ARs must have no fire or float
damage and less than 50% system damage, and have op points remaining for the function to be
allowed.
Amphibious Force Command (AGC) Ships
These add a bonus that minimizes damage to units when they are unloading over a beach at an
enemy occupied hex (amphibious assault).
187
Seaplane Tenders (AVD and AV) and Scout Cruisers (CS) Ships
AVD, AV and CS ships will add Aviation Support for float planes, float fighters, and patrol aircraft
(seaplanes) that are based at a base in their hex. This support is not given if the ship’s system
damage is greater than 50 or if the ship has any floatation or fire damage. AVD/AV/CS support is
listed as a “+” to the normal support value of a base, so that 30 aviation support and 18
AVD/AV/CS support will appear as 30 + 18. This support does not benefit normal aircraft or the
level of aviation support these aircraft need. These ships add aviation support equal to the
following:
Japanese AVD/AV/CS ships: their capacity plus 10, minus the number of planes on
board
Allied AVD/AV/CS ships with durability greater than 12 : their capacity plus 18, minus the
number of planes on board
Allied AVD/AV/CS ships with durability less than or equal to 12 : their capacity plus 12,
minus the number of planes on board
14.3 GROUND UNIT SUPPLY
When tracing a supply path for movement of ground units or overland movement of supplies, a
supply value is generated. This is determined by tracing a path from the base transferring
supplies or the ground unit moving to the destination. This supply value determines whether the
move is legal, and how much of the supplies are used up during the move. The supply value of a
move is calculated by subtracting the following from 100 (900 if a ground unit move):
2 for each hex moved along a rail/highway
5 for each hex moved along a road
25 for each hex moved along a trail
50 for each hex moved cross country
To order a ground unit move to a specific hex, the path of the move must generate a positive
supply value to constitute a valid supply path. Ground units will move along a path that provides
the best possible supply route from their current hex to their destination. For automatic supply
movement, the supply value must be greater than 0. The greater the supply value, the more often
supplies will be moved, and the less supplies will be expended during the move.
Example: A unit moving from hex 54,87 (Lae) to 54,89 generates a supply value of 825 (1 hex of
trail movement and 1 cross-country, 900-25-50=825). Since the value is positive, it is a valid
move. Note that if there were enemy units in hex 54,87, a movement plot to 54,89 would not be
allowed as it is not a friendly base. If supplies were being automatically moved from 54,87 to
54,89, it would return a supply value of 25 (100-25-50) which would allow some supplies to
transfer. However this is a low value so supplies would not be transferred every day, and many
supplies would be expended during the transfer.
188
14.4 SUPPLY/FATIGUE EFFECTS ON LAND UNITS
Defensive and offensive fire of land units low on supplies will be reduced. Once a unit has less
supplies than its reported supply need, it stands a chance of having its combat fire reduced. Once
totally out of supplies, it will eventually have its fire greatly reduced. Ground units will gain fatigue
every turn. More fatigue will be suffered by troops that are marching or in combat. Each turn, units
will attempt to reduce their accumulated fatigue. The following items impact the amount of fatigue
reduced:
1.
2.
3.
4.
The amount of support available in the hex versus the support required by the units in the
hex. Units that are in hexes that have support available that equal or exceed the support
required for that hex will reduce the greatest amount of fatigue. The less support available,
the less fatigue is reduced. If a land unit has sufficient innate support, its Support value is
shown in white; if it does not have enough, but it is in a friendly base hex that has enough
total support located in hex, it is shown in green. If neither unit nor hex has enough, it is
shown in red.
Whether the unit is in a temperate or non-winter cold zone. Units in these hexes will reduce
the most fatigue.
Whether the unit is occupying a base, and the size of the base. Units occupying a base will
reduce more fatigue. The larger the base (airfield size plus port size) the greater the fatigue
reduction.
The supply level of the unit. A unit that has supplies equal to or greater than its supply need
will reduce more fatigue. The less supplies the unit has below its needs, the less the fatigue
reduction.
When a unit’s fatigue level gets high, elements of the unit will slowly become disabled. When a
unit has more disabled elements than non-disabled, it will begin to have elements destroyed
instead of just disabled due to high fatigue.
Ground units with a Fatigue of less than 50 will gain 1 extra Fatigue per turn if at sea on a
transport. If 50 Fatigue is reached in this manner, their Fatigue will not increase beyond this level.
14.5 AIR UNIT SUPPLY
Aircraft in an air unit can be in one of three states:
Ready
Being Repaired
In Reserve
Ready aircraft are those aircraft that are capable of flying during the next day. Aircraft being
repaired and in reserve are not available to participate in Missions. Aircraft require aviation
support and supplies to remain ready, or to be repaired or activated from reserve. An aircraft that
is ready may become damaged due to combat or operational losses from flying (even during
Transfer Missions).
189
Furthermore:
One Aviation Support point is required for each aircraft operating at an airbase for those
aircraft to function at maximum efficiency (exception: a base never requires more than
250 aviation support).
A base must have supplies equal to its stated supply needs for the aircraft operating at
the airfield to function at maximum efficiency (exception: level bombers require their base
to have supplies equal to double the supply need in order for the bombers to operate at
max efficiency).
Planes other than level bombers flying an offensive Mission and planes flying an Escort
Mission expend one supply point per plane per Mission.
Level Bombers flying an offensive Mission expend supplies equal to their Maximum Load
divided by 1000 per Mission.
All planes flying other Mission types (search, CAP) expend 1/3 of a supply point per
plane per Mission. These supply points must be available for expenditure or the planes
will not fly.
All aircraft groups require that their base contain supplies at least equal to the supply needs for
the base, or:
The group will not fly more than 75% of the ready aircraft in the group on an Offensive or
Escort Mission.
Level Bomber squadrons require that their base contain supplies at least double the
supply needs for the base, or the Level Bomber group will not fly more than 75% of the
ready aircraft in the group on an Offensive Mission.
All groups attempting to fly any other Mission type (Naval Search, CAP, etc.) require that
their base contain supplies at least one half (50%) the supply needs for the base, or the
group will not fly more than 75% of the ready aircraft in the group.
During the Supply Operations Phase each day there is a chance that aircraft will change their
state. An aircraft that is ready may become damaged because the base lacks sufficient aviation
support and supplies. The chance of a plane being repaired is based on the damage to its
airfield’s service facility, the amount of aviation support available and the supplies available at the
base. Planes may also be placed in reserve due to insufficient supplies and/or aviation support. A
unit can never have more than its maximum ready aircraft ready at one time, with any remaining
planes being placed in reserve. Once the number of ready planes falls below the unit’s maximum,
the unit will attempt to move reserve aircraft to ready, but this will be based on the aviation
support and supplies available at the base.
Aircraft on ships are assumed to have sufficient aviation support and supplies. However:
Planes on a ship may not fly if the ship’s combined System Damage and Floatation
Damage are greater than 50. They may transfer off the ship if docked or at anchor at a
base with an airfield with a size of at least 1 (they are assumed to have been manually
unloaded and taken to the airfield).
If the number of aircraft on board exceeds 115% of the ship’s capacity, only Transfer
Missions can be flown. Planes won’t make an emergency landing (refer to 7.2.2.16
Emergency Landings) on another Carrier in such a way as to cause it to exceed 110%
of the carriers aircraft capacity.
A ship may never have more aircraft on board than twice its capacity.
190
14.6 AUTOMATIC CONVOYS
By using the Automatic Convoys system, players can select certain ship types (AK’s, TK’s, and
certain escort supply ships) to be placed into a computer controlled system that will attempt to
keep bases supplied with needed supplies and fuel, and for the Japanese, will attempt to pick up
resources and oil to return them to Japan for production. Ships are put into this system by the
player at Osaka, San Francisco, or Karachi, and bases must be specifically set to be included in
the system to receive supplies/fuel or have resources picked up (do this by pressing on the Auto
Convoy System button at the top of the main game screen; bases may also be added into the
Auto Convoy system from the Base orders screen).
Each turn the computer will create a TF using the ships in the system if the supply at a base in the
system is less than 2 times the supply needs of the base. If there are sufficient ships, the
computer will create up to 2 TF’s for each player per turn (2 in Osaka and 1 each in San
Francisco and Karachi).
For the Japanese only, during a turn the computer does not create a TF to resupply a base, the
computer may create up to one TF to pick up resources if there are raw materials or oil stockpiles
at a base that is in the system (it may skip one or two turns if it is missing sufficient quantities of
both TK’s and AK’s in the system at Osaka.).
Once an Automatic Supply TF’s cargo has been unloaded, a Japanese TF that has been
sent to resupply a base will attempt to pick up raw materials/oil, either at its current
location or another base that is in the system, and return these items to Osaka.
In addition to providing supply, a TF formed to resupply a base will include available TK ships to
carry fuel if the computer deems the base also requires fuel.
No more than one Automatic Supply TF will be in transit to a particular base at any given time.
Currently, bases with x coordinates less than 50 and Y coordinates less than 90 are supplied from
Karachi and all other bases are supplied from San Francisco.
Only tankers (TK’s), cargo ships (AK’s), and some escorts types may be placed into the system.
Ships may be transferred into or out of Automatic Supply task forces. If transferred out, the ship is
removed from the system. Ships transferred in are added to the system if of the proper type.
A TF created by the Automatic Supply system will have this indicated on their TF orders screen
and most functionality normally accessible on this screen is not available. The destination of the
TF is displayed.
An Auto Supply TF can be changed to Human Control by clicking on the Automatic Supply
Convoy text on the screen. A Yes/No dialogue box to confirm this will be displayed, as once they
are switched to human control the ships will be taken out of the system and there is no way to
switch the TF back to be in the system. Press Y for Yes or N for No.
This system is an excellent way to keep rear area bases in supply, and for the Japanese to pick
up raw materials and oil from rear areas and return them to Japan.
Bases with a decent overland supply link (with a Supply Line value over 75) to Osaka, Karachi, or
the United States will not be displayed in the Automatic Convoy system base list (they are
already getting things shipped by land). These bases will also have the option to put the base into
the system grayed out on their Base Orders screen.
191
14.7 CAPTURING BASE RESOURCES
A base that generates a daily allotment of supplies, fuel, oil and/or resources will not generate
these items if the nationality of the base is not part of the side that controls the base.
Example: Chungking is nationality Chinese and has a daily allotment of supplies. If Chungking is
controlled by the Japanese player, no daily supplies will be generated. If the Allies recapture
Chungking, daily supplies will be generated. Players using the editor should be aware that if a
scenario is created with a base having a nationality that does not belong to the controlling player,
the daily allotments will not arrive unless the base is captured by the other side.
14.8 SPOILAGE
Spoilage (or waste) to fuel and supplies at a base may occur, based on the size of the base. To
determine this possibility, first add the port and airfield sizes. Any base with combined port and
airfield of 10 or more has no spoilage. Otherwise:
Fuel over 1000 + ( ( port + airfield size ) * ( port + airfield size ) *1000 ) suffers
spoilage.
Supplies over 5000 + ( ( port + airfield size ) * ( port + airfield size ) * 3000 ) suffers
spoilage.
14.9 BURMA ROAD
For the Allies, if a rail/highway/road/trail path free of Japanese units between Yunan and Ledo or
between Yunan and Rangoon can be traced, than each day, 500 supply points per turn are added
to Yunan.
192
15.0 REINFORCEMENTS AND
REPLACEMENTS
Reinforcements are ships, air units and ground units that enter the game after a scenario has
begun. These units appear in locations displayed on the various reinforcement screens found off
of the Intelligence Screen. Refer to section 15.6 Arrivals for what happens if the arrival location is
enemy controlled. Ground and air units that have taken losses may also receive replacements.
Reinforcements and replacements are noted in the appropriate menu off of the Intelligence
Screens. Some ground units, air units and ships may upgrade their equipment during the course
of a game.
Disbanding/withdrawing units come back as if they were a normal reinforcement as do certain
destroyed air and ground units as detailed in this section. When production is on, all Japanese
units coming into the game use planes from the Production Pool.
15.1 NAVAL UNITS
At the beginning of each scenario, ships are given a “standard availability date” which is the date
on which the ship will enter the game. You can randomize the availability dates somewhat
through the use of the Reinforcement realism option. Ships that have been sent off map (or are
being converted) will also be given an availability date at the time they are sent home (these ships
not only repair damage but may upgrade their ship class and be given new weapons systems, AA
guns, radar, etc.). Once ships have reached their availability date, they become available and
enter the map at their entry location.
15.1.1 Automatic Ship Replacements
There are several instances in which replacement ships will be provided as reinforcements if a
ship is sunk during the game. Replacement ships are generated if:
An American CV is sunk prior to 1944 will be replaced by an Essex-class CV.
An American or Australian CA that is sunk prior to 1944 will be replaced by a Baltimoreclass CA or a Cleveland-class CL. The replacement class is chosen at random.
A Minesweeper of any navy that is sunk will be replaced by a similar minesweeper.
Whenever a replacement ship is created, it will be placed in the reinforcement list and given an
arrival time of around 550 days from the date the original ship was sunk.
15.2 AIR UNITS
Air units will automatically gain replacements under certain circumstances if aircraft our available
in the replacement pool and the air unit has been set to Accept Replacements. To get
replacement aircraft to flow automatically into an air unit, there must be planes in the pool and
one of the following cases must be true (the first true will take effect):
193
The air unit is located at a base and the base has over 20000 supplies. Supplies will be
expended at the base and the unit will receive damaged planes from the pool (they may
repair before the next orders phase during the repair phase).
The air unit is located at a base and the HQ that the base is assigned to is within transfer
range of the air unit’s aircraft type and the HQ is located at a base that has over 20000
supplies. Supplies will be expended at the HQ’s base and the unit will receive damaged
planes from the pool.
The air unit is located on a ship in the same hex as a base (TF or at anchor) and the
base has over 20000 supplies. Supplies will be expended at the base and the unit will
receive damaged planes from the pool.
The air unit is located on a ship in the same hex as a base and the HQ that the base is
assigned to is within transfer range of the air unit’s aircraft type and the HQ is located at
a base that has over 20000 supplies. Supplies will be expended at the HQ’s base and
the unit will receive damaged planes from the pool.
If none of these conditions apply, land based air units may automatically have a sub unit created
for it at the base containing the HQ that the air unit’s base is assigned to. The base with the HQ
must have supplies that are at least equal to twice the base’s supply needs plus the supplies that
will be expended in creating the sub unit, and there must be planes in the pool equal to:
10 + (plane build rate / 2)
If these conditions are met, a sub unit of damaged planes will be placed at the HQ’s location and
supplies will be expended from the base. Note Japanese build rates are usually 0 when
production is on. Another subgroup will not be formed for the air unit until at least 7 days have
elapsed.
In scenarios with production on all new air units (including reinforcements, disbanded, and
withdrawn) must take from the replacement pool to fill out the air unit when it arrives.
Aircraft units may receive replacements during the Supply Operations Phase. Air units on
airfields only check for replacements 2 out of every 3 days, while air units on ships check for
replacements every day. Any unit, including sub-units, with less aircraft (Total Ready, Repairing,
and Reserve) than its maximum ready aircraft level is eligible for replacements (the main unit's
maximum ready aircraft level is checked versus the total number of aircraft from the main unit and
sub-units). Air units with more losses will receive priority for replacements. Air groups on carriers
with more than 50% system or flood damage cannot receive replacements.
Replacements are taken from the replacement pool if the appropriate planes are available (fighter
aircraft for fighter squadrons, carrier-capable aircraft for carriers, etc.). To view the number of
planes currently in the replacement pool, access the Aircraft Replacement Screen from the Intel
Screen. Also, the expected average rate of monthly replacements (and/or production) by plane
model will give you an idea of how quickly losses can be made up.
The Aircraft replacement screen lists the number of available planes and the number of planes
used so far during the scenario. The number used can become negative if more planes have
been returned from upgrading air units than have been used as replacements.
Non-Dutch air units that are destroyed on the ground when a base is captured will return to the
game as a reinforcement after 360 days. If production is on for the Japanese player, Japanese
units will use planes from the replacement pool to try to fill out the units when they reenter the
194
game. Allied air units that are sunk while on a ship and that are not part of that ship’s normal air
group complement will return to the game as a reinforcement after 120 days.
15.2.1 Carrier Aircraft and Off-map Movement
If a Carrier is withdrawn off-map during a partial map scenario, the aircraft assigned to it are
placed in the replacement pool, but the pilots remain with the carrier air group. If a carrier returns
to the war zone, it will attempt to replace its aircraft from the replacement pool.
15.2.2 Pilot Replacements
Air units may receive pilot replacements during the Supply Operations phase. Units that have
more ready aircraft than pilots will have new pilots assigned to the unit from the pilot replacement
pool. The number of trained pilots, and the base experience levels of these replacement pilots are
listed on the Pilot Replacement screen. However, if replacement pilots are needed and none are
available, poorly trained replacement pilots will be provided to the air groups needing them. These
poorly trained replacement pilots will enter the game with roughly ½ of the experience of that
nationality’s trained replacement pilots.
195
15.2.3 Average Pilot Experience by Nationality
When new units arrive as reinforcements, they will generally arrive with pilots that have
experience levels based on their nationality and the year of arrival. This is not always true as
some air groups have been given unusual experience ratings or contain a high proportion of
“historical” pilots that were of extraordinary skill. Normal units will enter with pilot experience set
near to the levels in the following table.
Year
Japanese Army
Japanese Navy
US Navy
US Army
US Marine Corps
Australia
New Zealand
Great Britain
France
Dutch
China
Soviet Union
India
Commonwealth
Philippines
Canada
1941
65
80
70
55
55
55
55
55
55
55
45
55
50
50
50
55
1942
60
75
70
55
60
60
55
60
60
60
45
60
55
55
55
60
1943
55
60
75
60
60
60
60
60
60
60
45
60
60
60
60
60
1944
50
45
75
65
65
65
60
65
65
65
50
65
60
60
60
65
1945
45
40
75
70
65
65
65
70
65
65
50
75
65
65
65
70
1946
40
40
75
70
65
65
65
70
65
65
55
75
65
65
65
70
15.2.4 Aircraft Upgrades
Many of the aircraft models in the game were improved as the war went on. The engineers at
home toiled to perfect their designs, creating a constant flow of newer, more powerful models. In
War in the Pacific - The Struggle Against Japan, 1941-45™, as these models become available
their numbers will steadily grow in the player's Replacement Pool. Every day, during the Supply
Operations phase, air units will check for possible automatic upgrading if the unit is set to
upgrade. During the orders phase, an air group that meets the needed requirements will be able
to
use
the
Upgrade
Now
option
to
accomplish
an
immediate
upgrade.
There must be a sufficient number of the new model planes in the Replacement Pool to equal the
maximum ready aircraft level for the unit in order for the upgrade to occur. In addition, one of the
four requirements listed in section 15.2 must be true. If these conditions are met, the unit's current
aircraft are placed in the player's Replacement Pool, and the unit has its number of damaged
aircraft set equal to the maximum ready aircraft level for the unit.
Dutch aircraft may not upgrade until July 1, 1942. British aircraft may not upgrade until May 1,
1942.
196
15.3 GROUND UNITS
Bases that have supplies that exceed double their supply requirements may use the excess over
double needs to provide replacements (as long as the ground unit has the Accept Replacements
selection made on its Ground Unit Information screen). Units are within supply range of the base
if the supply range is 50 or greater from a base where you trace a path starting with 100 and
subtracting for each hex the path moves through as follows:
Rail/Highway: 2
Road: 5
Trail: 25
Cross Country: 50
If needed items are in the pool (or there are armament points ready to build them if the forces are
Japanese and the Production system for Japan is turned on), then they may be added to the unit.
The unit should gain at least 1 of each of the needed items (need is if TOE value is greater than
the disabled+ready value of the unit and any sub units on the map). The unit may receive more
than 1 of each item needed, but must pass a series of checks to do this. Each base that the unit is
within supply range of may send replacements, so there is an advantage of being near lots of well
stocked bases. Sub units may never receive replacements unless it is an engineer type unit under
computer control. If the sub unit is an engineer type unit, it may take replacements for Aviation
Support, Support, and Engineers (if the sub unit has any of the specific item). The desired TOE it
tries to build to is up to 90 Aviation Support, 90 Support, and/or 48 Engineers.
Except for most HQ units and some Chinese units (see section 15.3.2), ground units are not
replaced when destroyed. Most HQ units do return to the game as a reinforcement if they are
destroyed.
15.3.1 Ground Unit Weapon Upgrades
Ground units may have their individual weapons elements (i.e. infantry squads, artillery, etc.)
upgraded to newer elements as they become available if they are available in the replacement
pool or can be produced by the Japanese production system. An example of this is an Allied unit
with a 37mm AT gun will attempt to upgrade it to a 57mm AT gun when there are enough in the
replacement pool. Another example is the basic USA Rifle Squad will upgrade beginning in July
1942 (gaining some additional firepower). In fact, the USA Rifle Squad will upgrade two additional
times during the war.
As with replacements, the unit must have access to a nearby base with supplies in order to
receive an upgrade. When upgrades are performed, they remove all of the elements of a single
weapon’s element (i.e. all 37mm AT guns or all USA Rifle Squads) in a ground unit, placing these
back in the replacement pool (both disabled and ready squads). An equal number of new
elements are placed in the unit in the same condition as the elements removed (i.e. 6 ready and 4
disabled 37mm AT guns will be replaced with 6 ready and 4 disabled 57mm AT guns, while 10
37mm AT guns will be added to the replacement pool).
When production is turned on for the Japanese player, any infantry and/or engineer squads that
are upgraded will not be returned to the pool. Instead a number of points equal to the load costs
of the units replaced will be added to the manpower pool.
197
Upgrades occur automatically and cannot be stopped from happening as long as sufficient new
items are in the pool and the unit has access to sufficient supplies.
15.3.2 Special Chinese Replacements
Chinese infantry units that are totally destroyed are recreated. When destroyed, the unit is set to
return to Chungking 30 days later at 1/3 of its TO&E strength. These replacement units do not use
up any units from the replacement pool. They represent the almost unlimited ability of China to
replace infantry units if needed.
15.4 BASE FORCE REPLACEMENTS
Base Forces also receive replacements just as any ground unit does, but their expected full
strength level for the computer player can change during the game. Every friendly airfield with at
least one Base Force unit at the airfield will pick one Base Force to be its primary Base Force.
The primary Base Force will have its expected full strength value for aviation support points
change so that its expected value equals 30 times the current size of the airfield (never greater
than 250). This change in the expected value can cause replacement units to be built even when
losses have not been taken. This will provide sufficient aviation points to support growing airfields.
15.5 ARRIVALS
The rules for ships, groups and land based units (collectively known as items) coming onto the
map, when the assigned base is controlled by the enemy, are as follows: If not a full map
scenario, the four possible main bases from the data base are checked, and if one of them is
present and owned by the player, the item arrives in that location. In full map scenarios, the
nationality of the item is determined and the following bases are checked in the order shown. If
under friendly control, the item arrives at that base. If all arrival locations for the unit are enemy
controlled, the unit will arrive as soon as one of the locations is recaptured and the unit will be
listed as arriving at an unknown destination.
198
Japan - Tokyo, Osaka
China - Chungking, Chengtu
Britain - Karachi, Bombay (includes India and Commonwealth)
Dutch - Tjilitjap, Soerabaja
Philippines - Manila, Cagayan
Australia - Sydney, Melbourne
New Zealand - Auckland, Christchurch
Soviet Union - Rukhlovo, Ondorhaan
United States - San Francisco, Los Angeles, San Diego, Seattle (includes France and
any other nationality not listed).
16.0 VICTORY CONDITIONS
"I have returned."
- General Douglas Macarthur, Supreme Allied Commander of South-West Pacific (at the
Philippines, 1944)
The Pacific campaign was a conflict that both America and Japan stumbled into. Neither side
expected it to become a black hole that devoured men and material at a prodigious rate. Capital
ships, especially aircraft carriers, were priceless and could not be risked lightly. America had few
carriers to spare, while Japanese shipyards and training schools could not hope to replace severe
losses in ships and trained aircrew. In War in the Pacific - The Struggle Against Japan, 194145™, points are given for destruction of enemy planes, ships and ground troops, and control of
bases. Below is a detailed description of how victory points are awarded.
Throughout the game, both sides are scoring victory points (VPs). VPs are gained and lost as
units are destroyed. At the end of the game, these points are totaled along with the points for
bases controlled by either side, and these points are then compared to determine which side has
won. Points are awarded in the following ways:
Aircraft Destroyed (Japanese or Allied): 1 VP per plane destroyed
Allied ground unit items (squads, vehicles, or guns):
o Phillipine and Chinese: 1 VP for every 12 items destroyed
o Soviet: 1 VP for every 6 items destroyed
o All Other Allied: 1 VP for every 3 items destroyed
Japanese ground unit items (squads, vehicles, or guns): 1 VP for every 6 items
destroyed
Ships Sunk - The VPs for sinking a ship is generally equal to the durability of the ship:
For CV and CVL ships, add 3 times the A/C capacity to the durability.
For CVE ships, add 2 times the A/C capacity to the durability.
For CS ships, add the A/C capacity to the durability.
For BB ships multiply their durability by 1.33.
For LST, LCI, PG and ML ships divide their durability by 2.
For SS ships divide their durability by 3.
For AP,AK,TK,AO,LSD divide their durability by 2.
If a ship is scuttled, it will score 10% less than its standard VP’s.
Barges are worth zero VP’s.
Ship Damaged - In certain scenarios VP’s are awarded for ships that have system
damage at the end of the game but are not sunk. The points awarded is equal to the
normal VPs for sinking x 1/2 x system damage / 100). In scenarios allowing points for
ship damage, ships may not be sent home to Japan, Pearl Harbor, or any other off map
location. In these scenarios the Intel screen will list the total number of ships on each
side that are damaged and the victory points earned for these ships. A display showing
data on ships sunk will appear at the end of a scenario, and points scored from damaged
ships is located in the player’s Intel screen.
199
Control of Base - Each base has a basic VP level for Allied ownership and one for
Japanese ownership. The final victory point value that is awarded to the controlling
player at the end of the game is figured by the following formula:
Basic VP# x [ ( current size of port ) + ( current size of airfield x 2) ]
The basic VP and final VP numbers for each side are displayed for each base when the
mouse cursor is placed over a base (the basic VP number value is in parenthesis).
This full amount of the final VP value is only scored at the end of the game if the base
has supplies at least equal to its needed supplies. If supplies are lower than the required
amount, the VP’s scored will be less than this maximum, (the lower the supplies the
lower the scored VP’s). Bases with 0 supplies would score 25% of the full final points.
Example: Rabaul has a Basic Japanese VP level of 3. Assuming the size of the airfield is
8, and the size of the port is 7, the Final VP level for Japanese ownership of Rabaul is 3
x [ (7) + (8 x 2) ] or 69. As long as Rabaul had more than its supplies needed, the
Japanese player would score 69. If Rabaul’s supplies were only equal to 30% of its
needs, the Japanese player would score only 33 VP’s.
Industry damage – Two VPs per point damaged, 20 VPs per point destroyed (an item
destroyed when damaged will yield 18 more VPs). Industry can only be destroyed by
firestorms and A-bombs, but can be damaged by any type of attack (including firestorms
and A-bombs). VPs scored by damaging industry is cumulative; if an industry hex is
bombed, damaged, repaired, then bombed again, the player keeps earning VPs as long
as the industry hex keeps generating value by repairing itself.
This is true for all industry types including manpower.
Points will only be scored by the Allies for bombing industry in mainland Japan, and by
the Japanese for bombing industry in North America, Australia, and/or Hawaii.
200
16.1 VICTORY LEVELS
War in the Pacific - The Struggle Against Japan, 1941-45™ can end in either a Decisive or
Marginal Victory for one side, or in a draw. Victory Levels are displayed at the end of the game
and determined as follows:
Allied Decisive Victory: Allied VP Score is 1.75 times (or greater) higher than the
Japanese VP Score
Allied Marginal Victory: Allied VP Score is 1.25 to 1.74 times higher than the Japanese
VP Score
Draw: The Allied VP Score or Japanese VP Score is 1 to 1.24 times higher than their
opponent’s score
Japanese Marginal Victory: Japanese VP Score is 1.25 to 1.74 times higher than the
Allied VP Score
Japanese Decisive Victory: Japanese VP Score is 1.75 times (or greater) higher than
the Allied VP Score
16.1.1 Victory After 1945
If the game ends in 1946 when the scenario time expires (as opposed to ending due to an
Automatic Victory), the Victory Level moves two levels in the Japanese player’s favor.
For example, scenario 15 ends when time expires in March 1946 with the Allies having 1.8
times the Japanese points. Normally this would be a Decisive Allied Victory, but since it is
ending due to time expiring in 1946, it shifts to a Draw.
16.1.2 Using Atomic Bombs
If the Allies use 3 or more atomic bombs during the game, then the level of victory moves 1 level
in favor of the Japanese. This is in addition to the 2 level move if the game ends with the time
expiring in 1946. If the player achieves a Decisive Victory having used more than 3 A-bombs,
then the Allies win a Marginal Victory.
If the game ends on its own due to time expiring in 1946, and three or more Atomic Bombs have
been used, the best Victory Level the Allied player can hope for is a Marginal Victory for the
Japanese (or a Marginal Loss for the Allies).
201
16.2 AUTOMATIC VICTORY
Once 365 days have been played into a scenario, there is a possibility that the game will end
immediately due to an Automatic Victory Condition. If any of the following Automatic Victory
criteria are met, the game will end immediately with the side that met the criteria winning a
Decisive Victory (unless the A-bomb exception (section 16.1.1) has been triggered, in which case
the Allies would at best score a Marginal Victory). In addition, if the Allies score an Automatic
Victory after August 31, 1945, the victory scored will only be an Allied Marginal Victory (unless the
Allies have used 3 or more A-bombs, in which case the game would end a draw).
16.2.1 Automatic Victory in 1943
In 1943, if one player has 4 times the VP’s of the other, the game will end.
16.2.2 Automatic Victory in 1944
In 1944, if one player has 3 times the victory points of the other, the game will end.
16.2.3 Automatic Victory in 1945 or Later
In 1945 or beyond, if one player has 2 times the victory points of the other, the game will end.
17.0 SPECIAL RULES
17.1 REALISM OPTIONS
War in the Pacific - The Struggle Against Japan, 1941-45™ includes several options that
increase the realism of the game. These options are chosen from the Realism Options menu.
These options are also detailed in section 2.0.
There are eight options to choose from:
17.1.1 Fog of War
This setting only displays information on enemy units that have been sighted, and the information
garnered will be based on the Detection Level of the unit (i.e., the information may be limited,
approximate, and/or inaccurate). When set to On:
Losses for ground units as well as the number of hits on bases (ports, airfields, supplies)
are randomized to be inaccurate.
Players will not be shown Victory Points for their opponent’s damaged ships.
202
When a ship is sunk a date is set when this information will be given to the opposing
player. Until that time, the ship will not be listed as sunk and will not be reflected in the
sunk ship victory points for the opposing player. The delay until the information is given is
between 0 and 60 days. After the game ends, all damaged and sunk ship information is
visible and counted in the final victory point total.
Not all ships will be reported sunk during the Execution Phase if the Fog of War option is used.
17.1.2 Allied Damage Control Advantage
If this is selected, Allied crews will be more effective at fighting fires and making repairs at sea.
17.1.3 Advanced Weather Effects
If set to On, there will be a different weather forecast every Day: Clear, Partly Cloudy, Overcast,
Rain, or Thunderstorms. The worse the weather that Day, the greater the likelihood of an air
Mission missing the target, or even of being grounded before takeoff. If this option is off, the
weather forecast will always be Partly Cloudy.
Regardless of whether this option is turned on or off, the weather forecast on the first day of every
scenario is always ‚Clear.’
17.1.4 Japanese Sub Doctrine
If set to On, Japanese submarines will attempt to attack combat ships and generally avoid
attacking non-combat ships. Japanese Sub Doctrine favored attacking combat vessels, and at
this they were very successful in late 1942. However, this was at the expense of the opportunity
to wreck havoc on Allied transports containing the troops and supplies that eventually won the
war for the Allies.
17.1.5 Reinforcement Variability for Allied and Axis units
When set at variable, reinforcement times will vary for ground and air units and ships by plus or
minus 15 days from the fixed dates in the scenario. When “very variable” the times will vary by
plus or minus 60 days. This variable is set separately for each side. The “fixed” setting has
reinforcements arrive as historically scheduled.
If either of the Variable Arrival settings is chosen in a PBEM game, neither player will be able to
view their reinforcements on their Intel screens during the first turn of any scenario.
17.1.6 Historical First Turn
This option gives the player a chance to start a game by immersing themselves into the historical
strategies selected by both sides for the forthcoming scenario chosen. With this option selected:
A human playing against the computer will not be able to issue orders on Turn One.
Neither player in a head-to-head (i.e., two human player) game will be able to issue
orders on Turn One.
203
Neither player in a PBEM game (i.e., two human player) game will be able to issue
orders on Turn One. Essentially, each player’s first turn is going to be skipped after
entering their password, with the player being asked to save the game immediately. After
both players have done this once, the second turn will begin by allowing the first player to
enter orders after seeing the first turn’s execution phase.
In a computer-versus-computer game, the player will be able to issue orders on Turn
One, if the player desires to.
17.1.7 Variable Setup
If this option is selected along with Historical First Turn (section 2.4.5), and either scenario 8 (First
Year, 7 Dec 41 – 31 Dec 42) or scenario 15 (The War in the Pacific), the game will have one of
four possible random openings:
OPERATION OUTFIELD: If this random opening occurs, Kimmel sends forces to
Midway, Johnston Island, and Wake Island. These include ships and air groups. Some
Allied submarines are repositioned. There is a very good chance that all groups and antiaircraft batteries are put on alert, even if the December 7th surprise option has been
selected. The idea is that Kimmel has taken the dispatches from Washington seriously
and is spreading a force umbrella to protect the Hawaiian Islands. Due to the odd, out of
the way path the Japanese take to Pearl Harbor, this is unlikely to work. Still, some
forces begin the game in different places. In addition, there are some dispersal of Allied
air groups in the Central Pacific, Philippines, and Malay.
OPERATION INFIELD: If this random opening occurs, Kimmel forms a surface fleet
which he keeps in the Pearl Harbor area and brings both Carrier Task Forces close to
home port. Some air groups are repositioned and put on alert. Some Allied submarines
may be repositioned. In addition, there are some dispersal of Allied air groups in the
Central Pacific, Philippines, and Malay. This opening usually produces a fierce carrier
battle on turn one near Pearl Harbor.
OPERATION HOME PLATE: If this random opening occurs, Kimmel assumes the safer
course to be pulling all Task Forces into port. Surprise is likely, and the Japanese are
happy to find two American carriers in port, when they launch their attack.
DECEMBER 7th SURPRISE: If this random opening occurs, the standard turn one is
played.
17.1.8 December 7th Surprise Rule
If the player selects a scenario that begins on December 7th, 1941, this option may be selected.
When chosen, during the Morning Phase only on December 7, 1941, the following occurs to
represent Allied surprise:
204
Allied air units flying patrols (CAP, search, etc.) have a 50% chance of not flying any
aircraft
If an air group passes this test and elects to fly, the number of aircraft that will fly is
reduced by 75%
The Allies will launch no airstrikes
Japanese Naval TFs move at twenty times thier normal speed to reach their
destinations
Aircraft making a port attack during any December 7 phase will attack ships 100
percent of the time if there are at least 10 ships in the port
Aircraft hit on any Allied airfields suffer increased damage
Japanese ships on Turn 1 will not use more than 3 hexes of fuel, representing their
tanker support
Japanese Fast Transport TFs do not receive a bonus movement rate on Turn 1
17.2 EMERGENCY RESCUE OF SURVIVORS
Whenever a ship sinks, other ships in the same TF will automatically attempt to rescue personnel
(squads and support troops) that are loaded on the sinking ship. Every ship is rated for its
emergency rescue capacity. Ships carrying these rescued troops will unload them at the first
opportunity, either when the TF reaches its Destination Hex or its home base.
17.3 HIGH-ALTITUDE AIR COMBAT
P-39D and P-400 aircraft are less effective in air-to-air combat if fighting at altitudes over 10,000
feet. To reflect this, one point is subtracted from their maneuverability rating for every 1,000 feet
over 10,000, up to a maximum penalty of 15 maneuver points.
17.4 EARLY WAR ZERO ADVANTAGE
During the timeframe December 1941 – April 1942, the Japanese aircraft types A6M2 Zero and
A6M3 Zero are given an advantage in air to air combat by having a bonus added to their
maneuverability as follows:
December 1941:
January 1942:
February 1942:
March 1942:
April 1942:
+5
+4
+3
+2
+1
This is to account for the fact that the extreme maneuverability of the Zero was unknown to most
Allied pilots. This allowed the Japanese to take advantage of poor Allied tactics. Eventually the
Allies began to appreciate the performance aspects of the Zero and devised tactics to offset its
advantage.
205
18.0 NOTES ON COMBAT
18.1 LAND COMBAT
The value listed after the unit’s symbol is its Assault Value (or, if the unit is artillery, the number
of tubes engaging).
The Assault Value listed during the Orders phase is the unit’s potential value, and will not always
be the same as the value listed in the Combat Screen. The value listed in the Combat Screen has
been modified by the combat situation, unit disruption, fatigue, damage already sustained, and
the general confusion of battle. During combat execution, the player will note that the unit’s value
may sometimes be decreased. This dynamic value is the one actually used in the combat
calculations.
After combat, the unit has had some time to bandage wounds and reorganize, so its resting value
may be higher than it was at the end of combat. The values in combat can be used to determine
the general condition and strength of the opposition, but fog of war makes it impossible to assume
accurate figures.
18.2 NAVAL COMBAT
The general situation is now displayed at the beginning of combat. Non-combat task forces will try
to disperse and flee, while escorts run interference and engage the enemy task force. Fog,
darkness, sea conditions and the lack of knowledge of minefields or other forces in the area can
sometimes make full engagement difficult for the combat task force trying to attack a non-combat
force. And, although the player can see all the ships in the defending task force, the task force
commander may not be able to. Combat task forces will try to engage each other in the most
favorable fashion. If possible, they will try to cross the T, that is turn and fire broadsides at the
front of the enemy column. If they cannot, they will try to assume the best position. The player
should note that non-penetrating hit locations are now displayed and penetrating hits now display
a variety of messages, concerning the nature of the damage. The messages are taken from
tables assigned to various ship locations and are generic in nature. So, messages saying that the
ship is taking on water, for instance, mean damage below the water line has opened the ship to
the sea.
18.3 AIR-TO-AIR COMBAT
The cloud cover over the general target area is now displayed. This affects the bombing accuracy
and the ability of CAP to find the attacking aircraft. The message that the group is climbing to
intercept, means it does not have adequate climb rate to engage effectively during that impulse.
Higher altitude gains an advantage for both attacking fighters and bombers. The messages that
the group is intercepting means it has sufficient altitude and is close enough to attack effectively.
The message that LR CAP (long range CAP) is intercepting means some CAP was approaching,
while some returned to base and the group is engaging with less effectiveness than if it were all
206
together. The message that the group area CAP is intercepting means that the CAP was spread
out over a goodly area and is engaging, like LR CAP, piecemeal. There may also be a group
tactic. This is what the group leader is trying to do and may include bouncing, that is attacking
from above or with surprise, attacking head on in a slashing attack, maneuvering for a tail attack,
gaining the advantage by attacking in formation or engaging, that is just trying to get his planes to
shoot at the enemy, however they can. After this last message is displayed, the flights exchange
fire. Each group is broken into flights and these are handled separately. Each flight is broken in
individual planes and these are handled separately. Cloud cover, the range the attacking group
has had to fly, the group leader’s characteristics, the relative altitude and the aircraft
characteristics, mainly speed and maneuverability help to determine the relative position and
conditions under which the individual pilots operate.
Similar tactical calculations are made for each pilot. So, although the flight may be at a tactical
advantage the pilot may not be able to take advantage of that advantage. When fighters attack
bombers, the messages will tell he attacker and direction of attack.
On the bomb run, the cloud cover over the specific target is displayed. When bomber formations
turn back or fighter formations break off, a message now appears.
207
19.0 APPENDICIES
19.1 APPENDIX A - GLOSSARY AND ABBREVIATIONS
19.1.1 Glossary: Game Abbreviations
A/C – Aircraft
ASW – Anti-submarine Warfare
CAP – Combat Air Patrol
DH – Destination Hex
DL – Detection Level
Dst – Destination
Dur - Durability
Flt – Floatation damage
HQ - Headquarters
MDL – Maximum Detection Level
Mvr - Maneuverability
Ops - Operations
SOPAC – South Pacific
SPS – Standard Potential Size
SWPAC – Southwest Pacific
Sys – System damage
TF – Task Force
VP – Victory Point
19.1.2 Military Abbreviations
AD – DESTROYER TENDER
AE – AMMUNITION
AG – COLLIER
AGC – AMPHIBIOUS FORCE COMMAND
AGP – PT BOAT TENDER
AK – CARGO
AO – OILER
AP – TROOP TRANSPORT
APD – HIGH SPEED TRANSPORT (CONVERTED DESTROYER)
AR – REPAIR
AS – SUBMARINE TENDER
AV – SEAPLANE TENDER
AVD – SEAPLANE TENDER DESTROYER
BB – BATTLESHIP
BC – BATTLE CRUISER
CA – HEAVY CRUISER
CL – LIGHT CRUISER
CLAA – LIGHT CRUISER, ANTI AIRCRAFT
CS – SCOUT CRUISER
208
CV – AIRCRAFT CARRIER
CVE – ESCORT CARRIER – AKA THE JEEP CARRIER
CVL – AIRCRAFT CARRIER LIGHT
DD – DESTROYER
DE – DESTROYER ESCORT
DM – DESTROYER (MINELAYER) – SPECIAL DESTROYER ARMED WITH MINES FOR ASW
DMS – DESTROYER MINE SWEEPER (OR HIGH SPEED MINE SWEEPER)
LCI – LANDING CRAFT (INFANTRY)
LCM – LANDING CRAFT (MECHANIZED)
LCT – LANDING CRAFT, TANK
LCVP – LANDING CRAFT (VEHICLE PERSONNEL)
LSD – LANDING SHIP (DOCK)
LST – LANDING SHIP (TANK)
ML – MINE LAYER
MLE – MINE LAYER TENDER
MSW – MINE SWEEPER
PC – PATROL COASTAL – OR SUBMARINE CHASER (173’)
PG – PATROL GUNBOAT
PT – PATROL TORPEDO BOAT
SC – SUB CHASER (110’)
SS - SUBMARINE
TK - TANKER
19.2 APPENDIX B - PBEM GAME SECURITY
War in the Pacific - The Struggle Against Japan, 1941-45™ contains a feature that informs the
player which scenario he is playing, if it is an official War in the Pacific - The Struggle Against
Japan, 1941-45™ campaign or a user designed campaign or if an official campaign has been
modified or corrupted. Scenario slots 1-25 are reserved for official unedited campaigns. These
campaigns can be edited but not saved in campaign slots 1-25, but only in slots 26 and above.
You can check your campaign status at the bottom of the in-game Preferences Screen. Players
will see one of the following three messages:
Scenario #1-25 – Campaign Name. This is an official War in the Pacific Campaign.
or
Scenario #26-199 - Campaign Name. This is a user defined Campaign.
If an edited campaign is found in slots 1-25 you will receive the following message.
Warning: This official War in the Pacific Campaign has been edited which could lead to
unbalanced play. Please check with the other player.
The latter message indicates that one or more of the campaign files have become corrupted or a
player has edited and renumbered an official campaign file. The message pretty much means that
the players should start the campaign over. If the message persists, the Japanese player should
reinstall the game and start over.
209
To help players guard against turns being replayed for better results, we have designed our
replay feature to save all game turn results. This means that no matter how many times the same
turn is played, the results will always be the same. To ensure the integrity of your PBEM games,
all players will now need to restart their War in the Pacific - The Struggle Against Japan, 194145™ session before being allowed to proceed with a second PBEM game turn.
19.2.1 Saved Game File
Our saved game files are already compressed and encrypted when a game turn is saved. Players
will gain very little in terms of file size reduction by zipping them with another third-party
compression program. The game will now save the PBEM game in a file with your defined save
name. These files are in your War in the Pacific \ SAVE directory and use a .dat extension.
19.3 APPENDIX C – STYLES OF PLAY
War in the Pacific - The Struggle Against Japan, 1941-45™ is played by two sides, one side is
the Japanese and the other side is the Allies. War in the Pacific - The Struggle Against Japan,
1941-45™ is played by choosing one of the many different battles or campaigns known as
scenarios. A scenario may be played by one person against the computer, computer vs. computer
or by two persons playing against each other using a variety of possible play styles. The styles of
play available in War in the Pacific - The Struggle Against Japan, 1941-45™ are Two-Player Hot
Seat and Play By E-Mail (PBEM).
19.3.1 Computer Controlled Japanese / Allied Forces
This option allows the player to play one side while the computer controls the other side’s forces.
The computer controlled opponent should give players a moderately challenging experience.
19.3.2 Computer vs. Computer
This style of play is generally used for two main reasons. This first is for players that edit or design
their own scenario battles or campaigns to test there designs in a timely fashion without the need
to dig up willing opponents to help them. The second is for a player to simply watch the game in
action and get an idea on how the game play unfolds as he is beginning to learn the system.
While this second option can prove interesting, we predict players will want to jump in themselves
before too long.
19.3.3 Hot Seat
Two players at the same computer can play against each other by taking turns sitting at the
computer entering their orders. Once both players are done making there orders both players can
then review the results together.
19.3.4 Play By E-Mail (PBEM)
PBEM allows players to play turns and send them to their opponents via E-Mail. Once you find an
opponent you will both need to choose who will be controlling what forces, the scenario or
210
campaign to play and what optional features you will be playing with. The Japanese player must
start the game and must make sure to select the choices that were agreed to by both players
beforehand. Once all this is done and the battle is started the Japanese player will be prompted
for a password. DO NOT forget your password if you do you will have no choice but to start over.
When you are finished with your turn you will automatically be taken to the Save Game Screen.
Select a free slot or an old slot that can be erased and follow these two steps:
1.
2.
Give the game a name with a turn number that allows you to readily know what turn it
is and which side created it. (example: Allies3, Jap3, Turn3a or Turn3j)
Now write any notes and select Save.
The game will now save the PBEM game in a file with your previously selected name, these files
use a .dat extension. Our game files are already compressed and will gain very little by zipping
them with another compression program like Winzip. The player can now E-mail their opponent
the turn. The save file can be found off of the main game directory in the save folder. If the default
directory was used to install the game the newly created save file would be located in C:\Matrix
Games\War in the Pacific\Save.
When the other player receives the e-mail with his opponents’ saved game it needs to be copied
into his saved folder. To start the save game file, start the game and select “Load Saved Game”
from the main menu enter your password and the turn will start.
The Japanese player needs to be sure to send his save, as well as the save in slot 001
which is the combat replay. If the combat replay is not sent the player receiving your turn
will not be able to view what happened before their turn!
19.4 APPENDIX D – CARRIER LOADOUTS
19.4.1 Standard Aircraft Load For Japanese Fleet Carriers
Japanese Fleet Carriers (the largest Carriers, such as the Akagi, Soryu, etc.) carry Fighters, Dive
Bombers, and Torpedo Bombers only. (A few Fleet Carriers had one or two specialized search
aircraft, but these are represented by the system intrinsically and not via an actual unit.)
The number of aircraft each Fleet Carrier has on board is roughly divided into thirds – i.e., 1/3
Fighters, 1/3 Dive Bombers, and 1/3 Torpedo Bombers, from December 1941 until the end of
June, 1942. On July 1, 1942, and thereafter, all Japanese Fleet Carriers have thier loadouts
changed to roughly 3/8 Fighters, 3/8 Dive Bombers, and 3/8 Torpedo Bombers.
211
19.4.2 Standard Aircraft Load For USN Fleet Carriers
Refer to the Plane & Weapon Database within the game program for full descriptions of the
aircraft types.
VF: Fighter Squadron
VB: Dive Bomber Squadron
VBF: Fighter/Bomber Squadron
212
SQN
NUM
TYPE
EARLY 42
VF
VS
VB
VT
27
18
18
15
F4F-3
SBD
SBD
TBD
LATE 42
VF
VS
VB
VT
36
18
18
15
F4F-4
SBD
SBD
TBF
1943
VF
VB
VT
36
36
18
F6F
SBD
TBF
EARLY 44
VF
40
VB
34
VT
18
F6F
SB2C
TBF
LATE 44
VF
VB
VT
42
32
18
F6F
SB2C
TBM
1945
VF
VBF
VB
VT
36
36
15
15
F6F
F4U
SB2C
TBM
VS: Scout Squadron
VT: Torpedo Squadron
20.0 CREDITS
EXECUTIVE PRODUCERS
Joel Billings, David Heath
DESIGN AND DEVELOPMENT
Joel Billings, Gary Grigsby, David Heath, Mike Wood
PROGRAMMING
Keith Brors, Gary Grigsby, Mike Wood
SCENARIO DESIGNS AND HISTORICAL RESEARCH
Joel Billings, Richard Dionne, Stephen Dyer, Gary Grigsby, Mike Kraemer, Russ Neer, Chris
Rickard, Ronald Sueracker, Gaylon Williams, Paul R. Yarnall
SCENARIO AND DATABASE EDITOR DESIGN AND PROGRAMMING
Mike Wood
ART AND GRAPHICS
Iain Christie, Steve Ford, Marc Schwanebeck
LOGO ART DESIGNS
Marc Schwanebeck
VIDEO DESIGN AND LAYOUT
Marc Schwanebeck
USER MANUAL AND EDITOR CONTENT
Michael Eckenfels
USER MANUAL EDITORS
Joel Billings, Mike Eckenfels
MANUAL LAYOUT AND DESIGN
Marc Schwanebeck
HISTORICAL PHOTOGRAPHS
Reddie Aviation & Military Archives
TUTORIAL GUIDE CONTENT
Richard L. Porter
MUSIC COMPOSED BY
Audio Networks
SOUND EFFECTS
David Heath and Audio Networks
213
PLAYTEST COORDINATOR
Richard L. Porter
PLAYTESTERS
Scot Donovan (Admiral DadMan), Stephen Dyer, Ray Gardner (Mr.Frag), Douglas Gold, David
Goldfinch (Raverdave), Jeremy Harris (Luskan), Paul Harrison (DoomedMantis), Mike Kraemer,
Russ Neer (Mogami), Daniel Patocka, Richard L. Porter (Kid), Chris Rickard, Ronald Saueracker,
Matt Morrissey (Snigbert), Thomas “BB-55” Walters, Jason R. Wilborn, Gaylon Williams, James
Wirth, Paul R. Yarnell
WEB SITE DESIGN
Marc Schwanebeck
OFFICIAL WEB SITE
http://www.warinthepacific.net/
MATRIX’S PURPLE HEART RECIPIENTS OF THE WAR IN THE PACIFIC DEVELOPMENT
CAMPAIGN
We would like to thank the following friends and family for their love, support and understanding
during this project:
Ava Marie Heath, Karen Vebber, Kim Frisina, Pam Christie, Patty Rutins, Theresa Dionne, Ute
von Martial, Kelly Eckenfels
OUR STRENGTH
We thank God for giving us the ability and strength to follow our dream.
214
MATRIX GAMES LIMITED WARRANTY
MATRIX GAMES MAKES NO WARRANTIES, EITHER EXPRESS
OR IMPLIED WITH RESPECT TO THE SOFTWARE PROGRAM
RECORDED ON CD OR DISKETTE OR THE GAME DESCRIBED
IN THIS RULE BOOK, THEIR QUALITY, PERFORMANCE, MERCHANTABILITY OR FITNESS FOR ANY PARTICULAR PURPOSE.
THE PROGRAM AND THE GAME ARE SOLD "AS IS". THE
ENTIRE RISK AS TO THEIR QUALITY AND PERFORMANCE IS
WITH THE BUYER. IN NO EVENT WILL MATRIX GAMES BE
LIABLE FOR DIRECT, INDIRECT, INCIDENTAL OR CONSEQUENTIAL DAMAGES RESULTING FROM ANY DEFECT IN THE PROGRAM OR GAME, OR FOR LOST DATA RESULTING IN ANY WAY
FROM USE OF THE PROGRAM OR GAME, IN ALL CASES EVEN
IF MATRIX GAMES HAS BEEN ADVISED OF THE POSSIBILITY
OF SUCH DAMAGES (SOME STATES DO NOT ALLOW THE
EXCLUSION OR LIMITATION OF IMPLIED WARRANTIES OR
LIABILITY FOR INCIDENTAL OR CONSEQUENTIAL DAMAGES,
SO THE ABOVE LIMITATION OR EXCLUSION MAY NOT APPLY
TO YOU).
MATRIX GAMES LICENSE AGREEMENT
The enclosed software program and this manual are copyrighted. All
rights are reserved. The original purchaser may print or have a
print/copy shop make a printout and/or copy of the manual. Matrix
Games grants the original purchaser of this software package the
right to use one copy of the software program. You may not rent or
lease it, disassemble, decompile, reverse engineer, or modify the
software in any way. All editors may be used to create scenarios that
may be freely distributed. All scenario authors hold the ultimate
rights to their designed scenarios and Matrix Games makes no
claims thereof. You may not copy or distribute copies in any media
form. Any persons doing so shall be guilty of copyright violation and
subject to the appropiate civil or criminal action at the discretion of
the copyright holder.
© 2004 Matrix Games All Rights Reserved. Matrix Games and the Matrix Games logo are trademarks of
Matrix Games. All other trademarks and trade names are the properties of their respective owners and
Matrix Games makes no claim thereto.
USE OF THIS PRODUCT IS SUBJECT TO THE ACCEPTANCE OF THE
LICENSE AGREEMENT AND LIMITED WARRANTY
© 2004 Matrix Games All Rights Reserved. Matrix Games and the Matrix Games logo are trademarks of
Matrix Games. All other trademarks and trade names are the properties of their respective owners and
Matrix Games make no claim thereto.