1
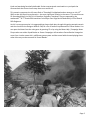
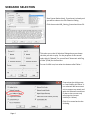
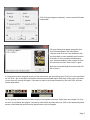
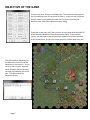
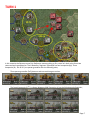
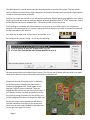
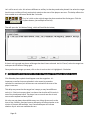
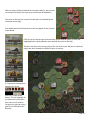
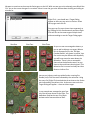
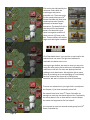
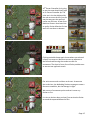
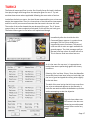
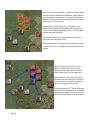
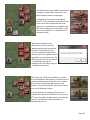
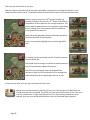
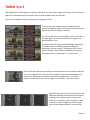
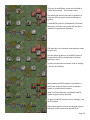
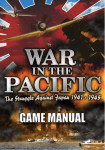
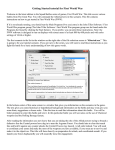
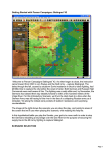
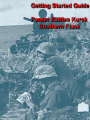
Page 1
Welcome to Panzer Battles: Kursk Southern Flank. On July 4, 1943, Germany launched its summer
offensive with an initial aim of destroying the Soviet salient around Kursk. After a week of fighting,
German forces have breached two of the three Russian defensive lines and were in a position to break
through the third and final fortified line. Success in the next twenty four hours would see the Axis
forces in open terrain and able to advance at a much quicker pace. SS Panzer Grenadier Division
Totenkopf had crossed the Psel River in the last 24 hours. The Psel was the last natural barrier before
Page 2
Kursk and was being fanatically defended. Soviet counterattacks continued to try and push the
Germans back but it was time to stop them once and for all.
This scenario represents the left most flank of Totenkopf’s bridgehead and an attempt on July 11th
1943 to take the Klyuchi army barracks – the most significant location in the sector. This scenario uses
SS-Sturmbannführer Karl Ullrich's III Battalion, Regiment Totenkopf. They are opposed by the
weakened 2nd & 3rd Guards Rifle battalions from Major Petr Grigorievich Moskovskiy's 153rd Guards
Rifle Regiment.
As this is a new game series it is suggested that players both play through this getting started scenario
and also check out the Designer Notes & FAQ for a list of features implemented in Panzer Battles. You
can open the Notes from the main game by pressing F3 or by using the Menu Help | Campaign Notes.
Players who own either Squad Battles or Panzer Campaigns will see where Panzer Battles lineage has
come from. Just be aware this is a different game system and that some habits learned playing these
other titles may not be successful in Panzer Battles.
Page 3
SCENARIO SELECTION
Start Panzer Battles Kursk, if you haven’t already and
you will be taken to the File Selection Dialog.
Click the scenario #00_Getting_Started and then OK.
This takes you to the AI Selection Dialog where you choose
the side you wish to play. For the purposes of this tutorial
select Axis AI "Manual" for yourself and "Automatic with Fog
of War"(FOW) for the Russians.
Do not click OK now, but rather the button called ‘Rules…’
Ensure that the tick box next
to ‘Low Visibility Air Effects’ is
not selected. We have one air
unit to support our attack and
with this selected it would not
fly due to the current early
morning mist (current
visibility is 4 hexes).
Click OK to move back to the
AI dialog.
Page 4
Click OK to get the game underway - you are now the German
commander.
The map should now appear along with your
first Command Report with information
relevant to the first turn. You should see that
you have both air units available and six salvos
of smoke. Air units could be available every
turn. Smoke availability is the number of shots
for the whole scenario. Once used, it’s gone.
Note the Command Reports contents and click
OK to close it.
It’s important to tailor the game to give you the information you need during play. Firstly, let’s turn map labels
on. Hit ‘Shift – Alt’ at the same time and the location names should appear (and stay) on the map. If you want
to turn them off, just tap shift again. If you want to look at the names temporarily, just hold ‘Shift’ and then
release when done.
For this getting started scenario we want to play at the highest zoom level. Either press the number 3 or click
on the + on the Menu Bar will give a zoomed in view of both the map and units. Click on the white and yellow
square on the Menu Bar and formation identification colors will appear.
Page 5
OBJECTIVE OF THE GAME
Click Info and then Victory on the Menu Bar. This shows how many points
the first side must earn for each level of victory. As you can see, to obtain
a major victory in this battle you must earn 75 Victory Points by the
scenario’s end. Click OK to close the Victory Dialog.
If you look at the map, you’ll see a there is an oval shape with the value 50
at the Barracks. We have circled this below for clarity. To win a minor
victory, you will need to take and hold this objective and inflict casualties
on the Soviet forces. As you incur losses, points are taken away from you.
Click Info and then Objectives on
the Menu Bar to see a list of the
objectives in the scenario. As you
can see, there is only 1 objective
worth 50 points for the Germans,
currently controlled by the Soviet
side. Click OK to close the
Objectives Dialog.
Page 6
TURN 1
In this scenario the Germans move first. Before we move anything or fire a shot let’s look at the forces we
command and a possible plan. The III Battalion, Regiment Totenkopf has four kompanies (Kp). Three
kompanies (9th, 10th & 11th) are panzer grenadier with the following units;
Three panzer grenadier (PzG) platoons and two machine gun sections
The fourth kompanie (12th) is a Heavy Weapons (HW) formation. It has the following units/batteries;
Page 7
The HW kompanie is spread across the other three kompanies to provide fire support. The four mortar
sections will be combined into an eight tube battery and used at battalion level to either fire high explosive
rounds or more importantly lay smoke.
Our plan is a simple one. We aim to try and destroy the Russian Guards longer range weapons (Anti-tank &
infantry guns) and use smoke to mask the advance of panzer grenadiers from 9th & 10th kompanies. Smoke
will be important as there is between 500 – 750 meters of clear terrain to traverse.
The first thing to remember with Panzer Battles is to use your air and artillery early. This is important
because a unit cannot spot once it moves. Looking at the map there are a number of spotted units both at
the Barracks and the hills behind it.
Let’s look now at what air & artillery assets are available to us.
By clicking on the ‘Artillery Dialog’, we can see the following;
We have three artillery units supporting our attack. The first two are off board while the third is the eight
tubes of 8cm Mortars that are currently stacked with our Battalion HQ.
Please note that the first artillery unit is selected in
the Artillery dialog. Looking at the map shows a
number of highlighted units. These appear as the
highlight ‘Targets’ button is selected. These are
targets that the artillery unit can currently shoot at. If
the ‘Spotters’ button is clicked all friendly units that
are currently acting as spotters for that artillery unit
will be highlighted. Please try clicking either field now.
Moving the cursor over a spotted unit will show a
crosshair and allow the artillery to fire at that unit.
Move over the unit stack indicated by the red arrow
on the right and ‘right click’ to fire.
Page 8
You should see a combat result in hex. In our
example to the left we have destroyed two defending
guns. Don’t worry if your outcome is different.
Fire the second artillery piece at the other hex with a
gun in it (north of the barracks).
Artillery in Panzer Battles uses the ‘Alternate Indirect
Fire Resolution rule’ as standard. In simple terms,
you can only fire once but that fire is doubled in
strength and will impact all defending units in hex
proportional to their strengths. Mortars and direct
fire artillery (infantry guns) do not use this rule and
can fire a number of times in a turn.
Don’t fire the mortars (the final unit on the artillery
dialog) yet! We need them to fire smoke a little later
in the turn. Hit OK to close the Artillery dialog now.
We don’t want to fire smoke yet as we have some direct fire units capable of shooting at the Russians. If we
drop smoke prematurely it will protect our units from Soviet fire, but it will also stop us from firing ourselves.
Panzer Battles is all about timing.
Page 9
Let’s call in our air units. Air units are different to artillery in that they need to be plotted. You select the target
hex this turn and they will only resolve their attack at the start of the players next turn. This delay reflects the
time needed to co-ordinate a World War 2 airstrike.
First, let’s click on the original target hex that contained the Soviet guns. Click the
Airplane button, (see example to the left).
That will open the ‘Air Mission Dialog’, which will look like the below;
If the air unit is greyed out then a valid target hex hasn’t been selected. Just hit ‘Cancel’, select the target hex
and open the Air Mission Dialog again.
Once you have the target you want, click on the air unit so that it is highlighted – like below.
Click Ok and a plane symbol should appear over the target hex. It’s
important to realize that once placed air units cannot be moved or
canceled. As mentioned, air missions are not resolved till the start of the
player’s next turn.
This delay may mean that the target hex is empty or may have different
units in it. If the hex is empty there is a chance the airstrike will hit units in
one of the six adjacent hexes. The player has no control over the air unit
once a strike request has been placed.
Air units may not always be available every turn. Many factors such as the
time of day, visibility, previous losses or disruption all effect whether an air
mission is present and available. Your Command Report will indicate
whether any air units are available this turn.
Page 10
With our heavy artillery fired and our airstrikes called in, we can now
use some of our direct fire units to try and disrupt the defenders.
Click once on the hex just south of the barracks as indicated by the
red arrow to the right.
You should see all the friendly units in the hex appear in the unit box
as per below.
Click only on the top two gun units and they should now be lighter in color and
highlighted with a yellow border once selected (see units to the left).
These are the only units we are going to fire out of the stack. We plan to move the
others two units towards the objective later in the turn.
It’s important to know what
targets you can see.
Press the ‘Visible Hexes’
button. This will highlight all
the hexes that can be seen
from the current location.
Our guns can see the enemy
guns on the hill behind the
barracks.
Page 11
We want to continue to shoot up the Soviet guns on the hill. With our two gun units selected, press & hold the
‘Ctrl’ key so the cursor changes to a crosshair. Move it over the gun units we have been shelling and calling an
airstrike on.
Right Click – you should see a Target Dialog
appear as there are two units in the hex. Select
the top gun and click Ok.
Our guns can fire up to three times separately or
by holding Ctrl-Alt simultaneously and then Right
Click will fire at the same target multiple times
without needing to use the Target Dialog again.
Shot One
Shot Two
Shot Three
As you can see we managed to destroy a
gun as well as disrupt our target. When a
unit is disrupted by fire the ‘On Map
Combat Results’ are shown in yellow. Your
fire results may be different but hopefully
you will have started to wear down the
defenders. There is also a reasonable
chance that the defenders won’t let you
shoot at them without shooting back. This
defensive fire is normal and may be either
direct or indirect fire.
Lets use an infantry stack to provide further covering fire.
Double (Left) Click the stack indicated by the red arrow. Using
the same Ctrl, Right Click method take three shots at the Soviet
unit indicated by the yellow circle. As there are two units the
Target Dialog will appear – shoot at either target.
In our example we managed to get a few
hits, like the ones shown to the right. The
defenders fired back at our firing stack
and we took a few casualties as well.
Page 12
We are finished firing for the moment and are preparing to move our assault teams forward. To protect them
as they advance over open ground we are going to drop a smoke screen that will hopefully reduce the chance
of our troops being seen.
Click on the Artillery Dialog again. As we want to fire smoke, click next to Smoke as indicated by the red arrow.
Our mortar battery is automatically selected as it’s the only remaining indirect fire formation.
The mortar unit can fire twice. This will use up two of our
six salvos of smoke. Shoot once at the hex directly south of
the Barracks and then the hex south of that. The cursor
should be an O and to fire you just Right Click over the
target hex.
Our smoke screen will stay in place for both our current
turn and our opponents next turn.
Smoke is twenty meters high (i.e. one height level) and in
hilly terrain can be seen over if carelessly placed. Take the
time to work out where it is most effective as it will help
you close with the enemy.
Importantly, smoke only blocks sight through the hex. Any
unit in a smoke hex can be seen and fired upon.
Page 13
Click on the hex indicated by the
red arrow. Select both the
machinegun and panzer
grenadier unit. These two units
are the assault elements of 9th
Panzer Grenadier Kp. Both have
combined two units (usually
platoons) to become larger
formations. The benefit of this is
that they will fire and assault
better, the downside is that
there are negative modifiers if
there are over 125 men in the
hex. These modifiers will see the
target unit take higher casualties.
Click ‘Reachable Hexes’ in the tool bar to see how far the
selected units can move. The light area indicated is
reachable, the darker area is not.
Leaving the gun behind, we want to move our two units
along the valley and to the brush hex as indicated by the
red arrow to the left. Our units are deployed and are
walking to their destination. We might be able to move
faster by mounting our trucks (changing to Travel Mode)
but that increases the chance of us taking heavy
casualties. We won’t risk that this close to the enemy.
To move our selected units, just right click in an adjacent
hex. Repeat, if you have movement points left.
Our assault force force from 9th Panzer Grenadier Kp
manages to move the two hexes without loss. Fortunately
the enemy doesn’t fire on them while in transit. Maybe
the smoke and suppressive fire has helped?
It’s time now to move our second assault group from 10th
Panzer Grenadier Kp.
Page 14
10th Panzer Grenadier Kp is going
to use the same detachment type
as 9th Panzer Grenadier Kp. The
units are in the hex indicated by
the red arrow on the left. You can
see the two guns that we fired
earlier are also here. A few of our
Machine Gunners have been lost
to earlier Soviet defensive fire but
we’ll still use them to advance.
Clicking reachable hexes again shows where our selected
infantry can move to. We want to move up adjacent to
the Barracks while using the smoke to mask our
movement. The slope in front of us will also provide cover
as we start our approach march.
Our units move north and then north east. As we enter
the smoke hex, the defending Russians manage to cause a
few more casualties, but the damage is slight.
We are out of movement points and can’t move any
further or fire.
It’s time to hunker down and see if we survive the Soviet
turn and the expected blizzard of fire.
Page 15
We’ve moved and fired all the units that we want to this turn. Before we end the turn, let’s review what we
have learned and done.
The phasing of actions in Panzer Battles is critical. We did the following actions in order; artillery
bombardment, airstrike requests, direct & suppressive fire, smoke bombardment & finally movement. It is
good discipline for players to try and complete each of these stages before progressing to the next. Spotting &
masking of movement are important concepts and actions done out of order may expose units to additional
casualties or worse still an inability to fire or fight.
In this first turn we have learned how to both move and fire our units. We have fired all our artillery and
mortar batteries available under the Artillery Dialog as well as called in an airstrike that will hopefully arrive in
our next turn. Finally, we have dropped a smoke screen and moved our two assault groups forward without
taking too many casualties.
Now that we’re finished moving and firing all our units, click the Next Turn Button on the
Toolbar and click OK if prompted. The Soviets will now move and fire their forces. Your units
may fire automatically in reply using Opportunity Fire. Some enemy movement may be
spotted. Your next turn will be announced once the Axis Command Report appears.
Page 16
TURN 2
The Soviet AI moves and fires its units. Our friendly forces fire back in defense.
Your play through will diverge from the examples given for turn 2. Try and
emulate these moves where applicable following the same order of actions.
Just before the Axis turn starts, the airstrike we requested last turn arrives and
attacks the targeted hex. There is a chance that an airstrike will be intercepted
and fail to arrive, but we were fortunate that that wasn’t the case this time.
The results of the strike showed that we destroyed four guns. The ‘X’ shown
reports that a unit was completely eliminated, in this case the anti-tank guns.
The Soviet infantry guns in the hex are still operational though.
Immediately after the airstrike the Axis
Command Report appears. It contains three
messages. The first is that visibility has
improved by one to five hexes. The second
confirms that air units are again available for
ground support. The third message confirms
that we have four salvos of smoke left to fire.
This is after we fired two salvos last turn.
As it is the start of a new turn, it is appropriate to
look at how we are performing against the victory
conditions.
Selecting ‘Info’ and then ‘Victory’ from the Menu Bar
shows that losses have been heavy on both sides, but
the loss of guns has tipped the victory points slightly
in the Axis favor.
The bulk of the men lost by the Axis have come from
the units we advanced adjacent to the Barracks. It
looks like we need to soften the defenders up further
before attempting to take the objective.
Our units have taken over
20% losses in the last turn.
Advancing on undisrupted
enemy forces can be very
costly.
Page 17
We start turn two like the last – calling in artillery. Hidden
units have been revealed at the barracks. Panzer Battles
uses ‘Persistent Concealment’. Persistent Concealment
will only reveal units when they spend movement points
if they are in a hex with cover.
Opening the Artillery Dialog, fire is requested on the
barracks and immediately rewarded with a disruption
result on the defending Guards Infantry. This result was
unexpected, but welcomed.
The second artillery unit is ineffective only killing two
men when fired at the barracks.
We will again hold our mortars back to either fire smoke
later in the turn or to hit targets of opportunity that may
appear.
With a unit disrupted at the barracks
there is an opportunity to storm the
objective if the other defender (Maxim
machinegun team) can be suppressed.
Using Direct Fire, the hexes with guns in
them shoot at the Soviet guns on the hill.
The units and their targets are shown by
blue line in the graphic to the left.
The fire group from 11th Panzer Grenadier
Kp shifts fire to the barracks in an attempt
to disrupt the Maxim. Casualties (ten) are
created, but the Maxim remains resolute.
Page 18
The adjacent panzer grenadiers fire once and
manage to incapacitate a further five men,
but the Maxim remains undisrupted.
In desperation the second assault group
from 9th Panzer Grenadier Kp moves one hex
north rather than the planned two hexes
north east. It’s hoped that its firepower from
500 meters might just tip the balance. Firing
from its new position, it’s rewarded with a
disruption result.
When the turn began it was
planned only to try and further
weaken the defenders around the
barracks. The disruption of the
units at the objective opened the
opportunity for the adjacent panzer
grenadiers to assault them out. The
Germans waste no time. An Assault
is initiated by selecting the
attacking units and right clicking on
an adjacent enemy unit.
With fog of war (FOW) on the odds for an assault
are not revealed to either player. Fortunately the SS
panzer grenadiers were successful, but at a steep
price. Losses for both sides were heavy, in the
graphic to the left the attacker (German) lost seven
men to the defenders sixteen.
Also significantly the retreating Soviets end in a
position that isolates the Germans for the next turn.
9th Panzer Grenadier Kp were meant to be adjacent
this turn, but had been called to provide the
additional direct fire.
Page 19
There are two final actions for the turn.
With the capture of the barracks by the panzer grenadiers, suppressive fire of adjacent Soviets is more
important than smoke screens. The battalion mortar fires twice and creates a few more Russian losses.
With the assault teams from 10th Panzer Grenadier Kp
probably isolated at the barracks, 11th Panzer Grenadier Kp
consolidates all three platoons into a single kompanie. This
will increase firepower but also the formations vulnerability
due to stacking limits. The kompanie will be available to
move forward from next turn.
Move the panzer grenadier platoon indicated to the left to
the other members of the kompanie.
Once in the same hex highlight the two panzer grenadier
units.
To combine (and uncombined) use the ‘Combine’ selection
from the Menu Bar.
You should now see a single unit with the combined total of
men of the previously separate formations.
One final note, the fatigue value has dropped (from
thirteen to eight) for the combined unit as it averages the
value based upon the starting fatigue and size of unit.
If there are any other units you want to move or fire do it now.
Now that we’re finished moving and firing all our units, click the Next Turn Button on the
Toolbar and click OK if prompted. The Soviets will now move and fire their forces. Your units
may fire automatically in reply using Opportunity Fire. Some enemy movement may be
spotted. Your next turn will be announced once the Axis Command Report appears.
Page 20
TURNS 3 to 5
Play through the remaining turns, keeping in mind what you have done through the first two. You may have to
fight off a counterattack by the Soviets as they try and recapture their lost Barracks.
Here are a few additional tips to help you learn the game quicker.
To check any units’ statistics, chain of command and
special unit abilities, right click the Hex Info Area while the
desired hex with the unit(s) is selected.
You will see the chain of command for a unit on the left; on
the right appear its various combat factors, speed, and
special abilities, if any.
The Hard, Soft & AA values are Attack/Range respectively.
The Assault value is used both when attacking and
defending in Assault combat. The Defense value is used
when fired upon while Speed is modified by the type of
unit and whether it is deployed or in Travel mode.
The Terrain Information box provides a lot of information on the currently selected
hex. In the example to the left, the hex is predominantly scattered buildings at an
elevation of 180 meters with Russian owned improved positions. It is also an
objective (worth fifty points) and in supply. Local visibility is up to four hexes.
Right Clicking on the Terrain Information box will
show both hex side information and the current
stacking in hex. White numbers means road
movement is possible, yellow numbers no road
movement, while red digits are over the road
limit and accruing penalties for over-stacking.
Page 21
Units can move in Travel mode. In the case of the panzer
grenadier platoon shown here this represents the infantry
moving in trucks rather than walking. Note the
differences - movement points have increased
substantially and a ‘T’ has been appended to
indicate Travel mode. In addition the unit
counter has a white stripe across the bottom.
When a unit is selected other members of its organization can be highlighted.
An organization can be anywhere in the hierarchy. For example selecting a
Regimental HQ and ‘Highlight Org’ will show all members of that Regiment. In
our graphic to the left one unit in 11th Panzer Grenadier Kp has been selected
and all members of the kompanie highlighted.
It’s easy to keep track of which units have already fired
and moved. Click on ‘Used Movement points’ on the tool
bar shows the player all the units that have expended at
least one movement point.
In our example it is easy to see which two German units
have not moved or fired yet.
If players do not like the yellow highlight a white
highlight is available. Click ‘Settings’ | ‘Alternative
Highlighting’ to enable this function.
Page 22
There are three different conter sets included in
Panzer Battles Kursk – The Southern Flank.
The default set uses the unit side art graphics to
show the different types of units and weapons
systems.
A small NATO symbol is included and if Divisional
Markings is turned on this symbol will be colour
coded to the appropriate formation.
The alternative unit counters have top down views
for each unit.
Like the default graphics a small NATO symbol is
included that will be coloured when Divisional
Markings is used.
To select the alternative counters click on Settings
| Use Alt Unit Graphics.
More traditional NATO symbols are available. A
description of the primary function or weapon
system is included on the counter.
When Divisional Markings is enabled the NATO
symbol is appropriately coloured.
To select the NATO counters click on Settings | Use
NATO Symbols.
These three graphics sets can be changed in game
and work at both zoom level two and three.
Page 23
FINISHING THE GAME
You now know how to move your units, fire, and assault with your forces. With the victory conditions
in mind, keep maneuvering your forces in the manner you see fit. The end of the game will be
announced at the conclusion of the enemy’s final turn, at which time, final Victory Points will be
shown.
To restart the scenario, click File and Selection in the Menu Bar. A list of scenarios will appear and you
may select any by double clicking on its entry.
FURTHER INFORMATION
This Guide is designed to make you feel comfortable with what’s going on in Panzer Battles, but it is no
substitute for reading the Game Help files. You can access Help from the Game Help Menu. The Game
rules are really in two parts:
Part 1 in the User Manual, which is the series rulebook. You can see this while playing by pressing F2.
The Main Program Manual discusses the various elements of the interface in helpful detail such as
each Menu or Dialog. There is even a list of HOT KEYS Show in the Other Features section of this
manual. You can view this program guide while playing by pressing F1
Pressing F3 opens the Campaign Notes, which include both the historical background for the battle and
the Designers notes. This is a good place to start when you want to understand why the designers
included certain features and the historical situations they were trying to emulate.
Pressing F4 invokes a feature called the Parameter Data Table. It provides a host of information
including movement costs, terrain benefits, and stacking limits amongst other things.
Lastly, documentation for the game’s editors may be found in help files accessed from the Help Menu
when you open each editor.
Page 24
Page 25