1
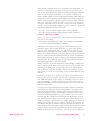
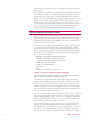
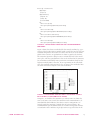
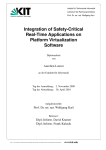
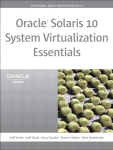
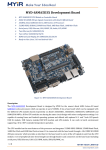
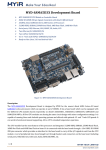
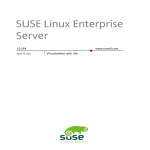
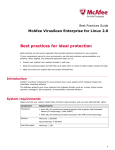
T h e v i r t u a l i z at i o n o p t i o n s f o r Wenjin Hu, Todd Deshane, and J e a n n a M a tth e w s Solaris virtualization options Wenjin Hu is a PhD student in Computer Science at Clarkson University. He focuses on applying virtualization and file system techniques to provide security and reliability on the desktop. [email protected] Todd Deshane is a PhD student in Engineering Science at Clarkson University. His current research deals with using virtualization to provide security on the desktop. [email protected] Jeanna Neefe Matthews is an associate professor of Computer Science at Clarkson University in Potsdam, NY, where she leads an incredible team of students. She is currently on sabbatical and working with VMware in Cambridge, MA. [email protected] Solaris have been expanding rapidly. In this article we discuss three types of virtualization systems available in OpenSolaris for x86: Solaris Containers, Solaris xVM, and Sun xVM VirtualBox. We include instructions on how to deploy each solution and a detailed comparison of the three to help system administrators and virtualization fans alike choose the appropriate virtualization technology for their needs. Even if you don’t use Solaris, we do explain the differences among OS-level virtualization, paravirtualization, and full-virtualization clearly. Solaris has included Containers (also called Zones) since Solaris 10 was released in 2005. Containers are an operating-system-level virtualization facility, meaning that the OS itself provides the illusion of multiple independent systems, each with its own IP address and file system, all based on the same base kernel. More recently, support for paravirtualization in the form of Xen (called Sun xVM on Solaris) has been added and now, with the acquisition of VirtualBox, full virtualization on Solaris is also an option. Unlike OS-level virtualization, paravirtualization and full virtualization both offer the ability to run guest operating systems that are different from the underlying OS. Full virtualization can run unmodified operating systems, whereas paravirtualization requires targeted changes to the hardware interface and therefore corresponding changes in the OS source code. As a result, proprietary operating systems such as Microsoft Windows can typically only be run on virtualization systems that support full virtualization. Some virtualization systems, such as Xen, require hardware support for virtualization, such as Intel VT or AMD-V, to support full virtualization. Getting Started with Solaris Containers In Solaris Containers/Zones, a virtual machine is called a zone and a zone with resource limitations is called a container. The basic command to operate a zone’s configuration file is zonecfg –z newzone. This will bring up a shell in which you can issue a variety of commands to manipulate the specified zone. As shown in Listing 1, you create a zone, add the attached devices such as add net , set zone options such as set autoboot=true, display the configuration, verify the configuration, and finally commit a zone’s resources, which writes out a ; L O G I N : O c to b e r 2 0 0 8 Sola r i s v i r t uali z at ion o p t ion s 7 final configuration file for the zone. You can also use zonecfg to browse the characteristics of an existing zone and modify it as desired. # zonecfg -z newzone newzone: No such zone configured Use ‘create’ to begin configuring a new zone. zonecfg:newzone> create zonecfg:newzone> set zonepath=/export/home/newzone zonecfg:newzone> set autoboot=true zonecfg:newzone> add net zonecfg:newzone:net> set address=192.168.16.109 zonecfg:newzone:net> set physical=pcn0 zonecfg:newzone:net> end zonecfg:newzone> verify zonecfg:newzone> commit zonecfg:newzone> exit L i s t i n g 1 : T h e S t e p s S h o w i n g t h e Z o n e Co n f i g u r a t i o n Solaris provides a number of options to manage the resources that a zone can own, including the CPU, the memory, and the number of the processes. This is the heart of making a zone into a container with resource limitations. In Listing 2, we illustrate how to add a variety of restrictions to our new zone. (These commands are also issued at the zonecfg prompt.) The capped - cpu command limits the CPU cycles assigned to the zone to a fourth of one CPU. Similarly, our capped -memor y command assigns the zone 128 MB of memory and 512 MB of swap space. It also guarantees that 64 MB of the zone’s memory will be resident in physical memory at all times. Finally, the set max-lwps command illustrates how we can place limits on things besides physical resources. It limits the number of lightweight processes in a running zone and is useful for preventing problems such as fork-bombs from taking down the whole machine. add capped-cpu set ncpus=0.25 end add capped-memory set physical=128M set swap=512M set locked=64M end set max-lwps=175 L i s t i n g 2 : T h e O p t i o n s L i m i t i n g t h e Co n t a i n e r ’ s R e s o u r c e s Once our new zone is configured, we are ready to instantiate it with the command zoneadm –z newzone install and then run it with the command zoneadm –z newzone boot . zoneadm can also be used for other zone administration functions such as listing the configured zones, installing or uninstalling the zones, and booting, pausing, and halting installed zones. Listing 3 shows the output of running zoneadm list after installing our new zone. The parameter – c will display all the configured zones’ information; –v will display the detailed information of zones. # zoneadm list -vc ID NAME STATUS PATH 0 global running / 1 newzone running /export/home/newzone BRAND IP native shared native shared L i s t i n g 3 : A Z o n e a d m l i s t s h o w i n g a ll zo n e s 8 ; L O G I N : VO L . 33, N O. 5 Finally, we are ready to log in to our new zone with the command zlogin newzone. It will be running the same version of OpenSolaris as the base operating system, as is required with OS-level virtualization. However, the zone will behave like a separate system, with its own IP address, its own file system, and its own set of installed applications. Getting Started with Solaris xVM A virtual machine in xVM is called a domain, just as it is in other Xen implementations. Domains are divided into two major categories: paravirtualized (PV) domains and Hardware-assisted Virtual Machine (HVM) domains. In a PV domain, the hardware abstraction presented to the guest VM is not identical to the underlying physical hardware; instead, strategic changes are made to make the system easier to virtualize. To run properly on the paravirtualized hardware, the guest operating system must be modified to be aware of these changes. This requires source-code-level changes to the OS and is therefore rarely available for proprietary operating systems such as Windows. Two common choices for paravirtualized guest domains are Solaris and Linux. In an HVM domain, the hardware abstraction presented to the guest is identical to the underlying hardware, so any operating system that runs on x86 hardware architecture can be installed. To make this possible, an HVM domain relies on special hardware support for virtualization such as Intel V-T or AMD-V. If your system does not have this hardware support for virtualization, then paravirtualized domains are your only option. Xen is a virtual machine monitor, called a hypervisor, which intercepts the guest domain’s system calls. It is necessary to boot the Xen-enabled Solaris kernel on the physical machine rather than a normal Solaris kernel. Since Solaris Nevada Version build 75, Xen has been developed and well integrated into Solaris Express Community Edition through a variety of boot options in the GRUB menu. For example, the standard GRUB menu displays three choices: Solaris Express Community Edition snv87 X86, Solaris xVM, and Solaris Failsafe; the second grub option, Solaris xVM, should be chosen. Xen also relies on a special, privileged domain, called Domain0, and the Xen control daemon, Xend, for communication between the hypervisor and the guests. Domain0 is granted the full privileges of managing the guest domains and the physical devices by the Xen hypervisor, similar to a “normal” Solaris OS instance. Device drivers can also be fully virtualized or paravirtualized. Even a system that does full virtualization of the CPU and memory can load paravirtualized drivers to handle external devices such as a disk or network interface. In a paravirtualized driver, the driver running in the guest operating system is aware of the hypervisor and explicitly participates in communicating its requests to domain0 where the real physical device drivers are running. In a fully virtualized driver, the real device access still occurs on the Domain0 drivers, but the guest driver is unaware of this, so the hypervisor must trap accesses to I/O space or DMA operations in order to forward them on to the proper device driver in Domain0. PV drivers have much lower overhead, because they avoid this expensive process of trapping and forwarding. Our first step in running Xen guests is to make sure that the hypervisor, Domain0, and Xend are all running. After Solaris xVM boots up, you can use the command virsh list as shown in Listing 4 to check whether Domain0 is running. ; L O G I N : O c to b e r 2 0 0 8 Sola r i s v i r t uali z at ion o p t ion s 9 # virsh list Id Name State -------------------------------------------------- 0 Domain-0 running 110 newSolaris blocked L i s t i n g 4 : V i r s h l i s t s h o w i n g Do m a i n 0 Next, we check that Xend is running and specify the default network interface in Xend first so that our guest domains are able to set up the virtual network based on that physical NIC. Xend is wrapped as an application service in Solaris. Listing 5 illustrates the use of svccfg and svcadm facilities to configure and restart Xend. The – s parameter specifies the Xend service; setprop specifies the Xend configuration options. After making this (or any change) to the Xend configuration, you can apply the change by refreshing and restarting Xend as shown. The svcadm facility can be used to enable, disable, refresh , or restart the Xend service at any time. # svccfg –s xvm/xend setprop config/default-nic=”bge0” # svcadm refresh xvm/xend # svcadm restart xvm/xend L i s t i n g 5 : T h e s t e p s f o r co n f i g u r i n g a n d r e s ta r t i n g X e n d With that, we are ready to create a new guest domain. In this section we will show three primary examples: a PV Solaris guest domain, a PV Linux domain, and an HVM Solaris domain. In Solaris, virt-install is a tool used to create the guest domain images regardless of whether it is PV or HVM. For example, a paravirtualized Solaris image can be created with the following command: # virt-install --nographics -n newSolaris --paravirt -f /export/home/newSolaris.\ img -r 1024 -s 30 -l /export/home/sol-nv-b87.iso where -n is for specifying a domain name to be newSolaris, - - paravirt is for selecting the mode to be paravirtualized, -f is for specifying the domain image name newSolaris.img in the path /export/home, -r is for assigning the domain memory size to be 1024 MB, -s is for creating the domain image size in gigabytes, and -l is for choosing the installation location. Note that in Solaris xVM, for paravirtual guests (both Solaris and Linux), the video card and CD-ROM drivers are not yet fully ported, will not have a graphical window, and cannot use fully use the CD-ROM. However, we were able to use an ISO file as the guest CD-ROM during the install of the paravirtual Solaris guest by using the – l option to specify the ISO location. But for the HVM guest, the guest can fully use a standard CD-ROM driver within it and then have a CD-ROM device. We can also install the guest via a Solaris NFS share on Solaris xVM. If we use ZFS volumes for the guest disk storage, it should have better performance and more reliability than using a file-based image in the Domain0 file system. After running this command and finishing the normal Solaris Installation process, you can use virsh list again to see the newSolaris guest domain running, as illustrated in Listing 4. To access the running domain newSolaris, we can use the command virsh console newSolaris. To get out of the guest domain, the combination key Ctrl+] is needed. If we wish to save the guest domain’s configuration file for later use, we can use the virsh tool to write an XML format configuration file when the guest domain is running, with virsh dumpxml newSolaris > newSolaris.xml. With the guest domain’s xml configuration file, we can directly boot the 10 ; L O G I N : VO L . 33, N O. 5 image with the command virsh create newSolaris.xml. Furthermore, we can use the command virsh shutdown newSolaris to turn off the guest. Next, we will walk through an example of installing an HVM guest domain. Before creating the Solaris HVM image, we may need to enable VNC in Xend, as Listing 6 shows. In the svccfg command shown, 0.0.0.0 indicates that the VNC server is listening to any IP and passwd should be replaced with the actual password. If you don’t explicitly set the password, it will default to the empty string, which is, of course, not secure. If you don’t want to use VNC for remote access to the guest at all, you can use the command svccfg -s xvm /xend delprop config /vnc -listen to remove that option and then refresh and restart Xend as we did earlier. # svccfg -s xvm/xend setprop config/vnc-listen = astring: \”0.0.0.0\” # svccfg -s xvm/xend setprop config/vncpasswd = astring: \”passwd\” L i s t i n g 6 : V NC s e t u p i n X e n d Next, we can use virt-install with the - -hvm argument to start an HVM Solaris guest as, for example: # virt-install -n SolarisHVM --hvm -r 1024 --vnc -f /export/home/SolarisHVM.\ img -s 30 -c /export/home/newbie/sol-nv-b87.iso Notice that we use almost the same options as we did when creating the paravirtual Solaris guest; the only differences are - -hvm , which specifies the guest works in HVM mode, and - -vnc , which specifies that the guest will have a VNC connection. Also, the argument – c is used for specifying the virtual CD-ROM rather than – l when installing the paravirtual guest. In this case, it indicates that the installation is from the ISO file /export/home/ sol-nv-b87.iso and, from the guest’s perspective, the installation is from the guest CD-ROM. We could install guests based on any other operating system, including Windows, in this same manner. When you run the virt-install command, it will first display a window asking for a VNC password, which is passwd as we have set up in Xend at the beginning of the HVM guest setup procedure. The rest of the installation process will look exactly like installing Solaris on a real machine. As with the PV guest, we can use the virsh facility to create and shut down the guest domain. We used virt-install to create Solaris guests and it’s also possible to use it to create Linux guests in a similar way. However, for Linux guests there are some additional options. In this section, we will illustrate the use of one of these, virt-manager, to install a Linux guest. Refer to our Web site [1] for additional information on options for Linux guests such as netinstall, isoin stall , and cdrom -install . Virt-manager is a GUI installation and management tool for guest domains. It provides a GUI tool for the creation of new domains, an integrated VNC viewer for accessing domains, and other useful tools for the management of domains and their resources. Virt-manager is available on newer releases of CentOS and Red Hat Enterprise. It is also available in the latest version of Solaris now. You can find its icon from menu->All Applications->System Tools->Virtual Machine Manager. You can also run it as root with the command virt-manager. It will first display a window asking you to connect to Xen hypervisor. Single-clicking the “Connect” button will show you the Virtual Machine Manager GUI interface displaying the Domain0 and guest domain’s running status and resource usage. Click the “New” button and it will guide you step by step through the guest creation wizard. It only supports network installation for paravirtual guests, but both ISO and network instal; L O G I N : O c to b e r 2 0 0 8 Sola r i s v i r t uali z at ion o p t ion s 11 lations for HVM guests. Here we give an example for creating a paravirtual CentOS guest. Virt-manager first asks for the guest domain’s name, which later becomes the guest domain id and the type of the guest domain (paravirtualized or fully virtualized). Then, it will request a network path address to the CentOS repository such as http://mirror.clarkson.edu/pub/centos/5/os/i386/. Later, you will be asked to choose a disk partition or a file to be the guest file system. If you have not set up a special disk partition for your new guest, a file is the safest choice. After allocating the memory size and the number of virtual CPUs, it will go through the normal CentOS network installation process. Our Web site [1] includes detailed screenshots of the entire process. Getting Started with Sun xVM VirtualBox Since VirtualBox was acquired by Solaris only recently, it is not yet automatically installed in Solaris. So the first step is to download VirtualBox from http://virtualbox.org/wiki/Downloads. To determine which Solaris package to download (32-bit x86 or 64-bit AMD64), you can use the isainfo command on your base Solaris system. The VirtualBox installation package includes two packages: the kernel package, used to install the Virtual Disk Image (VDI) kernel module, and the VirtualBox package, which will install the VirtualBox application and GUI library. Once the proper package is downloaded, use the command pkgadd to first install the VirtualBox kernel package and then the VirtualBox package, as illustrated in Listing 7. # pkgadd -G -d VirtualBoxKern-VERSION-OS-BIT.pkg # pkgadd -G –d VirtualBox-VERSION-OS-BIT.pkg ……(package installing message are partly omitted)…… VirtualBox kernel module unloaded VirtualBox kernel module loaded. Creating links... Done. Installation of <SUNWvbox> was successful. L i s t i n g 7 : T h e s t e p s f o r i n s t a ll i n g V i r t u a lBox Once the packages are installed, simply issue the command VirtualBox so that the VirtualBox management window will pop up. One important note for trying all the virtualization systems available on Solaris is that VirtualBox and Solaris xVM cannot currently operate at the same time. If you have been running in Solaris xVM, it is necessary to reboot the machine and switch to the first option, Solaris, in the GRUB menu. Otherwise, you will see the error VirtualBox Kernel Driver not Loaded when you do run the VirtualBox command, because the VirtualBox kernel has not yet been ported to the Xen kernel. To create a virtual machine, when you choose the “NEW” button, it will lead you to the VM installation wizard. VirtualBox can run any guest operating system including Windows, Linux, and Solaris, or any x86 OS running on it without any modifications to your guest OS. All of their device drivers will work normally, with no need to port to the guest OS. First, you need to choose your VM name and its OS type, then assign the memory size to the VM (which for normal Solaris installation requires at least 768 MB). Next, you need to specify the VM disk image. If it is your first time to create a VirtualBox File image, you have to click the “NEW” button. You must also specify a file for the disk image. You can either specify 12 ; L O G I N : VO L . 33, N O. 5 the size of the disk file or set it to grow dynamically over time. A standard Solaris SXCE requires 12 GB for the image file. If you want to further configure the VM’s devices, you can click the “Settings” button. One important note is that so far VirtualBox only supports NAT network topology. If you want to install from the CD, choose the CD-ROM option; there you can click to mount the CD drive from the host CD-ROM or from a specific ISO image. Once done, you can simply click the “Start” button to start the VM. The VM will boot from CD-ROM and the rest of the installation process is the same as normal Solaris installation. When the virtual machine is created and booting, VirtualBox will prompt you with a VNC window to display the screen of the guest VM; you can either click the mouse or press the Enter key to get into the guest VM. If you want to get out of the VM box, you can press the right Ctrl key to release yourself from the VM. In VirtualBox, if you want to run a previously installed VM, you can operate on the existing vdi files. By default, the VM virtual disk images are stored in the /root/.VirtualBox/VDI directory. There is a virtual disk manager to manage them. You can press the combination key Ctrl+D to pop up the disk manager window. If you already have a system-installed vdi file, you can press the “Add” button to add the existing VM image into the VirtualBox. Then you can go through the previous process of creating a new VM procedure to run a VM. But if you want to remove a VM image from VirtualBox, you need to first Release the image and then Remove it from the virtual disk manager, because when a disk image is assigned to a VM, VirtualBox automatically registers it and grants a unique uuid to that VM and image. Comparing Containers, xVM, and VirtualBox Now that we have shown you the basics of getting started with three different virtualization options on Solaris, in this section we will present some comparisons among them. One important point of comparison is ease of use. In our opinion, the easiest to use is VirtualBox. It is fully GUI-guided, straightforward, and simple. Solaris Containers are also relatively easy to use, especially because they are so well integrated into Solaris and have such a complete tool chain for configuration and management. However, since they have no GUI interface, they are better suited to server applications than desktop virtualization. Solaris xVM is the most complicated, but as more management tools, such as virt-manager, are extended and integrated into Solaris, the ease of use will improve. Of course, ease of use is just one part of the story. It is also important to consider the features of each system. Containers can only run Solaris guests, so some common applications of virtualization (e.g., running alternate operating systems) simply won’t work in Containers. Solaris xVM requires the running guest to be a modified OS and generic virtual device drivers need to be ported. If the unmodified OS is to run on Solaris xVM, VT or AMD-V hardware support will be needed on the CPU chip. VirtualBox, however, can run any type of unmodified guest even without hardware support for virtualization. In terms of storage, Solaris Zones can either share files with the global zone or have their own version of files from the global zone. In other words, zones can use the same library files as the global zone or have older or newer versions of libraries than the global zone. You should also be aware that when you change the files in the global zone, you may also affect other zones that are sharing them. For VirtualBox, the system files in a VM of Vir; L O G I N : O c to b e r 2 0 0 8 Sola r i s v i r t uali z at ion o p t ion s 13 tualBox are only used by that VM and will not affect other VMs. Each VM is encapsulated in a separate vdi or vdmk files. However, if sharing is desired, VirtualBox does have a shared folder option that can mount a base OS directory to share with the guest. Similar to VirtualBox, in Solaris xVM each guest’s file system is independently separated either by files or partitions or disks. Theoretically, we can dynamically add Domain0’s disk or partitions to the guest domain, sharing with the guest domain. But we do not recommend attempting that, because there is no way to maintain the consistency of shared files or file systems. The preferred method of sharing files with xVM guests would be to use a network file server. For the network topology, in Solaris Zones all zones share the network interface with the global zone’s network interface in a bridged mode. There are no other network topology choices. Bridging is also currently the only option available for Solaris xVM guest domains. The routing and NAT topologies that are available to Xen on Linux are still in development for Solaris. VirtualBox supports only the NAT topology. This means that there is no way for an outsider to directly access the VirtualBox VM through the network. This is a crucial difference for running server VMs. It is worth noting that, with the Crossbow project, changes in networking support should be coming for all virtualization systems. Crossbow is a Solaris network virtualization and flow control solution. It provides universal network architecture to the virtualization systems described here (Containers, xVM, and VirtualBox) to manage the flow control of those virtual NICs, such as bandwidth and packet types. Crossbow is not yet stable but is being tested as part of SNV build 91. Finally, a critical aspect of the comparison is performance overhead from virtualization. A full performance comparison on various types of hardware and running a wide variety of tests is beyond the scope of this article. Here we present the results of some simple compilation tests on baseline Solaris and on each of the virtualization systems. Specifically, we report the time to compile the Apache Web server. All our tests are run on Open Solaris Community Express Nevada build 87 (SNV b87) running on a Dell Optiplex (Intel-VT dual-core 2.4-GHz 6600 CPU, with 4 GB memory, a 250-GB disk, and 1-Gb NIC). The guest resource allocation can be seen in Table 1. Zone is a virtual machine in Solaris, Xen domU is the virtual machine in Solaris xVM, and VBox VM is the virtual machine running in VirtualBox. Container is a zone with resource controls. Here the container is assigned the limited CPU to be 1 ncpus. If we use zonecfg –z newzone info, we can see the information in Listing 8. For more complicated resource configuration, you can look at the usage of project and task facilities. CPU (dual) Memory Image size Network Zone - - - Bridged Container 1 1024M - Bridged Xen domU 1 1024M 30G Bridged Vbox VM 1 1024M 30G NAT T a b l e 1 : V M R e s o u r c e Allo c a t i o n s f o r E a c h V i r t u a l i z a t i o n System 14 ; L O G I N : VO L . 33, N O. 5 # zonecfg –z newzone info capped-cpu: [ncpus: 1] capped-memory: physical: 1G [swap: 1G] [locked: 768M] rctl: name: zone.cpu-cap value: (priv=privileged,limit=50,action=deny) rctl: name: zone.max-swap value: (priv=privileged,limit=1073741824,action=deny) rctl: name: zone.max-locked-memory value: (priv=privileged,limit=805306368,action=deny) rctl: name: zone.max-lwps value: (priv=privileged,limit=200,action=deny) L i s t i n g 8 : T h e R e s o u r c e L i m i tat i o n f o r t h e B e n c h m a r k e d Co n t a i n e r Figure 1 shows the relative overhead of the four virtual machines by a percentage of the baseline time to compile httpd. Overall, the zone has the least overhead compared to the baseline, because it has full access to the whole global zone’s resources. Its performance is almost as good as the baseline. The container experiences delay because it is limited to half of the overall CPU cycles. The Xen guest domain is close to the overhead of the container, but it consumes substantially more system time. VirtualBox clearly has the highest overhead (250%). Note that, in our experiment on the same hardware, the overhead of Xen on Linux is less. In general, the overhead of Xen on Solaris is not necessarily the same as Xen on Linux. F i g u r e 1 : P e r f o r m a n c e Co m p a r i s o n b y P e r c e n t a g e A g a i n s t B a s e Sol a r i s S y s t e m Co m p i l e o f A p a c h e In Figure 2, we find that the container’s sys and user time are almost the same as the zone’s. But, overall, the container’s total consumed time is almost doubled, which indicates that Solaris resource management is effectively giving the container a limited share of system resources. We recommend that system administrators use resource management facilities to avoid some zones’ malicious or greedy resource usage and effect on the ; L O G I N : O c to b e r 2 0 0 8 Sola r i s v i r t uali z at ion o p t ion s 15 overall performance of other zones. Although the configurations may be a little complicated, it is worth taking the time to get it right. One successful experiment involves running a memory bomb (a loop constantly allocating and touching additional memory) in the zone and container: The zone leaves the global zone dead, but although the container suffers from running out of memory, the global zone is still alive and works well. For more details, refer to our previous paper [2]. F i g u r e 2 : Co m p a r i n g a R e s o u r c e - L i m i t e d Co n t a i n e r t o a Z o n e Conclusion Overall, Solaris has offered us a variety of virtualization systems to use: Solaris Containers, Solaris xVM, and Sun xVM VirtualBox. Each of these has its own unique advantages. Sun xVM VirtualBox offers full virtualization, is straightforward to use, and has nice GUI windows, but its performance overhead is also high and, with an NAT-only network, running servers is difficult. Still, for easy-to-use desktop virtualization on Solaris, VirtualBox is probably the best choice. In contrast, Solaris Containers/Zones OS-level virtualization is targeted at server-level usage. It achieves good performance, but to make it work properly you need to master the resource management control tools, which can be somewhat complicated. Containers/Zones also do not give you a choice of guest operating systems. For fast Solaris servers, they are likely the best choice. However, if you want a choice of guest operating systems and good performance, then Solaris xVM is likely to be the best choice. Its performance is comparable with OS-level virtualization, and it is suitable for both desktop usage and server usage. Solaris xVM can be a bit complicated to configure, but there are a variety of configuration options, from GUI to command line, and the available tools continue to improve. references [1] Clarkson Web site for screenshots and documents: http://www.clarkson.edu/projects/virtualization/solaris/login08. [2] Quantifying the Performance Isolation Properties of Virtualization Systems: http://people.clarkson.edu/~jnm/publications/isolation_ExpCS _FINALSUBMISSION.pdf. 16 ; L O G I N : VO L . 33, N O. 5 practical resources [1] Wenjin’s blog on Solaris Virtualization Tutorials: http://deepenintocs .blogspot.com/. [2] Xen introduction and tutorial: http://runningxen.com/. [3] Solaris Containers online documentation: http://www.sun.com/ bigadmin/content/zones/. [4] Solaris xVM: http://opensolaris.org/os/community/xen/. [5] VirtualBox user manual: http://www.virtualbox.org/wiki/End-user _documentation. [6] Crossbow project: http://opensolaris.org/os/project/crossbow/. ; L O G I N : O c to b e r 2 0 0 8 Sola r i s v i r t uali z at ion o p t ion s 17