1
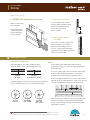
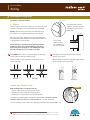
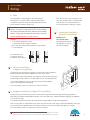
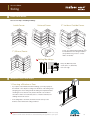
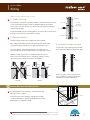
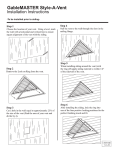
Genuine Wood
Siding
Installation Guide
Carefully read this entire guide before installing maibec em+ siding. You must
understand and follow the instructions provided to properly install this product.
General Information
maibec em+ siding was developed to make installing maibec genuine wood
siding easier. The end-matched tongue and groove system allows boards to fit
into one another. End joints do not need to be cut and joints can fall anywhere
between two furring strips. As a result, em+ siding requires less cutting,
less stain touch-ups and no caulking.*
maibec em+ siding is secured to the wall with staples. We recommend using
a pneumatic tool, which will be much quicker than working by hand.
The fastening line is concealed by subsequent rows of siding, resulting in
a flawless and uniform finish.
Tongue
Fastening
line
Like all maibec siding, em+ siding is factory-made and stained on
all surfaces.
If you prefer, you can also install em+ siding by hand using stained maibec
nails. Keep in mind that the nail heads will remain visible, however. If you
choose this method, you must refer to the regular siding installation guide
for nailing instructions.
Groove
For exterior use only.
*Unless otherwise specified.
Residents of the Îles-de-la-Madeleine and coastal regions** – Unstained stainless steel grade 316 ringed nails
must be used for installing em+ siding in the traditional manner (with nails) and mouldings. Failure to comply
with this requirement will void the warranties.
** Applicable coastal regions include those located less than 600 m (2,000 feet) from the coastline in the Atlantic provinces (New Brunswick, Prince Edward Island,
Nova Scotia, Newfoundland and Labrador), Saint-Pierre-et-Miquelon and the U.S. East Coast.
Warning
Do not install defective material. maibec will only replace defective material if it is notified prior to installation. For more details,
contact us.
Before you begin, consult your national, provincial and local building codes for requirements regarding the installation of siding,
breather membrane (housewrap), caulking, etc. Follow the manufacturer’s instructions for installing the breather membrane and
applying caulking.
For more information, consult the Government of Canada’s National Model Construction Codes at http://www.nationalcodes.nrc.gc.ca.
Storage
•
•
•
•
Store the siding in a dry and well-ventilated area. Do not place it directly on the ground.
Always cover any unused siding after a day’s work.
Do not store the siding in a heated space, which can dry out the wood.
Failure to follow these storage requirements may alter the dimensional properties of em+ siding and make
installation difficult.
important : Must be followed. Failure to follow maibec’s mandatory installation and storage
requirements will void the warranties. Consult the building codes applicable to your region.
1
Genuine Wood
Siding
1
Wall Preparation
• When installing maibec siding, it is preferable to do so over a standard 16” (406 mm) on centre stud built wall with OSB
(Oriented Strand Board) sheathing or plywood, and an approved breather membrane. Use 1” x 3” (25 x 76 mm) furring strips.
They must be kiln-dried, straight, without splits or nail holes to ensure a proper fastening base.
• The breather membrane and flashing must be installed according to building codes and the manufacturer’s instructions.
• Use approved exterior tape around windows, doors and any opening to ensure a tight seal with the breather membrane.
• Install flashing over openings and in areas where moisture drainage is needed. The siding must be installed over furring
strips or other maibec approved rainscreen to ensure airflow, allow for moisture drainage
and reduce the risk of premature aging.
• To provide proper ventilation for the wall and prevent rodent and certain insect infestations, use the maibec em+ starter trim
or staple screening at the base of the wall. See page 3 and 4.
• Verify the structural integrity of the wall, making certain that it is solid, straight and ready for siding to be installed. Verify that the
wall’s moisture drainage is ensured by a properly installed breather membrane and appropriate flashing.
Allow a minimum clearance of:
• 8” (203 mm) from the ground,
• 1” (25 mm) from adjacent horizontal structures (e.g. deck),
• 2” (51 mm) from roof shingles.
Note: If you are using insulating concrete forms (ICF) or foam sheathing, please contact maibec for technical assistance.
2
Before You Begin, Make Sure:
Carefully plan the distribution of the boards on the walls. First, check the tally on the pallet identifying the product and the
number of boards in each length. Arrange the boards on the wall so as to minimize the number of joints and cuts. Use longer
boards above and beneath windows and on large areas. Use short segments of boards for small areas such as spaces between
doors and windows. Alternate board lengths to avoid joint alignment. Boards measuring 4 feet to 10 feet (1.22 m to 3.05 m) in
length should be installed between boards measuring 11 feet to 16 feet (3.35 m to 4.88 m) in length.
For a flawless finish, distribute the joints evenly on the entire surface.
Never install 2 boards longer than 12 feet (3.66 m) end to end.
3
Starter Course
To avoid being splashed by rain hitting the ground, the board should be installed be at least 8” (203 mm) from the ground.
The siding should never touch the ground.
Note: It is important that furring strips are nailed to the structure according to federal and provincial building codes as well as any
applicable municipal regulations in your area.
In the Îles-de-la-Madeleine and coastal regions, unstained stainless steel grade 316 ringed nails must be used for installing
the starter course of em+ siding and mouldings. Failure to comply with this requirement will void the warranties.
important : Must be followed. Failure to follow maibec’s mandatory installation and storage
requirements will void the warranties. Consult the building codes applicable to your region.
2
Genuine Wood
Siding
Starter Course (cont’d)
The starter course can be done as follows:
NEW !
1. WITH the maibec em+ galvanized steel starter trim
•
•
•
•
Allows you to install the first row of siding without any visible nails
Acts as a level starter course around the entire building
Prevents rodent and certain insect infestations
Provides proper ventilation for the wall
1 1/2”
The maibec em+ starter trim is designed only for installing siding horizontally.
8”
The starter trim must be used around the entire building, including inside and outside corners.
It allows for a 1 ½” overlap with the foundation.
Install the maibec em+ starter trim as follows:
1 a. For newly constructed homes or renovated walls WITHOUT furring strips:
• Use a precision level (laser) or regular level to install the maibec em+ starter trim.
This starter course will serve as the reference point for beginning to install the
maibec em+ siding. Nail horizontally every 16”.
• Once the maibec em+ starter trim has been installed, place 1” x 3” vertical furring
strips on the wall at 16” intervals on centre. The bottom of the furring strips should
touch the base of the maibec em+ starter trim.
• Install the first row of siding according to the recommendations in the installation guide
and staple in place.
1 b. For a wall WITH vertical furring strips:
WITH a horizontal
cross beam:
WITHOUT a horizontal
cross beam:
To install the maibec em+ starter
trim, remove the horizontal cross
beam and cut approximately
12” from the vertical furring
strips around the entire building.
To install the maibec em+ starter
trim, cut approximately 12” from
the furring strips around the
entire building.
Whether the wall has a horizontal cross beam or not, install the maibec em+ starter trim as fallows:
Use a precision level (laser) or
regular level to install the maibec
em+ starter trim. This starter
course will serve as the reference
point for beginning to install the
maibec em+ siding. Nail
every 16” on centre.
Once the maibec em+ starter
trim has been installed, replace
the 1” x 3” pieces to complete
the wall and to finish the
furring strips from the base
of the maibec em+ starter
trim to the cut section.
important : Must be followed. Failure to follow maibec’s mandatory installation and storage
requirements will void the warranties. Consult the building codes applicable to your region.
3
Genuine Wood
Siding
Starter Course (cont’d)
2. WITHOUT the maibec em+ starter trim
Staple screening at the
base of the wall.
a. Without any starter trim
To properly repel water from the
wall, the starter board must extend
past the furring strip by at least
1/4” (6 mm), but not more
than 1” (25 mm).
16”
centre to
centre
Fold back and fasten
over the furring strips
before installing the
first row of siding
1” x 3”
furring
strips
1/4” - 1”
8”
b. With maibec’s regular
skirt board
You can also use maibec’s regular skirt
board as a starter course. It fits all
maibec horizontal siding profiles. In
this case, press the back of the siding
against the top of the skirt board and nail
in place as recommended.
4
Subsequent Courses
Horizontal Installation
TIPS:
Fit boards tightly into one another lengthwise, with a
maximum variance of 1/16” (1.5 mm) between boards.
Correct
0’’ (0 mm)
Incorrect
More than 1/16’’ (1.5 mm)
The upper alignment of boards can be adjusted up to a maximum
of 1/16” (1.5 mm), taking care not to leave any visible staples.
Correct
0’’ (0 mm)
Acceptable
1/16’’ (1.5 mm)
Incorrect
More than
1/16’’ (1.5 mm)
• To fit boards together tightly with a hammer without
damaging the tongues, use a block of siding approximately
6” (152 mm) long.
• To serve as a gauge guide, make a pencil mark on the wedge
block. This reference will instantly tell you if the board is
properly inserted. Keep this block on hand at all times!
• Verify course alignment with a level every 3rd or 4th row and
adjust the board as needed. A variance of 1/16” to 1/8” (1.5 mm
to 3 mm) in height between boards is considered normal.
• Using a reference line 3/4 from the top of the wall, place nails
every 8 feet so that you can take measurements that will
allow you to periodically verify alignment and make slight
adjustments as needed.
important : Must be followed. Failure to follow maibec’s mandatory installation and storage
requirements will void the warranties. Consult the building codes applicable to your region.
4
Genuine Wood
Siding
End Joints
End joints - board to board:
End joints - board to moulding:
With maibec em+ siding,
end joints do not need to
be cut and joints can fall
anywhere between two
furring strips. No caulking
is required.
Cut the end of the board to
be butted to the moulding
at a 90° angle and at the
appropriate length.
Apply touch-up stain as
recommended.
1” x 3” furring strip
Wall structure
Siding
Caulking
If you have to make
a joint cut, make 45°
cuts at the ends of both
boards to be butted,
apply touch-up stain as
recommended and fasten
to the furring strip. No
caulking is required.
Siding
90° board joint
Apply caulking to the joint
according to building codes
and the manufacturer’s recommendations.
Siding
45° board joint
Staple
Touch-Up Stain
/À
u
ba
se
d’ea
ba
i
plo
ke
N
UP
tura AIL DE ST
l to S
RE AI
/ C TO N
l bef ne
ore s /
LO UCHE
use Te
U
/ Bie intes
n agi
natu S
ter
ava
rel
nt
l’em les
wel
TO
TU UCHRE
IN
TE
se
Wat
er
sed
/
À ba
d’ea
u
TO
UC
TU
HRE UP
IN
ba
t l’em
ploi
s na S
turell
es
agit
er avan
Teinte
/ Bien
Use Kee 4.9
Util Gar
onl p out fl oz
ise der
y
r seu hor in a of rea / 145
lem s de well-vch of ml
ent la
ent chi
dan por
ilat ldre
s un tée
ed n.
enddes enf area.
roit ant
bie s.
n aér
é.
TE
re use
d’e
au
Natur CUTS DE STAI
RE
al
/ CO TOUCN
well ton
befo es /
UPE HE
Sha
ke
se
i
plo
ke
N
UP
tura AIL DE ST
l to S
RE AI
/ C TO N
l bef ne
ore s /
LO UCHE
use Te
U
/ Bie intes
n agi
natu S
ter
ava
rel
nt
l’em les
wel
Na
base
d/
Sha
ter
Wa
TO
TU UCHRE
IN
TO
UC
TU
HRE UP
IN
TE
d’e
au
Natur CUTS DE STAI
RE
al
/ CO TOUCN
well ton
befo es /
UPE HE
re use Tei
/ Bien ntes
S
agit natur
er avan ell
t l’em es
Sha
ke
.
se
À ba
TE
NAILS / CLOUS
Use Keep 4.9 fl
Util Gar only out of oz / 145
in
iser der
reac
seu hors a wel h of ml
l-ve chil
lem de
ent la port ntila dren
dan
ted
s un ée des area.
end enfa .
roit nts.
bien
aéré
TOUCH-UP STAIN
TEINTURE DE RETOUCHE
Natural tones / Teintes naturelles
Shake well before use / Bien agiter avant l’emploi
Na
ter
À ba
.
CUTS / COUPES
Natural tones / Teintes naturelles
Shake well before use / Bien agiter avant l’emploi
Sha
Wa
base
d/
Use Keep 4.9 fl
Util Gar only out of oz / 145
in
iser der
reac
seu hors a wel h of ml
l-ve chil
lem de
ent la port ntila dren
dan
ted
s un ée des area.
end enfa .
roit nts.
bien
aéré
TOUCH-UP STAIN
TEINTURE DE RETOUCHE
ploi
d’eau
l’empl
oi
TOU
CH-UP
TUR
E DE STAIN
RET
TEIN
base
CU
OUC
HE
Natural TS / CO
UPES
tones
well
/ Teint
before
es natu
use /
Bien
relles
agiter
avant
4.9 fl oz / 145 ml
Keep out of reach of children.
Use only in a well-ventilated area.
Shake
Water based / À base d’eau
Garder hors de la portée des enfants.
Utiliser seulement dans un endroit bien aéré.
based
/À
4.9
4.9 fl oz / 145 ml
Keep out of reach of children.
Use only in a well-ventilated area.
Water
Water based / À base d’eau
Garder hors de la portée des enfants.
Utiliser seulement dans un endroit bien aéré.
fl oz /
Keep
145 ml
Use only out of
reach
in a well-v
of childre
Garde
Utilise
r hors
entilat
n.
r seulem
de la
ed area.
ent dansportée
des enfant
un endroi
t bien s.
aéré.
For Natural Tones siding touch-ups, use the maibec touch-up
applicator. You need (2) bottles for natural tones siding touchups – one bottle for the siding CUTS, one bottle for the NAILS.
To entirely seal the wood, apply a sufficient amount of
touch-up stain.
sed
Apply touch-up stain to all cut or planed surfaces and to all bare
wood, even if it will not be visible once the siding is installed. It
is imperative to touch-up boards before they are installed.
Wat
er
6
1” x 3” furring strip
Wall
structure
Moulding
Use Kee 4.9
Util Gar
onl p out fl oz
ise der
y
r seu hor in a of rea / 145
lem s de well-vch of ml
ent la
ent chi
dan por
ilat ldre
s un tée
ed n.
enddes enf area.
roit ant
bie s.
n aér
é.
5
When using touch-up stain in a can, use a polyester, nylon,
or any synthetic applicator with firm bristles approved for
water-based coating.
Touch-up stain is only meant to be used in areas in need of it. It
must not, under any circumstance, be applied over undamaged
factory coated material.
For more information, see the touch-up guide that comes with
the touch-up stain cans or kits, or go to www.maibec.com.
important : Must be followed. Failure to follow maibec’s mandatory installation and storage
requirements will void the warranties. Consult the building codes applicable to your region.
Apply
precisely
Do not spillover
or overbrush
5
Genuine Wood
Siding
7
Fastening and Furring Strips
Fastening line
Use maibec recommended staples:
a. Staples
If you must fasten a board
anywhere other than along the
fastening line, use a stained
maibec nail.
These are staples used solely for siding: 2’’ (51 mm) length, 7/16”
(11 mm) crown staples, resin-coated stainless steel SUS 304.
Warning: Specific safety rules must be followed when using
pneumatic tools. Consult the manufacturer’s user manual.
When fastening siding, always press the board firmly against
the furring strip. Ensure staples have a minimum penetration of
1 1/4" (30 mm) in a solid substrate.
Staples must be positioned directly along the fastening line
indicated on the board’s profile. Installing the staple above
this line may cause the tongue to crack. Installing the staple
below the line will cause it to be visible on the wall.
3/4’’
minimum
Do not install
staples less than
3/4" (19 mm) from
the ends of boards.
Install TWO staples centred on each furring strip at a 20° angle,
leaving a 3/4” (19 mm) space between them.
The staple head should not sink into the wood but
sit flush on the surface.
TIP: A wood block can be attached to the pneumatic tool to
Most pneumatic tools have an adjustable depth of drive.
See the manufacturer’s user manual.
ensure a 20° angle.
20°
Correct
Incorrect
Correct
Incorrect
maibec em+ Stapler Guide
Makes installing maibec em+ siding fast and easy
• Ensures constant positioning along the fastening line
• Guarantees the desired angle when installing staples
• Facilitates the recommended 3/4” spacing between staples
NEW!
The maibec em+ stapler guide is compatible only with SENCO (SNS50XP, SNS45XP,
SNS44XP), MAKITA (AT1150A), and HITACHI (N5008 AC 1’’ and AC 2’’) staplers.
For more information, see the maibec em+ stapler guide instruction sheet at www.maibec.com.
important : Must be followed. Failure to follow maibec’s mandatory installation and storage
requirements will void the warranties. Consult the building codes applicable to your region.
6
Genuine Wood
Siding
b. Nails
If you must fasten a board anywhere other than along the
fastening line, use a stained maibec nail. Use maibec double
hot dipped zinc galvanized ring shank nails with textured heads,
factory-stained to match the siding colour.
In the Îles-de-la-Madeleine and coastal regions, unstained
stainless steel grade 316 ringed nails must be used for installing
em+ siding in the traditional manner (with nails) and mouldings.
Failure to comply with this requirement will void the warranties.
To touch-up nail heads, please consult section 6.
Lengths*:
• 2” (51 mm) for siding and 1” fascia
• 3” (76 mm) for all other regular mouldings
* Ensure nails have a minimum penetration of 1 1/4" (30 mm)
in a solid substrate.
If you have to make a joint cut, make 45° cuts
at the ends of both boards to be butted, apply
touch-up stain as recommended and nail
to the furring strip. No caulking is required.
c. Horizontal Installation,
Vertical Furring Strips
Installing 1” x 6”
(25 x 150 mm) siding:
Nail furring strips vertically
16” (406 mm) on centre for
horizontal installation.
Furring
strip
1” x 3”
The nail head should
not sink into the wood
but sit flush on the surface.
Incorrect
Correct
Tongues
d. Vertical Installation,
Diagonal Furring Strips
Contemporary, V-Joint and Channel profiles are well suited to vertical installation.
Install furring strips diagonally 12” (300 mm) on center at a 45° angle.
It is important to install siding starting on the right side of the wall. The first board is
installed with nails like a starter course, with staples used on all remaining boards.
To avoid water infiltration in the joint, the board must be installed with the
tongue end facing upward. See drawing.
For nail and staple position, see instructions in sections 7a and 7b.
12”
Start on
the right
e. Diagonal Installation, Diagonal Furring Strips
Contemporary, V-Joint and Channel profiles are well suited to diagonal installation. A diagonal furring strip pattern is
particularly useful when installing different profiles on the same wall surface. Install furring strips diagonally 12” (300 mm)
on centre at a 45° angle.
To avoid water infiltration in the joint, the board must be installed with the tongue end facing upward.
If this is not possible, it is imperative that you cut the ends of the boards at a 45° angle to avoid water infiltration in the joint.
Touch-up stain must be applied and the ends of the board must be secured to the furring strip with nails or staples.
For nail and staple position, see instructions in sections 7a and 7b.
important : Must be followed. Failure to follow maibec’s mandatory installation and storage
requirements will void the warranties. Consult the building codes applicable to your region.
7
Genuine Wood
Siding
8
Corner Finish Details
Here are a few ways of installing mouldings:
Inside Corner
Universal Corner
2” Inside or Outside Corner
Corner, door and window mouldings must
be installed before the siding is installed
(except when using 1” fascia – contact
maibec for details).
1” (25 mm) Fascia
Nailing Mouldings
Every 16” (406 mm), fasten
2 nails 3/4” to 1” (19-25 mm)
from each edge.
9
Window or Door Finish Details
1. Choosing a Window or Door
• If you plan to install maibec window mouldings, you must properly set
the window or door depth according to the thickness of the furring strips
(strapping), the chosen siding and the moulding. It is important that the
moulding does not extend too far past the window or door frame in
areas where water can accumulate (such as on headers and sills). See
drawings in #3 of this section.
• If the siding butts to the frame, the frame must be as deep as the
thickness of the wall and the siding combined.
3"
important : Must be followed. Failure to follow maibec’s mandatory installation and storage
requirements will void the warranties. Consult the building codes applicable to your region.
8
Genuine Wood
Siding
Window or Door Finish Details (cont’d)
Membrane
2. Header Flashing
Steel flashing is essential to avoid water infiltration. It must be installed so that it
covers and extends beyond the header moulding that will later be installed.
Siding
Leave a 1/4” to 1/2” (6 to 13 mm) space between the siding and the flashing for
effective water drainage.
Flashing
extending
past moulding
1/4” - 1/2”
Furring strip
The adjacent drawing shows a flashing with a 2” (51 mm) inside or inside corner.
If using a 1” fascia, please contact maibec for details.
Moulding
3. Siding Installation
Window
frame
Install the siding only after the mouldings have been installed.
Since siding installed directly under a window cannot be fastened, we
recommend manually nailing it in place with stained maibec nails.
4. Installation under a window
To help fit the course running under a window,
we recommend cutting the board at a 45° angle.
The same applies to siding installed directly over a window or door.
These boards must also be manually nailed in place with maibec nails.
All flat horizontal surfaces (such as a window sill trim) are prone to
water or snow accumulation. The use of flashing, caulking or a miter
cut on the trim is necessary to prevent this accumulation.
Caulking
Caulking
Caulking
Caulking
Incorrect
Caulking
Caulking
Caulking
The 45° cut makes it easy to slide the piece
into place without creating a large gap thus
reducing the size of the caulking line.
Correct
Dormer/Roof Junction Finish Details
10
2” spacing
The siding must be spaced at least 2” (51 mm) when it ends
adjacent to the roof surface.
This spacing protects the siding by creating a channel wide
enough to allow water to drain properly. This will also prevent
the build-up of ice against the siding.
important : Must be followed. Failure to follow maibec’s mandatory installation and storage
requirements will void the warranties. Consult the building codes applicable to your region.
2” spacing
Metal
flashing
Roof
cladding
9
Genuine Wood
Siding
11 Top of Wall Finish Details
Wood
spacer
1/2" spacing
1” spacing
1” Fascia
2’’ Inside or
Outside Corner
Siding
1” spacing
Furring
strip
Siding
The tops of walls are usually finished by installing a
moulding and then having the siding butt directly to it.
This is generally done when the uppermost course of
siding is wide enough for 2 nails. Siding that is at least
4” (102 mm) wide is acceptable. To facilitate air flow
behind the siding, it is important to leave a 1/2” (13 mm)
gap between the moulding and the soffit.
1” Fascia
Furring
strip
Siding
Furring
strip
Alternatively, you can install a 1” (25 mm) fascia board over the
installed siding. This is typically called “capping”. A wood spacer
is sometimes needed behind the fascia for a proper flush setting;
particularly in the case of rabbeted bevel siding under a roof
gable (sloped soffit). To facilitate air flow behind the siding, be
sure to leave a 1” (25 mm) gap behind the fascia.
12 Gable Finish Details
Finishing a gable is similar to finishing the top of a wall.
Step 1
TIP: To make installing and fitting the pieces of siding together
easier, cut the ends according to the angle of the gable (step 1), then
again at a 45° angle (step 2).
Apply a coat of touch-up stain to the cut ends.
The 45° cut makes it easy to slide the piece into place without creating
a large gap thus reducing the size of the caulking line.
Maintenance
As with all sidings, dirt build-up can occur; this can be due to a number of factors such as surrounding vegetation, dust or
air pollution. Periodic cleaning may be required. Wash down with a hose or a mild detergent to avoid damaging the stain.
Do not use a pressure washer. Contact maibec for more details.
See the maibec Sidings Maintenance Guide for more details.
Drawings not to scale.
important : Must be followed. Failure to follow maibec’s mandatory installation and storage
requirements will void the warranties. Consult the building codes applicable to your region.
® Trademark of maibec inc.
© Copyright - maibec inc.
Printed in Canada
March 2013
E1213162.1A
Step 2
1.800.363.1930
maibec.com
250 – 1990, 5e Rue, Saint-Romuald QC G6W 5M6 Canada
10