1
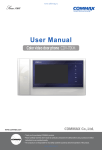
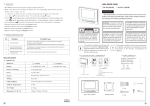
DVR 608 Instruction Manual
Camera1
Camera2
DVR608 consists of a highly integrated digital processor designed for home security
system. We advice you to read these instructions before so the installation process
and operation is trouble free for you. Please keep this for future reference.
Main Features
DVR608 consists of a highly integrated digital processor designed for home security
system. It can support the standard NTSC/PAL video as well as transmit image to
JPEG/MJPEG format based on the embedded high efficient JPEG engine. It also
supports real time video display on TV monitor. Moreover, it is equipped with
motion detect function. When there is any moving object detected, the images will
be recorded automatically and saved in built-in flash memory or SD card inserted.
To power
socket
Package Contents
1 x Digital Video Recorder (DVR)
1 x Connector Cable for TV Connection
1 x AC/DC Adapter 5VDC with 5mm plug
DVR Controller
5. Switch on the TV and select the AV
channel.
6. By default, the TV would show you
channel 1 when power is up. You can
press
(MODE) button to switch
view or playback photo screen.
7. You can now manually capture camera
pictures by pressing (OK) button.
8. Press
(MODE) button to playback
mode to view the recorded pictures.
9. You can select the pictures by using the
ARROW buttons.
10. Disconnect the power supply so as to
switch off the DVR controller.
Other Things Required (Not Supplied)
- 1-2 cameras for CCTV with extension connector cables.
- SD memory card (up to 1GB)
Set up the system
1. Connect the connector cables from each
camera to the DVR controller (CH1 or
CH2).
2. Insert the SD memory card into the slot.
Push in until it clicks. (Press again to
remove).
3. Connect the connector cable from the
DVR controller (TV OUT) to the TV (AV
input).
4. Plug in the mains power plug into the
DVR controller (5VDC) and the other
end to the power socket. The DVR
controller is automatically switched on.
TV
To Camera2
SD Card Slot
Right Side of DVR
To Socket
Operation
Left (LF)
Right (RT)
To TV
To Camera1
Up (UP)
Down (DN)
Back of DVR Controller
Mode
OK
1
2
3
4
5
6
Change mode between view and play back
By default, the DVR is in view mode and show channel 1 when power up. One
can press MODE to switch view or playback photo screen
Change viewing channel and PIP
2.1
Press LF to change view from Ch1 to Ch2
2.2
Press again LF and view PIP, Ch2 in Ch1
2.3
Press again LF and view PIP, Ch1 in Ch2
2.4
Press again LF to cycle from viewing Ch1
Capture photo
3.1
by manually: at View mode, press OK to snap an image
3.2
by motion detect: please refer to the following setup section, once it is
in armed mode, the DVR will capture the image when motion detected.
3.3
Use short cut key UP to arm the system at View mode
Playback the photo inside the memory
The capture photos will be stored in different folders for easy searching. The
folders are named according to the date sequence. If there is no file in the
memory, it will show “NO FILE” and enter view mode
4.1
press MODE button to enter playback mode
4.2
press OK to enter thumbnail view, press again OK to normal view
4.3
use LF/RT button to forward or rewind the image
4.4
press UP to turn on off the OSD
4.5
press OK and hold 3 sec to show folder name, use UP/DN key to scroll,
OK to select
Delete files from memory
5.1
At playback mode, press Mode and
hold for 3 sec to enter playback menu,
by using LF/RT key, one can select
delete current image or all files in the
current folder. Press OK to confirm
and reconfirm by selecting a tick icon.
5.2
One can select format to delete all
Delete Menu
files in all folders
System Setup
At preview mode, press MODE and hold for
3 sec
6.1
Set up Date time
6.1.1 Use LF/RT key to select date or
time and UP/DN key to set the
correct digit. The setting will
Set Up Screen
then store into system. Press OK
to confirm.
6.2
Set up auto capture – enable or disable
6.2.1 Press OK to toggle enable or disable
6.3
Set up the capture format – AVI or Photo
6.3.1 Press OK to toggle AVI or Photo, press LF/RT key to select next.
6.4 Advance Setup
6.4.1 Set up the TV system: Press OK to toggle NTSC or PAL
6.4.2 Setup the image quality: Press OK to toggle HQ or SQ
6.4.3 Setup the motion detect sensing area
6.4.3.1 Press OK to set up the area
6.4.3.2 Use LF/RT key to select full/middle/small area
6.4.3.3 Press OK, then LF/RT/UP/DN key to move the sensing area to
desired target position
6.4.3.4 Press OK to quit sensing area setup.
6.4.4 Set up motion detect count: press OK to select 1, 3 or 5. this means the
no of images will be captured at every trigger.
6.4.5 Set up motion detect interval: press OK to select 1,3 or 5, the bigger
figure the longer interval to active the detection. Setting 1 is about
3 sec between 2 snap shot.
6.4.6 Set up motion detect sensitivity
6.4.6.1 Use UP/DN key to select value from 1 to 99
6.4.6.2 The value of data changes in the targeted area is shown,
therefore, one can determine what target value is good for his
monitoring purpose. In general speaking, bigger value, lower
sensitivity.
6.4.6.3 Press OK to confirm and quit.
Icon Definition
Set up Menu
Date Time setup
Motion Detect On or Off
Advance Set up
Quit Menu
Select Photo or Video
Advance Set up
Select TV System, NTSC
or PAL
Select image quality
Hi or Low
Motion detect area setting
Motion Detect count
Motion detect interval
setting
Photo Management
Delete one photo
Delete all photos
Motion detect
sensitivity
Format memory,
clear all files