1
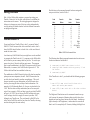
Each button on the command console has been assigned a
unique code letter, listed in Table 1.
Setting the Clock
Side 1 of the Utilities disk contains a program for setting your
TimePro. Boot side 1 of the disk, select option 2, and follow the
instructions on the screen. The setting program is designed to
allow you to change any part of the time or date independently,
such as setting the hours ahead or back for different time zones
or daylight savings time.
ProDOS and Slot 3
If you installed your TimePro/Plus in slot 3, you must “inform”
ProDOS. This is because other clock cards don’t work in slot 3—
hence ProDOS doesn’t bother to check it for a clock card when it
needs the time or date.
Just about any ProDOS disk that you might have can be modified
to recognize the TimePro in slot 3. A program on the Utilities disk
will do this for you on as many disks as you like. To use the program, select item 3 from the utilities main menu. The program
puts a small modification in the ProDOS program on each of your
disks which, in essence, tells ProDOS not to ignore slot 3. The
Utilities disk itself has been modified in this way.
The modification to ProDOS made by this utility also has another,
perhaps even more important, benefit. ProDOS was written for
an older clock card made by another manufacturer. This card
does not provide any year information, so ProDOS must calculate the year using the date and day of week information. For
example, if it’s Wednesday March 16, the year is calculated to be
1983. But this date and day combination (as well as many others) will occur again in 1988, and what year do you think ProDOS
will say it is? 1983! Due to the way ProDOS calculates the year,
it will no longer be able to supply the correct year after 1987,
although your TimePro can. The patch made to ProDOS by the
utility forces ProDOS to read the year from the TimePro, ensuring
accurate dating into the next century!
2
CodeConsole CodeConsole
LetterButton LetterButton
A
B
C
D
E
F
G
H
I
J
K
1
2
3
4
5
6
7
8
9
10
11
L
12
M
13
N
14
O
15
P
16
Q On
R Off
S Bright
T Dim
U
All Lights On
V
All Off
Table 1. BSR Port Command Codes
The following short Basic program demonstrates how to turn on
the device connected to button #1.
10
20
30
PRINT CHR$ (4);”PR#4”: REM TimePro in slot 4
PRINT “AQ”: REM Commands simulating pressing “1” and
“On” buttons
PRINT CHR$ (4);”PR#0”
If the TimePro is in slot 3, you should add the following program
lines:
5
POKE -16373,0: REM Switch from 80-column card to
TimePro when sending BSR commands
25 POKE -16374,0: REM Switch back to 80-column card when
finished
The Bright and Dim buttons on the command console are special, because the amount of dimming that actually takes place
depends on how long these buttons are held down. Assuming a
light is already at full brightness, it takes about five seconds to
dim it until it is completely off. Likewise, holding the Bright but-
7