1
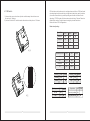
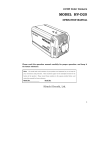
A B -8 8 H
MIN I T he rma l P rinte r
U S E R 'S M AN UAL
MAN UAL R E V IS IO N E N 1 . 1
NOTICE
Do not fall the printer down and avoid
vigorously impact.
You must use the only supplied adapter. It is
dangerous to use other adapters.
Do not plug or unplug with your hands
wet. You may be electrocuted.
Make sure the printer power is off before
plug or unplug the cable.
Avoid magnetic objects near the printer.
Please don’t place the printer in
humidity or dusty space because
excessive humidity and dust may
damage it.
Don’t use tweezers, knife,
screwdriver or other hard objects
to touch the heating piece; for the
heating piece will hurt you eternally.
Do not put printer on unstable surface.
Do not put foods or drinks on the
printer, in case that splash into
the printer.
The print head has a high temperature
’
after work. Please don t touch
the
print head or touch the motor shell
in case scalded.
NOTICE
If there appears any abnormal noise, smoke etc, please power off the
machine and unplug power at once. Please ask after-sarle service for
help.
Chapter 1 Packing List
Table of Contents
Chapter 1 Packing List . . . . . . . . . . . . . . . . . . . . . . . . . . . . . . . . . . . . . . . . . .01
Chapter 2 Specification . . . . . . . . . . . . . . . . . . . . . . . . . . . . . . . . . . . . . . . . .02
Chapter 3 Product Overview . . . . . . . . . . . . . . . . . . . . . . . . . . . . . . . . . . . . .03
3.1 Printer Parts. . . . . . . . . . . . . . . . . . . . . . . . . . . . . .. . . . . . . . . . . .. . 03
3.2 Interfaces. . . . . . . . . . . . . . . . . . . . . . . . . . . . . . . . . . . . . . . . . . . . . .03
Chapter 4 Usage Description . . . . . . . . . . . . . . . . . . . . . . . . . . . . . . . . . .. .04
4.1 Connect the cables . . . . . . . . . . . . . . . . . . . . . . . . . . . . . . . .. .. . . 04
Your printer box should include these items.
1. Printer
2. User's Manual/Warranty Card
3. Paper Roll
4. RS232 Interface Cable
5. AC Adapter
6. AC power cable
7. Oil Proof Cover
8. USB Cable
4.2 Control Panel . . . . . . . . . . . . . . . . . . . . . . . . . . . . . . . . . . . . . . . . . . 04
4.3 Installing the Roll Paper . . . . . . . . . . . . . . . . . . . . . . . . . . . . . . . . . 05
4.4 Installing Oil Proof Cover. . . . . . . . . . . . . . . . . . . . . . . . . . . . . . . . .06
4.5 Paper Jam Caused By Cutter . . . . . . . . . . . . . . . . . . . . . . . . . . . . . 06
微型热
用户手 敏打印 机
册
AB-8 8IV
保修卡
Paper Roll
4.6 Self-Test and DUMP Mode. . . . . . . . . . . . . . . . . . . . . . . . . . . . . . . .07
4.7 DIP Switch. . . . . . . . . . . . . . . . . . . . . . . . . . . . . . . . . . . . . . . . . . .. . 08
4.8 Interface Explanation Interface Explanation . . . . . . . . . . . . . . . . 10
RS232 Interface Cable
User's Manual/Warranty Card
4.8.1 RS -232 Serial Interface . . . . . . . . . . . . . . . . . . . . . . . . . . . . . . . . 10
4.8.2 USB Interfacet . . . . . . . . . . . . . . . . . . . . . . . . . . . . . . . . . . . . . . .10
4.8.3 Ethernet Interface . . . . . . . . . . . . . . . . . . . . . . . . . . . . . . . . . . . . 11
Oil Proof Cover
4.8.4 Cash Drawer Interface . . . . . . . . . . . . . . . . . . . . . . . . . . . . . ... . .11
Printer
US
B
AC power cable
USB Cable
AC Adapter
Pictures for reference only.
01
Chapter 2 Specification
Chapter 3 Product Overview
3.1 Printer Parts
Printing
Printing Method
Printing Speed
Thermal line printing
Resolution
Paper Supply Mode
203 DPI
Language
User language supported
Interface
RS-232 / USB / Ethernet
Pringing width
72 mm
Character Size
Font A:12×24
Font B:9×17
Character Per Line
42/48/53
Barcodes
Code 39,Code 128,EAN 8,EAN 13
Driver
Windows 2000/XP/2003 Server/VISTA/7
Out of paper
Sensor
Receive Buffer Size
Mass
Dimensions W×D×H
Paper type
Paper Width
Diameter
Printer head life
Autocutter
Power supply
Usage
Operating
conditions
Storage
Reliability
Max 250 mm/sec
2
1
Easy paper loading
3
5
4
6
1. Cover Opener
2. Printer Cover
3. Paper Cabin
4. Cutter Cover
5. Printer Head
6. Control Panel
7. Power Button
7
4K Bytes
Approx.1.45 kg
146×196×152mm
Thermal Paper
79.5±0.5 mm
Max.¢80 mm
Approx. 100 km (pringting rate 12.5% or less)
500,000 cuts
24 VDC ± 10%
5℃~45℃,20~85%RH
-10℃~50℃,10~90%RH(the paper is not included)
3.1
3.2 Interfaces
8. Power Plug Port
9. Cash Drawer Interface
10. Ethernet Port
11. USB Port
12. RS232 Interface
8
12
Notice: The printing speed relates with data transporting, command control
and power voltage etc.
9
10
11
3.2
02
03
Chapter 4 Usage Description
1. Make sure that the printer is not receiving data before replacing the roll paper;
otherwise, data may be lost.
2. Upward the” PULL” buckle handle till the cover open.
3. Remove the used paper roll core.
4. Put into new paper roll. As picture 4.4shows.
5. Be sure the correct direction of the paper comes off the roll.
6. Pull out a small amount of paper, and then close the cover. As picture 4.5shows.
4.1 Connection the Cables
Power Supply Cable
4.3 Install the Roll Paper
Ethernet Connector Cable
Serial Connector Cable
Drawer kick-out Cable
USB Connector Cable
4.1
4.2 Using the Printer
POWER
4.3
4.4
ERROR
FEED
Paper end direction:
4.2
POWER INDICATING LIGHT
Power on the printer, power lights; power off, light off.
ERROR INDICATING LIGHT
The light is on when the printer is lack of paper; the light will flash when the
printer cover installs not well or Online error.
FEED
Press the FEED button once to advance paper one line. You can also hold
down the FEED button to feed paper continuously.
04
Front
4.5
4.6
05
4.4 Installing Oil Proof Cover
The printer is an Oil Proof Cover supplied. It’s used to prevent water
splashing into the inside of the printer and not oil-water corrosion and
oxidation protection to the internal electronic components, which
extends the life of the printer.
Installation method:
Put the Oil Proof Cover onto the printer cover as the picture4.7 shows.
4.9
4.7
4.5 Paper Jam Caused By Cutter
4.6 Self-Test and DUMP Mode
1. If the paper is thick or sudden lack of power when cutting, paper jam might
appear.(cutter cannot reset)
2. Normally the cutter will reset when repowered, if the cutter did not reset,
users could follow below steps to solve the problem.
① Take away the cutter cover as below picture4.8 shows.
② Stir the cutter gear till the cutter moves to the Initial position as picture4.9
shows.
1. Press "FEED" button and hold on when powering on the printer, the
printer will perform self-test.
2. Power off the printer and take out the paper roll. Then press "FEED"
button and hold on and power on the printer. Then put in the paper
roll and close the printer cover. The printer will print out "DUMP".
That means the printer enters in DUMP mode. All data will be printed
out in raw hex format.
Back to normal mode: restart the printer could put the printer in normal
mode.
4.8
06
07
4.7 DIP Switch
1)Unscrew the screw on bottom of printer and take away the metal cover as
the picture 4.10shows.
2)Users will find the DIP switches under the window as the picture 4.11shows.
DIP switches could perform printer configurations as follows: COM port baud
rate adjusting, beep alarm switch, printing density adjusting, parity selection
(for serial communication), parallel printing server mode or normal mode
adjusting , EPSON mode or 64character mode switching, Chinese Character
double byte mode or English character single byte mode selection.
Below are lists of DIP configurations:
Baud rate adjusting:
Baud Rate
DIP1
DIP2
Default
9600bps
OFF
OFF
▲
1920bps
OFF
ON
38400bps
ON
OFF
115200bps
ON
ON
DIP3
DIP4
Default
42
OFF
OFF
▲
48
OFF
ON
Reserved
ON
ON
53
ON
OFF
7
8
Character per line
Beep
4
5
6
DIP
4.10
2
3
4
5
E4
6
6
7
3
JA
ON
8
Disable
ON
Enable
OFF
Density
Default
▲
DIP6
Dark
ON
Light
OFF
Default
▲
4.11
08
1
ON
2
1
DIP5
Printing speed
DIP7
SLOW
ON
FAST
OFF
Default
Byte Mode
DIP8 Default
Double-Byte Mode ON
▲
SingleByte Mode
09
OFF
▲
4.8.3 Ethernet Interface
4.8 Interface Explanation
4.8.1 RS-232 Serial Interface
Ethernet port uses RJ45 port with 10M ability. Configurations are as below:
Signal configuration for communication with PC host:
PRINTER
SIDE
HOST
SIDE
(TXD) 2
(RXD) 3
3 (RXD)
2 (TXD)
(GND) 5
(DTR) 6
5 (GND)
6 (DSR)
(RTS) 8
8 (CTS)
Printer serial port is DB9, baud rate supports 9600, 19200, 38400, 115200 bps,
8 bits data word length, 1 stop bit, no parity settings.
Descriptions to interface signals:
Pin No.
Signal name
Direction
Function
1
-
-
-
2
TXD
Transmit Data
3
RXD
Output
Intput
4
-
-
-
5
GND
-
Signal Ground
6
DTR
Intput
Ready To Sen
7
-
-
8
RTS
Output
10
Description
TX+
Tranceive Data+
2
TX-
Tranceive Data+
3
RX+
Receive Data+
4
n/c
Not connected
5
n/c
Not connected
6
RX-
Receive Data-
7
n/c
Not connected
8
nc
Not connected
4.8.4 Drawer Connector Interface
6
1
Clear To send
USB port uses Type B plug and support USB1.0 and USB2.0. Signals are as
below:
Signal Name
VCC
DD+
GND
Signal Name
1
Receive Data
4.8.2 USB Interface
PIN
1
2
3
4
Pin No.
Direction
+ 5V DC
Data Data +
Ground
Pin No.
Signal name
1
Frame ground
-
2
-
-
3
Open cash drawer
Input
4
+24V
-
5
-
-
6
Signal ground
-
11
Direction