1
User Manual -
User Manual - Photobook PRO
060 677 289 A 10/2006
1
User Manual - Photobook PRO
- User Manual
2
060 677 289 A 10/2006
User Manual -
Contents
Safety...................................................................................................5
1. Warnings ...................................................................................................... 5
2. Electrical hazard .......................................................................................... 5
3. Moving the machine .................................................................................... 5
4. Installation conditions ................................................................................. 5
Using Photobook PRO.......................................................................7
1. Position of the user...................................................................................... 7
2. Using the Photobook PRO's control screen ............................................. 7
3. Realizing a photo book................................................................................ 8
3.1 Realizing a photo book with cover............................................................................... 8
3.2 Realizing a photo book without cover......................................................................... 9
3.3 Aborting the realization ............................................................................................... 9
4. Selecting the paper type ........................................................................... 10
5. Changing the user's language ................................................................... 11
7. Information about your machine ............................................................. 11
6. Cleaning the rollers ................................................................................... 11
Supplying glue...................................................................................13
1. Loading the glue roll.................................................................................. 13
2. Path of the glue strip ................................................................................. 15
3. Changing a finished glue roll..................................................................... 16
4. Changing the glue roll format .................................................................. 16
Appendix ...........................................................................................19
Compliance with FCC standards part 15 .................................................... 19
060 677 289 A 10/2006
User Manual - Photobook PRO
1. FCC as applies to PhotoBook PRO machines ............................................................ 19
2. FCC norm as applies to the bar code reader ............................................................. 20
3
User Manual - Photobook PRO
- User Manual
4
060 677 289 A 10/2006
User Manual -
Safety
1. Warnings
1. Access areas for the user do not require tools to access them. Only maintenance technicians approved by the manufacturer are authorized to access
areas requiring a tool.
2. Some parts can be heavy to handle like the glue magazine or the machine
itself.
3. Since the machine is not watertight, do not spill liquid over it.
2. Electrical hazard
Important: only maintenance technicians approved by the manufacturer are authorized to
open and/or dismantle the machine.
3. Moving the machine
The machine should not be moved when operating mode even switched on.
4. Installation conditions
The machine is intended for indoor use only.
Site requirements:
060 677 289 A 10/2006
5
User Manual - Photobook PRO
1. The machine should be installed near a main electrical outlet which should
remain accessible after the installation so that the user can disconnect it. This
main electrical outlet must be earth grounded to ensure proper operation and
personal safety to conform with current standards. If the main electrical oultlet
- User Manual
socket cannot be accessed, include an isolating switch, quickly and easily
accessible, with (as the outlet) the following characteristics: 100-240 V AC,
50/60 Hz. Power consumption should be: 100-240 V 4-2 A.
Note: the machine is disconnected from the power network by disconnecting the switch from
the outlet.
2. The machine should be placed on a dry, hard, stable and flat plane. Avoid
excessively humid areas.
3. The ambient temperature in the premises should be between + 10° C et
+ 40° C. Do not put the machine in areas exposed to direct sunlight (in front of
a window) or near heaters. Never place the machine near steam or oily vapours. The premises should be properly ventilated and the atmosphere cleaned with air filtration.
User Manual - Photobook PRO
4. The machine should not hinder traffic routes or public exits. Avoid areas
closed to stairs, escalators or lifts.
6
060 677 289 A 10/2006
User Manual -
Using Photobook PRO
Photobook PRO allows to realize photo books, with or without cover, from
photos arranged with the My Creativ' Album software.
To select the different options of Photobook PRO, use the screen and the
selection keyboard on the side of the machine.
1. Position of the user
To use Photobook PRO, face the side of the machine where are located the
screen and the selection keyboard. The back of the machine is then to your
left and the front is to your right.
2. Using the Photobook PRO's control screen
Once you've started the machine (thanks to the switch located on the back of
the machine), a welcome message automatically displays. Hit then any key to
access the 'Product selection' option of the main menu.
Use the and keys to move within a menu, the
to validate your choice
or the
key to cancel your choice and go back to the previous menu. The
different options available from the main menu are:
Product selection
Paper type/format selection
Language option
Cleaning
About...
Superuser mode
060 677 289 A 10/2006
7
User Manual - Photobook PRO
Note: the superuser mode is not accessible by endusers. Only technicians from Kis - photo-Me
Group are authorized to use it. This option requires a password to be accessed. If an erroneous
password is entered, the user will have to wait for a timeout to go back to the main menu.
- User Manual
3. Realizing a photo book
Select the 'Product selection' option from the main menu. Using the
and keys (and validating by hitting
solutions:
), choose among two
1. The realization of a photo book with cover ('Photo book product'
option);
2. The realization of a photo book without cover ('Photo book pro-
3.1 Realizing a photo book with cover
1. Put the photos in front of you without modifying their order or
flipping them, so that you can see the first one normally (landscape
view).
2. Since the 'Photo book product' option has been selected, the
machine initializes. The 'First photo upside down please' instruction
displays.
3. Take the first photo and flip it over from the left to the right (as
you turn a page when reading a book).
4. Put the photo in the loading zone (make sure it is well placed
against the limit stop).
5. Lightly push the photo downwards. A detector activates the rollers and the photo is automatically taken and processed.
6. The 'Following photo upside up please' instruction displays.
Insert then the next photo at the right side. Repeat this operation as
many times as there are photos.
Note: only the first photo must be flipped over, since this one corresponds to the
last photo of the album, the second one to the last photo but one, etc...The last
photo is used for the cover of the book.
User Manual - Photobook PRO
Note: Photobook PRO automatically detects that the last the last photo (the cover)
has been inserted since this one is longer than the others.
As soon as the book is finished, the 'Product available' instruction
displays on the screen. Open the cover of the machine, take the
photo book out of it, close the cover and hit the
key to continue.
8
060 677 289 A 10/2006
User Manual 3.2 Realizing a photo book without cover
1. 1. Put the photos in front of you without modifying their order or flipping
them, so that you can see the first one normally (landscape view).
2. Since the 'Photo book product without cover' option has been selected, the
machine initializes. The 'First photo upside down please' instruction displays.
3. Take the first photo and flip it over from the left to the right (as you turn a
page when reading a book).
4. Put the photo in the loading zone (make sure it is well placed against the
limit stop).
5. Lightly push the photo downwards. A detector activates the rollers and the
photo is automatically taken and processed.
6. The 'Finish product' instruction displays on the screen once the photo has
been processed. Do not take it into account until you've finished to insert the
photos and insert then the next photo at the right side. Repeat this operation
as many times as there are photos.
Note: only the first photo must be flipped over, since this one corresponds to the last photo
of the book, the second one to the last photo but one, etc...
Once you have finished you have finished to insert the photos, select 'Finish
product' by hitting the
key.
When the book is finished, the 'Product available' instruction displays on the
screen. Open the cover of the machine, take the photo book out of it, close
the cover and hit the
key to continue.
3.3 Aborting the realization
You can stop the realization of the book at any time. You can use two modes
to abort the realization.
Immediate abort of the realization
Use this abort mode when you realize in time (that means before the process
of the first photo has been completed) that you do not use the appropriate
glue roll or if you notice a dysfunction of the machine. You can then change
the glue format in the glue magazine and, once you have this, restart the realization of the book.
2. You can either change the glue rolls (see Changing the glue roll's format in
the Supplying glue section), and then continue the book's realization by hitting
the
key again, or confirm the immediate abort of the realization by hitting
the
key.
060 677 289 A 10/2006
9
User Manual - Photobook PRO
1. Hit the
key. The 'Immediate abort requested" instruction displays on the
screen and the machine freezes (but does not switch off).
- User Manual
3. If you confirm the immediate abort, you can then open the machine's cover
and remove the inserted photo from the rollers.
Note: when the machine is switched on, it is easier to rotate the rollers after having pulled
the inner plate forwards.
4. Hit the
key to go back to the 'Product selection' option.
Abort after processing of the last inserted photo
Use this abort mode when you realize too late that you do not use the appropriate glue roll. Photobook PRO will then process the last inserted photo and
the machine will make available the book not completed and without cover
(whatever the selected type of product) avoiding you this way to remove the
last inserted photo from the rollers.
1. Hit the
key. The 'Abort at the end of the page' instruction displays on
the screen and the machine completes the processing of the last photo.
2. Confirm the abort after page by hitting the
key.
key or cancel by hitting the
3. As soon as the last photo has been processed, the 'Product available' instruction displays on the screen. You can then open the machine's cover and
retrieve the not finished book.
4. Selecting the paper type
In the main menu, go to the 'Paper type/format selection' option and validate
your choice by hitting the
date your choice by hitting the
key. Select the desired paper type, then valikey.
User Manual - Photobook PRO
Note: in case you do not select a paper type, the machine will use the last used paper type
or the default one at the first use of the machine.
10
060 677 289 A 10/2006
User Manual -
5. Changing the user's language
In the main menu, go to the 'Language option' and validate your choice by
hitting
. Select 'Français' or 'English', then validate your choice by hitting
to go back to the main menu.
6. Cleaning the rollers
After a certain amount of uses, you may have to clean the rollers of the machine.
1. Go to the 'Cleaning' option in the main menu and validate your choice by
hitting the
key.
2. Then use the and keys to rotate the rollers to a direction or the reverse
direction until the cleaning position. The roller rotates an eighth revolution
each time you hit one of these keys.
3. Open the machine's cover to clean the rollers.
Note: the excess of glue that can remain on the silicone rollers (red ones) can easily and
simply removed with the finger. Nevertheless, you can use a cloth and the degreasing spray
(ref.: 060 677 573) if the excess of glue cannot be removed with the finger.
7. Information about your machine
To know about the serial number (SN), the production date and the machine
version, go to the 'About...' option in the main menu and validate your choice
by hitting the
key. This information is then displayed on the screen.
User Manual - Photobook PRO
060 677 289 A 10/2006
11
User Manual - Photobook PRO
- User Manual
12
060 677 289 A 10/2006
User Manual -
Supplying glue
The supply of glue, in the form of rolls, is done in the magazine located at
the back of the machine. A specific size of glue roll corresponds to each book
size.
Photobook PRO is delivered with as many cores (recipient rolls for the used
glue strip) as there are roll sizes. When a core is full, use the empty glue roll
as a new one.
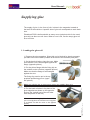
1. Loading the glue roll
1. Remove the glue magazine. Since this one is blocked by simple magnets,
just take hold of the handle (located at the back of the machine) and pull it.
2. On the back roll arbor, place the core. Make
sure that the core is well wedged against the
flange (opposite picture).
3. Put the pinion flange with the fixing clip on
the outside on the roll arbor (opposite picture).
Make sure that the flange is well wedged
against the core.
The fixing clip must be put in the appropriate positioning groove (opposite picture).
Note: each roll arbor has as many grooves as there are available album sizes.
4. Put the back roll arbor in its place of the
glue magazine as shown on the opposite
picture (the "naked" part of the roll arbor
must be placed on the left).
060 677 289 A 10/2006
User Manual - Photobook PRO
Note: a locator on the right of the roll arbor allows
you to correctly place the roll arbor in the magazine
(it is pointed out with the arrow on the opposite
picture).
13
- User Manual
5. On the fore-roll arbor, put the glue roll in such
a way that it unwinds underneath and forward
(opposite picture).
6. Put the second pinion flange and place the
fixing clip as you did on the back roll arbor.
7. Put the roll arbor in its place of
the glue magazine as shown on the
opposite picture.
Note: the blue arrow on the picture points
out the glue roll's unwind direction and the
black arrow points out the positioning and
the adhesive side of the glue strip.
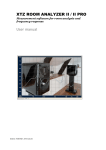
8. Make the leader (white part of
the beginning of the beginning of
the glue roll) go under the roller (1
on the opposite picture), then under
the grey roller (2 on the picture) and
then above the red roller (3 on the
picture).
User Manual - Photobook PRO
9. Put the magazine in vertical position, by putting it on its back part, in such a way that you
face the magazine's bottom. Rull the leader
downward and make it go under the grey roller
(1 on the opposite picture) and then until the
core located on the back roll arbor (2 on the
picture, see also next picture).
14
060 677 289 A 10/2006
User Manual -
10. Turn on the magazine (always in vertical position) in such a way that you can see its upper part.
Stick the beginning of the leader onto the core (red
arrow on the opposite picture). For this, use the
black scotch tape at the beginning of the leader.
11. Use the black flanges to make the core turn
upward (in the direction of the arrow on the picture).
12. When the leader cannot be seen anymore in
the fore-part of the machine (as on the picture below), the operation is completed. Put the magazine
back in place at the back of the machine.
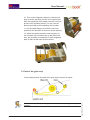
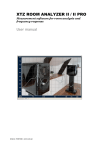
2. Path of the glue strip
In the drawing below, the path of the glue strip is colored in yellow.
060 677 289 A 10/2006
15
User Manual - Photobook PRO
Note: make sure of the positioning of the leader's end before putting back in place the
magazine.
- User Manual
3. Changing a finished glue roll
Follow the whole procedure (described in the Loading the glue roll chapter) to change the glue roll.
Reminder: keep each empty glue roll (see opposite picture),
and this for each roll size, so that you can use it as a new
core for next use at the same size.
4. Changing the glue roll format
You may have to change the glue roll
format before the roll in use is finished.
Note: the ideal situation is to have as many glue
magazines as used formats. This way, you only
need to change the glue magazine instead of
following this procedure.
1. Remove the glue magazine. Since
this one is blocked by simple magnets,
just take hold of the handle (located at
the back of the machine) and pull it.
2. Put the magazine in vertical position,
by putting it on its back part, in such a
way that you face the magazine's bottom.
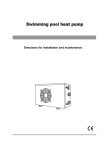
3. Cut the glue strip on all its width
thanks to a cutter lightly beneath the
grey roller (as shown on the opposite
drawing) so that you preserve your hands from the glue. Make sure you do
not cut the strip above.
User Manual - Photobook PRO
4. Rewind the glue roll and then the core.
16
060 677 289 A 10/2006
User Manual -
5. Load the magazine with the new glue roll
format and the appropriate core. Make sure
you respect the path of the glue strip.
Note: keep both rolls and mark the one which is
adhesive.
6. Stick approximately 10 cm of the glueless strip onto the adhesive side of the glue
strip (as between points A and B on the
opposite drawing). Do this approximately
where you cut.
7. Stretch the strip by rotating the rollers in
the direction shown on the drawing.
8. Put the magazine back in place at the
back of the machine.
User Manual - Photobook PRO
060 677 289 A 10/2006
17
User Manual - Photobook PRO
- User Manual
18
060 677 289 A 10/2006
Manuel Utilisateur -
Appendix
Compliance with FCC standards part 15
1. FCC as applies to PhotoBook PRO machines
FCC Norms (USA) / normes FCC (Etas Unis)
The United States Federal Communications Commission (in 47 CFR 15.105)
has specified that the following notice be brought to the attention of users of
this product:
This equipment has been tested and found to comply with the limits for a
Class B digital device, pursuant to part 15 of the FCC Rules.
These limits are designed to provide reasonable protection against harmful
interference in a residential installation. This equipment generates, uses and
can radiate radio frequency energy and, if not installed and used in accordance with the instructions, may cause harmful interference to radio communications.
However, there is no guarantee that interference will not occur in a particular
installation. If this equipment does cause harmful interference to radio or television reception, which can be determined by turning the equipment off and
on, the user is encouraged to try to correct the interference’s by one or more
of the following measures:
Reorient or relocate the receiving antenna. Increase the separation between
the equipment and the receiver.
Connect the equipment into an outlet on a circuit different from that to which
the receiver is connected.
Consult the dealer or an experienced radio/TV technician for help.
060 677 289 A 10/2006
19
Manuel Utilisateur - Photobook PRO
Pursuant to Part 15.21 of the FCC Rules, any changes or modifications to this
equipment not expressly approved by KIS may cause, harmful interference
and void the FCC authorization to operate this equipment.
- Manuel Utilisateur
2. FCC norm as applies to the bar code reader
Manuel Utilisateur - Photobook PRO
Notice This equipment has been tested and found to comply with limits for a
Class A digital device, pursuant to part 15 of the FCC Rules. These limits are
designed to provide reasonable protection against harmful interference when
the equipment is operated in a commercial environment. This equipment
generates, uses and can radiate radio frequency energy and, if not installed and used in accordance with the instruction manual, may cause harmful
interference to radio communications. Operation of this equipment in a residential area is likely to cause harmful interference, in which case the user will
be required to correct the interference at his own expense. Any unauthorized
changes or modifications to this equipment could void the user’s authority
to operate this device. This device complies with part 15 of the FCC Rules.
Operation is subject to the following two conditions: (1) This device may not
cause harmful interference, and (2) this device must accept any interference
received, including interference that may cause undesired operation. Notice
This Class A digital apparatus complies with Canadian ICES-003.
20
060 677 289 A 10/2006
User Manual -
This document is not binding. The manufacturer reserves
the right to modify his machines and this manual without
prior notice.
Document non contractuel. Le constructeur se réserve le
droit de modifier ses machines et le présent document
sans préavis.
User Manual Photobook PRO
Manuel Utilisateur Photobook PRO
Ref. 060 677 289 A
©Kis 10.2006
User Manual - Photobook PRO
060 677 289 A 10/2006
21