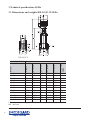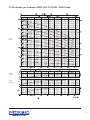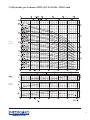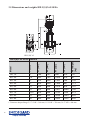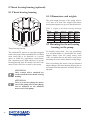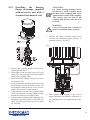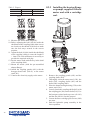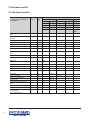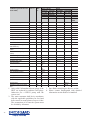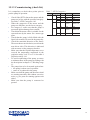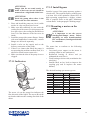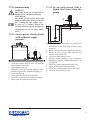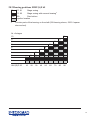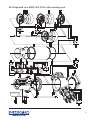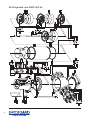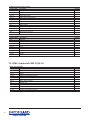
1
HIL MULTISTAGE VERTICAL CENTRIFUGAL PUMPS Technical Data Book Series: HIL 32/45/65 2 Table of Contents 1 Pump introduction 1.1 General .......................................................................................................................................................................... 7 1.2 Model key ..................................................................................................................................................................... 7 1.3 Description of the product ............................................................................................................................................ 8 1.4 Operation ...................................................................................................................................................................... 8 1.5 Working range ...............................................................................................................................................................9 1.6 Performance range 2-pole 50 Hz ................................................................................................................................ 10 2 Performance characteristics 2.1 Performance curve details ........................................................................................................................................... 11 2.2 Performance with variable frequency drive ................................................................................................................ 11 2.3 Performance characteristics HIL(S)(F) 2-pole 50 Hz ................................................................................................. 13 3 Technical specifications 50 Hz 3.1 Dimensions and weights HIL(S)F 32 50 Hz ............................................................................................................... 14 3.2 Hydraulic performance HIL(S)F 32 50 Hz ~2900 1/min ........................................................................................... 15 3.3 Dimensions and weights HIL(S)F 45 50 Hz ............................................................................................................... 16 3.4 Hydraulic performance HIL(S)F 45 50 Hz ~2900 1/min ........................................................................................... 17 3.5 Dimensions and weights HIL(S)F 65 50 Hz ............................................................................................................... 18 3.6 Hydraulic performance HIL(S)F 65 50 Hz ~2900 1/min ........................................................................................... 19 4 Materials 4.1 Overview of materials ..................................................................................................................................................20 4.2 Materials conversion ....................................................................................................................................................20 4.3 Mechanical seal specifications .....................................................................................................................................21 5 Connections 5.1 Suction and discharge connections (standard G and DIN) ......................................................................................... 22 5.2 Suction and discharge connections (optional ASME) ................................................................................................ 22 5.3 Suction and discharge connections (optional Rc and JIS) .......................................................................................... 23 6 Factory options 6.1 Factory options ........................................................................................................................................................... 24 7 Horizontal mounting kit (optional) 7.1 Horizontal mounting kit .............................................................................................................................................. 25 7.2 Mounting of motor flange support .............................................................................................................................. 26 7.3 Mounting of pump bracket support ............................................................................................................................ 27 7.4 De-aeration and draining of a horizontally mounted pump ........................................................................................ 27 8 Thrust bearing housing (optional) 8.1 Thrust bearing housing ............................................................................................................................................... 28 8.2 Mounting the thrust bearing housing on the pump ..................................................................................................... 28 3 9 Medium handled 9.1 Medium handled ......................................................................................................................................................... 32 10 Manual Introduction 10.1 Preface ...................................................................................................................................................................... 35 10.2 Icons and symbols ..................................................................................................................................................... 35 11 Identification, service and technical support 11.1 Obtaining data and information ................................................................................................................................ 36 11.2 Nominal current ........................................................................................................................................................ 37 12 Warranty 12.1 Terms of warranty ..................................................................................................................................................... 38 13 Safety and environment 13.1 General ...................................................................................................................................................................... 39 13.2 Users ......................................................................................................................................................................... 39 13.3 Safety provisions ...................................................................................................................................................... 39 13.4 Safety precautions ..................................................................................................................................................... 40 13.5 Environmental aspects .............................................................................................................................................. 40 14 Intended use 14.1 Intended use .............................................................................................................................................................. 41 15 Explosion safety 15.1 Explosion safety ........................................................................................................................................................ 42 16 Transport 16.1 Transport ................................................................................................................................................................... 44 16.2 Weight ....................................................................................................................................................................... 45 16.3 Storage ...................................................................................................................................................................... 45 17 Installation 17.1 Setting up the pump .................................................................................................................................................. 46 17.2 Mounting a motor on the pump ................................................................................................................................ 47 17.3 Electrical install ........................................................................................................................................................ 50 17.4 Commissioning ......................................................................................................................................................... 51 18 Operation 18.1 Operation .................................................................................................................................................................. 52 4 19 Maintenance 19.1 Introduction ............................................................................................................................................................... 53 19.2 Lubrication ................................................................................................................................................................ 53 19.3 Maintaining the pump for an extended period of non-operation .............................................................................. 53 20 Failures 20.1 Failure table .............................................................................................................................................................. 54 21 Standard HIL motors 21.1 General ...................................................................................................................................................................... 57 21.2 Specific adaptations .................................................................................................................................................. 57 21.3 Reinforced bearings .................................................................................................................................................. 57 21.4 Fixed axial play ......................................................................................................................................................... 58 21.5 High temperature grease ........................................................................................................................................... 58 21.6 Smooth shaft without keyway .................................................................................................................................. 58 21.7 Voltage range ............................................................................................................................................................ 59 21.8 Nominal current ........................................................................................................................................................ 59 21.9 Motor temperature ratings ........................................................................................................................................ 59 21.10 Rotational speed ...................................................................................................................................................... 61 21.11 Efficiency ................................................................................................................................................................ 62 21.12 Efficiency and cosine phi ........................................................................................................................................ 63 21.13 Number of starts ..................................................................................................................................................... 63 21.14 Terminal box position ............................................................................................................................................. 64 21.15 Related norms ......................................................................................................................................................... 64 21.16 Technical specifications .......................................................................................................................................... 65 22 Spare parts 22.1 Spare part kits ........................................................................................................................................................... 67 22.2 Recommended spare parts HIL(S)(C)(F)(V) ............................................................................................................ 68 23 Service tools 23.1 Service tool kits ........................................................................................................................................................ 70 24 Condensed repair instructions 24.1 General ...................................................................................................................................................................... 71 24.2 Replacement of standard mechanical seal HILV(S) ................................................................................................. 71 24.3 Replacement of mechanical cartridge seal HILV(S)F 32/45/65 ............................................................................... 72 24.4 Change of terminal box connection .......................................................................................................................... 72 25 Assembling and disassembling HIL(S)(C)(F)(V) 25.1 General ...................................................................................................................................................................... 73 25.2 Disassembling HIL(S) .............................................................................................................................................. 73 25.3 Assembling HIL(S) ....................................................................................................................................................74 25.4 Motor assembly and adjustment of the pump shaft HIL(S) ...................................................................................... 78 26 De-staging 26.1 De-staging a pump .................................................................................................................................................... 80 5 27 Torques 27.1 Torques (all pump types) .......................................................................................................................................... 81 28 Bearing positions 28.1 Bearing positions HIL(S)F 32/45 ............................................................................................................................. 82 28.2 Bearing positions HIL(S)F 65 .................................................................................................................................. 83 29 Sectional drawings 29.1 Sectional drawing HIL(S)F 32 .................................................................................................................................. 84 29.2 Sectional drawing HIL(S)F 32 with cartridge seal ................................................................................................... 85 29.3 Sectional drawing HIL(S)F 45 .................................................................................................................................. 86 29.4 Sectional drawing HIL(S)F 45 with cartridge seal ................................................................................................... 87 29.5 Sectional drawing HIL(S)F 65 .................................................................................................................................. 88 30 Exploded views 30.1 Exploded view motor ................................................................................................................................................ 89 30.2 Exploded view HIL(S)F 32/45 ................................................................................................................................. 90 30.3 Exploded view HIL(S)F 32/45 with cartridge seal ................................................................................................... 91 30.4 Exploded view HIL(S)F 65 ...................................................................................................................................... 92 31 Bill of materials 31.1 References in bill of materials .................................................................................................................................. 93 31.2 Bill of materials HIL(S)F 32/45 ............................................................................................................................... 93 31.3 Bill of materials HIL(S)F 65 .................................................................................................................................... 94 6 1 Pump introduction 1.1 General HILV(S) HILVCF 1.2 Model key Pump type HILS F 45 -50 -1 Materials HILV HIL Vertical pumps in AISI 304 (1.4301). HILVS HIL Vertical pump in superior grade AISI 316 (1.4401). HILVCF HIL Vertical pump with cast-iron pumpcasing for heavy duty applications. Pump connections Model / flow Stages / head Half stage impeller Oval counterflanges with female thread F Round flanges DIN, JIS or ASME. V Victaulic connection. Pump model indicates nominal flow in [m 3/h]. 45 -50 Indicates number of impeller stages (50 = 5). -1 Fitted with a half stage impeller (only HILV(S)F 45 7 1.3 Description of the product The vertical, single or multistage pump series HILV(S), HILVE, HILLHS and HILVCF are designed for pumping clean, watery liquids. Suction and discharge of the pump are in-line, making the pump easy to install. The hydraulic assembly is installed vertically and driven by an electric motor. All hydraulic parts of the pump (except for the suction/ discharge casing of the HILVCF) are made of stainless steel, making the pump light and extremely suitable for applications that demand high grade materials, such as drinking water applications. The HILV series is the standard vertical pump, available in various types. The HILVE is a compact vertical pump with a built-in nonreturn valve, especially designed for drinking water applications. The HILVCF is designed for industrial, heavy duty applications, such as boiler feed. The pump is initially designed for vertical installation, but can be installed horizontally by using a special adaptation set. 1.4 Operation The liquid is sucked in through the pump inlet (A) on the supply side under minimum pressure. The pump increases the pressure. The liquid leaves the pump through the pump outlet (B) on the delivery side under increased pressure. C D A 8 B E A B C D E Pump inlet Pump outlet Terminal box Fill plug/air relief plug Drain plug A B 1.5 Working range The working range of the pumps in this series can be summarised as follows: +4 to 40 Liquid temperature [°C] -15 to 100 Maximum working pressure [bar] 164 254 1 30 -15 to 120 164 2 254 20 254 10 15 40 Minimum supply pressure Not cavitating5. Cooling -15 to 120 0 5μ to 1mm Density liquid [kg/m3] 25 5 Allowable size of solids pumped Viscosity liquid [cSt] Q [%] Ambient temperature [°C] HILVCF HILVSF/V HILVS HILV Pump type HILVF/V Table 1: Specification of the working range 5. Contact Smedegaard for more detailed advice. 6. For standard motors see the technical specifications. When the pump is fitted with another motor band, please consult the motor supplier. 7. Pumps that are intended for 50Hz operation, may not be connected to 60Hz. A higher density may require more motor power.5 The space above the cooling fan of the motor must at least be equal to 1/4 of the diameter of the inlet of the cooling fan of the motor in order to have a sufficient supply of air. Number of starts Related to the motor6 Minimum frequency [Hz] 10 Maximum frequency [Hz] 607 1. Using the factory option "O-Ring sealing EPDM E425" the max. temp. limit is 120oC. 2. When pumping water, the max. allowable liquid temp is 80oC. 3. Higher temperatures are possible at lower pressure. For specific limits contact Smedegaard. 4. The total of the supply pressure and no-load delivery pressure with closed outlet shut-off valve may not exceed the maximum working pressure. 70 80 90 100 110 120 Minimum volume flows (Q), in % of Q, at optimum temperatures (t). Table 2: Minimum volume flows (Qmin) 50 Hz 60 Hz Qmin in m3/h 1 1000 60 t [°C] HIL A higher viscosity may require more motor power.5 50 32 4.0 4.0 45 4.6 5.1 65 6.1 6.1 Table 3: Specific applications type application area HILV (Drinking) water supply systems, irrigation systems, water treatment systems, carwash systems, sprinkler systems. HILVS Water-supply systems for drinking water, softened and demineralised water, systems for brackish water, sea water and swimming-pool water, however limited with respect to temperature, pressure and chlorine percentage. HILVCF Systems for boiler supply and discharge of condensed water HILHS Reverse osmosis installations and high pressure cleaning systems. 9 1.6 Performance range 2-pole 50 Hz 5 4 500 US .gpm 10 IM.gpm 5 20 30 10 40 20 50 30 40 100 50 200 300 100 200 400 1000 300 200 500 400 100 300 200 50 HILV 45 40 100 30 HILV 32 HILV 65 20 50 40 10 30 20 5 ft 4 10 3 H [m] 2 3 Q[m /h] 1 0.3 10 0.4 2 0.5 3 4 1 5 l/s 10 2 20 3 4 5 30 40 10 50 80 20 2 Performance characteristics 2.1 Performance curve details The preceding diagrams give a global overview of all the pump models mentioned in this documentation. Detailed characteristics are given for each model showing the hydraulic efficiency, NPSHreq, and shaft power. 2.2 Performance with variable frequency drive The minimum frequency of the HIL motor should be limited to 10 Hz to ensure sufficient cooling. When the rotational speed exceeds the nominal speed of the motor, make sure that the power output of the motor is suitable to drive the corresponding pump model. The performance of the pump depends on the number of stages. The number of stages are shown as a multiple of 10, as per example: HILV 32-60 HILVF 45-50-1 6 full stage impellers 5 full stage impellers and 1 half stage impeller The detailed performance curves are in accordance with ISO 9906 Annex A. Vibration limits at rated speed and rated flow are according to ISO 9905. The motors used for the measurements are standard HIL. When using another motor brand the performance data, like Q/H, efficiency and shaft power must be corrected accordingly. The characteristics given are based on: • De-aerated water at a temperature of 20 °C • Density of 1.0 kg/dm3 • Kinematical viscosity of 1 mm2/s (1 cst) To prevent the pump from overheating, gathering gas, cavitation etc. a minimum flow has to be ensured. The minimum flow corresponds to a percentage of the optimum flow Qopt in relation to the temperature of the liquid pumped. 11 12 2.4 Performance characteristics HILV(S)(F) 2-pole 50 Hz US.gpm 5 4 500 5 10 IM.gpm 20 30 10 40 20 50 30 40 100 50 200 300 100 200 400 1000 300 200 500 400 100 300 200 50 HILV(S)F 45 40 100 30 HILV(S)F 32 HILV(S)F 65 20 50 40 10 30 20 5 ft 4 10 3 H [m] 2 3 Q[m /h] 1 0.3 0.4 2 0.5 3 4 1 10 5 l/s 2 20 3 4 5 30 40 10 50 80 20 13 3 Technical specifications 50 Hz 3.1 Dimensions and weights HILV(S)F 32 50 Hz HILV(S)F 32 P [kW] E2 [mm] F1 [mm] F2 [mm] Net weight [kg] 32- 10 2.2 176 136 733 458 61 32- 20 4 233 162 830 506 81 32- 30 5.5 233 162 904 575 89 32- 40 7.5 233 162 980 623 96 32- 50 11 315 206 1279 777 167 32- 60 11 315 206 1327 825 169 32- 70 15 315 206 1376 874 186 32- 80 15 315 206 1424 922 188 32- 90 18.5 315 206 1517 971 205 32- 100 18.5 315 206 1565 1019 208 32- 110 18.5 315 206 1614 1068 210 32- 120 22 350 225 1711 1116 248 E1 [mm]1 Model HILV(S)F 32 50 Hz General 1. Diameter adapter flange 5.5-7.5 kW = 300 mm, 11-22 kW = 350 mm, 30-37 kW = 400 mm 14 3.2 Hydraulic performance HILV(S)F 32 50 Hz ~2900 1/min Pump Pressure Pump Efficiency 15 3.3 Dimensions and weights HILV(S)F 45 50 Hz HILV(S)F 45 F2 [mm] Net weight [kg] 176 233 233 233 315 315 315 315 315 315 315 350 350 400 400 400 400 400 400 400 F1 [mm] 2.2 4 5.5 7.5 11 11 11 15 15 18.5 18.5 22 22 30 30 30 30 37 37 37 E2 [mm] P [kW] 45- 10-1 45- 10 45- 20-1 45- 20 45- 30-1 45- 30 45- 40-1 45- 40 45- 50-1 45- 50 45- 60-1 45- 60 45- 70-1 45- 70 45- 80-1 45- 80 45- 90-1 45- 90 45- 100-1 45- 100 E1 [mm]1 Model HILV(S)F 45 50 Hz General 136 162 162 162 206 206 206 206 206 206 206 225 225 290 290 290 290 290 290 290 733 782 855 883 1182 1182 1230 1230 1279 1323 1371 1420 1469 1524 1572 1572 1621 1621 1669 1669 458 458 526 526 680 680 728 728 777 777 825 825 874 874 922 922 971 971 1019 1019 62 80 88 92 164 164 166 180 182 198 200 236 238 311 314 314 316 330 332 332 1. Diameter adapter flange 5.5-7.5 kW = 300 mm, 11-22 kW = 350 mm, 30-37 kW = 400 mm 16 3.4 Hydraulic performance HILV(S)F 45 50 Hz ~2900 1/min Pump Pressure Pump Efficiency 17 3.5 Dimensions and weights HILV(S)F 65 50 Hz HILV(S)F 65 P [kW] E2 [mm] F1 [mm] F2 [mm] Net weight [kg] 65- 10 3 194 147 886 570 78 65- 20 5.5 233 162 1008 679 97 65- 30 11 315 206 1300 798 104 65- 40 11 315 206 1389 887 173 65- 50 15 315 206 1478 976 191 65- 60 15 315 206 1567 1065 194 65- 70 18.5 315 206 1700 1154 213 65- 80 22 350 225 1838 1243 252 65- 90 30 400 290 1982 1332 255 E1 [mm]1 Model HILV(S)F 65 50 Hz General 1. Diameter adapter flange 5.5-7.5 kW = 300 mm, 11-22 kW = 350 mm, 30-37 kW = 400 mm 18 3.6 Hydraulic performance HILV(S)F 65 50 Hz ~2900 1/min Pump Pressure Pump Efficiency 19 4 Materials 4.1 Overview of materials Pos. nr. Description HILV HILVS HILVCF Pump casing 1.4301 1.4404 JL 1040 HILHS 1.4408 101 108 Stage casing 1.430 1.4404 1.4301 1.4404 160 Cover 1.4301 1.4404 1.4301 1.4404 1.4404 1.4404 1.4401 1.4301 1.4301 1.4305 1.4404 1.4401 1.4404 JL 1040 1.4301 1.4404 Viton EPDM E425 171 Diffuser 10-6 Pump shroud 1.430 210 Shaft 230 Impeller 1.4305 1.430 341 Motor stool 412 O-ring 525 Spacer sleeve 5 29 Bearing sleeve 1 ) B earing 890 Base plate 903 Vent plug EPDM 1.430 1.4408 1.4401 1.4301 Tungsten-carbide Viton 1.4404 Ceramic JL 1040 Brass 905 Tie bolt AISI316 1.4057 913 Vent plug AISI913 920 Nut 932 Circlip 1.4301 AISI316 1.4404 1.4301 1.4571 1.4404 1. The bearing has no pos.nr. because it is a fixed part of the stage casing (108) or diffuser (171) 4.2 Materials conversion Material Description Code and material nr. Standard JL 1040 Cast iron GJL-250 EN 1561 A48:40B 1.4301 Chromium-nickel steel X5CrNi18-10 EN 10088 A276:304 1.4404 Chromium-nickel-molybdenum steel X2CrNiMo 17-12-2 EN 10088 A276:316L 1.4408 Chromium-nickel-molybdenum cast steel GX5CrNiMo 19-11-2 EN 10213 A743CF8M 1.4571 Chromium-nickel-molybdenum steel X6CrNiMoTi17-12-2 EN 10088 A276:316Ti A276:431 1.4057 Chromium-nickel steel X17CrNi16-2--QT800 EN 10088-3 1.4305 Chromium-nickel steel X8CrNiS 18-9 EN 10088 A276:303 1.4401 Chromium-nickel-molybdenum steel X5CrNiMo 17-12-2 EN 10088 A276:316 1.4308 Chromium-nickel cast steel GX5CrNi 19-10 EN 10283 A743:CF8 1.4460 Chromium-nickel-molybdenum steel X3CrNiMoN 27 5 2 EN 10088 --:329 1. Note: The indication of the material designations to ASTM / AISI is not binding 20 ASTM / AISI1 4.3 Mechanical seal specifications Pump series HILV(F)(V) HILVS(F)(V) HILVCF HILVF 32, 45 > 7.5 kW HILVF 65 HILVSF 32, 45 > 7.5 kW HILVSF 65 HILVCF 32, 45 > 7.5 kW HILVCF 65 Mechanical seal type Max. pressure 1000 kPa 1000 kPa 1000 kPa 1000 kPa Dynamic part Carbon Carbon Carbon Carbon Static part Silicon carbide Elastomer EPDM Silicon carbide Viton Silicon carbide EPDM Silicon carbide Viton Max. pressure 2500 kPa Silicon carbide 2500 kPa 2500 kPa 2500 kPa 2500 kPa 2500 kPa Silicon carbide Tungsten carbide Silicon carbide Tungsten carbide Static part Carbon Carbon Carbon Silicon carbide Carbon Carbon Carbon Elastomer EPDM Viton EPDM E425 EPDM Viton EPDM E425 Dynamic part Max. pressure Dynamic part 21 5 Connections 5.1 Suction and discharge connections (standard G and DIN) Pump model key HILV(S)F HILV(S)V HILVCF Connection Round sliding flange Stub end fitting on Victaulic coupling Round flange ridged cast to pump casing Norm DIN EN 1092-2 PN 25 - DIN EN 1092-2 PN25 Pressure class PN 2 5 HILV(S/C)F 3 DN 65 - DN 65 HILV(S/C)F 4 DN 80 HILV(S/C)F 6 DN 1001 - DN 80 DN 100 1. PN 16 5.2 Suction and discharge connections (optional ASME) Pump model key HILV(S)F Connection Round sliding flange Norm ASME B 16.1 cl.250 Pressure class HILV(S)F 32 HILV(S)F 45 HILV(S)F 65 1. class 125 22 2½” 3” 4”1 5.3 Suction and discharge connections (optional Rc and JIS) Pump model key Connection Norm Pressure class HILV(S)F 32 HILV(S)F 45 HILV(S)F 65 HILV(S)F Round sliding flange JIS B2238 16 K JIS 65 JIS 80 JIS 100 23 6 Factory options 6.1 Factory options Description: Applicable model: Standard: Options HILV HILVS EPDM Viton Viton HNBR Sealing: Sleeve and stage O-rings: E425 EPDM EPDM M e ch an ic al s ea l : HILV Ca/Sic/EPDM SiC/Ca/EPDM HILVS Ca/SiC/Viton SiC/Ca/Viton HILVCF Tuc/Ca/EPDM Ca/SiC/EPDM SiC/Ca/EPDM Ca/SiC/Viton Sic/Ca/Viton Tuc/Ca/EPDM SiC/SiC/EPDM SiC/SiC/Viton TuC/TuC/Viton TuC/TuC/HNBR Mechanical: Vent and drain plugs AISI 316 HILV Vent and drain plugs brass Vent and drain plugs AISI 316 Safety vent plug AISI 316 All Standard vent plug Safety vent plug AISI 316 Color finish All Pump and motor RAL 5001 RAL 3000 (fire red) De-staging Intermediate impeller stage Stage without impeller DIN flanges A ll HILV Oval flange PN 16 Round flange DIN PN 25 JIS flanges HILVF Round flange DIN PN 25 Round flange JIS PN 25 ASME flange s HILVF Round flange DIN PN 25 Round flange ASME B 16.1 cl. 250 Motor: High efficiency motor 3 phase 2-pole 2.2 kW - 37 kW Eff class 2 Eff class 1 / IE2 Anti condensation heater Multipin Plug Connector Rain cover 3 phase 2.2 kW - 37 kW None With anti condensation heater 1~230 V Rain cover on fan hood 3 phase 2.2 kW - 37 kW 2.2 kW - 37 kW None PTC thermistors None With 3 PTC thermistors Harting stecker 3 phase 2.2 kW - 37 kW None Cable connection provided with 10-pole Harting stecker 9h 0h, 3h, 6h Connection box position 2.2 kW - 37 kW Increased motor power 2.2 kW - 37 kW Standard motor power One step higher motor power Enlarged motor lantern 2.2 kW - 37 kW Standard motor lantern Motor lantern to fit one step higher motorpower Winding configuration 3 phase 2.2 kW 3 phase 3 kW - 37 kW 230 / 400 V 400 / 692 V 400 / 692 V 230 / 400 V 3 phase 2.2 kW - 37 kW 400 V Y or ' 500 V Y or ' Winding Voltage 24 3 phase 7 Horizontal mounting kit (optional) 7.1 Horizontal mounting kit In special applications it could be a solution to mount the pump in a horizontal position. Although the pump is designed for vertical mounting the hydraulic parts of the pump are also capable of functioning in a horizontal position. This option is limited by the motor rating. The motors of 11kW and above are equipped with a co-axial bearing which is not suitable for horizontal mounting. To ensure a proper and stable horizontal mounting for the pump, stainless steel AISI 304 support brackets are available. To mount the support brackets, bolts up to a maximum of M12 can be used. Pump bracket support The horizontal mounting kit includes the following parts: 7.1.1 Dimensions of pumps fitted with horizontal mounting kit • Pump bracket support • Motor flange support • 4 bolts M12 • 4 washers 12mm • 4 nuts M12 Dimensions are related to the dimensions of the complete pump in standard vertical position and are in [mm]. HILV(S)(C)F 32/45 D = 137 HILV(S)(C)F 65 D = 172 Motor [kW] Art. nr. C 1.5 2.2 18707041 F2+47 3 4 18707042 F2+39 5.5 7.5 18707043 F2-17 H A B 170 210 180 Weight [kg] 4.00 3.90 Motor flange support 25 7.2 Mounting of motor flange support 7.2.1 Motor flanges 2.2kW to 4kW The motor flange support can be mounted to the pump using the original bolts, washers and nuts of the motor flange. To mount the motor flange support to the motor flange, proceed as following: ATTENTION The direction for mounting the support flange to motors with a motor rating of 2.2kW to 4kW is opposite to the direction for mounting the support flange to motors with a motor rating of 5.5kW to 7.5 kW (see illustration of the motor flange). ATTENTION For de-aeration purposes make sure that the fill/air vent plug is at the top side of the pump when mounting the bracket kit to the pump. 1 Remove the bolts from the side of the motor flange to which the support is to be mounted. 2 Position the motor flange support at the motor flange. Make sure that the slots for mounting the motor flange support to the floor are placed in the direction of the motor! 3 Put the original bolts back in place and fasten the bolts with the required torque. 2.2kW Motor flange B14 (rating 0.37kW to 4kW) 26 7.2.2 Motor flanges 5.5kW to 7.5kW To mount the motor flange support to the motor flange, proceed as following: 1 Remove the bolts from the side of the motor flange to which the support is to be mounted. 2 Position the motor flange support to the motor flange. Make sure that the slots for mounting the motor flange support to the floor are placed in the direction of the pump! 3 Put the original bolts back in place and fasten the bolts with the required torque. 7.4 De-aeration and draining of a horizontally mounted pump 7.4.1 De-aerating Due to the horizontal position of the pump, the pump can only be de-aerated properly when at least 5% of the maximum flow capacity of the pump is available in the circuit. To de-aerate the horizontally mounted pump proceed as described in the installation and operating instructions. 7.4.2 Draining To drain a horizontally mounted pump, the pump must be removed completely from the system and be put in it’s original vertical position. After the pump has been removed proceed as descibed in the installation and operating instructions ATTENTION For supplementary information about de-aerating and draining the pump please consult the installation and operating instructions supplied with the original pump. Motor flange B5 (rating 5.5kW to 7.5kW) 7.3 Mounting of pump bracket support The pump bracket support can be mounted to the pump foot using the bolts, washers and nuts supplied with the bracket kit for horizontal mounting. Proceed as following: 1 Position the pump bracket support at the pump foot, make sure that the slots for mounting the pump bracket support to the floor are directed towards the outside of the pump foot! 2 Put the bolts, washers and nuts supplied with the bracket kit in place and fasten them with the required torque. 27 8 Thrust bearing housing (optional) 8.1 Thrust bearing housing 8.1.1 Dimensions and weights. The total height increase of the pump will be 113.5 mm / 4.47 inch. The weight of the thrust bearing housing kits are given in the table below: Table 4: weight of the thrust bearing housings kits Frame size Thrust bearing housing The standard HIL motors are specially designed to drive the pump. When a standard IEC or NEMA norm motor has to be installed (or a special motor to fulfill the applications requirement, like explosion proof, high efficiency) a special bearing housing must be installed to relieve the motor of the axial force created by the pump. ATTENTION Only a motor with a standard key can be installed with a thrust bearing housing. ATTENTION There is no need to change the motor stool of the pump. The bearing flange can be mounted on the standard motor stool of the pump. 28 Motorshaft Kit art. nr. Weight [kg] Weight [lbs] 132 38 18708020 7.97 17.57 160 42 18708021 8.25 18.19 180 48 18708022 9.30 20.50 200 55 18708023 9.44 20.81 8.2 Mounting the thrust bearing housing on the pump To simplify motor shaft / key way positioning it is recommendable to disassemble the motor adapter flange from the pump motor stool (341) and mount this on the motor itself before mounting the motor on the thrust bearing flange. Prior to mounting the motor (with pre-mounted adapter flange), the thrust bearing housing has to be installed and the hydraulic assembly has to be adjusted. 8.2.1 Installing the bearing flange on pumps, supplied without motor and with a standard mechanical seal. ATTENTION For thrust bearing housings meant for motors of 11kW or higher, block the shaft of the coupling (840) when adjustments are made to the coupling. This ensures that the shaft of the coupling (840) will not come out of its bearings. WARNING Correct seal tension max. -1 mm lower than the maximum upper position! 7. Position the pump assembly 1mm lower (A) than the maximum upper position as mentioned earlier (See fig. 1). Fig 1. 1. Remove the coupling guards (681) and the coupling shells (862). 2. Thoroughly clean the motor stool (341), the shaft (210), the coupling shell (862) and the shaft of the coupling (840). 3. Place the thrust bearing housing (354) on the motor stool (341). 4. Loosely fasten the coupling shells (862) with the coupling pin (560) on the shaft (210). Use the hexagon socket head cap screw (914.01) and the nut (920.01) for this purpose. 5. Tighten the lower bolts of the coupling shells (862) so far that the coupling slightly clamps around the shaft of the coupling (840). 6. Lift the pump assembly and coupling to the maximum upwards position and mark the shaft. For this purpose put a tyre lever under the coupling. 8. Fully tighten the coupling to the correct torque and make sure that the clearances of the coupling halves are equally divided (See fig. 2). 29 Table 5: Torques Material Dimensions Torques[Nm] Cast iron M8 30 Cast iron M10 70 8.2.2 Installing the bearing flange on pumps, supplied without motor and with a cartridge seal. Fig 2 9. Measure the motor shaft (length X). 10. Before adjusting the bolt (914.06) inside the shaft bush of the coupling (840) make sure to use loctite on the thread of the bolt to make sure the bolt stays secured in the correct position. 11. Adjust the bolt (914.06) inside the shaft bush of the coupling (840) to create the length X + 1mm. This extra millimeter is necessary to provide the required axial play. 12. Put the motor shaft with the key in the shaft of the coupling (840). 13. Mount the motor (with the pre-assembled adapter flange). 14. Attach the coupling guards (681) with the hexagon head bolts (901.01) to the motor stool(341). 15. Connect the electricity supply to the motor. 30 1. Remove the coupling guards (681) and the coupling shells (862). 2. Thoroughly clean the motor stool (341), the shaft (210), coupling shells (862) and the shaft of the coupling (840). 3. Place the thrust bearing housing (354) on the motor stool (341). 4. Loosely fasten the coupling shells (862) with the coupling pin (560) on the shaft (210). Use the hexagon socket head cap screw (914.01) and the nut (920.01) for this purpose. 5. Loosen the three cartridge grub screws (904) one turn. 6. Push the hydraulic pump assembly in the lowest position. 7. Tighten the three cartridge bolts (904) firmly to the shaft. 8. Tighten the lower bolts of the coupling shell (862) so far that the coupling slightly clamps around the shaft of the coupling (840). 9. Lift the pump assembly and coupling to the maximum upwards position and mark the shaft. For this purpose put a tyre lever under the coupling. ATTENTION For thrust bearing housings meant for motors of 11 kW or higher, block the shaft when adjustments are made to the coupling. This ensures that the shaft will not come out of its bearings. WARNING Correct seal tension max. -1 mm lower than the maximum upwards position! 10. Position the pump assembly 1mm lower (A) than the maximum upwards position as mentioned earlier (See fig. 1). 11. Fully tighten the coupling to the correct torque (see point 8 of the previous paragraph) and make sure that the clearances of the coupling halves are equally divided. (See fig.2). 12. Measure the motor shaft (length X). 13. Before adjusting the bolt (914.06) inside the shaft bush of the coupling (840) make sure to use loctite on the thread of the bolt to make sure the bolt stays secured in the correct position. 14. Adjust the bolt (914.06) inside the shaft bush of the coupling (840) to create the length X + 1mm. This extra millimeter is necessary to provide the required axial play. 15. Put the motor shaft with the key in the shaft of the coupling (840). 16. Mount the motor (with the pre-assembled adapter flange). 17. Attach the coupling guards (681) with the hexagon head bolts (901.01) to the motor stool (341). 18. Connect the electricity supply to the motor. 31 9 Medium handled 9.1 Medium handled Substances (see special conditions given at the end of the table) Content- Temp. Mechanical seal and elastomer variant max % Max PN 10 / PN 25 PN 25 PN 25 °C BQ1EGG BQ1VGG U3U3X4GG U3U3VGG U3BEGG Ca / SiC Ca / Sic TuC / TuC TuC / TuC TuC / Ca Q1BEGG Q1BVGG Alkaline (bottle rinsing) (pH 9.5) Alkaline (metal degreasing) (pH 9.5) 10 Alcohol (ethanol) Alum 3 SiC / Ca SiC / Ca EPDM Viton HNBR Viton 80 - - - HILV 1) EPDM E425 - 80 - - - HILVS - 60 HILV - - - - 80 - HILVS - - Aluminium sulphate 5 60 - - - HILV 1) - Ammonium chloride (salmiac) 25 30 HILVS - - - - Ammonium sulphate 20 30 HILV 1) - - - - Antifreeze (glycol base), salt– free HILV - - - - Antifreeze (halogen–free) 4) HILV - - - - HILV 1) HILV 1) - - - - - - - - HILV - - - - Bicarbonate of ammonia 10 40 Buttermilk 80 Butyl alcohol (butanol) 60 Calcium acetate 10 60 HILVS - - - - Calcium nitrate (non–acidic) 10 60 - - - HILV - 40 HILV 1) - - - - Cider Citric acid 25 30 - HILV 1) - - - Copper sulphate 10 80 - HILV 1) - - - HILV 1) - - - - HILV 1) - - - HILV 1) - - - - Crude oil condensate 4) Crude oil 4) 80 Deionised water (demineralised) Diesel oil (light, extra–light) 80 - HILV - - - Ethanol (alcohol) 60 - - - - Ethylene glycol/diethylene glycol (salt–free) 100 HILV HILV - - - - Ferric sulphate (II) 32 10 80 HILV Substances (see special conditions given at the end of the table) Content- Temp. Mechanical seal and elastomer variant max % Max PN 10 / PN 25 PN 25 PN 25 °C BQ1EGG BQ1VGG U3U3X4GG U3U3VGG U3BEGG Ca / SiC Ca / Sic TuC / TuC TuC / TuC TuC / Ca Q1BEGG Q1BVGG Glycerin 40 Glycol (salt–free) 100 Hexan 40 Isopropyl alcohol (2–propanol) 80 Kerosene 100 Lactic acid 40 Liqueur 60 60 Magnesium sulphate 10 80 Maleic acid 10 60 Corn oil 100 Cutting oil 100 Hydraulic oil 80 Linseed oil 60 Linseed oil + 3 % H2SO4 60 Lubricating oil 100 Mineral oil 80 Peanut oil Rapeseed oil 100 Salad oil 100 Silicon fluid 60 Soybean oil 100 Turpentine oil 60 Turbine oil (no SDF oils) 100 Vegetable oils (free from H2SO4) Oxalic acid 5 20 Paraffin(s) 4) Petroleum (without solids) Phosphoric acid 80 5 20 Polyethylene glycol 80 Polyglycols 80 Potassium bicarbonate 10 60 Potassium carbonate 25 60 Potassium hydroxide 5 60 Potassium nitrate 10 30 Potassium sulphate 3 20 Soda lye 10 60 Sodium carbonate 6 60 Propyl alcohol 80 SiC / Ca SiC / Ca EPDM Viton HNBR Viton EPDM E425 HILV HILV HILV - - - - - - - HILV - - - HILV HILV 1) HILV HILV HILVS HILV 1+3) HILV 3) HILV 3) HILVS HILV 3) HILV 3) HILV 3) HILV 3) HILV 3) HILV 3) HILV 1+3) V 3) HILV 4) HILV 4) - - - HILV 1) HILV HILV HILV - - - - - - - - - - HILV 3) - - - - - HILV HILV HILV HILVS - - - - - - HILV - - - - HILV 1) HILV 1) HILV 1) HILV 1) HILV 1) 33 Substances (see special conditions given at the end of the table) Content- Temp. Mechanical seal and elastomer variant max % Max PN 10 / PN 25 PN 25 PN 25 °C BQ1EGG BQ1VGG U3U3X4GG U3U3VGG U3BEGG Ca / SiC Ca / Sic TuC / TuC TuC / TuC TuC / Ca Q1BEGG Q1BVGG Sodium sulphate (non–acidic) 5 Spirits SiC / Ca SiC / Ca EPDM Viton HNBR Viton 60 HILV 1) - - - EPDM E425 - 60 HILV - - - - Sulphuric acid 5 30 - HILVS 3) - - Tannic acid 20 80 - HILV 1) - - - Tartaric acid 8 60 - HILV 1) - - - Trisodium phosphate 4 80 - - HILV 1) - - 60 - - - - 60 HILVS HILV 1) HILV - - - - - - - - Turpentine (oil) Vinegar (wine vinegar) Wine (white, r ed) 10 40 Water: Water/glycol mixture (salt–free with inhibitors) HILV - - - - boiler feed water, fully desalinated HILV 2) - - - HILVCF 2) boiler feed water, partly desalinated) HILV 2) - - - HILVCF 2) boiler water (pH < 11.5) HILV 2) HILVS 2) - - - condensate - - - HILVCF 2) - cooling water - - - decarbonised water - - HILV 1) HILV 1) - - deionised water HILV 1) - - - - distilled water HILV 1) - - - - drinking water HILV - - - - fully desalinate d water - - - - heating water HILV 1) HILV - - - - HILV 1) - partly desalinated water - - pure water (chemically neutral) HILV 1) - - - - rinsing water - - - HILV 1) - - - - HILVS - seawater (continuous operation) 25 1. Only valid if all standard (brass) plugs of the HILV are replaced by stainless steel plugs. Otherwise use a HILVS pump with the correct seal. 2. The water treatment shall be in accordance with the applicable guidelines for feed and boiler water in steam plants of up to 64 bar. The penetration of air into the system must be avoided by all means. 34 - 3. Pure fluids containing no abrasive solids. 4. Please contact Smedegaard with detailed information on the fluid to be handled! 10 Manual Introduction 10.1 Preface This manual contains important information for reliable proper and efficient operation. Compliance with the operating instructions is of vital importance to ensure reliability and a long service life of the product and to avoid any risks. ATTENTION Is used to introduce safety instructions whose non-observance may lead to damage to the product and its functions. The first chapters contain information about this manual and safety in general. The following chapters provide information about normal use, installation, maintenance and repairs of the product. The annexes contain the technical data, the parts drawings and the declaration(s) of conformity. E N V I R O N M E N T A L INSTRUCTION Remarks with respect to the environment. • • • • Make yourself familiar with the content. Accurately follow the directions and instructions. Never change the sequence of the operations to be carried out. Keep this manual or a copy of it together with the logbook in a fixed place near the product which can be accessed by all personnel. 10.2 Icons and symbols In this manual and in all accompanying documentation the following icons and symbols are used. WARNING Danger of electric Voltage. Safety sign according to IEC 417 - 5036 WARNING Operations or procedures, if carried out without caution, may cause personal injury or damage to the product. General hazard sign according to ISO 7000-0434 35 11 Identification, service and technical support 11.1 Obtaining data and information The name plate indicates the type series / size, main operating data and identification number. Please quote this information (first two lines*) in all queries, repeat orders and particularly when ordering spare parts. If you need any additional information or instructions exceeding the scope of this manual or in case of damage please contact Smedegaard Pumps nearest customer service centre. Q: H: I nom: Ser.Nr: P: n: Q: H: P.req: Ser.Nr: P: n: Pump without motor H nom Pump with motor Q nom Indication HILV 32-40 Serial number* S: / ser.nr. 19/2004/234567 Ca / Sic / EPDM PN Meaning Pump type* 19 Production week* 2004 Production year* 234567 Product identification (as built file)* Ca Rotating part mechanical seal (Carbon)* Sic Stationary part mechanical seal (Siliconcarbide)* EPDM Static sealing, O-rings (EPDM)* 10 Pressure class (flange) connection* 3 Q m /h - l/sec. - USGPM Nominal capacity (see Q/H curve above) H mWc - PSI Nominal head (see Q/H curve above) Inom1 A Nominal current ( see 2.2) n 1 Nominal rotation speed P kW - HP Installed motor power on the pump Preq kW - HP Required motor power for the pump /min 1. For pumps delivered with special motors no values are given (please use values as indicated on the motor plate). 36 The following address data are available for service and technical support: Smedegaard Pumps Ltd United Kingdom Tel. +44 (0)1278 458 686 Fax +44 (0)1278 452 454 [email protected] www.smedegaard.co.uk T. Smedegaard A/S Denmark Tel. +45 43 96 10 28 Fax +45 43 63 17 66 [email protected] www.smedegaard.dk 11.2 Nominal current The maximum allowable current of the motor is mentioned as I.max. on the motor plate. This maximum allowable current shows the maximum working range of the motor and can be used to protect the motor. WARNING Be careful in using it this way, because, not only the motor, but also the pump has to be protected in its application. On the pump plate (sleeve sticker) "pump current at 400 Volts" will be stated against I nom. and can be used to pre-set the motor protection switch to protect the pump/motor combination. Q: H: I nom: Ser.Nr: P: n: This current value can also be used to determine the proper electrical equipment such as variable frequency drive, main switch, wiring diameter etc. 37 12 Warranty 12.1 Terms of warranty The warranty period is settled by terms of your contract or at least by the general terms and conditions of sales. ATTENTION Modifications or alterations of the product supplied are only permitted after consultation with the manufacturer. Original spare parts and accessories authorized by the manufacturer ensure safety. The use of other parts can invalidate any liability of the manufacturer for consequential damage. ATTENTION The warranty relating to the operating reliability and safety of the product supplied is only valid if the product is used in accordance with its designated use as described in the following sections of this manual. The limits stated in the data sheet must not be exceeded under any circumstances. The warranty becomes invalid if one or more of the points below occur. • • • • 38 The buyer makes modifications himself. The buyer carries out repairs himself or has these carried out by a third party. The product has been handled or maintained improperly. The product has non original (Smedegaard) spare parts fitted. Smedegaard's remedies defects under warranty if the points below are observed. • • Defects are caused by flaws in the design, the materials or the production. The defect has been reported within the warranty period. Other terms of warranty have been included in the general terms of delivery, which are available upon request. 13 Safety and environment 13.1 General 13.2 Users This Smedegaard product has been developed using state-of-the-art technology; it is manufactured with utmost care and subject to continuous quality control. Smedegaard does not accept any liability for damage and injury caused by not observing the directions and instructions in this manual. This also applies in cases of carelessness during the installation procedure, use and maintenance of the product. Non-compliance with safety instructions can jeopardize the safety of personnel, the environment and the product itself. Noncompliance with these safety instructions will also lead to forfeiture of any and all rights to claims for damages. For example, in particular non-compliance can result in: All personnel involved in the operation, maintenance, inspection and installation of the product must be fully qualified to carry out the work involved. Personal responsibilities, competence and supervision must be clearly defined by the operator. If the personnel in question is not already in possession of the required know-how, appropriate training and instruction must be provided. If required, the operator may commission the manufacturer / supplier to take care of such training. In addition, the operator is responsible for ensuring that the contents of the operating instructions are fully understood by the responsible personnel. • • • • • failure of important pump/system functions, failure of prescribed maintenance and servicing practices, injury to persons by electrical, mechanical and chemical effects, hazard of the environment due to leakage of hazardous substances, explosions. Depending on specific activities, extra safety measures may be required. Contact Smedegaard if a potential danger arises during use. ATTENTION The owner of the product is responsible for compliance with the local safety regulations and internal company guidelines. 13.3 Safety provisions The product has been designed with the greatest possible care. Original parts and accessories meet the safety regulations. Modifications in the construction or the use of non-original parts may lead to a safety risk. ATTENTION Make sure that the product operates within its working range. Only then is the product performance guaranteed. 13.3.1 Labels on the product The icons, warnings and instructions applied to the product are part of the safety provisions. The labels may not be removed or covered. Labels must remain legible during the entire life of the product. Replace damaged labels immediately. ATTENTION Not only must the general safety instructions laid down in this chapter on "Safety" be complied with, but also the safety instructions outlined under specific headings 39 13.4 Safety precautions 13.4.1 During normal use • • • • Contact the local electricity company for questions about the power supply. Shield parts, that can become hot in such a way, that direct contact is impossible. Never use damaged or deformed coupling protection plates to protect the coupling before putting the pump into use. Make sure that the coupling protection plates are never in contact with the running coupling. Always close the terminal box on the pump. Only authorised personnel may install, maintain 13.4.2 During installation, maintenance and repair and inspect the product and repair electrical components. Observe the local safety regulations. WARNING Always disconnect the energy supply to the product first, before installation, maintenance and repairs. Secure this disconnection. WARNING Surfaces of a pump can be hot, after continuous operation. WARNING Make sure that no one can be near rotating components when starting a pump. WARNING Handle a pump with dangerous liquids with the utmost care. Avoid danger for persons or the environment when repairing leakages, draining liquids and venting. It is strongly recommended to place a relief barge under the pump. 40 WARNING Immediately following completion of the work, all safety-relevant and protective devices must be reinstalled and / or re-activated. WARNING Please observe all instructions set out in the chapter "Commissioning/ Startup" before returning the product to service. 13.5 Environmental aspects 13.5.1 General The products of Smedegaard are designed to function in an environmentally friendly way during their entire life. Therefore, when applicable, always use biodegradable lubricants for maintenance. E N V I R O N M E N T A L INSTRUCTION Always act according to the laws, bylaws regulations and instructions with respect to health, safety and the environment. 13.5.2 Dismantling Dismantle the product and dispose of it in an environmentally friendly way. The owner is responsible for this. E N V I R O N M E N T A L INSTRUCTION Ask at the local government about the re-use or the environmentally friendly processing of discarded materials. 14 Intended use 14.1 Intended use The pumps HILVE, HILV(S) and HILVCF are suitable for moving and increasing the pressure of cold and hot water without wear to parts within the indicated working range. The pumping of liquids with a different viscosity or density than water is possible as well. For this a motor with an adjusted power is used. Ask Smedegaard or your distributor for advice. Any other or further use of the pump is not in conformity with its intended use. Smedegaard does not accept any liability for any damage or injury that results from this. The pump is produced in accordance with the current standards and guidelines. Use the pump only in a perfect technical state, in conformance with the intended use described below. The Intended use as laid down in EN 121001 is the use for which the technical product is intended according to the specifications of the manufacturer. The use of the product has been described in the sales brochure and in the user manual. Always observe the instructions given in the user manual. When in doubt the product must be used as becomes evident from its construction, version and function. 41 15 Explosion safety 15.1 Explosion safety ATTENTION This sub chapter contains important information which has to be taken in consideration when installing the pump to the ATEX specification in a hazardous environment. Table 6: Explosion safety Indication Meaning II Product group for use above ground, with the exception of mine working where there can be danger of explosion due to mine gas and/or flammable substances. 2/3 Category 2: Equipment in this category is intended for use in areas in which explosive atmospheres caused by mixtures of air and gases, vapours or mists or where air/dust mixtures are likely to occur. Category 3: Equipment in this category is intended for use in areas in which explosive atmospheres caused by mixtures of air and gases, vapours or mists or where air/dust mixtures are likely to occur or, if they do occur, are likely to do so only infrequently and for a short period only. G Suitable for an environment that is explosive due to gas, vapour or fumes; not suitable for an environment that is explosive due to dust. EEx c Protection principle type c: for products that are constructively safe. T4/T3 Temperature class: T4 for medium temperatures up to 100°C; T3 for medium temperatures above 100°C 15.1.1 General Stickers or indicators on the pump sleeve and the motor indicates whether the pump is suitable for use in an environment with risk of explosion. It is allowed to install the pump in a zone which is classified in directive 1999/92/EC. When in doubt it is compulsory to check the above directive. 15.1.2 Indication ATTENTION When there is an ATEX sticker on the pump, the pump must only be used for pumping a medium with a conductivity higher than 50 pS/m. The medium must not be flammable. ATTENTION When the pump is placed in an explosion hazardous environment no pump should be opened or disassembled on site. Due to the probable creation of sparks during loosening and tightening of nuts and bolts. 42 15.1.3 Commissioning (check list) It is compulsory to check these points prior to put the pump in operation. • • • • • • • • • • • Check if the ATEX-data on the motor and the pump are in line with the specified category. See table 7 ATEX-Categories 142. When the categories of the motor and the pump are different, use the lower category. For category 2: make sure that the pump is protected against damage from outside. Check that the motor cable is suitable for the current drawn by the motor. See: motor type plate. Check that the pump is fully filled with the liquid (de-aerated). Do not run the pump dry. Check the rotational direction of the motor. The motor has to run clockwise (seen from the non driven side). This direction is indicated with an arrow on the pump top bracket. Make sure that the liquid temperature never exceeds the temperature mentioned in the explosion safety code T3 or T4. See table 6 Explosion safety 141. To avoid overheating of the pump, to ensure a minimum flow in the pump according with the description in chapter 1.5 Working range 11. The pumps has to be de-aerated again when: • the pump is taken out of operation. • some air is gathered in the pump. Make sure that the pump and the motor shaft are running smoothly and without excessive noise (e.g. no parts are running against each other). Make sure that the pump is connected to ground. Table 7: ATEX-Categories Group Category I M 1 Zone none none II 1 G 0 none none D 20 none none 2 G 1 HILV(S) HILVCF 2G Eex e T3 2G Eex d T4 D 21 none none 3 G 2 HILV(S) HILVCF 2G Eex e T3 2G Eex d T4 D 22 none none 2 Pumps Motors none none 43 16 Transport 16.1 Transport 1. Transport the pump in the position as indicated on the pallet or packaging. 2. Make sure the pump is stable. 3. If present, observe the instructions on the packaging. WARNING Lift the pump, if necessary using a hoist and suitable slings. Attach the slings to the transport lugs on the packaging, where present. WARNING The pump must be lifted according to the current hoist guidelines. Only qualified personnel are allowed to lift the pump. WARNING Do not lift the pump by using the frequency converter (if fitted), electrical parts or the motor cover. Be sure that the pump is always in balance. WARNING All the pumps will turn approximately 2 to 15 degrees. Do not remove the lever or protection from the pump before the pump is placed and mounted correctly. 44 16.2 Weight Motor Minimum weight Maximum weight Minimum weight with frequency converter Maximum weight with frequency converter kW (kg) (kg) (kg) (kg) 2.2 29 72 38 81 3 43 82 52 91 4 49 86 59 96 5.5 81 120 71.5 130.5 7.5 68 138 78.5 148.5 16.3 Storage Fill the pump with glycol in order to protect it against the risk of frost. Storage tambient [°C] -10/40 Max. rel. humidity [%] 80% at 20°C not condensing 16.3.1 Inspection during storage 1. Turn the shaft every three months and just before putting into operation. 45 17 Installation 17.1 Setting up the pump Table 9: Allowable moment HILVCF Type DN [mm] Mx My Moment [Nm] Mz 6M HILVCF 32 65 2300 1700 2000 3500 HILVCF 45 80 2700 2700 2300 4500 HILVCF 65 100 3300 3600 3000 5700 ATTENTION The values mentioned in the tables above are given for the point at which a maximal tension of between 200 and 205 MPa occurs. It is assumed that the 3 forces or the 3 moments as given in the drawing below occur simultaneously. ATTENTION Make sure that the pump connections are stress-free (e.g. no heavy load on the inlet and outlet connections). It is to be advisable to use flexible connections, suitable for the application, see drawing above. Only on the condition that the pump is provided with a reinforced cast casing, model HILVCF, the top/ down force on the flanges can be in accordance with the table below. Table 8: Allowable forces HILVCF Type 46 DN [mm] Fx Force [kN] Fy Fz 6F HILVCF 32 65 54 25 44 74 HILVCF 45 80 48 17 31 59.6 HILVCF 65 100 60 21 33 71.6 ATTENTION Pumps that do not stand steady or stable of their own accord, should be mounted on a ridgid and stable base. 1. 2. 3. 4. 5. 6. ATTENTION Instal the pump where there is the lowest risk for noise nuisance. Place and install the pump on a level, stable surface in a dry and frost-proof room. Make sure that sufficient air can reach the cooling fan of the motor. For this purpose the free space above the cooling fan should be at least 1/4 of the diameter of the fan cover air intake. Install the pump with counter flanges. Pumps with non-standardised connections; counter flanges are delivered separately. Install a valve on the supply and on the delivery connection of the pump. If there is a chance that when the pump is not operating the medium can flow back, it is advised to install a non-return valve. Make sure that the inlet of the pump is never clogged. 17.1.1 Indicators 17.1.2 Install bypass Install a bypass if the pump operates against a closed valve. The required capacity of the bypass is at least 10% of the optimum volume flow. At high operating temperatures a higher volume flow is required. Refer to the table "Minimum volume flows" in the paragraph "Working range". 17.2 Mounting a motor on the pump ATTENTION It is important to use the correct Smedegaard-Pumps motor. Before installing an other brand/standard IEC norm motor, Smedegaard should be consulted. The motor has to conform to the following conditions: • Over-rated power output (so the motor is working within its safe parameters) • Reinforced bearing at driven end (to withstand the axial force) • Fixed bearing at driven end (to minimize the axial play) • Smooth shaft, no key lock (to improve the coupling grip and to improve the motor balance) The advised bearings per motor type are: [kW] Axial bearing B A The arrow (A) on the pump foot indicates the flow direction of the liquid. The arrow (B) on the top bracket indicates the rotating direction of the motor. 2.2 6305-2Z-C3 3 6306-2Z-C3 4 6306-2Z-C3 5.5 6308-2Z-C3 7.5 6308-2Z-C3 [kW] Co-axial bearing 11 7309-BEP 15 7309-BEP 18.5 7309-BEP 22 7311-BEP 30 37 7312-BEP 7312-BEP 47 17.2.1 Install the motor on pumps, supplied without motor, with a standard mechanical seal. ATTENTION For motors of 11 kW or higher, block the rotor when adjustments are made to the coupling. This ensures that the rotor will not come out of its bearings. WARNING Correct seal tension max. -1 mm lower than the maximum upwards position! 1. Remove the coupling guards (681) and the coupling shells (862). 2. Remove the seal protection bracket (8911.03) and its mounting material. For pumps with a taper piece (722) (with motor of 5.5 kW or higher), the two bolts (914.02 or 901.02) has to be placed back to connect the taper piece to the motor stool. Thoroughly clean the motor stool (341), the shaft (210), the coupling shells (862) and the motor shaft. 3. Loosely fasten the coupling shells (862) with the coupling pin (560) on the shaft (210). Use the hexagon socket head cap screw (914.01) and the nut (920.01) for this. (When the pump is equipped with a steel coupling, never use the same coupling twice but order a new one). 4. Place the motor on the motor stool (341). 5. Tighten the lower bolts of the coupling shells (862) in such way, that the coupling slightly clamps around the motor shaft. 6. Lift the pump assembly to the maximum upwards position and mark the shaft. Use a tyre lever to lift the coupling. 48 7. Position the pump assembly 1mm lower than the maximum upwards position as mentioned earlier. 8. Fully tighten the couplings at the given torque (see "Torques" in the annexes). Make sure that the gaps between the couplings are equally divided on both sides (see drawing). 9. Attach the coupling guards (681) with the socket head cap screws (914.05) to the motor stool (341). 10. Connect the electricity supply to the motor. 17.2.2 Installing the motor on pumps, supplied without motor, with a cartridge seal 8. Tighten the lower bolts of the coupling shells (862) so that the coupling slightly clamps around the motor shaft. 9. Lift the pump assembly to the maximum upwards position and mark the shaft.Use a tyre lever to lift the coupling. ATTENTION For motors of 11 kW or higher, block the rotor when adjustments are made to the coupling. This ensures that the rotor will not come out of its bearings. 1. Remove the coupling guards (681) and the coupling shells (862). 2. Remove the seal protection bracket (89-11.03) and its mounting material. For pumps with a taper piece (722) (with motor of 5.5 kW or higher), the two bolts (914.02 or 901.02) has to be placed back to connect the taper piece to the motor stool. Thoroughly clean the motor stool (341), the shaft (210), the coupling shells (862) and the motor shaft. 3. Loosely fasten the coupling shells (862) with the coupling pin (560) on the shaft (210). Use the hexagon socket head cap screw (914.01) and the nut (920.01) for this. (When the pump is equipped with a steel coupling, never use the same coupling twice but order a new one). 4. Place the motor on the motor stool (341). 5. Loosen the three cartridge grub screws (904) one turn. 6. Push the hydraulic pump assembly in the lowest position. 7. Tighten the three cartridge grub screws (904) firmly to the shaft. WARNING Correct seal tension max. -1 mm lower than the maximum upwards position! 10. Position the pump assembly 1 mm lower than the maximum upwards position as mentioned earlier. 11. Fully tighten the couplings at the given torque (see "Torques" in the annexes). Make sure that the gaps between the couplings are equally divided on both sides (see drawing). 12. Install the coupling guards (681) with the socket head cap screws (914.05) to the motor stool (341). 13. Electrically connect the motor. 49 17.3 Electrical WARNING Only authorised personnel are allowed to make electrical connections to the motor. This should be accordance with the local regulations. PTC connection STM 140 EK: • All motors 3 kW and up are equipped with a PTC thermistor. Consult: 23.17 Technical specifications 165. • Connect the PTC on a thermistor relais. 50 ATTENTION After connecting the motor according to the diagram always check the rotation direction. Electrical connections: • Make sure that the motor specifications correspond with the power supply to which the pump motor is connected. Consult "Electrical diagrams" in the annexes for the correct connection diagram. • Connect the motor using a motor safety switch. 17.4 Commissioning WARNING The pump must not be switched on when it is not completely filled up. ATTENTION Seen from the top of the motor the pump should rotate clockwise (B) See 19.1 Setting up the pump 145 . In case of a 3-phase motor the rotating direction can be changed by exchanging two of the three phase wires. 17.4.2 In an open circuit with a liquid level lower than the pump B A 17.4.1 In an open or closed circuit with sufficient supply pressure C A B 1. Close the suction shut-off valve (A) and the outlet shut-off valve (B). 2. Open the fill plug (C). 3. Gradually open the suction shut-off valve until the liquid flows from the fill plug (C). 4. Close the fill plug. 5. Fully open the suction shut-off valve. 6. Check the rotational direction of the pump. 7. Fully open the outlet shut-off valve. 1. Partly loosen the drain plug (A). For HILVE and HILVCF the drain plug must be fully removed. 2. Remove the fill plug (B) from the top bracket. 3. Block the entry of the drain plug on the outside of the pump foot. 4. Close the outlet shut-off valve. 5. Fill the pump housing to the maximum through the fill plug with the liquid that is to be pumped. 6. Screw the drain plug into the pump foot. 7. Insert the fill plug in the top bracket. 8. Check the rotational direction of the pump. 9. Open the outlet shut-off valve. 51 17.4.3 After an extended period of non operation or storage 18 Operation During first start-up, be sure to check the mechanical seals for leakage due to seizure or dehydration of the lubricating film. If this is the case, please proceed as follows: 1. Turn shaft manually or; 2. Start up the pump, then open and close the outlet shut-off valve quickly during operation. 3. Check if the mechanical seal is still leaking. 18.1 Operation If the shaft is still leaking: 1. Disassemble the mechanical seal. 2. Thoroughly clean and degrease the running surfaces. 3. Assemble the mechanical seal again and retry start-up. If this doesn’t solve the shaft leakage, replacement of the mechanical seal is necessary. 52 The pump is controlled externally and therefore does not need any operation guidance. 19 Maintenance 19.1 Introduction 19.3 Maintaining the pump for an extended period of non operation WARNING Observe the general safety precautions for installation, maintenance and repair. Turn the shaft every three months. This protects the seals from seizure. Regular maintenance is necessary for the correct operation of a pump. For maintenance of the pump, please contact your supplier. Protect the pump against freezing if there is a risk of frost. Proceed as follows: 19.2 Lubrication Standard motors, with a maximum power of 7.5 kW, are provided with maintenance free sealed bearings. Motors with lubricating nipples must be lubricated after 2000 hours. If the pump works under extreme conditions, such as vibrations and high temperatures, the motors must be lubricated more often. 1. 2. 3. 4. Close all pump valves. Drain each pump and/or the system. Remove all plugs from the pump. Open the shut-off and fill/air vent plug, if present. Use a lithium based -30 °C / 160 °C bearing lubricant (about 15 gram). When the pump is delivered without a motor and fitted with an other brand or the standard motor is replaced by an other brand than Smedegaard, please consult the maintenance instructions of the motor supplier. ATTENTION Also follow the instructions in § 19.2 Mounting a motor on the pump. 53 20 Failures 20.1 Failure table WARNING Observe the general safety precautions before install, maintenance and repair. Problem Leakage along the shaft Possible cause Running surfaces of the mechanical seal worn or damaged New pump: seal stuck due to assembly mechanical seal mounted incorrectly Elastomers affected by medium Pressure too high Shaft worn Pump has been operating without water Leakage along the shroud O-ring worn at the top bracket or at the O-ring not resistant to the pump foot medium to be pumped Too much tension on the pump foot; it becomes oval 54 Possible solution Replace the mechanical seal. Open and close the outlet shut-off valve quickly during operation Install the mechanical seal correctly. Use water and soap as a lubricant Use a the right rubber compound for the mechanical seal Use the right type of mechanical seal Replace shaft and mechanical seal Replace the mechanical seal Replace the O-ring Replace O-ring by an Oring with better resistance Decrease tension on piping Mount the pump foot tensionless Support the connections. Checkpoints Check the pump for dirt abrasive parts. Problem Pump is vibrating or noisy Possible cause Coupling mounted incorrectly Faulty setting of the hydraulic assembly There is no water in the pump No supply Bearings of pump and/or motor worn Available NPSH too low (cavitation) Pump does not work in its working range Malfunction Pump does not start Pump is standing on an uneven surface Internal blockage in the pump No voltage on the terminal clamps Thermal motor safety switch triggered The motor is running, but the pump does not work The pump shaft has been broken The coupling between pump- and motor shaft is loose Possible solution Install the coupling in parallel Adjust the assembly according to the manual Fill and vent the pump Checkpoints Make sure there is sufficient supply. Check for blockages in the supply line Have the bearings replaced by a certified company Improve suction condition Select another pump or adjust the system to work within its working range Level the surface Have the pump inspected by a certified company Check the power supply Circuit Main switch Fuses Earth leakage switch Check the motor safety Protective relay relay Reset the thermal motor- Check if the correct value is set. Find the correct safety. Contact the supplier, if this problem occurs value (Inom) on the more often. motortype plate Contact the supplier Tighten the connecting screws to the recommended torque 55 Problem Possible cause Pump supplies insufficient Outlet and/or inlet shut-off capacity and/or pressure valve is closed There is air in the pump The suction pressure is insufficient Pump rotates in the wrong direction The suction line has not been vented Air bubble in the suction line Pump sucks air because of leakage in the suction line Too little water consumption so air bubbles clog up in the pump The diameter of the suction line is too small Capacity of water meter in the supply line is too small Foot valve blocked The impeller or the diffuser is blocked O-ring between impeller and diffuser is gone O-ring not resistant to the medium to be pumped 56 Possible solution Open both shut-off valves Vent the pump Increase the suction pressure Change over L1 and L2 of the three phase supply. Vent the suction line Install the suction line with pump end higher than the other end Repair the leakage Make sure the consumption increases or use a smaller pump Increase the diameter of the suction line Increase the capacity of the water meter Clean the foot valve Clean the inside of the pump Replace the O-rings Replace O-ring by an Oring with better resistance Checkpoints 21 Standard HIL motors 21.1 General 21.3 Reinforced bearings The standard HIL motors comply with both the international standards and EU directives regarding safety measures. The motors can be specified as: • T.E.F.C. (totally enclosed fan cooled) Squirrel cage. • AC induction motor. • Protection IP55 (single phase IP54). • Insulation class F. • Temperature rise class B. • Duty class S1. • Noise levels conform IEC 60034-9. The motors come in 3 different configurations. Mounting in acc. with IEC60034-7 and dimensions in acc. with IEC 60072-1 V18 flange V 1 flange With extended shaft All models HILV(S) and HILHS up to 4 kW All models HILV(S) and HILHS From 5.5 kW All models HILVE (Block pump) 21.2 Specific adaptations Due to the fact that the motors are used in a specific application such as vertical multistage centrifugal pumps and comprise a major part of the pump construction itself, a number of specific adaptations are to be taken into consideration: • Improved power output . • Reinforced bearing. • Fixed axial play. • High temperature grease. • Smooth shaft without keyway. Every pump stage (impeller and diffuser) is in full balance because the pressure above the impeller is the same as beneath, however the impeller inlet is disturbing this balance due to lack of pressure. The larger the impeller inlet diameter, the more pressure is forcing the pump shaft downwards (axial load). The more impellers the bigger the axial load. The pump bearing is only meant to center the shaft and, because of its specification, not suitable to withstand any axial load of the pump shaft. Therefore the pump hydraulic assembly is coupled to the motor shaft using the motor bearing to hold the pump shaft in its axial position. E.g. the 4 kW motor is used in the following pump models: Model Stage Axial load [N] HILVF 32 -20 1100 HILV 45 -10 716 57 21.5 High temperature grease The required driven side bearing type for this 4 kW motor is 6306-2Z-C3.This particular bearing has a dynamic bearing load of 28100 N, which is used to calculate the guaranteed running time of the bearing before it runs out of the factory tolerances. The advised bearings per motor type are: kW Axial bearing 2.2 6305-2Z-C3 3 6306-2Z-C3 4 6306-2Z-C3 5.5 6308-2Z-C3 7.5 6308-2Z-C3 kW Co-axial bearing 11 7309-BEP 15 7309-BEP 18.5 7309-BEP 22 7311-BEP 30 37 7312-BEP 7312-BEP Using a motor with a different bearing on the driven side, consequently leads to a different expected lifetime of the motor. Needless to say that when the motor bearing is damaged the axial position of the pump shaft is incorrect which could lead to extreme damages on the hydraulic assembly of the pump. ATTENTION Only applicable for motors of 1.5 kW and up! In high temperature applications, mostly a combination of ambient temperature, pumped liquid and a fully loaded motor, the motor winding could reach its maximum temperature difference of Δt80oC (Insulation class F / temperature rise class B). At long term running, the bearings could lose their grease and shorten the lifetime of the motor bearing. 21.6 Smooth shaft without keyway The pump shaft (210) is coupled to the motor shaft with a clamp coupling (862). To avoid imbalance and to insure maximum grip between the shafts and the coupling, the motor shaft is not provided with a keyway. 862 914.01 560 862 920.01 341 681 901.01 554.02 901.02 21.4 Fixed axial play Regarding the above mentioned, it is also important to avoid axial movement of the motor shaft, which directly influences the axial position of the pump shaft and impeller in relation to the diffuser. An incorrect position of the hydraulic assembly could influence the hydraulic performance of the pump (Internal leakage or flow disturbance per stage). 903.01 411.01 412.02 160 433 210 In case of a special / other brand motor which is provided with a keyway, it is recommended to put a half key in the keyway prior to clamping the coupling on the shaft. 58 21.7 Voltage range To enable the motor to run on a wide range of voltages and frequencies, in order that they are applicable for most of the countries and remain reliable in applications with an instable power supply, the motors have an extended voltage range and can be used at 50 Hz or 60 Hz. WARNING The motor/pump combination must be selected for 50 Hz or 60 Hz operation. Specific range 230V 400V 230/400 50 Hz 208 - 240 360 - 420 230/400 60 Hz 208 - 280 360 - 480 Specific range 400V 692V 400/692 50 Hz 360 - 420 624 - 752 400/692 60 Hz 360 - 480 624 - 832 The maximum allowable current of the motor is mentioned as I.max. on the motor plate. This maximum allowable current shows the maximum working range of the motor and can be used to protect the motor. WARNING Be careful in using it this way, because, not only the motor, but also the pump has to be protected in its application. The current of the pump/motor combination has to be measured while in the application to pre-set the motor protection switch at its required value. On the pump plate (sleeve sticker) this "pump current at 400 Volts" will be mentioned as I nom. and can be used to preset the motor protection switch to protect the pump/ motor combination. 21.8 Nominal current The current of the motor depends on the required output power and voltage. Both the increased power output and wide voltage range is a benefit of the HIL motor, but on the other hand implies that the rated current could be misunderstood. These figures are only valid when pumping a water-like liquid with a viscosity of 1 mm2/s. When the viscosity deviates from the above, the required power deviates accordingly. Q: H: I nom: Ser.Nr: P: n: This current value can also be used to determine the proper electrical equipment such as variable frequency drive, main switch, wiring diameter etc. 21.9 Motor temperature ratings The electric motor's insulation system separates electrical components from each other, preventing short circuits, winding burnout and failure. Insulation's major enemy is heat therefore it's very important to be sure to keep the motor within temperature limits. Thermal classes relate to the maximum winding temperature for which the motor windings are designed to operate for a long and predictable insulation life of 20.000 hours or more. The table below provides a summary. 59 21.9.1 Ambient temperature Ambient temperature is the temperature of the air surrounding the motor or the room temperature in the vicinity of the motor. This is the temperature that the entire motor would assume when it is shut off and completely cool. The basic ambient temperature rating point of all standard motors is 40° C. 21.9.2 Temperature rise Insulation system class (NEMA) B F Temperature Rating (Maximum Winding Temperature) 130° C 155° C Temperature Rise Allowance by Resistance (Based on 40° C Ambient Temperature) 115° C All Motors with 1.15 Service Factor (Hot Spot Allowance) 90° C 1 1 Totally Enclosed Fan Cooled Motors (Hot Spot Allowance) 80 (10) 105 (10) 1. When operating at service factor loading, the hot spot temperatures can exceed the insulation rating, resulting in shortened motor life. The table shows the temperature ratings, temperature rise allowances and hot spot allowances for various enclosures and service factors of standard motors. The Table also shows highest allowable stator winding temperatures for long insulation life. Temperatures are total, starting with a maximum ambient of 40° C (104° F). The standard motors for the HILV(S) are designed to operate cooler than their thermal class allows. The standard motors have Class F insulation with a Class B temperature rise. This gives an extra thermal margin. Temperature rise is the change in temperature of the critical electrical parts of the motor when it is being operated at full load. If the motor is located in a room with a temperature of 20°C, and operates continuously at full load, the winding temperature rises from 20° C to a higher temperature. The difference between starting temperature and final elevated temperature, is the motor’s temperature rise. The amount of temperature rise is always additive to the ambient temperature. 21.9.3 Hot spot allowance Measuring “temperature rise” shows the difference between cold and hot ohmic resistance of the motor winding, resulting in the average temperature change of the entire winding including motor leads, end turns and wire deep inside stator slots. Because some of these spots are hotter than others, an allowance factor is made to reflect the temperature at the hottest spot. This allowance factor is called the “hot spot allowance”. 21.9.4 Changed insulation class By taking a Class B, totally enclosed fan cooled, T frame motor with Class F insulation, an increased service factor from 1.0 to 1.15 is possible. The same change of insulation class can be used to handle a higher ambient temperature or to increase the life expectancy. Changed insulation classes also make the motor more suitable for operation in high elevations where thinner air has less cooling effect. 60 Similarly, the HIL standard motors are designed for Class B temperature rise but have insulation systems utilizing Class F materials. This extra margin gives the motor a “life bonus”. Extra thermal capability can be used to handle: • • • Higher than normal ambient temperatures, Higher than normal temperature rise brought on by overloads, or The extra capability can be used to extend motor life and make it more tolerant of overheating factors caused by high or low voltages, voltage imbalance, blocked ventilation, high inertia loads, frequent starts, and any other factors that can produce above normal operating temperatures. If the motor is not loaded to full capacity, its temperature rise will be lower. This automatically makes the total temperature lower and extends motor life. Also, if the motor is operated in a lower than 40° C ambient temperature, motor life will be extended. The same ten degree rule also applies to motors operating at above rated temperature. In this case, insulation life is “halved” for each 10° C of over temperature. pump curves don't show the pump running at the nominal specific speed of the motor, which is 2850 rpm (at 60Hz. 3420 rpm), but rather at the rated speed of the installed HIL motor, which can in fact be much higher. ATTENTION Single phase motors do not maintain their rotational speed as high as a three phase motor does and therefore the pump, equipped with a single phase motor, will have a performance curve, which is approx 5% lower than the published curves. Installing another brand of motor on the pump with a different speed, influences the performance of the pump and consequently the load of the motor. The effect of the speed deviation is: Capacity (linear) (n2/n1) = (Q1/Q2) Pressure (squared) (n2/n1)2 = (P2/P1) Motor power (cube) (n2/n1)3 = (P2/P1) 21.9.5 Insulation life Insulation life is affected by many factors aside from temperature. Moisture, chemicals, oil, vibration, fungus growth, abrasive particles, and mechanical abrasion created by frequent starts, all work to shorten insulation life. On some applications if the operating environment and motor load conditions can be properly defined, suitable means of winding protection can be provided to obtain reasonable motor life in spite of external disturbing factors. 21.10 Rotational speed The motors are normally mentioned as 2850 rpm and (at 60Hz. 3420 rpm) this value is used as specific value for resp. 2 pole and 4 pole motors. Depending on the quality and power stage of the motor, the actual nominal motor speed varies from 2750 up to 2950 rpm. The published 61 21.11 Efficiency 21.11.2 High efficiency motors The converting of energy from one form to another always results in the loss of efficiency. In converting electrical energy to mechanical energy an electrical motor must, therefore, also suffer a loss of efficiency. This is especially critical where the motor is to be in operation over long periods of time. Developments in the construction of electric motors have resulted in increased efficiencies, to be able to compare the efficiencies a classification system was introduced in 2001. The benefits of a high efficiency motor, besides the lower energy costs, are also a lower noise level and, due to a reduced heating of the windings, a higher permissible ambient temperature and a longer bearing life. Most efficiency losses are causes by mechanical factors within the motor and tend to have a greater effect on smaller motors. The classification system is designed to take this into account. Table 10: Efficiency comparison For further reference, there is a higher standard, IEC4 Super Premier Efficiency, being proposed. It is likely that much of the increased efficiency required for this standard will be achieved by the improvements in the electrical/magnetic properties of the materials of manufacture. 21.11.1 Efficiency classification The CEMEP (European Committee of Manufacturers of Electrical Machines and Power Electronics) and the European Commission agreed, that all 2 and 4 pole three-phase AC motors between 1 and 100 kW should be classified according to their efficiency. The EFF standards have been replaced by the more recent IEC standards. EFF and the newer IEC efficiency ratings are not identical but the approximate correlation is: • • • • 62 EFF 2 - IEC 1 EFF 1 - IEC 2 - IEC 3 - IEC 4 Standard Efficiency High Efficiency Premier Efficiency Super Premier Efficiency (Proposed) The 2-pole HIL motors are (as a factory option), also available as motors with the IEC 3 classification. In the table below the comparison, for 2 pole motors, between IEC 2 and IEC 3 is shown. Motor Power [kW]: IEC 2 Class Motor IEC 3 Class Motor Efficiency in [%] Efficieny in [%] 0.75 77.4 80.7 1.1 79.6 82.7 1.5 81.3 84.2 2.2 83.2 85.9 3 84.6 87.1 4 85.8 88.1 5.5 87.0 89.2 7.5 88.1 90.1 11 89.4 91.2 15 90.3 91.9 18.5 90.9 92.4 22 91.3 92.7 30 92.0 93.3 37 92.5 93.7 21.12 Efficiency and cosine phi 21.13 Number of starts The cosine phi of the HIL motors is kept as low as generally allowed by the energy companies to improve the efficiency of the motor. The efficiency figure of the motor is normally used as the one and only parameter to determine the difference between power input and power output. The smaller the difference, the better the efficiency. However, the cosine phi is creating a "blind current" which is not recognized by the energy meters and therefore not taken into account when calculating the total energy consumption. The kW rating of the motor generally dictates the maximum allowed number of starts per hour, the motors are continuously rated. The maximum number of starts per hour is governed by the temperature rise within the windings for each start (DOL, Star Delta or Soft Start) and the time required for the increased temperature to fall away. The moment of inertia of the pumps hydraulic assembly does not influence this due to the square ratio between torque and rotational speed. The number of starts varies from 2.2kW-50 starts/ hour to 37kW-6 starts/hour. Pin = U.I.cosij.Ș.3 Ș=Pshaft/Pin Pin=Pshaft/Ș The multiplication of cosine phi and efficiency determines the total power consumption and this is what must be used to select the size of the switchgear, frequency inverters, fuses etc. And last but not least; total costs which have to be paid to the energy company. kW 2.2 3 4 st./h 30 20 20 kW 5.5 7.5 11 15 18.5 22 30 37 st./h 15 12 10 10 10 10 6 6 For example: Pmotor=Pshaft: 1000 [W] power supply 400 [V] Cosine phi 0.8 0.5 0.7 0.7 Efficiency 0.5 0.8 0.7 0.8 I [A] 3.61 3.61 2.95 2.58 Pin [W] 2000 1250 1429 1250 0.4 0.49 0.56 Cos phi * eff. 0.4 Pin [W]: used to calculate the mains electrical supply. 63 21.14 Terminal box position The position of the motor terminal box can easily be rotated by rotating the motor on its motor stool (341) This can be done by loosening the motor bolts only and keeping the coupling (862) adjustments unchanged. When ordering the pump with an optional position of the terminal box following indications are used. Discharge Connection 12 o’clock OV30000712 6 o’clock OV30000710 Suction Connection 3 o’clock OV30000709 9 o’clock OV30000711 All models are provided with the motor terminal box at 3 o'clock (Suction side) as standard. HILVE models are provided with the motor terminal box at 9 o'clock (discharge side). 21.15 Related norms Rating and performance IEC 60034-1 Methods for determining losses and efficiency IEC 60034-2 Classifications of degrees of protection IEC 60034-5 Methods of cooling IEC 60034-6 Symbols of construction and mounting arrangements IEC 60034-7 Terminal markings and direction of rotation IEC 60034-8 Noise limits IEC 6 0034-9 Dimensions and output for electric machines IEC 60072-1 Starting performance of singlespeed three-phase cage induction motors IEC 60034-12 Vibration limits IEC 60034-14 Voltage puls rise time IEC 60034-17 Country Standard Germany DIN VDE 0530; DIN EN 60034/VDE; DIN IEC 34; DIN 42673; DIN 42677 Great Britain BS 5000; BS 4999 France NFC 51 111 51 120; NFC 51 200; NFC 51 117; NFC 51 115 NFC 51 119 Italy CEI 2-3 1988; CEI 2-6; CEI 2-8 CEI/UNEL 13113-71 CEI/UNEL 13117-71 CEI/UNEL 13118-71 CEI 2-7 CEI 2-15 The product complies with the specifications regarding the electromagnetic compatibility in: EN 61000-6-1, EN 61000-6-2, EN 61000-6-3, EN 61000-6-4. 64 21.16 Technical specifications ATTENTION The motor data are only applicable for standard motors delivered with the pump and are not applicable for explosion proof motors. ATTENTION * motors are equiped with a PTC. 71 10 n [min-1] I max [A] 2820 C [ȝF] 74 Max. starts [h-1] 3 Lp [dB(A)] P [HP] 2.2 Ș [%] P [kW] Table 13: Technical specifications of pumps with 2-pole, 1 phase, 50 Hz motors 220V 230V 240V 60 15.2 15.2 15.2 I max [A] n [min-1] Max. starts [h-1] Lp [dB(A)] Ș [%] P [HP] P [kW] Table 14: Technical specifications of pumps with 2-pole, 3 phase, 50 Hz motors 220V 230V 240V 380V 400V 420V 660V 692V 725V 2.2 3 85.6 72 30 2875 10.4 10.4 10.4 6 6 6 3* 4 83.6 67 20 2915 13.3 13.3 13.3 7.7 7.7 7.7 4.4 4.4 4.4 4* 5 87.3 69 20 2935 16.8 16.8 16.8 9.7 9.7 9.7 5.6 5.6 5.6 5.5* 7.5 86 74 15 2890 20.8 20.8 20.8 12 12 12 6.9 6.9 6.9 7.5* 10 86.8 70 12 2880 26.8 26.8 26.8 15.5 15.5 15.5 8.9 8.9 8.9 11* 15 89.3 74 10 2950 52.8 52.8 52.8 30.5 30.5 30.5 17.6 17.6 17.6 15* 20 90.5 74 10 2920 54.9 54.9 54.9 31.7 31.7 31.7 18.3 18.3 18.3 18.5* 25 91 74 10 2930 70.1 70.1 70.1 40.5 40.5 40.5 23.4 23.4 23.4 22* 30 90.6 87 10 2920 77.1 77.1 77.1 44.5 44.5 44.5 25.7 25.7 25.7 30* 40 93 74 6 2960 102.3 97.5 93.4 59.2 56.3 53.6 34.0 32.4 N-A 37* 50 93 74 6 2960 118.7 113.5 108.8 68.7 65.3 62.2 39.7 37.8 N-A 65 I max [A] n [min-1] Max. starts [h-1] Lp [dB(A)] Ș [%] P [HP] P [kW] Table 15: Technical specifications of pumps with 2-pole, 3 phase, 60 Hz motors 220V 240V 380V 420V 480V 660V 725V 797V 2.2 3 85.6 72 30 3450 10.9 10.9 10.9 6.3 6.3 6.3 3* 4 83.6 67 20 3495 13.6 13.6 13.6 7.9 7.9 7.9 4.6 4.6 4.6 4* 5 87.3 69 20 3520 17.2 17.2 17.2 9.9 9.9 9.9 5.7 5.7 5.7 5.5* 7.5 86 74 15 3465 21 21 21 12.1 12.1 12.1 7 7 7 7.5* 10 86.8 70 12 3455 26.8 26.8 26.8 15.5 15.5 15.5 8.9 8.9 8.9 11* 15 89.3 74 10 3540 53.7 53.7 53.7 31 31 31 17.9 17.9 17.9 15* 20 90.5 74 10 3500 56.3 56.3 56.3 32.5 32.5 32.5 18.8 18.8 18.8 18.5* 25.0 91 74 10 3515 72.1 72.1 72.1 41.6 41.6 41.6 24 24 24 22* 30.0 90.6 87 10 3500 78.8 78.8 78.8 45.5 45.5 45.5 26.3 26.3 26.3 30* 40.0 93 74 6 3552 102.3 93.4 N-A 59.2 53.6 N-A 34 N-A N-A 37* 50.0 93 74 6 3552 118.7 108.8 N-A 68.7 62.2 N-A 39.7 N-A N-A Table 16: Technical specifications PTC STM 140 EK Value o tn [ C ] 66 280V 140 R20 °C [Ƿ] ~ 20 Rtn-20 °C [Ƿ] ~ 250 Rtn-5 °C [Ƿ] < 550 Rtn+5 °C [Ƿ] > 1330 Rtn+15 °C [Ƿ] > 4000 Un [ V D C ] 2 .5 < U < 3 0 22 Spare parts 22.1 Spare part kits Spare part Kit Kit Nr Fan Hood Kit Fan hood (832) + Fan Impeller (831) 832 Coupling Kit 4/6 x Nut (920.01) + 4/6 x hexagon socket head cap screw (914.01) + 2 x coupling shell (862) + coupling pin (560) 862 Drain / air relief plug Kit Screwed plug (903.01) + joint ring (411.01) + screwed plug (903.02) + joint ring (411.02) 903 Stage casing compl. with bearing Kit Stage casing with bearing (108.02) + bearing sleeve (529) + impeller (230) + spacer sleeve short (525.01) 10-5 Spacer sleeve Kit 2 x Spacer sleeve short (525.01) + 6 x spacer sleeve long (525.03) + spacer sleeve (525.08) + spacer sleeve seal (525.05) 525 Sealing Kit Mechanical seal (433) + 2 x O-ring (412.01) + 2 x gasket (400) 433 Shaft end Kit Spacer sleeve end (525.04) + lock nut (920.02) + safety device, Nord-lock (930) + circlip (932) 81-88 Flange Kit 2 x Flange (723) + 4/8/16 x hexagon head bolt (901.03) + 0/4/8/16 x nut (920) + 4/8/16/32 x washer (554.03) + 2 x gasket (400) 723 Terminal box kit Gasket (400.02) + terminal box (833) + terminal board (835) + gasket (400.03) + terminal box coverplate (81.37) + 4 x screw (900) 833 Capacitor Capacitor (837) 837 67 22.2 Recommended spare parts HILV(S)(C)(F)(V) This recommendation includes all parts required to rebuild a disassembled pump with replacement of all stage casings / diffusers with bearing (108.02/ 171.02), bearing sleeves (529) and all sealings. Major parts such as impellers, diffusers, shafts, castings etc. are normally not required for overhaul but are of course available on request. The number of parts needed for a specific type of pump can be found in either the Bill of Materials or the Spare Parts List. The position number refers to the cut away drawing. Table 17: HILV(S)(C)F 24/32/45 with mechanical cartridge seal Quantity Pos. nr. Description 1 O-ring EPDM 18660171 O-ring EPDM E425 18660175 412.05 1 1 O-ring Viton 18660172 O-ring EPDM 18660170 1 O-ring EPDM E425 18660179 1 O-ring Viton 18660178 1 2 68 Part. nr. 412.06 412.01 O-ring EPDM 18660200 2 O-ring EPDM E425 (Rectangular groove) 18660201 2 O-ring Viton 18660208 Quantity Pos. nr. 433 1 Part. nr. Mech. bellow seal HILVF 32/45/65, <10 bar, EPDM Mech. bellow seal HILVSF 32/45/65, <10 bar, Viton Mech. bellow seal HILVF 32/45/65, <25 bar, EPDM 1 1 1 Mech. bellow seal HILVSF 32/45/65, <25 bar, Viton Mech. bellow seal HILVCF 32/45/65, <25 bar, EPDM 1 B Description Mechanical seal 25 mm, according to EN 12756 171.02 Diffuser with ceramic bearing HILVF 525.01 32/45 Diffuser with ceramic bearing HILVSF 32/45 Spacer sleeve short HILVF 65 B 529 Spacer sleeve short HILVSF 65 Bearing sleeve d=22mm B 525.03 B B B B 18660184 18660185 18660180 18660183 18661188 18330260 13330260 18330379 13330379 18320377 Spacer sleeve long HIL VF 65 Spacer sleeve long HILVSF 65 Spacer sleeve end HILV(S) 32/45/65 18330375 13330375 1 525.04 1 920.02 Lock-nut with non metallic insert A2 (V) Lock-nut with non metallic insert A4 ( HILVS) 76052012 9 30 Safety device Nord-lock M12 76940112 1 1 13330374 76052013 Table 18: HILV(S)(C)F 65 with mechanical cartridge seal Quantity Pos. nr. Description 1 O-ring EPDM 18660171 O-ring EPDM E425 18660175 O-ring Viton 18660172 412.05 1 1 1 O-ring EPDM 18660170 1 O-ring EPDM E425 18660179 1 O-ring Viton 18660178 2 412.06 Part. nr. 412.01 2 2 B O-ring EPDM 18660200 O-ring EPDM E425 (Rectangular groove) 18660201 O-ring Viton 18660208 171.02 Diffuser with ceramic bearing HILVF 65 Diffuser with ceramic bearing HILVSF 65 18660260 433 Mechanical seal 25 mm, according to EN 12756 B 1 Mech. bellow seal HILVF Mech. bellow seal HILVSF Mech. bellow seal HILVF 1 1 13660260 32/45/65, <10 bar, EPDM 18660184 32/45/65, <10 bar, Viton 18660185 32/45/65, <25 bar, EPDM 18660180 Mech. bellow seal HILVSF 32/45/65, <25 bar, Viton Mech. bellow seal HILVCF 32/45/65, <25 bar, EPDM 18660183 525.01 Spacer sleeve short HILVF 65 Spacer sleeve short HILVSF 65 18660379 B 529 Bearing sleeve d=22mm 18320377 B 525.03 Spacer sleeve long HILVF 65 Spacer sleeve long HILVSF 65 18660375 1 525.04 13330374 1 920.02 Spacer sleeve end HILV(S) 32/45/65 Lock-nut with non metallic insert A2 ( HIL V) Lock-nut with non metallic insert A4 ( HILVS) 76052013 Safety device A4 Nord-lock M12 76940112 1 1 B B B 1 1 930 18661188 13660379 13660375 76052012 69 23 Service tools 23.1 Service tool kits Pump de-aeration kit K368000140 Vacüum de-aeration kit: Quantity: Hand pump 1 Clamp 2 Hose pipe 25mm 1 [m] Hose connection 1” X 25mm 1 Adapter piece 1” X 22mm 1 Pipe 22mm 20 [cm] Knee coupling 3/4” X 22mm 1 Reducing ring 3/4” X 1/2mm 1 Reducing nipple 1/4” X 1/2” 1 Pump (dis)assembling kit K368000141 Coupling adjustment: Quantity: Socket head wrench screwdriver 3mm 1 T-grip socket head wrench 5mm 1 T-grip socket head wrench 6mm 1 T-grip socket head wrench 8mm 1 Tyre lever 300 1 Socket wrench screw driver 1 De-aeration and draining: Quantity: Wrench 17mm 1 Motor mounting: Quantity: Wrench 10mm 1 Wrench 13mm 1 Wrench 19mm 1 Wrench 22mm 1 Wrench 24mm 1 (Dis)assembling of hydraulic parts: Quantity: Mounting plate 1 Davel pin 5 X 70mm 1 Torque wrench: Quantity: Torque wrench 10-100 Nm 1 Socket 13mm 1 Socket 17mm 1 Socket 24mm 1 Mounting Plate Mounting Plate Dimensions 70 24 Condensed repair instructions 24.1 General These instructions concern the repairs which can be handled by a local service engineer. Please note that during all mentioned repairs all precautions are to be taken and the pump always has to be disconnected from the electrical supply. The numbers mentioned after the parts refer to the position numbers of these parts in the cutaway drawing of the pump concerned. WARNING Never allow the pump to run dry 24.2 Replacement of standard mechanical seal HILV(S) 1. Check if pump is drained and if not, drain it. 2. Remove the hexagon head bolts and coupling guards (901.01, 681), disassemble the coupling shell (862) and the pin (560), unscrew hexagon head bolts and washer (901.02, 554.02) and take the motor (800) off the motor stool (341). 3. Loosen the 4 nuts (920.03) crosswise and equally and lift the motor stool (341) and the cover (160) from the upper stage casing (108.05/108.06/171.03) and the pumpshroud (10-6). If necessary use a screwdriver (flat and narrow) to remove the motor stool (341) from the pump-shroud (10-6). Push the screwdriver in the groove of the pump-shroud (10-6) and rotate it around the edge of the motor stool (341). Repeat this action several times until the two parts are separated. 4. Pull the rotating part of the mechanical seal (433) from the shaft (210). Clean the shaft (210) and check for damages. 5. Wet the shaft-end (210) with water or a soap solution. Push the rotating part of the new mechanical seal (433) on the shaft (210). Finishing the pump assembly all HILV(S)(C) (F) with standard mechanical seal 195. 433 932 525.05 210 6. Remove the old static part of the mechanicalseal (433) from the cover (160) assembly. Wetthe new part of the mechanical seal (433) withwater or a soap solution and put it in the motorstool (341). Slide the cover (160) into the motor stool (341) and over the mechanical seal. 341 160 433 210 7. Finish the pump assembly as described in29.3.9 Finishing the pump assembly all HILV(S)(C)(F) with standard mechanical seal195. 8. Install the motor (800) on the motor stool (341)and assemble pin (560) and coupling shell (862)on the shaft (210) as described in 29.4.1 HILV(S)(F) 32/45/65 with standard mechanical seal 196. 9. De-aerate pump and pipework. Check for the correct rotation (clockwise). See 19.1 Setting up the pump 145. 10. Test run the pump and retighten the tie-rods crosswise and equally on torque. 71 24.3 Replacement of mechanicalcartridge seal HILV(S)F 32/45/65 1. Carefully relieve any pressure in the pump. 2. Remove hexagon head bolts (901.01) and coupling guard (681), disassemble the coupling shell (862) and the pin (560). 3. Unscrew the three grub screws (904) partly and the four hexagon socket head cap screws (914.01) completely. 4. Place a screwdriver between the seal cover (471) and the motor stool (341) and lift the cartridge seal from the shaft (210). 5. Unscrew the grub screws (904) completely and remove the ring (500), if present the flat ring and the seal cover (471) from the spacer sleeve cartridge (525.07). 6. Remove the old static part of the mechanical seal (433) from the seal cover (471). Wet the seal cover (471) with water or a soap solution and place the new static part. 7. Remove the old rotating part of the mechanical seal (433) from the spacer sleeve cartridge (525.07). Clean the spacer sleeve cartridge (525.07) and check for damages. 8. Wet the spacer sleeve cartridge (525.07) with water or a soap solution and place the new rotating part. 9. Remove the O-rings (412.05, 412.06) from the spacer sleeve cartridge (525.07) and the seal cover (471) and replace them by new ones. 10. Slide the seal cover (471) on the spacer sleeve cartridge (525.07) and the ring (500) and screw grub screws (904) partly in. Do not replace the flat ring. 11. Wet the shaft (210) with water or a soap solution and place the new cartridge seal. 12. Assemble pin (560) and coupling shells (862) on the shaft (210) as described in 29.4.2 HILV(S)F 32/45/65 with mechanical cartridge seal 197. 13. De-aerate pump and pipe work. Check for the correct rotation (clockwise). See 19.1 Setting up the pump 145. 14. Test run the pump. 72 24.4 Change of terminal box connection 1. Disassemble the hexagon head bolts (901.01) and the coupling guards (681). 2. Remove the bolts/screws (901.02/914.02) of the motor and if necessary the electrical wiring. 3. Lift the motor (800) a little with a tyre lever placed underneath the coupling shell (862). If this fails disassemble the coupling as described in 29.4.2 HILV(S)F 32/45/65 with mechanical cartridge seal 197. 4. Turn the motor (800) into preferred position. 5. Fasten the bolts/screws (901.02/914.02) of the motor crosswise and equally, if necessary reassemble the coupling as described in 29.4.2 HILV(S)F 32/45/65 with mechanical cartridge seal 197, reconnect the electrical wiring and check rotation (clockwise). 6. Reassemble the coupling guard (681) and the hexagon head bolts (901.01). 25 Assembling and disassembling HILV(S)(C)(F)(V) 25.2 Disassembling HILV(S) 25.1 General The starting point of the following procedure is a pump taken out of an installation. The hydraulic assembly of a HILV(S) pump is to be assembled or disassembled with the coupling side of the shaft directing downwards. A simple aid for this method is a jawbench, provided with tension plates. For larger series a special mounting plate can be used. The shaft (coupling side) is to be placed in the bush and locked with a pin diameter 5 mm through the coupling hole. WARNING Before starting the assembly or disassembly, make sure the correct type of O-rings and shroud are present! For determination of the correct O-ring and shroud to be used for the assembling and disassembling of the HILV(S)(C)(F)(V), carefully select them using the proceding diagrams. 1. Remove the coupling guards (681). 2. Remove motor bolts/screws (901.02/914.02) and washers (554.02) and lift the motor (800) with a tyre lever placed under the coupling shells (862) to loosen it from the motor stool (341). 3. Remove hexagon socket head cap screws (914.01) and nuts (920.01) from the coupling shells (862) and take the coupling shells (862) and the pin (560) from the shaft (210). 4. Remove the motor (800) from the motor stool (341). 5. Only for V(S)F 32/45/65 with cartridge seal: thoroughly clean the top end of the shaft (210), loosen the three grub screws (904) partly and remove the four hexagon socket head cap screws (914.03), place a screwdriver between the seal cover (471) and the motor stool (341) and lift the cartridge seal from the shaft (210). 6. Loosen the 4 nuts (920.03) fitted on the tiebolts (905) crosswise and equally, lift the motor stool (341) and the cover (160) from the upper stage casing/diffuser (108.05/108.06/ 171.03) and the pump-shroud (10-6). If necessary use a screwdriver (flat and narrow) to remove the motor stool (341) from the pump-shroud (10-6). Push the screwdriver in the groove of the pumpshroud (10-6) and rotate it around the edge of the motor stool (341). Repeat this action several times until the two parts are separated. 7. Lift the pump shroud (10-6) from the pump casing (101). 8. Lift the hydraulic parts from the pump casing (101) by means of a pin diam. 5 mm through the coupling pinhole at the top of the shaft (210). 9. Only for V(S)F 32/45/65 with standard mechanical seal: Clean the top end of the shaft (210) thoroughly before removing the rotating part of the mechanical seal (433) from the shaft. 10. Place the shaft with the top end facing downwards in a jaw bench or place and lock it into a shaft support accessory. 73 11. Remove the lock nut with non metallic insert (920.02) from the shaft (210) and take all hydraulic parts from the shaft. It is recommended to number the different parts in sequence of disassembling. For reassembly of the pump, see 29.3 Assembling HILV(S) 191. 25.3 Assembling HILV(S) A HILV(S) pump consists of the assembly of three sub-assemblies. First prepare the subassemblies before commencing with the assembly. For the subassembly of the pump casing see 29.3.1 Assembling the pump casing HILV(S)(F) 32/45 191, 29.3.2 Assembling the pump casing HILV(S)F 65 192 or 29.3.3 Assembling the pump casing all HILVCF 192. For the subassembly of the hydraulic parts see 29.3.4 Assembling the hydraulic parts HILV(S)(C)F 32/45 193 or 29.3.6 Assembling the hydraulic parts HILV(S)(C)F 65 194. For the subassembly of the motor stool assembly see 29.3.7 Assembling the motor stool all HILV(S)(C)(F) with standard mechanical seal 195 or 29.3.8 Assembling the motor stool all HILV(S)(C)(F) mechanical cartridge seal 195. The assembly of these three sub-assemblies is described in 29.3.9 Finishing the pump assembly all HILV(S)(C)(F) with standard mechanical seal 195 or 29.3.10 Finishing the pump assembly all HILV(S)(C)F with mechanical cartridge seal 196. While reading the assembling instructions you are well advised to have a copy available of a cut-away drawing and/or an exploded view of the pump. 25.3.1 Assembling the pump casing HILV(S)(F) 32/45 1. Place the pump casing (101) on top of the baseplate (890). The hole for the screwed plug (903.02) should be directed opposite to the arrow. 2. Slide the joint ring (411.03) on the screwed plug (903.02). 74 3. Mount the screwed plug (903.02) into the pump casing (101). 4. Insert the stage casing/disc (108.04/550) into the pump casing (101) and wet the O-ring (412.01) with water or a soap solution. 5. Check if stage casing/disc (108.04/550) is level with the pump casing (101). If not tap gently with a rubber or plastic hammer. 6. Mount 4 tie bolts (905) in the baseplate (890). 25.3.2 Assembling the pump casing HILV(S)F 65 1. Place the pump casing (101) on top of the base plate (890). The hole for the screwed plug (903.02) should be directed towards the arrow. 2. Slide the O-ring (411.03) on the screwed plug (903.02). 3. Mount the screwed plug (903.02) into the pump casing (101) 4. Insert the stage casing/disc (108.04/550) into the pump casing (101) with the letter “T” upwards. 5. Check if the stage casing/disc (108.04/550) is level with the pump casing (101). If not tap gently with a rubber or plastic hammer. 6. Mount 4 tie bolts (905) in the base plate (890). 25.3.3 Assembling the pump casing all HILVCF 1. Place the pump casing (101) on the table. 2. Slide the joint ring (411.03) on the socket head cap crew (914.03). 3. Mount the socket head cap crew (914.03) into the pump casing (101). 4. Insert the stage casing/disc (108.04/550) into the pump casing (101) and wet the O-ring (412.01) with water or a soap solution. 5. Check if stage casing/disc (108.04/550) is level with the pump casing (101). If not tap gently with a rubber or plastic hammer. 6. Mount 4 tie bolts (905) in the pump casing (101). 25.3.4 Assembling the hydraulic parts HILV(S)(C)F 32/45 1. Place the shaft (210) with the top end facing downwards, into a shaft support accessory or clamp the top end in a jaw bench fitted with soft jaws. 2. Slide the spacer sleeve seal (525.05) on the shaft (210) and lock it with the circlip (932). The circlip (932) should be completely covered by the spacer sleeve seal (525.05). If necessary a piece of pipe, slightly larger in diameter than the shaft (210), can be used to apply a force to the spacer sleeve seal (525.05). 525.05 932 210 3. Assemble on a bench the upper intermediate ring (509.02) to the discharge opening of the upper diffuser (171.03) and push them (in one piece) over the shaft (210) with the discharge facing opening downwards. 4. Slide an impeller (230 / 230.01 or 320.02) on the shaft (210). The inlet of the impeller (230 / 230.01 or 230.02) should point upwards. In case of a pump with a half stage impeller (230.02), this impeller must be fitted first. Assemble an intermediate ring (509.01) to the upper diffuser (171.03). The top stage of the pump is now assembled. ATTENTION Depending on the specific pump and the number of stages that need to be assembled the next step is to assemble either an interstage casing with diffuser (171.01) or a diffuser with ceramic bearing (171.02). 5. Check the bearing position number in chapter 33 Bearing positions 205 and check if this stage will need a bearing. 6. When a diffuser without bearing (171.01) is used, slide a spacer sleeve long (525.03) over the shaft (210) “into” the impeller (230/230.01 or 230.02). 7. When a diffuser with ceramic bearing (171.02) is used, the inside of the bearing must be greased with acid-free vaseline and a spacer sleeve short (525.01) must be fitted followed by a bearing sleeve (529). 8. Slide an impeller (230/230.01) on the shaft (210). The inlet of the impeller (230/230.01) should be pointed upwards. Assemble an intermediate ring (509.01) to the diffuser (with ceramic bearing) (171.01/171.02), the welding seams on the distance ring rotated 90 degrees with respect to the previous one. 9. Repeat assembly 5-8 until all impellers (230/ 230.01) are mounted. 10. Slide the spacer sleeve end (525.04) and the safety device nord-lock (930) on the shaft. Make sure you mate the similar sides of the safety device nord-lock (930) and the spacer sleeve end (525.04). 920.02 930 525.04 210 11. Lock the impellers (230/230.01), spacer sleeve (short / long / end) or bearing sleeve (525.01, 525.03, 525.04 or 529) and spacer sleeve seal (525.05) with a new lock-nut with non metallic insert (920.02). The maximum torque is mentioned in 32.1 Torques (all pump types) 204. 75 25.3.4 Assembling the hydraulic parts HILV(S)(C)F 65 1. Place the shaft (210) with the top end facing downwards, into a shaft support accessory or clamp the top end in a jaw bench fitted with soft jaws. 2. Slide the spacer sleeve seal (525.05) on the shaft (210) and lock it with the circlip (932) (fig.3, Appendix 1). The circlip (932) should be completely covered by the spacer sleeve seal (525.02). If necessary a piece of pipe, slightly larger in diameter than the shaft (210), a force can be applied to the spacer sleeve seal (525.05). 3. Assemble on a bench the sharp innerside of the upper intermediate ring (509.02) to the discharge opening of the diffuser (with ceramic bearing) (171.02 or 171.01) and push it (in one piece) over the shaft (210) with discharge opening downwards. 4. Slide an impeller (230) on the shaft (210). The inlet of the impeller (230) should be pointed upwards. The top stage of the pump is now assembled. ATTENTION Depending on the specific pump and the number of stages that need to be assembled the next step will be to assemble either a diffuser with ceramic bearing (171.02) or a diffuser (171.01). 5. Check the bearing position number in chapter 33 Bearing positions 205 and check if this stage will need a bearing. 6. (Not for HILV(S)F 65-10) Push the spacer sleeve long (525.03) over the shaft (210) “into” the impeller (230) (with the thin side down). 7. When a diffuser with ceramic bearing (171.02) is used, the inside of the bearing must be greased with acid-free vaseline and a spacer sleeve short (525.01) must be fitted followed by a bearing sleeve (529) 8. When a diffuser without bearing (171.01) is used, a spacer sleeve middle (525.02) must be fitted. 76 9. Assemble on a bench the sharp innerside of a distance ring to the discharge opening of the diffuser (171.02 or 171.01) and push it (in one piece) over the shaft (210) (with a rotating movement) with discharge opening downwards. Have the intermediate ring (509.01) connected to the previous diffuser (171.02 or 171.01), the welding seams on the distance rings rotated 90 degrees with respect to each other. 10. Place the next impeller (230) on the shaft (210). 11. Repeat assembly 5-10 until all impellers (230) are mounted. 12. Slide the spacer sleeve end (525.04) and the safety device nord-lock (930) on the shaft. Make sure you mate the similar sides of the safety device nord-lock (930) and the spacer sleeve end (525.04). 920.02 930 525.04 210 13. Lock the impellers (230), spacer sleeve (short/ middle/long/end) and bearing sleeve (525.01, 525.02, 525.03, 525.04 and 529) and spacer sleeve seal (525.05) with a new lock-nut with non metallic insert (920.02). The maximum torque is mentioned in 32.1 Torques (all pump types) 204. 14. Place the lower distance ring on the last diffuser. 25.3.5 Assembling the motor stool all HILV(S)(C)(F) with standard mechanical seal 1. Slide the O-ring (412.02) on the cover (160). 2. Place the screwed plug (903.01) and the joint ring (411.01) in the cover (160). 3. Clean the seal area on the motor stool (341). 4. Wet the static part of the mechanical seal (433) with water or a soap solution and put it in the motor stool (341). 5. Slide the cover (160) into the motor stool (341). 341 4. Insert the hydraulic parts assembly with the bottom end into the bottom stage casing / bottom disc (108.04/550) already assembled into the pump casing (101). 5. Wet the top end of the shaft (210) with water or a soap solution. 6. Slide the rotating part of the mechanical seal (433) on the shaft (210). 160 433 210 25.3.6 Assembling the motor stool all HILV(S)(C)(F) mechanical cartridge seal 1. Slide the O-ring (412.02) on the cover (160). 2. Place the screwed plug (903.01) and the joint ring (411.01) in the cover (160). 3. Slide the cover (160) into the motor stool (341). 341 160 433 210 25.3.7 Finishing the pump assembly all HILV(S) (C)(F) with standard mechanical seal 1. Put two O-rings (412.01) around the pump shroud (10-6). Wet the O-rings (412.01) with water or a soap solution. 2. Insert the pump-shroud (10-6) into the pump casing (101). 3. Turn the pump-shroud (10-6) so that the welding seam is hidden behind a tie bolt (905). 433 932 525.05 210 7. Check if the rotating part of mechanical seal (433) can slide freely over the shaft (210). 8. Slide the prepared motor stool (341) carefully over the pump-shroud (10-6) and the upper diffuser (108.05/108.06/171.03). The screwed plug (903.01) should be on the same side as the screwed plug (903.02) and the name plate (if available on support plate). 9. Fasten the washers (554.01) and nuts (920.03) manually on the tie bolts (905). 10. Tighten the nuts (920.03) crosswise and equally. The maximum torque is mentioned in 32.1 Torques (all pump types) 204. Make sure that the motor stool (341) is horizontal. 11. Lift the shaft (210) manually. Axial clearance of the shaft (210) should be approximately 3 millimeters. If this is not the case, check the hydraulic parts assembly for errors. 77 25.3.8 Finishing the pump assembly all HILV(S)(C)F with mechanical cartridge seal 1. Put two O-rings (412.01) around the pump shroud (10-6). Wet the O-rings (412.01) with water or a soap solution. 2. Insert the pump-shroud (10-6) into the pump casing (101). 3. Turn the pump-shroud (10-6) so that the welding seam is hidden behind a tie bolt (905). 4. Insert the hydraulic parts assembly with the lower intermediate ring (509.03) into the bottom stage casing / bottom disc (108.04/550) already assembled into the pump casing (101). 5. Slide the prepared motor stool (341) carefully over the pump shroud (10-6) and the upper intermediate ring (509.02). The screwed plug (903.01) should be on the same side as the screwed plug (903.02). 6. Fasten the nuts (920.03) and washers (554.01) manually on the tie bolts (905). 7. Fasten the nuts (920.03) crosswise and equally. (For maximum torque see 32.1 Torques (all pump types) 204). Make sure that the motor stool (341) is horizontal. 8. Firmly fasten the screwed plug (903.02) in the pump casing (101). 9. Wet the top end of the shaft (210) with water or a soap solution. 10. Slide the mechanical seal (433) on the shaft (210) into the motor stool (341). 11. Screw the four hexagon socket head cap screws (914.03) into the motor stool (341). (For maximum torque see 32.1 Torques (all pump types) 204) 12. Lift the shaft (210) manually. Axial clearance of the shaft (210) should be approx. 5 millimeters. If this is not the case, check the hydraulic parts assembly for errors. 78 25.4 Motor assembly and adjustment of the pump shaft HILV(S) After assembling the motor (800), the shaft (210) has to be carefully adjusted because improper adjustment can cause damage to the pump. 25.4.1 HILV(S)(F) 32/45/65 with standard mechanical seal 1. Remove the coupling guards (681) and the coupling shells (862). 2. Remove all possible paint, preservation means and/or grease found on the face of the motor stool (341), the shaft (210), the coupling shells (862) and the motor shaft. If present remove the key from the motor shaft. 3. Loosely fasten the coupling shells (862) with the coupling pin (560) on the shaft (210). Use the hexagon socket head cap screw (914.01) and the nut (920.01) for this purpose.(When the pump is equipped with a steel coupling, never use the same coupling twice but order a new one). 4. Place the motor on the motor stool (341). 5. Tighten the lower bolts of the coupling shells (862) so far that the coupling slightly clamps around the motor shaft. 6. Lift the pump assembly to the maximum upwards position and mark the shaft. For this purpose put a tyre lever under the coupling. Make sure the coupling can move smoothly over the motor shaft, so that the shaft will not be lifted out of the bearing (see 19.2.1 Install the motor on pumps, supplied without motor, with a standard mechanical seal. 147). ATTENTION For motors of 11 kW or higher, block the rotor when adjustments are made to the coupling. This ensures that the rotor will not come out of its bearings. WARNING Correct seal tension max. -1 mm lower than the maximum upwards position! 7. Position the pump assembly 1mm lower than the maximum upwards position as mentioned earlier. 8. Fully tighten the couplings to the correct torque. The maximum torque is mentioned in 32.1 Torques (all pump types) 204.). Make sure that the gaps between the couplings are equally divided on both sides (see drawing). 9. Attach the coupling guards (681) with the hexagon head bolts (901.01) to the motor stool (341). 10. Connect the pump to the electrical power and put the pump into operation according to the proce-dures stated in 15.4 Safety precautions 139 and 19.3 Electrical install 149. 3. Mount the four hexagon socket head cap screws (914.03) for the seal disc in the motor stool (341). The maximum torque is mentioned in 32.1 Torques (all pump types) 204. 4. Loosely fasten the coupling shells (862) with the coupling pin (560) on the shaft (210). Use the hexagon socket head cap screw (914.01) and the nut (920.01) for this purpose. (When the pump is equipped with a steel coupling, never use the same coupling twice but order a new one). 5. Place the motor on the motor stool (341). 6. With the pump shaft in the lowest position tightly mount the cartridge ring with three grub screws (904) on the shaft (210). The cartridge seal is now assembled correctly. 7. Tighten the lower bolts of the coupling shells (862) so that the coupling clamps slightly around the motor shaft. 8. Lift the pump assembly to the maximum upwards position and mark the shaft. For this purpose put a tyre lever under the coupling. Make sure the coupling can move smoothly over the motor shaft, so that the shaft will not be lifted out of the bearing (see 19.2.1 Install the motor on pumps, supplied without motor, with a standard mechanical seal. 147). ATTENTION For motors of 11 kW or higher, block the rotor when adjustments are made to the coupling. This ensures that the rotor will not come out of its bearings. 25.4.2 HILV(S)F 32/45/65 with mechanical cartridge seal 1. Remove the coupling guards (681) and the coupling shells (862). 2. Remove all possible paint, preservation means and/or grease found on the face of the motor stool (341), the shaft (210), the coupling shells (862) and the motor shaft. If present remove the key from the motor shaft. WARNING Correct seal tension max. -1 mm lower than the maximum upwards position! 79 9. Position the pump assembly 1mm lower than the maximum upwards position as mentioned earlier. 10. Fully tighten the couplings to the correct torque. The maximum torque is mentioned in 32.1 Torques (all pump types) 204.). Make sure that the gaps between the couplings are equally divided on both sides (see drawing). 26 De-staging 26.1 De-staging a pump For the pump types HILV 24/32/ 45/65 destaging is not a factory option because of the complete hydraulic range of these pump types. ATTENTION Only the upper pump stage of the pump can be de-staged. 11. Install the coupling guards (681) with the hexagon head bolts (901.01) to the motor stool (341). 12. Connect the pump to the electrical power and put the pump into operation according to the 15.4 Safety precautions 139 and 19.3 Electrical install 149. ATTENTION For correct assembling an disassembling of the pump, consult the preceding chapters about assembling and disassembling the pump type concerned. When de-staging a pump fitted with the original full (upper) stages, proceed as follows: 26.1.1 HILV 32/45 • • Replace the upper impeller (pos 230) by a "spacer sleeve de-staging" (pos 525.08). Replace the "Diffuser upper" (pos. 171.03) by a "stage casing bottom" (pos 108.04) However, do not fit the O-ring present! 26.1.2 HILV 65 • • 80 Replace the upper impeller (pos 230) by a "spacer sleeve de-staging" (pos 525.08) The stage casing remains the same, and does not have to be replaced! 27 Torques 27.1 Torques (all pump types) WARNING The torques given in the table below are valid for materials at 20 °C, therefore it is essential that pumps are assembled at 20 °C ambient temperature. Table 21: Coupling shells (pos. 914.01) Type Bolt size Torque Steel M6 16 Nm Steel and cast iron M8 30Nm Aluminium M8 22Nm Cast iron M10 70Nm Table 22: Screwed plugs (pos.903.02) WARNING Never tighten nuts and bolts to the required amount of torque at once. Always make sure to increase torque using at least 3 attempts before reaching the required amount. Pump V(C/S) 32/45/65 Bolt size M12 Torque 10Nm Table 23: Seal cover (pos. 901.05) Pump V(C/S) 32/45/65 Bolt size M6 Torque 10Nm WARNING Always make sure to tighten nuts and bolts crosswise! WARNING The torques given in the tables below already take into account possible frictional resistance of windings and materials. Therefore, never use grease, copper paste or oil on the nuts and bolts when applying the torques! Table 19: Shafts (pos. 920.02) Bolt or nut Shaft diameter Torque Bolt M6 11Nm Bolt M8 12 mm Bolt M8 16 mm 25Nm 30Nm Bolt M10 70Nm Lock nut M10 V(C/S) 28Nm Lock nut M10 LH S 6 40Nm Lock nut M12 50Nm Table 20: Tie bolts (pos. 920.03) Pump Types Torque V(C/S) 2/4 12Nm V(C/S) 10/14/18 20Nm V(C/S) 24/32/45/65 70Nm LHS 6 80Nm 81 28 Bearing positions 28.1 Bearing positions HILV(S)F 32/45 01 171.01 Diffuser 02 171.02 Diffuser with ceramic bearing1 03 171.03 Diffuser upper 04 108.04 Stage casing bottom Impeller location 1. Counter parts of the bearing on the shaft (529 bearing sleeve, 525.01 spacer sleeve short) Nr. of stages 17 03 16 02 15 01 14 01 03 01 03 02 01 03 02 01 02 03 02 01 01 01 03 02 01 01 02 01 03 02 01 01 01 01 01 03 02 01 01 02 02 01 02 03 02 01 01 01 01 01 01 01 03 02 01 01 02 02 01 01 02 01 03 01 01 01 01 01 01 01 01 01 01 03 01 01 01 01 01 01 01 01 01 01 01 13 12 11 10 9 8 7 6 5 4 3 82 2 02 02 02 02 02 02 02 02 02 02 02 02 02 1 04 04 04 04 04 04 04 04 04 04 04 04 04 HILV(S)F 32 10 20 30 40 50 60 70 80 90 100 110 120 HILV(S)F 45 10 20 30 40 50 60 70 80 90 100 28.2 Bearing positions HILV(S)F 65 01 171.01 Stage casing 02 171.02 Stage casing with ceramic bearing1 550 550 Disc bottom Impeller location 1. Counter parts of the bearing on the shaft (529 bearing sleeve, 525.01 spacer sleeve short) Nr. of stages 10 01 01 02 01 02 01 01 02 01 02 01 02 01 02 01 01 02 01 02 01 02 01 02 01 02 01 02 01 01 01 01 01 01 01 01 01 02 02 02 02 02 02 02 02 9 8 7 6 5 4 3 2 02 1 550 550 550 550 550 550 550 550 550 HILV(S)F 65 10 20 30 40 50 60 70 80 90 83 29 Sectional drawings 29.1 Sectional drawing HILV(S)F 32 84 29.2 Sectional drawing HILV(S)F 32 with cartridge seal 85 29.3 Sectional drawing HILV(S)F 45 86 29.4 Sectional drawing HILV(S)F 45 with cartridge seal 87 29.5 Sectional drawing HILV(S)F 65 88 30 Exploded views 30.1 Exploded view motor 89 30.2 Exploded view HILV(S)F 32/45 90 30.3 Exploded view HILV(S)F 32/45 with cartridge seal 91 30.4 Exploded view HILV(S)F 65 92 31 Bill of materials 31.1 References in bill of materials B = Number of stages with bearing (see chapter 33 Bearing positions 205). C = Number of stages without bearing (see chapter 33 Bearing positions 205). N = Number of stages. (..) = Depending on pumptype. 31.2 Bill of materials HILV(S)F 32/45 Motor stool assembly Number (ZN) Description Quantity 800 Motor 1 722 Flanged tap piece (1) 901.04 Hexagon head bolt (4) 554.04 Washer (4) 920.05 Nut (4) 914.02 Hexagon socket head cap screw 4 341 Motor stool 1 471 Seal cover (1) 525.07 Spacer sleeve (1) 500 Ring (1) 904 Grub screw (3) 412.05 O-ring (1) 412.06 O-ring (1) 914.03 Hexagon socket head cap screw (4) 920.01 Nut 4 914.01 Hexagon socket-head cap screw 4 862 Coupling shell 2 560 Pin 1 681 Coupling guard 2 901.01 Hexagon head bolt 4 Stationary hydraulic parts assembly Number (ZN) Description 903.01 Screwed plug Quantity 1 411.01 Joint ring 1 412.02 O-ring 1 160 Cover 1 412.01 O-ring 2 10-6 Pump-shroud 1 509.02 Upper intermediate ring 1 171.03 Upper diffuser 1 509.01 Intermediate ring 1 171.02 Diffuser with ceramic bearing B 171.01 Diffuser C 108.04 Bottom stage casing 1 412.03 O-ring N 905 Tie bolt 4 920.03 Nut 4 554.01 Washer 4 93 Rotating hydraulic parts assembly Number (ZN) Description Quantity 210 Shaft 1 433 Mechanical seal 1 932 Circlip 1 525.05 Spacer sleeve seal 1 525.06 Spacer sleeve seal extension (1) 230/230.01 Impeller N 230.02 Half head impeller (1) B/1 525.01 Spacer sleeve short 529 Bearing sleeve B 525.03 Spacer sleeve long C 525.04 Spacer sleeve end 1/B 920.02 Lock-nut with non metallic insert 1 930 Safety device nord-lock 1 Pump casing assembly Number (ZN) Description Quantity 890 Baseplate 1 101 Pump casing 1 400 Gasket 2 903.02 Screwed plug 1 412.04 O-ring 1 901.03 Hexagon head bolt 16 723 Flange (round) 2 920.04 Nut 16 554.03 Washer 32 31.3 Bill of materials HILV(S)F 65 Motor stool assembly 94 Number (ZN) Description Quantity 800 Electric motor 1 722 Taper piece flanged (1) 554.02 Washer 4 914.02 Hexagon socket head cap screw 4 341 Motor stool 1 471 Seal cover (1) 525.07 Spacer sleeve cartridge (1) 500 Cartridge ring (1) 904 Grub screw (3) 412.05 O-ring (1) 412.06 O-ring (1) 914.03 Hexagon socket head cap screw (4) Motor stool assembly Number (ZN) Description Quantity 920.01 Nut 4 914.01 Hexagon socket head cap screw 4 862 Coupling shell 2 560 Pin 1 681 Coupling guard 2 901.01 Hexagon head bolt 4 Stationary hydraulic parts assembly Number (ZN) Description Quantity 903.01 Screwed plug 1 411.01 Joint ring 1 412.02 O-ring 1 160 Cover 1 412.01 O-ring 2 10-6 Pump-shroud 1 509.02 Upper intermediate ring 1 509.03 Lower intermediate ring 1 509.01 Intermediate ring N-1 171.02 Diffuser with ceramic bearing B 171.01 Diffuser C 550 Bottom disc 1 412.03 O-ring N 905 Tie bolt 4 920.03 Nut 4 554.01 Washer 4 Rotating hydraulic parts assembly Number (ZN) Description 210 Shaft Quantity 1 433 Mechanical seal 1 932 Circlip 1 525.05 Spacer sleeve seal 1 230 Impeller N 525.01 Spacer sleeve short B 529 Bearing sleeve B 525.03 Spacer sleeve long N-1 525.02 Spacer sleeve middle C-1 525.04 Spacer sleeve end 1 920.02 Lock-nut with non metallic insert 1 930 Safety device nord-lock 1 Pump casing assembly Number (ZN) Description Quantity 890 Baseplate 1 101 Pump casing 1 400 Gasket (oval / round) 2 903.02 Screwed plug 1 412.04 O-ring 1 901.03 Hexagon head bolt 16 723 Flange (round) 2 920.04 Nut 16 554.03 Washer 32 95 It is Smedegaard’s policy to continually improve and develop its product range. We reserve the right to change specifications without prior notice. Whilst every care has been taken to ensure the data is correct, no responsibility can be taken for inaccuracies or misprints. Smedegaard Pumps Ltd United Kingdom Tel. +44 (0)1278 458 686 Fax +44 (0)1278 452 454 [email protected] www.smedegaard.co.uk T. Smedegaard A/S Denmark Tel. +45 43 96 10 28 Fax +45 43 63 17 66 [email protected] www.smedegaard.dk