1
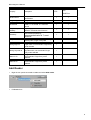
Biomanager
Version 2.5
11/10/2011
User Manual
Biomanager 2.5 Manual
Table of Contents
About 3
Software 4
How to start 4
Language 4
Password 4
Keycode 5
Portals 5
Add Portal 6
Edit Portal 6
Delete Portal 7
Readers 7
Readers properties 7
Add Reader 8
Edit Reader 11
Delete Reader 11
Calibrate sensor 12
Users 12
Add user 12
Edit user 12
Delete users 13
Enroll fingers 13
Upload fingerprint to readers 14
Delete fingerprints 14
Complex user upload 15
Custom Wiegand 15
Troubleshooting 17
Glossary 19
2
Biomanager 2.5 Manual
About
Biomanager is suport utility for fingerprint readers.
Functions:
- Readers configuration
- User management
- Finger templates storage
- Upload templates to readers
- Readers firmware update
3
Biomanager 2.5 Manual
Software
How to start
First time after the installation of Biomanager it is recommended to follow bellow steps in described order:
o
o
o
o
o
o
o
o
o
Run Biomanager, default password is "admin"
Select language
Change Biomanager password
Set Keycode length if readers with keypad are used
Add portals
Add readers
Add users
Enroll users fingerprints
Upload users to readers
Language
o From main menu select language menu and choose language.
o Restart Biomanager
Password
o From the main manu select Password from Settings menu
o Fill password form with current and new password and click on Save & Exit button
4
Biomanager 2.5 Manual
Keycode
Keycode length is number of digits to be typed at reader to grant access.
Keycode length can be from 1 to 8 digits.
Default length is 4 digits.
Changing Keycode length:
o Select System parameters from System menu
o From drop-down list select desired value and click Save button
Portals
5
Biomanager 2.5 Manual
Add Portal
o Right click on Portals and select Add portal
o Fill Portals form
- Enter portal name by your choice
- If connection is via network with CNV300 check "Network" box, enter IP address of CNV300, enter IP Port
of CNV300
- if connection is with CNV100 or CNV200 leave check box unchecked and chose serial port from drop-down
list
o Click Save button
Under "Portalstree appears new portal, with icon
for network and icon
for serial interface
Edit Portal
o Right-click on desired portal and select Properties
6
Biomanager 2.5 Manual
o Edit values on Portals form
o Click Save button
Delete Portal
o Right-click on desired portal and select Delete portal
Readers
Readers properties
Reader properties may vary depends on type
7
Biomanager 2.5 Manual
BioC
Property
Description
BioXr
BioIn Prox
Serial number
Unique serial number of device, built in by
manufacturer
o
o
Wiegand type
Wiegand format sent to reader controller
o
o
Sound level
Level of the sound generated from the
reader, 0 = no sound, 9 = maximum
volume
o
o
Finger acceptance
flexibility
Adjust fingerprint tolerance, recommended
default is "Automatic More Secure"
o
o
Sensitivity
Bio-sensor sensitivity,
recommended value is 7, most
sensitive.
o
o
Entry mode
Reader authorisation mode - Finger, Finger
and Keycode, Finger or Keycode
o
Wrong finger ID
Wiegand code sent if reader do not find
finger match, not functional if Finger Entry
mode selected
o
Wrong Keycode ID
Wiegand code sent if reader do not find
keycode match, not functional if Finger
Entry mode selected
o
Button A ID
Wiegand code sent if button A is pressed,
not functional if Finger Entry mode
selected
o
Button B ID
Wiegand code sent if button B is pressed,
not functional if Finger Entry mode
selected
o
Add Reader
o Right-click on portal connected to reader and select Add reader
o Fill Reader form
8
Biomanager 2.5 Manual
o Click on Save button and reader icon appears under the selected portal
o Right-click on reader and select Version info
9
Biomanager 2.5 Manual
If reader is online, new line is added on top of the event table
If reader is not online, following line is added on top of the event table
o If reader is online, right click on reader and select Upload configuration
o Check at event table if configuration was successful
10
Biomanager 2.5 Manual
Edit Reader
o Right-click on reader and select Properties
o Edit reader properties and click Save button
o Right click on reader and select Upload configuration
o Check at event table if configuration was successful
Delete Reader
o Right-click on reader and select Delete reader
11
Biomanager 2.5 Manual
Calibrate sensor
o Right-click on reader and select Calibrate
o See events panel to check Calibration flow
It is recommended to do sensor calibration once after reader is mounted. Clean the fingerprint sensor before
calibration.
Users
Add user
o At user table, click on last empty user field and enter user name
o Click on ID (User code) field and enter ID number. This number will be send by reader to access controller when
user finger is recognised by reader
o Click on PIN code field and enter PIN. PIN code is used at readers with keypad. When PIN code is typed at
reader, User ID will be sent to access controller
Edit user
o
o
o
o
Find user at user table to edit
Click on user field for edit (Name, ID or PIN)
Type new value
Press Enter on keyboard
Important:
When ID is changed, warning message is displayed reminding that if ID exist in some reader, should be deleted
from reader prior to change.
12
Biomanager 2.5 Manual
Delete users
o Check users to be deleted
o Right-click on users table
o Click on Delete checked users menu
o Confirm warning message
Enroll fingers
o Select the User in the User Column, not the check box (the check box is for sending the fingerprints) and the
User name cell will turn blue
o Select the Fingerprint reader or Desktop reader BioE from where the enrollment will be done
o Right click on the fingertip and select Enroll
o Swipe the finger on the Reader and the finger tip will become blue, with percentage of successful enrollment
given right beside the fingertip
13
Biomanager 2.5 Manual
Note: If more fingerprints are added for one user, all the fingers will send the same Wiegand Code to the controller.
Upload fingerprint to readers
o Check the users which fingers will be sent to the Reader
o Right-click on the Fingerprint reader those users should be sent and select Upload users
o As each user is being sent, the checkbox will become unchecked indicating that the user is successfully sent.
In the same time the Amber LED of the Fingerprint Reader blinks
Note: Average time for transferring one finger template is 0,8 sec.
Note: The PIN Codes are also being sent, if there are any.
Delete fingerprints
After transferring, the fingerprint are stored in the Fingerprint reader and in the PC.
Deleting can be done only in the software, only in the readers or from the both places.
Deleting one user from the fingerprint Reader
o Select the users checkbox.
o Right click on the Reader and select Delete Users
14
Biomanager 2.5 Manual
o The user is deleted from the reader, but his fingerprints are still in the software’s database. They can be sent
ones again without the need of re enrollment.
Deleting all users from the fingerprint Reader
o Right click on the Reader and select Delete all
Complex user upload
Complex user upload is used to sent multiply user selection to more readers.
o Click on Upload table at main menu
o Use mouse click to select combination you need or use right-click to check or clear entire row or column
o Select Upload Users to readers or Delete Users from readers at right-click menu
o As upload is progressing, check boxes are cleared mining appropriate combination was successfully done
o When upload is over, if there is still checked items, repeat upload command
Custom Wiegand
Biomanager have defined Wiegand 26 and 34 bit as standard options, and leave 3 wiegand settings as user
definable.
To setup custom wiegand format
o Select Wiegand menu from Settings
o At wiegand setup window select one from customs wiegand
15
Biomanager 2.5 Manual
o Set wiegand parameters
o Click on Save button
Note:
Wiegand settings are out of scope for common end user. Please ask your installer to set parameters and
do not change if later.
16
Biomanager 2.5 Manual
Troubleshooting
o Reader reading performance is decreased
1. Check if fingerprint reading area is dirty. Do not clean the device with any form of liquid. Use soft
and dry cloth only.
2. Reading area is damaged. If damage is minor, try to calibrate the sensor
o Fingerprint is not recognized normally
1. Retry after drying the wetness of your finger
2. When your finger is too dry, touch your forehead and try again
3. When you have a cut on your registered finger, register another fingerprint.
o Fingerprint is recognised but Control panel report other ID number
1. If the user is not deleted from reader and user is enrolled again with new ID, reader will recognise finger
with first ID. To resolve this, delete all users from reader and upload all users to reader
17
Biomanager 2.5 Manual
18
Biomanager 2.5 Manual
Glossary
A
Access Area: Space with restricted access by reader. One area can contain more separate areas. Can be one or
group of rooms, parking lot, fence restricted area...
Access controller:When a credential is presented to a reader, the reader sends the credential’s information,
usually a number, to a Control panel, a highly reliable processor. The control panel compares the credential's
number to an internal access control list, grants or denies the presented request, and sends a transaction log to a
database. When access is denied based on the access control list, the door remains locked. If there is a match
between the credential and the access control list, the control panel operates a relay that in turn unlocks the door.
The control panel also ignores a door open signal to prevent an alarm. Often the reader provides feedback, such as a
red LED for an access denied and a green LED for an access granted.Smart electronic with ability to remember
User Id's, Time zones, Events, to control Doors, Relays, recieve informations of Door state, Inputs, Readers,
Communicate with Access control software and to take action based on events and programmed parameters
Access level: Definition of time zones for each reader. Users can access readers only at time zones defined in
Access level they belong. One user can be assigned only to one Access level. Same time zone can be used in
unlimited number of Access levels.
Anti-passback: Prevention of allowing the user to enter area more than once with the same ID. It is prevention from
borrowing the ID to another person in purpose of entering the area. This function is useful when higher level of
security is needed, counting of persons in areas, time attendance, fire reports, etc. Anti-passback can have more
variations. It can be valid for one or more readers, one or more doors, can be reset as fixed time of the day, can
prevent double acces within a given period of time. Since Access controler is enforcing this restrictions, Antipassback can be enforced only at doors and readers connected to the same controller.
B
Biometry: Way of recognising specific body parts specific to each person. Most common parts used in security
systems are Fingerprint, Face, Eye, Finger vein, Voice and Palm. For higher security biometry can be mixed and
combined with standard acces techniques like Fingerprint + Proximity card, Fingerprint + Code.
C
Code: Personal identification presented by typing a sequence of numbers to keypad. Depending on keypad model it
can be fixed or variable length.
COM, COM port: Serial communication interface. Can be existing port in PC or can be external component.
External component can be USB device with drivers of can be network device using drivers at PC side to create
virtual COM port.
Control panel: Same as Access controller
D
Department: Grouping the users by internal organisation. Used for printing reports with convenient grouping of
users.
Door contact sensor: The sensors are standard magnetic door sensors used in security applications.
Either Normally Open or Normally Closed Sensors can be used. Recommended are Normally
Closed sensors (door closed, switch closed) so that a alarm can be generated if the connection wire
breaks.
E
Egress button, Exit switch: Push-button used to open the door from protected area side. Connected to Access controller.
Electronic touch sensors can be used for same function.
Electric strike:access control device used for doors. It replaces the fixed strike faceplate often used with a latchbar (also
known as a keeper). Like a fixed strike, it normally presents a ramped surface to the locking latch allowing the door to close
and latch just like a fixed strike would. However, an electric strike's ramped surface can, upon command, pivot out of the way
of the latch allowing the door to be pushed open (from the outside) without the latch being retracted (that is, without any
operation of the knob) or while exited the knob or lever can be turned to allow egress from the secured area.
Electric strikes generally come in two basic configurations:
19
Biomanager 2.5 Manual
o Fail-secure. Also called Fail-locked or non-fail safe. In this configuration, applying electrical current to the strike will
cause it to open. In this configuration, the strike would remain locked in a power failure, but typically the knob can still be
used to open the door from the inside for egress from the secure side. These units can be powered by AC which will
cause the unit to "buzz", or DC power which will offer silent operation, except for a "click" while the unit releases.
o Fail-safe. Also called Fail-open. In this configuration, applying electrical current to the strike will cause it to lock. In this
configuration, it operates the same as a magnetic lock would. If there is a power failure, the door would open merely by
being pushed/pulled open. Fail safe units are always run using DC power.
F
Fingerprint reader: Reader with ability to recognise human finger and send information to Access controller.
Fire alarm input: Triggering this input will release all doors controlled by Control panel
Firmware: Programs and data structures that internally control various electronic devices
Free Input: Additional inputs available at Access controller. Not dedicated to primary role of Access control. Can
be configured for additional monitoring of other events (Alarm, Fire..) or user action (Bell, Panic...)
Free output: Additional outputs available at Access controller. Not dedicated to primary role of Access control. Can
be configured for execution of some tasks (Timer, Alarm bell, Light control..)
I
ID: Identification number presented to Access controler by Reader. Reader get information from media presented
(Proximity card, Code, Biometry) and translate it to number format that Access controler can recognise.
Input: Hardware gate on Access controller able to recieve information about other equipement. It can be dedicated
to specific task ( door monitor, egress button..) or can be programmatically assigned to monitor other devices
( Intruder alarm, fire, temperature). Access controller can be programmed to execute specific actions following the
change of the inputs state. Inputs can have only two states ( OFF/ON ) . Inputs also are used to pass the
information to Access control software.
IP Address: An Internet Protocol (IP) address is a numerical label that is assigned to devices participating in
a computer network that uses the Internet Protocol for communication between its nodes.
IP Port: A port number is a 16-bit unsigned integer, thus ranging from 0 to 65535. A process associates with a
particular port (known as binding) to send and receive data, meaning that it will listen for incoming packets
whose destination port number and IP destination address match that port, and/or send outgoing packets
whose source port number is set to that port.
M
Magnetic lock: simple locking device that consists of an electromagnet and armature plate. By attaching the
electromagnet to the door frame and the armature plate to the door, a current passing through the electromagnet
attracts the armature plate holding the door shut.
Mantrap: Group of doors with logic that only one door can be open at the time. Opening the one of the door lock all
other doors until it closes. Using combination of inputs and outputs mantrap can be extended to doors from different
Access controllers in the same site.
O
Operator: Person listed at Access control software with given right to one or more options.
P
PIN Code: Personal identification presented by typing a sequence of numbers to keypad. Depending on keypad
model it can be fixed or variable length.
Portal: Hardware interface between Access control software and devices installed in the system. One portal can
connect one or more devices to software. Portal can be existing as single device or as a part of Access controller.
R
Reader: Device installed near access barrier (door, gate, turnstile..) to recognise user identification media ( card,
code, finger..) and send information to Access controller.
Relay: Electrical component used as output at Access controller. Provide eclectic isolation between Access
20
Biomanager 2.5 Manual
controller and device that is controlled by output. Relay have two state: ON and OFF. Output of the relay provide
mechanical switch contact with two outputs - one contact is open when relay is energised and other is closed.
.
T
Time zone: Definition of time period of the day used later to define system behaviour by time periods. Time zone
also have definition of weekdays and holidays as additional filter for system behaviour.
Touch sensor: Electronic device reacting on human touch. Mostly used as egress button.
W
Wiegand interface: W iring standard used to connect a card swipe mechanism to the rest of an electronic entry
system. A Wiegand-compatible reader is normally connected to a Wiegand-compatible security panel.
21