1
AlarmAlert© Notification Processor
(Copyright fdindustries, 2012; Manual 20121115.0)
Purpose:
®
AlarmAlert* monitors files that are being created by another process (in this case WhatView ) and reports on
occurrences of text strings created by that process that are added to that process’s log files.
AlarmAlert then notifies members of (user) defined groups of the alarm condition via email and/or cell phone
text messaging. Internet and SMTP access is required for its operation.
AlarmAlert has an automatic updating feature, allowing the system to acquire and execute updates when made
available.
AlarmAlert is meant to run whenever the log-file creating device is running.
AlarmAlert is designed and certified to run on Intel©-based PCs, under Windows XP© and Windows 7©. Use
on any other operating system will have to be requested from the manufacturer.
AlarmAlert is a licensed product, and is capable of monitoring up to 10 alarm conditions as sold. Additional
alarm events can be configured by the manufacturer on an as-needed, licensed, per contract basis.
Use:
The AlarmAlert Process Screens
This system has three processes running, with two typically on-screen and one typically minimized (although
all three can be minimized at any time once the alarms and notifications are defined). In every case where you
see a question mark in a box you can find ‘Help”. Most of what follows is contained in these Help files.
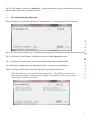
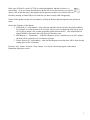
1)
The Master Controller:
This is the first screen that you will see when
AlarmAlert is started.
If you ‘hover’ over each of the items (descriptions and
boxes) you will see an explanation of their purpose.
Here it can be seen from the checked boxes that the
System is running and monitoring the subject file
system and the updater is also running.
Checking the ‘Reset’ box will cause a reset of the process that is checked. Checking the ‘Cycle’ box is not
used in this version.
The ‘Define Targets’ button is a setup by the manufacturer, put here only for support purposes. The ‘Reset
Chkd’ button resets ALL of the above-listed processes (like checking all of the ‘Reset’ buttons above).
(* - Remote control through the AlarmAlert interface is also available as a different, engineered product)
1
M
a
s
t
e
r
C
o
n
t
r
o
l
l
e
r
The ‘Exit All’ button is used to exit AlarmAlert . It stops the other two processes and then closes itself (not
always in that visual order, depending on the PC)
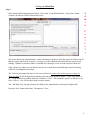
2)
The Alarm Monitoring Subsystem:
This screen/process is spawned by the Master Controller process. At this point there are no alarms set.
A
l
a
r
The ‘View Current File’ button is for viewing the monitored process-created file where the alarms are created. m
The ‘View History Events’ button is to display the activity file that AlarmAlert creates.
M
o
n
i
t
o
r
The ‘Control Panel’ button is where you set up your alarms and notification information.
The clock display contains the license information (‘hover’ to see the acces information).
Again, ‘hovering’ with the mouse cursor over these boxes will instruct in their use.
{This shows what the screen looks like when alarms are set. The GREEN is no alarm, the
red is an alarm condition. Instructions for setting the alarms follows, and is access with the
‘Control Panel’ button on this screen.
}
2
3)
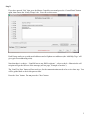
The Process Watcher:
This window shows the overall process watching subsystem. It makes sure everything is running and
checks for updates.
This screen is typically minimized (IPI_Lab_Number_One W in this example).
The ‘Web Enabled’ button must be green. When clicked (then red) it stops outbound traffic, used for
testing mainly. The ‘Stop’ button stops the log reporter, i.e. watching the files, also lets the program exit
with that button. ‘Stop Watching’ does the same thing, but the program keeps running, ‘Start Watching’
turns on the logic that keeps the program running even if ‘Exit’ is pushed – minimizes it to the task bar.
The ‘Setup’ button is where the communications, etc., is entered, allowing AlarmAlert to send email and
text alerts (see Step 4, below).
When an alert is being sent there is the notification, in red, at the bottom left, as can be seen in the figure,
above.
P
r
o
c
e
s
s
W
a
t
c
h
e
r
3
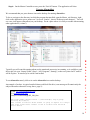
Setting up AlarmAlert
Step 1:
A
d
m
i
n
In the Alarm Monitoring Subsystem Screen, click on the ‘Control Panel button. Choose the ‘Admin
Controls’ tab and you will be taken to this screen:
C
o
n
t
r
o
l
s
This screen defines the Administrators’ contact information, the hours of the day (based on 24 hour clock)
that the system sends out an ‘I am alive’ message to let the Administrators know that the system is still
running. Whether or not these folks are included in all messages is sent set in the top-most check box.
It has a footer box where you can add the same footer on each alarm and notification, best for knowing
which PC is sending these messages.
The ‘Directory to monitor the logs in’ box is used to browse to where the monitored process keeps its
alarm log files, the file being monitored being where the alarm conditions appear. In this case shown as
the …\logs subdirectory, and the alarm file watched is *.LOG. This example is specific to WhatView (see
Step 3, below). You will use this to help set up the alarms.
The ‘Add Help Tags’ just gives formats for filling in the Administrators email and cell phone info.
Press the ‘Save’ button when done. Do not press ‘Close’.
4
Step 2:
If you have pressed ‘Exit’ then go to the Master Controller screen and press the ‘Control Panel’ button
again, then choose the ‘Notify Groups’ tab. You will see this screen:
Each Group can be set up with email addresses and cell phone text addresses (the ‘Add Help Tags’ will
give typical text addressing rules).
Note that there is a choice – ‘Send full text to any SMS recipients’ – a box to check. Otherwise the cell
recipient will get the full text of the message (see last page, ‘Example of an alert’).
The ‘Send Test Now’ button will not work yet, for the communications needs to be set in a later step. You
will be guided back to check this part out later.
Press the ‘Save’ button. Do not press the ‘Close’ button.
5
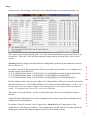
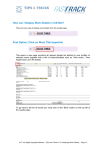
Step 3:
Navigate to the ‘Alarm Triggers’ tab and you will see the following screen (without the alarms set):
This is where close attention must be paid. Over in the Alarm Monitoring screen press the button ‘View
Current File’. This is the *.LOG file that contains the alarms that you set up in Step 1, above, in this
section.
AlarmAlert looks for strings (text) that match the verbiage that is produced by the monitored system (in
this case WhatView).
A
l
a
r
m
For alarms 1 through 10 the system looks at file content to pick out text of interest. For example, here is
an alarm sequence from WhatView:
13:31:59 [2000] Channel Alarm - [CLS216-RS(#1) Loop 4][High Process(Ack Required)](0)(0)(4)(5)
13:31:59 [2000] Channel Alarm - [CLS216-RS(#1) Loop 2][High Process](0)(0)(6)(5)
13:32:12 [2000] Channel Alarm - [CLS216-RS(#1) Loop 1][High Process (Acked)](0)(0)(4)(5)
For this example we have chosen to have Phrase I be ‘Channel Alarm’; Phrase 2 to be the first part of the
data in the [brackets], i.e. CLS216-RS; and Phrase 3 to be the actual alarm differentiator – Loop 1, 2 or 4.
Phrase patterns are case sensitive!! Make certain that upper/lower case and punctuation are followed
exactly!! Cut & paste from ‘Current File’ views is not a bad idea.
T
r
i
g
g
e
r
s
There must be text in the Phrase 1 window else the notification will not work, and the box cannot be
checked.
The Notification Email Subject Text can be anything, but here we have entered the actual alarm and its
condition for exact identification.
For alarms A1 and A2 (Activity 1 and 2, respectively), AlarmAlert looks for the presence or the
modification of a file, but not its contents. The presumption here is that, if the file is neither present nor
changing on a periodic basis then the monitored system is not working correctly.
6
In the case of WhatView an Excel™ file is created and updated, and that is what we’ve
entered here. To do so, browse the little box with the dots in it to the directory (you need to
choose a file in that directory), then modify the file pattern to whatever you want, in this case *.XLS.
Finish by entering an Email Subject Text that lets you know exactly what is happening.
Choose which group to notify for each alarm by clicking in the box and choosing from the pull-down
menu.
Choose the frequency of the alarms:
1. Notify Rate (2 – 600 minutes) – this is the time until the alert is sent after the alarm condition.
For example, if an alarm exists at 10:45 and its value is set to 5 minutes the alert will go out at
10:50 (plus or minus a few seconds, depending on the load on the PC). This notification will
appear in RED at the bottom left of the Process Watcher screen.
2. Max Repeat (1 – 100 minutes) – If the Max Repeat is set for 6 and the rate is set for 5 minutes
the alert will be repeated every five minutes six times.
3. Silence Period (10 – 600 minutes) – after the Max Repeats occurs the alert will be silent for this
setting (here set for 30 minutes).
Press the ‘Save’ button. Press the ‘Close’ button. You will see the alarms appear on the Alarm
Monitoring Subsystem screen.
7
Step 4:
This step is to set up the ‘Targets’ screen before entering the SMTP information. This will allow
you to test the notifications set up earlier.
As stated before, the Process Watcher screen is minimized as installed. In the task bar at the
bottom of your screen you will see an icon labeled {Process}-W (in this case
IPI_Lab_Number_One-W). Open that window and you will see the ‘Setup’ button. Press it.
In the screen that opens there are three buttons at the top – press the ‘Targets’ button and you will
see this screen:
T
a
r
g
e
t
s
S
e
t
u
p
The only change that needs to be made here is in the ‘Target Mutex Name’ box. Here
‘IPI_Lab_Number_One’ is the Name. It appears on the other process screens, as can be seen above.
Click on ‘Save’, then go to the ‘Connections’ button at the top.
The next step is to set up the SMTP information (next page)
8
Step 5:
Press the ‘Connections’ button. This step sets up the SMTP specs so that the alerts will be sent.
Here you need to fill in (if you do not have this it can be gotten from your IT people or your ISP):
1.
2.
3.
4.
the SMTP Mail Server name;
The SMTP Username (not necessarily needed in all cases);
{if it doesn’t work at first, add
The SMTP Password (not necessarily needed in all cases);
these in.}
The Email Subject – MUST BE FILLED IN, a good idea to make it easily recognizable and
unique;
5. The Email From address – can be a bogus address;
6. SMTP Port – usually 25 (can be anything - ours is actually 587)
S
M
T
P
S
e
t
u
p
Press the ‘Test HTTP’ button. You will get a ‘Success’ message if you have access to the internet.
Press the ‘SMTP’ button. You will get a ‘SMTP Success, check for email at [email protected]’ message
if you are configured correctly. If not successful at first add in the username and password (above).
Press ‘Save’. Press ‘Exit’.
9
Step 6: On the Master Controller screen, press the ‘Exit All’ button. The application will close.
Running AlarmAlert
We recommend that you put a shortcut icon on the desktop for running AlarmAlert .
To do so, navigate to the directory in which the program has installed, open the Master_ctrl directory, right
click on the application ‘grow_master.exe’, hover on ‘Send to’, choose ‘Desktop (create shortcut)’. You will
see a new icon appear (somewhere) on your desktop. Put in a place where it is easily accessible when running
other applications (a corner?).
Typically you will want this running whenever the monitored process(es) are running, so it would be a good
idea to put it in your ‘Startup’ folder (‘Start’,‘{All} Programs’, Startup’), so that every time the PC starts it
will be in place. It can always be exited if not needed.
To run AlarmAlert merely click twice on the AlarmAlert icon on the desktop.
An example of an alert: A typical emailed alarm would look like this (a text message will contain only the
subject line unless otherwise set-up, above, page 5):
From: [email protected]
To: [email protected]
Subject: Ozone too high IPI_Lab_One
00:13:09 [2000] Channel Alarm - [CLS216-RS(#1) Loop 4][High
Process](0)(3)(6)(5)
The license to monitor Alarm events is going to expire in 14 days!
The total alarm event counter is now 8 at 2012-11-16 09:41:45
Art's Office
R
u
n
n
i
n
g
A
l
a
r
m
A
l
e
r
10 t
Utilities
‘Hovering’ over words, boxes and buttons will give Help information that will probably be enough to get you
through any questions.
VUpdate: This is a process that, when checked, runs in the background and checks for updates automatically.
If you are made aware of an update and want it
immediately click on the word ‘VUpdate’ and you will be
taken to the update screen. Choose ‘Check for Updates’
and you will be given the chance to ‘Update Now’, then
the ‘Install Updates’ screen will appear when they are
downloaded. Choose ‘Install Updates’.
11