1
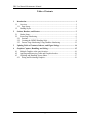
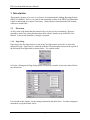
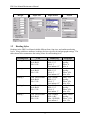
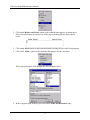
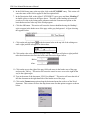
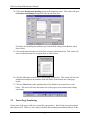
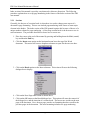
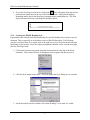
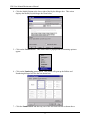
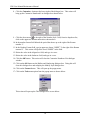
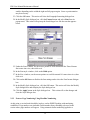
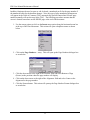
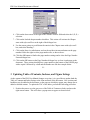
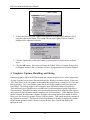
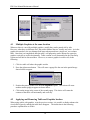
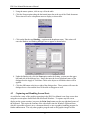
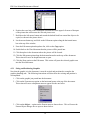
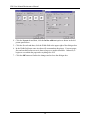
Finding Reporting System
User Manual
Maintenance Manual
Version 1.0
Produced by
United States
Internal Revenue Service
The Office Security Policy Support and Oversight
M:S:S
Author: Terry Reece
May 30, 2003
FRS User Manual Maintenance Manual
Table of Contents
1
Introduction ............................................................................................................... 1
1.1
Overview ..............................................................................................................1
1.1.1 Page Setup ........................................................................................................1
1.2
Heading Styles .....................................................................................................2
2
Sections, Headers, and Footers ................................................................................ 3
2.1
Header Setup ........................................................................................................3
2.2
Footer Page Numbering .......................................................................................6
2.2.1 Sections ............................................................................................................7
2.2.2 Creating the INDEX Heading Style .................................................................8
2.2.3 Footers: Page Numbering Using Headline Numbering .................................12
3
Updating Table of Contents, Indexes, and Figure listings .................................. 14
4
Graphics: Capture, Handling, and Sizing ............................................................ 15
4.1
Multiple Graphics at the same location .............................................................16
4.2
Applying and Removing Table and Graphics borders .......................................16
4.3
Capturing and Handling Screen Shots ...............................................................17
4.3.1 Sizing and Positioning Graphics ....................................................................19
i
FRS User Manual Maintenance Manual
1 Introduction
This manual‟s purpose is to serve as a reference for maintaining the Finding Reporting System
(FRS) User Manual. There is very little in the formatting or setup of the FRS User Manual that
is hard to understand or to adjust, if necessary. Almost anyone can maintain the FRS manual
without too much effort.
1.1
Overview
At first, some of the detail that this manual will cover may seem overwhelming. However,
remember, most of the setting this document deals with are already set up in the FRS User
Manual. It only needs attention if a change is required.
1.1.1 Page Setup
Page setup is the first logical place to start in any Word document, and so this is where this
manual will start. Page Setup is a submenu under the File menu option located at the top left of
the Microsoft Word application as shown below. For each tab in this
Of course, clicking on the Page Setup option will open up a window by the same name like the
one shown here.
For each tab in this window, use the settings indicated in the table below. For those setting not
mentioned, accept the default values.
1
FRS User Manual Maintenance Manual
Margin
1.2
Paper Size
Paper Source
Layout
Heading Styles
Headings in the FRS User Manual exhibit different fonts, font sizes, and outline numbering
levels. Along with these attributes, headings also have specific tab and paragraph settings. The
table shown below summarizes the setting values for each heading level.
Heading Style
Heading 1
Font
Font: Times Roman
Style: Bold
Size: 16 Pt.
Heading 2
Font: Times Roman
Style: Bold
Size: 14 Pt.
Heading 3
Font: Times Roman
Style: Bold
Size: 12 Pt.
Heading 4
Font: Times Roman
Style: Bold
Size: 12 Pt.
Heading 7
Font: Times Roman
Style: Bold
Size: 16 Pt.
2
Numbering
Type: Outline
Style: 1,2,3
Level: 1
Text indent: 0.5”
Type: Outline
Style: 1,2,3
Level: 2
Text indent: 0.5”
Type: Outline
Style: 1,2,3
Level: 3
Text indent: 0.5”
Type: Outline
Style: 1,2,3
Level: 4
Text indent: 1”
Type: Number
Style: A,B,C
Start: I (INDEX)
Text indent: 0.
Paragraph
Justify: Left
Spacing Before: 0
After: 0
Justify: Left
Spacing Before: 6 Pt.
After: 6 Pt.
Justify: Left
Spacing Before: 6 Pt.
After: 6 Pt.
Justify: Left
Spacing Before: 6 Pt.
After: 6 Pt.
Justify: Center
Spacing Before: 12 Pt.
After: 3 Pt.
FRS User Manual Maintenance Manual
2 Sections, Headers, and Footers
2.1
Header Setup
In Microsoft Word, the section‟s primary purpose is to allow the author to vary the layout of a
document within a page or between pages. A section break inserted into document divides it into
sections, allowing for a different page format for each. In the FRS User Manual, there are five
sections in all. Most of these sections have only minor page formatting differences. Formatting
for the five sections in the FRS User Manual appear in the summary table below.
Section
#1 - Title Page
None
#2 - Table of Contents & None
Table of Figures
#3 - Chapter 1 through
Chapter 8
Header
#4 - Index
Name of Chapter (left justified)
& Title of Manual (right
justified) with underline.
Same as section #3.
#5 - Index (continued)
Same as section #4.
Footer
None
Page Numbering
Starts at i,
Centered.
Page Numbering
Starts at 1,
Centered
Page Numbering
Starts at 1 and uses Index
Heading 7 for leading bullet
for I-9 format,
Centered.
Same as section #4.
Headers and footers can vary from one section to another. Even so, there are only two sections
where the setup might need some explanation. In section three, the header combines the title of
the current chapter (left justified) and the title the document (right justified). In section four, the
same header theme continues, but the page numbering combines sequential numbering with the
bullet numbering of the title, “INDEX.”
Section three makes use of a special function in Microsoft Word known as a field code. There
are many types of field codes that perform various functions. However, the one used in the
section three‟s header looks toward the beginning of the document for the last applied “Heading
1” style and incorporate the text that it applies to in the header of each page. This is set up as
explained by the following procedure.
1. Click on the View option at the top left of the horizontal menu at the top of the Word
program.
3
FRS User Manual Maintenance Manual
2. Click on the Header and Footer option on the submenu that appears, as shown above.
This action will display the header area of the page something like the figure shown
below.
3. Click on the Insert option on the horizontal menu bar along the top of the Word program.
4. Click on the Field ...option on the submenu that appears, like the one below.
This action will display field dialogue box like the figure below.
5. In the Categories pane at the top left, click on the Links and References entry.
4
FRS User Manual Maintenance Manual
6. In the Field Names pane at the top right, click on the STYLEREF entry. This action will
cause the name of the field to appear in the Description field.
7. In the Description field, to the right of “STYLEREF” type a space and then “Heading 1”
in double quotes as shown in the figure above. The name of the heading style must be
exactly as it is the styles listing on the submenu under the Format menu option on the
horizontal menu bar at the top of the Word program.
8. Click the OK button. This action will cause the last text headline having the Heading 1
style to appear in the header area of the page with a gray background. A figure showing
this appears below.
9. Click on the tab stop button
on the horizontal ruler at the top left of the editing area
until a right justified tab appears as shown here.
10. Click on the ruler at the rightmost margin setting. This action will place a right justified
tab at that location as shown in the before and after action figure below.
Before:
After:
11. Click on the area to the right of the gray field-code entry in the header area of the page
and press the Tab key. This action will cause the cursor to move over to the right all the
way to the right margin.
12. Type in the name of the document, “FRS User Manual.” This action will enter the title of
into the document at the right hand side of the header area of the page.
13. Click on the Format menu option along the horizontal menu bar at the to of the Word
document. This action will cause the drop down menu for that option to appear as shown
below.
5
FRS User Manual Maintenance Manual
14. Click on the Borders and Shading option on the dropdown menu. This action will open
the Borders and Shading dialogue box like the one seen here.
Generally, the one half point solid line style is the default setting for the Borders tab as
shown above.
15. Click on the bottom border area of the Preview pane in the Borders tab. This action will
cause a solid horizontal line to appear there as shown below.
16. Click the OK button on the Borders and Shading dialogue box. This action will close the
dialogue box and place an underline under the entries in the header area of the page
layout.
17. Click the Close button at the right hand side of the Header Footer menu bar as seen
below. This action will close the header area of the page layout so that normal editing
can resume.
2.2
Footer Page Numbering
Footer areas of the page usually have items like page numbers. Word‟s help system documents
this function well. However, some subject like how that numbering mechanism finds use in the
6
FRS User Manual Maintenance Manual
Index section of the manual is specialty, one that needs a bit more discussion. The following
procedure explains how to set up page numbering in the footers of the Index section of the FRS
user manual.
2.2.1 Sections
Generally, the best use of a section break is when there is a need to change some aspect of a
document‟s page formatting. This use can include page numbering in the footer or some major
element in the header. The index section of the FRS manual requires this because of the use of a
unique number scheme for page numbering. A Next Page section break is the best one to use in
such an instance. The procedure that follows shows how to create one.
1. Place the cursor at the end of the manual by pressing and holding down the Ctrl (control)
key and then the End key.
2. Click the Insert menu option on the horizontal menu bar at the top of the Word
document. This action will cause a dropdown submenu to open like the one seen here.
3. Click on the Break option on the Insert submenu. This action will cause the following
dialogue box to display.
4. Click on the Next Page radio button as shown above.
5. Click on the OK button on the Break dialogue box. This option will cause the removal of
the dialogue box, and the insertion of a section break. The cursor now resides on the next
page of the document. Now, the new page can take on formatting that does not affect the
previous pages in the document. This new formatting includes new page numbering.
7
FRS User Manual Maintenance Manual
6. To see the Next Page section break, click on the
Show All option along the tool bar
under the horizontal menu at the top of the Word document. This function displays
formatting marks such as tab characters, paragraph marks, and hidden text. The Next
Page break mark will look something like the figure below.
2.2.2 Creating the INDEX Heading Style
Page numbers that includes the bullet numbering of a specific heading style requires a special
treatment. This is especially so in the Index section of the FRS document. The following
procedure will show how to set up the style in the right way so as to setup for the special page
numbering for this section. Here, the starting assumption is that the cursor is on the new page
after the Next Page break.
1. Click on the Format menu option along the horizontal menu at the top of the Word
document. This action will cause its dropdown menu to appear like the one below.
2. Click the Style option on the menu. This will display the Style dialog box as seen here.
3. Scroll down the Styles list and then click on the Heading 7 style when it is visible.
8
FRS User Manual Maintenance Manual
4. Click the Modify Button at the lower right of the Styles dialogue box. This action
displays the Modify Style dialogue box seen below.
5. Click on the Format button. This action causes a popup menu of formatting option to
appear.
6. Click on the Numbering menu option. This action will open up the Bullets and
Numbering dialogue box like the one shown here.
7. Click the Numbered tab and then any one of the selections offered as shown above.
9
FRS User Manual Maintenance Manual
8. Click the Customize... button at the lower right of the dialogue box. This action will
bring up the Customize Numbered List dialogue box shown below.
9. Click the down arrow
to the right of the Number Style: field; from its dropdown list,
click on the uppercase Roman numerals as shown above.
10. In the number format field deleted the period the shows up to the right of the Roman
number „I‟.
11. In the Number Format field, type in uppercase letters “NDEX” To the right of the Roman
numeral „I‟. This action will spell the word “INDEX” in the field.
12. Delete the value in the Aligned at: field, and type in a zero.
13. Delete the value in the Indent at: field, and type in a zero.
14. Click the OK button. This action will close the Customize Numbered List dialogue
window.
15. Click on the OK button on the Bullets and Numbering dialogue box. Doing this will
close this dialogue box and redisplay the Modify Style dialogue box.
16. Click on the Format button. This will open up the popup menu.
17. Click on the Tabs menu option from the popup menu as shown below.
This action will open up the Tabs dialogue box as seen below.
10
FRS User Manual Maintenance Manual
18. Click the Clear All button, and then click the OK button. This action will erase all tab
settings associated with the style and close the Tabs dialogue box.
19. In the Modify Style dialogue box, click the Format button, and then click the Paragraph
option from the popup menu as shown here. This action will open up the paragraph
formatting dialogue box shown below.
20. Click the down arrow for the Alignment: field and select the Centered option.
21. Click the down arrow for the Special: field under the Indentation section and select the
(none) option from its popup menu.
22. Click the up arrow on the Left: field under the Indentation section, and keep clicking it
until 0.5” (one half inch) is indicated. This setting will exactly center the special INDEX
heading in the middle of the page; however, some settings may need to be larger or
11
FRS User Manual Maintenance Manual
smaller depending on the width the right and left page margins. Some experimentation
may be necessary.
23. Click the OK button. This action will close the Paragraph formatting dialogue box.
24. In the Modify Style dialogue box, click the Format button and select Font from its
popup menu. This action will open up the font dialogue box like the one that appears
below.
25. Under the Font: window, use the mouse pointer to scroll down until the Times Roman
font comes into view, then click on it.
26. In the Font style: window, click on the Bold option.
27. In the Size: window, use the mouse pointer to scroll down until 16 comes into view, then
click on it.
28. Click on the OK button to finalize the font settings and to close the Font format dialogue
box.
29. In the Modify Style dialogue box, click the OK button. This action will close the Modify
Style dialogue box and redisplay the Style dialogue box.
30. Click the Apply button in the Style dialogue box. This action will set the changes and
close the Style dialogue box.
2.2.3 Footers: Page Numbering Using Headline Numbering
At this point, a section break should be in place, and an INDEX heading with numbering,
established. Page numbers can included a bullet number from a Heading style used in the
section where page numbers will appear. Using automatic bullet numbering applied to a
12
FRS User Manual Maintenance Manual
headline eliminates the need to enter or edit, by hand, a numbered prefix for the page number if
the numbered bullet for the headline changes. Also, this type of page numbering arrangement
will appear in the Table of Contents (TOC) automatically (prefixes entered into a footer page
number manually will not show up in the TOC). The following procedure assumes that the
cursor is located somewhere on the INDEX page at the end of the document.
1. Use the mouse pointer to click on the Insert menu option along the horizontal menu bar
at the top of the Word document. This action will open a dropdown menu as shown
below.
2. Click on the Page Numbers ... entry. This will open up the Page Numbers dialogue box
as seen below.
3. Click the down arrow to the right of the Position: field and select Bottom of Page
(Footer) as the position where the page number will display.
4. Click on the down arrow to the right of the Alignment: field and select Center as the
alignment for the page number.
5. Click the Format button. This action will open up the Page Number Format dialogue box
as seen below.
13
FRS User Manual Maintenance Manual
6. Click on the down arrow to the right of the Number Format: field and select the 1, 2, 3, ...
selection.
7. Click on the Include chapter number checkbox. This action will activate the Chapter
starts with style scroll box at the right of the dialogue box.
8. Use the mouse pointer to scroll down the entries in the Chapter starts with style scroll
box, and select Heading 7.
9. Click on the Start At: radio button, and use the up/down increment button on the page
number field to the right to select page number one, as shown above.
10. Click the OK button to finalize the page number settings and to close the Page Number
Format dialogue box.
11. Click on the OK button on the Page Numbers dialogue box to close it and return to the
document. These actions should place a page number at the bottom of the INDEX page
with a capital I followed by a dash and the number one like the example below.
I-1
3 Updating Table of Contents, Indexes, and Figure listings
As the content of the FRS User Manual changes over time, it is a good idea to update both the
Table of Contents and Index listings at the front and back of the document. New sections and
headlines may be added to the document, or the page on which they appear may change due to
added or deleted content. To update the TOC or the Index, perform the following procedure.
1. Position the mouse over the gray area of the Table of Contents or Index and press the
right mouse button. This will cause a popup menu to appear as shown below.
14
FRS User Manual Maintenance Manual
2. Position the mouse over the Update Field option on the popup menu and then click it
using the right mouse button. This action will cause the Update Table of Contents
dialogue box to appear as seen here.
3. Click the Update entire table radio button by pressing the left mouse button as shown
above.
4. Click the OK button. This action will cause the Update Table of Contents dialogue box
to disappear and the Table of Contents will have its page numbers and contents updated.
4 Graphics: Capture, Handling, and Sizing
Numerous graphics appear in the FRS manual and with the exception of two of the images, they
all came from the screen capture function built into the Windows operating system. Figure one,
–FRS Data Flows, is the one graphic in the manual that started out as a composite of vector and
bitmap graphics. The vector graphics parts like the ANSI disk symbols came from Microsoft
PowerPoint. The bitmap images in this composite came Microsoft‟s online clip art library.
These different types of graphics were assembled in PowerPoint and then grouped together to
form one image. After that, the image was copied and pasted into Word using the Paste Special
menu option on the Edit menu option‟s dropdown list, as shown below. When the Paste Special
option is chosen, Word presents a number of graphic conversion options from which to choose.
In the case of a mixed type graphic, Picture is the best choice. This option inserts the contents of
the clipboard as a picture. This format is better than Bitmap for printing to high quality printers.
Of the format options available, Picture occupies the least space on disk and displays the
quickest in word.
15
FRS User Manual Maintenance Manual
4.1
Multiple Graphics at the same location
Whenever there is a need for multiple graphics, usually they can be pasted side by side.
However, when they are different sizes, the need to balance the two visually may arise. As in the
graphic shown above, the two bitmaps look better when pasted into a single row, two-column
table. Once that is accomplished, then the table‟s cell properties can be adjusted to center the
graphics vertically as well as horizontally. Table creation is well documented in the Word help
system and will not be discussed here. However, to center a graphic in a table cell, do the
following.
1. Click in a table cell where the graphic resides.
2. Press the right mouse button. This will cause a popup like the one in the partial image
shown below to appear.
3. Position the mouse pointer over the Cell Alignment option. This action will cause
another smaller popup to appear as shown above.
4. Click on the image in the center of the second popup. This choice will center the
contents of the table cell horizontally and vertically.
4.2
Applying and Removing Table and Graphics borders
When using a table with graphics, as in the previous section, it is possible to further enhance the
visual effect figure by making the table lines disappear. The instruction in the following
procedure explains how to do this.
16
FRS User Manual Maintenance Manual
1. Using the mouse pointer, click in any cell in the table.
2. Click the Format option along the horizontal menu bar at the top of the Word document.
This action will cause a dropdown menu to display as shown here.
3. Click on the Borders and Shading ... option on the dropdown menu. This action will
cause the Borders and Shading dialogue box to appear as shown below.
4. Under the Borders tab, click the None option under the Setting: section near the upper
left hand side of the dialogue box. Notice that near the lower right hand corner of the
dialogue box the Apply to: field show Table as the object to which this choice will be
applied.
5. Click the OK button at the lower right of the dialogue box. These actions will cause the
dialogue box to close and the lines of the table to disappear as well.
4.3
Capturing and Handling Screen Shots
As said before, many of the graphics appearing in the FRS User Manual come from screen shot
using the screen capture feature built into Microsoft Windows. To capture any full screen
display on the system monitor, just press the Print Scrn button near the top right hand corner of
the keyboard. This copies the contents of the video buffer into the Windows clipboard from
which it is possible to paste it in to a document directly or into a graphics-handling program for
further enhancement. The only other graphics program used to edit graphic images besides
17
FRS User Manual Maintenance Manual
PowerPoint has been Microsoft‟s Paint utility that comes with the operating system. In fact,
Paint has been the main graphics utility used to create graphics for the FRS User Manual.
Many times a full screen shot just adds a lot of unnecessary clutter when trying to explain a
specific part of the system. One way around this is to use only that part of the screen shot that
applies to the subject under discussion. However, the Windows Print Scrn function only
captures the whole screen. In this situation, the Windows Paint utility comes into play. To
include only part of a screen shot in a document, follow the instructions provided below.
1. Press the Print Scrn key near the upper right hand corner of the keyboard.
2. Start up the Windows Paint utility. It usually resides under the Accessories submenu
option, as shown below. This action will start up the Paint program.
3. When the paint program is displayed on screen, click the Edit menu button along the
horizontal menu bar at the top of the window.
4. Click the Paste option on the Edit submenu as shown below. This action will paste the
screen shot captured earlier from the clipboard into the Paint application.
5. Click the irregular selection tool and then click the rectangular selection tool to the right
of it as shown in the following picture. This action deselects the entire screen shot and
enables rectangular selection with the tool.
18
FRS User Manual Maintenance Manual
6. Position the cross hair of the rectangular selection tool at the upper left corner of that part
of the picture that will become the selected picture area.
7. Hold down the left mouse button and stretch the dashed lined box around the object to be
copied, as shown in the picture above.
8. Let the mouse button up, and click on the Edit menu option along the horizontal menu
bar at the top of the window.
9. From the Edit menu option dropdown list, click on the Copy option.
10. Switch back to the Word document that the picture will be pasted into.
11. Click that place in the document where the picture will be located.
12. Click the Edit menu option along the horizontal menu bar at the top of the document.
This action will cause its dropdown menu to open.
13. Click the Paste option on the Edit menu. This action will paste the selected graphic area
into the Word document.
4.3.1 Sizing and Positioning Graphics
Now that the graphic is in the document, it must be resized and positioned to complete the
graphics-handling task. The following instructions will show how the resizing and position is
accomplished.
1. Click on the graphic just pasted into the document.
2. Click on the Format menu option on the horizontal menu at the top of the document.
This action will cause a dropdown menu to appear like the one below.
3. Click on the Object ... option on the Format menu as shown above. This will cause the
Format Object dialogue box to open as shown below.
19
FRS User Manual Maintenance Manual
4. Click the Layout tab and then, click the In line with text option as shown in the left
picture panel above.
5. Click the Size tab and then, click the Width field at the upper right of the dialogue box.
6. In the Width field enter some size that will accommodate the picture. For most pages,
four and one half inches across is about a large as a graphic should be. Otherwise, it
begins to overwhelm the page and everything else on it.
7. Click the OK button to finalize the changes and to close the dialogue box.
20