1
Programming Software
User Manual
(Manual P/N MAN-P3000-002)
WARNING!
Programmable control devices such as the UTICOR’s PowerMarquee must not be used as stand-alone protection in any application. Unless proper safeguards are used, unwanted start-ups could result in equipment
damage or personal injury. The operator must be made aware of this hazard and appropriate precautions must
be taken.
In addition, consideration must be given to the use of an emergency stop function that is independent of the
programmable controller.
The diagrams and examples in this user manual are included for illustrative purposes only. The manufacturer
cannot assume responsibility or liability for actual use based on the diagrams and examples.
WARNING: If the PowerMarqueel is used in a CLASS I, DIV. 2 environment, the following conditions must be
met: Class I, Div. 2 methods; AND — must conform to all rules and requirements of applicable jurisdictions
regarding Class I, Div. 2 installations; ALSO — peripheral equipment controlling this device or being controlled
by it shall be suitable for service in the location in which they are used. Failure to comply with any of the
above installation requirements will invalidate the device’s qualifications for service in CLASS I, DIV. 2
hazardous locations.
WARNING: EXPLOSION HAZARD — SUBSTITUTION OF COMPONENTS MAY IMPAIR SUITABILITY FOR
CLASS I, DIVISION 2.
WARNING: EXPLOSION HAZARD — DO NOT DISCONNECT EQUIPMENT UNLESS POWER HAS BEEN
SWITCHED OFF OR THE AREA IS KNOWN TO BE NON-HAZARDOUS.
Trademarks
This publication may contain references to products produced and/or offered by other companies. The
product and company names may be trademarked and are the sole property of their respective owners.
UTICOR Technology, L. P. disclaims any proprietary interest in the marks and names of others.
Manual Part No. MAN-P3000-002 (06/03/03)
© Copyright 2003,UTICOR Technology, L.P.
All Rights Reserved
No part of this manual shall be copied, reproduced, or transmitted in any way without the prior
written consent of UTICOR Technology, L.P. UTICOR Technology, L.P. retains the exclusive rights
to all information included in this document.
MANUFACTURED and MARKETED
by
UTICOR Technology, L.P.
4140 Utica Ridge Rd. • Bettendorf, IA 52722-1327
Phone: 1-563-359-7501 • Fax: 1-563-359-9094 • www.uticor.net
Programming Software User Manual
Warning/Trademarks/Copyright ...................................................................... (inside front cover)
Table of Contents
.................................................................................................... i
CHAPTER 2. CREATE A PROJECT
Create a Project .................................................................................................................... 9
PowerMarquee Main Programming Screen ........................................................................ 11
Message Types ............................................................................................................. 11
Creating Messages ....................................................................................................... 13
About Character Size ............................................................................................. 15
About Embedded Data Values ............................................................................... 16
CHAPTER 3. REFERENCE
File Menu ............................................................................................................................. 21
Edit Menu ............................................................................................................................. 24
PowerMarquee Menu .......................................................................................................... 26
Setup Menu ......................................................................................................................... 31
Tag Database ................................................................................................................ 31
About Expressions Tags ........................................................................................ 36
Tag Cross Reference .................................................................................................... 38
Export Tags ................................................................................................................... 38
Import Tags .................................................................................................................... 40
Export Messages .......................................................................................................... 42
Import Messageds ......................................................................................................... 44
Export Power-Up Messages ......................................................................................... 46
Import Power-Up Messages ......................................................................................... 46
Project Attributes ........................................................................................................... 46
General ................................................................................................................... 46
Printer ..................................................................................................................... 48
Clock ....................................................................................................................... 49
Panel to PLC .......................................................................................................... 50
PLC to Panel .......................................................................................................... 51
MAN-P3000-002
Phone: 1-563-359-7501 • Fax: 1-563-359-9094 • www.uticor.net
i
Introduction
CHAPTER 1. INTRODUCTION
Introduction ........................................................................................................................... 1
Technical Support .................................................................................................................. 1
P3000 PowerMarquee Master — Models and Features ...................................................... 2
Physical Characteristics .................................................................................................. 2
Messages ........................................................................................................................ 2
Conclusion ...................................................................................................................... 3
PLCs Compatible with PowerMarquee ................................................................................. 4
Installing the Software ........................................................................................................... 5
Main Programming Window .................................................................................................. 7
Programming Software User Manual
Ports ....................................................................................................................... 52
Error Messages ...................................................................................................... 53
Select PLC .................................................................................................................... 54
Upgrade Firmware ........................................................................................................ 54
Help Menu ........................................................................................................................... 57
Right Click Menus ............................................................................................................... 58
Tag Database Right Click Menu ................................................................................... 58
Message Database Right Click Menu .......................................................................... 58
Message Text Right Click Menu ................................................................................... 61
Embed Tags ............................................................................................................ 62
APPENDIX A
ASCII Characters .............................................................................................................. A-2
PowerMarquee Programming Software Error Messages ................................................. A-4
International Character Sets ........................................................................................... A-11
ii
Phone: 1-563-359-7501 • Fax: 1-563-359-9094 • www.uticor.net
MAN-P3000-002
Programming Software User Manual
Introduction
The PowerMarquee can be configured on-line or off-line. You can
add or edit messages, embed up to 4 data values, and set the
triggers for each message.
Technical Support
Although most questions can be answered with PowerMarquee
HELP or the manuals, you may find answers to your questions in
the operator interface section of our web site @ www.uticor.net. If
you still need assistance, please call our technical support at 1800-832-3647 or FAX us at 1-563-359-9094.
MAN-P3000-002
Phone: 1-563-359-7501 • Fax: 1-563-359-9094 • www.uticor.net
1
Introduction
Introduction
Welcome to UTICOR’s PowerMarquee Programming Software,
P/N ACC-P3000-EDIT. This software is used to configure a Message
Project for PowerMarquees. You will install this software to run
from an IBM or compatible computer.
Programming Software User Manual
Introduction
P3000 PowerMarquee Master — Models and Features
The P3000 PowerMarquee Master is a cost-efficient, alphanumeric
display. It is the newest of UTICOR’s line of Programmable Message
Displays (PMD).
The PowerMarquee is a large LED display available in 2 widths
and 1 height for a total of 2 different sizes. The PowerMarquee is
a red LED (also available in High-Bright Red LED display) display
that displays messages in 2", 4", 6", and 8" characters. The
PowerMarquee uses suspended mounting: the unit is suspended
using a hole in the top of each end plate.
Physical Characteristics
The PowerMarquee is housed in an anodized aluminum case. Two
capped holes are provided for routing wires through the back access
plate. The fuse, connectors, and switches can be accessed by
removing the back access plate.
The front panel of the PowerMarquee contains a lens that covers
the LED field and protects the inside of the unit. The LED field is
offered in 2 sizes. The display area is 9.6" high. Field width sizes
are 36" or 72" wide.
The P3000 PowerMarquee Master Hardware Manual that was
shipped with your unit, provides hardware information such as wiring
requirements, switch settings, fuse locations and outline dimensions.
Refer to the hardware manual, P/N MAN-P3000-003 for information
about PowerMarquee installation.
Messages
How messages look depend on the way they were programmed.
Messages programmed into the PowerMarquee Master have
message options that determine message outputs and visual
appearance. One of the master message output options is sending
messages to slaves. When the message contains this option, the
message can be displayed on one, some, or all slaves.
The behavior of the message is determined by selected message
options and/or embedded codes. Messages can be stationary,
flashing, or scrolling. Scrolled messages scroll up or left. Other
options determine if message text is centered on lines, if previous
text remains on the display or is removed, etc. Embedded codes
place time, date, and variable data locations in the message. These
locations display the continuously-updated information it receives
from the controller or computer.
2
The PowerMarquee displays also feature international character
sets. This option is switch-selectable to allow message display in
the following character sets America (U.S.) (default), England,
France, Denmark, Sweden, Germany, Cyrillic, or Japan (Kana).
(See Appendix A)
Phone: 1-563-359-7501 • Fax: 1-563-359-9094 • www.uticor.net
MAN-P3000-002
Programming Software User Manual
Left-scroll messages feature “smooth scrolling”, that is, letters move
one LED at a time. Each portion of a letter will illuminate every dot
in that row when it scrolls across the display. Upward-scrolling
messages actually do not scroll at all. Rather, they “wipe on” to the
display in an upward fashion. The first section of message lines
appear, then the display pauses, clears, and displays the next
section of text.
Conclusion
Application of the PowerMarquee display is as diverse as individual
business needs. Think of it, if you will, as a mailbox into which
messages addressed to that location are delivered (and
subsequently displayed).
Now consider several mailboxes in various locations within your
company. Delivery of these messages takes a matter of milliseconds
and can provide vital information to all employees -- from machine
operators to the CEO.
MAN-P3000-002
Phone: 1-563-359-7501 • Fax: 1-563-359-9094 • www.uticor.net
3
Introduction
Introduction
The PowerMarquee has a large, LED field on which to display
messages. The size of this field varies (see part numbers) and
provides a variety of ways to display messages. 2", 4", 6", 8", and
8” compressed characters can be displayed simultaneously, even
within the same message. Because of this, programmed embedded
codes are used to change character size. Another code, a frame
definition code, can be used to determine which lines of the display
are used by a particular message.
Programming Software User Manual
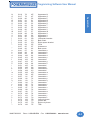
PLC Brand
Introduction
PLCs Compatible
with PowerMarquee
The table to the right lists the
PLCs, by manufacturer, that
PowerMarquee is
compatible with. We are
always updating PLC
compatibility, if you don’t see
your type PLC in this table,
visit our web site at
www.UTICOR.net or call
UTICOR Technology, L.P.
technical support at 1800-832-3647 or FAX us at
1-563-359-9094.
Allen-Bradley
Model
DH485/AIC/AIC+
SLC5/04, PLC5
DH+ (Option Card)
Micrologix 1000, 1200 and 1500
SLC5/03, /04, /05 (with DF1)
DF1 Half Duplex; DF1 Full Duplex
PLC5
DF1
PLC 2, 3, and 5
Remote I/O (DH+ Option Card)
Control Techniques
Unidrive 2-wire, 4-wire
Binary
Control Technology
Corporation (CTC)
CTC 2600, 2700, and 5100
CTC Binary
DeviceNet
DeviceNet I/O
Generic DeviceNet I/O (Option Card)
Ethernet
Ethernet/IP
Generic Ethernet/IP (Option Card)
General Electric
90/30 and 90/70
Versamax
SNPX
SNP
Mitsubishi
FX Series (all)
CC-LINK
Direct
Modicon
984 CPU, Quantum 113 CPU
AEG Modicon Micro Series 110 CPU:
311-xx, 411-xx, 512-xx, 612-xx
Modbus RTU
984 Series, Quantum Series
Modbus Plus (Option Card)
Omron
C200, C500, CQM1, CPM1, & CPM2
Host Link
Profibus
Profibus-DP
Generic Profibus-DP (Option Card)
DL05
K-Sequence; DirectNet;
ModBus (Koyo addressing)
DirectLogic
DL105
DL205
DL305
DL405
K-Sequence
D2-230
K-Sequence
D2-240
K-Sequence; DirectNet
D2-250
K-Sequence; DirectNet;
ModBus (Koyo addressing)
D2-240/250 DCM
DirectNet
D3-330/330P
DirectNet
D3-340
DirectNet
D3-350
K-Sequence; DirectNet;
ModBus (Koyo addressing)
D3-350 DCM
DirectNet
D4-430
K-Sequence; DirectNet
D4-440
K-Sequence; DirectNet
D4-450
K-Sequence; DirectNet;
ModBus (Koyo addressing)
All with DCM
4
Protocols Supported
Micrologix 1000/1200/1500,
SLC500, 5/01,/02,/03
DirectNet
Siemens
Siemens S7 MPI Adapter
3964R
Square D Symax
300 Series CPU, 400 Series CPU
Symax
Texas Instruments
TI5X5 Series—
TI 505, TI545-1102, TI545-1104
TBP (Transparent Byte Protocol) or
NITP (Non-Intelligent Terminal Protocol)
Uni-Telway
Telemecanique TSX 37 Micro
UNI-TE (Version 1.1)
Other
H2- WinPLC (Think & Do V6.3, Think
& Do Studio,check for version
compatibility)
Modbus RTU (serial port)
Phone: 1-563-359-7501 • Fax: 1-563-359-9094 • www.uticor.net
MAN-P3000-002
Programming Software User Manual
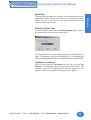
Installing the Software
Perform the following steps to install the PowerMarquee
Programming Software onto your PC.
•
Place the CD into your CD ROM drive.
•
The CD should automatically start the install program, if it
does not, perform the following 2 steps:
1. From Windows click on the Start Button, and then click
on Run from the menu. The Run dialog box will pop up.
2. At the prompt type D:\ (or your CD ROM drive) setup.exe
or click on the Browse Button and find the
Setup.exe file for PowerMarquee Programming Software.
•
Click on the OK button to begin the installation. The
PowerMarquee Programming Software Installation Screen
will appear.
•
Follow the onscreen prompts to load the software.
Installation Screens
MAN-P3000-002
Phone: 1-563-359-7501 • Fax: 1-563-359-9094 • www.uticor.net
5
Introduction
Introduction
PowerMarquees are configured with software running on an IBM
or compatible personal computer. This software is available through
Uticor Technology, L. P., part number ACC-P3000-EDIT. The
PowerMarquee can be configured on-line or off-line.
Introduction
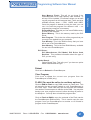
Programming Software User Manual
This is the screen that will appear when you are
installing your software. Read the information in
each dialog and follow the onscreen instructions
This icon will appear on your desktop after
the software has been installed. The next
time you want to run the PowerMarquee
Programming Software, just double-click on
the icon
6
Phone: 1-563-359-7501 • Fax: 1-563-359-9094 • www.uticor.net
MAN-P3000-002
Programming Software User Manual
Main Programming Window
Introduction
Introduction
Title Bar
Main Menu Bar
Tool Bar
Message List
Window
Power-UP Message
List Window
Status Bar
Title Bar
The Title Bar tells you the name of the project and name and
number of the screen that you currently have open.
Main Menu Bar
This is the Main Menu Bar. PowerMarquee Programming Software
menus are represented by the names listed across the top of the
Main Programming Screen and directly under the Title Bar.
Tool Bar
The Toolbar consists of icons for frequently used commands.
These commands are also found in, and accessible from the Main
Menu Bar. Click on an icon in the graphic below to go to the help
topic for that item.
Message List
The Message list provides you with a list of programmed messages.
From this list you can enter a new message or edit an existing
message. You can delete messages, copy one or more and paste
them into the list, and sort them by different variables. You can
also search for a character string in the entire message list to find
each instance where it appears. It provides you with a quick view
MAN-P3000-002
Phone: 1-563-359-7501 • Fax: 1-563-359-9094 • www.uticor.net
7
Programming Software User Manual
Introduction
of the primary attributes of each message you have programmed,
making it easy to track, and update messages as your program
grows. You can see what messages you’ve programmed, where
they are being sent and the controls that trigger them.
Power-Up Message List
Power-Up Messages are messages that will display upon powerup. They can be programmed to display on the PowerMarquee
Master or a slave message display.
Status Bar
The Status Bar is located at the bottom of the Programming Screen
and shows the status of the current screen. It provides information
about a tool bar or menu item on the main programming screen
that the pointer passes over and the current programming mode
(ONLINE or OFFLINE).
8
Phone: 1-563-359-7501 • Fax: 1-563-359-9094 • www.uticor.net
MAN-P3000-002
Programming Software User Manual
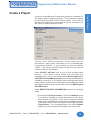
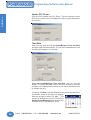
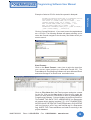
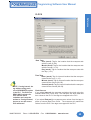
Create a Project
The top of the Project Information screen shows you the
manufacturer and contact information for the PowerMarquee
Programming Software. It also provides you with the software
version. If you contact technical support, make sure you know the
version number of the software.
Under SELECT ACTION, click on one of the “working mode
buttons.” If you want to work offline (not connected to a
PowerMarquee), click on the button labeled Edit Program OFFLINE (Write to PowerMarquee Later). You will use this mode when
creating a new project. If you want to edit an exiting project that is
online (make sure your PC is connected to the PowerMarquee where
the program resides that you want to edit), click on the Edit Program
ON-LINE button.
Under ENTER PROJECT INFORMATION, perform the following
steps:
1. First select the Project Location. Click on the Browse button
if you want to navigate to another Directory or Folder where
you will store your project. If you want to accept the default
folder (where PowerMarquee Programming Software resides),
just enter the name of your new project in the empty field under
Project Name. For an existing project, click on the Browse
button to go to the location of the project you wish to edit.
MAN-P3000-002
Phone: 1-563-359-7501 • Fax: 1-563-359-9094 • www.uticor.net
9
Create a Project
Introduction
Once your PowerMarquee Programming Software is installed you
are ready to begin configuring a project. The first screen to appear
is the Project Information Screen (shown below). From here you
will enter information about a new program you are creating, or you
will select an existing program to edit.
Programming Software User Manual
Create a Project
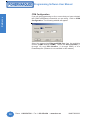
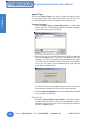
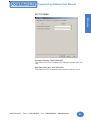
2. Click on the DOWN arrow to the right of PLC Type and
Protocol to view the list. Select the PLC Type and Protocol
you are using.
3. Click on the View/Edit PLC COM Setup to edit the PLC
Attributes. A dialog box will appear that is particular to the
type of PLC you have selected in the previous step. Set the
attributes to match your PLC. Click OK. (If you have selected
Think & Do as your PLC Type, the Thnk-n-Do Map File field
will become available allowing you to navigate to the map file
and bring it into the project.)
4. Under Ethernet/COM Port, click on the Configuration Button.
The following dialog box will appear.
5. Click on the down arrow to view the choices for the Ethernet/
COM Port. Click on COM1, COM2, COM3, COM4, COM5,
COM6, COM7, or COM8. (Ethernet is not available in this
release.) Select the Group Number (1 through 15) and Unit
Number (1 through 4095) of the PowerMarquee. Select the
one that matches the port on your programming PC and is
connected to the PowerMarquee.
6. Do one of the following:
•
Click on OK button to save your selections and exit the
dialog box.
•
Click on Clear to clear all entries or selections in the dialog
box.
•
Click on Cancel button to exit the dialog box without saving
your selections.
•
Click on Help button to go to the Help Topic for that dialog
box.
Once you have clicked on OK and saved your selections you will
begin configuring messages on the Main Programming Screen.
10
Phone: 1-563-359-7501 • Fax: 1-563-359-9094 • www.uticor.net
MAN-P3000-002
Programming Software User Manual
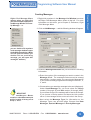
PowerMarquee Main Programming Screen
Create a Project
Introduction
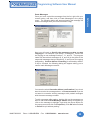
Configure Data, Queued, and Priority Messages here....
Configure Power-Up Messages here....
Message Types
•
Data Messages: These are messages with embedded data values.
They are typically used for displaying information such as production
data, temperature, etc.
Data Messages are written over with the next triggered Message. It
remains on the marquee until it is overwritten. It does not re-display. Be
aware that when the trigger is no longer active, the message does not
clear automatically. You must overwrite it or use some method to
clear it, or the Data Message will remain on the display.
If you send a command to the PowerMarquee telling it to erase
Message No. 1 from Line 1, it will erase the Line regardless of the
message being displayed. In otherwords, the Marquee will receive the
command to erase line 1 and cannot differentiate if line 1 contains
Message No. 1, 2, or 3, etc. Data Messages are triggered by a change
in a variable in a PLC register.
•
MAN-P3000-002
Queued Messages: These messages will be redisplayed on the
Marquee (after the Message Display time is met) as long as the trigger
is active. Each queued message will continue to display in the order in
which it was triggered and for as long as the trigger is active. (Message
Phone: 1-563-359-7501 • Fax: 1-563-359-9094 • www.uticor.net
11
Programming Software User Manual
Create a Project
display time is set in System Attributes.) Up to 99 Messages can be
stored in the Queue. When the queue is full (99), the 100th message
will write over the first message in queue.
12
•
Priority Messages: Priority Messages are also queued messages, but
when the message trigger is active no other messages will be updated
or processed. Priority Messages might be used to display critical
information. For example, if a Marquee is routinely displaying Data
Messages that provide pressure readings for Valve #1, you may want to
program a Priority Message to display if Valve #1 pressure exceeds a
maximum point. Priority Message could read “WARNING: Valve #1
pressure exceeds maximum. Shut down System XYZ.”
•
Power-Up Messages: Power-Up Messages are unique messages that
are displayed on the PowerMarquee when the system is turned on.
Phone: 1-563-359-7501 • Fax: 1-563-359-9094 • www.uticor.net
MAN-P3000-002
Programming Software User Manual
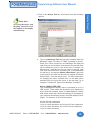
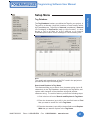
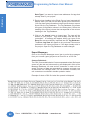
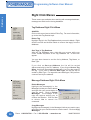
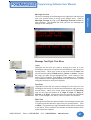
Right Click Message Menu
appears when you right click
your mouse button anywhere in
the Message Window or PowerUp Message ... or
1. Right click anywhere in the Message List Window to access
the Right Click Messages Menu shown to the left. For more
information on this menu, go to Chapter 6, Reference, Right
Click Message Menu.
2. Click on Add Message…. and the following window will appear.
you can double click anywhere
in the message window to open
the Add Message dialog ( Make
sure the space is blank, if you
double click on an existing
message, you will open that
message’s attribtes.)
3. Under the Message Attributes tab, you will enter the following
information.
a. Enter the number of the message you want to create in the
Message # field. The message numbers must be entered
sequentially—in other words, you cannot enter Message #5
if you haven’t already programmed message numbers 1, 2,
3, and 4.
IMPORTANT!
The PowerMarquee Master
contains a subordinate marquee
and its location is factory set to
Group 1, Unit 1.
MAN-P3000-002
b. Choose where you want the message to be sent (displayed).
Under Send Message To, you must select the Group
number (0 through 15) and Unit number (0 through 4095).
If you choose Group 0, the message will be sent to all Groups.
If you choose a Group number and leave the Unit number
set to 0, the message will be sent to all units in the Group.
c. Next select the Message Type (for information on the
Message Types, see previous page. Choose from Data
Messages, Queued Messages or Priority Messages.
Phone: 1-563-359-7501 • Fax: 1-563-359-9094 • www.uticor.net
13
Create a Project
Introduction
Creating Messages
Programming Software User Manual
Create a Project
d. Now select the Message Display Condition. Select or enter
the Message Tag. The message will be triggered by a value
that resides in this tag (PLC register).
If the Tag Data Type is Discrete, the options will change in
the field immediately below to the following.
Select whether to trigger the message when the tag is On or
Off.
Please Note:
The Message will activate
when the tag value goes
outside the set point limits.
The available ranges for the
Low and High Limits will be
displayed in these fields and
are particular to the data
type. The limits you place
here must be within these
ranges. (If the data type of tag
is Discrete then data boxes
for Low Limit and High Limit
will not be available.)
For all other tag data types the field below will stay as
Numeric. Under Numeric, choose the Display Condition
for the Message. You may choose In the Range, Out of
Range, Equal, Not Equal, Less Than, or Greater Than.
Out of Range or In the Range will leave both the Low Limit
and High Limit fields available (see note in left margin).
Enter a range in the fields. Make sure that the Low Limit is
less than the High Limit or you will receive an error message.
If the value of the tag falls in or out of the range you have
entered, the message will be triggered based on the
condition.
For Equal, Not Equal, Less Than, or Greater Than, you
will only need to enter the Low Limit. This is the value that
will trigger the message based on the condition you have
selected.
e. Choose whether or not to Print the Message when it is
triggered.
f. You may also select whether or not to Use Inactive Text. If
you choose to use inactive text, you can enter message text
that will be displayed when the message is inactive (has not
been triggered) under the Inactive Text tab. If you deselect
it here, the Inactive Text dialog will be unavailable (grayed
out). When Inactive Text is not available in a message, NO
ACTION takes place. If a message has already been
displayed, it will remain on the display’
g. Select Match Frame/Line Information for Active and
Inactive Texts if you want the inactive and active messages
to display in the same frame and on the same line.
14
Phone: 1-563-359-7501 • Fax: 1-563-359-9094 • www.uticor.net
MAN-P3000-002
Programming Software User Manual
Please Note:
Scrolling Messages and
Blinking Characters will
NOT appear on the display
simultaneoulsy.
a.
Type in the Message Text that you want to display when the
Message Trigger Condition is TRUE (message is active).
Place your cursor anywhere in the Message Text field and
right click your mouse button to access a menu that will allow
you to change the color or size of the text, or change it to
blinking text. Highlight the text you want to change, right
click, and select the color, character size, or blink attribute
for that text. If you want to Embed a Data Value, right click
in the position you want the data value to appear and select
Embed Tags… from the popup menu. For more information
on changing the color, character size, or the blink option
available from the right click menu in the text field, go to
Chapter 6, Reference, Right Click Message Text Menu.
About CHARACTER SIZE:
The PowerMarquee display area is composed of up to 8
LED “sticks”. These sticks are denoted in your display size
by the W and H numbers, that is, a 2W4H display is 2 sticks
wide and 4 sticks high. When formatting your message for
your particular size display, keep in mind the display’s stickheight. For instance, a 4H unit can display:
4
2
1
1
1
MAN-P3000-002
lines of 2-inch characters
lines of 4-inch characters
line of 4-inch characters and 2 lines of 2-inch characters
line of 6-inch characters and 1 line of 2-inch characters
line of 8-inch characters
Phone: 1-563-359-7501 • Fax: 1-563-359-9094 • www.uticor.net
15
Create a Project
Introduction
4. Click on the Active Text tab, and choose from the following
options.
Programming Software User Manual
Create a Project
Each stick-height represents a 2-inch high character. Two
stick-heights represents a 4-inch tall character or two 2-inch
characters. One stick-width supports 20 2-inch characters.
Two stick-widths support 40 2-inch characters or 20 4-inch
characters, etc.
Each stick is 8 LEDs high and 120 LEDs wide. Together,
these LED sticks form the LED display “field”. Character size
and field definitions can change continuously and can be
hardware and/or software defined.
About EMBEDDED DATA VALUES:
1) The following dialog box will appear when you select
Embed Tags value within a message.
Special characters in the message determine where the
embedded data from the registers should go. Up to four data
values may be embedded in a single message. Program
how the data value will be displayed as follows:
2) Select the Embedded Command that determines the
type of value to embed. Available choices are Discrete,
Numeric, String, Time and Date. Depending on what type
command you choose, certain areas of the dialog box
become available or unavailable (grayed out) for selection
or data entry.
3) If you choose Discrete, Numeric, or String, select or
enter the Tag name where the data value will be read by
clicking in the field or on the down arrow next to Select tag
from where value will be read for embedded data.
16
Phone: 1-563-359-7501 • Fax: 1-563-359-9094 • www.uticor.net
MAN-P3000-002
Programming Software User Manual
5) Select the Display Format from the available choices.
6) Select Justification from Leading Zeroes, Leading
Spaces, or Trailing Spaces.
7) Under # Digits, click on the box in front of Auto Check if
you want to have the panel automatically determine the
number of digits to be placed for the embedded value. Total
Digits and Fractional Digits will be disabled if you choose
Auto Size.
8) Also, under # Digits, you may enter the Total Digits that
you want to display, and enter the Fractional Digits you
want to display (leave at default, 0, if you do not want
fractional digits).
9) If you have selected Discrete, the fields under “Selected
tag is a discrete tag” will be available. Enter the text that
you want to appear within the message when the Discrete
register is ON and when the Discrete register is OFF.
10) If you have selected Time under Embedded Command,
the field “Time Command,” will be available.
11) Select the Time Format from the available choices:
HH_MM_SS_24, HH_MM_24, HH_MM_SS_12, or
HH_MM_12.
12) If you have selected Date under Embedded Command,
the field, “Date Command,” will be available.
13) Select Date Format from the available choices:
DD_MMM_YY, DD_MM_YY, MM_DD_YY, YY_MM_DD.
14) Press the Add button to add the embedded data to the
message. (When inserted in a message a numeric command
will be represented in the Active Text or Inactive Text message
field as <___#>: Discrete is represented as <DISCRETE>;
String is represented as <STRING>; Time as <Time>; and
Date as <Date>.) You will return to the Add/Edit Message
details dialog.
b.
MAN-P3000-002
Next you will decide how you want your message to appear
on the marquee. Click in the box in front of Clear Display if
you want the previous message to be erased from the display.
If left unchecked, The previously displayed characters will
remain on the display where this message does not overlay
them. For example:
Phone: 1-563-359-7501 • Fax: 1-563-359-9094 • www.uticor.net
17
Create a Project
Introduction
4) If you have selected Numeric, the options under
“Selected tag is a numeric tag” will be enabled.
Create a Project
Programming Software User Manual
Checked
Not Checked
Previous
Message
New
Message
Result
1234567890
2nd LINE
ABC
ABC
1234567890
2nd LINE
ABC
ABC4567890
2nd LINE
c. Click in the box in front of Center Message if you want the
message to be centered on all lines of the display. If left
unchecked, the text will be displayed as entered in the
message. Please note that left-scrolling messages
cannot be centered.
d. Click in the box in front of the Blink Message option to “blink”
the message. The entire message (including time, date and
variable data) will blink ON and OFF when displayed. (If you
just want to blink certain characters in the text, see step a.,
above.) Characters that remain on the display from the
previous message will also blink.
e. Click in the box in front of Include Marquee Frame Info to
set the default state for the PowerMarquee Frame Upper
Row (or top) and Lower Row (or bottom) attributes on this
message. The Upper Row attribute sets the top stick that
will be used to display as a message. The Lower Row sets
the bottom stick that will be used to display a message. Enter
a number between 0 and 8 for the Upper Row and the Lower
Row.
f. Click in the box in front of Enable Scrolling if you want the
message to scroll on the display. Please be aware that If
you have selected to Include Marquee Frame Info, you will
not be able to select the lines that where you want the
message to scroll (they will be grayed out), it will scroll on
the lines selected under Include Marquee Frame Info.
g. Click on the box in front of Scroll Upwards to enable it with
a check mark and the message lines will scroll up from a
lower line of the display to the next line up of the display.
h. If you have selected Scroll Upwards, select the Top Line
(from 1 to 8) and the Bottom Line (from 1 to 8) where you
want the message to scroll. The bottom line value must be
equal to or greater than the top line value.
i. If you select Scroll Left, the message will scroll from right to
left on any one line of the display. Select the Scroll Line
(from 1 to 8) where you want your message to scroll.
18
Phone: 1-563-359-7501 • Fax: 1-563-359-9094 • www.uticor.net
MAN-P3000-002
Programming Software User Manual
k. Select Repeat Message if you want the scrolling message
to keep repeating until a new message is selected. If you
leave this check box empty, the scrolling message will be
displayed only once.
5. Click on the Inactive Text tag to program the inactive text
message. Inactive text will be displayed when the Message
Trigger condition is False. Inactive Text is programmed with
the same options as Active Text. Refer to step 4., above. If
you did not select the Use Inactive Text option under the
Message Attributes tab, you will see the following dialog when
you click on the Inactive Text. You will need to go back to the
Message Attributes tab and select Use Inactive Text if you
want access to the inactive text options.
6. When finished you may click the Add (or Apply, if editing a
message) button to make the changes.
7. If you want to see how the message will look on the display,
click on the Preview button at the bottom of the Add (or Edit)
Message Details window. A message preview window similar
to the following example will appear.
MAN-P3000-002
Phone: 1-563-359-7501 • Fax: 1-563-359-9094 • www.uticor.net
19
Create a Project
Introduction
j. Enter a Scroll Rate for the message. The value you enter
here will determine the rate at which this particular message
will scroll. The range for the Scroll Rate is 1 to 99 (0.1 to 9.9
seconds and the default is set at 1 second). Click in the box
to enter a value for this option.
Create a Project
Programming Software User Manual
8. To go to the Previous Message or the Next Message (if
programmed), click on the Previous Msg or Next Msg buttons
at the bottom of the window.
9. Click on Cancel to quit without saving the current message
changes.
20
Phone: 1-563-359-7501 • Fax: 1-563-359-9094 • www.uticor.net
MAN-P3000-002
Programming Software User Manual
Reference
File Menu
Open Project
Click on File > Open Project… to open an existing or create a new
project. The Step 1: Project Information screen will open. If you
want to open an existing project, click on the Browse button and
the following window will open allowing you to navigate to the folder
where the project is stored. The primary PowerMarquee program
file has “.pmq” suffix.
Close Project
Click on File > Close Project to exit the current open project.
Save Project
Click on File > Save Project to save the current, open project and
any changes or additions to the project’s attributes, databases,
messages, etc.
Copy Project As
Click on File > Copy Project As…. to save the open project under
another name. The following dialog will open allowing you to enter
a name for the copied project.
Copy Project As Protected
If you click on File > Copy Project As Protected…, you will only
be able to transfer the project to and from the marquee, as is. The
project that you have copied as protected will no longer open in
PowerMarquee Programming Software to allow editing. This
protects the project from unauthorized changes after it has been
distributed. Make sure you have another copy saved (as
unprotected) if it will require changes or updates.
Transfer to PowerMarquee...
MAN-P3000-002
DON’T LOSE AN EXISTING PROGRAM! When you write the
program to the marquee, it will write over any program already
loaded into marquee. Save the existing program before you
click on the Start button to transfer your new program. To do
this, exit project to the Step 1, Project Information screen and
click on the Edit Program ON-LINE button. Save this project
to your computer.
Phone: 1-563-359-7501 • Fax: 1-563-359-9094 • www.uticor.net
21
Reference
Introduction
The Reference chapter provides more details on Menu commands.
It takes you through the Main Menu Bar item by item, command by
command, with instructions. It also contains information about the
tool bar, and popup menus, referred to as Right Click Menus, that
are available when working in the Tag Database, Message List,
and Active/Inactive Text fields.
Programming Software User Manual
Reference
This allows you to transfer the current (open) project to the
PowerMarquee. Click on Transfer to PowerMaruqee and the
following dialog box will open.
This dialog box provides information about the current project and
the PowerMarquee memory available. Under Project Information,
the screen provides you with the Project Title you are about to
transfer and the PLC Type and Protocol that you have selected
as used by your application. (Press Start to begin the transfer or
Cancel to abort.)
If you receive an error message, check to ensure your marquee to
PC connections are correct. Under Ethernet/COM Port, click on
the Configuration… button.
Click on the down arrow under Ethernet/COM Port to select the
correct PC Port — COM1 through COM8, or Ethernet. Group
Number and Unit Number must match that of the marquee you
are trying to communicate with. (Ethernet is not available in this
first release.) Click OK. When ready click on the Start button to
begin the transfer.
The Progress Bar indicates that the transfer is in process and
then when the process is complete.
After the transfer is complete, PowerMarquee Information
gathered during transfer communication is displayed. It will tell you
the Total Memory installed in your PowerMarquee (in bytes) and
the Free Memory available after the project upload. The
PowerMarquee Firmware Revision (internal software) number is
displayed and whether or not a PowerMarquee to PLC Link is
established.
22
Phone: 1-563-359-7501 • Fax: 1-563-359-9094 • www.uticor.net
MAN-P3000-002
Programming Software User Manual
1. Click on Print to print the current (open) project. The dialog
shown below will open. From here you will Select Items for
Printing.
2. Click in the box in front of Print Messages and then choose
either All Messages or a Range of Messages from the project
to print. If you choose Range, enter the From, To message
numbers in the appropriate field.
Please Note: The project will
print from the System Printer.
To print a message when it
is triggered you must set this
option when configuring the
message and then print from
a serial printer attached to
the marquee. You will set the
serial printer parameters, see
Project Attributes, Printer
tab.
3. Click in the box in front of Print Power-Up Messages and
then choose either All Messages or a Range of Messages
from the project to print. If you choose Range, enter the From,
To message numbers in the appropriate field.
4. Click in the box in front of Print Tag Database if you want to
print the tags from your project. You must then select whether
you want the tags listed alpha-numerically by name or by
address — click in front of Sort by Tag Name or Sort by Tag
Address.
5. Click on OK to print your selections or click on Cancel to quit
without printing.
Exit
Click on Exit to quit PowerMarquee Programming Software.
MAN-P3000-002
Phone: 1-563-359-7501 • Fax: 1-563-359-9094 • www.uticor.net
23
Reference
Introduction
Print
Programming Software User Manual
Reference
Edit Menu
Toolbar
The Toolbar consists of icons for frequently used commands. These
commands are also found in, and accessible from, the Main Menu
Bar. The toolbar is selected to “show” by default. To hide the Toolbar,
click on it in the menu to remove the check mark (deselect). The
icons, from left to right, represent the following commands:
Opens a Project
Saves a Project
Print Project
About
Default Tag Data Type
Transfer to PowerMarquee
Set Group and Unit Numbers
PowerMarquee Information
Marquee Warmstart
Set Marquee Time and Date
Monitor Tags
Clear Memory
Diagnostics
Communication Settings
Tag Database
Project Attributes
Export Tags to Excel
Export Tags in CSV Format
Import Tags from Excel
Import Tags from CSV Format File
Export Messages to Excel
Export Messages in CSV Format
Import Messages from Excel FIle
Import Messages from CSV Format
24
Phone: 1-563-359-7501 • Fax: 1-563-359-9094 • www.uticor.net
MAN-P3000-002
Programming Software User Manual
The Status Bar is located at the bottom of the Programming Screen
and shows the status of the current screen. It provides information
about a tool bar or menu item on the main programming screen
that the pointer passes over.
Default Tag Data Type
Click on this menu item to set the Default Tag Data Type. Click on
the down arrow to view the list of data types.
The Default Data Type automatically switches to the last data type
used. For example, if you set UNSIGNED_INT_16 as default and
create a Message (DISCRETE), the default will switch to DISCRETE.
Tag Name as Address
Click on this to use the Tag Name that you type in as the Tag
Address. The Address must be in the correct Data Format. For
example, if using an Allen-Bradley SLC 500, you might name the
tag N7:2, which is the address format of the PLC register.
MAN-P3000-002
Phone: 1-563-359-7501 • Fax: 1-563-359-9094 • www.uticor.net
25
Reference
Introduction
Status Bar
Programming Software User Manual
Reference
PowerMarquee Menu
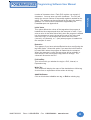
Set Group and Unit Number
Click here to set the Group Number (0-15) and Unit Number (14095) of the PowerMarquee that you want to program. Enter
numbers or click on the down arrow to select and then click Set to
save or Cancel to quit without saving.
Information
Click for important information about the PowerMarquee you are
using and your PLC. Information includes:
Revisions:
Hardware: This is the revision of the PowerMarquee unit.
Boot Software: This is internal PowerMarquee firmware
used to power-up the marquee.
Exec Software: This is also internal firmware, used to
display marquee information and allow panel adjustments
to the internal clock.
Memory (bytes):
Exec Flash: Amount of memory available to hold the boot
and exec firmware.
26
Phone: 1-563-359-7501 • Fax: 1-563-359-9094 • www.uticor.net
MAN-P3000-002
Programming Software User Manual
PLC Driver:
PLC Manufacturer, PLC Model, PLC Driver Code
Revision: This provides information about the type of
PLC you are using.
Option Board:
Option Board Type: This tells you if you have an option
board installed and the type.
Reboot
Click here to Reboot the PowerMarquee.
Clear Program
Click here to Clear the current user program from the
PowerMarquee’s RAM (only).
FLASH (You must be online to use these options)
Click on RAM to Flash to copy RAM memory to Flash card. This
will transfer the user program loaded on your PowerMarquee to
the Flash Card. Flash card may then be removed and installed
into another Powermarquee to transfer to the RAM. You may also
backup your user program to save it before shutting off power to
the Marquee. You may then reinstall the program later.
Click on Flash to RAM to copy the contents of the Flash card to
the PowerMarquee RAM memory. This is used to copy the user
program from one PowerMarquee to another or to reinstall a
program to the PowerMarquee.
MAN-P3000-002
Phone: 1-563-359-7501 • Fax: 1-563-359-9094 • www.uticor.net
27
Reference
Introduction
User Memory Flash: This will let you know if the
PowerMarquee has a Flash Memory card installed. (It
will say 0 if not installed.) This feature allows you to back
up your program from the marquee itself. There are three
available memory sizes — 512K, 1 MEG, and 2 MEG.
Once the program is backed up onto the card, you can
use it to load the program into different units — no
programming computer is necessary.
System Memory: This tells you how much RAM memory
is used by the firmware.
Driver Memory: This is the memory used by the PLC
Driver.
User Program: This is the size of the program that you
currently have loaded into your marquee.
Free Memory: This is the RAM memory that you have
left to use in the PowerMarquee.
User Memory: This is the total RAM Memory available
for use in the PowerMarquee.
Programming Software User Manual
Update PLC Driver....
Reference
Click on this to update your PLC Driver. This will send the current
PLC Driver code to your PowerMarquee (other project information
is not sent.)
Time/Date
Here you may view and set the PowerMarquee Time and Date
and then send it to the marquee. The current PowerMarquee Time
and Date will display in the window.
Under Set PowerMarquee Time and Date, your PC time will
display. To change the Time, click on the hour, minutes or seconds
and type in the appropriate numbers or use the UP/DOWN arrows
to change the time.
To change the Date, click the DOWN arrow next to the date field.
A calendar, shown to the right, will appear.
Use the arrows to search for date. (The
current PC date will be circled.) Click on the
Send to PowerMarquee button to send your
changes to the PowerMarquee clock.
28
Phone: 1-563-359-7501 • Fax: 1-563-359-9094 • www.uticor.net
MAN-P3000-002
Programming Software User Manual
To run a diagnostic test on the PowerMarquee, click here. The
screen shown below will appear, letting you choose from Test RAM
and Test Flash. Click OK to begin diagnostic.
When you click on OK, you
will receive the “warning”
message shown below. Save
program to disk before testing
the marquee memory!
Monitor Tags (must be ONLINE)
Click on Monitor Tags if you want to monitor tag values from the
PowerMarquee. You may select up to 100 tags to monitor at one
time.
Click on the Tag Names (in the first column/list) that you want to
monitor. Press the Shift key and then click to highlight more than
one tag name. Then click on the Add >> button. To remove tag
names from the list to be monitored, click on them to highlight and
then click on the <<Remove button. They will be added to the list
(on the right hand side) to be monitored. Select the Data Format
for the value. Click on the Start Monitoring button to begin the
monitoring process. The tag values from the PowerMarquee will
display in the Value column.
MAN-P3000-002
Phone: 1-563-359-7501 • Fax: 1-563-359-9094 • www.uticor.net
29
Reference
Introduction
Diagnostics
Programming Software User Manual
COM Configuration
Reference
If you will be programming on-line, ensure that you have selected
the COM Port/Ethernet connection you are using. Click on COM
Configuration. The following window will appear.
Select the appropriate Ethernet/COM Port from the available
choices (COM1 through COM8.) Select the Group Number (1
through 15) and Unit Number (1 through 4095) of the
PowerMarquee. (Ethernet is not available in this release.)
30
Phone: 1-563-359-7501 • Fax: 1-563-359-9094 • www.uticor.net
MAN-P3000-002
Programming Software User Manual
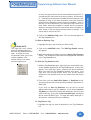
Tag Database
The Tag Database is where you define the Tags for your project. A
Tag can be a discrete (single bit) location or word location within
the PowerMarquee. Tags may be Internal (no address), External
(PLC Address) or Expression (math or logic function). In other
words, a Tag is an alias for a PLC address or an Internal
PowerMarquee location that a message is communicating with.
PLC:
The model and manufacturer of the PLC used in the project are
provided at the top of this dialog box.
Search and Replace in Tag Name
This feature allows you to search for a character string (up to 40
characters) in the Tag Database, specifically, the Tag Name, and
replace each instance of the character string with another
character string. To use this feature, perform the following steps:
1. Click in the box in front of Search and Replace in Tag Name.
2. Enter the characters (up to 40) in the text field next to Find
that you want to search for in the Tag Name.
3. Enter the characters (up to 40) in the text field next to Replace
With that you want to replace in the Tag Name.
MAN-P3000-002
Phone: 1-563-359-7501 • Fax: 1-563-359-9094 • www.uticor.net
31
Reference
Introduction
Setup Menu
Programming Software User Manual
Reference
4. Click on the Find Next button. The program loader will find the
character string in applicable Tag Names and highlight the
line(s) where it appears.
5. Click on Replace if you want to approve/check each item before
replacing. Click on the Replace All button if you want to replace
all instances of the character string without checking.
Number of PLC Tags, Number of internal tags, Number of
Expression tags, and Total Tags
The number of PLC tags that are programmed in the project are
listed here. Also, the number of internal tags and Expression tags
that are currently programmed in the project are provided. Total
Tags is the combined total of all kinds of tags.
Highlight Internal/Expression Tags
This is enabled by default. Click on the box with the check mark
to deselect this option. When selected, the internal tags in the
list will be displayed in blue and the expression tags will be
displayed in red.
Highlight Unused Tags
Click in the box in front of Highlight Unused Tags to enable this
option. The tags that are not currently linked to a message or
attribute are highlighted in the list. Unused tags are highlighted
in yellow. If you want to delete the unused Tags, click on the
Delete Unused Tags button at the bottom of the screen.
Columns Headings in Tag List:
Tag #
This is the number of the Tag in the list.
Tag Name
You may enter a descriptive Tag Name of up to 40 characters.
Data Type
This is the format of the data. Select the Data Type that is
appropriate for your PLC. Choose from DISCRETE,
SIGNED_INT_16, SIGNED_INT_32, UNSIGNED_INT_16,
UNSIGNED_INT_32, BCD_INT_16, BCD_INT_32,
FLOATING_PT_32, and ASCII_STRING.
ADDRESS/EXP
The syntax for entering PLC addresses depends on the type of
PLC. A message will display letting you know if the PLC Address
Type and Tag Data Type don’t match or if the Address is invalid.
If you are configuring an Expression tag, the expression will
appear in this column.
Number of Characters
If the Tag will read a character (ASCII) string from the PLC or
write a character string to the PLC, you will need to enter the
32
Phone: 1-563-359-7501 • Fax: 1-563-359-9094 • www.uticor.net
MAN-P3000-002
Programming Software User Manual
Initial Value
This option affects the values of the tags when the program is
loaded into the marquee and when the marquee is reset. If you
enter a value in the Initial Value field, when the program is loaded
into the marquee or reset, the tag will be set to this value and
sent to the PLC. If not selected, the values are set to zero
(numeric), off (discrete), or “” (text) when program is loaded into
the marquee or reset.
Retentive
This appears if you have selected Retentive when configuring the
tag Initial Value. Select this option if you want the initial value to
be used ONLY when the program is loaded into the marquee.
When the marquee is reset, the tag values will be retained. In
other words, it will not cause the tag values to change. The
values will be sent to the PLC.
PLC/Int/Exp
This column tells you whether the tag is a PLC, Internal, or
Expression tag.
Write Tag
This column will display the name of the destination or Write tag.
A value from an expression will be written to this tag.
Add/Edit Button
Click on this button to Add a new tag, or Edit an existing tag.
MAN-P3000-002
Phone: 1-563-359-7501 • Fax: 1-563-359-9094 • www.uticor.net
33
Reference
Introduction
number of characters here. Each PLC register can contain 2
characters. You may enter up to 40 characters. The PLC will
assign the correct number of sequential registers needed for the
string. The address you have entered for the tag is the starting
address. For a list of ASCII characters supported by the
PowerMarquee see Appendix A.
Programming Software User Manual
To Add a New Tag:
Reference
1. Click on Add/Edit button. (If you have existing tags, ensure
that none are highlighted or you will go to the edit tag window.)
The screen shown below will appear.
2. Under Select Tag Type, select from PLC, Internal Tag, or
Expression. Select Internal Tag if the tag you are adding does
not use a PLC address. The Address String will be grayed
out (unavailable). Select Expression if the tag you are adding
is comprised of a constant and/or operands and/or predefined
tags. To Define Expression, click on the button so named.
For information on how to program Expression tags, see page
36.
3. After you have selected the type of tag, click in the field next to
Tag Name and enter a name for the tag.
4. Click on the DOWN arrow next to the Tag Data Type field and
select the data type from the list.
5. If you have selected Internal Tag, the Address String field
will not be available. If you have selected Expression, the
Address String field will contain the expression. If you have
selected PLC, enter a PLC Address String that is appropriate
for your type PLC.
6. If you have selected ASCII String as your Data Type, the # of
Characters field will become available. Enter or select the
number of characters (up to 40) for the ASCII String.
7. Select Initial Value/Retentive Flag. This option affects the
values of the tags when the program is loaded into the marquee
and when the marquee panel is reset. If you enter a value in
the Initial Value field, when the program is loaded into the panel
34
Phone: 1-563-359-7501 • Fax: 1-563-359-9094 • www.uticor.net
MAN-P3000-002
Programming Software User Manual
8. Click on the Add New Tag button. The new tag will appear in
the Tag Database list.
To Edit an Existing Tag:
PLEASE NOTE:
This “right click” menu (shown
below) is available when you
have the Tag Database window
open. Just right click your
mouse button while your cursor
resides anywhere in the
window, and you can select
from this popup menu.
1. Highlight the tag in the list that you wish to edit.
2. Click on the Add/Edit button. The Edit Tag Details window
will appear.
3. Make any changes and then click on the Apply Tag Changes
button. The changes will be made to the tag and are reflected
in the Tag Database list.
To Sort the Tag Database list:
1. With the Tag Database open, right click your mouse while your
cursor resides anywhere in the Tag Database list. A menu will
appear. This “right click” menu (shown to the left) is available
when you have the Tag Database window open open. Just
right click your mouse button while your cursor resides
anywhere in the window, and you can select from this popup
menu.
2. From here you may Add/ Edit, Delete, or Duplicate a tag.
You may also choose to sort the list by Address, Tag Name, or
Data Type.
If you click on Sort on Address, the list will be sorted
alphanumerically by the PLC address. If you click on Sort on
Tag Name, the list will be sorted alphabetically (A to Z) by the
name of the tag. If you click on Sort on Data Type, the tag list
will be sorted by Data Type. For tags with same data type, it
will perform a second sort by the address.
To Duplicate a Tag:
1. Highlight the tag you want to duplicate in the Tag Database
list.
MAN-P3000-002
Phone: 1-563-359-7501 • Fax: 1-563-359-9094 • www.uticor.net
35
Reference
Introduction
or reset, the tag will be set to this value and sent to the PLC. If
not selected, the values are set to zero (numeric), off (discrete),
or “” (text) when the program is loaded into the marquee or the
marquee is reset. If you have entered a value into the Initial
Value field, the Retentive option becomes available. Click in
the box in front of Retentive if you want the initial value to be
used ONLY when the program is loaded into the marquee.
When the marquee is reset, the tag values will be retained. In
other words, it will not cause the tag values to change. The
values will be sent to the PLC.
Programming Software User Manual
Reference
2. Right click your mouse, and then click on Duplicate Tag in the
popup menu that appears.
3. Simply enter the number of the tags that you want created in
the field provided and then click on the Duplicate button.
4. The duplicates will appear in the Tag Database list.
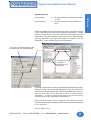
About EXPRESSION TAGS
Display expression tags are expressions that send the result (value)
to the message display. These tags are read-only and can only be
used where read-only tags are permitted. These tags are updated
when the operand values change.
Conditional Expressions: The format for the conditional is:
IF <expression> THEN <expression> ELSE <expression> ENDIF
The ELSE and ENDIF are required. All expressions require at least
one operand. The conditional can be used as an operand. For
example:
tag1 * IF tag2 THEN tag3 + 10 ELSE 5 ENDIF
The following table provides a list of the Operators, their Symbol,
order of Precedence and Direction
Operators
End of expression
Left parenthesis
Right parenthesis
Bitwise NOT
Logical NOT
Negative
Positive
Modulus
Multiply
Divide
Add
Subtract
Shift left
Shift right
Less than
Less than or equal
Greater than
Greater than or equal
Equal
Not equal
Bitwise AND
Bitwise XOR
Bitwise OR
Logical AND
Logical OR
Assignment
36
Symbol
none
(
)
~
!
+
%
*
/
+
<<
>>
<
<=
>
>=
=
<>
&
^
|
&&
||
Precedence
13
13
13
12
12
12
12
11
11
11
10
10
9
9
8
8
8
8
7
7
6
5
4
3
2
1
Phone: 1-563-359-7501 • Fax: 1-563-359-9094 • www.uticor.net
Direction
Left to right
Left to right
Left to right
Right to left
Right to left
Right to left
Right to left
Left to right
Left to right
Left to right
Left to right
Left to right
Left to right
Left to right
Left to right
Left to right
Left to right
Left to right
Left to right
Left to right
Left to right
Left to right
Left to right
Left to right
Left to right
Right to left
MAN-P3000-002
Programming Software User Manual
Special Symbols
$
Octal constant
#
Used to indicate a hexadecimal constant
i.e. $3F
Used to indicate a octal constant i.e.
#377
Click in the middle column (Expression) to type in a Constant. Press
CTRL + ENTER to move to a new line within the expression. Double
click on a Tag in the list on the left hand column to embed it into the
Expression. The tag will appear in the center column. Select (double
click) an Operator in the right hand column to embed it into the
Expression. Insert another tag into the Expression.
The value of this Expression tag will
be diplayed on the PowerMarquee
This operand is used
in Expression
These Tags are used
in Expression
The Expression is shown here
Complex computations can be accomplished with Expression tags.
However, please be aware that Expression Tags are limited to a
maximum of 40 operands per tag. Complex operands may use more
memory and may further limit the number of operands per
expression. In order to avoid errors when trying to use the tag,
avoid using too many operands per expression.
When the Expression Tag is triggered, the operation that is
expressed in the tag will be performed and the result will be displayed
on the marquee.
Click on OK to save.
MAN-P3000-002
Phone: 1-563-359-7501 • Fax: 1-563-359-9094 • www.uticor.net
37
Reference
Introduction
Hex constant
Programming Software User Manual
Reference
Tag Cross Reference
The Tag Cross Reference screen provides you with a list of the
programmed tags and a cross reference to the messages that use
them.
Information is provided on the PLC type and protocol next to PLC:
at the top of the screen.
Tag Names are listed alphabetically. Click on the arrow to scroll to
a particular tag name. Information on the Address, Data Type,
and I/O Type for the selected tag is provided.
In the Message List you are provided with the Message numbers
that use the selected Tag. If the message has a Display Condition
or an Embedded Tag is shown in parenthesis after the message
number. To view specifics for each Tag, go to the Tag Name field,
click on the DOWN arrow, and select one from the drop down list.
Export Tags
Click on the Export Tags menu item to write the tags from your
current (open) project to an Excel file or a CSV file.
Comma Delimited...
The CSV (Comma delimited or Comma-separated values) file format
saves only the text and values as they are displayed in cells of the
Tag Database. All rows and all characters in each cell are saved.
Columns of data are separated by commas and each row of data
ends in a carriage return. If a cell contains a comma, the cell contents
are enclosed in double quotation marks.
38
Phone: 1-563-359-7501 • Fax: 1-563-359-9094 • www.uticor.net
MAN-P3000-002
Programming Software User Manual
TAG NAME,TAG DATATYPE,ADDRESS/EXP,# OF CHARACTERS,INITIAL
VALUE,RETENTIVE FLAG,PLC /INT/EXP,WRITE TAG
DIFF ACTUAL VS OPTIMUM,SIGNED_INT_16,V20005,,,,PLC1,
OVERHEAT WARNING,SIGNED_INT_16,V20004,,,,PLC1,
TEMP OPTIMUM RANGE,SIGNED_INT_16,V20003,,,,PLC1,
TEMP OUT RANGE,SIGNED_INT_16,V20002,,,,PLC1,
TEMPERATURE DIFFERENCE,SIGNED_INT_16,[[TEMP OUT RANGE]][[TEMP OPTIMUM RANGE]],,,,EXPRESSION,
Click on Comma Delimited... if you want to save the tag database
as a .CSV file. The following window will appear allowing you to
name the file and navigate to the directory and folder where you
want to save it.
Excel Format...
Click on the Excel Format... menu item to write the tags from
your current (open) project to a Microsoft Excel® file. The
PowerMarquee Programming Software will open Microsoft Excel
and write the tags to an Excel book as shown below.
Click on File >Save As in the Excel program and enter a name
for the file. Click on the Save button to save the file under the
name you have entered. Close Excel to return to PowerMarquee
Programming Software. Column Headers in the Excel file will be:
TAG NAME, TAG DATA TYPE, ADDRESS/EXP (an Expression
will appear within double brackets [[ ]]), # OF CHARACTERS,
INITIAL VALUE, RETENTIVE FLAG (if applicable), PLC/INT/EXP
(will list if the tag is a PLC tag, and Internal tag or a Expression
tag), WRITE TAG. These attributes are listed for each tag in the
project database.
MAN-P3000-002
Phone: 1-563-359-7501 • Fax: 1-563-359-9094 • www.uticor.net
39
Reference
Introduction
Example of what a CSV file looks like opened in Notepad:
Programming Software User Manual
Import Tags
Reference
Click on the Import Tags menu item to import the tags into your
current (open) project from a Microsoft Excel® (.xls) file or a CSV
(Comma delimited or Comma-separated values) file format.
Comma Delimited...
1. Click on Import Tags > Comma Delimited... to import tags
from a .CSV file. The following window will appear. Navigate
to the folder where the file is stored.
2. Click on the .csv file you want to import to highlight it and then
click on the Open button. The file will be written to the Tag
Database. You will be prompted to choose whether the import
.csv file’s first row contains header information, and whether
or not you only want to import addresses for tags with the
same Name and Data Type.
An “Errors Log View” will display letting you know if there were
any problems importing the file into your current project.
3. Click on Setup>Tag Database to view the database and make
any corrections or changes.
Excel Format...
1. Click on the Import Tags > Excel Format...menu item to select
the Microsoft Excel® file where the tag database resides.
Navigate to the file you want, click on it to highlight it and then
click on the Open button.
40
Phone: 1-563-359-7501 • Fax: 1-563-359-9094 • www.uticor.net
MAN-P3000-002
Programming Software User Manual
Reference
Introduction
2. The Tag Database Import from Excel window will appear
(shown below).
3. PowerMarquee Programming Software will read the Excel
Database Fields and allow you to choose the field name that
correlates with the PowerMarquee Tag Database field in your
project.
4. Click on the down arrow to view the Excel Database Fields
and select the Excel field that corresponds to the
PowerMarquee Tag Database field (TAG NAME, TAG DATA
TYPE, ADDRESS/EXP, # OF CHARACTERS, INITIAL
VALUE, RETENTIVE FLAG, PLC/INT/EXP, WRITE TAG).
(See Tag Database Import from Excel dialog, below, right.)
Click on First row contains the header information if the
first row in the Excel file is a header row. Click on Only
Import addresses for Tags that have the same Name and
MAN-P3000-002
Phone: 1-563-359-7501 • Fax: 1-563-359-9094 • www.uticor.net
41
Programming Software User Manual
Reference
Data Type if you want to import new addresses for tags that
already exist in your project.
5. Each column heading in the Excel file you have imported will
display when you click on the down arrow next to each field.
(You may have other information in the Excel file that you cannot
import into the Tag Database. The Tag Database only allows
the types of information shown in the dialog box.) Select the
heading of the Excel column that corresponds to the column
headings in the Tag Database.
6. Click on the Import button to import tags. The tags will be
written to your project. Tags that already exist will not be
overwritten. A message will appear letting you know if the
Excel file was successfully imported into the Tag Database.
The Error Log View will appear to let you know if there were
problems in the import process or if the tags already exist in
the project. Open the Tag Database to make changes.
Export Messages
Click on the Export Messages menu item to write the messages
from your current (open) project to an Excel file or a CSV file.
Comma Delimited...
The CSV (Comma delimited or Comma-separated values) file format
saves only the text and values as they are displayed in cells of the
Message Database. All rows and all characters in each cell are
saved. Columns of data are separated by commas, and each row
of data ends in a carriage return. If a cell contains a comma, the
cell contents are enclosed in double quotation marks.
Example of what a CSV file looks like opened in Notepad:
42
Phone: 1-563-359-7501 • Fax: 1-563-359-9094 • www.uticor.net
MAN-P3000-002
Programming Software User Manual
Excel Format...
Click on the Excel Format... menu item to write the messages from
your current (open) project to a Microsoft Excel® file. The
PowerMarquee Programming Software will open Microsoft Excel
and write the messages to an Excel book as shown below. Click
on File >Save As in the Excel program and enter a name for the
file. Click on the Save button to save the file under the name you
have entered. Close Excel to return to PowerMarquee Programming
Software.
MAN-P3000-002
Phone: 1-563-359-7501 • Fax: 1-563-359-9094 • www.uticor.net
43
Reference
Introduction
Click on Comma Delimited... if you want to save the Message
Database as a .CSV file. The following window will appear allowing
you to name the file and navigate to the directory and folder where
you want to save it.
Programming Software User Manual
Reference
Import Messages
Please Note: Always
import tags used by
messages into the
project’s tag database
before you import the
Messages into the project.
If the Message tags are not
already in the tag
database, they will not be
imported into the project.
Click on the Import Messages menu item to import Messages into
your current (open) project from a Microsoft Excel® (.xls) file or a
CSV (Comma delimited or Comma-separated values) file format.
Comma Delimited...
1. Click on Import Messages> Comma delimited... to import
messages from a .CSV file. The following message will appear.
Make sure you have the tags associated messages already
in your project. Click Yes if you want to continue with the import.
Click No if you need to import or configure the tags into the
tag database first.
TIPs on Editing Excel/CSV
Message files before importing:
1. Ensure that tag name is
spelled properly (if it is
available
in
tag
database)
2. When you click Yes the following window will appear. Navigate
to the folder where the file is stored.
2. ^C indicates color, ^S
indicates size, and ^B
indicates blink.
3.
Embedded tag nkames
are in [TAGNAME] and
details of this tag are
specified in different
columns (AM_EMBED/
TOTAL CHARACTER,
etc.)
4.
Ensure that you have
used YES/NO properly
in the various fields.
5.
We suggest that you
make a copy of a
previous record and
edit it for subsequent
messages.
44
3. The file will be written to the Message Database. To avoid
overwriting or replacing an existing message(s), the Message
Paste dialog box (shown below) will appear providing you with
import options.
Phone: 1-563-359-7501 • Fax: 1-563-359-9094 • www.uticor.net
MAN-P3000-002
Programming Software User Manual
5. Click OK when done and the imported Messages are now listed
in the Messages list.
Excel Format...
1. Click on the Import Messages> Excel Format... menu item
to select the Microsoft Excel® file where the Message database
resides. The following Read Message Excel File window will
appear. Navigate to the file you want, click on it to highlight it
and then click on the Open button.
2. The file will be written to the Message Database. To avoid
overwriting or replacing an existing message(s), the Message
Paste dialog box will appear providing you with import options
(the same as for the .csv file shown on previous page.)
3. Enter the Message No. 1 where you want to begin importing.
Confirm before overwriting is selected by default. If you
leave this selected, you will be prompted with each imported
message that has the same Message No. of an existing
message to confirm each overwrite. Click Yes or No. You can
also select Overwrite without confirmation or Do not
overwrite. Click OK when finished.
4. The imported Messages are now listed in the Messages list.
MAN-P3000-002
Phone: 1-563-359-7501 • Fax: 1-563-359-9094 • www.uticor.net
45
Reference
Introduction
4. Enter the Message No. 1
where you want to begin
importing. Confirm before
overwriting is selected by
default. If you leave this
selected, you will be
prompted with each imported
message that has the same
Message No. of an existing
message to confirm each
overwrite. Click Yes or No.
You can also select
Overwrite without confirmation or Do not overwrite.
Programming Software User Manual
Export Power-Up Messages
Reference
Click on the Export Power-Up Messages menu item to write the
messages (power-up messages only) from your current (open)
project to an Excel file or a CSV file. This is accomplished in the
same way as for the regular messags. See the previous section,
Export Messages, for step-by-step instructions.
Import Power-Up Messages
Click on the Import Power-Up Messages menu item to import
messages stored in an Excel file or a CSV file into your current
(open) project. This is accomplished in the same way as importing
regular messages, See the previous section, Import Messages, for
step-by-step instructions.
Project Attributes
GENERAL
Under the General tab in Project Attributes you will make the
following selections.
Please Note: When
Priority Messages are
displayed, no other
messages will update or
be processed until the
Priority Message is
removed.
46
Priority Message Display Time (sec.)
This is the amount of time in seconds that the Priority Message will
display on the marquee. Enter a number between 1 and 60 seconds
(default is 5). After the display time has been reached, the next
active Priority Message will display. If there is no other active Priority
Message in the queue, the same Priority Message will re-display.
Phone: 1-563-359-7501 • Fax: 1-563-359-9094 • www.uticor.net
MAN-P3000-002
Programming Software User Manual
Queued Message Display Time (sec.)
This is the amount of time in seconds that the Queued Message
will display on the marquee. Enter a number between 1 and 60
seconds (default is 5). After the display time has been reached,
the next active Queued Message in the list will display. If there is
no other active Queued Message in the queue, the same Queued
Message will re-display. (Please note that active Priority Messages
are displayed in place of Queued Messages. A Priority Message
must become inactive before Queued Messages will be displayed.
Queued Message List Size
This is the maximum number of Queued Messages that can be
stored in the list. Enter a number between 1 and 99 (default is the
maximum 99). After the maximum is reached, no other Queued
Messages can be stored in the queue list.
Blink ON Time (1/10th of a second)
Enter a number between 1 and 99 (tenths of a second) for the time
the message will remain ON during the blink sequence. (Used if
the blink option is selected as a message attribute.) The default is
5 tenths of a second.
Blink OFF Time (1/10th of a second)
Enter a number between 1 and 99 (tenths of a second) for the time
the message will remain OFF during the blink sequence. (Used if
the blink option is selected as a message attribute.) The default is
5 tenths of a second.
Display Time Interval between consecutive Power-Up
Messages (1/10th of a second)
Enter a number between 1 and 255 (tenths of a second) for the
time that each consecutive Power-Up Message will display. The
default time is 16 tenths of a second.
MAN-P3000-002
Phone: 1-563-359-7501 • Fax: 1-563-359-9094 • www.uticor.net
47
Reference
Introduction
Priority Message List Size
This is the maximum number of Priority Messages that can be stored
in the list. Enter a number between 1 and 99 (default is the maximum
99). After the maximum is reached, no other Priority Messages
can be stored in the queue. Once a Priority Message in the queue
list becomes inactive and the list is no longer at maximum capacity,
the next Priority Message will be added to the list.
Programming Software User Manual
Reference
PRINTER
Baud Rate
Select baud rate to match Printer. Select from 1200, 2400, 4800,
9600, 19200, or 38400. Default is 9600.
Parity, Stop Bits, Data Bits
Select the corresponding attributes of the printer.
Select RS485
This allows you to select RS-485 as the communication protocol. If
you are connecting RS-232 or RS-422, do NOT select this feature.
Click on the box to place a check mark, if you want to enable RS485.
Require CTS
Select this to match the printer.
Control RTS
Select this to match the printer.
48
Phone: 1-563-359-7501 • Fax: 1-563-359-9094 • www.uticor.net
MAN-P3000-002
Programming Software User Manual
NOTE: If using Internal, the
tag address string must
use a READ/WRITE register
in the PLC. The PLCs use
READ ONLY registers for
their internal clock/
calendars and cannot be
written to. If using External,
be sure to use the correct
PLC addresses!
MAN-P3000-002
Reference
Introduction
CLOCK
Date Tags:
Year (word): Tag for the location that the marquee sets
with the year (0–99).
Month (word): Tag for the location that the marquee sets
with the month (1–12).
Day (word): Tag for location that the marquee sets with
the day (1–31)
.
Time Tags
Hour (word): Tag for internal location that the marquee
sets with the hour (1–12).
Minute (word): Tag for internal location that the marquee
sets with the minute (00–59).
Second (word): Tag for internal location that the marquee
sets with the second (00–59).
Clock Source
If you select Internal, the marquee maintains the clock using the
onboard Real-Time Clock chip. The marquee will write data and
time values to the PLC if the tags are mapped to the PLC.
If you select External, the marquee uses values from the tags in
place of internal Real-Time Clock. The marquee will read these
values from the PLC if the tags are mapped to the PLC.
Phone: 1-563-359-7501 • Fax: 1-563-359-9094 • www.uticor.net
49
Programming Software User Manual
Reference
PANEL TO PLC
Good Communication Toggle (Discrete)
Watchdog — this bit is toggled every 5 seconds allowing the PLC
to determine if the marquee is communicating.
Low Battery (Discrete)
Indicates battery for system RAM needs to be replaced. Cleared
on power-up, set when low battery is detected.
50
Phone: 1-563-359-7501 • Fax: 1-563-359-9094 • www.uticor.net
MAN-P3000-002
Programming Software User Manual
Reference
Introduction
PLC TO PANEL
Increase Clock by 1 hour (Discrete)
This allows the PLC to increment the marquee system clock by 1
hour.
Decrease Clock by 1 hour (Discrete)
This allows the PLC to decrement the system clock by 1 hour.
MAN-P3000-002
Phone: 1-563-359-7501 • Fax: 1-563-359-9094 • www.uticor.net
51
Programming Software User Manual
Reference
PORTS
Computer Interface
Select the PowerMarquee port that you will use to connect to a
programming computer when you create a PowerMarquee Project
and load it into a marquee.
PLC Driver
Select the marquee port that you will use to connect to a PLC.
Printer
Select the PowerMarquee port that you will use to connect to a
serial. Select NOT USED if not connecting to a Printer.
Slave
Select the PowerMarquee port that you will use to connect to a
slave device. Select NOT USED if not connecting to a slave.
NOTE: Please be aware that any given port can be used only
once. If you attempt to duplicate the COM1 (e.g.) port
assignment, you will receive a warning message.
52
Phone: 1-563-359-7501 • Fax: 1-563-359-9094 • www.uticor.net
MAN-P3000-002
Programming Software User Manual
Reference
Introduction
ERROR MESSAGES
Error Messages will be displayed on this Group and Unit
number
Select the Group Number (0–15) and Unit Number (1–4095) of
the message display that will display system error messages.
Please remember that the display of the PowerMarquee Master
Unit is always Group 1, Unit 1.
Include Marquee Frame Information
Click here if you want to include the Marquee Frame information
and then select the Top Stick for Error Messages to appear and
the Bottom Stick for Error Messages to appear.
MAN-P3000-002
Phone: 1-563-359-7501 • Fax: 1-563-359-9094 • www.uticor.net
53
Programming Software User Manual
Reference
Select PLC
Click on the down arrow to view the available PLCs. Select the
PLC Type and Protocol for the PLC you are using. If your PLC
Type and Protocol is Entivity’s (Think & Do) Modbus, the Think N
Do Map File field will become available, allowing you to select a
map file to import into the project.
If you want to view or edit the PLC Attributes, click on the View/
Edit PLC Com Setup button. The PLC Attributes dialog box
applicable to the type PLC you have previously selected will be
shown. Here you can make changes to the PLC communication
setup. Click on OK to save your changes or Help to view the help
topics available for that particular PLC.
Upgrade Firmware
There may be occasional upgrades to the PowerMarquee internal
software, also referred to as the Exec or Firmware. (Check the
www.uticor.net website periodically for information about software
and firmware upgrades.)
CAUTION: Existing Programs that are saved to FLASH
Memory must be resaved to FLASH after the upgrade.
When upgrading firmware, YOU MUST write the program
to the panel and save the program to FLASH using Panel
> Flash > RAM to Flash.
To Upgrade Firmware:
1. Back up the user program currently stored in the
PowerMarquee and save to disk or Flash option card.
54
Phone: 1-563-359-7501 • Fax: 1-563-359-9094 • www.uticor.net
MAN-P3000-002
Programming Software User Manual
3. Click on Browse button and navigate to the new firmware file
(.hex file). Firmware is generally stored in the PowerMarquee
Program file, in the “Firmware” folder. Click on the .hex file that
you want to import and click on the Open button.
4. Select the appropriate COM port under Ethernet/COM Port
(click on the Configuration… button) and click on the OK
button to begin the upgrade. A status bar will let you know
when the upgrade is complete.
MAN-P3000-002
Phone: 1-563-359-7501 • Fax: 1-563-359-9094 • www.uticor.net
55
Reference
Introduction
2. Click on Upgrade Firmware, the following window will appear.
Programming Software User Manual
Reference
5. The dialog box will show the File Revision number of the
firmware and the Panel Revision of the Firmware.
Check these revision numbers. If they are the same (no
upgrade is needed), you may click on the Cancel button to
exit. If the file you have selected is not the right one, click on
the Select a different file... button.
6. Click on Continue to write the new firmware to the
PowerMarquee.
56
Phone: 1-563-359-7501 • Fax: 1-563-359-9094 • www.uticor.net
MAN-P3000-002
Programming Software User Manual
Help Topics
Click on Help Topics to view the help topics for PowerMarquee
Programming Software. The help window is in Windows 2000
format. Use the Contents tab to view help topics by category.
Click on the Index tab to view an alphabetical list of all help topics.
Click on the Search tab and enter a word or words to find them
where used in the help topics.
About PowerMarquee
Click on About PowerMarquee for copyright, manufacturer, and
version number of the PowerMarquee Programming Software.
MAN-P3000-002
Phone: 1-563-359-7501 • Fax: 1-563-359-9094 • www.uticor.net
57
Reference
Introduction
Help Menu
Programming Software User Manual
Reference
Right Click Menus
These menus are availabe when working with message database,
message text field and in the tag database.
Tag Database Right Click Menu
Add/Edit
Click on this menu item to Add or Edit a Tag. For more information,
go to the Add Tag Details topic.
Delete Tag
Highlight Tag(s) in the Tag Database that you want to delete. Right
click the mouse and choose Delete to remove the tag(s) from the
database.
Sort Tags in Tag Database
With the Tag Database open, right click your mouse while your
cursor resides anywhere in the Tag Database list. A menu will
appear.
You may also choose to sort the list by Address, Tag Name, or
Data Type.
If you click on Sort on Address, the list will be sorted
alphanumerically by the PLC address. If you click on Sort on Tag
Name, the list will be sorted alphabetically (A to Z) by the name of
the tag. If you click on Sort on Data Type, the tag list will be
sorted by Data Type. For tags with same data type, it will perform
a second sort by the address.
Message Database Right Click Menu
Delete Messages
Highlight the message(s) in the
Message List that you want to delete
and right click your mouse button to
view the menu. Click on Delete
Messages. The message to the
right will appear asking you to
confirm the deletion. Click on Yes
to delete, No to cancel the
command.
Copy Messages
Highlight the message(s) in the Message List that you want to copy
and right click your mouse button to view the menu. Click on Copy
Messages.
58
Phone: 1-563-359-7501 • Fax: 1-563-359-9094 • www.uticor.net
MAN-P3000-002
Programming Software User Manual
Next you will want to Specify the messages number to start
copying to. For example, if you select 7, messages 1, 5 and 6 will
be copying to new message number 7, 11, and 12. The program
loader will leave blank messages (8, 9, and 10) in the place of the
sequential messages that you skipped (2, 3, and 4) over for copying
and pasting. Confirm before overwriting is selected by default.
If this is checked, the following dialog will appear asking you to
confirm each Message overwrite.
You can also select Overwrite without confirmation if you do not
want to receive the message above, or Do not overwrite if you do
not want to overwrite existing messages with pasted messages
with the same message number.
To edit a message after pasting, double click on the message you
want to edit and the Edit Message details dialog will appear (or
click on the message to highlight, right click the mouse button for
the popup menu and click on Properties). Click OK when finished
or Cancel to quit without pasting.
MAN-P3000-002
Phone: 1-563-359-7501 • Fax: 1-563-359-9094 • www.uticor.net
59
Reference
Introduction
Paste Messages
Once you have copied the messages from the list, right click your
mouse button, and then click on Paste Messages in the popup
menu. The following dialog will appear showing the message list
and the messages that you have selected to copy.
Programming Software User Manual
Reference
Find . . .
Click on Find to search for character strings in the Message List,
the following dialog box will appear:
1. Enter the text string into the Find What: field.
2. Select Match Case if you want the upper and lower case
characters found to match exactly what you typed in, otherwise
it will match your word “MONITOR” to “Monitor”, for example.
3. Select Match Exact if you only want the search to find and
display exactly what you have typed in, otherwise it may find
the characters as part of a larger word/text string.
4. Select Any Word if you have typed in a phrase and want the
search to find any word in the phrase.
5. Select All Words if you want the search to find only instances
where all of the words in the character string appear.
6. Click on the Find Next button to go to the next match.
Sort
Click on Sort in the right click menu to sort (alphanumerically) by
Msg # (Message Number), Msg Name (Active Text in Message),
or by Group Number (where messages are sent for display). You
can also click on a column heading in the Message List window or
the Power-Up Message list window to sort alphanumerically).
Properties
Click on a message in the Message list to highlight it and then right
click your mouse button to bring up the popup menu. Click on
Properties to bring up the Edit Message details dialog for that
message.
60
Phone: 1-563-359-7501 • Fax: 1-563-359-9094 • www.uticor.net
MAN-P3000-002
Programming Software User Manual
Message Text Right Click Menu
Color
Highlight the text that you want to change the color of in the
message’s active text or inactive text field and then right click your
mouse button. Move your cursor to the arrow next to Color and
you will see the options of Red (default), Green, or Yellow. Choose
the color you want for the highlighted text. It will change in the
Active Text or Inactive Text window* PowerMarquee is currently
only available in Red or High Brite Red, but it can drive other UTICOR
marquees that have multi-color displays.
Font Size
Highlight the text that you want to change the font size of in the
message’s active text or inactive text field and then right click your
mouse button. Move your cursor to the arrow next to Font Size
and you will see the options of 2" High, 4" High, 6" High, 8"
Narrow, or 8" High. Choose the size you want for the highlighted
text. It will change in the Active Text or Inactive Text window.
Blink Text
Highlight the text that you want to blink in the message’s active text
or inactive text field and then right click your mouse button. Click
on Blink. The text that you have selected to blink will be underlined
in the Active Text or Inactive Text window to indicate that the blink
option has been enabled.
MAN-P3000-002
Phone: 1-563-359-7501 • Fax: 1-563-359-9094 • www.uticor.net
61
Reference
Introduction
Message Preview
Click on a message in the Message list to highlight it and then right
click your mouse button to bring up the popup menu. Click on
Message Preview to bring up the Message Preview window for
that message. This window will show you how the message will
display on the marquee.
Programming Software User Manual
Embed Tags...
Reference
Special characters in the message determine where the embedded
data from the registers should go. Up to four data values may be
embedded in a single message. Program how the data value will
be displayed as follows:
62
1.
The following dialog box will appear when you select Embed
Tags value within a message.
2.
Select the Embedded Command that determines the type of
value to embed. Available choices are Discrete, Numeric,
String, Time and Date. Depending on what type command
you choose, certain areas of the dialog box become available
or unavailable (grayed out) for selection or data entry.
3.
If you choose Discrete, Numeric, or String, select or enter
the Tag name where the data value will be read by clicking in
the field or on the down arrow next to Select tag from where
value will be read for embedded data.
4.
If you have selected Numeric, the options under “Selected
tag is a numeric tag” will be enabled.
5.
Select the Display Format from the available choices.
6.
Select Justification from Leading Zeroes, Leading Spaces,
or Trailing Spaces.
Phone: 1-563-359-7501 • Fax: 1-563-359-9094 • www.uticor.net
MAN-P3000-002
Programming Software User Manual
Under # Digits, click on the box in front of Auto Check if you
want to have the panel automatically determine the number of
digits to be placed for the embedded value. Total Digits and
Fractional Digits will be disabled if you choose Auto Size.
8.
Also, under # Digits, you may enter the Total Digits that you
want to display, and enter the Fractional Digits you want to
display (leave at default, 0, if you do not want fractional digits).
9.
If you have selected Discrete, the fields under “Selected tag
is a discrete tag” will be available. Enter the text that you
want to appear within the message when the Discrete register
is ON and when the Discrete register is OFF.
10. If you have selected Time under Embedded Command, the
field “Time Command,” will be available.
11. Select the Time Format from the available choices:
HH_MM_SS_24, HH_MM_24, HH_MM_SS_12, or
HH_MM_12.
12. If you have selected Date under Embedded Command, the
field, “Date Command,” will be available.
13. Select Date Format from the available choices: DD_MMM_YY,
DD_MM_YY, MM_DD_YY, YY_MM_DD.
14. Press the Add button to add the embedded data to the
message. (When inserted in a message a numeric command
will be represented in the Active Text or Inactive Text message
field as <___#>: Discrete is represented as <DISCRETE>;
String is represented as <STRING>; Time as <Time>; and Date
as <Date>.) You will return to the Add/Edit Message details
dialog.
MAN-P3000-002
Phone: 1-563-359-7501 • Fax: 1-563-359-9094 • www.uticor.net
63
Reference
Introduction
7.
Reference
Programming Software User Manual
This page intentionally left blank.
64
Phone: 1-563-359-7501 • Fax: 1-563-359-9094 • www.uticor.net
MAN-P3000-002
Appendix A
ASCII Characters
Error Messages
International Character Sets
Programming Software User Manual
Appendix A
ASCII Characters
Name
Octal
Dec
Hex
Description
SP
!
“
#
$
%
&
‘
(
)
*
+
,
.
/
0
1
2
3
4
5
6
7
8
9
:
;
<
=
>
?
@
A
B
C
D
E
F
G
H
I
J
K
L
M
040
041
042
043
044
045
046
047
050
051
052
053
054
055
056
057
060
061
062
063
064
065
066
067
070
071
072
073
074
075
076
077
0100
0101
0102
0103
0104
0105
0106
0107
0110
0111
0112
0113
0114
0115
32
33
34
35
36
37
38
39
40
41
42
43
44
45
46
47
48
49
50
51
52
53
54
55
56
57
58
59
60
61
62
63
64
65
66
67
68
69
70
71
72
73
74
75
76
77
20
21
22
23
24
25
26
27
28
29
2A
2B
2C
2D
2E
2F
30
31
32
33
34
35
36
37
38
39
3A
3B
3C
3D
3E
3F
40
41
42
43
44
45
46
47
48
49
4A
4B
4C
4D
Space
Exclamation point
Double quote
Pound sign
Dollar sign
Percent sign
Ampersand
Apostrophe (single quote)
Left parenthesis
Right parenthesis
Asterisk
Plus
Comma
Hyphen (minus)
Period (decimal point)/dot
Slant (slash)
Zero
One
Two
Three
Four
Five
Six
Seven
Eight
Nine
Colon
Semicolon
Less than / Left angle bracket
Equals sign
Greater than / Right angle bracket
Question mark
“At” sign
Uppercase A
Uppercase B
Uppercase C
Uppercase D
Uppercase E
Uppercase F
Uppercase G
Uppercase H
Uppercase I
Uppercase J
Uppercase K
Uppercase L
Uppercase M
A-2
Phone: 1-563-359-7501 • Fax: 1-563-359-9094 • www.uticor.net
MAN-P3000-002
Programming Software User Manual
0116
0117
0120
0121
0122
0123
0124
0125
0126
0127
0130
0131
0132
0133
0134
0135
0136
0137
0140
0141
0142
0143
0144
0145
0146
0147
0150
0151
0152
0153
0154
0155
0156
0157
0160
0161
0162
0163
0164
0165
0166
0167
0170
0171
0172
0173
0174
0175
0176
MAN-P3000-002
78
79
80
81
82
83
84
85
86
87
88
89
90
91
92
93
94
95
96
97
98
99
100
101
102
103
104
105
106
107
108
109
110
111
112
113
114
115
116
117
118
119
120
121
122
123
124
125
126
4E
4F
50
51
52
53
54
55
56
57
58
59
5A
5B
5C
5D
5E
5F
60
61
62
63
64
65
66
67
68
69
6A
6B
6C
6D
6E
6F
70
71
72
73
74
75
76
77
78
79
7A
7B
7C
7D
7E
Uppercase N
Uppercase O
Uppercase P
Uppercase Q
Uppercase R
Uppercase S
Uppercase T
Uppercase U
Uppercase V
Uppercase W
Uppercase X
Uppercase Y
Uppercase Z
Left square bracket
Back slash
Right square bracket
Caret
Underscore
Back quote
Lowercase a
Lowercase b
Lowercase c
Lowercase d
Lowercase e
Lowercase f
Lowercase g
Lowercase h
Lowercase i
Lowercase j
Lowercase k
Lowercase l
Lowercase m
Lowercase n
Lowercase o
Lowercase p
Lowercase q
Lowercase r
Lowercase s
Lowercase t
Lowercase u
Lowercase v
Lowercase w
Lowercase x
Lowercase y
Lowercase z
Left curly brace
Vertical bar
Right curly brace
Tilde
Phone: 1-563-359-7501 • Fax: 1-563-359-9094 • www.uticor.net
Appendix A
Introduction
N
O
P
Q
R
S
T
U
V
W
X
Y
Z
[
\
]
^
_
‘
a
b
c
d
e
f
g
h
i
j
k
l
m
n
o
p
q
r
s
t
u
v
w
x
y
z
{
|
}
~
A-3
Programming Software User Manual
PowerMarquee Programming Software Error Messages
Appendix A
"Error M01: Unable to open the project file (*.prp)."
"Error M02: Unable to open Message database file."
"Error M03: Unable to open PLC attributes file (*.atr)."
"Error M04: Unable to open project options file (*.ppo)."
"Error M05: Unable to create project file (*.pmq)."
"Error M06: Unable to create PLC attributes file (*.atr)."
"Error M07: Unable to create message database file (*.mmd)."
"Error M08: Unable to create project options file (*.ppo)."
"Error M09: Unable to create project options file (*.opt)."
"Error M18: File %s not found."
Solution: If you have inadvertently renamed your project while open in
PowerMarquee Programming Software, close and then reopen the project.
"Error M10: Unable to create temporary PLC attributes file."
Reason: You might receive this error message if you are running two instances of
the PowerMarquee Programming Software, opened a project in one and then gave
the same project name in another to be downloaded from marquee.
Solution: Give a valid project file name that is not open in any application. If the
problem persists, close all your applications, run only one instance of
PowerMarquee, and try again.
"Error M13: Problems in project file while verifying checksum."
Reason: Project file is corrupted.
Solution: If you have a backup of your project files, use them to open the project.
You may have to recreate the project. If this problem persists, call technical
support.
"Error M14: There are no PLC dlls available in this execution directory."
"Error M15: PLC Dll file being used by this project is not found."
Reason: If you have moved all the PLC dlls from the directory where
PowerMarquee.exe resides, you will receive this error message.
Solution: Reinstall the software
"Error M16: Downloaded project is a protected project. This cannot be edited/viewed in
the editor."
Reason: Project is write protected.
Solution: You will not be able to open this project for viewing/editing purpose.
Consult with project's creators.
"Error M18: File xxxx not found."
"Error M19: Unable to open xxxx file."
Solution: If you have inadvertantly renamed your project while open in
PowerMarquee Programming Software, close and then reopen the project.
A-4
Phone: 1-563-359-7501 • Fax: 1-563-359-9094 • www.uticor.net
MAN-P3000-002
Programming Software User Manual
"Error M21: Unable to find details in Excel file."
Reason: This Excel file does not have details (no fields and records).
"Error M22: Unable to import data."
Reason: PowerMarquee Editor is not able to import the data from Excel file/CSV
file. Reason could be that either the file has invalid data or the data is improperly
ordered.
"Error M23: Unit Number is out of range."
Solution: Enter a valid unit number. Valid range is 1–4095.
"Error M24: Invalid file name or path."
Reason: You have specified an invalid file name.
Solution: You have to specify a valid file name. Do not include any special
characters (\, /,.,*,?,<,>,|,etc.) while naming your files. First character should be
alphanumeric.
"Error M25: Invalid file name. Do not use symbols."
Reason: You have specified an invalid file name.
Solution: To avoid getting both these messages, when creating a project do not
use character symbols (/,{,},[,],<,>,…etc.) in the project name. Only use letters A-Z
and/or numbers 0-9 for a unique project name.
"Error M26: Invalid Think and Do map file."
Reason: When working with Think and Do PLC type, this program will map the
PowerMarquee project to an existing Think and Do map file. If you try to map the
PowerMarquee project to a map file generated by any program other than Think and
Do, this message will appear and prevent you from continuing with the project.
Solution: Select a valid Think and Do map file.
"Error M27: Cannot edit ON-LINE unless the PowerMarquee has a program. Edit OFFLINE first and write a program to the PowerMarquee."
Reason: If no project has been loaded into the PowerMarquee, the program loader
will not allow you to enter the ON-LINE Edit mode. Also, if the map file has been
altered, you will receive this message.
Solution: Get into OFF-LINE Edit mode and upload a project. Exit to the "Step 1:
Project Information" screen, click on the ON-LINE Edit mode button, and select
"OK". If that doesn’t work, you may need to make a new project with a new map file.
"Error M28: Invalid project name."
Reason: You have specified an invalid file name.
Solution: Specify a valid file name.Do not include any special characters (\, /
,.,*,?,<,>,|,etc.) while naming your files. First character should be alphanumeric.
MAN-P3000-002
Phone: 1-563-359-7501 • Fax: 1-563-359-9094 • www.uticor.net
A-5
Appendix A
Introduction
"Error M20: Unable to start Excel application. Do you want to import from *.csv format?"
Reason: PowerMarquee Editor is not able to start Excel. It is possible that Excel is
not installed in the system or the system has insufficient memory.
Solution: Install Excel, or restart the system and try again. If the problem persists,
contact technical support.
Programming Software User Manual
Appendix A
"Error M29: Not a valid project file (xxxx)."
Reason: If you have chosen a non-PowerMarquee project file, you will get this error.
"Error M30: Unable to find PLC dll with manufacturer id : xxxx and model id : xxxx."
Reason: If you have moved the PLC dlls from the directory where
PowerMarquee.exe resides, you will receive this error message.
Solution: Reinstall the software
"Error M32: OLE libraries initialization failed."
Solution: Restart the system. If the problem persists, OLE related Windows system
files are not installed properly.
"Error M34: Wrong Embedded Data Format."
Solution: If you are getting this error while opening a project, the project file is
corrupt. Recreate the project. If the problem persists, contact technical support.
"Error C01: Unable to open communication port."
Solution: Select another COM port.
"Error C02: Communication port is being used by some other application. Access denied."
Solution: Close the other application and try to communicate, or, if you have an
extra serial port, connect the cable to that port and select that extra port for
communication from PowerMarquee.
"Error C05: Unable to update PLC driver."
Reason: You will receive this error message if communication is not established
between the programming software and the marquee, or if the marquee is still trying
to communicate with the old driver and you are attempting to update the driver.
Solution: Restart the marquee and try communicating with the marquee. If you still
face this problem, clear memory from Marquee (using PowerMarquee > Clear
Memory) and update the PLC driver and then, save your project. Ensure that you
have the project saved to disk before you clear memory.
"Error C07: PLC Attributes could not be written to the PowerMarquee."
"Error C09: Tags could not be written to the PowerMarquee."
"Error C10: Error in sending Project attributes to PowerMarquee."
Solution: Check the connections between the marquee and computer. Restart the
panel and try communicating again.
"Error C12: Unable to delete message from PowerMarquee."
Reason: If Delete Message is selected while there is a disruption in the
communication between the panel and computer, this error message is displayed.
Solution: Check the COM line, power to the marquee, and COM port used for
correct setting and function.
"Error C13: Memory diagnostics failed."
Solution: Check connections and COM port settings. Ensure the proper function
and power distribution of marquee (no system faults). If all checks out OK and you
are still receiving this error message, there maybe a physical problem with the
marquee's memory.
A-6
Phone: 1-563-359-7501 • Fax: 1-563-359-9094 • www.uticor.net
MAN-P3000-002
Programming Software User Manual
"Error C15: Errors in reading Flash card."
"Error C16: Unable to program User Flash."
Reason: If the Flash card is not set properly, communication cannot be established
between the marquee and the programming software.
Solution: Check whether the Flash card is set properly in the slot / restart the
marquee. Check the cable for communication.
"Error C17: Unable to read PLC Attributes from PowerMarquee."
"Error C18: Unable to read PLC 1 Attributes from PowerMarquee."
"Error C19: Unable to read PLC 2 Attributes from PowerMarquee
"Error C20: Unable to delete message %s # %d from the PowerMarquee."
"Error C21: Unable to get Information from PowerMarquee. \nPlease checkup the
connection between PowerMarquee and computer."
"Error C22: Unable to read System Attributes from PowerMarquee."
"Error C23: Unable to read tags from the PowerMarquee."
Solution: Check the connection between marquee and computer. Restart the
marquee and try communicating again.
"Error C24: Testing RAM - failed."
Solution: If you have a RAM Card installed in the marquee, remove this RAM card
and redo the test. If the test passes, replace the RAM card with a new RAM card. It
the test fails, there is a problem with the marquee. Please contact technical support.
"Error C25: Testing Flash - failed."
Solution: Replace the Flash card.
"Error C26: Error in Setting Group and Unit Number on PowerMarquee."
"Error C27: Incorrect Communication Packet (Checksum Error)."
"Error C28: Incorrect Communication Packet (Time Out Error). \nCheck cable,
communication port and ports assignment on PowerMarquee."
"Error C29: PowerMarquee is out of memory; \nPlease delete few messages and try again."
"Error C30: Incorrect Communication Packet (Incorrect message code)."
"Error C31: Incorrect Communication Packet (Incorrect message number)."
"Error C32: Incorrect Communication Packet (Incorrect message length)."
"Error C33: Incorrect Communication Packet (Error in EEPROM program)."
"Error C34: Incorrect Communication Packet (Incorrect message load)."
"Error C35: Incorrect Communication Packet (Incorrect Format)."
"Error C36: Incorrect Communication Packet (Image not found)."
"Error C37: Incorrect Communication Packet (Incorrect password)."
"Error C38: Incorrect Communication Packet (Error in INIT)."
"Error C39: Incorrect Communication Packet (ERR MSG ECHOED)."
"Error C42: Incorrect Communication Packet (Protection error)."
"Error C43: Incorrect Communication Packet (Program read only error)."
"Error C44: Incorrect Communication Packet (Incorrect type)."
Solution: Check the connection between marquee and computer. Restart the
marquee and try communicating again.
MAN-P3000-002
Phone: 1-563-359-7501 • Fax: 1-563-359-9094 • www.uticor.net
A-7
Appendix A
Introduction
"Error C14: Errors in WarmBoot."
Reason: Marquee is not warm booting.
Solution: This could indicate that the marquee is not active and/or communication
is not established between the PC and the marquee. Please check the connection
between the marquee and the PC. If the problem persists, restart the marquee.
Programming Software User Manual
Appendix A
"Error C50: The starting address does not match."
Reason: Driver file (or) firmware file is not valid (may be corrupt).
Solution: Reinstall the software.
"Error C51: Error reading driver or hex file."
Solution: You will receive this error message if two different applications are trying
to access the same driver / firmware file. Close one application and try again. If you
are using only one application, try restarting the system.
"Error C52: Error in transmitting data."
"Error C53: Error while sending Messages to Marquee."
"Error C54: Error in Execute Boot!"
"Error C55: Error in writing firmware to PowerMarquee!"
"Error C56: Error reading project from PowerMarquee."
"Error C57: Error while sending Power-Up Messages to PowerMarquee."
"Error C58: Communications Error: Operation can not be performed !"
Solution: Check the cable and communication. If required, restart your system.
"Error C60: Unable to set the Group and Unit number on the Power Marquee."
Solution: Try again to set the group and unit number. If the problem persists,
contact technical support.
"Error T01: Tag name already exists."
Reason: The tag name that was entered is a name that already has a data type
and/or PLC address assigned to it in the tag database.
Solution: Change the tag name entered to a name that is unique when compared to
the other tags in the Tag Database.
"Error T02: Tag category does not match."
Reason: This error occurs when a Tag Name of an incorrect data type is typed into
the Tag Name field of an object.
Solution: Select a valid Tag Name from the pull-down list, or create a new valid Tag
Name.
"Error T04:
"Error T05:
Not used by PowerMarquee.
"Error T06: Number of Characters must be even and valid range is 2 to 40."
Reason: In the process of making an ASCII tag, the number of characters must
remain between 2 and 40. If you enter a number outside of this range, this error
message will display.
Solution: Either re-enter a number within the specified range or use the wheel to
the right edge of that field.
"Error T07: IO Type is not valid forxxxx. Unable to convert"
Reason: If you specify a discrete address to an object requiring a word address or
vice versa, you will receive this error message.
Solution: Specify a valid PLC address.
A-8
Phone: 1-563-359-7501 • Fax: 1-563-359-9094 • www.uticor.net
MAN-P3000-002
Programming Software User Manual
"Error T11: Tag index limit reached; unable to create a new tag."
Reason: You’ve reached the tag maximum. Maximum number of tags that can be
entered is 32,000.
"Error T12: Tag expected but not found. Creating it as an internal tag."
Solution: Try the following:
1)
Accept defaults
2)
Open Tag Database and check to see if all tags are there.
3)
Some Tags will be UNKNOWN, modify to your requirements.
"Error T16: No map data found in tag database file named xxxx. Unable to read MapData."
Solution: Try the following:
1)
Accept defaults
2)
Open Tag Database and check to see if all tags are there.
3)
Some Tags will be UNKNOWN, modify to your requirements.
"Error T19: Unable to add Tag. Maximum tag index limit reached."
Solution: Try the following:
1)
Accept defaults
2)
Open Tag Database and check to see if all tags are there.
3)
Some Tags will be UNKNOWN, modify to your requirements.
"Error E01: Illegal Token xxxx is found"
"Error E02: Illegal Token: Token xxxx value exceeds max allowed value"
"Error E03: Unknown token found"
Solution: Delete the expression and enter it again. If problems persist, please call
technical support.
MAN-P3000-002
Phone: 1-563-359-7501 • Fax: 1-563-359-9094 • www.uticor.net
A-9
Appendix A
Introduction
"Error T08: Unable to get the datatype."
"Error T09: Tag index not found. Creating tag with default name and making it as internal."
"Error T10: Unable to open tag database file (*.ptd)."
Reason: The Tag Database is corrupt.
Solution: Try the following:
1)
Go to Tag Database (Setup > Tag Database) and select a tag
not associated with any objects.
2)
Delete the tag by pressing the Delete button or by using the delete
key on keyboard.
3)
Save the project.
4)
Close and then restart PowerMarquee software.
5)
Open the project and check for the error again.
Programming Software User Manual
Appendix A
PLC Driver Error Messages
For a list of PLC Driver Error Messages that you may encounter when using the PowerMarquee,
consult the PowerMarquee Programming Software online help.
A-10
Phone: 1-563-359-7501 • Fax: 1-563-359-9094 • www.uticor.net
MAN-P3000-002
Programming Software User Manual
International Character Sets
A MER IC A
C YR ILL IC
GER M ANY
EN GLA ND
DEN MA R K
SW ED EN
F RAN C E
K ANA
#
< SPA CE >
MAN-P3000-002
Phone: 1-563-359-7501 • Fax: 1-563-359-9094 • www.uticor.net
A-11
Appendix A
Introduction
The PowerMarquee display messages in 7 international character sets in addition to the U.S. character
set. The marquee is set to the specific character set on positions 2, 3, and 4 on Switch Two (see
PowerMarquee Hardware Manual, P/N MAN-P3000-003). The marquee will display messages
according to the ASCII conversion chart on the following pages. To program messages (into a master
display or the computer) in a non-U.S. character set, refer to the ASCII conversion chart. Enter the
ASCII character or code equivalent to the non-U.S. character desired. Blank areas on the chart
indicate no change from the American set. If no character is shown for the character set in use, the
American character is displayed. For example, when using the English character set, enter the “#”
character (Program Mode) or HEX 23 (Computer Interface Mode) to program and display the “£”
character. All international character sets use the standard ASCII codes. The programming terminal
always shows only the American character set.
Programming Software User Manual
CYR IL LIC
GER M AN Y
EN GLAN D
D ENMA RK
SW EDE N
F RA N CE
KAN A
Appendix A
AM ER IC A
A-12
Phone: 1-563-359-7501 • Fax: 1-563-359-9094 • www.uticor.net
MAN-P3000-002
Programming Software User Manual
MAN-P3000-002
CYR IL LIC
GER M ANY
EN GL AN D
D ENMA RK
SW EDE N
Phone: 1-563-359-7501 • Fax: 1-563-359-9094 • www.uticor.net
F RA N CE
K AN A
A-13
Appendix A
Introduction
AM ER IC A
Programming Software User Manual
C YR IL LIC
GER M AN Y
EN GL AN D
D EN MA RK
SW EDE N
F RA N CE
K AN A
Appendix A
AM ER IC A
A-14
Phone: 1-563-359-7501 • Fax: 1-563-359-9094 • www.uticor.net
MAN-P3000-002
Programming Software User Manual
MAN-P3000-002
CYR IL LIC
GER M AN Y
EN GLAN D
D EN MA RK
SW EDE N
Phone: 1-563-359-7501 • Fax: 1-563-359-9094 • www.uticor.net
F RAN CE
KAN A
A-15
Appendix A
Introduction
AM ER IC A
Programming Software User Manual
C YR IL LIC
GER M AN Y
EN GL AN D
D ENMA RK
SW EDE N
FRA N CE
K AN A
Appendix A
AM ER IC A
A-16
Phone: 1-563-359-7501 • Fax: 1-563-359-9094 • www.uticor.net
MAN-P3000-002