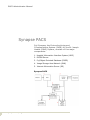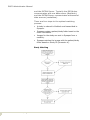
1
PACS
ADMIN
GUIDE
PACS Administrator Manual
Table of Contents
Synapse PACS
PACS Administration
PACS Administrator Responsibilities ........................ 4
User Accounts ...................................................... 7
Anomalies ........................................................... 9
Interface Monitoring ........................................... 20
Totoku Monitor Calibration ................................... 24
Support
Troubleshooting ................................................. 42
Downtime Procedures ......................................... 45
Workstations
Set Up a Diagnostic Workstation ........................... 55
Set Up a Clinical Workstation ............................... 63
Diagnostic and Clinical Workstation Settings .......... 65
Installing Synapse .............................................. 72
Review Workstations ........................................... 78
Remote Workstations .......................................... 78
Virus Scan Settings for Workstations ..................... 82
Diagnostic and Clinical Workstation Checklist ......... 85
Modalities
Adding a New Modality ........................................ 87
DD DICOM CD Burner
Prior to Installation ............................................. 90
Installation ........................................................ 92
Log On .............................................................. 93
Create a New User Account .................................. 94
Configure Rimage System Manager ....................... 95
Configure RADinfo Power PACS ............................ 96
View an Image ................................................... 98
Create CD ......................................................... 98
Import or Send from a Guest CD ........................ 100
Reports and Logs ............................................. 101
T a bl e o f C o n t e n t s/ P a g e i
PACS Administrator Manual
Everest II Label Printer .....................................
Media Kits .......................................................
eFilm Lite ........................................................
Reloading RADinfo PowerPACS Software ..............
Troubleshooting ...............................................
PACS Resources
Abbreviations
Glossary
PACS Contact Listing
T a bl e o f C o n t e n t s/ P a g e i i
102
103
104
105
106
PACS Administrator Manual
Synapse PACS
Fuji Synapse, the Picture Archiving and
Communication System (PACS) for the St. Joseph
Health (SJHS) System, consists of five major
components:
1. Hospital Information Interface System (HIIS)
2. DICOM Server
3. Fuji Object Oriented Database (FOOD)
4. Image Storage Area Network (SAN)
5. Internet Information Server (IIS)
Synapse PACS
S y n a ps e P A C S / P a ge 1
PACS Administrator Manual
Hospital Information Interface System
(HIIS)
This software component is the interface between
HIS/RIS and SYNAPSE. HIIS receives messages
from HIS/RIS in an HL/7 format and maps the
information to the appropriate locations in the
Synapse database.
DICOM Server
The DICOM server is a process that runs on the
PACS server and provides external communication
with the modalities that are configured to
communicate with SYNAPSE using the DICOM 3.0
protocol. Three typical transactions take place
between SYNAPSE and a DICOM modality:
•
Image compression and storage.
•
Query/retrieval of patient demographic information
from the SYNAPSE database (Modality Work List).
•
Query/retrieval of images from SYNAPSE to a
query/retrieve station.
Fuji Object Oriented Database (FOOD)
This is the core of the system. All textual
information is stored in the database (patient
demographics, procedure codes, users, etc.). The
database also contains pointers or addresses for
the graphical objects used in SYNAPSE (images,
attached documents, etc.).
Image Storage Area Network
All graphical objects are stored on the image
storage device or the Storage Area Network (SAN)
server.
Internet Information Server (IIS)
IIS is a software component that allows SYNAPSE
to display lists and exams as web pages. All
SYNAPSE workstations communicate with IIS,
S y n a ps e P A C S / P a ge 2
PACS Administrator Manual
which in turn communicates with the database and
the image storage device.
The Synapse components are a combination of
hardware and software that resides on the PACS
servers at the Orangewood Centralized Data
Center (CDC).
Synapse Components
S y n a ps e P A C S / P a ge 3
PACS Administrator Manual
PACS Administration
PACS Administrator Responsibilities
Responsibilities of the Synapse PACS
Administrator are described below for each major
functional area or activity.
Table 1: PACS Administrator Responsibilities
Function
Responsibility
• Add/Change/inactivate Synapse
user access in SWAT.
User Management
• Submit changes to SJHS Help
Desk for SJHS network
accounts.
• Manage & repair anomalies.
Study Management
P A C S Ad m i n i s t ra t i o n / P a g e 4
• Maintain synchronization of
Meditech and Synapse
databases.
PACS Administrator Manual
Table 1: PACS Administrator Responsibilities
Function
Interface Monitoring
Digitize Prior
Studies
Responsibility
• Use the HIIS Interface
Monitoring Tool to monitor the
state of Fuji integration
(Meditech messages filing into
Synapse).
• Use the Meditech MIS Outbox to
review the status of outgoing
messages and to resend
messages to Synapse as
needed.
• Digitize prior studies when
patients are scheduled for
radiology procedures.
• Formal training – conduct
classroom or one-on-one user
training.
Training
• Informal training – provide
application and process support
to end user.
• Personal training – attend SJHS,
Fuji, or other PACS classes, as
appropriate, to maintain and
update skills.
System Testing
P A C S Ad m i n i s t ra t i o n / P a g e 5
Perform system testing of all
Meditech and Synapse system
changes, patches and upgrades:
• Ensure level of testing is
commensurate with the degree
of change of the system.
• Ensure testing is end-to-end:
i.e., test of modalities (sending
& worklist), interfaces (ADT,
Orders & Reports), Synapse
functions, image display, and
end user settings.
Procedure Code
Management
• Ensure procedure codes are
unique and body-part specific.
Hanging Protocols
• Work with Radiologists to
create, maintain, and update
hanging protocols as needed.
PACS Administrator Manual
Table 1: PACS Administrator Responsibilities
Function
Responsibility
Comparable Study
Table
• Create, maintain, and update as
new procedures or modalities
are added.
Modality
Management
• Work with Fuji and vendor
support technicians to
implement and maintain
communication with PACS (such
as programming modalities to
send images and retrieve
worklist from Synapse).
• Establish and maintain
downtime procedures.
Downtime
Management
• Verify technologists are
following downtime procedures.
• Perform recovery activities after
a downtime event.
Quality Assurance
• Work with technologists and
radiologists to ensure that
image settings are correct
• Troubleshoot system problems.
Troubleshooting
• Coordinate activities with the
Information Systems
department when
troubleshooting
system problems.
• Manage and track problems
until resolved.
Monitor Calibration
• Calibrate Totoku monitors every
six-months.
Reporting
• Generate monthly reports on
modality volumes, performance
measures, and system issues.
Personal
Development
P A C S Ad m i n i s t ra t i o n / P a g e 6
• Read PACS related literature.
• Track industry trends.
Knowledge Sharing
• Share knowledge and
experience with PACS
Administrators from other sites.
Fuji Users Group
• Participate in Synapse groups
such as FUSUN and Intelligroup.
PACS Administrator Manual
User Accounts
All users are first set up with a user name and
password in the SJHS-NT domain. The PACS
Administrator then uses the Synapse Web
Administration Tool (SWAT) to set the amount of
access and permissions for each user.
Synapse, through the use of Windows
authentication, verifies the user’s credentials and
allows access to the Synapse application.
Account Setup Process:
Requests for new accounts must go to the local
PACS Administrator. The PACS Administrator
verifies the user’s Meditech ID and whether the
user has an NT account.
Physicians with SJHS-NT ID
1. If a physician has an SJHS-NT ID, the PACS
Administrator resubmits the physician to the SJHS
Help Desk for a new SJHS-NT ID
• In case of a duplicate ID, the PACS Administrator
adds a hospital-specific append number at the
end of the physician’s current ID number.
Table 2: Physician ID
Append Numbers
P A C S Ad m i n i s t ra t i o n / P a g e 7
Hospital
Extension
SJO
1
HHS
2
SJF
3
HHN
4
QVH
5
SRM
6
SJE
7
PACS Administrator Manual
Table 2: Physician ID
Append Numbers
Hospital
Extension
RMH
8
COV
9
MHR
10
PVH
11
GHE
12
SMMC
13
2. The SJHS Help Desk opens a ticket and assigns the
request to the Security Access Team.
3. The Security Access Team updates the account.
4. The Security Access Team contacts the PACS
Administrator when the account is established.
5. After the physician begins using the updated ID, the
PACS Administrator inactivates the old ID in
Synapse SWAT and notifies the SJHS Help Desk to
inactivate the old SJHS-NT ID.
6. The PACS Administrator ensures that provider
accounts in other systems such as Physician
Connect are changed, when necessary, to match the
new Meditech/SJHS-NT ID.
For All Other Users with SJHS-NT ID
The naming convention for all other users
(non-physicians) is still being evaluated.
For Users without NT Accounts
For users without NT accounts, the PACS
Administrator forwards the name(s) in an Excel
spreadsheet to the SJHS Help Desk.
1. The SJHS Help Desk opens a ticket and assigns the
request to the Security Access Team.
2. The Security Access Team sets up the new accounts.
P A C S Ad m i n i s t ra t i o n / P a g e 8
PACS Administrator Manual
• The new accounts are issued a generic
one-time password that must be changed upon
first use.
3. The Security Access Team contacts the PACS
Administrator when the accounts are established.
4. The PACS Administrator sets up the account in
Synapse SWAT.
5. The PACS Administrator informs end-users of their
username and password at their initial training
class.
Anomalies
An anomaly is created when there is a discrepancy
between the data sent to Synapse from Meditech
and the data sent to Synapse from a modality. The
most common discrepancies are incorrect
accession number and incorrect patient ID.
Incorrect data causes errors in the Synapse Study
Matching algorithms.
Incorrect ID numbers fall into two categories:
•
An incorrect ID number can match an ID that
currently exists in the Synapse database. For
example, a patient ID entered incorrectly at the
modality can match a different patient’s ID number
in Synapse. In this case, a mismatch anomaly
occurs and Synapse inserts images or studies into
an incorrect folder.
•
An incorrect ID number can be currently unique. For
example, an accession number entered incorrectly
at the modality can be currently unique in the
Synapse database, causing a new patient or new
study anomaly. This anomaly shows that Synapse
created a duplicate patient or study folder in the
database.
Study Matching
Information is imported to Synapse via two
Synapse components: the RIS Broker/Interface
P A C S Ad m i n i s t ra t i o n / P a g e 9
PACS Administrator Manual
and the DICOM Server. Typically the RIS Broker
communicates with one data source (Meditech),
and the DICOM Server communicates with several
data sources (modalities).
There are four steps to the optimal matching
process:
•
A study is ordered in Meditech and transmitted to
Synapse.
•
Synapse creates a patient/study folder based on the
order information.
•
Images for the study are sent to Synapse from a
modality.
•
Synapse matches the images with the patient/study
folder based on Study ID (Accession #).
Study Matching
P A C S Ad m i n i s t ra t i o n / P a g e 1 0
PACS Administrator Manual
Anomalies by Type Folder
Synapse provides a list of all anomalous exams
within the Anomalies by Type folder. This folder
contains the following three subfolders:
1. Recent Anomalous Studies, containing seven days of
anomalous studies.
2. All Anomalous Studies, containing a listing of all
anomalous studies regardless of age.
3. Fixed Studies, containing a listing of anomalous
studies that have been corrected.
Common Anomalies
Mismatch [patient name]
Issue
The patient name does not match the patient name
of the destination folder.
Possible Cause
1. The incorrect patient name was manually entered
into the DICOM header rather than selected from
the modality work list.
2. The incorrect Accession Number was manually
entered into the DICOM header rather than selected
from the modality work list.
3. The Account Number/Visit Number was switched to
another Unit Number/Patient ID in Meditech.
Synapse will reject each order/result update
message for orders that existed prior to the Unit
Number/Patient ID switch.
• Currently, this functionality causes an A34 (ADT
Merge) message to be sent from Meditech to
Synapse. The merge message causes Synapse
to combine the patient folders with the
associated Patient IDs.
• In the Synapse Patient Merge folder, the initial
(incorrect) Unit Number/Patient ID is referred to
P A C S Ad m i n i s t ra t i o n / P a g e 1 1
PACS Administrator Manual
as the source folder and the new (correct) Unit
Number is referred to as the destination folder.
Resolution
DICOM related cause:
1. If the patient name in the anomaly description field
is typed or formatted incorrectly, do nothing.
2. If the patient name is different, validate which
images go to that patient.
3. Reallocate images to the correct patient if
necessary.
4. Delete the anomaly entry.
Meditech related cause:
1. In RIS Scheduler, enter the source patient as a new
patient.
2. Using Meditech as a reference, reallocate the
appropriate study from the destination patient
folder to the source patient folder.
3. In the RIS Scheduler, access the destination patient
folder.
4. Update (redefine) the Visit Numbers that belong to
the source patient folder. (For example: change
FV0012345678 to FVXX12345678).
5. In the RIS Scheduler, access the source patient
folder.
6. Add Visit Numbers one a time, associating the
appropriate studies prior to adding next Visit
Number.
7. Delete the anomaly entry.
Mismatch [Visit/Patient]
Issue
The Visit Number in the DICOM header matches the
Visit Number in the destination folder but either
the patient name or patient ID is different.
P A C S Ad m i n i s t ra t i o n / P a g e 1 2
PACS Administrator Manual
Possible Cause
•
The incorrect patient name or patient ID was
manually entered into the DICOM header rather
than selected from the modality work list.
•
The incorrect Accession Number was manually
entered into the DICOM header.
Resolution
1. Validate whether the patient name and/or Patient ID
were mistakenly entered or the images belong to a
different patient.
2. If the patient name and/or Patient ID were
mistakenly entered:
• Using Meditech as a reference, validate that the
patient’s data displays correctly in Synapse.
• Using the RIS Scheduler, make corrections to
data as needed.
3. If the images belong to a different patient:
• Reallocate the images to the appropriate study
folder.
4. Delete the anomaly entry.
Mismatch [Visit/Study]
Issue
The incoming Visit Number is not the same as the
Visit Number associated to the study in Synapse.
Possible Cause
•
The incorrect Visit Number is manually entered into
the DICOM header rather than selected from the
modality work list.
•
The Account Number/Visit Number was edited in
Meditech.
Resolution
1. Compare the order data in Meditech with the study
data in Synapse.
P A C S Ad m i n i s t ra t i o n / P a g e 1 3
PACS Administrator Manual
2. If the order has been Cancelled in Meditech, use the
RIS Scheduler to change the Study Status to
Cancelled.
3. If the orders are still valid in Meditech, use the RIS
Scheduler to update the Visit Number in Synapse.
4. Resend any failed order/result messages from
Meditech to Synapse.
5. Delete the anomaly entry.
Study Absent
Issue
Images are received in Synapse prior to the
Meditech order message.
Possible Cause
•
The Meditech order interface, Neon Engine, or
Synapse Integration are not functioning.
•
Images sent from the modality with the incorrect
patient/study data such that the images do not
match the Synapse study data that was created by
the Meditech order message.
Resolution
1. Validate if the Meditech order message created a
study in Synapse.
2. If not, confirm that the DICOM header Accession
Number is correct. The order message will overlay
the DICOM created Synapse study data when the
interfaces begin functioning.
3. If so, and the incorrect DICOM header Accession
Number was manually entered, there will be 2
separate study folders for the exam. Merge the
DICOM created study folder into the Meditech
created study folder.
4. Delete the anomaly entry.
P A C S Ad m i n i s t ra t i o n / P a g e 1 4
PACS Administrator Manual
Study Late
Issue
Synapse receives a Meditech order message after
receiving images from the DICOM server.
Possible Cause
•
The incorrect Accession Number is manually entered
into the DICOM header and therefore does not
already exist in Synapse.
•
No Accession Number is entered into the DICOM
header.
•
Meditech, Neon Engine, or Synapse Integration
downtime.
Resolution
1. If the Accession Number was incorrectly typed or
omitted:
• Merge the DICOM created study folder into the
Meditech created study folder.
2. If Meditech, Neon Engine or Synapse Integration
downtime:
• If the Accession Number was correctly typed into
the DICOM header, the order message will
automatically update the study folder data when
the system is back online.
• If the Accession Number was incorrectly typed
into the DICOM header, merge the DICOM
created study folder into the Meditech created
study folder.
3. Delete the anomaly entry.
Study Reset
Issue
Additional images are sent to Synapse after the
Study Status has been marked as Dictated or
Finalized.
P A C S Ad m i n i s t ra t i o n / P a g e 1 5
PACS Administrator Manual
Possible Cause
•
The study is mistakenly marked Dictated prior to
images being sent to Synapse.
•
Additional images were sent to Synapse as
requested by the interpreting radiologist.
•
Images were reallocated.
Resolution
When images are sent to Synapse, the study status
changes to Complete, causing the study to return
to the Unread Studies folder for the radiologist to
re-dictate.
1. If the images require additional interpretation,
nothing need be done.
2. If the images do not require additional
interpretation, using the Synapse Web
Administration Tool (SWAT), change the study
status to Finalized.
3. Delete the anomaly entry
Additional Anomalies
Study Remains in Dictated Status
Issue
The study status displays as Dictated in Synapse
while the order status displays as Cancelled in
Meditech.
Possible Cause
The order is amended in Meditech causing the
order number to change. Images are sent to
Synapse with the old accession number in the
DICOM header.
Resolution
1. Reallocate the series to the new study.
2. Cancel original study in the RIS Scheduler.
P A C S Ad m i n i s t ra t i o n / P a g e 1 6
PACS Administrator Manual
Images Exist for Cancelled Study
Issue
The study’s status displays as Cancelled in
Synapse and has images associated.
Possible Cause
The order is edited in Meditech after the images
have been sent from the modality to Synapse with
the old Accession Number in the DICOM header.
Resolution
Reallocate the series to the correct study.
Anomaly Correction
All merges and reallocations begin with a source
and a destination:
•
Source folder - the folder where the image or
study currently resides.
•
Destination folder - the folder where the image or
study should reside.
Five Types of Anomaly Corrections:
Patient merge
A patient merge is merging two patient folders
together to create one patient folder. All contents
of the source patient folder are transferred to the
destination patient folder. The source patient
folder or shell disappears.
Study merge
A study merge is merging two study folders
together to create one study folder. All contents of
the source study folder are transferred to the
destination study folder. The source study folder or
shell disappears.
P A C S Ad m i n i s t ra t i o n / P a g e 1 7
PACS Administrator Manual
Study reallocation
A study reallocation is taking a study folder from
one patient folder and putting it into a different
patient folder. The source study folder is entirely
transferred to the destination patient folder. All
images in the source study folder are displayed in
Synapse with the patient information from the
destination patient folder.
Series reallocation
Series reallocation is moving a series from a study
from one patient’s study folder into a different
patient’s study folder. The source series folder is
entirely transferred to the destination study folder.
All images in the source series folder are displayed
in Synapse with the patient information from the
host patient folder of the destination study folder.
Image reallocation
Image reallocation is moving a study image from a
study from one patients study folder into a
different patient’s study folder. The source image
is transferred to the destination series or study
folder. The image displays in Synapse with the
patient information from the host patient folder of
the destination series/study folder.
Merging Anomalies
To merge an anomaly, drag and drop the incorrect
patient or study into the correct patient or study.
If both a patient merge and a study merge are
required, for example Patient ID wrong and
Accession number wrong. Perform the study merge
first and then the patient merge.
If a study with zero images has the correct
demographics and the study containing images has
the wrong information, merge the study with
images into the one with zero images because the
P A C S Ad m i n i s t ra t i o n / P a g e 1 8
PACS Administrator Manual
one with zero has the correct demographics.
Reallocating a Series
1. On the Windows desktop, right click the Synapse
icon and select Explore.
2. On the Synapse toolbar, click Folders.
3. In the left Explore window, click the plus (+) sign to
expand the Synapse folder.
4. Repeat step 3 when there is a Synapse subfolder
displayed below Synapse.
5. Log on to Synapse when requested.
6. Double-click All Patients.
7. In the All Patients folder, locate the source patient.
8. Double-click the source patient entry.
• In the Folders window, the patient name now
displays as a subfolder of the All Patients folder.
9. Click All Patients, and locate the destination
patient.
10.Double-click the destination patient entry.
• In the Folders window, the patient name now
displays directly below the source patient.
• Both the source patient and the destination
patient display in the All Patients folder.
• If you cannot see both the source patient and
the destination patient, repeat steps six through
ten until both patients are displayed.
11.Double-click the source patient folder to display all
of the patient’s studies in both the folders window
(on the left) and in the Synapse window on the
right.
12.In the Synapse window, double-click the source
study to highlight it in the Folders window.
13.After the images display, click the ‘Up’ button on the
toolbar.
14.Press F11 to view the Folders window.
15.Expand the study.
P A C S Ad m i n i s t ra t i o n / P a g e 1 9
PACS Administrator Manual
16.In the Folders window, expand patient’s destination
folder to reveal all of the patient’s studies both in
the Folders window and in the Synapse window.
17.In the Synapse window, double-click the destination
study to highlight the study in the Folders window.
18.After the image window displays, click the ‘Up’
button on the toolbar.
19.Press F11 to view the Folders window.
20.Expand the to display the source study series
subfolders
21.Double-click the source study Series folder to
display the series subfolders in the Synapse window.
22.‘Drag and drop each source study series subfolder to
the destination study folder.
23.When the message box displays, move, confirm or
cancel appropriately.
Reallocating a Study or Image
Reallocating a study or image is performed using
the series reallocation process above, but moving
a study or image rather than a series.
Interface Monitoring
Using the HIIS Router Monitoring Tool
The Synapse HIIS Router Monitoring Tool provides
a graphical interface of web pages for the PACS
Administrator to monitor the status of integration
between Meditech and Synapse. From the Status
Page, the user can view:
1. Number of messages completed.
2. Number of pending messages.
3. Number of messages rejected by the destination
(Synapse).
4. Number of messages that failed translation.
P A C S Ad m i n i s t ra t i o n / P a g e 2 0
PACS Administrator Manual
5. Number of messages ignored.
6. Number of messages with the wrong format.
7. Status of input (active or inactive).
Checking System Status
Accessing the HIIS Router Monitoring Tool:
1. In Internet Explorer, navigate to http://
<servername>/hiis/performance.asp.
2. At Username, type synapseadmin.
3. At Password, type appropriate password.
4. At Domain, type <local>.
Viewing Messages
Pending messages
•
Click the Pending Messages link to view the
messages not yet filed into Synapse. The messages
remain in this queue until Synapse is able to process
them. Instances occur when messages from
Meditech are received faster than Synapse can
process them. Messages also queue here if the
Synapse database is down.
Destination rejected
Note: Rejected
messages do not
appear in
Synapse.
•
Click destination rejected to view messages
rejected by Synapse. These might include messages
with a medical record number, visit number, and/or
accession number already in use by another patient
in Synapse.
Failed translation
•
P A C S Ad m i n i s t ra t i o n / P a g e 2 1
Click failed translation to view messages that
failed translation based on the Fuji HL7
specification. These might include HL7 message
event types not supported by Synapse, or messages
with missing data such as the patient’s medical
record number or accession number.
PACS Administrator Manual
Ignored messages
•
Click ignored messages to view messages not
routed to Synapse. Messages found here are usually
the HL7 event type, filtered out when the incoming
message is received.
Wrong format
•
Click wrong format to view incoming messages in
the wrong HL7 format.
Reviewing Problematic Message Web Pages
Each type of problematic message page contains
the following data and functionality:
Message type:
•
ORM-001 – order message
•
ORU-R01 – result message
•
ADT-A## - admission message
•
A01 – Admit/visit notification (inpatient)
•
A02 – Transfer
•
A03 – Discharge
•
A04 – Register a patient (outpatient)
•
A08 – Update patient information
•
A18 – Merge patient information
•
A34 – Merge patient information – patient ID only
•
A35 – Merge patient information – account number
only
Message destination
P A C S Ad m i n i s t ra t i o n / P a g e 2 2
•
Message destination always appears as Synapse.
•
Arrival date/time when message was sent from
Neon to Synapse.
•
Action search – used with message type,
destination, or arrival date/time filters to limit the
message list.
•
Remove - used to delete selected messages from
list.
PACS Administrator Manual
•
Remove all - used to delete all messages from list.
•
Details - used to view contents of message.
Viewing message detail
This page shows the entire message sent from
Neon to Synapse. Any data manipulation done on
Neon is displayed here.
This page includes the following information:
•
Status
•
Message type
•
Destination – where message is directed
•
Action
• Remove - deletes message from list
• Save - saves message
•
Message Text – full message as received from Neon
Checking Communication Status
This page shows a list of the input data sources and
the destinations. It shows the machine name and
port number they are listening on. At this time Fuji
only supports TCP/IP protocol.
•
Click this link to view information on communication
protocols.
System Configuration
This page shows file locations for the integration
logs.
Logs include:
Message logs - messages that have filed
successfully into synapse.
Error logs - problematic messages that have not
filed into Synapse.
P A C S Ad m i n i s t ra t i o n / P a g e 2 3
PACS Administrator Manual
Reset System
This page allows you to reset the system logs. The
message count on the status screen can be reset
and the log files deleted.
It is recommended to stop the HIIS Router service
first before deleting any logs but is not required.
Send Messages
This page allows you to send messages directly to
Synapse from a file containing saved messages.
•
Use the browse button to select the saved message.
Save Messages
This page allows you to save selected status
messages to a file.
Options include:
•
All messages
•
Pending messages
•
Messages rejected by destination (Synapse)
•
Messages that failed translation
•
Ignored messages
When saving files, keep in mind:
This method only allows a limited number of
messages from a file to process at a time. Send
only the missed studies.
Avoid sending messages using this method that
may revert the study status on those studies
already completed or finalized.
After the status selection is made, click Save
Messages to create the message file.
Totoku Monitor Calibration
The Totoku monitors require calibration every six
months or if a problem with the display is
P A C S Ad m i n i s t ra t i o n / P a g e 2 4
PACS Administrator Manual
identified. Calibration is the responsibility of the
PACS Administrator.
The time requirement is about 30-minutes to
calibrate a pair of Totoku monitors. After the
cables are attached correctly, the actual
calibration is wizard driven and requires no special
training or knowledge.
Calibration requires:
•
The monitors are installed and working
•
Medivisor Calibration Kit
•
Most current Medivisor driver
•
Internet connection to verify and download the
latest drivers
Equipment Needed
Items from the Medivisor calibration kit:
Note: Never
touch the sensor
directly to the
screen.
•
Brightness sensor (a.k.a. photometer)
•
Metal bracket that protects the monitor from the
sensor
•
One or more communication cables, each with a
serial connector and two PS2 connectors
• There should be at least one communication
cable for each monitor purchased. The
communication cable can remain attached to the
monitor between calibrations.
•
An AC adapter for the ME311L/ME312L (SJF only)
Table 3: Calibration Equipment
Image
Item
PS2 connector
P A C S Ad m i n i s t ra t i o n / P a g e 2 5
PACS Administrator Manual
Table 3: Calibration Equipment
Image
Item
Serial connector
Top of brightness
sensor
Bottom of brightness
sensor
Cable inputs on left
side of monitor
Check for Most Current Medivisor Driver
If Medivisor is installed on the computer:
1. Select Start/Programs/Medivisor.
P A C S Ad m i n i s t ra t i o n / P a g e 2 6
PACS Administrator Manual
2. Locate version of Medivisor driver:
a. With Medivisor closed, open Medivisor.
• As the program opens, the installed version of
the Medivisor Calibration driver displays in
large text.
b. With Medivisor open, click Help/About to display
the installed version of the Medivisor Calibration
driver.
3. Go to http://www.questinc.com/drivers.html to
verify the latest Medivisor driver for your operating
system.
4. If the installed driver is older than the current driver
listed on the website:
a. Download the more current driver.
b. In the Control Panel use the Add or Remove
Programs utility to remove the out-of-date
driver.
• Do not install the new Medivisor calibration
driver over an existing driver.
Download New Medivisor Driver
1. If there is not a Medivisor folder:
a. Right-click Start/Explore.
b. Select (C:).
c. Click the right window.
d. Right-click to view the dropdown menu.
e. On the dropdown menu, select New/Folder.
f. Name the folder Medivisor.
g. Press Enter to save the folder.
h. Close Windows Explorer.
2. Open Internet Explorer.
3. Go to http://www.questinc.com/drivers.html.
4. Locate and click the appropriate download.
5. In the logon box:
a. At User name, type totoku.
b. At Password, type download.
P A C S Ad m i n i s t ra t i o n / P a g e 2 7
PACS Administrator Manual
6. Click Save.
7. In the Save in window, browse to C:\Medivisor.
8. Double-click the Medivisor folder.
9. Click Save.
10.Close Internet Explorer.
Install the Medivisor Driver
1. Right-click Start and select Explore.
2. Go to C:/Medivisor.
3. Double-click the Medivisor folder.
4. Double-click the Medivisor zipped file.
5. Click Extract to unzip the file.
6. In the Extract to address box, click the down arrow
and locate the C:Medivisor folder.
7. Double-click the Medivisor folder so that it displays
in the Extract to address box.
8. Click Extract.
9. Close Winzip.
10.In Windows Explorer, locate the Medivisor folder.
11.Double-click to open the folder.
12.Select the appropriate version Medivisor folder and
double-click to open that folder.
13.Double-click Setup to begin the install process.
14.Accept the defaults and click Next in each dialog
box until the setup is complete.
15.Close the dialog box.
16.Close Windows Explorer.
Assemble Brightness Sensor and Bracket
1. Holding both the sensor and the bracket, position
the sensor over the holes in the bracket:
a. Line up the single nipple on the sensor over the
single hole on the bracket.
P A C S Ad m i n i s t ra t i o n / P a g e 2 8
PACS Administrator Manual
b. Line up the large optical eye over the large hole
on the bracket.
2. Attach the sensor to the bracket:
a. Lay the bracket on a flat surface, with its legs
down.
b. With one hand, hold and press down both ridged
sides of the sensor.
c. With the other hand, lift the body of the sensor
and let it down again to seal the suction cup to
the bracket.
3. Test that the sensor is firmly attached to the
bracket:
a. Pick up the sensor and bracket by lifting the
sensor.
b. Move the sensor side to side to ensure it is
attached.
4. To remove the sensor from the bracket, reverse the
procedure and slip your fingernail under the suction
cup to release it.
Connect Cables
Sensor cable
The brightness sensor and cable are white. There
is a long cable extending from its base to a male
PS2 connector. Off the male PS2 connector is a
small AC adapter and a female PS2 connector.
1. Lay the sensor and bracket on the desk in front of
the first monitor to calibrate.
2. Insert the male PS2 sensor cable connector in the
port marked sensor on the back of the monitor.
a. If calibrating an ME311L or ME312L monitor,
attach the AC adapter to the sensor and plug it in.
b. The ME315L obtains power from the monitors and
does not need external power. The AC adapter is
not needed.
c. The female PS2 connector is not needed. Do not
attach it to anything.
P A C S Ad m i n i s t ra t i o n / P a g e 2 9
PACS Administrator Manual
3. If desired, to save time in the future, label the
cables.
Communication cables
The communication cables are longer than the
sensor cables, are black and have male PS2
connectors on both ends. Off one of the male PS2
connectors is a six-inch cable female serial
connector.
One communication cable is sufficient when
calibrating the Totoku monitors. The
communication cable(s) can remain attached to
the monitor between calibrations or it can removed
and stored away with the calibration kit.
1. Communication cable 1
a. Locate the serial port (should be com1) on the
back of the PC and attach the female serial connector.
• If there are multiple serial ports on the back of
the computer, use the top one. It is most likely
com1. Change it later if the calibration is not
working as expected.
• Connect the PS2 connector on the other end of
the cable to the Remote-In on the back of the
monitor.
• Do not connect the PS2 connector on the short
cable to anything.
2. Chaining communication cables (not an option on
the ME311L)
a. Using a second communications cable, connect
either of the PS2 connectors to the Remote-Out
on the monitor connected to the PC by the serial
cable.
b. Connect the other end of the same PS2 cable to
the second monitor’s Remote-In.
c. Do not connect the serial connector.
3. To save time in the future, leave the communication
cables connected. There is no reason to disconnect
them.
P A C S Ad m i n i s t ra t i o n / P a g e 3 0
PACS Administrator Manual
Configure Medivisor
This is only necessary when using Medivisor for the
first time. If the monitors have been previously
calibrated, skip to the next section.
1. Select Start/Programs/Medivisor/
Configuration and Calibration.
2. Accept the defaults in the configuration wizard by
clicking Next at each dialog box.
• Never change the settings.
• The defaults include a dropdown for division
pattern - the default is 1 column x 1 row.
3. Repeat the configuration steps for the second
monitor.
4. When configuration is complete, click Finish to save
the calibration settings.
Check the Need for Calibration
1. In the main window of Medivisor, click a numbered
monitor button to select that monitor. Begin with
either monitor.
Medivisor Open
The adjustment pattern buttons display patterns
on the screen that show whether or not the monitor
requires calibration.
• Go through any or all of the 8 adjustment
patterns for one or both monitors.
P A C S Ad m i n i s t ra t i o n / P a g e 3 1
PACS Administrator Manual
• Skip the adjustment patterns and go directly to
Start the Calibration. See “Adjustment Patterns”
on page 32.
• Click the top adjustment button to display the
available adjustment patterns for the selected
monitor. See “Adjustment Buttons” on page 33.
Table 4: Adjustment Patterns
Adjustment
pattern icon
P A C S Ad m i n i s t ra t i o n / P a g e 3 2
Pattern
name
Pattern
description
All white
Displays an all white
screen to show any
dead pixels.
Gray scale
Displays all
gradations of black
to white to show a
normal screen.
SMPTE
In the center of the
pattern are two sets
of squares within
squares. If both
inside squares are
visible, the settings
are good.
Contrast
The 4th horizontal
band in the center of
the pattern should
show good contrast.
PACS Administrator Manual
Table 5: Adjustment Buttons
Adjustment
icon
Adjustment
button name
Adjustment
button
description
Adjustment
pattern
Display test
patterns on
screen.
Automatic
adjustment
Requires the
Medivisor
Calibration sensor.
Manual
adjustment
Do not use.
Inspection
Perform
inspection.
Advanced Mode
Do not use.
The first 4 patterns that display on your screen are
for curved screens only. They do not assist in
determining flat screen calibration and are not
shown in this manual.
1. Click the All white adjustment pattern button
• A smooth white screen denotes no dead pixels.
2. Click the Gray scale adjustment pattern button.
P A C S Ad m i n i s t ra t i o n / P a g e 3 3
PACS Administrator Manual
• Dark black on the left of the screen graduating
to pure white on the right of the screen denotes
no problems.
3. Click the SMPTE (Society of Motion Picture and
Television Engineers) pattern button.
• In the center of the pattern, on the 0%/100%
line, are two sets of squares within squares, at
the black end and the white end of the gray
scale.
• It is not necessary that the squares have the
same contrast ratio.
4. Click the Contrast pattern button
• The 4th horizontal band in the center of the
pattern should show good contrast.
• Models 311L/ME312L should display steady, but
not stepless, gradation all the way across.
• Model ME315L should display a smooth stepless
gradation.
Start the Calibration
The ambient light in the room affects the
calibration results, therefore the lighting in the
room should be the same during monitor
calibration as it will be during monitor use.
1. Click a monitor selection button to select that
monitor for calibration.
2. Click the Automatic Adjustment button (the second
button down on the left side of the Medivisor
window) to begin the calibration.
3. Select the radio button based on monitor selected:
a. First monitor to calibrate - select the New
Adjustment radio button and click Start.
b. Second monitor to calibrate - select the Make the
same adjustments as the previous ones radio
button and click Start.
• This calibration setting tells Medivisor to use
the same settings the second time around.
4. Defaults should be as follows:
P A C S Ad m i n i s t ra t i o n / P a g e 3 4
PACS Administrator Manual
• Calibration radio button.
• Default L-max is 410 and L-min is 0.
• Barten radio button.
Note: Do not
touch mouse or
keyboard during
calibration.
5. Attach the brightness sensor and bracket to the
front of the monitor:
a. Spring-clamp bracket
• Pull the spring-clamp on the end of bracket
and gently attach it to the monitor, making
sure that it is flush with the monitor screen.
•If the monitor is in the usual portrait position,
the bracket will be horizontal across the
width of the monitor.
•If the monitor is in landscape mode, as in the
image below, the bracket will be vertical on
the front of the monitor.
• Release clamp gently to secure the bracket.
b. Hanging bracket
• Hang the bracket from the front top center of
the monitor.
• The position of the monitor does not matter.
The bracket always hangs vertically.
Table 6: Brightness Sensors on Monitors
Sensor on spring-clamp
bracket
Sensor on hanging
bracket
6. Click Start to begin the calibration:
• A white square displays on the screen.
• The power light on the monitor begins flashing.
• A progress bar displays the time remaining.
P A C S Ad m i n i s t ra t i o n / P a g e 3 5
PACS Administrator Manual
• Model ME311L/ME312L takes 15 minutes per
monitor.
• Model ME315L takes 7 minutes per monitor.
7. When the calibration is complete, click Save Data.
8. Repeat the calibration process for the other monitor.
c. On the ME311L/ME312L only:
• Push the toggle button on the right side of the
right monitor.
• Then use the keyboard arrow down to select
monitor 2.
Inspect the Results
Note: Do not
touch mouse or
keyboard during
inspection.
1. Click the Inspection adjustment button to inspect
the results of the calibration. See “Adjustment
Buttons” on page 33.
• The deviation percent between the current
brightness (what the calibration accomplished)
and the target brightness (what the calibration
attempted to accomplish) is displayed in the
Result table onscreen.
2. Click Finish to close the Inspection Wizard.
3. If desired, go back through the 4 adjustment
patterns to see if there are any noticeable changes.
See “Adjustment Patterns” on page 32.
Log the Calibration
PACS Administrators should maintain a calibration
log for the Totoku monitors.
The log should contain:
P A C S Ad m i n i s t ra t i o n / P a g e 3 6
•
Date purchased
•
Date placed in use
•
Serials numbers
•
Location
•
Warranty/contact information
•
Dates of calibration
PACS Administrator Manual
•
Issues reported by radiologists that require
calibration
Troubleshooting the Totoku Calibration
Possible troubleshooting steps include:
1. Verify that all other programs are closed.
2. Verify that all cables are properly connected.
3. Re-connect and re-position the brightness sensor.
4. Verify that both monitors are set to 32-bit color.
• Not applicable to models ME311L/ME312L.
5. Verify that license agreement was accepted.
6. Verify L-min value is set to zero (0).
P A C S Ad m i n i s t ra t i o n / P a g e 3 7
PACS Administrator Manual
Support
The PACS Administrator is the first line of support
for all PACS-related issues and is responsible for
managing and tracking problems until they are
resolved.
PACS Support
PACS Admin
notified of problem
Triage
Assign
Resolve
Resolved
in a timely
manner?
No
Escalate
Support/Page 38
Yes
Close
PACS Administrator Manual
Triage
The PACS Administrator collects information
necessary for troubleshooting the problem.
Assign
If the problem is outside the expertise of the PACS
Administrator, they should call the SJHS Help Desk
for support. The SJHS Help Desk provides a ticket
number and assigns a Business Analyst to the
ticket.
If the problem is an obvious Synapse problem, the
PACS Administrator should place a call
immediately to Fuji Support.
If the problem is an obvious modality problem, the
PACS Administrator should contact SJHS
Biomedical Department for support.
If the problem is an obvious vendor problem, the
PACS Administrator should place a call to the
correct vendor.
If the system is down, then the PACS Administrator
may want to follow up the SJHS Help Desk call with
a direct call to the PACS Technical Analyst (Erik
Hill) and the IT Site Director to let them know of
the urgent problem.
In all cases, record ticket numbers provided by
Fuji, SJHS, or other vendors.
Resolve
The PACS Administrator is informed when the
problem is resolved and is responsible for
informing end users that the problem was
resolved.
Support/Page 39
PACS Administrator Manual
Escalate
If the problem is not addressed in a timely manner,
escalate the issue to the next level of support. See
Attachment 1, Contact List, for the escalation
contacts.
Fuji service level escalation standard:
Level One
•
Support calls are routed to a Technical Support
Engineer (TSE).
•
Any request not closed in 24-hours is escalated to
level 2.
Level Two
A Network Service Engineer (NSE) for Synapse, or
a Field Service Engineer (FSE) for CR will provide
phone support or dispatch to site, if necessary.
Level Three
If the NSE or FSE is unable to correct the problem,
support is escalated to the Fuji Engineering or
Integration departments.
Perot service level escalation standard:
Information Services assesses ticket severity and
provides initial response based on the following
criteria.
Level One
Any reported problem where the majority of the
users are affected. The problem has high visibility
and materially impacts ability of SJHS to perform
its business and there is no work-around.
Support/Page 40
PACS Administrator Manual
Service Level Agreement (SLA) is - ticket closed or
in Temp Fix within 4 hours of occurrence.
Initial contact guideline is within 30 minutes.
Examples:
•
Network connectivity down to one or more sites
•
Phone system unavailable at one or more sites
•
Meditech System unavailable at one or more sites
Severity Two
Any reported problem where the majority of the
users for a particular system are affected. The
problem has high visibility, a work-around is
available, however, performance may be degraded
or functions limited.
SLA - ticket closed or in Temp Fix within 8 hours of
occurrence.
Initial contact guideline is within 30 minutes.
Examples:
•
GroupWise unavailable at one or more sites
•
Meditech Order Entry unavailable
•
Network drive or Home directory unavailable to
multiple users
Severity Three
Definition - Any reported problem impacting one
customer or small group of customers which is
important to business but there is an acceptable
work-around.
SLA - ticket closed or in Temp Fix within 48 hours
of occurrence.
Initial contact guideline is within 2 hours.
Examples:
Support/Page 41
•
Printer problems in patient care area.
•
Unit secretary phone unavailable, other lines
working
PACS Administrator Manual
Close
The PACS Administrator is responsible for
documenting the steps that were taken to resolve
the problem.
Troubleshooting
Guidelines
End users should report all issues to the PACS
Administrator as soon as possible.
The PACS Administrator should attempt to solve
the problem within the Imaging Services
department prior to contacting the SJHS Help Desk
or the PACS Technical Analyst.
1. Collect quantitative information pertinent to the
problem:
a. If the system is slow, identify exactly how slow in
number of seconds it takes for an image to display.
b. Identify the exact PC by name and location.
c. Identify the end user.
d. If an error message is displayed, note the exact
message or take a screen print.
e. If an image is not appearing in Synapse, then
identify the exact modality and accession number.
2. Identify the scope of the problem:
a. Determine if the problem is isolated to a single
PC, location (e.g., Radiology reading room, file
room, ED), or type of device (diagnostic workstations, clinical workstations, PCs, or thin clients).
b. Determine if the problem is intermittent or
continuous.
c. Note when the problem began.
3. Manage the resolution process:
Support/Page 42
PACS Administrator Manual
a. If the PACS Administrator is unable to resolve the
problem, open a ticket with the SJHS Help Desk.
b. Track the problem until resolved.
4. Report progress to the end users:
• Approximately every 30 minutes for urgent
problems.
• Daily for non-urgent issues.
• When the problem is resolved, report the
findings and summarize the resolution.
5. Document the problem details and resolution results
in an Excel spreadsheet.
Troubleshooting Workstations
Possible troubleshooting steps include:
1. Reboot the system to clear the memory.
2. Check all settings on the PC to ensure they are
correct.
3. Clear history, caches, and cookies from Internet
Explorer.
4. Clear Internet Explorer temporary files.
5. Verify that Synapse is loaded correctly.
• If necessary, remove the Synapse Code and
reinstall.
6. Verify that Synapse properties are set correctly.
7. Ping a valid network address to verify that the
network connection is working.
8. Run a virus scan on the PC to verify that the PC is
not infected with a virus.
Troubleshooting Remote Installations
1. Verify that the user ID is set up correctly.
2. Verify that the user is typing their password and
domain accurately.
3. Follow the Troubleshooting Workstations steps
above.
Support/Page 43
PACS Administrator Manual
Troubleshooting Other Areas
Network problems
If all Synapse workstations are equally affected,
the problem may lie in the network connection.
Network problems are handled by an Information
Systems Analyst, but it is always helpful to the
PACS Administrator to understand the nature or
frequency of a problem when troubleshooting.
Check the status of the network by checking the
SJHS online Network monitoring system, Netops.
To Access Netops:
1. Open Internet Explorer.
2. In the address bar, type netops.
3. On the Netops page, select MRTG WAN Map.
4. Click the network links between your facility and the
CDC to verify that the links are active.
Server Problems
Server problems are difficult to differentiate from
network problems.
To check the status of your site’s PACS servers:
1. Open Internet Explorer.
2. In the address bar, type netops.
3. On the Netops page, select NetSaint for Southern
California.
4. On the NetSaint page, click Status Overview.
• Allow a few seconds for the page to load.
5. Scroll toward the bottom of the page to locate the
SJS NT Servers group. Locate your site’s servers to
determine their status.
Support/Page 44
PACS Administrator Manual
Interface Problems
See "Interface Monitoring" on page 20.
Downtime Procedures
Downtime is an event when the PACS is
unavailable. Downtime can be either scheduled or
unscheduled.
The PACS Technical Analyst schedules short
downtimes (<2 hours) for Monday, Tuesday or
Thursday nights after 10:00 p.m. and longer
downtime events (>2 hours) on weekends.
Unscheduled downtime
Possible reasons for unscheduled downtime
include:
•
Server failure
•
Network failure
•
Software failure
•
Virus
•
Component failure
Partial, unscheduled downtime events include:
•
Meditech down/worklist not working
•
Interface failure/worklist not working
•
Unable to send images to PACS
Scheduled downtime
Possible reasons for scheduled downtime include:
Support/Page 45
•
Synapse upgrades and patches
•
Operating system upgrades and patches
•
Storage Area Network (SAN) upgrades and patches
•
Network maintenance
PACS Administrator Manual
•
Maintenance on servers due to disk or CPU errors
PACS Technical Analyst During Downtime
During a downtime event, the PACS Technical
Analyst is responsible for restoring the system to
its normal production state and for communicating
status to the PACS Administrator and the IT Site
Manager.
The sequence of events is:
•
Identify the problem
•
Perform triage
•
Communicate recommendations
•
Resolve the problem
•
Document the results
Identify the Problem
The PACS Technical Analyst may learn of system
problems from several different sources including
PACS Administrators, SJHS Help Desk, SJHS
Operations/NetSaint, Fuji, Dell, EMC or Microsoft.
After notified, the Analyst researches the problem
and determines the nature and scope of the
problem.
Perform Triage
After the problem has been researched, the PACS
Technical Analyst identifies priorities and initiates
a course of action.
Table 7: Possible Scenarios
Support/Page 46
Scenario
Action
System is down
Take immediate measures to
restore system
PACS Administrator Manual
Table 7: Possible Scenarios
Scenario
Action
System is unstable,
failure is imminent
Take immediate measures to
stabilize system. May schedule
downtime during business
hours, if necessary.
Disk or system error,
immediate maintenance
required
Schedule downtime for that
night
System error,
maintenance required,
low risk of data loss or
system failure
Schedule next available
downtime window
OS patch, application
patch, utility upgrade
Schedule next available
downtime window
Communicate Recommendations
After the problem is triaged, the PACS Technical
Analyst communicates recommendations to the
PACS Administrator. Together they establish a plan
of action and estimate the timeframe necessary.
The PACS Technical Analyst communicates
progress with the PACS Administrator before,
during, and after downtime events.
Table 8: Typical Communications
Support/Page 47
Timing
Responsibilities
Problem triaged
Work with PACS Administrator and IT
Site Manager to determine an
acceptable downtime window. After a
window has been agreed upon,
schedule Change Management and
notify stakeholders via email.
15 minutes prior
to downtime
Contact lead PACS Administrator.
Confirm downtime plans.
PACS Administrator Manual
Table 8: Typical Communications
Timing
Responsibilities
Downtime
window needs to
be extended
As soon as it is determined that the
system will not come up within the
scheduled window, contact the PACS
Administrator and the IT Site Manager
to let them know of the updated
window. Send an email notification to
stakeholders that the downtime
window is extended.
Production
system restored
Contact PACS Administrator and notify
stakeholders.
Resolve the Problem
The PACS Technical Analyst is responsible for
managing the problem resolution process and
coordinating vendor activities.
Document the Results
After the problem is fully addressed, the PACS
Technical Analyst documents the downtime event
and resolution activities.
PACS Administrator During Downtime
During a downtime event, the PACS Administrator
is responsible for identifying an appropriate
downtime contingency, implementing the
contingency, and communicating the status of the
downtime event with Radiologists, technologists,
and other PACS personnel.
Sequence of Events:
Support/Page 48
•
Identify a contingency plan
•
Implement the plan
•
Manage the workflow
PACS Administrator Manual
•
Restore normal operations
Identify a Contingency Plan
After a problem has been identified, work with the
PACS Technical Analyst to determine the downtime
window. Understanding the estimated time and
duration of the window will enable the PACS
Administrator to select an appropriate downtime
contingency. See "Downtime Procedures" on
page 45.
Regardless of the downtime contingency selected,
the PACS Administrator should send a few exams
to the test server to verify that it is working
correctly.
Implement the Plan and Manage the Workflow
The PACS Administrator is responsible for
managing the downtime event at the hospital.
They should frequently inform Radiologists,
technicians, and other PACS users of the downtime
status.
Restore Normal Operations
When the system is restored, the PACS
Administrator must restore the workflow back to
normal operations.
Support/Page 49
•
Send all exams performed during the downtime
window to the standard production target.
•
Restore workstations that were temporarily pointed
to test back to production
•
Fix anomalies caused by manual data entry
PACS Administrator Manual
Downtime Contingencies
Wait for system to be restored
If the downtime window is short or is being
performed during off-hours, the simplest downtime
contingency is to wait for the system to come back
online.
Redirect to alternate production server
If a DICOM server fails (and the site has more than
one DICOM server available) send exams to an
alternate DICOM server. The change will be
transparent to end users.
After the server is restored, send exams to the
normal production target. No exams need to be
resent.
Redirect to test server
If production Synapse is completely unavailable,
and the downtime window is long, send exams to
TEST. Worklist refreshes are not available during
this period.
Redirect diagnostic workstations and clinical
workstations to TEST.
Note: Notify
users that any
notes entered into
the system during
this period will be
lost and that
comparable
studies will not be
available.
Support/Page 50
After the system is restored, resend all exams to
their normal production targets.
PACS Administrators reset workstations to
production.
PACS Administrator Manual
Print Film
In the event that both the production and test
systems are unavailable, and exams must be read,
technicians may need to print exams to film.
Planning Requirements
Each modality and IIP that sends images to PACS
must have alternate storage and print targets set
up ahead of time in order to be prepared for a
downtime contingency.
Targets are:
1. Primary DICOM storage server
2. Secondary DICOM storage server (for sites with
more than one DICOM server)
3. Test Server
4. Primary printer
5. Secondary printer
Support/Page 51
PACS Administrator Manual
Workstations
There are five types of PACS Workstations. Setting
up a PACS workstation is the joint responsibility of
the PACS Administrator, the PACS Technical
Analyst, and the site IT personnel.
The type of workstation to set up is based on the
location of the workstation and the personnel that
will use the workstation.
Table 9: Types of PACS Workstations
W o rk s t at i o ns / P ag e 5 2
Type
Description
Diagnostic
These workstations have two Totoku LCD,
gray scale, 3-megapixel (1536 x 2048)
monitors. They are used by radiologists for
primary interpretation.
Clinical
These workstations have one or two 2megapixel (1200 x 1600) color monitors.
They are used by physicians and clinicians for
viewing radiologic images. Some clinical
workstations are mounted on mobile carts for
use in O.R. suites.
Review
These are standard PC workstations that may
already be located throughout the hospital.
Synapse is loaded on the PC, often along with
other applications such as Meditech.
PACS Administrator Manual
Table 9: Types of PACS Workstations
Type
Description
Thin Client
Some thin client workstations may be
configured to provide access to Synapse. Thin
Client workstations are setup and maintained
by the Citrix Administrators
Remote
Access to Synapse outside the hospital is via
a remote workstation. This may be a
standard PC or laptop located in a physician's
office or home.
The system requirements are also based on the
location of the workstation and the personnel that
will use the workstation
Table 10: System Requirements
Hardware/
Software
Diagnostic &
Clinical Setup
Review and Remote
Setup
CPU
Pentium IV, min.
400 MHz
Pentium II, min 400
MHz
RAM
1 GB or higher
256 MB minimum
Operating
System
Windows 2000
Windows 98, ME, NT
4.0, 2000, XP Home
or XP Professional
Browser
Internet Explorer
6.0 or newer
Internet Explorer 6.0
or newer
Display Mode
32 bit color
32 bit color
Monitor
2-3 LCD flat
screen
Any
Modem
N/A
N/A on-site. Off-site, a
high-speed modem is
recommended.
Standard PACS Image
Both diagnostic and clinical workstations begin
with the standard PACS software configuration
image. This requires a floppy boot disk available
from the PACS Technical Analyst.
W o rk s t at i o ns / P ag e 5 3
PACS Administrator Manual
The standard PACS image includes:
•
Windows 2000 or XP
•
Monitor(s) set to portrait (in a 3-monitor setup, the
third monitor is landscape)
•
Monitor resolution set, based on workstation
•
Totoku drivers installed (on diagnostic workstation
image)
•
24-hour clock
•
Virtual memory set equal to 150% of RAM
•
Power Management for system set to OFF
•
Power Management for NIC set to OFF
•
Fonts enlarged
•
Mouse pointer enlarged
•
Recycle bin set to 3%
•
Internet Explorer installed
•
Synapse installed
•
Synapse properties configured
•
Virus scan installed
•
Profile set for ALL USERS
Install PACS Image on PC
Obtain a copy of the SJHS PACS Image boot disk
from the PACS Technical Analyst, Erik Hill.
1. Insert the floppy disk in the drive and boot the
system.
• The floppy disk directs the computer to the SJHS
network and then maps the drive directly to the
PACS server where the PACS images are located.
Note: For
diagnostic
workstations - do
not image the PC
with the Totoku
monitors
attached. Use any
standard monitor
during the install.
W o rk s t at i o ns / P ag e 5 4
2. Select the appropriate image based on the following
categories:
• CLIN for Clinical Workstations
• DIAG for Diagnostic Workstations
• Windows 2K or XP Operating system
• PC Model
PACS Administrator Manual
3. For both diagnostic and clinical workstations, follow
the normal procedure to restore an image.
Set Up a Diagnostic Workstation
Diagnostic workstations begin with the standard
PACS image. These workstations use a pair of
Totoku monitors. The original monitor may or may
not remain part of the diagnostic workstation
setup.
When the workstation is complete, test and
calibrate the Totoku monitors using the vendor
provided calibration kit. See “Totoku Monitor
Calibration” on page 24.
Note: Ensure the
PC boots correctly
into Windows
BEFORE installing
the Totoku
monitors.
Totoku monitors require a specific graphics card
that is shipped with the monitors.
•
ME315L requires the Matrox MED3mp graphics card
(Totoku calls this the LV32P1).
•
ME311L/ME312L (St. Jude only) requires the Astro
GM184A graphics card.
If using a disk to image the PC for the
Diagnostic Workstation:
•
See “After Installing the Image” on page 55.
If not using a disk to image the PC for the
Diagnostic Workstation:
•
See “Diagnostic and Clinical Workstation Settings”
on page 65. Then,
•
See “After Installing the Image” on page 55.
After Installing the Image
After installing the PACS image on the PC, set the
following options:
1. Name the computer and add the workstation to the
domain.
W o rk s t at i o ns / P ag e 5 5
PACS Administrator Manual
2. Use a static IP address for each diagnostic
workstation.
3. Set NIC to 100MBps/Full Duplex (Start/Control
Panel/Network/Local Area Connection/
Connect Using/Configure/Advanced/Link
Speed & Duplex).
4. Install the graphics card for the Totoku monitors.
Install the Graphics Card
1. Shut down the PC.
2. Disconnect the PC from the electrical power before
opening the back of the computer.
3. Place the new graphics card in the third PCI slot.
• Because it was in the third slot when the initial
PACS image was created.
Third PCI Slot for Graphics Card
4. Connect the DVI ports on the monitors to the DVI
ports on the Matrox video card.
5. Boot the system.
6. Configure the monitors:
a. For a two-monitor setup:
W o rk s t at i o ns / P ag e 5 6
PACS Administrator Manual
• Disable and remove the extra monitor from the
workstation.
b. For a three-monitor setup:
• See “Configure the Three-monitor Setup” on
page 62.
Manually Install the Totoku Monitors
If the Totoku monitors do not install correctly from
the image, or for some reason need to be
reinstalled, manually install them.
•
Never let Windows select a driver for the Totokus.
•
Always use the most current driver available.
•
Never install a Totoku driver over an existing driver
- uninstall first, using the uninstaller.
Check for an Installed Monitor Driver
Skip this section if no driver is installed.
1. In the Control Panel, select Display.
2. On the Settings tab, click Advanced.
3. On the Adapter tab, click Properties.
4. On the Driver tab, click Properties.
• If there is more than one graphics card, they will
all be displayed here.
5. Do not upgrade the driver from the Control panel.
Check for the Most Current Monitor Driver
1. Go to the Quest International Incorporated website
and determine the latest recommended monitor
driver for your operating system.
a. Go to http://questinc.com.
b. Mouse over and click the photo of the medical
monitor.
W o rk s t at i o ns / P ag e 5 7
PACS Administrator Manual
c. In the gray window on the bottom left side of the
screen, select Drivers/Calibration Software.
d. In the dropdown window on the Drivers/
Calibration Software screen, select by display.
2. On the Drivers for Totoku Displays screen, locate
your monitor model in bold type.
3. Locate the correct download for your operating
system and read the version next to the OS name.
4. If the driver listed on the Quest website is more
recent than the installed driver, uninstall the
currently installed driver. See “Uninstall the Totoku
Monitor Drivers” on page 59.
• Do not attempt to install over the current driver.
• Do not let MS Windows select the driver or
recommend the driver.
• Download the monitor driver for best monitor
performance. See “Download New Monitor
Driver” on page 58.
• Manually install the monitor driver. See “Install
the Monitor Driver” on page 60.
Download New Monitor Driver
Only download the driver if it is the first time you
are installing the monitors or if the monitor driver
on the Quest website is newer than the currently
installed driver.
1. Go to www.questinc.com.
2. Click the image of the Totoku monitor.
3. Locate and double-click the current driver for
your operating system.
Note: If you have
problems with the
download, use the
directions in
Check for most
current driver,
located above.
4. In the logon box:
a. At user name, type totoku.
b. At password, type download.
5. At the File Download prompt, click Save.
6. In the Save in window, browse to C:Downloads/
Totoku Drivers.
7. If there is not a Totoku drivers folder:
W o rk s t at i o ns / P ag e 5 8
PACS Administrator Manual
a. Right-click in the window.
b. Select New folder.
c. Name the folder Totoku drivers.
d. Double-click to open the new folder.
e. Click Save to begin the download.
f. When the download is complete, close the
download dialog box.
8. For first time installations, you must also install
Microsoft.NETFramework. See “Install
MS.NETFramework” on page 60.
9. Close Internet Explorer.
Note: Download
the driver, but do
not install the
driver.
•
Do not attempt to install over the current driver.
•
Do not let MS Windows select the driver or
recommend the driver.
10.Manually install the driver for best monitor
performance.
Uninstall the Totoku Monitor Drivers
To uninstall a previously installed Totoku monitor
driver on model ME315L, use the Windows Add or
Remove program utility in the Control Panel.
To uninstall a previously installed Totoku monitor
driver on models ME311L and ME312L, use the
vendor provided uninstaller available on their
website.
1. Go to the Quest International Incorporated website
and locate the uninstaller.
a. Go to www.questinc.com.
b. Click the photo of the medical monitor.
c. In the gray window on the bottom left side of the
screen, select Drivers/Calibration Software.
2. Scroll to the bottom of the page and select
Uninstaller.
3. Follow the wizard to download the driver.
4. Close Internet Explorer.
5. Double-click to execute the uninstaller.
W o rk s t at i o ns / P ag e 5 9
PACS Administrator Manual
6. Follow the wizard to uninstall the old driver.
Begin the Monitor Install Process
1. Power the system on and boot into MS Windows.
2. At the MS Windows notification that it has found
new hardware, click Cancel.
3. Do not allow MS Windows to automatically install
the monitors.
4. Close any dialog boxes that are open.
Note: Do not
allow MS Windows
to automatically
install the
monitors.
5. Right-click Start and select Explore.
6. Browse to C:/Downloads/Totoku drivers.
7. Double-click Totoku drivers to open the folder.
Install MS.NETFramework
This is only necessary if this is a new Totoku
monitor installation. NETFramework never needs
to be updated.
Note: If
MS.NETFramewor
k is already
installed, a
notification
displays when you
attempt
installation.
1. Double-click _NET_Framework to open the folder.
2. Extract the zipped file to the same folder.
3. Double-click _NET_FRAMEWORK.exe to begin the
installation.
4. Follow the wizard to install NetFRAME.
Install the Monitor Driver
1. Double-click the zipped driver folder.
2. Double-click the zipped file.
3. Click Extract to unzip the file.
4. In the Extract to address box, click the down arrow
and locate the C:/Downloads/Totoku drivers folder.
5. Double-click the C:/Downloads/Totoku drivers folder
so that it displays in the Extract to address box.
W o rk s t at i o ns / P ag e 6 0
PACS Administrator Manual
6. Click Extract.
7. Close Winzip.
8. Double-click the folder that is the same name as
your operating system.
9. Double-click Color.
10.Double-click Portrait.
11.Double-click setup.exe and accept the defaults.
• If a hardware error displays, click Continue.
12.Check Restart and then click Finish.
13.Adjust the monitor resolution.
Adjust the Monitor Resolution
1. Right-click the desktop and select Properties.
2. On the Settings tab, click the number of the monitor
to adjust.
Note: Monitor
numbering is
Windows-based.
You cannot
change their
numbers.
• Do not use the slider to adjust the resolution.
3. Select the monitor.
4. Click Advanced.
5. Select the Adapter tab.
6. Click List All Modes.
7. Scroll to bottom and select 1536 x 2048.
8. Click OK.
9. Click Apply.
10.Click Yes.
11.Click OK.
12.Select the other monitor and repeat steps 1 through
11 to adjust its resolution.
13.Close the dialog box.
Configure the Monitors
If this is a two monitor setup:
•
W o rk s t at i o ns / P ag e 6 1
Setup is complete.
PACS Administrator Manual
If this is a three-monitor setup:
•
See “Configure the Three-monitor Setup” on
page 62.
Configure the Three-monitor Setup
1. Position the original monitor to the left of the two
Totoku monitors.
2. In Display/Properties, checkmark True Color on
each of the three monitors.
3. In Properties, right-click each monitor and select
Attached.
4. Modify the registry settings, using these DWORD
values:
d. Select Start/Run
e. Type regedit.
f. Browse to My Computer/
HKEY_LOCAL_MACHINE/SOFTWARE/Fuji
Medical Systems USA/Synapse/
Workstation/Monitor Configuration
g. Double-click FullScreenCount and type 2.
h. Click OK.
i. Double-click FullScreenX and type the horizontal
resolution of the left color monitor.
• Left color monitor is not a Totoku monitor.
• Resolution is normally 1600 pixels wide by
1200 pixels high for the monitor in landscape
position.
• Select the decimal radio button when typing
the resolution is in pixels.
j. Click OK.
k. Double-click MonitorCount and type 0.
l. Click OK.
m.Close Regedit.
5. Reboot for the registry settings to take effect.
6. In Display/Properties, right-click and select
Identify to see the monitor number displayed on
each monitor.
W o rk s t at i o ns / P ag e 6 2
PACS Administrator Manual
7. Check display:
• In a 3-monitor setup, at boot-up the worklist
displays on monitor one.
• Studies display on monitors two and three.
• The worklist goes blank.
• After the first study is closed, the worklist moves
to monitor two and remains there.
8. Complete the diagnostic workstation.
Complete the Diagnostic Workstation
1. Install critical updates to MS Windows and Internet
Explorer.
2. Make any site-specific changes to Synapse
properties.
• If no changes are made, the setup is complete.
• If changes are made, copy the changed profile to
All Users.
3. Notify one of the Network Design Technicians that a
new PACS workstation has been set up and needs to
be added to the ePO server.
• Provide the Network Design Technicians with the
location of the workstation, the IP address, and
the host name.
Set Up a Clinical Workstation
Clinical workstations begin with the standard PACS
image. These workstations are configured with one
or two 2-megapixel color monitors.
A single-monitor clinical workstation does not need
an additional graphic card.
A dual-monitor clinical workstation requires a
special graphics card to drive the two monitors.
The SJHS standard is the Matrox P650 video card.
W o rk s t at i o ns / P ag e 6 3
PACS Administrator Manual
After Installing the Image
After installing the PACS image on the PC, set the
following options:
1. Name the computer and add the workstation to the
domain.
2. Use a static IP address for each clinical workstation.
3. Set NIC to 100MBps/Full Duplex (Start/Control
Panel/Network/Local Area Connection/
Connect Using/Configure/Advanced/Link
Speed & Duplex).
4. Configure the monitor(s):
a. If this is a single-monitor workstation:
• See “Complete the Clinical Workstation” on
page 64.
b. If this is a two-monitor workstation:
• See “Install the Graphics Card” on page 64.
Install the Graphics Card
1. Shut down the PC.
2. Disconnect the PC from the electrical power before
opening the back of the computer.
3. Place the new graphics card in the AGP slot.
4. Connect the DVI ports on the monitors to the DVI
ports on the video cards.
5. Boot the system.
6. Install the P650 graphics driver.
7. Install Pivot software.
8. Set the monitors to portrait mode.
9. Adjust the monitor resolution.
Complete the Clinical Workstation
1. Install critical updates to MS Windows and Internet
Explorer. See “MS Windows Updates” on page 72.
W o rk s t at i o ns / P ag e 6 4
PACS Administrator Manual
2. Make any site-specific changes to Synapse
properties.
• If no changes are made, the setup is complete.
• If changes are made, copy the changed profile to
All Users.
• Notify one of the Network Design Technicians
that a new PACS workstation has been set up
and needs to be added to the ePO server. See
“Network Design Technicians” on page 84.
Diagnostic and Clinical Workstation Settings
Workstation settings are automatically loaded as
part of the initial PACS image. The following
instructions can be used if the initial settings have
been changed or to perform a manual installation.
A checklist of diagnostic and clinical workstation
settings is located at the end of this chapter. See
“Workstation Checklist” on page 85.
1. Set the monitor to portrait:
a. In Control Panel, select Display/Settings.
b. Select monitor #2 as the primary monitor.
c. Click Advanced.
d. Select the Adapter tab.
e. Select List all Modes.
f. Select 1200 by 1600.
g. Select Display/Settings.
h. Select monitor #1 as the primary monitor.
i. Click Advanced.
j. Select the Adapter tab.
k. Select List all Modes.
l. Select 1200 by 1600.
m.Select Display/Settings.
n. Click OK to save.
W o rk s t at i o ns / P ag e 6 5
PACS Administrator Manual
o. For a dual monitor setup, set the monitors to
Independent Mode using the graphics card
software
2. Set clock to 24-hour time format:
a. In the Control Panel, select Regional Options.
b. On the Time tab, at the Time Format dropdown
menu, select HH.mm.ss.
• In Windows XP, click Customize to locate the
Time Format dropdown menu.
c. Click OK.
3. Set initial and maximum virtual memory paging file
size to be one and a half times the RAM:
a. In the Control Panel, select System.
b. On the Advanced tab, under Performance, click
Settings to open the Performance Options dialog
box.
In Windows 2000:
a. In the Performance Options dialog box, click the
radio button at Applications.
b. Click Change to open the Virtual Memory dialog
box.
c. Under Drive [Volume Label], highlight the drive
containing the paging file to change (usually C
drive).
d. Do not change the default in the Initial size (MB)
address box.
e. Type a new paging file size in megabytes only in
the Maximum size (MB) address box.
• Type the number of megabytes that equals 1.5
times the RAM on the computer.
• Convert, if needed. See “Conversions” on
page 67.
f. Click Set.
• Increasing the virtual memory paging file does
not typically require a restart.
g. Click OK.
W o rk s t at i o ns / P ag e 6 6
PACS Administrator Manual
h. In the Performance Options dialog box, click the
radio button at Background services and repeat
steps b through g.
i. Click OK three times to save the changes and
return to the Control Panel.
In Windows XP:
a. In the Performance Options dialog box, select the
Advanced tab.
• Under Virtual Memory, click Change.
b. Under Drive [Volume Label], highlight the drive
containing the paging file to change (usually C
drive).
c. Under Paging file size for selected drive, click the
radio button at Custom size.
d. Do not change the default in the Initial size (MB)
address box.
e. Type the new paging file size in megabytes only in
the Maximum size (MB) address box.
• Type the number of megabytes that equals
75% of the RAM on the computer.
• The total virtual memory paging file maximum
for both Applications and Background services
should equal 1.5 times the RAM on the
computer.
• Convert, if needed. See “Conversions” on
page 67.
f. Click Set.
• Increasing the virtual memory paging file does
not typically require a restart.
g. Click OK three times to save changes and return
to the Control Panel.
Table 11: Conversions
1 Gigabyte =
1000 MB (megabytes)
1 Megabyte =
1000 Kb (kilobytes)
1 Kilobyte =
1000 bytes
4. Turn Power Management off for system:
a. In the Control Panel, select Power Options.
W o rk s t at i o ns / P ag e 6 7
PACS Administrator Manual
b. On the Power Schemes tab:
• At the Power Schemes dropdown menu, select
Always On.
• At the Turn off monitor dropdown menu, select
After 20 minutes.
• At the Turn off hard disks, select Never.
c. Click Apply and OK.
5. Turn Power Management off for NIC:
a. In the Control Panel, select Network and Dialup Connections.
b. Right-click Local Area Connections and select
Properties.
c. On the General tab, select Configure.
d. On the Power Management tab, make sure there
are no checked boxes.
e. Click OK to save any changes.
f. Close Network Connections.
Note: Larger
fonts are needed
due to the screen
resolution. Larger
icons and buttons
are for aesthetics
only. Font should
always be Arial or
Tahoma.
6. Increase the Windows font size:
a. In the Control Panel, select Display.
b. Select the Appearance tab.
In Windows 2000:
• On the Appearance tab, at the Scheme
dropdown menu, select Windows Standard
(extra large).
• At the Header dropdown menu, select each
item listed in the table below and use the
up/down arrows to change the font size and
the corresponding item size.
Table 12: Enlarging Fonts in Win
2000
Title
W o rk s t at i o ns / P ag e 6 8
Font Size
Item size
Active Title Bar
20
28
Caption Buttons
20
28
Icons
20
36
PACS Administrator Manual
Table 12: Enlarging Fonts in Win
2000
Title
Font Size
Item size
Icon Spacing
(horizontal)
20
46
Icon Spacing
(vertical)
20
46
Inactive Title
Bar
20
28
Menu
20
24
Message Box, if
available
20
24
Palette Title
20
22
Scrollbar
20
24
Selected Items
20
24
Tooltip, if
available
20
24
• When finished, click OK to save the settings
and exit the properties window.
In Windows XP:
• On the Appearance tab, at the Windows and
buttons dropdown menu, select Windows
Classic.
• At the Color scheme dropdown menu, select
Default (blue).
• At the Font size dropdown menu, select Extra
Large Fonts for diagnostic workstations and
Large Fonts for clinical workstations.
7. Enlarge the mouse pointer:
a. In Control Panel, select Mouse.
b. On the Pointers tab, at the Scheme dropdown
menu, select Magnified (system scheme).
c. Click Apply and OK.
8. Set Recycle Bin:
a. Right-click the Recycle bin icon on the desktop
and select Properties.
W o rk s t at i o ns / P ag e 6 9
PACS Administrator Manual
b. Slide the bar 3% and click OK.
9. Clean up Start menus:
a. Right-click Start and select Open All Users.
b. Right-click each unneeded shortcut and select
Delete.
c. Confirm deletion.
d. Usually the only items necessary in the Start
Menu on a diagnostic or clinical workstation are
Synapse and Internet Explorer.
10.Clean up the Desktop.
a. Right-click any shortcut or file on the desktop that
is not needed by users, administrators and support staff.
b. Select Delete.
c. Click Yes to confirm deletion.
Configure Internet Explorer
1. In MS Internet Explorer, select Tools/Internet
Options.
2. On the Security tab, select Custom Level.
3. In the Settings box, under Active X controls and
plug-ins, click the center radio button to enable the
following:
a. Download signed ActiveX controls.
b. Download unsigned ActiveX controls.
c. Initialize and script ActiveX controls not marked
as safe.
4. Also in the Settings box, scroll down near the
bottom to User Authentication:
a. Under Logon, select Automatic Logon with current username and password.
5. Click OK to save the settings.
W o rk s t at i o ns / P ag e 7 0
PACS Administrator Manual
Set Internet Explorer to Blank
1. In Internet Explorer, select Tools/Internet
Options.
2. On the General tab, in the Home page section below
the address box, click Use Blank.
3. Click Apply/OK.
Optimize Internet Explorer
1. In MS Internet Explorer, select Tools/Internet
Options.
2. On the General tab:
a. In the Temporary Internet files section, click
Delete Cookies.
b. In the Delete Cookies dialog box, click OK to
confirm the deletion.
c. Click Delete Files.
d. In the Delete Files dialog box, check Delete all
offline content and click OK.
e. Click Settings.
f. At Amount of disk space to use, type a number
equal to your computer's RAM and click OK.
Note: To view
RAM, go to
Control Panel/
System/General
and look under
Computer.
• Convert RAM, if needed. See “Conversions” on
page 67.
g. In the History section, click Clear History.
h. In the Internet Options dialog box, click Yes to
confirm the deletion.
i. Use the up/down arrows to set Days to keep
pages in history to 1.
3. On the Advanced tab, scroll down to the Security
section.
4. Select Empty Temporary Internet Files when
browser is closed.
5. Click OK.
6. Close Internet Explorer.
W o rk s t at i o ns / P ag e 7 1
PACS Administrator Manual
MS Windows Updates
Note: Only
Microsoft security
patches may be
installed without
the express
approval of Fuji.
Synapse software is closely integrated with
Microsoft Windows and Microsoft Internet Explorer.
Service Packs and updates must be approved by
Fuji prior to installation on PACS related
equipment.
The PACS Technical Analyst obtains approval from
Fuji and schedules software changes with the PACS
Administrator or IT Site Director.
If a service pack has extreme importance to the
operation of Synapse, Fuji notifies SJHS of the
Product Change Notice and includes instructions on
how to apply those changes.
If the site IT personnel find a need to implement a
new OS, product patch, or service release before
Fuji has validated the software for use with
Synapse, they initially apply the update to the test
system. After ensuring that the update is safe,
they apply it to the production system.
Installing Synapse
Facilities should always download Synapse for
production workstations from the production
server.
1. In the Microsoft Internet Explorer address box, type
the appropriate facility URL listed below (for either
the test server or the live server) and press Enter.
Table 13: Test Servers
W o rk s t at i o ns / P ag e 7 2
Facility
URL
MHR
http://sjsnt-mhrpactst
QVH
http://sjsnt-pacsqvh
SJF
http://pacstest
SJO
http://sjsnt-sjopactst
PACS Administrator Manual
Table 13: Test Servers
Facility
URL
SRM
http://sjsnt-srmpactst
If Synapse was previously installed from the test
server, completely uninstall the test server version
of Synapse and install the production version
before using Synapse in the production
environment.
Table 14: Production Servers
Note: For off-site
installation of
Synapse: See
“Remote
Workstations” on
page 78.
Facility
URL
MHR
http://mhrweb1
QVH
http://sjsnt-qvhpacs1
SJF
http://sjfweb1
SJO
http://sjoweb1
SRM
http://sjsnt-srmpacs1
2. In the network logon box, type your Synapse user
ID, password, and domain:
a. Windows XP users, type the domain ID before the
user ID, separated by a back slash (i.e., sjhsnt\userID).
b. All other users, type sjhs-nt in the domain field.
3. When the Synapse Workstation page displays, click
Synapse Workstation Code Download.
4. When the Security warning message displays, check
Always trust content from FUJIFILM Medical
Systems and click Yes.
5. After the message, Installation of Synapse version
xxx successful displays, close Internet Explorer.
6. Right-click on the Windows desktop and select
Refresh.
If both Synapse test and Synapse live are installed
on the same computer, use the Synapse properties
window to navigate from one to the other.
1. On the desktop, right-click the Synapse icon to open
the properties window.
W o rk s t at i o ns / P ag e 7 3
PACS Administrator Manual
2. At the Data Source Settings tab address box, click
the dropdown arrow to change from test to live.
3. Click OK to save the setting and close the properties
window.
Configure Synapse Properties
On the desktop, right-click the Synapse icon and
select Properties.
Table 15: Synapse Properties Tabs
Tab
Configures:
Data Source
Settings
Data sources for the Synapse
workstation.
Synapse View
Settings
The way information is retrieved and
displayed to the user.
Workflow
Workstation-specific workflow
automation functionality.
Security
Workstation-specific security features
such as automatically logging off
Synapse and hiding the Synapse icon
from the desktop.
Data Source Settings Tab
For diagnostic workstations, the Data Source
Settings tab should remain set to the defaults that
come across with Synapse installation:
W o rk s t at i o ns / P ag e 7 4
•
The Data Source Settings address box populates
with the word Synapse, the default name of the
Data Source.
•
The Communication Settings Address box displays
the path from which you downloaded the Synapse
software.
•
None of the boxes in Communications Settings are
checked.
•
The Cache Address box is blank.
•
The AON factor is set at Clinical for Dictated studies
and Original for Unread studies.
PACS Administrator Manual
For clinical workstations, one change is necessary
on the Data Source Settings tab:
•
Change the AON factor for Unread studies to
Clinical.
Synapse View Settings Tab
All settings on the Synapse View Settings tab are
optional and should be set by each user to his or
her own requirements.
Table 16: View Settings Tab
W o rk s t at i o ns / P ag e 7 5
Item
Check box to automatically:
Save Filter settings
Saves the most recent filter value in
the search bar.
Save View settings
Saves the last List view used.
Show Report
Automatically opens a report, if a
report is available, when a study is
displayed.
Show notes if
report is not
available
Automatically opens the notes page,
if no report is available, when a
study is displayed.
Show Study
Information
Automatically opens the Study
Information page when a study is
displayed.
Display comparison
study
Automatically displays multiple
comparison studies. The number of
comparison studies can be set for
each modality.
...only for unread
studies
Displays the comparison studies,
only for unread studies.
Select comparison
studies with...
Displays the comparison study with:
the same modality, or
the same procedure code, or
a related procedure code, or
a related procedure code within the
same modality.
Include newer
comparison studies
Allows user to view newer
comparison study when an older
study is opened.
PACS Administrator Manual
Table 16: View Settings Tab
Item
Check box to automatically:
Close notes window
after adding a note
Automatically closes the notes
window along with the study.
Workflow Tab
The Workflow tab options configure how the
Synapse application reacts to the use of the F8 and
F9 keys when a Radiologist reads from an unread
studies folder.
Table 17: Workflow Tab
Item
Purpose
Automatically display
next case
F8 Key: When viewing studies
from an unread folder, this key
marks the open study as dictated,
and can either (a) proceed to the
next unread study on the list, (b)
allow the user to manually select
the next study, or (c) return the
user to the worklist.
Manually select next
case for display
Go back to list (to
choose another case)
Automatically display
next case
Manually select next
case for display
Go back to list (to
choose another case)
Selected Items
Viewed Items
F9 Key: When viewing studies
from an Unread Folder, this key
skips the open study without
marking it dictated, and then can
automatically go to the next
Unread Study on the list, or allow
user to manually select the next
study, or automatically return user
to the worklist.
F12 Key: Automatically mark
selected or viewed items as
dictated.
Security Tab
For both diagnostic and clinical workstations, the
Security tab should remain set to the defaults that
come across with Synapse installation:
W o rk s t at i o ns / P ag e 7 6
PACS Administrator Manual
•
Allow access to Synapse from desktop is checked.
•
Enabled Automatic Logoff is not checked.
•
The address box at Logoff time-out in minutes has
10 typed in.
•
Enable Logoff when all windows are closed is
checked.
Uninstalling Synapse
To completely remove the Synapse Workstation
Code from a computer, you must manually remove
three specific program files.
1. In the Control Panel, select Add or Remove
Programs.
2. Select Synapse and click Remove.
3. In the Remove Synapse Warning dialog box, click
OK.
4. At the Warning dialog box, click OK.
5. In the Downloaded Program Files dialog box,
right-click Synapse InstallHelper Class.
6. Select Remove and confirm at the prompt.
• If you try to remove the Synapse Medical Image
Workstation file at this time, you will receive an
error message.
7. Close Downloaded Program Files, Add or Remove
Programs, and Control Panel.
8. Reboot the system.
9. From the desktop, right-click Start/Explore.
10.Locate and expand C:\WINNT\Downloaded
Program Files.
11.Right-click Synapse Medical Image Workstation.
12.Select Remove and confirm at the prompt.
13.Locate and right-click
C:\SynapseDatasource.dat.
14.Select Remove and confirm at the prompt.
15.Locate and right-click C:\Synapse.
16.Select Remove.
W o rk s t at i o ns / P ag e 7 7
PACS Administrator Manual
17.Confirm the removal at the prompt.
18.Reboot the system.
Review Workstations
A review workstation is any on-site SJHS PC
connected to the SJHS servers.
These workstations require the following:
•
Installation of Synapse Code. See “Installing
Synapse” on page 72.
•
Synapse properties configuration. See “Configure
Synapse Properties” on page 74.
•
Internet Explorer configuration. See “Configure
Internet Explorer” on page 70.
•
Set Internet Explorer to blank page. See “Set
Internet Explorer to Blank” on page 71.
•
Internet Explorer optimization. See “Optimize
Internet Explorer” on page 71.
•
Virus scan setup. See “Virus Scan Settings for
Workstations” on page 82.
Remote Workstations
Remote workstations provide access to Synapse
through any off-site PC or laptop.
Radiologists and radiology personnel install
Synapse directly on their home and office
computers because they need only to view
radiology images.
Note:
Connections to
the Internet are
processed
through an SSL
with 128-bit
encryption
between the web
browser and the
SJHS web server.
W o rk s t at i o ns / P ag e 7 8
Referring physicians, doctors offices, and other
off-site facilities install and use Synapse through
Physician Connect. Physician Connect access
affords them access to patient charts, lab tests,
patient history, and other detailed patient
information.
PACS Administrator Manual
Remote Installation for Radiologists
The instructions below are printed separately by
SJHS as Quick Install Cards and are available from
the PACS Administrator.
1. In the Internet Explorer address box, type the
appropriate URL listed below and press Enter to
display a network logon dialog box.
Table 18: Remote Installation URLs
Facility
URL
St Jude
https://pacs.stjoe.org
All others
https://pacs2.stjoe.org
2. Type your Synapse user ID, password, and domain
name:
a. Windows XP users, type the domain ID before the
user ID, separated by a back slash (i.e., sjhsnt\userID).
b. All other users, type sjhs-nt in the domain field.
3. When the Synapse Workstation page displays, click
the Synapse Workstation Code Download box.
4. When the Security warning message displays, check
Always trust content from FUJIFILM Medical
Systems and click Yes.
5. When the message, Installation of Synapse version
xxx successful displays close Internet Explorer.
6. Right-click on the Windows desktop and select
Refresh.
7. Right-click the Synapse icon and select Properties.
8. In Synapse Properties, on the Data Source Settings
tab:
a. Type the appropriate address for your hospital:
Table 19: Synapse (Remote) Properties URL
W o rk s t at i o ns / P ag e 7 9
Facility
URL
Mission
https://pacs2.stjoe.org/mhr
Queen of the Valley
https://pacs2.stjoe.org/qvh
PACS Administrator Manual
Table 19: Synapse (Remote) Properties URL
Facility
URL
Santa Rosa
https://pacs2.stjoe.org/srm
St Jude
https://pacs.stjoe.org
St. Joseph, Eureka
https://pacs2.stjoe.org/sje
St. Joseph, Orange
https://pacs2.stjoe.org/sjo
b. Check the following boxes:
• Use encrypted communication (https) for
images.
• Enable pre-caching images for slow networks.
c. In AON Factor for Initial Display, select Reference
for faster downloads, or select Clinical or
Diagnostic for more image detail in the initial
download.
Note: The AON
factor can be
changed after the
images are
downloaded.
9. On the Synapse View Settings and Workflow tabs,
check the desired options.
10.Click Apply/OK.
11.Right-click the Synapse icon and select Log Off
Synapse.
12.Configure and optimize Internet Explorer, as above.
13.Recommend to your radiology personnel that they:
a. Use virus scan software and keep it up to date.
b. Regularly update MS Windows with critical
updates and service packs. Go to http://
www.microsoft.com for more information.
c. Maintain security by logging off Synapse when
finished.
Remote Installation via Physician Connect
The instructions below are printed separately by
SJHS as Quick Install Cards and are available from
the PACS Administrator.
1. Locate a patient and then the patient's radiology
study.
W o rk s t at i o ns / P ag e 8 0
PACS Administrator Manual
2. Click See Report to open the Transcription Viewer/
Editor window.
3. Click View Detail to display the Synapse logon box.
a. If Synapse is installed on the computer, completing the logon box, as shown below, displays the
radiology images.
b. If Synapse is not installed on the computer,
completing the logon box, as shown below,
initiates the installation process.
Note:
Installation and
setup take about
five minutes and
are necessary the
first time Synapse
is accessed on a
computer.
4. In the login box, type your Synapse user ID and
password:
a. Windows XP users, type the domain ID before the
user ID, separated by a back slash (i.e., sjhsnt\userID).
b. All other users, type sjhs-nt in the domain field.
5. When the Security warning message displays, check
Always trust content from FUJIFILM Medical
Systems and click Yes.
6. When a black screen displays, observe the progress
bar until it reaches 100%.
7. Minimize all windows to reveal your Windows
desktop.
8. Right-click the Windows desktop and select
Refresh.
9. Right-click the Synapse icon and select Properties.
10.In Synapse Properties, on the Data Source Settings
tab:
• Type the appropriate address for your hospital:
See “Synapse (Remote) Properties URL” on
page 79.
• Checkmark Use encrypted communication
(https) for images.
• Checkmark Enable pre-caching images for slow
networks.
• In AON Factor for Initial Display, select
Reference for faster downloads, or select Clinical
or Diagnostic for more image detail in the initial
download.
W o rk s t at i o ns / P ag e 8 1
PACS Administrator Manual
Note: The AON
factor can be
changed after the
images are
downloaded.
11.On the Synapse View Settings and Workflow tabs,
check the desired options.
12.Click Apply/OK.
13.Right-click the Synapse icon and select Log Off
Synapse.
14.Maximize the Transcription Viewer/Editor window
and click View Detail to open and use Synapse.
15.Configure and optimize Internet Explorer, as above.
16.Recommend to your physicians that they:
a. Use virus scan software and keep it up to date.
b. Regularly update MS Windows with critical
updates and service packs. Go to http://
www.microsoft.com for more information.
c. Maintain security by logging off Synapse when
finished.
Virus Scan Settings for Workstations
The McAfee anti-virus program is the current
standard for SJHS. PACS workstations must have
an up-to-date installation of McAfee anti-virus
software. The workstation must also be set to
communicate with the McAfee ePO (ePolicy
Orchestrator). The master ePO server maintains
configuration, virus scanning, and routine updates
on the SJHS workstations.
The PACS workstations group on the ePO server
has on-access scanning at all times and a timed
scan daily at noon.
PACS workstation group scans are set to:
W o rk s t at i o ns / P ag e 8 2
•
Scan boot sectors
•
Scan floppy drive during shutdown
•
Enable on-access scanning at startup
•
Enforce a maximum scanning time of 15 seconds for
archives and 45 seconds for all files
•
Scan for macro viruses in all files
•
Overwrite client exclusions
PACS Administrator Manual
•
Scan inside packed executables
•
Scan inside multiple-file archives (e.g., zip)
•
Quarantine any infected file
•
Notify user that a virus has been detected
•
Clean the infected file
•
Delete any infected file that does not clean up
•
Log any virus activity
•
Exclude C:\Program Files\Meditech\Print
The ePO server itself receives the same scheduled
scan at noon every day, but also receives a more
thorough scan every Wednesday morning at 0400
hours.
The ePO server scans are set to:
•
Scan boot sectors
•
Scan floppy drive during shutdown
•
Enable on-access scanning at startup
•
Enforce a maximum scanning time of 15 seconds for
archives and 45 seconds for all files
•
Scan for macro viruses in all files
•
Overwrite client exclusions
•
Scan inside packed executables
•
Quarantine any infected file
•
Notify user that a virus has been detected
•
Clean the infected file
•
Delete any infected file that does not clean up
•
Log any virus activity
•
Exclude drives O, Q, W, I, and J
•
Exclude the Oracle database on D
Table 20: PACS Drives
System Drive Letters
W o rk s t at i o ns / P ag e 8 3
Files
C
Operating system
D
Database backup/
O
Synapse live database
PACS Administrator Manual
Table 20: PACS Drives
System Drive Letters
Files
Notes, reports,
annotations. docs
I
images
I, J
Q
W
The v-shield icon in the system tray designates the
anti-virus protection is installed. The man-shield
icon in the system tray designates the PCs
connection to the ePO server for uninterrupted
scanning and security.
To Install the ePO Agent
1. Click Start/Run.
2. Type \\sjsnt-epo\epoagent\install7.
3. At the licensing page select Perpetual Licensing.
4. Accept the defaults.
5. After McAfee is installed, go to \\sjsntepo\epoagent\epoagent.
6. Double-click to initiate the ePO agent installation
process.
7. Accept the defaults to install the agent.
8. Notify one of the two Network Design Technicians
listed below that you have installed McAfee on a
PACS workstation. They will need the computer
name and IP address.
Table 21: Network Design Technicians
Technician
Email
Telephone
Louis Tillis
[email protected]
714.347.7571
Phong Chau
[email protected]
714.937.7434
Within 2 hours of notification of the McAfee install
on a PACS PC, the technicians enable the ePO
server to take over that responsibility.
W o rk s t at i o ns / P ag e 8 4
PACS Administrator Manual
Virus scan settings are maintained by the ePO
server. Manual changes revert to the ePO settings
after 15 minutes.
Diagnostic and Clinical Workstation Checklist
Use the checklist below to verify the workstation is
setup as recommended by the Corporate PACS
Team.
Table 22: Workstation Checklist
W o rk s t at i o ns / P ag e 8 5
No
Diagnostic/Clinical Workstation
Item
1.
Static IP address used
2.
PC named and workstation added to
domain
3.
Appropriate monitor(s) installed
4.
Monitor resolution and appropriate pivot
mode (portrait or landscape) set
5.
Graphics card installed, if appropriate
6.
NIC at 100 Mbps/Full Duplex
7.
24-hour clock
8.
Virtual memory equal to 150% of RAM
9.
Power Management for system set to off
10.
Power Management for NIC set to off
11.
Fonts enlarged
12.
Mouse pointer enlarged
13.
Recycle bin set to 3%
14.
Clean Start menu
15.
Clean desktop
16.
Internet Explorer configured
17.
Internet Explorer set to blank page*
18.
Internet Explorer optimized*
Checked
PACS Administrator Manual
Table 22: Workstation Checklist
No
Diagnostic/Clinical Workstation
Item
19.
Microsoft Windows updates completed*
20.
Synapse installed
21.
Synapse properties configured
22.
Virus scan software installed (icon
visible)
23.
Profile copied to All Users
24.
Virus scan set to ePO server (icon
visible)*
Checked
Items one through six are completed by the PACS
Technical Analyst or local IT personnel.
*
W o rk s t at i o ns / P ag e 8 6
Item is not part of standard PACS image and
must be added after imaging the PC.
PACS Administrator Manual
Modalities
Adding a New Modality
Before adding a new modality to the PACS, both
the modality and Synapse are configured so they
can communicate. The modality technician
configures the modality, and Fuji configures
Synapse.
A connection license must be purchased from Fuji
if the modality is new and not replacing an existing
modality.
1. Inform the corporate PACS Team when planning to
add or replace a new modality.
a. If the new modality is replacing an existing
modality, use the same IP and Application Entity
Title (AET) as the replaced modality, if possible.
Go to Step 6, below.
b. If the modality is a newly added modality, then
perform Steps 2 – 5.
2. Contact Fuji and request a quote for a connection
license.
• Connection licenses are $3000 minus SJHS
standard discount of 27%, or $2190.
• This pricing is valid through 2007.
M o da l it i es / P a ge 8 7
PACS Administrator Manual
3. Obtain a new IP, subnet mask, and gateway from
Information Systems department.
4. Configure the AET (Application Entity Title) and host
names to match the SJHS naming convention.
a. Create both the AET and host names to include:
• 3-letter site ID such as SRM or SJO
• Multiple letter equipment identifier, such as
IIP, x5000, or Sequoia
• 2 or 3-letter location identifier, such CT, MR, or
Rm2
b. Make host name lower case and the AET full caps.
c. Maximum number of characters is 16 for host
name and AET.
Table 23: Example Host Names and AE Titles
System
Host Name
AET
SJO Drystar 5500
thermal camera in
CT
sjo-ds5500-ct
SJO-DS5500-CT
SJO Sequoia 512
Ultrasound system
sjo-sequoia-1
SJO-SEQUOIA-1
SJO Sensation 16slice CT, Navigator
(acquisition)
workstation
sjo-sens-nav-ct
SJO-SENS-NAVCT
5. Obtain the port number that the modality uses for
DICOM communications (usually 104).
6. Provide the AET, IP, Host Name, and port number
to:
• Fuji for configuring Synapse.
• Corporate PACS Team for maintaining accurate
master documentation.
7. After Synapse is configured, have the modality
technician configure the following DICOM targets:
• All available production DICOM servers
• Test server
• Printers
• CD burner
M o da l it i es / P a ge 8 8
PACS Administrator Manual
DD DICOM CD Burner
The DD (Data Distributing) DICOM CD Burner
workstation is comprised of both hardware and
software that work together to create CDs of
images stored on the DICOM server.
The image server locates the files in PACS and
hands them to the production server. The
production server sends them to the CD burner.
The CD burner records the images and associated
reports onto the blank CD media that the robotic
arm has moved from bin one of the carousel to the
CD burner drawer. After the CD is burned the
robotic arm transfers the CD media from the
burner to the label printer that thermally imprints
a label using selected meditags from the DICOM
header fields. After the label is printed on the CD,
the robotic arm moves the completed CD to bin
four.
D D D I C O M C D B u rn er / P a g e 8 9
PACS Administrator Manual
Table 24: DD DICOM CD Burner System
Product
Includes
• Rimage Amigo II CD burner
• Everest II label printer
Rimage Publishing
System (hardware)
• Dell PowerEdge 600 PC, monitor,
keyboard and mouse
• Robotic arm
• 4-bin rotating carousel
Rimage Publishing
Software Suite
• Rimage System Manager (enables
user to view Windows background
services and make changes to the
robotics. Background services
include: Production Server, Image
server. Bridge Server and Messaging Server)
• Quick Disk (which is not used by
SJHS)
RADinfo CD
PowerPACS DICOM
software application
GUI for query, retrieval, and
submission of the order to Rimage
services for CD burning
Prior to Installation
Advanced Tek Rep is the company hired by Data
Distributing to install the CD burner systems in the
various SJHS facilities and to train the personnel to
use the DD DICOM CD Burner system
Before an installation of the Rimage DD DICOM CD
Burner system the PACS Administrator receives a
2-page Excel spreadsheet from Advanced Tek,
titled Check List for DD DICOM Installs. The PACS
Administrator must complete the form and return
it to the Advanced Tek representative at least 10
days before the scheduled installation.
It is very important that the information provided
to Advanced Tek include:
•
D D D I C O M C D B u rn er / P a g e 9 0
Host Name
PACS Administrator Manual
•
AE Title
•
Port Address
•
TCP/IP Address
Also send the ATR Systems Engineer an electronic
copy of the facility logo and the facility’s full
address for the default CD label design.
The ATR Systems Engineer configures the CD
Power PACS System based on the criteria provided
on the spreadsheet and through discussions with
the PACS Administrator prior to the installation.
The PACS Administrator must ensure the planned
location for the CD Power PACS System has the
following:
•
Electrical outlet
•
Surge protector/power strip with at least 3 outlets
•
Network connection (jack)
•
Sufficient counter space for the keyboard, mouse
and monitor
•
Sufficient shelf space for a PC in a small tower case
•
Sufficient shelf space for the main Rimage unit – 24
inches front to back, 24 inches in height, and 30
inches side to side. [Some facilities have purchased
a SpaceWorks mobile work center from Home Depot
for $50 to hold the Rimage unit and consumable
supplies.]
The PACS Administrator should schedule, with the
ATR Systems Engineer, times for ATR to train the
appropriate personnel.
Each facility also needs to purchase a CD shredder
for the complete disposal of CDs with patient
information. Shredders that destroy 30 CDs per
minute are available at most office supply stores
for $50.
D D D I C O M C D B u rn er / P a g e 9 1
PACS Administrator Manual
Installation
Installation of the system is performed by
Advanced Tek Rep and requires about a half day.
To configure the system and demonstrate that
configuration to the PACS Administrators requires
another half day.
The Biomedical Department Lead Technician
should be available to:
•
Setup the modalities to push to the CD burner.
•
Learn from the ATR reps how to configure the
modalities in RADinfo POWERPACS.
Site IT personnel should be available to:
•
Set up the network printer.
•
Install virus scanning software.
•
Ensure the computer is on the ePO network.
Caution!
D D D I C O M C D B u rn er / P a g e 9 2
•
Never unplug the power cable or turn the power
switch off during CD creation.
•
Never move or jostle the printer during CD creation,
it causes misalignment of the laser and results in a
malfunction.
•
Do not use the reject mail slot on the left side of the
unit. The reject slot can hold only one CD. If a CD is
on the slot and a second CD gets rejected, the
system freezes.
•
Always remove the clear disk protectors from the
top and bottom of each stack of CDs before placing
in the carousel.
•
Do not close RADinfo PowerPACS while jobs are
waiting to print.
•
Do not remove the dongle or attach anything to the
dongle. The dongle is attached to the printer’s
parallel port during installation. This dongle acts as
a security key for the software. If the dongle is not
present, the system does not work.
PACS Administrator Manual
Dongle
Carousel
•
The CD carousel has 4 bins. Each rotating bin holds
100 CDs. Load up to 50 blank CDs in each of bins 1,
2, and 3.
•
Never place blank CDs in bin 4, which is used to
catch the burned CDs.
•
An unlimited number of burns can be ordered in
succession without waiting for the burner to
complete any of them. As long as the system is left
open and running, the process will proceed until all
CDs are burned.
•
If more than one CD is needed to complete the
series, the CDs is labeled 1 of 3, 2 of 3, 3 of 3, etc.
Log On
The DD DICOM CD Burner workstation should
remain on at all times, and the RADinfo PowerPACS
software should remain open and ready to use.
This allows the modalities to push to the CD burner
without assistance.
If the computer is rebooted, the screen displays
two choices for logon: Admin and User. Select the
appropriate icon and use the logon and password
supplied by the PACS Administrator.
If the computer is on and the RADinfo PowerPACS
software application is not visible, it is minimized.
Click RADinfo on the taskbar to maximize the
application.
D D D I C O M C D B u rn er / P a g e 9 3
PACS Administrator Manual
The RADinfo PowerPACS software application
opens to display four windows:
1. The left window displays:
• The local hard drive and any studies currently
stored there.
• The DICOM server not available (red circle with a
line through it). The red circle and line disappear
after a query is performed.
• Studies display with human faces. Initially the
face is a profile. The image turns full face when
selected. The full face has a CD partially over it
when a CD was burned.
• Downloaded files are automatically deleted from
the local server every seven days or when the
cache is full (100 MB), whichever comes first.
2. The right upper window displays the detailed view of
images and patient information.
• Images can be dragged and dropped from this
window into the window below for CD creation.
3. The long window at the bottom of the screen
displays studies ready for the CD.
• Checkmarked studies are marked for burning.
• Non-checkmarked studies are not burned to the
CD.
4. The bottom right corner displays the information
that will be burned as part of the CD (e.g., title, ID,
date, and disk space the prospective burn requires.
Create a New User Account
1. In RADinfo Power PACS, select File/User
Accounts.
2. In the User Accounts window:
• At User Name, type the name of the user.
• At password, type a password for the user.
• Confirm the password.
• At Full Name, type a name for the type of
account (e.g., admin or user).
D D D I C O M C D B u rn er / P a g e 9 4
PACS Administrator Manual
• At the Default CD Label dropdown, select both a
single patient default label and a multiple patient
default label.
• Under User Right, checkmark permissions for
the user.
• Click Add.
• Repeat for each user.
• Restart the computer to activate the new
user(s).
Configure Rimage System Manager
The following changes to settings need to be done
at first installation and any time that Rimage
System Manager is upgraded.
Note: Change
only the tabs
listed. Leave all
other tabs set at
their defaults.
1. Double-click the Rimage System Manager (RSM)
icon to display the DICOM station control center and
4 RSM servers in the left window:
• Control Center
• PS is production server
• IS is image server
• BS is bridge server
• 2nd BS is the messaging server
2. Select Control Center - DICOM Station.
3. In the right window, click the top Settings button to
open the Select DICOMStation_PS01 Settings
window.
4. On the (default) Recording tab:
• Checkmark Reject non ISO for incremental
multi-session orders.
• Checkmark Destroy failed recordings.
5. On the Printing tab:
• At the Print Reject Pattern dropdown, select On
all rejected disks.
6. At the bottom of the DICOMStation_PS01 Settings
window, click More to expand the tab views.
D D D I C O M C D B u rn er / P a g e 9 5
PACS Administrator Manual
7. On the Server tab, at the View dropdown, select All
Orders so that everything displays for the day.
8. On the Verify tab, checkmark Enable verification.
9. Click OK to save the changes and exit the Rimage
System Manager.
Configure RADinfo Power PACS
1. In RADinfo PowerPACS, select File/Configure.
Note: Change
only the tabs
listed. Leave all
other tabs set at
their defaults.
2. On the Housekeeping tab, select All Orders, so
that the history log lists all CDs burned.
3. Click Save.
4. On the CD Label tab.
a. Click Browse and locate C:\RADinfo\default
label to access the default label created by the
ATR Systems Engineer.
• The prepared label already has fields created
for the DICOM metatags.
b. Click Open to add it to the CD Label File.
c. In the CD Label File window, checkmark Default
to activate the default label in RADinfo
PowerPACS.
• For labels created, but not needed any longer,
deactivate them by removing the checkmark.
• Deactivating the label keeps it available in case
it is needed at a later date but prevents it from
showing up as a current label option in RADinfo
PowerPACS.
d. Checkmark Do not separate series to keep a
series all on the same CD when the burn involves
more that one CD.
e. Checkmark Default Label.
f. In the CD Label window, click the top row in
Column 1 to activate a dropdown window of
DICOM metatags from which to select information
for the label fields.
• Column 1 is the title of the second column in
the window and Column 2 is the title of the
third column in the window.
D D D I C O M C D B u rn er / P a g e 9 6
PACS Administrator Manual
g. Continue selecting metatags for each label field
until the label is finished.
h. When finished, click Save.
5. After the modalities are set up, burn a CD and
inspect the label.
6. Use CD Designer software to create more labels or
edit existing labels. Double-click the User Guide
Manuals folder on the desktop and select the
PowerPACS Quickstart guide.
Add Modalities
The Biomedical Department Lead Technician will
set up the modalities to send images directly from
the modality to the CD Burner.
1. In RADinfo PowerPACS, select File/Configuration.
2. On the DICOM Network tab, type the host name,
TCP port number, and AE title.
3. Checkmark Auto-creating CD/DVD.
• Do not checkmark any other options, as they
tend to slow down the process.
4. Click Add.
5. Send the file to the printer.
• If the entire AE title is not shown on the
printout, handwrite it before filing.
6. Repeat for each modality.
7. When all modalities have been added, click Save.
8. Right-click Start and select Explore to open
Windows Explorer.
9. Locate C:Windows/System32/Drivers/ETC/
HOSTS.
10.Double-click HOSTS to open the folder.
11.In the Open With dialog box, select WordPad and
click OK.
12.Click at the end of the word localhost and press
Enter.
13.Type the IP address for the modality.
14.Press Tab.
D D D I C O M C D B u rn er / P a g e 9 7
PACS Administrator Manual
15.Type the host address for the modality and press
Enter.
16.Repeat for each modality.
17.When all modalities are listed, click Save.
18.Print the file to the local printer.
• Remember to change the printer at the
dropdown.
19.Close WordPad and all of the Explorer windows.
20.Attach the printout to the hardcopies of the modality
setup pages and file.
21.To delete a modality, select the modality and click
Remove.
View an Image
In RADinfo PowerPACS:
1. In the DICOM Image List window, expand the
folders:
a. Click the plus (+) sign at Local Storage to display
the patient.
b. Click the plus (+) sign at patient name to display
the study.
c. Click the plus (+) sign at the study folder to
display the series.
2. Right-click a series and select Display series.
Create CD
The instructions below are printed separately by
SJHS as Quick CD Cards.
Create CD from the Local Hard Drive
In RADinfo PowerPACS:
1. In the DICOM Image List window, right-click the
patient’s name.
D D D I C O M C D B u rn er / P a g e 9 8
PACS Administrator Manual
2. Select Cut CD for Patient.
3. Type recipient information and click OK.
Create CD from the DICOM Server
In RADinfo PowerPACS:
1. Click Query & CD.
2. On the Query DICOM Server and Create CD window,
use the Server dropdown arrow to select the DICOM
server.
3. In the Patient ID box, type the AR number.
a. Type AR+two leading zeros+six-digit identification number: e.g., AR00123456.
b. If the AR number is not available, type the
patient’s name with an asterisk as a wild card.
• Type last name+comma+first initial+asterisk
(no spaces): e.g., jones,p*
4. Click Search.
5. Checkmark individual files to burn to CD, or select
All.
6. Type name of recipient.
7. Click Create CD.
8. Click Reports/Task List to check the status of the
CD creation. The choices are:
• Processing
• Completed
• Error
Burn a Subsequent CD
In RADinfo PowerPACS:
1. In the DICOM Image List window, select any patient
whose face is partially covered by a CD icon,
denoting that a CD was burned.
2. Select Reports/Task List to open the CD Task
Dialog window.
3. Click Modify.
D D D I C O M C D B u rn er / P a g e 9 9
PACS Administrator Manual
4. Place a checkmark at Write CD Again.
5. Type the number of copies needed and click OK.
Import or Send from a Guest CD
Each CD is created using the DICOM 3.0 standard
for medical communication protocol with a Part X
standard for exporting images. If a CD is brought
in from a facility outside the SJHS system, images
view correctly if the same standards were used to
create the CD. When the standards are used, the
CD can be viewed as if it were the original – based
on the viewing station’s capabilities. Import the
images, send them to Synapse, then notify the
physicians they can view the images on the nearest
clinical or diagnostic workstation. Note that images
transferred from film to digital via a film digitizer
cannot be manipulated or viewed as originals.
1. Insert the CD into the Dell PC.
2. If the CD auto-executes, close the program.
3. In RADinfo PowerPACS, select File/Import DICOM
Images.
4. In the Open dialog box, select the folder with
DICOM in the name.
• Folder names vary, based on what program was
used to create the original CD.
5. Click Open to display the Import Images window.
6. In the Import Images window, select the images to
transfer.
7. Click one of the following:
• Import – to import selection only.
• Import All – to import everything on the CD.
• Send – to send to any modality capable of
receiving DICOM information (including
Synapse).
8. If sending: select the Destination DICOM Node from
the dropdown menu and click Send to initiate the
action.
D D D I C O M C D B u rn er / P a g e 1 0 0
PACS Administrator Manual
9. When the CD is silent, close the Import Images
window.
• There is no acknowledgement from the software
that the files are transferred, until after the
Import Images window is closed.
• When the Import Images window is closed, the
files display in Local storage.
Reports and Logs
RADinfo PowerPACS Reports
RADinfo PowerPACS reports are in an MS Access
database and remain and are not erased if the
application is removed or reloaded.
In RADinfo Power PACS, select Reports to view the
following reports.
•
Task List displays the progress of current activities.
•
CD Recipient lists all recipients of CDs for the last
seven years.
•
History lists the CD Operation History for the last
14 days. Checkmark the box in the lower left corner
to list today’s data only.
Timeframes for reports stored in memory can be
changed on the File/Configure/Housekeeping tab.
It is recommended to leave the above defaults or
increase the timeframe rather than decrease it.
Rimage System Manager Server Logs
To view the server logs:
1. Double-click the Rimage System Manager (RSM)
icon to display the servers.
2. Select a server in the left window.
• The right window displays three tabs: Server
Info, Server Orders, and Server Log.
3. Select the Server Log tab.
D D D I C O M C D B u rn er / P a g e 1 0 1
PACS Administrator Manual
4. Click View Log File for a more detailed view of the
server logs.
Occasionally, during a support call, the Data
Distributing, Rimage, or ATR systems engineer
requests to have a copy of the server log faxed to
them.
To copy server log information:
1. Open the server log.
2. Copy the information needed.
• Highlight the portion needed or press control +
a to select the entire log.
• Press control + c to copy the selected
information.
3. Select Start/All Programs/Accessories/
WordPad.
4. Press control + v to paste the information into
WordPad.
5. Save the file to the desktop.
6. Print the file and fax as requested.
Everest II Label Printer
The Everest II Printer will not operate without at
least one ribbon, either color or black. It is not
necessary to have both.
The clear transfer filament is not a ribbon. It is a
clear film that protects the printed labels from
smearing or wearing off after a period of time, and
gives the labels a laminated appearance.
D D D I C O M C D B u rn er / P a g e 1 0 2
•
Do not print labels without filament.
•
Do not rewind the ribbons to reuse them.
PACS Administrator Manual
Cleaning the Printer
The following items should be cleaned every three
months:
•
Printhead
•
Platen roller
•
Tacky rollers
•
Air Filter
For step-by-step directions on cleaning,
maintenance, installing ribbons and troubleshooting the label printer, see your Everest II User
Guide, provided by ATR in both hardcopy and CD.
Media Kits
CDs used in the DD DICOM CD Burner system must
be thermal re-transfer CD disks that are Everest
certified.
Printing supplies are available from ATR in a media
kit designed specifically for SJHS. The CDs are 52X
Mitsui Everest Printable CDs. Cleaning kits for the
label printer and cardboard CD mailers are sold
separately. Turn-around time is usually 3 days on
most supplies from Data Distributing.
Fax P.O.s to Nick Fisher at Data Distributing,
949.595.7941.
Media Kit
Part #210762-001 ($869.00) contains:
•
1000 CDs
•
1000 paper CD sleeves
•
2 CMY ribbons (color)
•
1 transfer roll (filament)
Rimage Cleaning Kit
D D D I C O M C D B u rn er / P a g e 1 0 3
PACS Administrator Manual
Part #210725-001 ($49.00)
Cardboard CD Mailers
Part #PT7000sleeve (30 cents each) contains:
•
500 mailers
First time orders require an electronic copy of the
facility logo and the exact text for the return
address.
eFilm Lite
Each burned CD includes a viewer for eFilm-Lite.
The instructions below are printed on the CD
sleeves.
1. Insert CD in drive. If CD does not auto-execute:
a. Right-click Start and select Explore.
b. Locate and expand CD drive.
c. Double-click the Merge eFilm icon.
2. In the eFilm window, select a study on the worklist
and click View.
3. To scroll through the images, hold down the left
mouse button and move the mouse forward and
backward.
4. To adjust the contrast, hold down the right mouse
button and move the mouse side to side.
5. To adjust the brightness hold down the right mouse
button and move the mouse forward and backward.
6. To display another study while a study is open, click
the question mark (?) on the left side of the toolbar.
• To replace the open study, click Yes at the
query.
• To open the study concurrently, click No and
then Yes.
7. Right-click an image to display a dropdown menu of
available series.
8. On the dropdown, select the series to display.
D D D I C O M C D B u rn er / P a g e 1 0 4
PACS Administrator Manual
9. To view all eFilm tools, select Toolbars/Full.
Reloading RADinfo PowerPACS Software
1. Save all current label files to CD and to the desktop.
• Reloading the software erases the label files.
2. Right-click Start and select Explore to open
Windows Explorer.
3. Browse to C:RADinfo.
4. Right-click the RADinfo folder and select Delete to
delete the application.
5. Insert the RADinfo PowerPACS CD into the CD drive
of the Dell PC and close the drawer.
• If the CD automatically opens, click Cancel.
6. In Windows Explorer, locate the CD drive.
7. Click the plus (+) sign next to CDPowerPACS to
expand and view the available files.
8. Locate and double-click the Sentinel folder.
9. Double-click Sent.
10.Double-click Setup.
11.Click File.
12.Click Load Driver.
13.Click Close All.
14.Remove and reinsert the CD into the drawer.
15.Expand PowerCDCreator to view the subfolders.
16.Double-click Setup (application).
17.Accept the defaults.
18.Reboot the computer.
19.In Windows Explorer, drag the labels from the
desktop to C:RADinfo.
20.Open RADinfo PowerPACS and configure the labels.
D D D I C O M C D B u rn er / P a g e 1 0 5
PACS Administrator Manual
Troubleshooting
1. If the Insert Software Key dialog box displays at
startup:
a. Click OK.
b. Close the RADinfo CD PowerPACS software
application and re-open it.
c. Repeat, if needed.
d. If the error continues to display after opening and
closing the application three times, reboot.
e. Repeat, if needed.
f. If the error continues to display after rebooting
three times, reload the application. If p
2. If paper printouts are small CD size printouts on 8.5
x 11 inch paper:
• Locate and install the proper printer driver for
your network printer.
3. To ensure that the DICOM system is communicating
with Synapse, ping the server using DICOM C-Echo:
a. In RADinfo PowerPACS left window, locate the
SJHS server.
b. Right-click the server and select C-Echo to display
verification of connectivity.
4. To learn more about basic troubleshooting:
a. Double-click the User Guide Manuals folder on the
desktop.
b. Select the DD DICOM Troubleshooting guide for
basic troubleshooting assistance.
D D D I C O M C D B u rn er / P a g e 1 0 6
PACS Administrator Manual
PACS Resources
As the fields of digital radiology and PACS (Picture
Archiving and Communication System) expand,
more and more resources for information become
available.
There are books to read, organizations to join,
conferences to attend, the Internet to surf, and
much more. The information is available -- you
just have to know where to look for it.
Books
PACS - A Guide to the Digital Revolution by Keith
J. Dreyer, et al.
PACS and Imaging Informatics: Basic Principals
and Applications by H. K. Huang.
Organizations
SCAR
SCAR, the Society for Computer Applications in
Radiology has an informative website. It includes
their SCAR Expert Hotline, a question and answer
resource available to anyone.
P A C S Re s o u rc e s / P a ge 1 0 7
PACS Administrator Manual
The site includes a wealth of information on PACS
technology and the clinical implementation of
information systems in imaging.
Visit the Expert Hotline and submit a question or
browse the extensive, indexed database of
questions and answers. SCAR members may post
questions to the site free of charge. Experts
regularly review each question submitted and post
timely answers.
SCAR also holds an annual meeting. Visit the SCAR
website at www.scarnet.org.
RSNA
RSNA, the Radiological Society of North America,
will host their annual conference -- Radiology’s
Global Forum -- in Chicago, November 28 through
December 3, 2004.
RSNA website:www.rsna.org/index.html
SJHS Documentation
This manual includes both a glossary of PACSrelated terminology and an acronym directory.
Other SJHS printed PACS materials available
through CRD include:
P A C S Re s o u rc e s / P a ge 1 0 8
•
Paper CD sleeves with basic instructions for
eFilm Lite
•
Cardboard CD mailers with facility-specific return
address
•
PACS Remote Access Setup Quick Card
•
Physician Connect Access Quick Card
•
Pocket Quick Reference Card
•
Rimage CD Burner Quick Card
PACS Administrator Manual
The Internet
The World-wide Web is a great resource for PACS
information.
Yahoo
Go to www.yahoo.com. Locate and select Yahoo
Groups.
On the Groups page, in the Search address box,
type PACS to see all of the PACS groups. New
PACS groups are started all the time. You can even
start your own.
Note: Not all of
the PACS groups
are radiology
oriented.
Current pertinent PACS listserves include:
•
mypacs
•
pacs_admin
•
clubPACS
Create a Yahoo account first, then join a PACS
group to access the discussion thread.
PACSweb
PACSweb is an AGFA site with a lot of information
for PACS aficionados.
PACSweb site: www2.dimag.com/pacsweb.
Auntminnie.com
Go to www.auntminnie.com to look for almost
anything to do with radiology or PACS:
P A C S Re s o u rc e s / P a ge 1 0 9
•
Real-time radiology-specific news
•
Lively, topical discussion groups
•
Conference calendar
•
Focused digital communities
•
Case of the Day and Teaching Files
•
Medical imaging bookstore
•
SalaryScan
•
Job Boards
PACS Administrator Manual
•
OnLine CME and CE credits
•
Open Market
•
Used equipment marketplace
DICOM
To learn more about DICOM (Digital Imaging and
Communications in Medicine) visit http://
medical.nema.org/dicom:
•
Purpose and Organization
•
Process
•
Products
•
Partnerships
•
Technical Assistance (like FAQs and the discussion
group)
•
Administrative Assistance
Medcyclopaedia
Amersham Health provides a huge scientific library
on the Internet in the field of medical imaging.
First time users must register and must pass a
one-step test to logon. New users must identify an
anatomical region on a radiology image.
After registering, you can search the
Encyclopaedia of Medical Imaging for any of
17,000 topics and can even hone your imaging
skills using their free tests on words or images. Go
to www.amershamhealth.com and select
Medcyclopaedia.
You can also visit their Cybrary (take the same
test) for volumes on Medical Imaging, Online
Working Tools and Medical Resources.
There is even a section, also available from their
Home Page, called Medical Imaging Made Easy just in case you have new inductees to educate.
P A C S Re s o u rc e s / P a ge 1 1 0
PACS Administrator Manual
Fuji Medical Systems
Intelligroup
Intelligroup is an online discussion forum for users
of Fuji Synapse (PACS). Its purpose is for the
exchange of experience and knowledge related to
the use of Synapse.
To visit Intelligroup, go to www.fujimed.com and
select Communities/Intelligroup.
This free user’s group includes:
•
Threaded discussions dealing in topics such as CRT
vs LCD, archive solutions, etc.
•
Information on updates for Synapse infrastructure
software.
•
Topic areas including OEM partners, workstations,
DICOM.
•
Synapse software documentation
•
Synapse events calendar
Synapse (PACS)
To learn more about Synapse from Fuji, go to
www.fujimed.com and select Products and
Services.
The Synapse link includes:
•
Architectural Choices
•
Product Information
•
Technical Data
•
Customer Profiles
•
Standard Compliance
Fuji Synapse Users Network (FUSUN)
Email the Fuji Synapse user’s network at
[email protected].
P A C S Re s o u rc e s / P a ge 1 1 1
PACS Administrator Manual
Synapse online help files
On the Synapse toolbar, click Help/Synapse Help
to open the Synapse Online User’s Manual.
P A C S Re s o u rc e s / P a ge 1 1 2
PACS Administrator Manual
Abbreviations
A b b r e v i a t i o ns / P a g e 1 1 3
ACR
American College of Radiology
AEMR
Ambulatory Enterprise Medical Record
AET
Application Entity Title
ANSI
American National Standards Institute
ASP
Application Service Provider
bps
Bits per second
CAD
Computer Aided Diagnosis
CCOW
Clinical Context Object Workgroup
CDC
SJHS Centralized Data Center, located
in Anaheim, CA
CR
Computed Radiography
CRD
Care Redesign
CT
Computed Tomography
DAT
Digital Audio Tape
DBMS
Database Management System
DICOM
Digital Imaging and Communications
in Medicine
DLT
Digital Linear Tape
PACS Administrator Manual
A b b r e v i a t i o ns / P a g e 1 1 4
DVD
Digital Versatile Disk
DWLM
DICOM Worklist Manager
DX
Digital X-Ray
FCR
Fuji Computed Radiography
GB
Gigabyte (1000 MB)
GUI
Graphical User Interface
HIIS
Hospital Information Interface System
HIMSS
HealthCare Information and
Management Systems Society
HIPAA
Health Insurance Portability and
Accountability Act
HL7
Health Level 7
IDF
Intermediate distribution frame
IHE
Integrating the Healthcare Enterprise
IIP
Image and Information Processor
IIS
Internet Information Server
IOD
Information Object Definition
ISO
International Standards Organization
JBOD
Just a bunch of disks
LAN
Local Area Network
MAN
Metropolitan Area Network
MB
Megabyte
Mb
Megabit
Mbps
Megabits per second
MDF
Main distribution frame
MG
Digital Mammography
MOD
Magneto Optical Disk
MRI
Medical Resonance Imaging
MRN
Medical Record Number
PACS Administrator Manual
A b b r e v i a t i o ns / P a g e 1 1 5
NEMA
National Electrical Manufacturers
Association
NIC
Network Interface Card
NM
Nuclear Medicine
OSI
Open Systems Interconnection
PACS
Picture Archiving and Communication
System
PET
Positron Emission Tomography
RAID
Redundant Array of Inexpensive Disks
RF
Radiology Fluoroscopy
RIS
Radiology Information System
RSNA
Radiological Society of North America
SAN
Storage Area Network
SCAR
Society for Computer Applications in
Radiology
SC
Secondary Capture
SCP
Service Class Provider
SCU
Service Class User
SOP
Service Object Pair
SQL
Structured Query Language
SSL
Secure Sockets Layer
SWAT
Synapse Web Administrator Tool
TCP/IP
Transmission Control Protocol/Internet
Protocol
UID
Unique Identifier
UPS
Uninterruptible Power Supply
US
Ultrasound
VR
Voice Recognition
WAN
Wide Area Network
XA
X-Ray Angiography
PACS Administrator Manual
XRF
A b b r e v i a t i o ns / P a g e 1 1 6
X-Ray Flouroscopy
PACS Administrator Manual
Glossary
Accession number. A unique number generated by the RIS and
assigned to each patient study. This is a portion of the information
required to define the patient's identification in the imaging
modality.
Bandwidth. The amount of data that can be transmitted in a fixed
amount of time. For digital devices, the bandwidth is usually
expressed in bits per second (bps) or more commonly Mbps. This
is also known as transfer rate.
Byte. The abbreviation for binary term, the smallest unit of storage
capable of representing a single character. On all modern
computers, a byte comprises 8 bits.
Care ReDesign (CRD). The Care ReDesign initiative bridges the
information gap by redesigning inefficient manual processes and
supporting them with new technologies within the St Joseph
Health System.
Centera. EMC Centera is content addressed storage (CAS) for the PACS.
Information is backed up nightly to the EMC Centera before being
again backed up to tape.
Clinical Workstation. These workstations have one or two
2-megapixel (1200 x 1600) color monitors. They are for
physicians and clinicians for viewing radiologic images. Some
clinical workstations are mounted on mobile carts for use in OR
suites.
Compression. Lossless compression and lossy compression.
Glossary/Page 117
PACS Administrator Manual
Computed Radiography (CR). CR uses an imaging plate instead of film
to capture an image. The plate is made of a storage phosphor that
captures x-ray energy. When scanned with a laser the plate emits
light. This is captured by the plate reader in order to build up an
image from measurements made on the released energy.
Destination Folder. The Synapse folder, created by a Meditech order
or the RIS Scheduler, where the DICOM Study has been inserted
Diagnostic Workstation. These workstations have two Totoku LCD,
gray scale, 3-megapixel (1536 x 2048) monitors. They are used
by radiologists for primary interpretation.
DICOM. The standard method for transferring radiology images and
associated information between devices manufactured by various
vendors. These devices produce a variety of digital image formats.
DICOM conformance statement. A formal statement, provided by a
vendor, associated with a specific implementation of the DICOM
Standard. It specifies the service classes, information objects, and
communication protocols supported by the implementation. This
statement is usually several pages long, and specifies precisely
how any item of equipment will implement the various options
allowed within the DICOM standard.
DICOM Study. The study (with images) sent to Synapse from a
modality.
Digital Audio Tape (DAT). A magnetic tape storage device used in the
backup of large amounts of data which conforms to the DDS
standard. The cartridges can store from 2 to 20 GB of native or
uncompressed data with an archiving rate of 2 Mbps.
Digital Imaging and Communications in Medicine (DICOM). The
ACR-NEMA standard protocol adopted by all manufacturers of
equipment associated with medical imaging. The standard
provides a method of linking a series of heterogeneous modalities,
workstations and printers without the need for customized
hardware to allow them to communicate and transfer images
(http://medical.nema.org/dicom.html).
Digital Linear Tape (DLT). A magnetic tape storage device used in the
backup of large amounts of data. The tape cartridges can store
from 20 to 40 GB of data and has a transfer rate of 6 MB/sec. The
DLT system was improved to super DLT (S-DLT) which has a
maximum storage of 110 GB with a transfer rate of 11 MB/sec.
Glossary/Page 118
PACS Administrator Manual
Digitizer. A device used to scan a traditional X-ray film to create a
digital image data file. There are two types of film digitizers in
common use. Both use lasers to scan the film to create the digital
image; however one uses photo-multiplier tubes (PMT) to capture
the light whereas the other uses charged coupled device (CCD)
technology.
Dongle. A hardware device that serves as copy protection for certain
software by rendering the software inoperable when the device is
not plugged into a printer port.
Ethernet. This is the most widely used architecture in local area
networks (LAN). It is defined by the IEEE as the 802.3 standard.
Ethernet operates over various types of physical media such as
coaxial, shielded or unshielded twisted pair and fiber optics. It
normally operates at 10 or 100 Mbps but new versions can operate
at Gbit (1000 Mbps) transfer rates.
Hanging protocol. Default Display Protocol, also called reading
protocol.
Header. In DICOM a standard medical image has an associated DICOM
header containing information pertaining to the image (e.g.,
patient name or image information such as the size of the image).
The header contains the information that allows the computer to
exchange information related to the image with other devices and
perform tasks on the data.
A header is also used in networking and is attached to each unit
of data sent across the network, the size of header being
dependant on the network protocol being used. The header holds
information about the data which allows the computer to combine
all the data units after transmission to form the file sent across
the network.
Health Insurance Portability and Accountability Act (HIPAA). USA
law that came into effect in 2002. Principally the goals are the
standardization of information management and exchange in
medicine, to maintain security, improve accuracy and ensure
privacy ( http://www.hipaadvisory.com ).
Health Level 7 (HL7). An ANSI accredited standard developed to allow
transfer of data between different systems in healthcare. This
operates at the top level of the open system integration model, the
application layer ( http://www.hl7.org ).
Glossary/Page 119
PACS Administrator Manual
HealthCare Information and Management Systems Society
(HIMSS). A society which provides a forum for multidisciplinary
professionals in healthcare information services to discuss
problems and provide educational facilities for its member and
aids in the advancement of standards and initiatives such as IHE
( http://www.himss.org ).
HIIS Router Monitoring Tool (HIIS). The software component that
acts as the interface between HIS/RIS and SYNAPSE. HIIS
receives messages from HIS/RIS in an HL/7 format and maps the
information to the appropriate locations in the database.
Image and Information Processor (IIP). Both the image processing
computer and the CR operator interface.
Image depth. An image consists of an array of pixels. Every pixel in the
image will be made up of a number of bits. A common size for
imaging systems is 16 bit pixels. This is known as the image
depth, and determines the number of grayscale levels in the
image.
Integrating the Healthcare Enterprise (IHE). An initiative by HIMSS
and RSNA to establish the integration of all hospital information
and imaging systems. Its aim is to encourage manufacturers to
establish common protocols that will allow this integration to take
place.
Intermediate distribution frame. A free-standing or wall-mounted
rack for managing and interconnecting the telecommunications
cable between end user devices and a main distribution frame
(MDF). For example, an IDF might be located on each floor of a
multi-floor building routing the cabling down the walls to an MDF
on the first floor. The MDF would contain cabling that would
interconnect to the phone company or to other buildings.
Lossless compression. A data compression technique which results in
data being returned to its original form without any loss of
information when it is decompressed. The decompressed file and
the original file are identical.
Lossy compression. This is a data compression technique; which
results in data not being returned to its original form when it is
decompressed. The benefit of using this technique is that it
provides a high degree of compression, saving on storage space
and transmission time over a network.
Medical Record Number. Unique number generated by the RIS and
assigned to every patient.
Megabit. A unit of data equal to 1,048,576 (2 20 ) bits; one million bits.
Glossary/Page 120
PACS Administrator Manual
Megabyte. A unit of computer memory or data storage capacity equal
to 1,048,576 (2 20 ) bytes; one million bytes.
Modality. A generic term used to describe an imaging device such as
MRI, CT, Ultrasound, DR and CR.
Network Interface Card (NIC). A circuit board that allows a computer
to communicate on the network. There are NICs available for all
network protocols.
Petabyte. A unit of computer memory or data storage capacity equal to
1,024 terabytes (2 50 bytes). One quadrillion bytes.
Picture Archiving and Communication System (PACS). The
acquisition, archival and retrieval of digital images over a
computer network, for diagnosis and review at dedicated
workstations.
Pixel. The smallest viewable element, rectangular or square in an image
or display. The function of a workstation determines the number
of pixels required in its display.
Query/Retrieve. A DICOM service class. It supports the ability to query
a device for a list of patients, studies or series and to initiate the
transfer instances of patients, studies or series, this is the MOVE
operation.
Radiological Society of North America (RSNA). An organization
based in the USA whose purpose is to promote radiology and
related sciences through education and research, and forward
research in both clinical and basic sciences including IT to improve
and promote healthcare ( http://www.rsna.org ).
Radiology Information System (RIS). A computer system which
stores the appointment information for a radiology department
and may be linked to the HIS. A PACS may take exam booking
information and demographics from the RIS to form worklists.
Redundant Array of Inexpensive Disks (RAID). A RAID is a multi
disk system where one or more of the disks provides fault
tolerance. A RAID should be able to withstand disk failure and
have the ability to reconstruct the data from a failed disk.
Review workstation. A workstation used for checking that acquired
images are of the required quality and that all necessary views
have been performed, or a workstation used on a ward or in a
clinic to view images in conjunction with the associated clinical
report. A review workstation has one or two display monitors,
usually of lower display quality than the monitors used in
reporting workstations.
Glossary/Page 121
PACS Administrator Manual
Secure Sockets Layer. SSL (Secure Sockets Layer) provides encryption
between web browsers and web servers.
Service Class Provider (SCP). This is a DICOM term. A Service Class
Provider acts as a server and provides a service to a client or user,
where the client is a workstation or modality that requires
information from the server. An example of this is an archiving
device which acts as a service class provider (SCP) when receiving
images from a modality (which acts as a service class user (SCU)).
Service Class User (SCU). This is a DICOM term. A Service Class User
is a 'client', where a client is a workstation or modality, and hence
uses a service provided by the SCP. An example of this is a
modality (which acts as a service class user (SCU) when sending
images to an archiving device (which acts as a service class
provider (SCP)).
Society for Computer Applications in Radiology (SCAR). This a
multi-disciplinary body involved in the advancement of computer
applications and information technology in medicine. This is
achieved through educational bodies and conferences ( http://
www.scarnet.org ).
Storage Area Network (SAN). A network topology which has a series
of servers linked through a series of switches through a dedicated
network to a central storage. This allows all servers to access a
large storage and improves access times. This topology would be
most suitable in a distributed PACS, with the PACS servers at
remote locations accessing a central data store. A dedicated high
speed network, usually fiber channel connects the storage
elements (RAID, JBOD and tape), to the servers.
Structured Query Language (SQL). The high level language used to
query databases and obtain information. Storage This is defined
as the data which requires fast access, this access does not
require any robotic or manual intervention, and will be stored on
a disk system either RAID or JBOD.
Synapse Web Administrator Tool (SWAT). The SYNAPSE Web
Administration Tool (SWAT) is a web-based tool intended for use
by the PACS Administrator and Fuji service engineers. It serves to
configure, modify and maintain the SYNAPSE system.This webbased interface allows the PACS Administrator to configure all
aspects of Synapse including users, permissions, roles, and
access.
Terabyte. A unit of computer memory or data storage capacity equal to
1,024 gigabytes (240 bytes); one trillion bytes.
Glossary/Page 122
PACS Administrator Manual
Transmission Control Protocol/Internet Protocol (TCP/IP). TCP is
one of the main protocols in TCP/IP networks. Whereas the IP
protocol deals only with packets, TCP enables two hosts to
establish a connection and exchange streams of data. TCP
guarantees delivery of data and also guarantees that packets will
be delivered in the same order in which they were sent.
Ultrasound. An imaging technique that uses high-frequency sound
waves.
Uninterruptible Power Supply (UPS). A device which provides backup power in the event of failure in the primary power supply
system. If there is a power-cut or drop-out the UPS will keep the
system running for a finite period of time, allowing the primary
power supply to be repaired and/or the system to be powered-off
gracefully. This protects the equipment and the stored data.
Wide Area Network (WAN). A computer network that spans a
relatively large geographical area and typically consists of more
than one LAN.
Worklist. The list of patient studies sent from the RIS and displayed at
the appropriate acquisition modality.
Glossary/Page 123
PACS Administrator Manual
INDEX
A
abbreviations , 113
account setup
DD DICOM CD burner , 94
PACS users , 7
acronyms , 113
add modalities
to DD DICOM CD burner , 97
anomalies , 9
additional , 16
by type , 11
correction , 17
merging , 18
reallocation , 19
anomaly correction
image reallocation , 18
patient merge , 17
series reallocation , 18
study merge , 17
study reallocation , 18
C
cables
communication cable , 30
sensor cable , 29
calibrate Totoku monitor , 34
calibration
check need for , 31
connect cables , 29
equipment needed , 25
start the calibration , 34
CDC , 3
common anomalies , 11
configure
RADinfo Power PACS , 96
Rimage System Manager , 95
connect
brightness sensor cable , 29
communication cable , 30
connect calibration cables , 29
In de x/ Page 124
D
DD DICOM CD burner
add modalities , 97
carousel , 93
caution , 92
create CD , 98
create new user account , 94
dongle , 93
logon , 93
prior to installation , 90
Rimage CD burner , 89
view an image on , 98
dictionary , 117
download
new Medivisor driver , 27
F
Fuji
support escalation standards , 40
Fuji Object Oriented Database
(FOOD) , 2
G
glossary , 117
I
Image Storage Area Network , 2
inspect monitor calibration results ,
36
interface monitoring , 20
M
Medivisor
calibration kit , 25
download new driver , 27
install new driver , 28
monitor calibration
adjustment buttons , 33
adjustment patterns , 32
inspect the results , 36
log the monitor calibration , 36
PACS Administrator Manual
troubleshooting monitor
calibration , 37
Orangewood Centralized Data
Center , 3
escalate , 40
Fuji escalation standards , 40
Perot escalation standards , 40
resolve , 39
triage , 39
Synapse components , 3
P
T
O
PACS account setup , 7
physicians , 7
users with NT accounts , 8
users without NT accounts , 8
PACS Administrator
responsibilities , 4
PACS dictionary , 117
PACS glossary , 117
PACS information resources , 107
PACS resources , 107
Perot
support escalation standards , 40
R
RADinfo Power PACS
configure , 96
resources , 107
Rimage System Manager
configure , 95
RIS Broker/Interface , 9
S
study matching , 9
study matching table , 10
support , 38
assign , 39
In de x/ Page 125
Totoku monitor
adjustment buttons , 33
adjustment patterns , 32
calibration , 24
calibration equipment , 25
check for current calibration
driver , 26
check need for calibration , 31
connect communication cable , 29
connect sensor cable , 29
download calibration driver , 27
inspect the results , 36
install calibration driver , 28
log the calibration , 36
troubleshooting the calibration , 37
troubleshooting
guidelines , 42
interface problems , 21
network problems , 44
remote installations , 43
server problems , 44
Totoku monitor calibration , 37
workstations , 43
U
user accounts , 7
PACS Quick Card Order List and Examples
Title
PACS Administrator Manual
PACS Technical Analyst Manual
PACS Remote Access Setup Quick Card
Status
First draft PDF
In-progress
Approved
Source file
FrameMaker
FrameMaker
Illustrator
Updated
10/04/04
N/A
6/3/04
Approved
Illustrator
6/3/04
Approved
Illustrator
9/28/04
Approved
Illustrator
6/3/04
Approved
Illustrator
9/21/04
PACS Remote Access Setup_June3_side a
PACS Remote Access Setup_June3_side b
Physician Connect Access Quick Card
Physician Connect Access_June3_side a
Physician Connect Access_June3_side b
eFilm Lite for CD sleeves
CD sleeve_sept28
Pocket Quick Reference Card
Pocket QR card_June3_side a
Pocket QR card_June3_side b
DD DICOM CD Burner Quick Card
DD DICOM Card v1_Sept21
Notes
See separate manual
See separate manual
Print full color, sides a and b (back to
back) on white light-weight card. Fold in
half.
Print full color, sides a and b (back to
back) on white light-weight card. Fold in
half.
Print full color on backs of paper CD
sleeves with transparent window on
front.
Print 4-up, full color, sides a and b
(back to back) on white light-weight
card and cut to four.
Print double-sided, full color on white
light-weight card and cut to two.
Troubleshooting Synapse Installation Problems
1. Problem: Synapse opens partially, then freezes.
Resolution: Your user ID may not be set up properly. Contact your PACS
Administrator.
2. Problem: You type your name and password correctly in the dialogbox, but
every time you press Enter, the dialog box refreshes instead of opening
Synapse.
Resolution: Your user ID may not be set up properly. Contact your PACS
Administrator.
4. Problem: New window opens when you double-click a new folder.
Resolution:
a. From the desktop, right-click Start and select Explore.
b. On the menu bar, select Tools/Folder Options.
c. On the General tab, click Open each folder in same window.
d. Click Apply/OK and close Windows Explorer.
5. Problem: Action Cancelled message displays during installation.
Resolution: Refer to Configure Synapse Properties on page 2.
6. Problem: The logon prompt appears several times in a row when you try
to logon.
Resolution:
a. In MS Internet Explorer, select Tools/Internet Options.
b. On the Security tab, select Internet and click Custom Level.
c. Scroll down to User Authentication/Logon.
d. Select Automatic Logon only in Intranet zone.
e. Click OK twice to save the settings and exit the dialog box.
7. Problem: When trying to view an image, you receive the message,
" Your display is configured for xxx colors."
Resolution:
a. Right-click the Windows desktop and select Properties.
b. Click the Settings tab.
c. On the dropdown menu at Color quality, select Highest (32-bit)
and click Apply/OK.
8. Problem: Synapse icon does not display on the desktop.
Resolution:
a. Right-click on the Windows desktop and select Refresh.
b. If refresh does not solve problem, reboot.
c. If rebooting does not solve problem, repeat the installation.
Contact, _____________________, your PACS Administrator at
________________for help installing or using Synapse.
How to Use PACS (Synapse)
System Requirements
CPU.................................. Pentium II, min. 400 MHz
RAM................................. 256 MB minimum
Operating System....... Windows 98, ME, NT 4.0, 2000,
XP Home or XP Professional
Browser......................... Internet Explorer 6.0 or newer
Display Mode.............. 32 bit color
Modem.......................... High-speed DSL or cable*
*A dial-up modem can be used, but is not recommended.
Install Synapse
1. In the Internet Explorer address box, type the appropriate URL
listed below and press Enter to display a network logon dialog
box:
URL
Facility
https://pacs.stjoe.org
St Jude
https://pacs2.stjoe.org
All others
2. Type your Synapse user ID, password, and domain name:
a. Windows XP users, type the domain ID before the user ID,
separated by a back slash (i.e. , sjhs-nt\userID).
b. All other users, type sjhs-nt in the domain field.
3. When the Synapse Workstation page displays, click Synapse
Workstation Code Download.
4. When the Security warning message displays, check Always
trust content from FUJIFILM Medical Systems and click Yes.
5. When the message, Installation of Synapse version xxx successful
displays close Internet Explorer.
6. Right-click on the Windows desktop and select Refresh.
7. Go to Page 2 and configure Synapse properties.
1
Configure Synapse Properties
1. Right-click the Synapse icon.
2. Select Properties.
3. In Synapse Properties, on the Data Source Settings tab:
a. Type the appropriate address for your hospital:
URL
Facility
https://pacs2.stjoe.org/mhr
Mission
Queen of the Valley https://pacs2.stjoe.org/qvh
https://pacs2.stjoe.org/srm
Santa Rosa
https://pacs.stjoe.org
St Jude
https://pacs2.stjoe.org/sje
St. Joseph, Eureka
St. Joseph, Orange https://pacs2.stjoe.org/sjo
b. Check the following boxes:
Use encrypted communication (https) for images.
Enable pre-caching images for slow networks.
c. In AON Factor for Initial Display, select Reference for faster
downloads, or select Clinical or Diagnostic for more image
detail in the initial download. Note: The AON factor can be
changed after the images are downloaded.
4. On the Synapse View Settings and Workflow tabs, check the
desired options.
5. Click Apply/OK.
Configure Internet Explorer Properties
1. In MS Internet Explorer, select Tools/Internet Options.
2. On the Security tab, select Custom Level.
3. In the Settings box, under Active X controls and plug-ins, click
the center radio button to enable the following:
a. Download signed ActiveX controls.
b. Download unsigned ActiveX controls.
c. Initialize and script ActiveX controls not marked as safe.
4. Click OK twice to save the settings and exit the dialog box.
2
Improve Your System's Performance
Optimize Internet Explorer
In MS Internet Explorer, select Tools/Internet Options.
1. On the General tab:
a. Click Delete Cookies.
b. Click Delete Files. At prompt, click Delete all offline
content.
c. Click Clear History and set days to keep history at 1.
d. Click Settings and at Amount of disk space to use, type
a number equal to your computer's RAM.
e. Click OK.
2. On the Advanced tab, scroll down to Security and select
Empty Temporary Internet Files when browser is closed.
3. Click OK twice to save the settings and exit the dialog box.
Regularly Update MS Windows
Regularly update MS Windows with critical updates and
service packs. Go to www.microsoft.com for more
information.
Run Virus Protection Software
To keep your system free of computer viruses, please install,
regularly run, and keep current either the Norton or McAfee
anti-virus program.
Maintain Security
Your access to confidential patient information is designed with
security in mind. Connections to the Internet are processed
through a Secure Sockets Layer (SSL) with 128-bit encryption
between your web browser and the SJHS web server. To maintain
security of patient information, always log off Synapse when
finished.
3
Troubleshooting Synapse Installation Problems
1. Problem: Synapse opens partially, then freezes.
Resolution: Your user ID may not be set up properly. Contact your PACS
Administrator.
2. Problem: You type your name and password correctly in the dialogbox, but
every time you press Enter, the dialog box refreshes instead of opening
Synapse.
Resolution: Your user ID may not be set up properly. Contact your PACS
Administrator.
4. Problem: New window opens when you double-click a new folder.
Resolution:
a. From the desktop, right-click Start and select Explore.
b. On the menu bar, select Tools/Folder Options.
c. On the General tab, click Open each folder in same window.
d. Click Apply/OK and close Windows Explorer.
5. Problem: Action Cancelled message displays during installation.
Resolution: Refer to Configure Synapse Properties on page 2.
6. Problem: The logon prompt appears several times in a row when you try
to logon.
Resolution:
a. In MS Internet Explorer, select Tools/Internet Options.
b. On the Security tab, select Internet and click Custom Level.
c. Scroll down to User Authentication/Logon.
d. Select Automatic Logon only in Intranet zone.
e. Click OK twice to save the settings and exit the dialog box.
7. Problem: When trying to view an image, you receive the message,
" Your display is configured for xxx colors."
Resolution:
a. Right-click the Windows desktop and select Properties.
b. Click the Settings tab.
c. On the dropdown menu at Color quality, select Highest (32-bit)
and click Apply/OK.
8. Problem: Synapse icon does not display on the desktop.
Resolution:
a. Right-click on the Windows desktop and select Refresh.
b. If refresh does not solve problem, reboot.
c. If rebooting does not solve problem, repeat the installation.
Contact, _____________________, your PACS Administrator at
________________for help installing or using Synapse.
How to Access PACS (Synapse)
through Physician Connect
-from the Internet
System Requirements
CPU.................................. Pentium II, min. 400 MHz
RAM................................. 256 MB minimum
Operating System....... Windows 98, ME, NT 4.0, 2000,
XP Home or XP Professional
Browser......................... Internet Explorer 6.0 or newer
Display Mode.............. 32 bit color
Modem.......................... High-speed DSL or cable*
*A dial-up modem can be used, but is not recommended.
To View Radiology Images within Physician Connect:
1. Locate the patient's radiology study.
2. Click See Report to open the Transcription Viewer/Editor window.
3. Click View Detail to display the Synapse logon box.
a. If Synapse is installed on the computer, completing the logon
box, as shown below, displays the radiology images.
b. If Synapse is not installed on the computer, completing the
logon box, as shown below, initiates the installation process.
Note: Installation and setup take about 5 minutes and are only
necessary the first time Synapse is accessed on a computer.
Install Synapse
1. In the login box, type your Synapse user ID and password:
a. Windows XP users, type the domain ID before the user ID,
separated by a back slash (i.e. , sjhs-nt\userID).
b. All other users, type sjhs-nt in the domain field.
2. When the Security warning message displays, check Always
trust content from FUJIFILM Medical Systems and click Yes.
3. When a black screen displays, observe the progress bar until it
reaches 100%.
4. Minimize all windows to reveal your Windows desktop.
5. Right-click the Windows desktop and select Refresh.
6. Go to Page 2 of this instruction sheet and set up Synapse Properties.
1
Configure Synapse Properties
1. Right-click the Synapse icon.
2. Select Properties.
3. In Synapse Properties, on the Data Source Settings tab:
a. Type the appropriate address for your hospital:
URL
Facility
https://pacs2.stjoe.org/mhr
Mission
Queen of the Valley https://pacs2.stjoe.org/qvh
https://pacs2.stjoe.org/srm
Santa Rosa
https://pacs.stjoe.org
St Jude
https://pacs2.stjoe.org/sje
St. Joseph, Eureka
St. Joseph, Orange https://pacs2.stjoe.org/sjo
b. Check the following boxes:
Use encrypted communication (https) for images.
Enable pre-caching images for slow networks.
c. In AON Factor for Initial Display, select Reference for faster
downloads, or select Clinical or Diagnostic for more image
detail in the initial download. Note: The AON factor can be
changed after the images are downloaded.
4. On the Synapse View Settings and Workflow tabs, check the
desired options.
5. Click Apply/OK.
6. Right-click the Synapse icon and select Log Off Synapse.
7. Maximize the Transcription Viewer/Editor window and click
View Detail to open and use Synapse.
Improve Your System's Performance
Optimize Internet Explorer
In MS Internet Explorer, select Tools/Internet Options.
1. On the General tab:
a. Click Delete Cookies.
b. Click Delete Files. At prompt, click Delete all offline
content.
c. Click Clear History and set days to keep history at 1.
d. Click Settings and at Amount of disk space to use, type
a number equal to your computer's RAM.
e. Click OK.
2. On the Advanced tab, scroll down to Security and select
Empty Temporary Internet Files when browser is closed.
3. Click OK twice to save the settings and exit the dialog box.
Regularly Update MS Windows
Regularly update MS Windows with critical updates and
service packs. Go to www.microsoft.com for more
information.
Run Virus Protection Software
To keep your system free of computer viruses, please install,
regularly run, and keep current either the Norton or McAfee
anti-virus program.
Configure Internet Explorer Properties
1. In MS Internet Explorer, select Tools/Internet Options.
2. On the Security tab, select Custom Level.
3. In the Settings box, under Active X controls and plug-ins, click
the center radio button to enable the following:
a. Download signed ActiveX controls.
b. Download unsigned ActiveX controls.
c. Initialize and script ActiveX controls not marked as safe.
4. Click OK twice to save the settings and exit the dialog box.
2
Maintain Security
Your access to confidential patient information is designed with
security in mind. Connections to the Internet are processed
through a Secure Sockets Layer (SSL) with 128-bit encryption
between your web browser and the SJHS web server. To maintain
security of patient information, always log off Synapse when
finished.
3
How to Open and Use your CD
..
.
1. Insert CD in drive. If CD does not auto-execute in 8 seconds:
Right-click Start and select Explore.
Locate and expand CD drive.
Double-click the Merge eFilm icon.
2. In the eFilm window, select one or more exams & click View.
3. To scroll, hold down the left mouse button and move it forward and backward.
4. To adjust contrast, hold down the right mouse button and move it side to side.
5. To adjust brightness hold down the right mouse button and move it
forward and backward.
6. To display another study while a study is open, click the question mark (?) .
To replace the open study, click Yes at the query.
To open the study concurrently, click No and then Yes.
7. Right-click an image to display a dropdown menu of available series.
On the dropdown, select a series.
8. To view all eFilm tools, select Toolbars/Full.
..
.
CD Sleeve_v1a
PACS (Synapse) Quick Reference Card
Log On Synapse
1. Double-click the Synapse program icon to open Synapse.
2. Double-click the word Synapse on the gray background to
expand the Synapse folder.
3. At the logon screen, type your Synapse user ID, password, and
domain name:
a. Windows XP users, type the domain ID before the user ID,
separated by a back slash (i.e. , sjhs-nt\userID).
b. All other users, type sjhs-nt in the domain field.
4. Press Enter.
Locate a Study
1. Double-click All Studies, or other desired folder.
2. Click in the address box in the Patient Name field and type
the first few letters of your patient's last name.
3. Press Enter to sort or filter by the last name you typed.
4. Click any column heading to sort it alpha-numerically.
a. Click again to sort the column in reverse.
b. Click a third time to revert to the original, unsorted, list.
5. Locate the correct study and double-click to open the exam.
6. To start over, right-click the filter row and select Clear. Then
type a new filter(s) for the sort.
7. Use the up-arrow on menu toolbar to return to the last screen.
Synapse Toolbar:
Synapse Toolbar:
PACS (Synapse) Quick Reference Card
Log On Synapse
1. Double-click the Synapse program icon to open Synapse.
2. Double-click the word Synapse on the gray background to
expand the Synapse folder.
3. At the logon screen, type your Synapse user ID, password, and
domain name:
a. Windows XP users, type the domain ID before the user ID,
separated by a back slash (i.e. , sjhs-nt\userID).
b. All other users, type sjhs-nt in the domain field.
4. Press Enter.
Locate a Study
Po
we
r
Po
we
r
Ja
ck
St
et
u
d
Sh y
ow in
S r fo
Se ho epo
rie w n rt
st
hu otes
m
bn
ail
Pa
s
g
Pr
ev e L
ay
io
ou
us
Ne pro t
xt to
pr co
ot l
oc
ol
Ja
ck
St
et
u
Sh dy
ow in
S r fo
Se ho epo
rie w n rt
st
hu otes
m
bn
ail
Pa
s
g
Pr
ev e L
ay
io
ou
us
Ne pro t
xt to
pr co
ot l
oc
ol
1. Double-click All Studies, or other desired folder.
2. Click in the address box in the Patient Name field and type
the first few letters of your patient's last name.
3. Press Enter to sort or filter by the last name you typed.
4. Click any column heading to sort it alpha-numerically.
a. Click again to sort the column in reverse.
b. Click a third time to revert to the original, unsorted, list.
5. Locate the correct study and double-click to open the exam.
6. To start over, right-click the filter row and select Clear. Then
type a new filter(s) for the sort.
7. Use the up-arrow on menu toolbar to return to the last screen.
PACS (Synapse) Quick Reference Card
Log On Synapse
1. Double-click the Synapse program icon to open Synapse.
2. Double-click the word Synapse on the gray background to
expand the Synapse folder.
3. At the logon screen, type your Synapse user ID, password, and
domain name:
a. Windows XP users, type the domain ID before the user ID,
separated by a back slash (i.e. , sjhs-nt\userID).
b. All other users, type sjhs-nt in the domain field.
4. Press Enter.
Locate a Study
Synapse Toolbar:
Synapse Toolbar:
Po
we
r
Po
we
r
Ja
ck
St
et
u
Sh dy
ow in
S r fo
Se ho epo
rie w n rt
st
hu otes
m
bn
ail
Pa
s
g
Pr
ev e L
ay
io
ou
us
Ne pro t
xt to
pr co
ot l
oc
ol
1. Double-click All Studies, or other desired folder.
2. Click in the address box in the Patient Name field and type
the first few letters of your patient's last name.
3. Press Enter to sort or filter by the last name you typed.
4. Click any column heading to sort it alpha-numerically.
a. Click again to sort the column in reverse.
b. Click a third time to revert to the original, unsorted, list.
5. Locate the correct study and double-click to open the exam.
6. To start over, right-click the filter row and select Clear. Then
type a new filter(s) for the sort.
7. Use the up-arrow on menu toolbar to return to the last screen.
Navigate/Manipulate Synapse
1. Click an image and use the mouse wheel to move through the
slices in a series.
2. Use the right arrow on the Synapse toolbar to go to the next
series when there are additional series available.
3. Click and right-click the image to display a context toolbar with
image manipulation tools.
4. To use the window level, zoom, and pan tools: Select the tool
with your left mouse button and keep the mouse button down
while moving the tool on top of the image.
5. To toggle between tools: With the window level, zoom, or pan
tool active (left mouse key is down), right-click the mouse.
6. Hold down the letter O and left-click mouse to display a 2 cm.
square magnifier. Release O and move the magnifier around.
7. Press F11 to toggle between full-screen theatre mode and the
standard MS Windows display mode.
Use the Power Jacket to Review Data
1. Click the Power Jacket icon to view patient data, such as other
studies available, specific information on a study, reports, notes,
and attachments to the study.
2. Click and drag one corner or side of the Power Jacket to resize it.
3. If the Power Jacket is minimized, click the Restore Up button to
Restore Up
maximize it.
Log Off
To maintain security of patient information, right-click Synapse
icon and select Log Off Synapse, when finished.
Contact, _____________________, your PACS Administrator at
To maintain security of patient information, right-click Synapse
icon and select Log Off Synapse, when finished.
Contact, _____________________, your PACS Administrator at
________________for help installing or using Synapse.
________________for help installing or using Synapse.
Navigate/Manipulate Synapse
1. Click an image and use the mouse wheel to move through the
slices in a series.
2. Use the right arrow on the Synapse toolbar to go to the next
series when there are additional series available.
3. Click and right-click the image to display a context toolbar with
image manipulation tools.
4. To use the window level, zoom, and pan tools: Select the tool
with your left mouse button and keep the mouse button down
while moving the tool on top of the image.
5. To toggle between tools: With the window level, zoom, or pan
tool active (left mouse key is down), right-click the mouse.
6. Hold down the letter O and left-click mouse to display a 2 cm.
square magnifier. Release O and move the magnifier around.
7. Press F11 to toggle between full-screen theatre mode and the
standard MS Windows display mode.
Use the Power Jacket to Review Data
1. Click the Power Jacket icon to view patient data, such as other
studies available, specific information on a study, reports, notes,
and attachments to the study.
2. Click and drag one corner or side of the Power Jacket to resize it.
3. If the Power Jacket is minimized, click the Restore Up button to
Restore Up
maximize it.
Log Off
To maintain security of patient information, right-click Synapse
icon and select Log Off Synapse, when finished.
Contact, _____________________, your PACS Administrator at
To maintain security of patient information, right-click Synapse
icon and select Log Off Synapse, when finished.
Contact, _____________________, your PACS Administrator at
________________for help installing or using Synapse.
________________for help installing or using Synapse.
View an Image
In RADinfo PowerPACS:
1. In the DICOM Image List window:
a. Click the plus (+) sign at Local Storage to display the patient.
b. Click the plus (+) sign at patient name to display the study.
c. Click the plus (+) sign at the study folder to display the series.
2. Right-click a series and select Display series.
Import or Send from a Guest CD
1.
2.
3.
4.
5.
6.
7.
8.
9.
Insert the CD into the Dell PC.
If the CD auto-executes, close the program.
In RADinfo PowerPACS, select File/Import DICOM Images.
In the Open dialog box, select the folder with DICOM in the name.
Folder names vary, based on what program was used to create
the original CD.
Click Open to display the Import Images window.
In the Import Images window, select the images to transfer.
Click one of the following:
Import – to import selection only.
Import All – to import everything on the CD.
Send – to send to any modality capable of receiving DICOM
information (including Synapse).
If sending: select the Destination DICOM Node from the
dropdown menu and click Send to initiate the action.
When the CD is silent, close the Import Images window.
There is no acknowledgement from the software that the files
are transferred, until after the Import Images window is closed.
When the Import Images window is closed, the files display in
Local storage.
.
.
..
.
.
Caution!
.
..
.
Never unplug the power cable or turn the power switch off
during CD creation.
Never move or jostle the printer during CD creation.
Always remove the clear disk protectors from the top and
bottom of each stack of CDs before placing in the carousel.
Do not close RADinfo PowerPACS while jobs are waiting to print.
DD DICOM CD Burner
Create CD from Local Hard Drive
In RADinfo PowerPACS:
1. In the DICOM Image List window, right-click the patient’s name.
2. Select Cut CD for Patient.
3. Type recipient information and click OK.
Create CD from the DICOM Server
In RADinfo PowerPACS:
1. Click Query & CD.
2. On the Query DICOM Server and Create CD window, use the
Server dropdown arrow to select the DICOM server.
3. In the Patient ID box, type the AR number.
a. Type AR+two leading zeros+six-digit identification number:
e.g., AR00123456.
b. If the AR number is not available, type the patient’s name
with an asterisk as a wild card.
Type last name+comma+first initial+asterisk (no spaces):
e.g., jones,p*
4. Click Search.
5.
Checkmark individual files to burn to CD, or select All.
6. Type name of recipient.
7. Click Create CD.
8. Click Reports/Task List to check the status of the CD creation.
.
Burn a Subsequent CD
In RADinfo PowerPACS:
1. In the DICOM Image List window, select any patient whose face is
partially covered by a CD icon, denoting that a CD was burned.
2. Select Reports/Task List to open the CD Task Dialog window.
3. Click Modify.
4. Checkmark Write CD Again.
5. Type the number of copies needed and click OK.
DD DICOM Card/V1_Sept. 21, 2004