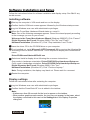
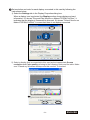
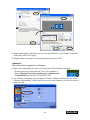
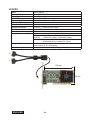
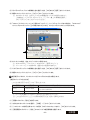
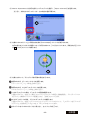
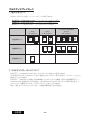
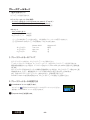
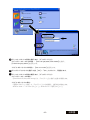
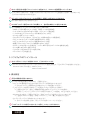
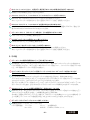
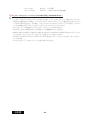
1
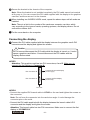
Graphics card LV32E2/LV32P4
User's Manual
グラフィックスカード LV32E2/LV32P4
取扱説明書
Graphics Card LV32E2/LV32P4
User’s Manual
-1-
ENGLISH
FCC Information
FCC (U.S. Federal Communications Commission)
This equipment has been tested and found to comply with the limits for a Class A digital
device, pursuant to part 15 of the FCC Rules. These limits are designed to provide
reasonable protection against harmful interference in a residential installation. This
equipment generates, uses, and can radiate radio frequency energy, and if not installed
and used in accordance with the instructions, may cause harmful interference to radio
communications. However, there is no guarantee that interference will not occur in a
particular installation. If this equipment does cause unacceptable interference to radio or
television reception, which can be determined by turning the equipment off and on, the
user is encouraged to try to correct the interference by one or more of the following
measures:
- Reorient or relocate the receiving antenna.
- Increase the separation between the equipment and receiver.
- Connect the equipment into an outlet on a circuit different from that to which the
receiver is connected.
- Consult your dealer or an experienced radio/TV technician for help.
FCC Warning
To assure continued FCC compliance, the user must use a grounded power supply cord
and the provided shielded video interface cable with bonded ferrite cores. Also, any
unauthorized changes or modifications to this monitor would void the user's authority to
operate this device.
Responsible Party Located within the United States
Totoku North America, Inc.
1425 Greenway Dr., Ste. 565
Irving, TX 75038, U.S.A
Tel: (469)-442-0122
CE Certification
This device complies with the requirements of the EMC directive 89/336/
EEC "Electromagnetic Compatibility."
Warning
- When using at 240 V in United States, supply must be from center-tapped, 240 V,
single phase circuit.
- Concerning disposal of waste, please consult the dealer you have purchased this
device from.
ENGLISH
-2-
Content
Introduction............................................................................................................ 4
Package Contents ............................................................................................... 4
Hardware Requirements ...................................................................................... 4
Safety Precautions ............................................................................................... 4
Hardware Installation ............................................................................................ 5
Disconnecting power cables ................................................................................ 5
Installing the graphics card .................................................................................. 5
Connecting the display ........................................................................................ 6
Connecting the power cables .............................................................................. 7
Software Installation and Setup .......................................................................... 8
Installing software ................................................................................................ 8
Display settings .................................................................................................... 8
Multi-Display Modes ............................................................................................ 13
About multi-display modes ................................................................................. 13
Changing multi-display modes ........................................................................... 13
Grayscale Mode ................................................................................................... 15
About grayscale modes ..................................................................................... 15
Changing grayscale modes ............................................................................... 15
Q & A .................................................................................................................. 17
Prior to installation ............................................................................................. 17
Installation .......................................................................................................... 17
Uninstallation ..................................................................................................... 19
Driver setup ....................................................................................................... 19
Miscellaneous .................................................................................................... 19
Technical Specifications ..................................................................................... 21
LV32E2 .............................................................................................................. 21
LV32P4 .............................................................................................................. 22
After-Sale Service ................................................................................................ 23
Repair ................................................................................................................ 23
Driver updates ................................................................................................... 23
Disposing of the product .................................................................................... 23
* Company names and product names are brand names or registered brand names.
-3-
ENGLISH
Introduction
This manual explains how to use this graphics card along with TOTOKU LCD displays.
Package Contents
Confirm that the package contains the following items.
Graphics Card ........... 1
Driver CD ................... 1
User’s Manual ........... 1
Hardware Requirements
● PC/AT compatible computer with a processor equivalent to or higher than Intel Pentium
4 or Athlon
● For LV32E2: PCI Express x16 compatible slot
For LV32P4: 32 bit/33MHz PCI slot
● Microsoft Windows 2000, Windows XP
● System Memory: 256MG or more (Recommended: 512MB or more)
● Hard Disk Space: 20MB or more
● CD-ROM Drive
● TOTOKU LCD Display(s) (ME/CCL series)
Safety Precautions
Please take the following precautions for your safety in using this graphics card.
● Do not try to repair or alter the product. It could cause fire, an electric shock, and/or
other injuries.
● If any abnormalities are detected such as odor, sound, and overheat, turn off the power
and disconnect it immediately. Otherwise, it could cause fire and or an electric shock.
● Do not touch the product with wet hands. It could cause an electric shock.
● This product is easily damaged by static electricity. Be careful when installing, storing,
and handling.
● Do not touch the electric terminals directly.
● Keep this product away from magnetized places and objects.
● Do not leave this product on the floor. If you accidentally step on it, you could get
injured or it could damage the product.
ENGLISH
-4-
Hardware Installation
Notices
Please read the following notices before installing the graphics card.
● Make sure that your operating system is installed properly.
● Uninstall all previously installed drivers and display-related software such as Pivot.
● Log in as a user with administrative privileges to install the driver.
● Remove all currently installed old graphics card.
● Make sure to disable the on-board graphic controller on the computer’s motherboard if
it is enabled. Contact the computer manufacturer on how to disable it.
● Proper operation of this graphics card is not guaranteed when used with other graphics
cards for multi-display. If an error occurs, see Q&A in this manual.
Disconnecting power cables
Disconnect power cables of the computer and other peripheral devices.
Installing the graphics card
1 Remove the cover of the computer. (See the user’s manual for your computer.)
Caution: ESD (Electrostatic Discharge) Breakdown
Static electricity could damage delicate components of the computer and the graphics
card. Discharge static electricity by touching metal parts of the computer prior to
installation. Do not touch electric parts or terminals.
2 Remove the old card or a bracket from the slot.
Caution: Burn
Internal parts may be hot if the computer has been turned on previously.
3 Install the graphics card in the appropriate slot on the computer firmly so that it does
not touch any part of the computer.
See the following table for compatibility between the card and PCI slots.
LV32E2
LV32P4
Slot Shape
AGP
PCI Express x 16
Yes
PCI Express x 1
PCI 32 bit
Yes
PCI 64bit
Yes
Caution: Ventilation
Ensure the proper airflow for cooling the graphics card: leave the adjacent slot
unoccupied, keep the computer's internal cables away from the cooling fan, or keep
things away that could get caught in the fan. (e.g., labels are easy to peel off when
heated.)
Important: If the computer is used without the fan working, it could cause a failure.
-5-
ENGLISH
4 Secure the bracket to the chassis of the computer.
Note: When the bracket is not installed completely, the DVI cable cannot be inserted
all the way in. You can connect the DVI cable supplied with the display to the graphics
card first, and then secure it to the chassis.
5 When installing two LV32E2/LV32P4 cards, repeat the above steps until all cards are
installed.
Note: There is a limit to the number of the cards one computer can take, which
vary according to the types of cards, operating systems, and display drivers. Do not
exceed the number limit.
6 Put the cover back on the computer.
Connecting the display
1 Connect the DVI cable supplied with the display between the graphics card's DVI
connector and the display and tighten the screws.
Caution
Do not connect/disconnect the DVI cable while the display is turned on. It could
cause a graphics card failure. Connect/disconnect the DVI cables with the
display disconnected.
LV32E2
Attention: This graphics card has two DVI connectors; A and B. Make sure to
connect the first display to Connector A.
Connect the second display
(on the right)
DVI Connector B
B
Connect the first display
(on the left)
DVI Connector A
A
PCI Slot
LV32P4
• Connect the supplied DVI branch cable to LFH60 on the card and tighten the screws on
the connector.
Note: Do not force the connector into the card at an angle. It could damage the
connector pins or the mold.
• Connect the DVI cable supplied with the display between the branch cable's DVI
connector and the display and tighten the screws.
Attention: This branch cable has two DVI connectors. Make sure to connect the first
display to "450MMS-2/4."
ENGLISH
-6-
DVI Branch Cable
G450MMS-2/4
LFH60 (Graphics Card)
G450MMS-1/3
DVI Connector of Display 1
Note: The branch cable has a round core where the cable . When installing two
LV32E2/LV32P4 cards, leave a slot open between two cards to save enough space for
the cores.
Core
Unoccupied slot
2 When using multiple displays, repeat step 1 until all displays are connected.
Connecting the power cables
Plug all power cables to the wall outlets, including the computer, the display(s) and other
peripheral devices.
-7-
ENGLISH
Software Installation and Setup
Follow the instructions below for software installation and display setup. See Q&A if any
trouble occurs.
Installing software
1 Start up the computer in VGA mode and turn on the display.
2 Confirm that the VGA boot screen appears followed by the Windows startup screen.
3 Log into Windows as a user with administrative privileges.
4 When the Found New Hardware Wizard starts up, cancel it.
Note: One of the following messages appears. Cancel the wizard properly according
to the message you see on your screen.
Welcome to the Found New Hardware Wizard (Windows 2000/XP): Click "Cancel."
Digital Signature Not Found (Windows 2000): Click "No" and "Finish."
Hardware Installation (Windows XP): Click "Stop Installation" and "Finish."
5 Insert the driver CD in the CD-ROM drive on your computer.
6 If not installed yet, install Microsoft .NET Framework 2.0 by running the following file
according to the on-screen instructions. This is required to display the PowerDesk-HF
menu.
DriverCD/Microsoft/dotnetfV20x86.exe
7 Select and install a display driver following the on-screen instructions.
Gray mode in landscape orientation: DriverCD/XP2K/Gray/Landscape/Setup.exe
Color mode in landscape orientation: DriverCD/XP2K/Color/Landscape/Setup.exe
Digital Signature Not Found (Windows 2000): Click "Yes."
Hardware Installation (Windows XP): Click "Continue Anyway."
Note: During installation, the display may black out. Please wait for a moment.
8 Restart the computer.
Display settings
Follow the instructions below after restarting the computer.
1 Log into Windows as a user with administrative privileges.
2 Confirm that the PowerDesk-HF icon is added in the taskbar.
Note:
• It takes more than 30 seconds for the icon to appear on the taskbar.
• When another graphics card coexists, the icon may not appear. In that case, select
the display connected to this card on the Settings tab in the Display Properties
dialog box.
ENGLISH
-8-
3 Set resolution and color for each display connected to this card by following the
instructions below.
1) Select the Settings tab in the Display Properties dialog box.
When a display icon is selected, the Display section shows display and card
information. If it shows "Plug and Play Monitor on Matrox/TOTOKU LV32xx," it
indicates that the display is connected to this card. If it shows "Default Monitor on
Matrox/TOTOKU LV32xx," it means that there is no display connected.
2) Select a display that is connected to this card and set appropriate Screen
resolution and Color quality referring to the following notes and the table. Make
sure "Extend my Windows desktop onto this monitor" is checked.
-9-
ENGLISH
Note:
• To use the display in color mode, select "True Color" in Windows 2000 or "Highest
[32 bit]" in Windows XP in the Screen resolution section using the slider.
• To use the display in grayscale mode,
In Windows 2000: select "256 Colors" in the Color quality section.
In Windows XP: click "Advanced," select the Adapter tab, and set appropriate
resolution in the List All Modes section referring to the following table.
Predetermined Resolution
Resolution
Landscape
Display
3 MP
2048 x 1536
ME315L/CCL316/CCL350i/ME351i/CCL352i2/
ME355i2
2 MP
1600 x 1200
ME201L/CCL202/ME203L/CCL212/ME213L/
CCL250i/ME251i/CCL252i2/ME253i2
3) Click "Apply."
4) If another display is connected to this card, repeat step 2.
5) Select a display that says "Default Monitor on Matrox Rad PCI" in the Display
section, and uncheck "Extend my Windows desktop onto this monitor" so that this
display icon become inactive.
6) Click "OK" to apply the all settings.
4 To set the vertical timing, there are two methods. Follow the instructions below
according to your display.
● Method 1
This method works only on the following dislays. For other displays, perform Method 2.
Resolution
Landscape
Display
3 MP
1536 x 2048
ME315L/CCL316/CCL350i/ME351i/
CCL352i2/ME355i2
2 MP
1200 x 1600
ME203L/ME213L/CCL252i2/ME253i2
Note:
• Do not apply this method in combination with card's pivot function "Orientation."
• Method 2 can be used as well.
1) Select Display Properties>Settings.
2) Select the subject display's icon, click "Advanced," and select the Monitor tab.
3) Uncheck "Hide modes that this monitor cannot display" and click "OK."
ENGLISH
- 10 -
4) Select appropriate vertical timing (see the table above) in the Display Properties
dialog box, and click "Apply."
5) Repeat steps 1 through 4 for another display and click "OK."
● Method 2
This method can be applied on all displays.
1) Open the PowerDesk-HF menu by using one of the following methods:
• Double click the PowerDesk-HF icon in the taskbar, or
• Select Display Properties>Settings(tab)>Advanced>
PowerDesk(tab) and click "Power Desk HF."
2) The "Select a category" screen appears. Select a subject card on the left, click
"Monitor Adjustments." When there is only one card installed, you do not need to
select a card.
- 11 -
ENGLISH
3) The Monitor Adjustments screen appears. Select a display on the left and click
"Adjust orientation." When there is only one display connected, you do not need to
select a display.
4) The Rotate display screen appears on the subject display. Click on an arrow, and a
confirmation message appears. Click "Yes." Click to close the screen.
5) Repeat steps 1 through 4 until all displays are set up.
5 If necessary, change grayscale modes (see "Grayscale Mode").
6 If necessary, change multi display modes (see "Multi Display Mode").
7 When in the multi-display environment, check the physical arrangement of displays:
select Display Properties>Settings(tab), click "Identify," rearrange displays by
dragging the icons if necessary, and click "Apply."
8 When in the multi-display environment, confirm your primary display: select Display
Properties>Settings(tab), select the subject display's icon, check "Use this device
as the primary monitor," and click "OK."
9 Setup is complete. Remove the driver CD from the CD-ROM drive.
ENGLISH
- 12 -
Multi-Display Modes
About multi-display modes
The following modes are available:
● Independent Mode: two displays working independently and separately
● Stretched Mode: two displays combined into one desktop
● Single Display Mode: only one display working
Mode
Independent
Mode
1 Display on
1 Card
2 Displays on
1 Card
4 Displays on 2 Cards
(LV32P4 only)
1 2
1 2
1 2 3 4
1
Stretched
Mode
Single Display
Mode
2
1
1
Independent Mode allows two displays working independently and separately, which is a
very common multi-display configuration in Windows 2000 and XP. Each Display needs
to be set up separately.
Stretched Mode is where two displays, connected to the same card and running at
the same resolution, are combined into one wide screen desktop. This configuration is
usually used in Windows NT4.0.
Note: Four displays that are connected to two cards cannot be combined into one wide
screen desktop.
Changing multi-display modes
1 Open the PowerDesk-HF menu by using one of the following methods:
• Double click the PowerDesk-HF icon in the taskbar, or
• Select Display Properties>Settings(tab)>Advanced>
PowerDesk(tab) and click "Power Desk HF."
- 13 -
ENGLISH
2 Select "Multi-Display Setup."
3 Select a multi-display mode.
Stretched Mode
: Select "2 displays, Stretched mode."
Independent Mode : Select "2 displays, Independent mode."
Single Display Mode : Select "1 display."
4 Repeat step 3 for each card and click "Yes."
Note: When switching from or to Independent Mode, the computer restarts
automatically.
5 Confirm the multi-display mode settings you have selected.
When in Stretched Mode:
1) Check the physical arrangement of the two displays (see step 7 on page 12).
2) Select Display Properties>Settings(tab) and check the display icons and
resolution.
When in Independent Mode (Independent mode):
1) Select Display Properties>Settings(tab) and check the display icons and
resolution.
2) Select PowerDesk-HF>Grayscale Settings and check the
settings for each display.
ENGLISH
- 14 -
Grayscale Mode
About grayscale modes
The following modes are available:
8 bit Grayscale (256 shades of gray)
● Static linear gray palette/Fixed linear gray palette (default)
● Static non-linear gray palette/Fixed non-linear gray palette
● Dynamic gray palette/Programmable gray palette (not recommended)
Color
● 32 bit color mode
● 16 bit color (not recommended)
● 8 bit color (not recommended)
Note:
• The modes we do not recommend do not support display of 256 shades of gray.
• See the table below for the names of color modes in your operating system.
32 bit Color
16 bit Color
8 bit Color
Windows 2000
True Color
High Color
256 Colors
Windows XP
Highest [32 bit]
Medium [16 bit]
Low [8 bit]
For color displays, use 32 bit color mode.
For monochrome displays, 8 bit grayscale modes and 32 bit color mode are available.
We recommend "Static linear gray palette/Fixed linear gray palette" if you prefer drawing
speed.
When a color display is included, we recommend 32 bit color mode if you wish to avoid
color palette-related problems. However, the drawing speed in 32 bit color mode may be
slower than when in gray palette modes.
To realize multi gradation display with the use of certain applications (viewers) or to use
DIrect3D or OpenGL, 32 bit color mode is recommended.
Changing grayscale modes
1 Select PowerDesk-HF>Grayscale Settings.
- 15 -
ENGLISH
2 Select a grayscale mode.
8 bit Grayscale Mode: Select "Use 8-bit grayscale (256 shades)" and "Fixed linear
gray palette.
32 bit Color Mode
: Select "Use color mode."
3 Repeat step 2 for each display and click "OK," and a warning message appears
asking whether or not to restart the computer. Click "Yes" to restart the computer
automatically.
4 Confirm the grayscale mode settings you have selected.
When in 8 bit Grayscale Mode, select PowerDesk-HF>Grayscale
Settings and check the settings for each display.
When in 32 bit Color Mode, select Display Properties>Settings(tab)
and check the settings for each display. If necessary, make corrections as follows.
• If you are using Windows 2000, select "True Color."
• If you are using Windows XP, select "Highest [32 bit]."
ENGLISH
- 16 -
Q&A
Prior to installation
What are the supported operating systems?
Windows 2000 and Windows XP
How many displays can this card take?
2 displays per graphics card
LV32E2: Up to 2 displays/card guaranteed
LV32P4: Up to 4 displays on 2 cards guaranteed
What are the supported TOTOKU displays?
The followings are the supported TOTOKU LCD displays.
3MP displays: ME315L, CCL316, CCL350i, ME351i, CCL352i2, ME355i2
2MP displays: ME201L, CCL202, ME203L, CCL212, ME213L, CCL250i, ME251i,
CCL252i2, ME253i2
What are the possible resolutions?
3MP x 2 screens: 1536x2048, 2048x1536
3MP x 2MP: 1536x2048, 2048x1536
2MP x 2 screens: 1200x1600, 1600x1200
(In addition, 640x480, 800x600, 1024x768 are possible.)
Is multi-display possible when multiple graphics cards are used?
Yes, however we do not guarantee proper operation of this card with any other
graphics card(s).
Which PCI slot should I insert this card to?
For LV32E2, use only PCI Express x16. For LV32P4, both 32 bit PCI and 64 bit PCI
slots are useable. Also make sure that there is enough room for the card inside the
computer.
Does this card support OpenGL?
Yes, when set to 32 bit color (and 16 bit color). However, there are some restrictions.
Please check the performance on your system. OpenGL is not supported in any 8 bit mode.
Installation
Which display driver should I use?
Use the supplied driver or the designated customized driver for TOTOKU displays. We
do not guarantee proper operation when other display drivers are used.
The VGA boot screen (POST) does not appear at startup.
Check for the followings:
● The display is not turned on, or the signal cable is not connected properly.
● The display is not connected to the right card; output is from the on-board VGA
adapter or other graphics card to which the display is not connected.
● The system BIOS is set to AGP primary or on-board VGA primary, instead of VGA boot.
● Other graphics cards including the on-board VGA are interfering.
● The display is not connected to DVI Connector A on this card.
Can I reinstall the display driver by over writing?
No. Make sure to uninstall the driver once to update the driver, add/remove cards, or
- 17 -
ENGLISH
change slots and install it again.
(Prior to driver installation) The Windows startup screen doesn't look right: pure white
or horizontal misalignment.
Restart the computer in VGA mode.
The new graphics card doesn't get detected as new hardware.
Check for the followings:
● The graphics card is not inserted all the way in the slot.
● An older version of the display driver may have been installed. If so, uninstall the
old one first and then install the latest display driver.
● Another coexisting graphics card may be interfering. Remove it.
● Even the wizard does not detect it, it may be detected as "[!] Video Controller (VGA
compatible)" in the Other devices section in the Device Manager. Install it from there.
The graphics card I installed doesn’t get recognized.
Confirm that the card is inserted all the way in the slot, and a proper graphics card
and/or a display driver is installed. If another graphics card coexists, remove it.
I can’t install the display driver when another graphics card coexists.
Remove another card once, insert this card, install and setup the display driver. Now
remove this card, insert another card in another slot, install and setup a display driver.
Put this card back into the slot where it was inserted.
The computer freezes at the Windows startup screen when restarting after the driver
is installed.
This happens when another graphics card coexists. Reinstall cards according to the
instructions above.
When I add another card after setting up this card, the computer freezes at the
Windows startup screen.
Remove this card once. Insert another card in another slot, install and set up a driver,
and put this card back into the slot where it was inserted.
The display blacks out during driver installation.
Wait for a while.
Any other measures for multi-display-related problems?
Try the followings as measures.
● Use the CMOS switch if the computer has one.
● Set the system BIOS from VGA boot to PCI primary.
● Share the same IRQ with all graphics cards.
● Install cards one by one.
● Check the card for the secondary display if it can be used for a secondary display.
● Update the computer motherboard BIOS.
● Use the latest chip set driver on the computer.
● Update the driver for another graphics card.
● Disable the on-board VGA in the system BIOS settings.
● Use a different slot.
● Remove PCI cards such as sound card.
● Change the driver version.
ENGLISH
- 18 -
Uninstallation
How can I uninstall the software for this graphics card?
Select Control Panel>Add/Remove Programs from the Start menu and delete the
following programs.
● Matrox Driver
● Matrox PowerDesk-HF
Driver setup
I can’t select the predetermined resolution.
Check the followings:
● Was the display connected when turning on the computer? Start up the computer
with the display being connected.
● Is "Hide modes that this display cannot display" unchecked? Select Display Propertie
s>Settings(tab), select the subject display's icon, click Advanced>Monitor(tab), and
uncheck "Hide modes that this display cannot display." (This has to be done for each
display.)
● For those who are using Windows XP, didn't you try to set resolution using the slider
on the Settings tab in the Display Properties dialog box? Select resolution from
Display Properties>Settings>Advanced>Adapter>List All Modes....
● Isn't the old display driver still active? Remove the old driver and reinstall the new one.
I can’t uncheck "Hide modes that this display cannot display."
Log in as a user with administrative privileges.
Can I have Portrait and Landscape displays or two different resolutions at the same
time using the two DVI outputs on this card?
Yes.
I don't get the PowerDesk-HF icon or its menu doesn't appear.
Is Microsoft .NET Framework 2.0 installed? Check to see if the display is connected to
this card on the Settings tab in the Display Properties dialog box.
Is there another way to launch PowerDesk-HF?
Double-click the Matrox PowerDesk-HF icon in the Control Panel.
Which one of the Grayscale modes (color modes) should I use?
See "Grayscale Modes."
Tell me about the Multi-Display Mode settings.
See "Multi-Display Modes."
One of two displays connected to this card doesn't work.
Confirm that it is not set to "Single Display Mode." Select Display
Properties>Settings(tab) and see if the display is connected to this card.
Miscellaneous
Grayscale images are not displayed properly.
Check the color setting. The following modes do not support 256 shades of gray: 8 bit
color, 16 bit color, and Programmable gray palette. Set it to one of the followings: 32
bit color, Fixed linear gray palette, or Fixed non-linear gray palette.
- 19 -
ENGLISH
I tried to use a 32 bit color display and an 8 bit fixed linear gray monochrome display
together, display color changes.
The following symptoms occur due to restrictions for the Windows 2000/XP system
color palette. It is not a failure.
• When the primary display is set to 32 bit color and the secondary is set to 8 bit fixed
linear gray, the active title bar on the secondary display may appear dithered.
• When the primary display is set to 8 bit fixed linear gray and the secondary display is
set to 32 bit color, the background color on the secondary display turns to gray.
In Windows XP, the gray shades behind the menu temporarily changes.
This can happen when you have a 32 bit color display (primary) along with a fixed
linear gray monochrome display. Uncheck either "Use the following transition effect
for menus and tool tips: (Fade effect)" or "Show shadows under menus" in Display
Properties>Appearance>Effects.
What is the display driver version?
Version 1.12.2.2 released in January 2007
Driver upgrade history:
Version
Release Changes
1.8.2.1
May/05
Released
1.12.2.2
Jan/07
Fixed bugs
1.13.0.158 Jun/07
Fixed a problem in /3GB switching function
What are the restrictions on display settings when calibrating displays?
● In an environment where an 8 bit color display is primary and a monochrome display
is secondary, proper calibration cannot be performed on the monochrome display.
To calibrate it properly, set the color display to 32 bit color or have the monochrome
display as the primary display.
● Displays set to 8 bit color mode cannot be calibrated.
●The Windows gamma correction function should be disabled.
● Calibration software for ME203L/ME213L/ME251i/ME253i2/ME315L/ME351i/
ME355i2 supports 32 bit color and fixed gray palette.
● Calibration software for CCL250i/CCL252i2/CCL316/CCL350i/CCL352i2 supports
32 bit color. Do not calibrate displays in 8/16 bit color mode.
ENGLISH
- 20 -
Technical Specifications
LV32E2
GPU
Video Memory
Card Type
BUS
Operating System
Video Outputs
Output Connector
Dimensions
Max. Power Consumption
Resolution
Grayscale Mode
Multi-Display Mode
Matrox MM-05
128MB DDR SDRAM
PCI Express (x16)
PCI Express x16
Windows 2000, Windows XP
2
DVI-I (x2)
112 x 167 mm (without bracket)
27W
VGA boot : 640x480, 800x600, 1024x768
ME201L/CCL202/ME203L/ME213L/CCL250i/ME251i/CCL212/
ME253i2 : 1200x1600 (60Hz), 1600x1200 (60Hz)
ME315L/CCL316/CCL350i/ME351i/CCL352i2/ME355i2
:1536x2048 (30Hz), 2048x1536 (30Hz)
Fixed linear gray palette
Color modes (8, 16, 32 bit/pixel)
Independent, Stretched, Single Display
167 mm
B
112 mm
A
- 21 -
ENGLISH
LV32P4
GPU
Video Memory
Card Type
BUS
Operating System
Video Outputs
Max. Number of Cards
Output Connector
Dimensions
Max. Power Consumption
Resolution
Grayscale Mode
Multi-Display Mode
Matrox MM-05
128MB DDR SDRAM
32 bit PCI
32 bit/33MHz PCI
Windows 2000, Windows XP
2
2
LFH60 (x1, LFH60 Branch Cable)
65 (W) x 133 (H) mm (without bracket)
15W
VGA boot : 640x480, 800x600, 1024x768
ME201L/CCL202/ME203L/ME213L/CCL250i/ME251i/CCL212/
ME253i2 : 1200x1600 (60Hz), 1600x1200 (60Hz)
ME315L/CCL316/CCL350i/ME351i/CCL352i2/ME355i2
:1536x2048 (30Hz), 2048x1536 (30Hz)
Fixed linear gray palette
Color modes (8, 16, 32 bit/pixel)
Independent, Stretched, Single Display
2
1
133 mm
65 mm
ENGLISH
- 22 -
After-sale Service
Repair
1. Read this manual carefully and check to see if the problem solves.
2. If the problem remains, stop using the card, unplug it, and consult your dealer.
3. Do not try to repair yourself. It is very dangerous.
4. Use the original box and packing material to pack the product for shipping.
Driver upgrades
Consult your dealer.
Disposing of the product
The related laws and/or ordinance by local government may apply. Consult your dealer.
For more information, visit our Web site at:
www.totoku.com/display/
TOTOKU
Graphics Card LV32E2 & LV32P4 User's Manual
June 2007 Edition
PZZ11-1112B
Notes for the User's Manual
・ No part of this manual, whether partly or wholly, may be reproduced or copied without authorization.
・ The content of this manual is subject to change without notice.
・ Although this manual has been prepared carefully, please let us know if you find any errors,
omissions, or ambiguous explanations.
- 23 -
ENGLISH
ENGLISH
TOTOKU ELECTRIC CO., LTD.
1-3-21 Okubo, Shinjuku-ku,
Tokyo 169-8543 Japan
TEL. +81-3-5273-2005
FAX.+81-3-5273-2091
http://www.totoku.com/display/
- 24 -
グラフィックスカード LV32E2/LV32P4
取扱説明書
-1-
日本語
注意
この製品は、 情報処理装置等電波障害自主規制協議会 (VCCI) の基準に
基づくクラスA情報処理装置です。
この装置を家庭環境で使用すると電波妨害を引き起こすことがあります。
この場合には使用者が適切な対策を講ずるよう要求されることがあります。
日本語
-2-
目 次
はじめに ....................................................................................................................................................................................................................... 4
パッケージ内容 ................................................................................................................................................................................................... 4
必要システム構成 ............................................................................................................................................................................................ 4
安全にお使いいただくために .................................................................................................................................................................. 5
ハードウェアのインストールとディスプレイ接続 ............................................................................................................ 6
注意事項 ................................................................................................................................................................................................................ 6
1. 電源コードの取り外し .............................................................................................................................................................................. 6
2. グラフィックスカードの取り付け ....................................................................................................................................................... 6
3. ディスプレイの接続 ................................................................................................................................................................................... 7
4. 電源コードの接続 ....................................................................................................................................................................................... 9
ソフトウェアのインストールと表示設定 .................................................................................................................................. 9
1. ソフトウェアのインストール .................................................................................................................................................................... 9
2. 表示設定 ...................................................................................................................................................................................................... 10
マルチディスプレイモード ..................................................................................................................................................................... 14
1. 選択可能なモード .................................................................................................................................................................................. 14
2. マルチディスプレイモードについて ............................................................................................................................................ 14
3. マルチディスプレイモードの変更方法 .................................................................................................................................... 15
グレースケールモード ................................................................................................................................................................................. 16
1. 選択可能なモード .................................................................................................................................................................................. 16
2. グレースケールモードについて ..................................................................................................................................................... 16
3. グレースケールモードの変更方法 ............................................................................................................................................. 16
Q&A
18
1. 導入前 ............................................................................................................................................................................................................. 18
2. ソフトウェアのインストール ................................................................................................................................................................ 19
3. ソフトウェアのアンインストール ...................................................................................................................................................... 20
4. 表示設定 ....................................................................................................................................................................................................... 20
5. その他 .............................................................................................................................................................................................................. 21
技術仕様 ................................................................................................................................................................................................................ 23
LV32E2 グラフィックスカード .............................................................................................................................................................. 23
LV32P4 グラフィックスカード .............................................................................................................................................................. 24
保証とアフターサービス ......................................................................................................................................................................... 25
保証期間 ............................................................................................................................................................................................................. 25
修理を依頼されるときは ........................................................................................................................................................................ 25
サポートを依頼されるときは ............................................................................................................................................................... 25
ドライバのアップグレードについて ..................................................................................................................................................... 25
廃棄について .................................................................................................................................................................................................... 25
アフターサービスのお問い合わせ窓口 ....................................................................................................................................... 26
* 記載されている会社名および商品名は各社の登録商標または商標です。
-3-
日本語
はじめに
本書は、 お買い上げいただいたグラフィックスカードを弊社の液晶ディスプレイと組み合わせて、 すぐにお使いいただ
くための取扱説明書です。 グラフィックスカードの取付 ・ 接続、 ドライバのインストールおよび表示設定までを順を追
って説明します。
パッケージ内容
パッケージに下記のものがすべて含まれていることを確認してください。
グラフィックスカード ドライバ CD 取扱説明書 日本語保証書
1枚
1枚
1 冊 (本書)
1枚
必要システム構成
・ Intel Pentium 4 または AMD Athlon クラス以上のマイクロプロセッサを搭載した PC/AT 互換機
(サーバ用コンピュータには、 ご使用できない場合があります。)
・ LV32E2 の場合 : PCI Express x16 に対応したスロット
LV32P4 の場合 : 32bit/33MHz PCI スロット
・ Microsoft Windows 2000 または Windows XP
・ 256MB 以上のシステムメモリ
(推奨 : 512MB 以上)
・ 20MB 以上のハードディスク空き容量
・ CD-ROM ドライブ
・ 弊社製の液晶ディスプレイ (ME/CCL シリーズ)
日本語
-4-
安全にお使いいただくために
グラフィックスカードを安全にお使いいただくために、 下記の項目を守って正しくお使いください。
● 本製品を修理 ・ 改造しないでください。 火災 ・ 感電 ・ けがのおそれがあります。
● 異臭 ・ 異常音 ・ 過熱等の異常が発生したときは、 すぐに電源を切り、 電源プラグをコンセントから
抜いてください。 そのまま使用し続けると火災 ・ 感電の原因となります。
● 本製品を濡れた手で取り扱わないでください。 感電の原因になります。
● 静電気による破壊を防止するため、 本製品を設置 ・ 保管 ・ 運搬する場合には十分注意してください。
● 端子部分には指などで直接触れないでください。
● 本製品を磁気の強い場所、 または磁気の強いもののそばにおかないでください。
● 本製品を床などに放置しないでください。 踏みつけて壊したり、 けがの原因になります。
-5-
日本語
ハードウェアのインストールとディスプレイ接続
注意事項
新しいグラフィックスカードをインストールする前に、 以下の項目を確認してください。
● OS (Windows) が正しくインストールされていることを確認してください。
● 過去に使用していたディスプレイドライバやディスプレイ関連のソフトウェア (Pivot Software など)
は、 すべて削除しておいてください。
● ドライバをインストールする際は、 アドミニストレータとしてログオンしてください。
● 古いグラフィックスカードが実装されている場合は、 それを取り外してください。
● コンピュータのマザーボードにオンボードのグラフィックコントローラがある場合は、 それを無効
(Disable) にしてください。 その方法については、 コンピュータメーカーにお問い合わせください。
● マルチディスプレイ表示のために、 他の種類のグラフィックスカードと混在してお使いになる場合、 あらゆ
る組み合わせでの動作を保証するものではありません。 もしもインストールが正常に行えないなどの
問題が発生した場合は、 Q&A の内容を参考にしてください。
1. 電源コードの取り外し
コンピュータ本体や周辺機器の電源コードをコンセントから抜き、 電源が入っていないことを確認してください。
2. グラフィックスカードの取り付け
1
コンピュータのカバーを取り外してください。
(その方法はコンピュータの取扱説明書を参照してください。)
注意 : 静電放電破壊
静電気によりコンピュータやグラフィックスカード上のデリケートなコンポーネント類に損傷を
与える可能性があります。 コンピュータの金属部分に触れるなどして静電気を放電させてから
作業を行ってください。 電気部品や端子部分に触れないようにしてください。
2
新しくグラフィックスカードを取り付ける際は、 古いグラフィックスカードを取り外すか、 スロットから
補助ブラケットを取り外します。
注意 : やけど
直前にコンピュータを動作していた場合、 内部の部品が熱くなっていることがあります。
3
グラフィックスカードをコンピュータ内の該当するスロットに差し込み、 グラフィックスカードが
コンピュータ内の他の部品に当たらないこととスロットに完全に差し込まれていることを確認します。
本製品を取り付けできるスロットは以下のようになります。
LV32E2
LV32P4
×
×
○
×
×
×
×
○
×
○
日本語
スロット形状 (←ブラケット取付側)
AGP
PCI Express x 16
PCI Express x 1
PCI 32 bit
PCI 64 bit
-6-
注意 : 通風
グラフィックスカードの放熱をよくするために、 すぐ隣の PCI スロットを使用しないなど、 冷却の
ための通風にご留意ください。
カード上の冷却ファンにコンピュータの内部ケーブルが接触していないことと、 ファンに巻き込まれる恐れの
あるもの (熱ではがれやすいラベルなど) がファンの近くにないことを確認してください。
重要 : ファンが回らない状態で使用されますと、 故障の原因となります。
4
5
グラフィックスカードのブラケット部分をコンピュータの筐体に固定します。
注意 : 取付精度
取り付け方がよくないと、 DVI ケーブルが奥まで確実には挿入できません。 仮にグラフィックス
カードの DVI コネクタにディスプレイ付属の DVI ケーブルを接続して、 固定位置を決めるとよいです。
LV32P4 を 2 枚使用する場合は、 すべてのカードを同様に取り付けてください。
注意 : 枚数制限
1 台のコンピュータで同時に使用可能なグラフィックスカードの数は制限があります。 制限を
越えた数のグラフィックスカードを取り付けないでください。 使用可能な枚数はグラフィックス
カードの種類や OS、 ディスプレイドライバによって異なります。
注意
DVI 分岐ケーブルには大きなコアが付いているため、グラフィックスカードを 2 枚取り付ける場合は、
1 スロット空けて取り付けてください。
コアとコアがあたり、 コネクタ部にストレスが
加わるため 1 スロット空ける
6
コンピュータにカバーを取り付けます。
3. ディスプレイの接続
1
グラフィックスカードの DVI コネクタとディスプレイ間を、 ディスプレイ付属の DVI ケーブルで接続し、 ネジ止
めロックします。
注意
電源が入ったまま DVI ケーブルを抜き差しすると、 グラフィックスカード故障の原因となります。
DVI ケーブルの抜き差しは、 必ず電源コードを抜いた状態で行ってください。
-7-
日本語
(1) LV32E2 のディスプレイ接続
注意 : 2 つの DVI コネクタ
本グラフィックスカードには 2 つの DVI コネクタ (A と B) があります。
必ずコネクタ A に 1 台目のディスプレイを接続してください。
DVI コネクタ B
2 台目 (右側) のディスプレイを接続
B
DVI コネクタ A
1 台目 (左側) のディスプレイを接続
A
PCI スロット側
(2) LV32P4 のディスプレイ接続 ・ 付属の DVI 分岐ケーブルを本カードの LFH60 コネクタに接続し、 ネジ止めロックします。
注意 : コネクタ破損
DVI 分岐ケーブルと LFH60 コネクタは乱暴に斜めに挿入すると、 コネクタのピンが折れ曲がったり、
モールド部が破損する事が有りますので、 まっすぐ丁寧に接続してください。
・ DVI 分岐ケーブルの DVI コネクタとディスプレイ間を、 ディスプレイに付属の DVI ケーブルで接続し、 ネジ止め
ロックします。 注意 : 2 つのコネクタ
DVI 分岐ケーブルには 2 つの DVI コネクタがあります。 コネクタ#1 【G450MMS-2/4】 に 1 台目の
ディスプレイを接続してください。
LFH60
コネクタ
G450MMS-2/4
DVI 分岐ケーブル
G450MMS-1/3
ディスプレイ 1
DVI コネクタ
2
複数台のディスプレイを使用する場合は、 すべてのディスプレイを接続してください。
日本語
-8-
4. 電源コードの接続
コンピュータやディスプレイ、 周辺機器の電源コードを、 すべてコンセントに差し込みます。
ソフトウェアのインストールと表示設定
ご使用の OS に対応した以下の手順で、 ソフトウェアのインストールと表示設定を行ってください。 もしもトラブルが
発生した場合は、 Q&A をご参照ください。
1. ソフトウェアのインストール
1
接続したディスプレイの電源を入れ、 コンピュータを VGA モードで起動します。
2
VGA ブート画面、 続いて Windows 起動画面がディスプレイに表示されることを確認します。
3
アドミニストレータとして Windows にログオンします。
4
新しいハードウェアが検出されますが、 キャンセルします。
メッセージは以下の 3 通りありますので、 適切な方法でキャンセルしてください。
[ 新しいハードウェアの検出ウィザード ] : [ キャンセル ] をクリック (Windows 2000/XP)
[ デジタル署名が見つかりませんでした ] : [ いいえ ] → [ 完了 ] をクリック (Windows 2000)
[ ハードウェアのインストール ] : [ インストールの停止 ] → [ 完了 ] をクリック (Windows XP)
5
ドライバ CD を CD-ROM ドライブに挿入します。
6
Microsoft .NET Framework 2.0 をインストールします。 (未インストールの場合)
以下のファイルを実行し、 その後は画面の指示にしたがってください。
DriverCD/Microsoft/dotnetfV20x86.exe
注) PowerDesk-HF メニューを使用するために必要です。
7
ディスプレイドライバを選択してインストールします。
以下のファイルを実行し、 その後は画面の指示にしたがってください。
グレーパレット表示の場合
: DriverCD/XP2K/Gray/Setup.exe
カラーモードでポートレート表示の場合
: DriverCD/XP2K/Color/Setup.exe
[ デジタル署名が見つかりませんでした ] : [ はい ] をクリック (Windows 2000)
[ ハードウェアのインストール ] : [ 続行 ] をクリック (Windows XP)
注) インストール中に画面が一瞬消えることがあります。 そのままお待ちください。
8
コンピュータを再起動します。
-9-
日本語
2. 表示設定
表示設定はソフトウェアをインストールして再起動した後に行います。
1
アドミニストレータとして Windows にログオンします。
2
PowerDesk-HF アイコンがタスクバー上に表示されることを確認します。
注)
注)
3
PowerDesk-HF アイコンがタスクバー上に 表示されるまで
30 秒程度の時間がかかります
他種グラフィックスカードと混在して使用すると、 このアイコンが
表示されないことがあります。 その場合、 [ 画面のプロパティ / 設定 ]
で本カード上のディスプレイを接続すると表示されます。
各ディスプレイの解像度と色を以下の手順で設定します。
(1) [ 画面のプロパティ / 設定 ] を表示します。
[ ディスプレイ ] 欄に 「Matrox/TOTOKU LV * *」 と示されるディスプレイが本カード上のディスプレイです。
「Matrox/TOTOKU LV * *上のプラグアンドプレイディスプレイ」 は、 実際のディスプレイが接続されています。
「Matrox/TOTOKU LV * *上の ( 既定のディスプレイ )」 は、 実際のディスプレイが接続されていません。
本カード上のそれぞれのディスプレイを以下のように設定します。
注) 「Windows デスクトップをこのディスプレイ上で移動できるようにする」 のボックスに
チェックがない場合は、 このディスプレイを接続するためにチェックを入れます。
(2) 「Matrox/TOTOKU LV * *上のプラグアンドプレイディスプレイ」 というディスプレイは、 所定の解像度を選
択します。
Windows 2000 または Windows XP
[ 画面の色 : 最高 (32 ビット )] の場合 :
[ 画面のプロパティ / 設定 ] のスライダで
下表の解像度を選択します。
Windows XP [ 画面の色 : 低 (8 ビット )]
の場合 :
[ 画面のプロパティ / 設定 ] → [ 詳細設定 ]
→ [ アダプタ ] → [ モードの一覧 ] より
下表の解像度を選択します。
所定の解像度 :
画素数
縦長表示
ディスプレイ
3 メガ
1536 × 2048
ME315L/ME315L plus/CCL316/CCL350i/ME351i
CCL352i2/ME355i2
2 メガ
1200 × 1600
ME201L/CCL202/ME203L/CCL212/ME213L/CCL250i
ME251i/CCL252i2/ME253i2
日本語
- 10 -
(3) それぞれのディスプレイの解像度と色を選択した後、 [OK] または [ 適用 ] をクリックします。
(4) 確認のメッセージにしたがって、 [OK] や [ はい ] をクリックします。
注) Windows XP では、 色が 8 ビットのときの解像度をスライダでは選択できません。
[ 詳細設定 ] → [ アダプタ ] をクリックして、 [ モードの一覧 ] より解像度を選択し、
[OK] → [OK] → [ はい ] をクリックしてください。
(5) 「Matrox/TOTOKU LV * *上の ( 既定のディスプレイ )」 というディスプレイがある場合は、 「Windows デ
スクトップをこのディスプレイ上で移動できるようにする」 のチェックボックスのチェックを外します。
(6) カラーモードの場合、 色を 32 ビットカラーに設定します。
注) Windows2000 : 「True Color」、 WindowsXP : 「最高 (32 ビット )」
注) グレースケールモードで使用中は、 画面の色の変更はできません。
(7) それぞれのディスプレイの解像度と色を選択した後、 [OK] または [ 適用 ] をクリックします。
(8) 確認のメッセージにしたがって、 [OK] や [ はい ] をクリックします。
4
縦長表示にするには、 モニタによって以下のいずれかの方法で設定します。
【縦長タイミングの出力方法】
この方法で縦長表示できるモニタは下表のとおりです。
画素数
縦長表示
ディスプレイ
3 メガ
1536 × 2048
ME315L/ME315L plus/CCL316/CCL350i/ME351i
CCL352i2/ME355i2
2 メガ
1200 × 1600
ME203L/ME213L/CCL252i2/ME253i2
注 ) カードの回転機能 [Orientation] と組み合わせて使用しないで下さい。
注) この方法の代わりに [ 全モニタ対象の縦長表示方法 ] を用いる事が出来ます。
(1) [ 画面のプロパティ / 設定 ] を表示します。
(2) 対象となるモニタアイコンを選択し、 [ 詳細 ] → [ モニタ ] をクリックします。
(3) [ このモニターでは表示出来ないモードを隠す ] のボックスのチェックを外し、 [OK] をクリックします。
(4) [ 画面画面のプロパティー / 設定 ] 中のスライダで縦長解像度を選択します。
- 11 -
日本語
(5) それぞれのディスプレイごとに同様の設定を行った後、 [OK] または [ 適用 ] をクリックします。
(6) 確認メッセージに従って、 [OK] または [ はい ] をクリックします。 【全モニタ対象の縦長表示方法】
(1) 次のどちらかの方法で [PowerDesk HF] を表示します。
アイコンをダブルクリックします。
・ タスクバーの通知領域にある
・ 画面のプロパティー > 設定 > 詳細設定 > PowerDesk > [Power Desk HF] ボタンをクリックします。
(2) Select a category から表示を変えたいグラフィックスカードを選択し、[Monitor Adjustment s ] を選択します。
日本語
- 12 -
(3) Monitor Adjustments から表示を変えたいディスプレイを選択し、 [Adjust orientation] を選択します。
注) 但し、 対象となるディスプレイが 1 台の場合は選択不要です。
(4) 対象モニタのスクリーン上に回転方向を表す [Rotate diaplay] ウインドウが表示されます。
矢印の部分をクリックすると確認メッセージが現れますので、 [Yes] をクリックします。 回転方向が正しけれ
ば
[Close] でウインドウを閉じます。
(4) 対象となるカード / ディスプレイ毎に同様の設定を行います。
5
6
7
8
9
必要であれば、 グレースケールモードを変更します。
「グレースケールモード」 の章をご参照ください。
必要であれば、 マルチディスプレイモードを変更します。
「マルチディスプレイモード」 の章をご参照ください。
マルチディスプレイの場合、 ディスプレイの配置を確認します。
[ 画面のプロパティ / 設定 ] の [ 識別 ] をクリックしてディスプレイの番号と配置を確認し、 ディスプレイアイコン をドラッグして実際のディスプレイの配置と合わせ、 [ 適用 ] をクリックします。
マルチディスプレイの場合、 プライマリディスプレイを確認します。
[ 画面のプロパティ / 設定 ] でプライマリにしたいディスプレイアイコンをクリックし、 「このデバイスをプライマリデ
ィスプレイとして使用する」 にチェックをして 「OK」 ボタンをクリックします。
ドライバ CD を CD-ROM ドライブから取り出し、 セットアップは完了です。
- 13 -
日本語
マルチディスプレイモード
1. 選択可能なモード
Windows 2000/XP の場合、 以下の 3 つのモードが選択可能です。
・ 独立表示モード (Independent mode) : 2 台のディスプレイを独立して表示
・ 連結表示モード (Stretched mode) : 2 台のディスプレイを連結して表示
・ 単独表示モード (1 display mode) : 1 台目のディスプレイのみ表示
※ LV32P4 のみ対応可
1 カード
1 ディスプレイ
独立表示モード
1 2
1
2
1
連結表示モード
単独表示モード
1 カード
2 ディスプレイ
2 カード
4 ディスプレイ
1 2 3 4
1
2
1
2. マルチディスプレイモードについて
独立表示モード (Independent mode) では、 2 台のディスプレイを独立して表示できます。
これは Windows 2000 や Windows XP では一般的なマルチディスプレイ表示の方法で、 ディスプレイ 1 台ごとに
設定を行うことができます。
それ以外に、 1 枚の本カードに接続した同じ解像度の 2 台のディスプレイを連結して表示できる連結表示モード
(Stretched mode) を選択することができます。 これは Windows NT4.0 のようなスタイルで表示する方法で、 2
台のディスプレイを連結してワイドな 1 台のディスプレイとして扱うことができます。
なお、 2 枚のカードで 4 台のディスプレイを 1 つの画面に連結することはできません。
日本語
- 14 -
3. マルチディスプレイモードの変更方法
1
PowerDesk-HF メニューを表示します。
次のどちらかの方法で [PowerDesk HF] を表示します。
・ タスクバーの通知領域にある
アイコンをダブルクリックします。
・ 画面のプロパティー > 設定 > 詳細設定 > PowerDesk > [Power Desk HF] ボタンをクリックします。
2
[Multi-Display Setup] を選択します。
3
マルチディスプレイモードの設定を選択します。 (カードごとに)
連結表示モードで表示する場合 : [2 displays, Stretched mode] を選択します。
独立表示モードで表示する場合 : [2 displays, Independent mode] を選択します。
単独表示モードで表示する場合 : [1 display] を選択します。
4
[ はい ] をクリックします。
注) 独立表示モードから (に) 他のモードに (から) 変更した場合は再起動となります。
5
マルチディスプレイモードの設定を確認します。
連結表示モード (Stretched mode) の場合 :
・ 連結画面の左側のディスプレイと右側のディスプレイの配置を確認します。
・ [ 画面のプロパティ / 設定 ] で、 ディスプレイアイコンと設定解像度を確認します。
独立表示モード (Independent mode) の場合 :
・ [ 画面のプロパティ / 設定 ] で、 ディスプレイアイコンと各ディスプレイの解像度と色を確認します。
・ [PowerDesk-HF/Grayscale Settings] で、 各ディスプレイのモード設定を確認します。
- 15 -
日本語
グレースケールモード
1. 選択可能なモード
以下のモードが選択可能です。
8 ビットグレースケール (256 階調)
・ リニアグレー固定パレット (Fixed linear gray palette) (デフォルト)
・ ノンリニアグレー固定パレット (Fixed non-linear gray palette)
・ ダイナミックグレーパレット (Programmable gray palette) (非推奨)
カラーモード
・ 32 ビットカラーモード
・ 16 ビットカラーモード (非推奨)
・ 8 ビットカラーモード (非推奨)
注) 上記で非推奨のモードに設定すると、 256 階調のグレースケールは表示できません。
注) 各 Windows でのカラーモードの表現は以下のように対応します。
32 ビットカラー
16 ビットカラー
8 ビットカラー
Window 2000
True Color
High Color
256 色
Windows XP
最高
中
低
2. グレースケールモードについて
カラーディスプレイの場合は、 32 ビットカラーモードでご使用ください。
モノクロームディスプレイの場合は、 8 ビットグレースケール、 または 32 ビットカラーモードが選択可能です。
描画速度を最優先にしたい場合は、 リニアグレー固定パレット (Fixed linear gray palette) 設定でのご使用を推
奨します。
カラーディスプレイ混在時のカラーパレット問題の回避を優先したい場合は、 32 ビットカラーモード設定でのご使
用を推奨します。 ただし、 描画速度がグレーパレット設定の場合より若干遅くなることがあります。
また、 特定のアプリケーション (ビューア) と組み合わせて、 多階調表示を行ったり ,
Direct3D や Open GL を利用する場合には、 32 ビットカラーモードに設定してご使用ください。
3. グレースケールモードの変更方法
1 PowerDesk-HF メニューを表示します。
タスクバーの
字状の PowerDesk-HF アイコンをダブルクリックしてください。
数秒後に PowerDesk-HF メニューが表示されます。
2
[Grayscale Setup] を選択します。
日本語
- 16 -
3
グレースケールモードの設定を選択します。 (ディスプレイごとに)
8 ビットグレースケールにする場合 : [Use 8-bit grayscale (256 shades)] を選択し、
[Fixed linear gray palette] を選択します。
32 ビットカラーモードにする場合 : [Use color mode] を選択します。
4
ディスプレイごとにモードを選択した後、 [OK] → 「はい」 をクリックし、 再起動します。
5
グレースケールモードの設定を確認します。 (ディスプレイごとに)
8 ビットグレースケールの場合 :
・ [PowerDesk-HF/Grayscale Settings] で、 ディスプレイごとに選択した通りか確認します。
32 ビットカラーモードの場合 :
・ [ 画面のプロパティ / 設定 ] で、 ディスプレイごとに色を確認し、 違う場合は設定します。
Window 2000 : 「True Color (32 ビット )」、 Windows XP : 「最高 (32 ビット )」
- 17 -
日本語
Q&A
1. 導入前
対応する OS は何ですか?
Windows 2000/XP に対応します。
ディスプレイを何台表示できますか?
本カード 1 枚で 2 台のディスプレイが表示可能です。
LV32E2 の場合 : 1 枚のカードで 2 台のディスプレイまで保証
LV32P4 の場合 : 2 枚のカードで 4 台のディスプレイまで保証
TOTOKU のどの液晶ディスプレイと組み合わせて使用できますか?
以下の組み合わせで使用できます。
ディスプレイモデル ME315L, ME315L plus, CCL316, CCL350i, ME351i, CCL352i2, ME355i2
ME201L, CCL202, ME203L, CCL212, ME213L, CCL250i, ME251i, CCL252i2
ME253i2
どの解像度を表示できますか?
TOTOKU ディスプレイと組み合わせて、 以下の解像度を表示できます。
3 メガピクセル x 2 画面 (1536x2048 または 2048x1536) と (1536x2048 または 2048x1536)
3 メガピクセル x 2 メガピクセル (1536x2048 または 2048x1536) と (1200x1600 または 1600x1200)
2 メガピクセル x 2 画面 (1200x1600 または 1600x1200) と (1200x1600 または 1600x1200)
(上記以外に 640x480, 800x600, 1024x768 の解像度を選択可能です。)
複数枚のグラフィックスカードを混在してのマルチディスプレイ表示ができますか?
Windows 2000/XP では基本的に使用できます。
ただし、 他の種類のグラフィックスカードと混在してお使いになる場合は、 あらゆる組み合わせでの動作を保証
はしておりません。
本カードはコンピュータのどのスロットにセットできますか?
LV32E2 は PCI Express x16 スロットでのみ使用可能です。 また、 LV32P4 は 32bit PCI スロットと 64bit PCI
スロットで使用可能です。
基板サイズが物理的に入るスペースがコンピュータ内にあることをご確認ください。
OpenGL に対応しますか?
基本的には 32 ビットカラーモード (および 16 ビットカラーモード) において Open GL がサポートされています。
ただし制約がいくつかありますので、 実際のシステムで動作をご確認の上ご利用ください。
なおリニアグレー固定パレットなど 8 ビットモードにおいての Open GL はサポートされておりません。
日本語
- 18 -
2. ソフトウェアのインストール
ディスプレイドライバは、 どのドライバを使用すればよいですか?
同梱または指定の TOTOKU 液晶ディスプレイ用カスタムドライバを用いてください。
それ以外のディスプレイドライバでの動作は保証いたしかねます。
コンピュータ起動時の POST 画面 (VGA ブート画面) が表示されません。
以下のような理由が考えられますので、 ご確認ください。
・ ディスプレイの電源が入っていない、 または信号ケーブルが確実に接続されていない。
・ ディスプレイ未接続のオンボード VGA アダプタや他のグラフィックスカードから出力されている。
・ コンピュータのシステム BIOS の VGA Boot 設定が AGP 優先やオンボード VGA 優先になっている。
・ オンボード VGA を含む他のグラフィックスカードの影響を受けている。
・ 本カード上の DVI コネクタ A にディスプレイが接続されていない。
ディスプレイドライバを上書きインストールしてもよいですか?
いいえ。 ドライバの更新やカードの追加、 取り外しおよび使用しているスロットの変更を行う場合には、
必ずいったんディスプレイドライバをアンインストールした上で、 再度ドライバをインストールしてください。
ドライバインストール前の Windows 起動画面の表示が異常 (白ベタ表示や左右段差) です。
VGA モードで再起動してください。
新しいグラフィックスカードを取り付けても、 新しいハードウェアとして検出されません。
以下のような理由が考えられますので、 ご確認ください。
・ グラフィックスカードがスロットに確実に挿入されていない可能性があります。
・ ディスプレイドライバが既にインストールされていた可能性があります。 古いバージョンのドライバがインストール
されていた場合、 そのドライバをアンインストールしてから最新ディスプレイドライバをインストールしてください。
・ 混在して実装された他種グラフィックスカードの影響を受けている場合があります。 他種グラフィックスカードを
取り外してみてください。
・検出されないようでも、実際はデバイスマネージャの 「その他のデバイス」 に 「! ビデオコントローラ (VGA 互換)」
として認識されている場合があります。 そのままディスプレイドライバをインストールしてください。
ディスプレイドライバをインストールしようとしたが、 取り付けたカードが認識されません。
グラフィックスカードがスロットに確実に挿入されているか、 またグラフィックスカードやディスプレイドライバが
誤っていないかを確認してください。 また、 他種グラフィックスカードが混在実装されている場合は、 それを取り
外してみてください。
他種グラフィックスカードと混在させると、 ディスプレイドライバがうまくインストールできません。
いったん他種グラフィックスカードを取り外し、 本カード (1 ~ 2 枚) のみ取り付けてディスプレイドライバの
インストールと画面設定を行います。 次に本グラフィックスカードを取り外して、 他種グラフィックスカードのみを
取り付けてディスプレイドライバのインストールと画面設定を行った後、 本カードを元のスロットに取り付けてみてく
ださい。
ドライバをインストールし再起動したら Windows 起動画面でフリーズしてしまいます。
他種グラフィックスカードが混在実装されている場合に起こりえます。 いったん他種カードを取り外し本カードのみ
でセットアップを行い、 次に本カードを取り外して他種カードのみを取り付けてセットアップを行った後、 本カードを
元のスロットに取り付けてみてください。
- 19 -
日本語
本カード設定後に他種グラフィックスカードを追加したら、 Windows 起動画面でフリーズします。
いったん本カードを取り外し、 他種グラフィックスカードだけでインストールと設定を行った後に、 再び本カードを
元のスロットに取り付けてみてください。
ディスプレイドライバのインストール中に画面が一瞬消えて暗くなることがあります。
そのままの状態でしばらくお待ちください。
マルチディスプレイ表示でのトラブル対策として、 他に何か参考として考えられますか。
以下の事項を行うことでトラブル対策となることがあります。
・ CMOS スイッチのあるコンピュータでは、 CMOS スイッチを利用する。
・ システム BIOS で VGA Boot を PCI 優先 (プライマリ) に設定する。
・ 1 つの IRQ を全グラフィックスカードで共有するようにしてみる。
・ カードを 1 枚ずつインストールする。
・ セカンダリディスプレイ用には、 セカンダリとして使用できるカードか確認する。
・ コンピュータのマザーボードの BIOS を最新のものにしてみる。
・ コンピュータのチップセットのドライバを最新のものにしてみる。
・ 他種グラフィックスカードのドライバを最新のものにしてみる。
・ オンボード VGA が付いている場合は、 システム BIOS 等でオンボード VGA を無効化する。
・ カードを挿入するスロットを変えてみる
・ サウンドカードなど他の PCI カードを取り外す。
・ ドライバのバージョンを変える。
3. ソフトウェアのアンインストール
本カード用のソフトウェアを削除するには、 どうすればよいですか。
「コントロールパネル」の「アプリケーション(プログラム)の追加と削除」で、下記のプログラムを削除してください。
Windows 2000/XP の場合 : Matrox Driver
Matrox PowerDesk-HF
4. 表示設定
所定の解像度に設定できません。
以下のような理由が考えられますので、 ご確認ください。
・ コンピュータの電源を入れたときに所定のディスプレイが接続されていましたか?
→ 所定のディスプレイが接続された状態でコンピュータを起動してください。
・ 「このディスプレイでは表示できないモードを隠す」 のチェックが外れていますか?
→ [ 画面のプロパティ / 設定 ] で解像度が設定できないディスプレイアイコンを選択し、
[ 詳細 / モニタ ] で 「このディスプレイでは表示できないモードを隠す」 のチェックを外してください。
・ Windows XP の場合、 [ 画面のプロパティ / 設定 ] のスライダで選択しようとしていませんか?
→ [ 画面のプロパティ / 設定 / 詳細 / アダプタ / モードの一覧 ] より選択してください。
・ 古いディスプレイドライバが有効になっていませんか?
→ そのドライバを削除した後に、 新しいドライバを再インストールしてください。
「このディスプレイでは表示できないモードを隠す」 のチェックが外せません。
アドミニストレータとして Windows にログオンし、 操作してください。
日本語
- 20 -
本カードの 2 つの DVI 出力で、 縦長表示と横長表示あるいは他の解像度を混在表示できますか?
縦横表示や他の解像度と混在して表示が出来ます。
Windows 2000/XP で、 PowerDesk-HF アイコンおよびメニューが表示されません。
Microsoft .NET Framework 2.0 がインストールされているか確認してください。
本カード上のディスプレイが接続されているか [ 画面のプロパティ / 設定] を確認してください。
Windows 2000/XP で、 PowerDesk-HF を起動する他の方法はありますか?
コントロールパネルの Matrox PowerDesk-HF アイコンをダブルクリックするか、 [ 画面のプロパティ / 設定 / 詳
細 /PowerDesk] の PowerDesk-HF ボタンをクリックします。
グレースケールモード (カラーモード) の設定は、 どれを選択すればよいですか?
「グレースケールモード」 の章をご参照ください。
マルチディスプレイモードの設定について教えてください。
「マルチディスプレイモード」 の章をご参照ください。
本カード上の 2 台のディスプレイの内 1 台が表示できません。
マルチディスプレイモードが 「単独表示モード」 に設定されていないか確認してください。
本カード上のディスプレイが接続されているか [ 画面のプロパティ / 設定 ] を確認してください。
5. その他
グレースケールの階調が階調落ちなどして正常に表示されません。
色の設定が、 カラーモードの 8 ビットカラーや 16 ビットカラー、 あるいはダイナミックグレーパレットに設定されて
いないか確認してください。 32 ビットカラーあるいはリニアグレー固定パレット、 ノンリニアグレー固定パレットでな
いと、 256 階調のグレースケールが表示できません。
32 ビットカラーディスプレイと 8 ビット固定グレーパレットのモノクロームディスプレイを混在すると色が
変わってしまいます。
以下は Windows 2000/XP のシステムカラーパレットの制約で起こるもので、 異常ではありません。
プライマリディスプレイが32ビットカラーモードでセカンダリディスプレイが8ビットグレー固定パレットモードのときは、
セカンダリディスプレイ上のアクティブタイトルバーにディザがかかったりします。
逆にプライマリが8ビットグレー固定パレットモードのモノクロームディスプレイでセカンダリが32ビットカラーモードの
カラーディスプレイのときは、 セカンダリのカラーディスプレイのデスクトップ背景などの色がグレーになります。
Windows XP で、 メニューの背面の階調表示が一時的におかしくなります。
Windows XP で、 32 ビットカラーディスプレイ (プライマリ) と混在してリニアグレー固定パレットに設定したモノ
クロームディスプレイを表示した場合、 この現象が発生することがあります。
その場合、[ 画面のプロパティ / デザイン / 効果 ] の 「次のアニメーション効果をメニューとヒントに使用する (フ
ェード効果)」 や 「メニューの下に陰を表示する」 のチェックボックスのチェックを外してみてください。
ディスプレイドライバのバージョンについて教えてください。
本書改訂時のバージョンは、 Ver. 1.12.2.2 です。
ドライバ更新履歴 バージョン
リリース
Ver. 1.8.2.1
2005.05
- 21 -
主な更新内容
LV32E2, LV32P4 リリース
日本語
Ver. 1.12.2.2
Ver. 1.13.0.158
2007.01
2007.06
バグ対策
/3GB スイッチの不具合改善
ディスプレイのキャリブレーションを行うときの表示設定上の制約はありますか ?
以下の点にご注意ください。
・ モノクロームディスプレイのキャリブレーションを行うときに、 プライマリディスプレイとして他のカラーディスプレ
イを混在して使用されている場合、 プライマリディスプレイが 8 ビットカラーモードに設定されているとキャリブレ
ーションが正常に行えません。 その場合、 プライマリディスプレイを 32 ビットカラーモードにするか、 キャリブレ
ーションの対象となるモノクロームディスプレイをプライマリディスプレイにしてください。
・ 8 ビットカラーモードに設定されているモニタは、 キャリブレーションが行えません。
・ Windows 上でガンマ補正がかかっている場合は、 その機能をオフにしてください。
・ ME203L/ME213L/ME251i/ME253i2, ME315L/ME315L plus/ME351i/ME355i2 用のキャリブレーション
ソフトウェアは、 32 ビットカラーモードおよびグレー固定パレットに対応しています。
・ CCL250i/CCL252i2/CCL316/CCL350i/CCL352i2 用のキャリブレーションソフトウェアは、 32 ビットカラー
モード対応です。
8/16 ビットカラーモードでキャリブレーションを行わないでください。
日本語
- 22 -
技術仕様
LV32E2 グラフィックスカード
GPU
ビデオメモリ
カードタイプ
対応バス
対応 OS
ビデオ出力数
出力コネクタ
寸法
最大消費電力
出力解像度
Matrox MM- 05
128MB DDR SDRAM
PCI Express (x16)
PCI Express x16
Windows 2000, Windows XP
2 出力
DVI-I コネクタ x2
112(W) X 163(H) mm ブラケット除く
27W
解像度
640X480, 800X600,
1024X768
1200X1600 (60Hz),
1600X1200 (60Hz)
1536X2048 (30Hz),
2048X1536 (30Hz)
グレースケールモード
マルチディスプレイ
モード
適用
(ブート表示用)
ME201L, CCL202, ME203L, CCL205i, ME251i
CCL212, ME213L, CCL252i2, ME253i2
ME315L, ME315L plus, CCL316, CCL350i, ME351i
CCL352i2, ME355i2
リニアグレー固定パレット
カラーモード (8, 16, 32 bit/pixel)
独立表示、 連結表示、 単独表示
163mm
112mm
B
A
- 23 -
日本語
LV32P4 グラフィックスカード
GPU
ビデオメモリ
カードタイプ
対応バス
対応 OS
ビデオ出力数
最大混在枚数
出力コネクタ
寸法
最大消費電力
出力解像度
Matrox MM- 05
128MB DDR SDRAM
32 ビット PCI
32 ビット / 33MHzPCI バス ( 3V / 5V 兼用 )
Windows 2000, Windows XP
2 出力
2枚
LFH60 コネクタ X1 (LFH60 - DVI/ DVI 分岐ケーブル)
65(W) X 133(H) mm ブラケット除く
15W
解像度
640X480, 800X600,
1024X768
1200X1600 (60Hz),
1600X1200 (60Hz)
1536X2048 (30Hz),
2048X1536 (30Hz)
グレースケールモード
マルチディスプレイ
モード
適用
(ブート表示用)
ME201L, CCL202, ME203L, CCL205i, ME251i
CCL212, ME213L, CCL252i2, ME253i2
ME315L, ME315L plus, CCL316, CCL350i, ME351i
CCL352i2, ME355i2
リニアグレー固定パレット
カラーモード (8, 16, 32 bit/pixel)
独立表示、 連結表示、 単独表示
133mm
65mm
2
1
日本語
- 24 -
保証とアフターサービス
(この内容は日本国内に限られます。)
保証期間
保証期間はお買い上げの日から 3 年間です。
修理を依頼されるときは
① 本書をよくお読みの上、 もう一度お調べください。
② それでも異常があるときは、 使用をやめて電源コードをコンセントから抜き、
TOTOKU フィールドサービスセンターにお問い合わせください。
ご自分での修理はしないでください。 大変危険です。
③ 保証期間中の修理は…
故障内容や使用状況により無料修理いたします。
④ 保証期間後の修理は…
TOTOKU フィールドサービスセンターにご相談ください。
修理によって機能が維持できる場合は、 ご要望により有料修理いたします。
⑤ 修理依頼での輸送は、 製品の梱包箱および梱包材をご使用ください。
サポートを依頼されるときは
トラブルのお問い合わせの際は、 必ず下記の情報をご連絡ください。
・ グラフィックスカード : モデル名、 使用枚数、 他のグラフィックスカードやオンボードVGAの有無
・ ディスプレイ : モデル名、 使用台数、 他のディスプレイの有無
・ コンピュータ : メーカー、 モデル名、 メモリサイズ、 CPU、 チップセットなど
・ OS : バージョン (サービスパック含む)
・ アプリケーション
: 使用アプリケーション (ビューア)
・ 画面の設定 : 使用解像度と色数 (グレースケール、 カラー)
・ トラブル内容 : トラブルの詳細と再現方法
ドライバのアップグレードについて
ドライバのアップグレードについては販売店にお問い合わせください。
廃棄について
本製品の廃棄については、 各自治体の廃棄ルールにしたがってください。 詳しくは、 各自治体に
お問い合わせください。
- 25 -
日本語
アフターサービスのお問い合わせ窓口
アフターサービスのお問い合わせは、 下記の窓口にご相談ください。
[修理に対するお問い合わせ]
TOTOKU フィールドサービスセンター
[サポートに対するお問い合わせ]
サポートデスク
〒 940-0006
〒 940-0006
新潟県長岡市東高見 1-2-1
新潟県長岡市東高見 1-2-1
東特長岡株式会社 東特長岡株式会社
TOTOKU フィールドサービスセンター TOTOKU サポートデスク
TEL. 0120-24-7911 FAX. 0258-24-6700
TEL. 0120-24-2061 FAX. 0258-24-6700
受付時間 9 : 00 ~ 12 : 00
受付時間 9 : 00 ~ 12 : 00
13 : 00 ~ 17 : 00
13 : 00 ~ 17 : 00 (土、 日、 祝祭日および東特長岡休日は除く) (土、 日、 祝祭日および東特長岡休日は除く)
[製品に関する営業窓口]
[年間保守契約に対するご相談]
〒 169-8543
各営業 窓口
東京都新宿区大久保 1-3-21
営業本部 情報機器営業部
東京特殊電線株式会社
TEL. 03-5273-2005 FAX. 03-5273-2091
営業本部 情報機器営業部
大阪支店
TEL. 03-5273-2005 FAX. 03-5273-2091
TEL. 06-6352-3541 FAX. 06-6354-0828
受付時間 9 : 00 ~ 12 : 00
名古屋支店
13 : 00 ~ 17 : 00
TEL. 052-771-1161 FAX. 052-776-0643
(土、 日、 祝祭日および弊社休日は除く)
信越支店
TEL. 0268-34-5285 FAX. 0268-34-5497
受付時間 9 : 00 ~ 12 : 00
13 : 00 ~ 17 : 00
(土、 日、 祝祭日および弊社休日は除く)
◆製品に関する詳しい内容は、 弊社インターネットホームページをご覧ください。
www.totoku.co.jp/display/
TOTOKU
グラフィックスカード LV32E2&LV32P4 取扱説明書
2007 年 6 月版
PZZ11-1112B
取扱説明書に関するご注意
・ 本書の内容の一部又は全部を無断転記することは禁止されています。
・ 本書の内容について将来予告なしに変更することがあります。
・ 本書は内容について万全を期して作成いたしましたが、 万一ご不明な点や誤り、 記載もれなどお気づきの
ことがありましたらご連絡ください。
日本語
- 26 -
Memo
- 27 -
日本語
東京特殊電線株式会社
〒 169-8543 東京都新宿区大久保 1-3-21
TEL.03-5273-2005 FAX.03-5273-2091
http://www.totoku.co.jp/display/
日本語
- 28 -
Printed in Japan (Recycled Paper)
PZZ11-1112B
LV32E2/LV32P4
070621