1
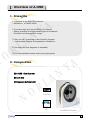
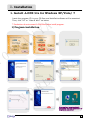
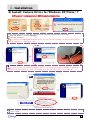
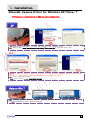
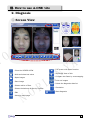
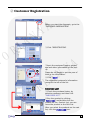
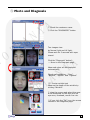
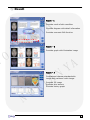
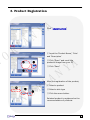
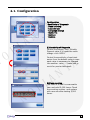
Automatic Skin Diagnosis System
A-ONE Site
USER Manual
O
N
L
R
A
Y
N
A
A
Y
N
A
L
R
O
N
NORLANYA SKIN DIAGNOSIS SYSTEM A-ONE Site
www.norlanya.com
[ Contents ]
Ⅰ. Overview of A-ONE Site
1.
2.
3.
4.
5.
Strengths
Composition
Composition of the CD
Required Specification
Specification
A
Y
N
A
Ⅱ. Installation
1. Install
2. Connection
O
N
L
R
Ⅲ. How to use of A-ONE Site
1. Precaution
2. Diagnosis
① Screen View
② Customer registration
③ Photo and Diagnosis
④ Simulation
⑤ Result
⑥ Product Recommendation
A
Y
3. Products Registration
4.
①
②
③
④
⑤
⑥
⑦
Configure
Sensitivity of Diagnosis
Flash counting
Screen Saver
Logo Change
Guideline
Back up
Restore
L
R
O
N
N
A
IV. Warranty
1. Maintenance
2. Warranty
3. Spare parts
1
Ⅰ. Overview of A-ONE
1. Strengths
A
Y
N
A
1. Adoption of the BOMTECH camera
- Resolution: 10 MEGA PIXEL
2. Provides high level visual effect; UV function
- Sebum quantity and Pigmentation can be measured
- Provides vivid and realistic image
L
R
3. Easy to use : providing a user-friendly program
– it stimulates curiosity and appeals to customers
4. Accurate full face diagnosis is available
O
N
5. Provides detailed results charts and prescription
A
Y
2. Composition
N
A
▣ A-ONE Site Scanner
L
R
O
N
▣ Lock Key
▣ Diagnosis Software CD
Lock key
CD
A-ONE Site Scanner
2
3. Composition of the CD
A
Y
N
A
▣ Program
▣ Driver
Camera driver
▣ User Manual
4. Required Specification
L
R
1.Computer‟s Requirement
-Windows XP/ Vista / 7
O
N
2. Recommended hardware requirement
-CPU: Over the Pentium (Ⅳ)
-RAM: Over the 2GB
-VGA: True color(32bit), Over the 32MB VGA memory
-HDD: Over the 10GB
-Monitor: Resolution 1024×768
3. VGA Compatibility
-3Dfx Voodoo classes
-ATI RageⅡ, Rage Pro, Radeon classes
-Matrox classes
-Nvidia Riva 128, Riva TNT, Geforce classes
-Intel i740
-S3 Virge GX/GX2, Trio 3D, Savage 3D classes
N
A
L
R
O
N
5. Specification
A
Y
1. Model name : A-ONE Site
(One-click skin diagnosis system)
2. Rated input power :
AC 100-120V, 200-240V
INTERNAL OUTPUT:DC12V (4.2A),DC 5V(10A)
3. Power consumption : 50W (Max.)
4. Weight : Scanner only 780g
5. Size : 302(W) X 369(D) X 480(H)
3
Ⅱ. Installation
1. Install: A-ONE Site for Windows XP/Vista/ 7
Insert the program CD in your CD-Rom and AutoPack software will be executed.
A
Y
N
A
Then, click "XP" or "Vista & Win7" as below.
* Production: do not connect A-ONE Site before install program.
1) Program installation
O
N
L
R
Click the ‘SET UP’
A
Y
L
R
O
N
N
A
Program icon is automatically
generated after the installation of
program is completed
4
Ⅱ. Installation
2) Install: Camera Driver for Windows XP/Vista/ 7
※ Precaution: Do not connect A-ONE Slte before install driver.
2-1
A
Y
N
A
Insert the program CD in your CD-Rom drive and Autopack software will be executed.
1. Click the “Drivers” on the install menu.
2. Click the “Camera”.
2-1. In case you already installed camera driver, you can see the message (“Bomtech USB Camera is
already installed….). Then, click “Yes”.
L
R
O
N
3-1
A
Y
3. Click the “Next”.
3-1. In case the pop-up “Before installation, eject A-One Camera from your computer” is appeared,
disconnect the USB cable of A-ONE Site scanner from the USB port of PC. Then, click “OK”.
N
A
L
R
O
N
XP
Vista or Win 7
5. Click “Continue Anyway”(XP) / “Install this driver software anyway”(Vista or Win7)
6. Click “Finish”
5
Ⅱ. Installation
2)Install: Camera Driver for Windows XP/Vista/ 7
※ Precaution: Do not connect A-ONE Site before install driver.
XP
L
R
A
Y
N
A
7-1. Connect the USB cable of A-ONE Site scanner to the USB port of PC.
8-1. Mark on the “Install the software automatically (Recommended)”. And then click “Next”.
O
N
8-1-1
A
Y
N
A
8-1-1. In case you already installed camera driver, you can see the message (“Please select the best
match ….”). Then, select “c:\windows\inf\oem21.inf” and click “next”.
9-1. Click “Continue Anyway”.
10-1. Click “Finish”.----, installation is done.
L
R
O
N
Vista or Win 7
7-2. Connect the USB cable of A-ONE Site scanner to the USB port of
PC. 8-2. Installation is done. (above messages)
6
Ⅱ. Installation
2-1) Install:
When A-ONE Site program doesn’t execute
properly after installation of the Camera driver.
XP
L
R
A
Y
N
A
1. Connect the USB cable of A-One Site to the USB port of PC.
2. Click the right button on the “MY Computer” icon. Then Choose the “Properties”.
3. Go to the “Hardware”.
O
N
A
Y
N
A
4. Go to the “Device Manager”.
5. You can see the “Other devices”, “BOMTECH Camera v1.0”.
Click the right button on the “BOMTECH Camera v1.0” and then uninstall it.
6. Disconnect the USB cable of A-One Site from the USB port of PC. Then
connect the USB cable of A-One Site to the USB port of PC again.
Install Camera driver again from the beginning.
L
R
O
N
You can see the “Universal Serial Bus controllers”,
“BomTech USB Generic Driver(3.4.4.000)”
when installation is perfectly done.
7
Ⅱ. Installation
2-1) Install:
When A-ONE Site program doesn’t execute properly
after installation of the Camera driver.
Vista or Win 7
L
R
O
N
A
Y
N
A
1. Connect the USB cable of A-One Site to the USB port of PC.
2. Click the right button on the “MY Computer” icon. Then Choose the “Properties”.
3. Go to the “Device Manager”.
A
Y
N
A
L
R
O
N
4. You can see the “Other devices”, “BOMTECH Camera v1.0”.
Click the right button on the “BOMTECH Camera v1.0” and then uninstall it.
5. Disconnect the USB cable of A-One Site from the USB port of PC. Then
connect the USB cable of A-One Site to the USB port of PC again.
Install Camera driver again from the beginning.
You can see the “Universal Serial Bus controllers”,
“BomTech USB Generic Driver(3.4.4.000)”
when installation is perfectly done.
8
Ⅱ. Installation
2-2) Uninstall: Camera Driver for Windows XP/Vista/ 7
L
R
A
Y
N
A
1. Disconnect the USB cable of A-One Site from the USB port of PC.
2. Click the “Start”.
3. Click the “Control Panel”.
O
N
A
Y
N
A
4. Click “Uninstall a program”.
5. Click “Bomtech USB Camera” and then click “Uninstall/Change”.
6. Click “Uninstall”.
L
R
O
N
6-1. When you see above message(Please disconnect A-ONE Camera from your computer….),
disconnect the USB cable of A-One Site from the USB port of PC. Then Click the “OK”.
7. Click the “Exit”.
Uninstallation is done.
9
Ⅱ. Installation
2. Connection: A-ONE and P-sensor
A
Y
N
A
1. How to Connect the E-cam, P-sensor & the lock key
O
N
L
R
USB port
USB port
A
Y
2. Each parts of the A-ONE Site
N
A
A-ONE Lite Scanner
Forehead
holder: place
your forehead
here
L
R
O
N
Chin pad: place your chin
here
12
10
Ⅲ. How to use A-ONE Site
1. Precaution
A
Y
N
A
Please be sure to read the instructions before use and follow as described.
1. Do not use it with other electronic devices.
It may cause malfunction.
2. Do not keep it in the humid place.
It may cause malfunction.
L
R
3. Do not use it on the power other than AC 100~120 or 200~240V.
It may cause fires, electric shocks or malfunction.
4. Do not put on the device nearby the containing water.
It may cause fires, electric shocks or malfunction as water flows into it.
If water does flow, stop using it immediately and make sure to inspect it.
O
N
5. Do not use it near the place with high temperature, dust or humidity
(Near the humidifier). It may cause electric shock (sparks) and malfunction.
A
Y
6. Do not repair, disassemble or alter the main body.
It may cause malfunction, fires or burns.
7. Do not touch the device or detach the power cords with wet hands.
It may cause electric shock.
N
A
8. Do not use the stripped or bent cord by force.
It may cause fires or electric shock (Be sure to replace it with another).
9. Do not try to draw the stripped or propped cord by force, or apply heat
to it (Make sure not to place a heavy object on it).
It may cause fires or electric shocks.
L
R
O
N
10. Do not use the propped cord which has cracks or scares.
It may cause scares on the skin.
11. Do not run the scanner or sensor into a hard object, or drop it.
It may cause injuries and malfunction.
12. When you don‟t use it for a long time, unplug it from the outlet.
It may cause fires.
13. Be sure to have an inspection for test. If any troubles are found, get it
repaired.
Ⅲ. How to use A-ONE Site
2. Diagnosis
A
Y
N
A
① Screen View
O
N
L
R
N
A
: Clear the SCREEN VIEW
: Hide and show test value
L
R
O
N
: Open images
: Save image
: Shows outline of face
: Shows the balance of face by contour
: Edit
A
Y
: Full screen with zoom function
: Shows 3D View of skin
: Compare two faces by overwrapping
: Print out images
: Delete the diagnosis date list
: Simulation
: Start diagnosis
: Move to result page
12
12
Ⅴ. How to use of SDM
② Customer Registration
A
Y
N
A
Before you start the diagnosis, go to the
"CUSTOMER INFORMATION"
O
N
L
R
① Click “REGISTRATION“
①
①
②
A
Y
①Input the customer's name, gender,
age and other information on the popup.
N
A
Please do not forget to put the year of
birth in the information.
L
R
O
N
② Click “SAVE“
③
The registered customer‟s information
moves to the left of the list.
PURCHASE LIST
① Check the purchase history by
selecting customer and then click
“PURCHASE LIST”
①
② Buy the product by clicking
“PURCHASE” and double-click the
product on the Product List, you can
move the product to the Cart List.
②
After you select the products on the cart
list, click the PURCHASE icon.
13
③ Photo and Diagnosis
A
Y
N
A
① Check the customer name
② Click the "DIAGNOSIS” button
O
N
L
R
①
Two images view
by Normal light and UV light.
Please wait for 3 seconds with eyes
closed.
A
Y
Click the “Diagnosis” button
--- Move to the Diagnosis page
N
A
Measured value will be displayed
automatically.
①
Check each condition - "Pore",
"Wrinkle“, "Sebum" and "Pigment”
L
R
O
N
②
*** Precise wrinkle test
Measure the depth of the wrinkle by
clicking "Wrinkle“.
①
① drag the mouse and select the area
to be measured on the face such as
eye zone, forehead, mouth line…etc
② If you click the "OK" icon, the screen
returns to the diagnosis page.
②
④ Simulation
A
Y
N
A
Click the “Simulation” button
O
N
L
R
①Remove mole or wrinkle
with Pipette.
①
②
②
-1 ~ -3
A
Y
: Predicted result of neglecting skin
0
: Present state
+1 ~ +3
: Predicted result of treatment
N
A
Visualization of skin condition
L
R
O
N
③ Red button
: Visualization
③
of hemoglobin distributions
and vascular
④ Brown button
: Visualization
of Melanin concentrations
and hyper-pigmentation
④
⑤ Result
A
Y
N
A
Result -1
Provides result of skin condition
Provides diagram with detail information
Provides comment Edit function
O
N
L
R
Result - 2
Provides graph with illustration image
N
A
A
Y
Result – 3
L
R
O
N
Comparison between standard skin
image and customer‟s skin image
Provides 3D image
Provides skin texture
Provides history graph
⑥-a. Product Recommendation
A
Y
N
A
Click the “Product” button to
recommend suitable cosmetics
L
R
O
N
① Recommendable products are
shown on the Products list.
② Select one in the ' Skin Type"
category then, the registered
products are displayed automatically.
A
Y
③ Choose products among
recommend items.
N
A
④then, click
⑤ If you want to select all the
products, you can use the "Select
ALL" function.
①
L
R
O
N
⑥ You can select the products on the
list and click the "Purchase" button.
②
⑤
④
③
⑥
17
⑥-b. Product Recommendation
A
Y
N
A
Click the 'check account' button.
O
N
L
R
(On this page, you can find the
customer‟s purchase history and print
out the cart page.)
A
Y
Quantity, Unit price and Total amount
N
A
L
R
O
N
Click 'Purchase', double-click the 'Yes'
button to finalize your purchase.
(The purchase record is saved in the
customers information.)
18
3. Product Registration
A
Y
N
A
Click “REGISTRATION”
L
R
O
N
①
① Input the „Product Name‟, 'Price'
and 'Description‟
②
A
Y
② Click “Open” and recall the
product‟s image from your PC
③ Click "Save“
N
A
③
L
R
O
N
After the registration of the product,
①
① Select a product
②
③
② Select a skin type
③ Click the arrow button.
Selected product is registered on the
recommendation of products.
12
19
4-1. Configuration
A
Y
N
A
Configuration
-Sensitivity of Diagnosis
- Flash counting
- Logo change
- Language change
- Guide line
- Back up
- Restore
O
N
L
R
① Sensitivity of Diagnosis
Control the Sebum, Pore, Wrinkle,
Pigment value if it needs the value
change -click „APPLY‟
A
Y
Control the sensitivity of each test
sector from the default value in case
each value is necessary to changed
into another value --- make less or
much for precise test result.
L
R
O
N
N
A
② Flash counting
The flash of A-ONE is consumable
item and valid 5,000 times. Check
the counting number and replace
with new one after testing 5,000
times.
12
20
4-2. Configuration
A
Y
N
A
③ Screen Saver
Mark the screen saver on,
Set the waiting time,
Bring the images from your pc and add it
on the list. Then click "Apply“
O
N
L
R
(you can display the commercial,
training, new products, news… etc on
the screen saver)
④ Logo Change
Add your log on the program.
Mark on the „LOGO ON‟,
click „OPEN‟ and bring your logo image
from your PC. Then click "Apply“
L
R
O
N
N
A
A
Y
⑤ Guideline
If you need assistance using the
program properly, mark the GUIDELINE
tap on.
Then the tool tip will pop up whenever
you put the mouse on each button
4-3. Configuration
Save the database of A-ONE program into other position of the PC directly. It
automatically backs the file up.
A
Y
N
A
BACK UP
Click the “BACKUP” on the Configuration
menu.
L
R
①
O
N
When the backup window pops up,
① Click the “Path”
N
A
②
L
R
O
N
③ Click the “OK”
③
④
A
Y
② Click the folder to back up
④ Check the path again
⑤ Click the “BACKUP START”.
⑤
4-5. Configuration
In case of installation of A-ONE program into another PC, move the database to another PC.
In case of recover the A-ONE program, move the back-up database directly.
A
Y
N
A
RESTORE
Click the “RESTORE” on the Configuration
menu.
L
R
①
O
N
When the restore window pops up,
① Click the “Path”
A
Y
② Select the folder to back up.
N
A
②-1. Select the date(when you backed up)
backup folder that you want to restore
②
②-2. Select the time(when you backed up)
backup folder that you want to restore
L
R
O
N
②-3. Click the “Data” folder
③
④
③ Click the “OK”
④ Check whether the path is correct or not.
⑤ Click the “RESTORE START”.
⑤
IV. Warranty
1. Maintenance
A
Y
N
A
1. General maintenance
- Keep it with its power off. Wipe its surface out with a dry cloth.
- Keep it away from direct sunlight or high temperature and humidity.
- Do not repair, disassemble or alter of the device to non-professional staff.
2. Routine inspection
- Make sure to inspect the device and adapter before use.
- When you use the device which has not been used for a long time, make
sure to check if it works properly with safety.
L
R
2. Warranty
O
N
1. We guarantee the products as follows.
2. For troubles of the products in use, contact __________________.
3. We provide the after-sales service within 7days from the receipt of an application
form.
4. We provide each spare parts for maintenance and keep the stock for 2 years more
after stopping of the production
5. We offer free repairing service to our products within 12 months (warranty period)
from the date they are purchased, except the consumable parts. In case the
product has damages or natural troubles, we offer free repairing service or replacement
6. If they are included in the following problems, you have to pay for the repair even
during warranty period.
- Troubles due to a user‟s careless treatment, voluntary repair or alteration
- Troubles due to the repairs by a man other than the technician from a dealer shop
or the customer center appointed by manufacturer
- Troubles or damages due to shocks while in movement
- Troubles due to the accessories or options not appointed by manufacturer
- Troubles due to other natural disasters (fires, salt or water, etc.)
7. This warranty card is limited to apply in the domestic area. Keep it with its
instructions.
N
A
L
R
O
N
Model Name
Delivered by
A
Y
A-ONE Site
Serial No.
Signature
Place:
Date:
O
N
L
R
A
Y
N
A
Norlanya Technology Co., Limited
GUANGZHOU OFFICE:
ADD: NO.7 SHILUNLI STREET, SHICHA RD.,
HAIZHU, GUANGZHOU
TEL: 0086-20-34445162
FAX: 0086-20-34445162
CELL: 0086-18620219141
SKYPE: jane_2602080
WWW.NORLANYA.COM
L
R
O
N
N
A
A
Y