1
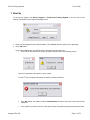
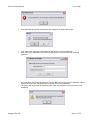
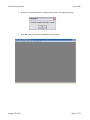
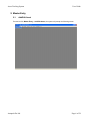
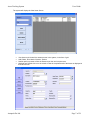
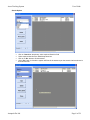
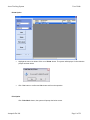
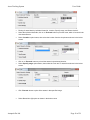
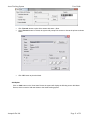
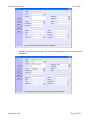
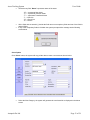
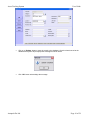
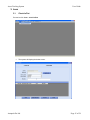
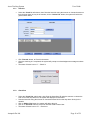
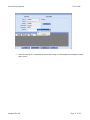
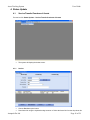
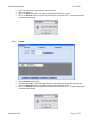
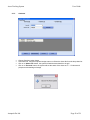
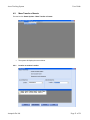
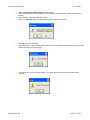
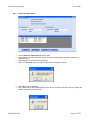
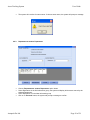
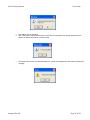
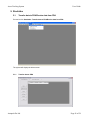
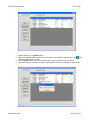
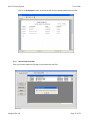
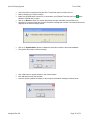
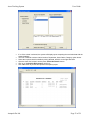
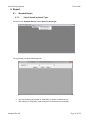
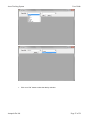
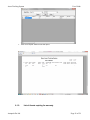
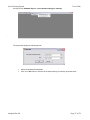
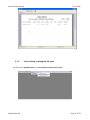
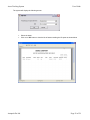
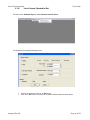
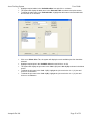
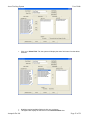
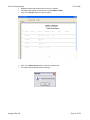
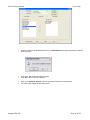
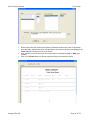
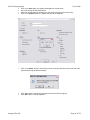
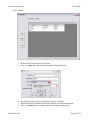
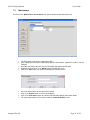
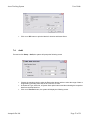
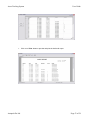
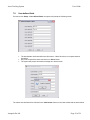
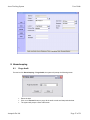
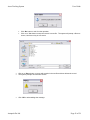
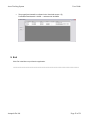
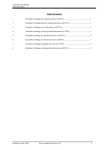
Asset Tracking System User Guide ASSET TRACKING SYSTEM AUTOPACK PTE LTD Tel No: 62882112 Fax: 62883113 Autopack Pte Ltd Page 1 of 58 Asset Tracking System User Guide ASSET TRACKING SYSTEM .......................................................................................................................................... 1 AUTOPACK PTE LTD ..................................................................................................................................................................... 1 1. START UP .......................................................................................................................................................................... 3 2. MASTER ENTRY............................................................................................................................................................... 6 2.1. ADD/EDIT ASSET ............................................................................................................................................................. 6 3. LOAN................................................................................................................................................................................. 15 3.1. CHECK IN/OUT ............................................................................................................................................................... 15 4. STATUS UPDATE........................................................................................................................................................... 18 4.1. SERVICE/TRANSFER/CONDEMN OF ASSETS ...................................................................................................... 18 4.2. MASS TRANSFER OF ASSETS .................................................................................................................................. 21 5. STOCKTAKE ................................................................................................................................................................... 26 5.1. TRANSFER DATA TO PDA/RECEIVE DATA FROM PDA ..................................................................................... 26 5.2. PRINT DISCREPANCY .................................................................................................................................................. 31 5.3. PURGE STOCKTAKE DATA ........................................................................................................................................ 33 6. REPORT ........................................................................................................................................................................... 34 6.1. STANDARD REPORT .................................................................................................................................................... 34 6.1.1. LIST OF ASSETS BY ASSET TYPE ...................................................................................................................... 34 6.1.2. LIST OF ASSETS EXPIRING FOR WARRANTY ................................................................................................. 36 6.1.3. LIST OF ASSETS REACHING THE LIFE SPAN .................................................................................................. 38 6.1.4. LIST OF ASSETS CHECKED IN/OUT.................................................................................................................... 40 6.2. CUSTOMIZED REPORT ................................................................................................................................................ 41 7. SETUP............................................................................................................................................................................... 47 7.1. SECURITY ........................................................................................................................................................................ 47 7.2. LOGIN SETUP ................................................................................................................................................................. 50 7.3. MAINTENANCE .............................................................................................................................................................. 51 7.4. AUDIT ................................................................................................................................................................................ 52 7.5. USER-DEFINED FIELDS ............................................................................................................................................... 54 8. HOUSEKEEPING ............................................................................................................................................................ 55 8.1. PURGE AUDIT ................................................................................................................................................................ 55 8.2. PURGE ASSET ............................................................................................................................................................... 57 Autopack Pte Ltd Page 2 of 58 Asset Tracking System User Guide 1. Start Up To start up the system, click Start-> Program -> Fixed Asset Tracking System or click the icon on the desktop. The System will prompt the following screen Enter your pre-assigned User id and password. Click ‘Cancel’ button to quit from the application. Click ‘OK’ button. Upon clicking ‘OK’ button, the different Error, Informative screens that occur. If the user id and password is invalid, the system will prompt you the following screen: Note: No of attempts to the system is set to 3 trials. th For the 4 trial, the system will prompt an Intruder Locked Out Screen. Click ‘OK’ button, the system will show ‘Authentication’ Screen to key-in the correct User ID and Password. If the system is not been active for more than 30 days, the system will prompt an Inactivity Check. Autopack Pte Ltd Page 3 of 58 Asset Tracking System User Guide If the password has expired (exceed more than 90 days), the system will prompt: Click ‘Yes’ button to change the password or ‘No’ button to quit the application. Upon click on the ‘OK’ button, the system will prompt you to enter the new and confirmed password: Key-in the New and Confirmed password. Click on ‘OK’ button to save the new password and the system will check if the new password is not similar to last 3 old passwords. The system will only prompt the following screen if the new password is same as the last 3 old passwords. Autopack Pte Ltd Page 4 of 58 Asset Tracking System User Guide However, if the new password is accepted by the system, the system will prompt. Click ‘Ok’ button to access to the Main Menu of the system. Autopack Pte Ltd Page 5 of 58 Asset Tracking System User Guide 2. Master Entry 2.1. Add/Edit Asset Proceed to click Master Entry – Add/Edit Asset; the system will prompt the following screen. Autopack Pte Ltd Page 6 of 58 Asset Tracking System User Guide The system will display the View Asset Screen. View Asset could view all the assets present in the system, in the form of grid. Add, Delete, Print labels of Assets - options Search option is present to filter the assets as per the user’s requirement. Highlight and Double-click on to the record to view the complete detail of the Asset as displayed in the below screen. Autopack Pte Ltd Page 7 of 58 Asset Tracking System User Guide Search Option Click on ‘Search in’ drop-down, select required Search-in field Select required data from the ‘Find’ drop-down box. Click on to ‘Go’ button to find the assets. Once ‘Go’ button is clicked the system will filter all the assets as per the search criteria as shown in the below screen. Autopack Pte Ltd Page 8 of 58 Asset Tracking System User Guide Delete Option Highlight the row to be deleted. Click on to ‘Delete’ button. The system will display a Confirm deletion prompt as shown below. Click ‘Yes’ button to confirm and ‘No’ button exit from the operation. Print Option Click ‘Print labels’ button, the system will prompt the below screen. Autopack Pte Ltd Page 9 of 58 Asset Tracking System User Guide Printing of asset labels by Individual Asset No, Location, Specify range, and Status criteria’s. Select the Individual Asset No; click on to ‘Proceed’ button to print the asset, which is focused in the View Asset Screen. Select ‘Location’ option button, then select the location from the drop-down as shown in the below screen. Click on to ‘Proceed’ button to print all the assets in the selected location. Select ‘Specify range’ option button, then select the From and To asset No as shown in the below screen. Click ‘Proceed’ button to print all the assets in that specified range. Select Status-New (N) option as shown in the below screen Autopack Pte Ltd Page 10 of 58 Asset Tracking System User Guide Click ‘Proceed’ button to print all the assets with status = New. Once ‘Proceed’ button is clicked, the system will prompt Print screen to choose the printer as shown below. Click ‘OK’ button to print the labels. Add Option Click on ‘Add’ button on the View Asset Screen the system will display the following screen Add Asset Screen, which is used to Add new Assets to the Asset tracking system. Autopack Pte Ltd Page 11 of 58 Asset Tracking System User Guide Select the Category from the drop-down box; the Asset tracking system will generate the Asset No automatically Autopack Pte Ltd Page 12 of 58 Asset Tracking System User Guide The data entry field “Status” represents status of the asset. “N”---- represents New Asset. “C”---- represents condemn Asset. “T”---- represents Transferred Asset “I” ----Check-In “O” ---Check Out “S”--- Service All the fields with an asterisk (*) beside the field name are compulsory fields and rest of the fields is optional fields. If any of the compulsory fields is felt blank the system prompts with a message as the following screen below. Clone Option Click ‘Clone’ button, the system will copy all the data to create a new asset as shown below. Select the New Category, the system will generate the new Asset No as displayed in the below screen Autopack Pte Ltd Page 13 of 58 Asset Tracking System User Guide Click on to ‘Update’ button to save the record to the database. Once the data is saved to the database the system will prompt Update message as shown below. Click ‘OK’ button acknowledge the message. Autopack Pte Ltd Page 14 of 58 Asset Tracking System User Guide 3. Loan 3.1. Check In/Out Proceed to click Loan – check In/Out The system will display the below screen. Autopack Pte Ltd Page 15 of 58 Asset Tracking System 3.1.1. User Guide Check-In Select the ‘Check In’ radio button, then Scan the Asset No using the scanner or choose the asset no from the drop-down list, key-in the remarks, click to ‘Add to List’ button, the system will add to the grid as shown below. Click ‘Proceed’ button, to Check-in the assets Once the checking in is completed, the system will prompt an acknowledgement message as shown below. The status of Asset is set to “I” – Check-in 3.1.2. Check-Out Select the ‘Check Out’ radio button, then Scan the Asset User ID using the scanner or choose the Loan to from the drop-down list, the system will display the User Name. Scan the Asset No using the scanner or choose the Asset No from the drop-down list key-in the remarks Click to ‘Add to List’ button, the system will add to the grid. Click on to ‘Proceed’ button to check out/ loan the asset to Asset User. The status of Asset is set to “O” – Check-out Autopack Pte Ltd Page 16 of 58 Asset Tracking System User Guide Once the checking in is completed, the system will prompt an acknowledgement message as shown above screen. Autopack Pte Ltd Page 17 of 58 Asset Tracking System User Guide 4. Status Update 4.1. Service/Transfer/Condemn of Assets Proceed to click Status Update – Service/Transfer/Condemn of Assets 4.1.1. The system will display the below screen. Service Choose ‘Service’ option button Scan Asset No using the keyboard wedge scanner or Select the Asset No from the drop-down list. Autopack Pte Ltd Page 18 of 58 Asset Tracking System 4.1.2. User Guide Key-in the Service Cost, Select Vendor code from the list. Key-in the remarks. Click on to ‘Add to list’ button, the system will add the asset details to the grid Click on to ‘Proceed’ button, the system will set the status of the Asset as “S” – service and prompts an acknowledge message Transfer Choose ‘Transfer’ option button Scan Asset No using the keyboard wedge scanner or Select the Asset No from the drop-down list. Click on to ‘Add to list’ button, the system will add the asset details to the grid Click on to ‘Proceed’ button, the system will set the status of the Asset as “T” – Transfer and prompts an acknowledge message Autopack Pte Ltd Page 19 of 58 Asset Tracking System 4.1.3. User Guide Condemn Choose Condemn option button Scan Asset No. using the keyboard wedge scanner or Select the Asset No from the drop-down list. Click on to ‘Add to list’ button, the system will add the asset details to the grid Click on to ‘Proceed’ button, the system will set the status of the Asset as “C” – Condemn and prompts an acknowledge message Autopack Pte Ltd Page 20 of 58 Asset Tracking System 4.2. User Guide Mass Transfer of Assets Proceed to click Status Update – Mass Transfer of Assets. 4.2.1. The system will display the screen below. Location to another Location Autopack Pte Ltd Page 21 of 58 Asset Tracking System User Guide Choose ‘Location to another location’ option button Select location in the Old Information group, the system will display all the assets in the selected location. Select location in the New Information group Click on to ‘Proceed’ button, the system will prompt a message to confirm. Click ‘No’ to quit the operation Click ‘Yes’ button confirm transferring the Asset from one location to another location, the system will display informative screen as below. The system will not allow for same location. If choose same location, the system will prompt a message Autopack Pte Ltd Page 22 of 58 Asset Tracking System 4.2.2. User Guide Owner to another Owner Choose Owner to another Owner option button Select Owner in the Old Information group, the system will display all the assets owned by the selected Owner. Select Owner n in the New Information group Click on to ‘Proceed’ button, the system will prompt a message to confirm. Click ‘No’ to quit the operation Click ‘Yes’ button confirm transferring the Asset from one owner to another owner, the system will display informative screen as below. Autopack Pte Ltd Page 23 of 58 Asset Tracking System 4.2.3. User Guide The system will not allow for same owner. If choose same owner, the system will prompt a message Department to another Department Choose ‘Department to another Department’ option button Select Department in the Old Information group, the system will display all the assets owned by the selected Department. Select Department n in the New Information group Click on to ‘Proceed’ button, the system will prompt a message to confirm. Autopack Pte Ltd Page 24 of 58 Asset Tracking System User Guide Click ‘No’ to quit the operation Click ‘Yes’ button confirm transferring the Asset from one department to another department, the system will display informative screen as below. The system will not allow for same department. If choose same department, the system will prompt a message Autopack Pte Ltd Page 25 of 58 Asset Tracking System User Guide 5. Stocktake 5.1. Transfer data to PDA/Receive data from PDA Proceed to click Stocktake– Transfer data to PDA/Receive data from PDA The system will display the below screen. 5.1.1. Transfer data to PDA Autopack Pte Ltd Page 26 of 58 Asset Tracking System User Guide Click on to the tab Transfer data to PDA Click on to ‘Delete’ button to delete all the previous transferred data to PDA. The system will prompt the below screen. Choose Department to another Department option button Click ‘No’ button to exit the operation. Click on to ‘Select Assets’ button the system will display the below screen. Choose Location, Department, Asset Owner, Category or status to filter the assets as per the users’ requirement. Select the required check-list details by ticking the data, which is on the right hand side. Once the check-list is ticked, need to press ‘Select As Criteria’ button. Selected location will be viewed at the selected location box. Click ‘OK’ button to filter the assets Click ‘Refresh’ button to show all the filtered assets as displayed in the below screen. Autopack Pte Ltd Page 27 of 58 Asset Tracking System User Guide Before clicking on to ‘Transfer’ button. Make sure the USB cable from the PC is connected to your PDA/HHT and the Sync icon at the Windows Task Bar stay in green. Click ‘Transfer’ button, the system will transfer the selected data from the PC to PDA. Once the transfer is complete, the system will prompt an informative message as shown below. Autopack Pte Ltd Page 28 of 58 Asset Tracking System User Guide Click on to ‘Print Report’ button to preview & print the list of assets transferred to the PDA. 5.1.2. Receive data from PDA Click on to Receive data from PDA tab to receive data from the PDA. Autopack Pte Ltd Page 29 of 58 Asset Tracking System User Guide Once stock take is completed using the PDA. Transfer the data from PDA to the PC. Before clicking on the ‘Receive’ button Make sure the USB cable from the PC is connected to your PDA/HHT and the Sync icon at the Windows Task Bar stay in green. Click on to ‘Receive’ button, the system will transfer the stock take data from the PDA to PC. Once the PC receives all the data, prompt informative message with number of records transferred as displayed in the below message screen. Click on to ‘Update Master’ button to Update the stock take location to the master database. The system will prompt a confirm message. Click ‘Yes’ button to update location to the master location Click ‘No’ button to exit the operation. Once the system updates the master, it will prompt an informative message as shown below. Autopack Pte Ltd Page 30 of 58 Asset Tracking System 5.2. User Guide Print Discrepancy Proceed to click Stocktake --- Print Discrepancy The system will display the following screen. Autopack Pte Ltd Page 31 of 58 Asset Tracking System User Guide If no of the criteria is selected, the system will display report comparing the stock take data with the master database The user is allowed to select criteria Location, Department, Asset Owner, Category option button. Select the required check-list details by ticking the data, which is on the right hand side. Once the check-list is ticked, need to press ‘Select As Criteria’ button. Click on to ‘Include No Discrepancy’ check box Click ‘OK’ button to preview and print the discrepancy report. Autopack Pte Ltd Page 32 of 58 Asset Tracking System 5.3. User Guide Purge Stocktake Data Proceed to click Stocktake --- Purge stock take data The system will prompt the following below screen. Click ‘Yes’ button the system will purge all the stock take data, which was received from the PDA. Click ‘No’ button to exit the operation. Autopack Pte Ltd Page 33 of 58 Asset Tracking System User Guide 6. Report 6.1. Standard Report 6.1.1. List of Assets by Asset Type Proceed to click Standard Report-- List of Assets by Asset type The system will prompt the following screen User can do filtering by selection of “Search By” combobox for particular item . After selection in “Search By”, data will bind to next combobox by accordingly. Autopack Pte Ltd Page 34 of 58 Asset Tracking System Autopack Pte Ltd User Guide Click on to “find” button to show the data by selection. Page 35 of 58 Asset Tracking System User Guide \ 6.1.2. Autopack Pte Ltd Click on to “Report” button to see the report. List of Assets expiring for warranty Page 36 of 58 Asset Tracking System User Guide Proceed to click Standard Report -- List of Assets expiring for warranty ` The system will display the following screen. Autopack Pte Ltd Select the Warranty Ending dates Click on to ‘OK’ button to view the list of assets expiring for warranty as shown below Page 37 of 58 Asset Tracking System 6.1.3. User Guide List of Assets reaching the life span Proceed to click Standard Report -- List of Assets reaching the life span Autopack Pte Ltd Page 38 of 58 Asset Tracking System User Guide The system will display the following screen. Autopack Pte Ltd Select the dates Click on to ‘OK’ button to view the list of assets reaching the life span as shown below Page 39 of 58 Asset Tracking System 6.1.4. User Guide List of Assets Checked In/Out Proceed to click Standard Report -- List of Assets checked In/Out The System will prompt the following screen. Autopack Pte Ltd Choose the criteria and click on to ‘OK’ button. Click on to ‘OK’ button to view the list of assets checked In/Out as shown below Page 40 of 58 Asset Tracking System 6.2. User Guide Customized Report Proceed to click Customized report; the system will display the following screen Autopack Pte Ltd Click on to ‘New Report’ to create a new report Key-in the Saved report, report title Page 41 of 58 Asset Tracking System User Guide Highlight required tables in the ‘Available tables’ box and click on >> button The system will display the table name in the ‘Selected Table’ as shown in the below screen. To delete the table name in the ‘Selected table’, highlight the table name in the Selected table box and click on to << button. Click on to ‘Select Joins’ Tab, the system will display the entire available joins from the tables selected. Highlight required joins in the ‘Available Joins’ box and click on >> J1 Highlight required joins in the ‘Available Joins’ box and click on >> J2 The system will display the join name in the ‘Join 1 (J1)’ and ‘Join 2 (J2)’ as shown in the below screen. To delete the join name in the ‘Join 1 (J1)’, highlight the join name in the Join 1 (J1) box and click on to << J1 button. To delete the join name in the ‘Join 2 (J2)’, highlight the join name in the Join 1 (J1) box and click on to << J2 button. Autopack Pte Ltd Page 42 of 58 Asset Tracking System User Guide Click on to ‘Select Field’ Tab, the system will display the entire field name from the tables selected. Highlight required available field and click on to >> button The system will display the field name in the ‘Selected Fields’ box. Autopack Pte Ltd Page 43 of 58 Asset Tracking System Highlight required selected field and click on to >> button The system will display the field name in the ‘Sort/Group fields’ Click on to ‘Preview’ button to view the report Click on to ‘Saved report’ button to save the report format. The system will prompt informative message. Autopack Pte Ltd User Guide Page 44 of 58 Asset Tracking System User Guide Select the report to be deleted and click on to ‘Delete Report’ the system will prompt a Confirm deletion screen. Click on to ‘Yes’ button to delete the report Click ‘No’ button to exit the operation Click on to ‘Selection Criteria’ button to select the criteria for the saved report. The system will display the following screen Autopack Pte Ltd Page 45 of 58 Asset Tracking System Autopack Pte Ltd User Guide Double-Click Field, then double-click operator, followed by double-click Value or Expression Once the fields, operator and value is double-clicked, the system build query and display in the ‘Build query’ box as shown below in the screen Logic operator is used for more then filter option which is combined by ‘OR‘ or ‘AND’ logic operator Click on to ‘Preview’ button to view the report according to the selection criteria. Page 46 of 58 Asset Tracking System User Guide 7. Setup 7.1. Security Proceed to click Setup – Security report; The system will display the following screen 7.1.1. User Groups Autopack Pte Ltd Page 47 of 58 Asset Tracking System User Guide Click on to ‘Add’ button, the system will display the screen below Key-in the Group ID and Group Name Select the Access rights by clicking on to the check-box which is the menu items Click on to ‘Update’ button, the system will save to the database Click on to ‘Delete’ button in the Security screen, if the group ID has users under this, then system will prompt the below message Click ‘Yes’ button to delete group Id with all the users under this group Click ‘No’ button to exit the operation Autopack Pte Ltd Page 48 of 58 Asset Tracking System 7.1.2. User Guide Users Double-click on to the record to edit the data Click on to ‘Add’ button, the system will display the Add User Screen Key-in the User ID, Username, Password and select the Group ID Minimum length of the password is 4 which is defined in the User-defined screen Click on to ‘Update’ button to save to database and display as show below. Autopack Pte Ltd Page 49 of 58 Asset Tracking System 7.2. User Guide Click ‘OK’ acknowledge the message. Login Setup Proceed to click Setup – login Setup, the system will prompt the following screen Autopack Pte Ltd The administrator is allowed to key-in all the details Click on to ‘Update’ button to save the login setup Page 50 of 58 Asset Tracking System 7.3. User Guide Maintenance Proceed to click Maintenance—Asset Owner; the system will prompt the following screen The drop-down list has all the maintenance table User is allowed to choose the maintenance table like Asset Owner, department, location, Vendor, Category Once the User selects the table, the grid will display that particular table data Highlight record and click on to ‘Delete’ button to delete the record Click on to ‘Add’ button, the system will display the following screen Key-in the Asset Owner Id and Asset Owner Name Click on to ‘Update’ button to save to the database Click on to ‘Print labels’ button to print the individual Asset Owner and location labels The system will prompt a Print screen, select the ‘Datamax E-4203’ printer Autopack Pte Ltd Page 51 of 58 Asset Tracking System 7.4. User Guide Click on to ‘OK’ button to print the labels for location and Asset Owner. Audit Proceed to click Setup – Audit; the system will prompt the following screen Autopack Pte Ltd Choose the reporting criteria, select the Data option button and then select the range of date or single date by selecting same date in the From and To date. Or Select the Type, Asset No, or System User option buttons and then selecting the respective data from the drop-down list. Click on to ‘Proceed’ button, the system will display the following screen. Page 52 of 58 Asset Tracking System Autopack Pte Ltd User Guide Click on to ‘Print’ button to preview and print the Audit trail report Page 53 of 58 Asset Tracking System 7.5. User Guide User-defined fields Proceed to click Setup – User-defined fields; the system will prompt the following screen The administrator is allowed define the field names. Make Sure there is no space between characters Key-in the required field name and click on to ‘Save’ button The system will prompt Informative message as in below screen. The above User-defined will be reflected in the ‘Add Assets’ Screen in the User-defined tab as shown below. Autopack Pte Ltd Page 54 of 58 Asset Tracking System User Guide 8. Housekeeping 8.1. Purge Audit Proceed to click Housekeeping – Purge Audit; the system will prompt the following screen Autopack Pte Ltd Select the date Click on to ‘Proceed’ button to purge all the audit records until that particular date. The system will prompt a Save Audit screen Page 55 of 58 Asset Tracking System User Guide Click ‘No’ button to exit from the operation. Click on to ’Yes’ button to save the records in a text file. The system will prompt a Save as screen, User has to key-in a file name. Click on to ‘Save’ button, to save audit records in the text file and then deletes the record. The System prompts an informative screen Click ‘OK’ to acknowledge the message Autopack Pte Ltd Page 56 of 58 Asset Tracking System 8.2. User Guide Purge Asset Proceed to click Housekeeping – Purge Asset; the system will prompt the following screen Select the date Click on to ‘Proceed’ button to purge all the audit records until that particular date The System will prompt the following message Click on to ‘Yes’ button to delete all the condemn assets Click ‘No’ button to exit the operation If the system does not have any records, it will prompt the below message. Once the Asset data is deleted the system will prompt the informative message as shown below. Autopack Pte Ltd Page 57 of 58 Asset Tracking System User Guide The purged fixed data will be reflected in the View Audit screen : Eg PurAudASt/FixedAsset/21/11/2005 --- and asset No 3A100001 9. Exit Click Exit in the Menu to quit from the application. ******************************************************************************************************************* Autopack Pte Ltd Page 58 of 58