1
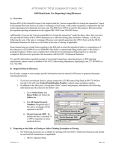
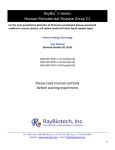
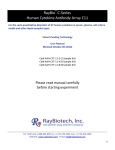
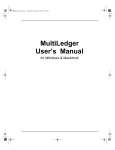
User Manual for
COINS OA 1099 Processing
Date:
Jul 07 2010, rev. Mar 06 2013
Document Version:
2.0
Prepared by:
John Orloff
Earliest available version of COINS:
COINS OA
Construction Industry Solutions
6 Airport Park Blvd.
Latham, NY 12110
©2011, 2013 Construction Industry Solutions
User Guide for
COINS OA 1099 Processing
©2011, 2013 Construction Industry Solutions
The contents of this documentation and all other documentation provided are the property of Construction Industry
Solutions (COINS) and are strictly confidential.
All rights reserved; no part of this publication may be reproduced, stored in a retrieval system, or transmitted in any
form or by any means, electronic, mechanical, photocopying, recording, or otherwise, without the prior written
permission of COINS.
Much care has been taken in the preparation of the documentation and COINS believes that the information given is
accurate and reliable. However, no responsibility, financial or otherwise, can be assumed for any errors or
consequences arising from the use of the material.
Companies, names and data used in examples are fictitious unless otherwise noted.
The information contained in this document is subject to change.
©Construction Industry Solutions, Jul 07 2010, rev. Mar 06 2013
User Guide for
COINS OA 1099 Processing
CONTENTS
1
Overview ........................................................................................................................ 1
2
General Setup Maintenance ............................................................................................ 2
3
2.1
Flag COINS Company as United States Company ...................................................................... 2
2.2
Central Repository - Companies Workbench ............................................................................ 2
2.3
Define Supplier/Company/Office and Subcontractor/ Company/Office Relationships............ 4
Steps for Processing 1099 Data ........................................................................................ 5
3.1
Step 1 - Edit 1099 Payer Information ........................................................................................ 6
3.2
Step 2 - Generate 1099 Payee Data .......................................................................................... 7
3.3
Step 3 - Edit 1099 Payee Information........................................................................................ 9
3.4
Step 4 - 1099 Final Error Check ............................................................................................... 10
3.5
Step 5 - Print 1099 Forms ........................................................................................................ 11
3.6
Step 6 - Create 1099 Magnetic Media File .............................................................................. 12
©Construction Industry Solutions, Jul 07 2010, rev. Mar 06 2013
User Guide for
COINS OA 1099 Processing
1 Overview
This document describes 1099 processing, which is only available for COINS companies that
have been defined as USA companies.
©Construction Industry Solutions, Jul 07 2010, rev. Mar 06 2013
Page 1
User Guide for
COINS OA 1099 Processing
2 General Setup Maintenance
This section describes how to set up OA so that US companies can use 1099 processing.
2.1 Flag COINS Company as United States Company
1099 processing is only available for COINS companies that have been defined as USA companies. NonUSA companies do not have any 1099 data entry tabs or menu items displayed. For clients using COINS
OA in the United States, this should already be set up correctly.
1. Go to System > Company Setup > Configuration > Company Parameters and find the COMPLOC
Parameter ID.
2. Open the parameter and set the value of the company location to USA.
2.2 Central Repository - Companies Workbench
Each Supplier and Subcontractor that needs to have a 1099 form generated must be flagged as such in
the Companies Workbench. This information is maintained in Central Repository > Companies > Click
on a Company Name > 1099 Info tab.
©Construction Industry Solutions, Jul 07 2010, rev. Mar 06 2013
Page 2
User Guide for
COINS OA 1099 Processing
Fill in the fields on this tab according to the criteria below:
Print A 1099 Form For This Company
A check box that causes 1099 data to be generated for this company.
TIN Type
A drop down box for the Tax Identification Number Type with valid choices of EIN (Employer
Identification Number), SSN (Social Security Number), and Unknown.
TIN Number
A numeric field for the Tax Identification Number.
Box To Print 1099 Amount
A drop down box with valid choices of 1, 2, 3, 4, 5, 6, 7, 8, 10, 13, 14, 15a, 15b, 16, and 18 that
refer to the boxes on the printed 1099 form.
Bank Account Number
This optional data is the bank account number of the supplier or subcontractor company.
Alternate 1099 Name
Allows you to override the supplier / subcontractor company name printed on the 1099 forms.
Foreign Payee
A check box that indicates if the supplier / subcontractor company is foreign.
©Construction Industry Solutions, Jul 07 2010, rev. Mar 06 2013
Page 3
User Guide for
COINS OA 1099 Processing
2.3 Define Supplier/Company/Office and Subcontractor/
Company/Office Relationships
The Accounts Payable (Supplier) Account Number and/or the Subcontract Ledger (Subcontractor)
Account Number must be linked to a company or office so that transactions can be related to a company
when the 1099 data is generated.
This is maintained in Central Repository > Companies > Click on a Company Name > Office tab > Click
on an Office Name > Accounts tab.
•
•
•
If this Company/Office is a supplier to be used in the Accounts Payable module, the account
number of the supplier used in Accounts Payable should be entered on this screen.
If this Company/Office is a subcontractor to be used in the Subcontract Ledger module, the
account number of the subcontractor used in Subcontract Ledger should be entered on this
screen.
If this Company/Office is both a supplier and a subcontractor, an account number for both can
be entered on this screen. This causes the generation of 1099 data from both modules to be
combined into one 1099 form.
©Construction Industry Solutions, Jul 07 2010, rev. Mar 06 2013
Page 4
User Guide for
COINS OA 1099 Processing
3 Steps for Processing 1099 Data
A 1099 Processing Menu can be found in the Central Repository module under the Administration
menu. The steps involved for processing 1099 data are designed so that you can follow the six menu
options in order from beginning to end. Steps can be run as many times as needed. Each menu option is
discussed in more detail later in this document.
©Construction Industry Solutions, Jul 07 2010, rev. Mar 06 2013
Page 5
User Guide for
COINS OA 1099 Processing
3.1 Step 1 - Edit 1099 Payer Information
A 1099 Payer is the Company issuing the 1099 forms to the suppliers and subcontractors. The typical
COINS user only sets up one 1099 payer for each year, but COINS can handle processing for multiple
1099 payers in the same year.
A sample data entry screen is shown below.
Some special fields of note in this function are:
Payer Name
Once the Payer Name has been entered, it cannot be changed because the 1099 data generated
for this payer is tagged internally with this name. Changing this name would break the link and
stop processing. You therefore need to take extra care when entering the Payer Name so that it
is entered exactly how it should appear on the printed 1099 form.
Companies to Process
This controls combining transactions from multiple COINS companies for 1099 reporting. When
left blank, all data from all companies in COINS are reported under this Payer. To only report
one or more specific lists of COINS companies, enter a comma separated list of company
numbers with no spaces.
©Construction Industry Solutions, Jul 07 2010, rev. Mar 06 2013
Page 6
User Guide for
COINS OA 1099 Processing
3.2 Step 2 - Generate 1099 Payee Data
At this point in the processing, the Payer record has been created from Step 1, but no data has been
created from which to print 1099’s. This function creates the 1099 data known as the Payee
Information. You must enter a 1099 Year if different from the default year, and click the button to the
right of the Payer Name to select a payer from a list that appears in a pop-up box.
The following processing takes place when this function is run:
1. The payments to suppliers and subcontractors are totaled so that there is a value paid to each for
the payment year based on the check date of each payment. A 1099 Payee Information record is
created for each company/office with payments greater than the value entered for the Produce
1099s for Amounts Over in the Edit 1099 Payer Information function.
2. The following data default from the Companies Workbench > 1099 Info tab into the newly created
1099 Payee Information record.
•
TIN Type
•
TIN Number
•
Bank Account Number
•
Alternate 1099 Name
•
Foreign Payee
3. Error checks are performed as this data is created. Error messages are noted on each Payee record.
4. A report of the data created is produced along with any error information for each Payee record.
NOTE:
The generation of the 1099 data is processed by using the report generator. This
processing could take some time depending on the volume of transactions in COINS.
It is always recommended that this type of processing be run in the background. A
simple report is produced as a summary of the processing. Checking the status of this
report alerts the user that the 1099 data has been created successfully, created with
errors, or is still being generated in background mode.
A sample report from the Generate 1099 Payee Data function is shown below.
©Construction Industry Solutions, Jul 07 2010, rev. Mar 06 2013
Page 7
User Guide for
COINS OA 1099 Processing
©Construction Industry Solutions, Jul 07 2010, rev. Mar 06 2013
Page 8
User Guide for
COINS OA 1099 Processing
3.3 Step 3 - Edit 1099 Payee Information
This function allows you to view and edit the 1099 Payee Data that was created with the Generate 1099
Payee Data function from Step 2.
Some things to note about this function are:
•
•
•
A payee record can be added or changed in this function.
The Generate function can be run as many times as needed, but if a payee record was generated,
then changed with this function, the changes are lost when the data is regenerated.
If a new payee record is added with this function, the Generate function is run again. The new
payee record remains unchanged by the Generate function.
©Construction Industry Solutions, Jul 07 2010, rev. Mar 06 2013
Page 9
User Guide for
COINS OA 1099 Processing
3.4 Step 4 - 1099 Final Error Check
When the payee data has been reviewed and all errors have been fixed using Step 3, the 1099 Final
Error Check function should be run to verify that all errors have been resolved. The selection screen for
this function (shown below) works in the same manner as the Generate selection screen.
The 1099 Final Error Check can be run as many times as needed. It produces a report similar to the
Generate 1099 Payee Information Report, but only errors are shown. Error checking is performed on
data that are both generated and added.
Below is a sample 1099 Final Error Check Report with errors.
Below is a sample 1099 Final Error Check Report with no errors.
©Construction Industry Solutions, Jul 07 2010, rev. Mar 06 2013
Page 10
User Guide for
COINS OA 1099 Processing
3.5 Step 5 - Print 1099 Forms
The Print 1099 Forms function allows 1099 data to be printed to a special preprinted 1099 form. If any
1099 records have an error, the number of error records is displayed with a message; no 1099’s are
printed until the errors are resolved.
There are two slightly different formats for 1099 forms. The Form drop down box allows you to select
either a Federal or Payee format. The Federal format is used for the form that is sent to the
government. All other forms use the Payee format.
The 1099 Year and Payer Name fields on this selection screen are used in the same way as the Generate
and Error Check selection screens; in other words, you can select a Payer for which to print 1099 data.
The From / To Payee Number field allows you to print one form, or a small subset of forms, from the
entire group. This can be useful if part of a group of forms is destroyed from a paper jam or other
printing problem.
©Construction Industry Solutions, Jul 07 2010, rev. Mar 06 2013
Page 11
User Guide for
COINS OA 1099 Processing
3.6 Step 6 - Create 1099 Magnetic Media File
The Create 1099 Magnetic Media File function creates an ASCII file of 1099 data to be sent to the
government for reporting. If any 1099 records have an error, the number of error records is displayed
with a message, and the 1099 Magnetic Media File is not created until the errors are resolved. The
selection screen for this function is shown below. It works in the same manner as the Generate selection
screen.
Additional selection screen fields on this screen are Magnetic Media File Name and Save File in
Directory.
The government requires the file submitted to be named “IRSTAX”, but you can change the name if you
wish to do a test run. Just make sure that the final creation of the file is named “IRSTAX”. Do not create
the file under a different name and rename the file using an operating system command. This is because
the file name is also stored in the ASCII file. Renaming the file at the operating system level does not
change the name saved within the ASCII file.
The ASCII file is located on the COINS server at the Save File in Directory. The default path in this field
saves the 1099 Magnetic Media file to your 'My Files' directory. This path (such as
/coinsoa/live/var/home/katrey) is set up with the beginning representing the OA environment that you
(the current user) are working in (such as /coinsoa/live/) and the ending based on your 'My Files'
directory (such as var/home/katrey/, where katrey is the user id variable). To access the ASCII file, 'My
Files' can be found at System > My Files.
It is best to use the directory name that defaults, but this can be changed. Note that if the report
generator does not have permissions to access the directory, no file is created.
©Construction Industry Solutions, Jul 07 2010, rev. Mar 06 2013
Page 12