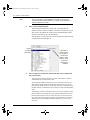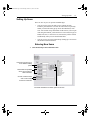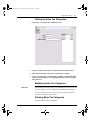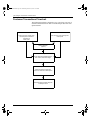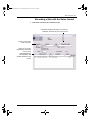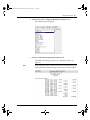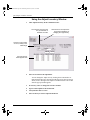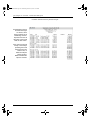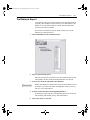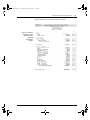
1
MLManual.book Page 1 Wednesday, October 27, 2010 12:04 PM
MultiLedger
User’s Manual
for Windows & Macintosh
MLManual.book Page 2 Wednesday, October 27, 2010 12:04 PM
Information in this manual is subject to change without notice. This manual (“Manual” or “Documentation”) and the software (“Software”) described in it are copyrighted, with all rights reserved. By using
this Manual and accompanying Software, you, the end user, agree to the terms set forth in the License
Agreement.
Copyright
Under the copyright laws, this Manual or the Software may not be copied, in whole or in part, without
the express consent of CheckMark Software, Inc. (“CheckMark Software”), except in the normal use of
the Software or to make a backup copy of the Software for your own use. The same proprietary and
copyright notices must be affixed to any permitted copies as were affixed to the original. This exception
does not allow copies to be made for others, whether or not sold, but all of the material purchased (with
all backup copies) may be sold or given to another person. Under the law, copying includes translating
into another language or format.
Federal copyright law prohibits you from copying the written materials accompanying the Software
without first obtaining our permission. You may not alter, modify or adapt the Software or Documentation. In addition, you may not translate, decompile, disassemble or reverse engineer the Software. You
also may not create any derivative works based on this Software or Documentation. A derivative work
is defined as a translation or other form in which the Software may be recast, transformed
or adapted.
Limited Warranty on Media and Replacement
If you discover a physical defect in the Manual or in the media with which the Software is distributed,
CheckMark Software will replace the media or Manual at no charge to you, provided you return the item
to be replaced with proof of purchase to CheckMark Software or a CheckMark Software dealer during
the 60-day period after you purchased the Software.
All implied warranties on the media and Manuals, including implied warranties of merchantability and
fitness for a particular purpose, are limited in duration to 60 days from the date of original retail purchase of this product.
Even though CheckMark Software has tested the Software and reviewed the Documentation, CheckMark Software makes no warranty or representation, either express or implied, with respect to
the Software, its quality, performance, merchantability, or fitness for a particular purpose. As a
result, this Software is sold “As is”, and you the purchaser are assuming the entire risk as to its
quality and performance. In no event will CheckMark Software be liable for direct, indirect, special, incidental, or consequential damages resulting from any defect in the Software or its Documentation, even if advised of the possibility of such damages.
The Warranty and remedies set forth above are exclusive and in lieu of all others, oral or written, express
or implied. No CheckMark Software dealer, agent, Consultant, or employee is authorized to make any
modification, extension, or addition to this warranty.
Some states do not allow the exclusion or limitation of implied warranties or liability for incidental or
consequential damages, so the above limitation or exclusion may not apply to you. This warranty gives
you specific legal rights, and you may also have other rights which vary from state to state.
Trademarks
CheckMark Software and MultiLedger are registered trademarks of CheckMark Software, Inc. All other
references are trademarks of their respective owners.
© 2010 CheckMark Software, Inc. 10/10 pdf
MLManual.book Page i Wednesday, October 27, 2010 12:04 PM
i
Table of Contents
Chapter 1 Getting Started 1
Hardware and System Requirements 2
MultiLedger for Windows: 2
MultiLedger for Macintosh: 2
How to Get Help 2
Before you call 3
How to reach us 4
What You Should Know Before Using MultiLedger 4
Cross-Platform Versions 5
Cross-Platform Considerations 5
Platform Differences 5
Installing MultiLedger on Windows 6
Starting MultiLedger and Opening a Sample Company on Windows 6
Opening Recently Used Companies On Windows 8
Installing MultiLedger on a Macintosh 8
Starting MultiLedger and Opening a Sample Company on Macintosh 9
Opening Recently Used Companies on Macintosh 10
The Command Center 11
Accessing Multiple Open Windows 12
Where to Go From Here 12
Chapter 2 Initial Setup 13
What You’ll Need 14
Steps to Setting Up 16
Creating a New Company File on Windows 17
Creating a New Company File on Macintosh 19
Setting Up Basic Company Information 21
Setting Up the Chart of Accounts 23
Guidelines for Setting Up Accounts 23
Entering the Accounts 24
Setting Up Cash Flow Designations 25
Modifying Account Numbers and Names 26
Deleting Accounts 26
Setting Up Posting Categories 27
Category Descriptions 27
Assigning Posting Categories 28
MLManual.book Page ii Wednesday, October 27, 2010 12:04 PM
ii
Table of Contents
Setting Up Ledger Account Balances 30
Setting Up Prior Outstanding Receivables 32
Entering Outstanding Receivables 32
Verifying the Outstanding Receivables Setup 38
What to do if your outstanding receivables don’t balance 39
Setting Up Outstanding Payables 41
Entering Outstanding Payables 42
Verifying the Outstanding Payables Setup 46
What to do if your outstanding payables don’t balance 47
Setting Up Items 49
Verifying the Items Setup 49
What to do if your inventory doesn’t balance 50
Chapter 3 Backing Up & Restoring 51
Backing Up Your Company Files 52
Suggestions for Backing Up 52
Automatic Backup Reminder 52
Backing Up Your Company Files on Windows 53
Backing Up Your Company Files on Macintosh 54
Restoring a Backup Archive on Windows 55
Restoring a Backup Archive on Macintosh 57
Using Backups in a Cross-Platform Environment 60
Chapter 4 Customer, Vendor & Item Setup 61
Customer Terms 62
Customer Terms Field Descriptions 62
Setting Up Customer Terms 63
Modifying Customer Terms 64
Deleting Customer Terms 64
Customers 65
Customer Setup Field Descriptions 65
Setting Up Customers 68
Modifying Customer Information 69
Deleting a Customer 69
Vendors 70
Vendor Setup Field Descriptions 70
Setting Up Vendors 73
Modifying Vendor Information 75
Deleting a Vendor 75
MLManual.book Page iii Wednesday, October 27, 2010 12:04 PM
iii
Items 76
Item Setup Field Descriptions 76
Setting Up Items 79
Entering New Items 79
Modifying Item Information 80
Deleting Items 80
Chapter 5 Setup Options 83
Setting Up Budget Amounts 84
Setting Up Shipping Methods 86
Modifying a Ship Via Method 86
Deleting a Ship Via Method 86
Setting Up Profit Centers 87
Setting Up Profit Centers on the Profit Centers Window 88
Setting Up Profit Centers in the Chart of Accounts 89
What accounts can I set up as profit centers? 89
Setting Program Preferences 90
Mailing Label Options 92
Setting User Settings 93
Customizing Financial Statements 95
Customizing Heading Descriptions 95
Customizing Heading Ranges 96
Customizing Account Groupings 96
Modifying or Deleting Custom Account Groupings 97
Jobs Set Up 97
Job Setup Field Descriptions 97
Setting Up Jobs 98
Modifying a Job 99
Deleting a Job 99
Sales Tax Set Up 100
Sales Tax Setup Field Descriptions 100
Setting Up Sales Tax Categories 101
Modifying Sales Tax Categories 101
Deleting Sales Tax Categories 101
Salesperson Setup 102
Salesperson Setup Field Descriptions 102
Setting Up Salespeople 103
Modifying Salespeople Information 103
Deleting Salespeople 104
MLManual.book Page iv Wednesday, October 27, 2010 12:04 PM
iv
Table of Contents
Selecting the Font for Printing 104
Using the Print Screen 105
Printing Options 105
How to Use the Print Command 107
How to use the Email Command 108
Setting Up the MICR Encoding Information 108
Formatting Checks, Invoices, Statements, 1099s & Deposits 110
Customizing Print Field Positions for Your Printer 111
Positioning Print Fields for Windows Metafiles or Macintosh PDF or PICT
Files 112
Codes for Customers, Vendors, and Items 115
Chapter 7 Introduction to Transactions 117
Moving Between Fields 118
Using Pop-Up Lists 118
Finding a Name in a Pop-Up List 119
Entering Information with a Pop-Up List 120
Adding or Editing Names in a Pop-Up List 120
Skipping a Pop-Up List 121
Document Numbers 121
Checking for duplicate document numbers 122
Working with 30 Open Months 122
Locking and Unlocking Months 123
Transaction Dates 123
Date Formats 123
Valid Transaction Dates 124
Date Alert Messages 124
Adding Comment Lines to Transactions 126
Modifying or Removing Comment Lines 126
Saving a Transaction 127
Modifying or Deleting a Transaction 127
Entering a Void Document 129
Recurring Entries 130
Creating a Recurring Entry 131
Working with Recurring Entries 131
The Recurring Window 133
Viewing and Printing Recurring Entries 134
MLManual.book Page v Wednesday, October 27, 2010 12:04 PM
v
Chapter 6 Multi-User MultiLedger 135
Using Multi-User MultiLedger 136
Installing MultiLedger for Multi-User 136
Mapping the Drive on Windows 136
Using the Multi-User Capabilities 137
Access Limitations 137
Multi-User Restrictions 138
Network Considerations 140
Users and Passwords 140
Setting Up Users and Passwords 140
Modifying and Deleting Users and Passwords 142
How Passwords Work 143
Locking and Unlocking Months 143
How to Lock a Month 143
How to Unlock a Month 144
Chapter 8 Customer Transactions 145
Customer Transactions Flowchart 146
Recording Sales 147
Customer Invoices 149
Customer Invoices Field Descriptions 149
Recording a Sale with Customer Invoices 155
Printing a Customer Invoice 159
Modifying or Deleting an Invoice 159
Sales Journal 160
Sales Journal Field Descriptions 160
Recording a Sale with the Sales Journal 163
Printing a Sales Journal Invoice 166
Modifying or Deleting Sales Journal Invoices 166
Receipts Journal 167
Receipts Journal Field Descriptions 167
Recording a Deposit with the Receipts Journal 169
Modifying or Deleting Receipts Journal Documents 170
The Customer Payments Window 171
Customer Payments Field Descriptions 171
Recording Customer Payments 173
Modifying or Deleting Payments Before Saving a Deposit 177
Modifying or Deleting Payments After Saving a Deposit 177
When a Customer Fails to Pay an Invoice 178
MLManual.book Page vi Wednesday, October 27, 2010 12:04 PM
vi
Table of Contents
Quotes 179
Creating Quotes 179
Working with Quotes 179
Printing Quotes 180
Viewing Quotes 181
Special Customer Situations 181
Recording Advance Deposits 181
Reversing a Receivable 182
Recording Customer Credit Memos 183
Recording Customer Credit for Returned Inventory 183
Recording Other Customer Credit 183
Applying Customer Credits 184
The credit amount is equal to the outstanding receivable amount 184
The credit amount is larger than the outstanding receivable amount 184
The credit amount is less than the outstanding receivable amount 185
Writing a Refund Check for the Customer Credit 185
Calculating Finance Charges 187
Finance Charges Field Descriptions 187
Recording Finance Charges 188
Recording Finance Charge Payments 190
Deleting Finance Charges 190
Chapter 9 Vendor Transactions 191
Vendor Transactions Flowchart 192
Recording Purchases 193
Item Purchases 194
Item Purchases Field Descriptions 194
Recording a Purchase with Item Purchases 198
Printing an Item Purchase 201
Modifying or Deleting an Item Purchase 201
Payables Journal 202
Payables Journal Field Descriptions 202
Recording a Purchase with the Payables Journal 204
Modifying or Deleting Payables Journal Transactions 206
Disbursements Journal 207
Disbursements Journal Field Descriptions 207
Recording a Check with the Disbursements Journal 209
Printing Disbursements Journal Checks 211
Modifying or Deleting Disbursements Journal Documents 212
MLManual.book Page vii Wednesday, October 27, 2010 12:04 PM
vii
Using the Vendor Payments Window 213
Vendor Payments Field Descriptions 213
Recording Vendor Payments 214
Modifying or Deleting Payments Before Saving a Check 218
Modifying or Deleting Payments After Saving a Check 218
Purchase Orders 219
Creating Purchase Orders 219
Working with Purchase Orders 220
Printing Purchase Orders 220
Viewing Purchase Orders 221
Special Vendor Situations 221
Reversing a Payable 221
Recording Vendor Credit 222
Recording Vendor Credit for Returned Inventory 222
Recording Other Vendor Credit 223
Applying Vendor Credits 223
The credit amount is equal to the outstanding payable amount 223
The credit amount is larger than the outstanding payable amount 224
The credit amount is less than the outstanding payable amount 224
Chapter 10 Other Activities 225
Using the General Journal 226
General Journal Field Descriptions 226
Recording a General Journal Transaction 227
Modifying or Deleting General Journal Documents 228
Balancing Your Checkbook 229
Bank Reconciliation Field Descriptions 229
Reconciling Your Bank Balances 231
Bank Reconciliation Tips 234
Bank Reconciliation Problems 234
Adjust Inventory Window 236
Adjust Inventory Field Descriptions 236
Using the Adjust Inventory Window 238
Modifying or Deleting Adjust Inventory Transactions 239
Reusing Adjust Inventory Transactions 239
Building Inventory 240
Viewing Adjust Inventory Transactions 241
Importing and Exporting Data 242
The Basics of Importing and Exporting 242
MLManual.book Page viii Wednesday, October 27, 2010 12:04 PM
viii Table of Contents
Exporting from MultiLedger 244
Exporting to CheckMark Forms 1099 247
Importing into MultiLedger 248
To Import Data into MultiLedger 250
Closing the Year 254
Before Closing the Year 254
Close Year Command 254
Making Adjusting Entries to the Previous Year 254
Renaming Company Files 255
Using the Rebuild Files Command 256
Finding Company Files 257
Renumbering Accounts 257
Chapter 11 Customer, Vendor & Item Reports 259
Using the Report Windows 260
Using the Find Command with Reports 260
Making Selections in a Reports List 262
Printing Multiple Reports 263
Reporting Options 264
Customer Reports 265
Types of Customer Reports 265
Customer History Reports 266
Customer Information and Mailing Labels 267
Customer Statements 267
Working with Accounts Receivable Reports 268
Aging Periods 268
Working with Customer History Reports 271
Working with the Customer Information Report 273
Vendor Reports 277
Types of Vendor Reports 277
Accounts Payable Reports 277
Vendor History Reports 278
Vendor Information and Mailing Labels 278
1099s 278
Working with Accounts Payable Reports 278
Aging Periods 279
Working with Vendor History Reports 282
Working with the Vendor Information Report 284
Working with 1099s 285
MLManual.book Page ix Wednesday, October 27, 2010 12:04 PM
ix
Verifying 1099 Information 285
Printing 1099s 286
Item Reports 290
Item Report Options 291
Working with Item Reports 291
Chapter 12 Financial & Other Reports 297
Chart of Accounts Reports 298
Printing Your Chart of Accounts 299
Graphing Comparisons 299
Graphing Account Balances versus Budget Amounts 300
Trial Balance Report 301
Drill Down on Trial Balance Report 302
Transaction Journals Reports 304
Sorting Transaction Journal Reports 304
Types of Transaction Journal Reports 305
Working with Transaction Journal Reports 306
Drill Down on Transaction Journal Reports 308
General Ledger Reports 309
Drill Down on General Ledger Report 310
Balance Sheet Reports 312
Types of Balance Sheet Reports 313
Balance Sheet Report Options 313
Income Statement Reports 315
Types of Income Statement Reports 315
Income Statement Report Options 316
Profit Center Income Statements 316
Creating Income Statements for Individual Profit Centers 317
Creating a Consolidated Income Statement for Profit Centers 318
Cash Flow Reports 320
Types of Cash Flow Reports 321
Cash Flow Report Options 321
Financial Snapshot Report 323
Sales Tax Report 324
Creating Sales Tax Report 325
Salesperson Report 326
Creating a Salesperson Report 327
Job Reports 329
Creating Jobs Reports 330
MLManual.book Page x Wednesday, October 27, 2010 12:04 PM
x
Table of Contents
Appendix A Working with CheckMark Payroll 333
Posting Employee Checks to MultiLedger for Windows 334
Set up Ledger Accounts in CheckMark Payroll 334
Review Posting Summary 334
Posting to MultiLedger for Windows 335
Posting Employer Checks to MultiLedger for Windows 337
Set up Ledger Accounts in CheckMark Payroll 337
Review Posting Summary 337
Posting to MultiLedger for Windows 337
Posting Employee Checks to MultiLedger for Macintosh 339
Set up Ledger Accounts in CheckMark Payroll 339
Review Posting Summary 339
Posting to MultiLedger for Macintosh 340
Posting Employer Checks to MultiLedger for Macintosh 342
Set up Ledger Accounts in CheckMark Payroll 342
Review Check Summary 342
Posting to MultiLedger for Macintosh 342
Possible Posting Errors for Employee Checks 344
Possible Posting Errors for Employer Checks 345
Appendix B Sample COAs 347
Basic Chart of Accounts 348
Construction Partnership Chart of Accounts 349
Graphic Artist Chart of Accounts 351
Medical Partnership Chart of Accounts 352
Newspaper Chart of Accounts 354
Non-Profit Chart of Accounts 355
Partnership Chart of Accounts 357
Printing/Copy Center Chart of Accounts 358
Professional Chart of Accounts 359
Profit Center Chart of Accounts 360
Restaurant Chart of Accounts 363
Retail Chart of Accounts 365
Sole Proprietorship Chart of Accounts 366
Appendix C Glossary 367
Appendix D AppleScript and Importing 371
Importing Information into MultiLedger Using AppleScript 372
MLManual.book Page xi Wednesday, October 27, 2010 12:04 PM
xi
Appendix E Error Messages 375
Macintosh or Windows Error Messages 376
Macintosh Error Messages 376
Windows Error Messages 376
Index 379
MLManual.book Page xii Wednesday, October 27, 2010 12:04 PM
xii Table of Contents
MLManual.book Page 1 Wednesday, October 27, 2010 12:04 PM
1
Chapter 1
Getting Started
Like most users of business software you probably bought
MultiLedger because you’ve got a job to do. But before you jump into
the chapter on setting up a company, please read this brief chapter on
what you should know before you start using MultiLedger.
MLManual.book Page 2 Wednesday, October 27, 2010 12:04 PM
2
Chapter 1 Getting Started
Hardware and System Requirements
MultiLedger for Windows:
•
10 MB free disk space
•
Windows 2000 or higher
•
Windows compatible printer
MultiLedger for Macintosh:
•
10 MB free disk space
•
Power PC running OS 10.3.9 or higher
•
Macintosh compatible printer
How to Get Help
Only registered users are entitled to technical support from CheckMark
Software. For information on CheckMark’s Extended Support options,
please refer to the brochure that was included with your MultiLedger
package.
Registered users also receive update and upgrade information. So
please take a few moments to read the License Agreement, fill out and
sign the Registration Card, and drop it in the mail. If you are in a hurry
to register, you can fill out the Registration Card and fax us a copy at
(970) 225-0611.
Note
While CheckMark Software is happy to offer you help in using our
accounting software, we can only offer limited accounting help or
advice. However, we maintain a network of independent CheckMark
Consultants who offer services beyond the support that CheckMark
Software provides. You’ll find a directory of consultants on the
MultiLedger master disk or on our web site, www.checkmark.com.
MLManual.book Page 3 Wednesday, October 27, 2010 12:04 PM
Before you call
3
Before you call
You can help us make your phone call more effective by doing the
following before you call:
Fax or mail registration
•
In order to receive support from CheckMark Software, Inc., we
need to have record of your registration. Fax or mail us the
Registration Card that is found in the MultiLedger package.
Read manual
•
Many users want to start using a program without reading the
manual. However, if you have any questions about how to use
MultiLedger, please read the relevant sections in this manual
before calling us. The manual contains procedures to accomplish
most accounting tasks. If you feel the manual lacks any crucial
information, please tell us.
Look for help in
Knowledge Base
•
You can find many answers in the Knowledge Base on our
website:
http://www.checkmark.com/support/knowledgebase.php
or click on the CheckMark KnowledgeBase link under the Help
menu in MultiLedger.
Know your registration
number or customer
number
•
When you call for technical support, you will be asked for your
registration or customer ID number. You will find your
registration number printed on the software package and on the
part of the registration card you keep. Your customer number can
be found on any order forms you had received from us.
Know your version
number and date
•
Also, before you call, you should know your MultiLedger version
and date. On Windows, the version is listed at the upper left hand
corner of your screen on the title bar. On Macintosh, choose
About MultiLedger under the MultiLedger title bar.
MLManual.book Page 4 Wednesday, October 27, 2010 12:04 PM
4
Chapter 1 Getting Started
How to reach us
You can reach us in the following ways:
•
You can submit support questions from our web site, as well as
find answers in our Knowledge Base:
Web Address: http//www.checkmark.com/support
•
A call-back system for Telephone Technical Support is available
between 8 a.m. and 5 p.m. MT, Monday through Thursday and
between 8 a.m. and 4 p.m. MT on Fridays.
Phone support: (970) 225-0387
•
You can fax us questions or comments at any time:
Fax registration and support: (970) 225-0611
•
You can write us:
CheckMark Software, Inc.
Attn: Technical Support
724 Whalers Way, Bldg. H
Fort Collins, CO 80525
What You Should Know Before Using MultiLedger
Before you start using MultiLedger, you should know how to perform
the following basic operations:
•
Move and copy files
•
Click, drag, and highlight text
•
Choose commands from menus
•
Open and close windows
•
Use control buttons, check boxes, radio buttons, and scroll bars
•
How to navigate through dialog boxes
If you are unfamiliar with any of these topics, refer to the owner’s
manual that came with your copy of Microsoft Windows or your
Macintosh computer.
MLManual.book Page 5 Wednesday, October 27, 2010 12:04 PM
Cross-Platform Versions
5
Cross-Platform Versions
The MultiLedger CD-ROM you received contains both the Windows
version and the Macintosh version of MultiLedger. You can install the
software on a PC, a Mac, or both, according to the software’s License
Agreement. This brief section describes the basic differences between
the two platforms, as well as how this manual can be used for either
version of the software.
Cross-Platform Considerations
MultiLedger is a multi-user, cross-platform accounting software. You
can have up to ten users accessing data over a network of PCs, Macs,
or a combination of the two. You can also move company files back
and forth across platforms if your computers are not networked.
Chapter 6 in this manual explains how to use the multi-user capabilities
in MultiLedger and Chapter 3 explains how to backup company files
and restore the files on another platform.
Important
OSX Server has a problem handling “byte-range locking” requests from
Windows (ie., SMB) users and Mac users simultaneously. Until Apple
supports cross-platform record locking for multiuser databases, if you
have both Mac and PC users on MultiLedger, you’ll need a Windows
Server or Macintosh OS9 Server.
Platform Differences
For the most part, MultiLedger for Windows and MultiLedger for
Macintosh are functionally identical. Wherever there are notable
differences, however, the applicable platform is clearly noted in this
manual.
MLManual.book Page 6 Wednesday, October 27, 2010 12:04 PM
6
Chapter 1 Getting Started
Installing MultiLedger on Windows
Follow the steps below to install MultiLedger on your Windows
computer. For instructions on installing MultiLedger on a Macintosh,
see “Installing MultiLedger on a Macintosh” on page 8.
Note
If you will be using MultiLedger’s multi-user capabilities, see also
Chapter 6, “Multi-User MultiLedger.”
1
Start your computer as you normally would.
2
Insert the MultiLedger disk.
3
Follow the on-screen instructions for installing MultiLedger.
Important
MultiLedger is copyrighted. You may only copy the program according
to the terms set forth in the License Agreement.
After MultiLedger is finished installing, a folder named “MLedger” is
installed in the Program Files directory.
4
Eject the MultiLedger program disk from your computer.
Starting MultiLedger and Opening a Sample Company on
Windows
The following steps show you how to start MultiLedger and open a
company file (using a sample company as an example). If you want to
immediately begin setting up a company with MultiLedger, go to the
next chapter “Initial Setup.”
1
Click Start, go to Programs, then choose MultiLedger from the
CheckMark MultiLedger group. Or click the shortcut on your Desktop
if one was installed.
MLManual.book Page 7 Wednesday, October 27, 2010 12:04 PM
Starting MultiLedger and Opening a Sample Company on Windows
2
Choose Open Company from the File menu
3
Select the “SampleCo” folder, then click Open, or double-click the
“SampleCo” folder.
7
The dialog box now shows the three ML Sample Companies you can
choose from: “Construction Sample Co.”, “Retail Sample Co.”, and
“Service Sample Co.”
4
Select a sample company, then click Open.
The dialog box now shows a highlighted MultiLedger sample company
file.
5
Click Open again.
Once MultiLedger is running with a company open, MultiLedger’s
Command Center is enabled on your screen.
MLManual.book Page 8 Wednesday, October 27, 2010 12:04 PM
8
Chapter 1 Getting Started
Opening Recently Used Companies On Windows
MultiLedger stores the paths to the last three open companies, which
makes opening frequently used company files easy.
1
Start MultiLedger by clicking Start to Programs, then choosing
MultiLedger from the CheckMark MultiLedger group. Or doubleclick the shortcut on your Desktop.
2
Choose Open Recent Company from the File menu, then drag out to
select the desired company files.
Note
If you use one set of company files on a regular basis, you can have
MultiLedger automatically open that set of files when you launch
MultiLedger. For more information, see “Setting User Settings” on
page 93.
Installing MultiLedger on a Macintosh
Follow the steps below to install MultiLedger for Macintosh on your
hard drive:
Note
If you will be using MultiLedger’s multi-user capabilities, see also
Chapter 6, “Multi-User MultiLedger.”
1
Start your computer as you normally would.
2
Insert the MultiLedger disk.
3
Double-click the ML Installer icon.
4
Follow the on-screen instructions for installing MultiLedger on your
hard drive.
Important
MultiLedger is copyrighted. You may only copy the program according
to the terms set forth in the License Agreement.
A folder named “MultiLedgerƒ” is installed in the Applications folder
and automatically opens.
5
Eject the MultiLedger program disk.
MLManual.book Page 9 Wednesday, October 27, 2010 12:04 PM
Starting MultiLedger and Opening a Sample Company on Macintosh
9
Starting MultiLedger and Opening a Sample Company on
Macintosh
The following steps show you how to start MultiLedger and open a
company file (using a sample company as an example). If you want to
immediately begin setting up a company with MultiLedger, go to the
next chapter “Initial Setup.”
1
Open the MultiLedgerƒ folder that was installed on your hard drive.
2
Start MultiLedger by double-clicking the MultiLedger™ icon .
3
Choose Open Company from the File menu
4
Select the ML Samples folder, then click Open, or double-click the ML
Samples folder.
The dialog box now shows the three ML Sample Companies you can
choose from: “Construction Sample Co.”, “Retail Sample Co.”, and
“Service Sample Co.”
5
Select a sample company, then click Open.
The dialog box now shows a highlighted MultiLedger sample company
file.
6
Click Open again.
Once MultiLedger is running with a company open, MultiLedger’s
Command Center is enabled on your screen and you are ready to start
exploring MultiLedger.
MLManual.book Page 10 Wednesday, October 27, 2010 12:04 PM
10 Chapter 1 Getting Started
Opening Recently Used Companies on Macintosh
MultiLedger stores the paths to the last five open companies, which
makes opening frequently-used company files easy.
Note
1
Start MultiLedger by double-clicking the MultiLedger™ icon in the
MultiLedgerƒ folder.
2
Choose Open Recent Company from the File menu, then drag out to
select the desired company files.
If you use one set of company files on a regular basis, you can have
MultiLedger automatically open that set of files when you launch
MultiLedger. For more information, see “Setting User Settings” on
page 93.
MLManual.book Page 11 Wednesday, October 27, 2010 12:04 PM
The Command Center
The Command Center
When you open a company with MultiLedger, the first thing you’ll
notice is MultiLedger’s Command Center. The Command Center is
divided into three sections: Setup, Transactions, and Reports. To use
the Command Center, simply click the button of the window you want
to open.
When you have a company open with MultiLedger, the Command
Center is active and MultiLedger displays the path to your company
files at the bottom of the window, as well as how many users currently
have the company files open. When MultiLedger is running, but no
company files are open, the Command Center is disabled.
Note
Please note that not all menu commands are represented in the
Command Center. Some dialogs and windows, such as those found
under the File menu, can only be accessed using the pull-down menus
or keyboard shortcuts.
MLManual.book Page 12 Wednesday, October 27, 2010 12:04 PM
12 Chapter 1 Getting Started
Accessing Multiple Open Windows
With MultiLedger, you can have multiple windows open at once.
To open multiple windows using the Command Center
1
Click a button in the Command Center to open a window.
2
Click anywhere in the Command Center to reactivate it, or choose
Commands from the Windows menu.
3
Click another button in the Command Center.
To access multiple windows using the pull-down menus, select an
option from one of the pull-down menus, then select another.
Note
You can quickly go to an open window, by choosing the window’s name
from the Windows menu.
Where to Go From Here
To get acquainted with MultiLedger, try processing a few transactions
by following the procedures in Chapter 8 and Chapter 9 in a sample
company.
To begin setting up your company with MultiLedger, go to the next
chapter, “Initial Setup.”
To exit MultiLedger, choose Exit from MultiLedger’s File menu in
Windows. On Macintosh, choose Quit under the MultiLedger menu.
MLManual.book Page 13 Wednesday, October 27, 2010 12:04 PM
13
Chapter 2
Initial Setup
This chapter shows you how to set up a company with MultiLedger,
and discusses the following topics:
•
Entering company information,
•
Setting up your company’s chart of accounts and beginning
account balances,
•
Entering prior outstanding receivables and payables, as well as
inventory or service items.
Optional setup information, such as passwords, salespeople, sales tax,
budgets, jobs, preferences, user settings, shipping methods, profit
centers, and financial statement format are covered in Chapter 5,
“Setup Options.”
This chapter uses the sample companies provided on the MultiLedger
program disk to show how information appears after a company has
been set up. Your setup, of course, depends on your specific accounting
needs.
MLManual.book Page 14 Wednesday, October 27, 2010 12:04 PM
14 Chapter 2 Initial Setup
What You’ll Need
You’ll need the following information to set up a company in
MultiLedger:
Ending date of prior year
This is the last day of your company’s previous accounting year. For
many companies, the last day of their previous accounting year is
December 31st. However, MultiLedger can accommodate any monthend date for a company operating on a non-calendar fiscal year.
If your company is a new start-up company, and you don’t have an
ending date for your company’s previous fiscal year, you should enter
a date that corresponds to the year just prior to the year you wish to start
tracking company data. For example, if your new company’s fiscal year
starts January 1, 2008, you would enter 12/31/07 as the Ending Date of
Prior Year.
Starting Transaction
Entry
Note
Chart of accounts
Beginning ledger account
balances
Note
List of outstanding
accounts receivable and
accounts payable
invoices
You can start transaction entry at the beginning of your fiscal year or
any other month. For example, if financial information has already been
summarized through 3/31/08, and you would like to start daily
transactions on 4/1/08, account balances could be entered for January,
February, and March by doing a general journal entry to record the
transaction totals for each account for those months. Or you could enter
all transactions for those months so the detail is available for the entire
year.
While you cannot enter transaction details prior to your current fiscal
year, you can enter outstanding accounts receivable and accounts
payable transactions with dates in an earlier year.
You can adapt your current chart of accounts, create a new one, or copy
and then modify an existing chart of accounts from one of the
MultiLedger sample companies or the Sample COAs folder.
You can use the values from a trial balance or balance sheet report or
the period just prior to your current fiscal year for your beginning
balances in MultiLedger.
You can begin entering transactions in MultiLedger before all your
beginning balances are entered or finalized.
To track receivables and payables on an accrual basis, you should have
a list of outstanding receivables and payables. These are invoices that
your company has not yet received payment for or that your company
has not yet paid as of the first day of your current fiscal year.
MLManual.book Page 15 Wednesday, October 27, 2010 12:04 PM
What You’ll Need
Important
15
Outstanding receivables or payables that are dated prior to your current
fiscal year are entered as individual invoices for each customer or
vendor through the Sales Journal or Payables Journal.
Outstanding receivables or payables that are dated within your current
fiscal year should be entered as new transactions through the Customer
Invoices, Sales Journal, Item Purchases, or Payables Journal windows.
For more details, see the “Customer Transactions” and “Vendor
Transactions” chapters.
The total for outstanding receivables invoices and the total for
outstanding payables invoices you enter with a date prior to your current
fiscal year should match the beginning balances you set up for the
Accounts Receivable and Accounts Payable ledger accounts.
MLManual.book Page 16 Wednesday, October 27, 2010 12:04 PM
16 Chapter 2 Initial Setup
Steps to Setting Up
Below is a checklist of the steps you should follow to set up a company
with MultiLedger and the windows you’ll use. Some of the steps are
optional and may not apply to your particular company setup. The rest
of this chapter and Chapter 4, “Customer, Vendor & Item Setup”
explain each step in detail.
Steps for Creating a New
Company
MultiLedger Window
Create a new company file.
Copy an existing chart of accounts
from a MultiLedger sample company.
(You can also enter a new chart of
accounts, which would come later in
the process.)
Enter the company name and address.
Company Information
Select the Ending Date of Prior Year
Company Information
Enter/modify a chart of accounts
Chart of Accounts
Assign posting categories
Interface Accounts
Enter beginning ledger balances
Account Balances
Enter customers
Customer Setup
Enter outstanding receivables prior to
current fiscal year
Sales Journal
Verify outstanding receivables setup
Customer Reports
Enter Vendors
Vendor Setup
Enter outstanding payables dated
prior to current fiscal year
Payables Journal
Verify outstanding payables setup
Vendor Reports
Setup inventory or service items
Item Setup
Verify beginning inventory
Item Reports
MLManual.book Page 17 Wednesday, October 27, 2010 12:04 PM
Creating a New Company File on Windows
17
Creating a New Company File on Windows
1
Open MultiLedger by clicking Start to Programs, or the shortcut, then
choosing MultiLedger from the CheckMark MultiLedger group.
2
Choose New Company from the File menu.
3
Enter a name for your company files.
The default location for your company files is the MLedger directory.
Important
Use a short name, such as “ABC” instead of “American Business
Company,” to identify your company files. The name is used only to
identify your company’s data files—it does not appear on reports. A
short name will be easier to find in a window on your desktop or in a
dialog box than a long one.
You can easily rename your company files at any time. For more
information, see “Renaming Company Files” on page 255. You should
NEVER rename your files using any other method, as you may make
your files inaccessible.
4
Click Save.
MLManual.book Page 18 Wednesday, October 27, 2010 12:04 PM
18 Chapter 2 Initial Setup
A folder called “COAs” is installed in the “MLedger” folder. This
folder contains several charts of accounts that you can modify for your
own business. Appendix B, “Sample Charts of Accounts,” in this
manual shows each of the sample charts of accounts.
5
Select Yes or No.
If you want to create a new chart of accounts, click No. After you
click No, MultiLedger’s Command Center appears on your screen with
only the Company Information button enabled.
All other Command Center buttons are disabled until you set up basic
company information. The next section shows you how to do this.
If you want to copy an existing chart of accounts, click Yes.
Open the “COAs” folder, then select the chart of accounts you want to
copy. You can also open the “SampleCo” folder, select the folder for
the type of chart of accounts you want to copy, then select the chart of
accounts.
MLManual.book Page 19 Wednesday, October 27, 2010 12:04 PM
Creating a New Company File on Macintosh
6
19
Click Open.
MultiLedger’s Command Center appears on your screen with only the
Company Information button enabled.
All other Command Center buttons are disabled until you set up basic
company information. For more information, see “Setting Up Basic
Company Information” on page 21.
Creating a New Company File on Macintosh
1
Double-click the MultiLedger™ icon in the MultiLedgerf folder that
was installed in the Applications folder on your hard drive or use the
alias on the dock or desktop.
2
Choose New Company from the File menu.
3
Enter a name to identify your company, choose the location where you
want to save your company files, and click save. It’s best to save this
either on the Hard Drive or in the Documents folder. A new folder
containing your company files will be created with the name you entered.
Important
Use a short name for your company files, such as “ABC” instead of
“American Business Company”. The name is used only to identify the
folder that is created and the company’s data files saved in that folder.
For example, entering the name “ABCf” would contain data files whose
names begin with “ABC”. The “f” is automatically added to the folder
name to identify it as a folder.
The name “ABC” does not appear on reports or checks. You will set up
the company name for reports and checks in the company information
window.
Note
You can easily rename your company files at any time. For more
information, see “Renaming Company Files” on page 255. You should
never rename your files using any other method, as you may make your
files inaccessible.
MLManual.book Page 20 Wednesday, October 27, 2010 12:04 PM
20 Chapter 2 Initial Setup
4
After the new company name has been entered, click Save.
A folder called “Sample COAs” is installed in the “MultiLedgerƒ”
folder. This folder contains several charts of accounts that you can
modify for your own business. Appendix B, “Sample Charts of
Accounts,” in this manual shows each of the sample charts of accounts.
5
Select Yes or No.
If you want to create a new chart of accounts, click No and skip to
Step 1 on the next page.
If you want to copy an existing chart of accounts, click Yes.
Open the “Sample COAs” folder, then select the chart of accounts you
want to copy. Or you can also open the “ML Sample Companies”
folder, select the folder for the type of chart of accounts you want to
copy, then select the chart of accounts:
MLManual.book Page 21 Wednesday, October 27, 2010 12:04 PM
Setting Up Basic Company Information
21
Click Open.
MultiLedger’s Command Center appears on your screen with only the
Company Information button enabled.
All other Command Center buttons are disabled until you set up basic
company information. The next section shows you how to do this.
Setting Up Basic Company Information
When you first start a new company file in MultiLedger, only a few
MultiLedger commands are available until you enter basic company
information and select an Ending Date of Prior Year.
1
Click Company Information in the Command Center.
MLManual.book Page 22 Wednesday, October 27, 2010 12:04 PM
22 Chapter 2 Initial Setup
2
Note
Enter the company name that you want to appear at the top of reports
and on checks.
The company name and address also print on invoices and customer
statements. For more details, see “Using the Print Screen” on page 105.
3
Enter the company’s address.
4
If the last date of your previous fiscal year differs from the date in the
Ending Date of Prior Year field, enter the correct ending date.
The Ending Date of Prior Year should correspond to the end of your
fiscal year.
If you are starting a new company, and don’t have an ending date for
your company’s previous fiscal year, you should enter a date that
corresponds to the year just prior to the year you wish to start tracking
company data. For example, if your company is starting January 1,
2008, you would enter 12/31/07 as the Ending Date of Prior Year.
Enter the date in the MM/DD/YY format.
Initially, the last date of the previous calendar year is entered (based on
your computer’s system clock). You can override the date to match the
ending date of your company’s fiscal year.
Note
The Company Information window also shows some basic
information from your company files, such as number of general ledger
accounts, customers, vendors, items, jobs, and salespeople.
Note
If you will be efiling your 1099s, you need to fill in the Contact Name
and Phone number. The Email field is optional.
5
Important
Close the window.
The Ending Date of Prior Year cannot be changed after saving. If you
save the wrong dates, you must start over with a new company.
6
Click OK to save the company information, and Ending Date of Prior
Year or Click Cancel to return to the Company Information window.
MLManual.book Page 23 Wednesday, October 27, 2010 12:04 PM
Setting Up the Chart of Accounts
23
Setting Up the Chart of Accounts
The numbering and sequencing of a company’s accounts provides the
foundation for the financial reports generated by MultiLedger. While
you can add accounts as needed throughout the year, careful thought
and planning should go into the initial design and numbering of your
company’s chart of accounts.
Note
Setting up income or expense accounts alphabetically with at least 10
digits between numbers allows accounts to be easily searched and
allows for insertion of additional accounts in alphabetic order.
Guidelines for Setting Up Accounts
Account numbers must meet the following requirements:
•
Each account number (except for profit centers) must be four
digits long.
•
Each account number must adhere to the types of accounts shown
below.
For example: all Assets must fall within the 1000–1999 range, all
Liabilities must fall within the 2000–2999 range, and so on.
Note
Important:
Assets
1000-1999
Liabilities
2000-2999
Owner’s Equity or Capital
3000-3999
Income
4000-4999
Cost of Sales
5000-5999
Operating Expenses
6000-8999
Other Income
9000-9499
Other Expenses
9500-9999
Certain headings and ranges can be changed for financial statements.
For details, see “Customizing Financial Statements” on page 95.
•
Do not set up an account to accumulate income (or loss) for the
current year. MultiLedger calculates the current year net income,
but does not store it in a ledger account.
MLManual.book Page 24 Wednesday, October 27, 2010 12:04 PM
24 Chapter 2 Initial Setup
•
Be sure to enter a retained earnings or accumulated owner’s equity
account in the 3000–3999 range. Current year income (or loss) is
closed into this account at year end.
•
Enter only one Accounts Receivable account, one Accounts
Payable account, and one Inventory account.
Entering the Accounts
Note
If you are going to use profit centers, see “Setting Up Profit Centers” on
page 87 for guidelines about entering profit centers into your chart of
accounts.
1
Click Chart of Accounts in the Command Center.
Create your account
numbers according to
these guidelines
Designations
Type an account
number in this box,
and press TAB
...then type in the
account name here,
then click Save
If you want to produce
a Cash Flow
Statement, be sure to
assign the Cash Flow
Designations
Setup MICR to print on
blank check stock for
one or more bank
accounts
MLManual.book Page 25 Wednesday, October 27, 2010 12:04 PM
Setting Up the Chart of Accounts
2
Important
25
Enter an account number in the left-hand edit box and press TAB.
Account numbers must meet certain requirements. For more
information, to see the previous section “Guidelines for Setting Up
Accounts” on page 23
3
Enter the account description in the right-hand edit box.
4
(optional) If you will be printing on blank check stock and need to
setup MICR for your bank accounts, you can setup this information
now. For more information on setting up MICR encoding see “Setting Up
the MICR Encoding Information” on page 108.
5
If needed, click on the appropriate radio button for Cash Flow
Designation.
See table below for details.
6
Click Save to add the new account to the list.
Repeat steps 2–6 for each account that you want to enter into the Chart
of Accounts.
The accounts are saved when you close the Chart of Accounts
window.
Setting Up Cash Flow Designations
MultiLedger defaults to the Cash Flow designations in the following
chart to produce a Cash Flow Statement. You can change the default
and assign the accounts to a different designation by clicking on the
account in the list and clicking on the radio button for the Cash Flow
designation that you want to assign the account to, then click Save.
Designation
Default Account
Range
Cash
1000 - 1099
Cash balance at beginning and end of period.
Operating
Activity
1100 - 1899
2000 - 2599
Cash generated from day-to-day business
operations.
Investing
Activity
1900 - 1999
Cash invested in furniture, equipment or other
long term assets.
Financing
Activity
2600 - 3999
Includes loans, investments by the owner, and
retained earnings. Also includes reductions in
equity due to owners draws on profits.
Purpose
MLManual.book Page 26 Wednesday, October 27, 2010 12:04 PM
26 Chapter 2 Initial Setup
Modifying Account Numbers and Names
To modify an account, highlight the appropriate account line, modify
the existing account description, and press ENTER. Account numbers
cannot be modified—you must delete the entire account and then enter
a new account number. If you try to change an account number, a new
account will be added to the list but the old one will not be removed or
changed. For information on re-numbering accounts see
“Renumbering Accounts” on page 257
Deleting Accounts
To delete an account, highlight the appropriate account line, and
choose the Delete button. (If Delete is dimmed, an account is probably
not highlighted. Select an account and try again).
If you try to delete an account that has transactions from the open
months, the following warning appears:
MLManual.book Page 27 Wednesday, October 27, 2010 12:04 PM
Setting Up Posting Categories
27
Setting Up Posting Categories
Category Descriptions
The following table describes the purpose of each category and the
MultiLedger windows that use it.
Category
Cash Account
Asset 1000-1999
Accounts Receivable
Asset 1000-1999
only one allowed
Accounts Payable
Liability 2000-2999
only one allowed
Windows
Purpose
Vendor Payments
Disbursements Journal
Paying vendors and writing checks decreases
this account.
Customer Payments
Receipts Journal
Making deposits from customer payments and
cash receipts increases this account.
Customer Invoices
Sales Journal
Invoices increase this account.
Customer Payments
Customer payments decrease this account.
Item Purchases
Payables Journal
Buying inventory and entering payables
increases this account.
Vendor Payments
Vendor payments decrease this account.
Retained Earnings
Equity 3000-3999
Retained earnings, capital account, or owner’s
equity. Income is closed into this account when
the company’s fiscal year is closed.
Note: You must assign an account number to
the Retained Earnings posting category.
Shipping Charged
Income 4000-4999
Customer Invoices
If you charge customers shipping or freight on
invoices, assign the appropriate account here.
Shipping Paid
Cost of Sales 50005999
Item Purchases
If you separate shipping from the cost of
inventory, assign the appropriate account for
shipping paid to vendors.
MLManual.book Page 28 Wednesday, October 27, 2010 12:04 PM
28 Chapter 2 Initial Setup
Category
Windows
Inventory
Asset 1000-1999
only one allowed
Sales Tax Paid
Cost of Sales 50005999
Purpose
Item Purchases
Adjust Inventory
If you track inventory, assign the appropriate
account for buying and selling inventory items.
The calculated cost of sales will be subtracted
from this account when the item is sold in
Customer Invoices.
Item Purchases
If you separate sales tax from the cost of
buying inventory, assign the appropriate
account for sales tax paid to vendors here.
Assigning Posting Categories
1
Click Interface Accounts in the Command Center.
First, click a ledger
account...
...then click a category name to
assign the account to the
appropriate posting category
The list on the left shows your company’s chart of accounts. The list on
the right shows the posting categories.
MLManual.book Page 29 Wednesday, October 27, 2010 12:04 PM
Assigning Posting Categories
Note
29
Only one account number can be assigned to each posting category.
However, you can use different Cash Accounts by selecting them from
the pop-up list on the appropriate transaction window. The default
account, however, will stay the same.
2
Select a ledger account from the list on the left.
3
Click the appropriate posting category on the right.
Repeat steps 2–3 for each posting category that you need to use. For
details about each category, see the previous section, “Category
Descriptions.”
You must assign account numbers to the Cash and Retained Earnings
categories.
Important
If a category is not assigned a number but it is used in transactions,
MultiLedger posts the amount to the first account number (usually the
cash account) from your chart of accounts.
4
Close the window to save the categories.
To remove an account from a posting category, click the category
name without an account selected in the list on the left (To deselect an
account simply click it again so that it’s no longer highlighted). You
cannot remove an account from the Cash Account category. However,
you can re-assign it an account number.
To re-assign an account to a posting category, select a new account
from the list on the left, and then click the category on the right.
MLManual.book Page 30 Wednesday, October 27, 2010 12:04 PM
30 Chapter 2 Initial Setup
Setting Up Ledger Account Balances
You don’t have to enter account balances before you begin transaction
entry; however, to obtain a valid balance sheet you must enter the
beginning balances for the accounting period you will be starting
transaction entry in MultiLedger.
Note
You can enter or adjust these balances at any time during the current
year.
Important
A Retained Earnings ledger account must have been assigned to a
posting category (using the Interface Accounts window) before account
balances can be saved.
1
Click Account Balances in the Command Center.
After checking that the Ledger
Balance is 0.00, click Save
After all the balances have been
entered, the Ledger Balance should
be 0.00
Enter the
amount for the
account, and
press TAB
Credit balances
should be
prefaced with a
minus (-) sign
MLManual.book Page 31 Wednesday, October 27, 2010 12:04 PM
Setting Up Ledger Account Balances
2
31
Enter the amount for the highlighted account balance from your trial
balance or balance sheet report and press TAB.
Important
The amounts you enter should be current balances as of that date—not
monthly activity.
When you press TAB, the amount in the edit box above the list replaces
the highlighted account balance in the list, and the next account
balance in the list is highlighted for editing.
Enter beginning balances for each account using positive numbers to
represent debits and negative numbers, (prefaced with a minus sign(-)),
to represent credits. Typically, liability, equity, and income accounts
have credit balances (for example, –30719.60) while asset and expense
accounts have debit balances (no minus sign).
Repeat step 2 for each account balance. You can scroll through the
account balances using the scroll bar or tab key. You can also click an
account balance to select it for editing. Be sure to TAB out of the last
account you edit, or changes to that account will not be saved.
3
After all balances have been entered, check to see if the Ledger Balance
amount (just above the balance edit box) is 0.00.
If the Ledger Balance is not 0.00, then your accounts are out of
balance.
Why your Ledger
Balance might not be
0.00
Note
•
A common mistake is not putting a minus (–) sign before credit
amounts.
•
A current income account and value were entered. MultiLedger
automatically calculates the current year net income for the
income statement and balance sheet reports.
•
You have not tabbed out of the last amount entered.
Since MultiLedger functions as a double-entry bookkeeping system, the
Ledger Balance for each period should total 0.00. You can temporarily
Save a ‘non-zero’ balance, but you should correct the balances as soon
as possible to correctly reflect your company's financial information.
Once you correct the balances, the totals will be reflected in future
month transactions.
4
Click Save.
MLManual.book Page 32 Wednesday, October 27, 2010 12:04 PM
32 Chapter 2 Initial Setup
Setting Up Prior Outstanding Receivables
Outstanding receivables that are dated prior to your current fiscal year
are entered as invoices for each customer through the Sales Journal.
Transactions entered with dates prior to your current fiscal year do not
affect ledger balances.
Outstanding receivables that are dated within your current fiscal year
should be entered as new transactions through the Customer Invoices
or Sales Journal windows. For more details, see Chapter 8, “Customer
Transactions.”
The steps for entering prior outstanding receivables are as follows:
1
Set up Customer Terms.
2
Enter names and information for customers with outstanding
receivables on the Customer Setup window
3
Enter all outstanding receivables for each customer in the Sales
Journal.
4
Verify the outstanding receivables setup by checking balances on an
Accounts Receivable report on the Customer Reports window.
The first two steps, setting up customer terms and customer
information, are explained in Chapter 4, “Customer, Vendor & Item
Setup.” The following sections explain steps 3 and 4.
Entering Outstanding Receivables
Once entered, outstanding receivables appear in Customer Payments.
Before entering your outstanding receivables you should have already
set up customer terms and customer information.
The total for outstanding receivables invoices that you enter with a date
prior to your current fiscal year should match the beginning balance
you set up for the Accounts Receivable ledger account in Account
Balances.
MLManual.book Page 33 Wednesday, October 27, 2010 12:04 PM
Setting Up Prior Outstanding Receivables
1
33
Click Sales Journal in the Command Center.
Make sure you enter a date that
is prior to your Start Month
After the Sales Journal window opens, the cursor is in the Invoice #
field.
Note
For more details about the fields on the Sales Journal window, see
“Sales Journal Field Descriptions” on page 160.
MLManual.book Page 34 Wednesday, October 27, 2010 12:04 PM
34 Chapter 2 Initial Setup
2
Enter or edit the invoice number.
Each invoice must have a document number associated with it. Invoice
numbers can contain both letters and numbers, but must end in a
number and are limited to eight characters. Invoice numbers are
automatically increased by one after you save the transaction.
When the cursor enters the Customer field, a pop-up list of customers
appears:
If you want to
search the list
by any part of
the customer
name, make
sure the “Find
Anywhere”
check box is
selected
Customers
pop-up list
If the pop-up list doesn’t appear, customers have not yet been set up.
To set up customers, see Chapter 4, “Customer, Vendor & Item Setup.”
3
Select a customer from the list and click OK (or double-click a
customer name).
The customer name and address are entered in the Customer field, and
the cursor moves to the Date field.
4
Enter the original invoice date.
Enter the outstanding receivable’s invoice date using the format MM/
DD/YY. For example, December 27, 2008, would be entered like this:
12/27/08. Make sure you enter a date that is prior to your company’s
current fiscal year. The invoice date along with any terms selected will
determine the invoice’s due date.
Note
You can enter dates in the DD/MM/YY format by selecting the
“International Date Format [dd/mm/yy]” option on the Preferences
window under the File menu.
MLManual.book Page 35 Wednesday, October 27, 2010 12:04 PM
Setting Up Prior Outstanding Receivables
5
35
Enter a Statement Description.
Statement descriptions print on customer statements. You could enter a
purchase order number or note here for reference. If you don’t enter a
description, the customer name is automatically copied into this field
when you save the transaction.
After you press TAB, the cursor moves to the Terms field. A pop-up list
of terms appears:
Terms pop-up
list
If you want to
search the list
by any part of
the term
name, make
sure the “Find
Anywhere”
check box is
selected
If terms have not yet been set up, the cursor skips the Terms field and
moves to the Ledger Account field. To set up terms, see “Customer
Terms” on page 62. If default terms were selected in the Customer
setup window, those terms will be highlighted when this field is
selected.
MLManual.book Page 36 Wednesday, October 27, 2010 12:04 PM
36 Chapter 2 Initial Setup
6
Select the desired term and click OK (or double-click the desired term)
or click Cancel to not enter any terms.
The cursor moves to the Ledger Account field, and a pop-up list of
accounts appears:
Ledger
Accounts
pop-up list
7
If you want to
search the list
by any part of
the account
number, make
sure the “Find
Anywhere”
check box is
selected
Select a sales account from the list and click OK (or double-click the
account name).
You can type the first few characters of the account number or name to
automatically select the desired account.
Since transactions that are dated prior to your current fiscal year do not
affect General Ledger balances, the specific ledger account you choose
really doesn’t matter. However, usually when you enter a transaction in
the Sales Journal, you should choose a sales account in the 4000-4999
range.
After a ledger account is entered, the cursor moves to the Job field.
Unless jobs have been set up already, the cursor skips the Job field and
moves to the Description field. Even if you want to use jobs, you don’t
need to set up any jobs until after your basic company setup is finished;
a jobs report will not show any transactions dated prior to your current
fiscal year.
8
Enter a description.
If you don’t enter a description, the customer’s name will
automatically be copied to this field.
MLManual.book Page 37 Wednesday, October 27, 2010 12:04 PM
Setting Up Prior Outstanding Receivables
9
37
Enter the total amount of the prior outstanding invoice.
You don’t need to enter a dollar sign ($) or any zeros for .00 cents.
10 Press TAB to add the line to the detail list.
After pressing TAB, the invoice
detail line is listed here....
Note
...and the Invoice Total is updated
You should enter the total for the outstanding invoice on one detail line.
11 Click Save.
12 Click Yes.
After clicking Yes, the document is saved, and the invoice number is
automatically increased by one.
13 Repeat steps 2-12 for each outstanding receivable.
MLManual.book Page 38 Wednesday, October 27, 2010 12:04 PM
38 Chapter 2 Initial Setup
Verifying the Outstanding Receivables
Setup
After entering all your outstanding receivables that are dated before
your current fiscal year, you can use a Customers report to verify the
setup.
1
Click Customer Reports in the Command Center.
Click View or Print
to see the report
Don’t worry about
the sorting options
or Cutoff Date for
this report
All the customers
you set up are
shown here
2
Make sure Accounts Receivable is selected.
Don’t select any customers from the customer list. When no customers
are highlighted, all the customers with outstanding invoices will be
reported.
Note
If you have entered current year transactions, you should change the
Cutoff Date to the prior year-end date. Otherwise, the Cutoff Date is not
important.
MLManual.book Page 39 Wednesday, October 27, 2010 12:04 PM
Setting Up Prior Outstanding Receivables
3
39
Click View or Print.
After clicking View, a report window appears:
Report total
The report total and the
Accounts Receivable
balance should agree
4
Note
This is the amount that was
entered for the Accounts
Receivable balance on the
Verify that the total for the “Amount” column on the report equals the
“Accounts Receivable” balance listed on the report.
Customer reports are discussed in more detail in Chapter 11, “Customer,
Vendor & Item Reports.”
What to do if your outstanding receivables
don’t balance
Several reasons could cause your outstanding receivables not to
balance with the Accounts Receivable ledger balance:
•
An outstanding receivable was not entered.
Solution: Enter the outstanding receivable in the Sales Journal.
•
The wrong amount was entered for an outstanding receivable.
Solution: Delete the incorrect outstanding receivable by following the
steps below, and then enter the correct outstanding receivable in the
Sales Journal.
MLManual.book Page 40 Wednesday, October 27, 2010 12:04 PM
40 Chapter 2 Initial Setup
Deleting an incorrect outstanding receivable entry
Important
Deleting an outstanding receivable from Customer Payments in the
following way will leave no record of the deletion. This procedure is
used only to delete incorrect outstanding receivables that were entered
with a date prior to your current fiscal year, and should not be used to
delete outstanding receivables dated within or after your current fiscal
year.
1
Click Customer Payments in the Command Center.
2
Select the appropriate outstanding receivable from the list.
3
Choose the Delete button.
4
Click Yes.
The outstanding receivable is deleted and removed from the list. Since
the outstanding receivable did not affect any general ledger balances
when it was entered (because it had a date that was prior to your
company’s current fiscal year), it should not affect any general ledger
balances when it is deleted.
•
Accounts receivable had an incorrect starting balance.
Solution: Correct the accounts receivable balance by editing the
amount on Account Balances.
MLManual.book Page 41 Wednesday, October 27, 2010 12:04 PM
Setting Up Outstanding Payables
41
Setting Up Outstanding Payables
Outstanding payables are those invoices that your company has not yet
paid. Outstanding payables that are dated prior to your current fiscal
year are entered as totals for each vendor in the Payables Journal.
Transactions entered with dates prior to your current fiscal year do not
affect ledger balances.
Outstanding payables that are dated within or after your current fiscal
year should be entered as new transactions in Item Purchases or the
Payables Journal windows. For more details, see Chapter 9, “Vendor
Transactions.”
The total for outstanding payables invoices that you enter with a date
prior to your current fiscal year should match the beginning balance
you set up for the Accounts Payable ledger account on Account
Balances.
The steps for setting up outstanding payables are as follows:
1
Enter names and information for vendors with outstanding payables in
Vendor Setup.
2
Enter all the prior outstanding payables for each vendor in the
Payables Journal.
3
Verify the outstanding payables setup by checking balances on an
Accounts Payable report.
The first step, setting up vendor information, is explained in the
Chapter 4, “Customer, Vendor & Item Setup.” The following sections
explain steps 2 and 3.
MLManual.book Page 42 Wednesday, October 27, 2010 12:04 PM
42 Chapter 2 Initial Setup
Entering Outstanding Payables
Once entered, prior outstanding payables appear in Vendor Payments.
Before entering your outstanding payables you should have already set
up vendor information.
1
Click Payables Journal in the Command Center.
Make sure you enter a date
that is prior to your current
fiscal year
When the Payables Journal window opens, the cursor is in the
Document # field.
Note
For more details about the fields on the Payables Journal window, see
“Payables Journal Field Descriptions” on page 202.
MLManual.book Page 43 Wednesday, October 27, 2010 12:04 PM
Setting Up Outstanding Payables
2
43
Enter or edit the document number.
Each Payables Journal document must have a document number
associated with it. Document numbers can contain both letters and
numbers, but must end in a number and are limited to eight characters.
Document numbers are automatically increased by one after you save
the transaction.
When the cursor enters the Vendor field, a pop-up list of vendors
appears:
Vendors
pop-up list
If you want to
search the list
by any part of
the Vendor
name, make
sure the “Find
Anywhere”
check box is
selected
If the pop-up list doesn’t appear, vendors have not yet been set up. To
set up vendors, see Chapter 4, “Customer, Vendor & Item Setup.”
3
Select a vendor from the list and click OK (or double-click a vendor
name).
The vendor name, address, and any terms are entered in the Vendor
and Due Date fields, and the cursor moves to the Date field.
4
Enter the outstanding payable’s date.
Enter the outstanding payable’s date using the format
MM/DD/YY. For example, December 5, 2008 would be entered like
this: 12/5/08. Make sure you enter a date that is prior to your
company’s current fiscal year.
The initial due date for the payable is 30 days (as defined on the
Preferences window under the File menu) after the document date
unless other terms were set up for the vendor on the Vendor Setup
window. To change the due or discount dates, click under the label
“Due Date” and edit the values.
MLManual.book Page 44 Wednesday, October 27, 2010 12:04 PM
44 Chapter 2 Initial Setup
Note
You can enter dates in the DD/MM/YY format by selecting the
“International date format [dd/mm/yy]” option on the Preferences
window under the File menu.
5
Enter a check stub description.
The description will print on a check stub. You could enter the
vendor’s reference (invoice) number or note here for reference. If you
don’t enter a description, the vendor’s name is automatically copied
into this field when you save the transaction.
After pressing TAB, the cursor moves to the Ledger Account field, and
a pop-up list of accounts appears:
Ledger
Accounts
pop-up list
6
If you want to
search the list
by any part of
the account
number, make
sure the “Find
Anywhere”
check box is
selected
Select an expense account from the list and click OK (or double-click
the account name).
You can type the first few characters of the account number or name to
automatically select the desired account.
Since transactions that are dated prior to your current fiscal year do not
affect General Ledger balances, the specific ledger account you choose
really doesn’t matter. However, usually when you enter a transaction in the
Payables Journal, you should choose an expense account in the 6000-8999
range.
After a ledger account is entered, the cursor moves to the Job field. Unless
jobs have been set up already, the cursor skips the Job field and moves to
the Description field. Even if you want to use jobs, you don’t need to set
up any jobs until after your basic company setup is finished; a jobs report
will not show any outstanding transactions dated prior to your current
fiscal year.
MLManual.book Page 45 Wednesday, October 27, 2010 12:04 PM
Setting Up Outstanding Payables
7
45
Enter a description.
If you don’t enter a description, the vendor’s name will automatically
be copied to this field. Or you can set a Preference under the File
menu to Use Check Stub Description in Payables Journal. For
information on setting preferences see “Setting Program Preferences”
on page 90
8
Enter the amount of the prior outstanding payable.
You don’t need to enter a dollar sign ($) or any zeros for .00 cents.
9
Press TAB to add the line to the detail list.
After pressing TAB, the
invoice detail line is listed
here....
...and the Invoice Total is updated
10 Click Save.
11 Click Yes.
After clicking Yes, the document is saved, and the document number is
automatically increased by one.
Note
For more detailed descriptions of the fields in the Payables Journal , see
“Payables Journal Field Descriptions” on page 202.
MLManual.book Page 46 Wednesday, October 27, 2010 12:04 PM
46 Chapter 2 Initial Setup
Verifying the Outstanding Payables Setup
After entering all your outstanding payables that are dated before your
current fiscal year, you can use a Vendors report to verify the setup.
1
Click Vendor Reports in the Command Center.
2
Make sure Accounts Payable is selected.
Click View or Print
to see the report
Don’t worry about
the sorting options
or Cutoff date for
this report
All the vendors you
set up are shown
here
Don’t select any vendors from the vendors list. When no vendors are
highlighted, all the vendors with outstanding payables will be reported.
Note
If you have entered current year transactions, you should change the
Cutoff Date to the prior year-end date. Otherwise, the Cutoff Date is not
important.
MLManual.book Page 47 Wednesday, October 27, 2010 12:04 PM
Setting Up Outstanding Payables
3
47
Click View or Print.
After clicking View, a report window appears:
Report total
The report total and the
Accounts Payable balance
should agree
4
Note
This is the amount that was
entered for the Accounts
Payable balance on the
Account Balances window
Verify that the total for the “Amount” column on the report equals the
“Accounts Payable” balance listed on the report.
Vendor reports are discussed in more detail in Chapter 11, “Customer,
Vendor & Item Reports.”
What to do if your outstanding payables
don’t balance
Several reasons could cause your outstanding payables not to balance
with the Accounts Payable ledger balance.
•
An outstanding payable was not entered.
Solution: Enter the outstanding payable in the Payables Journal.
•
The wrong amount was entered for an outstanding payable in
the Payables Journal.
Solution: Delete the incorrect outstanding payable by following the
steps below, and then enter the correct outstanding payable.
MLManual.book Page 48 Wednesday, October 27, 2010 12:04 PM
48 Chapter 2 Initial Setup
Deleting an incorrect outstanding payable entry
Important
Deleting an outstanding payable from Vendor Payments in the
following way will leave no record of the deletion. This procedure is
used only to delete incorrect outstanding payables that were entered
with a date prior to your current fiscal year, and should not be used to
delete outstanding payables dated within or after your current fiscal
year.
1
Click Vendor Payments in the Command Center.
2
Select the appropriate outstanding payable from the list.
3
Choose the Delete button.
4
Click Yes.
The outstanding payable is deleted and removed from the list. Since
the outstanding payable did not affect any general ledger balances
when it was entered (because it had a date that was prior to your
company’s current fiscal year), it should not affect any general ledger
balances when it is deleted.
•
Accounts payable had an incorrect starting balance.
Solution: Correct the accounts payable balance by editing the amount
on Account Balances.
MLManual.book Page 49 Wednesday, October 27, 2010 12:04 PM
Setting Up Items
49
Setting Up Items
Items can be classified as inventory or non-inventory (for service
sales).
The steps for setting up items are as follows:
1
Enter the name and information for each inventory item by following
the instructions “Setting Up Items” on page 79.
2
Verify the items you set up by checking balances on an Inventorycurrent report.
The first step is described in Chapter 4, “Customer, Vendor & Item
Setup.” Step 2 is explained in the following section.
Verifying the Items Setup
After entering all your inventory items, you can use an Inventorycurrent report to verify the setup. The total On Hand Cost for all your
items should equal the general ledger balance for the inventory
account. The following procedure shows you how to check these
values.
1
Click Item Reports in the Command Center.
2
Select Inventory-current radio button.
You do not need to select any inventory items from the items list.
When no items are highlighted, all inventory items will be reported.
3
Click View or Print.
After clicking View, a report window appears:
MLManual.book Page 50 Wednesday, October 27, 2010 12:04 PM
50 Chapter 2 Initial Setup
Report total
The report total and the
Inventory balance should
agree
4
This is the amount that was
entered for the Inventory
balance on the Account
Balances window
Verify that the report total equals the “Inventory” balance listed.
These two amounts should agree.
Note
Item reports are discussed in more detail in Chapter 11, “Customer,
Vendor & Item Reports.”
What to do if your inventory doesn’t
balance
The following are some reasons that could cause your inventory not to
balance with the Inventory ledger balance:
•
An incorrect starting inventory balance was entered.
Solution: Correct the inventory balance by editing the amount in
Account Balances.
•
Incorrect values were entered for an inventory item.
Solution: Double check the values entered for an item on Item Setup.
MLManual.book Page 51 Wednesday, October 27, 2010 12:04 PM
51
Chapter 3
Backing Up &
Restoring
This chapter discusses the importance of backing up your company
files. It also discusses how to make and how to restore a backup.
MLManual.book Page 52 Wednesday, October 27, 2010 12:04 PM
52 Chapter 3 Backing Up & Restoring
Backing Up Your Company Files
MultiLedger has a backup feature that compresses your company files
into a Zip file (.zip) and lets you choose where you want to save the
archive. When you want to open a backup archive, you must first
restore it using the Restore Backup command under the File menu.
For more information on restoring a backup, see “Restoring a Backup
Archive on Windows” on page 55. Or “Restoring a Backup Archive on
Macintosh” on page 57.
Important
We cannot stress enough the importance of making frequent backups of
your company files. Backups are sometimes the only way to restore data
that is lost due to a power failure or a system crash. Please use the
Backup feature in MultiLedger, we cannot support or help recover
backups made by other methods.
Suggestions for Backing Up
Backing up your company files is very important. While there are no
set rules for how frequently you should back up, you should consider
how much work you could reasonably reconstruct if a crash or problem
should occur. For some companies, this would mean daily backups; for
others, once a month is fine. If you are using MultiLedger in a multiuser environment, you should consider making daily backups.
It is also important to keep a backup that is not on your hard drive, in
case your hard drive should fail. You could backup to a another hard
drive, or any other external media. (Please keep in mind that floppy
disks are not always reliable media.)
Automatic Backup Reminder
You can set up an automatic alert in MultiLedger that will remind you
to make a backup of your company files. This way, you can be sure you
have current backups of your accounting records. For more
information on setting up the automatic backup reminder, see “Setting
User Settings” on page 93.
MLManual.book Page 53 Wednesday, October 27, 2010 12:04 PM
Backing Up Your Company Files on Windows
53
Backing Up Your Company Files on Windows
1
Choose Backup Company from the File menu.
A dialog appears that allows you to name the backup archive and
choose where you want to save it.
Use the pop-up menu to choose
where you want to save the
backup. You can even backup to
a floppy or ZIP drive
The default name for your
backup is “m,” followed by part
of your company name, today’s
date, and the suffix .zip
2
Change the name of the backup archive, if necessary.
The default name for the archive is “m,” followed by part of your
company name, the current date, and the suffix “.zip.” Don’t change or
delete the “.zip” suffix.
3
Choose where you want to save the backup archive.
Be sure to pay attention to where you save the backup. You may want
to change the folder using the pull-down menu and list below. You can
save the backup archive anywhere, such as on your hard drive or
another type of media.
Note
While it’s a good idea to store backups on external media, you could
also make a folder named “Backups” in the MLedger directory and
store all your backups there. That way they will be easy to find when
you want to restore one.
4
Click Save.
When the backup is complete a “Backup successful” message appears.
MLManual.book Page 54 Wednesday, October 27, 2010 12:04 PM
54 Chapter 3 Backing Up & Restoring
Backing Up Your Company Files on Macintosh
1
Choose Backup Company from the File menu.
A dialog appears that allows you to name the backup archive and
choose where you want to save it.
The default name for your
backup is the letter “m”,
plus part of the name of
your company files
followed by today’s date
and the suffix .zip.
Use the pop-up menu to
choose where you want to
save the backup. You can
even backup to a floppy or
ZIP drive.
2
Change the name of the backup archive, if necessary.
The default name for the archive is the letter “m” (for MultiLedger),
plus part of the name of your company files followed by the current
date and the suffix “.zip.” Don’t change or delete the “.zip” suffix.
3
Choose where you want to save the backup archive.
The default for the dialog is your company folder. You should change
the folder before clicking Save. You can save the backup archive
anywhere, such as on your hard drive, or another type of media.
4
Note
Click Save.
While it’s a good idea to store backups on external media, you could
also create a folder in the MultiLedgerƒ folder, name it “Backups,” and
store all your backups there. That way they will be easy to find when
you want to restore one.
MLManual.book Page 55 Wednesday, October 27, 2010 12:04 PM
Restoring a Backup Archive on Windows
55
Restoring a Backup Archive on Windows
In order to open company files stored as a .zip backup archive, first you
must restore the backup archive.
Important
If you try to double click the “.zip” backup file to open, you will most
likely get the message that it can’t find an application to open. The files
must be restored using the Restore Backup command as described
below before they can be opened.
1
Open MultiLedger, but don’t open a set of company files. Or, if a
company is open, choose Close Company from the File menu.
2
Choose Restore Backup from the File menu.
An Open dialog box appears.
3
Locate the backup archive using the dialog box.
If you backed up your company files on a an external drive, you should
insert the disk now. Use the Look In pop-up menu and list below to
locate the backup archive.
Note
You may have to
use the pop-up
menu and list to
locate the .zip
backup archive
saved using the
Backup Company
command, then
click Open
If you created a folder named “Backups” in the MLedger directory, as
suggested above, simply use the Look In pop-up menu to locate the
Backups folder in the Mledger directory (in Program Files), then click
Open.
MLManual.book Page 56 Wednesday, October 27, 2010 12:04 PM
56 Chapter 3 Backing Up & Restoring
4
Click Open.
An Extract To dialog similar to the following appears:
Use the list to choose where
you want to save the restored
backup.
Avoid restoring the backup in
the folder where your original
company files are located, as
they will replace your original
files
5
Select where you want to restore the company files using the Extract To
dialog box.
Note
If you created a folder named “Backups” as suggested in the Backing
Up Your Company Files section above, you could also restore the
backup in the Backups folder. Simply locate and select the Backups
folder in the MLedger directory (in Program Files), then click OK. Keep
in mind that you may have to click the plus sign (+) next to a folder to
see the folder’s contents.
Important
Unless your intent is to replace your original company files with the
restored files, you should avoid selecting the folder where your original
company files are located, as the restored files will replace your original
files.
MLManual.book Page 57 Wednesday, October 27, 2010 12:04 PM
Restoring a Backup Archive on Macintosh
Note
57
You can create a new folder for the restored files by clicking the Make
New Folder button on this dialog. Right Click “New Folder” then
choose Rename. Type a name for the folder, then hit Enter on the
keyboard. Make sure the folder you just created is automatically
selected as the location for the restored files.
6
Click OK.
7
The restored company files open automatically.
Restoring a Backup Archive on Macintosh
In order to open company files stored as a backup archive, first you
must restore the backup archive.
Important
If you try to double click the “.zip” backup file to open, you will most
likely get the message that it can’t find an application to open. The files
must be restored using the Restore Backup command as described
below before they can be opened.
1
Open MultiLedger, but don’t open a set of company files. Or, if a
company is open, choose Close Company from the File menu.
2
Choose Restore Backup from the File menu.
An Open dialog box appears.
3
Locate the backup archive using the dialog box.
If you backed up your company files on an external drive, you should
insert the disk now. Use the pop-up menu and list to locate the backup
archive.
Note
If you created a folder named “Backups” in the MultiLedgerƒ, as
suggested above, simply use the dialog box to locate the Backups folder
in the MultiLedgerƒ folder (on your hard drive), then click Open.
MLManual.book Page 58 Wednesday, October 27, 2010 12:04 PM
58 Chapter 3 Backing Up & Restoring
Use the pop up menu and list
to locate the backup archive,
then click Open
4
Click Open.
A dialog similar to the following appears:
Use the pop-up menu and list
to choose where you want to
save the restored backup.
Avoid restoring the backup in
the folder where your original
company files are located, as
they will replace your original
files
MLManual.book Page 59 Wednesday, October 27, 2010 12:04 PM
Restoring a Backup Archive on Macintosh
5
59
Select where you want to restore the company files using the dialog
box.
Note
If you created a folder named “Backups” as suggested in the Backing
Up Your Company Files section above, you could also restore the
backup in the Backups folder. Simply locate and select the Backups
folder in the MultiLedgerƒ folder (on your hard drive), then click Open
or Choose.
Important
Unless your intent is to replace your original company files with the
restored files, you should avoid selecting the folder where your original
company files are located, as the restored files will replace your original
files.
Note
You can create a new folder for the restored files by clicking the New
Folder button on this dialog. Name the folder, then click Create. The
folder you just created is automatically selected as the location for the
restored files.
6
Click Open or Choose.
The restored company files open automatically.
The original backup archive remains unchanged and can be restored
again.
MLManual.book Page 60 Wednesday, October 27, 2010 12:04 PM
60 Chapter 3 Backing Up & Restoring
Using Backups in a Cross-Platform Environment
Because MultiLedger compresses the backup as .zip file, you can
restore a backup on any Macintosh computer or Windows computer
that is running the current version of MultiLedger. This makes it easy
to transfer company files between Mac and Windows platforms.
Note
Since PCs cannot read a Macintosh-formatted disk, you should make all
backups to PC-formatted disks if you’re using the backups in a crossplatform environment.
MLManual.book Page 61 Wednesday, October 27, 2010 12:04 PM
61
Chapter 4
Customer, Vendor &
Item Setup
This chapter discusses the following topics:
•
Defining customer terms
•
Setting up customers
•
Setting up vendors
•
Setting up items
MLManual.book Page 62 Wednesday, October 27, 2010 12:04 PM
62 Chapter 4 Customer, Vendor & Item Setup
Customer Terms
Using customer terms is optional in MultiLedger. Customer terms
determine how long a customer has until payment is due and whether
they’ll receive a discount for early payment. If you don’t define
customer terms for your company, an invoice’s due date will be the
same as the invoice date. You can define up to twelve customer terms.
Customer Terms Field Descriptions
The following section describes the fields on Customer Terms.
Description
Enter a name up to 13 characters long, including letters, numbers, and
symbols.
Terms are usually named for the time period and any discounts that
should apply. For example, “2/10 Net 30” means the invoice’s due date
is 30 days after the invoice date, and that the customer will receive a 2%
discount if they pay within 10 days.
Days til Due
Enter the number of days until the invoice is due. Days til Due
determines the due date for invoices that use the term.
For example, if you enter 30 for Days til Due for a “2/10 Net 30” term,
the due date for an invoice using “2/10 Net 30” and dated 3/7/08 would
be 4/6/08.
Days til Due is also used to create aged accounts receivable reports and
customer statements. The maximum number of Days til Due is 999.
Note
Early Payment
Discount
If no value is entered in Days til Due, then the invoice date is used as
the due date, regardless of the name of the term.
Early Payment Discount determines the discount percentage the
customer will receive if an invoice is paid within the specified discount
period. The Early Payment Discount is applied automatically on
Customer Payments if the customer pays within the discount period.
For example, if you enter 2 for the Early Payment Discount and an
invoice using that term has a total of $1000.00 due, the discount would
equal $20.
Enter a whole number, up to two digits, for the Early Payment Discount.
The maximum Early Payment Discount is 99.
Early Payment Due
Days
Early Payment Due Days determines the number of days after the
invoice date that an early payment discount applies. The discount date
appears on Customer Payments.
Enter a whole number, up to two digits, for the Early Payment Due
Days. The maximum Early Payment Due Days is 99.
MLManual.book Page 63 Wednesday, October 27, 2010 12:04 PM
Setting Up Customer Terms
63
Setting Up Customer Terms
1
Click Customer Terms in the Command Center.
The example below shows customer terms that are set up in the Retail
Sample Company:
2
Note
Enter a name for the term.
Enter your most common terms first so they appear first in the Terms
pop-up list during transaction entry. The first term in the pop-up list is
highlighted automatically unless the customer has been set up with
Default Terms.
3
Continue defining the term by filling in the appropriate fields.
See the section, “Customer Terms Field Descriptions,” earlier in this
chapter for more information and tips.
4
Click Save.
The prefix number and colon (:) are automatically entered when you
click Save.
5
Repeat steps 2–4 for up to 12 customer terms.
MLManual.book Page 64 Wednesday, October 27, 2010 12:04 PM
64 Chapter 4 Customer, Vendor & Item Setup
Modifying Customer Terms
Important
After modifying a term, any outstanding Customer Invoices or Sales
Journal invoices using the old term have the new term’s name (if
changed), but the Days til Due, Early Payment Discount, and Early
Payment Due Days will not be changed unless the invoice is modified
and resaved.
To edit or modify a term, select the term from the list, modify the
information, and click Save.
Deleting Customer Terms
You cannot delete a single term from the list. You can, however, delete
the entire list of terms.
To delete the entire list of terms, first select a term from the list. Then,
while holding down the Ctrl key (Windows) or the COMMAND key ( )
(Macintosh), click Save.
Important
After deleting the list of terms, any existing Customer Invoices or Sales
Journal invoices using the old term will have no term name, but the
Days til Due, Early Payment Discount, and Early Payment Due Days
will not change unless the invoice is modified and resaved.
MLManual.book Page 65 Wednesday, October 27, 2010 12:04 PM
Customers
65
Customers
Customer Setup Field Descriptions
The following section describes the fields on Customer Setup.
Inactive
Check this box to designate a customer as inactive. Inactive customers
appear at the bottom of a customer list with a tilde (˜) before their
names.
Marking a customer as inactive is an alternative to immediately deleting
a customer. You can still view reports for inactive customers, and you
can make an inactive customer active again by unchecking the Inactive
box. An Inactive customer, however, is not deleted when you close the
year.
Delete when Close
Year
Marking the option “Delete when Close Year” leaves the customer as
active, and as long as no outstanding invoices exist for the customer,
that customer will be deleted when the year is closed.
Name
Enter a name up to 36 characters long, including spaces.
Code
You can use an optional code field to sort or classify customers. For
details, see “Codes for Customers, Vendors, and Items” on page 115.
Contact
Enter a contact name up to 30 characters long, including spaces.
Address
Enter an address up to 30 characters long, including spaces.
City, State, Zip
Enter city, state, and zip code up to 30 characters long, including spaces.
Notes and Add’l Notes
Enter any internal notes you may have for a customer, such as the
preferred shipping method or an internal customer number. The Notes
field and Add’l Notes field are each 30 characters long. The notes
entered here appear in the Cust Notes field in Customer Invoices and the
Sales Journal, and on the Customer Information report.
There is a check box on Preferences under the File menu that, when
checked, allows the Notes and Add’l Notes you’ve set up for a customer
to print on Sales Journal invoices. They do not, however, print on
Customer Invoices or appear in the General Ledger.
Phone
Enter a customer’s phone number up to 30 characters long, including
spaces.
The information entered here appears on the Customer Information
report.
Fax
Enter a customer’s fax number up to 30 characters long, including
spaces.
This information appears on the Customer Information report.
MLManual.book Page 66 Wednesday, October 27, 2010 12:04 PM
66 Chapter 4 Customer, Vendor & Item Setup
Email
Enter a customer’s email address up to 30 characters long. When you
click the button at the top of the window, it will take you to your email
and automatically enter the email address in this field.
If you have an email address setup, you can email a quote or invoice
directly to your customer.
This information appears on the Customer Information report.
Website
Enter either a customer’s website up to 30 characters long, including
spaces. You must include the www. portion of the address. When you
click the button at the top of the window, it will take you to the website
listed in this field.
This information appears on the Customer Information report.
Terms
When you click to the right of this label, a pop-up list of terms appears.
If the pop-up list does not appear, terms have not yet been set up.
The term entered here will be highlighted automatically in the pop-up
list when you reach the Terms field in Customer Invoices or the Sales
Journal.
Reseller ID
Enter a customer’s reseller identification number up to 15 characters
long, including spaces.
This number appears on the Customer Information report.
Salesperson
When you click to the right of this label, a pop-up list of salespeople
appears. If the pop-up list does not appear, salespeople have not yet
been set up.
The salesperson entered here will be highlighted automatically in the
pop-up list when you reach the Salesperson field in Customer Invoices.
Credit Limit
Enter the credit limit for a customer. Enter a whole number, with no
decimal points. If you exceed the credit limit when you save a Customer
Invoice or Sales Journal invoice, an alert appears.
Enter the credit limit as a whole number up to nine digits long.
Sales Tax1
When you click to the right of this label, a pop-up list of sales tax
categories appears. If the pop-up list does not appear, sales tax
categories have not yet been set up.
The sales tax entered here will be highlighted automatically in the popup list when you reach the first Sales Tax field in Customer Invoices.
MLManual.book Page 67 Wednesday, October 27, 2010 12:04 PM
Customers
Sales Tax2
67
When you click to the right of this label, a pop-up list of sales tax
categories appears. If the pop-up list does not appear, sales tax
categories have not yet been set up.
The sales tax entered here will be highlighted automatically in the popup list when you reach the second Sales Tax field in Customer Invoices,
unless you have the Skip Tax 2 During Invoice Entry box checked on
the Preferences window under the File menu.You could use the default
Sales Tax1 and Sales Tax2 fields to keep track of the different sales tax
categories for a customer. For example, you could designate Sales Tax1
as the customer’s state tax, and Sales Tax2 as the customer’s local tax.
That way, the correct sales tax categories will be selected automatically
when you reach the Sales Tax fields on a Customer Invoice.
Sales Discount %
The Unit Price on items sold to a customer on Customer Invoices will
be reduced by the percentage entered here.
The maximum Sales Discount % is 99.99.
Sales Account
When you click to the right of this label, a pop-up list of your chart of
accounts appears. Select the account to associate with the customer and
click OK. When the customer is selected in the Sales Journal, the
account will be automatically highlighted in the Ledger Account popup list.
To remove the default account, click to the right of the label to open the
pop-up list and click Cancel.
Pricing Level
Click the appropriate radio button to assign the correct pricing level for
items for your customers. Pricing levels 1, 2, and 3 refer to the prices
you set up for your items on Item Setup. If you do not assign a pricing
level to a customer, Selling Price 1 will be selected automatically for
items on Customer Invoices.
MLManual.book Page 68 Wednesday, October 27, 2010 12:04 PM
68 Chapter 4 Customer, Vendor & Item Setup
Setting Up Customers
1
Click Customer Setup in the Command Center.
Notes entered here
appear on Customer
Invoices and Sales
Journal windows
Default selections
made here save time
during transaction
entry
If you attempt to save an invoice that
exceeds the credit limit entered here, a
warning appears.
2
Note
Enter a customer name.
You can use an optional code field to sort or classify customers. For
details, see “Codes for Customers, Vendors, and Items” on page 115.
3
Enter a contact name and the customer’s address.
4
Enter any other relevant customer information.
See “Customer Setup Field Descriptions” on page 65 for more
information and tips.
5
Click Save.
The customer name is added to the list on the right.
MLManual.book Page 69 Wednesday, October 27, 2010 12:04 PM
Customers
69
Modifying Customer Information
To modify existing customer information, first select the customer
name from the list. Then modify the relevant customer information. Be
sure to click Save after modifying any information, or your changes
will be lost.
Deleting a Customer
You can delete a customer as long as the customer is not associated
with any transactions in the open months. First, select the customer
from the list, then click the Delete button.
If you try to delete a customer that is associated with transactions in the
open months, the following message appears:
Important
Note
Because of restrictions with the multi-user capabilities of MultiLedger,
you must be the only user accessing the company files to delete a
customer.
As an alternative to deleting a customer, you can mark a customer as
inactive by checking the “Inactive” box or selecting “Delete when
Close Year on Customer Setup See “Customer Setup Field
Descriptions” on page 65.
MLManual.book Page 70 Wednesday, October 27, 2010 12:04 PM
70 Chapter 4 Customer, Vendor & Item Setup
Vendors
Vendor Setup Field Descriptions
The following section describes the fields on Vendor Setup.
Inactive
Check this box to designate a vendor as inactive. Inactive vendors
appear at the bottom of a vendor list with a tilde (˜) before their names.
Marking a vendor as inactive is an alternative to deleting a vendor. You
can still view reports for inactive vendors, and you can make an inactive
vendor active again by unchecking the Inactive box. An Inactive vendor
is not deleted when you close the year.
Delete when Close
Year
Marking the option “Delete when Close Year” leaves the vendor as
active, and as long as no outstanding invoices exist for the vendor, that
vendor will be deleted when the year is closed.
1099 Vendor
Check this option for vendors who require reporting on Form 1099misc, Miscellaneous Income. When you choose to print or send an efile
for 1099s from MultiLedger, vendors with this option checked will be
selected automatically.
Name
Enter a vendor name up to 36 characters long, including spaces.
Code
You can use an optional code field to sort or classify customers. For
details, see “Codes for Customers, Vendors, and Items” on page 115.
Contact
Enter a contact name up to 30 characters long, including spaces.
Address
Enter an address up to 30 characters long, including spaces.
City, State, Zip
Notes/Ref#
Enter the city, state, and zip up to 30 characters long, including spaces.
Enter any notes you may have for a vendor up to 30 characters long,
including spaces.
The notes entered here appear on Item Purchases and the Payables
Journal, and on the Vendor Information report. They also print on
checks. They do not, however, print on Item Purchases or Purchase
Orders or appear in the General Ledger.
Add’l Notes
Enter any internal notes you may have for a vendor up to 30 characters
long, including spaces.
The notes entered here appear on Item Purchases and the Payables
Journal, and on the Vendor Information report. They do not, however,
print on Item Purchases, checks, or Purchase Orders, or appear in the
General Ledger.
Phone
Enter a phone number up to 30 characters long, including spaces.
This information appears on the Vendor Information report.
MLManual.book Page 71 Wednesday, October 27, 2010 12:04 PM
Vendors
Fax
71
Enter a vendor’s fax number up to 30 characters long, including spaces.
This information appears on the Vendor Information report.
Email
Enter a vendor’s email address up to 30 characters long, including
spaces. When you click the button at the top of the window, it will take
you to your email and automatically enter the email address in this field.
If you have an email address setup, you can email an item purchase
invoice or purchase order directly to your vendor.
This information appears on the Vendor Information report.
Website
Enter a vendor’s website up to 30 characters long. You must include the
www. portion of the address.When you click the button at the top of the
window, it will take you to the website listed in this field.
This information appears on the Vendor Information report.
Tax ID
Enter a vendor’s tax identification number up to 15 characters,
including spaces.
This number appears on the Vendor Information report and prints on
1099s.
Default Account
When you click to the right of this label, a pop-up list of your chart of
accounts appears. Select the account to associate with the vendor and
click OK. When the vendor is selected in the Payables Journal or
Disbursements Journal, the account will be automatically highlighted in
the Ledger Account pop-up list.
To remove the default account, click to the right of the label to open the
pop-up list and click Cancel.
Default Amount
Enter an amount (such as for rent) that would automatically be entered
when the vendor is selected in the Payables Journal or Disbursements
Journal.
The Default Amount can be up to six places to the left and two places
to the right of the decimal point (999999.99).
1099 Adjust
1099 Category
You can use this box to adjust the amount that is reported on a vendor’s
1099. This field is used, for example, if your company operates on a
fiscal year that doesn’t end on December 31st. You can enter the total
from the prior fiscal year end in the 1099 Adjust edit box. This way, the
total from the fiscal year end will be added to the new year’s total so that
all payments to a vendor from January through December are reported.
Make sure to check the box in the Vendor Reports screen to use this
amount for reporting year.
Select the category in which you want the payments to this vendor to
show when reporting 1099-misc.You can select Rents (Box 1),
Royalties (Box 2), Other Income (Box 3), Medical and Healthcare
MLManual.book Page 72 Wednesday, October 27, 2010 12:04 PM
72 Chapter 4 Customer, Vendor & Item Setup
Payments (Box 6, Non-employee Compensation (Box 7) or Gross
Proceeds Paid to an attorney (Box 14).
Due Days/Day of
Month
You can assign terms to a vendor, such as days until due, discount %,
or the number of discount days you’re given by the vendor.
If Day of Month is checked, the due date is the same day of each month.
For example, if you enter 15 in the edit box, the due date will always be
the 15th day of the month. The maximum number of Due Days is 31 if
Day of Month is checked.
If Day of Month is not checked, the due date is the number of days after
the invoice date. For example, if you enter 15 in the edit box, the due
date would be fifteen days after the invoice date. The maximum number
of Due Days is 240 if Day of Month is not checked.
Initially, when you set up a new vendor, Due Days is 30, which is based
on the value entered for Default Vendor Due Days in Preferences under
the File menu and Day of Month is not checked. If you don’t have a
value in Due Days, MultiLedger uses the invoice date as the due date
and as the aging date for payables.
If you change a vendor’s default settings on Vendor Setup, it will not
change any outstanding payables for that vendor. Also, vendor terms
(due dates) can be changed for individual Item Purchases or Payables
Journal transactions on the transaction window.
Discount %
Enter the percentage, if any, by which this vendor discounts your
purchases for an early payment. If you process the payable before the
discount date has passed, the discount will be applied automatically on
Vendor Payments.
The maximum Discount % is 99.99.
Discount Days
Discount Days determines the number of days after the invoice date that
an early payment discount applies.
The maximum number of discount days is 99.
Credit Limit
Enter the credit limit extended to you from a vendor. Enter a whole
number, with no decimal points. If you exceed the credit limit when you
save an Item Purchase or Payables Journal transaction, an alert appears.
Enter the credit limit as a whole number up to nine digits long.
MLManual.book Page 73 Wednesday, October 27, 2010 12:04 PM
Vendors
73
Setting Up Vendors
1
Click Vendor Setup in the Command Center.
Check this box to mark a
vendor to be deleted
when the year is closed
Check this box to
designate vendors
who should receive
1099s
Check this box to mark a
vendor as Inactive , but
retain in list
Notes entered here
appear on Item
Purchases and
Payables Journal
windows, and print on
checks
Notes entered here
appear on Item
Purchases and
Payables Journal
windows, but do not
print on checks
Default selections made
here save time during
transaction entry
If you attempt to save an
invoice that exceeds the credit
limit entered here, a warning
appears
Choose the category in which
you want the 1099 amount to
print on the form
MLManual.book Page 74 Wednesday, October 27, 2010 12:04 PM
74 Chapter 4 Customer, Vendor & Item Setup
2
Note
Enter a Vendor name.
You can use an optional code field to sort or classify vendors. For
details, see “Codes for Customers, Vendors, and Items” on page 115.
3
Note
Enter a contact name and the vendor’s address.
If you print 1099s from MultiLedger, you should note that the Contact
name does not print on 1099s; just the information in the Name,
Address, and City/State/Zip fields prints on 1099s.
4
Enter any other relevant vendor information.
See “Vendor Setup Field Descriptions” on page 70 for more
information and tips.
5
Click Save.
The vendor name is added to the list on the right.
MLManual.book Page 75 Wednesday, October 27, 2010 12:04 PM
Vendors
75
Modifying Vendor Information
To modify existing vendor information, first select the vendor name
from the list. Then modify the relevant vendor information. Be sure to
click Save after modifying any information, or your changes will be
lost.
Deleting a Vendor
You can delete a vendor as long as the vendor is not associated with
any transactions in the open months. First, select the vendor from the
list, then click the Delete button.
If you try to delete a vendor that is associated with transactions in the
open months, the following message appears:
Important
Because of restrictions with the multi-user capabilities of MultiLedger,
you must be the only user accessing the company files to delete a
vendor.
Note
As an alternative to deleting a vendor, you can mark a vendor as inactive
by checking the “Inactive” box or mark “Delete when Close Year” on
the vendor setup window, See “Vendor Setup Field Descriptions” on
page 70.
MLManual.book Page 76 Wednesday, October 27, 2010 12:04 PM
76 Chapter 4 Customer, Vendor & Item Setup
Items
Item Setup Field Descriptions
The following section describes the fields on Item Setup.
Name
Enter the item name up to 36 characters long, including spaces.
Code
You can use an optional code field to sort or classify items. For details,
see “Codes for Customers, Vendors, and Items” on page 115.
Selling Price 1, Selling
Price 2, Selling Price 3
Each item you set up can have three different pricing levels. Assigning
multiple pricing levels is a two-step process. First, you set up the
different pricing levels for items, then you assign the correct pricing
level to your customers. Assigning pricing levels to customers is
discussed earlier in this chapter.
For example, you could set up the retail and wholesale prices for your
items as Selling Price 1 and Selling Price 2. Then, you could set up your
retail customers with Selling Price 1 as their default, and your wholesale
customers with Selling Price 2 as their default. That way you can be sure
that you charge the right price to your different types of customers when
you create an invoice.
If you don’t assign default selling prices to your customers, Selling
Price 1 will be entered automatically during invoice entry. You can
change the selling price during invoice entry.
If the item’s selling price is in whole dollars (such as $145), you don’t
need to enter a decimal point and “00” cents.
Qty on Hand
Important
Total Cost
The item’s quantity on hand is increased when you buy the item in Item
Purchases and reduced when you sell the item in Customer Invoices.
Any changes made to values on Item Setup do not affect account
balances in the General Ledger. To change the Qty on Hand value for an
item and adjust the General Ledger balances, use Adjust Inventory. For
more details, see “Adjust Inventory Window” on page 236. For items
that are non-inventory, such as labor or consulting, do not enter values
for Qty on Hand, Last Unit Cost, or Total Cost, and do not check the
Inventory Item check box.
Enter the total cost for the inventory items on hand. MultiLedger divides
the value entered in Total Cost by the Qty on Hand to reach the Avg
Unit Cost.
MLManual.book Page 77 Wednesday, October 27, 2010 12:04 PM
Items
77
Avg Unit Cost
When an inventory item is bought in Item Purchases, the Qty on Hand
and Avg Unit Cost of the item are adjusted to reflect new items added
to those on hand. The weighted-average inventory pricing method is
used to calculate the new Avg Unit Cost. The cost of each unit is added
together, and then the total cost is divided by the total number of units
to determine the new Avg Unit Cost. This means that the Avg Unit Cost
of newly purchased inventory items affects the Avg Unit Cost of the old
inventory.
Last Unit Cost
This reflects the last cost paid for an item when it was purchased
through the Item Purchases window.
If you are setting up a new item on Item Setup and do not assign a Last
Unit Cost, MultiLedger will use the Avg Unit Cost as the Last Unit
Cost.
Reorder Quantity
When you setup a Reorder Quantity for an item, that quantity will
automatically fill the quantity field on an Item Purchase when the item
is selected. This will also show on the Current Inventory report when
the ‘Qty Only’ checkbox is selected.
Minimum on Hand
When you enter a minimum quantity on hand in this field, it will show
on the Current Inventory report when the ‘Qty Only’ checkbox is
selected.
Sales Income Acct
When you click in this box, a pop-up list of your chart of accounts
appears. From the list of your chart of accounts, select a Sales Account
(in the 4000–4999 range) to associate with the item. When the item is
sold, the sales account associated with that item is automatically
increased.
Cost/Expense Acct
When you click in this box, a pop-up list of your chart of accounts
appears. From the list of your chart of accounts, select a Cost Account
(usually in the 5000–5999 range) to associate with the item. When the
item is sold, the cost account associated with that item is automatically
increased, and the inventory account you’ve selected on Interface
Accounts is decreased.
Taxable Rate 1
If checked, the sales tax category and corresponding rate that is entered
in the first Sales Tax box on Customer Invoices will be calculated for
the item.
This box is automatically checked for new items. If the item is nontaxable, you should uncheck the box.
Taxable Rate 2
If checked, the sales tax category and corresponding rate that is entered
in the second Sales Tax box on Customer Invoices will be calculated for
the item.
This box is automatically checked for new items. If the item is nontaxable, you should uncheck the box.
MLManual.book Page 78 Wednesday, October 27, 2010 12:04 PM
78 Chapter 4 Customer, Vendor & Item Setup
Commissionable
If checked, a sales commission for the salesperson selected on
Customer Invoices will be calculated on the item.
This box is automatically checked for new items. If the item is noncommissionable, you should uncheck the box.
Inventory Item
When this box is checked, the item is costed automatically when the
item is sold on Customer Invoices, and Qty on Hand is increased or
reduced when the item is bought or sold.
This box is automatically checked for new items. If the item is a noninventory item, such as consulting or labor, you should uncheck the box.
Important
Inactive
If an item is marked as an inventory item, an alert appears in Customer
Invoices if you try to sell more of the item than you have on hand. If an
item is a non-inventory item, be sure to uncheck the Inventory check
box when you’re setting up the item to avoid this alert.
Check this box to designate an item as inactive. Inactive items appear at
the bottom of an item list with a tilde (˜) before their names.
Marking an item as inactive is an alternative to deleting an item. You
can still view reports for inactive items, and you can make an inactive
item active again by unchecking the Inactive box. An Inactive item,
however, is deleted when you close the year, as long as there are no
outstanding transactions associated with that item.
MLManual.book Page 79 Wednesday, October 27, 2010 12:04 PM
Setting Up Items
79
Setting Up Items
There are two ways to set up items in MultiLedger:
•
You can set up a new item while you are entering an Item
Purchase, provided there is at least one other item set up already.
When you reach the Items pop-up list on Item Purchases, click
New. You can then set up information for the item. If you set up an
item using this method, you do not have to enter values for Qty on
Hand, Total Cost, or Last Unit Cost, because they will be entered
automatically when you save the Item Purchase.
•
You can set up a new item on Item Setup. Setting up a new item in
this manner is described below.
Entering New Items
1
Click Item Setup in the Command Center.
Each item can have up to
three different selling
prices
These fields are updated
when you buy items in
Item Purchases
Choose a sales account
and a cost of sales
account for each item
Use these checkboxes to define options for an item
MLManual.book Page 80 Wednesday, October 27, 2010 12:04 PM
80 Chapter 4 Customer, Vendor & Item Setup
2
Note
Enter the item’s name and press TAB.
You can use an optional code field to sort or classify items. For details,
see “Codes for Customers, Vendors, and Items” on page 115.
3
Enter any other relevant item information.
See “Item Setup Field Descriptions” on page 76 for more information
and tips.
4
Click Save.
The item name is added to the list on the right.
Modifying Item Information
To modify existing item information, first select the item name from
the list, then modify the relevant item information. Be sure to click
Save after modifying any information, or your changes will be lost.
Important
Any changes made to values on the Items window do not affect account
balances in the General Ledger. To change the Qty on Hand value for an
item and adjust the General Ledger balances, use Adjust Inventory. For
more details, see “Adjust Inventory Window” on page 236.
Deleting Items
You can delete items provided no outstanding invoices associated with
the item exist.
Important
1
Click Item Setup in the Command Center.
2
Select the item from the list.
3
Click the Delete button.
After deleting an item, you can no longer obtain any reports for that
item.
If you try to delete an Item that has outstanding invoices, the following
message appears:
MLManual.book Page 81 Wednesday, October 27, 2010 12:04 PM
Setting Up Items
Important
81
Because of restrictions with the multi-user capabilities of MultiLedger,
you must be the only user accessing the company files to delete an item.
As an alternative to deleting an item, you can mark an item as inactive
by checking the Inactive box on the item setup window. See “Item Setup
Field Descriptions” on page 76.
MLManual.book Page 82 Wednesday, October 27, 2010 12:04 PM
82 Chapter 4 Customer, Vendor & Item Setup
MLManual.book Page 83 Wednesday, October 27, 2010 12:04 PM
83
Chapter 5
Setup Options
This chapter shows you how to set up various options in MultiLedger.
The following topics are discussed in detail in this chapter:
•
Setting up budgets
•
Defining shipping methods
•
Using profit centers
•
Setting up jobs
•
Utilizing sales tax categories
•
Setting up salespeople
•
Customizing financial statements and formatting fields for
printing checks, invoices, customer statements, etc.
•
Setting up company preferences and user settings
•
Using the Print command
•
Setting up MICR Encoding Information
•
Setting up codes for customers, vendors, and items.
MLManual.book Page 84 Wednesday, October 27, 2010 12:04 PM
84 Chapter 5 Setup Options
Setting Up Budget Amounts
You can set up and edit monthly budget amounts for income and
expense accounts (account numbers 4000 and greater) for all open
months.
Note
To see budget amounts in a report format, click Income Statement in the
Command Center, click the Budget Report option or the Income vs
Budget option, select a month or range of months, then click View or
Print.
You can also import or export budget amounts. For more details, see
“Importing and Exporting Data” on page 242.
1
Click Budget Amounts in the Command Center.
You can set up budgets
for accounts 4000 and
higher
All budget amounts are initially set to 0.00.
2
Select the fiscal year you want from the pull-down menu.
The default selection is the first open year.
3
Select the appropriate income or expense account from the list on the
left.
MLManual.book Page 85 Wednesday, October 27, 2010 12:04 PM
Setting Up Budget Amounts
4
85
Enter the budget amount in the edit box for each month on the right
and press TAB.
You can also use the down arrow keys on your keyboard to move down
to another amount or click any amount to edit it.
To copy the amount in the edit box to all months, click the Annualize
button. After you click Annualize, you can still modify any month’s
amount before saving. As you enter budget amounts for the account,
the total for the year is shown at the bottom of the budget amounts:
The total for the year
is shown here
5
Click Save after editing the budget amounts for each account.
Be sure to click Save before selecting another account, or else your
changes will be lost.
MLManual.book Page 86 Wednesday, October 27, 2010 12:04 PM
86 Chapter 5 Setup Options
Setting Up Shipping Methods
You can set up a list of common shipping methods that will appear as a
pop-up list on Customer Invoices.
1
Click Ship Via in the Command Center.
You can set up an
unlimited number of
shipping methods.
Methods appear in
alphabetical order
2
Enter a name for the Ship Via method in the edit box, then click Save.
The name of the method appears in the list above. You can set up an
unlimited number of Ship Via methods.
Note
All Ship Via methods appear in alphabetical order regardless of the
order in which they were entered.
Modifying a Ship Via Method
First, select the method from the list. Then, modify the name, and click
Save.
Deleting a Ship Via Method
First, select the method from the list, then click Delete.
MLManual.book Page 87 Wednesday, October 27, 2010 12:04 PM
Setting Up Profit Centers
87
Setting Up Profit Centers
If your company has several departments or divisions, you might want
to individually track their income and expenses —that’s where profit
centers come in. Each portion of your company (whether it’s a
department, store, or division) can be assigned a profit center name and
account numbers.
You can create income statements for your profit centers. For details,
see “Profit Center Income Statements” on page 316.
To set up profit centers, you need to complete two steps:
•
Enter the general profit center names on the Profit Centers
window under the Setup menu. Profit center names must be
entered to produce an income statement report for a particular
profit center.
•
Enter specific profit center account numbers and names in your
company’s chart of accounts.
These two steps are discussed in the following sections.
MLManual.book Page 88 Wednesday, October 27, 2010 12:04 PM
88 Chapter 5 Setup Options
Setting Up Profit Centers on the Profit
Centers Window
1
Choose Profit Centers from the Setup menu.
You can have up to
99 Profit Centers for
a company
2
Note
Enter a number for the profit center that is between 1 and 99.
Leading zeros for single-digit profit centers are automatically added for
you.
3
Enter a name for the profit center and press TAB.
4
Click Save.
Repeat this step for up to 99 profit centers.
Don’t forget to set up the profit centers in your chart of accounts too.
MLManual.book Page 89 Wednesday, October 27, 2010 12:04 PM
Setting Up Profit Centers
89
Setting Up Profit Centers in the Chart of
Accounts
You should set up a general account followed by specific profit center
accounts. For example, you could have a general sales account such as
the following:
4000 Sales
You could then use the following profit centers for two stores:
4000.01 Sales - Store 1
4000.02 Sales - Store 2
Notice that each profit center account you enter into your chart of
accounts has a four digit number followed by a decimal point and the
appropriate profit center number (01-99). These profit center numbers
correspond to those set up on the Profit Centers window.
When you create a consolidated income statement, the general account
“4000 Sales” will be used for the consolidated description. If no 4000
account has been set up in the chart of accounts, the first profit center
account description will be used for the consolidated description.
You should follow the same procedure for entering profit center
accounts into your chart of accounts as you do for entering any other
account. For details, see “Setting Up the Chart of Accounts” on
page 23.
What accounts can I set up as profit
centers?
You can set up profit centers in your chart of accounts for any type of
account from 4000 and greater including income accounts (such as
sales) and operating expense accounts (such as advertising).
You cannot set up profit centers for asset (such as inventory, in the
1000-1999 range), liability (in the 2000 range), or equity accounts (in
the 3000 range).
MLManual.book Page 90 Wednesday, October 27, 2010 12:04 PM
90 Chapter 5 Setup Options
Setting Program Preferences
In MultiLedger you can set both program Preferences and User
Settings. Options set on Preferences apply to all users in a particular set
of company files. Options set on User Settings, on the other hand,
apply to each individual user. For more information on User Settings,
see the next section, “Setting User Settings.”
You can use Preferences under the File menu to set various
MultiLedger options, such as checking for duplicate documents or
hiding the cash balance on transaction windows.
After choosing Preferences from the File menu, the following window
appears:
Select each option according to the following guidelines:
Check for Duplicate
Documents
If checked, a warning appears when you try to save a document number
that’s already been used in that journal window. MultiLedger looks for
duplicate document numbers in the current month, the previous month
and the future month, all based on the transaction date, when this option
is checked.
Please note that some journal windows use the same numbering system.
See “Document Numbers” on page 121 for more details.
MLManual.book Page 91 Wednesday, October 27, 2010 12:04 PM
Setting Program Preferences
91
Include Tax1 in Tax2
Computation.
If checked, Tax 2 calculates a percentage of Tax 1. This accommodates
the Canadian GST.
Skip Tax 2 During
Invoice Entry
If checked, the second Sales Tax field is skipped on Customer Invoices.
This box is automatically checked for new companies.
Remove Item Code
Field on Invoice
This option will remove the item codes when printing invoices.
International Date
Format (dd/mm/yy)
If checked, dates can be entered in the international day/month/year
format instead of the month/day/year format.
Show Code Field on
Reports
Hide Unit Cost in
Customer Invoice
If this option is checked at the time you select a report to be viewed or
printed, the code set up for the Customer, Item, or Vendor will appear.
This affects most reports printed or viewed from the Customer Reports,
Vendor Reports, and Item Reports, except mailing labels for customers
and vendors, Customer Statements, and 1099s.
If checked, the Unit Cost field for items doesn’t show on Customer
Invoices.
Print Customer Notes
on Sales Jrnl
If checked, the Notes and Add’l Notes you’ve set up for a customer print
on Sales Journal invoices.
Use Check Stub
Description in
Payables Journal
If checked, the information entered in the Check Stub Description field
on the payables journal will automatically be copied into the
Description field on the next line.
Hide Cash Balance
If checked, the cash balance is replaced by asterisks (***) on Customer
Payments, Vendor Payments, Receipts Journal, and Disbursements
Journal. This is helpful if you want to allow users to enter transactions
in these journals, but do not want them to see the balance in the cash
account.
Print Check Dates in
CPA Format (YYYY)
CPA stands for Canadian Payments Association. Mark this option if
you are in Canada and must print checks in accordance to the
regulations that the CPA sets. See the Canadian Payments Association’s
website at www.cdnpay.ca for more information.
Item Purchase/PO Tax
Label
You can use this field to change the sales tax label that prints on Item
Purchases and Purchase Orders. “Sales Tax” is automatically assigned.
If you are using pre-printed purchase orders that already have this label
printed on them, you can remove this text.
Shipping Label
You can use this field to change the shipping amount label that prints on
invoices. “Shipping” is automatically assigned. If you are using preprinted invoices that already have this label printed on them, you can
remove this text.
MLManual.book Page 92 Wednesday, October 27, 2010 12:04 PM
92 Chapter 5 Setup Options
Currency Symbol
You can use this field to change from the dollar currency symbol ($) to
another currency symbol such as £ on checks. Please note that this
option simply changes the symbol that appears on checks, invoices and
customer statements ; it does not convert any currency values.
Default Vendor Due
Days
You can use this field to change the number of due days assigned to new
vendors. Thirty days is assigned by default.
Mailing Label Options
Label Left
Enter the number of inches from the left hand page edge.
Label Top
Enter the number of inches from the top of the page edge.
Label Height
Enter the height of each label in inches.
Label Width
Enter the width of each label in inches.
Across
Enter how many labels are across the label sheet.
Repeat Factor
Enter how many mailing labels should be printed for each selected
customer or vendor. For example, a Repeat Factor of “3“will cause
three mailing labels to be printed for each selected customer or vendor.
Note
Enter inches to (.01) hundreths of an inch.
MLManual.book Page 93 Wednesday, October 27, 2010 12:04 PM
Setting User Settings
93
Setting User Settings
In MultiLedger you can set both program Preferences and User
Settings. Options set on Preferences apply to all users in a particular set
of company files. Options set on User Settings, on the other hand,
apply to each individual user. For more information on Preferences, see
the previous section, “Setting Program Preferences.”
You can use User Settings under the File menu to set various
MultiLedger options, such as automatically launching the last opened
company and automatically showing scheduled recurring entries when
you open a company. After choosing User Settings from the File menu,
the following window appears:
Select each option according to the following guidelines:
Open Last Company
on Launch
If checked, the last set of company files that was used will open
automatically when you launch MultiLedger. If you want to open
another set of company files, simply choose Close Company from the
File menu, then choose Open Company from the File menu and select a
set of company files using the dialog box that appears. Or choose Open
Recent Company and select a company from the list.
Prompt If No Backup
in This Many Days
If checked, MultiLedger will ask you to make a backup of your
company files when you attempt to close the company or Exit/Quit
MultiLedger. Enter the number of days you want between backups in
the edit box.
MLManual.book Page 94 Wednesday, October 27, 2010 12:04 PM
94 Chapter 5 Setup Options
After the number of days you enter has passed, you will be asked
whether you want to make a backup of your company files when you
close the company or Exit MultiLedger. If you click Yes on the alert, a
Save As dialog appears. You should follow the instructions in Chapter
3, “Backing Up & Restoring” to make a backup of your company files.
If you click No on the alert, no backup is made and the company files
close or MultiLedger quits as normal.
If the “Prompt If No Backup In # Days” check box is checked and you
enter zero (0) or leave the edit box blank, you will be alerted to make a
backup every time you close the company or quit MultiLedger.
Show Scheduled
Recurring Entries
If checked, the Scheduled Recurring Entries window will appear each
time you open a set of company files that has recurring entries due. For
more information on entering and using scheduled recurring entries, see
“Recurring Entries” on page 130.
Use <Enter> Key to
Move Between Edit
Fields
PC only, if checked, you can use your <Enter> key to go from field to
field. Otherwise, you must use the <Tab> key.
Sort Customers by
Name
If codes are setup for customers, all lists will sort by the code as the
default. To change it to sort by Customer name, this preference must be
checked.
Sort Vendors by Name
Sort Items by Name
Save Window
Placement
Check for Latest
Version on Launch
Note
If codes are setup for vendors, all lists will sort by the code as the
default. To change it to sort by Vendor name, this preference must be
checked.
If codes are setup for items, all lists will sort by the code as the default.
To change it to sort by Item name, this preference must be checked.
When checked, if you resize or reposition a window within the
MultiLedger program, the new sizes and positions are saved.
An internet connection is required. When checked, MultiLedger will
determine if any patches or updates are available when you open the
program.
When you mark a checkbox to change the sort, the change will take
effect when the company is re-opened.
MLManual.book Page 95 Wednesday, October 27, 2010 12:04 PM
Customizing Financial Statements
95
Customizing Financial Statements
You can customize the account headings that appear on your balance
sheet and income statement. You can also group accounts so they will
appear as one line summaries on financial statements.
Click Financial Statements in the Command Center.
Note
Balance Sheet and Income Statement titles and footers can be changed
in the Report window. To customize the headings, ranges, and account
groupings, see the following sections.
Customizing Heading Descriptions
1
Click the Heading Description you want to modify.
2
Edit the highlighted Heading Description in the edit box.
MLManual.book Page 96 Wednesday, October 27, 2010 12:04 PM
96 Chapter 5 Setup Options
3
Click Save.
Repeat the steps above for all Heading Descriptions you want to
change. You may need to use the Vertical scroll bar to see the complete
list of modifiable Heading Descriptions.
Customizing Heading Ranges
Each heading has an associated account number range made up of a
lower and upper limit. This range determines the account numbers for
the Heading Description. For example, the heading “Current Assets”
has a range from a lower limit of 1000 to an upper limit of 1599.
1
Click the range that you want to modify.
You can change the upper limit only of the following ranges:
1000–1599 Current Assets
1700–1899 Fixed Assets
2000–2599 Current Liabilities
2
Click in the edit box, then change the upper limit for the range.
3
Click Save.
The lower limit of the next range in the list will automatically be
adjusted.
Repeat the steps above for all of the ranges that you want to change.
Customizing Account Groupings
You can group accounts to appear as one line summaries on balance
sheets and income statements. After grouping accounts for a financial
report, you can still see the individual accounts that make up the one
line summary by selecting the Show Detail Accounts option on the
Income Statement or Balance Sheet Reports. Accounts must be
consecutive and cannot be part of more than one grouping, nor can a
group span more than one heading.
1
Click in the edit box on the far left above Description.
2
Type in the first account number for the grouping, then press TAB.
3
Type in the last account number for the grouping, then press TAB.
4
Type in the description for the grouping, then click Save.
MLManual.book Page 97 Wednesday, October 27, 2010 12:04 PM
Jobs Set Up
97
You can group
accounts to appear
as one line on
financial statements
Modifying or Deleting Custom Account
Groupings
1
Click the Group Description so that it appears in the edit box.
2
Modify the Range and/or the Group Description in the edit box, or
click Delete to remove it.
Jobs Set Up
You can use MultiLedger to set up jobs or projects and track their
income and expenses. You can have up to 9999 jobs.
Note
You can also use Profit Centers to keep track of different jobs or
projects. For more information on using Profit Centers, see “Setting Up
Profit Centers” on page 87.
For details about creating job reports, see “Job Reports” on page 329.
Job Setup Field Descriptions
This section discusses the individual fields on Job Setup.
Job #
Completed
Name
Est. Income
You can enter up to 9999 jobs. You don’t have to enter leading zeros.
Check this box when a job is complete. Completed jobs are deleted
when you close the year.
Enter a job name up to 30 characters long, including spaces.
Enter how much income you expect this project to earn. The amount
entered here appears on the Job Summary report, so you can compare
estimated income to actual income for a job.
Est. Expense
Enter how much you expect this project to cost. The amount entered
here appears on the Job Summary report, so you can compare estimated
expense to actual expense for a job.
Prior Income
Enter how much money this project has already earned (from periods
prior to your current fiscal year).
MLManual.book Page 98 Wednesday, October 27, 2010 12:04 PM
98 Chapter 5 Setup Options
Prior Expense
Important
Enter how much money this project has already cost (from periods prior
to your current fiscal year).
When you close the year, the current year’s income and expenses for a
job are automatically added to the job’s Prior Income and Prior
Expense. Job detail is not maintained after you close the year.
Setting Up Jobs
1
Job Setup in the Command Center.
2
Enter a new job number between 1 and 9999.
When you save the job, leading zeros are automatically added.
3
Enter a job name.
4
Enter any other relevant job information.
For more details, see “Setting Up Jobs” on page 98.
MLManual.book Page 99 Wednesday, October 27, 2010 12:04 PM
Jobs Set Up
5
99
Click Save.
After you click Save, the job number and name are added to the jobs
list.
When entering transactions, you can quickly associate job numbers
(through a pop-up list of jobs) with any item line to track income and
expenses.
Important
If you want to make entries without having the job field pop-up each
time, you can go under the edit menu and select “Skip Job” or hit
Ctrl K (Windows) or Command K ( - Macintosh) on the keyboard. Do
the same thing to return to having the field pop-up.
Modifying a Job
First, select the job from the list on the right. Then, edit the necessary
job information and click Save.
You cannot modify a job number once it has been saved. Modifying a
job number and clicking Save will add the new job number to the list
but will not remove the old one.
Deleting a Job
You can delete a job that has had no activity in the 30 open months. To
delete a job, first select the job from the list on the right, then select
Delete from the Edit menu. Jobs that have had activity in any of the 30
open months cannot be deleted mid-year.
You can also delete a job at year end. To delete a job at the end of the
year, check the Completed option and the job will be deleted when you
close the year.
MLManual.book Page 100 Wednesday, October 27, 2010 12:04 PM
100 Chapter 5 Setup Options
Sales Tax Set Up
MultiLedger lets you set up as many as 100 different Sales Tax
Categories for tracking purposes. You can also get detailed Sales Tax
reports. For information on these reports, see “Sales Tax Report” on
page 324.
Sales Tax Setup Field Descriptions
The following section describes the fields on Sales Tax Setup.
Tax Name
Enter a name up to 13 characters long, including spaces.
Note
The sales tax categories appear in the pop-up list on Customer Invoices
in the order that you enter them. You may want to enter the most
common sales tax categories first.
Note
If you type a minus sign (-) in front of the sales tax name, the sales tax
name won’t print on invoices.
Tax %
Enter the Tax % as a percentage. For example, a tax rate of 3% should
be entered as 3. You can enter a percentage that is up to two places to
the left and four places to the right of the decimal point (99.9999).
Note: If you try to enter a percentage that is more than two places to the
left or more than four places to the right of the decimal point,
MultiLedger will truncate the number, not round it up.
Ledger Account
When you click in this box, a pop-up list of your chart of accounts
appears. From the list of your chart of accounts, select a Liability
Account (in the 2000 range) to associate with the sales tax category.
When the sales tax category is used on Customer Invoices, the liability
account associated with that category is automatically increased.
MLManual.book Page 101 Wednesday, October 27, 2010 12:04 PM
Sales Tax Set Up
101
Setting Up Sales Tax Categories
1
Click Sales Tax Setup in the Command Center.
2
Type in a name for the sales tax category in the Tax Name edit box.
3
Enter the percentage for the sales tax in the Tax % edit box.
4
Select a general ledger account (usually a liability account in the 2000
range) from the Ledger Account pop-up list for this sales tax category,
then click Save.
Modifying Sales Tax Categories
Important
After modifying a sales tax category, any outstanding invoices using the old
sales tax category will not be changed to the modified sales tax category.
To edit or modify a sales tax category, select the category from the list,
modify the information, and click Save.
Deleting Sales Tax Categories
You cannot delete sales tax categories.
MLManual.book Page 102 Wednesday, October 27, 2010 12:04 PM
102 Chapter 5 Setup Options
Salesperson Setup
You can track sales of commissionable items by salesperson. If no
salespeople are set up, the Salesperson field on Customer Invoices will
be skipped automatically during invoice entry. You can set up as many
salespeople as you need.
Salesperson Setup Field Descriptions
This section describes the fields on Salesperson Setup.
Name
Enter a name up to nine characters long.
The name you enter appears in the Salesperson pop-up list on Customer
Invoices in alphabetical order.
Long Name
Enter a name up to thirty characters long.
The name you enter appears on the Salesperson report.
Commission Rate
Enter the salesperson’s commission rate as a percentage. For example,
a commission of 15% should be entered as 15. You can enter a
percentage that is up to two places to the left and two places to the right
of the decimal point (99.99).
Commissions are calculated only on items that have been set up as
commissionable on Item Setup.
Each salesperson can have only one commission rate. If a salesperson
receives different commissions for different types of sales, you may
want to set up the salesperson more than once with a slightly different
name and a different commission rate in order to keep track.
Commission on Gross
Margin
Check this option if the salesperson’s commission should be calculated
based on sales minus cost of sales.
If not checked, the commission will be calculated based on gross sales.
MLManual.book Page 103 Wednesday, October 27, 2010 12:04 PM
Salesperson Setup
103
Setting Up Salespeople
1
Click Salesperson Setup in the Command Center.
2
Enter the salesperson’s name.
3
Enter the salesperson’s full name.
4
Enter the salesperson’s commission percentage.
5
If necessary, check the Commission on Gross Margin option.
6
Click Save.
The salesperson's name is added to the salesperson list.
Modifying Salespeople Information
To modify an existing salesperson, select the salesperson’s name from the
list and edit the relevant information. Click Save when finished.
Important
If you modify the salesperson’s commission rate, all existing sales for that
salesperson will be re-calculated at the new rate.
Important
If you change the checkbox for Commission on Gross Margin from its
original setting, all existing sales for that salesperson will be re-calculated.
MLManual.book Page 104 Wednesday, October 27, 2010 12:04 PM
104 Chapter 5 Setup Options
Deleting Salespeople
To delete a salesperson, select the salesperson’s name from the list and
choose Delete from the Edit menu.
You cannot delete a salesperson if he/she is associated with any
invoices in the 30 open months.
Selecting the Font for Printing
MultiLedger allows you to select the font used for printing all
transactions, reports, checks, and mailing labels.
1
Choose Print Font from the File menu.
Fonts that appear
here are the ones
installed on your
particular computer
system
2
Click a font in the list and a point size.
Fonts that appear are the ones that are installed on your particular
system. You can use point sizes from 9 to 12 with MultiLedger on Mac
and 8 to 14 with MultiLedger on Windows.
MLManual.book Page 105 Wednesday, October 27, 2010 12:04 PM
Using the Print Screen
105
Using the Print Screen
With the Print command, you can print checks, invoices, quotes,
packing slips, labels, Item Purchases documents, purchase orders and
deposits.
Printing Options
The following section describes what can be printed with the Print
command and the available options.
Checks
Checks created with Vendor Payments and the Disbursements Journal
for the selected month are shown.
Laser Stub
Check this option to print a second stub at the bottom third of the page
for use with laser checks.
Label Fields
Check this option to print the “Pay”, “To the Order of”, “Amount”, and
“Authorized Signature” field labels on blank check stock used for
MICR encoding.
Company Name on
Stub
Check this option to print your Company Name at the top of the check
stub.
Customer Invoices &
Quotes
Invoices and quotes created in Customer Invoices for the selected
month are shown.
Packing Slips
Invoices created in Customer Invoices for the selected month are
shown. The packing slip prints information from the invoice excluding
any dollar amounts.
Shipping Labels
Invoices created in Customer Invoices for the selected month are
shown. This allows you to print the customer name and Ship To address
from the Customer invoice. If no Ship To address has been entered on
the Customer Invoice, the customer’s name and address as it appears on
Customer Setup prints.
To adjust the printing dimensions for the label, use Preferences under
the File menu. For details, see “Setting Program Preferences” on
page 90.
Sales Journal Invoices
Invoices created in the Sales Journal for the selected month are shown.
Sales Journal Labels
Invoices and quotes created in the Sales Journal for the selected month
are shown. This allows you to print the customer name and address from
the Customer field on the invoice. To adjust the printing dimensions for
the label, use Preferences under the File menu. For details, see “Setting
Program Preferences” on page 90.
Item Purchases &
PO’s
Payables and purchase orders created in Item Purchases for the selected
month are shown.
MLManual.book Page 106 Wednesday, October 27, 2010 12:04 PM
106 Chapter 5 Setup Options
Deposits
Deposits created in Customer Payments and Receipts Journal for the
selected month are shown. This will print a deposit slip with MICR
information with up to 18 individual invoices. You can include more
than 18 invoices per deposit slip, but invoices over 17 will appear as one
lump sum, rather than individual invoices. Be sure Print MICR is
selected and that you have set up MICR Encoding Specifications. For
more information, see “Setting Up the MICR Encoding Information” on
page 108.
Print Metafile
(Windows) or Print
PDF/PICT File
(Macintosh)
Check this option for checks, invoices, quotes, item purchases and
purchase orders to have an Open File dialog box appear after clicking
Print or OK in a Print dialog box. Select the appropriate metafile or
PDF/PICT file from the list and click OK. (Metafiles and PDF/PICT
files can be created in a graphics program) Use the same field positions
as the default. To adjust where the various fields print on forms, use the
Format command under the File menu. For more details, see
“Positioning Print Fields for Windows Metafiles or Macintosh PDF or
PICT Files” on page 112.
Print MICR
Check this option to activate the Bank information, routing number and
account number fields to enable the MICR encoding to print on the
checks.
Email Without Prompt
.Sort by Doc # or by
Date
Selecting this option will send the emailed document immediately
without any warning or message when selecting the Email button.
This drop down list will allow you to sort the way you print your
invoices either by the document number (default) or by the date.
MLManual.book Page 107 Wednesday, October 27, 2010 12:04 PM
Using the Print Screen
107
How to Use the Print Command
1
Choose the Print window from the Command Screen.
2
Select the correct month from the Period list.
3
Click the appropriate radio button to see a list of documents available
for printing.
4
Check any appropriate print options such as Laser Stub, Print Metafile
(Windows), or Print PDF/PICT File (Macintosh).
5
Select Sort by option.
6
Select the documents for printing.
If necessary,
check the
appropriate print
options
If printing checks or
deposit slips with
MICR encoding,
make sure the Print
MICR box is selected
A list of
transactions for the
radio button and
month selected
appears here
Select a document by clicking its document number or select more than
one document by clicking and dragging through the list. You can select
a non-consecutive series of documents by holding down the Ctrl key
(Windows) or Shift key (Macintosh) while clicking the desired lines.
Important
If no single document or group of documents is selected, all documents
will be printed.
MLManual.book Page 108 Wednesday, October 27, 2010 12:04 PM
108 Chapter 5 Setup Options
Checks, Customer Invoices and Quotes, Sales Journal Invoices, and
Item Purchases and Purchase Orders followed by an asterisk (* Windows) or bullet (• - Macintosh) have already been printed.
You can also use the Find and Find Again commands under the Edit
menu to find a particular document, customer, or vendor.
7
Select the print options you want, and click Print.
How to use the Email Command
You can email Customer Invoices, Sales Journal Invoices/Quotes and
Item Purchases/PO’s.
To send an email, follow the same steps as you would to print a
document which is covered above in How to use the Print
Command, but instead of clicking the Print button, click on the Email
button.
Windows: Utilizes Messaging Application Program Interface (MAPI)
that is a part of the Windows operating system. This feature may
require additional setup in your email program. This feature does not
necessarily interface with an internet based email program.
Macintosh: Requires OS X to use this feature. Emailing documents
will only work with the Apple Mail program.To set Mail as the default
mail program first launch the Mail program. Under the Mail menu,
select Preferences. On the General tab, select the Mail program as the
default. Close the Preferences window.
Setting Up the MICR Encoding Information
1
Open up the Chart of Accounts window from the Command screen.
2
Highlight a Cash Account in your Chart of Accounts list.
This activates the Save button so you can begin entering the MICR
information.
3
Enter your bank’s nine digit ACH number.
This is usually the first nine digits at the bottom of a pre-printed check.
4
Enter your nine digit deposit routing number.
This will print on Deposit Slips printed from this window and also
deposit slips directly printed from Customer Payments. For more
information, see “Recording Customer Payments” on page 173. The
Routing # and Bank information will print unless you don’t have the
print option to Print MICR checked in the Print window of the
Command screen. For information on Printing documents see “How to
Use the Print Command” on page 107.
MLManual.book Page 109 Wednesday, October 27, 2010 12:04 PM
Using the Print Screen
5
Note
109
Enter your company’s bank account number, up to 15 digits.
In most cases, the MICR software automatically prints the symbols. If
you have to manually enter the symbols:
Enter a “D” (capital D) to type a MICR hyphen: DS
Enter a “C” (capital C) to type this symbol: C
Enter an “A” (capital A) to type this symbol: A
6
Enter your bank’s name and address in the appropriate fields.
7
Enter your bank’s Fractional Routing #.
Some checks (not all) have a number printed near the bank name or
near the top of the check. This number is also called a Non-MICR
ACH#.
8
Repeat steps 2-7 for all accounts that you wish to print MICR.
9
Print checks or deposit slips as you normally would.
Make sure the Print MICR option is selected in the Print window of the
Command screen. For information on how to print see “How to Use
the Print Command” on page 107.
MLManual.book Page 110 Wednesday, October 27, 2010 12:04 PM
110 Chapter 5 Setup Options
Formatting Checks, Invoices, Statements, 1099s & Deposits
The Format window under the File menu is used to position print fields
for checks, invoices, purchase orders, quotes, customer statements,
1099s, and deposit slips. You can position print fields for any
compatible printer
.
Print fields for the Default items have been positioned to fit forms from
CheckMark’s Forms division. (Forms can be ordered by calling 1-800444-9922 or online at www.checkmark.com.)
You might want to customize the position of print fields for the
following reasons:
•
You need to fine tune the preset print fields for your specific
printer.
•
You want to print on pre-printed forms other than those made by
CheckMark Forms.
•
You want to print forms saved as metafiles (Windows) or PDF/
PICT Files (Macintosh). Metafile is a Windows-based format and
a PICT File is a Macintosh-based format for a graphics document
created by many graphics programs. PDF files can also be used on
the Macintosh version of MultiLedger.
MLManual.book Page 111 Wednesday, October 27, 2010 12:04 PM
Formatting Checks, Invoices, Statements, 1099s & Deposits
111
Customizing Print Field Positions for Your
Printer
The initial positions of the print fields for Custom options are based on
CheckMark Forms. To customize the preset print fields for your printer
or to create a format other than that used by CheckMark Forms, do the
following:
1
Click the appropriate “Custom” radio button.
Clicking the Custom 11" Invoice/Quote/PO radio button opens the
following formatting window:
2
Drag the print fields to their new positions.
Select a group of print fields by dragging over the fields or by holding
down the SHIFT key while clicking individual fields. Moving one of the
fields moves the entire group.
To restrict movements to vertical positioning, hold down the Alt key
(Windows) or the OPTION key (Macintosh) while dragging the field or
fields.
To restrict movements to horizontal positioning, hold down the Ctrl
key (Windows) or Command key ( - Macintosh) while dragging the
field or fields.
You can use the arrow keys to move the fields.
MLManual.book Page 112 Wednesday, October 27, 2010 12:04 PM
112 Chapter 5 Setup Options
Note
Double-click a field to activate or de-activate. If the field label is red, it
is inactive.
3
When you are finished repositioning the print fields, click the window’s
close box.
The following dialog appears:
4
Click Yes to save the changes you made to the print field positions.
Click No to return to the Format window without saving any position
changes.
Note
To return any custom format to its original settings, hold down the Ctrl
key (Windows) or Command key ( - Macintosh) while clicking the
appropriate default radio button.
Positioning Print Fields for Windows
Metafiles or Macintosh PDF or PICT Files
If you’ve created your own form as a Windows metafile (.wmf) or a
Macintosh PICT file (.pct) or PDF (.pdf) in a graphics program, or you
want to use one of the sample metafiles, PDFs or PICTs that came on
the MultiLedger master disk, MultiLedger can show the metafile, PDF
or PICT file on your screen to help you position print fields.
MultiLedger can also print the metafile, PDF, or PICT file along with
the corresponding transaction information.
1
Create the invoice, check, quote, purchase order, or customer
statement form using any graphics program that can save Windows
metafiles or Macintosh PDF/PICT files.
2
Save the graphics file (in the graphics program) in the metafile format
(.wmf) or PDF/PICT format (.pdf/.pct). You can save the metafile or
PDF/PICT in the same folder that contains your company’s data files.
Close the metafile or PDF/PICT file.
3
Open your MultiLedger company files.
4
Choose Format from the File menu.
MLManual.book Page 113 Wednesday, October 27, 2010 12:04 PM
Formatting Checks, Invoices, Statements, 1099s & Deposits
113
You can align the print fields according to the following directions:
1
Check the Display Metafile option (Windows) or Display PDF/PICT
File option (Macintosh):
2
Click the appropriate “Custom” radio button.
For example, clicking the Custom 11" Invoice/Quote/PO radio button
with Display Metafile or Display PDF/PICT File checked causes a
standard Open File dialog box to appear on your screen.
Note
Invoices, quotes, and purchase orders use the same format.
3
Open the appropriate Metafile or PDF/PICT File.
Note
On Windows: Several sample forms in the metafile format are included
in the “Metafile” folder installed in the MLedger directory.
Note
On Macintosh: Several sample forms in the PDF/PICT format are
included in the “Sample PDF/PICTs” folder installed in the
MultiLedgerƒ folder.
Your company name and address from Company Information will
print on invoices and statements that use these metafiles or PDF/PICT
Files. For example, if you click “11_Inv.wmf” in the scroll box, and
then click Open, the following formatting window would appear:
MLManual.book Page 114 Wednesday, October 27, 2010 12:04 PM
114 Chapter 5 Setup Options
4
Note
Drag the print fields you want to reposition to their new positions.
You cannot reposition the background metafile or PDF/PICT File. For
example, the text “Acct#” is part of the metafile or PDF/PICT file—not
a print field. To edit the text, graphics, or background for this particular
metafile or PDF/PICT File, you must use a graphics program that can
edit Windows metafiles or Macintosh PDF/PICT Files.
5
When you are finished repositioning the print fields, close the window.
6
Click Yes to save the changes you made to the print field positions.
Click No to return to the Format window without saving any position
changes.
Note
To return any custom format to its original settings, hold down the Ctrl
key (Windows) or Command key ( - Macintosh) while clicking the
appropriate default radio button.
MLManual.book Page 115 Wednesday, October 27, 2010 12:04 PM
Codes for Customers, Vendors, and Items
115
Codes for Customers, Vendors, and Items
You can use an optional code field to sort or classify customers,
vendors, and items. Codes can be entered up to 15 alpha-numeric
characters and are entered in the Customer, Vendor, or Item setup
windows.
For example, if you want to sort vendors by an account number, you
would setup a code in the code field on vendor setup and it will show
as below on all vendor lists:
C123\ACME Office Supplies
Characters up to and including the backslash (\) won’t automatically
print on checks, invoices, mailing labels, or customer, vendor, and item
reports. The code, however, will appear on transaction journal reports.
Note
To have MultiLedger print the codes you’ve set up for customers,
vendors, and items on reports, check the “Show Code Field on Reports”
option on Preferences under the File menu.
MLManual.book Page 116 Wednesday, October 27, 2010 12:04 PM
116 Chapter 5 Setup Options
MLManual.book Page 117 Wednesday, October 27, 2010 12:04 PM
117
Chapter 7
Introduction to
Transactions
This chapter discusses the following topics:
•
Using MultiLedger’s transaction windows
•
Working with pop-up lists
•
Using MultiLedger’s Find command for pop-up lists
•
Adding or Editing names in a pop-up list
•
Valid document numbers and transaction dates
•
Adding comment lines to transactions
•
Modifying and deleting transactions
•
Entering void documents
•
Working with recurring entries
MLManual.book Page 118 Wednesday, October 27, 2010 12:04 PM
118 Chapter 7 Introduction to Transactions
Moving Between Fields
Recording a transaction in MultiLedger is similar to filling out a paper
form—you enter information under heading or field names. You can
enter information in any order you want by clicking in each field’s edit
box. However, the quickest way to move the cursor (a flashing vertical
bar in the edit box) to the next field is to press TAB or ENTER on
Windows or TAB or RETURN on Macintosh. To move to a previous
field, click in that field’s edit box.
Using Pop-Up Lists
Whenever the cursor enters a field that has an asterisk (*) after its
name, such as the Customer, Vendor, or Item fields, a pop-up list like
the following one appears:
Pop-up lists consist of customers, vendors, terms, salespeople, items,
jobs, shipping methods, sales tax categories, or account numbers.
These lists make data entry fast and easy. For example, by selecting a
customer name from a pop-up list, the customer’s name, and address
are all automatically added to the transaction.
MLManual.book Page 119 Wednesday, October 27, 2010 12:04 PM
Using Pop-Up Lists 119
Note
You can set up certain defaults for customers, vendors, and items on the
individual Setup window that will be automatically selected in a pop-up
list during transaction entry. For example, you can assign default
Customer Terms for a customer on Customer Setup, then that term will
be automatically selected in the pop-up list for the customer when you
create a Customer Invoice.
Finding a Name in a Pop-Up List
MultiLedger offers you several ways to quickly find a name in a popup list:
•
You can use the Find box to search for names, account numbers,
jobs, etc. For example, you can type in all or part of a customer’s
name, and the program will find the first occurrence of those
letters. You can then use the arrow keys on your keyboard to move
through the list.
The Find feature is case-sensitive if the “Find Anywhere” box is not
checked: typing in “ACT” will find “ACT Services” but not “Action
Services.” It will search on the beginning characters of a name or
number, and assumes that the first character of a name is capitalized.
For example, typing in “Action” will find “Action Services” but not
“Uniform Action” or “action plus.”
If you have the “Find Anywhere” box checked, it is not case-sensitive
and MultiLedger will search for the first occurrence of the letter
sequence you enter. For example, typing in “ve” will find “Inventory”
before it will find “Vehicle.” The Find Anywhere box should be
checked before you type information to search for. Otherwise, it will
search on the beginning characters only.
or
•
or
Press the up arrow or down arrow keys on your keyboard to move
through the list.
MLManual.book Page 120 Wednesday, October 27, 2010 12:04 PM
120 Chapter 7 Introduction to Transactions
•
Note
Use the pop-up list’s scroll bar to scroll the list up or down, and
click a name when it scrolls into view.
You can type the first letter of a name to scroll to that letter group in the
list, and then use the down arrow key to quickly move to the desired
name.
Entering Information with a Pop-Up List
You can enter information into a transaction from a pop-up list in one
of two ways:
•
If the name in the list is not already highlighted, click it once to
highlight it, then click OK or press TAB, RETURN (Macintosh), or
ENTER (Windows) to enter the information into the transaction.
or
•
Double-click a name in the list.
Adding or Editing Names in a Pop-Up List
You can access Customer, Vendor, and Item Setup windows directly
from a pop-up list. For those pop-up lists that don’t have the option of
New or Edit, you can access the Setup windows without having to
close a transaction window by choosing the appropriate option from
the Command Center or the pull-down menus.
To add a new customer, vendor, or item through a pop-up list, click New
(Alt-N on Windows or N on Macintosh). The appropriate Setup
window will open. After setting up the new customer, vendor, or item,
click Save on the Setup window or press ENTER. You return to the
transaction window and the new customer, vendor, or item is
highlighted in the pop-up list. Press TAB to add the customer, vendor, or
item to the transaction.
To edit information for an existing customer, vendor or item through a
pop-up list, first highlight the name in the list. Then, click Edit (Alt-E
on Windows or E on Macintosh). The appropriate Setup window will
open. After editing the customer, vendor, or item, click Save or press
ENTER on the Setup window. You return to the transaction window and
the edited customer, vendor, or item is highlighted in the pop-up list.
Press TAB or click OK to add the customer, vendor, or item to the
transaction.
MLManual.book Page 121 Wednesday, October 27, 2010 12:04 PM
Document Numbers 121
Skipping a Pop-Up List
A pop-up list will be skipped if no information is set up for it.
If Skip Jobs under the Edit menu is checked(Ctrl-K on Windows or
Command ( ) K on Macintosh), the Job field on all transaction
windows will be skipped.
Click Cancel (Alt-F4 on Windows or Command ( ) period on
Macintosh) to close a pop-up list without entering any information.
Document Numbers
Each transaction (document) must have a document number that
identifies it. Depending on the transaction window, these document
numbers are labeled as Document #, Invoice #, Doc #, Check #,
Deposit #, or Ref #.
Although document numbers can contain up to eight characters, such
as letters, numbers, or dashes, the last character must be a numeral. For
example, “INV-1138” would work, but “1138-INV” would not.
If a document number is missing or does not end with a numeral, the
following message appears when you try to save the document:
Click OK and re-enter the document number.
After you save a transaction, the document number automatically
increases by one. The next document number is saved for each
transaction window and will automatically be entered when the
window is opened again.
Sales Journal and Customer Invoices share the same last document
(invoice) number. Saving a document number in one will automatically
increment the next document number in both windows by one. For
example, after saving the document number “1138” in the Sales
Journal, the next document number in either the Sales Journal or
Customer Invoices would be “1139.”
The Payables Journal and Item Purchases also share the same last
document number, as do the Disbursements Journal and Vendor
Payments, and the Receipts Journal and Customer Payments.
MLManual.book Page 122 Wednesday, October 27, 2010 12:04 PM
122 Chapter 7 Introduction to Transactions
Quotes and Purchase Orders use their own unique numbers. For
example, when you save a Quote, you can assign the quote a document
number such as “QU 100.” Then, the next time you save a Quote, it
will automatically be assigned document number “QU 101.” When
you convert a Quote or Purchase Order to a transaction, it will be
assigned the next available document number for that transaction.
Checking for duplicate document numbers
MultiLedger allows you to save a transaction in the same journal with
the same document number (but not also the same date), unless you
have Check for Duplicate Documents checked on Preferences under
the File menu.
Some transaction windows access the same journal in MultiLedger and
will check for a duplicate document number entered in either
transaction window. For more information on which journals use the
same numbering system, see the “Document Numbers” section above.
If you have Check for Duplicate Documents on Preferences checked
and a duplicate document number is found, the following message
appears:
Click Yes to assign the next available document number, or click No to
return to the transaction window, then assign the transaction a new
document number.
Working with 30 Open Months
MultiLedger allows you to work in any month in the open 30 months.
For example, if your company operates on a calendar year, you could
enter and modify transactions for January, 2004, through June, 2006,
before you would be required to close 2004.
Important
Once a year has been closed, it cannot be reopened.
Important
We cannot stress enough the importance of making frequent backups of
your company files. For more information on backing up, see Chapter
3, “Backing Up and Restoring Company Files.”
MLManual.book Page 123 Wednesday, October 27, 2010 12:04 PM
Locking and Unlocking Months 123
Locking and Unlocking Months
Having 30 months open does not mean that you have to compromise
the security of your company files. MultiLedger has a feature that
allows you to lock a month when transaction entry should be closed,
and unlock a month if changes are necessary. For more information on
locking and unlocking months, see “Locking and Unlocking Months”
on page 143.
Transaction Dates
You can use the +/- keys on your keyboard to increment/decrement the
date in any transaction window. You can also type over the date to
modify it.
Date Formats
Enter dates in the MM/DD/YY format. For example, to enter February
15, 2005, you would enter the date like this: 2/15/05. Notice that you
do not have to enter any leading zeros.
If you want to enter dates in the DD/MM/YY format, check the
“International Date Format [dd/mm/yy]” option on Preferences under
the File menu.
MLManual.book Page 124 Wednesday, October 27, 2010 12:04 PM
124 Chapter 7 Introduction to Transactions
Valid Transaction Dates
The following table shows the dates that are allowed for each
transaction window:
TransactionWindow
Note
Valid Dates
Item Purchases
Customer Invoices
Vendor Payments
Customer Payments
Disbursements Journal
Receipts Journal
General Journal
Finance Charges
Adjust Inventory
Any date from 30 open months, provided
the month isn’t locked. No date prior to
the current fiscal year is allowed.
Payables Journal
Sales Journal
Any date from the 30 open months,
provided the month isn’t locked. For
setting up a company’s outstanding
receivables and payables, you can enter a
date prior to your current fiscal year.
To see what the current fiscal year is, click Company Information in the
Command Center.
Date Alert Messages
If you enter an invalid date and try to move the cursor out of the Date
field on a transaction window, the following message appears:
Click OK and change the highlighted date to a valid one.
If you enter an invoice in the Sales Journal or Payables Journal with a
date prior to your current fiscal year, the following alert appears:
MLManual.book Page 125 Wednesday, October 27, 2010 12:04 PM
Transaction Dates 125
Click Yes to save the transaction. Saving the transaction adds the detail
to your Accounts Receivable or Accounts Payable report, but does not
affect any ledger balances. Invoices entered in the Sales Journal or
Payables Journal with a date prior to your current fiscal year should be
invoices that your company has not yet received payment for or that
your company has not yet paid as of the first day of your current fiscal
year.
Click No to not save the transaction.
MLManual.book Page 126 Wednesday, October 27, 2010 12:04 PM
126 Chapter 7 Introduction to Transactions
Adding Comment Lines to Transactions
You can add comment lines to transactions by choosing Insert Line
(Ctrl-I on Windows or I on Macintosh) from the Edit menu. A five
line edit box appears:
Enter the comment, up to five lines long and click OK. The comment
lines are added to the transaction detail list.
If you try to wrap the text, it may not show up as entered. It is best to
force the line a line break with the Enter key on your keyboard.
Comment lines appear in transaction journal reports and when you
print the transaction. You can add as many comment lines as necessary.
Note
Important
You can add comment lines between detail lines on a transaction.
Simply select the detail line you want the comment line to appear
before, choose Insert Line (Ctrl-I on Windows or I on Macintosh)
from the Edit menu, then type in the comment line and click OK.
You cannot add comment lines to Receipts Journal transactions created
in Customer Payments or Disbursements Journal transactions created in
Vendor Payments.
Modifying or Removing Comment Lines
To modify or remove a comment line, click the comment line on the
transaction window. The Insert Line edit box with the comment line
highlighted appears. Choose Cut from the Edit menu (or press delete)
or edit the line and then click OK.You can only edit one line at a time.
MLManual.book Page 127 Wednesday, October 27, 2010 12:04 PM
Saving a Transaction 127
Saving a Transaction
After all the necessary information for a transaction has been entered,
click the Save button on the transaction window or press the ENTER
(Macintosh only) key on your keyboard. MultiLedger automatically
posts the transaction to the general ledger.
If you don’t want to save the document, simply close the transaction
window without clicking Save, the following alert appears:
Click No.
Modifying or Deleting a Transaction
You can modify or delete any transaction within the months that have
activity, provided the month isn’t locked.
If, while entering a transaction, you decide that you no longer want to
record it, simply close the transaction window, then click No on the
alert that appears.
Note
If the invoice or payable you want to modify has a Customer Payment
or Vendor Payment associated with it, you should delete the Customer
Payment or Vendor Payment first before modifying the invoice or
payable.
If the transaction has already been saved, do the following beginning
with step 1. If the transaction has not yet been saved, start with step 6.
If the transaction has
been saved, start here.
1
Open the window that was used to create the transaction.
2
Make sure the cursor is in the document number field.
3
Click the Modify button.
When you click Modify, a pop-up list of documents (showing
numbers, dates, and descriptions) from the month selected in the pulldown menu appears.
MLManual.book Page 128 Wednesday, October 27, 2010 12:04 PM
128 Chapter 7 Introduction to Transactions
Initially, this is the
month with the most
recent transaction
date, but you can
change it to any of the
months that have
activity.
If the transaction you’re looking for does not appear, be sure you have
the correct month and year selected in the pull-down menu and that
you are looking in the correct transaction window. If a month appears
grayed out in the pull-down menu, it is locked.
4
Double-click the desired document, or click the desired document so
that it’s highlighted, and then click OK. To select multiple documents
to modify, hold down the SHIFT key while clicking each document or
click and drag the desired documents.
The following choices appear:
5
Click Modify to modify the transaction, Cancel to exit the transaction
without making changes, Delete to remove the transaction, or Skip to
move to the next document without cancelling the remaining selected
transactions.
If you click Delete, you’re done and don’t need to follow steps 6
through 8.
If you click Modify, the original transaction appears.
Note
If you click Cancel while modifying multiple documents, all documents you are
modifying are closed and you are returned to the transaction window.
MLManual.book Page 129 Wednesday, October 27, 2010 12:04 PM
Entering a Void Document 129
Note
If you click Skip while modifying multiple documents,it will skip the
document on the screen and move on to the next one.
If the transaction has
not been saved yet,
start here
6
If necessary, click the detail line or field to be modified or deleted.
The information for the detail line appears in the appropriate fields.
7
Modify the necessary information.
To modify a field in a detail line, select the field that you want to
modify, make the changes, and press TAB to move through the
remaining fields and replace the old detail line in the list with the new
information.
To delete a detail line, enter a zero (0) in the highlighted Amount field
and press TAB to remove the line from the list.
8
Click Save to save the changes.
If you don’t want to save the changes, close the transaction window
without clicking Save, then click No on the alert that appears to not
save the changes.
Entering a Void Document
A void document can be recorded in the Payables, Sales, Receipts, or
Disbursements Journals. Enter the transaction information as you
normally would, except don’t enter any ledger account or amount.
After you click Save, the following message appears:
Click Yes to save the void document. Click No to return to the
transaction window without saving the void document.
To void a transaction that has already been saved, follow the guidelines
in “Modifying or Deleting a Transaction” on page 127. If you delete all
detail lines and then click Save, you will get the message noted above.
Click Yes to save the void document. Click No to return to the transaction
window without saving the void document. You could also delete the
document, and re-enter it as a Void document as described above.
MLManual.book Page 130 Wednesday, October 27, 2010 12:04 PM
130 Chapter 7 Introduction to Transactions
Note
If the disbursement was created in Vendor Payments or the receipt was
created in Customer Payments, you cannot save the document as Void.
You can, however, save the document with a zero balance. The
outstanding payable(s) or receivable(s) associated with the payment
will again appear in Vendor Payments or Customer Payments.
For more information on modifying Disbursements created in Vendor
Payments, see “Modifying or Deleting Payments After Saving a Check”
on page 218. For more information on modifying Receipts created in
Customer Payments, see “Modifying or Deleting Payments After
Saving a Deposit” on page 177.
Note
If the document you want to void has a comment line inserted using
Insert Line under the Edit menu (Ctrl-I on Windows or I on
Macintosh), you cannot save the document as Void. You can, however,
save the document with a zero balance.
Recurring Entries
Transactions entered in the following journals can be saved as
Recurring entries:
•Customer Invoices
•Sales Journal
•Item Purchases
•Payables Journal
•Disbursements Journal
•Receipts Journal
•General Journal
You can define any transaction as Recurring, with a frequency ranging
from none to annually. MultiLedger can alert you when Recurring
entries defined as weekly, bi-weekly, monthly, quarterly, semiannually, or annually come due. Some excellent uses for recurring
entries include rent, 941 payments, and bank charges.
MLManual.book Page 131 Wednesday, October 27, 2010 12:04 PM
Recurring Entries 131
Creating a Recurring Entry
The following procedure for creating a Recurring entry uses the
Disbursements Journal as an example. You can, however, create a
Recurring entry in the other journals listed above as well.
1
Click Disbursements Journal in the Command Center.
2
Check the Recurring check box.
3
Enter the check as you normally would, then click Save.
A frequency dialog appears.
4
Choose the desired frequency from the pop-up menu.
The Scheduled Date indicates when the next entry should be created
and changes depending on the frequency you select.
5
Click OK
A check is created and the transaction is marked to recur based on the
frequency you selected. Click Cancel to return to the Disbursements
Journal without saving the recurring information.
Working with Recurring Entries
When a recurring entry comes due, MultiLedger will alert users who
have Show Scheduled Recurring Entries checked on User Settings
(under the File menu). You can either create the recurring entry from
the Recurring Alert dialog, or you can create it from the Recurring
window..
The Recurring Alert Dialog
When recurring entries are due, the Recurring Alert dialog will appear
when you open the company files in MultiLedger. You can create the
transaction directly from this window, or you can click Cancel and
create the transaction later from the Recurring window. For more
information on the Recurring window, see the next section.
MLManual.book Page 132 Wednesday, October 27, 2010 12:04 PM
132 Chapter 7 Introduction to Transactions
Note
If you have scheduled recurring entries and the Recurring Alert dialog
does not appear when you open your company files, make sure the
Show Scheduled Recurring Entries option is checked on User Settings
under the File menu.
To create a transaction directly from the Recurring Alert dialog, do the
following:
1
Select the recurring entry you want to save as a transaction.
You can select more than one recurring entry at a time. To select a
contiguous selection, simply click and drag through the list. To select
non-contiguous selections, hold the Ctrl key (Windows) or the SHIFT
key (Macintosh) while clicking each recurring entry.
This window displays the last used date of the recurring transaction,
the scheduled date, the next available document number that will be
used for the transaction, the customer/vendor name (if applicable), and
a description for the transaction.
2
Click Create
All selected recurring entries are created in their appropriate
transaction journals and the Recurring Alert dialog closes. You can
modify or delete the transaction as you would any transaction. For
more information on modifying and deleting transactions, see
“Modifying or Deleting a Transaction” on page 127.
You can see the created transactions by viewing the appropriate
Transaction Journal report. For more information on Transaction
Journal reports, see “Transaction Journals Reports” on page 304.
MLManual.book Page 133 Wednesday, October 27, 2010 12:04 PM
Recurring Entries 133
The Recurring Window
The Recurring window allows you to do the following:
•
Modify the frequency of recurring entries
•
Delete a recurring entry
•
Convert a recurring entry into a transaction
1
Click Recurring in the Command Center.
2
Select the radio button for the recurring entry you want to work with.
Select the
appropriate radio
button to see the
Recurring Entries
for that journal
A list of recurring entries for that journal appears.
3
Select the recurring entry you want to create, delete, or edit the
frequency for.
You can select a continuous range by clicking and dragging. You can
select a discontinuous range by holding down the Ctrl key (Windows)
or the SHIFT key (Macintosh) and clicking each desired transaction.
The following descriptions outline each option:
Create
When you click Create, the appropriate transaction journal window
appears with the details of the transaction automatically filled in for
you and you have three options, Create, Cancel, or Skip.
MLManual.book Page 134 Wednesday, October 27, 2010 12:04 PM
134 Chapter 7 Introduction to Transactions
If you click Create, you can modify any information, such as
changing the amount or document number, then click Save. The
transaction is saved and the schedule date for the next occurrence of
the recurring entry is advanced based on the frequency you originally
defined.
If you click Cancel, a blank transaction journal window appears. Click
the window’s close box to return to the Recurring window and start
over.
If you click Skip, it will skip the entry on the screen and move on to
the next entry. When you’re done creating your recurring entries, the
one(s) you skipped will still show on the list with the same scheduled
date as it had before you started.
Delete
Edit Frequency
Click Delete to stop the entry from recurring. Transactions already
created based on the recurring entry will be unaffected.
When you click Edit Frequency, the frequency dialog appears. Make
any necessary changes, then click OK. Click Cancel to close the
frequency dialog without saving any changes.
Viewing and Printing Recurring Entries
You can view or print a list of Recurring Entries for a particular
journal.
1
Click Transaction Journals in the Command Center.
2
Check the Last Used Recurring Entries check box.
3
Click the appropriate radio button.
The last-used recurring entries for the journal appear, regardless of the
month you select in the Month list.
4
Click View or Print.
MLManual.book Page 135 Wednesday, October 27, 2010 12:04 PM
135
Chapter 6
Multi-User MultiLedger
This chapter discusses the following topics:
•
Utilizing the multi-user capabilities
•
Assigning users and passwords
•
Locking and unlocking months
MLManual.book Page 136 Wednesday, October 27, 2010 12:04 PM
136 Chapter 6 Multi-User MultiLedger
Using Multi-User MultiLedger
MultiLedger has built-in multi-user capabilities that allow up to 10
users to access your company’s accounting data over a network
simultaneously. This means that one or more users can be entering
invoices or payables while another user might be viewing financial
reports. All data is stored and updated in one location on your network.
When information is saved, records are locked to prevent overwriting
of data.
To utilize the multi-user capabilities, the volume (hard drive) or folder
containing your company’s data files must be shareable with other
users connected to your network.
Important
If you are using all Macintosh computers and use a Mac OSX computer
as a dedicated server to allow access to your MultiLedger company files
between Mac OSX and Mac OS9 users, OSX will work fine.
HOWEVER, you should not open MultiLedger files on the OSX
computer that is acting as the host, since it is not recognized as a user
and corruption problems can occur.
Important
OSX Server has a problem handling “byte-range locking” requests from
Windows (ie., SMB) users and Mac users simultaneously. Until Apple
supports cross-platform record locking for multiuser databases, if you
have both Mac and PC users on MultiLedger, you’ll need a Windows
Server or Macintosh OS9 Server.
Installing MultiLedger for Multi-User
You will need to install MultiLedger on each user’s computer, as
described in Chapter 1, “Getting Started.”
Mapping the Drive on Windows
For better data access over a network, you should map your network
drive to a letter. Each operating system handles this differently. For
more information, see the documentation the came with your operating
system.
MLManual.book Page 137 Wednesday, October 27, 2010 12:04 PM
Using the Multi-User Capabilities 137
Using the Multi-User Capabilities
All that is required to initiate multi-user operation is to place the
company files on a shared disk.
Note
Daily backups are strongly recommended for shared data. For more
information on backing up company files, read Chapter 3, “Backing Up
and Restoring Company Files.”
Using MultiLedger in a multi-user environment is very similar to using
it in a single user environment. The main difference is that
simultaneous access to the same data must be regulated, either by
disallowing certain operations at a given time, or by delaying a
particular operation until requested data is available.
Access Limitations
Access limitations are indicated by the following messages:
•
“Exclusive access required or maximum number of users
exceeded. Operation not allowed.”
Only one user may access company files during certain operations,
e.g., closing the year, deleting a customer. The maximum number
of users you can have is 10.
•
“Operation not allowed if more than one user accessing data.”
Certain operations may be performed by only one user at one time,
such as Customer Payments, Vendor Payments, Finance Charges,
Bank Reconciliation, and Chart of Accounts.
Delays in accessing data occur in two situations, each signaled by
the appearance of the network cursor (
):
• When the cursor is blinking, another user is accessing data needed for
the current operation, so the program is waiting until the required data
becomes available. When the data is no longer in use, the operation
will proceed. On Windows, holding down the Escape (esc) key will
abort the operation. On Mac, hold down the command key and period
at the same time. This is typified by two users trying to simultaneously
save a transaction, or a user attempting to save a transaction at the
same time another user is generating a balance sheet.
MLManual.book Page 138 Wednesday, October 27, 2010 12:04 PM
138 Chapter 6 Multi-User MultiLedger
• When the cursor appears without blinking, another user has added
data, and the program is incorporating this additional data; the duration
depends on the amount of data involved. Once the data has been
incorporated, the program will continue. An example of this would be
selecting the Customer report after customers have been added by
another user.
Multi-User Restrictions
The fundamental restriction is allowing only one user to access
transactions at one time. Access occurs whenever transactions are
saved (including transaction journals, customer/vendor payments,
import, etc.), or reports requiring a “balanced” state (Balance Sheet,
Trial Balance, or General Ledger listing) are being created. If
simultaneous transaction access is attempted, the blinking network
cursor will appear until the operation is completed. The delay will be
equal to the time needed to perform the operation, which in most cases
is relatively short.
There are several special cases of restricted access. A receivable/
payable cannot be modified if the Customer/Vendor Payments screen is
in use. Deletions (accounts, customers, vendors, items, salespeople)
require that only one user is accessing company files.
MLManual.book Page 139 Wednesday, October 27, 2010 12:04 PM
Multi-User Restrictions 139
The following table shows the access controls for the menus that are
not multi-user. Operations are classified as single (available to only
one user at a time), and exclusive (available only if no other user has
opened the same company).
Operation
Access
Profit Center
Single
Chart of Accounts
Single
Customer/Vendor Payments
Single
Adjust Inventory
Single
Finance Charges
Single
Bank Reconciliation
Single
Close Year
Exclusive
Delete (account, vendor, customer,...)
Exclusive
Back Up Company
Exclusive
Rebuild Files
Exclusive
Import chart of accounts
Exclusive
All other operations are available to multiple users, subject to the
restrictions and delays previously described. Note that for certain
operations, even though multiple users are not prohibited, a
“reasonable” use of the program is assumed. An instance of this would
be Account Balances. More than one user can enter balances—if they
are entering the same month, then the last one saved will overwrite any
previous values. (While saving, no other user may access transactions.)
MLManual.book Page 140 Wednesday, October 27, 2010 12:04 PM
140 Chapter 6 Multi-User MultiLedger
Network Considerations
For windows permitting multiple access, if two users access the same
data and save it, the last one to save will overwrite any previous
changes. For example, if two users modify the Preferences window,
one enables the check for duplicate documents and the other disables
it, the stored value will be that of the user who saves last.
Network timing will determine the data available to a user at any
particular time. If, for example, a transaction journal report is being
created while another user adds an entry to the journal, the entry will
not be included; however, if the report is recreated, the new entry will
appear. In general, data is made available at the time it is requested; for
example, the customer list is updated when the customer setup or
customer reports screens are entered.
Since more than one user can be entering into the same journal, we
recommend you check “Check for Duplicate Document Numbers” on
the Preferences window under the File menu.
Users and Passwords
MultiLedger allows you to set up individual users with unique
passwords, then assign the menu commands that each user should have
access to.
Setting Up Users and Passwords
You can set up as many as 20 users and passwords in MultiLedger.
Note
Although you can set up as many as 20 users, the maximum number of
users that can access your company’s data files
simultaneously is 10.
The number of users who currently have the company files open is
displayed at the bottom of the Command Center.
MLManual.book Page 141 Wednesday, October 27, 2010 12:04 PM
Users and Passwords 141
1
Click Company Information in the Command Center, then click
Passwords.
The following window appears:
2
Type in a user’s name (up to 20 characters).
3
Type in a password (up to six characters).
The password can be letters, numbers, or a combination of both.
Passwords are not case-sensitive, meaning entering “SKI” is the same
as entering “ski”.
4
Click the menu commands from the Accessible Menu Commands list
that this user should have access to, then click Save.
To deselect a menu command, simply click it so that the asterisk
(Windows) or check mark (Macintosh) is removed. You can select or
deselect a range of menu commands by clicking on the first one and
dragging down the list.
You can continue entering new users and passwords, or, if you’re
finished, click Done.
MLManual.book Page 142 Wednesday, October 27, 2010 12:04 PM
142 Chapter 6 Multi-User MultiLedger
When you create a new company with MultiLedger, a user named
Master is automatically set up for you. The Master initially has no
password, but has access to all menu commands. If you will be using
passwords for your company, you need to assign a password to the
Master before any other users and passwords are activated. Please note
that you can change the name Master to a user’s name. However, the
first user’s name in the list is always considered the Master and always
has access to all menu commands.
Note
The posting category on transaction journal windows and the Bank
Reconciliation cannot be changed if you do not check Interface
Accounts.
Note
Renumber Accounts in the File menu will be active or inactive when
you check or uncheck the Chart of Accounts.
Note
The Cash Flow Statement and Financial Snapshot will be active or
inactive when you check or uncheck the Balance Sheet.
Modifying and Deleting Users and
Passwords
Only the Master can modify or delete users and passwords. Please note
that while you can change the name Master and the password, you
cannot change the accessible menu commands or delete the Master.
1
Click Company Information in the Command Center, then click
Passwords.
2
Highlight a user’s name from the list on the right.
You can change any information for this user. After making changes,
be sure to click Save before selecting another user or clicking Done, or
else your changes will be lost.
To delete the user, click Delete. When you are finished making
changes in this window, click Done to return to the Company
Information window.
MLManual.book Page 143 Wednesday, October 27, 2010 12:04 PM
Locking and Unlocking Months 143
How Passwords Work
If you’ve set up users and passwords for your company, you’ll be
prompted to enter a password when you open your company files.
Highlight a user’s name in the list, type the correct password, then
press TAB. When you are prompted for the password, you get three
chances to enter a correct password before you are exited from the
program.
After opening a company using a password, if a user tries to access a
window that he/she doesn’t have password access to, the following
message appears:
Locking and Unlocking Months
MultiLedger has a feature that allows you to lock transactions through
a specific month-end date, and unlock a month or range of months if
changes are necessary. This feature can be password protected. For
more information on setting up passwords, See “Setting Up Users and
Passwords” on page 140.
How to Lock a Month
When you are ready to lock a month, the procedure is simple:
1
Click Company Information in the Command Center.
2
Click the month you want to lock entries through in the Lock Entries
Thru list.
For example, if you want transactions locked through April 2005, you
would highlight 04/30/05. Transactions with dates from your first open
month through April 2005 cannot be entered, modified, imported, or
deleted, but reports for those months can still be viewed and printed.
MLManual.book Page 144 Wednesday, October 27, 2010 12:04 PM
144 Chapter 6 Multi-User MultiLedger
How to Unlock a Month
If a month is locked, but you need to make a change in that month, you
can always unlock the month.
1
Click Company Information in the Command Center.
2
Click the selected month in the Lock Entries Thru list to deselect it,
which unlocks all months, or highlight a month from the Lock Entries
Thru list that is before the month you want to make changes in.
For example, if you need to make a change in April 2005, you could
highlight 03/31/05 in the list to keep transactions prior to April 2005
locked.
MLManual.book Page 145 Wednesday, October 27, 2010 12:04 PM
145
Chapter 8
Customer
Transactions
This chapter discusses the following topics:
•
Recording sales
•
Modifying or deleting sales
•
Recording customer payments
•
Working with quotes
•
Working with customer credits and refunds
•
Handling finance charges
MLManual.book Page 146 Wednesday, October 27, 2010 12:04 PM
146 Chapter 8 Customer Transactions
Customer Transactions Flowchart
The following flowchart is designed to give you a basic overview of
customer-based transactions. The rest of this chapter describes each
option in detail.
Customer Invoices
Sales Journal
Create an invoice for inventory sales.
Track salesperson commissions.
Track sales tax.
Create a quote
Create an invoice for non-inventory sales.
Create a quote
Finance Charges
(optional)
Customer Payments
Create a deposit from Customer Invoices,
Sales Journal, and Finance Charges
Receipts Journal
Customer Payments are posted here.
Also use for cash sales or other deposits
Bank Reconciliation
Shows deposits from Customer Payments
and Receipts Journal
MLManual.book Page 147 Wednesday, October 27, 2010 12:04 PM
Recording Sales 147
Recording Sales
MultiLedger offers great flexibility for recording sales. Depending on
the type of sale you want to record, the three windows you can use are:
•
Customer Invoices
•
Sales Journal
•
Receipts Journal
These windows are discussed in the following table.
If you want to....
Use this transaction window
Record a sale of inventory items and
create an outstanding receivable
Customer Invoices
Record a service sale that creates an
outstanding receivable
Customer Invoices
or Sales Journal
Create a recurring transaction
Customer Invoices, Sales
Journal, or Receipts Journal
Create a quote
Customer Invoices
or Sales Journal
Record commissionable sales for your
salespeople
Customer Invoices
Create outstanding receivables that
are dated prior to your Start Month
(for setting up your company with
MultiLedger)
Sales Journal
Record a cash sale or part of a deposit
that doesn’t involve inventory or
create an outstanding receivable
Receipts Journal
MLManual.book Page 148 Wednesday, October 27, 2010 12:04 PM
148 Chapter 8 Customer Transactions
If you need to track inventory or salesperson commissions, your choice
is simple—you should use Customer Invoices.
If you do not need to track inventory and want the sale to create an
outstanding receivable, you can use either Customer Invoices or the
Sales Journal. Both windows can record non-inventory sales, such as
consulting, labor, or some other service.
Customer Invoices
Customer Invoices offers more flexibility than the Sales Journal for
recording a sale that creates an outstanding receivable. It’s the only one
to use if you want to account for inventory sales, but it also offers many
convenient features for non-inventory sales as well:
• You can select up to two sales tax categories and
MultiLedger will automatically calculate the sales tax on
taxable items and on shipping if the checkbox is selected.
• Since items (non-inventory as well as inventory) already
have ledger accounts associated with them, you don’t have
to worry about picking the right ledger account for each
item; you just pick the right item.
• MultiLedger will automatically insert the Selling Price for
a selected item (non-inventory and inventory). This can
mean fewer mistakes during transaction entry.
• The Amount for each detail line will automatically be
calculated based on Quantity times Selling Price. You can
still modify the calculated amount.
• You can create a Quote which can be modified or
converted to a Customer Invoice at any time.
• You can track commissionable sales for your salespeople.
• You can utilize the default pricing level you set up for
customers.
Sales Journal
The Sales Journal offers the simplest means for recording a sale that
creates an outstanding receivable. For many, it’s the quickest way to
enter a sale when they don’t need to keep tabs on an inventory.
Although the Sales Journal does not automatically calculate a sales tax
based on a percentage, you can manually figure the tax and enter it as a
detail line on the invoice.
The Sales Journal is also used to enter any outstanding invoices that are
dated prior to your Start Month when you initially start your company
using MultiLedger.
MLManual.book Page 149 Wednesday, October 27, 2010 12:04 PM
Customer Invoices 149
Receipts Journal
The Receipts Journal gives you a way to a record a cash sale or part of
a deposit that doesn’t involve inventory or an outstanding receivable.
Customer Invoices
Use Customer Invoices when you want to create an invoice that
records inventory sales, track sales commissions, enter tax rates, enter
a shipping date, and so on. You can also record service sales (such as
consulting) with Customer Invoices by setting up a service as a noninventory Item (for details, see “Setting Up Items” on page 79).
Saving an invoice automatically updates the general ledger and creates
an outstanding receivable. Use Customer Payments to record the
amount a customer pays against the invoice.
Note
Before an inventory or non-inventory item can be sold in Customer
Invoices, the item should have been set up on the Items window. For
more details, see "Setting Up Items" on page 79.
Important
Do not use Customer Invoices to enter outstanding receivables dated
prior to your Current fiscal year. Use the Sales Journal to enter these
outstanding receivables when setting up your company with
MultiLedger.
Customer Invoices Field Descriptions
This section discusses the individual fields on Customer Invoices.
Quote
When you save a Customer Invoice with Quote checked, the transaction
does not affect the General Ledger, and can be modified, deleted, or
converted to a Customer Invoice at any time. For more details on
working with Quotes, see "Quotes" on page 179.
Recurring
If you have Customer Invoices that occur on a regular basis, you can
save them with Recurring checked. You can define the frequency for a
recurring entry and have MultiLedger remind you when the transaction
should be created. For more details on working with recurring entries,
see "Recurring Entries" on page 130.
Print on Save
If checked, the Print dialog box appears immediately after an invoice is
saved.
Modify Item
Description
If checked, when item is selected, you get a text box in which you can
change description or add to it. This can be selected or de-selected for
individual line items on the an invoice.The modified item will appear as
changed on the invoice, in the transaction journal and in the General
Ledger.
MLManual.book Page 150 Wednesday, October 27, 2010 12:04 PM
150 Chapter 8 Customer Transactions
Invoice #
Enter an invoice number up to eight characters long to identify the
invoice. The last character must be a number.
After the invoice is saved, the invoice number (or last number of a
combination of characters) is automatically increased by one.
You can have MultiLedger automatically warn you if you attempt to
save a transaction with a duplicate document number by checking
Check for Duplicate Documents on Preferences under the File menu.
For more details, see "Setting Program Preferences" on page 90.
Customer
Select a customer from the pop-up list. The customer’s address,
Discount Percentage, and notes set up for the customer are entered
automatically too. Notes appear during transaction entry, but do not
print on the invoice. If the pop-up list does not appear, customers have
not yet been set up.
You can add a new customer or edit existing customer information
without closing the Customers pop-up list by clicking New (Alt-N on
Windows or N on Macintosh) or Edit (Alt-E on Windows or E on
Macintosh).
Any Discount % set up for a customer will reduce the Selling Price for
each item sold by the percentage shown.
Ship To
Once a customer name is entered, you can select an existing or add a
new shipping address to this invoice by clicking anywhere in the Ship
To box. The following edit box appears:
Enter a Ship To address, then click Save. Ship to addresses appear in the
order in which they are entered. To use a Ship To address on this
invoice, select the address in the list, then click Use.
MLManual.book Page 151 Wednesday, October 27, 2010 12:04 PM
Customer Invoices 151
After you click Use, the information is entered into the invoice, and the
cursor moves to the Date field. To not enter a Ship To address, click in
the Ship To box, then click Cancel. To remove a Ship To address from
an invoice, click in the Ship To box, then click Cancel.
Important
You can modify existing addresses if necessary, but it’s best not to
Delete Ship To addresses.
Date
Simply type over the highlighted day or use the +/- keys on your
keyboard to increment/decrement the date. You can enter a date from
the 30 open months, provided the month isn’t locked, in the form MM/
DD/YY.
The invoice date, along with any selected terms, determine the invoice’s
due and discount dates.
Statement Description
Enter a description up to 25 characters long. You could enter a purchase
order number or some other reference number. The description will
print on a customer statement but not on the invoice. If you don’t enter
a description, the customer name will be automatically copied to this
field when you save the invoice.
Sales Tax
Select a Sales Tax category from the pop-up list. If the pop-up list does
not appear, sales tax categories have not yet been set up.
You can have up to two sales tax categories per invoice. The first sales
tax field could be used for a state tax and the second sales tax field could
be used for a city tax. If no tax should be applied, click Cancel in the
pop-up list. These tax rates only apply to items that have been set up
with Taxable Rates 1 and 2 checked and to shipping if the checkbox is
selected.
You can set up default sales tax categories for your customers that will
be selected automatically when you reach the Sales Tax pop-up list. The
second Sales Tax field is skipped automatically unless you uncheck the
“Skip Tax 2 During Invoice Entry” option on Preferences under the File
menu.
If “Include Tax 1 in Tax 2 Computation” is checked on Preferences, the
calculated tax value in the second Sales Tax field includes the amount
in Tax 1, as well the amount of all items on the invoice.
Taxable
If checked, the shipping amount will be included in the sales tax
calculation.
MLManual.book Page 152 Wednesday, October 27, 2010 12:04 PM
152 Chapter 8 Customer Transactions
Ship Chg
If shipping is charged to a customer, enter a dollar amount.
To account for a shipping charge in your chart of accounts, set up the
account using Chart of Accounts, and then assign it to the Shipping
Charged on Interface Accounts.
Terms
Select the terms from the pop-up list. If the pop-up list does not appear,
terms have not yet been set up.
You can choose default terms for your customers on Customer Setup
that will be selected automatically when you select the customer from
the pop-up list.
Terms determine the discount date and when payment is due for the
invoice. If terms are not entered, the invoice’s date becomes the due
date.
Ship Date
Salesperson
The Ship Date is filled in automatically with the invoice date. If
necessary, enter a new date.
Select the salesperson from the pop-up list. If the pop-up list does not
appear, salespeople have not yet been set up.
You can choose a default salesperson for a customer on Customer Setup
that will be selected automatically when you reach the Salesperson popup list.
Sales of commissionable items appear on Salespeople reports.
Order #
Ship Via
Enter a purchase order number up to 13 characters long.
Select the Ship Via method from the pop-up list. If the pop-up list does
not appear, shipping methods have not yet been set up.
You can either enter a name from this pop-up list or click Cancel in the
pop-up list box and type a 13 character name that’s not in the Ship Via
list. If you type the Ship Via method in, MultiLedger won’t save the
Ship Via method for future use.
Item
Select the item from the pop-up list. If the pop-up list does not appear,
items have not yet been set up.
You can add a new item or edit information for an existing item without
closing the Items pop-up list by clicking New (Alt-N on Windows or
N on Macintosh) or Edit (Alt-E on Windows or E on Macintosh).
Note
By selecting the option to Modify Item Description, you can change or
enter additional text in the item description line. This text will show on
an invoice and in the transaction joural reports.
MLManual.book Page 153 Wednesday, October 27, 2010 12:04 PM
Customer Invoices 153
Important
If the item you select does not have a sales account (in the 4000 range)
assigned to it when you save the invoice, MultiLedger warns you that
the sale will be incorrectly posted to the first account in your chart of
accounts (usually the cash account). You should assign the correct sales
account to the item on Item Setup, then you should modify the invoice
and resave it in order for it to post to the correct account.
Job
Select a job from the pop-up list. If the Jobs pop-up list does not appear,
no jobs have been set up, or Skip Jobs (Ctrl-K on Windows or K on
Macintosh) under the Edit menu is checked.
Quantity
Enter a quantity that is up to seven digits to the left of the decimal point
and three digits to the right (9999999.999).
MultiLedger warns you if you attempt to sell more of an item than you
have on hand. If you enter a quantity that is greater than what you have
on hand for the item, the following alert appears:
Click Yes to accept the quantity entered or click No to return to the
invoice so that you can change the amount.
Selling Price
When the cursor enters the Selling Price field, the selected item’s
Selling Price, as defined on Item Setup, is entered and highlighted
automatically. You can have up to three different selling prices per item.
You can also assign a default pricing level to your customers. That way,
the correct pricing level is entered automatically for the selected
customer. If the customer on this invoice does not have a default pricing
level assigned, Selling Price 1 is used.
You can change the Selling Price for a particular invoice by editing the
highlighted amount. If you want to permanently change the Selling
Price associated with a particular item, you should change the Selling
Price on Item Setup.
MLManual.book Page 154 Wednesday, October 27, 2010 12:04 PM
154 Chapter 8 Customer Transactions
Unit Cost
When the cursor enters the Unit Cost field, the selected inventory item’s
Average Unit Cost, as defined on Item Setup, is entered and highlighted
automatically. You can enter a unit cost up to six places to the left and
four places to the right of the decimal point (999999.9999).
The Unit Cost shown here is used to cost the inventory item when the
invoice is saved. The cost of the item is a calculation based on Quantity
times Unit Cost. When you save the invoice, the Cost Account assigned
on Item Setup is increased (debited) and the Inventory account is
decreased (credited).
If you change the Unit Cost on Customer Invoices, the Average Unit
Cost for the inventory item is automatically adjusted for future invoices.
If the item’s quantity on hand is greater than zero, then the Avg Unit
Cost is used as the Unit Cost to cost the item.
If the item’s quantity on hand is less than or equal to zero, then the Last
Unit Cost is used as the Unit Cost to cost the item.
Note
Please note that you can hide the Unit Cost field on customer invoices
by checking Hide Unit Cost in Customer Invoice on Preferences under
the File menu. For more details on this option, please see "Setting
Program Preferences" on page 90.
Amount
New Line
(Windows Only)
Invoice Total
When the cursor enters the Amount field, the amount will be calculated
automatically based on Quantity times Selling Price.
To enter another detail line to the invoice, click New Line or press
ENTER.
This shows the total for the invoice as you add items to the invoice.
When you save the invoice, the Invoice Total amount increases the
Accounts Receivable account assigned on Interface Accounts.
MLManual.book Page 155 Wednesday, October 27, 2010 12:04 PM
Customer Invoices 155
Recording a Sale with Customer Invoices
1
Click Customer Invoices in the Command Center.
Invoice number must
end in a number
Click in the Ship To field
to add a ship to address
or select an existing one
Check Taxable to have
sales tax calculate on
the shipping amount
Press TAB or RETURN
(Macintosh) or Press
New Line or ENTER
(Windows)after the
Amount field to add
another detail line to the
invoice
Information entered here prints on a
customer statement, but not on the invoice
MLManual.book Page 156 Wednesday, October 27, 2010 12:04 PM
156 Chapter 8 Customer Transactions
2
If necessary, enter or change the invoice number, press TAB.
The Customers pop-up list appears:
3
Select a customer from the pop-up list, and press TAB.
For details about using pop-up lists, see "Using Pop-Up Lists" on page
118.
MLManual.book Page 157 Wednesday, October 27, 2010 12:04 PM
Customer Invoices 157
Note
After selecting a customer, you can see the customer’s transaction
history by clicking on the History button at the top of the window. The
current date is used as the Cutoff Date for the report.
Click the window’s close box to close it and return to Customer
Invoices.
4
Continue filling in the rest of the fields with the appropriate
information.
For field explanations, see "Customer Invoices Field Descriptions" on
page 149.
Note
You can add comment lines to the invoice at any time by choosing Insert
Line from the Edit menu (Ctrl-I on Windows or I on Macintosh). You
can also add additional description to the Item description line. For
more details, see "Adding Comment Lines to Transactions" on page
126.
5
After you have entered an item, quantity, selling price, and amount,
press TAB to add the item to the invoice.
As you add items to the invoice, the Invoice Total field is updated:
After the first item is added, the Save button is enabled.
MLManual.book Page 158 Wednesday, October 27, 2010 12:04 PM
158 Chapter 8 Customer Transactions
Important
If the item you select does not have a sales account (in the 4000 range)
assigned to it when you save the invoice, MultiLedger warns you that
the sale will be incorrectly posted to the first account in your chart of
accounts (usually the cash account). You should assign the correct sales
account to the item on Item Setup, then you should modify the invoice
and resave it in order for it to post to the correct account.
6
On Windows, if necessary, click New Line or press ENTER to begin
entering another item.
On Macintosh, if necessary, press TAB or RETURN again to begin
entering another item.
7
When you are finished entering all the information for the document,
click Save.
If the Invoice Total exceeds the customer’s credit limit, an alert
appears allowing you to continue to save or cancel.
After the invoice is saved, the transaction is automatically posted to the
general ledger, and the invoice number is increased by
one.
.
MLManual.book Page 159 Wednesday, October 27, 2010 12:04 PM
Customer Invoices 159
Printing a Customer Invoice
MultiLedger offers you two ways to print an invoice:
• Check “Print on Save” on the Customer Invoice window.
When you save an invoice, a standard Print dialog box
appears. Select your print options and click OK or Print.
or
• Use the Print on the Command Center. After saving a
Customer Invoice, do the following:
1
Click Print from the Command Center.
2
Select the correct month.
3
Click the Customer Invoices & Quotes radio button.
4
From the list of documents, select the invoices that you want to print.
If no invoices are highlighted, all invoices and quotes for the selected
month will be printed.
5
If necessary, check Print Metafile (Windows) or Print PDF/PICT File
(Macintosh).
For more information on using Metafiles or PDF/PICT Files, see
“Using the Print Screen” on page 105.
6
Click Print.
7
Select your print options and click OK or Print.
For more details about the Print command, see "Using the Print
Screen" on page 105.
Note
MultiLedger’s flexibility allows you to adjust where the Customer
Invoice fields print on an invoice form. For more information, see
"Customizing Print Field Positions for Your Printer" on page 111.
Note
MultiLedger also prints packing slips based on Customer Invoices.
Packing slips contain most customer invoice information except dollar
amounts. For more information on printing packing slips, see "Using
the Print Screen" on page 105.
Modifying or Deleting an Invoice
When the cursor is in the Invoice # field, the Modify button is enabled.
Click Modify to see a list of Customer Invoices that you can modify or
delete. If the Customer Invoice you’re looking for doesn’t appear, you
may have to select another month from the pull-down menu.
MLManual.book Page 160 Wednesday, October 27, 2010 12:04 PM
160 Chapter 8 Customer Transactions
Sales Journal
Use the Sales Journal when you want to create an invoice that records
sales that do not involve inventory, such as service sales or consulting,
and creates an outstanding receivable. If you need to record inventory
sales, use Customer Invoices. Sales tax and shipping amounts are not
automatically calculated in the Sales Journal, but can be added as detail
lines.
Saving a Sales Journal invoice automatically updates the general
ledger and creates an outstanding receivable. You can use Customer
Payments to record the amount a customer pays against the invoice.
Note
When setting up your company with MultiLedger, you should use the
Sales Journal to enter outstanding receivables that are dated prior to
your Start Month. An outstanding receivable will be created without
affecting the general ledger account balances. For more information,
see "Setting Up Prior Outstanding Receivables" on page 32.
Sales Journal Field Descriptions
This section discusses the individual fields on the Sales Journal.
Quote
When you save a Sales Journal invoice with the Quote option checked,
the transaction does not affect the General Ledger, and can be modified,
deleted, or converted to a Sales Journal invoice at any time. For more
details on working with Quotes, see "Quotes" on page 179.
Recurring
If you have Sales Journal invoices that occur on a regular basis, you can
save them with Recurring checked. You can define the frequency for a
recurring entry and have MultiLedger remind you when the transaction
should be created. For more details on working with recurring entries,
see "Recurring Entries" on page 130.
Invoice #
Enter an invoice number up to eight characters long to identify the
invoice. The last character must be a number.
After the invoice is saved, the invoice number (or last number of a
combination of characters) is automatically increased by one.
Customer
Select a customer from the pop-up list. The customer’s name, address,
and any notes set up for the customer are entered automatically too.
Notes appear during transaction entry, but do not print automatically on
the invoice.
You can add a new customer or edit existing customer information
without closing the Customers pop-up list by clicking New (Alt-N on
Windows or N on Macintosh) or Edit (Alt-E on Windows or E on
Macintosh).
MLManual.book Page 161 Wednesday, October 27, 2010 12:04 PM
Sales Journal 161
You can have the Notes and Add’l Notes you’ve set up for a customer
print on Sales Journal invoices by selecting “Print Customer Notes on
Sales Journal” on Preferences under the File menu.
Date
Simply type over the highlighted day or use the +/- keys on your
keyboard to increment/decrement the date. You can enter a date from
the 30 open months, provided the month isn’t locked, in the form MM/
DD/YY.
The invoice date, along with any selected terms, determine the invoice’s
due and discount dates.
Statement Description
Enter a description up to 25 characters long. You could enter a purchase
order number or some other reference number. The description will
print on a customer statement but not on the invoice. If you don’t enter
a description, the customer name will be automatically copied to this
field when you save the invoice.
Terms
Select the terms from the pop-up list. If the pop-up list does not appear,
terms have not yet been set up.
You can choose default terms for your customers on Customer Setup
that will be selected automatically when you reach the Terms pop-up
list.
Terms determine the discount date and when payment is due for the
invoice. If terms are not entered, the invoice’s date becomes the due
date.
Ledger Account
Select the ledger account from the pop-up list. For more information on
using pop-up lists, see "Using Pop-Up Lists" on page 118.
When you save the invoice, the account entered here is increased by the
amount for the detail line. Usually, this is an income account in the
4000–4999 range.
Job
Select the job for this detail line from the pop-up list. If the Jobs pop-up
list does not appear, no jobs have been set up, or Skip Jobs (Ctrl-K on
Windows or K on Macintosh) under the Edit menu is checked.
Description
When the cursor enters this field, the customer’s name is automatically
copied to it and highlighted.
You can enter up to 25 characters of descriptive text for a particular
detail line in the invoice. The text entered in the Description field prints
on invoices along with the amount (unlike the Statement Description
field, which prints just on customer statements).
Amount
Enter an amount for the detail line. If the amount has zero cents, you
don’t have to enter .00.
MLManual.book Page 162 Wednesday, October 27, 2010 12:04 PM
162 Chapter 8 Customer Transactions
New Line
(Windows Only)
To enter another detail line to the invoice, click New Line or press
ENTER.
Invoice Total
This shows the total for the invoice as you add detail lines to the
invoice’s detail list. When you save the invoice, the Invoice Total
amount increases the Accounts Receivable account in the General
Ledger.
MLManual.book Page 163 Wednesday, October 27, 2010 12:04 PM
Sales Journal 163
Recording a Sale with the Sales Journal
1
Click Sales Journal in the Command Center.
Information entered here prints on a customer
statement, but does not print on the invoice
Invoice number must
end in a number
Press TAB or RETURN
(Macintosh), Press New
Line or ENTER
(Windows)after the
Amount field to add
another detail line to the
invoice
MLManual.book Page 164 Wednesday, October 27, 2010 12:04 PM
164 Chapter 8 Customer Transactions
2
If necessary, enter or change the invoice number.
The Customers pop-up list appears:
3
Select a customer from the pop-up list and press TAB.
For details about using pop-up lists, see "Using Pop-Up Lists" on page
118.
Note
After selecting a customer, you can see the customer’s transaction
history by clicking the History button at the top of the window. The
current date is used as the Cutoff Date for the report.
MLManual.book Page 165 Wednesday, October 27, 2010 12:04 PM
Sales Journal 165
Click the window’s close box to close it and return to the Sales Journal.
4
Continue filling in the rest of the fields with the appropriate
information.
For field explanations, see "Sales Journal Field Descriptions" on page
160.
Note
You can add comment lines to the invoice at any time by choosing Insert
Line from the Edit menu (Ctrl-I on Windows or I on Macintosh). For
more information, see "Adding Comment Lines to Transactions" on
page 126.
5
After you have entered a ledger account (usually an income account in
the 4000-4999 range) and amount (Job and Description are optional),
press TAB to add the detail line to the invoice.
As you add detail lines to the invoice, the Invoice Total field is
updated:
6
On Windows, if necessary, click New Line or press ENTER to begin
entering another item.
MLManual.book Page 166 Wednesday, October 27, 2010 12:04 PM
166 Chapter 8 Customer Transactions
On Macintosh, if necessary, press TAB or RETURN again to begin
entering another item.
7
When you’re finished entering all the information for the invoice, click
Save.
If the Invoice Total exceeds the customer’s credit limit, an alert
appears allowing you to continue to save or cancel.
When the invoice is saved, the transaction is posted automatically to
the general ledger, and the invoice number is increased by one.
Printing a Sales Journal Invoice
Use Print on the Command Center to print Sales Journal invoices.
After saving an invoice, do the following:
1
Click Print in the Command Center.
2
Select the correct month from the list on the right.
3
Click the Sales Journal Invoices radio button.
4
From the list of documents, select the invoices that you want to print.
If no invoices are highlighted, all invoices will be printed.
5
If necessary, check Print Metafile (Windows) or Print PDF/PICT File
(Macintosh).
For more information on using Metafiles or PICT Files, see "Using the
Print Screen" on page 105.
6
Click Print.
7
Select your print options and click OK or Print.
For more details about the Print command, see "Using the Print
Screen" on page 105.
Note
MultiLedger’s flexibility allows you to adjust where the invoice fields
print on an invoice form. For more information, see "Customizing Print
Field Positions for Your Printer" on page 111.
Modifying or Deleting Sales Journal
Invoices
When the cursor is in the Invoice # field, the Modify button is enabled.
Click Modify to see a list of Sales Journal invoices that you can modify or
delete. If the Sales Journal invoice you’re looking for doesn’t appear, you
may have to select another month from the pull-down menu.
MLManual.book Page 167 Wednesday, October 27, 2010 12:04 PM
Receipts Journal 167
Receipts Journal
You can use the Receipts Journal to record a deposit that is the result of
income not associated with an accounts receivable transaction. You can
also record miscellaneous deposits, such as bank interest or a refund
that you’ve received. Please note that because you can’t associate a
Receipts Journal deposit with a customer name, deposits entered with
the Receipts Journal do not affect customer transaction history.
Note
Customer payments against outstanding invoices should be recorded in
Customer Payments.
Receipts Journal Field Descriptions
The following section discusses the individual fields in Receipts
Journal.
Recurring
If you have Receipts Journal transactions that occur on a regular basis,
you can save them with the Recurring option checked. You can define
the frequency for a recurring entry and have MultiLedger remind you
when the transaction should be created. For more details on working
with recurring entries, see "Recurring Entries" on page 130.
Print on Save
If checked, the program will print a deposit slip with the total amount of
the receipt. For more information on printing deposit slips, see “Using
the Print Screen” on page 105.
Cash Account
The account shown will be increased by the Deposit Total when you
save the document. This account is initially the account number that was
assigned to the Cash Account on Interface Accounts. To change
accounts, click the account shown and select another cash account from
the pop-up list of accounts.
Deposit #
Enter a document number up to eight characters long to identify the
receipt. The last character must be a number.
After the deposit is saved, the deposit number (or last number of a
combination of characters) is automatically increased by one.
Description
Date
Ledger Account
Enter a description up to 25 characters long. A description must be
entered before the transaction can be saved.
Simply type over the highlighted day or use the +/- keys on your
keyboard to increment/decrement the date. You can enter a date from
the 30 open months, provided the month isn’t locked, in the form MM/
DD/YY.
Select a ledger account from the pop-up list. For more information on
using pop-up lists, see "Using Pop-Up Lists" on page 118.
MLManual.book Page 168 Wednesday, October 27, 2010 12:04 PM
168 Chapter 8 Customer Transactions
When you save the receipt, the account entered here is increased by the
amount for the detail line. Usually, this is an income account in the
4000–4999 range.
Job
Description
Select a job for this detail line from the pop-up list. If the Jobs pop-up
list does not appear, no jobs have been set up, or Skip Jobs (CTRL - K on
Windows or K on Macintosh) under the Edit menu is checked.
When the cursor enters this field, the description for the deposit is
automatically copied to it and highlighted.
You can enter up to 25 characters of descriptive text for a particular
detail line on the deposit.
Amount
New Line
(Windows Only)
Cash Balance
Enter an amount for the detail line. If the amount has zero cents, you
don’t have to enter .00.
To enter another detail line to the deposit, click New Line or press
ENTER.
This shows the current balance (from the general ledger) for the account
listed for Cash Acct.
You can hide the Cash Balance on this window by choosing Hide Cash
Balance on Preferences (under the File menu).
Deposit Total
This shows the total for the deposit as you add detail lines to the deposit.
When you save the deposit, the Deposit Total amount increases the
account selected for Cash Acct.
MLManual.book Page 169 Wednesday, October 27, 2010 12:04 PM
Receipts Journal 169
Recording a Deposit with the Receipts
Journal
1
Click Receipts Journal in the Command Center.
Click in the box to
change cash accounts
Press New Line or
(Windows) or TAB
or RETURN (Macintosh)
after the Amount field to
add another detail line to
the invoice
ENTER
2
If necessary, enter or change the deposit number.
The cursor moves to the Description field.
3
Type in a description for this deposit.
4
Verify that the date for the deposit is correct.
5
Select a cash account for the deposit.
When you open the Receipts journal, the default cash account assigned
on Interface Accounts is shown.
To change cash accounts, click in the box and select an account from
the pop-up list.
For details about using pop-up lists, see "Using Pop-Up Lists" on page
118.
MLManual.book Page 170 Wednesday, October 27, 2010 12:04 PM
170 Chapter 8 Customer Transactions
6
Continue filling in the rest of the fields with the appropriate
information.
For field explanations, see "Receipts Journal Field Descriptions" on
page 167.
Note
You can add comment lines to the transaction at any time by choosing
Insert Line from the Edit menu (CTRL - I on Windows or I on
Macintosh). For more information, see "Adding Comment Lines to
Transactions" on page 126.
7
After you’ve entered a ledger account (usually this is an income
account in the 4000-4999 range) and amount (Job and Description are
optional), press TAB to add the detail line to the deposit.
As you add detail lines to the deposit, the Deposit Total field is
updated.
8
On Windows, if necessary, click New Line or press ENTER to begin
entering another item.
On Macintosh, if necessary, press TAB or RETURN again to begin
entering another item.
9
When you are finished entering all the information for the transaction,
click Save.
When the transaction is saved, it is posted automatically to the general
ledger, and the deposit number is increased by one.
Modifying or Deleting Receipts Journal
Documents
When the cursor is in the Deposit # field, the Modify button is enabled.
Click Modify to see a list of Receipts Journal transactions that you can
modify or delete. If the transaction you’re looking for doesn’t appear,
you may have to select another month from the pull-down menu.
Please note that the transactions that appear here also include deposits
recorded in Customer Payments. For more details, see "Modifying or
Deleting a Transaction" on page 127.
MLManual.book Page 171 Wednesday, October 27, 2010 12:04 PM
The Customer Payments Window 171
The Customer Payments Window
You can use Customer Payments for any of the following situations:
•
You need to record a deposit consisting of payments for
outstanding receivables, such as invoices or finance charges.
•
A customer fails to pay an invoice or finance charge, and you want
to record this as a bad debt or reverse the original sale.
•
A customer overpays an invoice and you want to record the
overpayment and keep the credit balance to apply to future
invoices.
•
You need to apply the amount of an advance deposit to an
outstanding invoice.
•
An outstanding receivable dated prior to your current open months
was entered incorrectly when your company was set up with
MultiLedger.
•
You need to write a refund check for a customer credit.
Customer Payments Field Descriptions
This section describes the fields on Customer Payments.
Cash Acct
Disc/Adj Acct
The cash account assigned on Interface Accounts is shown. You can
change the cash account by clicking the account number or name and
selecting a new account from the pop-up list.
You can change the discount or adjustment account by clicking the
account number or name and selecting a new account from the pop-up
list.
This account can be used to record customer discounts or to reverse an
original sale, and is typically not the Accounts Receivable account.
Once you’ve selected an account as the Disc/Adj Acct, you can change
the account, but you cannot remove it.
Deposit #
Enter a document number up to eight characters long to identify the
invoice. The last character must be a number.
After the deposit is saved, the invoice number (or last number of a
combination of characters) is increased automatically by one.
Date
Simply type over the highlighted day or use the +/- keys on your
keyboard to increment/decrement the date. You can enter a date from
the 30 open months, provided the month isn’t locked, in the form MM/
DD/YY.
MLManual.book Page 172 Wednesday, October 27, 2010 12:04 PM
172 Chapter 8 Customer Transactions
Statement Desc
Total Paid
The information that appears here is the text that was entered for
Statement Description on Customer Invoices or the Sales Journal . The
text appears for reference purposes only; you cannot modify the text on
this window. To change the information that appears here, you should
modify the original invoice using Customer Invoices or the Sales
Journal.
As you apply payments, the Total Paid field shows the total for the
deposit.
Total Discount
As you apply discounts, the Total Discount field shows the total
discounted for the deposit. This will be the total amount recorded to the
account you selected in the Disc/Adj Acct field.
Cash Balance
This field shows the general ledger balance for the selected Cash Acct.
Print Deposit Slip on
Save
If checked, it will print a deposit slip with up to 18 individual invoices
when you click Save. You can include more than 18 invoices per
deposit slip, but invoices over 17 will appear as one lump sum, rather
than individual invoices. For more information on printing deposit slips,
see “Using the Print Screen” on page 105.
Refund
When you select a credit amount in the list, the Refund button is
enabled. For more information on writing a refund check to a customer,
see "Writing a Refund Check for the Customer Credit" on page 185.
MLManual.book Page 173 Wednesday, October 27, 2010 12:04 PM
The Customer Payments Window 173
Recording Customer Payments
When you save customer payments as a deposit, MultiLedger increases
the selected cash account and decreases your accounts receivable
account (as assigned on Interface Accounts) by the amount of the
deposit. While an individual deposit can have only one cash account
and one discount/adjustment account, you can choose different cash
accounts and different accounts for any discounts or adjustments for
separate deposits.
1
Click Customer Payments in the Command Center.
Click in the boxes to change accounts for
the deposit or adjustment
Choose to sort the
list by due date,
name, document
number or term
List of outstanding
receivables and
credits
This column shows
terms. You can sort
by term to pay all of
the same type of
invoices together
For field explanations, see "Customer Payments Field Descriptions" on
page 171.
2
Select a cash account for the deposit.
When you open Customer Payments, the default cash account assigned on
Interface Accounts is shown.You can change the cash account by clicking the
account number or name and selecting a new account from the pop-up list.
MLManual.book Page 174 Wednesday, October 27, 2010 12:04 PM
174 Chapter 8 Customer Transactions
3
If necessary, select an account for any discounts or adjustments.
You can add or change the discount or adjustment account by clicking
the account number or name and selecting a new account from the popup list (if no account is shown, click just to the right of the Disc/Adj
Acct label). Once you’ve selected an account as the Disc/Adj Acct, you
can change the account, but you cannot remove it.
4
If necessary, enter or change the deposit number.
After the deposit is saved, the deposit number (or last number of a
combination of characters) is increased automatically by one.
5
Verify that the deposit date is correct.
6
Select the invoice that’s been paid.
You can sort the receivables by date, name, document number or term
by clicking the appropriate option in the drop down menu.
When you select an outstanding receivable, the customer name, due
date, discount date, invoice total, and discount or adjustment (if any)
automatically fill in the appropriate fields above the outstanding
receivables list.
7
If you want to print a deposit slip with MICR information, be sure you
have “Print Deposit Slip on Save” checked.
When you click Save, you will get a print dialog to print the deposit
slip. For information on setting up the Deposit Slip with MICR
information, see “Using the Print Screen” on page 105.
Note
A deposit slip will print and total up to 18 individual invoices. If there
are more than 18 invoices on a deposit, invoices over 17 will appear as
one lump sum, rather than individual invoices. For more information,
see “Using the Print Screen” on page 105.
If the deposit date is later than the invoice’s discount date, the
following dialog appears:
Click Yes to still apply the discount to the invoice.
MLManual.book Page 175 Wednesday, October 27, 2010 12:04 PM
The Customer Payments Window 175
Click No to not apply the discount.
Note
To apply full payment quickly without any discount or adjustment, hold
down the Control key (Ctrl) on Windows or the Command key ( ) on
Macintosh while you click the outstanding receivable. The amount due
will be listed automatically as the amount paid. You could then go to
step 9, skipping steps 7 and 8.
8
If necessary, edit the highlighted amount in the Amt Paid edit box to
match the actual customer payment and press TAB.
The cursor moves to the Disc/Adjust edit box:
9
If necessary, change or enter any discount amount or adjustment and
press TAB.
After entering any
adjustment or discount,
press TAB to apply the
payment
After the payment and discount are applied, the payment is added to
the Total Paid field for the deposit, the discount is added to “Total
Discount” field and the Save button is enabled.
Note
If you find that you’ve made a mistake, you can easily correct it before
saving the deposit. See “Modifying or Deleting Payments Before
Saving a Deposit” on page 177.
MLManual.book Page 176 Wednesday, October 27, 2010 12:04 PM
176 Chapter 8 Customer Transactions
10 Continue recording the payments for the deposit. After the amount
shown for Total Paid matches the amount of the deposit that you are
making, click Save.
When you save the deposit, the Total Paid amount and any discounts or
adjustments increase the accounts that you selected.
Note
If you discover a payment error after saving the deposit, see "Modifying
or Deleting Payments After Saving a Deposit" on page 177.
MLManual.book Page 177 Wednesday, October 27, 2010 12:04 PM
The Customer Payments Window 177
Modifying or Deleting Payments Before
Saving a Deposit
If you’ve made a mistake (such as entering a payment incorrectly or
entering a payment for the wrong invoice), you can quickly fix the
problem before saving the deposit:
1
Select the appropriate outstanding receivable.
2
Change the highlighted amount paid (or press DELETE or BACKSPACE
to remove it), then press TAB.
3
If necessary, modify the amount in the Disc/Adjust edit box.
4
Press TAB to re-enter the modified payment (or remove the old one) on
the line.
Modifying or Deleting Payments After
Saving a Deposit
When you save a deposit using Customer Payments, MultiLedger uses
the Receipts Journal to post the transaction to the general ledger. You
can use the Receipts Journal to modify or delete the deposit that
contains the incorrect customer payment. Customer Payments and the
general ledger will automatically be updated to reflect the change.
To modify or remove a payment from a saved deposit:
1
Click Receipts Journal in the Command Center, and click Modify.
Please note that the list of deposits that appears also contains any
deposits made in the Receipts Journal.
2
Select the deposit from the transactions list.
If the transaction you’re looking for doesn’t appear, you may have to
select another month from the pull-down menu.
3
Modify the payment amount for a detail line or enter 0.00 in the
Amount edit box to remove a payment from the deposit.
4
Press TAB to replace the detail line in the list, then click Save.
The invoice associated with the payment will again appear as
outstanding on Customer Payments.
If you delete a deposit that was made in Customer Payments from the
Receipts Journal, all the customer payments that made up the deposit
will again appear as outstanding on Customer Payments.
For more details about modifying transactions, see "Modifying or
Deleting Receipts Journal Documents" on page 170.
MLManual.book Page 178 Wednesday, October 27, 2010 12:04 PM
178 Chapter 8 Customer Transactions
When a Customer Fails to Pay an Invoice
If a customer fails to pay an invoice, you can remove the receivable in
a way that records it as a bad debt or reverses the original sale.
Using the Disc/Adjust account on Customer Payments to reverse a
receivable or record the receivable as a bad debt gives you a complete
audit trail.
You can also delete the original receivable using Customer Invoices or
the Sales Journal. Deleting the original invoice leaves no record of the
transaction. For more information on deleting invoices, see
“Modifying or Deleting an Invoice” on page 159 or see "Modifying or
Deleting Sales Journal Invoices" on page 166.
1
Click Customer Payments in the Command Center.
2
Click just to the right of Disc/Adj Acct* and select an account for the
bad debt (usually in the 6000-8999 range) or select the original sales
account for the invoice from the pop-up list.
If a bad debt account is not listed, you can create one by following the
steps in “Setting Up the Chart of Accounts” on page 23.
3
Select the unpaid invoice.
After selecting the invoice, the invoice’s amount appears in the Amt
Paid edit box.
4
Press DELETE or enter zero in the Amt Paid edit box and press TAB.
This removes the amount from the Amt Paid edit box and moves the
cursor to the Disc/Adjust edit box. With no amount or a zero amount
entered for the Amt Paid field, saving the deposit will not affect your
cash account.
5
Enter the amount of the receivable in the Disc/Adjust edit box and
press TAB.
6
You could change the deposit number to an appropriate document
number, such as “VD [date],” to indicate a void deposit.
7
Click Save.
Here’s how this procedure affects your books:
•
MultiLedger increases the account selected for the Disc/Adj Acct
field by the amount shown for the Disc/Adjust amount.
•
MultiLedger decreases your accounts receivable account by the
Disc/Adjust amount.
•
The cash account selected for the “Cash Acct” field is not affected
because a zero amount was entered for the “Amt Paid” field.
MLManual.book Page 179 Wednesday, October 27, 2010 12:04 PM
Quotes 179
Quotes
For quotes involving inventory, you should use Customer Invoices. For
other quotes, you can use the Sales Journal. Saving an invoice as a
Quote does not create an outstanding receivable and does not affect the
general ledger until the quote is converted to an invoice. A quote can
be modified, deleted, or converted to an invoice at any time.
Creating Quotes
1
Click Customer Invoices or Sales Journal in the Command Center.
2
Check the Quote check box.
3
Enter the Quote information as you normally would enter an invoice.
For detailed information on entering a Customer Invoice, see
“Recording a Sale with Customer Invoices” on page 155. For detailed
information on entering a Sales Journal invoice, see "Recording a Sale
with the Sales Journal" on page 163.
Note
You may want to change the document number for Quotes, so as not to
confuse them with actual Customer Invoices or Sales Journal invoices.
For example, you could use “QU [document number],” to indicate a
quote. The document number you enter the first time for a quote will
automatically be incremented by one for each new quote you save.
4
Click Save.
Working with Quotes
You can modify, delete, or convert a Quote to an invoice at any time.
1
Click Customer Invoices or Sales Journal in the Command Center.
2
Check the Quote check box.
3
Click Modify.
A list of Quotes entered with that journal appears. If the Quote you are
looking for does not appear in the list, you may have to select a
different month from the pull-down menu.
4
Select the Quote from the list, then click OK.
You have four options: Modify, Cancel, Delete, and Create Invoice/
Item Purchase.
Modify
If you click Modify, you can change any information for the Quote.
After you modify information, click Save to save the Quote with
changes.
MLManual.book Page 180 Wednesday, October 27, 2010 12:04 PM
180 Chapter 8 Customer Transactions
Cancel
If you click Cancel, you return to Customer Invoices or the Sales
Journal.
Delete
If you click Delete, the Quote is deleted, and you are returned to
Customer Invoices or the Sales Journal.
Create Invoice/Item
Purchase
If you click Create Invoice/Item Purchase, an invoice is created using
the information from the Quote and the following happens:
•
The document number changes from the Quote document number
to an invoice document number. The new invoice is one greater
than the last invoice saved.
•
The date for the new invoice defaults to the last date saved.
•
The quote itself is deleted when you create an invoice from it.
•
You can modify anything on the new invoice before saving it.
Printing Quotes
1
Click Print from the Command Center.
2
Select the month.
3
Select the Customer Invoices/Quotes or the Sales Journal Invoices/
Quotes radio button.
A list of available invoices and quotes appears.
4
Select the quote(s) you wish to print.
If no quotes are highlighted, then all invoices and quotes will print.
5
If necessary, select Print Metafile (Windows) or Print PDF/PICT File
(Macintosh).
6
Click Print.
A standard Print dialog appears.
For more details on using the Print command, see "Using the Print
Screen" on page 105.
Note
Quotes use the same format as Customer Invoices. You can, however,
have a separate Metafile (Windows) or PDF/PICT File (Macintosh) for
quotes. For information on using Metafiles or PDF/PICT Files, see
"Positioning Print Fields for Windows Metafiles or Macintosh PDF or
PICT Files" on page 112.
MLManual.book Page 181 Wednesday, October 27, 2010 12:04 PM
Special Customer Situations 181
Viewing Quotes
1
Click Transaction Journals in the Command Center.
2
Select a month from the month list box on the right.
3
Click the Quotes radio button.
4
Select the quote(s) you want to view, then click View.
If the quote you are looking for does not appear, you may need to
select another month from the list.
Special Customer Situations
Recording Advance Deposits
Advance deposits are recorded in the Sales Journal. This section
briefly shows you how to enter the minimal information for the
advance deposit. For more details about entering information in the
Sales Journal, see "Recording a Sale with the Sales Journal" on page
163.
1
Click Sales Journal in the Command Center.
2
If necessary, enter or change the highlighted document number and
press TAB.
3
Select a customer from the Customer pop-up list.
4
If necessary, change the date.
5
Select a cash account (in the 1000-1999 range) for the advance deposit
from the Ledger Accounts pop-up list.
6
Enter a negative amount for the advance deposit.
Enter a negative amount for
an advance deposit
The minus sign debits (increases) the selected cash account.
7
Click Save.
The advance deposit will appear on the Customer Payments window as
a credit and can be applied as payment toward a future invoice.
MLManual.book Page 182 Wednesday, October 27, 2010 12:04 PM
182 Chapter 8 Customer Transactions
Reversing a Receivable
If you want a complete audit trail, you can use the Disc/Adjust Acct on
Customer Payments to reverse a receivable.
Important
If there is a payment associated with the receivable you want to reverse,
you should delete the payment in the Receipts Journal before deleting
or modifying the receivable.
You can also delete the original Customer Invoice or Sales Journal
invoice. Deleting the original invoice leaves no record of the
transaction. For more information on deleting invoices, see
“Modifying or Deleting an Invoice” on page 159 or see "Modifying or
Deleting Sales Journal Invoices" on page 166.
1
Click Customer Payments in the Command Center.
2
Select the Disc/Adj account.
Usually, this is the same sales account (4000–4999) that was used in
the original sale, not the Accounts Receivable account.
3
Select the outstanding invoice.
4
Enter zero in the Amt Paid edit box and press TAB.
5
Enter the amount of the receivable in the Disc/Adjust edit box and
press TAB.
6
You could change the deposit number to an appropriate document
number, such as “VD [invoice #],” to indicate a void sale.
7
Click Save.
MLManual.book Page 183 Wednesday, October 27, 2010 12:04 PM
Recording Customer Credit Memos 183
Recording Customer Credit Memos
Recording Customer Credit for Returned
Inventory
1
Click Customer Invoices in the Command Center.
2
Enter the credit memo information.
You could enter an invoice number, such as CM[date], to help identify
the credit memo. Follow the guidelines in “Recording a Sale with
Customer Invoices” on page 155, except for the following fields:
Item
Select the returned item from the Item pop-up list.
Quantity
Enter a negative quantity for the returned inventory:
Amount
The Amount of the credit will show automatically as negative amount:
3
Press TAB to add the credit memo to the detail list, and then click Save.
The customer credit will appear on Customer Payments as a credit and
can be applied as payment toward a current or future invoice.
Recording Other Customer Credit
1
Click Sales Journal in the Command Center.
2
Enter the credit memo information.
You could enter an invoice number, such as CM[date], to help identify
the credit memo. Follow the guidelines in “Recording a Sale with the
Sales Journal” on page 163, except for the following fields:
Ledger Account
Amount
Select the sales account (in the 4000–4999 range) that was used to
originally record the sale.
Enter the credit as a negative amount like this:
MLManual.book Page 184 Wednesday, October 27, 2010 12:04 PM
184 Chapter 8 Customer Transactions
3
Click Save.
The customer credit will appear on Customer Payments as a credit and
can be applied as payment toward a current or future invoice, or you
can write a refund check to the customer. For more information on
these options, see the following section.
Applying Customer Credits
The credit amount is equal to the
outstanding receivable amount
1
Click Customer Payments in the Command Center.
2
Select the outstanding receivable and press TAB twice.
3
Select the customer’s credit memo (with a minus (-) sign) and press TAB
twice.
The amount shown for Total Paid should be zero.
4
Change the deposit number to an appropriate description.
5
Click Save.
Both the outstanding receivable and the credit memo are removed from
Customer Payments.
The credit amount is larger than the
outstanding receivable amount
1
Click Customer Payments in the Command Center.
2
Select the outstanding receivable, and press TAB twice.
3
Select the customer’s credit memo (with a minus (-) sign), change the
amount shown in the Amt Paid edit box to the amount of the
outstanding receivable with a minus (-) sign, and press TAB twice.
For example, if the outstanding receivable amount is $250, you would
enter “-250” in the Amt Paid edit box for the credit memo. The amount
shown for Total Paid should be zero.
4
Change the deposit number to an appropriate description.
5
Click Save.
The remaining credit amount appears on Customer Payments to be
applied toward another outstanding receivable or refunded to the
customer.
MLManual.book Page 185 Wednesday, October 27, 2010 12:04 PM
Applying Customer Credits 185
The credit amount is less than the
outstanding receivable amount
1
Click Customer Payments in the Command Center.
2
Select the customer’s credit memo (with a minus (-) sign) and press TAB
twice.
3
Select the outstanding receivable.
If the customer is paying the remainder of the outstanding
receivable, simply press TAB twice. The Total Paid amount should
equal the outstanding receivable amount minus the credit amount.
If the customer is not paying the remainder of the outstanding
receivable, and you just want to apply the credit amount, change
the amount in the Amt Paid edit box to match the amount of the credit
amount with no minus (-) sign. For example, if the credit amount is “100,” you would change the Amt Paid for the outstanding receivable to
“100.” The Total Paid amount should be zero.
4
Change the deposit number to an appropriate description.
5
Click Save.
If the customer paid the remainder of the outstanding receivable,
both the outstanding receivable amount and the credit amount are
removed from Customer Payments.
If the customer did not pay the remainder of the outstanding
receivable, the remaining outstanding receivable amount remains on
Customer Payments to be paid later.
Writing a Refund Check for the Customer
Credit
1
Click Customer Payments in the Center.
2
Select the customer’s credit memo (with a minus (-) sign) and press the
Refund Button.
MLManual.book Page 186 Wednesday, October 27, 2010 12:04 PM
186 Chapter 8 Customer Transactions
3
Verify that the check number and date are correct.
4
If necessary, select the credit amount you want to refund.
If the customer has more than one credit memo, all credit amounts
appear in this window. You can write one check for all credit amounts
listed by holding down the SHIFT key while clicking on each credit
amount. The Refund Amount will show the total for all selected credits
amounts.
5
Click Create Check to write the refund check.
Click Cancel to return to Customer Payments without creating a refund
check.
Refund checks cannot be modified, but they can be deleted in the
Disbursements Journal. For more information, see “Modifying or
Deleting Disbursements Journal Documents” on page 212.
You can print the refund check using the Print command on the
Command Center. For more information, see “Using the Print Screen”
on page 105.
MLManual.book Page 187 Wednesday, October 27, 2010 12:04 PM
Calculating Finance Charges 187
Calculating Finance Charges
You can calculate finance charges on outstanding customer invoices by
using Finance Charges. You should create a new finance charge each
month for past due invoices.
Note
You could print out an aged accounts receivable report (on Customer
Reports) to help identify outstanding receivables past their due dates.
Finance Charges Field Descriptions
The following section discusses the individual fields on Finance
Charges.
Finance Charge Acct
Select an account from the pop-up list of your chart of accounts.
Usually, an income account in the 4000–4999 range is used for finance
charges.
If you don’t find an appropriate income account for the finance charge,
you can add one in Chart of Accounts. Make it an income account
number in the 4000–4999 range and name the account “FC Income” or
“Miscellaneous Income” or something similar. See “Setting Up the
Chart of Accounts” on page 23 for more details on entering new
accounts.
Ref #
Enter a reference number up to eight characters long, including letters,
numbers, spaces, and other symbols to identify the transaction (such as
FC 1). Finance charge document numbers automatically increment by
one.
Description
Enter a description up to 20 characters long, including letters, numbers,
spaces, and other symbols.
Date
Simply type over the highlighted day or use the +/- keys on your
keyboard to increment/decrement the date. You can enter a date from
the 30 open months, provided the month isn’t locked, in the form MM/
DD/YY.
% Rate
% Rate is multiplied by the invoice’s Due Amt to determine the Charge.
A new percentage rate should be entered before selecting an invoice, so
the calculated finance charge correctly reflects the new % Rate.
Charge
After an invoice is selected, the calculated finance charge (% Rate times
Due Amt) is put into the Charge edit box.
MLManual.book Page 188 Wednesday, October 27, 2010 12:04 PM
188 Chapter 8 Customer Transactions
Recording Finance Charges
1
Click Finance Charges in the Command Center.
2
If necessary, click just to the right of “Finance Charge Acct” and select
an income account for the finance charge (usually in the 4000–4999
range) from the pop-up list.
Click in the box to
select an account
An asterisk means the
transaction previously
had a finance charge
applied
If a finance charge income account is not listed, you can create one by
following the steps in “Setting Up the Chart of Accounts” on page 23.
The income account selected will be increased when payment of the
finance charge is recorded in Customer Payments.
3
If necessary, change or enter information for Ref#, Date, Description,
and % Rate.
For field explanations, see "Finance Charges Field Descriptions" on
page 187.
Note
% Rate should be entered before selecting an invoice so that the
calculated charge correctly reflects the % Rate. If the invoice is selected
before entering a percentage rate, the amount of the charge will not
reflect the new rate correctly.
MLManual.book Page 189 Wednesday, October 27, 2010 12:04 PM
Calculating Finance Charges 189
4
Select the desired invoice from the outstanding receivable list.
Finance charge = %Rate times Due Amt
Select an invoice
line to
automatically
calculate the
finance charge
You can sort the invoices by date or customer by clicking the appropriate Sort
by radio button.
After you’ve selected the invoice, the finance charge is automatically
calculated (% Rate times Amount Due) and put in the Charge edit box. You
can manually override the amount for the finance charge by typing an amount
in the Charge edit box.
Entries that previously have had a charge applied are marked with an asterisk
(*).
5
Press TAB to apply the finance charge to the selected invoice.
6
Repeat steps 4 through 5 for each finance charge.
7
After all the finance charges have been calculated and listed, click
Save.
Finance charges appear on Customer Payments and Finance Charges as
outstanding receivables, but do not affect the general ledger balance for the
cash account or the finance charge income account until they are paid in
Customer Payments.
After saving, receivables that have just had a finance charge applied are
marked with a plus (+).
MLManual.book Page 190 Wednesday, October 27, 2010 12:04 PM
190 Chapter 8 Customer Transactions
Recording Finance Charge Payments
When a customer pays a finance charge, you record it like any other
customer payment in Customer Payments. See “Recording Customer
Payments” on page 173 for more details.
When you save the customer payment, the transaction increases the
cash account that is chosen on Customer Payments and increases the
account that was selected when the finance charge was created on
Finance Charges. MultiLedger automatically uses the Receipts Journal
to post the payment to the general ledger.
Deleting Finance Charges
If the finance charge hasn’t been saved yet on Finance Charges, you
can select the finance charge, press the DELETE or BACKSPACE key on
your keyboard (or choose Cut from the Edit menu), and then press TAB
to remove the finance charge.
Once a finance charge has been saved, you can delete it, if necessary,
on Customer Payments by selecting the appropriate finance charge line
and click Delete. The following warning appears:
Click Yes to delete the finance charge. Click No to leave the finance
charge on Customer Payments. Since the finance charge did not affect
any general ledger balances when it was entered, it should not affect
any general ledger balances when it is deleted.
Important
Deleting a finance charge from Customer Payments leaves no record of
the deletion.
MLManual.book Page 191 Wednesday, October 27, 2010 12:04 PM
191
Chapter 9
Vendor Transactions
This chapter discusses the following topics:
•
Recording purchases
•
Recording vendor payments, vendor credits, and refunds
•
Writing checks
•
Handling special vendor situations
MLManual.book Page 192 Wednesday, October 27, 2010 12:04 PM
192 Chapter 9 Vendor Transactions
Vendor Transactions Flowchart
The following flowchart is designed to give you a basic overview of
vendor-based transactions. The rest of this chapter describes each
option in detail.
Item Purchases
Payables Journal
Create a payable for inventory items.
Create a purchase order.
Create a payable for non-inventory items.
Vendor Payments
Create a check for Item Purchases or
Payables Journal.
Disbursements Journal
Vendor Payments are posted here.
Also use to record miscellaneous disbursements or manual checks.
Bank Reconciliation
Shows checks from Vendor Payments and
Disbursements Journal.
MLManual.book Page 193 Wednesday, October 27, 2010 12:04 PM
Recording Purchases 193
Recording Purchases
MultiLedger offers great flexibility for recording purchases.
Depending on the type of purchase you want to record, the three
windows you can use are:
•
Item Purchases
•
Payables Journal
•
Disbursements Journal
These windows are discussed in the following table.
If you want to....
Use this transaction window
Record an inventory purchase for
resale that creates an outstanding
payable
Item Purchases
Record a purchase order
Item Purchases
Record a non-inventory purchase that
creates an outstanding payable
Payables Journal
Create outstanding payables that are
dated prior to your Start Month (for
setting up your company with
MultiLedger)
Payables Journal
Record a check written for purchases
not involving inventory or
outstanding payables
Disbursements Journal
MLManual.book Page 194 Wednesday, October 27, 2010 12:04 PM
194 Chapter 9 Vendor Transactions
Item Purchases
Use Item Purchases when you want to record the purchase of inventory
items for resale.
Saving an Item Purchase automatically updates your inventory, the
general ledger, and creates an outstanding payable.
After item purchases are recorded, use Vendor Payments to create the
check to pay the vendor.
Note
Before an item can be purchased in Item Purchases window, the item
should have been set up on Item Setup. For more details, see “Items” on
page 76.
Important
Do not use Item Purchases to enter outstanding payables dated prior to
your Current fiscal year. Use the Payables Journal to enter these
outstanding payables when setting up your company with MultiLedger.
Item Purchases Field Descriptions
The following section discusses the individual fields on Item
Purchases.
Purchase Order
When you save an Item Purchase with Purchase Order checked, the
transaction does not affect the General Ledger, and can be modified,
deleted, or converted to an Item Purchase at any time. For more details
on working with Purchase Orders, see “Purchase Orders” on page 219.
Recurring
If you have Item Purchases that occur on a regular basis, you can save
them with the Recurring option checked. You can define the frequency
for a recurring entry and have MultiLedger remind you when the
transaction should be created. For more details on working with
recurring entries, see “Recurring Entries” on page 130.
Modify Item
Description
If checked, when item is selected, you get a text box in which you can
change description or add to it. This can be selected or de-selected for
individual line items on the invoice.The modified item will appear as
changed on the invoice, in the transaction journal and in the General
Ledger.
MLManual.book Page 195 Wednesday, October 27, 2010 12:04 PM
Item Purchases 195
Document #
Enter a document number up to eight characters long to identify the
purchase. The last character must be a number.
After the Item Purchase is saved, the document number (or last number
of a combination of characters) is automatically increased by one.
You can have MultiLedger automatically warn you if you attempt to
save a transaction with a duplicate document number by checking
Check for Duplicate Documents on Preferences under the File menu.
For more details, see “Setting Program Preferences” on page 90.
Vendor
Select a vendor from the pop-up list. The vendor’s name, address, and
notes (as saved on Vendor Setup) are automatically entered. If the popup list does not appear, vendors have not yet been set up.
You can add a new vendor or edit existing vendor information without
closing the Vendors pop-up list by clicking New (Alt-N on Windows or
N on Macintosh) or Edit (Alt-E on Windows or E on Macintosh).
Date
Simply type over the highlighted day or use the +/- keys on your
keyboard to increment/decrement the date. You can enter a date from
the 30 open months, provided the month isn’t locked, in the form MM/
DD/YY.
The invoice date, along with any selected terms, determine the
payable’s due and discount dates.
Due Date
Due Date, Discount Date, and Discount %, as defined on Vendor Setup,
are shown under the Due Date label.
To change any of these values for a particular transaction, click the due
date shown. The following dialog box appears:
Edit any of the entries and click OK. Click Cancel to keep the original
values. You can also use Vendor Setup to change the terms for the
Vendor.
Important
Note: You cannot enter a Due Date more that 240 days from the date of
the invoice.
MLManual.book Page 196 Wednesday, October 27, 2010 12:04 PM
196 Chapter 9 Vendor Transactions
Check Stub
Description
Enter a 25 character description that will print on a check stub when you
pay for this purchase in Vendor Payments.
You could enter a vendor’s reference (invoice) number or other
information to help the vendor identify the transaction when your
payment is processed.
Tax Paid
Enter any tax paid for the items purchased.
To account for tax paid in your chart of accounts, set up an account for
the tax on Chart of Accounts, and then assign it to Sales Tax Paid on
Interface Accounts.
Shipping
Enter the amount of shipping charged by the vendor.
To account for shipping paid in your chart of accounts, set up the
account on Chart of Accounts, and then assign it to Shipping Paid on
Interface Accounts.
Item
Select the item from the pop-up list. If the pop-up list does not appear,
items have not yet been set up.
You can add a new item or edit information for an existing item without
closing the Items pop-up list by clicking New (Alt-N on Windows or
N on Macintosh) or Edit (Alt-E on Windows or E on Macintosh).
Note
By selecting the option to Modify Item Description, you can change or
enter additional text in the item description line. This text will show on
an invoice and in the transaction joural reports.
Job
Select a specific job from the pop-up list for the detail line. If the Jobs
pop-up list does not appear, no jobs have been set up, or Skip Jobs (CtrlK on Windows or K on Macintosh) under the Edit menu is checked.
Quantity
Enter a quantity that is up to seven digits to the left and two digits to the
right of the decimal point (9999999.99). If you have a Reorder Quantity
setup for an item, that quantity will automatically fill this field when the
item is selected.
Unit Cost
When the cursor enters the Unit Cost field, the selected item’s Unit Cost
as defined on Item Setup is entered and highlighted automatically.
You can change the Unit Cost for a particular purchase by editing the
highlighted amount. You can enter a unit cost up to six places to the left
and four places to the right of the decimal point (999999.9999).
When an inventory item is bought in Item Purchases, the Qty on Hand
and Average Unit Cost of the item in inventory are adjusted to reflect
new items added to those on hand. For more details, see “Item Setup
Field Descriptions” on page 76.
MLManual.book Page 197 Wednesday, October 27, 2010 12:04 PM
Item Purchases 197
Amount
New Line
(Windows Only)
Total
When the cursor enters the Amount field, the amount will be
automatically calculated based on Quantity times Unit Cost. Clicking in
the Amount edit box will not automatically calculate the amount. You
can change the amount by editing the highlighted value.
To enter another detail line to the Item Purchase, click New Line or
press ENTER.
This shows the total for the Item Purchase as you add detail lines. When
you save the document, the Total amount increases the Accounts
Payable account and Inventory account assigned on Interface Accounts.
MLManual.book Page 198 Wednesday, October 27, 2010 12:04 PM
198 Chapter 9 Vendor Transactions
Recording a Purchase with Item
Purchases
1
Click Item Purchases in the Command Center.
MLManual.book Page 199 Wednesday, October 27, 2010 12:04 PM
Item Purchases 199
2
If necessary, enter or change the Document # and press TAB.
The Vendors pop-up list appears:
3
Select a vendor from the pop-up list and press TAB.
For details about using pop-up lists, see “Using Pop-Up Lists” on
page 118.
Note
After selecting a vendor, you can see the vendor’s transaction history by
clicking the History button at the top of the Item Purchase window.
MLManual.book Page 200 Wednesday, October 27, 2010 12:04 PM
200 Chapter 9 Vendor Transactions
The current date is used as the Cutoff Date for the report. Click the
window’s close box to close it and return to the Item Purchases window.
4
Continue filling in the rest of the fields with the appropriate
information.
For field explanations, see “Item Purchases Field Descriptions” on
page 194.
Note
You can add comment lines to the Item Purchases document at any time
by choosing Insert Line from the Edit menu (Ctrl-I on Windows or I
on Macintosh). By selecting the option to Modify Item Description,
you can also change or enter additional text in the item description line.
This text will show on an invoice and in the transaction joural reports.
For more details, see “Adding Comment Lines to Transactions” on
page 126.
5
After you have entered an item, quantity, unit cost, and amount (Job is
optional), press TAB to add the item to the document.
As you add detail lines to the document, the Total field is updated:
After the first detail line is added, the Save button is enabled.
MLManual.book Page 201 Wednesday, October 27, 2010 12:04 PM
Item Purchases 201
6
On Windows, if necessary, press New Line or click ENTER to begin
entering another item to this document.
On Macintosh, if necessary, press TAB or RETURN to begin entering
another item to this document.
7
When you are finished entering all the information for the document,
click Save.
If the Total exceeds the vendor’s credit limit, an alert appears allowing
you to continue to save or cancel.
After the document is saved, the transaction is automatically posted to
the general ledger, and the Document # is increased by
one.
Printing an Item Purchase
After saving an Item Purchase, do the following:
1
Click Print on the Command Center.
2
Select the correct period.
3
Click the Item Purchases/PO’s radio button.
4
From the list of documents, select the purchases that you want to print.
If no purchases are selected, then all purchases will print.
5
If necessary, check Print Metafile (Windows) or Print PDF/PICT File
(Macintosh).
For more information on using metafiles or PICT Files, see “Using the
Print Screen” on page 105.
6
Click Print.
7
Select your print options and click OK or Print.
For more details about the Print command, see “Using the Print
Screen” on page 105.
Modifying or Deleting an Item Purchase
When the cursor is in the Document # field, the Modify button is
enabled. Click Modify to see a list of Item Purchases that you can
modify or delete. If the Item Purchase you’re looking for doesn’t
appear, you may have to select another month from the pull-down
menu.
MLManual.book Page 202 Wednesday, October 27, 2010 12:04 PM
202 Chapter 9 Vendor Transactions
Payables Journal
Use the Payables Journal to record a purchase that creates an
outstanding payable that does not involve inventory. If you need to
record inventory purchases, use Item Purchases.
Saving a Payables Journal document automatically updates the general
ledger and creates an outstanding payable.
After the payable is created, you can use Vendor Payments to create a
check to pay the vendor.
Note
When setting up your company with MultiLedger, you should use the
Payables Journal to enter outstanding payables that are dated prior to
your current open months. An outstanding payable will be created
without affecting the general ledger account balances. For more
information, see “Setting Up Outstanding Payables” on page 41.
Payables Journal Field Descriptions
This section discusses the individual fields on the Payables Journal.
Recurring
Document #
If you have Payables Journal transactions that occur on a regular basis,
you can save them with Recurring checked. You can define the
frequency for a recurring entry and have MultiLedger remind you when
the transaction should be created. For more details on working with
recurring entries, see “Recurring Entries” on page 130.
Enter a document number up to eight characters long to identify the
transaction. The last character must be a number.
After the document is saved, the document number (or last number of a
combination of characters) is automatically increased by one.
Vendor
Select a vendor from the pop-up list. The vendor's name, address, and
any notes set up for the vendor are entered automatically, too. If the
pop-up list does not appear, vendors have not yet been set up.
You can add a new vendor or edit existing vendor information without
closing the Vendors pop-up list by clicking New (Alt-N on Windows or
N on Macintosh) or Edit (Alt-E on Windows or E on Macintosh).
Date
Simply type over the highlighted day or use the +/- keys on your
keyboard to increment/decrement the date. You can enter a date from
the 30 open months, provided the month isn’t locked, in the form MM/
DD/YY.
The date, along with any selected terms, determine the payable’s due
and discount dates.
MLManual.book Page 203 Wednesday, October 27, 2010 12:04 PM
Payables Journal 203
Due Date
Due Date, Discount Date, and Discount %, as defined on Vendor Setup,
are shown under the Due Date label.
To change any of these values for a particular transaction, click the due
date shown. The following dialog box appears:
Edit any of the entries and click OK. Click Cancel to keep the original
values. You can also use Vendor Setup to change the terms for the
Vendor.
Important
Note: You cannot enter a Due Date more that 240 days from the date of
the invoice.
Check Stub
Description
Enter a 25 character description that will print on a check stub when you
pay for this purchase in Vendor Payments.
You could enter a vendor’s reference (invoice) number or other
information to help the vendor identify the transaction when your
payment is processed.
Ledger Account
Select the ledger account from the pop-up list. For more information on
using pop-up lists, see “Using Pop-Up Lists” on page 118.
When you save the payable, the account entered here is increased by the
amount for the detail line. Usually, this is an expense account in the
6000–8999 range.
Job
Select the job for this detail line from the pop-up list. If the Jobs pop-up
list does not appear, no jobs have been set up, or Skip Jobs (Ctrl-K on
Windows or K on Macintosh) under the Edit menu is checked.
Description
The vendor's name is automatically copied and entered here, unless you
have the preference selected to “Use Check Stub Description in
Payables Journal”. If you have the preference selected, the information
you entered in the Check Stub Description field will automatically be
entered in this field. Or you can enter up to 25 characters of descriptive
text for specific detail in the invoice, see “Setting Program Preferences”
on page 90.
Amount
Enter an amount for the detail line. If the amount has zero cents, you
don’t have to enter .00.
MLManual.book Page 204 Wednesday, October 27, 2010 12:04 PM
204 Chapter 9 Vendor Transactions
New Line
(Windows Only)
Total
To enter another detail line to the payable, click New Line or press
ENTER.
This shows the total for the payable as you add detail lines to it. When
you save the payable, the Total amount increases the account assigned
to Accounts Payable on Interface Accounts.
Recording a Purchase with the Payables
Journal
1
Click Payables Journal in the Command Center.
Document # must end
in a number
Comment line added
with Insert Line
command (Ctrl-I on
Windows or I on
Macintosh)
Click in the Due Date field to
change the Due Date, Discount
Date, or Percentage.
MLManual.book Page 205 Wednesday, October 27, 2010 12:04 PM
Payables Journal 205
2
If necessary, enter or change the Document # and press TAB.
The Vendors pop-up list appears:
3
Select a vendor from the pop-up list and press TAB.
For details about using pop-up lists, see “Using Pop-Up Lists” on
page 118.
Note
After selecting a vendor, you can see the vendor’s transaction history by
clicking the History button at the top of the Payables Journal window.
MLManual.book Page 206 Wednesday, October 27, 2010 12:04 PM
206 Chapter 9 Vendor Transactions
The current date is used as the Cutoff Date for the report. Click the
window’s close box to close it and return to the Payables Journal.
4
Continue filling in the rest of the fields with the appropriate
information.
For field explanations, see “Payables Journal Field Descriptions” on
page 202.
Note
You can add comment lines to the payable at any time by choosing
Insert Line from the Edit menu (Ctrl-I on Windows or I on
Macintosh). For more details, see “Adding Comment Lines to
Transactions” on page 126.
5
After you have entered a ledger account (usually an expense account in
the 6000-8999 range) and amount (Job and Description are optional),
press TAB to add the detail line to the transaction.
As you add detail lines to the transaction, the Total field is updated:
After the first detail line is added, the Save button is enabled.
6
On Windows, if necessary, click New Line or press ENTER to begin
entering another detail line. On Macintosh, if necessary, press TAB or
RETURN again to begin entering another detail line.
7
When you’re finished entering all the information for the invoice, click
Save.
If the Total exceeds the vendor's credit limit, an alert appears allowing
you to continue to save or cancel.
When the payable is saved, the transaction is posted automatically to
the general ledger, and the Document # is increased by
one.
Modifying or Deleting Payables Journal
Transactions
When the cursor is in the Document # field, the Modify button is
enabled. Click Modify to see a list of Payables Journal transactions that
you can modify or delete. If the Payables Journal transaction you’re
looking for doesn’t appear, you may have to select another month from
the pull-down menu.
MLManual.book Page 207 Wednesday, October 27, 2010 12:04 PM
Disbursements Journal 207
Disbursements Journal
With the Disbursements Journal you can create checks for purchases
that don’t involve inventory or accounts payable transactions. You can
also record checks that were written manually.
Saving a Disbursements Journal check automatically updates the
general ledger.
Important
Vendor Payments against outstanding payables should be recorded in
Vendor Payments, not the Disbursements Journal.
Disbursements Journal Field Descriptions
The following section discusses the individual fields on the
Disbursements Journal.
Recurring
Print on Save
Cash Acct
Check #
If you have Disbursements Journal checks that occur on a regular basis,
you can save them with Recurring checked. You can define the
frequency for a recurring entry and have MultiLedger remind you when
the transaction should be created. For more details on working with
recurring entries, see “Recurring Entries” on page 130.
If checked, the Print dialog box appears immediately after a check is
saved in the Disbursements Journal.
The account shown will be decreased by the Check Total when you save
the check. This account is initially the account that was assigned to Cash
Account on Interface Accounts. To change accounts, click the account
shown and select another cash account from the pop-up list.
Enter a check number up to eight characters long to identify the
disbursement. The last character must be a number.
After the disbursement is saved, the check number is automatically
increased by one.
Paid To
A pop-up list of vendors appears. If the pop-up list does not appear,
vendors have not yet been set up.
On Windows, you can either enter a name from this pop-up list or type a 25
character name that’s not in the Vendor list and click “1 Time”. If the vendor name
is typed in, MultiLedger won’t save the vendor name or track payments made to that
vendor. To keep track of payments by vendor name, you must add the vendor on
Vendor Setup.
On Macintosh, you can either enter a name from this pop-up list or click Cancel in
the pop-up list box and enter a 25 character name that’s not in the Vendor list. If the
vendor name is typed in, MultiLedger won’t save the vendor name or track payments
made to that vendor. To keep track of payments by vendor name, you must add the
vendor on Vendor Setup.
MLManual.book Page 208 Wednesday, October 27, 2010 12:04 PM
208 Chapter 9 Vendor Transactions
Important
You should not use the Disbursements Journal to pay outstanding
payables you’ve entered in Item Purchases or the Payables Journal.
Those payments should be made in Vendor Payments.
Date
Ledger Account
Simply type over the highlighted day or use the +/- keys on your
keyboard to increment/decrement the date. You can enter a date from
the 30 open months, provided the month isn’t locked, in the form MM/
DD/YY.
Select a ledger account from the pop-up list. For more information on
using pop-up lists, see “Using Pop-Up Lists” on page 118.
When you save the check, the account entered here is increased by the
amount for the detail line. Usually, this is an expense account in the
6000–8999 range.
Job
Description
Select a job for this detail line from the pop-up list. If the Jobs pop-up
list does not appear, no jobs have been set up, or Skip Jobs (Ctrl-K on
Windows or K on Macintosh) under the Edit menu is checked.
When the cursor enters this field, the name entered for Paid To is
automatically copied to it and highlighted.
You can enter up to 25 characters of descriptive text for a particular
detail line on the disbursement. The text entered here appears on the
check stub and on reports.
Amount
Enter an amount for the detail line. If the amount has zero cents, you
don’t have to enter .00.
New Line
(Windows Only)
To enter another detail line to the check, click New Line or press ENTER.
Cash Balance
This shows the current balance (from the general ledger) for the account
listed for Cash Acct.
Check Total
This shows the total for the check as you add detail lines to it. When you
save the check, the Check Total amount decreases the account selected
for Cash Acct.
MLManual.book Page 209 Wednesday, October 27, 2010 12:04 PM
Disbursements Journal 209
Recording a Check with the
Disbursements Journal
1
Click Disbursements Journal in the Command Center.
Click in the box to
change cash accounts
Choose a ledger
account to record the
expense for the check
Comment line added
with Insert Line
command (Ctrl-I on
Windows or I on
Macintosh)
2
If necessary, change the cash account for the check by clicking in the
Cash Acct edit box and selecting another cash account from the pop-up
list.
3
If necessary, enter or change the Check # and press TAB.
The cursor moves to the Paid To field.
MLManual.book Page 210 Wednesday, October 27, 2010 12:04 PM
210 Chapter 9 Vendor Transactions
4
On Windows, select a vendor from the pop-up list then press TAB, or
type a name then click 1 Time.
If you select a vendor who owes any outstanding payables, an alert
appears to remind you to pay outstanding payables in Vendor
Payments.
If the 1 Time vendor is used, MultiLedger won’t save the vendor name
or track payments made to that vendor. To keep track of payments by
vendor name, you must add the vendor in Vendor Setup.
OR
On Macintosh, select a vendor from the pop-up list then press TAB,
or click Cancel then enter a name manually.
If you select a vendor who owes any outstanding payables, an alert
appears to remind you to pay outstanding payables in Vendor
Payments.
If the vendor name is typed in manually, MultiLedger won’t save the
vendor name or track payments made to that vendor. To keep track of
payments by vendor name, you must add the vendor in Vendor Setup.
5
Verify that the date for the check is correct.
6
Select a ledger account for the check, enter an amount for the detail
line, then press TAB to add the detail line to the check.
The Ledger Account is usually an expense account in the 6000–8999
range. Entering a Job and Description are optional. As you add detail
lines to the check, the Check Total field is updated.
After the first detail line is added, the Save button is enabled.
7
On Windows, if necessary, click New Line or press ENTER to begin
entering another item.
On Macintosh, if necessary, press TAB or RETURN again to begin
entering another item.
For field explanations, see “Disbursements Journal Field Descriptions”
on page 207.
Note
You can add comment lines to the transaction at any time by choosing
Insert Line from the Edit menu (Ctrl-I on Windows or I on
Macintosh). For more details, see “Adding Comment Lines to
Transactions” on page 126.
MLManual.book Page 211 Wednesday, October 27, 2010 12:04 PM
Disbursements Journal 211
8
When you are finished entering all the information for the check, click
Save.
When the check is saved, it is automatically posted to the general
ledger, and the check number is increased by one.
Printing Disbursements Journal Checks
MultiLedger offers you two ways to print a Disbursements Journal
check:
•
Check “Print on Save” in the Disbursements Journal window.
Whenever you save a check in the Disbursements Journal, a
standard Print dialog box will appear. Select your print options and
click OK or Print.
or
•
Use Print on the Command Center. After closing the
Disbursements Journal window, do the following:
1
Click Print in the Command Center.
2
Select the correct period.
3
Click the Checks radio button.
4
If necessary, check Print Metafile (Windows) or Print PDF/PICT File
(Macintosh).
For more information on using Metafiles or PICT Files, see “Using the
Print Screen” on page 105.
5
Select the checks that you want to print.
If no checks are selected, then all checks will print.
6
Click Print.
7
Select your print options and click OK or Print.
For more details about the Print command, see “Using the Print
Screen” on page 105.
If you need to adjust where the fields print on a check, see
“Customizing Print Field Positions for Your Printer” on page 111.
MLManual.book Page 212 Wednesday, October 27, 2010 12:04 PM
212 Chapter 9 Vendor Transactions
Modifying or Deleting Disbursements
Journal Documents
When the cursor is in the Check # field, the Modify button is enabled.
Click Modify to see a list of Disbursements Journal checks that you
can modify or delete. If the check you’re looking for doesn’t appear,
you may have to select another month from the pull-down menu.
Please note that the checks that appear here also include checks
recorded in Vendor Payments.
MLManual.book Page 213 Wednesday, October 27, 2010 12:04 PM
Using the Vendor Payments Window 213
Using the Vendor Payments Window
You can use Vendor Payments for any of the following situations:
•
You need to write a check for an outstanding payable.
•
You need to delete an outstanding payable dated prior to your
current open months that was entered incorrectly when your
company was set up with MultiLedger.
•
You need to make an adjustment or write off an outstanding
payable.
Vendor Payments Field Descriptions
This section describes the fields on Vendor Payments.
Cash Acct
The default cash account assigned on Interface Accounts is shown. You
can change the cash account by clicking the account number or name
and selecting a new account from the pop-up list.
Disc/Adj Acct
You can change the discount or adjustment account by clicking the
account number or name and selecting a new account from the pop-up
list. If no account is shown, click to the right of the Disc/Adj Acct label
and select an account from the pop-up list.
This account can be used to record vendor discounts or to reverse an
original payable, and is typically not the Accounts Payable account.
Once you’ve selected an account as the Disc/Adj Acct, you can change
the account, but you cannot remove it.
Check #
Enter a document number up to eight characters long to identify the
check. The last character must be a number.
After the check is saved, the check number (or last number of a
combination of characters) is increased automatically by one.
Check Date
Simply type over the highlighted day or use the +/- keys on your
keyboard to increment/decrement the date. You can enter a date from
the 30 open months, provided the month isn’t locked, in the form MM/
DD/YY.
Total Paid
As you apply payments, the Total Paid field shows the total for the
check. When you save the check, the Total Paid amount decreases the
account selected for Cash Acct.
Total Discount
As you apply discounts, the Total Discount field shows the total
discounted for the deposit. This will be the total amount recorded to the
account you selected in the Disc/Adj Acct field.
Cash Balance
This field shows the current general ledger balance for the selected Cash Acct.
MLManual.book Page 214 Wednesday, October 27, 2010 12:04 PM
214 Chapter 9 Vendor Transactions
Recording Vendor Payments
When you save vendor payments as a check, MultiLedger decreases
the selected cash account and decreases your accounts payable account
(as assigned on Interface Accounts) by the amount of the check. While
an individual check can have only one cash account and one discount/
adjustment account, you can choose different cash accounts and
different accounts for any discounts or adjustments for separate checks.
1
Click Vendor Payments in the Command Center.
Click in the boxes to change accounts for
the check or adjustment
Choose to sort the
list by due date,
name, or document
number
List of outstanding
payables
For field explanations, see “Vendor Payments Field Descriptions” on
page 213.
2
Select a cash account for the check.
When you open Vendor Payments, the default cash account assigned
on Interface Accounts is shown.
You can change the cash account by clicking the account number or
name and selecting a new account from the pop-up list.
MLManual.book Page 215 Wednesday, October 27, 2010 12:04 PM
Using the Vendor Payments Window 215
3
If necessary, select an account for any discounts or adjustments.
You can add or change the discount or adjustment account by clicking
the account number or name and selecting a new account from the popup list (if no account is shown, click just to the right of the Disc/Adj
Acct label). Once you’ve selected an account as the Disc/Adj Acct, you
can change the account, but you cannot remove it.
4
If necessary, enter or change the check number.
After the check is saved, the check number is increased automatically
by one.
5
Verify that the check date is correct.
6
Select the outstanding payable.
You can select an outstanding payable by clicking it or by using the
Find command under the Edit menu.
You can sort the outstanding payables by date, name, or document
number by clicking the appropriate Sort by drop down option
When you select an outstanding payable, the vendor name, due date,
discount date, payable total, discount or adjustment (if any), and the
check stub description (from the original payable) automatically fill in
the appropriate fields above the outstanding payables list.
MLManual.book Page 216 Wednesday, October 27, 2010 12:04 PM
216 Chapter 9 Vendor Transactions
If the check date is later than the payable’s discount date, the following
dialog appears:
Click Yes to still apply the discount to the amount due.
Click No to not apply the discount.
Note
To apply full payment quickly without any discount or adjustment, hold
down the Control key (Ctrl) on Windows or the Command key ( ) on
Macintosh while you click the outstanding payable. The amount due
will be listed automatically as the amount paid. You thus go to step 9,
skipping steps 7 and 8.
7
If necessary, edit the highlighted amount in the Amt Paid edit box to
match the actual vendor payment and press TAB.
The cursor moves to the Disc/Adjust edit box:
MLManual.book Page 217 Wednesday, October 27, 2010 12:04 PM
Using the Vendor Payments Window 217
8
If necessary, change or enter any discount amount or adjustment and
press TAB.
After entering any
discount or adjustment,
press TAB to apply the
payment and discount
After the payment and discount are applied, the payment is added to
the Total Paid field for the check, the discount is added to Total
Discount field, and the Save button is enabled.
Note
If you find that you’ve made a mistake, you can correct it easily before
saving the check. See “Modifying or Deleting Payments Before Saving
a Check” on page 218.
9
After repeating steps 6–8 for each outstanding payable that you’re
paying, click Save.
A check is created for each vendor that you’re paying. For example, if
you selected two payables for Office Mart and three payables for Bats
Distribution and Saved, two checks are created; one for Office Mart for
the total of their two payables and one for Bats Distribution for the
total of their three payables.
When you save the check, the Total Paid amount and any discounts or
adjustments decrease the accounts you selected.
Note
If you discover a payment error after saving the check, see “Modifying
or Deleting Payments After Saving a Check” on page 218.
MLManual.book Page 218 Wednesday, October 27, 2010 12:04 PM
218 Chapter 9 Vendor Transactions
Modifying or Deleting Payments Before
Saving a Check
If you’ve made a mistake (such as entering a payment incorrectly or
entering a payment for the wrong payable), you can quickly fix the
problem before saving the check:
1
Select the appropriate outstanding payable.
2
Change the highlighted amount paid (or press DELETE or BACKSPACE
to remove it), then press TAB.
3
If necessary, change the amount in the Disc/Adjust field (or press
or BACKSPACE to remove it), and press TAB to re-enter the
modified payment (or remove the old one) on the line.
DELETE
Modifying or Deleting Payments After
Saving a Check
When you create a check in Vendor Payments, MultiLedger uses the
Disbursements Journal to post the check to the general ledger. You can
use the Disbursements Journal to modify or delete the check that
contains the incorrect vendor payment. Vendor Payments and the
general ledger will be updated automatically to reflect the change.
To modify or remove a payment from a saved check:
1
Click Disbursements Journal in the Command Center, then click
Modify.
A list of checks for the month selected in the pull-down menu appears.
Please note that the list of checks also contains any checks created in
the Disbursements Journal. Select the check from the transactions list.
If the check you’re looking for doesn’t appear, you may have to select
another month from the pull-down menu.
2
Modify the payment amount for a detail line or enter 0.00 in the
Amount edit box to remove a payment from the check.
3
Press TAB to replace the detail line in the list.
MLManual.book Page 219 Wednesday, October 27, 2010 12:04 PM
Purchase Orders 219
4
Click Save.
The outstanding payable associated with the payment will again appear
in Vendor Payments.
If you delete a check that was made using Vendor Payments from the
Disbursements Journal, all the vendor payments that made up the
check will again appear in the Vendor Payments.
For more details about modifying transactions, see “Modifying or
Deleting a Transaction” on page 127.
Purchase Orders
You can enter a Purchase Order in Item Purchases. Saving an Item
Purchase as a Purchase Order does not create an outstanding payable
and does not affect the general ledger until it is converted to an Item
Purchase. A Purchase Order can be modified, deleted, or converted to
an Item Purchase at any time.
Creating Purchase Orders
1
Click Item Purchases in the Command Center.
2
Check the Purchase Order check box.
3
Enter the purchase order information as you normally would enter an
Item Purchase.
For detailed information on entering an Item Purchase, see “Recording
a Purchase with Item Purchases” on page 198.
Note
You may want to change the document number for purchase orders, so
as not to confuse them with Item Purchases. For example, you could use
“PO [document number],” to indicate a purchase order. The document
number you enter the first time for a purchase order will automatically
be increased by one for each new purchase order you save.
4
Click Save.
MLManual.book Page 220 Wednesday, October 27, 2010 12:04 PM
220 Chapter 9 Vendor Transactions
Working with Purchase Orders
You can modify, delete, or convert a purchase order to an Item
Purchase at any time.
1
Click Item Purchases in the Command Center.
2
Check the Purchase Order check box.
3
Click Modify.
A list of purchase orders appears. If the purchase order you are looking
for does not appear in the list, you may have to select a different month
from the pull-down menu.
4
Select the purchase order from the list, then click OK.
You have four options: Modify, Cancel, Delete, and Create.
Modify
If you click Modify, you can change any information for the purchase
order. After you modify information, click Save to save the purchase
order with changes.
Cancel
If you click Cancel, you return to Item Purchases.
Delete
If you click Delete, the purchase order is deleted, and you are returned
to Item Purchases.
Create
If you click Create, an Item Purchase is created using the information
from the purchase order, and the following happens:
•
The document number assigned to the new Item Purchase is one
greater than the last Item Purchase saved.
•
The date for the new Item Purchase defaults to the current date.
•
The purchase order itself is deleted when you create an Item
Purchase from it.
•
You can modify anything on the new Item Purchase before saving
it.
Printing Purchase Orders
1
Click Print on the Command Center.
2
Select the period.
3
Select the Item Purchases/PO’s radio button.
A list of available Item Purchases and purchase orders appears.
4
Select the purchase order(s) you wish to print, and Print Metafile
(Windows) or Print PDF/PICT File (Macintosh), if necessary.
MLManual.book Page 221 Wednesday, October 27, 2010 12:04 PM
Special Vendor Situations 221
5
Note
Click Print.
Purchase orders use the same format as Customer Invoices. You can,
however, have a separate Metafile or PDF/PICT File for purchase
orders. For information on using Metafiles, see “Positioning Print
Fields for Windows Metafiles or Macintosh PDF or PICT Files” on
page 112.
Viewing Purchase Orders
1
Click Transaction Journals in the Command Center.
2
Select a month from the list box on the right.
3
Click the Purchase Orders radio button.
4
Select the purchase order(s) you want to view, then click View.
If the purchase order you are looking for does not appear in the list,
you may need to select another month from the list.
Note
You can select all months in the list by clicking and dragging or using
the SHIFT key to select more than one month.
Special Vendor Situations
Reversing a Payable
If you want a complete audit trail, you can use the Disc/Adjust account
in Vendor Payments to reverse a payable.
You can also delete the original Item Purchase or Payables Journal
transaction. Deleting the original payable leaves no record of the
transaction. For more information on deleting payables, see
“Modifying or Deleting Payables Journal Transactions” on page 206 or
see “Modifying or Deleting an Item Purchase” on page 201.
Important
If there is a check associated with the payable you want to reverse or
delete, you should delete the check in the Disbursements Journal before
deleting or modifying the payable.
MLManual.book Page 222 Wednesday, October 27, 2010 12:04 PM
222 Chapter 9 Vendor Transactions
Reversing a Payable on the Vendor Payments Window
1
Click Vendor Payments in the Command Center.
2
Select the Disc/Adj account.
Usually, this is the same expense account that was used in the original
payable, not the Accounts Payable account.
3
Select the outstanding payable.
4
Enter zero in the Amt Paid edit box and press TAB.
5
Enter the amount of the payable in the Disc/Adjust edit box and press
TAB.
6
You could change the check number to an appropriate document
number, such as “VD [Document #],” to indicate a void payable.
7
Click Save.
Recording Vendor Credit
Recording Vendor Credit for Returned
Inventory
1
Click Item Purchases in the Command Center.
2
Enter the credit memo information.
Follow the guidelines in “Recording a Purchase with Item Purchases”
on page 198, except for the following fields:
Item
Select the returned item from the Item pop-up list.
Quantity
Enter a negative quantity for the returned inventory:
Amount
The amount of the credit will show automatically as a negative amount:
3
Press TAB to add the credit memo to the detail list, and then click Save.
The vendor credit will appear in Vendor Payments as a credit and can
be applied as payment toward a current or future payable. The returned
inventory items will be subtracted from your inventory.
MLManual.book Page 223 Wednesday, October 27, 2010 12:04 PM
Applying Vendor Credits 223
Recording Other Vendor Credit
1
Click Payables Journal in the Command Center.
2
Enter the credit memo information.
Follow the guidelines in “Recording a Purchase with the Payables
Journal” on page 204, except for the following fields:
Ledger Account
Amount
3
Select the account that was used to originally record the purchase.
Enter the credit as a negative amount like this:
Click Save.
The vendor credit will appear in Vendor Payments as a credit and can
be applied as payment toward a current or future payable.
Applying Vendor Credits
The credit amount is equal to the
outstanding payable amount
1
Click Vendor Payments in the Command Center.
2
Select the outstanding payable, and press TAB twice.
3
Select the vendor’s credit amount (with a minus (-) sign) and press TAB
twice.
The amount shown for Total Paid should be zero.
4
Change the check number to an appropriate description.
5
Click Save.
Both the outstanding payable and the credit amount are removed from
Vendor Payments.
MLManual.book Page 224 Wednesday, October 27, 2010 12:04 PM
224 Chapter 9 Vendor Transactions
The credit amount is larger than the
outstanding payable amount
1
Click Vendor Payments in the Command Center.
2
Select the outstanding payable, and press TAB twice.
3
Select the vendor’s credit amount (with a minus (-) sign), change the
amount shown in the Amt Paid edit box to the amount of the
outstanding payable with a minus (-) sign, and press TAB twice.
For example, if the outstanding payable amount is $250, you would
enter “-250” in the Amt Paid edit box for the credit memo. The amount
shown for Total Paid should be zero.
4
Change the check number to an appropriate description.
5
Click Save.
The remaining credit amount appears in Vendor Payments to be
applied toward another outstanding payable.
The credit amount is less than the
outstanding payable amount
1
Click Vendor Payments in the Command Center.
2
Select the vendor’s credit amount and press TAB twice.
3
Select the outstanding payable.
If you are paying the remainder of the outstanding payable, simply
press TAB twice. The Total Paid amount should equal the outstanding
payable amount minus the credit amount.
If you are not paying the remainder of the outstanding payable,
and you just want to apply the credit amount, change the amount in
the Amt Paid edit box to match the amount of the credit amount with
no minus (-) sign. For example, if the credit amount is “-100,” you
would change the Amt Paid for the outstanding payable to “100.” The
Total Paid amount should be zero.
4
Change the check number to an appropriate description.
5
Click Save.
If you paid the remainder of the outstanding payable, both the
outstanding payable amount and the credit amount are removed from
Vendor Payments.
If you did not pay the remainder of the outstanding payable, the
remaining outstanding payable amount remains in Vendor Payments to
be paid later.
MLManual.book Page 225 Wednesday, October 27, 2010 12:04 PM
225
Chapter 10 Other Activities
This chapter discusses the following topics:
•
Using the General Journal
•
Reconciling bank accounts
•
Using the Adjust Inventory window, including how to build or
manufacture items
•
Using the import and export capabilities
•
Closing the year
•
Rebuilding Company Files
•
Renaming Company Files
•
Find Company Files
•
Renumbering Accounts
MLManual.book Page 226 Wednesday, October 27, 2010 12:04 PM
226 Chapter 10 Other Activities
Using the General Journal
You can use the General Journal to record transactions, such as the
following:
•
Depreciation or amortization adjustments
•
Bank charges or fees
•
Interest earned
General Journal Field Descriptions
This section discusses the individual fields on the General Journal.
Recurring
Reference #
If you have General Journal entries that occur on a regular basis, you
can save them with Recurring checked. You can define the frequency
for a recurring entry and have MultiLedger remind you when the
transaction should be created. For more details on working with
recurring entries, see “Recurring Entries” on page 130.
Enter a reference number up to eight characters long to identify the
transaction. The last character must be a number.
After the transaction is saved, the reference number is automatically
increased by one.
Description
Enter a description up to 25 characters long.
Date
Simply type over the highlighted day or use the +/- keys on your
keyboard to increment/decrement the date. You can enter a date from
any open month, provided the month isn’t locked, in the form MM/DD/
YY.
Ledger Account
Select a ledger account from the pop-up list. For more information, see
“Using Pop-Up Lists” on page 118.
Because you have to enter both the debit (+) and the credit (-) of a
General Journal transaction, each General Journal entry will have at
least two ledger accounts.
Job
Description
Select the job for this detail line from the pop-up list. If the Jobs pop-up
list does not appear, no jobs have been set up, or Skip Jobs
(Ctrl-K on Windows or K on Macintosh) under the Edit menu is
checked.
The description you entered above is copied and highlighted
automatically.
You can enter up to 25 characters of descriptive text for a particular
detail line on the transaction.
MLManual.book Page 227 Wednesday, October 27, 2010 12:04 PM
Using the General Journal 227
Amount
Enter an amount (no dollar signs). If the amount has zero cents, you
don’t have to enter .00.
Credits should be entered with a minus sign (-) before the amount like
this: -42.50
After at least one transaction line has been added, MultiLedger
automatically calculates the necessary balancing amount and puts it in
the Amount edit box. You can override the anticipated amount if more
than one transaction line needs to be added.
New Line
(Windows Only)
Entry Total
(Calculated)
Important
To enter another detail line to the entry, click New Line or press ENTER.
This shows the total for the transaction as you add detail lines to the
transaction. The Entry Total must equal zero before you can save the
transaction.
When using the General Journal, you must enter both the debit and
credit amounts for each transaction. An unbalanced entry (when credits
plus debits do not equal zero) cannot be saved. After entering both sides
of an entry, the amount shown for Entry Total should be 0.00.
Recording a General Journal Transaction
1
Reference # must
end in a number
Debits and credits
must be equal before
you can save the
transaction
Click General Journal in the Command Center.
MLManual.book Page 228 Wednesday, October 27, 2010 12:04 PM
228 Chapter 10 Other Activities
2
If necessary, enter or change the reference number and press TAB.
The cursor moves to the Description field.
3
Enter a description for the transaction.
4
Continue filling in the rest of the fields with the appropriate
information.
For field explanations, see “General Journal Field Descriptions” on
page 226.
Note
You can add comment lines to the transaction at any time by choosing
Insert Line (Ctrl-I on Windows or I on Macintosh) from the Edit
menu. For more information on adding comment lines see “Adding
Comment Lines to Transactions” on page 126
5
Note
After you’ve entered a ledger account and amount (Job and detail line
Description are optional), press TAB to add the line to the transaction.
Credits should be prefaced with a minus (–) sign.
As you add detail lines to the transaction, the Entry Total amount is
updated.
After selecting another ledger account for the next detail line,
MultiLedger automatically calculates the necessary balancing amount
and puts it in the Amount edit box.
6
On Windows, if necessary, click New Line or press ENTER to begin
entering another item to this entry.
On Macintosh, if necessary, press TAB or RETURN to begin entering
another item to this entry.
7
When you are finished entering all the information for the document,
click Save.
After the transaction is saved, it is posted automatically to the general
ledger, and the Reference # is increased by one.
Modifying or Deleting General Journal
Documents
When the cursor is in the Reference # field, the Modify button is
enabled. Click Modify to see a list of General Journal transactions that
you can modify or delete. If the General Journal transaction you’re
looking for doesn’t appear, you may have to select another month from
the pull-down menu.
MLManual.book Page 229 Wednesday, October 27, 2010 12:04 PM
Balancing Your Checkbook 229
Balancing Your Checkbook
Each month when you receive a bank statement you should reconcile
or account for the difference between a cash account’s current balance
(as shown in the general ledger) and the ending balance shown on the
bank statement. This provides a way for you to ensure that your record
of transactions matches what the bank has recorded for the same
account.
Bank Reconciliation Field Descriptions
The following section describes the fields on the Bank Reconciliation.
Cash Acct
The default cash account assigned on Interface Accounts is initially
shown. To change accounts, click the account shown and choose
another account from the pop-up list. The account selected will print at
the top of the Bank Reconciliation report.
Note
If you do not have access to the Interface Accounts, you cannot change
this account in the bank reconciliation.
Show Cleared Items
If Show Cleared Items is checked when you click Get Transactions, the
transactions list will include transactions that have already been
finalized (in the current accounting year) along with those that have
been cleared but not finalized and those that haven’t yet been marked as
cleared. This is useful for finding a transaction that was mistakenly
marked as cleared.
Sort by Ref #
If Sort by Reference # is checked when you click Get Transactions, the
unfinalized transactions will be listed from the lowest to the highest
reference number. Otherwise, the unfinalized transactions are listed
from the earliest to the most recent transaction date.
Print Cleared Items
Check this option to have finalized and unfinalized transactions print on
the report. The dates for finalized and unfinalized transactions are
determined by the Cutoff Date.
Cutoff Date
The date entered here determines the last date that will be reported. For
example, by entering the last date of a previous month and clicking Get
Transactions, all unfinalized transactions as of that date will be
reported. The Ledger Balance will also be as of the Cutoff Date.
Initially, MultiLedger enters the current date as the Cutoff Date.
Bank Statement
Balance
Enter the amount that your bank statement shows as an ending balance
for the account.
-Outstanding Not
Entered
Enter a value here if checks and/or deposits that were created prior to
your Current Fiscal Year have not yet cleared the bank. Checks and
deposits from a date prior to your Current Fiscal Year will not appear in
the transactions list since they were not created with MultiLedger.
MLManual.book Page 230 Wednesday, October 27, 2010 12:04 PM
230 Chapter 10 Other Activities
If you have outstanding checks and/or deposits written prior to your
Current Fiscal Year that have not yet cleared the bank, you should total
the outstanding checks and deposit amounts, then do one of the
following:
•
If the checks are more than the deposits, enter a positive total for Outstanding Not Entered.
•
If the deposits are more than the checks, enter a negative amount
for -Outstanding Not Entered.
As the checks and deposits that comprise the -Outstanding Not Entered
value clear the bank, you should reduce the value in this field.
Eventually, when all checks and deposits that were written prior to your
Current Fiscal Year have cleared, the -Outstanding Not Entered field
should be zero.
-Current Outstanding
(Calculated)
This calculated value shows the total of uncleared (unchecked)
transactions in the list. Since -Current Outstanding is subtracted from
the Bank Statement Balance entered, a negative value means your
uncleared deposits are more than your uncleared checks.
=Revised Bank
Balance (Calculated)
This is your current bank balance based on Bank Statement Balance
minus Outstanding Not Entered minus Current Outstanding.
-Ledger Balance
(Calculated)
This is the general ledger balance for the account selected for G/L Acct
as of the Cutoff Date.
=Difference
(Calculated)
After all transactions have been marked as cleared according to the bank
statement, this amount should be 0.00.
Cleared Withdrawals
This field keeps a running total of all credits (checks, withdrawals, bank
charges, etc.) for the selected account as you mark them as cleared. This
field is cleared when you click Finalize.
Cleared Deposits
This field keeps a running total of all debits (deposits, interest earned,
etc.) for the selected account as you mark them as cleared. This field is
cleared when you click Finalize.
Get Transactions
Click this button to see a list of transactions, cleared and uncleared, that
have not been finalized. If Show Cleared Items is checked, transactions
cleared in previously finalized bank reconciliations will also be
included in the list.
If you need to add a transaction or modify an existing transaction during
bank reconciliation, simply access the correct transaction journal
window, enter or modify the transaction, then return to Bank
Reconciliation and click Get Transactions. The new/modified
transaction appears as uncleared.
MLManual.book Page 231 Wednesday, October 27, 2010 12:04 PM
Reconciling Your Bank Balances 231
Print
If you click this button before a list of transactions is shown, the
reconciliation report will show only current reconciliation balances. If
you click Print after a list of transactions is shown, the report will
include all uncleared transactions as well as reconciliation balances. To
include cleared transactions on the report, make sure Print Cleared
Items is checked.
Finalize
Use Finalize only when you have completed the bank reconciliation for
a month and your Difference is 0.00. After clicking Finalize, cleared
transactions will no longer appear when you click Get Transactions
(unless you have Show Cleared Items checked).
Reconciling Your Bank Balances
Use the following steps to reconcile your bank balances.
1
Click Bank Reconciliation in the Command Center.
2
If necessary, select the G/L Acct that corresponds to the bank
statement.
When you click Get
Transactions a list of
uncleared
transactions, as well
as cleared
transactions that
have not been
finalized, appears
The default cash account is the one assigned on Interface Accounts.
You can change accounts by clicking on the current cash account and
MLManual.book Page 232 Wednesday, October 27, 2010 12:04 PM
232 Chapter 10 Other Activities
selecting a new account from the pop-up list.
For more information about the G/L Acct field, see “Bank
Reconciliation Field Descriptions” on page 229.
3
If necessary, edit the Cutoff Date.
The Cutoff Date is filled in automatically with the current date.
The Cutoff Date determines the last date that will be reported. For
example, by entering the last date of a previous month and clicking Get
Transactions, all outstanding checks and deposits as of that date will be
reported. The Ledger Balance will also be as of the Cutoff Date.
The Cutoff Date must be a valid transaction date from the any open
month.
4
Enter the ending balance from your bank statement into the Bank
Statement Balance field.
5
If desired, check Sort by Ref #.
If Sort by Ref # is checked when you click Get Transactions, the
transactions will be listed from the lowest to the highest reference
number. Otherwise, the transactions are listed from the earliest to the
most recent transaction date.
Note
If Sort by Ref # is checked, numeric reference numbers are sorted first
before alpha reference numbers. For example, check number “5500”
would come before document number “Dep138.”
6
Click Get Transactions.
The list includes uncleared transactions, as well as cleared transactions
that have not been finalized.
7
For each transaction shown on your bank statement, find the
corresponding transaction in the list and click it to mark it as cleared.
Disbursements or checks are shown as negative amounts. Deposits are
shown as positive amounts.
A checkmark (√- Macintosh) or an asterisk (* - Windows) appears to
the left of transactions that you have marked as cleared and the item
will change color. If you accidentally mark a transaction as cleared,
click it again to un-clear it and remove the mark.
You can mark multiple lines as cleared by dragging on the appropriate
transactions.
MultiLedger keeps a running total for checks and deposits you’ve
marked as cleared in the Cleared Withdrawals and the Cleared
Deposits fields.
MLManual.book Page 233 Wednesday, October 27, 2010 12:04 PM
Reconciling Your Bank Balances 233
Note
Attention CheckMark Payroll Users: Employee checks imported
from CheckMark Payroll to MultiLedger show “PR[posting date]”
under the Ref # heading, and check numbers under the Description
heading. Employer checks use the check number assigned in
CheckMark Payroll as the Ref #.
8
When you are finished checking off cleared transactions, =Difference
should be 0.00.
If =Difference is 0.00, you have successfully reconciled your bank
balance.
If =Difference is not 0.00, see “Bank Reconciliation Tips” on page 234
and “Bank Reconciliation Problems” on page 234
9
When you’re finished reconciling the bank account, click Finalize.
If the bank reconciliation is in balance, you will get the following
message:
If the bank reconciliation is not in balance, you will get the following
message:
Click No to not save the bank reconciliation data.
Click Yes to save the bank reconciliation data. Once finalized, cleared
transactions no longer appear when you click Get Transactions (unless
Show Cleared Items is checked).
MLManual.book Page 234 Wednesday, October 27, 2010 12:04 PM
234 Chapter 10 Other Activities
Bank Reconciliation Tips
If you’re having trouble reconciling your bank statement in
MultiLedger, read the following tips. If you’re still having trouble, read
the next section, “Bank Reconciliation Problems.”
•
Compare the Cleared Withdrawals total to your bank
statement. The amount in the Cleared Withdrawals field should
match the bank statement’s total for withdrawals. (This may be
called checks paid, withdrawals, or something similar on your
bank statement). If they don’t match, you may have mistakenly
cleared an item that hasn’t cleared the bank or you may have
missed checking off a cleared item in Bank Reconciliation.
•
Compare the Cleared Deposits total to your bank statement.
The amount in the Cleared Deposits field should match the bank
statement’s total for deposits. (This may be called total deposits or
something similar on your bank statement). If they don’t match,
you may have mistakenly cleared an item that hasn’t cleared the
bank or you may have missed checking off a cleared item in Bank
Reconciliation.
•
Double-check the amount entered for Bank Statement
Balance. This should be the ending balance from your bank
statement. When you open Bank Reconciliation, the amount in the
Bank Statement Balance field is the amount that was last saved, so
it may be the ending balance from last month’s bank statement.
•
Make sure all miscellaneous items, such as bank interest or
fees/charges, have been entered in MultiLedger. You can add
missing transactions while doing the bank reconciliation. When
you are finished adding missing transactions, simply click Get
Transactions on Bank Reconciliation to add the new transactions
to the list.
Bank Reconciliation Problems
If you’ve finished marking transactions as cleared and =Difference is
not zero, you should find the problem and correct it. The rest of this
section will help you find the problem and suggest what you can do
about it.
•
A transaction was mistakenly marked as cleared
To un-clear a transaction, click it to remove the mark.
If you haven’t finalized the bank reconciliation yet, make sure that
MLManual.book Page 235 Wednesday, October 27, 2010 12:04 PM
Reconciling Your Bank Balances 235
all transactions that have just been marked as cleared in
MultiLedger are also shown on the bank statement.
If you’ve already finalized the bank reconciliation, check Show
Cleared Items before you click Get Transactions. The transactions
list will include transactions that have already been finalized based
on the Cutoff Date.
•
A transaction listed on the bank statement was not marked as
cleared in MultiLedger
Make sure that all transactions listed on the bank statement have a
corresponding transaction marked as cleared in MultiLedger. As
you mark a transaction as cleared in MultiLedger, sometimes
putting a checkmark next to the corresponding transaction on the
bank statement helps.
•
A transaction listed on the bank statement was not recorded in
MultiLedger
Look at the bank statement to see what sort of transactions might
be missing from your MultiLedger records.
• Bank charges (such as a monthly service charge) or dividends
have probably not been entered in MultiLedger yet. Record these
types of transactions in the General Journal, then return to the
Bank Reconciliation and click Get Transactions. The new
transaction will appear in the list.
• A deposit might have been made to your cash account that
wasn’t recorded in MultiLedger. You should record this deposit in
Customer Payments or the Receipts Journal, then return to the
Bank Reconciliation and click Get Transactions. The new
transaction will appear in the list.
• A check might have been hand written without recording it in
MultiLedger. You should record the check in Vendor Payments or
the Disbursements Journal, then return to the Bank Reconciliation
and click Get Transactions. The new transaction will appear in the
list.
•
A transaction was marked as cleared in MultiLedger, but the
amount is different than on the bank statement.
A check or deposit might have been entered incorrectly. You can
modify or delete the transaction. For more details, see “Modifying
or Deleting a Transaction” on page 127.
MLManual.book Page 236 Wednesday, October 27, 2010 12:04 PM
236 Chapter 10 Other Activities
•
A prior outstanding total was not entered
You need to enter a prior outstanding total if checks or deposits
were created before you started using MultiLedger but haven’t yet
cleared the bank. The total amount for these checks and deposits
needs to be entered in the -Outstanding Not Entered field, so you
can reconcile the bank balance.
For details about the -Outstanding Not Entered field, see “Bank
Reconciliation Field Descriptions” on page 229.
•
A check or deposit was already marked as cleared, then the
transaction amount was modified after the bank reconciliation
was finalized.
If you modify a transaction that was cleared and then finalized,
then modify the transaction amount, the transaction is
automatically uncleared. You should mark the transaction with the
modified amount as cleared on the Bank Reconciliation.
Adjust Inventory Window
Adjust Inventory provides a simple way to adjust the values in your
inventory account to reflect current inventory values. You can use this
window to:
•
Adjust inventory levels after taking a physical inventory count to
reflect what you actually have on hand.
•
Remove an item from inventory that didn’t involve a sale, such as
an inventory transfer from one location to another.
•
“Build” an inventory item from existing inventory items. This is
handy if you do some light manufacturing or bundling of
inventory. For more information, see “Building Inventory” on
page 240.
Adjust Inventory Field Descriptions
Reuse
Inventory Account
When you click this instead of Modify, you can select a previous entry
to “Reuse” without changing or deleting the original entry. For more
information, see “Reusing Adjust Inventory Transactions” on page 239.
The default account assigned to Inventory on Interface Accounts is
shown.
The account shown for Inventory cannot be changed here.
Adjust Account
This account will be increased (debited) or decreased (credited) when
MLManual.book Page 237 Wednesday, October 27, 2010 12:04 PM
Adjust Inventory Window 237
you save the transaction. If no account appears here or to change the
account, click just to the right of the Adjust Account label and select an
account (usually in the 5000 range) in the pop-up list that appears.
Ref #
Description
Since MultiLedger uses the General Journal to post an Adjust Inventory
transaction to the general ledger, the same reference number system is
used in both windows.
Enter a description for the transaction up to 25 characters long. The
description entered here appears in Transaction Journal reports and in
General Ledger reports.
Date
Simply type over the highlighted day. You can enter a date from the any
open month, provided the month isn’t locked, in the form MM/DD/YY.
G/L Account Balance
The current general ledger balance, as of the last transaction date, for the
Inventory account is shown.
Total Cost of Items
A calculated value based on the quantity on hand multiplied by the
average unit cost for all items in your inventory.
Entry Total
The calculated total based on the Adjust Qty (+ or -) multiplied by the
Unit Cost for all items you are adjusting.
Adjust Qty +/-
The quantity you want to adjust an item’s quantity on hand by. You can
enter either a positive or a negative quantity.
MLManual.book Page 238 Wednesday, October 27, 2010 12:04 PM
238 Chapter 10 Other Activities
Using the Adjust Inventory Window
1
Click Adjust Inventory in the Command Center.
The inventory account is the
one you selected on
Interface Accounts
Click Reuse to use a previous
entry without modifying or
changing the original entry.
Choose a cost of sales
account, usually in the
5000 range
Current inventory
values appear here
2
Select an account for the adjustment.
You can change the Adjust Acct by clicking the account number or
name and selecting a new account from the pop-up list. If no account is
shown, click to the right of the Adjust Acct label and select an account
from the pop-up list that appears.
3
If necessary, enter or change the reference number.
4
Type in a description for the transaction.
5
Verify that the date is correct.
6
Select an item you want to adjust from the list.
MLManual.book Page 239 Wednesday, October 27, 2010 12:04 PM
Adjust Inventory Window 239
7
Enter a quantity, positive or negative, in the Adjust Qty +/– edit box,
then press TAB.
Entering a positive quantity adds to the existing inventory and entering
a negative (-) quantity subtracts from the existing inventory.
The Total Cost edit box shows the calculation of the Adjust Qty +/–
multiplied by the Unit Cost. If you change the amount in the Total Cost
field, the Unit Cost for the item will be updated accordingly.
8
Repeat steps 6 and 7 for all items you want to adjust.
9
When you are finished, click Save.
Modifying or Deleting Adjust Inventory
Transactions
You can modify or delete a transaction made in Adjust Inventory.
1
Click Adjust Inventory in the Command Center.
2
Click Modify.
3
Select the transaction from the list, then click OK.
If the transaction you are looking for does not appear, you may have to
select another month from the pull-down menu.
To delete the transaction, click each line in the entry, enter zero in the
Adjust Qty +/– edit box, then press TAB twice. When all items have a
zero in the Adjust Qty column, click Save.
To modify the transaction, change the appropriate items, then click
Save.
Reusing Adjust Inventory Transactions
You can reuse a transaction created in Adjust Inventory without
changing the original entry.
1
Click Adjust Inventory in the Command Center.
2
Click Reuse.
3
Select the transaction from the list, then click OK.
If the transaction you are looking for does not appear, you may have to
select another month from the pull-down menu.
You can modify any information, then click Save.
MLManual.book Page 240 Wednesday, October 27, 2010 12:04 PM
240 Chapter 10 Other Activities
Building Inventory
Adjust Inventory can be used for light manufacturing or bundling of
items. The following example shows you how to use Adjust Inventory
for light manufacturing to make a fictitious whizbat from existing
inventory of dingbats and dingwings. The dingbats and the dingwings
are the components and the whizbat is the finished good.
1
Note
Make sure you have the components of the finished good on hand and
an item name set up for the finished good.
Components should be purchased in the quantity they will be sold. For
example, if the dingbats you use to make whizbats come in 25 foot rolls,
but each whizbat uses only 4 inches of dingbat, you should purchase the
dingbat in inches.
2
Click Adjust Inventory in the Command Center.
3
Select an Adjust Acct.
Usually this is the inventory account.
4
Select a component in the list.
5
Enter a negative quantity in the Adjust Qty +/– edit box.
Enter a negative
adjust quantity for the
components
The Total Cost for the component will show as a negative amount.
6
Repeat steps 4 and 5 for each component.
7
Highlight the finished good item in the list and enter a positive quantity
for the finished good in the Adjust Qty +/– edit box.
8
Take the amount that appears as a negative in the Entry Total field and
enter this amount as a positive in the Total Cost edit box for the
finished good.
MLManual.book Page 241 Wednesday, October 27, 2010 12:04 PM
Adjust Inventory Window 241
Enter the total that
appears as a negative
for the components as
a positive amount for
the finished good
This will make the Entry Total zero.
For example, if it takes 5 inches of Dingbats and 5 units of Dingwings
to make 1 Whizbat, your entry would look similar to the one above.
9
Click Save.
Saving this transaction transfers the components into the finished good
and will reflect the true unit cost of the finished good based on the cost
of each of the components. To view the entry that was made, click
Transaction Journals in the Command Center, select the correct month
from the list, the click the General radio button. Highlight the
transaction, then click View.
Viewing Adjust Inventory Transactions
1
Click Transaction Journals in the Command Center.
2
Select a month from the list.
3
Click the General radio button.
4
Highlight the document(s) you wish to view, then click View or Print.
MLManual.book Page 242 Wednesday, October 27, 2010 12:04 PM
242 Chapter 10 Other Activities
Importing and Exporting Data
MultiLedger’s ability to import and export data is one of its most
powerful features and gives it a great deal of flexibility to work with
other programs. You can send data back and forth between different
MultiLedger companies or even to other programs. Some ideas for
using these features include:
•
Export your customers from MultiLedger to a word processor to
use its mail-merge capabilities.
•
Use a database to create specialized invoices, and then import
them into MultiLedger to track your accounts receivable
information.
•
Import your customers and vendors into MultiLedger from a
database or address book program.
•
Create a new set of company files because of a change in the fiscal
year-end date. This way, you can export much of the data from the
old company and import it into the company with the new fiscal
year-end date.
The Basics of Importing and Exporting
First, here are a few key terms to remember about importing and
exporting.
Record
The information about one vendor, customer, item or transaction. For
instance, consider these items to import:
Name
Widget
Poster
Qty
41
13
Price
4.25
12.00
The item called Widget and its associated quantity and price are one
record. Poster and its associated information are another record.
Field
ASCII file
Text file
One piece of information from a record. In the example above, name
and quantity are each one field.
Same as a text file.
The most basic file format. A text file doesn’t contain any information
about fonts or formats. It only contains the words and numbers that
make up your data. This is the kind of file that most programs (including
MultiLedger) use when they import and export data.
MLManual.book Page 243 Wednesday, October 27, 2010 12:04 PM
Importing and Exporting Data 243
Tab-delimited file
A special kind of text file. Each field is separated by a tab character, and
each record is separated by a carriage return. For example, a tabdelimited text file, using the above example, might look like this:
Wiget<tab>41<tab>4.25 <CR> Poster<tab>13<tab>12.00<CR>
MultiLedger uses tab-delimited text files to import or export
information. Text files are a common file format that many applications
understand. “Tab-delimited” simply means that a tab character
separates each field in the text file.
Here are a few important things to remember about a tab-delimited text
file:
•
There are no titles for the data in the text file.
•
<tab> is just a symbol for the TAB character on your keyboard.
(Don’t use the letters “t a b.”)
•
The <CR> character is the ENTER key (Windows) or the RETURN
key (Macintosh) on your keyboard.
•
A word processing program can be used to view a text file. It
might display characters like
for <tab> and ¶ for <CR>.
When data is imported, MultiLedger opens the text file and reads the
information into your company files. When data is exported,
MultiLedger copies the selected information from your company and
saves it to a text file. The exported information can then be read by
many applications including, of course, MultiLedger. Every time you
export information, you can save it to a different text file. For instance,
you could export your customers to one file, your vendors to a second
file, and your items to a third file.
MLManual.book Page 244 Wednesday, October 27, 2010 12:04 PM
244 Chapter 10 Other Activities
Exporting from MultiLedger
1
Choose Export from the File menu.
Choose the type of
data you wish to
export from the pulldown menu
2
If necessary, make sure you have the month that contains the data you
wish to export selected in the pull-down menu.
3
Select the type of data that you want to export from the pull-down
menu.
MLManual.book Page 245 Wednesday, October 27, 2010 12:04 PM
Importing and Exporting Data 245
After selecting the appropriate option from the pull-down menu, a list
of records for the month selected in the Month menu appears on the left
and the Field List shows the fields that you can export. For example, if
you clicked the Customers option, a list of customers appears:
Make sure you have
the correct month
selected
If you need to have the
City, State, & Zip code
in separate fields for
Customers or Vendors
when exporting, make
sure this box is
checked.
Note
If Customers or Vendors is selected and you want the City, State, and
Zip Code exported in separate fields, make sure you select the Separate
City/State/Zip checkbox.
4
Click Copy All to copy all the fields from the Field List to the Export
List in the same order they appear in the Field List.
You can also select a field then click Copy, or you can double-click
each field you want to export in the order you want it to appear in the
text file.
Since there are no field names in a text file, you should carefully
determine the order you want data to appear in the text file.
MLManual.book Page 246 Wednesday, October 27, 2010 12:04 PM
246 Chapter 10 Other Activities
As you double-click each field in the Field List, the field name appears
in the Export List:
To remove a field from the Export List, double-click it or click it once
then click Remove. Fields below the removed field will automatically
move up in the Export List.
5
From the list on the left, select the records that you want to export.
If no records are highlighted, all the listed records will be exported.
To select a consecutive series of records, drag on a range of records
so that all desired selections are highlighted.
To select a non-consecutive series of records, hold down the Ctrl key
(Windows) or the Command( ) key (Macintosh) while clicking each
desired record. All desired records should be highlighted.
6
Click Export.
A Save As dialog appears:
MLManual.book Page 247 Wednesday, October 27, 2010 12:04 PM
Importing and Exporting Data 247
7
A file name based on the category you have selected is automatically
entered.
This can be changed if you want to rename the file.
8
Determine where you want to save the file.
If necessary, use the folder pop-up menu to change folders or disks.
9
Click Save.
You have created a new tab-delimited text file that can be imported
into another program or another MultiLedger company.
Exporting to CheckMark Forms 1099
You can export Vendor or Customer information as a .txt file to
import into the CheckMark Forms 1099 application. CheckMark
Forms 1099 prints and eFiles 1099 copies for forms MISC, DIV, INT,
S and R. For information regarding this program, contact CheckMark’s
sales department at 800-444-9922 or visit www.checkmark.com
1
Chose Export from the File menu.
2
If necessary, make sure you have the month that contains the data you
wish to export selected in the pull-down menu.
3
Select the type of data, either Vendors or Customers, that you want to
export from the pull-down menu.
MLManual.book Page 248 Wednesday, October 27, 2010 12:04 PM
248 Chapter 10 Other Activities
4
Select the Vendors or Customers you wish to export. If no Vendors or
Customers are selected, all will be selected.
5
Click the Export to 1099 button. You’ll be prompted with a Save As
dialog box.
6
Choose a location to save the file, give the file a name or use the default
name given, and click Save.
7
Open up the CheckMark Forms Application and use the import
feature to import the information into that system.
Importing into MultiLedger
If you import an account, customer, vendor, or item with the exact
same name as one that already exists in your company, the original
data associated with that name will be replaced by the new information
you are importing.
If you attempt to import a transaction with the same document number
as one that already exists in your company, and Check for Duplicate
Documents is selected on Preferences under the File menu, the
transaction with the duplicate document number will not be imported.
If you attempt to import a transaction with the same document number
as one that already exists in your company, and you do not have Check
for Duplicate Documents selected on Preferences under the File menu,
the duplicate transaction will be imported, unless it also has the same
date as the existing transaction.
If you import a transaction that has an item, customer, or vendor that
does not exist in your company, MultiLedger will ask you if you want
to add the new item, customer, or vendor to your company files. If you
don’t add the new data, MultiLedger will skip that transaction. If you
do add the new data, you should go to the appropriate set up window
later to add address or payment information.
Important
You can import invoices and payables along with their associated
customer or vendor payments, provided you use the field “Amount
Paid” in both the Export List and the Import List. Please note that using
the “Amount Paid” field does not import the associated receipt or
disbursement transaction (you still need to import the receipt or
disbursement) but it does reduce the amount of the outstanding
receivable or payable.
If you don’t use the “Amount Paid” field, imported customer or vendor
payments do not automatically apply to invoices as they would if they
had been entered through Customer or Vendor Payments. Invoices
associated with the imported customer or vendor payments will still
MLManual.book Page 249 Wednesday, October 27, 2010 12:04 PM
Importing and Exporting Data 249
appear as unpaid and your Accounts Receivable or Accounts Payable
reports will be out of balance.
Repeating Fields
Many imported text files use repeating fields. For instance, a text file
containing an invoice might have the following repeating fields: item,
quantity, price, and amount. A text file containing an invoice that sold
two inventory items and a service contract might look like this:
3/30/01<tab>INV 1010<tab>Leona Helmsley Prop Mgmt. <tab>Net
30<tab>3/30/01<tab>CMS Deluxe Model
#7785<tab>10<tab>64.84<tab>648.40<tab>CMS Deluxe Model
#9975<tab>1<tab>451.25<tab>451.25<tab>CMS Service
Contract<tab>1<tab>475.00<tab>475.00 <CR>
The corresponding Import List in MultiLedger would look like this:
.
On the Import window, repeating fields are indicated with an asterisk
(*). These fields should appear at the bottom of the Import List.
Required Fields
MultiLedger requires certain fields for importing, depending on the
type of data you are importing. Required fields are marked with a plus
sign (+).
To get an idea of how a text file for a transaction might look, try
exporting some sample data out of MultiLedger, and then open it up in
another application such as Microsoft Word or Excel.
MLManual.book Page 250 Wednesday, October 27, 2010 12:04 PM
250 Chapter 10 Other Activities
Match Name & Code
The program will search for existing names and codes when importing
Customers, Vendors, or Items.
This searches for existing records with the same name and code, same
name, or same code depending on which option you choose from the
pull-down list. If it finds an exact match, it will update the existing
record. If there isn’t an exact match, it will add a new record.
To Import Data into MultiLedger
1
Choose Import from the File menu.
The following window appears:
2
Select the type of data that you want to import from the pull-down
menu.
MLManual.book Page 251 Wednesday, October 27, 2010 12:04 PM
Importing and Exporting Data 251
After selecting the appropriate option from the pull-down menu, the
Field List shows the fields that you can import. For example, if you
select Customers from the pull-down menu, the following fields appear
in the Field List:
3
Click Copy All to copy all the fields from the Field List to the Import
List in the same order they appear in the Field List.
You can also select a field then click Copy, or you can double-click
each field you want to import in the order you want it to appear in the
text file.
Since there are no field names in a text file, you should carefully
determine the order that you want to import the data.
A plus sign (+) before a field name indicates that it is a required field
for importing. An asterisk next to a field name indicates a repeating
field. For more information on repeating fields, see “Repeating Fields”
on page 249.
MLManual.book Page 252 Wednesday, October 27, 2010 12:04 PM
252 Chapter 10 Other Activities
To remove a field from the Import List, double-click it or click it once,
then click Remove. Fields below the field will automatically move up
in the Import List.
4
After selecting the appropriate fields for the Import List, click Import.
An Open File dialog appears:
Locate the text file
you want to import
using the dialog box
MLManual.book Page 253 Wednesday, October 27, 2010 12:04 PM
Importing and Exporting Data 253
5
Select the appropriate text file to import and click Open.
In this example, you would select Invoices and click Open.
The Import Preview window appears:
The Import Preview
window allows you to
spot any problems
before you import
This window allows you to see the Import List with the contents of the
selected text file by record. This can help you find any errors before
you actually import the data.
You can use the scroll bar to see more data for the record. You can also
click the appropriate button to move through the text file.
6
When you’re finished previewing the text file, click Import to read the
information into your company or click Cancel to return to the Import
window.
MLManual.book Page 254 Wednesday, October 27, 2010 12:04 PM
254 Chapter 10 Other Activities
Closing the Year
Before Closing the Year
•
As a precaution, make two backups of your company files.
Before closing the year, you should make two backup copies of
your company data files to protect your data from being lost. Use
the Backup Company command under the File menu. For details,
read Chapter 3, “Backing Up and Restoring Company Files.”
Restore and open each backup company to ensure that each
copy is usable.
Close Year Command
To close the year, simply choose Close Year from the File menu, then
follow the on-screen instructions. The progress bar will give you an
indication of how long this process will take.
Once you have closed a year, there is no way to open the previous year
unless you revert to a backup.
After closing the year, asset, liability, and equity accounts (1000–3999
range) carry over to the new year. Income and Expense accounts (4000
and higher) zero out to the Retained Earnings (profit and loss) account
assigned on the Interface Accounts window.
Making Adjusting Entries to the Previous
Year
If, after closing the year, you need to make adjusting entries to the
closed fiscal year, do the following:
1
Open one of the backup companies and enter the transactions.
2
After all adjusting entries have been made, print a Trial Balance report
for the last month of your fiscal year.
3
Close the backup company and open the new year company.
MLManual.book Page 255 Wednesday, October 27, 2010 12:04 PM
Renaming Company Files 255
4
On Account Balances, enter or adjust the balances from the Trial
Balance you printed from the backup.
You will need to total the income and expense accounts and either add
them to or subtract them from the Retained Earnings account.
5
After entering the new account balances, verify that the Ledger
Balance is zero, then click Save.
The new balances will carry forward and update balances and reports
for all months in the new year.
Renaming Company Files
You can use the Rename Files command to rename all the data files
associated with an open company. MultiLedger data files are named
when you create your company and can include up to 13 files ending in
a designated MultiLedger suffix, such as .ml0, .ml1, .mld, etc.
1
Choose Rename Files from the File menu.
2
Type in the new name for your company files, then click OK or click
Cancel to not rename the company files.
Use a short name, such as CMS, instead of a longer name, as it will be
easier to find in a dialog or window.
Note
This does not rename the company folder that contains the data files—
only the data file names. Also, renaming doesn’t affect the company
name that prints on reports.
Important
You should never rename your files using any other method, as you may
be unable to access the files.
MLManual.book Page 256 Wednesday, October 27, 2010 12:04 PM
256 Chapter 10 Other Activities
Using the Rebuild Files Command
MultiLedger has a built-in command for rebuilding company data files.
We recommend that you use this command if you have deleted a large
number of customers, vendors, items, or transactions, since doing so
compacts the files.
Under some circumstances, the Rebuild Files command can repair
other problems with your company files. If you are experiencing a
problem with your company files, please contact technical support to
ask if the Rebuild Files command can help correct the problem. To see
how to contact technical support, see “How to reach us” on page 4.
To rebuild your company files, do the following:
1
If you don’t have a current backup of your company files, you should
make one now.
For more information on backing up, read Chapter 3, “Backing Up &
Restoring.”
2
In your MultiLedger company files, choose Rebuild Files from the File
menu.
An alert appears to remind you to make a backup of your files.
3
Click Yes to perform the rebuild.
The progress bar will give you an indication of how long this process
will take.
MLManual.book Page 257 Wednesday, October 27, 2010 12:04 PM
Finding Company Files 257
Finding Company Files
MultiLedger includes a command to search your local drives, as well as
any network drives, for sets of company files. The results window displays
the physical location of all found company files, and you can open any
company directly from the results window.
To use the Find feature, choose Find Company from the File menu. When
the search is complete, the results window appears. To see what periods are
open in a company, click the path for that company in the results window
and you can see the open periods in the upper left corner of the Find Files
window. To open a found company, choose the path in the results window
and click Open.
If Find Company is dimmed, a company is already open. Choose Close
Company from the File menu first, then try again. The Find Company
command can take some time to complete, depending on the number and
size of the drives being searched.
Note
Renumbering Accounts
The Renumber Accounts feature is invaluable if you need to transfer
account balances, including all activity for the account, to another account,
with the option to delete the old account. To use the Renumber Accounts, do
the following:
1
Choose Renumber Accounts from the File menu.
2
Highlight the account you want to transfer activity from in the list on the
left.
The account number and name appear in the ‘Change To:’ edit boxes on the
right.
3
Type in the number of the account you want to transfer the activity to, then
press TAB.
If the account number is one that already exists in the chart of accounts, the
name of that account number will automatically be entered into the edit box,
and you can skip to step 5. If it is a new account that does not exist in the
chart of accounts, go to step 4.
4
Type in the name of the new account you want to transfer the activity to.
5
If you want to delete the old account you are transferring account activity
from, check the Delete box.
6
Click Save.
When you click Save, all activity is transferred to the designated account. If
you checked the Delete box, the old account is removed from the Chart of
Accounts.
7
Repeat steps 2-6 to transfer activity for other accounts, if necessary.
MLManual.book Page 258 Wednesday, October 27, 2010 12:04 PM
258 Chapter 10 Other Activities
MLManual.book Page 259 Wednesday, October 27, 2010 12:04 PM
259
Chapter 11 Customer, Vendor &
Item Reports
This chapter explains how to use MultiLedger’s report windows, as
well as the various customer, vendor, and item reports and information
you can get from MultiLedger.
MLManual.book Page 260 Wednesday, October 27, 2010 12:04 PM
260 Chapter 11 Customer, Vendor & Item Reports
Using the Report Windows
MultiLedger offers a variety of reporting options. Most reports can be
viewed on screen, printed, or saved as a text file to be opened in
another application (such as a word processor). You can also print
several different reports with one command on the Print Multiple
window. Individual reports are discussed in detail later in this manual.
If you save a report as a text file (tab-delimited), you can open it from
within a word processor to further customize the format and font
characteristics of the report.
Using the Find Command with Reports
Most report windows allow you to use the Find (Ctrl-F on Windows or
F on Macintosh) and Find Again (Ctrl-G on Windows or G on
Macintosh) commands (under the Edit menu) to find specific
characters in a report on screen. You can also use these commands to
select customer names, vendor names, and items for a report.
You can search for anything that can be entered from your keyboard,
such as account numbers, check numbers, names, amounts, and other
parts of a list or report.
1
Choose Find from the Edit menu.
Or press Ctrl-F on Windows or
appears:
F on Macintosh. The Find dialog box
If the Find command has already been used since starting MultiLedger,
the edit box will show the last characters entered.
2
Enter the characters that you want to search for.
Let’s say that you’re looking for the name “Kelley Hair & Net.” You
could enter “kell”:
MLManual.book Page 261 Wednesday, October 27, 2010 12:04 PM
Using the Report Windows
261
Notice that you don’t have to enter all of the name that you’re looking
for. You can enter just enough to distinguish the name from another
name.
You don’t have to enter upper case letters such as “K” because the
search does not distinguish between upper case (“K”) and lower case
(“k”) characters.
3
Click Find.
Or press ENTER (Windows) or RETURN (Macintosh). MultiLedger starts
at the beginning of the list and looks for the first occurrence of the
characters “kell”. When the characters are found, MultiLedger scrolls
the list and selects (highlights) the first occurrence of the characters
“kell”:
If you were searching for the line containing “kell” on a report, such as
an accounts receivable report, the first line that contains “kell” would
be highlighted:
If the name you are looking for is not selected as the first occurrence,
select Find Again (Ctrl-G on Windows or G on Macintosh) from the
Edit menu. You can continue to select Find Again from the Edit menu
until the name you are looking for is selected or until there are no more
matching selections.
If the characters you entered aren’t found, no line is selected. Choose
Find and enter a different name to search for.
MLManual.book Page 262 Wednesday, October 27, 2010 12:04 PM
262 Chapter 11 Customer, Vendor & Item Reports
Making Selections in a Reports List
Most report windows allow you to select a consecutive series of
accounts, names, or periods from a list box for a report:
You can select a
consecutive series
by clicking and
dragging.
Many reports also allow non-consecutive selections:
You can also select a
non-consecutive series
by holding down the Ctrl
key (Windows), the ??
key (Mac OS X) or SHIFT
key (Mac OS 9)while
clicking each item
If no names are highlighted in a list, all the names will be reported.
Selecting a consecutive series on Windows or Macintosh
•
Drag on a range of lines so that all desired selections are
highlighted.
or
•
Click the first desired line so that it’s highlighted. Then, while
holding down the SHIFT key, click the last line desired. All desired
selections should be highlighted.
Selecting a non-consecutive series on Windows
Click the first desired line so that it’s highlighted. Then, while holding
down the Ctrl key, click the next desired line.
Whenever you can select a non-consecutive series, you can also select
a consecutive series by dragging through all desired lines in the list
box.
Selecting a non-consecutive series on Macintosh
Click the first desired line so that it’s highlighted. Then, while holding
down the
key, click the next desired line.
MLManual.book Page 263 Wednesday, October 27, 2010 12:04 PM
Printing Multiple Reports
263
Whenever you can select a non-consecutive series, you can also select
a consecutive series by dragging through all desired lines in the list
box.
Printing Multiple Reports
You can print more than one report with just one Print command by
using the Print Multiple window under the Reports menu.
Choose Print Multiple from the Reports menu.
The following window appears:
The following types of financial reports can be printed with a single
Print command:
Prints the selected month’s trial balance.
Prints a general ledger listing for the selected month.
Prints a balance sheet for the selected month.
Prints a period and year-to-date income statement for the selected
month.
Prints the selected month’s accounts receivable report, sorted by Due
Date.
Prints the selected month’s accounts payable report, sorted by Due Date.
MLManual.book Page 264 Wednesday, October 27, 2010 12:04 PM
264 Chapter 11 Customer, Vendor & Item Reports
1
Click the appropriate checkboxes to select or deselect reports for
printing.
For details, see the previous descriptions of the types of reports
available.
Any combination of reports can be printed.
2
Select the period for the reports.
3
Click Print.
A standard Print dialog box appears. Select the print options that you
want, and click OK or Print.
Reporting Options
Most reports can be viewed, printed, or saved as a text or .xls file.
If you click View, the report appears on your screen.
You can use the Find command under the Edit menu to find a specific
line in the report (for details, see “Using the Find Command with
Reports” on page 260).
If you click Print, a standard Print dialog box appears. Select the print
options that you want, and click OK or Print.
If you click Text File, a save as dialog appears. If necessary, change
the name of the text file, choose where you want to save it, then click
Save.
If you click .XLS, a save as dialog appears. If necessary, change the
name of the .xls file and choose where you want to save it. Then click
Save. If you choose to open the .xls file in Microsoft Excel, it is
recommended you use the import feature in Excel vs opening the file
directly for better formatting options.
MLManual.book Page 265 Wednesday, October 27, 2010 12:04 PM
Customer Reports
265
Customer Reports
Click Customer Reports in the Command Center.
Select the type of
report you want from
the pull-down menu.
The available options
change, depending
on the report type
you select
Types of Customer Reports
MultiLedger has many different customer reports options. Each report
is described in detail below.
Accounts Receivable Reports
Accounts Receivable
Shows all outstanding invoices and finance charges as of the Cutoff
Date entered. You can sort this report by due date, customer name, or
document number by making the appropriate selection from the pop-up
menu.
Accounts ReceivableAged
Shows outstanding receivables (including any finance charges) in terms
of how long they have been outstanding as of the Cutoff Date entered.
Aging periods can be modified. You can sort this report by due date,
name, or document number by making the appropriate selection from
the pop-up menu.
You can see the Statement Description field, the customer’s phone
number, contact name, and salesperson on this report by checking this
option.
MLManual.book Page 266 Wednesday, October 27, 2010 12:04 PM
266 Chapter 11 Customer, Vendor & Item Reports
Accounts ReceivableSummary Aged
Shows the total amount owed (including any finance charges) by each
customer in terms of how long the receivable has been outstanding as of
the Cutoff Date entered. Aging periods can be modified.
Note
If you select the Accounts Receivable, Aged Accounts Receivable, or
Summary Aged Accounts Receivable report for all of your customers,
MultiLedger will show your accounts receivable detail balance and the
general ledger balance for the Accounts Receivable account that is
selected on the Interface Accounts window as of the Cutoff Date. These
balances appear at the end of the report.
Customer History Reports
Transaction Detail
Shows a list of sales and payments for any open month. You can select
one month or a range of months for this report. Payments made against
invoices using the Customer Payments window show the deposit
number along with the invoice number that was paid.
Transaction Summary
Shows a summary of the total sales and total receipts for each selected
customer for the selected month or range of months.
Invoice Item Detail
Shows a list of items bought by a customer. This report shows the
customer name, the date, invoice number, the item name, the quantity
purchased, and the amount. You can select one month or a range of
months for this report.
MLManual.book Page 267 Wednesday, October 27, 2010 12:04 PM
Customer Reports
267
Customer Information and Mailing Labels
Customer Information
Mailing Labels
Shows the customer name, address information, phone, fax, email
address, website, Reseller ID, ship to addresses, and any notes set up for
the customer.
For printing customer mailing labels. Mailing label dimensions are
defined on the Preferences window under the File menu.
Customer Statements
Customer StatementsOpen Invoices
Shows all of the outstanding invoices and finance charges that a
customer owes in chronological order as of the Cutoff Date entered.
Initially, the Cutoff Date is the current date. Any partial payments
applied to invoices are also shown.
Customer StatementsActivity Based
Shows all of the outstanding invoices and finance charges that a
customer owes, with a running balance for all outstanding amounts.
Payments from the 30 days prior to the Cutoff Date are also shown.
Options for Customer Statements
Print metafile
(Windows) or Print
PDF/PICT File
(Macintosh)
Note
If this option is checked, an Open File dialog box appears after clicking
Print or OK in a Print dialog box for customer statements. This allows
you to select the Metafile or PDF/PICT File for printing.
Use the Format command under the File menu to position where the
customer statement information prints on a page (for details, see
“Customizing Print Field Positions for Your Printer” on page 111).
If a Metafile (Windows) or a PDF/PICT File (Macintosh) is being used
for the customer statement graphics, check the Print Metafile or Print
PDF/PICT File option. To adjust where the various fields print on
customer statements, use the Format command under the File menu. For
more details, see “Positioning Print Fields for Windows Metafiles or
Macintosh PDF or PICT Files” on page 112.
Zero-Balance
Statements
(Activity Based statements only) If this option is checked, Activity
Based Customer Statements that show activity in the 30 days preceding
the Cutoff Date but have zero balances due are printed.
MLManual.book Page 268 Wednesday, October 27, 2010 12:04 PM
268 Chapter 11 Customer, Vendor & Item Reports
Working with Accounts Receivable
Reports
1
Select the customer or customers for the report.
If necessary, scroll the list box to find the name of the customer you
want. You can also use the Find command under the Edit menu to
select a customer from a long list (for details, see “Using the Find
Command with Reports” on page 260).
You can select a consecutive or non-consecutive series of customers
from the list (see “Making Selections in a Reports List” on page 262).
If no customer names are highlighted, all customers will be reported.
If you have set up codes for your customers and would like those codes
to appear on reports, check the Show Code Field on Reports option on
the Preferences window under the File menu.
2
Select a report type from the pop-up menu.
For details, see the previous descriptions of the types of accounts
receivable reports available.
3
Change the Cutoff Date if necessary.
When you open the Customers window, the Cutoff Date is
automatically filled in with the current date:
The Cutoff Date determines the last date that will be reported for
Accounts Receivable, Aged Accounts Receivable, and Summary Aged
Accounts Receivable reports. By changing this date, you can create a
report that shows what invoices were outstanding up until an earlier
date. For example, if you want a report that shows outstanding
receivables at the end of last month, change the Cutoff Date to the last
day of that month.
Aging Periods
4
If you are creating an aged accounts receivable report (Aged or
Summary Aged), do the following. Otherwise, skip this step.
To help you identify possible bad debts, you can specify how
MultiLedger will age your receivables by editing the following
numbers of days:
If necessary, change
the number of days in
these edit boxes
MLManual.book Page 269 Wednesday, October 27, 2010 12:04 PM
Customer Reports
269
Double-click an edit box, change the number, and press TAB to see the
date change. (If you don’t press TAB after changing an aging period,
the aging date will not change. However, the report will reflect the
change in the number of days.)
If you do not have zero as your first aging period, there will be no
“Current” column on the report.
The aging reports show invoices as past due beginning one day after
the due date. This due date is determined by the invoice date plus the
number entered for Days til Due for that particular term as set up on
the Customer Terms window under the Setup menu. For details about
terms, see “Customer Terms” on page 62.
5
Click View, Print, or Text File.
Accounts Receivable report example:
The Due Dates are
based on Customer
Terms you set up
The report total and the total for the
Accounts Receivable account plus
any Finance Charges should agree
Accounts Receivable
account plus Finance
Charges
Report total
MLManual.book Page 270 Wednesday, October 27, 2010 12:04 PM
270 Chapter 11 Customer, Vendor & Item Reports
Accounts Receivable-Aged report example:
Each invoice is
categorized based on how
many days it is past due
The report total and the total for the
Accounts Receivable account plus
any Finance Charges should agree
Accounts Receivable
account plus Finance
Charges
Report total
MLManual.book Page 271 Wednesday, October 27, 2010 12:04 PM
Customer Reports
271
Accounts Receivable-Summary Aged report example:
Outstanding amounts for each customer are
shown based on the defined aging periods
The report total and the total for the
Accounts Receivable account plus
any Finance Charges should agree
Note
Accounts Receivable
account plus Finance
Charges
Report total
Finance charges listed on the report can cause the balances to disagree
because finance charges are included in the report total, but not in the
G/L accounts receivable balance. The total for finance charges is shown
below the accounts receivable balance. The finance charges total plus
the accounts receivable balance should equal the report total.
Working with Customer History Reports
1
Select the customer or customers.
If necessary, scroll the list box to find the name of the customer you
want. You can also use the Find command under the Edit menu to
select a customer from a long list (for details, see “Using the Find
Command with Reports” on page 260).
You can select a consecutive or non-consecutive series of customers
from the list (see “Making Selections in a Reports List” on page 262).
If no customer names are highlighted, all customers will be reported.
If you have set up codes for your customers and would like those codes
to appear on reports, check the Show Code Field on Reports option on
the Preferences window under the File menu.
MLManual.book Page 272 Wednesday, October 27, 2010 12:04 PM
272 Chapter 11 Customer, Vendor & Item Reports
2
Select Transaction Detail, Transaction Summary, or Invoice Item
Detail.
For details, see the previous descriptions of the types of customer
history reports available.
3
Select a month or range of months.
4
Click View, Print, or Text File.
Transaction Detail report example:
Total sales and total
receipts for the
selected month(s) are
shown for each
customer
Total sales and receipts for all customers
are shown at the bottom of the report.
Transaction Summary report example:
Total sales and receipts are shown as oneline summaries per customer for the
selected month(s)
MLManual.book Page 273 Wednesday, October 27, 2010 12:04 PM
Customer Reports
273
Invoice Item Detail report example:
Item name, quantity,
and purchase
amount are shown
by invoice for the
selected customers
Working with the Customer Information
Report
1
Select the customer or customers.
If necessary, scroll the list box to find the name of the customer you
want. You can also use the Find command under the Edit menu to
select a customer from a long list (for details, see “Using the Find
Command with Reports” on page 260).
You can select a consecutive or non-consecutive series of customers
from the list (see “Making Selections in a Reports List” on page 262).
If no customer names are highlighted, all customers will be reported.
If you have set up codes for your customers and would like those codes
to appear on reports, check the Show Code Field on Reports option on
the Preferences window under the File menu.
2
Select Customer Information.
For details, see the previous description of the Customer Information
report.
3
Click View, Print, or Text File.
MLManual.book Page 274 Wednesday, October 27, 2010 12:04 PM
274 Chapter 11 Customer, Vendor & Item Reports
Customer Information report example:
This information
comes from the
Customer Setup
window
This information
comes from Ship To
addresses set up on
the Customer
Invoices window
Working with Customer Statements
1
Select the customer or customers.
If necessary, scroll the list box to find the name of the customer you
want. You can also use the Find command under the Edit menu to
select a customer from a long list (for details, see “Using the Find
Command with Reports” on page 260).
You can select a consecutive or non-consecutive series of customers
from the list (see “Making Selections in a Reports List” on page 262).
If no customer names are highlighted, statements for all customers will
be reported.
If you have set up codes for your customers and would like those codes
to appear on reports, check the Show Code Field on Reports option on
the Preferences window under the File menu.
2
Select either Customer Statements-Open Invoices or Customer
Statements-Activity Based.
For details, see the previous descriptions of the Customer Statements.
3
Click View, Print, or Text File.
MLManual.book Page 275 Wednesday, October 27, 2010 12:04 PM
Customer Reports
Customer Statement-Open Invoices example:
All outstanding
invoices prior to the
Cutoff Date are
shown, as well as any
partial payments to
invoices
275
MLManual.book Page 276 Wednesday, October 27, 2010 12:04 PM
276 Chapter 11 Customer, Vendor & Item Reports
Customer Statement-Activity Based example:
All outstanding invoices
and finance charges
are shown, with a
running balance for all
outstanding amounts.
Payments from the 30
days prior to the Cutoff
Date are also shown.
If the customer has had
activity in the 30 days
preceding the Cutoff
Date but has a zero
balance due, no
statement will print
unless the ZeroBalance Statements
option is checked.
MLManual.book Page 277 Wednesday, October 27, 2010 12:04 PM
Vendor Reports
277
Vendor Reports
Click Vendor Reports in the Command Center.
Select the type of
report you want from
the pull-down menu.
The available options
change, depending
on the report type
you select
Types of Vendor Reports
MultiLedger has many different vendor reports options. Each report is
described in detail below.
Accounts Payable Reports
Accounts Payable
Shows all outstanding payables as of the Cutoff Date entered. You can
sort this report by due date, vendor name, or document number by
making the appropriate selection from the pop-up menu.
Accounts PayableAged
Shows outstanding payables by invoice in terms of how long they have
been outstanding as of the Cutoff Date entered. Aging periods can be
modified. You can sort this report by due date, name, or document
number by making the appropriate selection from the pop-up menu.
Accounts PayableSummary Aged
Shows the total amount owed to each vendor in terms of how long the
payable has been outstanding as of the Cutoff Date entered. Aging
periods can be modified.
MLManual.book Page 278 Wednesday, October 27, 2010 12:04 PM
278 Chapter 11 Customer, Vendor & Item Reports
Note
If you select the Accounts Payable, Aged Accounts Payable, or
Summary Aged Accounts Payable report for all of your vendors,
MultiLedger will show your accounts payable detail balance and the
general ledger balance for the Accounts Payable account that is selected
on the Interface Accounts window as of the Cutoff Date. These balances
appear at the end of the report.
Vendor History Reports
Transaction Detail
Shows a list of payables and payments in the 30 open months. You can
select one month or a range of months for this report. Payments made
against invoices using the Vendor Payments window show the check
number along with the document number that was paid.
Transaction Summary
Shows a list of the total payables and total disbursements for each
selected vendor for the selected month or range of months.
Item Purchase Detail
Shows a list of items bought from a vendor. This report shows the
vendor name, the date, document number, the item name, the quantity
purchased, and the amount. You can select one month or a range of
months for this report.
Vendor Information and Mailing Labels
Vendor Information
Mailing Labels
Shows the vendor name, address information, phone, fax, email
address, website, Tax ID, and any notes set up for the vendor.
For printing vendor mailing labels. Mailing label dimensions are
defined on Preferences under the File menu.
1099s
1099s
Selecting any of the 1099 or 1096 options will automatically highlight
any vendors who have the 1099 option checked on the Vendor Setup
window. For more information on printing 1099s, see “Printing 1099s”
on page 286.
Working with Accounts Payable Reports
1
Select the vendor or vendors.
If necessary, scroll the list box to find the name of the vendor you
want. You can also use the Find command under the Edit menu to
select a specific vendor name from list (for details, see “Using the Find
Command with Reports” on page 260).
You can select a consecutive or non-consecutive series of vendors
from the list (see “Making Selections in a Reports List” on page 262).
MLManual.book Page 279 Wednesday, October 27, 2010 12:04 PM
Vendor Reports
279
If no vendor names are selected (highlighted), all vendors will be
reported.
If you have set up codes for your vendors and would like those codes
to appear on reports, check the Show Code Field on Reports option on
Preferences under the File menu.
2
Select Accounts Payable, Accounts Payable-Aged or Accounts PayableSummary Aged from the pull-down menu.
For details, see the previous descriptions of the types of accounts
payable reports available.
3
Change the Cutoff Date if necessary.
When you open the Vendors window, the Cutoff Date is automatically
filled in with the current date.
The Cutoff Date determines the last date that will be reported. By
changing this date, you can create a report that shows what invoices
were outstanding up until an earlier date. For example, if you want a
report that shows outstanding payables at the end of last month, change
the Cutoff Date to the last day of that month.
Aging Periods
4
If you are creating an aged accounts payable report (Aged or Summary
Aged), do the following. Otherwise, skip this step.
You can specify how MultiLedger will age your payables by editing
the following numbers of days:
If necessary, change
the number of days in
these edit boxes
Double-click an edit box, change the number of days, and press TAB to
see the date change. (If you don’t press TAB after changing an aging
period, the aging date will not change. However, the report will reflect
the change in the number of days.)
If you do not have zero as your first aging period, there will be no
“Current” column on the report.
5
Click View, Print, or Text File.
MLManual.book Page 280 Wednesday, October 27, 2010 12:04 PM
280 Chapter 11 Customer, Vendor & Item Reports
Accounts Payable report example:
The report total and the total for the
Accounts Payable account should agree
Report total
MLManual.book Page 281 Wednesday, October 27, 2010 12:04 PM
Vendor Reports
Accounts Payable-Aged report example:
Each invoice is
categorized based on how
many days it is past due
The report total and the total for the
Accounts Payable account should agree
Report total
281
MLManual.book Page 282 Wednesday, October 27, 2010 12:04 PM
282 Chapter 11 Customer, Vendor & Item Reports
Accounts Payable-Summary Aged report example:
Outstanding amounts for each vendor are
shown based on the defined aging periods
The report total and the total for the
Accounts Payable account should agree
Report total
Working with Vendor History Reports
1
Select the vendor or vendors.
If necessary, scroll the list box to find the name of the vendor you
want. You can also use the Find command under the Edit menu to
select a vendor from a long list (for details, see “Using the Find
Command with Reports” on page 260).
You can select a consecutive or non-consecutive series of vendors
from the list (see “Making Selections in a Reports List” on page 262).
If no customer names are highlighted, all vendors will be reported.
If you have set up codes for your vendors and would like those codes
to appear on reports, check the Show Code Field on Reports option on
Preferences under the File menu.
2
Select Transaction Detail, Transaction Summary, or Item Purchase
Detail from the pull-down menu.
For details, see the previous descriptions of the types of vendor history
reports available.
3
Select a month or range of months.
4
Click View, Print, or Text File.
MLManual.book Page 283 Wednesday, October 27, 2010 12:04 PM
Vendor Reports
Transaction Detail report example:
Total payables and
total disbursements for
the selected month(s)
are shown for each
vendor
Total payables and disbursements for all
selected vendors are shown at the
bottom of the report.
Transaction Summary report example:
Total payables
and disbursements are shown as one-line
summaries per vendor for the selected
283
MLManual.book Page 284 Wednesday, October 27, 2010 12:04 PM
284 Chapter 11 Customer, Vendor & Item Reports
Item Purchase Detail report example:
Item name, quantity,
and amount are
shown by invoice for
the selected vendors
Working with the Vendor Information
Report
1
Select the vendor or vendors.
If necessary, scroll the list box to find the name of the vendor you
want. You can also use the Find command under the Edit menu to
select a vendor from a long list (for details, see “Using the Find
Command with Reports” on page 260).
You can select a consecutive or non-consecutive series of vendors
from the list (see “Making Selections in a Reports List” on page 262).
If no vendor names are highlighted, all vendors will be reported.
If you have set up codes for your vendors and would like those codes
to appear on reports, check the Show Code Field on Reports option on
Preferences under the File menu.
2
Select Vendor Information from the pull-down menu.
For details, see the previous description of the Vendor Information
report.
3
Click View, Print, or Text File.
MLManual.book Page 285 Wednesday, October 27, 2010 12:04 PM
Vendor Reports
285
Vendor Information report example:
The information for
this report comes
from the Vendor
Setup window
Working with 1099s
MultiLedger will print 1099-Misc Income forms for your vendors on
preprinted and blank forms OR allow you to file your 1099-M
electronically using the IRS’ FIRE system.
Verifying 1099 Information
Before you print 1099s for your vendors, you should first verify that
your company information, including company name, address, and
Federal and state ID numbers, are correct. You can see this information
by viewing the 1099 report. If any information is incorrect, you can
make changes on the Company Information window.
On this same report you can verify information for your vendors. If any
information is incorrect, you can make changes on the Vendor Setup
window using the following instructions:
1
Click Vendor Setup in the Command Center.
2
Highlight a vendor for whom you’ll be printing a 1099 in the list on the
right.
3
Make sure that the 1099 Vendor option is checked, the Tax ID number
for the vendor is correct, and that the correct 1099 category is selected.
You can adjust the amount that is reported on a vendor’s 1099. A 1099
should report payments to a vendor from January through December. If
you need to make adjustments, then you’ll need to manually enter the
difference in the 1099 Adjust edit box on Vendor Setup.
4
If you make any changes, be sure to click Save before closing the
window or selecting another vendor.
MLManual.book Page 286 Wednesday, October 27, 2010 12:04 PM
286 Chapter 11 Customer, Vendor & Item Reports
5
Repeat these steps for each vendor who needs a 1099.
Printing 1099s
After you’ve verified that the information for your vendors is correct,
you’re ready to print the 1099s.
Important
Copy A of the 1099 and the 1096 must be printed on the preprinted Red
copy of the form to be filed with the IRS. The remaining copies of the
1099 to be sent to your vendors and your file copies, can be printed on
the 4-up blank forms. Or you can print all copies of the preprinted
forms. If printing on preprinted forms, see Note below.
Note
Before you print 1099s for all of your 1099 vendors, you should print a
sample 1099 on blank paper to test the alignment. If the alignment is not
correct, you can make changes to the 1099 format. For information on
formatting 1099s, see “Customizing Print Field Positions for Your
Printer” on page 111.
Printing 1099s on Preprinted Forms
1
Click Vendor Reports in the Command Center.
2
Select 1099 Preprinted Form from the pull-down menu.
All vendors you have designated as 1099 Vendors on the Vendor Setup
window are selected automatically. You can select or deselect vendors
by holding down the Ctrl key (Windows), key (Macintosh) while
clicking a vendor’s name.
3
Select the Year.
MultiLedger calculates the year-to-date payments to a vendor for the
year you have selected.
4
If necessary, select checkbox to Omit if under $600
If you have vendors marked as 1099 Vendors, but you have paid them
less than $600 for the calendar year, you can click this option so a 1099
doesn’t print.
5
If necessary, select the checkbox to use Adjust Value.
If you have entered a 1099 Adjust amount in the Vendor setup window
that should be included on the 1099s, click this option
MLManual.book Page 287 Wednesday, October 27, 2010 12:04 PM
Vendor Reports
6
287
Click Print.
If the alignment is correct, you are ready to print 1099s for all of your
1099 vendors.
If the alignment is not correct, see “Customizing Print Field Positions
for Your Printer” on page 111.
Printing 1096s on Preprinted Forms
1
Click Vendor Reports in the Command Center.
2
Select 1096 Preprinted Form from the pull-down menu.
All vendors you have designated as 1099 Vendors on the Vendor Setup
window are selected automatically. You can select or deselect vendors
by holding down the Ctrl key (Windows), or the Command key
(Macintosh) while clicking the vendor’s name.
3
Select the Year.
MultiLedger calculates the year-to-date payments to a vendor for the
year you’ve selected.
4
If necessary, select checkbox to Omit if under $600.
If you have vendors marked as 1099 Vendors, but you have paid them
less than $600 for the calendar year, you can click this option so a 1099
doesn’t print.
5
If necessary, select check to Use Adjust Value.
If you have entered a 1099 Adjust amount in the Vendor setup window
that should be included on the 1099s, click this option.
6
Click Print.
If the alignment is correct, you are ready to print the 1096.
If the alignment is not correct, see “Formatting Checks, Invoices,
Statements, 1099s & Deposits” on page 110.
Printing 1096 File Copy
This form is strictly for your files and cannot be submitted to the IRS
with the 1099s.
Follow the same procedures as the Preprinted 1096, but use plain white
paper instead of the preprinted forms.
MLManual.book Page 288 Wednesday, October 27, 2010 12:04 PM
288 Chapter 11 Customer, Vendor & Item Reports
Printing 1099s on 4up Blank Forms
1
Click Vendor Reports in the Command Center.
2
Select 4 Up Blank 1099 from the pull-down menu.
All vendors you have designated as 1099 Vendors on the Vendor Setup
window are selected automatically. You can select or deselect vendors
by holding down the Ctrl key (Windows) or Command key
(Macintosh) while clicking the vendor’s name.
3
Select the Year.
MultiLedger calculates the year-to-date payments to a vendor for the
year you have selected.
4
If necessary, select checkbox to Omit if under $600.
If you have vendors marked as 1099 Vendors, but you have paid them
less than $600 for the calendar year, you can click this option so a 1099
doesn’t print.
5
If necessary, select checkbox to Use Adjust Value.
If you have entered a 1099 Adjust amount in the Vendor setup window
that should be included on the 1099s, click this option.
6
Click Print
E-Filing your 1099s using the IRS FIRE System
Note
Any filer who files 250 or more 1099-Misc Forms for any calendar year
must file their Information Returns electronically. However, if you have
less than 250, the IRS encourages you to file these returns
electronically. For more information on how to participate, please refer
to IRS Publication 3609. You will need to send a completed form 4419
to the IRS before the due date of the returns for current year processing
before being allowed to participate.
1
Click Vendor Reports in the Command Center.
2
Select 1099 E-File from the pull-down menu.
All vendors you have designated as 1099 Vendors on the Vendor Setup
window are selected automatically. You can select or deselect vendors
by holding down the Ctrl key (Windows) or Command key
(Macintosh) while clicking the vendor’s name.
3
Select the Year.
MultiLedger calculates the year-to-date payments to a vendor for the
year you have selected.
MLManual.book Page 289 Wednesday, October 27, 2010 12:04 PM
Vendor Reports
4
289
If necessary, select checkbox to Omit if under $600.
If you have vendors marked as 1099 Vendors, but you have paid them
less than $600 for the calendar year,, you can click this option so a
1099 doesn’t print.
5
If necessary, select checkbox to Use Adjust Value.
If you have entered a 1099 Adjust amount in the Vendor setup window
that should be included on the 1099s, click this option.
6
If necessary, select checkbox for Test File.
If you wish to send a test file, click this checkbox.
Note
There is no requirement to submit test files, however, the IRS highly
recommends it for first time electronic filers. Electronic test files can
only be transmitted from November 1st through February 15th. Please
refer to IRS Publication 3609 for further information.
7
Note
Click Text File.
Contact Name, Phone number and Email address need to be setup in the
Company Information screen. Contact Name and Phone number are
required fields for efiling.
Fill in any appropriate information in the TIN, TCC and Transmitter
fields and click OK.
This creates a text file with the default name 1099’s. This is the file
you will upload to the IRS FIRE system.
MLManual.book Page 290 Wednesday, October 27, 2010 12:04 PM
290 Chapter 11 Customer, Vendor & Item Reports
Item Reports
MultiLedger provides the following types of item reports:
Sales Summary
This report shows the item name, quantity sold, total sales price, total
cost, and the margin, with combined totals for all reported items. You
can select one month or a range of months for this report.
Sales Detail
This report shows the invoice date, document number, customer name,
quantity sold, sales price, total cost, and the margin, with a subtotal of
all invoices for each reported item. Combined totals for all selected
items are shown at the bottom of the report. You can select one month
or a range of months for this report.
Purchase Summary
This report shows the item name, quantity purchased, unit cost, and total
cost with combined totals for all reported items. Combined totals for all
selected items are shown at the bottom of the report. You can select one
month or a range of months for this report.
Purchase Detail
This report shows the date, document number, vendor name, quantity
purchased, unit cost, and total cost, with a subtotal of all Item Purchases
for each reported item. Combined totals for all selected items are shown
at the bottom of the report. You can select one month or a range of
months for this report.
Inventory-Current
This report shows the item name, quantity on hand, unit cost, and
current total cost. This report always shows the current inventory
values, regardless of the month selected in the Month list. The general
ledger balance for the inventory account selected on Interface Accounts
is shown at the end of the report when all items are reported. This is
handy for verifying that your inventory general ledger balance and
inventory detail amounts are in balance.
Inventory-Selected
date
This report shows inventory values as of a month-end date. It shows the
item name, quantity on hand, unit cost, and total cost as of the last day
of the last selected month. The general ledger balance for the inventory
account selected on Interface Accounts is shown at the end of the report
when all items are reported. This is handy for verifying that your
inventory general ledger balance and inventory detail amounts are in
balance.
Price List
This report shows your item list and the three different selling prices for
each item.
Graph Sales $
This report gives you a bar chart that graphs an item’s sales volume by
month for the current year. This report shows one item at a time and all
months are reported regardless of the month selected in the list box.
Graph Sales Qty
This report gives you a bar chart that graphs an item’s quantity sold by
month for the current year. This report shows one item at a time and all
months are reported regardless of the month selected in the list box.
MLManual.book Page 291 Wednesday, October 27, 2010 12:04 PM
Item Report Options
291
Item Report Options
Omit if zero QOH
When this option is selected, the reports will not include any items that
have a zero Quantity on Hand.
Include Non-Inventory
Qty Only
When this option is selected, the reports will include items that are
marked as Non-Inventory in the Item setup window.
When this option is selected, the Current Inventory report will show the
Quantity on Hand, Minimum Quantity on Hand, and Reorder Quantity.
Working with Item Reports
Click Item Reports in the Command Center.
1
Select the item or items.
If necessary, scroll the list box to find the item that you want. You can also
use the Find command to select a specific item name from the item list (see
“Using the Find Command with Reports” on page 260).
You can select a consecutive or non-consecutive series of items from the
list (for details, see “Making Selections in a Reports List” on page 262).
If no items are selected, all items will be reported.
If you have set up codes for your items and would like those codes to
appear on reports, check the Show Code Field on Reports option on
Preferences under the File menu.
MLManual.book Page 292 Wednesday, October 27, 2010 12:04 PM
292 Chapter 11 Customer, Vendor & Item Reports
2
Select a report type from the pull-down menu.
For details, see the previous descriptions of the types of item reports
available.
3
Click View, Print, or Text File.
Sales Summary report example:
Each item is shown,
along with quantity
sold, sales amount,
cost, and margin for
the selected months
Combined totals for all selected items
are shown here
MLManual.book Page 293 Wednesday, October 27, 2010 12:04 PM
Item Report Options
293
Sales Detail report example:
Item sales are
shown by invoice,
including the
quantity sold,
sales amount,
cost, and margin
Subtotals are shown after
each item
Combined totals for all selected
items are shown here
Purchase Summary report example:
Each item is
shown, along with
quantity
purchased, unit
cost, and total cost
for the selected
months
Combined totals for all selected items
are shown here
MLManual.book Page 294 Wednesday, October 27, 2010 12:04 PM
294 Chapter 11 Customer, Vendor & Item Reports
Purchase Detail report example:
Item Purchases are
shown by invoice,
including the
quantity purchased,
unit cost, and total
cost
Subtotals are shown after each
item
Combined totals for all selected
items are shown here
Inventory-current report example:
The report total and the total for the
Inventory ledger account should agree
Report total
MLManual.book Page 295 Wednesday, October 27, 2010 12:04 PM
Item Report Options
Inventory-selected date report example:
The report total and the total for the
Inventory ledger account should agree
Price List example:
Each item is shown,
along with the three
different selling
prices
Report total
295
MLManual.book Page 296 Wednesday, October 27, 2010 12:04 PM
296 Chapter 11 Customer, Vendor & Item Reports
MLManual.book Page 297 Wednesday, October 27, 2010 12:04 PM
297
Chapter 12 Financial & Other
Reports
This chapter contains descriptions and examples of the following types
of reports:
•
Chart of accounts
•
Trial Balance
•
Transaction journals
•
General Ledger
•
Balance Sheet
•
Income Statement
•
Cash Flow Statement
•
Financial Snapshot
•
Sales tax report
•
Salesperson report
•
Job reports
MLManual.book Page 298 Wednesday, October 27, 2010 12:04 PM
298 Chapter 12 Financial & Other Reports
Chart of Accounts Reports
The Chart of Accounts report window offers the following options:
Note
•
Print a list of your chart of accounts.
•
Print or view a graph showing period comparisons.
•
Print or view a graph showing account balances versus budget
amounts.
If you want to look at account balances for a specific period, see “Trial
Balance Report” on page 301.
Click Account Reports in the Command Center.
When you first open the Chart of Accounts window, the Graph and
Print Graph buttons are dimmed. These buttons remain dimmed until
you select accounts.
MLManual.book Page 299 Wednesday, October 27, 2010 12:04 PM
Chart of Accounts Reports
299
Printing Your Chart of Accounts
You can print a list of the chart of accounts showing account numbers
and names grouped under headings. All accounts, regardless of any
accounts highlighted, are reported.
To change account descriptions, see “Setting Up the Chart of
Accounts” on page 23. To change account groupings or group
descriptions, see “Customizing Financial Statements” on page 95.
Click the Print button to print your chart of accounts.
A standard print dialog box appears on your screen. Select the print
options that you want, and click Print or OK.
Graphing Comparisons
You can print or view a bar graph comparing a balance for an account
or a range of accounts for each period in the open accounting periods.
1
Select the account or accounts to be reported.
If necessary, scroll the list box to find the name of the account or
accounts.
You can select a consecutive series of accounts (for details, see
“Making Selections in a Reports List” on page 262.)
2
Click Graph or Print Graph.
If you click Graph, the report appears on your screen.
If you click Print Graph, a standard Print dialog box appears on your
screen. Select the print options that you want, and then click OK or
Print.
Here’s an example graph showing a cash account’s comparative
balances:
MLManual.book Page 300 Wednesday, October 27, 2010 12:04 PM
300 Chapter 12 Financial & Other Reports
Graphing Account Balances versus
Budget Amounts
If budget amounts have been set up for your chart of accounts, you can
print or view a bar graph comparing a balance for an account or a range
of accounts for each period versus budget amounts in the open
accounting periods.
To set up budget amounts, see “Setting Up Budget Amounts” on
page 84.
1
Select the account or accounts to be reported.
If necessary, scroll the list to find the name or names of the account or
accounts that you want. You can select a consecutive series of accounts
(for details, see “Making Selections in a Reports List” on page 262).
2
Check the Actual vs Budget check box.
3
Select the year.
4
Click Graph or Print Graph.
MLManual.book Page 301 Wednesday, October 27, 2010 12:04 PM
Trial Balance Report
301
Trial Balance Report
A trial balance report shows ledger accounts, their beginning balances
(optional), their monthly activity and their year-to-date balances, and
whether or not your debits equal your credits. Debits should equal
credits for your books to balance.
You can use a trial balance report to quickly look at your account
balances for a particular period.
1
Click Trial Balance in the Command Center.
2
Select a period for the report.
Only one period can be selected at a time. The default period selected
corresponds to the last month in which transactions were entered.
3
If necessary, check the option Show Zero Balances.
If Show Zero Balances is checked, the report will show balances for all
accounts in your chart of accounts, including those with zero activity
and zero year-to-date balances.
4
If desired, check the option Show Beginning Balances.
If checked, the report will show the beginning balances for the period
selected along with monthly activity and YTD balances.
5
Click View, Print, or Text File.
MLManual.book Page 302 Wednesday, October 27, 2010 12:04 PM
302 Chapter 12 Financial & Other Reports
Drill Down on Trial Balance Report
The Trial Balance report has a drill-down function that allows you to
quickly see the general ledger listing for any amount in the Monthly
Activity column on a Trial Balance report. To utilize the drill-down
capabilities, do the following:
1
While viewing a Trial Balance report, move the pointer over the
Monthly Activity column.
The pointer tool changes to a magnifying glass tool.
2
With the magnifying glass tool, click on the amount in the Monthly
Activity column that you want to see in drill-down mode.
A General Ledger listing for that specific month and account appears.
From this General Ledger listing you can go directly to an original
transaction. For more details, see “Drill Down on General Ledger
Report” on page 310.
3
To return to the Trial Balance report, click the General Ledger report’s
close box.
Prior Year Income
If you have 2007, 2008, & 2009 open in your files, 2007 is considered
your current year. You need to keep 2007 open in order to get Prior
Year comparison reports for 2007 vs 2008.
Because you haven't closed 2007, your income and expenses for 2007
haven't rolled into retained earnings yet in the General Ledger or Trial
Balance. So when you look at your trial balance for 2008, it shows the
retained earnings from 2007 as a separate line at the bottom under the
totals in "Prior Income".
As long as the Ledger Debit line equals the total of the Ledger Credit
+/- the Prior Income, then you are in balance.
If you look at the Balance Sheet, it reflects the amount going into
Retained Earnings.
MLManual.book Page 303 Wednesday, October 27, 2010 12:04 PM
Trial Balance Report
Trial Balance report example:
Amounts with
parentheses are
credits.
Amounts without
parentheses are
debits
Debits and credits
should balance or
credits plus prior
income should
equal debits
303
MLManual.book Page 304 Wednesday, October 27, 2010 12:04 PM
304 Chapter 12 Financial & Other Reports
Transaction Journals Reports
You can view, print or create a text file of any journal from any of the
open months. You can also export any journal from any of the open
months using the Export command under the File Menu.
Click Transaction Journals in the Command Center.
The default month
selected on this window
corresponds to the last
month transactions were
entered
Sorting Transaction Journal Reports
You can sort Transaction Journal reports by date or by document
number. The default selection is by document number. To change the
sort, simply make a selection from the pop-up menu.
MLManual.book Page 305 Wednesday, October 27, 2010 12:04 PM
Transaction Journals Reports
305
Types of Transaction Journal Reports
MultiLedger provides the following types of transaction journal
reports:
Disbursements
Receipts
Shows transactions recorded in both Vendor Payments and
Disbursements Journal for the selected month(s).
Shows transactions recorded in both Customer Payments and Receipts
Journal for the selected month(s).
General
Shows transactions recorded in both General Journal and Adjust
Inventory for the selected month(s).
Item Purchases &
Payables
Shows transactions created in both Item Purchases and Payables
Journal for the selected month(s).
Customer Invoices &
Sales
Shows transactions created in both Customer Invoices and Sales
Journal for the selected month(s).
Purchase Orders
Shows transactions created with the Purchase Order option checked in
Item Purchases for the selected month(s).
Quotes
Shows transactions created with the Quote option checked in Customer
Invoices and Sales Journal for the selected month(s).
Last Used Recurring
Entries
If checked, the last-used recurring entries for the selected journal
appear regardless of the month selected. The Last Used Recurring
Entries check box is dimmed when either the Purchase Orders or
Quotes radio buttons is selected.
MLManual.book Page 306 Wednesday, October 27, 2010 12:04 PM
306 Chapter 12 Financial & Other Reports
Working with Transaction Journal Reports
1
Select the desired month or months for the report.
2
Select a journal by clicking the journal name.
When a journal radio button is clicked, a list of documents from the
selected month(s) is shown for that journal.
MLManual.book Page 307 Wednesday, October 27, 2010 12:04 PM
Transaction Journals Reports
3
307
Select the document or documents for the report.
If necessary, scroll the list to find the document you want. Or use the
Find command under the Edit menu. (see “Using the Find Command
with Reports” on page 260.)
You can select a consecutive or non-consecutive series of documents
(see “Making Selections in a Reports List” on page 262).
If no documents are selected, all documents for that journal and period
will be reported.
4
Click View, Print or Text File.
Transaction Journal report example:
A summary of all accounts
affected and total debits and
credits appear at the bottom of
the report
MLManual.book Page 308 Wednesday, October 27, 2010 12:04 PM
308 Chapter 12 Financial & Other Reports
Drill Down on Transaction Journal Reports
Transaction Journal reports have a drill-down function that allows you
to quickly move to an original transaction to see details or make
modifications. To utilize the drill-down capabilities, do the following:
1
While viewing a Transaction Journal report, move the pointer over the
document number of the desired transaction.
The pointer tool changes to a magnifying glass tool.
2
With the magnifying glass tool, click on the transaction you want to see
in drill-down mode.
The transaction journal used to create the original transaction opens
and the transaction appears. You can modify the transaction if
necessary. For more details on modifying transactions, see “Modifying
or Deleting a Transaction” on page 127. After you modify the
transaction, open report windows need to be refreshed by closing the
report window and reopening it before the modified transaction will
appear.
3
To return to the Transaction Journal report, either click Save, then
close the transaction window or click the transaction window’s close
box. You can also choose the report from the Windows menu.
If you close the transaction window without making changes or
without saving any changes you have made, a Save Changes message
appears. If you click Yes, you return to the transaction window. Click
Save, then close the transaction window; you then return to the
Transaction Journal report window. If you click No, you return to the
Transaction Journal report window.
MLManual.book Page 309 Wednesday, October 27, 2010 12:04 PM
General Ledger Reports
309
General Ledger Reports
A General Ledger report shows the General Ledger accounts with their
detailed activity for selected months. You can also create year-to-date
reports. If you only want ending balances and not the daily details,
create a trial balance report (see “Trial Balance Reports” earlier in this
chapter).
1
Click General Ledger in the Command Center.
2
Select the account or accounts for the report.
If necessary, scroll the list to find the name of the account you want.
You can select a consecutive or non-consecutive series of accounts
(see “Making Selections in a Reports List” on page 262).
If no accounts are selected, all accounts will be reported.
3
Select a period for the report.
You can select a consecutive series of months (see “Making Selections in a
Reports List” on page 262).
You can create a year-to-date General Ledger report by selecting all the
periods from the beginning of the year through the last month of the year.
MLManual.book Page 310 Wednesday, October 27, 2010 12:04 PM
310 Chapter 12 Financial & Other Reports
4
If necessary, select one or more Profit Centers.
If you select one or more Profit Centers, then just the accounts that
have been set up for those Profit Centers will be reported.
5
If necessary, select Omit Customer/Vendor Name
If you select the checkbox to Omit Customer/Vendor Name, that
column will not show on report.
6
Click View, Print, or Text File.
Drill Down on General Ledger Report
The General Ledger report has a drill-down function that allows you to
quickly move to an original transaction to see details or make
modifications. To utilize the drill-down capabilities, do the following:
1
While viewing a General Ledger report, move the pointer over the
desired transaction.
The pointer tool changes to a magnifying glass tool.
2
With the magnifying glass tool, click on the transaction you want to see
in drill-down mode.
The transaction journal that was used to create the original transaction
opens and the transaction appears. You can modify the transaction if
necessary. For more details on modifying transactions, see “Modifying
or Deleting a Transaction” on page 127. After you modify the
transaction, open report windows need to be refreshed by closing the
report window and reopening it before the modified transaction will
appear.
3
To return to the General Ledger report, either click Save, then close
the transaction window or click the transaction window’s close box.
You can also choose General Ledger from the Windows menu.
If you close the transaction window without making changes or
without saving any changes you have made, a Save Changes message
appears. If you click Yes, you return to the transaction window. Click
Save, then close the transaction window; you then return to the General
Ledger report window. If you click No, you return to the General
Ledger report window.
MLManual.book Page 311 Wednesday, October 27, 2010 12:04 PM
General Ledger Reports
311
General Ledger report example:
Journal initial
The beginning
balance of the
account being
reported
The debit and credit totals
are shown, and the
difference is shown here
The ending balance for
the account, based on the
month(s) being reported,
is shown here
MLManual.book Page 312 Wednesday, October 27, 2010 12:04 PM
312 Chapter 12 Financial & Other Reports
The J column on the General Ledger report shows the initial of the
journal that was used to create the transaction. The journal initials
represent the following:
D
Transactions created in the Disbursements Journal or Vendor Payments.
P
Transactions created in Item Purchases or the Payables Journal.
S
Transactions created in Customer Invoices or the Sales Journal.
R
Transactions created in the Receipts Journal or Customer Payments.
G
Transactions that were created in the General Journal, and includes
transactions created in Adjust Inventory.
Balance Sheet Reports
A Balance Sheet shows your company’s assets, liabilities, and equity
as of a specific month-end date.
1
Click Balance Sheet in the Command Center.
MLManual.book Page 313 Wednesday, October 27, 2010 12:04 PM
Balance Sheet Reports
313
MultiLedger provides the following types of balance sheet reports:
Types of Balance Sheet Reports
Selected Date
A standard Balance Sheet report for the selected month.
Prior Month
Comparison
Compares the selected month with the previous month.
Prior Year
Comparison
Compares the selected month with the same period in the prior year.
Prior Year-End
Comparison
Compares the selected month with the prior year-end.
Balance Sheet Report Options
Three options are available for each type of report:
Whole Dollars
Show Detail Accounts
Show Date & Time
2
Rounds dollars and cents to whole dollars on report.
Shows all accounts regardless of groupings that have been made with
the Financial Statements window.
Date and time printed at bottom of page.
Select a report type.
For details, see the previous descriptions of the types of balance sheet
reports available.
3
Select a period for the report.
Only one period can be selected for each report.
4
If necessary, click the appropriate checkboxes to select or deselect
report options.
For details, see the previous descriptions of balance sheet report
options.
5
If necessary, change the report title or footer line.
Entering data in these fields will print the information on the Balance
Sheet report.
6
Click View, Print, or Text File.
MLManual.book Page 314 Wednesday, October 27, 2010 12:04 PM
314 Chapter 12 Financial & Other Reports
Balance Sheet—Selected Date report example:
You can customize
headings for this
report using the
Financial
Statements
window
Total Assets and
Total Liabilities
and Equity should
match
MLManual.book Page 315 Wednesday, October 27, 2010 12:04 PM
Income Statement Reports
315
Income Statement Reports
An Income Statement shows whether or not your company has earned
a profit. In addition to dollar values, the income statement report shows
income and expense as a percent of total sales.
If you are using profit centers, you can create individual income
statements for each profit center as well as a consolidated income
statement for your company. For more information on Profit Center
Income Statements, see “Profit Center Income Statements” later in this
chapter.
1
Click Income Statement in the Command Center.
Types of Income Statement Reports
MultiLedger provides the following types of income statements:
Selected Period
Period & Y-T-D
Prior Month
Comparison
A standard income statement created for the selected month or range of
months.
Compares selected month or range of months with year-to-date
information through the latest date selected.
Compares selected month or range of months with the previous month.
MLManual.book Page 316 Wednesday, October 27, 2010 12:04 PM
316 Chapter 12 Financial & Other Reports
Prior Year
Comparison
Compares the selected month or range of months with the same period
in the prior year.
Income vs. Budget
Compares actual income and expenses for the selected month in the
current year with budget amounts for the same period.
Budget Report
Shows budget amounts for selected month or range of months.
Income Statement Report Options
Four options are available for each report:
Whole Dollars
Show Detail Accounts
Shows all accounts regardless of groupings that have been made with
the Financial Statements window.
Show Date & Time
Date and time printed at bottom of page.
Show Net Before
Taxes
2
Rounds dollar and cents values to whole dollars on report.
Shows a total for net income or loss before taxes.
Select a report type.
For details, see the previous descriptions of the types of income
statement reports available.
3
Select a period for the report.
You can select a month or a range of months.
4
If necessary, click the appropriate checkboxes to select or deselect
report options.
For details, see the previous descriptions of income statement report
options.
5
If necessary, change the report title or footer line.
Entering data in these fields will print the information on the Income
Statement report.
6
Click View, Print, or Text File.
Profit Center Income Statements
If you are using profit centers, you can create individual profit center
income statements and a consolidated report.
The profit centers are listed under the heading Profit Center on the
Income Statement window:
For details about setting up profit centers, see “Setting Up Profit
Centers” on page 87.
MLManual.book Page 317 Wednesday, October 27, 2010 12:04 PM
Profit Center Income Statements
317
Creating Income Statements for Individual
Profit Centers
1
Click Income Statement in the Command Center.
2
Select one or more profit centers to be reported.
Note
You can only select consecutive profit centers from the list.
3
Select a report type.
For details, see the previous descriptions of the types of income
statement reports available.
4
If necessary, click the appropriate checkboxes to select or deselect
report options.
For details, see the previous descriptions of income statement report
options.
5
If necessary, change the report title or footer line.
Entering data in these fields will print the information on the Income
Statement report.
6
Click View, Print, or Text File.
MLManual.book Page 318 Wednesday, October 27, 2010 12:04 PM
318 Chapter 12 Financial & Other Reports
Creating a Consolidated Income Statement
for Profit Centers
If you set up a general profit center account in your chart of accounts,
this account will be used for the consolidated description.
If you did not set up a general profit center account, the first profit
center will be used for the consolidated description.
For details about setting up a general profit center account, see “Setting
Up Profit Centers” on page 87.
1
Make sure no profit center names are selected (highlighted) in the
Profit Center list.
2
Select a report type.
For details, see the previous descriptions of the types of income
statement reports available.
3
If necessary, click the appropriate checkboxes to select or deselect
report options.
For details, see the previous descriptions of the options available for
income statements.
4
If necessary, change the report title or footer line.
Entering data in these fields will print the information on the Income
Statement report.
5
Click View, Print, or Text File.
MLManual.book Page 319 Wednesday, October 27, 2010 12:04 PM
Profit Center Income Statements
Income Statement—Selected Period report example:
You can customize
headings for this
report using the
Financial
Statements
window
319
MLManual.book Page 320 Wednesday, October 27, 2010 12:04 PM
320 Chapter 12 Financial & Other Reports
Cash Flow Reports
A Statement of Cash Flows shows the incoming and outgoing cash
over the selected period. This is shown by starting with the net income
(or loss) at the beginning of the period from the Income Statement,
then showing each asset, liability, and equity account whose value has
changed during the selected period. The result is net cash at the end of
the period. Please note that this report shows only the net increase or
decrease in each account, not the balance.
The Statement of Cash Flows report calculates the net cash at the end
of the period by adding the following items:
•
Net Income for the period
•
Changes to accounts shown in the three report sections: Operating
Activities, Investing Activities, and Financing Activities
•
Cash at beginning of period.
For details about assigning accounts for the Cash Flow Statement, see
“Setting Up Cash Flow Designations” on page 25.
1
Click Cash Flow in the Command Center.
MLManual.book Page 321 Wednesday, October 27, 2010 12:04 PM
Cash Flow Reports
321
MultiLedger provides the following types of cash flow reports:
Types of Cash Flow Reports
Selected Date
A standard Statement of Cash Flows report for the selected month or
range of months.
Prior Month
Comparison
Compares the selected month(s) with the previous month.
Prior Year
Comparison
Compares the selected month(s) with the same period in the prior year.
Cash Flow Report Options
Three options are available for each type of report:
Whole Dollars
Show Detail Accounts
Show Date & Time
2
Rounds dollars and cents to whole dollars on report.
Shows all accounts regardless of groupings that have been made with
the Financial Statements window.
Date and time printed at bottom of page.
Select a report type.
For details, see the previous descriptions of the types of cash flow
reports available.
3
Select a period for the report.
You can select one month or a range of months.
4
If necessary, click the appropriate checkboxes to select or deselect
report options.
For details, see the previous descriptions of cash flow report options.
5
Click View, Print, or Text File.
MLManual.book Page 322 Wednesday, October 27, 2010 12:04 PM
322 Chapter 12 Financial & Other Reports
Cash Flow Statement—Selected Date report example:
MLManual.book Page 323 Wednesday, October 27, 2010 12:04 PM
Financial Snapshot Report
323
Financial Snapshot Report
A Financial Snapshot report shows a summary of your business’
current cash, receivables, payables, inventory and several financial
ratios as of the date of the last entry.
1
Click Financial Snapshot in the Command Center.
2
Click View, Print, or Text File.
Financial Snapshot—report example:
MLManual.book Page 324 Wednesday, October 27, 2010 12:04 PM
324 Chapter 12 Financial & Other Reports
Sales Tax Report
MultiLedger provides a detailed sales tax report that can help in
completing sales tax forms for various state and local agencies. Sales
tax amounts are recorded on the Customer Invoices window.
Click Sales Tax Report in the Command Center.
The sales tax
categories you
set up appear
here
You can select a
month or range of
months for the
report
The Sales Tax report can include all or a selected group of sales tax
categories. The Sales Tax report includes the following information for
the selected month or range of months:
•
Sales Tax category’s name and tax percentage
•
The date, the invoice number, and the customer name for each
invoice that was charged to the sales tax category
•
The taxable and non-taxable amounts for each invoice, along with
the tax that was charged.
•
The total tax, taxable, and non-taxable amounts for each sales tax
category
MLManual.book Page 325 Wednesday, October 27, 2010 12:04 PM
Sales Tax Report
325
Creating Sales Tax Report
1
Select the sales tax category or categories for the report.
If necessary, scroll the list box to find the name of the sales tax
category you want.
You can select a consecutive or non-consecutive series of sales tax
categories from the list (for details, see “Making Selections in a
Reports List” on page 262).
2
Select the month or range of months for the report.
3
Click View, Print, or Text File.
Sales Tax report example:
The sales tax
category’s name
and percentage
appear here
Totals for each
sales tax category
are shown
MLManual.book Page 326 Wednesday, October 27, 2010 12:04 PM
326 Chapter 12 Financial & Other Reports
Salesperson Report
MultiLedger provides a Salesperson report that shows commissionable
sales, gross margin, and commission calculations for any salesperson
you’ve set up. Sales associated with a salesperson are recorded on the
Customer Invoices window.
Click Salesperson Report in the Command Center.
The salespeople
you set up on the
Salesperson
window appear
here
You can select a
month or range of
months for the
report
The Salesperson report can include all or a selected group of
salespeople. The Salesperson report includes the following information
for the selected month or range of months:
•
Note
Salesperson’s name, commission rate, and whether the
commission is based on gross sales or on gross margin
If you created Long Names in the Salesperson setup, those names will
show on the report. Otherwise, you will see what was entered in the
Name field.
•
Date, invoice number, customer name, and sales for each invoice
associated with the salesperson
MLManual.book Page 327 Wednesday, October 27, 2010 12:04 PM
Salesperson Report
327
•
Total commissionable sales, gross margin, and the salesperson’s
commission
•
Invoices that have been paid in full by the customer are marked
with an asterisk (*) in the report
•
Total of all invoices, as well as the total for all invoices that have
been paid in full. This is helpful if you pay salesperson
commissions only after payment has been received
Creating a Salesperson Report
1
Select the salesperson or salespeople for the report.
If necessary, scroll the list box to find the name of the salesperson you
want.
If you want all the salespeople to print at once, but want them on
separate pages, select the “Separate page per Salesperson” checkbox.
You can select a consecutive or non-consecutive series of salespeople
from the list (for details, see “Making Selections in a Reports List” on
page 262). If no salespeople are selected, all salespeople will be
reported.
2
Select a month or range of months.
3
Click View, Print, or Text File.
Salesperson report example:
MLManual.book Page 328 Wednesday, October 27, 2010 12:04 PM
328 Chapter 12 Financial & Other Reports
The salesperson’s
name and
commission rate
are shown
Total invoices, as
well as total paid
invoices appear
here
Totals for all
selected
salespeople
appear here
Invoices that have been paid by
the customer are marked with
asterisk
MLManual.book Page 329 Wednesday, October 27, 2010 12:04 PM
Job Reports
329
Job Reports
Job summary report shows actual and estimated job income and
expense, estimated cost, the difference between these values, and the
net income. There is also a Job Detail report that provides more detail.
Click Job Reports in the Command Center.
The jobs you set
up on the Jobs
window appear
here
You can select a
month or range of
months for the
report
Job Summary
This report shows the following information for each selected job:
•
Job number and name
•
The general ledger accounts that are affected
•
Current and prior income and expense
•
Total income & expense, and the net for the job
•
Total estimated income & expense, and net for the job
•
Totals for all jobs selected
You can select a month or range of months for this report.
MLManual.book Page 330 Wednesday, October 27, 2010 12:04 PM
330 Chapter 12 Financial & Other Reports
Job Detail
This report shows the following income and expense details for each
selected job:
•
Ledger account number for each income or expense
•
Income or expense date
•
Description of each income or expense
•
Document number associated with each income or expense
•
Journal type used to record the income or expense
•
Amount of each income or expense
•
Totals of all jobs selected
After closing the year, job reports will no longer show job detail for the
closed year. However, the income and expense for the Job are added to
Prior Income and Prior Expense in the new year.
Creating Jobs Reports
1
Select the job name or names.
If necessary, scroll the list box to find the name of the job you want.
You can select a consecutive or non-consecutive series of jobs from the
list (for details, see “Making Selections in a Reports List” on
page 262).
If no jobs are selected, all jobs will be reported.
2
Select a month or range of months.
3
Select the Job Summary or Job Detail radio button.
4
Click View, Print, or Text File.
MLManual.book Page 331 Wednesday, October 27, 2010 12:04 PM
Job Reports
Job Summary report example:
Income and
expense, including
estimated income
and expense, for a
job are shown on
this report
Balance Sheet
accounts (10002999) are shown,
but do not figure in
the totals for income
and expense
331
MLManual.book Page 332 Wednesday, October 27, 2010 12:04 PM
332 Chapter 12 Financial & Other Reports
Job Detail report example:
Income and
expense for a job is
shown by invoice,
including ledger
account, date, and
transaction journal
Current income and
expense are
summarized here
MLManual.book Page 333 Wednesday, October 27, 2010 12:04 PM
333
Appendix A Working with
CheckMark Payroll
This appendix describes how to post employee and employer check
information from CheckMark Payroll into MultiLedger.
MLManual.book Page 334 Wednesday, October 27, 2010 12:04 PM
334 Appendix A Working with CheckMark Payroll
Posting Employee Checks to MultiLedger for Windows
Employee check information from CheckMark Payroll for Windows
can be posted to MultiLedger for Windows by following these
instructions.
Set up Ledger Accounts in CheckMark
Payroll
Before posting to MultiLedger, you should assign account numbers to
payroll categories in CheckMark Payroll.
1
In CheckMark Payroll, click Ledger Accounts in the Command
Center.
2
Assign MultiLedger account numbers to all applicable Payroll
Categories.
For more information on setting up Ledger Accounts, see your
CheckMark Payroll User’s Manual.
Review Posting Summary
After you have calculated payroll and created checks in CheckMark
Payroll, you should review the Posting Summary to make sure the
information is correct before you post to MultiLedger.
3
In CheckMark Payroll, click Employee Paychecks in the Command
Center, then select Posting Summary.
4
Select Month or Check Dates for the Report Range, then select the
month or check dates.
5
Highlight the checks that you want to review from the list on the left.
If no checks are highlighted, information for all checks will be
reported.
6
Click View or Print.
The Posting Summary report shows check information in a
summarized format. The net for each check is shown, along with totals
for wages, income, taxes, and deductions. Employer payroll taxes are
shown as an entry at the bottom of the report. These are accrued tax
liabilities and total expense for FICA, FUTA, and SUTA.
7
Verify that all ledger accounts are assigned correctly.
For help with incorrectly assigned Ledger Accounts, see your
CheckMark Payroll User’s Manual.
MLManual.book Page 335 Wednesday, October 27, 2010 12:04 PM
Posting Employee Checks to MultiLedger for Windows
335
Posting to MultiLedger for Windows
8
Make sure you have your MultiLedger company files open.
9
In CheckMark Payroll, click Employee Paychecks in the Command
Center if you haven’t already.
10 Select Month or Check Dates for the Report Range, then select the
month or check dates.
11 Highlight the checks that you want to post to MultiLedger from the list
on the left.
If no checks are highlighted, all checks will be saved to the text file.
12 If you distribute wages or hours to jobs, you should check the Include
Jobs in Post Summary option.
13 Check the Mark Posted Checks option.
That way, checks that have been posted to MultiLedger will be marked
with an “x”.
14 Verify that the Checks Reference #, Taxes Reference #, Checks Posting
Date, and Taxes Posting Date are correct.
You can use these edit boxes to enter reference numbers and posting
dates for checks posted to MultiLedger. The default name for the
Checks Reference # is "PR" followed by the date of the first unmarked
check in the list. The default name for the Taxes Reference # is "ET"
followed by the date of the first unmarked check in the list. For
information on marking checks that have been posted to MultiLedger,
see step 13 above.
The default date for the Checks Posting Date and Taxes Posting Date is
the date of the first unmarked check in the list. If necessary, you can
change the information in these edit boxes.
Note
If you need to post payroll checks that have the same date as checks
you've already posted, you should change the Checks Reference # and
Taxes Reference #. Otherwise, you will receive an error message and
the posting will fail, as MultiLedger cannot accept entries with both the
same reference number and same date.
MLManual.book Page 336 Wednesday, October 27, 2010 12:04 PM
336 Appendix A Working with CheckMark Payroll
15 Click Post to MultiLedger.
A Save As dialog appears. The file is named Payroll by default.
Note
The Payroll file is a temporary file that can be dragged to the trash when
posting is complete. Or, if you save it in the same location each time,
you can simply choose to replace it each time you post payroll, thus
avoiding confusion of having multiple Payroll files on your hard drive.
16 Choose where you want to save the file, then click Save.
When the posting is complete, you will receive a message. Two files
are posted to the General Journal in MultiLedger. A PR-[date] entry for
employee checks and an ET-[date] entry for employer taxes.
17 Click OK.
Note
When you receive the message that posting has been sent, it does not
necessarily mean that the posting was successful. The posting process
sends information from CheckMark Payroll to MultiLedger, but does
not send information from MultiLedger back to CheckMark Payroll.
You should check the General Journal in MultiLedger to make sure the
PR and ET entries were sent correctly.
MLManual.book Page 337 Wednesday, October 27, 2010 12:04 PM
Posting Employer Checks to MultiLedger for Windows
337
Posting Employer Checks to MultiLedger for Windows
Employer payment checks from CheckMark Payroll for Windows can
be posted to MultiLedger for Windows by following these
instructions.
Set up Ledger Accounts in CheckMark
Payroll
Before posting to MultiLedger, you should assign account numbers to
payroll categories in CheckMark Payroll.
1
In CheckMark Payroll, click Ledger Accounts in the Command
Center.
2
Assign MultiLedger account numbers to all applicable Payroll
Categories.
For more information on setting up Ledger Accounts, see your
CheckMark Payroll User’s Manual.
Review Posting Summary
After you have created employer payment checks in CheckMark
Payroll, you should review the Posting Summary to make sure the
information is correct before you post to MultiLedger.
3
In CheckMark Payroll, click Employer Checks in the Command
Center, then select Posting Summary.
4
Select the month.
5
Highlight the checks that you want to review from the list on the left.
If no checks are highlighted, information for all checks will be
reported.
6
Click View or Print.
7
Verify that all ledger accounts are assigned correctly.
For help with incorrectly assigned Ledger Accounts, see your
CheckMark Payroll User’s Manual.
Posting to MultiLedger for Windows
8
Make sure you have your MultiLedger company files open.
9
In CheckMark Payroll, click Employer Checks in the Command
Center if you haven’t already.
10 Select the month.
MLManual.book Page 338 Wednesday, October 27, 2010 12:04 PM
338 Appendix A Working with CheckMark Payroll
11 Highlight the checks that you want to post to MultiLedger from the list
on the left.
If no checks are highlighted, all checks will be saved to the text file.
12 Click Post to MultiLedger.
A Save As dialog appears. The file is named Employer by default.
Note
The Employer file is a temporary file that can be dragged to the trash
when posting is complete. Or, if you save it in the same location each
time, you can simply choose to replace it each time you post payroll,
thus avoiding confusion of having multiple Employer files on your hard
drive.
13 Choose where you want to save the file, then click Save.
If a vendor does not exist in MultiLedger, you will be asked to add the
vendor. When the posting is complete, you will receive a message. The
checks are posted to the Disbursements Journal in MultiLedger.
14 Click OK.
Note
When you receive the message that posting has been sent, it does not
necessarily mean that the posting was successful. The posting process
sends information from CheckMark Payroll to MultiLedger, but does
not send information from MultiLedger back to CheckMark Payroll.
You should check the Disbursements Journal in MultiLedger to make
sure the checks were sent correctly.
MLManual.book Page 339 Wednesday, October 27, 2010 12:04 PM
Posting Employee Checks to MultiLedger for Macintosh
339
Posting Employee Checks to MultiLedger for Macintosh
Employee check information from CheckMark Payroll for Macintosh
can be posted to MultiLedger for Macintosh by following these
instructions.
Set up Ledger Accounts in CheckMark
Payroll
Before posting to MultiLedger, you should assign account numbers to
payroll categories in CheckMark Payroll.
1
In CheckMark Payroll, click Ledger Accounts in the Command
Center.
2
Assign MultiLedger account numbers to all applicable Payroll
Categories.
For more information on setting up Ledger Accounts, see your
CheckMark Payroll User’s Manual.
Review Posting Summary
After you have calculated payroll and created checks in CheckMark
Payroll, you should review the Posting Summary to make sure the
information is correct before you post to MultiLedger.
3
Click Employee Paychecks in the Command Center, then select Posting
Summary.
4
Select the check date(s) from the list.
5
Select the desired checks from the list on the left.
If no checks are highlighted, information for all checks will be
reported.
6
Click View or Print.
The Posting Summary report shows check information in a
summarized format. The net for each check is shown, along with totals
for wages, income, taxes, and deductions. Employer payroll taxes are
shown as an entry at the bottom of the report. These are accrued tax
liabilities and total expense for FICA, FUTA, and SUTA.
7
Verify that all ledger accounts are assigned correctly.
For help with incorrectly assigned Ledger Accounts, see your
CheckMark Payroll User’s Manual.
MLManual.book Page 340 Wednesday, October 27, 2010 12:04 PM
340 Appendix A Working with CheckMark Payroll
Posting to MultiLedger for Macintosh
8
Make sure you have your MultiLedger company open.
9
In CheckMark Payroll, click Employee Paychecks in the Command
Center, if you haven’t already.
10 Select the check date(s) from the list.
11 Select the desired checks from the list on the left.
If no checks are selected, all checks for the selected check date(s) will
be posted.
12 If you enter hours or distribute wages by MultiLedger Job, check the
Include Jobs in Post Summary check box.
13 Make sure the 'x' Post Summary Entries check box is checked.
That way, the checks that have been posted to MultiLedger will be
marked with an X.
14 Verify that the Checks Reference #, Taxes Reference #, Checks Posting
Date, and Taxes Posting Date are correct.
You can use these edit boxes to enter reference numbers and posting
dates for checks posted to MultiLedger. The default name for the
Checks Reference # is "PR" followed by the date of the first unmarked
check in the list. The default name for the Taxes Reference # is "ET"
followed by the date of the first unmarked check in the list. For
information on marking checks that have been posted to MultiLedger,
see step 13 above.
The default date for the Checks Posting Date and Taxes Posting Date is
the date of the first unmarked check in the list. If necessary, you can
change the information in these edit boxes.
Note
If you need to post payroll checks that have the same date as checks
you've already posted, you should change the Checks Reference # and
Taxes Reference #. Otherwise, you will receive an error message and
the posting will fail, as MultiLedger cannot accept entries with both the
same reference number and same date.
15 Click the Post to MultiLedger button.
MLManual.book Page 341 Wednesday, October 27, 2010 12:04 PM
Posting Employee Checks to MultiLedger for Macintosh
341
A Save As dialog appears. The file is named Posting Summary by
default.
Note
The Posting Summary file is a temporary file that can be dragged to the
trash when posting is complete. Or, if you save it in the same location
each time, you can simply choose to replace it each time you post
payroll, thus avoiding confusion of having multiple Posting Summary
files on your hard drive.
16 Choose where you want to save the file, then click Save.
When the posting is complete, you will receive a message. Two files
are posted to the General Journal in MultiLedger. A PR-[date] entry for
employee checks and an ET-[date] entry for employer taxes.
Note
When you receive the message that posting has been sent, it does not
necessarily mean that the posting was successful. The posting process
sends information from CheckMark Payroll to MultiLedger, but does
not send information from MultiLedger back to CheckMark Payroll.
You should check the General Journal in MultiLedger to make sure the
PR and ET entries were sent correctly.
MLManual.book Page 342 Wednesday, October 27, 2010 12:04 PM
342 Appendix A Working with CheckMark Payroll
Posting Employer Checks to MultiLedger for Macintosh
Employer payment checks from CheckMark Payroll for Macintosh can
be posted to MultiLedger for Macintosh by following these
instructions.
Set up Ledger Accounts in CheckMark
Payroll
Before posting to MultiLedger, you should assign account numbers to
payroll categories in CheckMark Payroll.
1
In CheckMark Payroll, click Ledger Accounts in the Command
Center.
2
Assign MultiLedger account numbers to all applicable Payroll
Categories.
For more information on setting up Ledger Accounts, see your
CheckMark Payroll User’s Manual.
Review Check Summary
After you have created employer payment checks in CheckMark
Payroll, you should review them to make sure the information is
correct before you post to MultiLedger.
3
In CheckMark Payroll, click Employer Checks in the Command
Center.
4
Select the month.
5
Highlight the checks that you want to review from the list on the left.
If no checks are highlighted, information for all checks will be
reported.
6
Click View or Print.
The report shows individual check information.
7
Verify that all ledger accounts are assigned correctly.
For help with incorrectly assigned Ledger Accounts, see your
CheckMark Payroll User’s Manual.
Posting to MultiLedger for Macintosh
8
Make sure you have your MultiLedger company open.
9
In CheckMark Payroll, click Employer Checks in the Command
Center, if you haven’t already.
10 Select the check month from the list on the right.
MLManual.book Page 343 Wednesday, October 27, 2010 12:04 PM
Posting Employer Checks to MultiLedger for Macintosh
343
11 Select the desired checks from the list on the left.
If no checks are selected, all checks for the selected month will be
posted.
12 Click the Post to MultiLedger button.
A Save As dialog appears. The file is named Employer Checks by
default.
Note
The Employer Checks file is a temporary file that can be dragged to the
trash when posting is complete. Or, if you save it in the same location
each time, you can simply choose to replace it each time you post
payroll, thus avoiding confusion of having multiple Employer Checks
files on your hard drive.
13 Choose where you want to save the file, then click Save.
When the posting is complete, you will receive a message. The checks
are posted to the Disbursements Journal in MultiLedger
Note
When you receive the message that posting has been sent, it does not
necessarily mean that the posting was successful. The posting process
sends information from CheckMark Payroll to MultiLedger, but does
not send information from MultiLedger back to CheckMark Payroll.
You should check the Disbursements Journal in MultiLedger to make
sure the checks were sent correctly.
MLManual.book Page 344 Wednesday, October 27, 2010 12:04 PM
344 Appendix A Working with CheckMark Payroll
Possible Posting Errors for Employee Checks
Below are some possible error messages you can receive when trying
to post employee checks into MultiLedger and ways to correct them.
•
"MultiLedger 5.1 or higher must be running and company
files must be open to post"— To correct this, simply open your
MultiLedger company files and try posting again. You must be
using MultiLedger 5.1.x or higher.
•
"Account <8000> not found-Record 1"—You have a general
ledger account in CheckMark Payroll that is not found in
MultiLedger. To correct this, verify that all accounts in the Posting
Summary report in CheckMark Payroll have matching accounts in
your MultiLedger company files. Then make any necessary
changes in either CheckMark Payroll or MultiLedger.
•
"Account <Chk 2> not found-Record 1"—There are two
possible explanations for this error message.
1) You distribute wages or hours to jobs but have not checked the
Include Jobs in Post Summary check box. To correct this, check the
Include Jobs in Post Summary checkbox on the Employee Paychecks
window then try posting again.
2) You do not distribute wages or hours to jobs but have checked
the Include Jobs in Post Summary check box. To correct this,
uncheck the Include Jobs in Post Summary checkbox on the Employee
Paychecks window then try posting again.
•
"Duplicate Document number found. Document not
imported."—There are three possible explanations for this error
message.
1) You have imported the payroll checks already. You should verify
in MultiLedger that the checks you are trying to post have not already
been posted. To do this:
Click Transaction Journals in MultiLedger's Command Center, then
select the month from the month list.
Select the General radio button, then look for PR and ET entries for
that date to see if checks have already been posted.
2) You are importing payroll checks with the same date as checks
you have imported already. If you are posting checks that have the
same date as checks you have already posted to MultiLedger, the
Checks Reference # and the Taxes Reference # on the Employee
Paychecks window in Payroll will be the same as the checks you
already posted. You should change the Checks Reference # and Taxes
Reference # and try posting again.
MLManual.book Page 345 Wednesday, October 27, 2010 12:04 PM
Possible Posting Errors for Employer Checks
345
3) You have a General Journal transaction in MultiLedger that has
the same document number and date as the payroll transaction
you are trying to post. Check the General Journal in MultiLedger for
a transaction with the same document number and date as the
transaction from Payroll. Usually it is the ET-[date] entry that is
duplicated. If necessary, change the Checks Reference # and the Taxes
Reference # in Payroll and try posting again.
Possible Posting Errors for Employer Checks
Below are some possible error messages you can receive when trying
to post employer checks into MultiLedger and ways to correct them.
•
"MultiLedger 5.1 or higher must be running and company
files must be open to post"— To correct this, simply open your
MultiLedger company files and try posting again. You must be
using MultiLedger 5.1.x or higher.
•
"Account <8000> not found-Record 1"—You have a general
ledger account in CheckMark Payroll that is not found in
MultiLedger. To correct this, verify that all accounts in the
Employer Checks report in CheckMark Payroll have matching
accounts in your MultiLedger company files. Then make any
necessary changes in either CheckMark Payroll or MultiLedger.
•
"Duplicate Document number found. Document not
imported."—There are two possible explanations for this error
message.
1) You have imported the checks already. You should verify in
MultiLedger that the checks you are trying to post have not already
been posted. To do this:
Click Transaction Journals in MultiLedger's Command Center, then
select the month from the month list.
Select the Disbursements radio button, then look those check numbers
to see if checks have already been posted.
2) You have a check number in MultiLedger that has the same
document number as the check you are trying to post. Change the
document number, and try posting again.
MLManual.book Page 346 Wednesday, October 27, 2010 12:04 PM
346 Appendix A Working with CheckMark Payroll
MLManual.book Page 347 Wednesday, October 27, 2010 12:04 PM
347
Appendix B Sample COAs
The charts of accounts in this appendix are contained in the folder,
"Sample COAs," on your master disk.
MLManual.book Page 348 Wednesday, October 27, 2010 12:04 PM
348 Appendix B Sample COAs
Basic Chart of Accounts
1010
1020
1100
1200
1700
1720
1740
1800
1820
1840
2100
2200
2300
2400
2500
2550
2700
3000
3100
3200
4100
5000
6000
6100
6200
6300
6400
6500
6600
6700
Cash In Bank - Checking Acct.
Money Market Account
Accounts Receivable
Prepaid Expenses
Computer Equipment
Office Furniture & Equipment
Vehicles
Accum. Depr. - Computer Equip.
Accum. Depr. - Office
Accum. Depr. - Vehicles
Accounts Payable
Sales Tax Payable
Federal Withholding Tax
State Withholding Tax
FICA Tax Payable
State Disability Tax
Bank Loan
Capital
Owners Draw
Retained Earnings
Sales
Cost of Sales
Automobile Expense
Advertising/Marketing
Bad Debts
Bank Charges
Contributions
Depletion
Depreciation Expense
Dues & Memberships
6800
6900
7000
7100
7200
7300
7400
7500
7600
7700
7800
7900
8000
8100
8200
8300
9100
7400
7500
Insurance - Business
Insurance - Health
Interest Expense
Legal & Professional Services
Meals & Entertainment
Miscellaneous Expense
Office Supplies
Pension/Profit Sharing Expense
Postage
Rent
Repairs & Maintenance
Salaries
Taxes & Licenses
Telephone
Travel
Utilities
Interest Earned
Office Supplies
Pension/Profit Sharing Expense
MLManual.book Page 349 Wednesday, October 27, 2010 12:04 PM
Construction Partnership Chart of Accounts
Construction Partnership Chart of Accounts
1010
1020
1030
1040
1100
1200
1400
1410
1420
1430
1500
1510
1520
1710
1720
1730
1810
1820
1830
2100
2200
2250
2300
2310
2400
2410
2500
2510
2520
2530
2540
2550
2600
2700
2800
2900
3000
3050
Cash In Bank - Checking Acct
Cash in Bank - Payroll Acct
Undeposited Cash
Petty Cash
Accounts Receivable
Contracts Receivable
Inventory
Construction in Progress
Material-Unused & Unassigned
Unimproved Land/Non-subdiv.
Prepaid Insurance
Prepaid Taxes
Prepaid Interest
Furniture & Equipment
Leasehold Improvements
Vehicles
Accum Depr - Furn & Equip
Accum Depr - Leasehold Improv
Accum Depr - Vehicles
Accounts Payable
State Sales Tax Payable
City Sales Tax Payable
Federal Withholding Tax
Federal Unemployment Tax
State Withholding Tax
State Unemployment Tax
FICA Tax Payable
Employee 401K Savings Plan
Employee Health Insurance
Employee Cafeteria Plan
United Way
Union Dues
Accrued Real Estate Taxes
Construction Loans Payable
Customer Escrow Deposits
Other Long-Term Liabilities
Partner A Investment
Partner A Withdrawal
3100
3150
3300
4000
4100
4200
4300
4400
5000
5100
5200
5300
5400
6000
6050
6100
6150
6200
6250
6300
6350
6400
6450
6500
6550
6600
6650
6700
6750
6800
6850
6900
6950
7000
7050
7100
7150
7200
Partner B Investment
Partner B Withdrawal
Retained Earnings
Sales-Commercial
Sales-Land
Sales-Extras
Sales-Residential
Other Income
Cost of Sales-Commercial
Cost of Sales-Land
Cost of Sales-Extras
Cost of Sales-Residential
Cost of Delivery/Shipping
Advertising
Auto-Gas, Oil, & Maintenance
Automotive Equipment
Bad Debts
Bank Service Charges
Casualty & Liability Insurance
Commissions Paid
Depletion
Depreciation Expense
Dues & Subscriptions
Equipment Rental
Insurance - Fire & Ext Covg
Insurance - General
Insurance - Health
Interest on Morg/Loans
Legal & Accounting
License Fees
Machinery Fuel & Supplies
Meals & Entertainment
Mileage Exp
Office Supplies
Pension/Profit Sharing Exp
Postage
Real Estate Taxes-Other
Rent
349
MLManual.book Page 350 Wednesday, October 27, 2010 12:04 PM
350 Appendix B Sample COAs
7250
7300
7350
7400
7450
7500
7550
Repairs-Auto & Machinery
Repairs-Other
State Franchise Taxes
Stationery & Printing
Telephone
Travel
Utilities
8700
8800
8900
9000
9100
9500
9600
Wages
Wages - Tax Expense
Workmen's Comp Insurance
Gain/Loss on Sales of Assets
Interest Income
Interest Expense
Tax Expense
MLManual.book Page 351 Wednesday, October 27, 2010 12:04 PM
Graphic Artist Chart of Accounts
Graphic Artist Chart of Accounts
1010
1020
1030
1040
1100
1200
1400
1600
1620
1640
1700
1720
1740
1900
1920
2100
2200
2300
2320
2400
2500
2600
2700
3000
3100
3200
3300
4000
4100
4400
Checking
Payroll checking
Cash register drawer
Petty cash
Accounts receivable
Other current assets
Inventory
Graphic arts equipment cost
Furniture and fixtures cost
Automobiles cost
Accum depr-graphic arts equip
Accum depr-furniture and fixt.
Accum depr-automobiles
Deposits paid
Other non-current assets
Accounts payable
Sales tax payable
Accrued payroll taxes
Accrued employer expenses
Customer deposits
Other current liabilities
Bank loans
Other long-term liabilities
Owner's investment
Owner's withdrawal
Suspense
Retained earnings
Contract fees
Commissions
Late fees collected
4500
5000
6000
6100
6200
6300
6400
6500
6600
6700
6800
6900
7000
7100
7200
7300
7400
7500
7600
7700
7800
7900
8000
8100
8200
8300
9000
9500
9600
Miscellaneous income
Freight
Professional promotion
Commissions paid
Depreciation
Discounts given
Discounts taken
Dues and subscriptions
Insurance
Interest
Late fees paid
Legal and accounting
License fees
Maintenance
Office supplies
Payroll wages
Payroll employer expense
Graphic art supplies
Postage
Rent
Supplies
Telephone
Travel and entertainment
Utilities-electric
Utilities-gas
Utilities-water
Interest income
Interest expense
Suspense
351
MLManual.book Page 352 Wednesday, October 27, 2010 12:04 PM
352 Appendix B Sample COAs
Medical Partnership Chart of Accounts
1010
Cash In Bank - Checking Acct.
1020
Money Market Account
1100
Accounts Receivable
1200
Prepaid Expenses
1700
Medical Equipment
1720
Office Furniture & Equipment
1740
Vehicles
1800
Accum. Depr. - Medical Equip.
1820
Accum. Depr. - Office
1840
Accum. Depr. - Vehicles
2100
Accounts Payable
2200
Sales Tax Payable
2300
Federal Withholding Tax
2400
State Withholding Tax
2500
FICA Tax Payable
2550
State Disability Tax
2700
Bank Loan
3000
Capital - Partner A
3050
Capital - Partner B
3100
Owners Draw - Partner A
3150
Owners Draw - Partner B
3200
Retained Earnings
4100
Patient Fees
4100.01 Patient Fees - Partner A
4100.02 Patient Fees - Partner B
4110
Consultation Fees
4110.01 Consultation Fees - Partner A
4110.02 Consultation Fees - Partner B
4120
Miscellaneous Income
4120.01 Miscellaneous - Partner A
4120.02 Miscellaneous - Partner B
4130
Fee Refund
4130.01 Fee Refund - Partner A
4130.02 Fee Refund - Partner B
6000
Automobile Expense
6000.01 Automobile Expense - Partner A
6000.02 Automobile Expense - Partner B
6100
Advertising/Marketing
6200
Bad Debts
6200.01 Bad Debts - Partner A
6200.02 Bad Debts - Partner B
6300
Bank Charges
6400
Contributions
6500
Depletion
6600
Depreciation Expense
6700
Dues & Subscriptions
6700.01 Dues & Subscriptions-Partner A
6700.02 Dues & Subscriptions-Partner B
6800
Insurance - General
6900
Insurance - Group
6950
Insurance - Owner
6950.01 Insurance - Owner - Partner A
6950.02 Insurance - Owner - Partner B
7100
Legal & Accounting Services
7200
Meals & Entertainment
7200.01 Meals & Entertainment-Partner A
7200.02 Meals & Entertainment-Partner B
7300
Miscellaneous Expense
7300.01 Miscellaneous Exp.- Partner A
7300.02 Miscellaneous Exp.- Partner B
7400
Office Supplies
7410
Equipment Rental
7420
Laboratory Expenses
7420.01 Laboratory Exp. - Partner A
7420.02 Laboratory Exp. - Partner B
7440
Reference Material
7440.01 Reference Material - Partner A
7440.02 Reference Material - Partner B
7450
Laundry
7450.01 Laundry - Partner A
7450.02 Laundry - Partner B
7460
Medical Supplies
7500
Pension/Profit Sharing Expense
7600
Postage
7700
Rent
7800
Repairs & Maintenance
MLManual.book Page 353 Wednesday, October 27, 2010 12:04 PM
Medical Partnership Chart of Accounts
7900
Payroll Salaries
7950
Payroll Taxes
8000
Licenses
8000.01 Licenses - Partner A
8000.02 Licenses - Partner B
8100
Telephone
8200
Travel
8200.01 Travel - Partner A
8200.02 Travel - Partner B
8300
Utilities
9100
Interest Earned
9500
Interest Expense
353
MLManual.book Page 354 Wednesday, October 27, 2010 12:04 PM
354 Appendix B Sample COAs
Newspaper Chart of Accounts
1010
1020
1100
1150
1200
1400
1600
1620
1640
1660
1680
1700
1720
1740
1760
1780
1800
1900
2100
2300
2320
2340
2360
2380
2400
2500
2560
2600
3000
3020
3040
3060
4000
4100
4200
4300
4400
4500
Cash in bank
Cash on hand
Notes and accounts receivable
Allowance for doubtful account
Prepaid expenses
Inventory
Land
Building
Machinery and equipment
Furniture and fixtures
Motor vehicles
Type and metal
Accum depr-building
Accum depr-machinery and equip
Accum depr-furniture and fixtures
Accum depr-motor vehicles
Accum depr-type and metal
Goodwill
Accounts and notes payable
Federal unemployment tax
State unemployment tax
FICA tax payable
Federal withholding tax
State withholding tax
Local withholding tax
Interest payable
Income tax payable
Mortgage and long term notes
Capital stock
Retained earnings
Dividends paid
Profit and loss clearing acct
Local advertising
National advertising
Classified advertising
Legal advertising
Circulation
Commercial printing
4600
4700
6000
6100
6200
6300
6400
6500
6600
6700
6800
6900
7000
7100
7200
7300
7400
7500
8000
8100
8200
8300
8400
8500
8600
8700
8800
8900
9000
9100
9200
9500
9600
9700
Merchandise sales
Miscellaneous revenue
Office salaries
Taxes on payroll salaries
Depr on machinery, furn, type
Depr on building
Feature and ad mat services
Insurance and professional svc
Light, power, water, gas
Memberships and dues
Motor vehicles and mileage
Office supplies and postage
Rent, fuel and heating
Repairs and maintenance equip
Taxes on plant and business
Taxes and maintenance on build
Telephone and telegraph
Miscellaneous
Shop wages
Taxes on shop payroll
Bad debts
Commissions on sales
Materials
Photos and engravings
Second class postage
Contributions
Advertising and promotion
Travel and entertainment
Cash discounts taken
Interest earned
Miscellaneous other income
Cash discounts allowed
Interest paid
Miscellaneous other expense
MLManual.book Page 355 Wednesday, October 27, 2010 12:04 PM
Non-Profit Chart of Accounts
Non-Profit Chart of Accounts
1000
1010
1020
1030
1040
1050
1100
1200
1300
1400
1500
1550
1600
1620
1640
1660
1680
1700
1720
1740
1760
1780
1900
1930
1950
2000
2100
2200
2300
2310
2320
2330
2340
2350
2360
2370
2380
2400
Current Assets
Cash in Bank - General
Cash in Bank - Payroll
Petty Cash
Undeposited Cash
Cash Register Drawer
Pledges Receivable
Prepaid Expenses
Accounts Receivable
Inventory
Investments
Long Term Assets
Building
Computer Equipment
Furniture & Fixtures
Leasehold Improvements
Vehicles
Accum. Depr. - Building
Accum. Depr. - Comp. Equip.
Accum. Depr. - Furn. & Fix.
Accum. Depr. - Leaseholds
Accum. Depr. - Vehicles
Construction in Progress
Deposits
Long Term Notes Receivable
Current Liabilities
Accounts Payable
Sales Tax Payable
Employee Health Insurance
Employee 401k Savings Plan
Federal Unemployment Tax
State Unemployment Tax
FICA Tax Payable
Federal Withholding Tax
State Withholding Tax
Local Withholding Tax
State Disability Ins. Tax
Credit Card
2500
2600
2700
2800
2850
3000
3100
3200
4000
4100
4200
4300
4400
4500
4510
4520
4530
4540
4550
4600
5000
6000
6100
6200
6300
6400
6500
6600
6700
6900
7000
7010
7020
7030
7100
7200
7300
7400
Collections Due Headquarters
Long Term Liability
Deposits for Future Services
Line of Credit - Bank
Notes Payable - Bank
Equity
Retained Earnings
Suspense
Income
Donations
Activities Income
Licensing Income
Subsidies
Fund Income
Poor Fund
Youth Fund
Foreign Fund
Building Fund
Other Fund
Miscellaneous Income
Cost of Goods
Expenses
Advertising
Bad Debts
Bank Service Charges
Travel & Entertainment
Miscellaneous
Late Fees Paid
Dues & Memberships
Freight and Shipping
Insurance Expenseq
Insurance-Group Health
Insurance-Life
Insurance-Disability
Interest Expense
Legal Fees
Messenger Services
Accounting Fees
355
MLManual.book Page 356 Wednesday, October 27, 2010 12:04 PM
356 Appendix B Sample COAs
7500
7600
7700
7800
7900
8000
8100
8200
8300
Parking
Pension Plan Expense
Postage
Rent
Repairs & Maintenance
Reproduction & Printing Chgs.
Salaries - Staff
Storage
Subscriptions
8400
8410
8500
8600
8700
9000
9100
9200
9500
Supplies - Office
Supplies - Other
Taxes - Payroll
Telephone
Utilities
Other Income
Gain/Loss on Sale of Assets
Interest Earned
Other Expenses
MLManual.book Page 357 Wednesday, October 27, 2010 12:04 PM
Partnership Chart of Accounts
Partnership Chart of Accounts
1010
1020
1030
1040
1100
1200
1400
1600
1620
1640
1660
1700
1720
1740
1760
2100
2200
2300
2320
2340
2360
2380
2400
2600
3000
3020
3100
3120
3200
4000
4100
4200
5000
5100
5200
6000
6100
6200
Checking
Payroll checking
Cash register drawer
Petty cash
Accounts receivable
Prepaid expenses
Inventory
Computer equipment
Office furniture and equipment
Vehicles
Leasehold improvements
Accum. depr.-computer equipment
Accum. depr.-office furniture
Accum. depr.-vehicles
Accum. depr.-leasehold improv
Accounts payable
Sales tax payable
FICA tax payable
Federal withholding tax
State withholding tax
Federal unemployment tax
State unemployment tax
State disability tax
Note payable
Partner A investment
Partner B investment
Partner A withdrawal
Partner B withdrawal
Retained earnings
Sales
Returns and allowances
Miscellaneous income
Cost of sales
Freight
Purchase discounts
Advertising/marketing
Automobile
Bad debts
6300
6400
6500
6600
6700
6800
6900
7000
7100
7200
7300
7400
7500
7600
7700
7800
7900
8000
8100
8200
8300
8400
9000
9500
Bank charges
Contributions
Commissions and fees
Depletion
Depreciation
Dues and memberships
Employee benefits
Insurance
Late fees
Legal and professional
Maintenance and repairs
Miscellaneous
Office supplies
Payroll-wages
Payroll-taxes
Postage
Rent
Rent or lease equipment
Taxes and licenses
Telephone
Travel, meals and entertainment
Utilities
Interest income
Interest expense
357
MLManual.book Page 358 Wednesday, October 27, 2010 12:04 PM
358 Appendix B Sample COAs
Printing/Copy Center Chart of Accounts
1010
1020
1030
1040
1100
1200
1400
1600
1620
1640
1700
1720
1740
1900
1920
2100
2200
2300
2320
2400
2500
2600
2700
3000
3100
3200
3300
4000
4020
4040
4100
4120
4140
4160
4200
4300
4400
4500
Checking
Payroll checking
Cash register drawer
Petty cash
Accounts receivable
Other current assets
Inventory
Printing equipment cost
Furniture and fixtures cost
Leasehold improvement cost
Accum depr-printing equipment
Accum depr-furniture and fixtures
Accum depr-leasehold improv.
Deposits paid
Other non-current assets
Accounts payable
Sales tax payable
Accrued payroll taxes
Accrued employer expenses
Customer deposits
Other current liabilities
Bank loans
Other long-term liabilities
Owner's investment
Owner's withdrawal
Suspense
Retained earnings
Photocopy
Signage
Other printing sales
Paper
Binders
Stamps
Other retail items
Printing services
Shipping collected
Late fees collected
Miscellaneous income
5000
5020
5040
5060
5080
5100
6000
6100
6200
6300
6400
6500
6600
6700
6800
6900
7000
7100
7200
7300
7400
7500
7600
7700
7800
7900
9000
9500
9600
Paper purchases
Binder purchases
Stamp purchases
Other purchases
Ink purchases
Freight
Advertising
Depreciation
Discounts given
Discounts taken
Dues and subscriptions
Insurance
Late fees paid
Leasehold improvements
Legal and accounting
Maintenance
Store supplies
Payroll wages
Payroll employer expense
Postage and shipping
Rent
Telephone
Travel and entertainment
Utilities-gas
Utilities-electricity
Utilities-water
Interest income
Interest expense
Suspense
MLManual.book Page 359 Wednesday, October 27, 2010 12:04 PM
Professional Chart of Accounts
Professional Chart of Accounts
1010
1020
1100
1200
1700
1720
1740
1800
1820
1840
2100
2200
2300
2400
2500
2550
2700
3000
3100
3200
4100
4200
4300
4400
4500
6000
6100
6200
6300
6400
6600
6700
6800
6900
7000
7100
7110
7120
Cash In Bank - Checking Acct.
Money Market Account
Accounts Receivable
Prepaid Expenses
Leasehold Improvements
Office Furniture & Equipment
Vehicles
Accum. Depr. - Leasehold
Accum. Depr. - Office
Accum. Depr. - Vehicles
Accounts Payable
Sales Tax Payable
Federal Withholding Tax
State Withholding Tax
FICA Tax Payable
State Disability Tax
Bank Loan
Capital
Owners Draw
Retained Earnings
Fee Income
Commissions
Consulting
Reimbursement Expenses
Miscellaneous Income
Automobile Expense
Advertising/Marketing
Bad Debts
Bank Charges
Contributions
Depreciation Expense
Dues & Memberships
Insurance - General
Insurance - Group
Insurance - Owner
Legal & Accounting Services
Professional Fees
Commissions Paid
7200
7300
7400
7500
7600
7610
7700
7800
7900
7950
8000
8100
8200
8300
9100
9500
Meals & Entertainment
Miscellaneous Expense
Office Supplies
Pension/Profit Sharing Expense
Postage
Printing
Rent
Repairs & Maintenance
Payroll Salaries
Payroll Taxes
Licenses
Telephone
Travel
Utilities
Interest Earned
Interest Expense
359
MLManual.book Page 360 Wednesday, October 27, 2010 12:04 PM
360 Appendix B Sample COAs
Profit Center Chart of Accounts
1010
1020
1030
1040
1100
1140
1200
1400
1600
1620
1640
1660
1680
1690
1720
1740
1760
1780
1790
1800
1900
1950
2100
2200
2300
2310
2320
2330
2340
2350
2360
2370
2380
2390
2400
2700
2750
2800
Cash in Bank - General
Cash in Bank - Payroll
Petty Cash
Money Market Account
Accounts Receivable
Allowance - Bad Debts
Prepaid Expenses
Inventory
Land
Building
Computer Equipment
Furniture & Fixtures
Leasehold Improvements
Vehicles
Accum. Depr. - Building
Accum. Depr. - Comp. Equip.
Accum. Depr. - Furn. & Fix.
Accum. Depr. - Leaseholds
Accum. Depr. - Vehicles
Construction in Progress
Deposits
Long Term Notes Receivable
Accounts Payable
Sales Tax Payable
Employee Health Insurance
Employee 401k Savings Plan
Federal Unemployment Tax
State Unemployment Tax
FICA Tax Payable
Federal Withholding Tax
State Withholding Tax
Local Withholding Tax
State Disability Ins. Tax
Credit Union
United Way
Line of Credit - Banks
Notes Payable - Bank
Notes Payable - Shareholders
3000
Common Stock
3020
Retained Earnings
4100
Sales - Consulting
4200
Sales - Labor
4300
Sales - Merchandise
4300.01 Sales - Merchandise - Store 1
4300.02 Sales - Merchandise - Store 2
4600
Sales Discounts
4600.01 Sales Discounts - Store 1
4600.02 Sales Discounts - Store 2
4700
Sales Returns & Allowances
4700.01 Sales Returns & Allow. Store 1
4700.02 Sales Returns & Allow. Store 2
4800
Other Income - Finance Charges
4800.01 Other Income - Store 1
4800.02 Other Income - Store 2
4900
Freight Revenue
4900.01 Freight Revenue - Store 1
4900.02 Freight Revenue - Store 2
5000
Cost of Goods Sold
5000.01 Cost of Goods Sold - Store 1
5000.02 Cost of Goods Sold - Store 2
5050
Delivery & Freight Charges
5050.01 Delivery & Freight - Store l
5050.02 Delivery & Freight - Store 2
5060
Purchase Discounts
5060.01 Purchase Discounts - Store 1
5060.02 Purchase Discounts - Store 2
6000
Accounting Fees
6000.01 Accounting Fees - Store l
6000.02 Accounting Fees - Store 2
6100
Advertising
6100.01 Advertising - Store l
6100.02 Advertising - Store 2
6200
Bad Debts
6200.01 Bad Debts - Store l
6200.02 Bad Debts - Store 2
6300
Bank Service Charges
MLManual.book Page 361 Wednesday, October 27, 2010 12:04 PM
Profit Center Chart of Accounts
6300.01 Bank Service Charges - Store l
6300.02 Bank Service Charges - Store 2
6400
Business - Entertainment
6400.01 Business/Entertainment-Store l
6400.02 Business/Entertainment-Store 2
6410
Business - Meals
6410.01 Business/Meals - Store l
6410.02 Business/Meals - Store 2
6420
Business - Travel
6420.01 Business/Travel - Store l
6420.02 Business/Travel - Store 2
6500
Contributions - Charitable
6500.01 Contrib/Charitable - Store l
6500.02 Contrib/Charitable - Store 2
6510
Contributions - Political
6510.01 Contrib/Political - Store l
6510.02 Contrib/Political - Store 2
6600
Depreciation Expense
6600.01 Depreciation Expense - Store l
6600.02 Depreciation Expense - Store 2
6700
Dues and Memberships
6700.01 Due and Memberships - Store l
6700.02 Dues and Memberships - Store 2
6800
Employee - Moving Expenses
6800.01 Employee/Moving - Store l
6800.02 Employee/Moving - Store 2
6900
Freight and Shipping
6900.01 Freight & Shipping - Store l
6900.02 Freight & Shipping - Store 2
7000
Insurance - Disability
7000.01 Insurance/Disability - Store l
7000.02 Insurance/Disability - Store 2
7010
Insurance - Group Health
7010.01 Insurance/Group Health-Store l
7010.02 Insurance/Group Health-Store 2
7020
Insurance - Life
7020.01 Insurance/Life - Store l
7020.02 Insurance/Life - Store 2
7030
Insurance - Officer Health
7030.01 Insurance-Off. Health-Store l
7030.02 Insurance/Off. Health-Store 2
7040
Insurance - Officer Life
7040.01 Insurance/Off. Life - Store l
7040.02 Insurance/Off. Life - Store 2
7100
Interest Expense
7100.01 Interest Exp - Store l
7100.02 Interest Expense - Store 2
7200
Legal Fees
7200.01 Legal Fees - Store l
7200.02 Legal Fees - Store 2
7300
Messenger Services
7300.01 Messenger - Store l
7300.02 Messenger - Store 2
7400
Miscellaneous
7400.01 Miscellaneous - Store l
7400.02 Miscellaneous - Store 2
7500
Parking
7500.01 Parking - Store 1
7500.02 Parking - Store 2
7600
Pension Plan Expense
7600.01 Pension Plan Expense - Store l
7600.02 Pension Plan Expense - Store 2
7700
Postage
7700.01 Postage - Store l
7700.02 Postage - Store 2
7800
Rent
7800.01 Rent - Store l
7800.02 Rent - Store 2
7900
Repairs & Maintenance
7900.01 Repairs/Maint. - Store l
7900.02 Repairs/Maint. - Store 2
8000
Reproduction & Printing Chgs.
8000.01 Reproduction/Printing-Store l
8000.02 Reproduction/Printing-Store 2
8100
Salaries - Agency Temp. Fees
8100.01 Salaries-Temp. Fees - Store l
8100.02 Salaries-Temp. Fees - Store 2
8110
Salaries - Commissions
361
MLManual.book Page 362 Wednesday, October 27, 2010 12:04 PM
362 Appendix B Sample COAs
8110.01 Salaries/Commissions - Store l
8110.02 Salaries/Commissions - Store 2
8120
Salaries - Officers
8120.01 Salaries/Officers - Store l
8120.02 Salaries/Officers - Store 2
8130
Salaries - Staff
8130.01 Salaries/Staff - Store l
8130.02 Salaries/Staff - Store 2
8200
Storage
8200.01 Storage - Store l
8200.02 Storage - Store 2
8300
Subscriptions
8300.01 Subscriptions - Store l
8300.02 Subscriptions - Store 2
8400
Supplies - Office
8400.01 Supplies/Office - Store l
8400.02 Supplies/Office - Store 2
8410
Supplies - Other
8410.01 Supplies/Other - Store l
8410.02 Supplies/Other - Store 2
8500
Taxes - Personal Property
8500.01 Taxes/Personal Prop. - Store l
8500.02 Taxes/Personal Prop. - Store 2
8510
Taxes - Payroll
8510.01 Taxes/Payroll - Store l
8510.02 Taxes/Payroll - Store 2
8520
Taxes - Real Estate
8520.01 Taxes/Real Estate - Store l
8520.02 Taxes/Real Estate - Store 2
8600
Telephone
8600.01 Telephone - Store l
8600.02 Telephone - Store 2
8700
Utilities
8700.01 Utilities - Store l
8700.02 Utilities - Store 2
9100
Gain/Loss on Sale of Assets
9200
Interest Earned
9600
Federal Income Tax
9700
State Income Tax
MLManual.book Page 363 Wednesday, October 27, 2010 12:04 PM
Restaurant Chart of Accounts
Restaurant Chart of Accounts
1010
1020
1030
1040
1100
1200
1300
1310
1320
1330
1700
1720
1730
1740
1750
1760
1800
1820
1830
1840
1850
1860
2100
2200
2300
2400
2500
2550
2560
2700
2999
3000
3020
4100
4200
4300
4400
4500
Cash in Bank - General
Cash in Bank - Payroll
Cash Register Drawer
Petty Cash
Accounts Receivable
Inventory
Deposits Paid
Prepaid Insurance
Prepaid Taxes
Prepaid Licenses
Kitchen Equipment
Dining Room Furn & Fixt
China, Glass, Silver, Linen
Office Furniture & Fixtures
Automobiles
Improvements
Accum Depr-Kitchen Equipment
Accum Depr-DR Furn & Fixt
Accum Depr-Ch, Gl, Sil, Lin
Accum Depr-Office Furn & Fixt
Accum Depr-Automobiles
Amortization-Improvements
Accounts Payable
Sales Tax Payable
Federal Withholding Tax
State Withholding Tax
FICA Tax Payable
State Disability Tax
Employees' Payroll Deductions
Note Payable
Suspense
Capital Stock
Retained Earnings
Food Sales
Beverage Sales
Catering Fees
Rental Fees
Other Income
5100
5200
5300
5400
5500
6000
6010
6020
6030
6040
6050
6060
6070
6080
6090
6100
6110
6120
6130
6140
6150
6160
6170
6180
6190
6200
6210
6220
6230
6240
6250
6260
6300
6350
6400
6450
9000
9100
Cost of Sales-Food
Cost of Sales-Beverage
Cost of Sales-Catering
Cost of Sales-Rentals
Other Cost of Sales
Automobile Expense
Advertising/Marketing
Bad Debts
Bank Charges
Contributions
Dues & Subscriptions
Employee Meals
Exterminator
General Insurance
Group Insurance
Laundry & Linen
Late Fees (Penalties)
Legal & Professional
Kitchen Supplies
Office Supplies
Postage
Repairs & Maintenance
Rent
Replacements
Rubbish Removal
Salaries-Management
Salaries-Host/Hostess
Salaries-Waiter/Waitress
Salaries-Bus Person
Salaries-Dishwasher
Payroll Tax Expenses
Retirement Plan Compensation
Telephone
Travel & Entertainment
Uniforms
Utilities
Interest Income
Gain on Assets
363
MLManual.book Page 364 Wednesday, October 27, 2010 12:04 PM
364 Appendix B Sample COAs
9500
9600
Interest Expense
Loss on Assets
MLManual.book Page 365 Wednesday, October 27, 2010 12:04 PM
Retail Chart of Accounts
Retail Chart of Accounts
1010
Cash In Bank - Checking Acct
1020
Cash in Bank - Payroll Acct
1030
Cash Register Drawer
1040
Petty Cash
1100
Accounts Receivable
1200
Prepaid Expenses
1400
Inventory
1710
Furniture & Equipment
1720
Leasehold Improvements
1730
Vehicles
1810
Accum Depr - Furniture & Equip
1820
Accum Depr - Leasehold
1830
Accum Depr - Vehicles
2100
Accounts Payable
2200
State Sales Tax Payable
2250
City Sales Tax Payable
2300
Federal Withholding Tax
2310
Federal Unemployment Tax
2400
State Withholding Tax
2410
State Unemployment Tax
2500
FICA Tax Payable
2510
Employee 401K Savings Plan
2520
Employee Health Insurance
2530
Employee Cafeteria Plan
2540
United Way
2550
Union Dues
2600
Bank Loan
2700
Other Long-Term Liabilities
3000
Capital Stock
3300
Retained Earnings
4000.01 Sales-Store 1
4000.02 Sales-Store 2
4100.01 Sales Returns-Store 1
4100.02 Sales Returns-Store 2
4200
Other Income
5000.01 Cost of Sales-Store 1
5000.02 Cost of Sales-Store 2
5100.01 Cost of Sales Returns-Store 1
5100.02 Cost of Sales Returns-Store 2
5200.01 COS Damage/Shrinkage-Store 1
5200.02 COS Damage/Shrinkage-Store 2
5300
Shipping/Postage
6000
Advertising/Marketing
6100
Automobile Expense
6200
Bad Debts
6300
Bank Service Charges
6400
Commissions Paid
6500
Contributions
6600
Depletion
6700
Depreciation Expense
6800
Dividend Expense
6900
Dues & Memberships
7000
Equipment Rental
7100
Franchise Fees
7200
Insurance - General
7300
Insurance - Health
7400
Interest Expense
7500
Legal & Accounting Services
7600
Licenses
7700
Meals & Entertainment
7800
Mileage Expense
7900
Pension/Profit Sharing Exp
8000
Printing
8100
Rent
8200
Repairs & Maintenance
8300
Store Supplies
8400
Telephone
8500
Travel
8600
Utilities
8700
Wages
8800
Wages - Officers
8900
Wages - Tax Expense
9000
Gain/Loss on Sales of Assets
9001
Interest Income
9002
Interest Expense
9003
Tax Expense
365
MLManual.book Page 366 Wednesday, October 27, 2010 12:04 PM
366 Appendix B Sample COAs
Sole Proprietorship Chart of Accounts
1010
1020
1030
1040
1100
1200
1400
1600
1620
1640
1660
1700
1720
1740
1760
2100
2120
2140
2160
2200
2300
2320
2340
2360
2380
2400
2600
3000
3100
3200
4000
4100
4200
5000
5100
5200
6000
6100
Checking
Payroll checking
Cash register drawer
Petty cash
Accounts receivable
Prepaid expenses
Inventory
Computer equipment
Office furniture and equipment
Vehicles
Leasehold improvements
Accum. depr.-computer equipment
Accum. depr.-office furniture
Accum. depr.-vehicles
Accum. depr.-leasehold improv
Accounts payable
American Express
MasterCard
Visa
Sales tax payable
FICA tax payable
Federal withholding tax
State withholding tax
Federal unemployment tax
State unemployment tax
State disability tax
Note payable
Owner's investment
Owner's draw
Retained earnings
Sales
Returns and allowances
Miscellaneous income
Cost of sales
Freight
Purchase discounts
Advertising/marketing
Automobile
6200
6300
6400
6500
6600
6700
6800
6900
7000
7100
7200
7300
7400
7500
7600
7700
7800
7900
8000
8100
8200
8300
8400
9000
9500
Bad debts
Bank charges
Contributions
Commissions and fees
Depletion
Depreciation
Dues and memberships
Employee benefits
Insurance
Late fees
Legal and professional
Maintenance and repairs
Miscellaneous
Office supplies
Payroll-wages
Payroll-taxes
Postage
Rent
Rent or lease equipment
Taxes and licenses
Telephone
Travel, meals and entertainment
Utilities
Interest income
Interest expense
MLManual.book Page 367 Wednesday, October 27, 2010 12:04 PM
367
Appendix C Glossary
This appendix contains a glossary of accounting terms, as well as terms
related to MultiLedger and your computer.
MLManual.book Page 368 Wednesday, October 27, 2010 12:04 PM
368 Appendix C Glossary
Accrual Accounting - a method of accounting in which transactions
are recorded in the period that they occur, which is not necessarily
when cash changes hands.
ASCII - an abbreviation for the American Standard Code for
Information Interchange. It is a standard way of representing text in
computer files.
Assets- property owned by the company, such as cash, inventory,
furniture, equipment, and buildings.
Audit Trail - records of the transactions of a company.
Balance Sheet - a report which lists the assets, liabilities, and equity in
a company as of a certain date.
Bank Reconciliation - a screen in MultiLedger used to reconcile the
cash accounts with the bank statements.
Beginning Balances - those account balances that are carried forward
from a previous accounting period.
Cash Accounting - a method of accounting in which revenues are
recorded when cash is received and expenses are recorded when cash is
paid.
Cash Flow Statement- a report which shows the cash in and out for a
given period of time.
Chart of Accounts - the account numbers and descriptions which a
company uses to record all transactions.
Check Box - a small square box that appears in a dialog box used to
choose an option.
Click- positioning the pointer on the object to be selected, and then
pressing and releasing the mouse button.
Close Box- a small square box in the upper left hand corner of the title
bar of the current window or dialog box on Macintosh or the ‘X’ box in
the upper right hand corner of the current window on Windows.
Close Year - an accounting procedure in which the balances in the
income and expense accounts are transferred to the balance sheet (to
Equity).
Control Buttons - buttons which are used to cause an action to take
place. The action is indicated by the button title.
Customer Invoices - a screen in MultiLedger used to record sales of
items and generate invoices.
Customer Payments - a screen used to record payments on account
from customers.
MLManual.book Page 369 Wednesday, October 27, 2010 12:04 PM
369
Dialog Box - a box where choices are made or data is entered.
Disbursements Journal - a journal used to record checks for items not
entered in accounts payable.
Double-click - positioning the pointer on the object to be selected, and
then clicking twice in quick succession with the mouse button.
Double Entry Accounting - a method of accounting in which each
transaction has equal debit and credit amounts. In this way, the
accounts remain balanced.
Drag - the act of positioning the pointer over the item to be dragged,
and then holding the mouse button down while moving the mouse.
Equity (Owner’s Equity) - the rights to the properties of a business,
such as common stock and retained earnings.
Expenses - expenditure for operating costs of an accounting period.
Export - the capability to move data into a text file which can be used
by other applications.
Financial Snapshot- a report which shows a summary of cash,
receivables, payables, inventory and several financial ratios.
Fiscal Year - the twelve-month accounting period used by a company.
Format - the ability to define the placement of fields for checks.
General Journal - a journal used to record transactions that do not fit
within the scope of the Receipts or Disbursements Journal, such as
depreciation or amortization adjustments.
General Ledger - a collection of ledger accounts which track a
company’s financial activities.
Icon- a picture on the desktop that represents a file.
Income - revenues received by a company, usually from sales.
Income Statement - a report which shows the income and expenses of
a company for a given time period.
Item Purchases - a screen in MultiLedger used to record purchases of
items.
Interface Accounts - a screen used to assign ledger accounts to
posting categories.
Liabilities- any debts owed by a company, such as accounts payable or
sales taxes payable.
Payables Journal - a journal used to record payables.
Pointer- the small shape on the screen that follows the movement of
MLManual.book Page 370 Wednesday, October 27, 2010 12:04 PM
370 Appendix C Glossary
the mouse (usually an arrow).
Profit Center - a portion of a company that is responsible for its own
income and expenses.
Radio Button - a hollow button which, when clicked on, becomes
filled in with a black circle. Radio buttons are a means of making a
single choice from several related alternatives within a dialog.
Receipts Journal - a journal used to record deposits to cash accounts
for items not entered in accounts receivable.
Retained Earnings - that portion of Owner’s Equity which represents
the retained net income/loss of a company.
Reversing Entry - an entry that reverses a previous entry.
Sales Journal - a journal used to record sales and generate invoices.
Scroll - to move lines of text within a box so that a different portion of
the text may be viewed.
Select - to use the mouse to click and drag across some information in
order to highlight it.
Text File - a file which can be opened by word processing and other
software packages.
Trial Balance - a listing of all of the accounts from the chart of
accounts along with their balances.
Vendor Payments - a screen used to record payments to vendors and
to generate checks.
Year-to-date - the total balance of an account from the first period in
the fiscal year to the current period.
MLManual.book Page 371 Wednesday, October 27, 2010 12:04 PM
371
Appendix D AppleScript and
Importing
This appendix describes how to use MultiLedger’s built-in AppleScript
capabilities for importing information into MultiLedger for Macintosh.
MLManual.book Page 372 Wednesday, October 27, 2010 12:04 PM
372 Appendix D AppleScript and Importing
Importing Information into MultiLedger Using AppleScript
AppleScript is a feature of the Mac OS that lets you automate tasks on
your computer. All of the available Import functions in MultiLedger,
such as importing customers, vendors, invoices, disbursements, etc...,
can be called automatically using AppleScript commands. This means
you can automate interaction from other AppleScript-aware
applications, such as FileMaker Pro or Microsoft Excel.
AppleScript is a scripting language. A scripting language lets you
control a computer by writing a series of commands, which make up
the script. When you run the script, the computer performs the actions
indicated by the commands. As with any programming or scripting
language, AppleScript consists of a set of commands, operators,
control structures, and syntax rules. Writing successful scripts is a skill
that takes time to acquire. Details about the AppleScript language,
including a beginner’s tutorial, can be found on Apple’s AppleScript
web site, http://www.apple.com/applescript.
MLManual.book Page 373 Wednesday, October 27, 2010 12:04 PM
Importing Information into MultiLedger Using AppleScript
373
MultiLedger’s AppleScript Dictionary is available from any scripting
tool, including Apple’s Script Editor. Below is MultiLedger’s scripting
dictionary.
The Required Suite of scriptable commands are Open, Run, and
Quit, and are standard with most scriptable applications.
The Open command opens a specified set of MultiLedger company
files. Be sure to type in the complete path name, including the file
name with the extension .ML0 (e.g.
HardDisk:Folder1:Folder2:FileName.ML0).
The MultiLedger Suite consists of three commands: Launch,
Import, and Exists.
The Launch command opens the specified application. In the example
below, it is the application MultiLedger.
Import is used from within a script to call any import function within
MultiLedger.
Scripting commands begin with a “tell application” command and end
with an “end tell” command. Comments are prefaced with a double
hyphen (- -).
MLManual.book Page 374 Wednesday, October 27, 2010 12:04 PM
374 Appendix D AppleScript and Importing
Below is an example of an import script written in Apple’s Script
Editor that imports a check into MultiLedger. This script checks first to
see if the disbursement "Ck 1234" already exists in the MultiLedger
company files. If the transaction already exists in the company files,
the import command is skipped.
Note
The field order used for the import is the same as the field order in the
Import List (on the Import window under the File menu) for the
company you are importing into. You should check the Import List in
the company files you are importing into to make sure that the field
order is correct.
The Import commands use the keywords import, thedata, from, and
alias.
Exists is used to determine if a customer, vendor, or item name, or, in
this case, a transaction document number already exists in the
MultiLedger company files.
MLManual.book Page 375 Wednesday, October 27, 2010 12:04 PM
375
Appendix E Error Messages
This appendix describes various MultiLedger error messages and
suggestions to help resolve these errors.
MLManual.book Page 376 Wednesday, October 27, 2010 12:04 PM
376 Appendix E Error Messages
Macintosh or Windows Error Messages
-39
File incorrect size - In most cases, a file has either been moved out of
the folder replaced by an older file, or renamed. If the message indicates
that it is the ML9 file, make sure you have a backup, then continue with
the open and Rebuild the Files. If there is a transaction or transactions
that are not complete, doing a Rebuild of the files should either delete
the problem transaction or fix it. After the Rebuild is complete, view the
General Ledger for the whole year to verify that it is in balance. If it’s
not the ML9 file, or the rebuild doesn’t work, the fastest and easiest
solution is to revert to a recent backup. If that’s not an option, you need
to contact Tech Support.
Macintosh Error Messages
-36
Input/Output Error - You might get this error by itself or with a -38
error. Either way, it’s BAD NEWS! It means a sector on the drive or
media you are using (hard drive, CD, zip, USB, etc.) is bad and the
files affected by that bad sector can’t be recovered. You will have to
revert to a backup. Make sure if the problem is with the hard drive that
you have the drive checked.
-38
File not Open - If you get this message by itself and not in conjunction
with the above error, you can generally close out of the company, shut
down your computer, then when you restart you shouldn’t get the error
message.
-5000
File Access Error - If you are getting this error message when trying
to open either MultiLedger or Payroll files on Mac OSX, it means
either the folder the datafiles are in, the application, or the datafiles
themselves have lost their access priviledges and need to be set to read
and write. If you need detailed instructions on how to do this, please
refer to the Knowledge Base on our website, www.checkmark.com.
Windows Error Messages
Unhandled Exception
This generally means there is a transaction or transactions that are not
complete. Doing a Rebuild of the files should either delete the problem
transaction or fix it. PLEASE make a backup of the files even if you
have to make a copy of the folder with the data files in it before doing a
Rebuild.
MLManual.book Page 377 Wednesday, October 27, 2010 12:04 PM
Windows Error Messages
DZIP32.DLL and/or
DUNZIP32.DLL
377
If you are getting these error messages, you need to first make a
backup of your files by copying the folder they are into a disk or
different location on your hard drive. Then you need to Uninstall the
MultiLedger or Payroll program. Then re-stall the most recent version
you have and download any patches from our website to bring your
application current. The re-install will install the DLL files into the
Windows folder where they need to be.
MLManual.book Page 378 Wednesday, October 27, 2010 12:04 PM
378 Appendix E Error Messages
MLManual.book Page 379 Wednesday, October 27, 2010 12:04 PM
379
Index
Numerics
1 time button
disbursements journal 207, 210
1099 adjust
for vendors 71
1099s 278
adjusting amount for vendor 71
formatting 110
marking vendors to receive 70
printing 286
verifying info 285
30 open months 122
A
Account balances 30
entering 30
reasons for not balancing 31
Account numbers
deleting 26
entering 24
for profit centers 89
guidelines for setting up 23
modifying 26
posting accounts 27
renumbering 257
Accounts
sample charts of accounts 347
Accounts payable
aged report 277, 281
aging periods for reports 279
interface account 27
report 277, 280
setting up prior outstanding 41
summary aged report 277, 282
Accounts receivable
aged report 265, 270
aging periods for reports 268
interface account 27
report 265, 269
setting up prior outstanding 32
summary aged report 266, 271
Accrual accounting definition 368
Adjust inventory 236
field descriptions 236
manufacturing from components 240
modifying or deleting 239
reuse 236, 239
uses for 236
using 238
viewing 241
Advance deposits
recording in sales journal 181
Aging periods
for accounts payable reports 279
for accounts receivable reports 268
Alert if no backup in this many days 93
AppleScript 372
MultiLedger dictionary 373
ASCII file
definition 368
importing and exporting 242
Assets definition 368
Audit trail
definition 368
B
Backing up
as zip file 53, 54
cross platform compatibility 60
on Macintosh 54
on Windows 53
reminder 93
MLManual.book Page 380 Wednesday, October 27, 2010 12:04 PM
380
Index
restoring a backup on Macintosh 57
restoring a backup on Windows 55
setting automatic reminder 52
suggestions for 52
Backing up files 52
(see also Backing up)
Backup
opening on Macintosh 57
opening on Windows 55
Backup company command 53, 54
Bad debt
recording 178
Balance sheet
customizing account groupings 96
customizing heading descriptions 95
customizing heading ranges 96
definition 368
deleting custom account groupings
97
modifying account groupings 97
prior year comparison report 313,
321
prior year-end comparison report 313
report options 313, 321
reports 312
show detail accounts option 313, 321
show whole dollars option 313, 321
types of reports 313, 321
Balances
entering beginning account 30
Balancing checkbook 229
(see also Bank reconciliation)
Bank reconciliation
balancing 231
bank statement balance 229
cleared deposits 230
cleared withdrawals 230
current outstanding 230
cutoff date 229
definition 368
finalize 231
get transactions 230
ledger balance 230
outstanding not entered 229
print 231
print cleared items 229
problems with 234
reconciling 231
revised bank balance 230
show cleared items 229
sort by ref number 229
tips for balancing 234
Bank statement balance
bank reconciliation 229
Beginning balances
definition 368
Beginning ledger account balances 14
Budget
report 316
setting up 84
versus income report 316
C
Cash account
for customer payments 171
for disbursements journal 207
for receipts journal 167
for vendor payments 213
interface account 25, 27
Cash accounting definition 368
Cash flow report 320
Chart of accounts 14
basic sample 348
construction sample 349
definition 368
deleting 26
entering 24
graphic artist sample 351
MLManual.book Page 381 Wednesday, October 27, 2010 12:04 PM
381
graphing account balances vs budget
300
graphing prior-year comparisons 299
guidelines for setting up 23
interface accounts 27
medical partnership sample 352
modifying 26
newspaper sample 354
non-profit sample 355
partnership sample 357
posting categories 257
printing 299
printing/copy center sample 358
professional sample 359
profit center accounts 89
profit center sample 360
renumber 257
reports 298
restaurant sample 363
retail sample 365
samples 347
setting up 23
setting up balances 30
sole proprietorship sample 366
Check box definition 368
Check for duplicate documents 90
Check number 121
disbursements journal 207
vendor payments 213
Check stub description
item purchases 196
payables journal 203
Check stub printing 105
Checkbook
(see also Bank reconciliation)
balancing 229
Checking account
balancing 229
CheckMark Forms 1099 Export 247
CheckMark Payroll
(see Payroll)
Checks
formatting 110
MICR encoding 108
modifying or deleting in
disbursements journal 212
modifying or deleting in vendor
payments 218
printing 2nd stub 105
printing from disbursements journal
211
recording in disbursements journal
209
recording in vendor payments 214
report 305
stub description from item purchases
196
stub description from payables
journal 203
writing refund to customer 172
Cleared deposits
bank reconciliation 230
Cleared withdrawals
bank reconciliation 230
Click definition 368
Close box definition 368
Close year definition 368
Closing the year 254
making adjustments to prior year 254
Codes
for customers 115
for items 115
for vendors 115
Command center 11
Commands
close year 254
find and find again 260
rebuild files 256
MLManual.book Page 382 Wednesday, October 27, 2010 12:04 PM
382
Index
rename files 255
Comment lines
adding to transactions 126
modifying or removing 126
Commission on gross margin 102
Commission rate 102
Company files
rebuilding 256
renaming 255
Company information window
ending date of prior year 14, 22
setting up basic information 21
start month 14
Contacting CheckMark Software 4
Control buttons definition 368
Creating a new company
on Macintosh 19
on Windows 17
Credit
applying customer 184
applying vendor 223
limit for customers 66
limit for vendors 72
recording vendor 222
refunding to customer 172
Credit memos 183
Cross-platform
compatibility 5
considerations 5
differences 5
Current outstanding
bank reconciliation 230
Customer information report 273, 274
Customer invoices 149
amount 154
defined 148
definition 368
deleting 159
field descriptions 149
invoice number 150
invoice total 154
item 152
job 153
modifying 159
order number 152
printing 159
quantity 153
quote 149
recurring entries 149
report 305
sales tax 151
salesperson 152
selling price 153
ship charge 152
ship date 152
ship to 150
ship via 152
show customer history 157
statement description 151
terms 152
unit cost 154
Customer invoices & sales report 305
Customer payments
applying customer credits 184
cash account 171
definition 368
deposit number 171
discount/adjust account 171
field descriptions 171
modifying or deleting 177
recording deposits with 173
report 305
reversing a receivable 182
statement description 172
writing refund checks 172
Customer statements 267, 274
activity based 267, 276
description on customer invoices 151
MLManual.book Page 383 Wednesday, October 27, 2010 12:04 PM
383
description on customer payments
172
description on sales journal 161
formatting 110
open invoices 267, 275
options for 267
zero-balance statements 267
Customer terms
days til due 62
deleting 64
early payment discount 62
early payment due days 62
field descriptions 62
modifying 64
on customer invoices 152
on sales journal 161
setting up 63
Customers
accounts receivable report 265, 269
aged accounts receivable report 265,
270
applying credits 184
assigning pricing level to 67
assigning sales tax to 66
assigning salesperson to 66
assigning terms to 66
bad debt 178
credit limit 66
deleting 69
finance charges 187
history reports 271
information report 267, 273, 274
invoice item detail report 266, 273
mailing labels 267
marking as inactive 65
modifying 69
notes 65
recording advance deposits 181
reports 265
sales discount % 67
separating city, state, zip when
exporting 245
setting up 65, 68
setting up codes for 115
setup field descriptions 65
show history in customer invoices
157
show history in sales journal 164
special situations 181
statements 267
summary aged accounts receivable
report 266, 271
terms (see Customer terms)
transaction detail report 266, 272
transaction summary report 271, 272
writing refund check to 172
Customizing financial statements 95
Cutoff date
bank reconciliation 229
on accounts payable reports 279
on accounts receivable reports 268
D
Data entry
moving between fields 118
using pop-up lists 118
Data files
rebuilding 256
renaming 255
Date
alert messages 124
for transactions 123
formats 123
international format 123
Default vendor due days 92
Deleting
adjust inventory 239
comment lines 126
MLManual.book Page 384 Wednesday, October 27, 2010 12:04 PM
384
Index
custom account groupings for
financial statements 97
customer invoices 159
customer payments 177
customer terms 64
customers 69
disbursements journal checks 212
finance charges 190
general journal 228
item purchases 201
items 80
jobs 99
ledger accounts 26
passwords 142
payables journal documents 206
purchase orders 220
quotes 180
receipts journal deposits 170
recurring entries 134
sales journal invoices 166
sales tax 101
salespeople 104
shipping methods 86
transactions 127
users 142
vendor payments 218
vendors 75
Deposit number 121
for customer payments 171
receipts journal 167
Deposit slips
MICR printing 172
printing 106
Deposits
modifying or deleting in customer
payments 177
recording advance 181
recording with customer payments
173
recording with receipts journal 169
Dialog box
definition 369
Disbursements
report 305
Disbursements journal 207
1 time button for vendor 207, 210
cash account 207
check number 207
definition 369
description field 208
entering one time vendor 207
field descriptions 207
job 208
ledger account 208
modifying or deleting checks 212
paid to 207
printing checks from 211
recording a check with 209
recurring entries 207
report 305
Discount/adjustment account
on customer payments 171
on vendor payments 213
Document number
item purchases 195
payables journal 202
Document numbers 121
checking for duplicates 122
Double entry accounting definition 369
Double-click definition 369
Drag definition 369
Drill down
on general ledger reports 310
on transaction journal reports 308
on trial balance report 302
Due date
item purchases 195
payables journal 203
MLManual.book Page 385 Wednesday, October 27, 2010 12:04 PM
385
Duplicate documents
checking for 90, 122
Ending date of prior year 14, 22
Equity (owner’s equity) definition 369
Error messages 376
-36 input/output error 376
-38 file not open 376
-39 file incorrect size 376
-5000 file access error 376
DUNZIP32.DLL 377
DZIP32.DLL 377
posting payroll 344
unhandled exception 376
Expenses definition 369
Export definition 369
Exporting 242, 244
posting employee checks to
MultiLedger for Mac 339
posting employee checks to
MultiLedger for Windows
334
posting employer checks to
MultiLedger for Mac 342
posting employer checks to
MultiLedger for Windows
337
separate city, state, zip 245
To CheckMark Forms 1099 247
Finance charges 187
deleting 190
field descriptions 187
recording 188
recording payments 190
Financial reports (see reports)
Financial snapshot 323
Financial snapshot report 323
Financial statements
customizing 95
customizing account groupings 96
customizing heading descriptions 95
customizing heading ranges 96
deleting account groupings 97
modifying account groupings 97
Find
company files 257
in reports 260
name in pop-up list 119
Find company files 257
Fiscal year definition 369
Font
for printing 104
Format definition 369
Formatting
1099s 110
checks 110
customer statements 110
invoices 110
resetting to default 112
F
G
File menu
find company fles 257
print font 104
renumber accounts 257
Finalize
bank reconciliation 231
General journal
definition 369
field descriptions 226
job 226
ledger account 226
modifying or deleting 228
recording transactions in 227
E
MLManual.book Page 386 Wednesday, October 27, 2010 12:04 PM
386
Index
recurring entries 226
reference number 226
report 305
using 226
General ledger
definition 369
drill down on reports 310
reports 309
Get transactions
bank reconciliation 230
Graphing
account balances versus budget 300
item sales 290
prior-year comparison chart of
accounts 299
Gross margin
calculate commission on 102
GST
setting preference 91
H
Hardware and system requirements 2
Hide cash balance 91
Hide unit cost in customer invoice 91
I
Icon definition 369
Importing 242, 248
AppleScript 372
match name & code 250
repeating fields 249
Inactive
customers 69
vendors 70, 78
Include Tax 1 in Tax 2 computation 91
Income definition 369
Income statement
budget report 316
customizing account groupings 96
customizing heading descriptions 95
customizing heading ranges 96
definition 369
deleting account groupings 97
income vs budget report 316
modifying account groupings 97
prior month comparison 315
prior year comparison 316
profit center reports 316
report options 316
reports 315
show detail accounts option 316
show net before taxes option 316
types of reports 315
whole dollar option 316
Income vs. budget
income statement 316
Insert line 126
modifying or removing 126
Installing
MultiLedger on Macintosh 8
MultiLedger on Windows 6
Interface accounts
accounts payable 27
accounts receivable 27
assigning 28
cash account 25, 27
category descriptions 27
definition 369
inventory 28
retained earnings 27
setting up 27
shipping charged 27
shipping paid 27
International date format 91
Inventory
(see also Items)
adjusting 238
MLManual.book Page 387 Wednesday, October 27, 2010 12:04 PM
387
building 240
buying 194
interface account 28
issuing credit memo for return 183
recording vendor credit for return
222
Inventory-current report 290, 294
Inventory-selected date report 290, 295
Invoice item detail customer report 273
Invoice number 121
customer invoices 150
sales journal 160
Invoice total
customer invoices 154
sales journal 162
Invoices
(see also Customer invoices)
(see also Sales journal)
creating from quotes 180
formatting 110
reversing 182
writing off for customer 178
Item purchase detail
vendor report 278, 284
Item purchase/PO tax label 91
Item purchases
check stub description 196
defined 194
definition 369
document number 195
due date 195
field descriptions 194
item 196
job 196
modifying or deleting 201
printing 105, 201
purchase order 194
recording a purchase with 198
recurring entries 194
report 305
reversing 221
shipping amount 196
show vendor history 199, 205
tax paid 196
unit cost 196
Item purchases & payables report 305
Item reports 290
Items
(see also Adjust inventory)
average unit cost 77
buying inventory 194
credit for returns 183
current inventory report 290
customer invoices 152
deleting 80
graphing sales 290
inventory not balancing 50
inventory-current report 294
inventory-selected date report 290,
295
item purchases 196
last unit cost 77
modifying 80
price list report 290, 295
purchase detail report 290, 294
purchase summary report 290, 293
reports 290
sales detail report 290, 293
sales summary report 290, 292
selling prices 76
setting cost/expense account for 77
setting income account for 77
setting up 49, 79
setting up as commissionable 78
setting up as taxable 77
setting up codes for 115
setup field descriptions 76
total cost 76
MLManual.book Page 388 Wednesday, October 27, 2010 12:04 PM
388
Index
verifying setup of 49
J
Job detail report 330
Job summary report 329
Jobs 97
deleting 99
detail report 330
estimated expense 97
estimated income 97
general journal 226
in customer invoices 153
in disbursements journal 208
in item purchases 196
in payables journal 203
in receipts journal 168
in sales journal 161
marking as complete 97
modifying 99
prior expense 98
prior income 97
reports 329
setup field descriptions 97
summary report 329
L
Labels
customer mailing 267
options 92
sales journal 105
shipping 105
vendor mailing 278
Laser stub 105
Ledger account
disbursements journal 208
general journal 226
payables journal 203
receipts journal 167
sales journal 161
Ledger accounts
deleting 26
entering balances 30
for Mac Payroll posting 339, 342
for Windows Payroll posting 334,
337
modifying 26
Ledger balance 31
bank reconciliation 230
Liabilities definition 369
Locking months 123, 143
M
Macintosh
backing up on 54
creating a new company on 19
entering one-time vendor 207
importing with Apple Script 372
installing MultiLedger 8
posting employee payroll checks to
MultiLedger 339
posting employer checks to
MultiLedger 342
printing PICT file 106
restoring a backup on 57
version of MultiLedger 5
Mailing labels 92
for customers 267
for vendors 278
Manufacturing (see Adjust inventory)
Mapping
drive on Windows 136
Margin
calculate commission on gross 102
Match name & code
importing 250
Metafile
positioning print fields for 112
MLManual.book Page 389 Wednesday, October 27, 2010 12:04 PM
389
printing 106
printing customer statements 267
MICR encoding 108
deposit slips 106, 172
Modifying 142
adjust inventory 239
comment lines 126
custom account groupings for
financial statements 97
customer invoices 159
customer payments 177
customer terms 64
customers 69
disbursements journal checks 212
general journal 228
item purchases 201
items 80
jobs 99
ledger accounts 26
passwords 142
payables journal 206
purchase orders 220
quotes 179
receipts journal deposits 170
sales journal invoices 166
sales tax 101
salespeople 103
shipping methods 86
transactions 127
users 142
vendor payments 218
vendors 75
Months
locking and unlocking 123, 143
working with 30 open 122
Multiple open windows 12
Multiple users
(see also multi-user)
in MultiLedger 136
Multi-user
access limitations 137
installing MultiLedger 136
mapping drive on Windows 136
network considerations 140
restrictions 138
Multi-user capabilities 136
N
Naming company 17
Network
(see also multi-user)
mapping drive on Windows 136
multi-user considerations 140
New company
creating on Macintosh 19
creating on Windows 17
New line
in customer invoices 154
in disbursements journal 208
in general journal 227, 228
in item purchases 197, 201
in payables journal 204, 206
in receipts journal 168
in sales journal 162
O
Open
backup on Macintosh 57
backup on Windows 55
sample company on Macintosh 9
sample company on Windows 6
Open last company on launch 93
Open recent company
on Macintosh 10
on Windows 8
Opening
last company on launch 93
MLManual.book Page 390 Wednesday, October 27, 2010 12:04 PM
390
Index
Opening multiple windows 12
Operating expenses
definition 369
Order number
customer invoices 152
Outstanding not entered
bank reconciliation 229
Outstanding payables
prior to start date 41
verifying set up of 46
Outstanding receivables
prior to start date 32
verifying setup of 37
P
Packing slip
printing 105
Passwords
deleting 142
how they work 143
modifying 142
setting up 140
Payables
accounts payable report 277, 280
aged report 277, 281
modifying or deleting in item
purchases 201
modifying or deleting in payables
journal 206
printing item purchases 201
recording in item purchases 198
recording in payables journal 204
reversing 221
setting up prior outstanding 41
summary aged report 277, 282
verifying the setup of outstanding 46
Payables journal 201
check stub description 203
definition 369
description field 203
document number 202
due date 203
entering outstanding payables 42
field descriptions 202
job 203
ledger account 203
modifying or deleting 206
recording a purchase with 204
recurring entries 202
report 305
reversing 221
Payroll
possible posting errors 344
posting employee checks to
MultiLedger for Mac 339
posting employee checks to
MultiLedger for Windows
334
posting employer checks to
MultiLedger for Mac 342
posting employer checks to
MultiLedger for Windows
337
Period & Y-T-D income statement report
315
Phone number for support 4
PICT files
positioning print fields for 112
printing 106
printing customer statements 267
Pointer definition 369
Pop-up lists
adding or editing names in 120
entering information with 120
finding a name in 119
skipping 121
using 118
POs
MLManual.book Page 391 Wednesday, October 27, 2010 12:04 PM
391
(see purchase orders)
Posting 342
error messages from CheckMark
Payroll 344
Payroll to MultiLedger for Mac 339,
342
Payroll to MultiLedger for Windows
334
Posting categories 27
assigning accounts to 28
see also Interface accounts
Preferences 90
check for duplicate documents 90
currency symbol 92
default vendor due days 92
hide cash balance 91
hide unit cost in customer invoice 91
include Tax 1 in Tax 2 computation
91
international date format 91
item purchase/PO tax label 91
mailing label options 92
print customer notes on sales journal
91
remove item code field on invoice 91
shipping label 91
show code field on reports 91
skip Tax 2 during invoice entry 91
use check stub description in
payables journal 91
Pre-payments
recording in sales journal 181
Price list for items 290, 295
Print cleared items
bank reconciliation 229
Print customer notes on sales journal 91
Print Metafile 106
Print multiple 263
Print PICT file 106
Printing 105
2nd stub on laser check 105
bank reconciliation 231
chart of accounts 299
checks 105
customer invoices 159
customer invoices & quotes 105
customer mailing labels 267
customer statements 267
deposit slips 106, 172
disbursements journal checks 211
item purchases 105, 201
MICR encoding 108
multiple reports 263
options 105
packing slip 105
PICT file 106
purchase orders 105, 220
quotes 180
recurring entries 134
sales journal invoices 105, 166
sales journal labels 105
selecting font for 104
shipping labels 105
using print command 107
vendor mailing labels 278
Windows Metafile 106
Prior month comparison
income statement 315
Prior outstanding A/R and A/P invoices
14
Prior year
adjusting 254
Prior year comparison
balance sheet report 313, 321
income statement 316
Prior year-end comparison
balance sheet report 313
Profit center definition 370
MLManual.book Page 392 Wednesday, October 27, 2010 12:04 PM
392
Index
Profit centers 87
income statement reports 316
sample chart of accounts 360
Purchase detail item report 290, 294
Purchase orders 219
converting to payable 220
creating 219
deleting 220
modifying 220
printing 105, 220
report 305
viewing 221
working with 220
Purchase summary item report 290, 293
Q
Quotes 179
creating 179
creating in customer invoices 149
creating in sales journal 160
deleting 180
modifying 179
printing 180
report 305
turning into invoices 180
viewing 181
working with 179
R
Radio button definition 370
Rebuild files 256
Receipts journal 167
cash account 167
defined 149
definition 370
deposit number 167
deposit total 168
description field 167, 168
field descriptions 167
job 168
ledger account 167
modifying or deleting 170
recording deposits with 169
recurring entry 167
report 305
Receipts report 305
Receivables
aged report 265, 270
report 265, 269
reversing 182
setting up prior outstanding 32
summary aged report 266, 271
verifying setup of outstanding 37
Recording sales 147
with customer invoices 155
with sales journal 163
Recurring entries 130
alert dialog 131
creating 131
customer invoices 149
deleting 134
disbursements journal 207
edit frequency 134
general journal 226
item purchases 194
payables journal 202
receipts journal 167
recurring window 133
reminder window 94
report 305
sales journal 160
viewing 134
Recurring window 133
Reference number
general journal 226
Refund
on customer payments 172
MLManual.book Page 393 Wednesday, October 27, 2010 12:04 PM
393
Remove item code field on invoice 91
Rename files 255
Renumbering accounts 257
Repeating fields
importing 249
Report
customer invoices and sales 305
Report windows
using 260
Reports
1099s 278
accounts payable 277, 280
accounts receivable 265, 269
aged accounts payable 277, 281
aged accounts receivable 265, 270
aging periods for accounts payable
279
aging periods for accounts receivable
268
balance sheet 312
balance sheet options 313, 321
budget 316
cash flow 320
chart of accounts 298
current inventory 290
customer 265
customer history 271
customer information 267, 273, 274
customer invoice item detail 266, 273
customer invoice item history 271
customer mailing labels 267
customer statements 267, 274, 275,
276
customer transaction detail 266, 272
customer transaction summary 266,
272
customizing financial statments 95
disbursements 305
drill down on general ledger 310
drill down on transaction journal
reports 308
financial snapshot 323
find command 260
general journal 305
general ledger 309
graph item sales 290
income statement for profit centers
316
income statements 315
income statment options 316
income versus budget income
statement 316
inventory price list 290
inventory-current 290, 294
inventory-selected date 290, 295
item 290
item price list 290, 295
item purchase detail 290, 294
item purchase summary 290, 293
item purchases and payables 305
item sales detail 290, 293
item sales summary 290, 292
job detail 330
job summary 329
jobs 329
mailing labels for customers 267
mailing labels for vendors 278
making selections in list 262
period and YTD income statement
315
printing 1099s 286
printing multiple 263
prior month comparison income
statement 315
prior year comparison balance sheet
313, 321
prior year comparison income
statement 316
MLManual.book Page 394 Wednesday, October 27, 2010 12:04 PM
394
Index
prior year-end comparison balance
sheet 313
purchase orders 305
quotes 305
receipts 305
recurring entries 305
sales tax 324
salesperson 326
selected date inventory 290
selecting print font for 104
show detail accounts on balance
sheet 313, 321
show detail accounts option on
income statement 316
show net before taxes option on
income statement 316
show whole dollars on balance sheet
313, 321
sorting transaction journal 304
summary aged accounts payable 277,
282
summary aged accounts receivable
266, 271
transaction journals 304
trial balance 301
trial balance drill down 302
types of balance sheets 313, 321
types of income statements 315
vendor 277
vendor history 278
vendor information 278, 284, 285
vendor item purchase detail 278, 282,
284
vendor mailing labels 278
vendor transaction detail 278, 282,
283
vendor transaction summary 278,
282, 283
whole dollar option on income
statement 316
Restoring a backup
Extract to dialog on Windows 56
on Macintosh 57
on Windows 55
Retained earnings
assigning account 27
definition 370
interface account 27
Reuse
adjust inventory 236, 239
Reversing a payable 221
Reversing entry definition 370
Revised bank balance
bank reconciliation 230
S
Sales detail item report 290, 293
Sales journal
defined 148
definition 370
entering outstanding receivables 32
field descriptions 160
invoice total 162
job 161
ledger account 161
modifying and deleting invoices 166
printing invoices 166
printing labels 105
quote 160
recording a sale with 163
recording advance deposits 181
recurring entry 160
report 305
show customer history 164
statement description 161
terms 161
Sales journal invoices
printing 105
MLManual.book Page 395 Wednesday, October 27, 2010 12:04 PM
395
Sales journal labels
printing 105
Sales summary
item report 292
Sales summary item report 290
Sales tax
assigning to customer 66
customer invoices 151
deleting 101
modifying 101
reports 324
setup 100
setup field descriptions 100
Salespeople
commission on gross margin 102
commission rate 102
customer invoices 152
deleting 104
modifying 103
report 326
setting up 102
setup field descriptions 102
Salesperson
(see Salespeople)
assigning to customer 66
Sample company
opening on Macintosh 9
opening on Windows 6
Saving transactions 127
Scripting in MultiLedger 372
Scroll definition 370
Searching in reports 260
Select definition 370
Selling price on customer invoices 153
Setting up
automatic backup reminder 93
basic company information 21
budget 84
chart of accounts 23
customer terms 63
customers 65, 68
interface accounts 27
inventory 49
items 49, 79
jobs 97
mailing labels 92
new company 16
outstanding payables 41
outstanding receivables 32
passwords 140
posting categories 257
preferences 90
profit centers 87
sales tax 100
salespeople 102
shipping methods 86
user settings 93
users 140
vendors 73
Ship charge 152
Ship date on customer invoices 152
Ship to on customer invoices 150
Ship via
(see Shipping methods)
customer invoices 152
Shipping
amount on item purchases 196
Shipping charged
interface account 27
Shipping labels 91, 105
Shipping methods
customer invoices 152
deleting 86
modifying 86
setting up 86
Shipping paid
interface account 27
Show cleared items
MLManual.book Page 396 Wednesday, October 27, 2010 12:04 PM
396
Index
bank reconciliation 229
Show code field on reports 91
Show detail accounts
on balance sheet 313, 321
option on income statement 316
Show history
from customer invoices 157
from item purchases 199, 205
from sales journal 164
Show net before taxes
on income statement 316
Show scheduled recurring entries 94
Skip Tax 2 during invoice entry 91
Sort by ref number
bank reconciliation 229
Starting month 14
Starting MultiLedger 6
Statement description
customer invoices 151
customer payments 172
sales journal 161
Statement of cash flows 320
Statements
(see also Customer statements)
formatting 110
Steps to setting up a company 16
Support
fax number 4
phone number 4
System requirements 2
T
Tab-delimited file
importing and exporting 243
Tax
(see Sales tax)
Tax ID for vendors 71
Tax paid on item purchases 196
Technical support 2
Terms
customer invoices 152
sales journal 161
See Customer terms
Text file
definition 370
importing and exporting 242
Transaction dates 123
Transaction detail
customer report 266, 272
vendor report 278, 283
Transaction journal reports 304
Transaction journals
customer invoices and sales report
305
disbursements report 305
drill down on reports 308
general report 305
item purchases and payables report
305
purchase order report 305
quotes report 305
receipts report 305
recurring entries report 305
sorting reports 304
Transaction journals reports 304
Transaction summary
customer report 272
vendor report 278, 283
Transactions
30 open months 122
adding comment lines to 126
checking for duplicate document
numbers 122
customer flowchart 146
date alert messages 124
dates 123
document numbers 121
modifying and deleting 127
MLManual.book Page 397 Wednesday, October 27, 2010 12:04 PM
397
modifying comment lines 126
moving between fields 118
recording in general journal 227
recurring (also see Recurring entries)
removing comment lines 126
saving 127
using pop-up lists 118
valid dates 124
voiding 129
Trial balance
definition 370
drill down on report 302
report 301
U
Unit cost
customer invoices 154
item purchases 196
Unlocking months 123, 143
User settings
open last company on launch 93
prompt if no backup in this many
days 93
setting up 93
show scheduled recurring entries 94
sort customers by name 94
sort items by name 94
sort vendors by name 94
Users
deleting 142
modifying 142
passwords 140
setting up 140
V
Vendor information report 285
Vendor payments 213
applying credit amounts in 223
cash account 213
check number 213
definition 370
discount/adjustment account 213
field descriptions 213
modifying or deleting 218
recording checks with 214
report 305
reversing a payable 221
Vendors
1 time button on disbursements
journal 207, 210
1099s 278
accounts payable report 277, 280
adjusting 1099 amount 71
aged accounts payable report 277,
281
applying credit 223
default due days 92
deleting 75
history reports 278
information report 278, 284, 285
item purchase detail report 278, 284
mailing labels 278
marking as inactive 70, 78
marking for 1099 70
modifying 75
notes 70
printing 1099s for 286
recording vendor credit 222
reports 277
selecting1099 category 71
separating city, state, zip when
exporting 245
setting credit limit for 72
setting day of month due 71
setting default account for 71
setting default amount for 71
setting discount % for 72
MLManual.book Page 398 Wednesday, October 27, 2010 12:04 PM
398
Index
setting discount days for 72
setting up 73
setting up codes for 115
setup field descriptions 70
show history in item purchases 199,
205
special situations 221
summary aged accounts payable
report 277, 282
tax ID 71
transaction detail report 278, 283
transaction summary report 278, 283
Voiding transactions 129
W
Whole dollars
show on balance sheet 313, 321
show on income statement 316
Windows
backing up on 53
creating a new company 17
installing MultiLedger 6
mapping drive for multi-user 136
new line in customer invoices 154
new line in disbursements journal
208
new line in general journal 227, 228
new line in item purchases 197, 201
new line in payables journal 204, 206
new line in receipts journal 168
new line in sales journal 162
posting employee payroll checks to
MultiLedger 334
posting employer checks to
MultiLedger 337
printing Metafile 106
restoring a backup on 55
version of MultiLedger 5
Y
Year
closing 254
Year-to-date
definition 370
Z
Zip file
backing up as 53, 54
restoring backup 55, 57