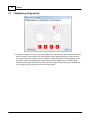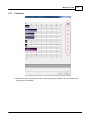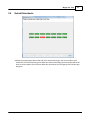
1
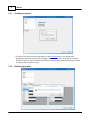
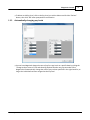
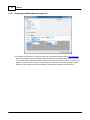
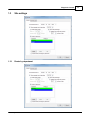
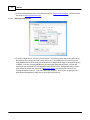
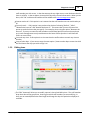
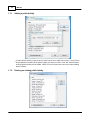
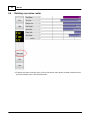
Contents
1
Table of Contents
Foreword
Part I WageLoch Control
0
3
1 Staff members
................................................................................................................................... 4
Creating a staff..........................................................................................................................................................
m em ber
4
Term inating an..........................................................................................................................................................
em ployee
5
Re-activating
.........................................................................................................................................................
a terminated employee
6
2 Pay levels
................................................................................................................................... 7
Creating a pay ..........................................................................................................................................................
level
8
Deleting a pay level
.......................................................................................................................................................... 8
Autom atically changing
..........................................................................................................................................................
pay levels
9
Assigning a staff
..........................................................................................................................................................
m em ber to a pay level
10
3 Site settings
................................................................................................................................... 11
Roster by departm
..........................................................................................................................................................
ent
11
Setting up .........................................................................................................................................................
departments
12
4 Colours
................................................................................................................................... 13
5 Leave...................................................................................................................................
management
14
Adding leave ..........................................................................................................................................................
entries
14
Editing leave .......................................................................................................................................................... 15
Deleting leave.......................................................................................................................................................... 16
6 Passwords
................................................................................................................................... 16
7 Public
...................................................................................................................................
holidays
17
Adding a public
..........................................................................................................................................................
holiday
18
Deleting an existing
..........................................................................................................................................................
public holiday
18
Dow nloading ..........................................................................................................................................................
the latest public holiday list
19
Part II WageLoch Roster
20
1 Setup................................................................................................................................... 21
2 Emailing
...................................................................................................................................
rosters
22
3 Saving
...................................................................................................................................
a roster
23
4 Deleting
...................................................................................................................................
a previous roster
24
5 Video...................................................................................................................................
Assist
25
6 Creating
...................................................................................................................................
a new roster
25
Roster
.......................................................................................................................................................... 27
Rostering staff
......................................................................................................................................................... 28
Roster by staff
.........................................................................................................................................................
member
29
Inserting a.........................................................................................................................................................
lunch break
30
Hours
......................................................................................................................................................... 31
Copy from......................................................................................................................................................... 31
Clear day ......................................................................................................................................................... 32
Show cost.........................................................................................................................................................
per shift
32
Daily notes......................................................................................................................................................... 33
Departments
......................................................................................................................................................... 33
Count staff.........................................................................................................................................................
members
34
© 2011 WageLoch
1
2
Manual
Printing ......................................................................................................................................................... 34
Printing options ......................................................................................................................................... 35
Budget
.......................................................................................................................................................... 35
Pays
.......................................................................................................................................................... 36
Sales
.......................................................................................................................................................... 36
7 Creating
...................................................................................................................................
a roster template
37
8 Rotating
...................................................................................................................................
rosters
38
9 Change
...................................................................................................................................
log
39
10 SMS messages
................................................................................................................................... 40
Check for replies
.......................................................................................................................................................... 41
Send a roster.......................................................................................................................................................... 41
Send a m essage
.......................................................................................................................................................... 42
Part III WageLoch Time
43
1 Registering
...................................................................................................................................
a fingerprint
44
2 Clocking
...................................................................................................................................
in and out
45
3 End of
...................................................................................................................................
day
46
Paid hours
Sales
Notes
Filter
.......................................................................................................................................................... 47
.......................................................................................................................................................... 48
.......................................................................................................................................................... 49
.......................................................................................................................................................... 50
4 Submit
...................................................................................................................................
timesheets
51
Sending tim esheets
..........................................................................................................................................................
to payroll
52
5 Print ...................................................................................................................................
who's here
53
6 Video...................................................................................................................................
Assist
53
7 Admin
................................................................................................................................... 54
Form at Of nam
..........................................................................................................................................................
es
54
Tim e clock font
..........................................................................................................................................................
size
54
Print tim esheet
.......................................................................................................................................................... 55
View tim esheet
..........................................................................................................................................................
calculations
55
Resubm it tim..........................................................................................................................................................
esheet
56
Delete a staff ..........................................................................................................................................................
m em ber's fingerprints
57
Com pare clock
..........................................................................................................................................................
tim es to pays
58
Print clock tim..........................................................................................................................................................
es
59
View /m odify clock
..........................................................................................................................................................
tim es
59
8 Fingerprint
...................................................................................................................................
Privacy Policy
60
Index
0
© 2011 WageLoch
WageLoch Control
1
WageLoch Control
Staff members
Pay levels
Site settings
Colours
Leave management
Change passwords
Public holidays
© 2011 WageLoch
3
4
1.1
Manual
Staff members
All of your staff details are kept in the "Staff members" page; their name, age, pay group and
base rate. This is where you can add an employee, change their details, or dismiss someone so
that they don’t show on the clock on system.
1.1.1
Creating a staff member
© 2011 WageLoch
WageLoch Control
5
To create a staff member, click the "Create" button down the bottom-left of the "Staff
members" form. This will display a form which lets you add information about your new
employee. Once you have finished click "OK" and the staff member will be added to WageLoch.
1.1.2
Terminating an employee
To terminate an employee, click "Staff members" in WageLoch Control, and then double-click
on the staff member you wish to terminate. In the top-right corner of the employee screen put
a tick in the box next to the words "Terminate on", choose the date they have been terminated
on, and then click OK. This staff member will remain in WageLoch as a terminated employee
for 1 year from the termination date just in case you re-hire them.
© 2011 WageLoch
6
1.1.2.1
Manual
Re-activating a terminated employee
To re-activate a terminated staff member, open Staff members in WageLoch Control and put a
tick in the "Show terminated" box at the bottom-left. This will then show all the staff members
you have terminated within WageLoch. Double-click the staff member you wish to re-activate
and remove the tick from the "Terminate on" box. This will put them back into WageLoch. Click
"Save & close" when finished.
© 2011 WageLoch
WageLoch Control
1.2
7
Pay levels
On the "Pay levels" screen you can specify named rates of pay, which can also be specified
according to the age of a person if necessary. These pay levels can then be linked to your
individual employees. Selecting the option to "Use age-based rates" when you create a new
pay level will allow WageLoch to automatically change the rate of a person when they have a
birthday.
© 2011 WageLoch
8
1.2.1
Manual
Creating a pay level
To create a Pay level click the Create button in the Pay levels screen. You will then be
prompted to name the Pay level (for example, Level 1, Level 2, etc.) Click "OK" to create the
Pay level in the list. Once created you will have to click the name of the Pay level you created
to bring up the list of rates to pay.
1.2.2
Deleting a pay level
© 2011 WageLoch
WageLoch Control
9
To delete an old Pay level, click on the Pay level you wish to delete and click the "Delete"
button, then click "OK" when prompted for confirmation.
1.2.3
Automatically changing pay levels
You can have WageLoch change the rates of pay for a pay level on a specific date by ticking the
"Change to these rates on" box and choosing the date that the new pay rates take effect.
WageLoch will automatically change the rates of pay to those specified in the right-hand list, as
long as the individual has been assigned to that Pay level.
© 2011 WageLoch
10
1.2.4
Manual
Assigning a staff member to a pay level
To assign a staff member to a Pay level that you have created simply click the Staff members
button and double-click the employee that you would like to assign the Pay level to. On the
"Pay details" tab at the bottom, there is a box called "Pay level" which is set to "<manual>" by
default. Click the word "<manual>" and choose one of the Pay levels that you have created.
Notice the Base Hourly rate will automatically change based on what you have chosen.
© 2011 WageLoch
WageLoch Control
1.3
Site settings
1.3.1
Roster by department
© 2011 WageLoch
11
12
Manual
To enable departments, put a tick in the box that says "Roster by department" and then follow
the steps for Setting up departments
1.3.1.1
Setting up departments
To create a department, click the "Create" button. It will then prompt you for the name of the
department (for example Assistant, Shop, Office, etc.) The MYOB job is only used if you are
using MYOB and would like feed your departments in WageLoch through to corresponding Jobs
in MYOB. If you are not using MYOB then you can simply leave that box blank. Choose the
colour that you would like for your department by clicking on the "Background colour" button
(this will be the colour that shows up in WageLoch Roster), and choose the text colour by
clicking the button next to it. Click "OK" when you are done. NOTE: if you are going to use a
dark coloured background, make sure to use a light coloured text.
© 2011 WageLoch
WageLoch Control
1.4
13
Colours
To change the colours that are used in the WageLoch Roster program and also the WageLoch
Time program click the Colours button in WageLoch Control. It will then show a screen that has
different colours on it with the descriptions of what they are for. Click the button of the colour
you wish to change and choose a colour. Please note that if you use a dark background colour,
then you should change the text colour to a light colour so that it is legible.
© 2011 WageLoch
14
Manual
1.5
Leave management
1.5.1
Adding leave entries
To enter a staff member who is going on leave or a staff member's availability times, click the
"Create button". Once the form opens click the box just below "Staff member" to choose the
© 2011 WageLoch
WageLoch Control
15
staff member you wish to use. In the date area up the top-right corner, enter the dates that the
leave is valid for. In the are below, choose which days they can and cannot work. When you are
done, click "OK" and that staff member will be added to the Leave management screen.
Cannot work at all - If this option is set it means that the staff member can not work that day at
all.
Can only work... - If this option is set you have the choice of selecting "Before", "After",
"Between the hours of" and "Outside the hours of". This means that you can still roster this
person to work the times that you specify. For example, when using the option "Between the
hours of", if you try to roster the staff member to work 10am-3pm but have set the employee
up in Leave management to only work between the hours of 9am-2pm then it will show the
shift in an error colour.
Can work any time - If this option is set it means that the staff member can work any time on
that day.
Copy to other days - If you want to copy the same option / times to other days to save time click
this and choose the days you wish to copy it to.
1.5.2
Editing leave
The "Edit" button will allow you to modify a person's leave/availability time. The staff member
drop-down box will be greyed out, showing you which staff member you are modifying. In
here you can extend/shorten the date length and change the days this particular employee is
available.
© 2011 WageLoch
16
1.5.3
Manual
Deleting leave
To delete a leave entry out of Leave management, click the entry you wish to delete and click
the "Delete" button down the bottom. Click OK to confirm the deletion.
1.6
Passwords
© 2011 WageLoch
WageLoch Control
17
Sensitive financial information in WageLoch is protected by a password so that only a manager
or supervisor can view it. When the WageLoch system is first installed a WageLoch technician
will assist you to set up your password. If at any time you need to change this password for any
reason, click the "Password" button in WageLoch Control. The top box will ask for a master or
admin password. Enter the password you have been given up the top and then tick the box for
the password that you wish to change.
Master password - Allows full access to the whole system
Manager password - Allows access to the whole system except pay rates, sales, changing
passwords, modifying site settings
Admin password - Allows full access to the whole system, if you have multiple locations you
can set up an admin password at all locations
If the master password is forgotten, email it to - Allows WageLoch to send an email to the
specified email address with the master password in it (in the case that you forget your
password)
1.7
Public holidays
© 2011 WageLoch
18
1.7.1
Manual
Adding a public holiday
To add a public holiday, simply click the "Add" button to the right of the screen. You will then
be prompted for the date of the public holiday you want to create. Click "OK" when finished
and that public holiday will be added. NOTE: be sure to choose the correct year when adding
public holidays
1.7.2
Deleting an existing public holiday
© 2011 WageLoch
WageLoch Control
19
To delete an existing public holiday, click on the public holiday and then click the "Delete"
button to the right of the public holidays box. NOTE: if you want to delete multiple public
holidays, simply hold down Ctrl and click on them one by one, or click the first public holiday
that you want to delete, hold down Shift and then click the last public holiday. Hit the "Delete"
button and then click "OK" to confirm the deletion.
1.7.3
Downloading the latest public holiday list
In Public holidays, click on the button that says "Download latest list", and then choose which
State's public holidays are applicable to you and click "OK" when prompted. NOTE: please make
sure that you check the list you have downloaded. These public holiday lists are gathered from
government websites and are often changed at later dates. WageLoch accepts no liability for
your failure to check your public holiday list.
© 2011 WageLoch
20
2
Manual
WageLoch Roster
Creating a new roster
Creating a template
Setting up rotating
rosters
Emailing rosters
SMS messages
Video Assist
Setup
Change log
© 2011 WageLoch
WageLoch Roster
2.1
21
Setup
Format of names - This will change the way the names are shown in the roster by first name
first or last name first.
Printing Options
Print daily notes on roster - This will print any notes you enter into the daily notes box in the
roster.
Print roster day by day - This will print out rosters as one page for each day broken down into
hour brackets (this will allow you to write or assign jobs in each hour bracket) see example here
Print break length in hours - This will print the break in hours instead of the time. e.g. 30 minute
break, 1 hour break, etc
Print start and finish time for breaks - This will print the time the staff member start and finish
their breaks. e.g. 1pm - 1:30pm
Do not print breaks - This stops breaks from printing on the roster.
Sort printed roster by... - This will sort how the staff on the final printed roster are arranged
(first name, last name, department, payroll code)
General
Enable internet roster - This will allow you to send your rosters to the internet to be viewed by
your staff members.
Allow roster until close or required - This will enable the right click options in the roster to
roster your staff until close or required.
Do not print shift on roster when no staff member has been assigned - This will only print the
names of staff who have been assigned shifts on the roster.
© 2011 WageLoch
22
Manual
Always show all staff members on the roster - This will show all staff members on the printed
roster even if they have not been rostered on.
Print daily count of staff at the bottom of the roster - This will show a number of the total staff
you have on.
Add a % loading to budget figures - This will allow you to add a percentage of loading to the
budget screen in the roster
Spread an extra $ evenly across the fortnight - If you have extra costs incurred and you want to
include it in your budgets you can add the dollar amount you spend.
Minimum shift length - This allows you to set a minimum shift length so when you add a shift to
the roster it is automatically created for that length of time
Disable background image on main screen - This will remove the image on the background of
WageLoch Roster.
Allow for extended notes in daily roster - This will allow you to write large notes in the roster. If
your notes are getting cut off you will want to use this option.
Enter separate daily notes for each department - Allows you to enter a different daily note for
each department.
Include all salary staff in per shift costing's - This will include your salary staff's weekly rate of
pay in the budget screen when this option is ticked
2.2
Emailing rosters
To email rosters, click the email rosters button on the right side of WageLoch Roster. In here
you will have to enter staff email addresses in order to be able to send the rosters. Click the
send a roster button and select the week or fortnight. It will now show the staff that are
working this week. Tick the box for the staff member you wish to email the roster to.
Request read receipt - This option will send a message along with the email asking them if they
© 2011 WageLoch
WageLoch Roster
23
have read the email. If they click yes it will send an email back to you letting you know.
2.3
Saving a roster
To save a roster, there are two ways you can do it. In the roster that you have open you can click
the Save button on the left side just under delete. You will also be prompted to save if you
have modified the roster and click the close button
© 2011 WageLoch
24
2.4
Manual
Deleting a previous roster
To delete and old or incorrect roster, Click on the Delete roster button located inside the roster
you wish to delete, then confirm the deletion
© 2011 WageLoch
WageLoch Roster
2.5
25
Video Assist
The video assist program is very useful if you are not sure how to use certain parts of the
software. Clicking the video assist button which is located on the right side of WageLoch Roster
or at the bottom of WageLoch Time will show you a list of video's. Clicking the topic name will
then open a media player and go into detail on how to do that specific topic. There is sound in
all the videos but if you do not have speakers there is also text, explaining what is happening in
the video.
2.6
Creating a new roster
To create a new roster, Click the New roster button up the top of WageLoch Roster.
© 2011 WageLoch
26
Manual
WageLoch will then ask you to select the date that you would like to start the roster on. If you
are fortnightly, you can only choose the fortnight you start on. Once you have chosen the date
click Next >
You can then choose from a few options on how you would like to create your roster.
Begin with a blank roster - Will create a blank roster.
Begin with a copy of a roster from the fortnight starting - Will create a roster copying all the
© 2011 WageLoch
WageLoch Roster
27
hours from the one you choose from the list. This option will only be available when you have
previous rosters created.
Begin with a copy from the rotating roster - Will create a roster copying a rotating roster.
Begin with a copy of a roster template - Will create a roster copying the template you choose.
Once finished click the Create button to open the roster screen.
2.6.1
Roster
© 2011 WageLoch
28
2.6.1.1
Manual
Rostering staff
To roster a staff member, choose which day you would like to add the staff member to and click
the <select> button to bring up the list of staff members. Once you choose the staff member in
the white boxes, click where you would like the shift to start and drag to where you would like
the shift to finish.
On the right side it will show how many hours you have rostered and below that will show how
much it is costing you for that employee before tax. Right down the bottom will give you a total
hours and cost for every employee rostered on that day.
© 2011 WageLoch
WageLoch Roster
2.6.1.2
29
Roster by staff member
Another way you may want to roster is by staff member. There is a tick box up the top of the
roster that when ticked will change the roster to display staff members names instead of days.
You may then select a staff member and follow the same process you used to roster a staff
member. Click where you would like the staff member to start and drag to where you would
like them to finish.
© 2011 WageLoch
30
2.6.1.3
Manual
Inserting a lunch break
To insert a lunch break into WageLoch right click on the shift you would like to insert the break
in. There is an option that says Insert into shift.. This will display a screen which will allow you
to create an unpaid break. Choose how long you would like the break to be, e.g 15 mins, 30
mins, 45 mins, 60 mins. You may also want to change the starting at time, This will change
where the break starts. Click unpaid break to insert the break.
© 2011 WageLoch
WageLoch Roster
2.6.1.4
31
Hours
To have a more visual view of your roster you can scroll all the way to the end and click Hours
This will show you how many hours each staff member has for each day and a total for the
week. If you would like there is also a show times box down the button which will change the
hours for each day into times they are working.
2.6.1.5
Copy from
© 2011 WageLoch
32
Manual
Copy from allows you to copy the hours from a different roster, template, etc and insert them
into any day you choose. This can make it easier if you have the same hours on other days. You
can also choose to just copy the shifts or shifts with employees attached to it. Copying from will
erase any of the current shifts entered and replace it with the new shifts
2.6.1.6
Clear day
Clear day will allow you to delete all the information in that current day to start fresh.
2.6.1.7
Show cost per shift
Removing the tick from this option will remove the dollar amount listed from your employees
rostered hours.
© 2011 WageLoch
WageLoch Roster
2.6.1.8
33
Daily notes
In Daily Notes you can write notes that you would like your staff members to see. You are able
to write multiple notes, e.g. Staff Meeting at 8am, Stock take Tuesday, etc. This will then show
up when you print the roster under the day you entered the note in.
2.6.1.9
Departments
If using departments in WageLoch you can use this drop down box to select a department and
roster only those staff assigned to the department. This can make it easier to maintain how
many staff from a particular department you have on shift.
© 2011 WageLoch
34
Manual
2.6.1.10 Count staff members
Count staff members will show you how many staff members you have on between the hours
specified. For example, in the image above, between 11am - 12pm 8 staff members are
rostered to work
2.6.1.11 Printing
When wanting to print a roster click the print button up the top, this will display a few options.
When using departments you have the option to print by department. This will show you a
different print out for the employees in each department.
© 2011 WageLoch
WageLoch Roster
35
2.6.1.11.1 Printing options
To Printer - This will print the roster out to the printer you choose.
Preview - This will preview the roster before printing to make sure everything is correct.
To File - This will allow you to save the roster to a file
Page Setup - This will allow you to change the page size.
Print Compact Roster - When there is a tick in this box it will change the print to portrait instead
of landscape and will allow you to fit more employees into the print out.
2.6.2
Budget
The budget screen in WageLoch Roster will allow you to see how much you are spending on
each staff member for the week or fortnight. It will show you a daily costing and a total for the
week. This will also show you an average cost per hour based on how many hours you are open
for and the base hourly on each employee. The total figures are a before tax amount and this
does not include super or workcover, etc.
You can switch between dollar amounts and show timesheet. This will show where the hours
have fallen according to the award and the columns of the timesheet
© 2011 WageLoch
36
2.6.3
Manual
Pays
The pays can come in handy if you have a staff member saying that they don't think they were
paid correctly. This screen will show your staff member exactly how they have been paid. The
black line up the top refers to the rostered time. The coloured bar refers to what they were
paid and the red bars at the start and end of this shift are where they have clocked in and out.
So it will show exactly how they have been paid. It will also show how many hours you have
paid them for.
2.6.4
Sales
© 2011 WageLoch
WageLoch Roster
37
The sales screen can show you a projected and actual wage percentage based on sales and
wages. To use this enter a projected sales amount into the Projected Sales boxes. This will then
give you a projected Wage Percent based on what you have rostered. In the WageLoch Time
screen when you confirm an end of day you will see a sales tab down the bottom left. This is for
entering the actual sales which is then transferred into the roster to give you an actual Wage
percentage.
2.7
Creating a roster template
To create a template roster click the Create button on the top left of WageLoch Roster. It will
then ask you to enter a name you would like to call the template for example, Christmas Roster,
Week 1, Week 2, etc. Once finished click OK and it will open the roster screen. Assigning shifts
in here is the same as assigning them in Rostering Staff .
© 2011 WageLoch
38
2.8
Manual
Rotating rosters
If you have rotating rosters enabled from WageLoch Control, There is no need to use the new
roster button. This is because your rosters are now stored in week 1, week 2 or fortnight 1,
fortnight 2, etc. Rotating rosters will use each roster until it has reached the end and continue
from the start again. So if you have a month rotating roster it will start from week 1 ending at
week 4 and go back to week 1 in the 5th week. This is often used if your rosters do not change.
© 2011 WageLoch
WageLoch Roster
2.9
39
Change log
The change log has been designed to inform you of any changes that have been made to the
system. When there is an update to WageLoch it will show the new version number and what
change has been made.
© 2011 WageLoch
40
2.10
Manual
SMS messages
The SMS message is a great feature allowing you to send your rosters to your staff's mobile
numbers. This feature does cost per text message. The SMS feature allows you to recieve
messages also so for example if you send Alice her roster she can reply Thanks. You can also
send a regular text message so if you need to replace someone you can send out a text message
to everyone or certain people.
© 2011 WageLoch
WageLoch Roster
2.10.1 Check for replies
Check for replies will show the name, number, time and the message they sent.
2.10.2 Send a roster
© 2011 WageLoch
41
42
Manual
Send a roster will pull out all the hours for that specific date and add them to the message text
for that particular employee. Tick the box for the staff members you wish to send your roster
too and click OK.
2.10.3 Send a message
In the first text box type the message you would like to send. In the box below tick the box you
wish to send the text message too. Click OK when ready to send.
© 2011 WageLoch
WageLoch Time
3
WageLoch Time
Clocking In And Out
Registering
Fingerprints
End Of Day
Submit Timesheets
Admin
Video Assist
Print Who's Here
Fingerprint Privacy
Policy
© 2011 WageLoch
43
44
3.1
Manual
Registering a fingerprint
To register a fingerprint click on you name from the list. It will prompt you on the box with what
fingers to place on the scanner. The same finger has to be registered 4 times in order to move
on to registering the next finger. You must register 4 fingers in order for the registration screen
to go away. If you are having trouble registering one of your fingers there is a retake finger
down the bottom right. Note you must make sure your finger is flat on the scanner and the top
of your finger is all the way to the top of the scanning pad.
© 2011 WageLoch
WageLoch Time
3.2
45
Clocking in and out
To clock in or out click your name and place your finger on the scanner. If it does not recognize
you it will flash red and say fingerprint unrecognized, otherwise if will change to green and say
Welcome or Goodbye.
© 2011 WageLoch
46
3.3
Manual
End of day
End of day is used to determine each day how many hours your workers are paid for. You can
edit these hours depending on what time they clocked in or out. You can also assign a shift as
annual leave or sick leave. You can enter sales information for the day which then feeds
through to the sales section in WageLoch roster. Adding notes will inform payroll of any
allowances or special details they may need to be aware of.
© 2011 WageLoch
WageLoch Time
3.3.1
47
Paid hours
Paid hours is the actual number of hours you are paying your staff for. This will change when
you drag the coloured bar.
© 2011 WageLoch
48
3.3.2
Manual
Sales
The Sales tab is used to confirm the sales for the day, this information is then fed back to the
sales screen in WageLoch Roster. Note: this option is only available if you have it enabled from
WageLoch Control.
© 2011 WageLoch
WageLoch Time
3.3.3
49
Notes
The notes written in the note box get sent to the Payroll company, This can be used to account
for travel kilometers and allowances
© 2011 WageLoch
50
3.3.4
Manual
Filter
The filter down the bottom is used to show different things,
The only show exceptions option will only show staff that have clocked in or out earlier or later
than they have been rostered. So for example if you have a staff member rostered to start 9am
and they clock in at 9:10am then they will show up.
Hide staff who won't get paid will only show the staff members that have either clocked in or
out for the day and those who have been rostered. This makes it easier to confirm the hours for
the staff members that were suppose to work.
The Show all staff will show every staff member.
© 2011 WageLoch
WageLoch Time
3.4
51
Submit timesheets
Submit timesheets gets done at the end of the week or fortnight. You can not submit your
timesheets till all the days are green. Make sure when submitting your timesheets that all the
days are correct before you click next. Note the next button will not light up untill all the days
are green.
© 2011 WageLoch
52
3.4.1
Manual
Sending timesheets to payroll
Once you are ready to Submit your timesheets, click the Submit button down the bottom right.
It will prompt you with a box asking you if you are sure you want to send your timesheets as
when they are sent there is no way to re-send them. Click OK when finished and the
timesheets will be sent to Payroll ready for processing.
© 2011 WageLoch
WageLoch Time
3.5
53
Print who's here
Print who's here will display a list of only the people that are currently clocked in. It will display
their name and a time that they clocked in. This list is able to be printed.
3.6
Video Assist
© 2011 WageLoch
54
Manual
The video assist program is very useful if you are not sure how to use certain parts of the
software. Clicking the video assist button which is located at the bottom of WageLoch Time and
also in WageLoch Roster will show you a list of video's. Clicking the topic name will then open a
media player and go into detail on how to do that specific topic. There is sound in all the videos
but if you do not have speakers there is also text, explaining what is happening in the video.
3.7
Admin
3.7.1
Format Of names
Format of Names gives you the ability to change the way the names are shown in the WageLoch
Time screen.
3.7.2
Time clock font size
If staff are struggling to see where their name is you can modify the text size to make it larger
and easier to see or smaller. Note if you make it really large there will be a scroll bar across the
bottom of the page depending on how many staff members you have.
© 2011 WageLoch
WageLoch Time
3.7.3
55
Print timesheet
Print Timesheet allows you to save, view and print previous timesheets that have been sent to
Payroll. Select the timesheet and hit one of the 3 buttons available.
3.7.4
View timesheet calculations
View Timesheet Calculations allows you to view how WageLoch has calculated the hours that
have been sent in the timesheet. Choose the date you wish to view and double click an
employee to see what hours have been paid and how it was calculated. This will show you a
© 2011 WageLoch
56
Manual
break down of the hours in the timesheet on a daily basis.
Print summary will print a breakdown of the hours for all employees.
Print Timesheets will print a breakdown of the hours for individual employees.
Print Breakdowns will print the breakdown on a daily basis for individual employees.
3.7.5
Resubmit timesheet
Resubmit Timesheet will allow you to resubmit a previous timesheet, this is often used if there
was a problem sending the timesheets to payroll. To resubmit the timesheet select the date
you wish to resubmit and hit Resubmit.
© 2011 WageLoch
WageLoch Time
3.7.6
57
Delete a staff member's fingerprints
If a staff member is having trouble clocking in and out, it could be because their fingerprints
have changed since they first registered. To fix this deleting the fingerprint and re-registering
usually solves the issue. Refer to Registering A Fingerprint if unsure on how to register a
fingerprint.
© 2011 WageLoch
58
3.7.7
Manual
Compare clock times to pays
Compare clock times to pays is used to show if a staff member has been paid differently to how
they have clocked in or out. If a staff member clock's in at 8:30am and clocks out at 5:30 but was
rostered from 9am - 5pm and was paid for their 9am - 5pm shift it will show that there is a
difference to what time they clocked in or out. It can also show staff members that might of
forgot to clock in or out but were paid anyway.
© 2011 WageLoch
WageLoch Time
3.7.8
59
Print clock times
Print Clock Times gives you the ability to print a list of the clock times for an individual
employee for a specific date or all the clock times this particular staff member might have. You
can also print the times that they were paid for instead of the clock times.
3.7.9
View/modify clock times
View clock times allows you to view the clock in and out times in a daily view. You can scroll
through the days with the previous day or next day buttons. You can also print the times for that
© 2011 WageLoch
60
Manual
particular day. There is a Create button down the bottom and does allow you to create a time
for an employee, however you can not modify any times. This is usually used if an employee
forgets to clock in or out.
3.8
Fingerprint Privacy Policy
Fingerprint privacy
WageLoch software never stores an image of your fingerprint. Several reference points from your
fingerprint are stored in the system, which are used to identify you when your finger is placed on
the scanner in the future. This information is stored in an encrypted database that resides only on
the computer that has the fingerprint scanner attached. Your fingerprint information will never be
shared by WageLoch with any other party.
© 2011 WageLoch