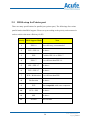
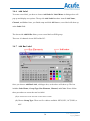
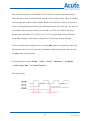
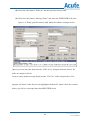
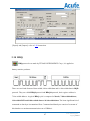
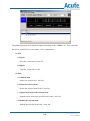
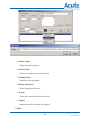
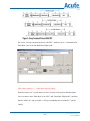
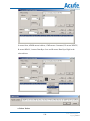
1
Table of contents Chapter 1 Introduction ------------------------------------------------------------- 1 1.1 What is programmable data generator? --------------------------------------------------- 2 1.2 Equipments ----------------------------------------------------------------------------------- 3 1.3 Specifications -------------------------------------------------------------------------------- 5 1.4 System Requirement ------------------------------------------------------------------------ 9 Chapter 2 Installation ------------------------------------------------------------- 10 2.1 Installation Procedures – PG1000/2000 ------------------------------------------------- 11 2.2 Installation Procedures – Pocket PG -----------------------------------------------------14 2.3 Driver Installation --------------------------------------------------------------------------17 2.4 Software Installation (PG Editor)---------------------------------------------------------19 2.5 BIOS setup for Printer port ----------------------------------------------------------------20 2.6 Questions ------------------------------------------------------------------------------------21 Chapter 3 3.1 Operation -------------------------------------------------------------- 22 PG-Editor Tools List -----------------------------------------------------------------------23 System Property ------------------------------------------------------------------23 3.2 System Property ----------------------------------------------------------------------------24 3.3 PG Base Frequency Setting ---------------------------------------------------------------25 3.4 Wave Editor ---------------------------------------------------------------------------------26 3.4.1 Field Adjustment ---------------------------------------------------------------------------------------- 28 3.4.2 Definitions------------------------------------------------------------------------------------------------ 28 3.4.3 Cursor ----------------------------------------------------------------------------------------------------- 29 3.4.4 Move, Insert, Quick Combine Labels ----------------------------------------------------------------- 31 3.4.5 Label Menu and Label Select -------------------------------------------------------------------------- 32 3.4.6 Add Label ------------------------------------------------------------------------------------------------ 34 i Acute Technology Inc. Copyright 2011 3.4.7 Add Bus Label ------------------------------------------------------------------------------------------- 34 3.4.8 Add All Labels ------------------------------------------------------------------------------------------- 35 3.4.9 Delete Label, Delete All Labels ----------------------------------------------------------------------- 36 3.4.10 Modify Label Name ------------------------------------------------------------------------------------- 36 3.4.11 Label Property ------------------------------------------------------------------------------------------- 36 3.4.12 Combine Labels ----------------------------------------------------------------------------------------- 37 3.4.13 Arrange Labels------------------------------------------------------------------------------------------- 37 3.4.14 Decompose Labels -------------------------------------------------------------------------------------- 37 3.4.15 Waveform File ------------------------------------------------------------------------------------------- 38 3.4.16 Print Waveform ------------------------------------------------------------------------------------------ 38 3.4.17 Zoom In --------------------------------------------------------------------------------------------------- 40 3.4.18 Zoom Out ------------------------------------------------------------------------------------------------- 40 3.4.19 Drag Mode and Point Mode---------------------------------------------------------------------------- 41 3.4.20 Edit Waveform ------------------------------------------------------------------------------------------- 41 3.4.21 Low Level, High Level and Invert -------------------------------------------------------------------- 41 3.4.22 Clock ------------------------------------------------------------------------------------------------------ 42 3.4.23 Input Bus Data ------------------------------------------------------------------------------------------- 43 3.4.24 Command Setting --------------------------------------------------------------------------------------- 45 3.4.25 Waveform Check ---------------------------------------------------------------------------------------- 49 3.4.26 Run and Stop Run --------------------------------------------------------------------------------------- 50 3.4.27 Set Parameters ------------------------------------------------------------------------------------------- 51 3.5 Synchronous Counter ----------------------------------------------------------------------53 3.6 Asynchronous Counter ---------------------------------------------------------------------56 3.7 Printer Port (SPP) Signal Generator ------------------------------------------------------60 3.8 Serial Port (RS232) Signal Generator ----------------------------------------------------62 3.9 I2C Signal Generator -----------------------------------------------------------------------65 ii Acute Technology Inc. Copyright 2011 3.10 Binary File to Waveform ------------------------------------------------------------------69 3.11 Text File to Waveform ---------------------------------------------------------------------71 3.12 Load from LA’s Waveform ----------------------------------------------------------------77 3.13 Altera’s Waveform to PG’s Waveform ---------------------------------------------------78 3.14 Batch Out ------------------------------------------------------------------------------------80 3.15 SPI --------------------------------------------------------------------------------------------82 3.16 LIN -------------------------------------------------------------------------------------------84 3.17 CAN ------------------------------------------------------------------------------------------92 3.18 HDQ ------------------------------------------------------------------------------------------97 3.19 1-Wire -------------------------------------------------------------------------------------- 102 3.20 I2S------------------------------------------------------------------------------------------- 106 3.21 Encoder ------------------------------------------------------------------------------------ 108 3.22 USB1.1 ------------------------------------------------------------------------------------- 110 3.23 SMBus ------------------------------------------------------------------------------------- 113 3.24 PMBUS ------------------------------------------------------------------------------------ 117 3.25 PWM --------------------------------------------------------------------------------------- 121 3.26 VCD File to PG’s Waveform ------------------------------------------------------------- 123 Chapter 4 Note -------------------------------------------------------------------- 126 4.1 Hardware ---------------------------------------------------------------------------------- 127 4.2 Software ----------------------------------------------------------------------------------- 128 Chapter 5 Miscellaneous--------------------------------------------------------- 129 5.1 Troubleshooting --------------------------------------------------------------------------- 130 5.2 How to use PG_Function Command --------------------------------------------------- 133 5.3 How to use text editor tool to edit PG vector file(*.PGV) -------------------------- 138 iii Acute Technology Inc. Copyright 2011 Chapter 1 Introduction 1 Acute Technology Inc. Copyright 2012 1.1 What is programmable data generator? Programmable data generator (PG in brief) is powerful of generating several kinds of digital waveforms; it is a PG that runs in high speed, multi channels and functions. PG allows you to easily edit waveforms and output those waveforms into a testing board, which should save your efforts by not to make a real circuit board. You may use the Acute PG to generate any waveform; no matter it is circuit simulation, integrated circuits (IC) testing, read only memory (ROM) simulation, protocol simulation, programming etc. Common protocol and digital pattern have been built as utilities that can be easily used. PG also provides many kinds of waveform editing: including direct waveform drawing, Text File conversion (to waveform), Altera waveform conversion, Acute LA waveform conversion. Besides, it runs on Window interface and can work with a notebook. Apply Acute LA, you can capture unknown system output data and translate into Acute PG, PG will output these data immediately. Besides, combining LA and PG will make an auto testing system or auto verification system. Acute Technology Inc. will continue to provide various commonly used programmable logic device (PLD) and field programmable gate array (FPGA) simulation waveform transformation software; this should easily transform drawn waveform or Test Vector into real waveform in order to verify PLD and FPGA. 2 Acute Technology Inc. Copyright 2012 1.2 Equipments 1.2.1 PG1000/2000 Equipment PGx020 PGx050 1. PG1000/2000 mainframe 1 1 2. Signal isolation amplifier pod 2 5 3. Extended Signal isolation pod 1 1 4. Signal connector/10-color 1x10 line 2 5 5. Special Signal connector/1x12 color line 1 1 6. Ground line/black 1x2 line with red mark 3 6 7. Probe (Red) 35 68 8. Interface card (PCI) * 1 1 9. Interface card connected cable * 1 1 10. Power transfer cable * 1 1 11. 12VDC 2A Regulator ** 1 1 12. Printer Round cable ** 1 1 13. Installation CD 1 1 14. Manual 1 1 15. Screw 1 1 16. USB2Printer transform cable (optional for USB) ** 1 1 1. 2. 3. 4. 5. 6. 7. 8. 9. 10. 11. 12. * : for PG internal mode connect with PC ** : for PG external mode connect with PC You may choose either internal mode by PCI card or external mode by parallel port. To purchase USB2Printer cable, you may also connect with PC through USB port. Please see 3 Acute Technology Inc. Copyright 2012 Chapter 2. BIOS Setup for Printer Port. 1.2.2 Pocket PG Item PKPG-2016/2116/2116+ 1. Pocket-PG mainframe 1 2. Signal 1x20 color line 1 3. Ground 1x2 black line 1 4. Gripper (Red) 22 5. USB A-B cable (1.8m) 1 6. Installation CD 1 7. Manual 1 1. 2. 3. 4. 5. 6. 4 Acute Technology Inc. Copyright 2012 1.3 Specifications 1.3.1 PG1000/2000 Specification & Characteristics Power PGx020 PGx050 Power Source (Internal/External) PC Power / Adapter (12V) Static Power Dissipation 2.4W Max Power Dissipation < 12W Internal PCI card External Parallel Port* / USB optional** Interface Number of Output Channels 20 50 Internal Clock Range 100MHz ~ 1Hz Operation Internal Clock Mode Adjustable (Fine tune) Clock System Internal Clock Output Channels 1 Channel (in Extended POD) External Clock Range <75MHz 5 Acute Technology Inc. Copyright 2012 Internal/External Clock Logic Not , External Clock Mode And External Clock Input Channels 2 Channels (in Extended POD) Loop Jump Data Flow Control Wait for Event Branch (If command) POD A-E: 1.5v-5.5v (255 scales) Output Type Extended POD: UART, I2C UART Baud Rate 110-256K Fan out 8 TTL Data Skew < 3ns Standard: 64k bits Memory Depth per channel Big size model: 512k bits Internal Event Hot Key External Event Channel 3 External Event Mode Events Not, Or External Event Threshold TTL Level Operating Temperature 5C ~ 45C (41F ~ 113F) Storage Temperature -40C ~ 75C (-40F ~ 167F) Operating System Windows 95/98/NT/ME/2000/XP Languages English/Chinese Event Temperature Software Features Save & Load Waveform Dimensions Yes Print Waveform Yes Online Help Yes Length x Width x Height (mm) 3 197 x 147 x 42 (mm) 3 6 Acute Technology Inc. Copyright 2012 1.3.2 Pocket PG Specifications & Characteristics PKPG2016 PKPG2116/2116+ Power Source USB bus-power (+5V) Static Power Dissipation 0.75W Max Power Dissipation < 2.5W Protection Re-settable Fuse (750mA) Power Hardware Interface USB Number of Output Channels 16 (ch-00~ch-15) Operation Internal Operation Clock **200MHz ~ 1Hz Internal Operation Clock Adjustable (Fine tune) Clock System Clock Output Channels 1 Channel (ch-19) External Operation Clock <=***200MHz 7 Acute Technology Inc. Copyright 2012 Internal/External Clock External Operation Clock Logic Not , And External Clock Input 1 Channel (ch-18) Loop Jump Data Flow Control Wait for Event Branch(If command) 5v*,3.3v,3v,2.8v,2.5v,2.1v,1.8v,1.5v,H Output Type i-Z (output voltage +/-2%) Fan out 20mA/ea. (Total < 150mA) Data Skew < 3ns Total Memory Size 256K Bytes 2M Bytes Memory Depth (in vectors) 64kb/ch 512kb/ch Internal Event Hot Key External Event Channel 2 (ch-16, ch-17) External Event Mode Events Not, Or External Event Threshold Same as output channel Operating Temperature 5C ~ 45C (41F ~ 113F) Storage Temperature -40C ~ 75C (-40F ~ 167F) Memory Event Temperature Data Skew Dimensions < 2ns Length x Width x Height (mm3) 117 x 72 x 20 mm3 *: When the Output Type is set to 5V, the actual level is 75mV less than that of the USB power rail. **: PKPG 2016/2116 Internal Operation Clock: 100MHz~1Hz, PKPG2116+ Internal Operation Clock: 200MHz~10Hz。 ***: PKPG 2016/2116 External Operation Clock: < 75 MHz, PKPG2116+ External Operation Clock: <= 200 MHz。 8 Acute Technology Inc. Copyright 2012 1.4 System Requirement 1.4.1 PG1000/2000 PC / INTEL 486 (or above) or compatibles,Pentium 100 (or above) recommended. One PCI bus slot. (for internal mode) 8M bytes RAM (or above). 1M bytes (or above) hard disk drive. CD –ROM drive (for installation). 640x480 (or above) VGA display, 800x600 or 1024x768 recommended. 101 keyboard, Win95 keyboard recommended. 2 or 3 buttons mouse. Printer port (for external mode). USB port (optional for external mode). 9 Acute Technology Inc. Copyright 2012 Printer (optional). Windows 95/98/ME/2000/NT/XP/7 operation system. 1.4.2 PkPG2000 PC / INTEL 486 (or above) or compatibles,Pentium 100 (or above) recommended. 32M bytes RAM (or more). 5M bytes (or more) available on hard disk drive. CD –ROM drive (for installation). 640x480 (or higher) VGA display, 800x600 or 1024x768 recommended. 101 keyboard, Win95 keyboard recommended. 2 or 3 buttons mouse. USB port Printer (optional). Windows 98/ME/2000/XP/7 operation system. Chapter 2 Installation 10 Acute Technology Inc. Copyright 2012 2.1 Installation Procedures – PG1000/2000 2.1.1 Internal Mode (1) Turn off the power of your PC and open your PC case. (2) Insert the interface card into your PC's PCI bus slot and fasten the screws of the interface card. 11 Acute Technology Inc. Copyright 2012 Fig 1: PCI Interface Card (3) Insert the PG mainframe into your PC's CD-ROM slot (Fig 2). Flat Cable Connector Power Plug Fig 2. PG Mainframe (4) Connect flat cable lines of the interface card to the bus on the back of the PG mainframe. (5) Connect the PC power connector (5V, 12V) with the PG power connector at the back of the PG mainframe. 2.1.2 External Mode (1) Connect your PC and PG mainframe by printer round cable. (You may also use USB2Printer cable to connect PC and PG.) (2) Plug Power Adapter into PG power connector. (3) (For USB interface only) When we plug USB2Printer cable into PC’s USB port, 12 Acute Technology Inc. Copyright 2012 Windows OS will find the new device. Please insert driver disc for installation. (4) (For Parallel interface only) Turn on your PC and configure printer port to EPP mode in BIOS setting screen. (Note: refer to Troubleshooting chapter.) 2.1.3 PG Peripheral Installation (1) Connect the flat cable lines of PG's signal isolation amplifier pod (see Page 6 Equipment) with PG mainframe. Make sure to match these lines in their respective 13 Acute Technology Inc. Copyright 2012 alphabetic order. E.g., A-A, B-B, etc. (2) Connect one end of the signal connector line (10Pins) with the signal isolation amplifier pod and the other end with probes. (3) Connect one end of the signal connector's ground line (2 pins) with the signal isolation amplifier pod and the other end with a probe (1 pin is enough). (4) Connect the ground line probe (red remark) with the ground line of the measurement target object. (5) Connect the signal connector probe with the measurement target object. 2.2 Installation Procedures – Pocket PG (1) Turn on the power of your PC and enter Windows system. When you insert the 14 Acute Technology Inc. Copyright 2012 installation CD, you may see an Auto-Installation screen, please cancel it first. (2) Connect the USB cable to the Pocket PG and your PC or Notebook computer. (3) Windows will find a USB device automatically and enter the hardware wizard. (4) Choose “Search for the best driver for your device. (Recommended)” Item to find the proper driver automatically. (5) Choose the correct location where the driver resides. If installing from CD-ROM disc, you should choose “CD-ROM drive”. (6) Windows will find an “Acute USB Interface” software driver. 15 Acute Technology Inc. Copyright 2012 (7) Finish driver installation of the “Acute USB Interface” (8) You may see the “Acute USB Interface” in “Universal serial bus controller” group located at Control Panel-System Properties-Device Manager. This indicates that the Pocket-PG USB interface set-up is OK. 16 Acute Technology Inc. Copyright 2012 2.3 Driver Installation There are 3 kinds of driver installation for different PG-PC interface and OS. Note: USB interface is not available in Windows95/98SP1/NT OS. (1) First situation: (driver installation is unnecessary.) Printer Port + Windows95 Printer Port + Windows98 Printer Port + Windows ME Printer Port + Windows NT PCI + Windows NT Please jump to Software Application Installation. (2) Second situation: (for Plug & Play [=PnP]) PCI + Windows OS (NT except) USB + Windows OS Please jump to Step-a. (3) Third situation:(none PnP, driver is requirement) Printer Port + Windows 2000 Printer Port + Windows XP Please jump to Step-g. a. After hardware installation finished, please turn on your PC’s power and start to enter Windows operation system. b. Insert the installation disk into CD-ROM drive. c. In entering Windows OS period, it will show a message about finding a new device. Please follow OS indication to do next step. d. When OS asks to install the device driver, please indicate CD-ROM drive. e. If you cannot install the driver well, please refer to Trouble Shooting section or 17 Acute Technology Inc. Copyright 2012 f. visit the FAQ page of our web site. You may also contact us directly. g. If you install the driver successfully, you will find the “Acute PC-based Instrument” item in the Device Manager. Congratulation, please jump to Software Application Installation. h. Please operate the Step-a, b, and then back to the next. i. Double click “Add/Remove Hardware” at Control Panel. j. Choose the “Add a Device” item. k. Windows OS will try to search a popular known hardware after the Step-i done, but no one can use. l. Please choose “Add a new device” m. Then, select the hardware by yourself. n. Choose “Other devices” at Windows 2000; choose “Display all devices” at Windows XP, it will take a long time, please patient. o. Click “Have Disk…” p. Indicate directory to the root of CD-ROM. q. Choose “Acute EPP & ISA Interface Driver”. r. Jump to Step-e. 18 Acute Technology Inc. Copyright 2012 2.4 Software Installation (PG Editor) (1) Insert the installation CD into CD-ROM drive. (2) Find and run the Setup.EXE file in the installation disk from My Computer. (3) Follow the instructions of the installation program. (4) Start installing the PG Editor software. (5) Once the installation is completed, you will find the, PG Editor icon in Desktop and Programs. You may click the icon twice to start PG Editor. (6) If it enters Demo Mode while you launch PG Editor, it means some problems happen in your software installation. Then, please refer to Troubleshooting in Chapter 5. 19 Acute Technology Inc. Copyright 2012 2.5 BIOS setup for Printer port There are many specifications for parallel port (printer port). The followings list various parallel modes that BIOS support. Please set up according to the priority order manner in order to achieve the most efficiency for PG. Priority BIOS Support Mode Note 1 EPP 1.9 Best efficiency, recommended 2 ECP + EPP 1.9 3 EPP 4 EPP 1.7 5 SPP + EPP 1.7 As above 6 ECP + EPP 1.7 As above 7 ECP + Bi-direction 8 Bi-direction 9 ECP 10 ECP + SPP As above 11 SPP As above 12 Normal As above Could be EPP 1.9 or EPP 1.7 Less efficient than EPP 1.9 Less efficient than EPP As above Not compatible with some computers Not available 20 Acute Technology Inc. Copyright 2012 2.6 Questions If you have any problems concerning the installation, please refer to the Troubleshooting in Chapter 5. Our home page is www.acute.com.tw. There is frequently updated information of our products (logic analyzer, programmable data generator), latest software, FAQs etc. Should you still have any questions or suggestions to our products, please feel free to contact us by e-mail at [email protected]. 21 Acute Technology Inc. Copyright 2012 Chapter 3 Operation 22 Acute Technology Inc. Copyright 2012 3.1 PG-Editor Tools List System Property PG-Editor provides many tools as above. We will add some useful tools continually. How to use these tools and what the PG-Editor tools could help you? Please follow us step by step. By using the user-friendly PG-Editor software, you may experience the amazing powerful PG. 23 Acute Technology Inc. Copyright 2012 3.2 System Property In Properties setup, it is mainly to choose the language as your preference. There are also two other columns within Properties: Model and Interface. PG series includes PG1020/2020 and PG1050/2050; PG1020/2020 is a 20-channels model, PG1050/2050 is a 50-channels model, Pocket PG is a 16-channels model. If the PG doesn’t link PC well, the model will show Demo Mode. There are internal mode (PCI interface) and external mode (printer port / USB port) shown in Interface. BIOS setup is important to using printer port interface, it can be adjusted according the PC's main board and BIOS setup; if BIOS setup is inappropriate, then PG may work in slow speed and even disconnected. Please refer to BIOS setup for Printer section. PG1000/2000 and Pocket PG series provide output level adjustable function. Output Level-1 to reflect CH-00 to CH-19; Level-2 to reflect CH-20 to CH-49. Pocket PG series 24 Acute Technology Inc. Copyright 2012 only provide output level-1 adjustable function. 3.3 PG Base Frequency Setting PG works as the base frequency of internal clock generator. Which can generate 2 kinds of frequency: integer-frequency and fraction-frequency, and own 4 level 10 based-frequency-divider. The integer-frequency includes 100MHz, 80MHz, 50MHz, 40MHz and 100KHz. 100MHz divided by the frequency-divider can generate 10MHz, 1MHz, 100KHz and 10KHz. It is similar to 80MHz generated 8MHz, 800KHz, 80KHz and 8KHz etc. The fraction-frequency has 2 range: one is from 15MHz to 75MHz with 100KHz interval fine-tuned for generating 15MHz, 15.1MHz, 15.2MHz through to 74.9MHz and 75MHz; the other one is from 1.25MHz to 15MHz with 50KHz interval fine-tuned for generating 1.25MHz, 1.3MHz, 1.35MHz through to 14.95MHz and 15MHz. The 4 levels 10 based-frequency-divider still works in the fraction-frequency. Hence, from 15MHz to 75MHz with 100KHz fine-tuned divides by 10 will generate 1.51MHz, 1.52MHz and 1.53MHz through to 7.49MHz and 7.5MHz. It seems complexity for adjusting frequency. But PG-EDITOR will help you to solve the setting. If you set an error frequency, PG-EDITOR will suggest a nearby value for you. 25 Acute Technology Inc. Copyright 2012 3.4 Wave Editor Wave Editor provides a friendly working environment to easily draw the waveform. Hereby Wave Editor, you may draw any preferred output digital waveform directly. Wave Editor includes many quick ways of drawing waveform, e.g. clock waveform or counter waveform etc. How to use the Wave Editor tool 26 Acute Technology Inc. Copyright 2012 (1) Double click Wave Editor . (2) Set up Base Frequency in Set Parameter icon of Tool Bar. (3) Move the mouse to the Label field and click the right button of the mouse, then Label Menu will pop up. (4) Choose Add Label in the pop-up menu, a dialogue box will show. (5) Define Label Name, Channel and Color. (6) Repeat procedure 3rd, 4th and 5th till all labels are set up. (7) Mark one waveform area within the waveform field by dragging the left button of the mouse and clicking Low Level or Input Bus Data , High Level , Invert , Clock (only available in bus label)to modify the waveform. (8) Click the right button of the mouse within the marked waveform area in order to 27 Acute Technology Inc. Copyright 2012 cut, copy, paste, or undo the waveform. (9) Connect the PG's ground line to the tested circuit ground line. (10) Connect the probes to the tested circuits according to the order of channel field number. (11) Click Run to output these wave patterns. 3.4.1 Field Adjustment The field width in the Wave Editor screen is adjustable; these fields include Label, Channel, Value and Waveform. There are three vertical Field Splitters among the above mentioned four fields; you may change these fields width by dragging any field splitter to the left or right while pressing the mouse's left button on the field splitter. Note! Some fields may be scrolled out of the PC screen when the field splitter is being dragged to the right. You may enlarge Wave Editor screen in order to see all fields and easily modify any field width. 3.4.2 Definitions (1) Label Labels can be defined as numeric, alphabetic, underscore (_), [, or], yet their length cannot be over 31 characteristics (bytes). (2) PG1000/2000 Channel(POD order from left to right) 28 Acute Technology Inc. Copyright 2012 Pod A = CH-00 ~ CH-09 Pod B = CH-10 ~ CH-19 Pod C = CH-20 ~ CH-29 (PG-x050 only) Pod D = CH-30 ~ CH-39 (PG-x050 only) Pod E = CH-40 ~ CH-49 (PG-x050 only) Extended Pod = Event_1, Event_2, Event_3, RS232_Out1, RS232_Out2, RS232_In1, RS232_In2, I2C -Clock, I2C -Data, Clock_ In1, Clock_In2, Clock_Out. (3) Pocket PG Channel(POD order from the Left to the Right) Standard Output Channels = CH-00 ~ CH-15 Function Channels = EV1, EV2, CKI and CKO EV1 = Event 1 Input Channel EV2 = Event 2 Input Channel CKI = External Clock Input CKO = Internal Clock Output 3.4.3 Cursor (1) Point, is the cursor either to highlight waveform area within the waveform field or to set up Address Stamp position. In order to mark waveform area, you need to drag the mouse (use icon) while pressing its left button within the 29 Acute Technology Inc. Copyright 2012 waveform field until all the desired waveform area is highlighted. Then, you may either use the Wave Edit Button to change their state or use the right button of the mouse to copy the marked waveform area. When the Point moves, the status field on the bottom of the screen will display the timing of the Address Stamp. Once waveform highlighted, the status field will display the start and the end timing scale and the whole marked waveform area's time period. Another way of marking the waveform is to double click the left button of the mouse within the waveform area. It will quickly mark the same state area of this channel. When you click the left button of the mouse within the waveform field, a red Address Stamp line will display. As Address Stamp shows, you may set up the PG Function . You can also use the Address Stamp as the start point to paste a waveform. There is a short blue line, within the Address Stamp line, representing the start point of the waveform, which you want to copy (cut) and paste it. (2) Drag cursor is used for moving a waveform screen. You may drag the waveform screen while the cursor is within the waveform field. Besides, the whole waveform screen shall move as Drag. (3) Channel cursor only displays at the Value field. When the mouse is moved to the Value field, the cursor will turn into Channel cursor automatically. You may mark the channel by clicking the left button of the mouse. Also, you may mark 30 Acute Technology Inc. Copyright 2012 multi-channels by pressing Ctrl or Shift key and clicking the left button of the mouse together. 3.4.4 Move, Insert, Quick Combine Labels There are four kinds of modes to move a label (labels). These modes are Insert a Label, 31 Acute Technology Inc. Copyright 2012 Insert Labels, Combine a Label and Combine Labels. Each identified with different cursor icon when dragging the mouse. You may move a label by dragging the mouse to and between any two destined labels (Insert a Label mode). Or you may combine a label with another label (bus) by dragging the label to and on top of the targeted label (bus) (Combine a Label mode). However, if you want to move or combine more than one label at once, you need to select (highlight) these labels (bus) and then move them all together (either Insert Labels or Combine Labels). When you combine 2 labels (bus) together, the name of the combined bus label name will remain the same as the name of the static-channel before the combinations. The ordering of the combined-bus will start from the static-channel (LSB) to the moving-channel (MSB). For example: Move label-D1 to combine with label-D0, the combined bus label name will be D0. Then, label D0 is Bit0 and label D1 is Bit1. Move bus label A [2..0] To combine with bus label D [2..0], the combined-bus label name will be D [2..0]. Then, from MSB to LSB, it will be in order like A2, A1, A0, D2, D1 and D0. When combining labels, all selected labels will be merged, in sequence order manner, to the new combined-label. Insert a Label Combine a Label Insert Labels Combine Labels 3.4.5 Label Menu and Label Select 32 Acute Technology Inc. Copyright 2012 To pop up Label Menu, you have to move the mouse to Label field and click the right button of the mouse. The Label Menu items are enabling or disable state depending on some action. (E.g. Undo will be enabled after any modification in label field. Otherwise, Undo will be disabling.) Only those labels in blue color, that have been selected, are editable. Otherwise, for those labels, in gray color, are not editable. To select a label (labels) as the standard procedure in Windows system by clicking the left button of the mouse on any label, the label color will turn into blue. If you select another label(s), then, the blue-colored label will turn into gray. If you want to select many labels at once, you have to keep pressed Ctrl or Shift key and click the left button of the mouse on all those labels you need. 33 Acute Technology Inc. Copyright 2012 3.4.6 Add Label To create a new label, you have to choose Add Label in Label Menu. A dialogue box will pop up and display two options. The up side Add Label has three items: Label Name, Channel, and Color. Once you finish setup and click OK button, a new label will show up at the Label field. The down side Add PODs allows you to create labels as POD group. There are 10 channels in one POD of the PG.. 3.4.7 Add Bus Label Once you choose Add Bus Label, a dialogue box, as the above will show up. The box includes Label Name, Group Type, Bus Elements, Channel, and Color. Please follow these procedures to create the new bus label: (1) To fill the name of the bus label in Label Name column. (2) Choose Group Type. There are five radixes available: HEX, DEC, OCT, BIN, or ASC. 34 Acute Technology Inc. Copyright 2012 (3) Choose Channels to compose the bus from the lowest bit to the highest bit. For instance: If there are four channels (19, 18, 17, and 16) within the bus label, then, you have to choose 16 first, then 17, 18, and 19. You can not choose gray-colored channels since they are already created. (4) Choose Color. (5) Press OK button, then finish the setup. There are two special function buttons on the right of the screen: one is All On, the other is All Off. All On means all available channels in the Channel area will be moved to the Bus Elements area, and All Off means the opposite action that all channels in Bus Elements will be moved to Channel. For insert the channel into and between two channels within the Bus Elements, you may move the Indicator, which is above the Bus Signals, to the place between the two channels and choose Channel. 3.4.8 Add All Labels Add All Labels will name all channels according to Channel Field number. (E.g., PG2050 has 50 channels: from CH00 to CH49; PG2020 has 20 channels: from CH00 to CH19.) In Add All Labels, there could be a warning dialogue box shows: Delete all of labels? If not, the same channels will be reserved. This is a warning message to prevent duplication of created channels. If you want to replace all existing signals, press Yes; otherwise, press No. 35 Acute Technology Inc. Copyright 2012 3.4.9 Delete Label, Delete All Labels There are two ways to delete label. The first is to delete the label's name: move the mouse to the label, which you want to delete, or to the marked label, and click the right button of the mouse. A label menu shall display and then click Delete Label to delete them. The second way is to delete all labels. As you pop up the label menu, then choose Delete All Labels, all labels shall be deleted. You may also press Del key to delete highlightedlabels. 3.4.10 Modify Label Name There are two ways to modify a label's name. One is to pop up the label menu and choose Properties to change the label name. The other is to pop up the label menu and choose Modify Label Name. An editable dialogue box will display and then you may modify the label name. Nevertheless, when modifying a label name, you cannot use an existing label name or more than 31 characters. 3.4.11 Label Property To set the basic parameter of a signal label, you may pop up the label menu and choose Property. Or move the mouse to the label then double click the left button. The two ways both can show up the Label Setting dialogue box for modifying label parameters. It can set 36 Acute Technology Inc. Copyright 2012 either single signal label or bus label. There are three items in the box: Label Name, Group Type and Color. The Group Type is set the radix for display of signal value: HEX、DEC、OCT、BIN and ASC. If click the Property while some labels are selected, the Label Name will be gray and forbid to modify because these labels name are different. The Group Type also becomes gray when these labels group type defined as different radix. 3.4.12 Combine Labels There are two ways to combine labels: Quick Combine Labels and Combine Labels. Quick Combine Labels please refer to Move, Insert and Quick Combine Labels section. Combine Labels structure is similar with Add All Labels but Channel in the dialogue box only display these labels, which are selected in the label field. 3.4.13 Arrange Labels You can use Arrange Labels to arrange the bus labels order from LSB to MSB. The dialogue box outline and operation rule is similar with Combine Labels and Add All Labels. 3.4.14 Decompose Labels To decompose labels (Bus), you just move the mouse to the bus label then click the right button of the mouse and choose Decompose Labels in pop-up label menu. These decomposed labels will be renamed. E.g. A bus named XA, consists of 4 labels, be decomposed will become 4 labels named as XA-3, XA-2, XA-1, XA-0. 37 Acute Technology Inc. Copyright 2012 3.4.15 Waveform File These waveforms edited by Wave Editor can be saved as a file. There are two kinds of file format supported: one extended file name is PGW (waveform type), the other extended file name is PGV (vector type). The PGW file content includes labels name, waveform, PG function and some parameters. It is unique for PG Editor only. The PGV file is a text format file. You may edit it by any text editor software like Notepad, PE2, etc. Please refer to the structure of PGV format in the Text File to Waveform section. The PGW format is different with Acute LA’s LAW file. But we provide a tool to translate LAW file into PGW file. Please refer to the Load from LA’s Waveform section. 3.4.16 Print Waveform (1) Printer select PG Editor will call Windows Printer setup, you may choose a fit printer and set 38 Acute Technology Inc. Copyright 2012 portrait, landscape, etc. (2) Range Waveform range for printing can be set as your requirement: All, Selected Channel, and Mark Area. The Selected Channel means that you selected labels with blue color in label field. The Mark Area means that waveform field channels are highlighted. (3) Proportion a. Fit to Paper: According to the paper’s height and width to adjust a good proportion. b. Fit to Horz Size: Horizontal range according to the width of paper to adjust proportion automatically. Vertical range according to the user defined. It will print to next paper if it is over the range. c. Fit to Vert Size: Vertical range according to the height of paper to adjust proportion automatically. Horizontal range according to the user defined. d. Custom Size: Adjust both horizontal, vertical size by user. (4) Grid Size You may also print grid, which set by the time interval. (5) Color or Gray Scale Black/White mode will print the background of waveform out white and then others out black in the paper. But Color or Gray Scale will keep the original color to print. To avoid illegible of printing waveform in black background paper, we suggest you change the background to white when you use Color or Gray Scale. (6) To Clipboard This function will output waveform to Clipboard. Some of drawing software can paste the picture easily. 39 Acute Technology Inc. Copyright 2012 (7) Output to BMP file This function allows you print waveform to a BMP file. If you enable this item, the Size button will appear for adjusting the horizontal and vertical size. The Size setting is similar with paper size setting. 3.4.17 Zoom In The waveform is displayed in units of a pixel. A pixel is the inverse of the base frequency if there is no Zoom In or Zoom Out. E.g., if the base frequency is 1MHz, then each pixel is 1us. Zoom In of the waveform represents the inverse times of the enlargement factor. When the enlargement is quadruple, then each pixel means 1us/4 = 250ns. Hence, when the waveform is enlarged, you will see the waveform widened. Note! The base point is the Address Stamp of the waveform field whenever the waveform is either zoomed in or zoomed out. Factors of Zoom in include 2, 4, 8, 16, and 32. When the Zoom in button’s factor is 32, the button’s color turns gray and its value can’t go any larger until you press the Zoom out button. 3.4.18 Zoom Out The waveform is displayed in units of a pixel. A pixel is the inverse of the base frequency if there is no Zoom In or Zoom Out. E.g., if the base frequency is 1MHz, then each pixel is 1us. Zoom out of the waveform represents the inverse times of the Zoom out factor. When the compression is quadruple, then each pixel means 1us*4 = 4 us. Hence, when the waveform is Zoom out, you will see the waveform narrowed. Note! The base point is the Address Stamp of the waveform field whenever the waveform is either 40 Acute Technology Inc. Copyright 2012 zoomed in or zoomed out. Factors of Zoom out include 2, 4, 8, 16, 32, 64, 128, 256, 512, 1024, and 2048. When the Zoom out button’s factor is 2048, the button’s color turns gray and it can’t be zoomed out any further until you press the Zoom in button. 3.4.19 Drag Mode and Point Mode Drag mode and Point mode are exclusive of each other. You just move Point cursor quickly then the Point cursor will change to be Drag cursor automatically. When you stop the Drag cursor for a while, it will restore to Point cursor. The cursor transformation depends on its moving and stop time gap. You can change it as your favorite speed at Set Parameter - Cursor Change column. 3.4.20 Edit Waveform To edit waveform may use Low Level, High Level, Invert, Clock and Input Bus Data buttons within tool bar. Besides, you may copy, cut and paste to modify waveform. In the mark of highlight area, to click right button of the mouse will pop up a menu with these functions. Which allows you to undo the previous step when you make some errors. 3.4.21 Low Level, High Level and Invert Low Level, High Level and Invert are all the basic function to edit waveform. When some of waveform is highlighted, the three buttons become red for effective. If you press the Low Level button, the highlighted area will all change to low level. If the highlighted area is bus label, the bus value will become 0. If you press the High Level button, the highlighted area will all change to high level. If the highlighted area is bus label, 41 Acute Technology Inc. Copyright 2012 the bus value will become the biggest value. (E.g. A bus composed by 8 channels. The biggest value is 255(0FFh). ) The Invert button is for inverting the channel state: high state changes to low, low state changes to high, bus value will become the 1’s complement. 3.4.22 Clock The first step to set clock is that you must highlight an area in waveform field to effect the Clock button. While you press Clock button, the above menu box will pop up. There is Mark Start, Mark End message in the box to indicate the highlighted area. There is also an important message Base Clock Period to show the resolution of edit unit. The based clock period is the inverse of base frequency. E.g., if the base frequency is 10MHz, then the based clock period unit is 1/10MHz=100ns. The based clock period is also the minimum scale of moving Address Stamp. So, the fastest clock being generated is only in the half of base frequency. Of course the Multiplied By have to set 1 to generate the fastest clock. To increase the Multiplied By value will slow down the speed. The value multiply by Base Clock Period is the half period of the clock. The clock frequency will be 42 Acute Technology Inc. Copyright 2012 calculated and display in Frequency message. Another parameter in the box is Start Value. The value indicates that the begging state of the highlighted area is high or low. Low state set to be 0, high state set to be 1. 3.4.23 Input Bus Data To mark bus label one section at waveform field first to enable the Input Bus Data button then click it, the Data Setting box will pop up as above. The Marked Duration in the box indicates the time interval of highlighted area. There is also an important message in the Base Clock Period to show the edited unit. It is the inverse of base frequency. E.g., if the base frequency is 10MHz, then the based clock period is 1/10MHz=100ns. The Base Clock Period is also the minimum scale of moving Address Stamp. Another message called Interval (per count) results from the Base Clock Period multiply by the 43 Acute Technology Inc. Copyright 2012 Multiplied By value. You may use the Input Bus Data to generate 3 kinds of waveform: Counter: set Start Value and Increment By value to define a counter. You may change the Group type to a proper radix you wanted. (1) Ex. Start Value=0; Increment By=3; The counter will be 0, 3, 6, …. (2) Fixed Value: it is similar with Counter. The different is Increment By value = 0. (3) Load From File: to enable Load From File and click Browse button to choose a file you want to load. The file load byte to byte continually. If the file size is smaller than the highlight area, it will be load from the file head again till the area is full up. 44 Acute Technology Inc. Copyright 2012 3.4.24 Command Setting There is one label name PG_Function in waveform field cannot be deleted. You may set PG_Function command to control the waveform output flow. There are 7 command instructions as: NP (No Operation), JP (Jump), LP (Loop), BE (Branch if Event), LC (Loop Count), SE (Set Event) and WE (Wait Event). * Clk : It is a machine cycle, reference to the Base Frequency. * OE : Only for Pocket PG use. Name Instruction NP No Operation JP LP Description Clk* No action 1 Jump Jump to a new address 3 Loop Reduce 1 of the LC value. Jump to a new 3 address if LC >0; Go to next address if LC =0 45 Acute Technology Inc. Copyright 2012 BE Branch if Event Jump to a new address if receive SE. 3 Else go to next address Set Loop Count (2~65536) 3 Set Event Set Event to be a trigger 1 WE Wait Event Stop for waiting Event received 1 *OE Output Enable Enable PG channels output 3 LC Loop Count SE (1) NP (No Operation) will affect nothing. The action is the same as MCU and CPU, NP means New Address = Address + 1. (2) JP (Jump) will effect the output flow. Ex.JP 35 means to jump a new address=35 without any condition. (3) LP (Loop) is similar with JP. The different is that JP requires no condition but LP is a condition-jump decided by LC. There is a register in Acute PG called LC (Loop Counter). To set LC 32 will write 32 into Loop Counter. The LC legal value is 2~65536. It is illegal value about 0 and 1. (Note: Here is the different with most CPU and MCU.) Now, we can use the LP command after setting the LC value. The waveform output flow run across the LP command will reduce 1 of the LC. Ex. Set LC 32 in address=3~4, set LP 16 in address=23~25 a. Run along address to LP 16, and then reduce 1 of the LC (LC=LC-1). b. Check the LC at address=25 c. If LC =0, New Address = Next Address = 26 d. If LC >0, New Address = 16 Note: If the LC=0 already, and run across the LP, reduce the LC will cause 46 Acute Technology Inc. Copyright 2012 unrespectable flow. (4) SE (Set Event): There are 4 events of PG, included 3 external events (Event_1, Event_2, Event_3) and 1 internal event (Keyboard Event). The PG interlaces the 4 events to be 16 conditions for controlling the output flow. These 16 conditions will be saved into the Event register of PG. a. Keyboard Event b. Event_1 c. Event_2 d. Event_3 e. Event_1 or Event_2 f. Event_1 or Event_3 g. Event_2 or Event_3 h. Event_1 or Event_2 or Event_3 Note: There are only 3 events of Pocket PG (Keyboard Event, Event_1, and Event_2); interlacing totally 8 conditions for controlling the output flow. The others 8 conditions are the inverse of these 8 items. If Event registers set as above 8 conditions, PG will detect these event-channels and compare with Event register. To get the same value will set the Flag-Register-Event bit of PG to be true state. If got the different value, then set the bit to be false state. Nevertheless, invert conditions will detect these event-channels and compare with Event register. To get the same value will set the Flag-Register-Event bit to be false state; Got the different value will set the Event bit to be true state. There are two-command sets actions depending on the Event bit: one is WE (Wait Event), the other one is BE (Branch If Event). The WE command will stop the PG 47 Acute Technology Inc. Copyright 2012 flow at the address and do not go to the next address until Event bit =1. (5) The BE (Branch If Event) command is similar with LP. Because they both are condition-jump. LP jumps by LC condition, BE jumps by Event bit state. When PG flow run across BE command, the PG will jump to BE address if the Event bit =1. It will go to next address when the Event bit =0. How to Set the PG_Function Command You have to choose Point Cursor before setting PG_Function command. Moving the Point Cursor to the address that you want to put command there, and clicking the left button of the mouse, a red line of the Address Stamp will appear in the waveform field. The Command Setting button will be effective in this situation. To press the button will pop up a dialogue box as below: Fig 1. Fig 2. The Fig 1. is original outline. The Fig 2. pop up command list outline. To choose one command in the list and click OK, you will see the command name in the PG_Functin channel. How to clear the PG_Function to be NP (No Operation)? You may highlight an area in the PG_Function channel that you want to clear and then click Command 48 Acute Technology Inc. Copyright 2012 Setting button. If you want to clear all of PG_Function to be NP (No Operation), you can use Channel-cursor to highlight whole PG_Function channel and click Command Setting button too. A warning message will pop up: Clear the command of mark area? To click Yes will clear all command. You can refer to the details of the PG_Function as below website address: How to use PG_Function Command 3.4.25 Waveform Check There are some commands settings rules must conform. It is recommended to make a check by clicking the Waveform Check button to reduce some unexpected situation. The main checkpoint of this function is address interval from one command to the others, especially in jump command sets. The check rules list as below: JP (Jump), LP (Loop) and BE (Branch If Event): It must keep NP at least 3 address interval in front of and behind these commands. E.g. JP 30 command located in the address =12; The JP occupies 3 address at 12, 13 and 14. The 3 NP must exist in front of and behind JP at 9, 10, 11 and 15, 16, 17. It cannot put any others command in this area. It is also forbidden to put command set at 27, 28, 29 and 31, 32, 33 area. And jumping to the new address is not allowed over the whole address range. 49 Acute Technology Inc. Copyright 2012 LC (Loop Count), SE (Set Event) and WE (Wait Event) command sets can put into PG_Function channel continually without NP interval. Waveform Check will detect unexpected command showed as XX. 3.4.26 Run and Stop Run After finished waveform check and reported no errors, you may click Run button to output these data. PC will take 0.5~1 second to transform these data into PG through PCI or Parallel or USB port. The tip of running PG is to empty front area of waveform field to inserted Set Keyboard Event and Wait Event command. After you click Run icon, the PG will stop at WE address. Now, you can enable the target device to the best-tested situation and then press the Hot Key to output the PG data immediately. When the PG in the running situation, the State field will display the active waveform icon for indication. If you want to stop the PG, you may click Stop Run button to stop it. Note: In before Run and after Stop Run situation, the output impedance of PG is at Hi-Z 50 Acute Technology Inc. Copyright 2012 (High Impedance) state. So, if your tested device cannot work fine in the situation, you have to insert SE and WE command to solve it. 3.4.27 Set Parameters There are 2 items in the dialogue box: The first one is Base Frequency Setting. The 51 Acute Technology Inc. Copyright 2012 second is Event Hot Key setting. To adjust Base Frequency you may pull down Mode menu first to choose Internal, External or Mixed Frequency source, then fill out the value in Frequency. If the warning message pop-up, it means the frequency you filled cannot be generated by PG. The warning message also recommends default nearby value to instead of yours. Click Yes to get the default nearby value of PG.. Internal & CKI” indicates that PG’s internal frequency “&” external clock frequency. Note: PKPG2016/2116/2116+ has only one CKI pin and CKO(Clock Output)pin and PG1020/2020/1050/2050 has two CKI pins and one CKO pin. Ex: Set Frequency is 1MHz 52 Acute Technology Inc. Copyright 2012 Event Hot Key, there are 2 legal hot keys: Space and Return. When you press the hot key button during the output state, PC will send a event to set PG Event bit. 3.5 Synchronous Counter This tool can generate synchronous counter very quickly. And it is easy to set the count of start number, end number, repeat counter, etc. According to the limitation of PG, the counter can be separated to a partial section when the count range is over memory depth. 53 Acute Technology Inc. Copyright 2012 Besides, you may also appoint the counter width (bits) and counter frequency simply. How to use the Sync Counter tool (1) Counter-Width (Bits) The maximum width of the counter depends on PG model. Ex. PG2020 width is 20 bits. PG2050 width is 50 bits. The default value of Start (=0) and End (=Max width) will load in launching Sync Counter. Ex. To set a counter Width =5; then The Start value will be 0, End value will be 31(25-1). This is default value and you may change them as your requirement. (2) Start The Start value is the beginning of the counter. You may click the scroll bar to change the value. If the value is over the maximum count range, the real Start will get the modulus from Start divided by maximum count value. Ex. The Start =45, and counter Width =5; then The real Start value treated by PG2000 is 13 (=45-25). (3) End 54 Acute Technology Inc. Copyright 2012 It is similar setting with Start but for the ending of the counter. When the Increment value is not 1, the counter may count over the End value. In this situation, the counter will return and increase continually. The counter cannot stop until count to End value. Ex. The Start =0; End =7 and Increment =3; then The counter output =0, 3, 6, 1, 4, 7. (4) Increment The setting way is similar with above. Increment means the counter increase by the value. It is legal to set a negative value for a down counter. (5) Start- Channel To assign the LSB output channel of the counter. Ex. Start Channel =5, counter Width =6; then The counter output channels are 10, 9, 8, 7, 6, and 5th. Channel 10th is MSB and channel 5th is LSB. (6) Frequency It is the counter frequency. If the counter frequency is10MHz, then the counter will increase by Increment after 100ns. (7) Binary & Gary code Default output mode: Binary code, you can choose [Gray Code] to output. The counter can output a serial number. It is also allowed to repeat output these data by checking the Repeat item. If the count range is over PG memory depth, you may check the Section item for partial output of these data. There is 64k bits memory depth per channel of PG (default). But this tool will take 12 bits for system flow control. So, the effective output memory depth is 64k-12=65536-12=65524. When the count range is over 65524 bits, the counter will ask you for partial output. If you click No, the counter will output data and stop 55 Acute Technology Inc. Copyright 2012 at the memory bottom (address =65524). But it will pop up a warning message when the Repeat is checked. According to the PG memory depth limitation, checking Section will make PG-Editor follow these steps: a. PC will upload 64k bits data to PG memory. b. PG outputs these data to the bottom of memory. c. PG stops output and acknowledges to PC. d. PC will upload the next data into PG memory again. e. PG-Editor will repeat a~d steps and stop at uploading all of data. Because uploading and acknowledgment action will interrupt and stop PG, the output data will delay and discontinue during this period. So, please understand your tested device feature to decide the Section item should be checked or not. After you finished these setting as above, pressing Run button will output these data. You may find an active wave icon under the left-bottom to indicate the output status. To click the Stop button will stop output. 3.6 Asynchronous Counter 56 Acute Technology Inc. Copyright 2012 Asynchronous counter is a ripple counter. This tool can generate it very quickly. The tool is easy to set the count of start number, end number, repeat counter, etc. According to memory limitation of PG, the counter can be separated to a partial section when the count range is over memory depth. You may also appoint the counter width (bits), frequency and delay time simply. How to use the Async Counter tool (1) Counter-Width (Bits) The maximum width of the counter depends on PG model. Ex. PG2020 width is 20 bits. PG2050 width is 50 bits. The default value of Start (=0) and End (=Max width) will load in launching Sync Counter. Ex. To set a counter Width =5; then The Start value will be 0, End value will be 31(25-1). This is default value and you may change them also. (2) Start The Start value is the beginning of the counter. You may click the scroll bar to 57 Acute Technology Inc. Copyright 2012 change the value. If the value is over the maximum count range, the real Start will get the modulus from Start divided by maximum count value. Ex. The Start =45, and counter Width =5; then The real Start value treated by PG2000 is 13 (=45-25). (3) End It is similar setting with Start but for the ending of the counter. When the Increment value is not 1, the counter may count over the End value. In this situation, the counter will return and increase continually. It cannot stop until count to End value. Ex. The Start =0; End =7 and Increment =3; then The counter output =0, 3, 6, 1, 4, 7. (4) Increment The setting way is similar with above. Increment means the counter increase by the value. It is legal to set a negative value for a down counter. (5) Start-Channel To assign the LSB output channel of the counter. Ex. Start Channel =5, counter Width =6; then The counter output channels are 10, 9, 8, 7, 6 and 5th. Channel 10th is MSB and channel 5th is LSB. (6) Frequency It is the counter frequency. If the counter frequency is10MHz, then the counter will increase by Increment after 100ns. (7) Delay Time Asynchronous counter delay a fix time from LSB channel to MSB channel. Ex. Counter frequency =10MHz; Delay Time =1/10. The channel 1 will delay 10ns to output after channel 0. 58 Acute Technology Inc. Copyright 2012 The counter can output a serial number. It is also allowed to repeat output these data by check the Repeat item. Section function is illegal in the Asynch Counter. There is 64K bits memory depth per channel of PG (default). But this tool will take 30 bits for system flow control. And enable Repeat function will reduce half memory size in the tool. So, there are two kinds of effective output memory size as 64K-30=65536-30=65506 at non-check Repeat mode, and (64K-30)/2 =(65536-30)/2 =32753 at check Repeat mode. When the count range setting over the memory limitation, it will pop up a warning message. After you finished these setting as above, pressing Run button will output these data. You may find an active wave icon under the left-bottom to indicate the output status. To click the Stop button will stop output. Ex. Asynchronous Counter Width =3, Start =0, End =7, Increment =1, Frequency =10MHz, Delay Time =1/10, Start Channel =0 The output result: 59 Acute Technology Inc. Copyright 2012 3.7 Printer Port (SPP) Signal Generator Printer (SPP) tool can generate SPP mode signal. You may connect PG channels with Printer as Pin Define in Setup button, then the text file or bit map file could be printed through the PG. How to use the Printer (SPP) tool There are two sources data to output. One is to load a Printer identified file such as text, bit map file or printer code file. The other one is to directly type text data into text field. You may also load a text file into text field, then to modify it and insert LINE FEED or FORM FEED command into each end of column. 60 Acute Technology Inc. Copyright 2012 Before pressing Run button to output data, you have to assign channels from Setup-pin define box and connect them with Printer first. Don’t forget to connect Ground line. Pinter pin definition refers to Note*. There are Data [7..0], nStrobe, nSelectIn, nAutoFeed and Busy channels in PG. Except the Busy is input signal, the others are output signal. So, the Busy can be assigned to Event_1, Event_2 or Event_3 channel. These 3 Event channels will acknowledge PG for controlled the data output. The tool output data through Data [7..0], nStrobe, nSelectIn and nAutoFeed channels and stop after the Busy active high from Printer. And it will output again when the Busy active low. If the output data size is over PG’s memory size, the tool will ask you to check Section item for partial outputting these data. You may also check the Repeat item for printing more copy. After you finished these setting as above, pressing the Run button will output these data. You may find an active wave icon under the left-bottom to indicate the output status. To click the Stop button will stop output. 61 Acute Technology Inc. Copyright 2012 Note: (Printer pin define) Data [7..0] = Pin 9..2 Nstrobe = Pin 1 NselectIn = Pin 17 NautoFeed = Pin 14 Busy = Pin 11 Ground = Pin 25..18 3.8 Serial Port (RS232) Signal Generator This tool can generate RS232 protocol and output standard RS232 signal voltage. You may connect PG with RS232 device directly without other driver. How to use the RS232 tool 62 Acute Technology Inc. Copyright 2012 (1) Baud Rate From 110 to 256000 (2) Parity None, Odd, Even, Mark, Space (3) Data Bits 4~7 (4) Stop Bits 1, 1.5, 2 (5) Output Port PG’s Extended Pod provides two RS232 port. You may choose one or two port to output. The two ports can output in Both mode and Different mode. (6) Synchronous- Channel 63 Acute Technology Inc. Copyright 2012 Assign a mapping channel from POD A~E to synchronous output RS232 signal. The standard POD output the same data as RS232 port signal but voltage level different. (7) Data format There are 5 formats to describe output signal: BIN, OCT, DEC, HEX, ASC. These formats describe by text mode. BIN is binary format, OCT is octal format, DEC is decimal format, and HEX is hexadecimal format. The 4 formats must insert Carriage Return and New Line in each data. Ex. BIN format to generate 1, 2, 3: 00000001 00000010 00000011 If you choose ASC format, the Carriage Return and New Line does not require anymore. Every text and character will be outputted. There are two sources data to output: One is to load a file; the other one is to directly type text data into text field. You may also auto-load a text file into text field and then to modify it. Because data code, stop code and parity code setting issue, the PG memory mapping is different in these different cases. If the output data is over PG memory size, the tool will ask you to check the Section item for partial outputting these data. You may also check the Repeat item for repeating output. After you finished these setting as above, pressing the Run button will output these data. You may find an active wave icon under the left-bottom to indicate the output status. To 64 Acute Technology Inc. Copyright 2012 click the Stop button will stop output. 3.9 I2C Signal Generator 65 Acute Technology Inc. Copyright 2012 I2C is one of serial protocol. That is developed from Philips Co. Only two bus lines are required: a serial clock line (SCL) and a serial data line (SDA). Open Collector, serial, 7-bits/8-bit/10-bit oriented for PG2020 or PG2050 that collocates the Extended Pod I2CC and I2CD pins, The tool of I2C generator has 7 Bits, 8 Bits, 10 Bits and you can decide the data rate by yourself. It is output only. There are two output modes to select: [Default Out] and [Custom Out]. If you select [Custom Out], you can decide which channel that SCL and SDA outputs, but it will not support Open Collector, only you select [Default Out] and use PG2020 or PG2050 collocates the Extended Pod I2CC(clock) and I2CD(data) pins will support Open Collector. You could edit the I2C signal contest by yourself. Show the format as below: --------------------------7 bits Address: 66 Acute Technology Inc. Copyright 2012 Aw=12; D=10,20,30; Ar=3f; D=0; Aw=46; D=21,3a; --------------------------8 bits Address: A=25; D=0,0,0; A=7f; D=0; A=8c; D=21,3a; --------------------------10 bits Address: Aw=12C; D=10,20,30; Aw=23f; D=4c; Ar=18a; D=0,0; --------------------------A means I2C address and D means I2C data. A=25; D=10,20,30; 67 Acute Technology Inc. Copyright 2012 It means that I2C signal transmits the data (0x10, 0x20, 0x30) to the slave device (address:0x25, 0x26,0x27). Every line must be ended with the sign [;] and every data must be separated with the sign [,]. When you finished editing I2C signal contest, pressing the button [Edit OK] and [Run] will output I2C signal, pressing the button [Cancel] can reedit the I2C signal. You can see the sample when you press the button [Sample]. PG2020 or PG2050 could select [Default out] or [Custom out]. When you select [Default out] and transmit the I2C signal from Extended Pod I2CC(clock) and I2CD(data) pins. It will support Open Collector. If you select [Custom out] and you could decide which channel of the PG output the I2C signal, but it doesn’t support Open Collector. Note:PKPG series (PKPG2016, PKPG2116, PKPG2116+)only select [Custom out]. (1) Custom Out a. SCL I2C clock. b. SDA I2C data. c. Wait Event(EV1) If check this item, PG will not output signal until EV1 pin has a pulse inputed. (2) File Setting a. SaveFile Save the content as a text file. b. OpenFile Load the text file. (3) I2C Address Set I2C Address mode. (4) I2C Speed(bit/s) 68 Acute Technology Inc. Copyright 2012 Set I2C clock. (5) Edit Section(Hex) a. Sample Show the I2C samples. b. Clear Clear the content of Edit Section. c. Convert It will convert as I2C waveform on Wave Edit. d. Repaet Output I2C signal repeatedly. e. Run & Stop Output I2C signal & Stop I2C signal. (6) Help Call on-line help. (7) Exit Exit the program. 3.10 Binary File to Waveform The tool can take any type file as binary code to output: How to use the Binary File to Waveform tool 69 Acute Technology Inc. Copyright 2012 (1) Data Width (Bytes) The width unit is Byte. According to the value, the tool will take 1 or more bytes each time from a file. Ex. A file size =1024Bytes, setting Data Width =2Bytes. Then the tool will take 2Bytes for 512 times from the file into Output Buffer. (2) Output- Width (Bits) This is the output channel width. The value sets from 1 to Data Width (x8 bits). Note: 2 Data Width = 2 Byte = 16 bits. (3) Start-Channel Assign the LSB output channel of the tool. Ex. Start Channel =5, Data Width =6; then the tool output channels are 10, 9, 8, 7, 6 and 5th. Channel 10th is MSB and channel 5th is LSB. (4) Frequency It is the output frequency. If the frequency is10MHz, then the tool will output 1 data each 100ns interval. If the output data is over PG memory size, the tool will ask you to check the Section item for partial outputting these data. You may also check the Repeat item for repeating output. After you finished these setting as above, pressing the Run button will output these data. You may find an active wave icon under the left-bottom to indicate the output status. To click the Stop button will stop output. 70 Acute Technology Inc. Copyright 2012 3.11 Text File to Waveform Text file is a vector format conformed by the PGV structure of PG-Editor. You may edit the file using any text editor software, and then, to load the file by the tool and convert it into Wave Editor. PGV (PG Vector File) structure: The PGV file has two modes as Time Stamp and No Time Stamp. There are several section-keywords to construct PGV file: INPUTS, UNIT, INTERVAL, FREQUENCY, PATTERN, ASSIGN and RADIX. You may see two examples following behind these keywords. (1) INPUTS To set output signal label name. (For tested device, PG output channels are input signals to them.) An empty space between each signal label is necessary. Labels can be defined as numeric, alphabetic, underscore (_), yet their length cannot be over 31 characteristics (bytes). The sign ‘[‘ and ‘]’ are used for bus label. Ex. Bus consisted of 4 channels can be defined as A[3..0]. It means A3, A2, A1, A0 labels. Note: the PG_Function is a special keyword. If the PG_Function defines in INPUTS section, it means that the PATTERN section include PG command sets. (2) ASSIGN The section-keyword is to assign real channels for INPUTS labels: INPUTS A[3..0]; ASSIGN A[3..0]=8..11; It means A3=CH8, A2=CH9, A1=CH10, A0=CH11. 71 Acute Technology Inc. Copyright 2012 INPUTS Reset; ASSIGN Reset=32; It means Reset=CH32 Note: If there are no channels to assign to match INPUTS labels, it will be assigned and arranged the order from small to big automatically. The amount channels of Pocket PG limit the ASSIGN channels. PG_Function is illegal word in the section. (3) UNIT This is for Time Stamp mode in PATTERN section to assign the time scale unit. The legal unit is ns, us and ms. It is useless for No Time Stamp mode. (4) INTERVAL The time scale of each column increased by the value. The section-keyword applies in No Time Stamp mode. (5) FREQUENCY You may use FREQUENCY to instead of INTERVAL section-keyword. It is almost the same function but for frequency domain, and applies in No Time Stamp mode too. (6) RADIX To set the bus group radix. If the value in PATTERN section follows with radix-ID (h, d, o, b), the RADIX should be set to AUTO. Ex. When the RADIX is AUTO, the pattern 35 (=35d) and 35h (=53d) are different: Set the RADIX to HEX, the pattern 35 and 35h are equal. When RADIX sets to DEC, the pattern 35h will treat as 35d. The 5 kinds of RADIX as: AUTO : depending on radix-ID 72 Acute Technology Inc. Copyright 2012 HEX : Hexadecimal DEC : Decimal OCT : Octal BIN : Binary In AUTO mode, the value with radix-ID in PATTERN section: “h” is hexadecimal value, “o” is octal value, and “b” is binary value. The empty radix-ID value will treat as decimal value. (7) PATTERN The section-keyword is the head of waveform pattern. There are two areas in the section: time scale (called Time Stamp) and wave data, using “>” to separate the two areas. In No Time Stamp mode, Time Stamp can be removed. The time scale is increased INTERVAL (or FREQUENCY) column by column. Only one section-keyword of INTERVAL and FREQUENCY can be chose in No Time Stamp mode. In Time Stamp mode, the time scale accord with Time Stamp, time unit accord with UNIT value, and these wave data describe what these INPUTS digital patterns are. (See Example) Note: It is necessary to use semicolon ( ; ) to end of each section. All of data behind the PATTERN section-keyword will treat as output contents. Just put one semicolon in the end of the section. Upper case and lower case alphabet is the same for section-keyword. Each section-keyword has to insert a space in front of contents. Each content has to insert a space too. (No space between Assign Channels Number. Ex: 3,5,6 or 7..0) You may write some comments just put “%” in front of and behind them. You may also put “//” in front of comments, which will treat as comment from “//” to the end 73 Acute Technology Inc. Copyright 2012 of the column. These comments will affect nothing. INPUTS and ASSIGN channels are limited by the PG output channels. (Ex. PGx020: ch00 to ch19, PGx050: ch00 to ch49) Upper case and lower case alphabet is different for INPUTS signal label name. Ex. Data [7..0] And data [7..0] Are two different bus labels. So, in the INPUTS and ASSIGN section label name and alphabetical case have to accord. There are Repeat and Wait Key Before Run items in the dialogue box. To check these items will add commands into PG_Function channels. The Custom Frequency item is just for No Time Stamp mode. In this mode, the Base Frequency Setting accords with FREQUENCY or INTERVAL value. You may check the item and adjust value to instead of INTERVAL. The Base Frequency Setting will load the default 10MHz value while FREQUENCY, INTERVAL and Custom Frequency are all not assigned. Example for Time Stamp mode INPUTS Reset KeyPulseAck CmdWrite data[7..0] CmdClkIn Clk100K AdjClkIn2 AdjClkIn1 AddrClkIn ; Radix HEX; UNIT ns ; PATTERN 0.0> 0 0 0 00 0 0 0 0 0 40.0> 1 0 0 00 0 0 0 0 0 50.0> 1 0 0 01 0 0 0 0 0 100.0> 1 0 0 02 0 0 0 0 0 150.0> 1 0 0 03 0 0 0 0 0 74 Acute Technology Inc. Copyright 2012 200.0> 1 0 0 04 0 0 0 0 0 250.0> 1 0 0 05 0 0 0 0 0 300.0> 1 0 0 06 0 0 0 0 0 350.0> 1 0 0 07 0 0 0 0 0 400.0> 1 0 0 08 0 0 0 0 0 450.0> 1 0 0 09 0 0 0 0 0 500.0> 1 0 0 0A 0 0 0 0 0 550.0> 1 0 0 0B 0 0 0 0 0 600.0> 1 0 0 0C 0 0 0 0 0 650.0> 1 0 0 0D 0 0 0 0 0 700.0> 1 0 0 0E 0 0 0 0 0 750.0> 1 0 0 0F 0 0 0 0 0 800.0> 1 0 0 10 0 0 0 0 0 850.0> 1 0 0 11 0 0 0 0 0 900.0> 1 0 0 12 0 0 0 0 0 950.0> 1 0 0 13 0 0 0 0 0 ; Example for No Time Stamp mode INPUTS Reset KeyPulseAck CmdWrite data[7..0] CmdClkIn Clk100K AdjClkIn2 AdjClkIn1 AddrClkIn ; Radix HEX; INTERVAL 12.5ns ; %FREQUENCY 8MHz ;% UNIT ns ; PATTERN 75 Acute Technology Inc. Copyright 2012 0 0 0 00 0 0 0 0 0 1 0 0 00 0 0 0 0 0 1 0 0 01 0 0 0 0 0 1 0 0 02 0 0 0 0 0 1 0 0 03 0 0 0 0 0 1 0 0 04 0 0 0 0 0 1 0 0 05 0 0 0 0 0 1 0 0 06 0 0 0 0 0 1 0 0 07 0 0 0 0 0 1 0 0 08 0 0 0 0 0 1 0 0 09 0 0 0 0 0 1 0 0 0A 0 0 0 0 0 1 0 0 0B 0 0 0 0 0 1 0 0 0C 0 0 0 0 0 1 0 0 0D 0 0 0 0 0 1 0 0 0E 0 0 0 0 0 1 0 0 0F 0 0 0 0 0 ; 76 Acute Technology Inc. Copyright 2012 3.12 Load from LA’s Waveform If you have the Acute LA, you may use LA to capture target circuit signal and save these captured data to be a LAW file. By the tool, it is easy to convert LAW file into PG Wave Editor. Then, you can edit and modify these captured data to output them again. With the magic feature, somebody can get unknown system signal far away from oversea and email to you for rebuilding them in your lab soon. Note: The tool supports that LAW file is in 64k Bytes mode only. Besides, caused by channels number limitation of PG, the captured channels of LAW file cannot over the PG owned. Ex. PG2020 cannot convert LAW file over 20 captured channels. PG2050 cannot convert LAW file over 50 channels. It can generate PGW file format by LA Viewer (Acute LA application software) after version 1.5. If you have Acute LA series and want to use PGW file, please download ver-1.5 or later to save captured data as PGW format. (Refer to LA Viewer manual) 77 Acute Technology Inc. Copyright 2012 3.13 Altera’s Waveform to PG’s Waveform It is more popular to implement products by FPGA and PLD in these days. Many engineers use FPGA and PLD to be a control circuit; For time to market, these chip’s vendors provide many software tool to assist and emulate FPGA and PLD development. How to verify these chips function by real signal after design in? It is not enough for just simulated by software only. You may use PG to generate FPGA and PLD input labels signal and feed them into these chips, then capture signals by Acute LA form these chip’s output. The verification model is wonderful for you, because it will save so many simulation times and reflect the real various responses. Not virtual simulation by software only, but it is also a real chip working result. The model also can apply in IC test, system circuit verification, others similar condition test and so on. Most software simulation provides testing model by waveform file and vector file. These existing testing models, you may convert them into PG Wave Editor and real output these testing patterns. According to so many testing models for simulation, we will continually provide various tools for different models conversion. 78 Acute Technology Inc. Copyright 2012 The Altera’s Waveform to PG tool converts Altera’s Max Plus II waveform file to PG’s PGW file. The Max Plus II provides two waveform file formats: Binary File (.SCF) and Text File (.VEC, .TBL). This tool supports only the Text file of vector format now. If the testing model is a Binary file, you have to use Create Table File (refer to Max Plus II Help) function to generate Text file, and then load the Text file by the tool for conversion. How to use the Altera’s Waveform to PG tool The first step is to browse and load a Altera Max Plus II Table file, you will find the signal label’s name and these mapping channels number of PG listed in the loading area. Because PG is an output device, the tool will only convert INPUT labels of the Table file into Wave Editor. The base frequency will be calculated and filled into the Custom Frequency. 79 Acute Technology Inc. Copyright 2012 According to that the minimum time scale is 10ns, even the Table file time scale setting smaller than 10ns, it will still convert to 10ns. You may change the time scale by adjust Custom Frequency for your requirement. To check the Repeat and Wait Key Before Run items in the dialogue box will add command sets in PG_Function channels. The Repeat item is for repeating output, and the Wait Key Before Run item is for starting output after received a hot key event. You may check the both items for production line auto-testing requirement. Waiting for the hot key event, which is easy pressed a key by operator, the tool will output the same pattern to each target device. 3.14 Batch Out The Batch Output can output a great deal of files by once; it supports the format of file that is edited by Wave Editor (extend file name is .PGW or .PGV). It offers a convenient function that you can enter [Interval for each file] and check [Loop Always] to output all files repetitively. It helps your measure or test automatically and let your experiment simply. How to use the Batch output tool 80 Acute Technology Inc. Copyright 2012 First, push [Add File] to select the files you want to output, if you want to output two files or above, you can push [Up] or [Down] to make the order files output. Push [Remove] bottom means that remove a single file; pushing [Remove All] means that remove all files list the dialog menu. You can check [Interval for each file] and decide interval time for each file. You also can uncheck and select [Manual] to output files. Check [Loop Always] will let all files you want to output circularly until you push [Stop], if you don’t check, all files will output once and stop. Note: when more files output, you must add PG command “Wait for Event”(WE) in your waveform file (.PGW or .PGV), it tells PG the end of the file and then output next file, it’s important, or you won’t use the function [Loop Always]. You can execute “Wave Editor” to command “Wait for Event”(WE). Show you the example as below: 81 Acute Technology Inc. Copyright 2012 3.15 SPI SPI is one of serial protocol. Only three bus lines are required: a serial clock line, a serial chip select, a serial data. You could load a file extended (*.bin) or (*.txt) or fill the data you want by yourself and it could generate data by random, too. How to use SPI tool 82 Acute Technology Inc. Copyright 2012 First all, you must select channels for SPI, default CH0: clock, CH1: chip select, CH2: data. You could fill “Chip Select” and “Clock Latch Data” setting according to your measurement. In the “Data Bits Setup” setting, you must decide SPI clock frequency, default 1MHz. MSB and LSB means the data’s “HIWORD” or “LOWORD” order to output. Let us take 1ah (8 Data Bits, MSB) for example, and 58h (8 Data Bits, LSB). “Number of Data” will show the number of data you edit by yourself or generate by random. 83 Acute Technology Inc. Copyright 2012 If you use random way to generate data, you can choose the way to get number of data by random or by manual. If you check [Repeat], SPI Generator will output the data continuously, if do not, SPI Generator will output the data only once. There is an important point that it only generates the Hex format data by random way. There is an 8~24 Bits range for the combo box ctrl “Data Bits”. If you load a file to generate SPI data and use “8 bits” to read file, the program will read the data and output with “8 bits (1 Byte)”. But if you choose “9~15Bits”, the program will read the data and output with “16 bits(2 Byte)” and the rest bits part (not enough 16Bits) will be mask. If you choose output data by random, the maximum data is 7FFF. It means it’s useless if you choose “Data Bits” “17~24Bits”. If you choose output data by edit and the data is 16-bit value as like 4a75h, but you choose “Data Bits 8 bits”. You will see the output data is 75h. The format of data by edit(Hex Format): 2a; 45; 1c; 67; 52; SPI Generator also can output the data of “Bin” file in Hex format and “Txt” file in ASCII format. 3.16 LIN It’s more important that how to control the transmissions of the internal electricity signal of the car as the growth of the vehicle market. CAN and LIN are the main protocols 84 Acute Technology Inc. Copyright 2012 on the applications. LIN BUS plays a key role that costs down opposite the CAN BUS. It applies to control the low speed peripheral device of the vehicle, like car door, car window and so on. How to use LIN tool A complete LIN signal is divided into two parts, HEADER and RESPONSE. SYNCH BREAK FIELD, SYNCH FIELD and IDENTIFER combine to the HEADER. DATA FIELD and CHECKSUM FIELD combine to the RESPONSE. SYNCH BREAK FIELD is also divided into two parts; they are TSYNBRK and TSYNDEL (synchronization delimiter). According to the protocol of LIN, TSYNBRK must be larger than 12 bits and TSYNDEL must be equal to 1 bit or larger than 1 bit. You can input the value by yourself, of course and don’t worry about the problem of the invalid value you input, because the program will notify you with a message. 85 Acute Technology Inc. Copyright 2012 SYNCH FIELD is a hexadecimal value 0x55 and it’s fixed. This program doesn’t show the information about the SYNCH FIELD. IDENTIFER FIELD is combined with 6 bits width IDENTIFER and 2 bits parity P0 and P1. All that only you do is push the button [Calc P0, P1, NDATA], the program will calculate P0, P1, and NDATA automatically. NDATA is numbers of the data you want to output. We take an example as below: IDENTIFER = 0x2F, we push the button [Calc P0, P1, NDATA] to calculate P0 = 1, P1 = 0, NDATA = 4; NDATA = 4 means you must insert 4 8-bit-width data or generate the data by random. Note: because of the NDATA = 4, the number of data you input must be 4, if the number of the data is large than 4, the program only will select 4 front data. Only IDENTIFER is 0x3E or 0x3F is an exception, the program will output all of the data you insert. 86 Acute Technology Inc. Copyright 2012 Here is an example that IDENTIFER is 0x3E and generate 10 data by random; you also can insert the data by yourself, of course. Note: it’s only generate 0~20 data by random. CHECKSUM FIELD is the last field of the MESSAGE FIELD; you can check the radio button “Classic” (LIN version 2.0 before) or “Enhanced” (LIN version 2.0 after). Finally, you must decide the LIN output speed and which channel do you select? Push the button [Add], the program will help you add this frame into “LIN List”. The program will output the LIN signal according to the contents of the “LIN List”. [Insert], [Modify], and [Delete] will help you modify the “LIN List”. We will explain the 4 function: [Add], [Insert], [Modify], and [Delete] as below: [Add] will add the frame you want to output into the “LIN List” order by order. Let’s make an example: I let PG send a LIN MESSAGE FRAME and then go to sleep, wake up and another LIN 87 Acute Technology Inc. Copyright 2012 MESSAGE FRAME order by order. Show the procedure of the software setting as below: (1) Check the radio button “Message Frame”. (2) Insert the IDENTIFER 0x2F. (3) Push the button [Calculate P0, P1, NDATA] and the NDATA = 4. (4) Push the button [Random] to generate the data; of course, you can also insert it by yourself. But there is a format of the data; you must follow the rule as below: 5d; 35; d5; 4b; (5) Push the button [Calculate CHECKSUM] and I check the radio button “Classic”. (6) Push the button [Add]. Show the software setting as below: (7) Check the radio button “Go to Sleep” and then push the button [Add]. 88 Acute Technology Inc. Copyright 2012 (8) Check the radio button “Wake up” and then push the button [Add]. (9) Check the radio button “Message Frame” and insert the IDENTIFER 0x3E, then repeat 1~4, finally, push the button [Add]. Show the software setting as below. [Insert]: you can insert the frame into the “LIN List” by using the function [Insert]. We make an example as below: I want to insert another message frame into the “LIN List” of the example above. The program will insert it after the item you highlighted with the PC mouse. Show the result as below, you will see a message frame that IDENTIFER 0x1A. 89 Acute Technology Inc. Copyright 2012 [Modify]: maybe you want to correct some frame of the long “LIN List”. You can use the function [Modify]. We make an example as below: you want to modify the second item of the “LIN List”. a. Highlight the item you want to modify. b. Insert the value. c. Push the button [Modify]. You can refer to the two photos as below to tell their differences. 90 Acute Technology Inc. Copyright 2012 [Delete]: this function will delete the item you highlighted with the PC mouse when you push the button [Delete]. [Export] and [Import]: [Export] will save the “LIN List” as text file and [Import] will load the text file into “LIN List”. 91 Acute Technology Inc. Copyright 2012 3.17 CAN CAN BUS (Controller Area Network) applies to the vehicle industry for a long time. It’s for the problem of the large and complicated communication line system in the car that raises the cost and increases the heavy of the car. The CAN BUS theorem uses the concept of the computer network, applying to the communication of the vehicle, every component is just like the client end of the network. It can transmit or receive the signal with one line and then controller will manage all signals and distribute them to the system. If there is something wrong with the component, we can find out the problem by measuring the transmission of the signal. How to use CAN tool There are 4 kinds of frame on CAN BUS; they are DATA FRAME, REMOTE FRAME, ERROR FRAME, and OVERLOAD FRAME. DATA FRAME is the general type of the CAN BUS, transmitting the data from one node to all nodes on the CAN BUS; REMOTE FRAME is similar to DATA FRAME (only RTR bit is 1 different with DATA FRAME), making a request that transmits the data from the other nodes on CAN BUS; ERROR 92 Acute Technology Inc. Copyright 2012 FRAME means there is something wrong occurs on the CAN BUS; OVERLOAD FRAME notifies all other nodes on the CAN BUS that it must take more time to process the data. When you use the CAN tool, you must decide which kinds of the frame do you want to select? DATA FRAME or REMOTE FRAME? STANDARD FRAME or EXTENDED FRAME? If you choose 11 bits, it means you select the STANDARD FRAME. If not, that means you select 29 bits (EXTENDED FRAME). 11 or 29 bits indicates that which kinds of IDENTIFER you choose. Let’s take an example as below: (10) IDENTIFER = 0x5A9, select 11 bits. (11) IDENTIFER = 0x1F1518D, select 29 bits. Note: when you choose 29 bits, the program will separate the IDENTIFER into the 11-bits MSB value and the 18-bits LSB value. If you worry about the invalid IDENTIFER you input, you can push the button [CHCEK ID] to check your IDENTIFER or push the button [Random] to generate correct IDENTIFER. RTR = 0 when you check the radio button “DATA FRAME”; RTR = 1 when you check the radio button “REMOTE FRAME”. Furthermore, insert the DLC (Data Length Code) and 93 Acute Technology Inc. Copyright 2012 Data field (D1~D8) will active according to the DLC value. After you insert the IDENTIFER, DLC and Data, push the button [Calc CRC], the program will calculate the CRC value. Insert the CRC Delimiter, ACKnowledge and Intermission. You can generate the Intermission by random and CRC Delimiter must be 1 and ACKnowledge must be 0 or 1. Choose the CAN BUS speed and the channels of CAN_HIGH and CAN_LOW and then push the button [Add], it will add the CAN BUS frame into the “CAN Signal List”. We take an example as below. I want to transmit 4 CAN BUS frame; 2 DATA FRAME; 2 REMOTE FRAME. Refer to the photo as below: [Add], [Insert], [Modify], and [Delete]: refer to LIN instruction. The CAN generator will generate the ERROR FRAME when you insert wrong CRC, CRC delimiter. We take “CRC ERROR” for an example: (1) Generate IDENTIFER 0x611 by random. 94 Acute Technology Inc. Copyright 2012 (2) Check the radio button “DATA FRAME” and “STANDARD FRAME”. (3) Generate DLC 8, Data: 0x9F, 0x1E, 0xB8, 0x6A, 0x09, 0x79, 0xEE, 0x30. (4) Push the button [Calc CRC], CRC = 0x4f80. I change wrong CRC value to 0x4f81. (5) Push the button [Add]. The program will show CRC ERROR message, you can choose “Active Error”, “Passive Error” or cancel this frame. I choose “Active Error”; refer to the photo as below: The “CAN Signal List” will show the item “DATA FRAME, 11(bits), ID = 611, RTR = 0, 95 Acute Technology Inc. Copyright 2012 DLC = 8, Data = 0x9F, 0x1E, 0xB8, 0x6A, 0x09, 0x79, 0xEE and 0x30, CRC = 0x4f81. Because CRC ERROR occurs, the rest of this DATA FRAME won’t transmit and next item will be Active CRC ERROR frame. Furthermore, show the FORM ERROR as below: (1) IDENTIFER = 0x332, RTR = 0, DLC = 4, Data = 0xAD, 0x5A, 0x44, 0x23 and CRC = 0x1023. (2) CRC Delimiter = 1, ACK = 0, Intermission = 4, DATA FRAME, STANDARD FRAME. I change CRC delimiter to 0; it will show the FROM ERROR message. 96 Acute Technology Inc. Copyright 2012 [Export] and [Import]: refer to LIN instruction. 3.18 HDQ HDQ protocol was made by TEXAS INSTRUMENTS Corp.; it’s applied to battery monitor products. There are two kinds format of data width, 8-bits-width data and 16-bits-width data in HQD protocol. They are called HDQ8 protocol and HDQ16 protocol, their register address is 7-bits-width address. A typical HDQ cycle is composed of break, 7-bits-width address, 1-bit-width R/W and 8-bits-width data or 16-bits-width data. The least-significant bit of command or data byte is transmitted first. Command and data bytes consist of a stream of bits that have a maximum transmission rate of 5Kbits/s. 97 Acute Technology Inc. Copyright 2012 How to use HDQ tool The pattern generator will output the signal according to the “HDQ Output List”. You could edit the list by yourself. Every row in the list indicates a HDQ cycle; we take a HDQ cycle, address 41h, and write bit, HDQ8 and data 20h for an example. You could follow the steps as below: 1. Push the button “HDQ8” (default). 2. Fill the “Address” edit item 41h and “Data” edit item 20h and check the “Write”. 3. Push the button “Add new item” in the “Tools” section. Refer to the graph as below: “Add new item” function will add new HDQ cycle item to the back of the present HDQ cycle item. It will tell the former HDQ cycle’s address, R/W bit and data width. When they 98 Acute Technology Inc. Copyright 2012 are the same, the program will show a dialog that queries you about the new data position. It will add the new data to the former HDQ cycle’s data section when you select “Yes” and add the new data to a new HDQ cycle’s data section when you select “No”. Refer to the graph as below: Select “Yes”. Select “No”. “Delete the selected item” function will delete the selected HDQ cycle item. 99 Acute Technology Inc. Copyright 2012 “Append the new item to the selected item” function append a new HDQ cycle to the back of the selected item. Refer to the graph as below: Note: “Append the new item to the selected item” function will not show a dialog to queries you about the new data position. 100 Acute Technology Inc. Copyright 2012 “Modify the selected item” function will modify the address, R/W bit, data width and data. Refer to the graph as below: Push the button, the program will show a dialog to let you modify the parameter of the HDQ cycle. We assume that we modify the HDQ cycle to address 5Ah, data 24h, 25h, 26h, Read bits and HDQ16. Note: Input a space key between the data. Show the result: 101 Acute Technology Inc. Copyright 2012 “Export the list” function will save the “HDQ Output List” to a text file. “Import the list” function will load the text file that exported. “Channel” will select the pattern generator output channel. “Transmission rate” range: 3.5K bit/s to 5.5K bit/s (default 5K bit/s). “Repeat” select output the signal once or repeat. 3.19 1-Wire 1-Wire communication protocol was developed by Dallas Semiconductor owned by Maxim. This protocol allows communication of multiple chips to one host with minimal pin count. The protocol is called 1-Wire because it uses 1 wire to transfer data. 1-Wire architecture uses pull up resistor to pull voltage of data line at master side. 1-Wire protocol defines several kinds of signals that include Reset Pulse, Presence Pulse, Write 1, Write 0, Read 1 and Read 0 to make a list of the command order to communicate between master device and slave device. 1-Wire protocol is usually applied to the communication of the EEPROM. 102 Acute Technology Inc. Copyright 2012 The least-significant bit of command or data byte is transmitted first and there are two kinds of transmission rate: standard speed and overdrive speed. How to use 1-Wire tool 103 Acute Technology Inc. Copyright 2012 The pattern generator will output the signal according to the “1 Wire List”. You could edit the list by yourself. Every row means 1 wire command set. (1) File a. Export Save the 1-wire list to a text file. b. Import Load the 1-wire list text file. (2) Edit a. Add new item Add a new item to the 1 wire list. b. Delete the selected item Delete the selected item in the 1 wire list. c. Append new item to the selected item Append a new item to the selected item in the 1 wire list. d. Modify the selected item Modify the selected item in the 1 wire list. 104 Acute Technology Inc. Copyright 2012 e. DeleteAll Delete the entire item in the 1 wire list. Note: please pay attention to the format of the “Data (Hex)”, every data must be separated by a space and hexadecimal format. (3) Dev (Device) a. Run Output the signal of the 1 wire list once. b. Stop Stop the output. c. Repeat Output the signal of the 1 wire list continually. (4) Help a. Contents On line help about the 1 wire. (5) Channel a. Select the channel to output. (6) Speed a. Standard speed 15kbps b. Overdrive speed 111kbps 105 Acute Technology Inc. Copyright 2012 3.20 I2S I2S, or Inter-IC Sound, or Integrated Interchip Sound, is an electrical serial bus interface standard used for connecting digital audio devices together. It is most commonly used to carry PCM information between the CD transport and the DAC in a CD player. The bus consists of at least three lines: (1) Bit clock line (2) Word clock line (also called word select line) (3) And at least one multiplexed data line How to use I2S tool The pattern generator will output the signal according to the “I2S Data”. You could edit the list by yourself. Every row means I2S data. (1) I2S Channel 106 Acute Technology Inc. Copyright 2012 Set I2S output Channel. The default is SCK: Channel 0, WS: Channel 1, SD: Channel 2. (2) Width Set I2S data width, 16 bits, 20bits, 24 bits included. (3) I2S Clock Set I2S clock. (4) I2S Data Set I2S Data. L = 75F5, R=5C75; means left data is 0x75F5, right data is 0x5C75.L = DD35, R=6501; means left data is 0xDD35, right data is 0x65D1. (5) Export Save the I2S data to text file. (6) Import Load the I2S data text file. (7) Sample Generate the I2S data sample. (8) Note the I2S signal is basic format. 107 Acute Technology Inc. Copyright 2012 3.21 Encoder There are four encoder options to select, they are NRZI, Manchester(Thomas), Manchester(IEEE 802.3), Differential Manchester. How to use Encoder (1) Encoder Channel Setting Select the channel to output the signal. (2) Transmission Mode 108 Acute Technology Inc. Copyright 2012 MSB or LSB. (3) Encoder Option NRZI、Manchester(Thomas)、Manchester(IEEE 802.3)、Differential Manchester. (4) Data Rate It’s rate to generate 1 bit data value. (5) Sample Generate the correct format data. Refer to the photo as above. 109 Acute Technology Inc. Copyright 2012 3.22 USB1.1 USB (Universal Serial Bus) was created by a core group of companies that consisted of Intel, Compaq, Microsoft, Digital, IBM, Northern Telecom, NEC and AT&T. USB Standard Interface How to use USB1.1 tool The pattern generator will output the signal according to the “USB1.1 Output”. You could edit the list by yourself. Every row means USB1.1 packet. 110 Acute Technology Inc. Copyright 2012 (1) USB1.1 Channel Set pattern generator channel as USB1.1 D+ and D- pins. (2) USB1.1 Data Rate Set the data rate of the pattern generator, default 12MHz. (3) USB1.1 Output Edit the USB1.1 packet, pattern generator will output the signal by the order of the list (from up to down). The menu will show up when push the right button of the mouse. a. Add New Packet Add a new packet to USB1.1 Output list. b. Delete Packet Delete the selected packet. c. Insert Packet Insert a new packet behind the selected packet. d. Modify Packet Modify the selected packet. e. Sample 111 Acute Technology Inc. Copyright 2012 Show a USB1.1 signal sample. f. Delete All Packets Delete all packets in the list. g. Export Save the content of the list as a text file. h. Import Open the text file. The program will show the dialog box as blow when you select the item “Add New Packet”, “Insert Packet” or “Modify Packet”. It will calculate the USB1.1 crc5 or crc16 automatically according to the value you input. (4) Repeat It will output the USB1.1 signal repetitively. Note: All the values you input must be hexadecimal. 112 Acute Technology Inc. Copyright 2012 3.23 SMBus The System Management Bus (abbreviated to SMBus or SMB) is a simple two-wire bus, derived from I²C and used for communication with low-bandwidth devices on a motherboard, especially power related chips such as a laptop's rechargeable battery subsystem. The SMBus was defined by Intel in 1995. It carries clock, data, and instructions and is based on Philips' I²C serial bus protocol. Its clock frequency range is 10 kHz to 100 kHz. Its voltage levels and timings are more strictly defined than those of I²C, but devices belonging to the two systems are often successfully mixed on the same bus. How to use SMBus tool The pattern generator will output the signal according to the List. You could edit the list by 113 Acute Technology Inc. Copyright 2012 yourself. Every row means SMBus packet. (1) SMBus Setting There are 21 kinds of the SMBus packet, they are Quick command protocol, Send byte protocol, Send byte protocol with PEC, Receive byte protocol, Receive byte protocol with PEC, Write byte protocol, Write Word Protocol, Write byte protocol with PEC, Write Word Protocol with PEC, Read Byte Protocol, Read byte protocol with PEC, Read word protocol, Read word protocol with PEC, Process Call, Process Call with PEC, Block Write, Block Write with PEC, Block Read, Block Read with PEC, Block Write - Block Read Process Call and Block Write - Block Read Process Call with PEC. Please refer to the SMBus Specification (version 2.0) about the details of the SMBus packet. We need to choose the packet format, the program will respond according to the packet format. We take the packet format “Process Call with PEC” for instance. We select “Process Call with PEC”, Address 0x10 , Command 0x20 , Data Byte Low 0x2F and Data Byte High 0x3A 114 Acute Technology Inc. Copyright 2012 Note: there must be a “;” mark after data you input. Push the button “Sr” to end master-to-slave section of the packet and then input slave-to-master data “Data Byte Low 0x3A” and “Data Byte High 0x2F”, push the button “Add List” and we make a “Procell Call with PEC” packet finally. S means Start, ADDR means Address, CMD means Command, W means WRITE, R means READ, L means Data Byte Low and H means Data Byte High in the selected item. 115 Acute Technology Inc. Copyright 2012 a. Delete Packet Delete the selected packet. b. Insert Packet Insert a new packet after selected packet. c. Modify Packet Modify the selected packet. d. Delete All Packets Delete all packets in the list. e. Export Export the content of the list to a text file. f. Import Import the text file saved by the program. (2) Run 116 Acute Technology Inc. Copyright 2012 Output the signal according to the list. (3) Stop Stop the signal. (4) Repeat Repeat to output the signal. 3.24 PMBUS The Power Management Bus (PMBus) is a variant of the System Management Bus (SMBus) which is targeted at digital management of power supplies. Like SMBus, it is a relatively slow speed two wire communications protocol based on I²C. Unlike either of those standards, it defines a substantial number of domain-specific commands rather than just saying how to communicate using commands defined by the reader. How to use PMBus tool 117 Acute Technology Inc. Copyright 2012 The pattern generator will output the signal according to the List. You could edit the list by yourself. Every row means PMBus packet. (1) PMBus Setting There are 10 kinds of the PMBus packet, they are Group command protocol without PEC, Group command protocol with PEC, Extended command read byte protocol, Extended command read byte protocol with PEC, Extended command write byte protocol, Extended command write byte protocol with PEC, Extended command read word protocol, Extended command read word protocol with PEC, Extended command write word protocol and Extended command write word protocol with PEC. Please refer to the PMBus Specification (Revision 1.1) about the details of the PMBus packet. We need to choose the packet format, the program will respond according to the packet format. We take the packet format “Group command protocol with PEC” for instance. 118 Acute Technology Inc. Copyright 2012 We select “Group command protocol with PEC”, Address 0x10 , Command 0x20 , Data Byte Low 0x30 and Data Byte High 0x40. Note: there must be a “;” mark after data you input. Push the button “Sr” to end master-to-slave section of the packet and then input slave-to-master data “Data Byte Low 0x50” and “Data Byte High 0x60”, push the button “Add List” and we make a “Group command protocol with PEC” packet finally. 119 Acute Technology Inc. Copyright 2012 S means Start, ADDR means Address, CMD means Command, W means WRITE, R means READ, L means Data Byte Low and H means Data Byte High in the selected item. a. Delete Packet 120 Acute Technology Inc. Copyright 2012 Delete the selected packet. b. Insert Packet Insert a new packet after selected packet. c. Modify Packet Modify the selected packet. d. Delete All Packets Delete all packets in the list. e. Export Export the content of the list to a text file. f. Import Import the text file saved by the program. (2) Run Output the signal according to the list. (3) Stop Stop the signal. (4) Repeat Repeat to output the signal. 3.25 PWM Pulse-width modulation (PWM) is a commonly used technique for controlling power to inertial electrical devices, made practical by modern electronic power switches. 121 Acute Technology Inc. Copyright 2012 How to use PWM tool PWM tool not only generate 2 different duty cycle PWM signals at the same time, but also save the waveform in form of the text format (*.PGV). (1) PWM Output Channel Set PWM Output Channel 1/2 number and duty cycle. (2) PWM Frequency Set the PWM frequency, default 100KHz. (3) Export Export the PWM waveform. (4) Run Output the PWM waveform. (5) Stop Stop the PWM output. (6) Help Show the user manual. (7) Exit 122 Acute Technology Inc. Copyright 2012 Exit the tool. (8) Repeat Repeat to output the signal. 3.26 VCD File to PG’s Waveform Value change dump(VCD) is an ASCII-based format for dumpfiles generated by 123 Acute Technology Inc. Copyright 2012 EDA logic simulation tools. How to use VCD File to PG’s Waveform tool VCD File to PG’s Waveform tool can translate the VCD file into PG’s waveform. (1) Browse Browse the VCD file. (2) Load Load the VCD file. (3) Cancel Loading Cancel the loading of VCD file. (4) Repeat Repeat to output the waveform. (5) Wait Key Before Run 124 Acute Technology Inc. Copyright 2012 Add the keyboard event (SPACE) at the front of waveform after translation. (6) Convert Translate the VCD file into PG’s waveform. (7) Cancel Exit the tool. (8) Help Show the user manual. 125 Acute Technology Inc. Copyright 2012 Chapter 4 Note 126 Acute Technology Inc. Copyright 2012 4.1 Hardware (1) While connecting the PG with the target system, please Do Not connect the output channel with Ground or VCC because doing so shall damage the signal isolation amplifier pod. (2) Please Do Not use any power adapter, provided by companies other than Acute, to connect the PG power since our power adapter fits into the PG power need. Otherwise, unexpected damage to the PG or its parts may be done. (3) At least one ground line of the signal isolation amplifier pod should be connected to the target system. If the noise or cross talk occurs from the measured waveform, you may need to connect one more ground line to the target system to improve the quality of the measurement. (4) Though the five signal-isolation amplifier pods are marked A, B, C, D, and E; they are all the same, and they are interchangeable. Nevertheless, it is recommended that Do Not Change these pods to avoid unnecessary errors in the channel numbering. However, Extended Pod is a special signal isolation amplifier pod, please Do Not plug it into either Pod A, B, C, D, or E's connector, or vice versa; otherwise, the PG can be damaged. (5) The connectors of the PG mainframe and its interface card are the same as that of the printer cable, yet Do Not connect printer cable to the PG or its interface card, otherwise unexpected damage can be done. Also, please use cables provided by Acute Technology to ensure PG works smoothly. (6) Insert the PG mainframe into a lower disk slot if possible since the PG needs to be connected to cables; otherwise it may cause inconvenience while you are using other PC peripherals (such as CD-ROM driver or floppy disk driver) placed below it. (7) If the probes provided by the PG package do not fit properly into the target system's 127 Acute Technology Inc. Copyright 2012 pins, you can contact us for other probes. (8) The Pocket PG provides 8 output voltage levels for user requirements. Please pay attention to check the target circuit voltage levels to avoid damage to the circuit and the Pocket PG. (9) The Pocket PG communicates with the PC through the USB interface. Make sure that the USB cable is stable and plugged in securely. 4.2 Software (1) It is necessary to finish the driver setup before launching the application; otherwise, the application will enter the demo mode. (2) Remove old drivers and applications first before you update them to the latest version. (3) Please download and update the latest software from our home page at www.acute.com.tw. 128 Acute Technology Inc. Copyright 2012 Chapter 5 Miscellaneous 129 Acute Technology Inc. Copyright 2012 5.1 Troubleshooting 5.1.1 PG1000/2000 (1) Should Demo Mode shows when you are executing PG Editor, it means the installation runs into problems. Then, please try the following procedures: a. Check if the PG power is connected properly. b. Check if the cable between the interface card and the PG is connected properly. c. If you use Internal Mode, please find if there is a PG in the System Devices Manager of Control Panel. If not, it means the PG interface card is not connected, please turn off your PC power and plug the interface card into the PCI slot or another slot properly. d. If you use External Mode, check the PC BIOS if printer setup is in EPP mode (Please refer to BIOS Setup for Printer Port section). e. Turn on the PC, restart Windows and PG Editor. f. If the problem still cannot be resolved, please contact us. (2) If the waveform is not outputted properly while being run, please try the following procedures: a. Check if the probes are properly connected to the signal connector lines. b. Check if signal connector lines are properly connected to the signal isolation amplifier pod. c. Check if the probes are properly connected to the target system. d. Check the signal at the target circuit end. You can switch another channel and 130 Acute Technology Inc. Copyright 2012 gripper to the same target point to identify whether the problem lies in the target system or the PG. e. Run Output Waveform again. 5.1.2 Pocket PG (1) Should Demo Mode shows when you are executing PG Editor, it means the installation ran into problems. If this occurs, try the following procedures: a. Check the driver state in device manager. b. Confirm that you are using the latest PG Editor version. c. You have to reboot your PC after installation is finished. d. You can download the latest version at Acute’s web site: http://www. Acute.com.tw e. If the driver does not exist in device manager, unplug and re-plug the USB cable and check the driver state again. f. If the driver is still absent in device manager, you should reboot your PC again. g. After performing the above steps without the correct driver appearing, notice if another driver, which is not for the PG, loads in device manager when you unplug and re-plug the USB cable. If this occurs, please contact us. (2) If the waveform is not outputted properly when the Pocket PG is running, try the following procedures: a. Confirm that the grippers are properly connected to the signal connector lines. b. Confirm that the signal connector lines are properly connected to the Pocket PG main frame. c. Confirm that the grippers are properly connected to the target circuit. 131 Acute Technology Inc. Copyright 2012 d. Check the signal at the target circuit end. You can switch another channel and gripper to the same target point to identify whether the problem lies in the target system or the Pocket PG. e. Run Output Waveform again. (3) If while using the Wave Editor tool to generate a digital pattern, there is no signal out or unexpected data out, run the Waveform Check to find embedded errors or check the Base Frequency Setting mode by pressing Set Parameter. Don’t forget to set OE commands to enable channel output. 132 Acute Technology Inc. Copyright 2012 5.2 (1) How to use PG_Function Command Output Enable OE(3): Output Enable, is only used by the PKPG series and is not supported by PG series. 0xFFFF means that enable PKPG 16 data pins to output. 0x000F means that enable PKPG CH-00~ CH-03 4 data pins to output and set the other rest data pins Hi-Z. 0xF000 means that enable PKPG CH-12~ CH-15 4 data pins to output and set the other rest data pins Hi-Z. OE(3) number 3 means this command must use 3 time intervals. Note: No commands are allowed within 4 clocks after the OE command. PKPG series: PKPG2016, PKPG2116,PKPG2116+ PG series: PG1020, PG1050, PG2020, PG2050 133 Acute Technology Inc. Copyright 2012 You can push the button [Waveform Check] to check it is correct that the time interval of the command. (2) Set Event SE(1) and Wait Event WE(1) SE(1) and WE(1) mean that PG will do something when some event happened. 134 Acute Technology Inc. Copyright 2012 Refer to the photo as above, push the button [Run] and you will find that PG doesn’t work until you push the <space> keyboard of your PC. Because we set that only keyboard event happened and then PG runs. PG will always wait if no keyboard event happens. You can choose <space> 135 or <enter> as a keyboard event. Acute Technology Inc. Copyright 2012 (3) Jump to New Address JP(3): PG will output the waveform repetitiously from address 10 to address 26 until you push the button [Stop Run] and PG will stop. (4) Set Loop Count LC(3) and Loop to New Address LP(3): Loop to New Address mean that you can configure the times of the PG output the waveform. Refer to the photo as below: 136 Acute Technology Inc. Copyright 2012 PG will output the waveform three times. (5) Branch If Event BE(3): Branch If Event means PG will jump to new address you set when some event happened. Refer to the photo as below: Refer to the photo as above; you will see we set Event1 as an external event. This example is that I use another PG as an external signal source, we called it PG2. And the other is PG1. You must connect PG1 EV1 pin with PG2 CH0 pin and PG2 output the 137 Acute Technology Inc. Copyright 2012 waveform as an external event as below photo. If Event1 doesn’t happen, PG1 will output the waveform repetitiously from the address 20 to the address 60 and PG1 will jump to new address 70 when Event1 happened. 5.3 How to use text editor tool to edit PG vector file(*.PGV) Programmable Data Generator (PG in brief), it can read not only PG Waveform File (*PGW) but also PG Vector File (*PGV). You can use any text editor software to edit the PG Vector File by yourself and the contest of PG Vector File is the data and PG command. We’ll explain the format of PG Vector File and 7 PG commands include NP (No Operation), JP (Jump), LP (Loop), BE (Branch if Event), LC (Loop Count), SE (Set Event) and WE (Set Event) 138 Acute Technology Inc. Copyright 2012 INPUTS PG_Function DATA; ASSIGN DATA 3..0; RADIX AUTO; FREQUENCY 1000 Hz; %INTERVAL 1ms;% 『%..%』:Remark PATTERN 8FFh 0h // 0 ( MOV RL, 255 ) 2FFh 0h // 1 ( MOV RH, 255 ) 900h 0h // 2 000h 0h // 3 000h 0h // 4 000h 0h // 5 000h 0h // 6 000h 0h // 7 000h 0h // 8 000h 0h // 9 000h 0h // 10 000h 1h // 11 000h 2h // 12 000h 3h // 13 000h 4h // 14 000h 5h // 15 000h 6h // 16 000h 7h // 17 000h Ah // 20 000h Bh // 21 OE 65535 『//』:Remark START PATTERN 139 000h Ch // 22 Acute Technology Inc. Copyright 2012 000h 8h // 18 000h 9h // 19 000h Ah // 20 000h Bh // 21 000h Ch // 22 816h Dh // 23 ( MOV RL, 22 ) 200h Eh // 24 ( MOV RH, 0 ) 100h Fh // 25 000h 0h // 26 JP 10 ; We’ll explain the PG Vector File sample that it is a 4-bits-width, 1 KHz synchronous counter as above. INPUT PG_Function DATA Decide the signal name. Every signal name separates by a space and if the signal is the bus signal (Group), you can use sign [] to express, for example, A [3..0] means A3, A2, A1, A0, 4 signals. Note: “PG_Function” is a keyword; don’t use “PG_Function” as your signal name. It means you’ll use PG_Function command in your pattern here. ASSIGN DATA 3..0 It indicates that which channel your signal output. It means DATA0 = CH-00, DATA1 = CH-01, DATA2 = CH-02, DATA3 = CH-03. 140 Acute Technology Inc. Copyright 2012 RADIX AUTO Set the bus group radix. If the value in PATTERN section follows with radix-ID (h, d, o, b), the RADIX should be AUTO. Ex. When the RADIX is AUTO, the pattern 35 (=35d) and 35h (=53d) are different: Set the RADIX to HEX, the pattern 35 and 35h are equal. When RADIX sets to DEC, the pattern 35h will treat as 35d. The 5 kinds of RADIX as: AUTO: depending on radix-ID HEX : Hexadecimal DEC : Decimal OCT: Octal BIN: Binary In AUTO mode, the value with radix-ID in PATTERN section: “h” is hexadecimal value, “o” is octal value, and “b” is binary value. The empty radix-ID value will treat as decimal value. FREQUENCY 1000 Hz It means PG clock frequency is 1000 Hz. 141 Acute Technology Inc. Copyright 2012 PATTERN The section-keyword is the head of waveform pattern. There are two areas in the section: time scale (called Time Stamp) and wave data, using “>” to separate the two areas. In No Time Stamp mode, Time Stamp can be removed. The time scale is increased INTERVAL (or FREQUENCY) column by column. Only one section-keyword of INTERVAL and FREQUENCY can be chose in No Time Stamp mode. In Time Stamp mode, the time scale accord with Time Stamp, time unit accord with UNIT value, and these wave data describe what these INPUTS digital patterns are. See Time Stamp example as below: INPUTS PG_Function DATA; ASSIGN DATA 3..0; RADIX AUTO; UNIT ms; PATTERN 0.0> 8FFh 0h 1.0> 2FFh 0h 2.0> 900h 0h 10.0>000h 0h 11.0>000h 1h 12.0>000h 2h 13.0>000h 3h 14.0>000h 4h 15.0>000h 5h 16.0>000h 6h 142 Acute Technology Inc. Copyright 2012 17.0>000h 7h 18.0>000h 8h 19.0>000h 9h 20.0>000h Ah 21.0>000h Bh 22.0>000h Ch 23.0>816h Dh 24.0>200h Eh 25.0>100h Fh 26.0>000h 0h ; There is a main difference between No Time Stamp example and Time Stamp example. In No Time Stamp example, FREQUENCY 1000 Hz or INTERVAL 1ms means that every interval of the data sample point is 1 KHz or 1ms. In Time Stamp example, UNIT ms means the unit of every Time Stamp. 000h 0h // 10 START PATTERN 000h 1h // 11 000h 2h // 12 000h 3h // 13 There is an extract from No Time Stamp example; it indicates that the tenth data sample point is 0h (Hex); the eleventh data sample point is 1h (Hex); the twelfth data sample point is 2h (Hex) and the thirteenth data sample point is 3h (Hex). Every interval of the data sample point is 1 KHz or 1ms. 143 Acute Technology Inc. Copyright 2012 0.0> 8FFh 0h 1.0> 2FFh 0h 2.0> 900h 0h 10.0>000h 0h 11.0>000h 1h 12.0>000h 2h Here is another extract from Time Stamp example; it means that the data is 0h (Hex) when 0 ms, 1ms, 2~10 ms; the data is 1h (Hex) when 11 ms; the data is 2h (Hex) when 12 ms. Note: 8FFh, 2FFh, 900h, 816h, 200h, 100h is PG_Function command. We will explain them later. PG_Function: Name NP Instruction No Operation Description Clk* No action 1 JP Jump Jump to a new address 3 LP Loop Reduce 1 of the LC value. Jump to a new 3 address if LC > 0; Go to next address if LC = 0 BE Branch if Event Jump to a new address if receive SE. Else 144 3 Acute Technology Inc. Copyright 2012 go to next address LC Loop Count Set Loop Count(2~65536) 2 SE Set Event Set event to be a trigger 1 WE Wait Event Stop for waiting event receive 1 *Clk: It is a machine cycle, reference to the Base Frequency. There are several internal registers in the PG: RT, REX, RC, and ROE. They are controlled by PG_Function command. PG_Function is 12-Bits command set. PG_Function (12Bits) 4Bits(MSB) 8Bits(LSB) 8 XX MOV RL,XX Move the LSB of the PG_Function into RL. 2 XX MOV RH,XX Move the LSB of the PG_Function into RH. 1 XX JP RT Jump new address to RT-12 RT is a 16-bits-width register; it can be separated two 8-bits-width 145 Acute Technology Inc. Copyright 2012 register RL and RH. MOV RL 16h //Insert 16h in the RL MOV RH 00h //Insert 0h in the RH Is equal to MOV RT 016h PG_Function commands told the internal register pointer of the PG to work according to the command you give. Show the detail of the PG_Function as below: NP(No Operation): NP (No Operation) will affect nothing. The action is the same as MCU and CPU, NP means New Address = Address + 1. JP(Jump): JP (Jump) will affect the output flow. Ex. JP 35 means to jump a new address=35 without any condition. 000h Bh // 00021: 000h Ch // 00022: 816h Dh // 00023: (MOV RL, 22) 200h Eh // 00024: (MOV RH, 0) 100h Fh // 00025: JP 10 000h 0h // 00026: ; 816h means that insert the value 22 (16h) into the RL register. 200h means that insert the value 0 into the RH register. 100h means that jump the new address RT-12(22-12=10) 146 Acute Technology Inc. Copyright 2012 LP(Loop): LP (Loop) is similar with JP. The different is that JP requires no condition but LP is a condition-jump decided by LC. There is a register in PG called LC (Loop Counter). To set LC 32 will write 32 into Loop Counter. The LC legal value is 2〜65536. It is illegal value about 0 and 1. (Note: Here is the different with most CPU and MCU.) Now, we can use the LP command after setting the LC value. The waveform output flow run across the LP command will reduce 1 of the LC. Ex. Set LC 32 in address=3~4, set LP 16 in address=23~25 1. Run along address to LP 16, and then reduce 1 of the LC (LC=LC-1). 2. Check the LC at address=25 3. If LC =0, New Address = Next Address = 26 4. If LC >0, New Address = 16 Note: If the LC=0 already, and run across the LP, reduce the LC will 147 Acute Technology Inc. Copyright 2012 cause unrespectable flow. 200h 0h // 00007: (MOV RH, 0) 401h 0h // 00008: LC 3 000h 0h // 00009: 000h 0h // 00010: =========================== 820h Dh // 00033: (MOV RL, 32) 200h Eh // 00034: (MOV RH, 0) 300h Fh // 00035: LP 20 PG_Function (12Bits) 4Bits(MSB) 8Bits(LSB) 3 XX LP RT Jump to new address RT-12 LC RC Loop count of the RC PG_Function (12Bits) 4Bits(MSB) 8Bits(LSB) 4 XX 200h means that insert 0 into the RH register. 401h means that insert 3 (1+2=3, loop count range: 2 ~65536) into the RC register 148 Acute Technology Inc. Copyright 2012 (16-bits-width). RC 00000000 (00h) 00000001(01h) SE(Set Event): There are 4 events of PG, included 3 external events (Event_1, Event_2, Event_3) and 1 internal event (Keyboard Event). The PG interlaces the 4 events to be 16 conditions for controlling the output flow. These 16 conditions will be saved into the Event register of PG. 1. Keyboard Event 2. Event_1 3. Event_2 4. Event_3 5. Event_1 or Event_2 6. Event_1 or Event_3 149 Acute Technology Inc. Copyright 2012 7. Event_2 or Event_3 8. Event_1 or Event_2 or Event_3 Note: PKPG series possess 2 external events (Event_1, Event_2) and 1 internal event (Keyboard Event). The others 8 conditions are the inverse of these 8 items. If Event registers set as above 8 conditions, PG will detect these event-channels and compare with Event register. To get the same value will set the Flag-Register-Event bit of PG to be true state. If got the different value, then set the bit to be false state. Nevertheless, invert conditions will detect these event-channels and compare with Event register. To get the same value will set the Flag-Register-Event bit to be false state; Got the different value will set the Event bit to be true state. 000h 0h // 00010: 609h 1h // 00011: 000h 2h // 00012: SE EV1 PG_Function (12Bits) 4Bits(MSB) 8Bits(LSB) 6 XX SE EV Insert event into the REX Note: 150 Acute Technology Inc. Copyright 2012 600h means that Set Keyboard Event. 601h means that Set Not Event_1. 602h means that Set Not Event_2. 603h means that Set Not Event_1 And Not Event_2. 604h means that Set Not Event_3. 605h means that Set Not Event_1 And Not Event_3. 606h means that Set Not Event_2 And Not Event_3. 607h means that Set Not Event_1 And Not Event_2 And Not Event_3. 608h means that Set Not Keyboard event. 609h means that Set Event_1. 60Ah means that Set Event_2. 60Bh means that Set Event_1 Or Event_2. 60Ch means that Set Event_3. 60Dh means that Set Event_1 Or Event_3. 60Eh means that Set Event_2 Or Event_3. 60Fh means that Set Event_1 Or Event_2 Or Event_3. There are two-command sets actions depending on the Event bit: one is WE (Wait Event), the other one is BE (Branch If Event). 151 Acute Technology Inc. Copyright 2012 WE(Wait Event): The WE (Wait Event) command will stop the PG flow at the address and do not go to the next address until Event bit =1. 000h 0h // 00010: 700h 1h // 00011: 000h 2h // 00012: WE PG_Function (12Bits) 4Bits(MSB) 8Bits(LSB) 7 XX WE PG paused and wait event 152 Acute Technology Inc. Copyright 2012 BE(Branch If Event): The BE (Branch If Event) command is similar with LP. Because they are both condition-jump. LP jumps by LC condition, BE jumps by Event bit state. When PG flow run across BE command, the PG will jump to BE address if the Event bit =1. It will go to next address when the Event bit =0. 000h 0h // 00010: 80Dh 1h // 00011: (MOV RL, 13) 200h 2h // 00012: (MOV RH, 0 ) 500h 3h // 00013: 000h 4h // 00014: BE 13 PG_Function (12Bits) 4Bits(MSB) 8Bits(LSB) 5 XX BE Jump to the new address of the REX 153 Acute Technology Inc. Copyright 2012 80Dh means that insert 13 (0Dh) into the RL register. 200h means that insert 0 into the RH register. 500h means that jump to the new address in the REX register. REX 00000000 (00h) 00001101(0Dh) There is a PG_Function command OE (Output Enable), it’s only used in PKPG series. 8FFh 0h // 00000: (MOV RL, 255) 2FFh 0h // 00001: (MOV RH, 255) 900h 0h // 00002: 0E 000h 0h // 00003: 000h 0h // 00004: 154 65535 Acute Technology Inc. Copyright 2012 PG_Function (12Bits) 4Bits(MSB) 8Bits(LSB) 9 XX OE Output Enable 8FFh means that insert 255 (FFh) into the RL register. 2FFh means that insert 255 (FFh) into the RH register. 900h means that enable channels output. ROE 11111111(FFh) 11111111(FFh) 155 Acute Technology Inc. Copyright 2012 PC-Based Pattern Generator Manual Copyright2012 Acute Technology Inc. All Rights Reserved. Acute Technology Inc. www.acute.com.tw Address: 6F-7, #12, Ln. 609, Sec. 5, Chongxin Rd., Sanchong Dist., New Taipei City 24159, Taiwan Tel: +886-2-2999-3275 Fax: +886-2-2999-3276 E-mail: [email protected] 156 Acute Technology Inc. Copyright 2012