1
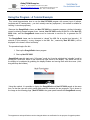
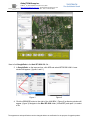
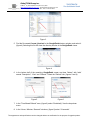
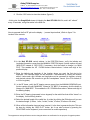
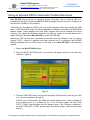
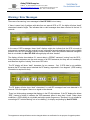
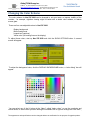
Global TSCM Group, Inc.
12 W 32nd St, Suite 604, New York, NY 10001, USA
http://globaltscmgroup-usa.com [email protected]
Tel.: +1 212 967 4030 +1 646 233 0383 Fax: +1 212 967 7560
THE STEALTH
The Confidential Catch
Navi DF-2020 DF Plotting Program
Operating Instructions
Introduction
Navi DF-2020 is a Windows program for plotting DF bearings on a map display, using the (very
popular and free) GoogleEarth viewer program, available on the web. Navi DF-2020 can plot up to
100 locations, and the DF bearing lines at those locations. Information can be entered manually using
the control panel (shown above) or automatically from a DF 2020 DF equipped with a (user-provided
or purchased form us) GPS receiver.
Although the GoogleEarth viewer program normally uses an internet link to fetch satellite images for
the display, it has been determined (by experiment) that it will run without such a link, provided that
the area being viewed has been “pre-viewed” on the same computer… the map images are saved
(cached) automatically in computer memory, (to accelerate the operation of the viewer) and these
images are later “recalled” (automatically) whenever the viewer is operated without an internet link.
This makes Navi DF-2020 suitable for mobile operation, when an internet link probably won’t be
available.
To use Navi DF-2020, a copy of the GoogelEarth viewer program must also be installed on the
same computer. GoogleEarth can be downloaded from this link;
www.earth.google.com
Users who are not familiar with GoogleEarth are encouraged to install and “play” with it for a while,
to become acquainted with its major features. The information that follows provides enough guidance
to use the basic features of Navi DF-2020 with a GoogleEarth viewer, but the more you know, the
more useful it becomes.
To learn Google Earth, please start here:
www.google.com/earth/learn/
The appearance and specifications can be changed without ant notification for the purpose of upgrade product.
Global TSCM Group, Inc.
12 W 32nd St, Suite 604, New York, NY 10001, USA
http://globaltscmgroup-usa.com [email protected]
Tel.: +1 212 967 4030 +1 646 233 0383 Fax: +1 212 967 7560
THE STEALTH
The Confidential Catch
Using the Program : A Tutorial Example
This tutorial demonstrates how to use the Navi DF-2020 program with manual input of latitude,
longitude and DF bearing data… you don’t actually need any equipment. ( this method is suitable for
learning / instruction purposes )
Because the GoogleEarth viewer and Navi DF-2020 are separate programs, plotting information
cannot be directly passed between them. Instead, Navi DF-2020 creates a KML file in the Navi DF2020 folder, and the GoogleEarth viewer must be instructed to use this file, to generate the DF
display.
The GoogleEarth viewer can be instructed to “reload” the KML file at regular time intervals ( 10
seconds in this example ) so any changes in the KML file ( created by Navi DF-2020 ) will be
displayed in the viewer, after a brief delay.
The procedure begins like this :
1. Start up the GoogleEarth viewer program
2. Start up Navi DF-2020
GoogleEarth normally starts up in “full screen” mode, but it can be switched into “sizeable” mode by
clicking the “multi-form” button in the extreme top right corner of the display. This allows the size of
the display to be adjusted by grabbing the display borders and moving them with the mouse. (click,
drag and drop the borders)
Using this method, it is possible to display the GoogleEarth and Navi DF-2020 panels at the same
time, so that the user can quickly switch back-and-forth between the two programs. This is shown in
the image on the following page. (Navi DF-2020 is the green panel beneath the GoogleEarth screen)
The appearance and specifications can be changed without ant notification for the purpose of upgrade product.
Global TSCM Group, Inc.
12 W 32nd St, Suite 604, New York, NY 10001, USA
http://globaltscmgroup-usa.com [email protected]
Tel.: +1 212 967 4030 +1 646 233 0383 Fax: +1 212 967 7560
THE STEALTH
The Confidential Catch
Now to link GoogleEarth to the Navi DF-2020 KML file…
3. In GoogleEarth, on the top menu bar, click ADD and select NETWORK LINK. A new
window will appear. ( figures 1 and 2 )
Figure 1
Figure 2
4. Click the BROWSE button to the right of the LINK BOX, (Figure 2) a directory window will
appear. (figure 3) Navigate to the Navi DF-2020 folder (c:\NaviDDF) and open it, to select
a file.
The appearance and specifications can be changed without ant notification for the purpose of upgrade product.
Global TSCM Group, Inc.
12 W 32nd St, Suite 604, New York, NY 10001, USA
http://globaltscmgroup-usa.com [email protected]
Tel.: +1 212 967 4030 +1 646 233 0383 Fax: +1 212 967 7560
THE STEALTH
The Confidential Catch
Figure 3
5. Find the file named Current_Hunt.kml in the GoogleEarth directory window, and select it.
(figure 4) Selecting this file will close the directory window in the GoogleEarth viewer.
Figure 4
6. In the bottom half of the remaining GoogleEarth screen are three “folders” with “tabs”
named “Description”, “View” and “Refresh”. Select the “Refresh” tab. (figures 5 and 6)
Figure 5
Figure 6
7. In the “Time-Based Refresh” area, (figure 6) select “Periodically” from the drop-down
menu.
8. In the “Hours / Minutes / Seconds” windows, (figure 6) select “10 seconds”.
The appearance and specifications can be changed without ant notification for the purpose of upgrade product.
Global TSCM Group, Inc.
12 W 32nd St, Suite 604, New York, NY 10001, USA
http://globaltscmgroup-usa.com [email protected]
Tel.: +1 212 967 4030 +1 646 233 0383 Fax: +1 212 967 7560
THE STEALTH
The Confidential Catch
9. Click the “OK” button to close the window. (figure 6)
At this point, the GoogleEarth viewer is linked to the Navi DF-2020 KML file, and it will “refresh”
every 10 seconds, using information in the KML file.
Now to generate the first DF plot on the display… ( manual input method ) Refer to figure 7 for
location of the controls.
Figure 7
10. In the Navi DF-2020 control window, in the POSITION frame, verify the latitude and
longitude information comes from the MANUAL POSITION inputs. (button caption will read
“MAN POS” instead of “GPS POS”) If necessary, click the button to change it to “MAN
POS”. This enables the UP / DOWN buttons located above / below each digit of the
position display.
11. Enter the latitude and longitude of the location where you want the first plot to be
displayed. The individual digits can be increment / decremented by clicking the buttons
above / below each digit. Latitude and longitude must be expressed in degrees, minutes
and decimal minutes. Be sure also to get the “hemispheres” correct. (N or S for latitude, E
or W for longitude)
12. In the DF frame, verify the DF bearing source comes from the MANUAL BEARING input.
(button caption will read “MAN BRG” instead of “DF BRG”) If necessary, click the button to
change it to “MAN BRG”. This enables the UP / DOWN buttons above / below each digit of
the bearing display.
13. Enter the DF bearing (expressed in true degrees) for the radial line that will be “drawn” on
the display, for this lat/long location.
14. Select the desired length of the radial line, (in miles) by clicking the DX button until you see
the desired length. (0 miles, 1 mile, 2 miles, 5 miles, 10 miles, 20 miles or 50 miles)
15. When all the information has now been inserted, it is the time to generate the plot. This can
be done by clicking the “ADD PLOT” button, but it can also be done by pressing the
SPACE BAR on the keyboard. (more convenient for mobile operations)
The appearance and specifications can be changed without ant notification for the purpose of upgrade product.
Global TSCM Group, Inc.
12 W 32nd St, Suite 604, New York, NY 10001, USA
http://globaltscmgroup-usa.com [email protected]
Tel.: +1 212 967 4030 +1 646 233 0383 Fax: +1 212 967 7560
THE STEALTH
The Confidential Catch
The ADD PLOT button will “turn white” for 3 seconds, to indicate that a plot is being
generated. After that, the caption on the ADD PLOT button will change (increment) to
indicate the number of the next plot to be generated. If an audio device is enabled, the
computer will briefly “beep” to indicate the plot was generated.
A few seconds later, (10 seconds or less) the plot will appear on the GoogleEarth viewer,
and each plot has a “name” consisting of the exact (computer) time when that plot was
generated.
NOTE : The SPACE BAR trigger will ONLY work if the Navi DF-2020 program window
has been active on the computer. If clicking the mouse (for any reason) on some other
program or area located OUTSIDE the Navi DF-2020 control window will direct the
keyboard output to somewhere else, and the SPACE BAR trigger won’t work anymore.
You can restore the SPACE BAR trigger by clicking the mouse anywhere INSIDE the
Navi DF-2020 control window.
To generate more plots (up to 100 are allowed), repeat steps 10 to 15 for each new plot desired.
Each time a new plot is generated, the caption on the ADD PLOT button will increment, to indicate
the number of the NEXT plot that will be generated.
The appearance and specifications can be changed without ant notification for the purpose of upgrade product.
Global TSCM Group, Inc.
12 W 32nd St, Suite 604, New York, NY 10001, USA
http://globaltscmgroup-usa.com [email protected]
Tel.: +1 212 967 4030 +1 646 233 0383 Fax: +1 212 967 7560
THE STEALTH
The Confidential Catch
Using an External GPS for Automatic Position Data Input
Navi DF-2020 has provisions for accepting lat/long information from an external GPS unit,
provided that the GPS can generate NMEA GPRMC messages that can be fed to a COM port on
the computer. (GPRMC is very common)
COM ports are (by definition) RS232 ports, and some computers these days provide only USB
ports. A GPS with RS232 output can often be adapted to a USB port, by means of an RS232/USB
adapter module. These adapters come with driver software that must be installed on the host
computer. The adapter and software “disguises” the USB port (makes it look and behave like a
regular COM port) and allows Navi DF-2020 to access the GPS data.
Assuming a GPS unit has been successfully connected to the host computer, and it is running
properly, (GPS = turned on, satellites have been acquired and it is generating valid GPRMC
position messages) then the GPS source can be used to drive Navi DF-2020, by the following
method :
1. Startup the Navi DF-2020 program.
2. Click the SHOW OPTIONS button. A new screen will appear where you can select the
COM port. (figure 8)
Figure 8
3. Click the COM PORT button until you find the proper COM port being used by your GPS
unit. ( they are numbered 1 through 8 )
Each time you click the button, the COM port is briefly tested to see if it truly is installed on
your computer, and if it is “available for use”. If not, the button caption will read “COM
PORT x : BUSY” and the button color will change to grey. If the COM port is available, it
will read “COM PORT x : FREE” and the button color will be normal. ( same as all the other
buttons )
The appearance and specifications can be changed without ant notification for the purpose of upgrade product.
Global TSCM Group, Inc.
12 W 32nd St, Suite 604, New York, NY 10001, USA
http://globaltscmgroup-usa.com [email protected]
Tel.: +1 212 967 4030 +1 646 233 0383 Fax: +1 212 967 7560
THE STEALTH
The Confidential Catch
4. On the Navi DF-2020 control panel, switch the position source from MAN to GPS, so that
the lat / long data will come from the GPS unit. This will “grey out” the UP / DOWN buttons
above / below each digit, since they are now disabled.
5. Verify that you have selected the proper COM port by watching the latitude / longitude
display on the Navi DF-2020 panel… if everything is running properly, the display will
show the exact same lat/tlong values as the GPS unit.
If Navi DF-2020 fails to detect a valid GPRMC message, then after 10 seconds the display
will “blank out” and show “dashes” in all the digit windows. If this happens, possibly you
have selected the wrong COM port to drive Navi DF-2020… try another.
6. Once you have verified that the GPS is driving Navi DF-2020, close the OPTIONS window
by clicking the HIDE OPTIONS button.
Once the proper COM port has been identified, the setting is saved to disk when the program is
closed, so that the same COM port will (automatically) be selected, the next time Navi DF-2020 starts
up. If the COM port is not available when Navi DF-2020 starts up (reason = any) you will get an error
message to warn you about the problem.
The appearance and specifications can be changed without ant notification for the purpose of upgrade product.
Global TSCM Group, Inc.
12 W 32nd St, Suite 604, New York, NY 10001, USA
http://globaltscmgroup-usa.com [email protected]
Tel.: +1 212 967 4030 +1 646 233 0383 Fax: +1 212 967 7560
THE STEALTH
The Confidential Catch
Using an External Agrello Format DF for Automatic Bearing Data Input
An external Doppler DF can be used to automatically provide the DF bearing data, if the DF
generates an RS232 output of Agrello format DF messages, at 4800 baud.
A GPS input is required for this mode of operation, since DF units generate “relative” bearings and
Navi DF-2020 requires “true bearings” to plot the lines on the display. GPS information is required to
convert “relative” bearings to “true” bearings. Furthermore, the indicated GPS “speed” must be 3 knots
or greater, to ensure the heading data from the GPS is trustworthy.
The DF messages must be applied to the same COM port used by the GPS, so it might be necessary
to contrive a switch, to select back-and-forth between the GPS and the DF, as desired.
The DF 2020 DF does this “switching” automatically… (shameless self-promotion) it has a GPS
RS232 input, to accept GPS messages. It searches for GPRMC messages from the GPS and “relays”
every 3rd GPRMC message through its own RS232 output port. If DF messages are available during
the time between GPS messages, they will be sent out using the same port. As a result, no manual
switching between the DF and the GPS is required.
To select an external Agrello format DF as the bearing source, click the DF SOURCE button so the
caption says “DF BRG”. (Instead of “MAN BRG”)
NOTE : If no DF messages are detected for 10 seconds, the DF bearing window will “dash out” to
indicate that no valid DF data is available for plotting. In this condition, if you force a plot to be
generated, (hit the space bar or click the “ADD PLOT” button) the plot will contain a location marker,
but no DF bearing line will be painted.
NOTE : Navi DF-2020 assumes the DF bearings are “relative bearings”, which must be corrected to
“true bearings” using COURSE information from the GPS. This is done automatically, before the
bearing lines are plotted on the display. When operated with automatic DF input, ( button caption =
“DF BRG” ) the loss of GPS information (for 10 seconds or more) will therefore prevent a DF line from
being plotted… the DF bearing display will also “dash out”, since it is impossible to calculate the true
bearings without valid GPS COURSE information.
NOTE : GPS heading information is not reliable for vehicle speeds below 3 MPH… therefore, Navi
DF-2020 checks the GPS speed when using an external DF input, and it will fail to generate a bearing
line (on a plot) if the GPS speed is less than 3 MPH. (vehicle is stationary) In this case, the DF display
will show the letters “SPD”, to indicate the problem.
The appearance and specifications can be changed without ant notification for the purpose of upgrade product.
Global TSCM Group, Inc.
12 W 32nd St, Suite 604, New York, NY 10001, USA
http://globaltscmgroup-usa.com [email protected]
Tel.: +1 212 967 4030 +1 646 233 0383 Fax: +1 212 967 7560
THE STEALTH
The Confidential Catch
Using The Automatic Timer to Generate Timed Plots
Navi DF-2020 has an automatic timer that can be enabled whenever GPS is selected as the POS
source. The TIMER button is normally disabled, (for MAN POS) and the background color for the
button is grey, to indicate this. Selecting GPS as a POS source will enable the TIMER button.
The TIMER causes Navi DF-2020 to automatically generate plots of GPS position and DF bearings
at regular time intervals. Time intervals can be selected for 1 minute, 2 minutes, 5 minutes and 10
minutes, as well as “TIMER OFF” which disabled automatic plotting.
If GPS data is not valid when the time comes to generate a plot, no plot will be generated. Similarly, if
DF data is not valid when the time comes to generate a plot, no DF bearing line will be plotted. (but
the location WILL be plotted IF GPS data is valid) GPS and DF data becomes invalid 10 seconds after
the last GPS and/or DF message was received.
This feature can be troublesome if used on a channel where multiple transmitters are conducting a
conversation… if the time comes for a plot, and the channel is occupied by a signal that is NOT
coming from the transmitter being hunted, the Navi DF-2020 program will still plot the bearing line…
(it can’t tell the difference between transmitters)
Obviously, this can lead to a display that is cluttered with many “false” bearing lines, after a while. In
situations like this, it is better to NOT use the timer, and ( manually ) “forcing” plots to be generated by
hitting the spacebar or “ADD PLOT” button, whenever the hunted transmitter comes on the air. (the
hunter must supervise the plotting process)
Timed plots might be useful in situations where the hunter is seeking an “accidental” signal on a
channel, like a stuck mike button… situations where the only signal on the channel is the signal being
hunted.
In cases like this, especially when the hunter is hunting “solo”, the Navi DF-2020 program can be
allowed to run (without manual supervision) for some time interval, accumulating data while the hunter
pays due attention to the road, and driving the vehicle… the results can be safely viewed anytime
later, when the vehicle is parked.
Using The Saved Google Earth Map without Internet Availability
If you expect to use your DF2020 in the certain area where any internet is not available for Google
Earth, you can search the area with internet and save it in “My Places” for later DF hunting on the
saved map
1.
2.
3.
4.
5.
Search an area with internet connection and adjust its scale desired.
Save the map in “My Places” with the desired name.
Repeat this procedure as many as you need.
Start “Google Earth” when you need for DF hunting and double click the saved map you need.
Start “Navi2020” to begin bearings.
The appearance and specifications can be changed without ant notification for the purpose of upgrade product.
Global TSCM Group, Inc.
12 W 32nd St, Suite 604, New York, NY 10001, USA
http://globaltscmgroup-usa.com [email protected]
Tel.: +1 212 967 4030 +1 646 233 0383 Fax: +1 212 967 7560
THE STEALTH
The Confidential Catch
Warning / Error Messages
There are a few warning / error messages in Navi DF-2020, but not many…
If there is some kind of problem with data from an exernal GPS or DF, the digits will show “dash”
characters instead of digits. This indicates that no valid messages have been received in the last 10
seconds.
In the case of GPS messages, these “dash” displays might also indicate that the GPS is turned on
and properly connected, but the receiver has not yet acquired enough satellites signal to get a reliable
position to fix the GPS messages contain a status indicator, and if this indicator states the navigation
data is not reliable, the Navi DF-2020 lat/long display will show “dashes”
The display will also show dashes if it cannot detect a GPRMC “sentence” coming from the GPS…
these particular sentences are the most common of all GPS sentences, but they are not “mandatory”,
and therefore might be “missing” from some GPS units.
The DF display will show “dash” characters for two reasons… first, if GPS data is not available,
because the DF routines cannot calculate the DF bearing, expressed in “true degrees”. (GPS heading
information is required for that)
The DF display will also show “dash” characters if no valid DF messages have been detected in 10
seconds. This can happen if there is no signal on the channel.
There is a third warning message that displays in the DF digit windows. If the DF displays the letters
“SPD” (instead of digits) it indicates the GPS-measured speed is less than 3 knots. Under these
conditions, a GPS heading is not reliable and might contain large errors. Therefore it is not suitable for
converting a DF “relative bearing” into a “true bearing”, for display and plotting by Navi DF-2020.
The appearance and specifications can be changed without ant notification for the purpose of upgrade product.
Global TSCM Group, Inc.
12 W 32nd St, Suite 604, New York, NY 10001, USA
http://globaltscmgroup-usa.com [email protected]
Tel.: +1 212 967 4030 +1 646 233 0383 Fax: +1 212 967 7560
THE STEALTH
The Confidential Catch
One last warning message involves problems with the COM port, and it appears whenever the
software attempts to open up the COM port. If any error is detected, the following message box will
appear :
This message can appear immediately after the program starts because the program “tests” the COM
port when the program begins, to ensure it really is available. If the COM port is not available, this
message box will appear. This can occur if the program attempts to open a COM port that is already
open, or attempts to close a COM port that is already closed.
For example, if some other program (not related to Navi DF-2020) is using the same COM port when
Navi DF-2020 is started, this error message box can appear.
Accumulating Maps in the Cache Memory
In order to get map images with sufficient detail to show street names, the “eye elevation” in the
GoogleEarth viewer must be around 5000 feet. At this altitude, the screen displays an area approx.
0.75 miles high by 1.0 miles wide.
To display an area the size of Los Angeles requires an eye elevation of 50 miles, which displays an
area measuring 40 miles high by 60 miles wide. ( 2400 square miles ) Therefore, about 3200 images (
0.75 x 1.0 miles ) are required to cover an area the size of Los Angeles, with sufficient detail to show
street names.
At this time, the only way known to accumulate these maps is to “fly over” these areas ( with the
GoogleEarth viewer ) at an altitude of 5000 feet, slowly covering the area desired. This can take a
fair bit of time, but it should only be necessary to do it once. Be sure to have ROADS checked in the
LAYERS list box, to accumulate the road names as well.
If these “high-resolution” images are not available, the viewer will continue to operate but the images
will be “blurry” if “zoomed in” to view small details… they just aren’t available with images taken at
higher elevations.
The appearance and specifications can be changed without ant notification for the purpose of upgrade product.
Global TSCM Group, Inc.
12 W 32nd St, Suite 604, New York, NY 10001, USA
http://globaltscmgroup-usa.com [email protected]
Tel.: +1 212 967 4030 +1 646 233 0383 Fax: +1 212 967 7560
THE STEALTH
The Confidential Catch
Changing the Color Scheme
The color scheme for Navi DF-2020 can be changed to suit your taste, or improve visibility of the
controls… for example, nighttime viewing might be better with a darker color scheme, to reduce
screen glare.
There are four user-adjustable colors in Navi DF-2020
Display background
Button background
Legend text (captions)
Vector color (for bearing lines on the display)
To adjust these colors, start up Navi DF-2020 and click the SHOW OPTIONS button. A second
screen will appear.
To adjust the background color, click the DISPLAY BACKGROUND button, a “color dialog” box will
appear.
You can select any of the 64 colors in the “library” called “basic colors”, or use the crosshairs and
vertical slider, to set the color yourself. Moving the crosshairs left or right will change the color itself. (
The appearance and specifications can be changed without ant notification for the purpose of upgrade product.
Global TSCM Group, Inc.
12 W 32nd St, Suite 604, New York, NY 10001, USA
http://globaltscmgroup-usa.com [email protected]
Tel.: +1 212 967 4030 +1 646 233 0383 Fax: +1 212 967 7560
THE STEALTH
The Confidential Catch
“hue” ) Moving the crosshairs up or down will change the intensity of the color from bright to soft, (
“saturation” ) by mixing the color with white. The slider control sets the total brightness (“luminosity”)
by mixing the color with black.
Clicking a “library color” will drive the crosshairs and slider to the values associated with that color…
so if you see a “library color” that is close to the color you want, you can select it to provide “starting
point” values that you can fine-tune yourself with the crosshairs and slider.
Once you have the color you want, click the OK button, the new color will be instantly applied to the
background. The same procedure is used for the other two colors.
If you want to restore the original color scheme, click the DEFAULT COLORS button.
The colors are saved to disk when the program is shut down, and restored automatically upon restart.
More Information
There is NO ASSOCIATION OR COLLABORATION between GoogleEarth Corporation of Palo
Alto California, USA (creator of Google Earth ) and Radio DF Instrument New York, New York,
USA. (distributor of Navi DF-2020). The name for Navi DF-2020 derives ONLY and EXCLUSIVELY
from the fact that GoogleEarth is used as a “viewer” program for the output of Navi DF-2020.
Therefore, for any problems, questions or more information about Navi DF-2020, please contact
us(by e-mail :
[email protected]
The Navi DF-2020 output file (which is read by the GoogleEarth viewer) is actually a “KML” file
which is a readable “text” file. (very similar to HTML, you can view it with WordPad )
The KML “language” is optimized for use with mapping programs. Information about the KML
“language” is available on the web.
Navi DF-2020 was created using VisualBasic 6 on a Windows7 machine in December 2009.
The appearance and specifications can be changed without ant notification for the purpose of upgrade product.


![Stealth Protect Series catalogue 2011_We[...]](http://vs1.manualzilla.com/store/data/005809212_1-caf297493bfcf938dba2b64bb0d79842-150x150.png)