1
RECEPTOR Version 2.0.1
Software Update for Receptor 2 Products
Operating
Manual V1.0
July 20, 2013
www.museresearch.com
Table Of Contents
Welcome.......................................................................................................................3
Downloading, Installing, and Registering your Update.........................................................4
Getting Familiar - OVERVIEW...........................................................................................6
RECEPTOR Front panel New Button Layout.........................................................................7
New Terminology of V2.0.1..............,...............................................................................8
PLAY MODE and the SOUNDFINDER function......................................................................8
RECEPTOR Presets Overview..........................................................................................10
Selecting "PLAY" Presets from the Front Panel..................................................................11
Selecting Individual Synth Channel Presets......................................................................13
Selecting Individual Audio Channel Presets......................................................................15
Adjusting levels and panning with the MIX menu..............................................................17
Adding effects to the overall mix....................................................................................18
Saving the presets you've created..................................................................................19
Selecting presets when performing live...........................................................................19
Editing Synth and effects plugins / MIDI Learn.................................................................20
Exploring the RECEPTOR Graphical User Interface.............................................................21
The GUI: SoundFinder, Tags, and Presets........................................................................22
The GUI: Synth Channel Controls...................................................................................24
The GUI: Audio Channel Controls...................................................................................25
The GUI: Master Mix Bus Channel Controls......................................................................26
The GUI: SETUP Tab functions.......................................................................................29
The GUI: LIVE MODE feature.........................................................................................35
The GUI: Mini-Strips MODE feature.................................................................................37
The Backup and Restpore feature...................................................................................39
Software and End User License Agreement......................................................................43
Acknowledgements.......................................................................................................44
Where to go for more info..............................................................................................45
2
RECEPTOR Version 2.0.1 Software Update Manual
Introduction
First off, thanks for being a RECEPTOR 2 owner. Whether you play for fun,gig at a local club or
Church, or tour the world performing for huge crowds, you understand how important it is to have
a stable, high-performance instrument with which to run your favorite virtual instruments and
effects.
Two years ago we released an entirely new version of our user-interface that employed an entirely
new paradigm of a virtual rack. We added the ability to drag and drop your virtual instruments
and effects into this rack, as well as introducing a new way to organize all your presets called
SoundFinder™ that seamless integrates front panel operation with the graphical user interface.
Last year we introduced an entirely new Receptor model called the VIP that introduced a new
feature called LIVE MODE™ that automatically loads the presets you will be performing with, and
dynamically loads new presets and unloads old presets as you move through your "virtual setlist"
that you create with SoundFinder. We followed up the VIP with two new models called the TRIO
and QU4TTRO that greatly enhance what you can do with a Receptor.
Now its your turn. We've taken much of the fantastic new technology we've developed for our
latest products and made it compatible in the RECEPTOR 2, RECEPTOR 2+, RECEPTOR 2 PRO,
RECEPTOR 2+ PRO, RECEPTOR 2 PRO MAX and RECEPTOR 2+ PRO MAX products. Now you can
take advantage of an entirely new user interface (in addition to the previous "mixer-style" interface
that remains an option for you to use) and all of the great new features we've developed over the
last couple of years.
The new Receptor 2.0.1 software update provides you with a huge number of features and benefits.
Here are some of the many new features found in this release:
•
•
•
•
•
•
•
•
•
•
•
•
•
•
SoundFinder™ function lets you organize your presets using TAGS, a new, flexible,
searchable organization tool that is super easy to use from the front panel and super
powerful when used with the Graphical User Interface.
Over $900 of virtual instrument and effects software is included with this update, including
the MusePlayer soundset, Camel Phat, Camel Space, MasterVerb 4, TrackPlug4, AAS player,
Alchemy Player, and many more, all "tagged" and ready to use with the new interface.
Simple drag and drop loading of virtual instruments and effects into the virtual rack.
Fast and easy assignment of effects in "insert" or "send" mode.
Convenient new Software Manager functionality for installing new plugins and presets.
Powerful new LIVE MODE function for making live performance a breeze.
Flexible "mini-strips" view for quick optimization of the view of the rack.
Up to 16-slots in the rack for your virtual instruments or effects along with two main effects.
MIDI Learn functionality on both the plugins as well as main mixer parameters.
New MIDI filter page with "verbose" MIDI monitoring for diagnosis MIDI setups.
Backup and Restore functionality for creating a backup drive, and performing incremental
backups of your work.
Support for installing Native Instruments Komplete 9 or Komplete 9 Ultimate.
Super-fast creation of splits between different synth channels
Easy creation of new Tags with the abillity to drag and drop presets from one Tag to another.
This manual will help you get your software update installed, registered, and get you started with
the exciting new features it offers.
3
Getting Started: Downloading your update
The Receptor 2.0.1 update is a paid update. Yeah, we know, every update up to now has been
free, but the fact is this update includes OVER $900 of SOFTWARE and tons of new features, so if
anything, its a bargain. We think you will agree once you start using it. If you already own V2.0
software, which came pre-installed on all RECEPTOR 2 products starting in March 2012, then the
update is free for you since you already have all the virtual instruments and effects installed on
your unit.
To purchase the update (and you might have done this already) visit the www.plugorama.com
website, and simply add the Version 2.0.1 Software Update for RECEPTOR 2 into your shopping
cart. Go ahead and check out, and then check your email. You will be sent an invoice for your
purchase which contains the all important sofware authorization code, along with a link to download
the update. If you own V2.0 already, you will need to contact tech support for a special download
code to download and register the update.
Downloading the updates:
The V2.0.1 update consists of TWO files. The System Software (Receptor-update-2.01.20130725),
and the accompanying plugins and presets (Plugin-bundle-2.0.1-4). This plugin preset update
is huge (about 5GB), because it includes that $900 of sofware we talked about and over 4GB of
sampled sounds. You will need a reasonably fast internet connection to download the software.
If you don't have such a connection available, then contact the factory for an alternative to
downloading the software.
Once the software is downloaded, you will need to connect to the Receptor's hard drive using the
Receptor Remote / Muse Tools utility that came with your unit. If you have lost the disc or don't
have it installed on your computer, you can download it by visiting http://www.museresearch.com/
support/updates.php.
Assuming you have the Receptor Remote Control software installed on your computer, connect
Receptor so that both your computer and your Receptor has access to the internet.
NOTE You cannot use Crossover mode to authorize the software upgrade. Receptor must have a
direct connection to the Internet in order to validate the installation!
To connect your Receptor to your computer's network, do the following:
1. Attach a standard Ethernet patch cable to the Ethernet port of your Receptor.
2. Connect the other end of the cable to your computer network's switch or router or an open port
on your cable or DSL modem (if available).
3. Power up the Receptor and press the SETUP button. Turn the top knob until it says "TCP-IP
Setup". Turn the bottom knob until it says AUTO DHCP and then confirm that choice when it asks
"Are you sure?"
Note: Network settings require power cycling to take effect, so if you changed the network settings,
please turn off your Receptor and turn it on again to enter into AUTO DHCP mode.
4.After your Receptor reboots, verify that it is receiving a valid address by selectting SETUP and
going to the TCP/IP Address screen. Valid addresses typical start with 192 or 10. Invalid addresses
typically start with 169.
5.Once your Receptor is connected to your computer's network, you are reaady to connect to your
Receptor from your computer and install your new software.
4
Getting Started: Installing the software update
Now its time to install the software you have downloaded but it needs to be done in TWO steps. The
process is simple:
1. Turn on your Receptor, connect to the hard drive using Muse Remote Control.
2. Drag and drop the "Receptor-update" file you downloaded into "Drop Installers Here".
3. Run the installer from the SETUP menu in your Receptor.
4. Once the installer has run, and the system has rebooted, AUTHORIZE the software update (requires
connection to the Internet) before installing all the plugins and presets.
5. Once the update is authorized, drag and drop the "Plug-in Bundle" file you downloaded into the "Drop
Installers Here" folder, and run the installer from the SETUP page. That's all there is to it. .
Step-by Step Installation Instructions
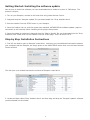
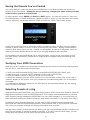
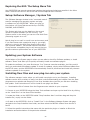
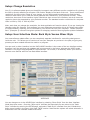
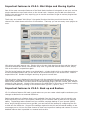
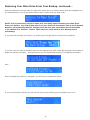
1. First off, we need to open up Receptor's hard drive. Assuming you've established connection between
your computer and the Receptor, we simply press on the HARD DRIVE button that is on the Muse Remote
Control window:
This will open up a window that has the contents of Receptor's hard drive:
2. Locate the folder called "Drop Installers Here" and then drag and drop the "Receptor Update" software
you downloaded into this folder.
5
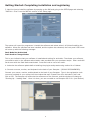
Getting Started: Completing installation and registering
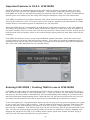
3. Now it's time to install the software by opening up the GUI and going to the SETUP page and selecting
"INSTALL 1 Files" from the INSTALL section of the Setup page.
The system will report its progress as it installs the software and reboot when it is finished installing the
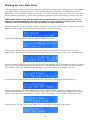
software. When the software has been installed, and the system has rebooted, the front panel LCD screen
will come up with the following message:
Rack Mode Not Authorized
Push Knob to Change Modes
This is your indication that your software is installed and waiting for activation. To activate your software,
you need to enter in the software authorization code provided with your purchase receipt. Mixer mode still
works even with the Rack Mode unactivated. Press the knob to use mixer mode.
4. Authorize the software update before installing the plugins and presets using method A or B below:
A. Connect a mouse, monitor, and keyboard to the back of your Receptor. (HIGHLY RECOMMENDED)
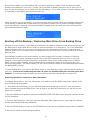
Connect your mouse, monitor, and keyboard to the back of your Receptor. Type in the registration code
you were provided on your receipt into the window that says "Please Enter Your Activation Code" and
click on OK. The Receptor will authorize the software over the Internet, and the window will change to
"Starting Up... Loading Data". Once it is done, you are now able to use Receptor OS V2.0.1 (cue fanfare).
6
B. If an LCD is not available, connect a USB or PS2 keyboard for "blind" activation (Not recommended, but
possible)
If you do not have a mouse, monitor and keyboard attached, you can still authorize the software using
just a keyboard connected to the Receptor. This is done "blind" since you can't verify the authorization
code as you enter it (which is why we don't recommend this method). To authorize the software in
this manner, simply connect the USB or PS2 keyboard to the Receptor, verify that the LCD display of the
Receptor says "Rack Mode Not Authorized" and then CAREFULLY type in the authorization code EXACTLY
as it appears on your receipt. Hit "Return" on your keyboard when you have entered the code, and if the
LCD screen changes to "Starting up" then you have successfully authorized the system. If the screen
remains as it was, the code was wrong (or you are not connected to the Internet) and you can try to enter
the code again. You must type in the code exactly as it appears on the receipt, and you must hit
"return" after entering in all the digits.
5. Now that Version 2.0.1 is authorized, you are ready to install the plugins and presets into your system.
Repeat Steps 1,2, and 3 above using the file "Plugin-bundle", but there is no need to authorize
this file.
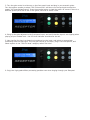
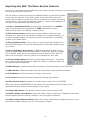
New Front Panel Button Layout for Version 2.0.1 Software
Your new software has a different button layout than before. This is because the new SOUNDFINDER
interface emphasizes the easy selection of presets on what is called the PLAY level. The PLAY level is
really the new Rack-mode interface's "home screen" which lets you select presets that you've created
without having to do anything but turn a knob and push the encoder to load it.
The simple turth is that this button layout is radically different than the mixer mode button layout, and
that's because the user-interfaces are completely different! You will be sent a sticker in the mail with the
new button layout that you can place on the front panel of your Receptor to make it easier to remember
the new button functions, but in the meantime, below is a chart that shows the new button names.
Its best not to compare the old and new, as they bear little resemblance to each other. If you want to keep
things in perspective, you can think of the button set "philosophies" this way:
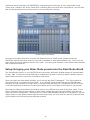
Mixer Mode: Left hand side of buttons next to the encoders is for preset selection, either on the Single
Channel or Multi (entire mixer) level. The rest of the top row depicts the signal flow throught the mixer,
from source, through three effects and on to the mixer. Remainder of the bottom row is for editing,
saving/organizing presets, and viewing the meter function.
Rack Mode: Most common buttons, including the default PLAY MODE are on the left hand side next to
the encoders. Next column allows you to select the upper or lower section of the rack (top section is
Synths, bottom section is for effects). Next column lets you select the slot or channel for that synth or
effect, moving up or down through the virtual rack. Next button column is for general setup and editing
or saving of presets. Far right hand column of buttons are used to increment or decrement through any
presets in a Tag.
7
Getting Familiar with the V2.0.1 Terminology and Operation
Now that your software is now installed and registered, so its time to become acquainted with the
many new features and benefits availble in the V2.0.1 software release!
FIRST... some definitions
PLAY: The PLAY mode is the super simple default mode that happens when the RECEPTOR powers
up. You can tell you are in PLAY mode because the PLAY button on the top left side of the button
field is lit. PLAY mode is the easiest way to operate your RECEPTOR.
SoundFinder™ is a feature in RECEPTOR that lets you quickly and easily find the right preset for
the instrument you have connected and/or the style of music you are making. SoundFinder works
whenever you are selecting presets either on a global (PLAY mode) basis, or when you are selecting
a sound or effect preset in a particular synth or effect channel. SoundFinder uses TAGS and
PRESETS to organize the sounds and effects in your RECEPTOR.
TAGS are the "categories" in SoundFinder that allow you to organize your sounds and effects. For
example, you might have an "Acoustic Pianos" TAG, that contains all of your various acoustic pianos
for playing with your MIDI keyboard. You might have an "Guitar Clean" Tag, which contains your
various clean-sounding amp models for playing your electric guitar. And you might have a "Vocal
FX" Tag that contains the appropriate vocal effects when using a microphone.
TAGS are also user-definable, meaning you can create your own categories using the graphical user
interface. This lets you create Tags to organize sounds in your own categories, or define a set list,
where each preset in that particular Tag has all the sounds you are using for a particular gigl
Note: TAGS are organized into two primary main groups: sounds for playing with a MIDI keyboard,
and effects for processing the incoming audio from one of the inputs. Sounds are simply listed
with the description of the TAG (as in "Synth Pads"), and effects are preceeded by the letters FX
(as in "FX Electric Guitar"). Within the FX group you have different sub-categories depending on
what you are processing, like electric guitar, acoustic guitar, vocals, etc.
PRESETS are the unique sounds or effects that are in a particular Tag. Take for example the
"Acoustic Pianos" Tag, where you might have presets like "Concert Grand Piano", "Studio Grand",
"Rock Piano", "Jazz Piano", etc. These different piano presets can be selected by turning the top
knob.
Note: The same preset may be associated with several different Tags. For example, the "Rock
Piano" preset might reside in the "Acoustic Pianos" Tag, as well as the "Jam Night" Tag you created.
SoundFinder and PLAY Mode
SoundFinder preset selection works like this: Turn the BOTTOM knob to select a TAG (category)
you want to choose from, and then turn the TOP knob to select the sound or effect (preset) that
you want to perform with. Once you have selected the TAG and PRESET you are interested in,
simply press the bottom or top knob to load that particular sound or effect preset.
Note: A preset selected in PLAY mode affects all aspects of the RECEPTOR. So when you select
a PLAY preset, not only does the virtual instrument or effect associated with the preset load, but
it also configures the MIDI ports, input and output assignments, and mixer settings for the entire
unit. When you change to another preset, the entire RECEPTOR setup will change with that preset;
all channels, all synths and effects, and all input assignment and mix settings.
8
What's great about PLAY mode is that it makes it really easy to utlilize all the functionality of your
RECEPTOR without having to spend a bunch of time creating sounds. With SoundFinder in the PLAY
mode, even someone completely unfamiliar with software instruments and effects can use RECEPTOR.
As you become more comfortable with your RECEPTOR, you'll find it valuable to know how the different
sounds and effects are organized so you can quickly find the preset you are looking for.
You already know RECEPTOR does two basic things: it generates sounds using a MIDI keyboard or
controller, or it processes sounds coming from an audio input of some sort. Because of this, there are
two main categories of TAGs: SOUNDS and EFFECTS.
The Tags for SOUNDS simply state the type of sounds to expect in that particular Tag. For example, the
"Acoustic Pianos" Tag has all the various acoustic piano sounds, the "Strings" Tag has all sampled string
instruments inside it.
Here are some example Tags for the synth and sampled sounds:
TAG Name
TAG: Acoustic Guitars
TAG: Acoustic Pianos TAG: Brass
TAG: Electric Basses
TAG: Electric Guitars
TAG: Electric Pianos
- etcetera -
TAG contains:
Synth / Sampled Sounds
Synth / Sampled Sounds
Synth / Sampled Sounds
Synth / Sampled Sounds
Synth / Sampled Sounds
Synth / Sampled Sounds
Expected Input:
MIDI keyboard, controller
MIDI keyboard, controller
MIDI keyboard, controller
MIDI keyboard, controller
MIDI keyboard, controller
MIDI keyboard, controller
or
or
or
or
or
or
interface
interface
interface
interface
interface
interface
The Tags for EFFECTS all have the letters FX before the effect category. Therefore, to hear a preset with
FX in the TAG name, you have to have a source of audio connected to the appropriate audio input.
In the realm of FX presets, different presets are designed for different sources of audio. You wouldn't
normally want to sing through a distorted guitar amp model, nor would you want to play guitar through
a vocal harmonizer. For this reason, presets are designed specifically for use with different pre-assigned
inputs However, there are also "generic" effect categories for specific types of effects that let you indulge
your more experimental side, or simply get you to a specific effect regardless of the input source quickly.
Here are some example Tags for effects organized by the expected input source:
TAG Name
TAG: FX Acous Guitar
TAG: FX Elec Guitar
TAG: FX Vocals
TAG: FX PA Effects
TAG: FX Kbd + Gtr
TAG contains:
Effects for Acous Gtrs
Effects for Acous Gtrs
Effects for Vocalists
Effects for use with Mixers
Synths + effects at once
Expected Input:
Input 1 on AudioBox
Input 1 on AudioBox
Input 2 on AudioBox
Inputs A/B on rear / Inputs 3 & 4 on AudioBox
MIDI and Input 1 on AudioBox
Here are some example Tags for effects organized by effect type:
TAG Name
TAG: FX Reverb
TAG: FX Spectral TAG: FX Dynamics
TAG contains:
Expected Input:
Reverb effects only
Any Audio Input (varies by preset)
Chorus, flanger, etc. effects Any Audio Input (varies by preset)
Compression, limiter, gates Any Audio Input (varies by preset)
Inside the effects-specific Tags you'll find presets organized by input type, i.e. inside the TAG: FX Reverb,
you might have GTR Large Hall, VOC Large Hall, and AUX Large Hall, where the GTR preset processes a
guitar on Input A, the VOC preset processes a microphone on Input B, and an AUX preset processes line
level inputs from an external device (keyboard, mixer, etc.) on inputs C & D.
9
The Different Types of Presets in your RECEPTOR
It is important to realize that there are not only different types of Tags for different purposes, but there
are also different "levels" of presets in your RECEPTOR.
The PLAY level has presets that control every aspect of your RECEPTOR. These presets control RECEPTOR
as a whole. The PLAY presets can contain several different virtual instruments and their MIDI settings,
different audio effects and their input assignments, and mixer settings along with the mixer effects, their
presets, and their routing configuration. One preset changes all aspects of the box in one go.
A PLAY preset can / will change any/all of the following:
The
The
The
The
The
The
The
The
The
The
virtual instrument synths and effects that are loaded into one or more channels.
presets in each of these virtual instruments or effects.
MIDI settings for each and every synth, (MIDI channel, note and velocity range, etc.)
MIDI controller assignments for every synthand MIDI mixer settings for each effect.
direct output assignments for each synth channel
input and direct output assignments for the audio channels.
Mixer send effect levels for each synth or effect channel..
relative gain levels and pan control positions for each channel and Master Mix slots.
Main mixer channel effects that are loaded into the mixer area and their presets.
routing and direct output configuration of those main master effects and Mix master outs.
So you can see from the list above that one preset in the PLAY mode controls A LOT of different things at
once. This is very handy when you want to explore the factory presets of your RECEPTOR.
However, there are times when you might want to build a preset from scratch, sound by sound or effect
by effect. For this reason, there is a "lower level" of presets that you can access on a channel-by-channel
basis. So just as there are PLAY level TAGS and PRESETS, there are also TAGS and PRESETS on the
"synth channel" and "effect channel" level. This lets you open up a synth or effect channel, and then
either select a preset by choosing a Tag of interest and loading a "factory" preset in to that channel.
SoundFinder let's you quickly and easily select from the hundreds of presets on your RECEPTOR using
convenient categories of sounds and effects, without regard to a particular plug-in's presets. However,
this also means that you are selecting presets from ALL of the synth or effect plugins that are installed on
your RECEPTOR.
There are times when you might want to use SoundFinder but restrict it so that it only displays the
presets of the one particular plugin you have loaded. This is done by clicking on the "Show only (name
of plugin) presets" check box beneath the TAG filter found on any synth or audio channel. So when you
open up an individual synth or effect channel you have the choice of using SoundFinder to fine the kind
of sound you are looking for, or you can turn off SoundFinder, focussing instead on the presets of the one
plug-in you have selected.
But wait... there's more. You can also bypass the SoundFinder function entirely and work only with the
factory presets of any plug-in by opening up the Preset selector on a channel, and then selecting the
BANK tab from the Tag / Preset listing for that particular virtual instrument or effect. You can also do
this from the front panel by selecting a particular synth or effect, pressing the EDIT button, and then
selecting the preset while in the EDIT mode.
IN SUMMARY: Each plug-in on RECEPTOR has its own Factory presets, stored in BANKS at the plug-in
level, just like a hardware synth or effects processor.
Those factory presets have been "tagged" so they can be used with the SoundFinder function, letting you
select presets by category, regardless of the particular plug-in being used. The SoundFinder function
works on both the "channel" level, as well as on the "global" (PLAY) level, the difference being the
channel level affects only one channel's settings, where as on the PLAY level it affects everything that
is happening in your RECEPTOR. In this sense, the PLAY level presets are like MULTIs or COMBIs in a
workstation keyboard.
10
Using PRESETs in the "PLAY" mode
Now that you have an overview of the different SoundFinder TAGs and what they provide, let's
move ahead and select a couple of presets.
RECEPTOR as a Synthesizer/Sound Module
1. Connect your keyboard to the MIDI input on the back of the unit, and connect the line outputs to
a stereo mixer, keyboard amplifier, or a pair of amplified speakers.
2. Power up RECEPTOR (if it is not already on). If not already lit, press the PLAY button.
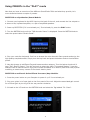
3. Turn the BOTTOM knob until the "TAG:Acoustic Pianos" is displayed. Press the BOTTOM knob to
select the preset called "Studio Grand".
4. Play your controller keyboard. Feel free to browse the other Acoustic Piano presets and enjoy the
high-quality sampled sounds. Simply turn the top knob and press the bottom knob to load another
preset.
5. Now lets change to a different Tag and browse another category. Turn the bottom knob until it
says "TAG: Electric Pianos". Turn the top knob to select the piano "Contrasted Rhodes." Press the
selector knob to load the sound. Enjoy the richness and detail of an electric piano that uses physical
modelling to create every nuance of the classic electric piano!
RECEPTOR as an Electric Guitar Effects Processor/Amp Modeller
1. Press the power button on your Receptor to power it up if it's not already on.
2. Plug your guitar in to Input jack on the front panel of the unit. Adjust the associated gain control
for minimum gain by turning it all the way counter-clockwise.
3. Go back to the LCD and turn the BOTTOM knob and select the Tag labeled "FX: Clean".
11
4. Play your guitar and adjust the Input 1 GAIN control on the AudioBox 1818 so that the red clip
light on the interface does not illuminate, even when playing loud.
5. Play your guitar and enjoy the incredibly realistic amp modeling provided by RECEPTOR.
Feel free to browse the other Guitar Effect presets; especially in some of the other TAGs since there
are many different sounds available to you. RECEPTOR's high-resolution floating point processing
and 24-bit audio output will makes your guitar sound amazing!
RECEPTOR as an Effects box
1. Start by plugging a line level audio source, like another keyboard, into the line inputs on the
back of your Receptor.
2. Power up RECEPTOR if its not already on. If it isn't already lit, press the PLAY button.
3. Turn the BOTTOM knob and select "TAG: FX: Keyboard". Select the preset "PianoChannelStrip"
using the top knob and push the knob to load. Play your keyboard and adjust the input level
control for Input 2 so that the clip light never illuminates.
Enjoy the high quality processing of your vocals. Feel free to browse the other effets processing
presets and enjoy how RECEPTOR enhances the sound of your other gear!.
4. Note that you can change the input assignments in yout Receptor by simply pressing EFFECT
button (with the new layout) and SETUP, which allows you to re-assign the effects to different
inputs.
You can also set up any of the input or output routings using the GUI of your RECEPTOR, described
later in this guide, which is easier to do if you have a lot of channels running.
12
Selecting Individual Synth Presets
PLAY mode lets you instantly select factory presets using SoundFinder, making RECEPTOR
incredibly simple to use. But what if you want to layer two sounds together, or make your own
custom preset consisting of different effects on different inputs? Well you can make your own
preset easily based on the presets that are in RECEPTOR right from the front panel. You can either
start by modifying an existing PLAY preset, or start with a blank preset and build your sound from
scratch.
To modify an existing PLAY preset, simply press the SYNTH or EFFECT buttons to select the sound
or effect you want to modify, use the CHANNEL + or CHANNEL - buttons to select the particular
sound or effect channel you want to change, and then select a different Preset for that particular
channel. This type of modification is particularly useful when you have a PLAY preset that has
both a keyboard sound and a vocal or guitar input effect working simultaneously, and you want to
change one sound or effect without changing the other.
You can also create a new preset, starting from scratch:
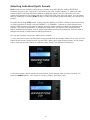
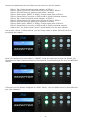
1. First, we want to clear out the system of any presets that are already loaded. To do this, turn the
bottom knob counter-clockwise until you see TAG: (None) and <New Empty Preset> as the preset
name. Press the encoder button to load this empty preset. The display will show this:
2. Now let's select a Synth preset into one the first Synth channel. With the PLAY mode lit, we
press the SYNTH button. You'll notice it too says (Empty) and Tag: (none).
13
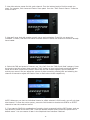
3. Now let's select a preset for this synth channel. Turn the bottom knob to find the sound you
want. For example, let's choose an Electric Piano patch from the "TAG: Electric Pianos." Press the
knob to load it
3. Now we'll layer that with another sound—say a pad synthesizer. To do this, we press the
CHANNEL + button, and then the bottom encoder switch to add a new channel to what we already
have loaded.
4. Select the TAG and preset of interest, say "Airy Pad" from the "TAG:Synth Pads" category. Press
the knob to load this preset. Now press the "PLAY" button to hear both sounds combined together
What we've done is layered the Electric Piano and the Pad sounds together, which creates an
entirely new sound. You can adjust the volume of either sound by pressing MIX and selecting the
channel of interest to adjust the Electric Piano or Pad volume levels respectively.
NOTE: Whenever you have an individual channel or effect selected in PLAY mode, you will only hear
that channel. To hear the entire system, press the PLAY button to deselect the SYNTH or EFFECT
channel to hear the combined sound.
5. If you want to SAVE this combination of sounds, simply press and hold the EDIT button, and you
can save this preset to the USER TAG. Press the bottom encoder knob to save the preset with a
default name. You can rename it later in the Graphical User Interface if desired.
14
Selecting Individual Audio Input Effect Presets
Now let's make your own custom preset consisting of different effects on different audio inputs.
Say, for example we wanted to play acoustic guitar and have some chorus on the guitar sound, and
sing with a some processing on our vocal microphone.
1. First, press the "PLAY" button. Now, since we want to start from a balnk preset, first turn the
bottom knob counter-clockwise until you see "TAG: (None)" and <New Empty Preset> as the preset
name and then press the bottom encoder button to clear out all the previous presets and settings.
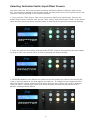
2. Next, we press the PLAY button and then select EFFECT channel. Since nothing has been loaded,
we need to open up a channel which is done by pressing the bottom encoder.
3. RECEPTOR defaults to the Stereo Line Inputs on the first channel you open up and the Mic/Gtr
input on the front panel for the next channel you open up. To change the input assignment for a
particular channel, simply press the SETUP button and you can re-assign the inputs to whatever
input you desire. Selecting the same input across multiple channels will process the input in
parallel, creating dramatic effects.
15
3. Turn the gain control to minimum on the front panel input and plug in your acoustic guitar.
Turn the bottom encoder to select "TAG FX Acous Gtr" and then turn the top knob to select the
preset "007 AcstcGuitarChannel" Press the encoder button to load the patch. Of course if there is a
different preset you'd like to use on the guitar, feel free to select it now.
4. Bring up the gain adjacent to the front panel input, and verify that the input is not clipping when
playing at your loudest level - the LED level indicator should never be red.
5. Now just for fun plug in a dynamic microphone into the input, and select an appropriate
processing effect on that input. Turn the gain control to minimum, plug in the microphone, and
select a patch in the "TAG:FX Vocal" category called "Fat Voice"
6. Enjoy the high-grade effects processing possible even when singing through your Receptor!
16
The MIX Button and Adjusting Levels
The MIX section allows you to adjust the volume and panning of the main outputs, adjust the
channel volume on any of the synth or effect slots, as well as configuring insert or send effects
using their factory presets.This is done by pressing the MIX button on the front panel.
When you are in PLAY mode, pressing the MIX button lets you adjust or see the following:
Master Volume: Adjust the main output mixer volume.
Master Pan: Adjust the left or right panning of the main output.
Main Output Meters: View the output levels on separate L and R meters
Mix Effects 1 and 2 settings and presets
Master Output assignments to the AudioBox interface (if selected).
When you select either the SYNTH or EFFECT button along with the MIX button, you can adjust the
following:
Adjust Volume for any Synth or Effect Channel (using the Channel +/- buttons)
Adjust Panning forany Synth or Effect Channel (using the Channel +/- buttons)
View the Output Meters for any Synth or Effect Channel (using the Channel +/- buttons)
Adding Effects to your Main Mix
With the MIX button pressed, you can also load two separate effects into the mixer channel,
allowing you to perform additional processing on any source, whether it is a synth or an audio
input. This works just like the Synth and Effect channels, letting you select a Tag, and load a
preset. For example, we can navigate to the FX REVERB tag and load up a reverb effect.
There are two Mixer effects slots in your RECEPTOR. They can be configured as "INSERT" effects,
where the overall effect amount is controlled by the "WET / DRY" setting, or as "SEND" effects,
where you can control on amount of the effect you want to have on a channel-by-channel basis.
17
Here are the parameters for the effects you can control in the MIX section:
Effect 1 Tag: Select the effects preset category of Effect 1.
Effect 1 Preset: Select the Preset within the current Tag for Effect 1.
Effect 1 DRY/WET amount: Adjust overall Effect 1 amount.
Effect 1 Mode (either INSERT or SEND): Change signal path of Effect 1.
Effect 1 Output Select (must be in SEND mode to enable individual outputs)
Effect 2 Tag: Select the effects preset category of Effect 2.
Effect 2 Preset: Select the Preset within the current Tag for Effect 2.
Effect 2 DRY/WET amount: Adjust over all Effect 2 amount.
Effect 2 Mode (either INSERT or SEND): Change signal path of Effect 2.
Effect 2 Output Select (must be in SEND mode to enable individual outputs)
Passive Mix C+D: Mixes inputs C and D (unprocessed) with the main outputs.
Just as with a Synth or Effect channel, you can simply select an effect TAG and load it for
processing the outputs:
When you configure the mixer effect in "INSERT" mode (all signals go through the effects) you
can adjust the relative balance between processed and unprocessed signal by using the WET/DRY
control:
If there are no MIX effects configured as "SEND" effects, then the SEND menu for that effect will
say: (Not Available).
18
Saving the Presets You’ve Created
Any new preset you create, as well as any modifications to the factory presets can quickly be
saved from the front panel. Always be sure to save any changes you make as they are NOT
retained when you turn off the power!
To save a preset, simply PRESS and HOLD the EDIT button. You have the option to "save over"
an existing preset, or create a NEW one (labeled as USER-X, where X is the last saved user preset
number plus one). All saved presets will show up under the "USER" Tag for easy access.
Simply use the bottom knob to select the location you want to save, and then press the bottom
encoder to either create (if "new") or save (if writing over) the preset. Writing a preset takes a
moment, after which time it will say "Created" on the display. All naming is automatic, but if you
want to give them specific names you can do so using the Graphical User Interface.
If you change your mind and decide not to save the preset, simply hit the PLAY button to exit
the SAVE screen. Remember, presets can be renamed and re-tagged using the Graphical User
Interface.
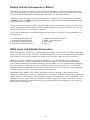
Verifying Your MIDI Connection:
What do you do if you have your keyboard connected and you think you should be hearing sound,
but you don't? Just follow these simple steps:
1. Verify your MIDI keyboard OUTPUT jack is connected to RECEPTOR MIDI INPUT jack.
2. Make sure there is a synth PRESET selected in PLAY mode on RECEPTOR.
3. Verify the Master Volume on the front of the unit is turned up.
4. With PLAY selected, press the SETUP button to turn on the MIDI monitor. Play a note, and if
it doesn't display on the system, then your keyboard is not transmitting MIDI or it is improperly
connected.
5. If MIDI data is displayed, make sure the MIX levels of the individual channel you are playing
have not been turned down.
Selecting Presets at a Gig
When performing with RECEPTOR, you'll most likely want to quickly move from preset to preset on
stage without having to touch the RECEPTOR itself. This is easily accomplished either 1) sending
MIDI Program Change messages to RECEPTOR from your MIDI keyboard, or 2) turning the front
panel knob and pressing the button to load the next preset (automatic in Live Mode, more later!)
If you have a MIDI keyboard attached, you can send a MIDI program change message and
RECEPTOR will load the corresponding presets in that particular TAG. If you change to a different
TAG, then your program changes will select presets within that new TAG.
You can easily create a custom named TAG before your gig using the Graphical User Interface and
then TAG the presets of interest to reside in that TAG. If you don't have the GUI handy, you can
simply save the presets into the USER TAG and select them there.
19
Editing Virtual Instruments or Effects
The virtual instruments and effects in RECEPTOR are intended to be edited from their Graphical
User Interfaces which you can see when you connect an LCD monitor to your RECEPTOR, or when
you use the RECEPTOR Remote software with your Mac or PC through a network.
However, you can edit some of the key parameters on a plugin from the front panel by pressing
the EDIT button. The EDIT mode lets you adjust up to eight pre-defined editable parameters per
virtual instrument or effect.
To edit a virtual instrument or effect, first you need to select the channel you want to edit. You do
this by simply pressing the SYNTH or EFFECT button and then selecting the channel you want to
edit using the Channel + and Channel - buttons.
In the case of MusePlayer, the default sound generating plugin in RECEPTOR, the parameters you
can adjust are:
1.
2.
3.
4.
Amplitude
Amplitude
Amplitude
Amplitude
Envelope
Envelope
Envelope
Envelope
Attack
Decay
Sustain
Release
5.
6.
7.
8.
Master Filter Cutoff Frequency
Master Filter Resonance
Filter Cutoff
Filter Q
MIDI Learn and Editable Parameters
RECEPTOR supports "MIDI Learn" which allows you to assign various MIDI-controllable parameters
to various MIDI continuous controllers. This feature requires you to use the Graphical User Interface
and is easier to show than to explain, so please view our online videos for more information.
Many of the virtual instruments and effects that come in your RECEPTOR have pre-assigned
editable parameters, which are accessed by selecting a channel, and pressing the EDIT button.
Even if these parameters are not pre-assigned, you can make your own assignments by using the
MIDI learn function, assuming the plug-in supports MIDI learning (some don't). The first eight
parameters that are assigned using the MIDI Learn function show up as the first eight parameters
in when the EDIT button is lit on each synth or effect channel.
IMPORTANT NOTE ABOUT MIDI LEARN: MIDI learn is able to do what it does because virtual
instruments and effects "publish" the parameters of the plugin, which allows them to be associated
with controllers inside Receptor. Not all plugins publish their parameters, and if a parameter is not
published, then the plugin cannot be "learned" via MIDI. Please consult the user manual for the
plugins you are using to determine whether or not the publish their parameters so as to support
MIDI learn inside Receptor.
20
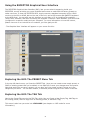
Using the RECEPTOR Graphical User Interface
The RECEPTOR Graphical User Interface (GUI), lets you see what is happening inside your
RECEPTOR, as well as letting you use a keyboard and mouse to make edit the factory presets or
make new ones. To view the RECEPTOR GUI, simply connect a standard computer VGA or HDMI
monitor to the VGA or HDMI jack on the rear of the unit, and a USB mouse and QWERTY keyboard
to the USB Ports. You can also see this interface on your Mac or PC by installing the supplied
"Muse Tools" software, and then connecting the supplied "crossover" cable between your RECEPTOR
(configured in crossover mode) and your computer. For more information on how this is done,
please view one of our tutorials on our website, you'll be glad you did.
. The Graphical User Interface will appear on your screen like this:
Exploring the GUI: The PRESET Menu Tab
In the top left-hand corner, you'll see the PRESET Tab. Here you can create a new empty preset, or
SAVE an existing preset that you've edited, or use SAVE AS to save your changes as a new preset.
Note that each time you save a preset, you can also "tag" the preset so that it shows up in the
categories you select. You can also rename, or delete a preset using the menu items in this tab.
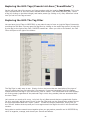
Exploring the GUI: The TAG Tab
Next to the Preset Tab menu is the TAG Tab, which lets you Create a New Empty Tag, Add Tags to
an existing preset, Remove Tags from an existing preset, or Rename a Tag.
This menu is also how you enter into LIVE MODE (see chapter on LIVE mode for more
information).
21
Exploring
the GUI: Tags/Presets List Area ("SoundFinder")
List
On the left hand side of the screen you'll see a column with the heading Tags/Presets. This is the
GUI's representation of the front panel SOUNDFINDER feature, and works the same way - select
a Tag (by clicking on the little triangle) and load a preset (by clicking on it). Only difference is that
here you sell ALL the Tags at once!
Exploring the GUI: The Tag Filter
You can have a lot of Tags in RECEPTOR, so we make it easy to focus on just the Tags of interest by
providing the TAG filter. You can open the Tag filter by clicking on the small Tag symbol (it looks like
a price tag) to the right of the TAG / PRESETS header bar. When you click on the button, the TAG
Filter will open to the right of the button:
The Tag Filter is really easy to use. Simply click on the terms that are descriptive of the type of
sound or effect that you are looking for. For example, if you are interested in all of the Basses
located across all the Tags in your RECEPTOR, click on "BASS". The SoundFinder area now displays
all of the presets (regardless of the particular Tag in which they preside) that are associated with
the term "Bass".
Let's narrow our search a bit more. Let's look for only Bass sounds that are created with Synths.
For this, we simply add the word "Synth" to the Tag Filter and now the SoundFinder window shows
all the presets associated with "Synth + Bass". To clear the search parameters, simply click on
the "See All" button at the top and you'll once again see all the Tags to the left in the SoundFinder
window.
Being able to combine search terms together gives you get another powerful tool in RECEPTOR by
which to organize, manage, and choose your sounds and effects.
22
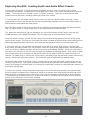
Exploring the GUI: Loading Synth and Audio Effect Presets
In the center of the GUI is a large area that constitutes a virtual "rack" for running your virtual
instruments and effects. At the top of the rack area is the name of the preset and tag that is currently
loaded. There can be up to 16 total "synth" or "effect" channels. There are several ways to load
presets into the rack area, including creating a preset from scratch.
1. The first way you can load a preset into the rack is to click on a preset name in the Tag / Preset
(SoundFinder) area on the left and the rack will automatically populate with the virtual instruments or
effects that are associated with that preset.
Each TAG has a small Arrow that you can click to reveal all the Presets associated with that particular
Tag. To load a preset in a Tag, simply click on the preset and the preset will load.
Tip: When the contents of a Tag are displayed, you can select presets in that Tag by using the UP/
DOWN arrows on your QWERTY keyboard. This is a great way to quickly audition sounds.
Once you select a Preset, you will see the name of the preset and tag appear at the top of the center
section of the screen. This lets you know that the preset is loaded as well as what virtual instruments or
effects are associated with that preset. You'll also see that Tag and Preset on the front panel LCD.
2. The other way you can populate the channels in the rack is to simply drag a plug-in into the rack
area, letting you easily create your own presets. Just to the right of the Tags/Presets /SoundFinder area
you'll see a column labeled "Synths" and a column below that labeled "Effects". There are scroll bars to
the right of the columns so you can scroll through the available synths and effects. Each synth or effect
has a small picture of its interface, as well as the name of the synth or effect to locate the plug-in of
interest. To load a plug-in, simply click on its picture, and drag it into the rack area (synths into the top
section, effects into the bottom section. This loads the synth or effect with its default patch.
To select a patch within a particular plug-in, simply click on the large horizontal "preset select" bar at
the top of the channel. This opens up another window that lets you select the factory presets for that
plugin (by clicking on the BANK tab) or by using the SoundFinder function for that particular channel (by
clicking on the Tag tab).
To clear out a channel, simply drag either that plug-in out of the rack area (keeping the channel open,
which is handy for swapping out a particular sound on a channel while keeping all the MIDI and mixer
settings intact) or drag the entire channel out of the rack to delete the channel and all of its settings.
If you want to run a different plug-in in a particular channel, just drag the new plugin picture over the
picture of the old plugin and it will be replaced.
23
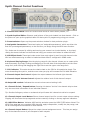
Synth Channel Control Functions
1. Channel Solo Switch: Solos this channel and mutes all others when pressed / lit.
2. Synth Graphical Editor: Shows a small picture of the synth loaded into that channel. Click on
the picture to open up the graphical editor for that synth for programming using your mouse.
3. Preset selector: Opens up the preset selection window for that particular plugin.
4. Assignable Parameters: These two knobs are "assignable parameters" which are either the
first four pre-assigned parameters, or the first four you assign using the MIDI Learn function.
Tip: Knobs can be moved by clicking and moving your mouse in a circular fashion, or by simply
resting the mouse indicator on the knob and using your mouse scroll wheel to rotate the knob.
5. MIX Effect Sends: These two knobs control how much signal is sent from this channel to the
MIX bus effects assuming an effect is loaded and that effect is configured in SEND mode.
6. Keyboard Playing Range: Sets the playing range for this channel. Allows you to create splits
and zones easily by simply clicking and dragging on the left side of the keyboard to set the lower
range limit, and clicking and dragging the right side to set the upper note range limit.
7. CPU indicator: This meter shows the relative load on the CPU for this particular plugin. The
more demanding the synth is, and the more notes you play will increase the CPU load indication.
8. Channel Output Pan Control: Adjusts the output between the left and right channels.
9. Channel Output Volume Control: Adjusts the relative level of this channel’s output.
10 Output dB readout: Indicates the current volume control setting in dB.
11. Channel Shrink / Expand button: Pressing this button "shrinks" the channel strip to show
only the most vital information for an individual channel. .
Tip: Double clicking any where on a channel strip will cause ALL channels to shrink or expand.
12. Channel Output Level Meters: Shows channel output level for current output volume setting.
Clipping will illuminate the top segments and are reset by clicking on the top segment indicators.
13. MIDI Filter Button: Indicates MIDI activity and also opens the MIDI FILTER when clicked. The
MIDI Filter page lets you re-assign MIDI channels, apply transposition, modify the play range, and
list all incoming MIDI information for that channel.
14. Channel Output Button: Opens the output channel assignment menu. This lets you assign
any of the channels to one of your Receptor's audio outputs.
24
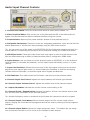
Audio Input Channel Controls
1. Channel Solo Switch: Solos this channel and mutes all others when pressed / lit.
2. Effect Graphical Editor: Click on the icon of the effect and the GUI of the effect itself will
appear. You can then edit the effect's individual interface using your mouse.
3. Preset Selector: Opens up the preset selection window for that particular plug-in.
4. Assignable Parameters: These four knobs are "assignable parameters" which are the first four
default parameters or the first four that you assign using the MIDI Learn function.
Tip: You can move any of the knobs in the RECEPTOR GUI by clicking and dragging the knob in a
circular fashion, or positioning the mouse tip on the knob and moving your mouse scroll wheel.
5. MIX Effect Sends: These two knobs control how much signal is sent from this channel to the
MIX bus effects assuming an effect is loaded and that effect is configured in SEND mode.
6. Input Selector: Lets you select one of the physical inputs on RECEPTOR, or on the PreSonus
1818 interface (if connected and selected). You can select inputs individually (mono) or in pairs
(stereo).
7. Input Level Indicator: Shows the current level of the input signal coming into the channel.
Adjust the input channel gain control (or source feeding the interface) so that the red clipping
indicator does not illuminate, or the audio signal will be clipped and distorted.
8. CPU Indicator: This meter shows the CPU load in real time from this particular effect.
9. Channel Output Pan Control: Adjusts the output between the left and right channels.
10. Channel Output Volume Control: Adjusts the relative level of this channel's output.
11. Output dB readout: Indicates the current volume control setting in dB.
12. Channel Shrink / Expand button: Pressing this button "shrinks" the channel strip to show
only the most vital information for an individual channel
Tip: Double clicking any where on a channel strip will cause ALL channels to shrink or expand.
13. Channel Output Level Meters: Shows channel output level for current output volume
setting. Clipping will illuminate the top segments and can be reset by clicking on the top segment
indicators.
14. Channel Output Button: Opens the output assignment menu. This button lets you assign
one of the audio channels to one or more of your Receptor's audio outputs.
25
Exploring the GUI: The Mixer Section Controls
Now that you know how to select different synths, effects and their presets, it is time to craft the
overall sound using the MIX section.
The MIX section consists of two slots for additional effects, as well as the master
volume and pan controls. These slots operate just like the audio input slots;
simply drag the effect of interest into the slot to activate it, or select a preset by
clicking on the on the preset bar that says (Empty). Below is an explanation of
the various controls found in the Mixer section:
1. Insert / Send Mode switch: Changes effect configuration from INSERT
mode (all audio passes through effect) to SEND mode (effect amount
determined by Send Level settings on each channel.
2. Effect Preset selector: Opens up the preset selection window for that
particular slot. Opens into SoundFinder for effects with no effect selected, or if
an effect is already loaded, you have the choice of SoundFinder or the factory
presets of the loaded effect.
3. Effect Graphical Editor: Click on the icon of the effect and the GUI of the
effect itself will appear. You can then edit the effect's individual interface using
your mouse.
4. Insert Mode Wet / Dry control: In INSERT mode, all of the audio in the
system is routed THROUGH the selected effect. The WET/DRY control is enabled
only in INSERT mode and lets you adjust the overall amount of the effect. To
hear more of the effect, move the control more towards the "wet" side.
5. Channel Output Button: Opens the output assignment menu. This allows
you to send the effected signals out a different output, or utilize this effect slot
as a separate stereo output bus.
6. MIDI indicator: Indicates when MIDI information is being received by your RECEPTOR.
7. RAM indicator: Shows the relative amount of RAM that is being used by the system.
8. CPU indicator: Shows the overall CPU load on the system.
9. Pan Control: Adjusts the output between the left and right channels.
10. Main Volume Control: Adjusts the overall output volume of your RECEPTOR
Note: this control is INDEPENDENT of the master volume control on the front panel, which
supersedes all other volume control settings in the system.
11. Output dB readout: Indicates the current volume control setting in dB.
12. Master Output Level Meters: Shows the master output volume level. Clipping will illuminate
the top segments and are reset by clicking on the top segment indicators..
13. Master Output Selector Button: Opens the master output channel assignment menu so you
can send the master output to any of your Receptor's outputs.
26
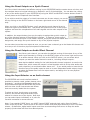
Using the Direct Outputs on a Synth Channel
All of the virtual instruments and effects running in your RECEPTOR feed the master stereo mix bus, and
the resultant stereo mix signal shows up on Outputs 1 and 2 of the AudioBox. You can alter the routing
of any of the audio signals in your RECEPTOR by using the INPUT and OUTPUT selector buttons found in
various places on the Graphical User Interface.
If you wish to send the output of a virtual instrument out its own output, you can do
this by clicking on the OUTPUT button on the lower right hand corner of the channel
strip.
When you click on the OUTPUT button, you'll see that the synth channel is set to
output its signal to the Master Bus. This allows the system to mix all of the synths
together and send the compbination of all audio signals out the main outputs of the
system.
In addition, the output button gives you the option to assign that synth's output to
any of the physical outputs of the AudioBox interface. To create a "direct output"
that does not send the synth to the master outputs, simply de-select the Master Bus
assignment, and assign the synth channel to any of the physical outputs.
You can select more than one output at once, so you can have a channel go to the Master Mix bus as well
as to any or all of the other physical outputs simultaneously.
Using the Direct Outputs on Audio Effect Channel
Just like a synth channel, you can alter the default routing of the output of any of the
audio input channels by clicking on the OUTPUT button on the lower right hand corner
of an audio channel. When you click on the OUTPUT button, you can select which
outputs you want the audio channel to send to, including multiple outputs .
Note that the default setting for the individual audio channel outputs is to send to the
Master Bus, which means the output is mixed together with all of the other audio and
synth channels in a combined master stereo mix. If you would prefer to have the the
results of any of the audio inputs be sent to its own independent audio output, simply
de-select the Master Bus from the output matrix, and assign it to its own physical
audio output.
Using the Input Selector on an Audio channel
The RECEPTOR rack mode interface makes it
possible to process vocals, guitars, basses, other
keyboards... anything that generates audio can
be processed through the RECEPTOR and mixed
with the other virtual instruments and effects
that are currently loaded into the system.
To select an input, simply open up an audio
channel, and use the drop down audio input
selector to choose one of the inputs. Note that
you can select inputs individually or in pairs for
use with monoaural or stereo sources.
Note: if you use the S/PDIF input, you MUST choose S/PDIF external clock option from the"Audio..."
menu in the SETUP tab. Failure to do so will result in audio clicks and pops caused by errors in the data
stream. By definition, digital audio inputs must have a corresonding clock source to keep the audio
properly synchronized and free from data dropouts.
27
Configuring The Master Mix Bus Effects, Stereo Mix, and Headphone Outputs:
In addition to configuring any of the individual channels to send their outputs directly to the phyiscal
outputs of your RECEPTOR, most of the time you will want to mix all of the synth and audio channels
together and send the results out the Line outputs and then on to a keyboard amplifier or mixer. NOTE:
the Master Mix bus is assigned to Line Out L+R, ADAT 1+2, and S/PDIF output by default.
As you already know, you can add effects to the master mix bus signal using the two effects slots, but
you also have the option of taking these effects channels and sending them out their own separate sets
of outputs. This also provides you with the opportunity to use the Effects channels in SEND mode as
separately controllable stereo mix outputs, giving you not one, not two, but potentially THREE separate
stereo mixes all at the same time.
Just as in the Mixer mode, your Receptor still echos whatever is assigned to the Line outputs and presents
those on the front panel Headphone output jack, and the master volume control on the front panel
controls both the headphone and the Line Output volume levels.
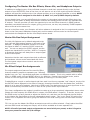
Master Mix Bus Output Assignment
The Main Mix Outputs are by default assigned to the
main Left and Right analog outputs on the back of the
Receptor. In addition,the default condition is to send
this signal to ADAT 1+2 and the S/PDIF outputs as
well. You can un-assign the S/PDIF outputs, but the
outputs are hardwired to Line Out / ADAT 1+2 outputs
to guarantee that there will always be an output signal
on the main outputs.
Remember that the main outputs have both a software
and hardware volume control associated with them.
The front panel output volume control sets the main
output volume.
Mix Effect Output Bus Assignments
The output assignment feature of the two Mix Effect
channels makes it possible to separate your "effected"
signals from your "dry" signals and send them out different outputs. This is only possible with an effect
that is in SEND mode, since an INSERT effect is, by definition, inserted into the signal chain, and to
remove it from the signal chain defeats the purpose of inserting it in the first place.
To add effects to a synth or audio channel and then send it out its own separate "wet" channel, simply click
the OUTPUT button adjacent to the effect of interest, de-assign the effect from the Master Bus, and then
assign it to its own set of outputs. Note that in SEND mode, the relative amount of each signal sent to the
effect is controlled by the SEND control on each of the synth or audio input channels.
This clever configuration also makes it possible to create up to three completely independent stereo mixes
(Master Mix Main outputs, Mix SEND effect 1 outputs, Mix SEND effect 2 outputs). To do this, simply use
the SEND control on each channel to adjust the relative mix, and then use the assigned physical output
on the Master Bus Send effect as its own independent stereo output. This is very handy for setting up a
monitor mix or separate mix that is going to a different from what is being sent out the master mix bus
outputs.
TIP: You can use the Master Mix Effects as outputs even with no effect selected. Simply place the effect
slot into SEND mode and assign an Output, and it will be available as its own separate bus.
NOTE: All audio input and output assignments are saved with your preset, so don't forget to
save your preset to retain the I/O settings.
28
Exploring the GUI: The Setup Menu Tab
Your RECEPTOR has several system level settings that go beyond what was possible in the Mixer
Mode. These are all found in the SETUP tab on the Graphical User Interface.
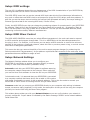
Setup: Software Manager / System Tab
The Software Manager window is the "command central"
area for managing the operating system and plugin software on your RECEPTOR. When you open up
the window, you'll see Tabs across the top: SYSTEM,
PLUGINS, and LICENSES.
The System tab gives you the details on the current
version of system software you are running. The
System screen is also where you can turn the Multi-Core
processing support on or off.
Not all plug-ins run well in a multi-core environment, and
if you have issues with a particular plug-in, you might
want to try turning the Multi-Core support off to see if
this improves matters. Be advised however that MultiCore processor compatible plug-ins will esnure that you
get the maximum performance out of your RECEPTOR.
Updating your System Software
At the bottom of the System page is where you are able to check for Software updates, or install
software "fixers" that allow you to quickly and easily install new software plugins.
To update the software, you must first have a "live" Internet conection available, just like you did
when you authorized the software update.To check for updates, simply select Software Update from
the SETUP menu, and the RECEPTOR will automatically check for, download and install any relevant
software updates for the system.
Installing fixer files and new plug-ins onto your system
The software manager is also where you will install new plugins on to your Receptor. Installing
software can be done a variety of ways, but often involves downloading an installer from the www.
plugorama.com website and dropping it into Drop Installers Here just like you did when installing
this update. Brief instructions on how to install a new plugin are below:
1. . Download the file of interest from the Plugorama.com website to your computer.
2. Connect to your RECEPTOR using the Muse Tools software and open up the Hard Drive by clicking
on the "Hard Drive" on the Muse Tools interface.
3. Locate the folder on the RECEPTOR called "Drop Installers Here" and then drag and drop the
installer file (.mrpk) into the folder.
4. Go back to the RECEPTOR, click on "Install Fixer" in the Software Manager System tab page,
navigate to the Drop Installers Here folder, and then select the INSTALL button when the file is
found.
5. Follow the specific instructions that came with the particular plugin or installer to finish the
installation and authorization of the particular software.
29
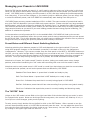
The Plug-ins Tab: Installing Plug-ins and their patches
If you have installed a fixer that includes plug-in software, you can now install that software by clicking
on the PLUGINS tab. This will open up a different window that lists all of the plug-ins that are installed
on your system, as well as giving you the opportunity to install plug-ins or their patches by pressing the
corresponding button on the bottom left.
The system will automatically scan for uniinstalled plug-ins, and if they are of a compatible file format and
have been placed in the proper folder, then the system will automatically install and attempt to validate
the plug-in for use. Note that not all plug-ins are compatible with RECEPTOR due to the fact that there
are literally thousands of different plug-ins on the market, and not all plug-ins are compatible with all
versions of hardware and operating system software that is on the market.
For more information about software installation, please visit www.plugorama.com, watch the you Tube
videos on software installation, or contact Muse Research technical support.
The Licenses Tab: Licensing new hardware and SW features
It is possible to add new features and hardware for use with your RECEPTOR as they become available.
Some of these features and options will require a software license to use them with your RECEPTOR. This
tab is where you can view the installed licenses, and enter new ones if required.
Important note about your upgrade license: Please keep your upgrade license written down and in a safe
place. Muse Research does not keep records of upgade licenses, so it is important that you write it down
and keep it in a safe place should you ever need it in the future.
30
Setup: The "Audio..." settings menu
The Current Audio Device is always the Built-in audio, which gives you two analog inputs, two analog
outputs, stereo S/PDIF inputs, stereo S/PDIF outputs, and an ADAT digital audio optical output.
System Latency refers to how many buffers of audio you are employing to perform all of the various
calculations necessary to turn digital "bits" into music. The plug-ins on your system require a certain
amount of CPU "processing time" in order to generate its sound or effect, and the more plug-ins you run,
the higher the demands on the CPU.
By increasing the number of buffers the CPU has to work with, you reduce the chances that a calcuation
won't be completed in the time allowed, which could result in an unpleasant audio click or pop. Increasing
the number of buffers the CPU has to work with gives it more time to do the work you have given it to
do, which means it can run more plug-ins, or deliver higher polyphony counts with any particular plugin. However, by increasing the number of buffers you are using in the processing chain, you are also
introduce additional delay between the time a MIDI or audio signal comes into the system and the time
that you hear the resultant audio. As such, the buffer setting directly affects the system latency which will
determine how "fast" or "tight" your RECEPTOR feels. The more buffers you use, the higher the system
latency, and the "slower" the system feels. The key for the setting is to find the right "buffer size" or
"System Latency" setting for your particular use case to allow everything to work smoothly and efficiently.
The audio menu gives you choice of several different "System Latency" settings:
Lowest (32 sample buffers): This is the fastest setting in the RECEPTOR, and is best for drums
or when you are singing. This is also the most demanding setting in terms of the processor load,
so some presets may not be able to run well at this setting. If you hear clicking or popping in the
audio output while playing at this setting, try selecting the next higher setting.
Normal (128 sample buffers): This is the standard setting in the RECEPTOR. Fast, but not so fast
that you are likely to overload the CPU on a regular basis. If you hear clicking or popping in the
audio output while playing at this setting, try selecting the next higher setting.
Medium (256 sample buffers): Slower than normal, this setting is typical of most computer
systems. Percussive sounds may feel a bit a little slow in their response at this setting but should
be fine for sounds that are more legato, like strings and pad synths. If you hear clicking or popping
in the audio output while playing at this setting, try selecting the next highest setting.
Highest (512 sample buffers): If Medium does not give your RECEPTOR enough time to get its
work done, then try the highest setting. This setting gives the processor the most amount of time
to do its job, and should be sufficient for every sound found in RECEPTOR. If you still hear clicks
and pops at this setting, you might want to try lowering the sample rate or reducing the CPU load.
The Sample Rate setting lets you set the rate of digital to analog and analog to digital conversion in the
system. The built-in audio of your Receptor provides your choice of 44.1, 48, 88.2, and 96kHz. The faster
you set your sample rate, the more load you are introducing to the CPU (since data is being processed
faster), but a faster sample rate also reduces the system latency: latency is halved with each doubling of
the sample rate.
The Sample Clock Source selects what clock source is used in the audio sub-system. Receptor lets you
chose from two clock sources: INTERNAL, or S/PDIF (clocking to the incoming S/PDIF stream). Note that
you MUST have a stable, clean, and valid clock presented to the system when using external clock mode
or your audio quality will suffer greatly. Do not use the S/PDIF input as a clock source if there is no signal
presented to your Receptor, or the audio quality will suffer
31
Setup: MIDI settings
The new V2.0.1 software release lets you change some of the MIDI characteristics of your RECEPTOR by
selecting the MIDI SETUP menu in the main SETUP menu.
The MIDI SETUP menu lets you set the internal MIDI clock rate which will provide tempo information to
any synth or effect that uses MIDI clock to set tempos for things like LFOs, delays, and drum patterns. It
also lets you set the tempo source to either be Internal (self-generated and set by the tempo setting) or
External (synchronized to the incoming MIDI clock, if there is one).
Finally, the MIDI SETUP menu lets you change the numbering scheme for presets used in your RECEPTOR.
By selecting "Start at One" the first preset in any Tag or Bank will be preset #1. By selecting "Start at
Zero" the first preset in any Tag or Bank will be Preset #0. This lets you accommodate different preset
numbering convention used by different manufacturers.
Setup: MIDI Mixer Control
The MIDI MIXER CONTROL menu lets you select different parameters in the main rack area to respond
to MIDI controller and program change data. This is in ADDITION to all the learnable parameters on
the plug-in level. For example, in this screen you can assign a MIDI controller to control the volume or
panning of the system or a particular channel, select the next or previous preset or tag, or control various
send levels of assignable parameters.
This menu also lets you remove the ability of the unit to accept program changes (by unlearning the
Select presets within Tag parameter). As you add new synths and audio channels to the rack area, those
parameters become available to assign as well.
Setup: Network Settings
The Network Settings window allows you to configure your
RECEPTOR for connection to another computer directly (crossover
mode) or via a local area network (automatic mode).
Automatic mode lets your RECEPTOR update its software assuning
the computer network has access to the Internet. Either mode lets
you use the Muse Tools software to view the GUI on your RECEPTOR.
In Automatic mode, it is assumed that your RECEPTOR is connected
to a computer network that has a device like a cable or DSL modem
with router functionality to supply it with a network address. This is also the mode to connect your
RECEPTOR to a WiFi router for viewing the GUI using a mobile device.
Crossover mode lets you connect your RECEPTOR directly to your computer with nothing in-between
except a crossover cable (supplied). In this mode, the assumption is that you will be using the computer
primarily to view the GUI using the Muse Tools program.
This window also provides you with your Network Status so you can verify whether your network is
properly configured. Proper status is indicated by the Status message "READY" and a network address
listed below that.
32
Setup: Change Resolution
Your 2.0.1 software update gives you the ability to support many different monitor resolutions for viewing
the GUI by directly attaching a computer LCD monitor display to the back of the unit. There are different
resolutions for the monitor output of your system, so you might need to experiment to find the best
resolution that allows you to view the entire graphical user interface on your particular monitor. Lower
resolutions show less of the interface, higher resolutions show more of the interface, but at all times the
resolution has to be supported by your particular monitor. The standard monitor resolutions for computer
LCDs is 1024 by 768, or 1280 by 1024.
Note: each time you change the resolution, the host application will need to reboot. If you are viewing the
interface using the Receptor Tools software you may loose your connection due to this brieft interruption
of communication, requiring you to reconnect to your RECEPTOR from your computer. Please note that
Rev F (Receptor 2) users are not given options for changing resolution due to graphics system limitations.
Setup: User Interface Mode: Rack Style Versus Mixer Style
Your new software update offers you two completely separate interfaces for controlling what goes on
inside the unit. This allows you to continue to use your Receptor as you have in the past, enjoying any
presets you have created without the need to re-program.
You can work in either interface, but the RACK MODE interface is the newer of the two interface modes,
therefore it will be receiving new updates and improvements in the future, whereas the MIXER mode
interface is no longer being targeted for improvements. As a result, it is definitely worth your while to
become more familiar with the new Rack Mode interface.
RACK
MODE
INTERFACE
You can change over to the MIXER Style interface by selecting "Mixer Style" from the User Interface
Mode drop down menu. Once the "Mixer-style" interface has launched you can return to the "RackStyle" interface by entering the SETUP page, and select "Rack-Style" interface from the UI Mode drop
down menu located in the lower right hand "INFO" section. Note that the system will reboot whenever it
transitions from one interface mode to the other.
33
Customers who are familiar with RECEPTOR 2 programming will obviously be very comfortable in the
"Mixer-style" interface, but as the "Rack-style" interface gains more and more new features, you will likely
find yourself spending more and more time in this exciting new interface.
MIXER MODE INTERFACE
For more information about how to utilize the features found in MIXER mode, please consult the
RECEPTOR manual that came with your unit and is avaialble on www.museresearch.com. There you can
learn about the various features found in this mode. This user guide focusses on the RACK mode interface
and its particular features.
Setup: Bringing your Mixer Mode presets into the Rack Mode World
The SoundFinder function in your RECEPTOR lets you quickly and easily located presets of interest based
on their Tags. Chances are you already have created some presets in the Mixer Mode interface, and you
might want to be able to use them in the Rack mode world.
When you select the Rack Mode interface, you'll notice a tag titled "(Untagged)". This Tag contains all
your presets that you created in Mixer Mode. To re-organize those presets into the new SoundFinder
interface, you can create a new Tag, name it, and then drag and drop your old patches into the new Tag,
or You can load those presets and re-save them adding one or more Tags to the sounds in the process.
Note that the effects architecture of the Rack mode is very different than that of the Mixer mode. There
are no individual channel insert effects in Rack mode; instead there are two main effects slots that can
either be insert or send effects. Although this is a more understandable design for most people, if you are
highly-reliant on long effects chains to get the sound you need, you may wish to continue to use the Mixer
mode interface for performing those particular presets.
34
Important Features in V2.0.1: LIVE MODE
RECEPTOR features an breakthrough technology that makes it possible to instantly switch from one
preset to the next, just like in a hardware keyboard. This exclusive, proprietary technology is called
LIVE MODE and it lets you pre-load the presets of a particular TAG into RAM. The result is instantaneous
switching from one preset to the next using MIDI program changes or using the LIVE mode screen.
LIVE MODE is important to live players because most virtual instruments and effects were not designed
with live performance in mind. As a result, some of the plug-ins, especially ones that make use of large
sample libraries, can takea long time to load before you can play them.
What LIVE MODE does is it "looks ahead" at what presets follow the first preset in a TAG, and instead of
just loading a single preset, it loads as many presets as can safely fit in RAM. Once they are loaded, you
can switch instantly from one to the next. You can even utlize the "Patch remain" function so that you can
hold the notes from one preset, switch to the next and begin playing while the other older notes are still
sounding. .
LIVE MODE also features its own, super-simple dedicated window that clearly shows the name of the
current preset, as well as the next and previous presets. This is ideal for choosing presets at a gig from
a portable device like an iPad, iPod, Android Pad, or Android Phone connected to your RECEPTOR using a
WiFi router and a VNC application on your portable device.
Entering LIVE MODE / Creating TAGS for use in LIVE MODE
LIVE MODE will make ready any preset from any TAG by simply clicking on the name of a TAG, going to
the TAG menu, and clicking on "Play 'TAG NAME' Live...". Once you do this, the LIVE MODE control panel
will open up, and the presets in that particular TAG will automatically start loading. All you have to do is
play the presets and change between them! Note that only one TAG can be performed at once, but you
can easily add new presets to any TAG to allow them to accomodate all the presets you require.
If you are preparing for a live performance where you will be using your own group of presets, you'll want
to set up your own custom TAG to perform. That can be done quite easily by selecting "New Empty TAG"
from the TAG menu, and entering in the name for that TAG, such as "Friday Night Jam" or "Concert in
the Park gig" or whatever. That TAG will now show up with all the other TAGs on the left hand side of the
GUI. You can now simply drag any existing presets of interest into that TAG by clicking, dragging, and
dropping the preset into the TAG, or by creating a new custom preset from scratch and then saving it
with your new TAG name checked when you go to save it.
35
Managing your Presets in LIVE MODE
Once the TAG has the presets you want in it, you'll want to make sure they are in the order in which you
think you will perform them before entering LIVE mode because you cannot reorder your presets in LIVE
mode. LIVE MODE works by loading the first presets in a TAG, and then loading the presets sequentially
from that point. If your set lists changes, or you need to jump to a different preset, you can simply click
or select the different preset, and LIVE MODE will automatically start loading from that point on.
LIVE MODE keeps as many presets loaded as will fit in to RAM. The exact number of presets that load in
any given TAG will depend on how much RAM each preset requires. Please note that very large sampledbased presets, such as can be found in products like Synthogy Ivory 2 or Kontakt from Native Instruments
can consume vast amounts of RAM, which means you won't be able to load nearly as many presets using
large sample libraries as you would if you were loading presets that were using physical modelling, FM,
additive or substractive synthesis.
In the case where not all presets can fit in to the available RAM, LIVE MODE will load up the current
preset, the preset immediately before the current preset, and as many presets beyond the current preset
as will fit into RAM. This is done because often you might have to rehearse the transition from a previous
song to the next, so keeping the previous preset around is handy in this case.
Preset Status and Different Preset Switching Methods
Note that switching time between presets in LIVE mode depends on the input method! If you are
using MIDI program changes, or the footswitch connection in the back of the unit, the changes are
instantaneous. However, if you use an encoder from the front panel or the NEXT or PREVIOUS buttons on
the GUI, you may notice a slight delay in switching from one sound to teh next. This is done intentionally
to allow you to skip through several presets in a TAG and not get bogged down going from one patch to
the next. Once you stop moving through the list of presets, the sound selected will instantly load.
Note that in all cases, the "patch remain" function is active, letting you sustain some notes, change
patches, and continue susatining the "old" notes while sounding new ones until the sustain is done.
Note that next to each preset name in LIVE mode is a small icon that shows you what the current status
is of that particular presets, as well as the presets that are affected by LIVE MODE.
Standard Text Preset Name: A preset that is loaded and ready to play.
Italic Text Preset Name: A preset that is NOT loaded yet or ready to play.
Green Dot : Indicates the preset that is currently being played in LIVE MODE
Red Dot: Indicates a preset that still has notes sounding from previous use (patch remain).
Clock icon: Indication that a particular preset is currently loading and becoming ready.
The "NOTES" field
Unique to the LIVE mode is a text field on the right hand side of the window that lets you enter in notes
for that particular preset. Notes can be things like the song name, who counts it off, what key it is in, a
list of lyrics or chord changes, pretty much anything.
To enter a note, simply double click on the field or click on the EDIT button. After a second or two the
note will be automticaly saved, or hit RETURN to manually save the note. You can adjust the size of the
font using the font sizing button (the letter A with an up / down arrow). You can "hide" a note from view
by clicking on the upper right hand box with the "i" in it.
36
Important features in V2.0.1: Mini Strips and Moving Synths
One of the most convenient features of the Rack Mode interface is being able to see your various
plugins stacked on top of each other on the virtual rack. However, as you add more and more
plugins, the rack grows in size, requiring you to use the scroll bars to get to various plugins that
you have in the rack.
That's why we created "Mini-Strips". the special function that lets you shrink the size of any
channel into a bare-bones minimum of information. That way you can see many more plugins at
once.
Mini-strips are really easy to use. Simply cick on the top right hand corner box and the channel
you have selected will shrink into the Mini Strip view. To grow that channel back to size, simply
click on the shrink / expand box again.
The Mini-strips feature also works on a global basis... simply double click on the blank area below
the shrink/expand button and you will shrink all the channel strips in the rack at once. Want to
expand them all? Double click again and they all grow to normal size.
The min-strips view is designed to provide you with the essential info you need during a
performance, including teh name of the plugin, the playing range (depicted on the keyboard) the
name of the preset that is currently active in that particular plugin, plus the volume, pan, and VU
meters for that channel. You also have access to the MIDI filter in this view, as well as the ability
to SOLO that channel by clicking on the channel name (Synth 1, Synth 2, etc.)
Important features in V2.0.1: Back up and Restore
V2.0.1 software features full back up and restore so you can create a back updrive and save your
changes as desired to an external USB drive.
Backup and restore is a feature that is only available from the front panel, since it actually runs
at an extremely low level in the system, allowing you to create a back up boot drive to use as a
safety. The backup/restore feature lets you create a complete backup of your internal (MAIN)
drive, and if that drive were to ever go bad, you can boot off the backup by configuring the unit
to boot off of a USB drive. Some of the settings required to do this are somewhat tweaky, so we
encourage you to visit our YouTube channel to view how to perform backup and restore in a more
detailed manner than is possible in a manual such as this.
Back up and Restore Operation
First off, its important to understand that Backup/Restore is a mode that you must enter and leave from
the front panel. This is the only way to backup the entire drive.
IMPORTANT NOTES ON SELECTING A SUITABLE BACKUP DRIVE: Please note that there are
certain requirements for backup drives to be used to back up your Receptor. First off, they
must have a storage capacity that is at least as big as your main drive (you can determine your
drive's size by checking the INFO section of the SETUP page.) Furthermore, the drive should
be a reputable brand and have a USB2.0 or faster interface on the drive. We highly recommend
you use Seagate drives, those are what we use in side your unit and we know they are fully
compatible. Finally, you can use any "speed" drive to create a back up drive, but if you choose
one of the "green" drives on the market (with spindle speeds of 5400 RPM) then your back up
will take longer and you may not be usable as a main drive. Currently, Toshiba Canvio series
drives are NOT compaible with Receptor.
Furthermore, you can only access Backup/Restore from the front panel when the new Rack Mode interface
is active. So if you have not already done so, please enter the Rack Mode at this time, which can be done
by selecting "Rack Style" from the UI Mode menu selector found in the lower right hand corner of the
SETUP menu while in the Mixer Mode. Changing the UI Mode from "Mixer Stye" to "Rack Style" will cause
the system to reboot and the new Rack Style Mode to be entered.
Once the unit is in Rack Mode, press the (new layout) SETUP button (old front panel label is FXC). The
SETUP button will cause the LCD to display "MIDI Monitor...." when pressed. Turn the top knob until it
says "Support Tools" and then press the lower encoder knob to enter the Support Tools mode.
The unit will reboot into the Support Tools Mode. Ignore any errors that are generated during that
transition, and once the display says "Receptor Support Tools" turn the top knob until it says "Support:
Utilities"
Now turn the bottom encoder until it says ""Enter Backup/Restore" and press the lower encoder knob
to enter the Backup/Restore mode. The unit will reboot again into this mode (it will take a minute or so
before the LCD changes).
Once the backup mode is available, the LCD will change to display your options for backing up, which can
be selected using the lower encoder. The two backup options are "Create Initial Backup" and "Normal
Backup".
The "Create Initial Backup" should be used when you want to back up the Main Drive in its entirety to
create a bootable backup drive (i.e. cloning the main drive) or when you first create a back up drive for
regular backing up of your data. When you create an initial backup, it reformats the drive that is being
used as the backup drive (which takes a long time) in addition to copying EVERYTHING on the Main drive
over to the backup drive. Since you may have a large drive installed in your Receptor, this can take
SEVERAL HOURS to do a complete initial backup.
38
Backing Up Your Main Drive
The good news is that once the Initial Backup is created, your system able to boot and run off the backup
drive (assuming it is high performance - see "Important Notes On Selecting a Suitable Backup Drive").
Additinoally, it can utilized to create "incremental" ("normal") backups, saving your work as you go along.
Normal backups (backing up just the things that have changed since the last backup) is usualy very fast.
IMPORTANT NOTE: If you shut the power off during the backup or restore process, you risk
causing irreperable damage to the drive, so make sure that you have a reliable power source
attached to the unit before performing any backup or restore operation.
So the first step to using the Backup / Restore function is to create the initial backup. Once you are in the
Backup / Restore Mode, simply turn the knob to where it says the following:
Press the Encoder and confirm that you want to backup your data: .
You will get a warning that the backup process will destroy any data that is on the drive you will be
backing up to. Make sure you are okay with wiping the drive you are going to back up to, and select YES.
Once the backup process starts, you will be informed that the drive will be formatted and that it will take a
long time. The formatting process only happens once, and can take a very long time if the drive is large,
so be patient. Once the backup process has begun, you'll see a series of messages, such as:
You will also see a warning that you should NOT turn the power off while the unit is backing up:
Eventually the display will start indicating the number of files left that need to get copied between the
MAIN and BACKUP drives. For an initial backup, the number of files can be in the hundreds of thousands
(which is why the initial back up takes so long). You'll see a display of the number of files left to copy:
Eventually, you will copy over all the data from your Main drive to the back and see this:
39
Once you've created your initial backup disk, you don't need to do it again unless you want to create
another entire backup of your drive. Usually, you'll just want to backup whenever you've done a lot of
work to save the changes you've made since the last backup. This is what we call a "Normal" backup, and
it is selected in the Backup menu and looks like this:
When you perform a normal backup, you'll see the same warning screens that you saw when creating the
initial backup, so please refer to that section for the specific screens you will need to navitage through.
When the backup is complete, you'll see the DONE! message, and if you turn the knob you'll be able to
quit the Backup/Restore Mode:
Booting off the Backup / Restoring Main Drive From Backup Drive
Although it is very unlikely, if your Main drive becomes corrupted or partially erased somehow,you can use
the Backup drive as the boot drive in order to continue operation in an emergency. Or if you accidentally
delete important work, you can restore the drive from your backup drive and make it as good as new.
However, before you can restore from your Backup drive to your Main drive, you must first boot off of the
Back up drive.
Most Receptor models let you select whether you want to boot off of the Main (internal) or Bacukup
(external) drive by simply pressing a Function key on an ASCII keyboard when you turn on the unit.
However, in the interest of booting as quickly as possible, some og the newer models have a "QUICK
BOOT" function that is enabled, which bypasses the drive selection routine so it will power up in the
shortest time possible. For these models, you will need to enter the BIOS of the motherboard and disable
the QUICKBOOT function.
In order to determine if you have a QuickBoot option on your Receptor, simply check the Serial number of
your unit. If the serial number begins with a G, then it is possible that your unit has Quick Boot
enabled. It must be turned off before you will be able to select an extremal drive to boot from.
Disabling Quick Boot Function on Rev G Receptors
To disaable Quick Boot on your Rev G Recetptor, you need to enter the BIOS mode of the system. To do
this, following the steps below:
1. Hold down the DELETE key on your ASCII keyboard when powering up the unit. You may have to
enter a password to see the BIOS screen, and as long as you dont tell anyone else, we can tell you the
password is muse123.
2. Once the BIOS screen appears, select the ADVANCED BIOS FEATURES menu using the up/down arrows
on your keyboard.
3. Fine the "Quick Booting" menu item from the Advanced BIOS Features menu, and using the up/down
arrows select the field that says ENABLED.
4. Hit the RETURN button to open up the OPTIONS menu, and use the up/down arows to select "Disabled".
5. Hit the F10 button to Save Changes and Exit.
40
Restoring Your Main Drive From Your Backup
Now that you have attached your back up drive to your Receptor, (and have disabled QuickBoot if you
own a Rev G model) you are now ready to boot from the extrernal Backup drive, and then restore the
Backup image to your Main drive.
To enable the boot menu do one of the following depending on your particular model:
1. Receptor 2 / Receptor 2+: Hold down F11 when you boot the unit. A menu will appear on
an attached LCD display allowing you to select the Main drive (always listed first, always Seagate, and
usually displaying an obscure Serial Number) or the Backup drive (always listed second, and in the case
of commercial drives intended for backup, should have the product name)
2. Receptor 2 PRO / PRO MAX 2+ PRO / PRO MAX - Intel Motherboard: hold down F10
when the unit is booting, and select the backup drive (always listed second, and in the case of commercial
drives intended for backup, should have the product name). You can identify whether or not you have an
Intel Motherboard has two distinquishing features, one is the existence of a 1394 port on the back, and
the other is the VGA port located ABOVE the DVI port.
3. Receptor 2 PRO / PRO MAX 2+ PRO / PRO MAX - MSI Motherboard: Hold down F11
when the unit is booting, and select the backup drive (always listed second, and in the case of commercial
drives intended for backup, should have the product name). The MSI Motherboard has the distinguishing
factor of the VGA port located directly next to the DVI port.
Note: When you boot from the Backup drive, a notification will appear on the LCD asking you to confirm
that you want to boot from the backup. If you do not see this prompt, then the backup drive might not
be selected by the system as the boot device. You will need to select the boot drive from the boot menu,
which will depend on the particular model you own
Once you have selected the external Backup drive as the boot drive, we are ready to restore the Main
drive by copying the Backup drive information over to the Main drive. To do this, enter the Backup/
Restore mode as described in the beginning of this section on Backup and Restore on page 38.
Note that when you enter Backup/Restore mode, the system knows that you want to Restore the Main
drive, and not back it up. This is because you selected the Backup drive as the boot drive.
IMPORTANT NOTE: If the menu selections in the Backup / Restore mode say "Create Initial Backup" or
"Normal Backup" then you are NOT booting from the extrenal back up drive. Please revisit the section
entitled "Booting off the Backup" and make sure you are selecting the external Backup drive as the boot
drive.
When you have successfully booted from the external backup drive, you will have two choices. One is to
do a full system restore:
A Full System Restore will erase EVERYTHING on your Main drive and copy ALL the data off your Backup
drive on to the Main drive. THIS SHOULD ONLY BE DONE WHEN THE MAIN DRIVE IS VERIFIED AS
CORRUPTED OR OTHERWISE NON-FUNCTIONING.
The other option is to select "Normal Backup" which copies only the data that has changed when
compared with your Main drive since you last did a backup:
41
Restoring Your Main Drive From Your Backup, continued...
Once you determine that you want to restore the entire drive, or simply restore what has changed since
you last backed up, you will be asked whether that is really what you want to do:
NOTE: This is particularly critical to make sure you really want to Restore your Main drive
from your Backuo. Any and all data that is on your drive will be erased if you do a Full System
Restore, and everything that has changed since the last time you backed up will be erased
if you choose do a "Normal" restore. Make sure you really want to do a Restore before
proceeding!
If you press the encoder to proceed, you wil be given one last chance to cancel the procedure:
If you are sure you want to proceed, then turn the bottom knob until it says OK and press the encoder to
begin the Restore procedure. During that time you will be advised similarly to the Backup procedure:
and...
Once the Restore procedure is complete, you will see the completion screen:
If you turn the knob clockwise you will see the exit screen allowing you to shutdown your unit:
42
END-USER SOFTWARE LICENSE AGREEMENT
By opening the seal of this product and operating it, you are agreeing to the following end-user licensing agreements
for the software that runs on RECEPTOR. If you do not agree to the terms set forth herewith, return the unit to your
retailer in the same condition as it was purchased for a full refund.
DEFINITIONS: This license is between you, the end-user ("you"), Muse R&D ("Muse")and the third party software
developers ("Developers") whose software is included for use with this product. This license agreement covers all
software used in and with the RECEPTOR product, made available for download, or provided on physical data storage
media for use with the RECEPTOR product. The term "software" in this agreement includes all source code, application
software, drivers, virtual instruments or effects, content, presets, and tools used or associated with the RECEPTOR
product.
OWNERSHIP: The software and any authorized copies of the software used in RECEPTOR, in any form, is intellectual
property of Muse or the Developer who created the software. You acknowldge that the software in RECEPTOR is
licensed (not sold) to you on a non-exclusive basis for use with the RECEPTOR hardware. You may use and benefit
from the functionality and intellectual property expressed in the software, but you are not allowed to unbundle,
resell or distribute the software for any purpose whatsoever. The copyrights, trademarks, and intellectual property
of all software contained or associated with the RECEPTOR remains the property of Muse or its suppliers at all times,
including when or if RECEPTOR is sold or transferred to another user.
THIS SOFTWARE IS PROTECTED BY LAW, INCLUDING BUT NOT LIMITED TO INTERNATIONAL COPYRIGHT AND
INTELLECTUAL PROPERTY TREATIES. You are specifically forbidden from UNBUNDLING, reverse
engineering, MODIFYING, HACKING, de-compiling, RE-PURPOSING or re-DISTRIBUTING the software
included in RECEPTOR for any reason. FURTHERMORE, the resampling of the content of aNY OF THE
SOUNDS OR PRESETS IN RECEPTOR TO CREATE COMMERCIAL SOUND LIBRARIES fOR SALE IS STRICTLY FORBIDDEN
AND VIOLATES THE COPYRIGHTS OF THE SOFTwARE AND SOUND DEVELOPERS.
ACCEPTABLE USE: The software in this product, including but not limited to the host software, software tools, the
virtual instruments and effects as well as the sampled sound content and presets used in RECEPTOR are licensed to
you for music composition, recording, and/or performance, including using the sounds created by or processed with
the software on recordings, live performance or in broadcast without restriction. Some software that can be installed
on RECEPTOR may have different restrictions on use and those specific terms of use are not superseded by the terms
of this agreement.
WARRANTY: Muse and/or the Developers of the licensed software included with RECEPTOR warrant the product
will perform substantially in accordance with the accompanying RECEPTOR documentation for the first 90 days after
purchase. Beyond the operation of the software as documented, you agree that Peavey, Muse and the Developers
have made no express warranties to you regarding the software provided herein, and acknowledge that the software
is provided "AS-IS" without warranty. Furthermore, you agree that no claims of the fitness of this software for any
particular purpose, merchantability, satisfactory quality, or non-infringement of third party rights have been made by,
Muse or the Developers. Some States do not allow the exclusion of implied warranties, so this exclusion or lmitation may
not apply to you. .
DISCLAIMER OF LIABILITY: In no event will Muse or the Developers be liable to you for any loss of use, interruption
of business, or any direct, indirect, special, incidental or consequential damages of any kind (including loss of data,
income, or profits) associated with the use of this product, regardless of the form of action including contract, tort
(including negligence), strict product liability, or otherwise, even in the event that Muse, and/or the Developers have
been advised of the possibility of such damages. Some States do not allow exclusions or limitations of liability rights, so
the above limitation or exclusion may not apply to you.
INTERNET CONNECTIVITY: The software in this product may connect to the Internet for the purposes of software
registration, updates, or enhancement. Whenever the product connects to the Internet, the IP address associated with
your RECEPTOR will be made available to Muse and/or its suppliers. All information obtained in this manner is treated
confidential, and all customer information assocated with the registration, updating, or use of RECEPTOR or the online
serlyvices associated with the device are managed in accordance with the company's privacy policies which can be
found on the website www.museresearch.com.
COPYRIGHT / TRADEMARK NOTICE: The software contained in and associated with RECEPTOR is Copyright 20012013, All Rights Reserved, by Muse Research and Development Inc., Peavey Electronics, Inc., Ultimate Sound Bank,
Inc., WaveArts, Inc., MuVoice, Inc., Camel Audio, Inc., ForeFront, Inc., and any or all other third party developers
whose software is included with this device. The Muse logo, RECEPTOR, and MusePlayer are trademarks of Muse
Research and Development, Inc. All other Copyrights and Trademarks are property of their respective owners.
43
Acknowledgements
RECEPTOR was created by a dedicated group of individuals at Muse Research & Development.
Special thanks go to the following individuals for turning this concept into a reality:
Executive Producer: Matt Christiano.
Software Engineering and System Design: Michael Ost and Louis Gorenfeld.
Product Concept and GUI Design: Michael Ost, Bryan Lanser, Louis Gorenfeld, Axel Hartmann
(DesignBox).
Software Testing: Kevin Bryson, Chris Ryan, Robert Bance, Kevin Looney.
Sound Design and Preset Creation: Kevin Bryson, Chris Martirano, Tom Allen, Louis Gorenfeld.
Special thanks to Mario DeCuittius at Alternate Mode for the great pitched percussion samples.
Project Wrangler / User Guide / Cooking and bottle washing: Bryan Lanser.
Virtual Instrument and Effects partners: Alain Etchart and Emanuel Usai (Universons) Ben Gillette
(Camel Audio), Bill Gardner (WaveArts), Wim D'Haes (Mu Tech), Marc-Pierre Verge (Applied Acoustics Systems), Michael Lundgren (Peavey), Urs Heckmen (U-He), George Yohng (ForeFront) Peter
Linsener (LinPlug).
Good Advice Along The Way: Kevin Looney, Peter Muller, and many current RECEPTOR users too
numerous to mention, but you know who you are!
All Muse Research products designed and manufactured in the USA.
We utilize green practices wherever possible during production, shipping, and recycling of this
product. Should you wish to dispose of this product in the future, you can ship it back to Muse
Research for environmentally-responsible recycling at no charge.
This manual and the proprietary software contained in RECEPTOR are Copyright 2013 Muse Research and Development, Inc., All Rights Reserved. Other software copyrights may apply.
Some software components used in this product are distributed in accordance with General Public
License (GPL) distribution guidelines and as such are available for download free of charge.
Contact Muse Research for more information.
Features and specifications subject to change without notice.
Muse Research, Inc.
1530 Meridian Ave 3rd Floor
San Jose, CA. 95125 USA
+(650) 326-5400
www.museresearch.com
Additional Resources for Learning More about RECEPTOR
Below is a list of additional resources where you can learn more about your RECEPTOR, Virtual
Instruments in general, and how to get the most from your system.
http://www.museresearch.com
Basic support information, tutorial videos, and software updates
http://www.plugorama.com
Advanced support information including a comprehensive FAQ database,
help desk for submitting specific questions, and installer files for installing
new plug-ins to your system.
http://www.youtube.com/receptorland
Various tutorial videos by Muse Research and others that show you how to
use specific features of the product. More videos are added on a regular
basis.
http://www.kvraudio.com
The industry's leading forum for all information about virtual instruments
and effects. Also includes a RECEPTOR specific forum with very
knowledgeable and helpful users.
Muse Research MuseCare Support Options
Muse Research offers free tech support for the first 90 days after you
purchase your unit. In addition, you can purchase MuseCare packages that
extend out the phone support for an entire year.
You can also purchase technical support for a specific incident or problem
on a one-time basis. Contact Muse Technical support at the following email
address for more information:
[email protected]
45
46