1
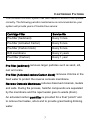
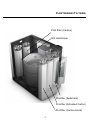
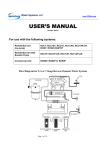
Reverse Osmosis System
OptiLIFE Dual
Coutertop
and
Undersink
OptiLIFE
OptiLIFE
Product Description:
Item no.
OptiLIFE countertop and RO system
and undersink RO system
Produce
Standard: 50GPD
(75 or 100GPD is available)
Filter
Quick Change filters
RO membrane
OptiLIFE Quick Change RO membrane TFC
Faucet
801A:Invisible / 801B: PV803 NSF faucet
Size
W24.5 x D39 x H39 (cm)
Tank inside
NSF approved storage tank, 8 liters
Components
801B faucet
2
Cartridge Filters
Your Reverse Osmosis System has been tested to ensure it will operate
correctly. The following periodic maintenance is recommended so your
system will provide years of trouble-free service:
Cartridge Filter
Service life
Pre-filter (Sediment)
Every 3 mos.
Pre-filter (Activated Carton)
Every 6 mos.
Pre-filter (Carbon block)
Every 6 mos.
R/O membrane
Every 2 years
Post filter (Carbon)
Every 1 year
Pre-filter (sediment) removes larger particles such as sand, silt,
rust and scale.
Pre-filter (Activated carbon/Carbon block) removes chlorine in the
feed water to protect the reverse osmosis membrane.
Reverse Osmosis Membrane reduces dissolved minerals, metals
and salts. During the process, harmful compounds are separated
by the membrane and the reject water goes to waste (drain).
An activated carbon post-filter is provided for a final “polish" and
to remove foul tastes, odors and to provide great tasting drinking
water.
3
Cartridge Filters
Post filter (Carbon)
RO membrane
Pre-filter (Sediment)
Pre-filter (Activated Carton)
Pre-filter (Carbon block)
4
Instruction of Micro Computer controller
* LED touch panel design
* Auto detect leaking (beeping sound, water
and electricity shut off)
* 24 hours water quality detect
* Auto notice filters replacing time and easy to
set up
* Filter change button to close the water inlet
* Auto flushing RO membrane
Auto detects leaking: If the system leaks, water and electricity will be
shut off automatically. And the leaking light will flash, the system will beep
for 90 seconds during producing R.O. water.
5
Instruction of Micro Computer controller
Micro Computer Panel Instructions
Power Light : Light is on when power is supplied normally.
Source Light : Light is on when water is supplied normally; Light will be blinking when
water supply is stopped.
Process Light : Light is on when system producing pure water.
Flush Light: Light is on when system flushing.
Full Light : Light is on when the tank is full.
Light 1 : When light is blinking, it is time to
replace 1st filter.
Light 2 : When light is blinking, it is time to
replace 2nd filter.
Light 3 : When light is blinking, it is time to
replace 3rd filter.
Light 4 : When light is blinking, it is needed to
replace 4th R.O. Membrane.
Light 5 : When light is blinking, it is time to
replace 5th filter.
6
Instruction of Micro Computer controller
Setup Button :
This button is for updating replace filter time and TDS value.
Zero Button :
1) This button is for every time replacing a new filter or R.O. membrane to reset.
2) It is to adjust the filters replace time and TDS value.
Filter Change:
Press the “FILTER CHANGE” button when changing the first three stage filters
TDS Display :
When the system produce pure water, it shows value of TDS in ppm. Show
replace time and TDS value when adjusting.
Ok Light :
Light is on when PPM detected the TDS of water quality is lower than the setup
value.
Over Light :
Light is on when PPM detected the TDS of water quality is over then the setup value.
Computer controller
Power supply: DC24V 1.2A
*In the high-pressure water supply area where the water pressure is over 60
psi, booster pumps are not needed for RO System.
7
Instruction of Micro Computer controller
OptiLIFE
Function instructions
1. Installation is completed and then power and water are ready, the LED
showing 8PPM. The OK light will also be on. The pump will work and
R.O. systems start to produce pure water. 4 minutes later, TDS will start
to detect water quality.
2. When the tank is full, TDS will stop to detect. The full light will be on; the
flushing light is also on while flushing the RO membrane for 30 seconds. Flushing light will turn off when flushing is done.
8
Instruction of Micro Computer controller
3. When the tank is empty, the high-pressure switch will be delayed for 25
seconds before starting the 30 seconds flushing process and then start
to produce pure water; the purpose for this delay function is to avoid the
faucet from opening and shutting while the water is being retrieved.
Then the high-pressure switch will be switched on and off which will
cause the electromagnetic valve to open and shut which will emit unusual sound 25 seconds in this delay process, if the tank is pressure
backing up, the computer will cancel the delay process automatically.
When the R.O. system produce pure water 4 minutes later, TDS will
start to detect water quality.
4. When the raw water is stopped, the low-pressure switch will be delayed
for 10 seconds then stop; this delay function is used to prevent over
pressuring of the original when raw water is insufficient. To prevent
such things from happening the low-pressure switch will be switched on
and off which will cause the water-input electromagnetic valve to open
and close which will also emit unusual sounds. During the 10-second
delay process, if raw water supply again, the computer will cancel the
delay process automatically. (When the raw water is stopped TDS detect will stopped too, when the water is coming and than start to produce pure water, 4 minutes later the TDS detect will start)
9
Instruction of Micro Computer controller
Preview Original Setting
First press and hold down the Set key and wait two seconds, then proceed
by entering the first setting mode. The LED will show 103 and the light 1
will start to blink. When released from the factory, the 103 setting indicates
that the first filter’s replacement reminder is set to automatically alarm every three months. (If you want to change the set time for the filters, please
read the next item which is reference instructions)
Press the Set key again, and then proceed by entering the second setting
mode. The LED with show 206 and the light 2 will start to blink. When released from the factory, the 206 setting indicates that the second filter’s
replacement reminder is set to automatically alarm every six months.
Press the Set key again, and then proceed by entering the third setting
mode The LED will show 306 and the light 3 will start to blink. When released from the factory, the 306 setting indicates the third filter’s replace-
ment reminder is set to automatically alarm every six months.
10
Instruction of Micro Computer controller
Press the Set key again, and then proceed by entering the fourth setting
mode.
The LED with show 040 and the light 4 will start to blink. When released
from the factory, the 040 setting indicates the fourth RO membrane replacement reminder is set to automatically alarm when PPM is over 40.
Press the Set key again, and then proceed by entering the fifth setting
mode. The LED with show 512 and the light 5 will start to blink. When released from the factory, the 512 setting indicates that the fifth filter’s replacement reminder is set to automatically alarm every twelve months.
Press the Set key for two seconds and wait for the “beep” two times, and
then it will go back to original set value.
If needing to change multiple items, change the usage months for the fil-
ters, one at a time, in sequence. Then press the Set key for 2 seconds and
wait for the two “beeps” to complete all the settings.
Flow sheet:
4
5
3
2
1
11
Benchtop OptiLIFE Tubing connection diagram
A. connect to the water supply connector
B. connect to drain
☆ install Quick fitting (ref. page 2) at outlets of C
A. connect
12
B. connect to drain
Undersink OptiLIFE Tubing connection diagram
A. connect to the water supply connector
B. connect to drain
☆ install Quick fitting (ref. page 2) at outlets of C
A. connect
13
B. connect to drain
Operation - First time
Plug in electricity
Turn on water
To RO system
A brand system is installed with RO membrane inside ready for
use.
After installation A.B.C
(p.12.13), You just need
to plug in electricity and
turn on water source.
Operation regulation:
A.
B.
C.
D.
E.
F.
With everything connected, turn on the water check for leaks.
Make sure the storage tank shut off valve is “OFF”. Open the
sink top faucet.
Within a few minutes (up to 15) the water will start to run from
the faucet slowly.
Let the water run for at least 30 minutes. The flushes the carbon
filters on first time use.
After initial flushing, open the shut-off valve on the tank and
close the sink top faucet.
Tank will now full of water (usually 2 to 3 hours) after the tank
has filled. Open the sink top faucet and drain all water until the
storage tank is empty and there is only a small flow from the
sink top faucet. DO NOT USE FIRST TANK OF WATER !
Caution:
1.Do not use hot water (over 45ºC)
2.Do not freeze the machine!
3.Switch off electricity, water source and drain out pure water if away for
more than 5 days.
14
CHANGE FILTERS
15
Trouble Shooting
SYMPTOMS
POSSIBLE
CAUSE
RO machine
Tap / Feed water Turn off the feed-water ball valve and
is suspended
wait water supplied normally. Then,
does not operate
SOLUTIONS
open the ball valve.
Power source is Turn off the power switch and be waitdamaged
ing the power supply is OK and turn on
it.
Other reasons
Turn off water supply and power supply,
call service man.
Water is leaking Fittings are loose Turn off water valve and power switch
booster pump
and power supply, lock the loose fitting
tightly. Do not try to open the booster
pump, call service man.
R.O. water is
not sufficient
Drain water or
Booster pump
can not stop
Leaking light
flashing and
Beeping
Filters are
Turn off water supply and power supply,
clogged with dirt call service man.
Solenoid valve or Turn off water supply and power supply,
High pressure
call service man.
switch are damaged
Filter/ Tubes/
Connector leaking
Turn off the power supply. Fix the leaking problem. Dry up the inside of system.
Dry up the leaking detector.
Turn on the power.
16