1
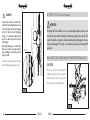
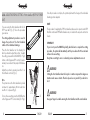
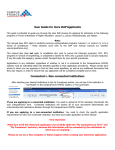
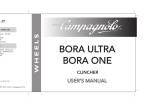
FRONT DERAILLEUR
WARNING!
Carefully read, follow and understand the instructions given in this manual. It is
an essential part of the product, and you should keep it in a safe place for future
reference.
MECHANIC QUALIFICATION - Please be advised that many bicycle service and repair
tasks require specialized knowledge, tools and experience. General mechanical aptitude may not be sufficient to properly service or repair your bicycle. If you have any doubt
whatsoever regarding your service/repair ability, please take your bicycle to a qualified
repair shop.
"AN ACCIDENT" - Please note that throughout this manual, reference is made that "an
accident" could occur. Any accident could result in damage to your bicycle, its components and, more importantly, could cause you or a bystander to sustain severe personal
injury or even death.
INTENDED USE - This Campagnolo® product is designed and manufactured for use
only on road racing style bicycles that are ridden only on smooth road or track surfaces.
Any other use of this product, such as off-road or on trails is forbidden.
LIFESPAN - WEAR - INSPECTION REQUIREMENT - The lifespan of Campagnolo®
components depends on many factors, such as rider size and riding conditions. Impacts,
falls, improper use or harsh use in general may compromise the structural integrity of the
components and significantly reduce their lifespan. Some components are also subject
to wear over time. Please have your bicycle regularly inspected by a qualified mechanic
for any cracks, deformation, signs of fatigue or wear. If the inspection reveals any deformation, cracks, impact marks or stress marks, no matter how slight, immediately replace
the component; components that have experienced excessive wear also need immediate replacement. The frequency of inspection depends on many factors; check with
your authorized Campagnolo® representative to select a schedule that is best for you.
18
ENGLISH
If you weigh 82 kg/180 lbs or more, you must be especially vigilant and have your bicycle
inspected more frequently (than someone weighting less than 82 kg/180 lbs) for any
evidence of cracks, deformation, or other signs of fatigue or stress. Check with your
mechanic to discuss whether the components you selected are suitable for your use,
and to determine the frequency of inspections.
Important PERFORMANCE, SAFETY and WARRANTY Notice - Dear customer,
please remember that to maximise the performance of your EPS drivetrain and to
prevent jeopardising its safety, performance, long-life and functionality, it is absolutely necessary to use the 6 components of EPS drivetrain with components of the
Campagnolo 11 speed mechanical drivetrain; it is not possible to use EPS components
that are not manufactured by Campagnolo.
Note: Tools supplied by other manufacturers for components similar to Campagnolo®
components, may not be compatible with Campagnolo® components. Likewise, tools
supplied by Campagnolo s.r.l. may not be compatible with components supplied by
other manufacturers. Always check with your mechanic or the tool manufacturer to insure compatibility before using tools supplied by one manufacturer on components
supplied by another.
The user of this Campagnolo® product expressly recognizes that there are risks inherent
in bicycle riding, including but not limited to the risk that a component of the bicycle
can fail, resulting in an accident, personal injury or death. By his purchase and use of
this Campagnolo® product, the user expressly, voluntarily and knowingly accepts and/or
assumes these risks, including but not limited to the risk of passive or active neglicence
of Campagnolo s.r.l. or hidden, latent or obvious defects in the product, and agrees
to hold Campagnolo s.r.l. harmless to the fullest extent permitted by law against any
resulting damages.
ENGLISH
19
1 - INFORMATION AND TECHNICAL SUPPORT
I contact my local
mechanic
I HAVE A TECHNICAL
PROBLEM
Refer to the diagram on the following page when
performing installation or adjustments or if you
have a technical problem. Scan this QR CODE to
access the search page to find your closest Campagnolo Pro Shop, or go to www.campagnolo.com.
I access www.campagnolo.com
and search for a Pro Shop near me
Was a Pro Shop
found?
NO
OK
Problem solved?
I contact a
Campagnolo Pro Shop
OK
END
NO
NOTE FOR SPECIALISED MECHANICS: Please remember that all assembly, disassembly,
adjustment and maintenance procedures for the
EPS drivetrain are described in the EPS technical manual, which is available in PDF format on
our internet site www.campagnolo.com. Scan
this QR CODE to directly access the main page
Is there a
Campagnolo Service Center
in my country?
NO
20
ENGLISH
ENGLISH
OK
I contact the Campagnolo
Service Center
I contact the store that sold me the product
21
IMPORTANT
Always check the tables in the product technical manual to ensure compatibility with the previous Campagnolo ranges.
WARNING!
THE EPS FRONT DERAILLEUR MUST BE MOUNTED AND CONNECTED
ONLY AND EXCLUSIVELY BY ONE OF CAMPAGNOLO'S SERVICE
CENTERS, A CAMPAGNOLO PRO-SHOP OR A MECHANIC SPECIALISED
IN MOUNTING EPS GROUPSETS.
PLEASE REMEMBER THAT TAMPERING OR INCORRECT OR INCOMPLETE
INSTALLATION OF EVEN JUST ONE COMPONENT OF THE EPS
GROUPSET AUTOMATICALLY RESULTS IN THE INVALIDATION OF ANY
WARRANTY.
2 - ASSEMBLY
When installing/removing or servicing
components, switch off the EPS drivetrain as indicated in the instruction sheet
of the EPS Power Unit.
7 Nm - 62in.lbs
Loosen the screw using a 5 mm Allen
wrench (A - Fig. 1) and remove the screw
together with the washers, then secure
the derailleur on the frame’s braze-on
coupling.
• Adjust the height of the derailleur so
that the cage is at a distance of 1,5÷3 mm
from the larger chainring (Fig. 2).
A
1
Always wear protective gloves and glasses while working on the front
derailleur.
-3
WARNING!
1.5
• Align the derailleur: the inner side of
the derailleur cage must be parallel with
the chainring (Fig. 3).
• Using a torque wrench, fasten the
tightening bolt (A - Fig. 1) to the frame,
torquing to the following values:
- 7 Nm - 62 in.lbs for braze-on versions
2
22
ENGLISH
ENGLISH
23
2.1 - ZERO SETTING of the front derailleur
WARNING!
If your frame is made of carbon fiber,
contact the frame manufacturer to insure that the frame will not be damaged
by this 7 Nm (62 in.lbs) tightening
torque, or to determine what actions
need to be taken to protect the frame
from damage.
Even slight damage to a carbon fiber
frame can result in an unexpected failure, resulting in an accident, personal
injury or death.
WARNING!
Resetting the front derailleur to zero is a particularly delicate operation and
must be carried out when the bicycle is stationary and placed on a stand. This
is why it should be conducted only and exclusively by a Campagnolo Service
Center, a Campagnolo Pro-shop or a mechanic specialised in mounting EPS
groupsets.
0,5 mm
2.2 - INSTRUCTIONS FOR DERAILLEUR WITH CARBON FIBER EXTERNAL CAGE
• Install the chain and position it on the
smaller chainring and larger sprocket.
CAUTION!
When you slip the chain through the
derailleur cage (Fig. 4), do not strain the
external carbon fiber semi-cage since
this could be irreversibly damaged.
3
4
24
ENGLISH
ENGLISH
25
2.3.A - ADJUSTING RIDING SETTING of front derailleur (WITH V2 POWER
UNIT)
NOTE
The procedure for adjusting the EPS front derailleur, when used in conjunction with EPS
Bar End controls and EPS Bar End brake levers, is included in the respective instruction
sheets.
If you are using the front derailleur with the V2
EPS Power Unit (Fig. 5), follow the procedure
given below.
The setting adjustment procedure is used to
change the position of the front derailleur
relative to the individual chainrings.
Place the front derailleur on the chainring for
which you intend to adjust the position. To adjust
the setting, press and hold the MODE (D - Fig.6)
button on the Ergopower EPS controls for approximately 6 seconds until the purple LED illuminates.
Adjust the position by pressing lever B or C on
the left hand control set (Fig. 6).
Once the procedure is complete, the system implements the change to the individual
chainring position adjusted.
IMPORTANT!
If you do not press the MODE key briefly, which allows to complete the setting
procedure, the system will automatically exit the procedure after 90 seconds and
will save the new setting.
Every time a resetting to zero is conducted, previous adjustments are reset.
5
WARNING!
Setting the front derailleur when the bicycle is in motion may result in dangerous
situations and cause accidents. Therefore please be very careful if you decide to
do it.
Note
The system moves the front derailleur by a fixed
increment of approximately 0.1 mm each time
lever B or C is pressed (Fig. 6).
D C
To store the new setting, press the MODE button
on the Ergopower EPS controls briefly (D - Fig.6).
A
WARNING!
Keep your fingers clear while moving the front derailleur and the rear derailleur.
B
6
26
ENGLISH
ENGLISH
27
2.3.B - ADJUSTING RIDING SETTING of front derailleur (WITH EXTERNAL
POWER UNIT)
NOTE
The procedure for adjusting the EPS front derailleur, when used in conjunction with EPS
Bar End controls and EPS Bar End brake levers, is included in the respective instruction
sheets.
If you are using the front derailleur with the external EPS Power Unit (Fig. 7), follow the procedure
given below.
The setting procedure allows to adjust the
reference position of the derailleur.
To adjust the derailleur, press and hold the
MODE button (D - Fig.8) on the Ergopower EPS
controls for approximately 6 seconds until the
purple LED turns on.
To save the adjustment, briefly press the MODE button located on the Ergopower EPS
controls (D - Fig.8).
IMPORTANT!
If you do not press the MODE key briefly, which allows to complete the setting
procedure, the system will automatically exit the procedure after 48 seconds and
will save the new setting.
Every time a resetting to zero is conducted, previous adjustments are reset.
7
Adjust the position by pressing lever B or lever C
on the left control (Fig. 8).
WARNING!
Note
Every time lever B or lever C (Fig. 8) is pressed,
this allows the system to carry out a fixed shift of
approximately 0.1 mm.
Setting the front derailleur when the bicycle is in motion may result in dangerous
situations and cause accidents. Therefore please be very careful if you decide to
do it.
When you have completed the procedure, the
system will correct the established positions of all
the chainrings based on the new settings.
D C
WARNING!
A
Keep your fingers clear while moving the front derailleur and the rear derailleur.
B
8
28
ENGLISH
ENGLISH
29
• Lubricate the joints in the front derailleur mechanism as normal with oil.
3 - REMOVAL / M A I N T E N A N C E
• Using poor-quality or incorrect lubricant may damage the chain and cause excessive
wear or damage to the system. A damaged drive system can malfunction, resulting in
an accident, personal injury or death.
WARNING!
THE EPS DRIVETRAIN MUST BE DISASSEMBLED ONLY AND EXCLUSIVELY BY
ONE OF CAMPAGNOLO SERVICE CENTERS, A CAMPAGNOLO PRO-SHOP OR A
MECHANIC SPECIALISED IN MOUNTING EPS GROUPSETS.
• When installing/removing or servicing components, switch off the EPS drivetrain as
indicated in the instruction sheet of the EPS Power Unit.
• The time indications reported herein are purely indicative and may vary considerably in relation to the conditions of use and intensity of your activity (significant
factors include for instance: professional training, rain, mud, salt on streets in
winter, the weight of the cyclist, etc). Contact your mechanic to identify the bestsuited schedules for your features.
• Make sure that the derailleur is always properly adjusted:
- the height of the derailleur so that the cage is at a distance of 1,5÷3 mm from the larger
chainring (Fig. 2).
• At the end of lubrication operations CAREFULLY degrease the braking surface and
the brake shoes.
• Never wash your bicycle with pressurised water. Pressurised water, even from the
nozzle of a garden hose, can pass the seals and enter inside your Campagnolo® components, causing irreparable damage. Wash your bicycle and Campagnolo® components
by gently cleaning them with water and neutral soap. Dry carefully with a soft cloth:
Never use abrasive or metallic sponges.
WARNING!
Salty environments (such as roads in winter or in areas near the sea) may cause
galvanic corrosion on most of the bicycle's components. To prevent damage, malfunction and accidents, carefully rinse, clean, dry and lubricate all the components
subjected to this phenomenon.
- the outside side of the derailleur cage must be parallel with the larger chainring
(Fig. 3).
30
ENGLISH
ENGLISH
31