1
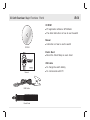
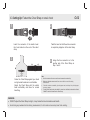
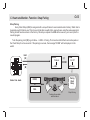
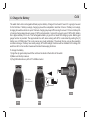
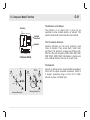
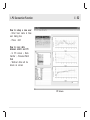
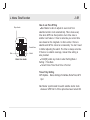
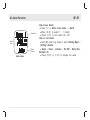
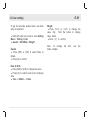
/STP VIEW
T.
LIGH
S
T
NAV Master II
GLOBAL POSITIONING SYSTEM
with Heart Rate Monitor
GPS SYSTEM
OWNER'S MANUAL
A-01
A. Introduction
Satellite
Signal
Satellite
Signal
Satellite
Signal
Nav Master II combines personal training and
navigation functions into one compact wrist
computer. It is among the world smallest of its
kind and yet fully water resistance. It can
withstand immersion in 30 meter of water. The
GPS navigation function locates and track
anywhere you go. Nav Master II is powered by
highly sensitive chip that fix your position even at
weak signal condition. It can be adopted for
varies kind of outdoor activities; such as Jogging,
Running, Biking, Hiking, Skiing, Sailing, hunting,
etc.
NAV
Maste r
This package comes with a digitally coded Heart
Rate Monitor (HRM) chest strap and a USB
dedicated cable. The HRM listens to your
physical condition and give you warning reliably
as you workout. The USB clip cable allows fast
battery charging and data transfer to and from
PC in a snap. Data transfer is done by GPS
Master. It is a PC software that assists workout
analysis, route planning and training summary
reporting. It is a helpful partner that accompany
you to explore your physical limit and beyond.
A-02
A. Introduction: Warnings and Cautions
WARNING !
CAUTION
! Make sure that fully understand the functions and limitations of this product
before using it.
! The performance of this product, like most Global Positioning System
equipment, depends on the satellites which operated by the United States
government. The above satellites system may subject to change which could
affect the accuracy and performance for this product and all GPS equipment.
! This product is an assistant device for navigation, and it is NOT a substitute
for getting the navigating information from chart, map, observation and
experienced navigator. DO NOT use this product for the navigation that
requires precise navigation or the navigation that devotes for vital matter.
! This Watch and Chest Strap is a supplementary device for measuring heart
rate; it is NOT a substitute for medical devices. You should periodically
compare the heart rate reading acquired by this watch and Chest Strap with
the reading from a doctor.
! Consult a doctor or trainer before setting your Upper and Lower heart rate
limits.
! This product set, like most electronic or magnetic devices that may interfere
with pacemaker. While it is safe for patients with pacemakers to check with
their doctor before using this product set.
! In case, there is doubt about the directions and positions of the way of the
navigation, consult the park administration office before starting the
navigation.
! DO NOT expose your watch to extreme heat or extreme cold situation.
! DO NOT use this Watch and Chest Strap for commercial or professional
purposes.
! DO NOT charge or connect the unit with USB clip when it is wet. Wipe dry
and air dry before using.
! Although this unit is water resistance and, you can wear it for swimming. The
GPS and chest strap heart rate function do not work under water.
! This product only can obtain position in
an outdoor environment. More open is the
area, more accurate the information and
faster to obtain the first position.
! The first position can be obtained within 1
minute at cold start, and 10 second for
hot start.
! To use workout and navigation functions
with GPS, turn on the GPS receiver and
get the position fixed beforehand.
Otherwise, the GPS related features are
not valid while receiver is still acquiring
GPS satellite data.
! The Altitude is Mean Sea Level in meter.
! Rinse and wash with tap water and wipe
your Chest Strap dry after each use.
! DO NOT take heart rate measurement
when diving or under water.
! DO NOT use hand cream on the skin that
touch with contacts; it will insulate the
signal between the skin and the contacts.
A. Introduction: FCC Compliance Statement
FCC
Compliance
Statement
(For US)
A-03
! This device complies with Part 15 of the FCC Rules. Operation is
subject to the following two conditions: (1) This device may not
cause harmful interference, and (2) This device must accept any
interference received, including interference that may cause
undesired operation.
! WARNING: Changes or modifications to this unit not
expressly approved by the party responsible for compliance
could void the user=s authority to operate the equipment.
! NOTE: This equipment has been tested and found to comply
with the limits for a class B digital device, pursuant to Part
15 of the FCC Rules. These limits are designed to provide
reasonable protection against harmful interference in a
residential installation. This equipment generates, uses and
can radiate radio frequency energy and, if not installed and
used in accordance with the instructions, may cause harmful
interference to radio communications.
! However, there is no guarantee that interference will not occur in
a particular installation. If this equipment does cause harmful
interference to radio or television reception, which can be
determined by turning the equipment off and on, the user is
encouraged to try to correct the interference by one or more of
the following measures:
! Reorient or relocate the receiving antenna.
! Increase the separation between the equipment and receiver.
! Consult the dealer or an experienced radio/TV technician for
help.
A. Introduction: Care and Maintenance
A-04
! The watch is carefully designed and produced. In order
CARE
!
MAINTENANCE
!
!
!
!
!
!
!
!
to utilize this feature, it is advisable to use the watch in
conformity with the below-mentioned notes:
Avoid exposing the watch to extreme conditions for an
unreasonable time, and avoid rough uses or severe
impacts on the watch.
Clean the watch occasionally with a soft moisten cloth.
Brush the clip contacts at the bottom of watch regularly.
Dirt build up on surface of the contact points may affect
normal charging and data transfer.
DO NOT expose the watch to strong chemicals such as
gasoline and alcohol, as they will damage your watch.
Store the in a dry place when it is not in use.
Remove the battery from the Chest Strap when it will not
be used for a long time.
Rinse and wash with tap water and wipe your Chest
Strap dry after each use.
Do not bend or stretch the contact strips on the Chest
Strap, especially while storing.
Under the environment with high electrostatic discharge,
the PC connect operation may not be maintained. It
requires user reconnect the PC connection to normal
operation.
A. Introduction
! Water resistant up to 30 meters
! Heavy duty mineral glass lens
! Compact size measures 46x71x16 mm and
Weight 55g only.
! Dual processors design optimizes for
battery life. Battery life of a single charge
keeps the watch running for a year without
using GPS function. Heavy usage of GPS
can be last for around 8.5 hours.
Workout functions
! 5 fully customized profiles for fast workout
setup. Profiles can be configured from
watch or through PC software.
! 3 configurable View (screen) for each
profile
! 3 programmable fields for each view
! A single workout log can have maximum
48,170 waypoints. If the number of workout
log files increases, total number waypoints
is slightly reduced. The watch memory is
able to keep 120 workout logs.
! Smart Lap
B-01
Heart Rate Monitor
! Digitally coded 2.4GHz wireless chest strap
! 4 target heart rate zones
! Above/In/Below Zone timer
Audio above/In/Below zone alert
Navigation functions
! Total 10 paths (routes) with maximum 99
waypoints for each path
! 3 Navigation Modes
Waypoint, Forward,
Backward
! Heading pointer
! Current speed, distance to waypoint and
destination, estimated time of arrival
! Manual and automatic waypoint marking
(Smart Lap)
Electronic Compass
! North Pole pointer
! 1 degree resolution with 16 cardinals
B-02
B. Unit Overview: Name of the Parts (Watch)
[EL]
Light
Button
[ S tart/ S top] [S/S]
Button
[ View ]
Button
LCD
Display
Clip Guiding
Notch
USB Cable
Contact points
[ Mode]
Button
Front
[Lap/Reset] [L/R]
Button
GPS antenna location – always
direct antenna towards sky for
best GPS reception
Back
B. Unit Overview: Name of the Parts (Chest Strap)
B-03
Battery
Hatch
Front
Conductive Contact Pad
Back
Built-in
Antenna
(underneath
the case)
Conductive Contact Pad
B-04
B. Unit Overview: Major Functions Part 4
CD ROM
! PC application software GPS Master
! The detail instruction on how to use the watch
Manual
! Instruction on how to use the watch
CD RO M
Elastic Bend
S
T
/STP VIEW
T.
LIGH
! Mount the Chest Strap on users chest
GPS SYSTEM
Manual
USB Cable
Elastic Bend
USB cable
! To charge the watch battery
! To communicate with PC
C-01
C. Setting Up: Replace Battery for the Chest Strap
Close position maker
Open position maker
Old
battery hatch
CR 2032
New
CR 2032
CR 2032
1
Turn the battery hatch
anticlockwise until the
arrow aligns with the
open position marker
(arrow). Then turn one
step further slightly until
the battery hatch pop up.
2
Put aside the battery
hatch. Replace the old
battery with a new
CR2032 battery, and the
“+” side facing upward.
IMPORTANT: Be sure
that the battery sits
beneath the metal
battery hook.
3
Re-install the battery
hatch.
IMPORTANT: Be sure
that the O-Ring is placed
on its original position
(battery hatch) and all
the surfaces are clean.
4
Turn the battery hatch
clockwise until the arrow
aligns with the close
position marker (dot).
C-02
C. Setting Up: Fasten the Chest Strap on one’s chest
1
2
Insert the connecter of the elastic bend
into hole located on the end of the chest
strap.
3
Twist the bend so that the whole connecter
is completely lodged on to the chest strap.
4
Center the Chest Strap against your chest
as high under breasts as is comfortable.
Adjust the Chest Strap with the elastic
band comfortably and allow for normal
breathing.
Lodge the free connector on to the
another end of the Chest Strap as
Step 1 and 2.
Note:
!
Wet the contacts with water or saliva can increase the conductivity.
!
Make sure that the contacts make firm contact with the user's skin during
measurement .
Clean the contacts occasionally by moist paper towel, and wipe it dry with dry paper
!
to remove grease.
!
Put the Chest Strap in the place within 3 meters from the Watch, otherwise the Watch
CANNOT receive the data from the Chest Strap.
WARNING:
! DO NOT adjust the Chest Strap too tight, it may hinder the blood circulation and breath.
! Avoid doing any awkward motion during measurement, it will create an inaccuracy heart rate reading.
C-03
C. Heart rate Monitor Function: Strap Pairing
Strap Pairing
Every Chest Strap (HRM) is assigned with a unique ID when it was manufactured in factory. Watch has to
be paired up with it before use. This is to avoid interference with other users who are using the same equipment.
Pairing should have been done in the factory. Should you replace the HRM with a new one, you have to pair the
new strap again.
To do the pairing, Hold [M] to go to Menu --> HRM--> Pairing. Then touch and hold the 2 conductive pads on
the Chest Strap for a few seconds. If the pairing is success, the message “DONE!” will be displayed on the
watch.
Home time mode
Hold
[M]
Menu:
Workout
[M]
HRM
[V]
HRM:
On/Off
Pairing
Paring
Chest
Strap
DONE!
or
.....
FAIL
Strap Pairing
Touching the contacts
with both hand
C-04
C. Charge the Battery
The watch has built-in rechargeable lithium polymer battery. Charge it for at least 3 hours if it is going to be used
for the first time. If battery is empty, charging cycle will be completed in less than 2 hours. If battery is not empty,
charging time will be shorter. A quick 15 minute charging may keep GPS running for around 1.5 hours. Battery life
of a single charge depends upon usage. If GPS is not activated, it can last for around a year. If GPS is ON, battery
life is approximately 8.5 hours. This rechargeable battery is good for at least 500 charging cycles. Battery gas
gauge function is provided. The approximate time left, when working with GPS, is calculated by pushing the [V]
button once in TIME mode. This is only serves as a rough estimation. The actual life may vary as the operating
conditions change. If battery level nearly empty, GPS and backlight functions will be disabled. At this stage, the
watch can still run for another 2 weeks with normal time keeping functions.
To charge the battery :
1) Align the clip guide and pins with the notch and contacts at the bottom of the watch
2) Make sure the clip is secure
3) Plug USB cable into any of the PC’s USB connector
USB Cable
Contacts point
Front
Back
Back
D. Getting Start: Glossary
D-01
Waypoint
Waypoints are sets of coordinates that identify a point in physical space. For the purposes of terrestrial
navigation, these coordinates usually include longitude and latitude, and sometimes altitude. Waypoint names
are limited to 10 characters long. It can be named or renamed in GPS Master. Renaming can be done easily by
just kick and drag on the waypoint names.
Path
Path is a collection of waypoints. It can be treated independently as scattered waypoints; or linked in sequential
order (either forward or backward). Linked waypoints form a PATH (or route). Nav Master has 10 Path. Each
path has 99 waypoints maximum. Paths can be created by Lap-To-Waypoint function. Or they can be created by
GE (Goggle Earth) or GMaps (Google Maps) then imported to watch through GPS Master. Path name can be 32
characters long.
Workout log
After workout/navigation start has started, Nav Master collects all information into a log. The sampling interval
is controlled by value in TrackLog setting. Workout logs contain: starting time and date, workout summary, lap
details, speed, distance, HR and track data.
Pace
PACE is commonly used by runners to estimate time required to go to destination. It is defined as the elapsed
time needed per Km / Mile. It is another interpretation of speed but in opposite magnitude. The unit of PACE is
specified in MenuSettingsSystemUnitsGeneral.
.e.g. if unit is Km and PACE is 6 then it means that you are running at 6 minutes per Kilometer. It is equivalent to
60/6 => 10 KmH. If PACE is smaller, it means that you are running faster.
Compass bearing
Compass bearing is equivalent to azimuth bearing. An azimuth bearing uses all 360" of a compass to indicate
direction. The compass is numbered clockwise with north as 0", east 90", south 180", and west 270". So a
bearing of 42" would be northeast and a bearing of 200" would be southwest, and so on.
D. Getting Start: Glossary
D-02
Lap-By-Distance (LBD)
Create a lap after the preset lap distance has reached
Lap-To-Waypoint (L2WP)
Create a waypoint at the end of selected path whenever a lap is marked.
Cold Start
If GPS has been suspended for a long time, Satellite data collected earlier is not valid anymore. It takes about
30 seconds to acquire sufficient satellite data and fix your location. This is known as the cold start.
Hot Start
If GPS has been terminated for only a short period abd re-start, satellite data is still valid. It takes only a few
seconds to fix your location. This is known as the Hot start.
GPS Master
GPS Master is a PC application software which is written to work with Nav Master watch. Workout log and paths
can be downloaded / uploaded easily via the USB cable. GPS Master provides a much better means for workout
analysis, path creation and manipulation.
%EMHR
%EMHR = percentage of HR with respect to the Estimated Maximum Heart Rate. Estimated maximum HR is
calculated as 220 – your age
Target HR Zone (Target Zone)
The region of HR which you would like you HR to be during exercise.
D. Getting Start: Buttons Functions Summary
Buttons Names
D-03
Major Functions
Light
Press to turn ON the EL back light for about 3 seconds
Hold to enter Night Mode (Press once to exit)
Mode
Press t o select among the functional displays
Hold to enter the setting mode
Hold to fast exit to functional modes when you are several levels down the menu
Press to exit setting or back one level up the menu
ST./STP
Press t o move forward
Press to increment watch data
Press to Start/Stop workout / Chronograph
VIEW
Press to enter sub - mode or workout views
Press to make selection
Hold to turn on GPS at Workout / Navigation Mode
LAP/RESET
Press t o move backward
Press to increment watch data
Press to Start/Stop Workout / Chronograph
Press to take laps at Workout Mode
Hold to save Way point at Navigation Mode
Hold to clear workout data
D-04
D. Getting Start: Main Function Modes
[M]
Compass
Time mode
[M]
[M]
[M]
Navigation
Workout mode
Main Functional Mode
E. Workout Mode
E- 01
Workout mode displays your current performance. You can measure and record your
performance as you are running or navigating in the wilderness. The workout mode shows
speed, distance traveled, workout time from start, heart rate and other interesting data
regarding your current workout. It records your track with the speed, heart rate and altitude
that you can view on your PC graphically.
Workout mode works together with the Navigation mode. Start, stop, lap, GPS shortcut
operations are common to both modes. Performing these actions in either of the modes has
same effect.
About the Workout Mode
The watch offers 5 activity profiles (defaults are Running, Cycling, Hiking, Sailing and User).
Name editing of these profiles can only be done on the PC application software. Because
text editing is quite a painful task if it is done by a watch which has only 4 buttons. Each
profile has 3 views (or screens). Every view has 3 data fields. Data fields can be selected
freely from a list of fields. This allows users to review selected fields on their own interest.
Profile configuration can also be done through the PC software quickly. You can store as
many profiles as you want in PC. It mass storage device virtually posts no limit on the
number of possible profile combinations that you can think of.
E. Workout Mode
E- 01
How to start the Workout Mode
! Press [M] in Time mode to enter Workout mode
! Press [S/S] to Start/Stop Workout. GPS and HRM hardware are
turned ON automatically at start if it has not been done manually.
Workout mode
Mark Laps
! Press [L/R] to take Laps. Maximum number of laps for a single
workout session is 99.
Reset Workout / Navigation
! When workout has been stopped, hold [L/R] until you have seen the
RESET popup message. This clear the current set of workout data
and prepare to start another new workout. Workout data is recorded
to the memory automatically at reset. If you dont want to keep it, you
have to erase it manually. Here is the key sequence:
Menu>
Workout > Delete > Del Last.
! Summary of workout history can be viewed from :
Menu > Workout > History.
How to change the Workout view
! Press [V] to select among the 3 preset display views. These 3 views
can be scrolled out one by one cyclically if the ViewScan function has
been selected. Each view stays for about 3 seconds. To set/reset the
ViewScan: Menu > Workout > ViewScan > On/Off
Note: See next chapter to select the Workout profiles, customize the
display view data and review the workout history.
E- 02
E. Workout Mode - GPS
Fixing with
GPS
GPS Fixed
Hold
[H ]
Workout mode
How to turn ON GPS manually:
If GPS receiver has been stopped for a long time, say more than 2
hours, it is recommended to start GPS manually. Especially if you
want to have track logging done even at the beginning of workout.
Because GPS cold start time is long. Usually it takes approximate
half a minute. During the cod start period, track information is not
available. you should have the GPS position fixed beforehand. To
do this you can do either of the followings:
>
>
>
>
a) Menu
GPS
GPS ON or OFF (turn GPS ON); or Simply
hold [V] for 2 seconds at Workout / Navigation modes to toggle
GPS either ON or OFF.
b) Menu
GPS
Timeout
It can be chosen either 5 or 30 minutes. If GPS is lost and 30
minutes timeout is selected, the watch will try re-fix satellites for 30
minutes.
GPS status indicator
- When GPS is acquiring satellite information, an “ANTENNA”
icon is flashing on top right for most of the workout views.
- If GPS has a 2D location fixed, “GPS fixed” will pop-up message
will appear for a few seconds. Icon at top left is as shown here.
- If more satellites are captured, GPS has 3D fixed. Icon will be
like this
- If GPS lost satellites and could not fix position, GPS “GPS Lost”
pop- up message will appear. It stays on LCD until any of the
button is pressed.
E- 03
E. Workout Mode - Workout Profile
Line 1
How to select Workout Profile
! Hold [M] under any mode to enter Setting Menu > Workout >
Line 2
Line 3
Profiles > Select
! Press [V] to confirm
How to customize the Workout view data
Workout mode
[V]
! Hold [M] under any mode to enter Setting Menu > Workout >
[V]
Profiles > Customize > Select the desire profile > Select View 1
to 3; Line 1-3 data according to the below table
How to reset to default setting
! Hold [M] under any mode to enter Setting Menu > Workout >
Profiles > Reset
Line 1 and 3
-
Altitude
Calories
Distance
Heading
Average Heart Rate
Max Heart Rate
Min Heart Rate
Current Heart Rate
Above target zone time
Below target zone time
Within target zone time
Line 2
- Lap distance
- Lap number
- Lap Time
- Average Pace
- Maximum Pace
- Current Pace
- Average Speed
- Maximum Speed
- Current Speed
- Time of Day
- Workout Time
- Distance
- Current heart rate
- Lap distance
- Latitude & Longitude
- Average Pace
- Average Speed
- Current Speed
- Time of Day
- Workout Time
E. Workout Mode - Workout History
E- 04
How to review Workout History from watch
! Hold [M] under any mode to enter Setting Menu > Workout > History
! Then the summary of latest record will be shown.
Workout summary:
! Workout summary data occupies 3 pages. Top right corner of first page is the record number.
Change the record number by pressing [S/S] or [L/R] button. The 2nd an 3rd lines are time and
date stamp. The last line is the total number of laps for this workout. A page stays for 5 seconds.
Then it is replaced by the next one. Page 1, 2, and 3 are shown one at a time for 5 seconds
sequentially. The 2nd page contains workout time, distance, and average pace. The 3rd page
contains calorie consumption, average heart rate and average speed. If you want to take a look at
the detail of individual laps, press [V] to go into Lap Summary view. If you are finish, press [M] to
go back to menu or hold [M] 2 seconds to go back to the functional mode directly.
Lap summary:
! Lap summary consists of 2 pages. Record number is at the top left while current lap number is at
the top right corner. Like the summary data, these pages are scrolled out alternatively. Page 1
contains lap time, lap distance, and lap average page. Page 2 contains the split time (elapse time
from starting to this lap), average heart rate for this lap and the lap speed.
Press [v] switch back to Workout Summary view. If you are finish, press [M] to go back to menu or hold
[M] 2 seconds to go back to the functional mode directly.
How to Delete the last or All record
! Hold [M] under any mode to enter Setting Menu > Workout > Delete last one/Delete all.
! Press [V] to confirm
Note: Numbers of Records is according on the Memory size
E. Workout Mode - Smart Lap
E- 05
Smart Lap is a concept to mark lap or waypoints automatically. You can make use of Smart Lap to achieve the
following features:
Lap-By-Distance (LBD): Menu>Workout>SmartLap>ByDist
If this function is turned ON, you can specify a fixed distance such that a new lap is marked automatically
whenever the lap distance reaches the preset target. Users just focus on their workout. They don’t need to worry
about pushing the lap button anymore. You are free to mark new laps manually between the Lap-By-Distance
period.
* If Alert is selected ON, a single beep will sound once a new lap is marked.
Lap-To-Waypoint (L2WP) : Menu>Workout>SmartLap>”Lap->WP”
This is a very useful feature for creating PATH by the watch alone. One of the 10 PATHs has to be dedicated
for this purpose. This path is specified in the Lap->WP setting screen. If this function is ON, the selected path is
cleared at the beginning of Workout/Navigation. After that whenever a new lap has been created, disregard it was
added by Lap-By-Distance / Lap-By-Time or by pushing lap button manually; the current location is added to the
end of the dedicated path. The number of waypoints allowed is same as that defined in regular paths.
E. Workout Mode - Application example - Backward tracking
E- 06
A typical application for this is backward tracking. If you are going to explore the wilderness without planning and
want to return back on the same trek. Then you may:
- Set LBD to, say 200 meters, and turn it ON: Menu>Workout>SmartLap>ByDist>[ON, 200].
Remember that the maximum number of waypoints for a path is limited to 99. Set minimum LBD distance
accordingly and yet it will not exceed the limit. Waypoints beyond the path limited are ignored.
- Set L2WP path to Path9, and turn it ON: Menu>Workout>SmartLap>"Lap->WP">[ON, Path9]
- Start Workout/Navigation trip: Navigation [S/S]
- If you want to stop and return, then press [S/S] to stop and hold [L/R] reset and ready to start new
Workout/Navigation.
- Turn OFF L2WP: Menu>Workout>SmartLap>"Lap->WP”>[OFF]
- Select Path9 as the current path for navigation. Menu>Navigation>SelPath>Path9
- Set navigation mode to backward. Menu>Navigation>NavMode>Backward
- In the Navigation-Goto screen, select the last waypoint of Path9 as the current waypoint
- Start Navigation, follow the Heading Pointer, and the watch will guide you from last waypoint to the starting
precisely.
E. Workout Mode - TrackLog interval
5
08
10Min
4
How to set the TrackLog time
! Under any mode, Hold [M]
! Menu > Workout > Tracklog
! Press [S/S] or [L/R} to set the time
10Min
10Min
Track Log
Nav Master records your track continuously. The sampling
interval is specified by the value in TrackLog setting.
Default is 4 seconds. It can be set from 1 second to 10
minutes per point.
3
2
Path
E- 07
10Min
1
Example: TrackLog has been set for 10Min
Note:
! 1% of memory can store approximate 480 points. Effective
memory for workout period can be estimated as 480 x
TrackLog Interval.
F. Navigation Function
F - 01
Navigation mode has 2 screens: Navigation and Goto screen. Navigation screen gives you all the information
when you are navigating to a waypoint. Goto screen allow you pick a waypoint from current path.
Introduction
Nav Master is able to keep 10 paths simultaneously. But you can work with a single path at a time. This is
known as the current path. To select the current path: MenuàNavigationàSelPath. Each path has maximum 99
waypoints. Waypoints, in a path, may or may not have relationship with each other. If they have no
relationship, then this path is just a collection of scattered waypoints. Waypoints can be linked sequentially to
form a route. You can navigate up or down a linked path until the first or last waypoint has reached. Select you
navigation mode before navigation
Navigation modes
There are 3 navigation modes: Waypoint, Forward, and Backward modes. To pick your desire mode with this
key sequence – MenuàNavigationàNavMode.
Waypoint mode
The active waypoint is the destination. Select this mode if you want to go individual waypoints in the current
path. Then pick the active waypoint in the Goto screen. This active waypoint is actually the destination.
Forward mode
The last waypoint is the destination. Select this mode if you want to navigation from the first to the last
waypoint in current path. Pick the nearest waypoint as the active waypoint in Goto screen before you start. If
the active waypoint is reached, it will navigate to the next waypoint in the path. This repeats until the
destination (last waypoint) is reached.
F. Navigation Function
F- 02
Backward mode
The first waypoint is the destination. Select this mode if you want to navigation among the path in reverse
order. For example: from the last to the first waypoint in current path. Pick the nearest waypoint in Goto
screen before you start. If the active waypoint is reached, it will navigate to the previous waypoint in the path.
This repeats until the destination (first waypoint) is reached.
Set Waypoint radius
You are treated as arrive the active waypoint if you fall into distance within radius set in WP Radius setting. It
is adjusted in MenuàNavigationàWP Radius. Default is 30 meters (100 ft). 10m~250m.
F. Navigation Function - How to navigate
GPS Fixed
Fixing with GPS
Hold
[V]
Current
Speed
Way point
Destination
Direction
Workout
Data View
Navigation
[V]
Way point
No.
Path
Name
Navigation
data
Way Point Data View
F- 03
Setup the path and navigation mode as described above. Turn
ON GPS by Hold [V]. Or if you want to have workout logged
then just press [S/S] to start workout. Then wait for GPS fix.
Meanwhile you can pick the active waypoint by press [V] to
switch to Goto screen.
Set Active Waypoint
In Goto screen, browse the waypoints up and down current path
with [S/S] and [L/R] buttons. The sequence number of waypoint
is shown at top right. Path name is at the 2nd line. Other
details of a waypoint are shown consecutively in lines 3 and 4
across 3 pages.
- Page 1 defines the time, date, and name of waypoint. Name of
waypoint is restricted to 10 characters long. Editing of waypoint
name can only be done in PC Master. Default name “WayptXX”
is assigned to a waypoint automatically by the watch when it is
marked manually or created by Smart Lap. Where XX is a
sequence number goes from 00 to 99.
- Page 2 defines the distance between current position and
heading to this waypoint if GPS has been fixed.
- Page 3 defines the longitude and latitude of this waypoint
Press [V] once again to go back to Navigation after the active
waypoint has selected.
F. Navigation Function
Heading pointer
Current
Speed
Way point
Destination
Workout
Data View
Navigation
F- 04
Follow the heading pointer
Once GPS has been fixed, the heading pointer starts to
work. Make sure that the electronic compass has been
calibrated properly (See compass calibration detail at the
System Setting chapter) and watch is maintained in
horizontal position. Tilting away from horizon affects the
heading pointer accuracy. If everything is good, the pointer
always points to the active waypoint.
Your current speed and distance to active waypoint figures
are shown on top right of Navigation screen. Time of Day,
Workout Time, Distance to Destination, Estimated Time to
Destination, and Current HR are scrolling out one at a time
at the bottom line. If there is HR data not available, it will
not be shown at all. This item will be skipped.
If you are approaching the WP Radius of active waypoint, 3
beep tones will be heard. Beep tones will be suppressed if
the Key Tone setting is turned OFF. If you are navigating
with Forward / Backward mode, it directs to the next
waypoint automatically. This process repeats until you arrive
to the final destination.
F- 05
F. Navigation Function
How to create Waypoints or path in PC
Note: You should have GPS Master installed in PC first. See GPS
Master installation and user manuals for detail.
! Run GPS Master
! Activate the Path Manager ( PathàPath Manger)
! Click NEW in Current Path
! Locate the desire position in the embedded Google Maps
Navigation
(GMAP) and left click the mouse button. A new waypoint has just
been created. It is assigned with default name. If you want to
change this name, double click the waypoints place mark, A dialog
box will appear. You can input it a meaningful name here. Name of
waypoints is limited to 10 character long.
! Add as many points as you want. Waypoints are linked
sequentially.
! Click Save Path as you finish adding waypoints. It will save into
the Current Path table.
! Clip the watch and plug USB cable. Then Click “PC->Watch”
button in GPS Master. Path(s) in Current Path table will be transfers
to watch in seconds.
How to Start/Stop Workout session and Take Laps while
navigating
! Press [S/S] to Start Workout. Push [S/S] again to Stop Workout
! Press [L/R] to take Lap
G- 01
G. Compass Mode Function
Direction
Cardinal
directions
The 16 cardinal directions
Cardinal directions are the most commonly used
forms of direction. They inculde North, South, East
and West. This electronic compass has Primary (NE,
NW, SE, SW) and Secondary (NNE, ENE, ESE, SSE,
SSW, WSW, WNW, NNW) InterCardinal directions as
well. Cardinal direction is shown at top left corner.
Azimuth
Compass Mode
N
object D
NE
08
angular
difference
08
object D
3158
N
W
object B
point A
SW
object C
Compass Directions
point
A
The Direction of an Object
The direction of an object from a point can be
specified in either cardinal direction or azimuth. This
watch includes both cardinal direction and azimuth.
908
object B
1358
object C
Bearing Directions
The Azimuth
Azimuth is defined as the angular difference between
North and the object measured clockwisely. (North is
0 degree. measuring range is from 08 to 3598).
Azimuth is shown at middle right.
G. Compass Mode Function - Setting
G- 02
How to calibrate the compass
! Hold [M] under any mode to enter Setting Menu > Setting > Compass > Calibrate
While calibrating, turn the watch 360 degree horizontally. You’ll see the trace of dots form
outline of a rectangular box when the watch is rotating. Calibration is done if the outline is
filled completely.
Note: Press any key can exit the calibration without change
How to set the compass magnetic declination
! Hold [M] under any mode to enter Setting Menu > Setting > Compass > Declinate
! Press [S/S] or [L/R] to change the value
! Press [V] to confirm
Note: Consult these websites in determine the declination at your location.
http://www.magnetic-declination.com/
http://www.ngdc.noaa.gov/geomagmodels/Declination.jsp
http://geomag.nrcan.gc.ca/apps/mdcal-eng.php
H- 01
H. Heart rate Monitor Function
How to Use Heart rate Monitor (HRM)
Working with HRM is simple. Wear chest strap as indicated earlier. The strap should be turned ON by itself. At
the watch, press [S/S] in Workout mode. Watch will display HR from chest strap in a couple of seconds. During your
workout HR is stored at rate defined in TrackLog. Press [S/S] again to stop as you finish workout.
How to start Heart Rate Monitor
There are 2 ways to activate the Heart Rate Monitor function:
1) Under Workout mode. Heart Rate Monitor will start automatically when Workout starts.
2) In Setting Mode > HRM > On/Off
Heart Rate Data
Heart Rate Data
H- 02
H. Heart rate Zone
%
EMHR
Health
Fat
Arobics
Burn
User
Above Zone
Upper
Limit
65%
75%
80%
In Zone
Lower
Limit
50%
55%
65%
Below Zone
Heart Rate Zone
User
defined
How to Use Target Heart Rate Zone
Set target HR zone that is most appropriate for your personal
training plan. If you are not working in target zone, audio alert
beeps will be heard. You can adjust your exercise intensity to
maintain HR in the target zone limits. There are 4 target zone
levels: Health, Fat Burn, Aerobic and User. The limits of these
zones are shown on the left table. If they do not fit you training
scheme, you are free to set your own target zone limits for any
of these settings.
How to select Heart Rate Zone
Hold [M] under any mode to enter Setting Menu > HRM > HR
Zone > Select
Select between Health / Fat burn / Aerobics / User
Press [V] to confirm > Done > will be shown
How to set User Zone Limits
Hold [M] under any mode to enter Setting Menu > HRM > HR
Zone > Customize
Select between Health / Fat burn / Aerobics / User
Set the value by pressing [S/S] or [L/R]
Press [V] to confirm
How to reset all Heart Rate Zone
Hold [M] under any mode to enter Setting Menu > HRM > HR
Zone > ResetALL
I. PC Connection Function
Personal Computer
I- 01
Install the bundled PC interface software into the
target PC.
The system requirements for the PC as follows:
! Pentium II 300MHz or higher
! 64MB Main memory or higher
! 20MB hard disk space or more
! 256 color monitor or higher
! Window XP/VISTA/7 operation system
! CD-ROM drive
! USB port
Follow the instructions in the GPS master setup
wizard to install the program. After installation,
restart your PC.
Clip the USB cable to watch and plug cable into
PC’s USB connector. Once connected " Connected
icon " will be shown on watch’s screen.
Watch connected
wit h PC
I- 02
I. PC Connection Function
How to setup a new user
- Enter User name in New
user dialog box
- Press ' Add '
How to sync data
between watch and PC
- In PC screen > Data
transfer > Receive Watch
Data
- Workout data will be
shown on screen
PC Screen
J. Home Time Function
Day of week
Current time
Month
Date
Home time mode
J - 01
How to set Time Of Day
! Nav Master is able to adjust its own clock from
satellites' atomic clock automatically. This is done every
time when GPS has fixed position. Auto time zone is
another cool feature. It tries to calculate you current time
zone based on the longitude. In other words, it there is
satellite and GPS is turned on occasionally. You don’t need
to bother adjusting the watch. The time is always accurate.
If there is no satellite coverage, manual time setting is
also provided.
! Hold [M] under any mode to enter Setting Menu >
Setting > Time Date
! Select Home Time/ Dual Time or Format
Time of Day Setting
GPS Update - Menu > Settings > TimeDate > HomeTime > GPS
Upd
Nav Master synchronized time with satellite atomic clock
whenever GPS first fix if this option has been turned ON.
J. Home Time Function
J - 01
Time Zone
Menu > Settings > TimeDate > HomeTime > TimeZone
Set time zone according to your current location. It can be adjusted from +12:00 to -12:00 hour
from GMT in 0.5 hour step. Or it can be set to be updated automatically by GPS. If this option
is activated, GPS calculates your time zone based on longitude. It should work most of the time,
but there are exceptions. Should the time zone calculated by GPS does not reflect your local
time correctly, select a fixed time zone instead.
Manual time setting
Menu > Settings > TimeDate > HomeTime > Manual
Set time and date in the following sequence:
Second-> Minute-> Hour-> Year-> Month-> Date
Press [S/S] or [L/R] to change the value
Dual Time Setting
Menu > Settings > TimeDate > DualTime
Press [S/S] or [L/R] to change the value per 30 min
Format
Menu > Settings > TimeDate > Format
Press [S/S] or [L/R] to change 12 / 24 Hour Format
K -01
K. Battery life time
Check Battery life time
! Press [ V ] in Home time mode -> Battery
! Battery remain hour will be shown
Remain
hour
Battery Life Time
L - 01
L. Timer Function
Timer time
Current time
Timer mode
How to use Timer
! Press [ V ] in Home time mode -> Timer
! Press [ S / S ] to start or stop
! Press [ L / R ] to reset
! Beep sound will be heard in last 10 seconds
! Long beep will be heard once reaching 0 : 00 : 00
How to set Timer
! Hold [M] under any mode to enter Setting Menu >
Setting > Timer
! Press [ S / S ] or [ L / R ] to change the value
! Manual Update - Second -> Minute -> Hour ->
Year -> Month
M - 01
M. Alarm Function
Alarm No.
Alarm
time
Alarm
Format
Alarm mode
How to use Alarm
! Press [ V ] in Home time mode -> Alarm
! Press [ S / S ] to select 1 - 5 Alarm
! Press [ L / R ] to turn alarm On / Off
How to set Alarm
! Hold [M] under any mode to enter Setting Menu >
Setting > Alarms
! Alarm -> Hour -> minutes -> On / Off -> Daily / Sun Sat / Mon - Fri
! Press [ S / S ] or [ L / R ] to change the value
N -01
N. Dual Time Mode
Dual
Time
Home
Time
Dual Time mode
How to use Dual Time
! Press [ V ] in Home time mode -> Dual Time
How to set Dual Time
! Hold [M] under any mode to enter Setting Menu >
Setting > Time Date
! Select Dual Time
! Press [ S / S ] or [ L / R ] to change the value per
30 min
O -01
O. User setting
To get the accurate workout data, user data
setup is important.
! Hold [M] under any mode to enter Setting
Menu > Setting > User
! Gender > BirthDate > Weight
Gender
! Press [S/S] or [L/R] to select Male or
female
! Press [V] to confirm
Date of Birth
! Press [S/S] or [L/R] to change the value
! Press [V] to confirm and set the following
data
! Year --> Month -- > Date
Weight
! Press [ S / S ] or [ L / R ] to change the
value ( Kg ), Hold the button to change
value faster
! Press [ V ] to confirm
Note : To change
follow chapter
the
Unit ,
see
the
P- 01
P. System setting
For system setting
! Hold [M] under any mode to enter Setting
Menu > Setting > System
! Sound > Contrast > Units > Compass >
Language > System Reset
Sound
! Select Key Tone / Chime
! Turn On/ Off
! Press [V] to confirm
Contrast
! Select from level 3 Lighter -> 16 Darker
! Press [V] to confirm
Units
! Select General / Latlong
! General > kg / M / km or lb / ft / mi
! Bearing > Min ' sec " or Decimal
Compass
! Refer to chapter
mode setting
-
Compass
function
Language
! Select languages
! Press [V] to confirm
System Reset
! Select No / Yes
! Press [V] to confirm
NOTE : This will reset
default factory settings .
All data will be cleared .
the
watch
to
Q. Memory Usage
Q -04
How to check the Memory Usage
! Hold [M] under any mode to enter Setting
Menu > Memory
Memory Usage
Mode
R - 01
R. Power Saving Mode
Home time mode
Hold [L/R]
5 second
Hold [L/R]
5 second
Power Saving Mode
(LCD display turned off)
Power Saving Mode
+ This Watch has a Power Saving Function which
can turn off the LCD display so that the battery
can last longer.
+ While in the Power Saving Mode, the watch
function is still worked normally. (i.e. The
timekeeping function is still running during
Power Saving Mode.)
How to enter/exit the Power Saving Mode
+ To enter the Power Saving Mode, hold down
the [L/R] button in Home Time Mode for about 5
seconds and the LCD display will be turned off.
+ Press [L/R] button during Power Saving Mode
will exit the mode and the LCD display will be
resumed.